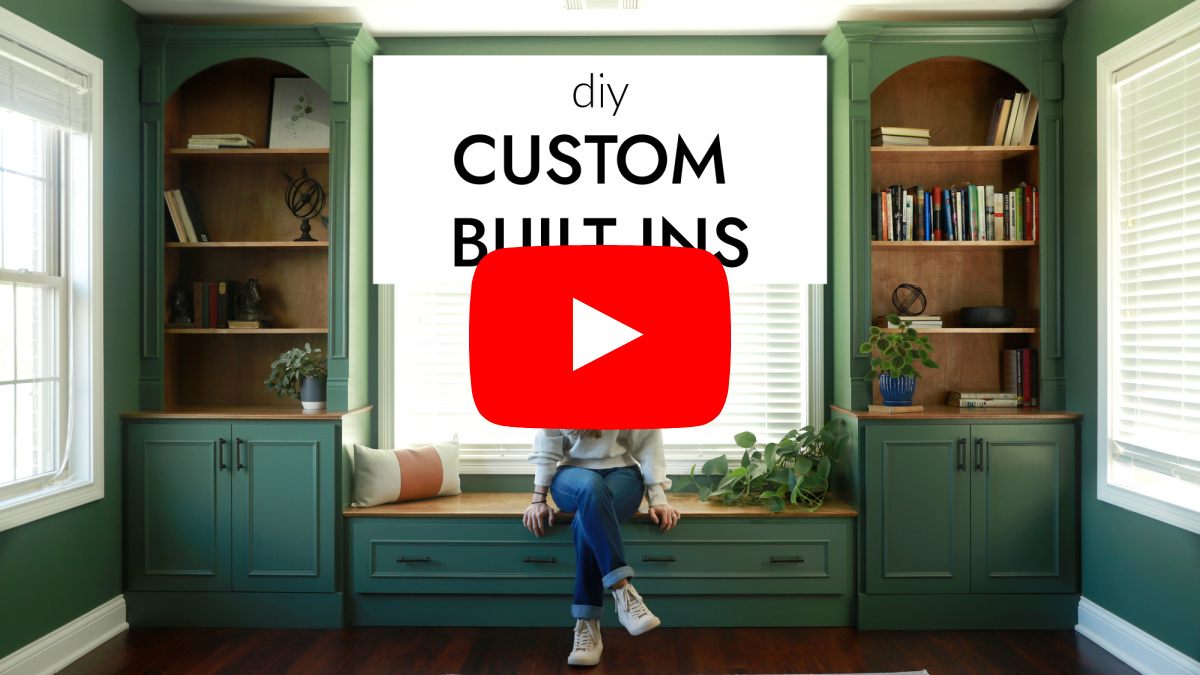
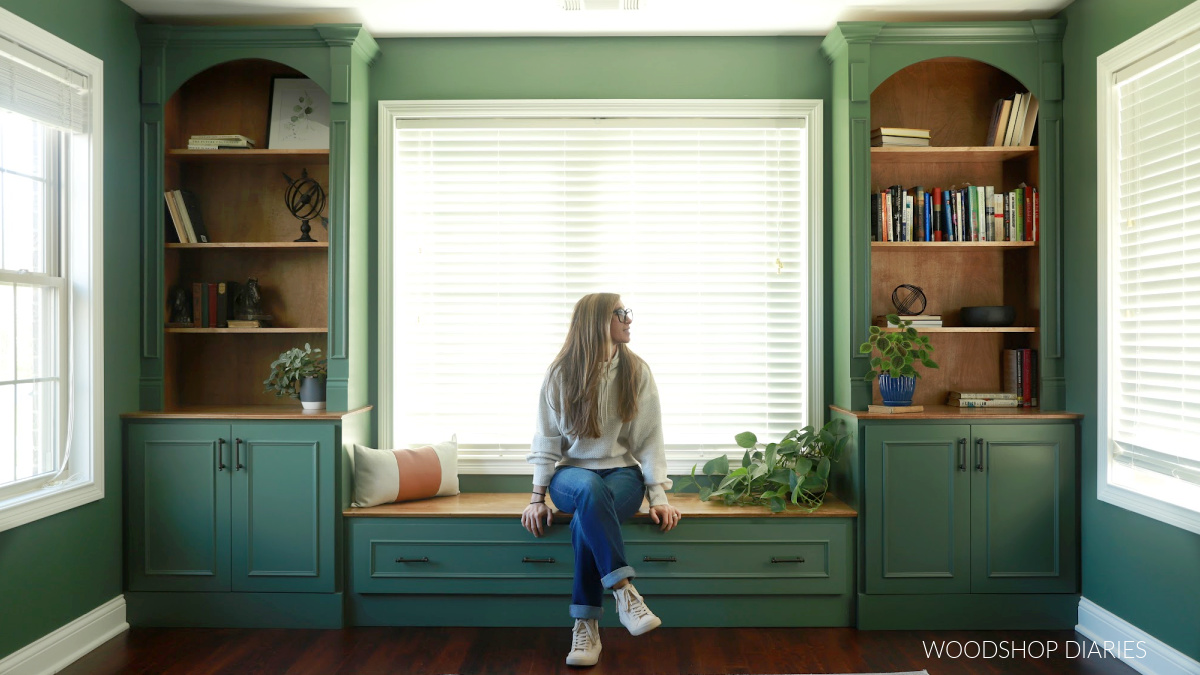
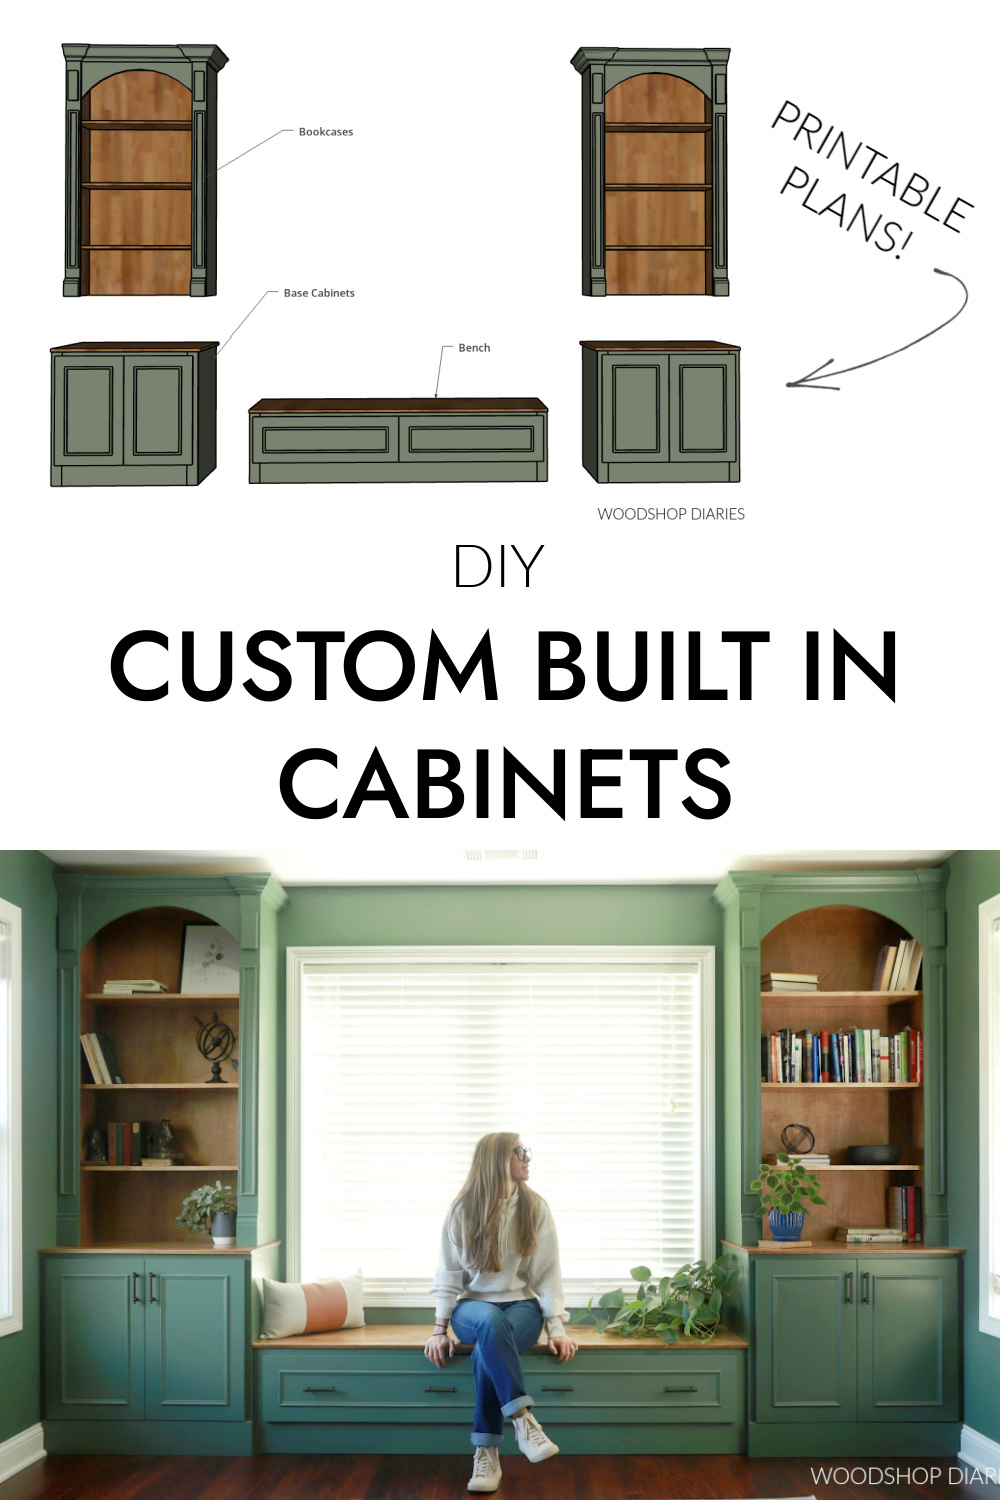
In this post, I’m sharing how fill a blank wall with custom DIY built in cabinets with a storage bench!
Custom built ins not only add style and sophistication to a room, but they also add storage space. And everyone knows you can never have too much storage!
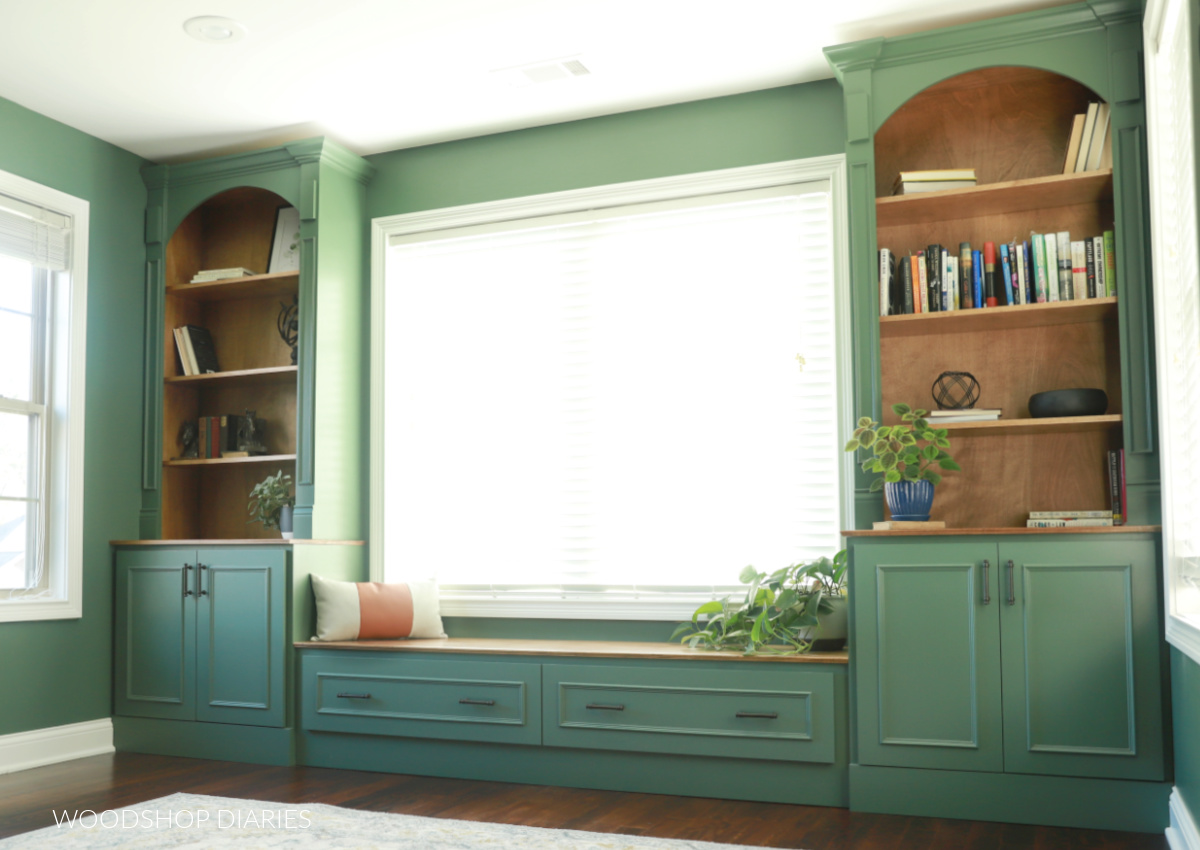
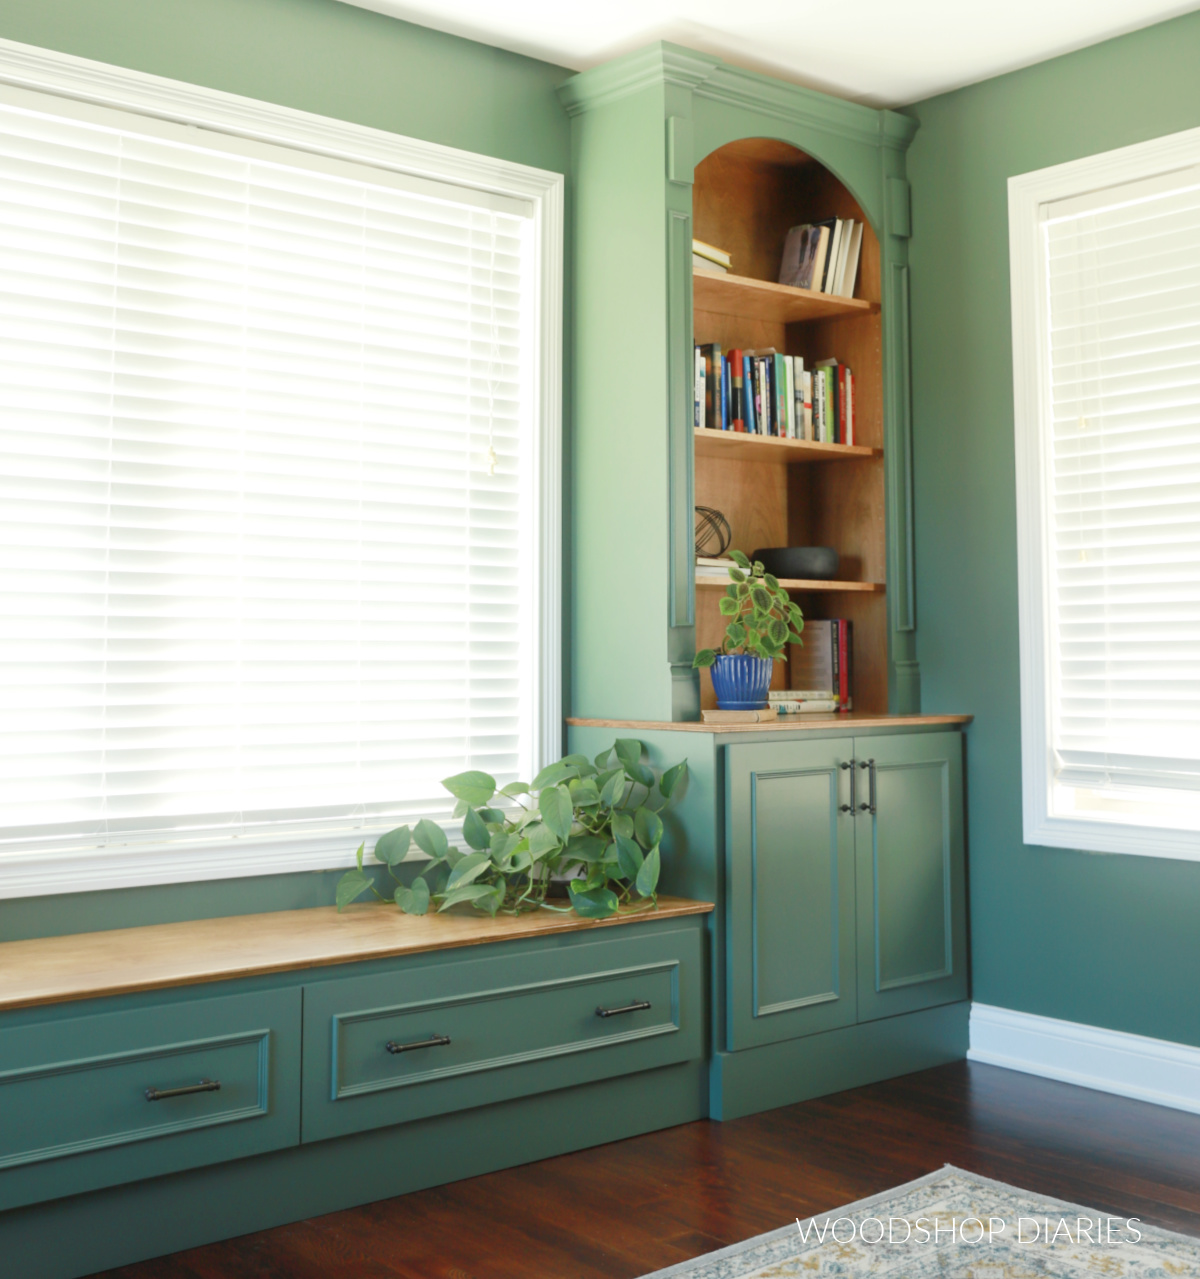
While this is a large project in size, it’s a pretty simple in complexity when it’s broken into pieces. Essentially, you have two base cabinets, two bookshelves, and a bench.
So I recommend building these in sections to keep things simple and not get overwhelmed.
If you’re ready to dive in and get building, I’ve got the plans, video, tutorial, and plenty of tips below.
*This post contains affiliate links. See website policies.
What to consider before building built in cabinets
Building your own custom built ins can seem a bit overwhelming. But consider this–built ins are literally just an assortment of boxes that are screwed to the wall and arranged in a way that fits your space.

Don’t overthink it! But also…don’t underthink it. Here are a few things to consider as you’re planning your built ins.
Before starting, look over your space and take note of any outlet/switch/air vent locations and be sure to consider how your project can work with or work around these.
Customizing Built Ins to Fit Your Space
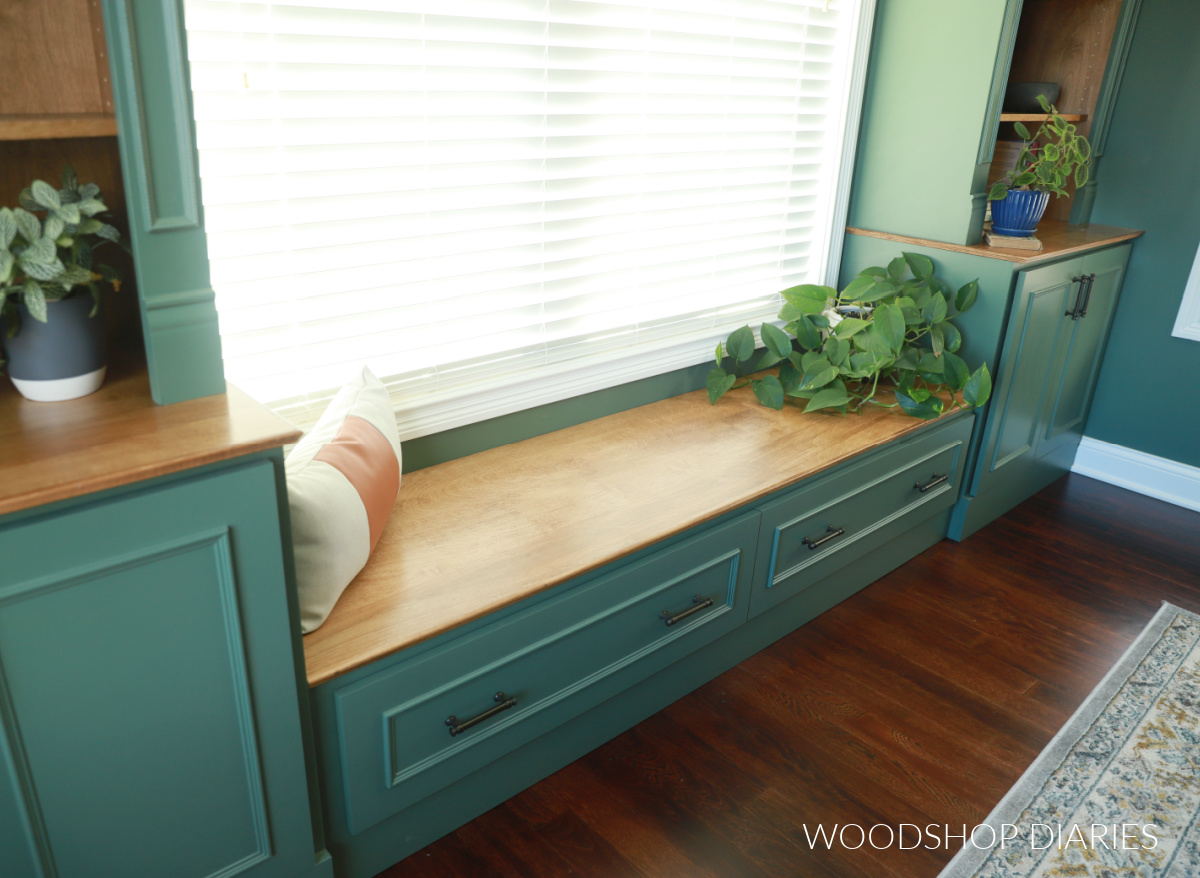
This project was intended as a built in to completely fill a wall in an office. The overall dimensions were 141″ wide, 94″ tall, and 22 ½″ deep.
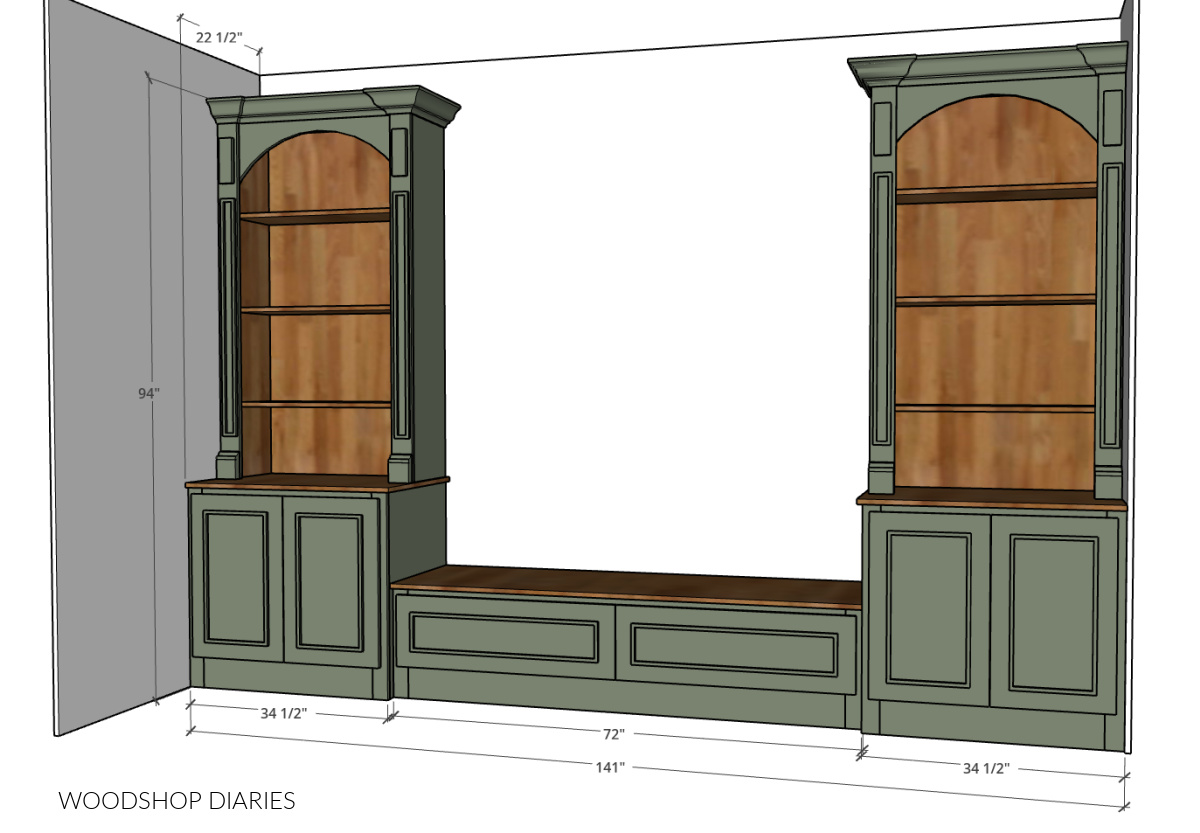
The cabinets are 34 ½″ wide and the bench seat was 72″ wide.
Because it’s very likely your wall won’t be the exact same length as my wall, you’ll need to figure your own dimensions to fit your space.
To keep this as simple as possible, I recommend building the bottom cabinets and top bookcases first. Then, install them. At that point, you can measure and build the bench seat to fill the open space between them.
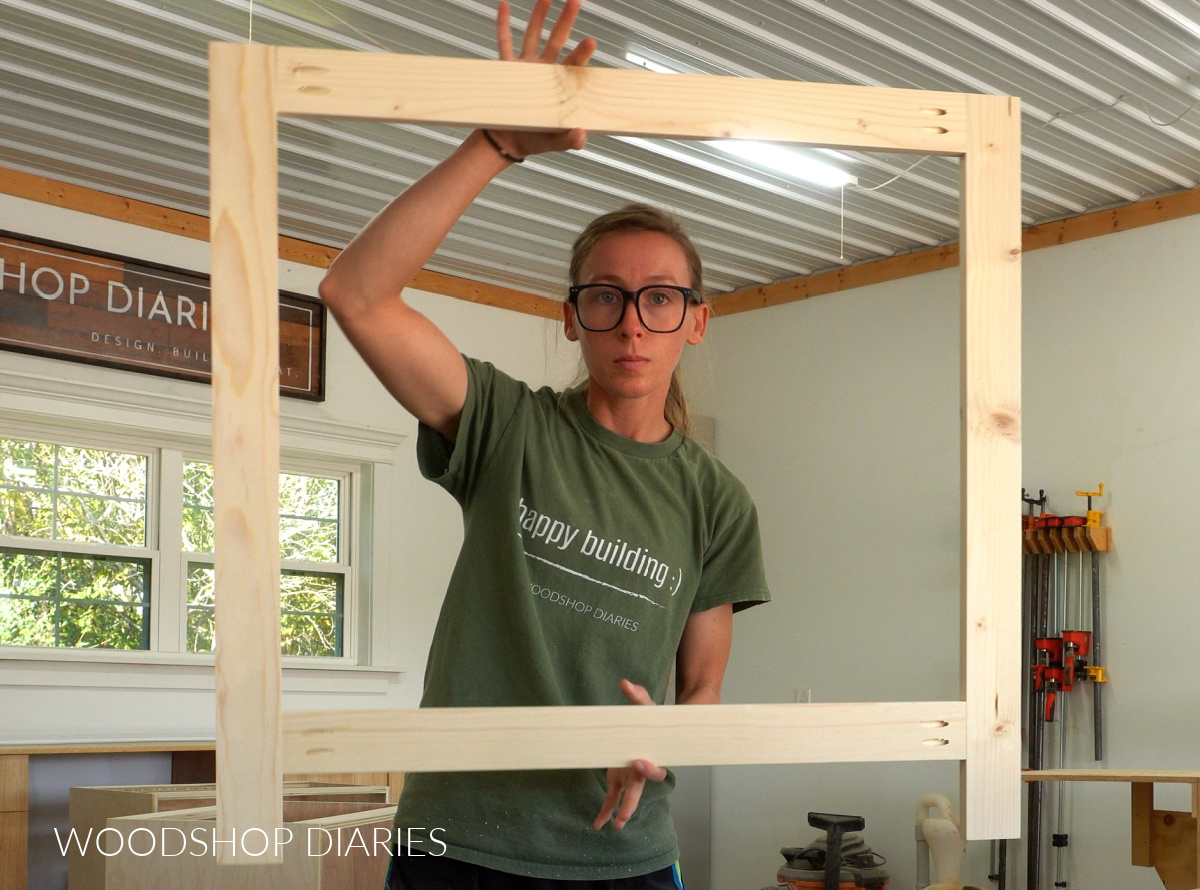
Face Frame Modifications
This project was installed between two walls. Because walls are rarely perfectly square, the face frames on both the bottom cabinets and top bookcases are built/installed oversized so that it hangs off one side to create a built in “filler strip.”
I do this on many of my cabinets that will go against a wall:
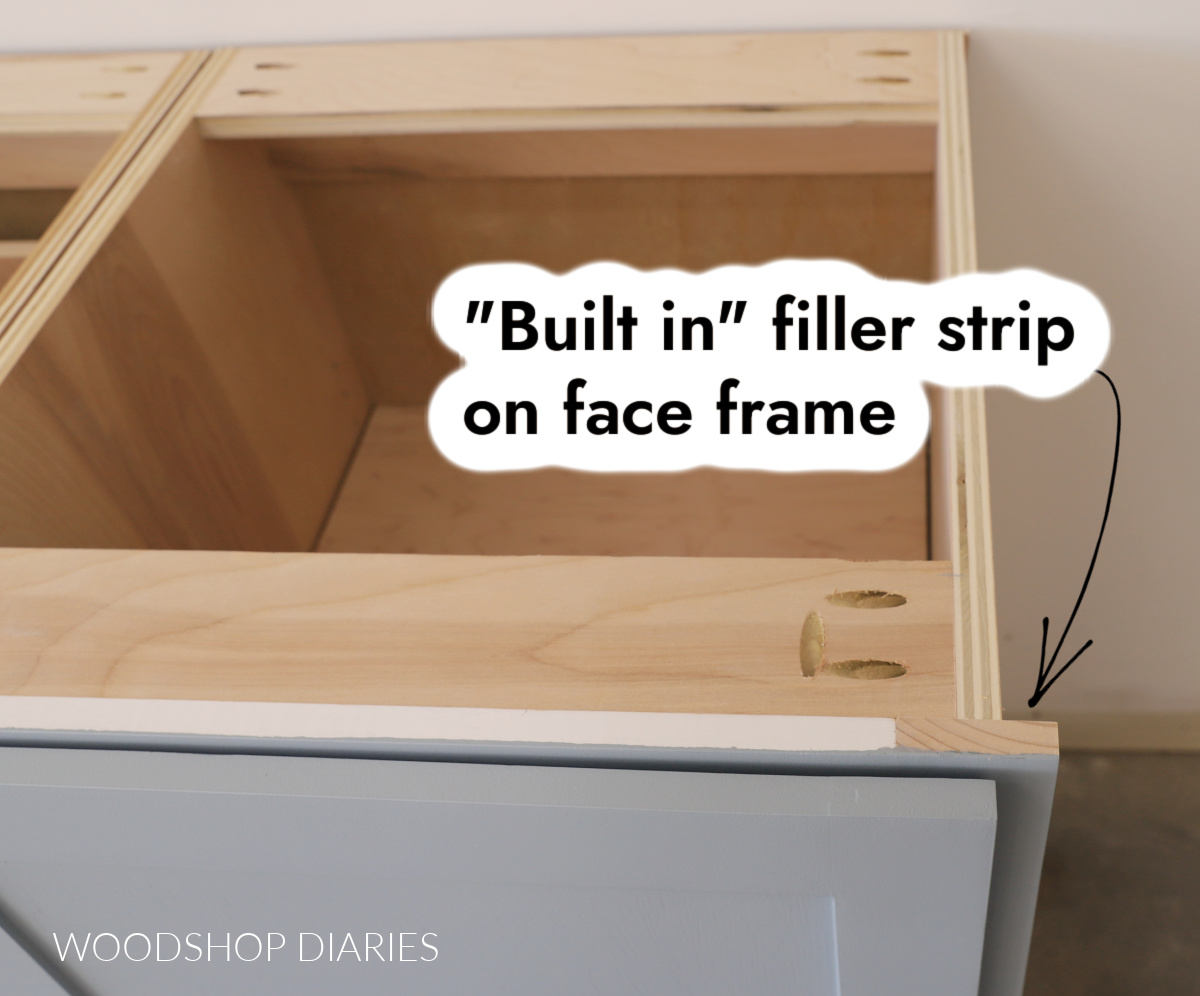
This helps minimize awkward gaps during installation in wall corners. However, if your project is not going against a wall, you’ll need to assemble your face frames without the overhang.
Adjustments to the face frame may also require slight adjustments to the cabinet door size as well. This article explains how to measure and size cabinet doors for any project.
Enjoy DIY projects and woodworking plans? Sign up for priority access for the latest posts on Woodshop Diaries!
You may find these resources helpful throughout the build:
How to create Built In Cabinets with storage bench
If you prefer to watch, I’ve shared the full build video with tons of tips, behind the scenes, and additional details on my YouTube Channel here.
Love watching how-to videos? Subscribe to my YouTube channel for plenty more where that came from!
Prefer to print? Grab the printable built in cabinet building plans available here:
Tools & Materials
Tools:
Check out this post for the top ten tools I recommend for cabinet building
- Drill/Driver
- Circular Saw
- Cutting guides–Kreg Rip Cut & Kreg AccuCut (optional)
- Miter Saw
- Jig Saw (optional to cut arches)
- Pocket Hole Jig (standard size)
- Micro Pocket Hole Jig (optional, but recommended for ½″ plywood and face frames)
- Brad or Finish Nailer
- Concealed Hinge Jig
- Shelf Pin Jig
Materials:
- (5) 4’x8′ sheets ¾″ plywood *
- (2) 4’x8′ sheets ½″ plywood
- (1) 4’x4′ sheet ¼″ plywood
- (2) 1x4x10′ board
- (4) 1x3x8′ boards
- (2) 1x6x8′ boards
- Various moldings as desired
- (2) pair 18″ ball bearing drawer slides
- (4) pair 1 ½″ overlay face frame concealed hinges
- 1″ pocket hole screws
- 1 ¼” pocket hole screws
- 1 lb box 1 ¼” wood screws
- Brad or Finish nails
- 2″ and 2 ½″ long screws (to install built ins)
- Edge banding (optional, but recommended)
- Shelf Pins
- Wood Glue
*I recommend using hardwood plywood for this build–I used birch here. Learn how to use the best plywood for your project here.
For the 1x and molding material, any wood type you prefer would work fine. If painting, spruce, whitewood, or preprimed pine are great options. If staining, use the same type of lumber as your plywood (or something that will stain similarly) so they’ll match once finished.
Step 1: Assemble Base Cabinets
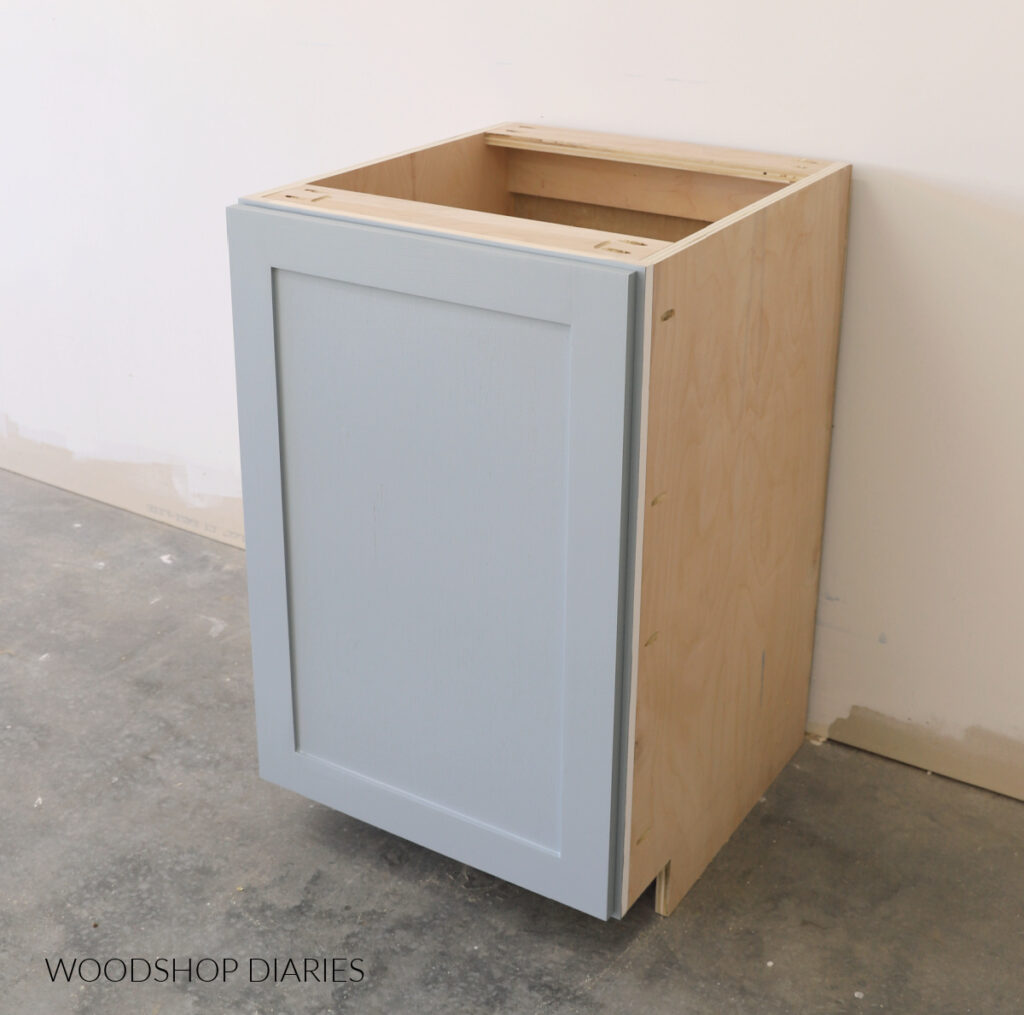
The first part of the project I tackled was building the base cabinets. These are the cabinets that will go on each side of the bench, in the bottom left and right corners of the room.
I assembled these cabinet boxes from ¾″ plywood, so first, I cut down my plywood sheets to get two sides, a bottom, and three support strips for each cabinet.
Learn how to cut down plywood sheets here.
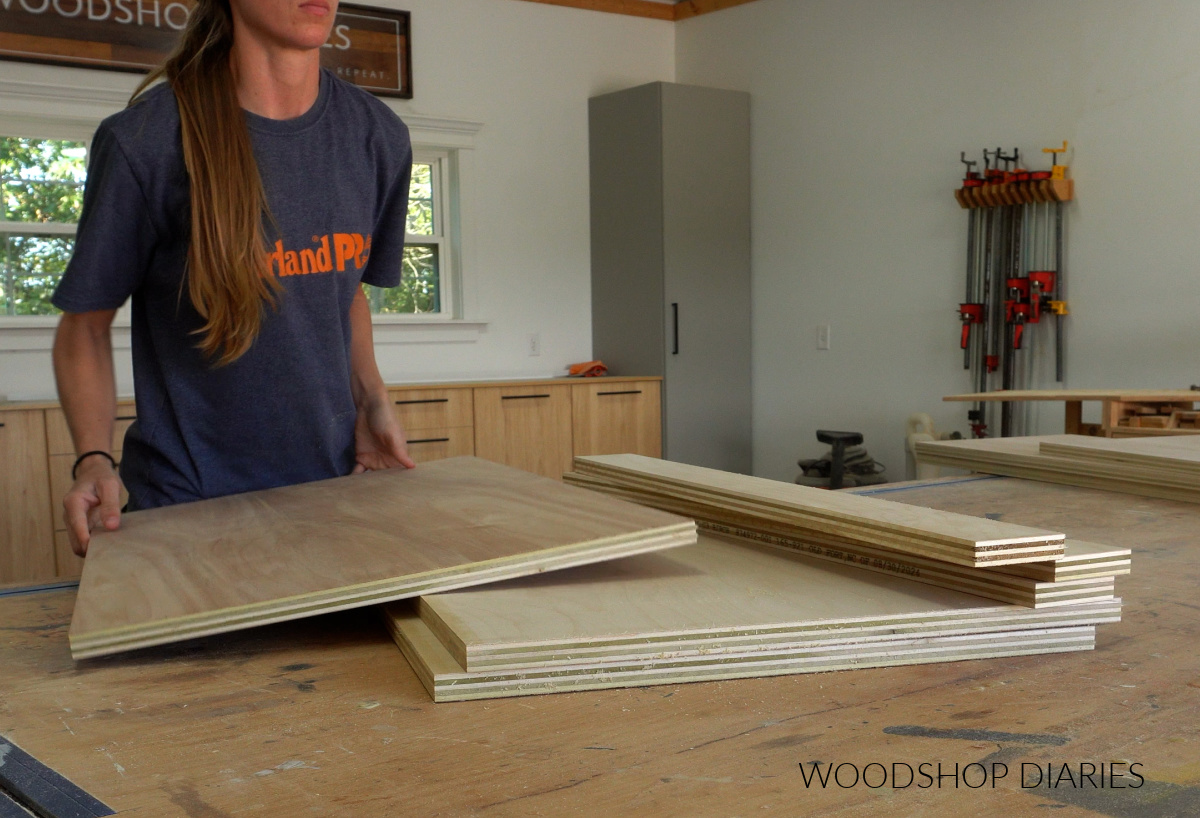
You can find the full cut list and cut diagrams in the printable plans here.
Then, I drilled ¾″ pocket holes into the ends of the bottom panel and all three support strips to assemble.
RELATED: How to use a pocket hole jig
I assembled two identical cabinet boxes using 1 ¼″ pocket hole screws. Note that the bottom panel was installed about 5 ⅜″ up from the bottom of the sides.
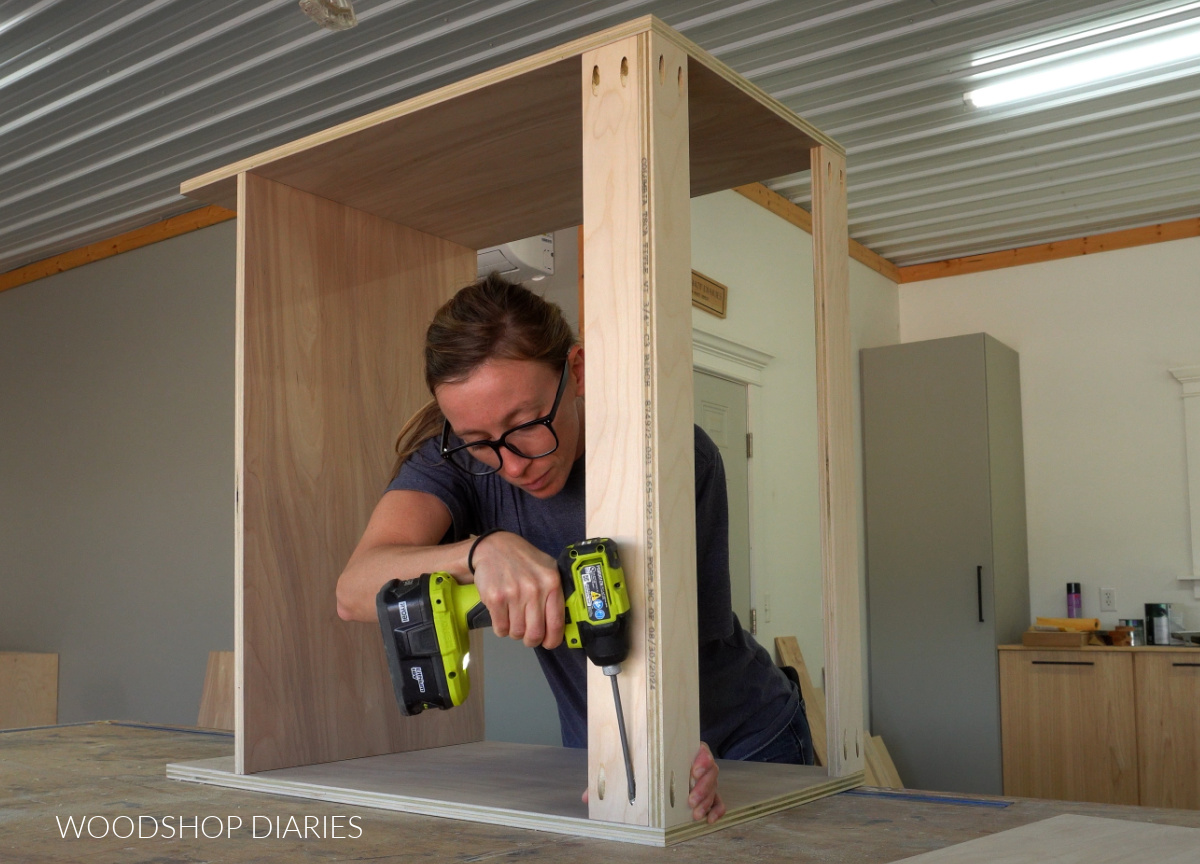
And the support strips are installed so that two are at the top, back corner and one is at the front corner.
FYI: This is very similar to how to build basic base cabinets for a kitchen, except for these built ins don’t have a toe kick.
Next, I assembled a basic face frame for each cabinet using 1x3s using pocket holes and screws.
A standard size pocket hole jig can work if you’re careful, but I recommend using a Kreg Micro Jig for these thin pieces with pan head pocket hole screws. The smaller holes and screws are less likely to cause splits.
Learn how, when, and why to use the Kreg Micro Pocket Hole Jig here.
(If you watch the video, I mention that in hindsight, I wish I had used a 1×6 at the bottom of this face frame. Later, I came back and added a piece of 1×6 across the bottom.)
Because these base cabinets are butting up to a wall, I built the face frames about 1″ wider than the cabinet boxes. So, when I glued and nailed them onto the front, I let the frame overhang the side of the cabinet that will butt up to the wall.
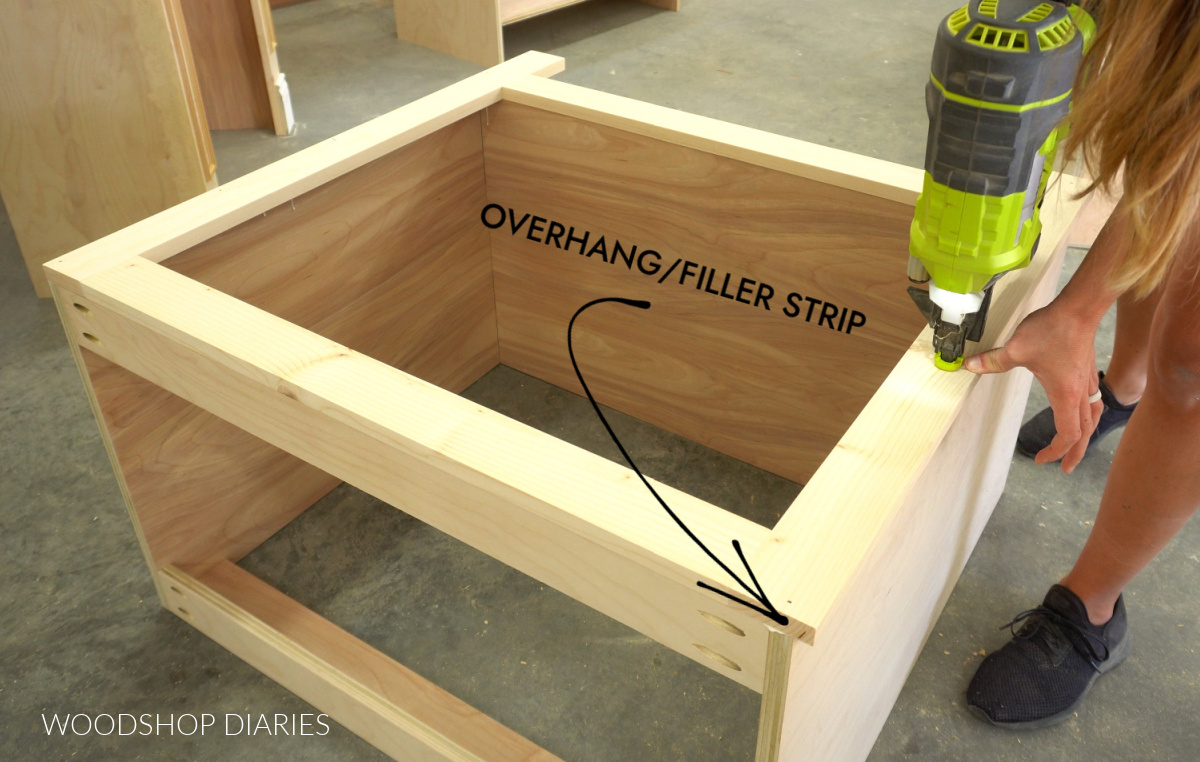
This creates a built in filler strip to help avoid any awkward gaps during installation in case the walls are unsquare.
If your cabinets were not going against a wall, you’d want to make your face frame the same size as your cabinet (no overhang).
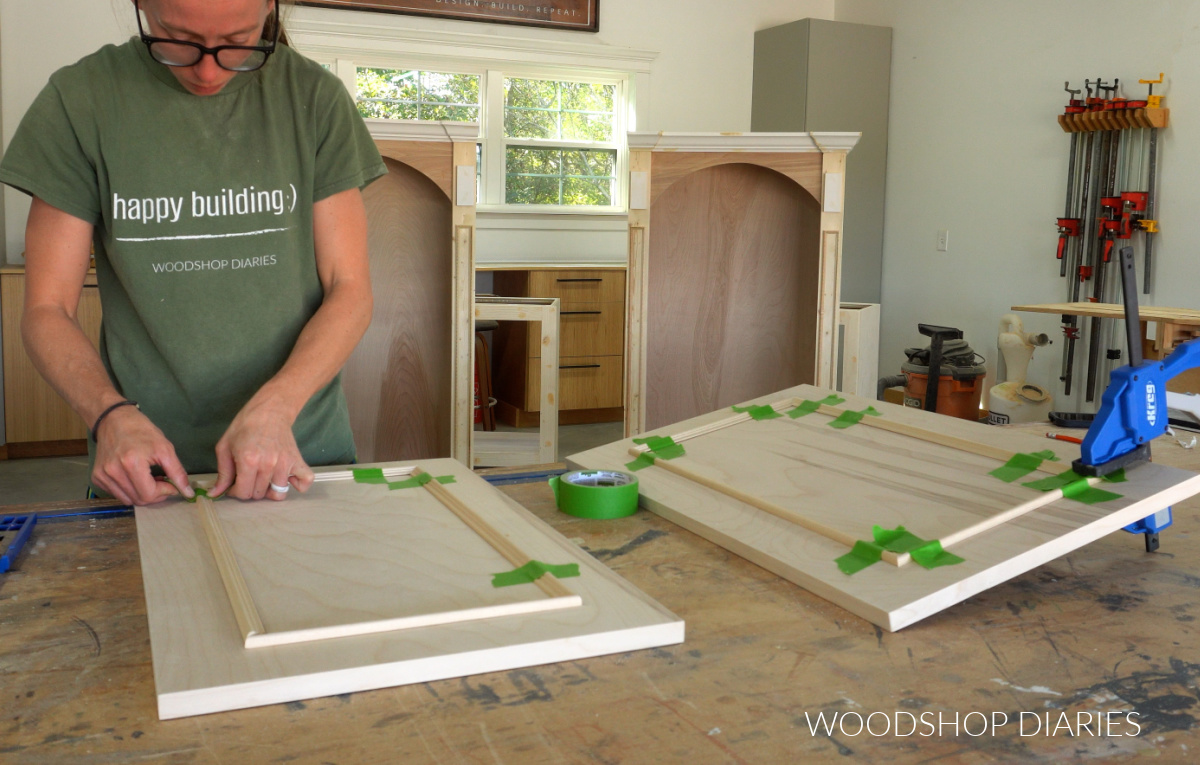
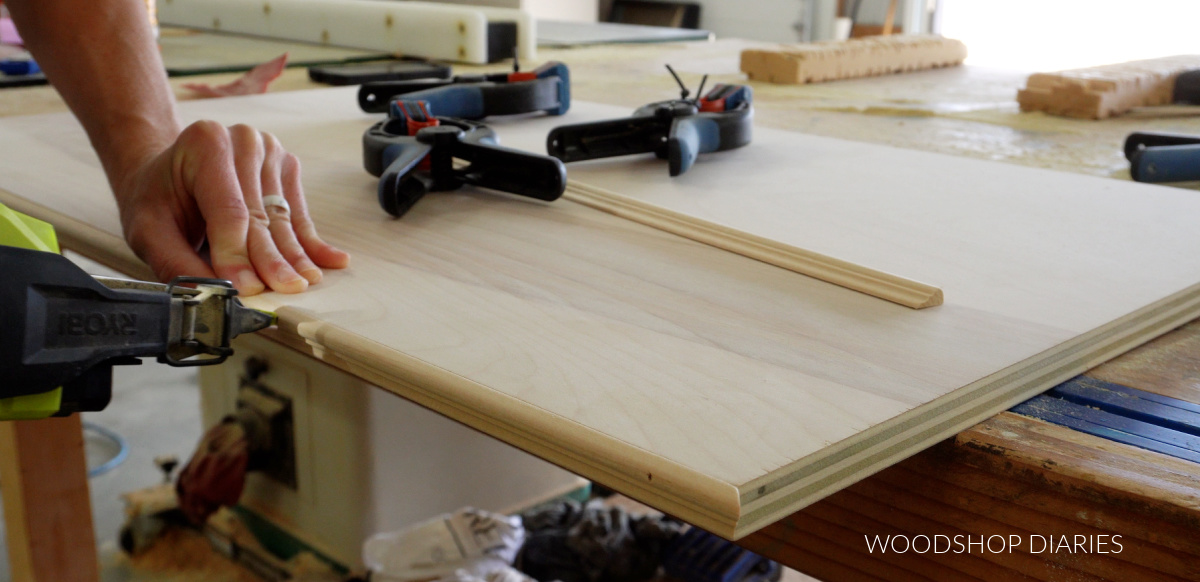
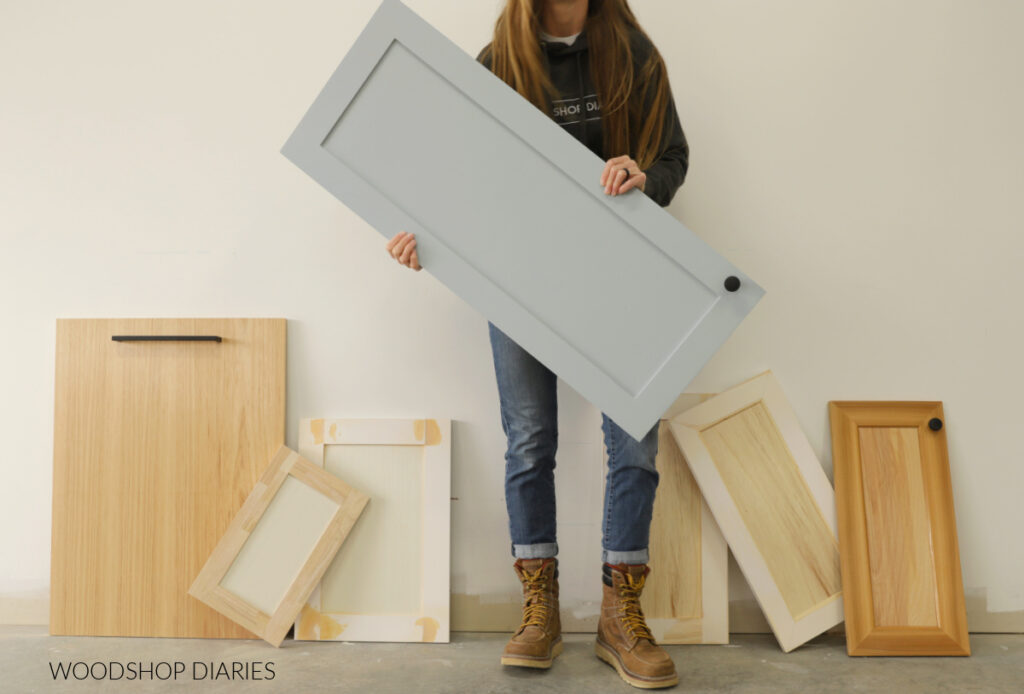
Then, I cut two doors for each cabinet from ¾″ plywood, edge banded them, and cut some small decorative trim pieces to glue onto the fronts of each one.
RELATED: How to measure and size cabinet doors
At this point, I went ahead and primed and painted the cabinet doors and cabinet boxes. These were going into my sister’s office and she wanted them to match the walls, so I painted them SW Basil.
RELATED: How to paint DIY furniture
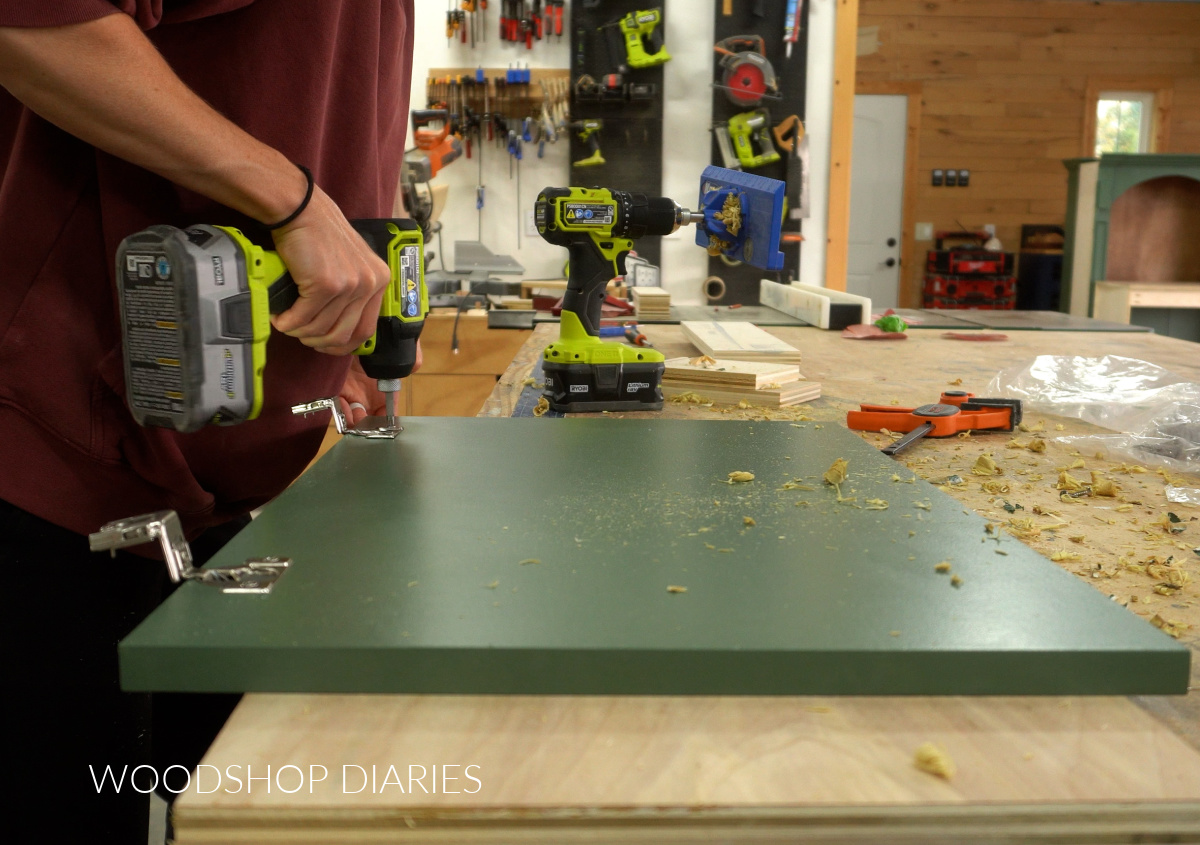
Then, I installed these doors onto the cabinets using concealed hinges.
RELATED: How to choose the right cabinet door hinges for your project
ALSO RELATED: How to install concealed hinges
To finish up the cabinets, I drilled shelf pin holes inside and cut a shelf to fit. Then, I cut another piece of ¾″ plywood to use for the cabinet countertop.
You could simply edge band these, but I glued and nailed some of the decorative trim I used on the doors around the front and the side that won’t be butting up to a wall.
Then, I set the cabinets and tops aside for now. I’ll install them in step 3.
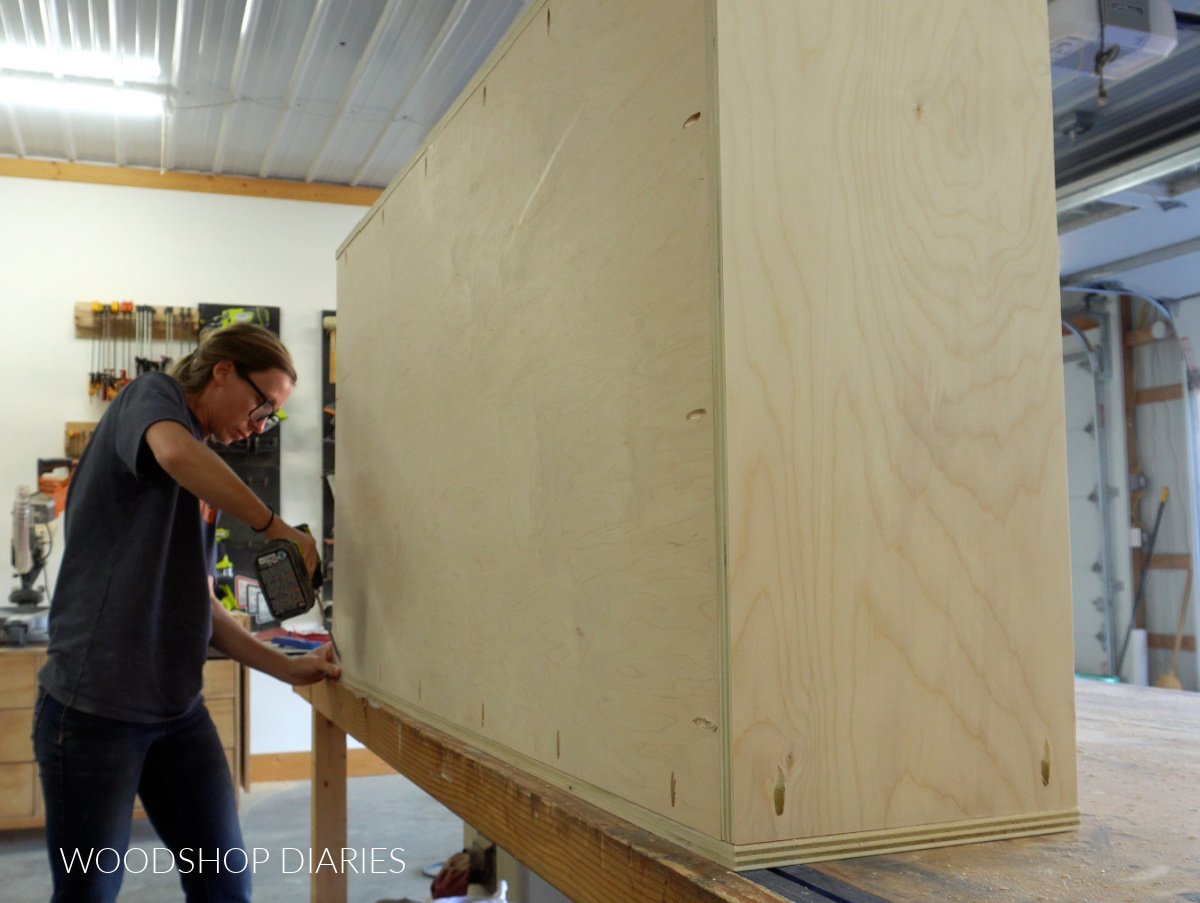
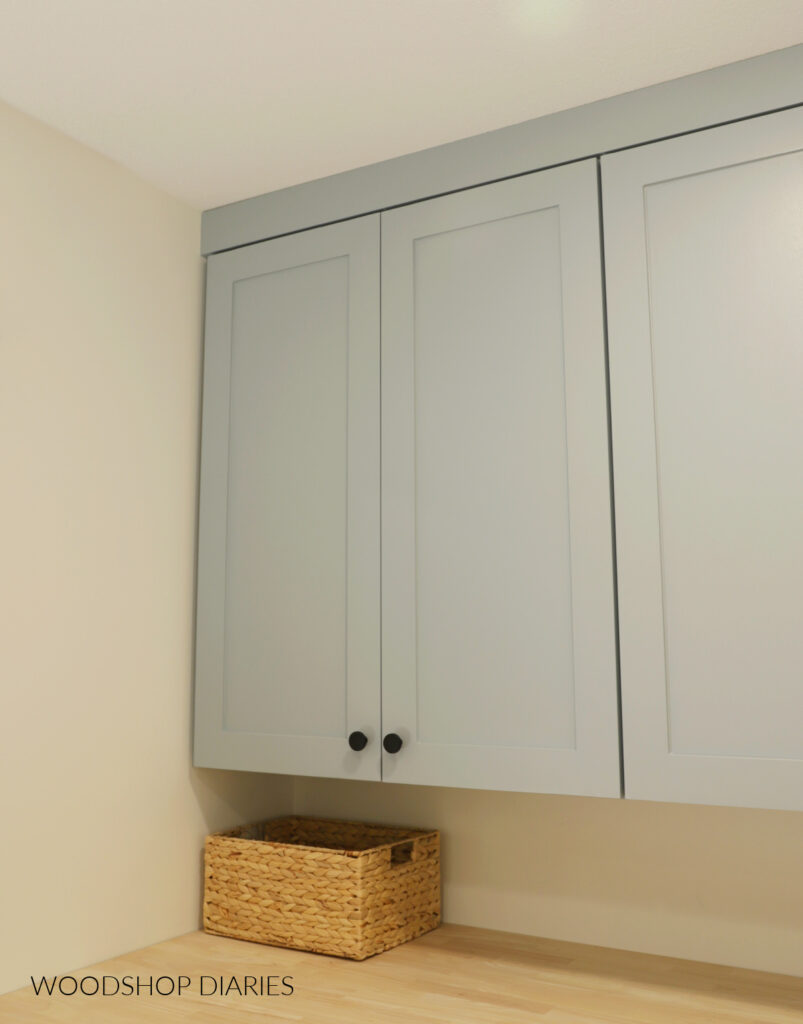
Step 2: Assemble Built in Bookshelves
The next part of the build was the bookshelves that will go on top of the base cabinets. For these, I used ¾″ plywood for the sides and top, but I used ½″ plywood for the back panel.
I drilled pocket holes along the back panel and into the top piece to assemble. Keep in mind you’ll need to drill ¾″ pocket holes into ¾″ thick material and ½″ pocket holes into ½″ material.
I assembled two bookshelves using pocket hole screws like shown in the photo. By the way, these bookshelves will not have a bottom since they’ll be placed on the cabinets from step 1.
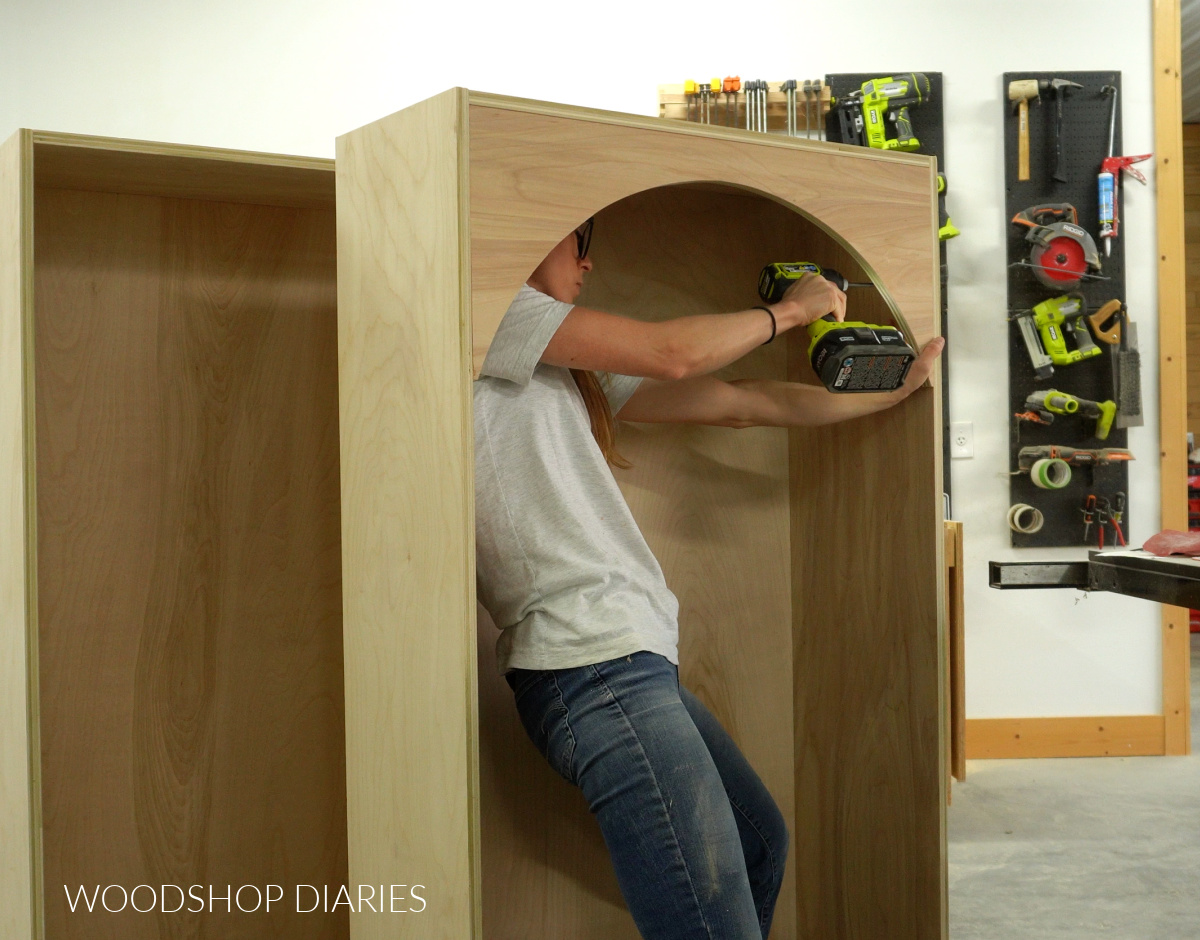
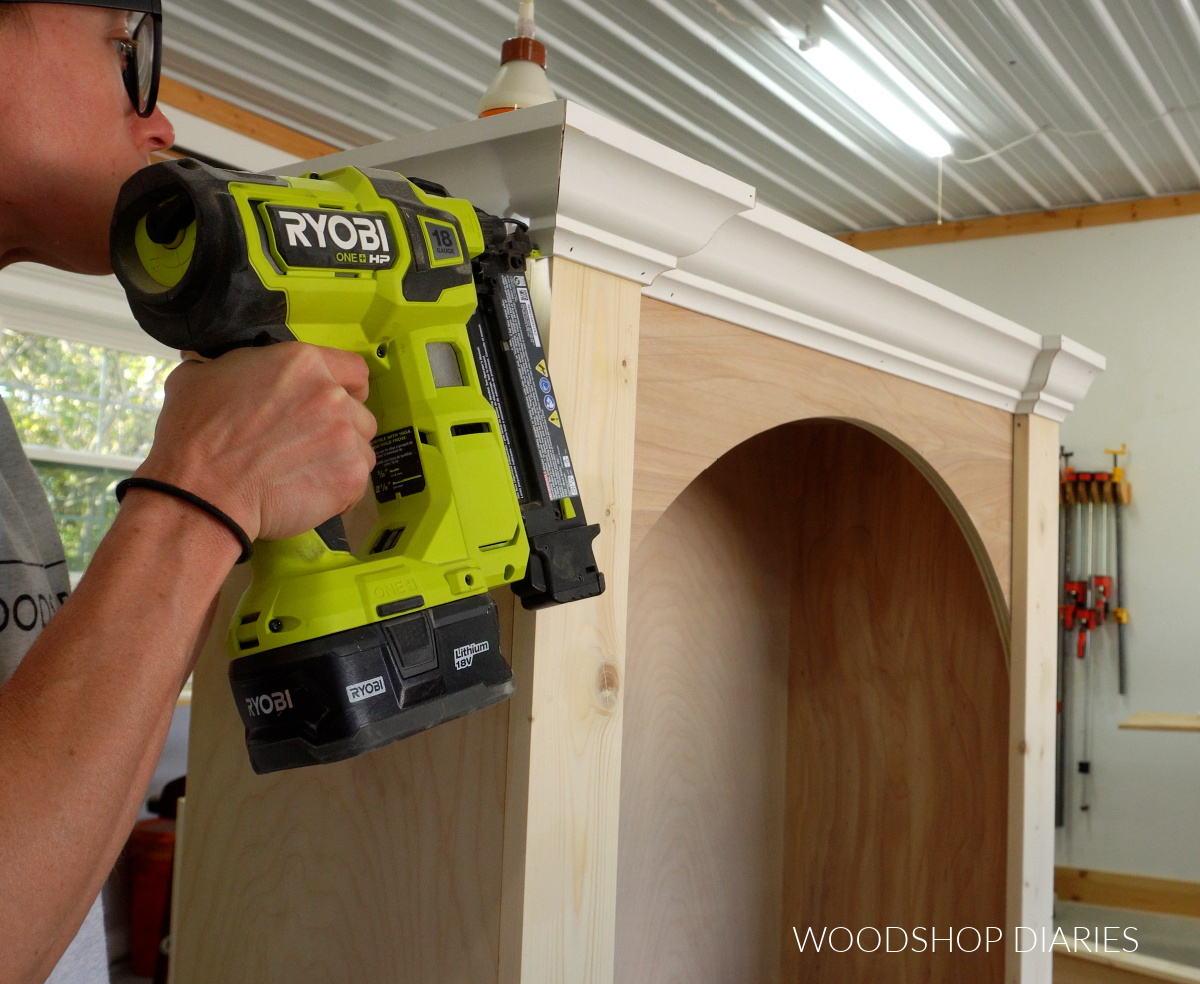
Then, I cut a piece of ¾″ plywood with an arch and installed this at the top of each cabinet using pocket hole screws on the inside.
Prefer to print? Grab the printable built in cabinet building plans here.
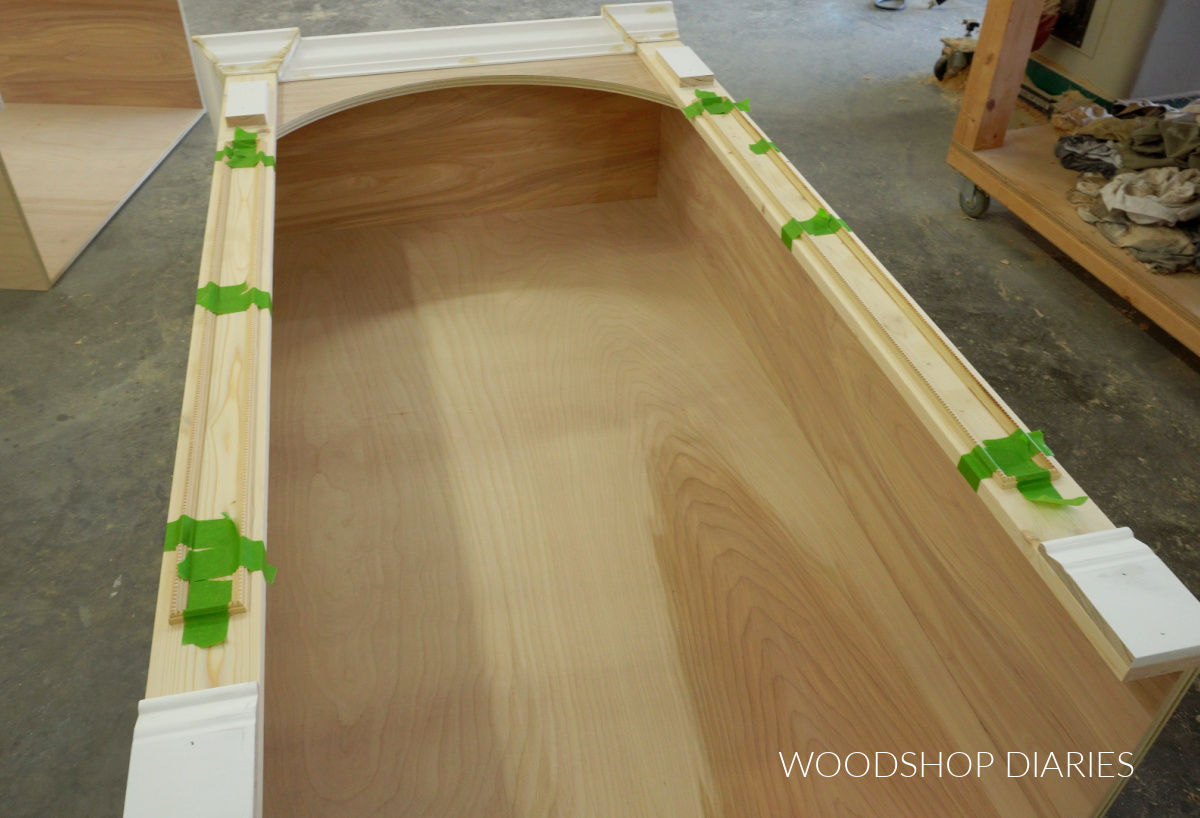
Next, I glued and nailed 1x4s onto the front of each bookshelf for the face frame. Just like for the base cabinets, I allowed the 1×4 to overhang the “wall side” of the shelf about an inch to help avoid weird gaps with unsquare walls during install.
Then I added various molding to dress these shelves up a bit. I glued and nailed crown molding around the tops first.
RELATED: How to cut crown molding
Then, I added some baseboard at the bottom, some 1×3 blocks at the top, and some small decorative trim forming a rectangle between them.
You can dress these up however fits your style. Once the glue was dry, I stained the inside of the bookcase in Minwax Early American, and painted the outside to match the base cabinets.
To finish these up, I drilled shelf pin holes along the insides and cut some shelves to fit.
Step 3: Install Built In Cabinets
I went ahead and installed these end cabinets before building the bench seat so that I knew exactly what size to build it so it would fit between them.
First, I removed the baseboard along the back wall and trimmed them down on the sides using an oscillating saw so that I could slide the base cabinets right in behind it in the corner.
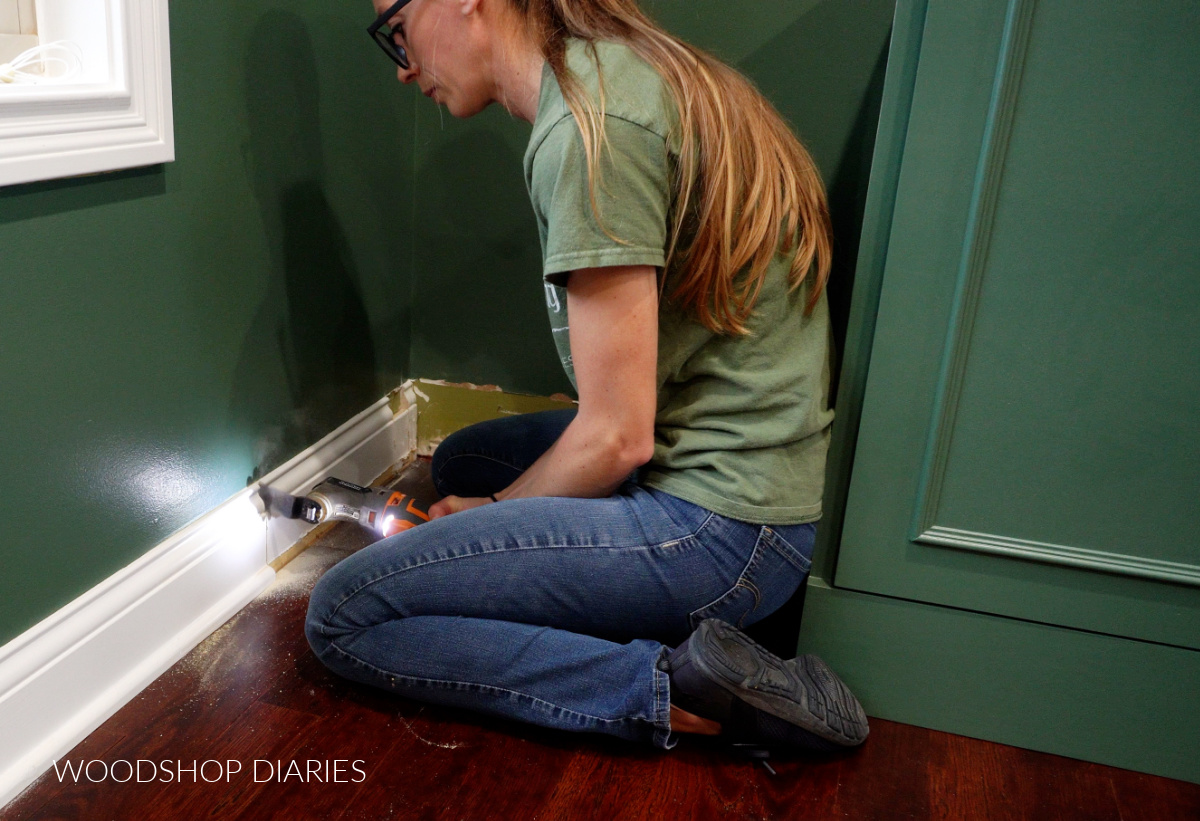
You don’t have to cut these in place if you don’t want. You can instead remove the baseboard and trim down on a miter saw, then reinstall.
I secured the base cabinets to the wall studs on each side of the room.
Then, I placed the countertops on and secured these through the top supports of the base cabinets.
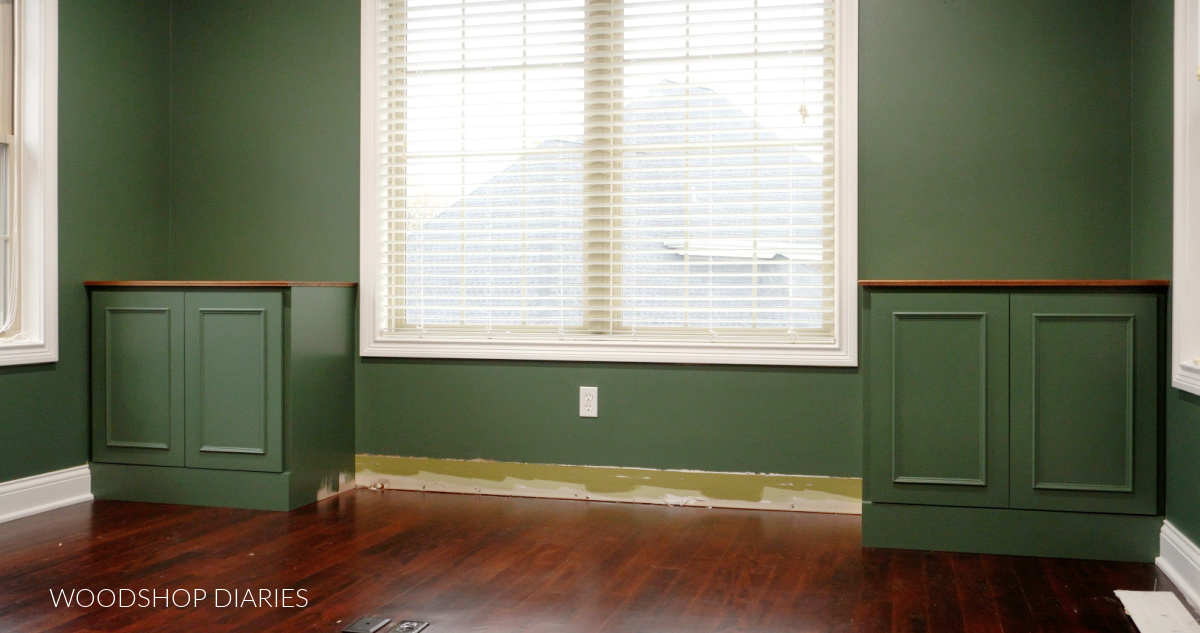
Then, we placed the bookshelves on top and secured them to the wall studs with screws through the back panel. I also used a couple screws through the countertops to secure the shelves to the base as well.
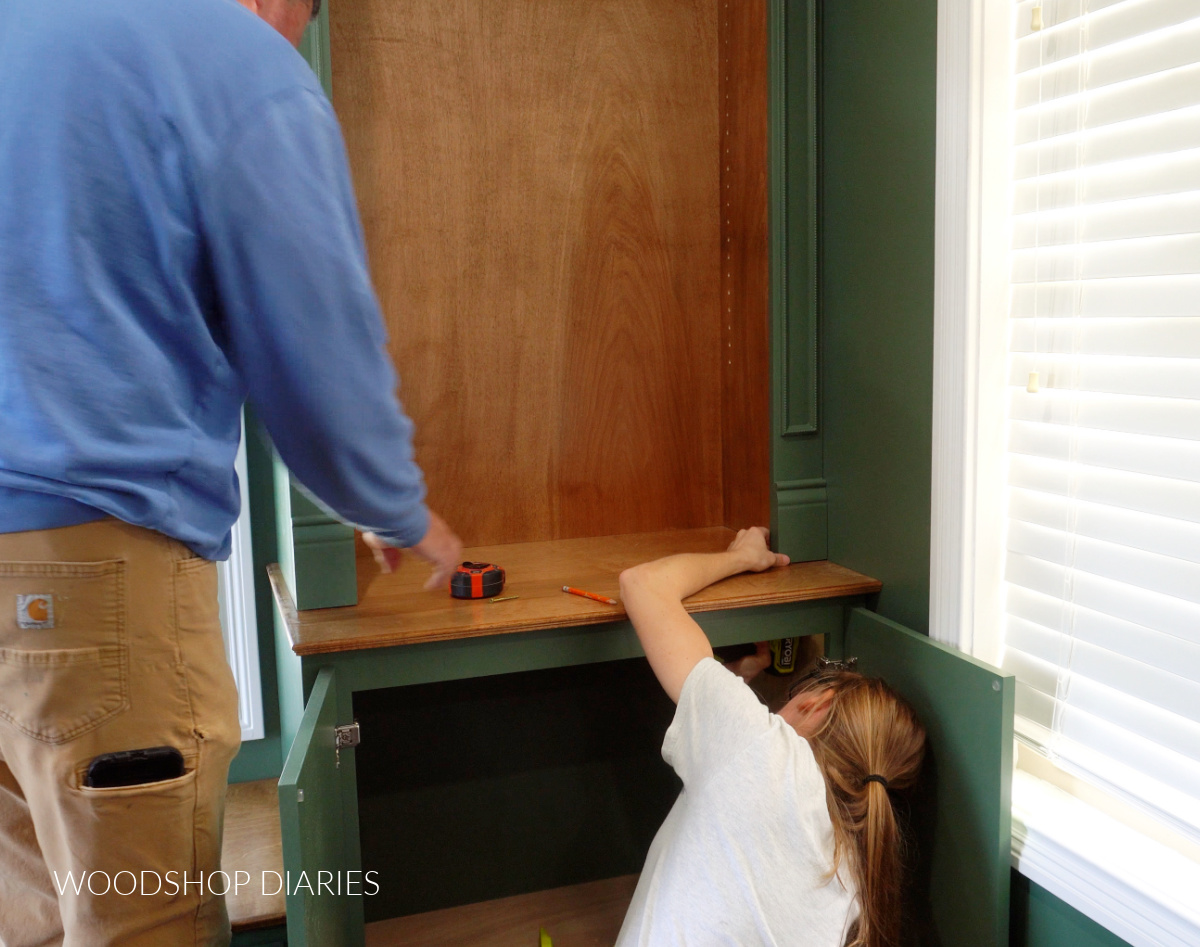
At that point, I could get a precise measurement of the open space between the base cabinets to build the bench seat for a perfect fit.
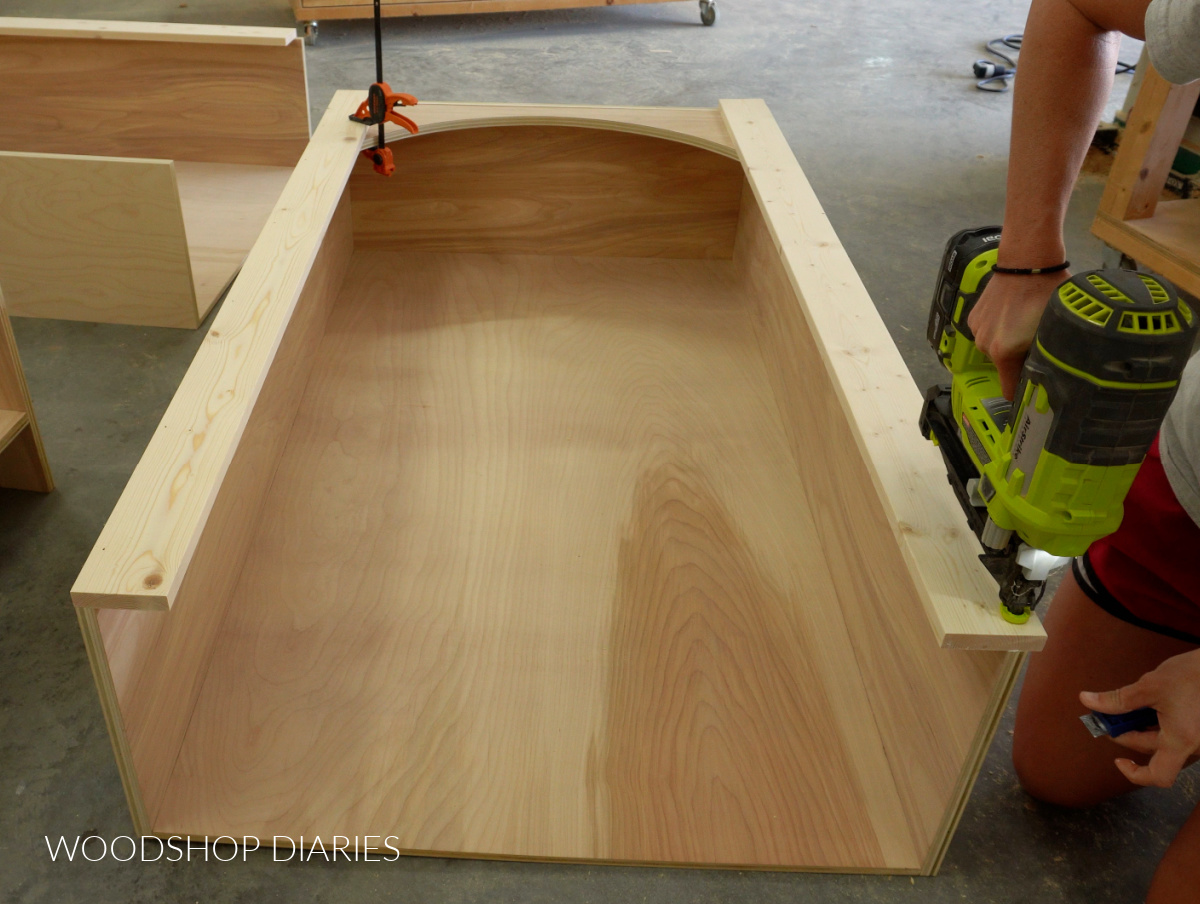
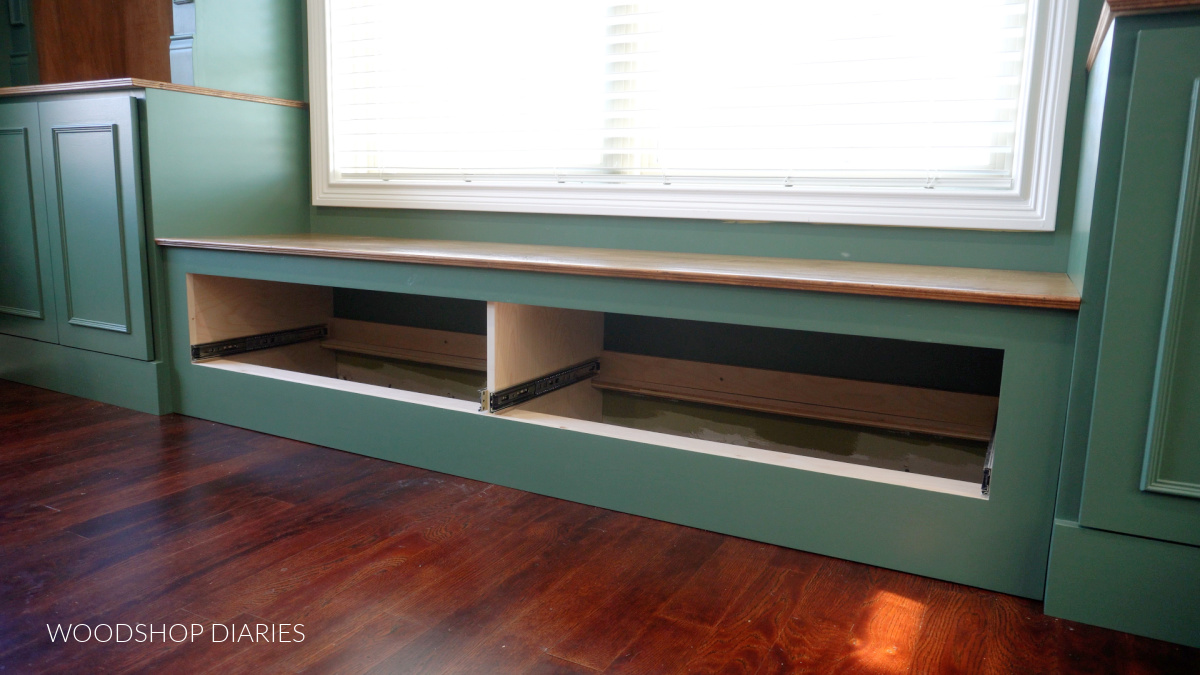
Step 4: Assemble Storage Bench
The storage bench is built much like the base cabinets except instead of a solid bottom panel, I just used a couple plywood strips–one at the front and one at the back.
So the bench frame had two sides, a divider, and five support strips on each side. I assembled this using pocket holes and screws.
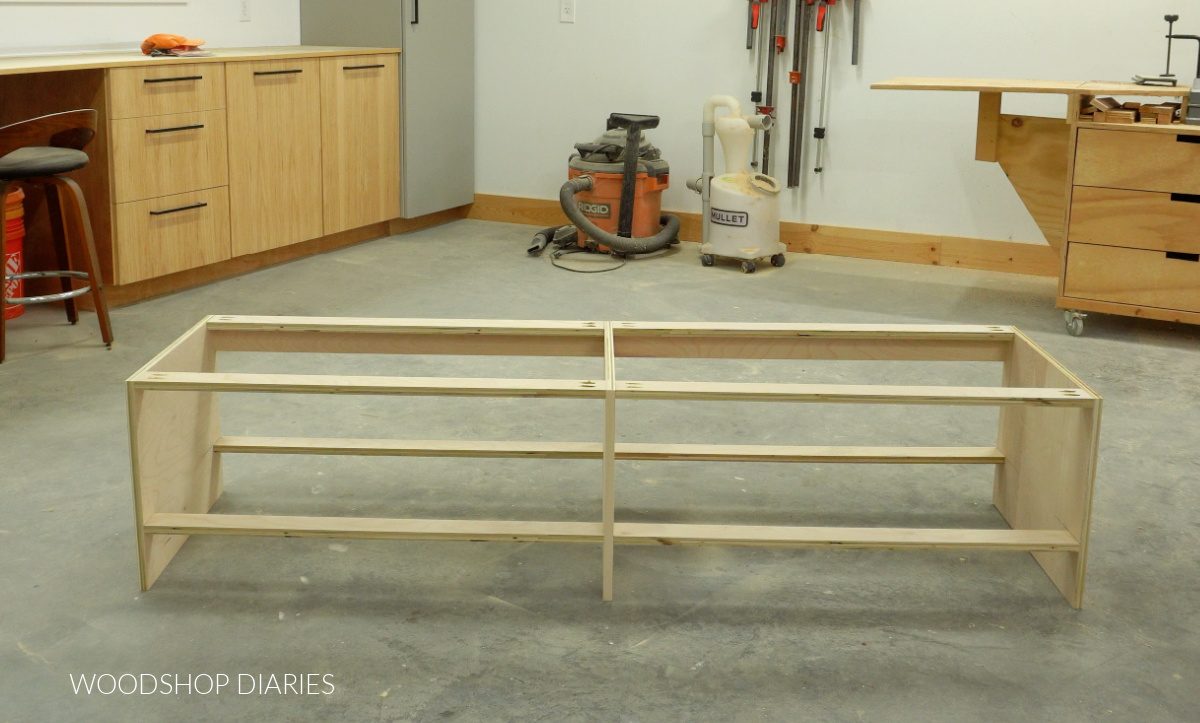
To make this easy to adjust and fit into the space, I built the main body of the bench about 3 ½″ smaller than the opening between my cabinets.
Then I built the face frame the exact width of the opening. I used 1x3s on the sides and top and a 1×6 at the bottom.
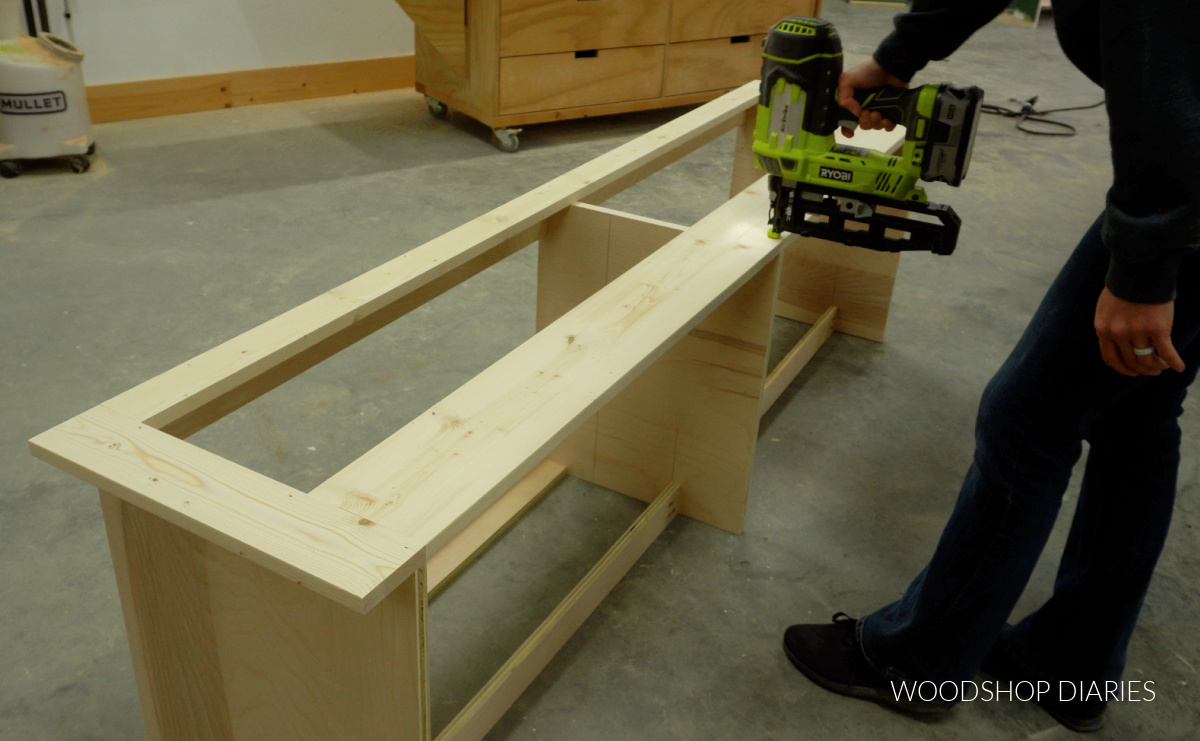
That way, when I glued and nailed the face frame on, it overhung each side about 1 ¾″.
That way, if it happens to be just a bit too big to fit in the space, I can easily trim a little off the side without having to take the whole bench apart.
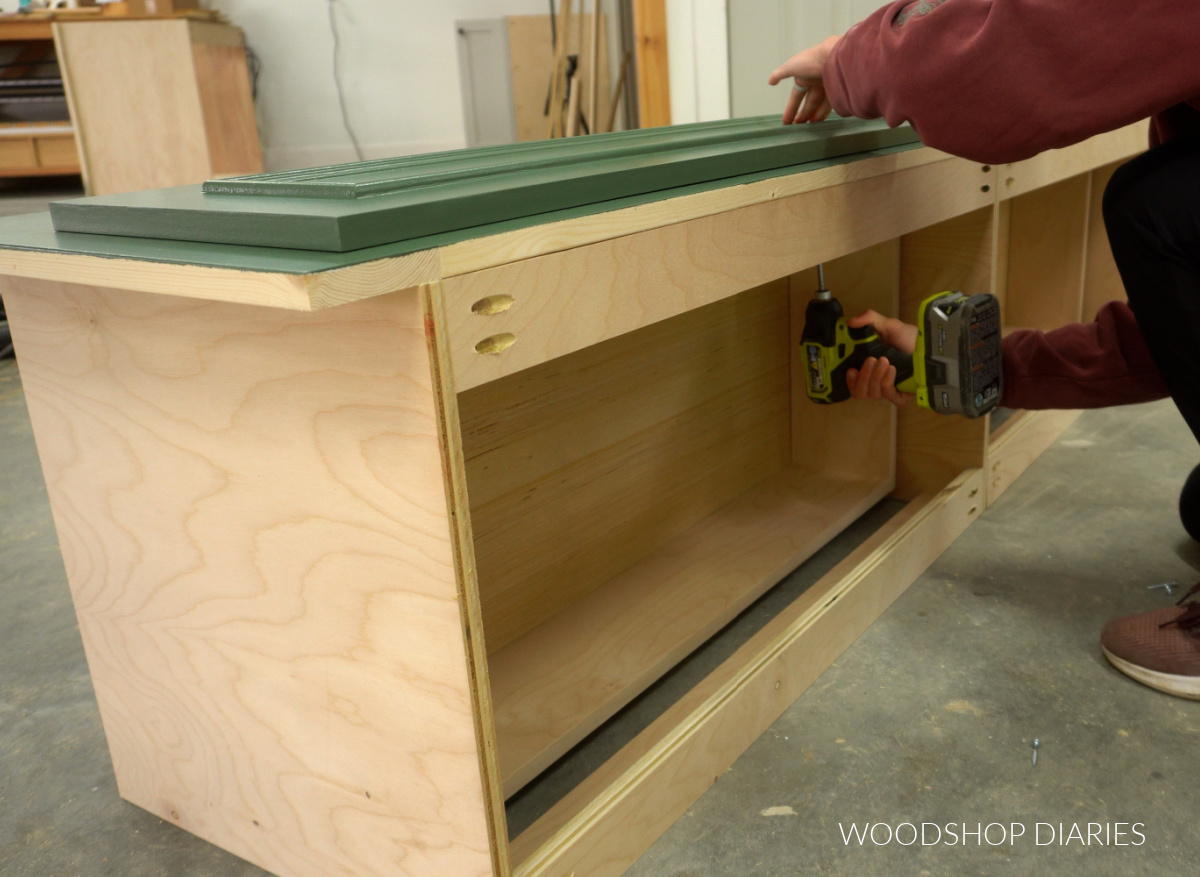
After the face frame, I added drawer slides into each side of the cabinet and assembled two large storage drawers to fit.
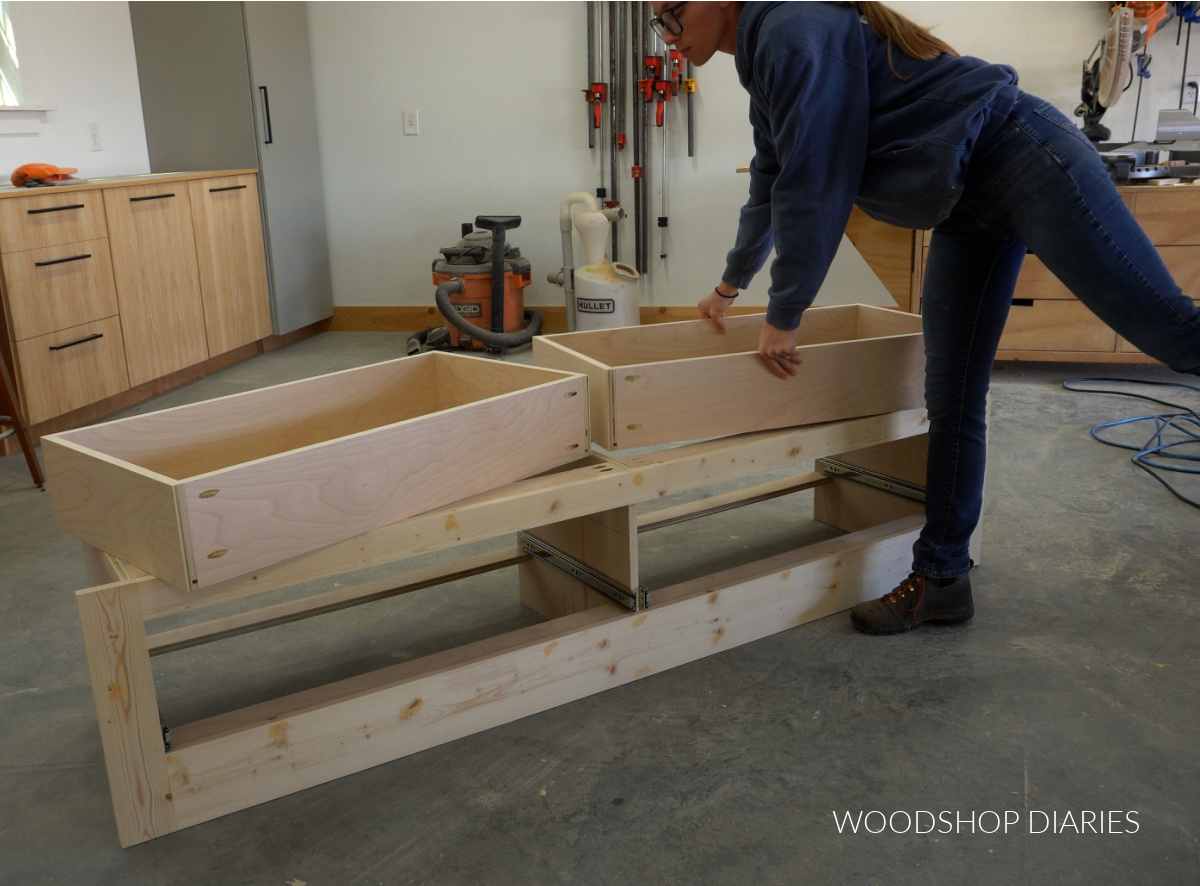
RELATED: Check out this article for more information on building drawer boxes
After I installed the drawers into the bench frame, I cut ¾″ plywood for the drawer fronts and added trim on them to match the doors on the base cabinets.
Then, I primed, painted, and installed these drawer fronts. TIP: I find it easiest to install drawer fronts if the project is lying on its back. Gravity helps hold the fronts in position.
Step 5: Install Storage Bench
Finally, I could install the bench and wrap this up. I removed the drawers using the little tabs on the sides of the slides so that I could access the inside easier.
And I slid this bench frame into position between the cabinets.
After securing the bench to the wall studs through the back supports, I cut to fit a ¾″ piece of plywood to set on top (I stained it before installing).
After the top was secured with screws through the top supports of the bench, I slid the drawers back in.
After adding some pulls to the drawers and doors, these built ins were complete and I could step back and see the big picture.
Of course, after installing, you can certainly add some additional trim, run baseboard across the front, if desired, caulk any gaps between walls and cabinet and touch up any paint as needed.
This is a great project that you can customize, trim out, size, and style to fit your space.
If you’re interested in building your own, grab the printable plans for these built in cabinets with storage bench here.
Looking for more built in storage ideas?
Wanting more ideas and information on building your own cabinets and built in storage? Here are a few posts you might enjoy browsing. Click on the images below to read more.
If you enjoyed this post, be sure to save it for later by pinning or sharing to your favorite social channel!
Until next time, happy building!