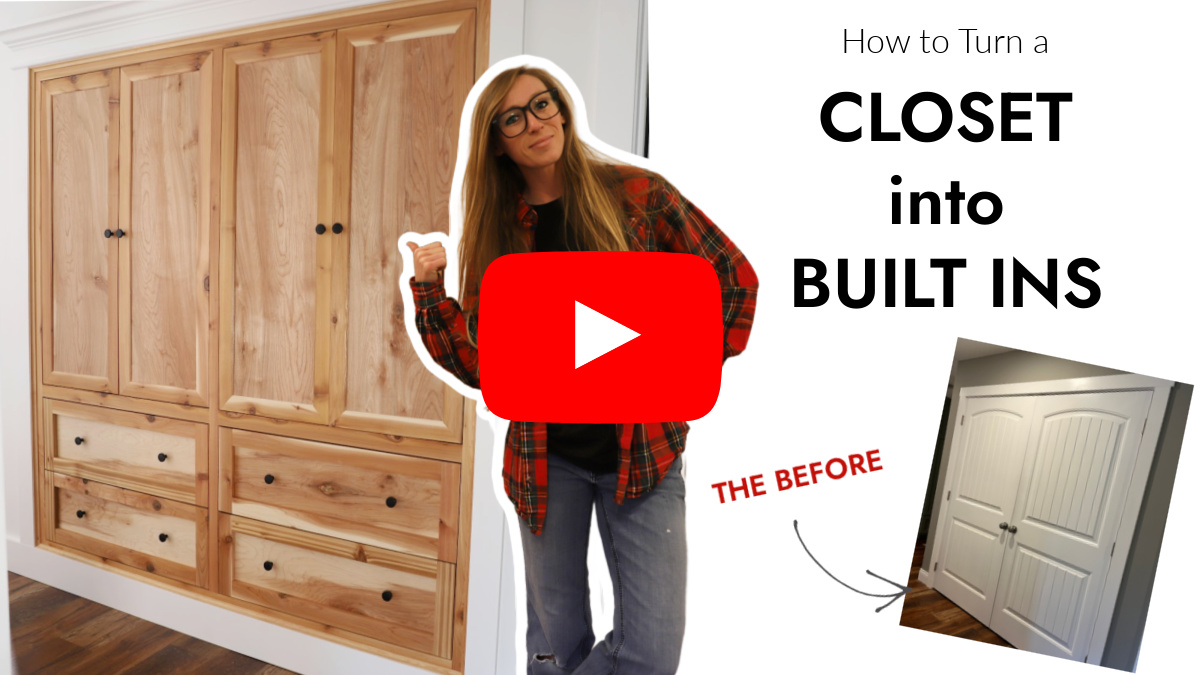
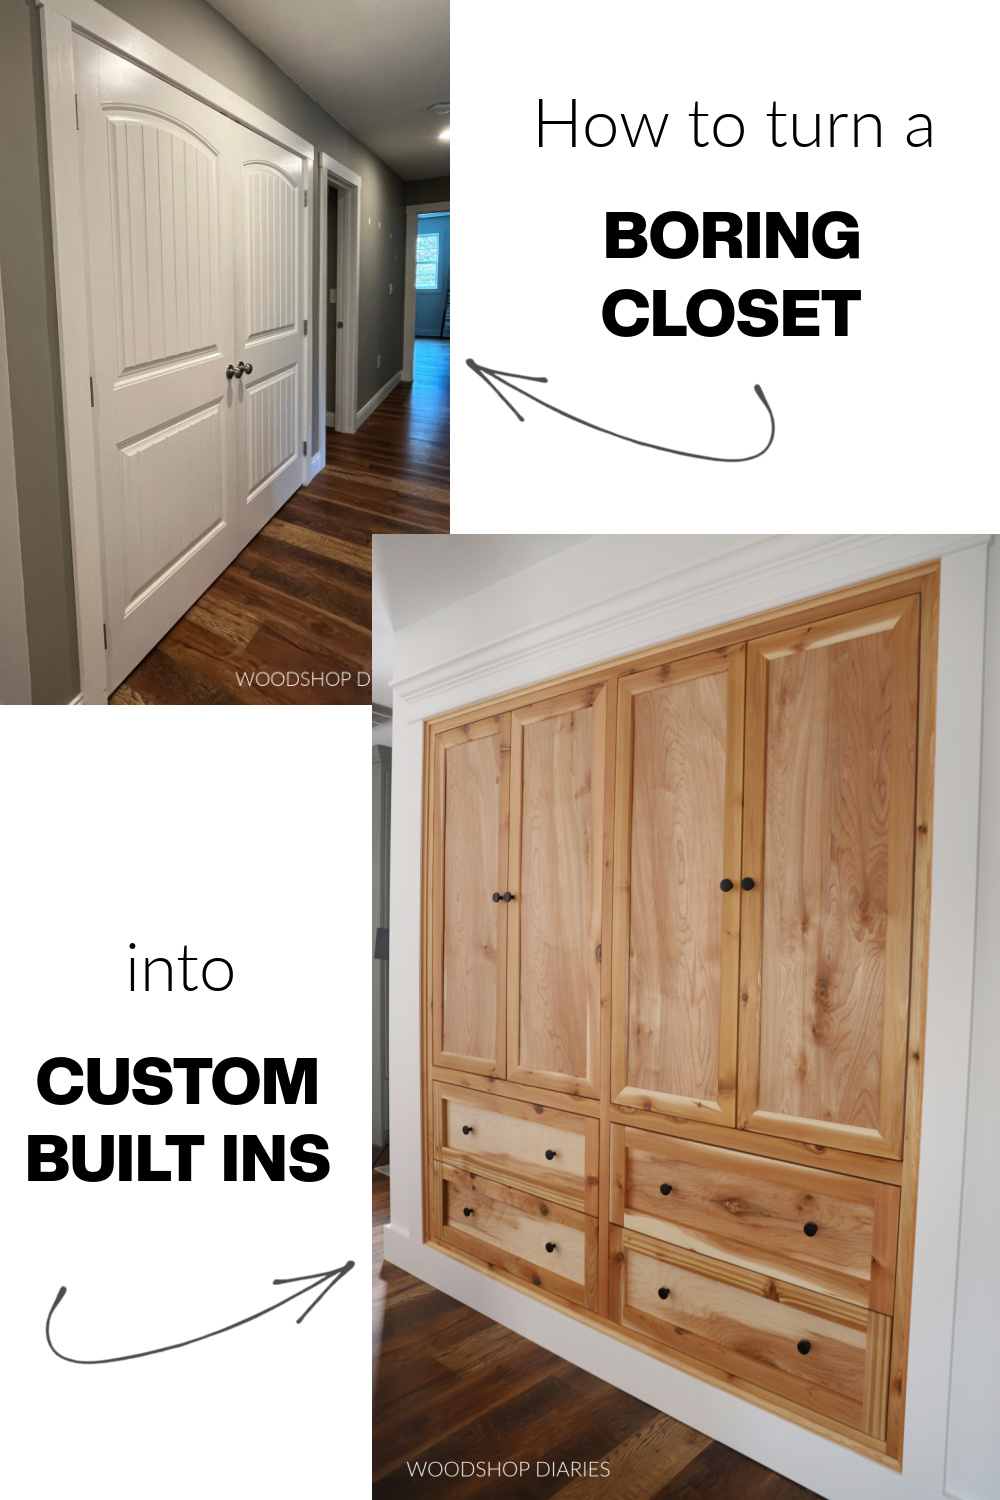
In this post, I’m sharing how to turn a basic hallway closet into gorgeous custom built ins!
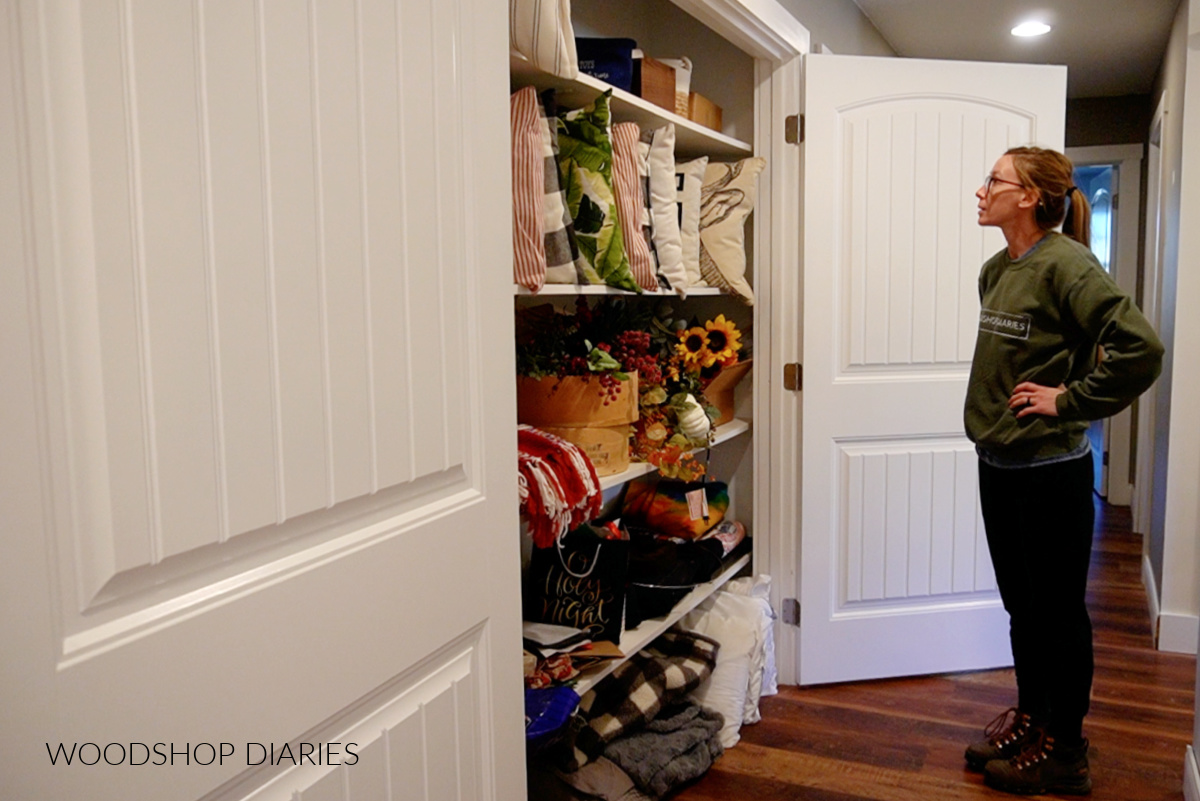
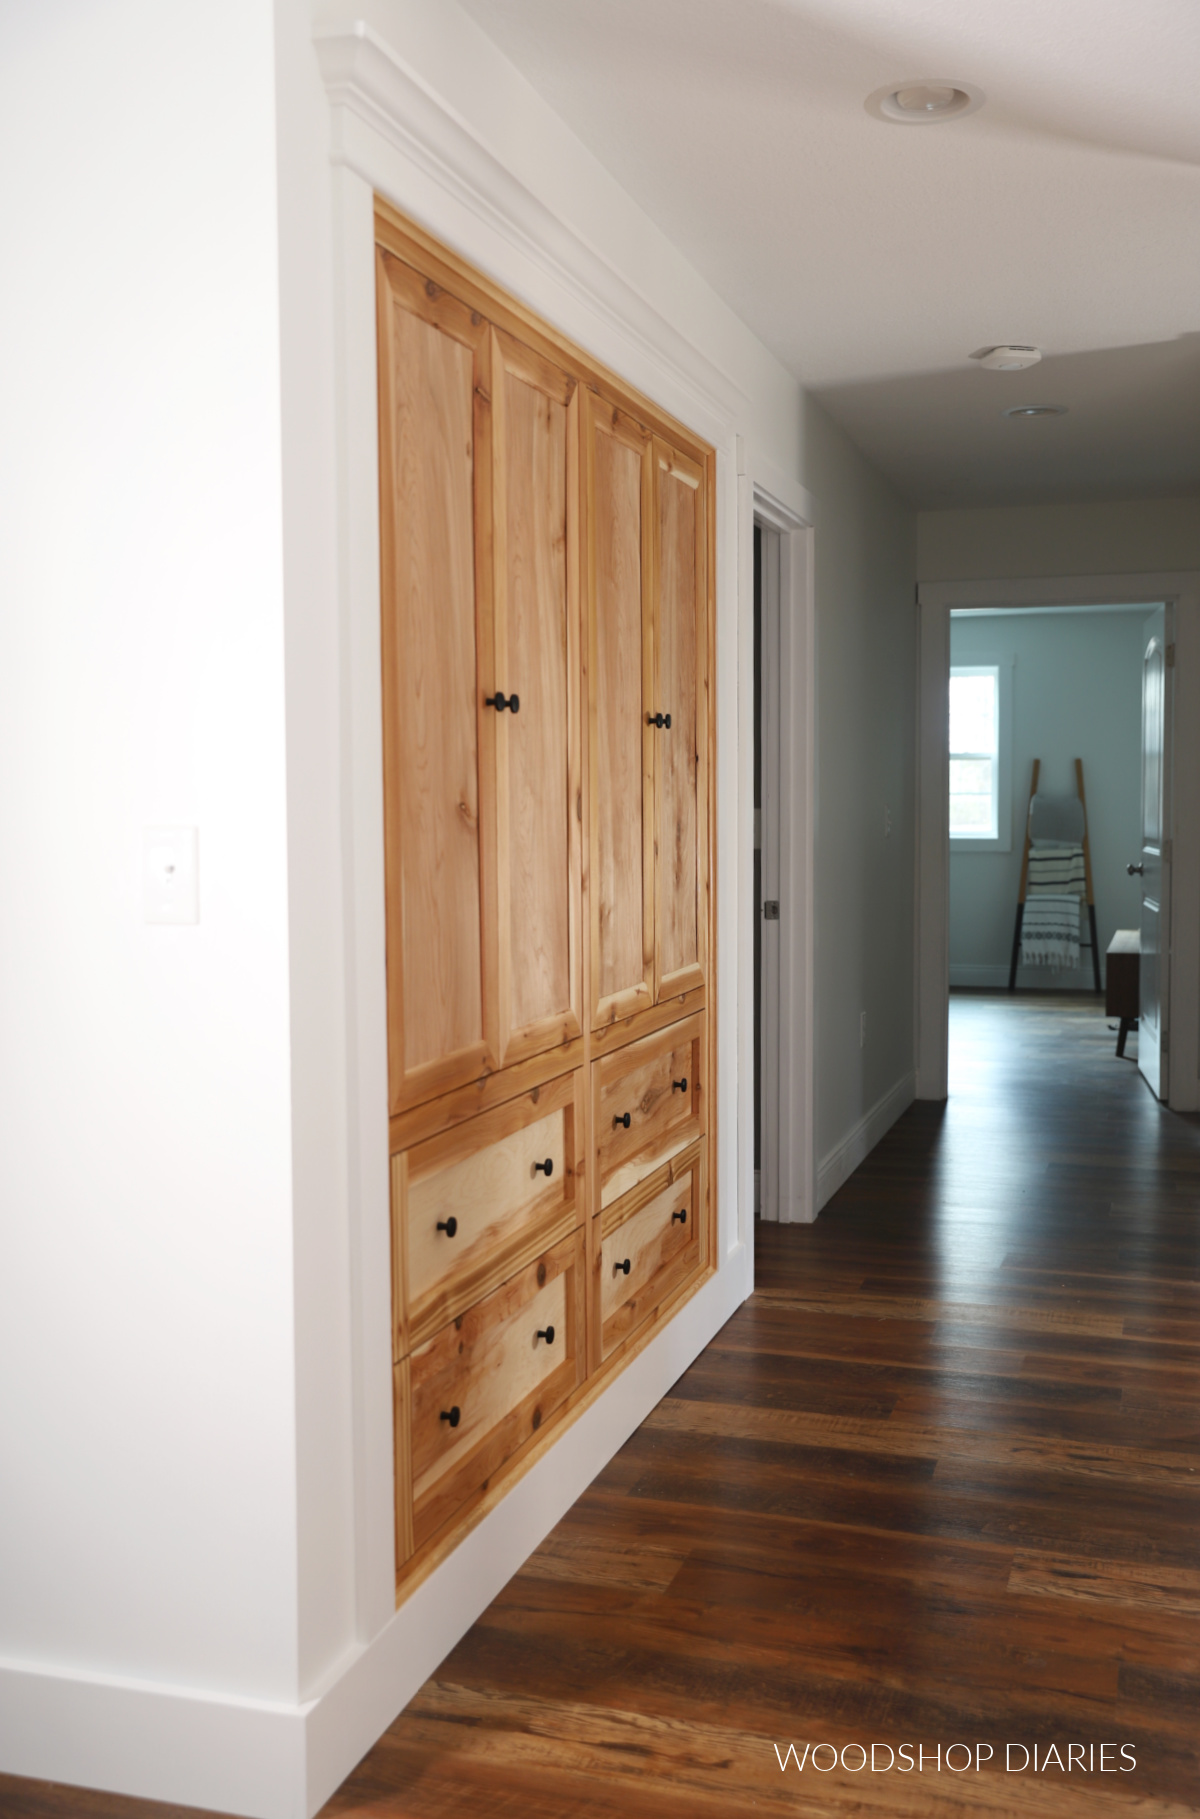
Our main hallway had a double door closet that was just…not ideal. The doors were difficult (and incredibly loud) to open and close. And the shelves inside weren’t adjustable, which resulted in a lot of poorly utilized space between them.
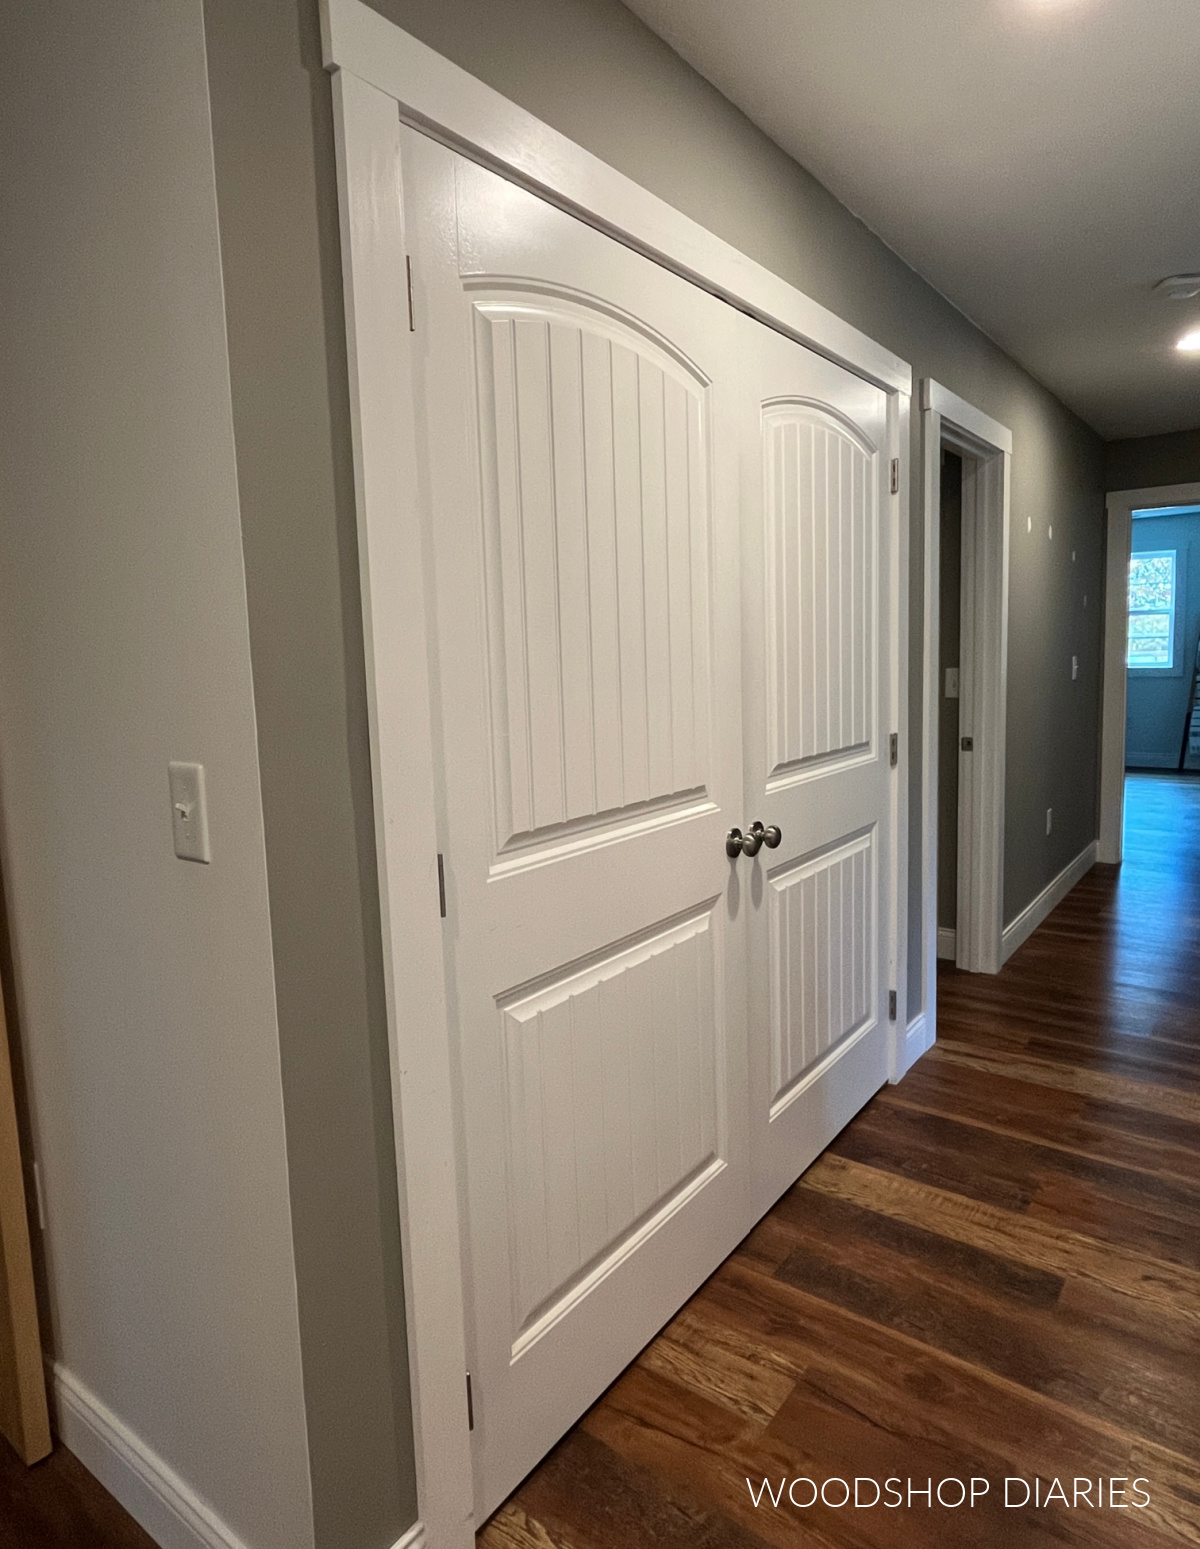
I wanted to improve both the looks and the function of this closet, so I replaced it with a custom built in linen cabinet!
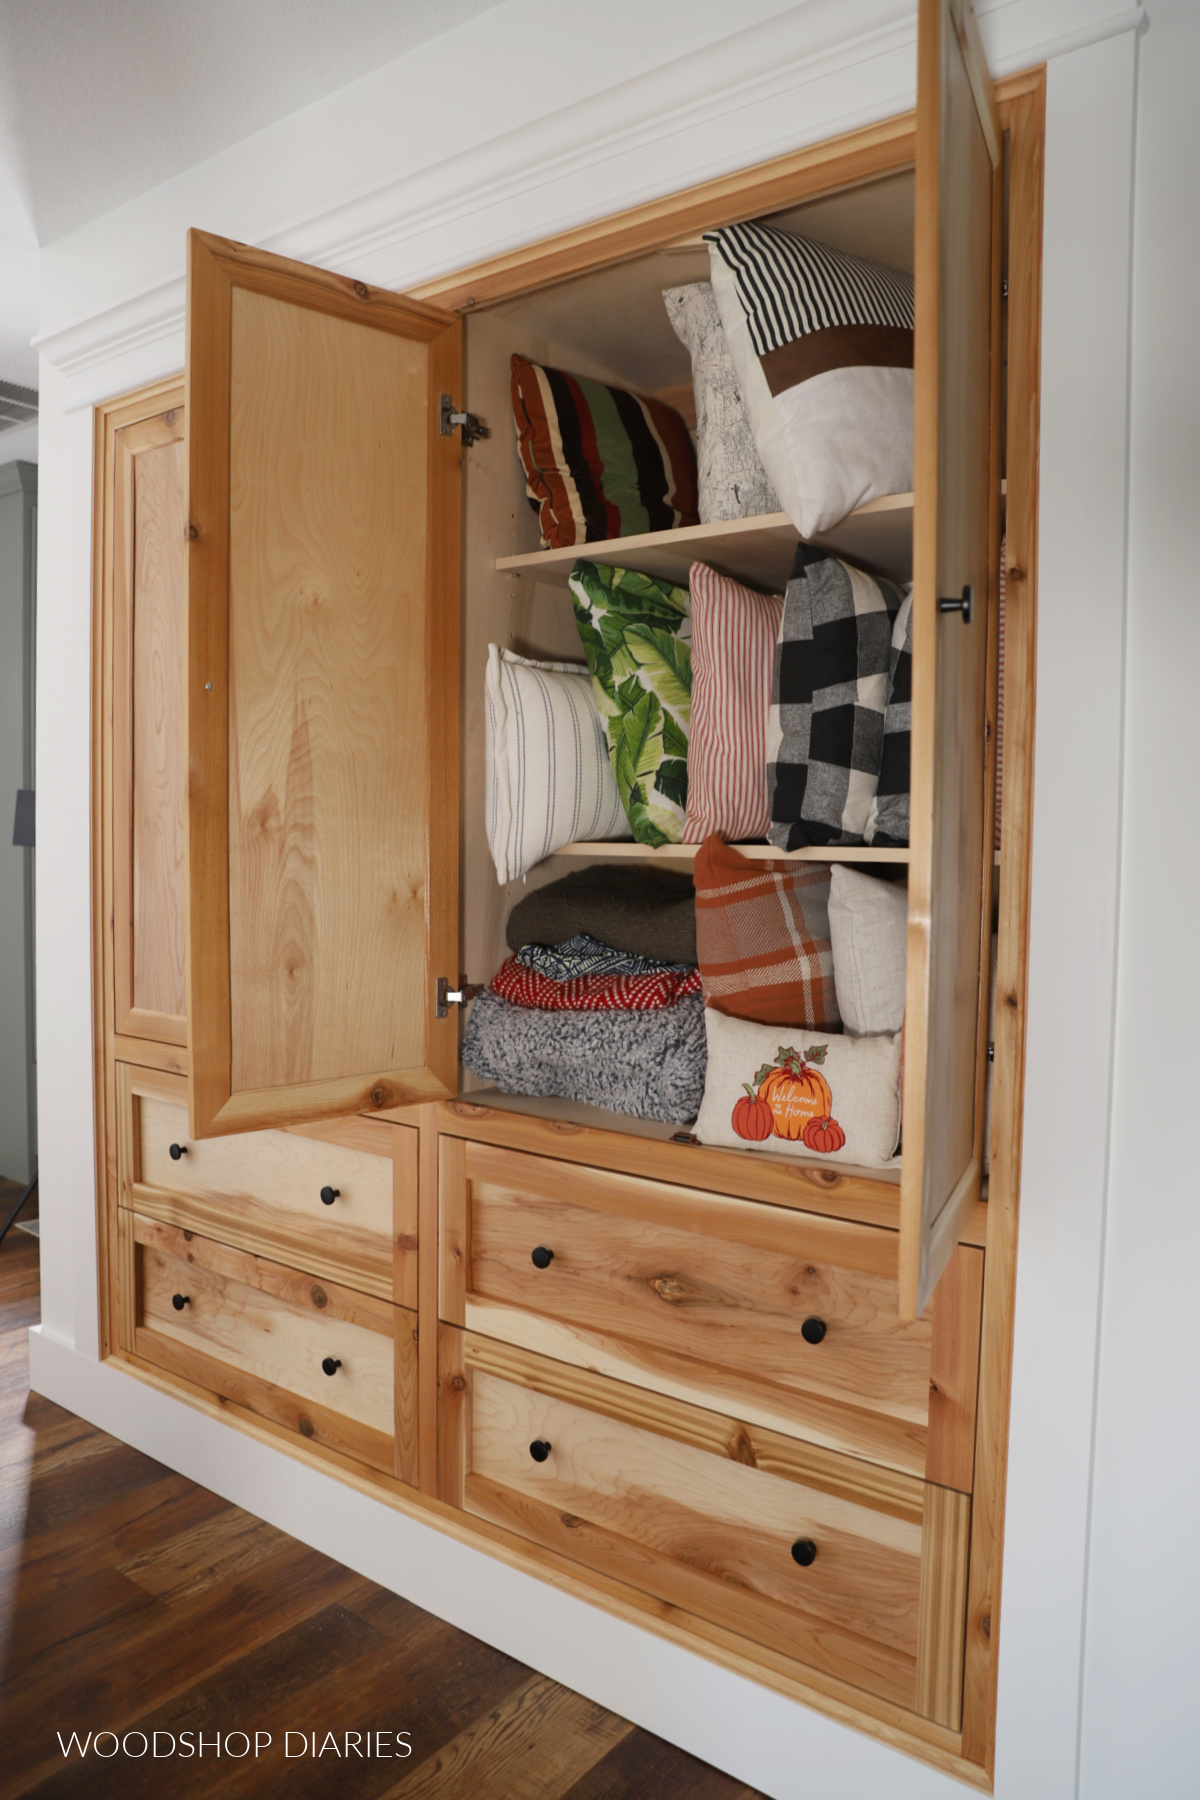
I designed these cabinets to be perfectly built into this closet opening with adjustable shelves at the top and large storage drawers at the bottom.

Not only is this storage much more organized, but this also made an absolutely gorgeous focal point in my hallway–much better than the basic white hollow core doors.
I’m excited to show you how I made them below so if you’re ready to tackle your own DIY closet transformation, let’s dive in.
*This post contains affiliate links. See website policies.
What to know before turning a closet into built ins
This project is an excellent way to add some custom touches to your home to fit your own storage needs and design style.
It’s an intermediate to advanced project–not because it’s difficult, but because it involves building and installing drawers, doors, shelves, and trim work–plus some detailed custom measurements in order to fit it into your specific space.
Closet Built In Size Considerations
Before we get too far, in full disclosure, this project did cause me to lose some cubic feet of storage space. The VOLUME of space inside the “new” closet is a little less than the existing closet.
However, the adjustable shelves and storage drawers in the new built ins allowed me to utilize the space much more efficiently, so I was able to put everything back in and actually still had room leftover.
So, it’s not always about the AMOUNT of space you have. It’s about how you use the space you have. However, if you feel that you need every square inch of space you can get, this may not be the project for you.
That said, for reference, this closet was roughly 84″ (which is 7′) wide, about 18″ deep, and 96″ (which is 8′) tall INSIDE.
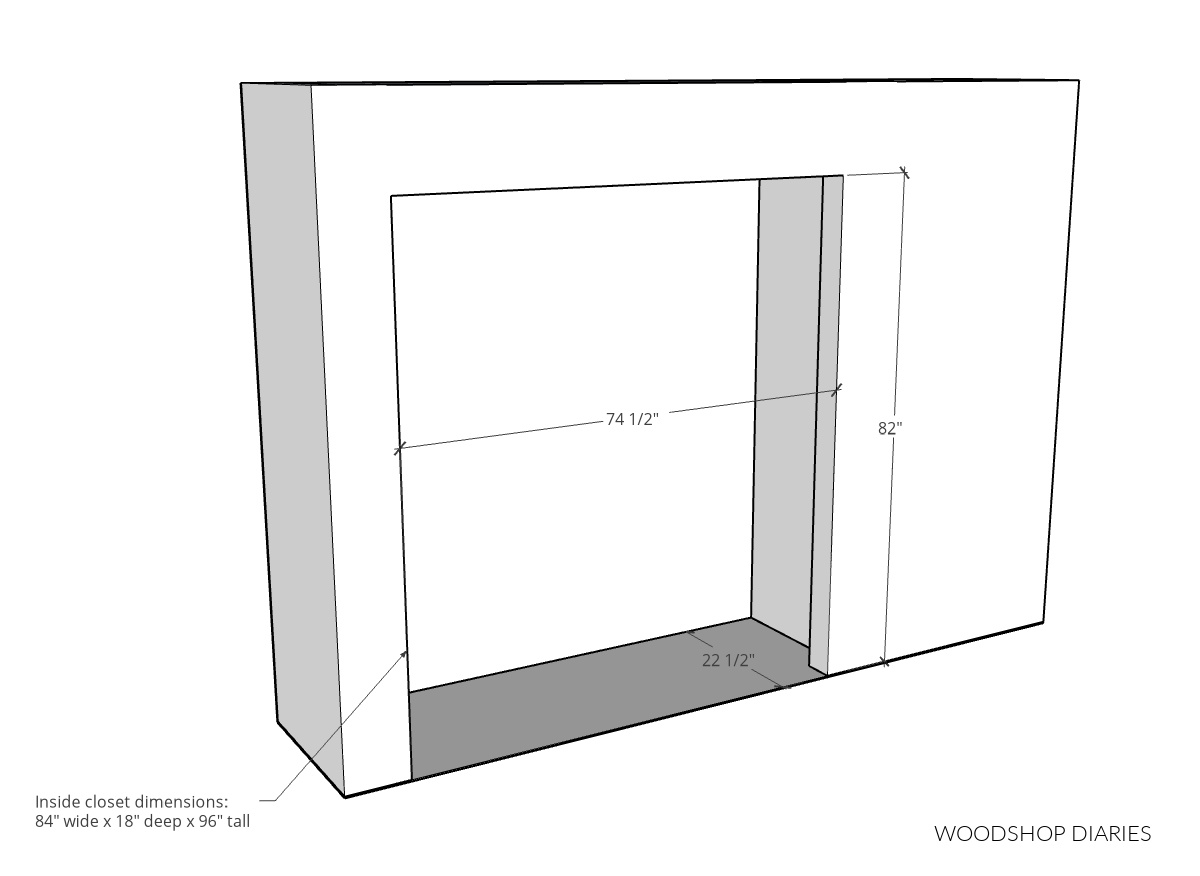
I built these built in cabinets to kind of “slide” into the door opening, so the cabinets themselves ended up being roughly 72 ½″ wide, 21 ½″ deep, and 81″ tall. Most of the space lost was just the very top–which was hard to access anyway, so losing it wasn’t a big deal.
Closet Cabinet Organization Options
In this design, I installed four deep drawers along the bottom with a taller open section above for adjustable shelving behind some simple shaker style cabinet doors.
This is all completely adjustable and you could make the entire thing a bunch of drawers (which would be a little weird, but hey–it’s doable haha). Or you could make the entire thing shelving and have your doors run top to bottom.
I encourage you to think through what makes the most sense for the things you’re already storing in your closet to figure out what types of storage will work best for you in your built ins. Then customize as needed to make that happen.
Are DIY projects your thing? Sign up for our newsletter for priority access to the latest projects and build plans!
How to turn a hallway closet into built ins
Since this is one of those “custom” type projects, I’m going to share the overview of how I made hallway closet built ins below, but I didn’t create specific printable plans since everyone’s measurements will vary (all closets are not the same size).
While this wasn’t an overly complicated project, there are a lot of parts, and I highly recommend watching the video first to see a lot of the details in the process.
But, I’ve included several additional helpful tips in the written steps below. Check out the full build video on my YouTube Channel here:
Love watching how-to videos? Subscribe to my YouTube channel for plenty more where that came from!
Tools & Materials
Tools:
- Circular Saw & Cutting Guides (Kreg Rip Cut & AccuCut used here)
- Drill/Driver
- Miter Saw
- Table Saw
- Brad nailer
- Pocket Hole Jig
- Dowel Jig (optional)
- Shelf Pin Jig
- Concealed Hinge Jig
Materials:
For Cabinet:
- (3) 4×8 sheets ¾″ plywood
- (2) 4×8 sheets ¼″ plywood
- (8) 1x6x8 tongue & groove boards OR (16) 1x3x8 boards (cedar used here)
- 1 ¼″ pocket hole screws
- 2 ½″ wood screws
- Shims
- (4) pair 18″ drawer slides
- (4) pair concealed hinges for inset doors
- Dowel Pins
- Wood Glue
- Shelf Pins
For Trim:
- (3) 1x4x8 boards
- (1) 1x6x8 board
- Cove, half round, and crown moldings
Step 1: Demo Existing Closet
The first thing I needed to do here was remove everything from the existing closet. I emptied the shelves, then removed them from the closet along with the brackets that supported them.
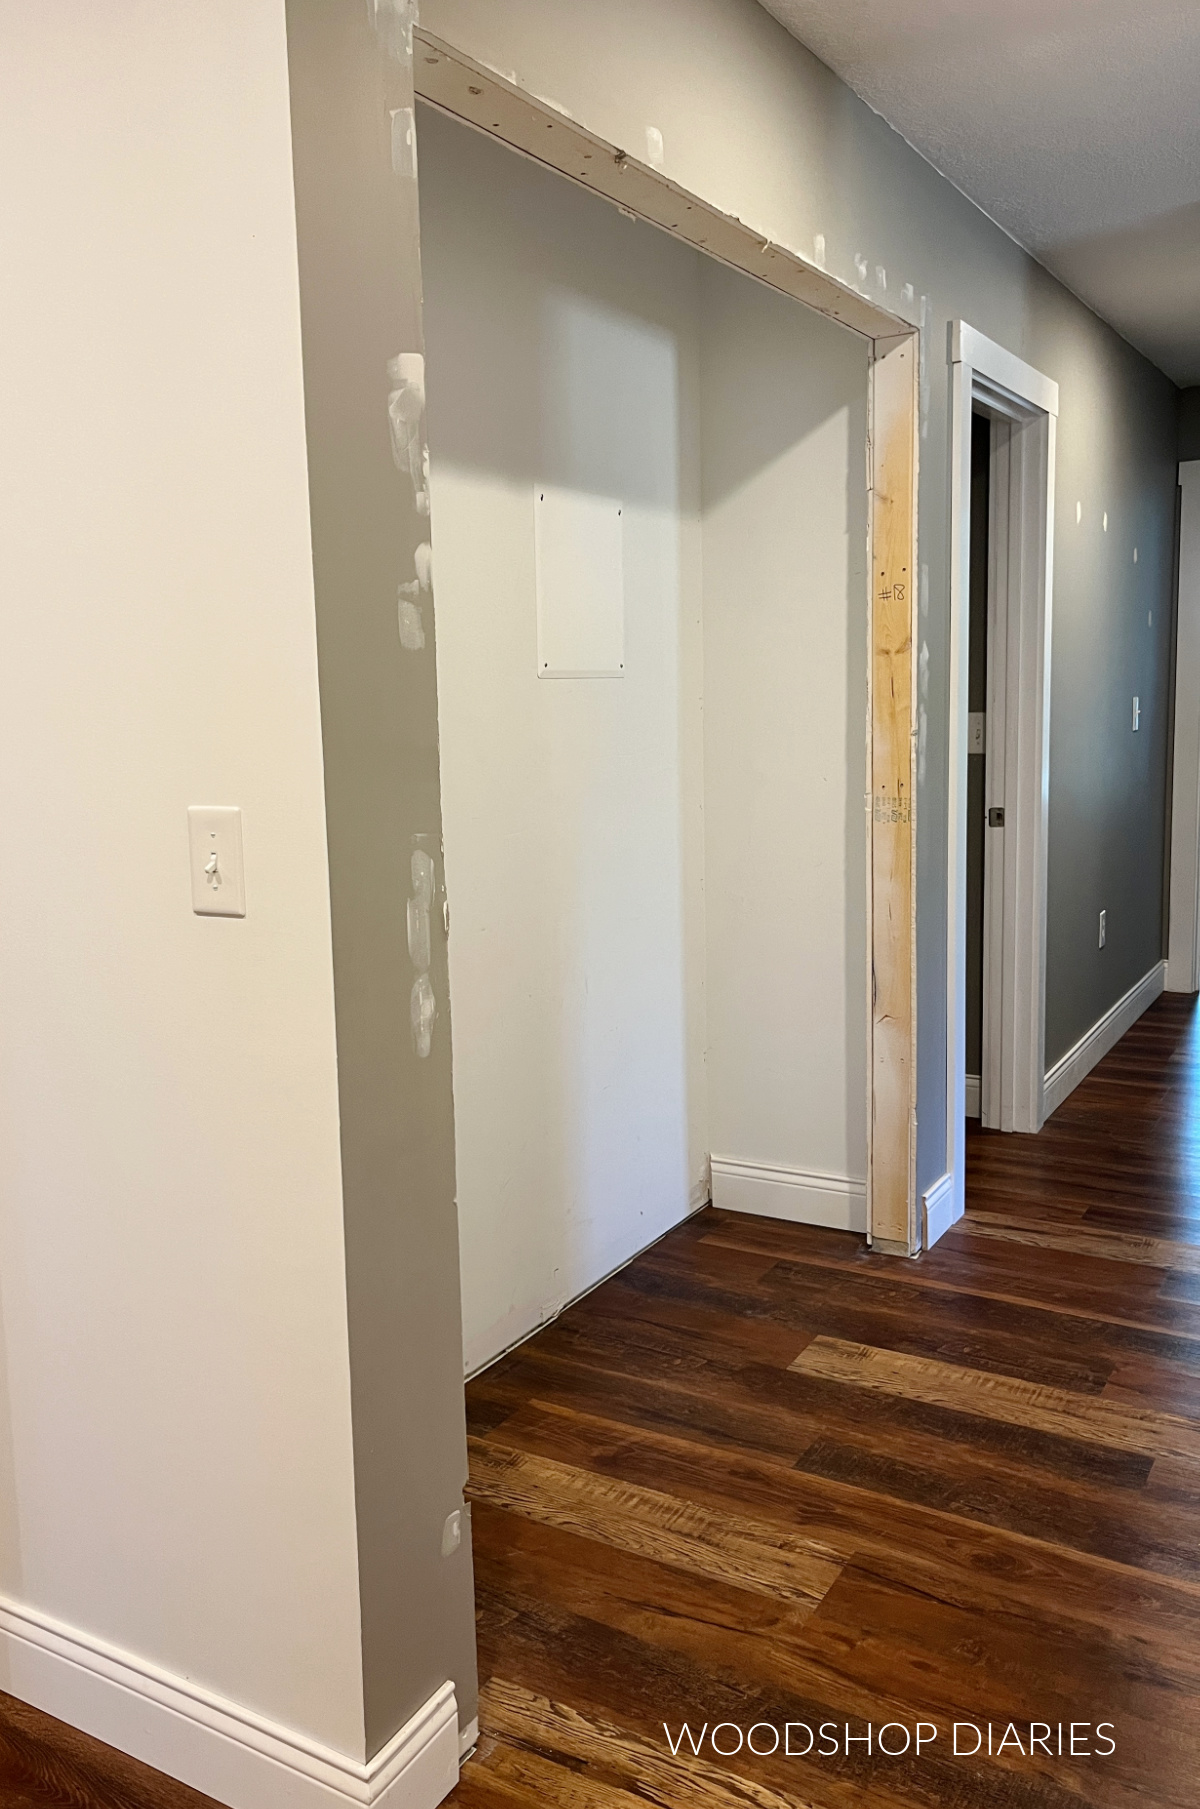
Then, I removed the door trim, the doors, the door jambs, and everything back to the bare drywall and the door framing.
It doesn’t show in the photo, but I also came back and removed the baseboards on each side of the door opening as well. I’ll be replacing them with 1×6 once installed.
Step 2: Assemble Bottom Built In Drawer Cabinet
Once demoed, I took detailed measurements of the opening and the depth of the closet. The door opening was roughly 74 ½″ wide x 82″ tall. And the depth from the back of the closet to the front edge of the drywall was about 22 ½″.
So, I made my cabinets about 72 ½″ wide x 81″ tall x 21 ½″ deep. This leaves me some wiggle room on all sides to be able to slide this into the closet opening. I’ll cover up the gaps with trim later.
NOTE ABOUT CABINET DEPTH: I planned to add a ¾″ thick face frame on the front of these cabinets, so 21 ½″ cabinet + ¾″ face frame = 22 ¼″ overall. And that leaves me with about ¼″ for wiggle room and shimming (because no walls are ever 100% flat).
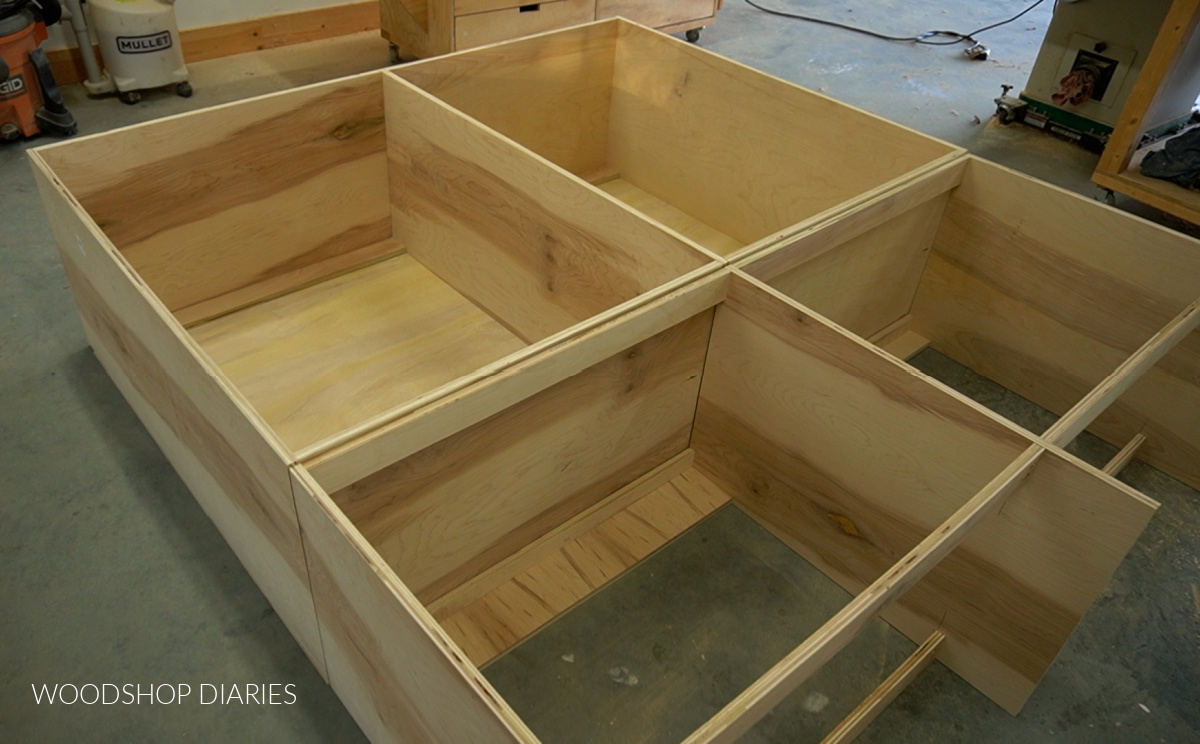
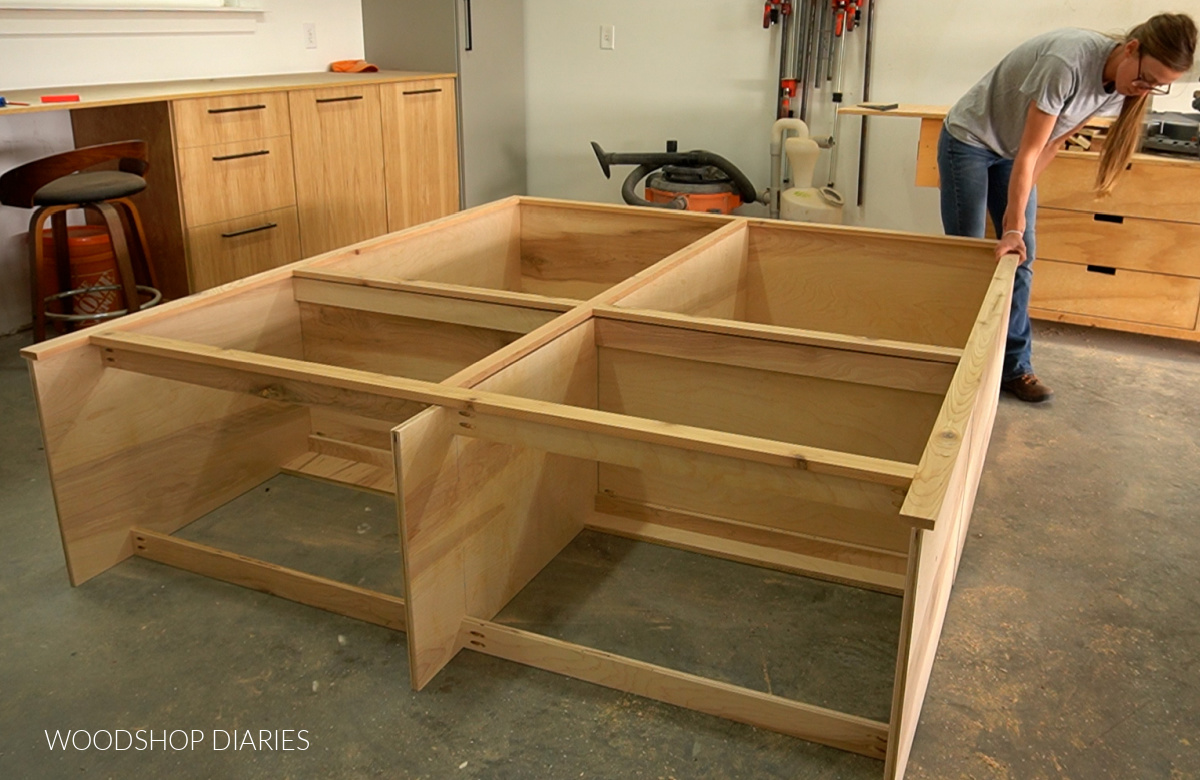
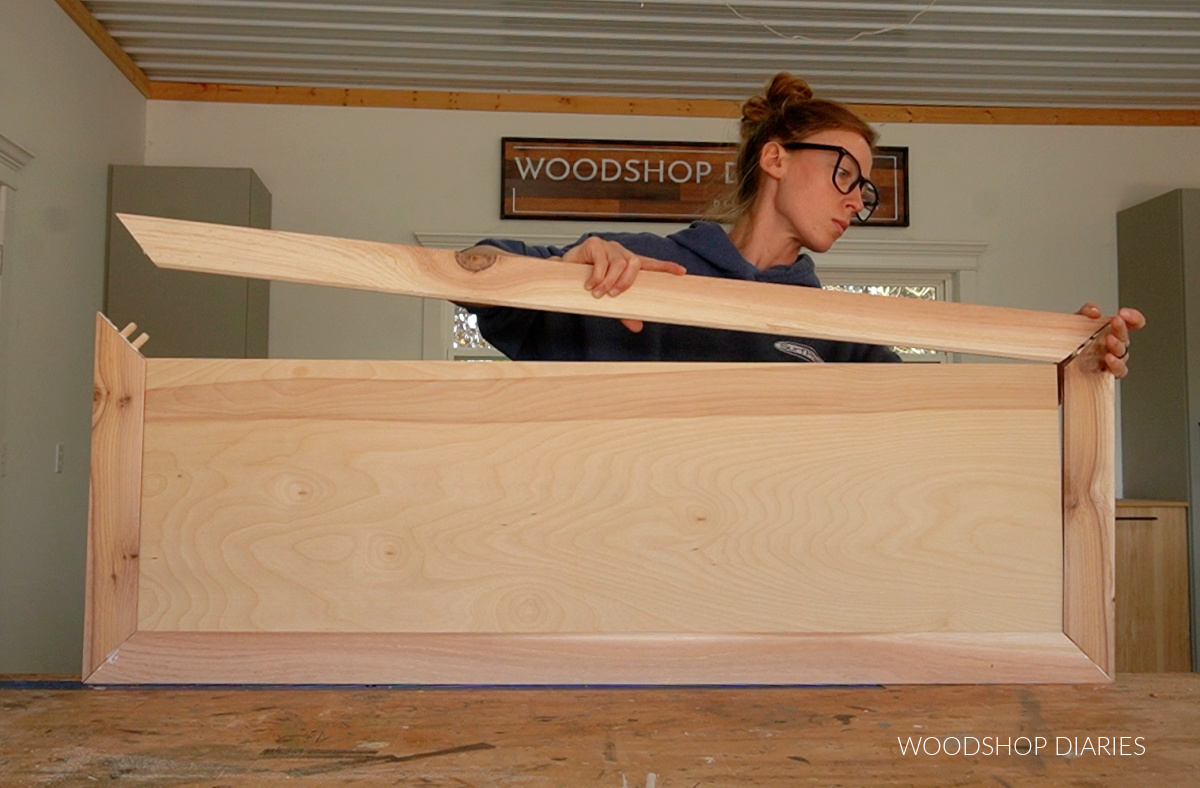
Because this would be a MASSIVE cabinet as one piece (and impossible to get through the doorways and into the house), I built it in two pieces–the bottom drawer cabinet and the top shelf cabinet.
I assembled the drawer cabinet first using ¾″ plywood and pocket hole screws. I cut three panels for the sides and middle divider, then used plywood strips between them–two at the bottom, two at the top, and one along the back.
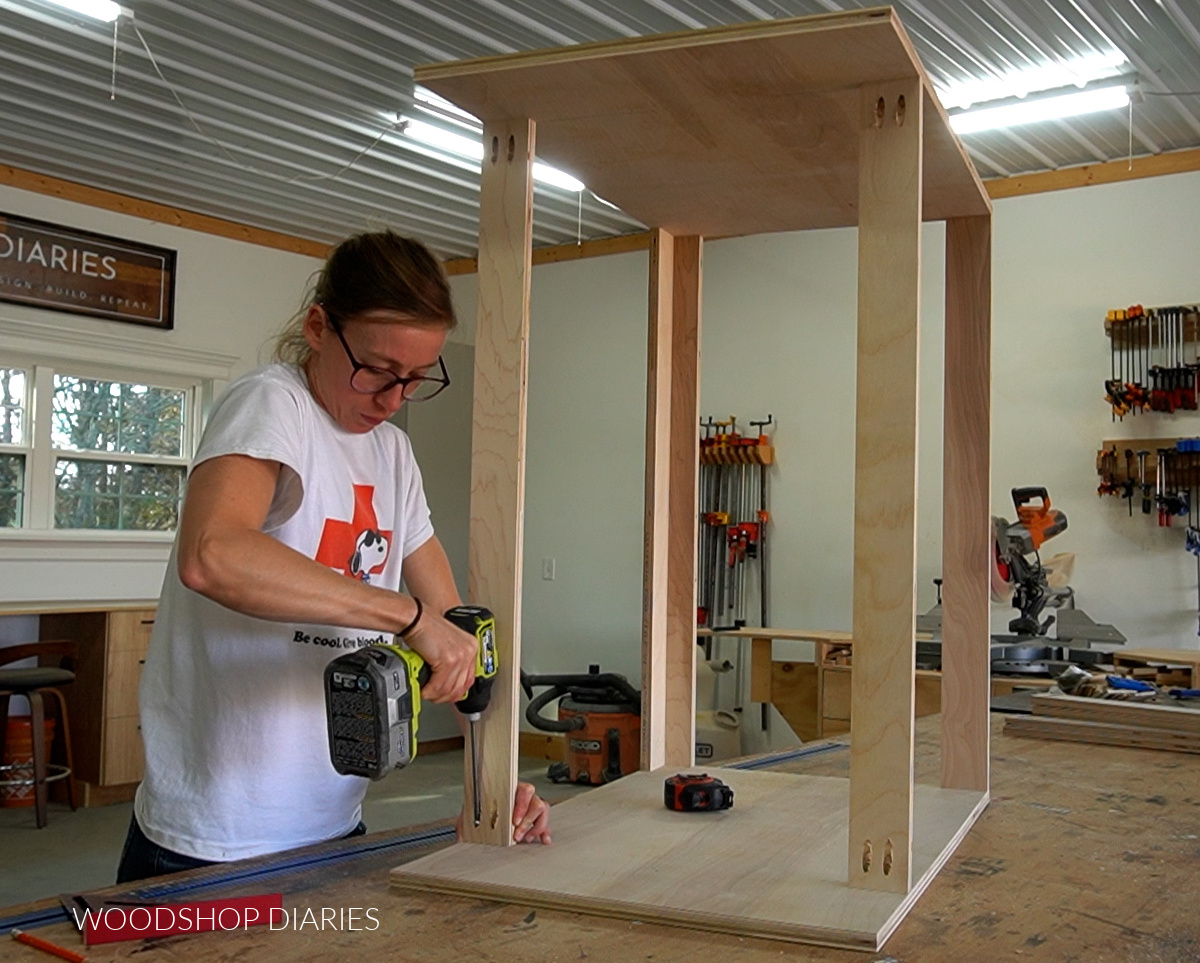
This is a similar concept to how you’d build basic kitchen cabinets, just without a toe kick and without a solid bottom panel.
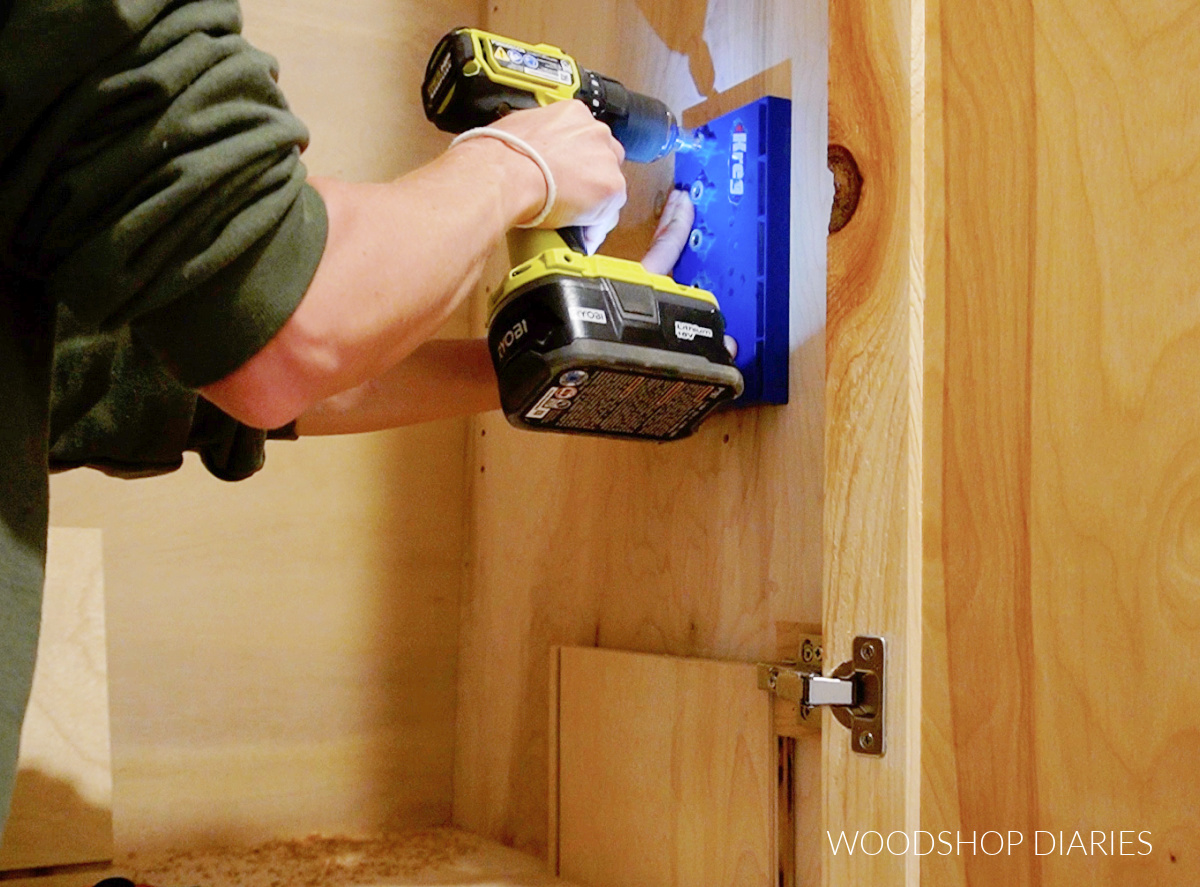
Once the main drawer cabinet was assembled, I added drawer slides into them. Because I’m adding a face frame to this later, I knew I’d have to use some spacer blocks to mount the slides to.
So I just glued and screwed some scrap ¾″ plywood strips to the inside of the cabinet to mount the slides onto.
RELATED: How to install drawer slides.
I was adding four drawers total, so I installed four pairs of slides–two on the left and two on the right.
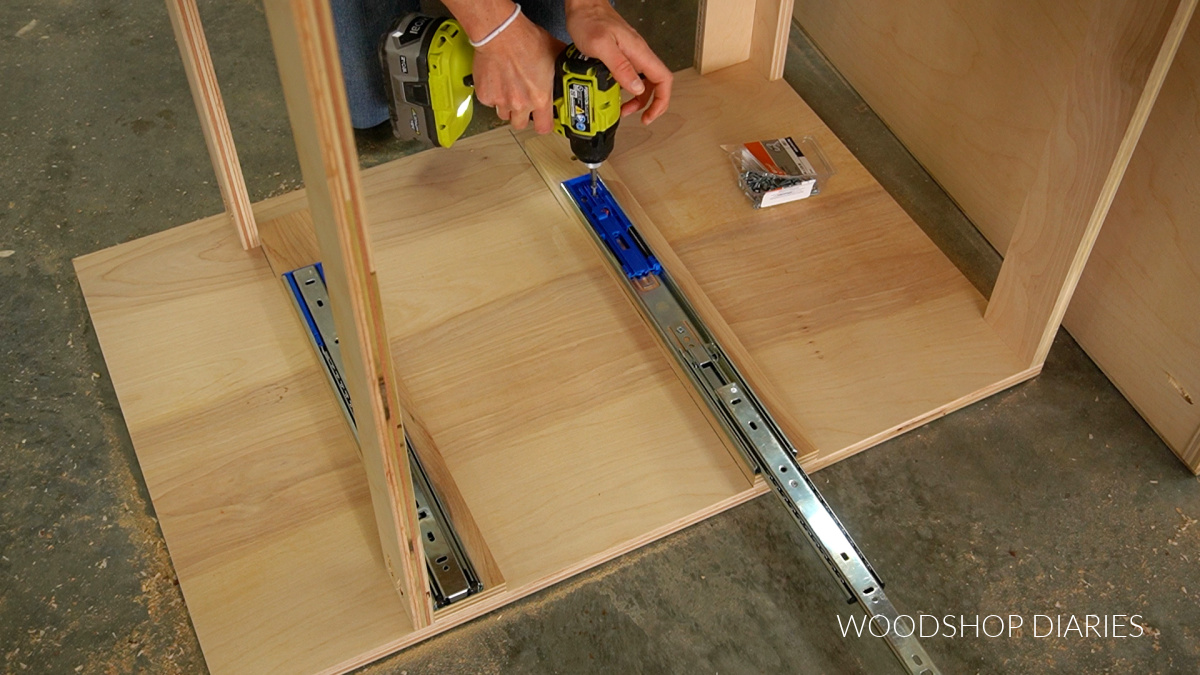
Then, I built and installed large, deep drawer boxes to install into the cabinet. Learn how to measure for drawer boxes here and learn how to assemble a drawer box here.
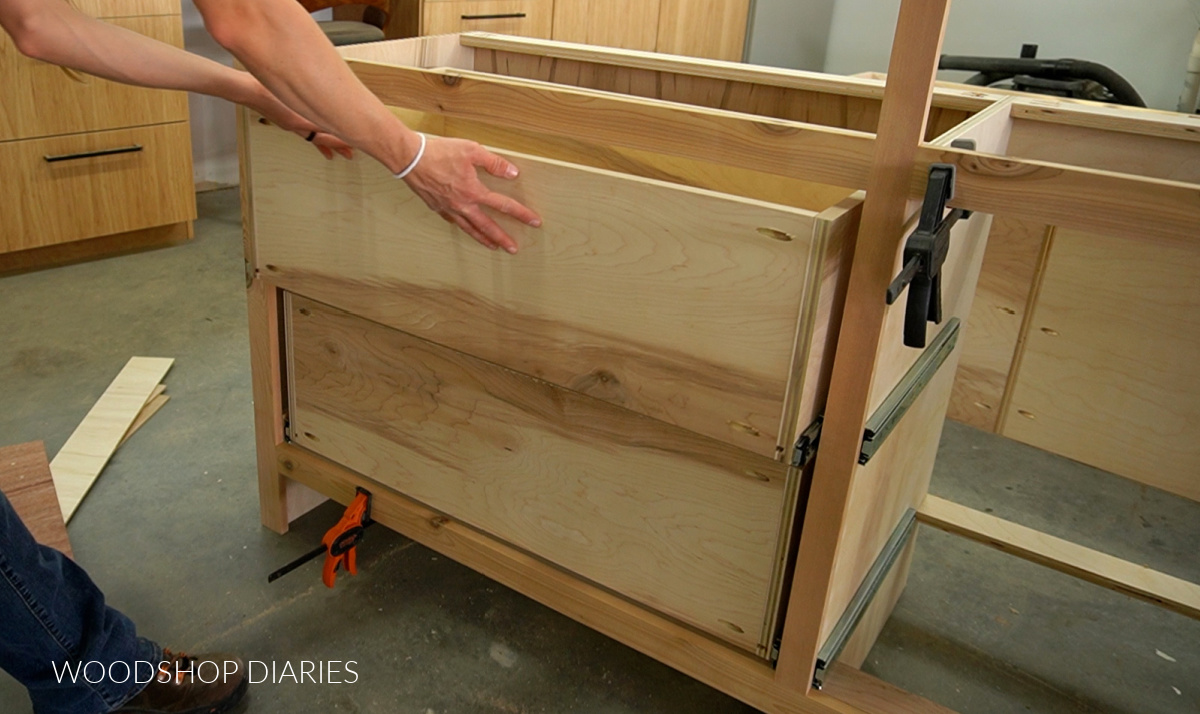
Note that when I assembled the drawer boxes, I drilled the pocket holes as close to the top and bottom edges as I could. Later, I’ll be adding a simple frame around the edges as the drawer front and I wanted to make sure it covered these holes.
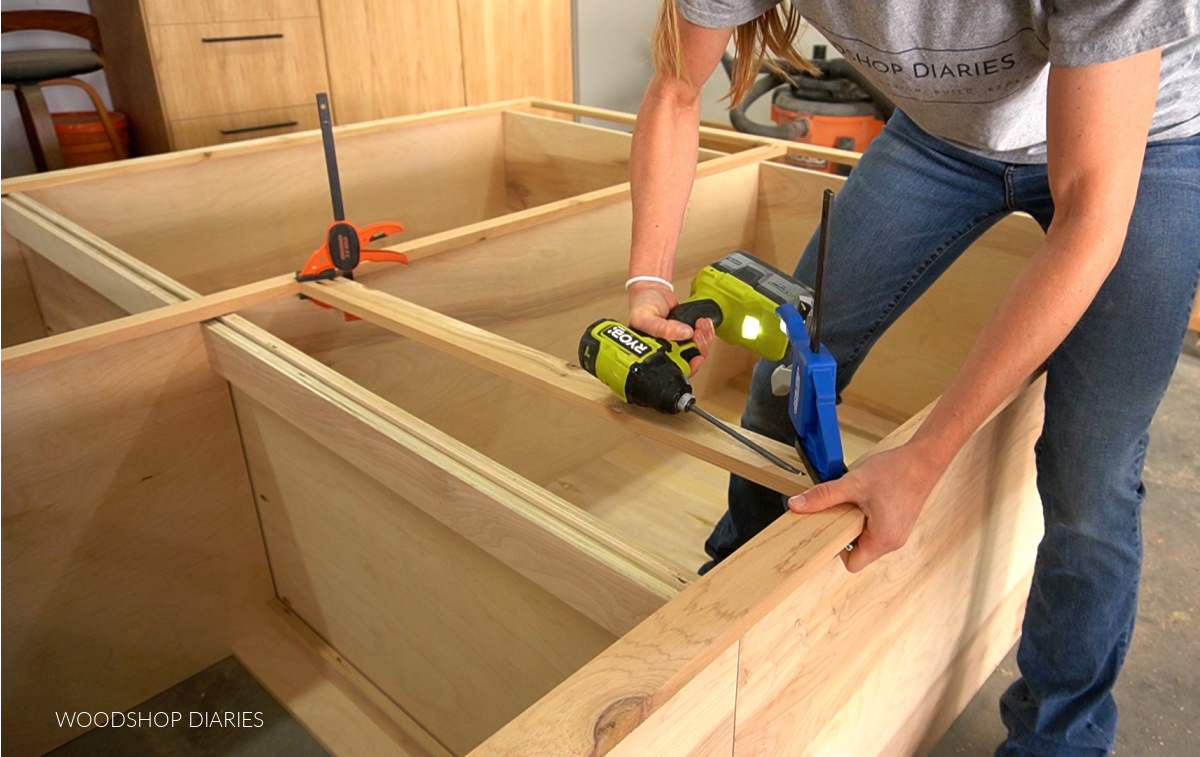
NOTE: In the image below, you can see that I went ahead and assembled the face frame (which is detailed in step 4) and clamped it onto the cabinet before adding the drawers.
There are a lot of little steps in this build that can be completed in any order. I actually recommend assembling and test fitting the face frame before adding the drawer boxes.
This helps make sure the spacer blocks are accurately placed and the slides can move freely.
I will come back and add the drawer fronts toward the end, but for now, I moved on to the top section of the cabinets.
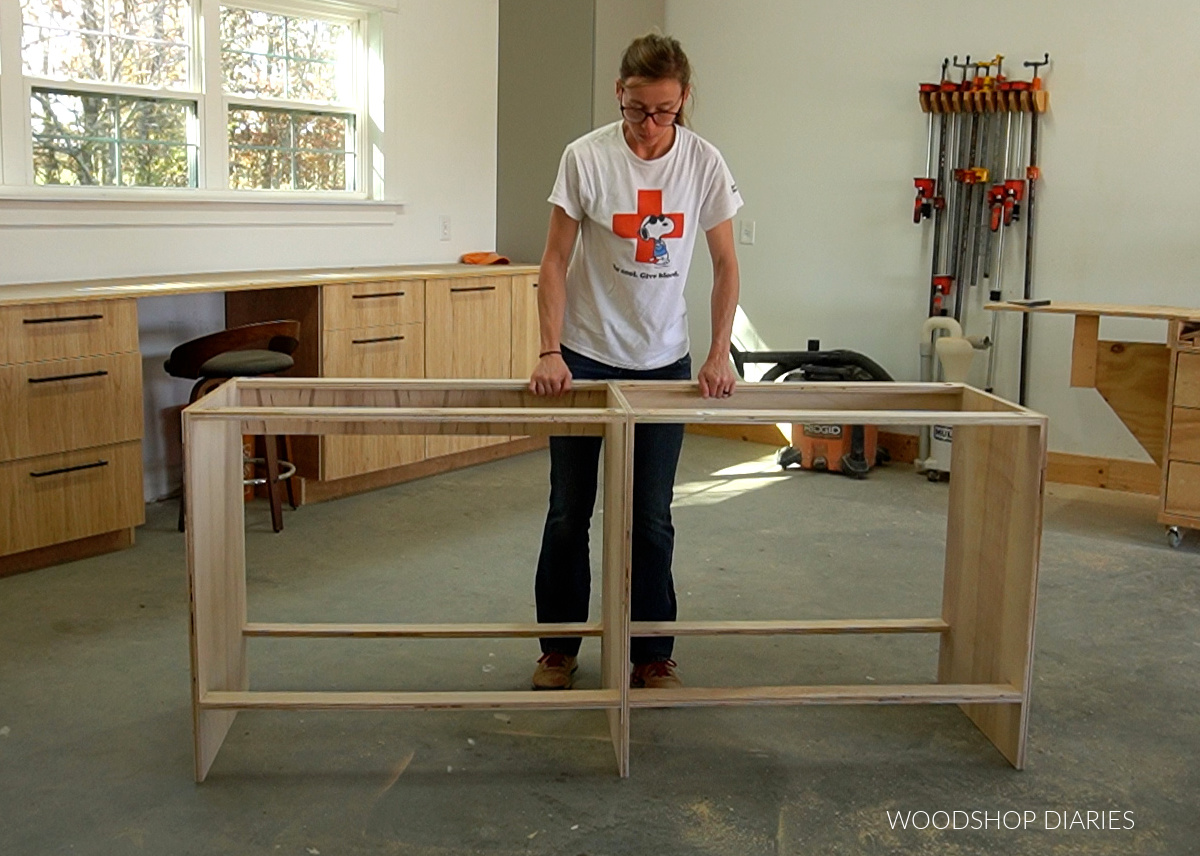
Step 3: Assemble Top Built In Cabinets
The top section of the built ins is quite a bit simpler as it’s basically just a large box with a divider and a ¼″ plywood panel stapled on the back.
I assembled it so that it was the same overall width of the drawer cabinet and when placed together (like shown below), the two cabinets would be the total overall height I needed.
NOTE: Since the top panel has a ¼″ plywood back panel stapled on, this will add ¼″ to the overall depth. So you may need to cut your sides, top, bottom, and divider panels ¼″ narrower.
Step 4: Build Face Frame
If you check out the video, you’ll see I made the face frame for this build from cedar tongue and groove lumber. But you could certainly make this from any type of 1x material you wanted.
I chose cedar because I love the color–but it can be pricey. Cedar 1×6 T&G is much cheaper than standard 1x6s, and when I built my bathroom vanity, I realized that if you rip the groove side off the board, these are perfect for making door frames.
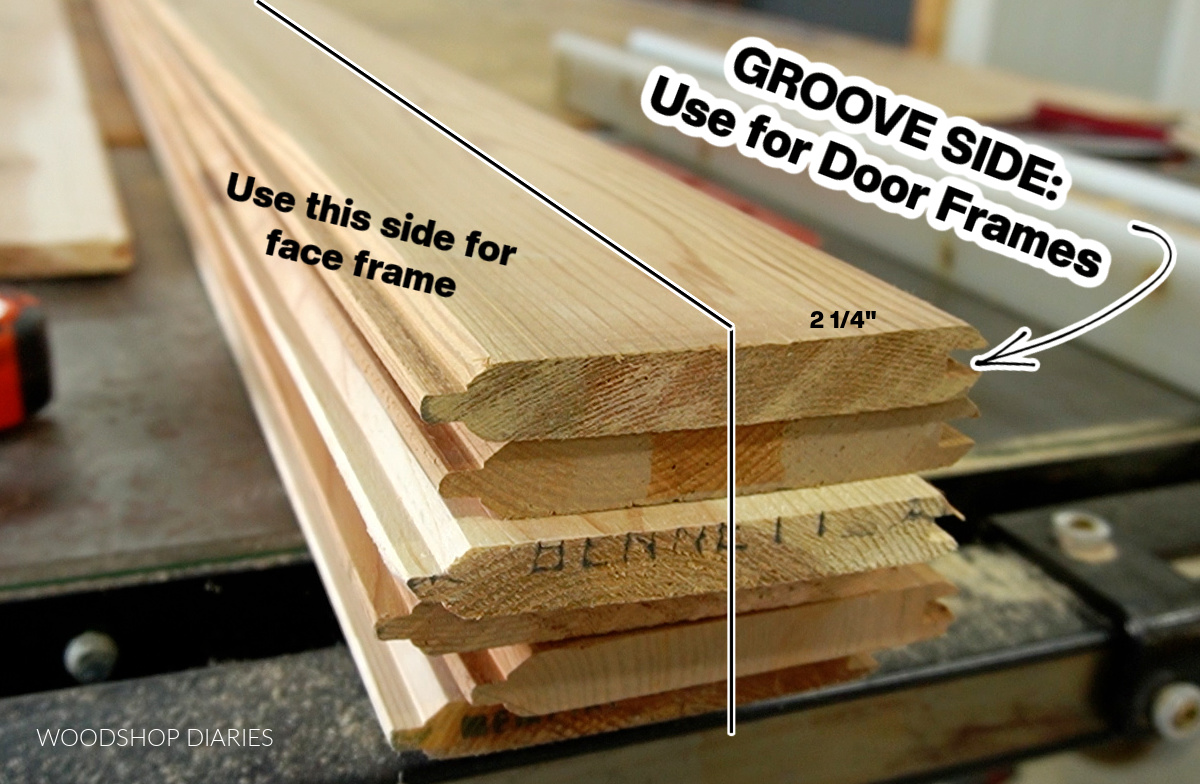
They already have a precut dado for the door panel and a chamfered edge. Then, you can use the other half of the board to trim down for a face frame. So that’s what I did here.
I ripped 2 ¼″ off the groove side of the board on my table saw, then ripped the leftover strips into 2″ wide pieces for the face frame.
I made the overall width of the face frame about 1″ wider than the cabinets so it would overhang the left and right sides about ½″ on each side.
So, I cut to fit the cedar board pieces to make a frame this size, and assembled it using pocket holes and screws. But I didn’t install it YET. I just laid it on the cabinets to make sure everything fit properly, then set it off to the side for now.
Step 5: Install Built In Cabinets into Closet
Once the drawer cabinet, top cabinet and face frame were assembled, I began installing them into the closet opening. First, I removed the drawer boxes from the cabinet (to make it easier to carry inside).
Then, I slid the drawer cabinet into the closet opening, shimmed it as needed to be level, and screwed it into the wall studs through the back supports.
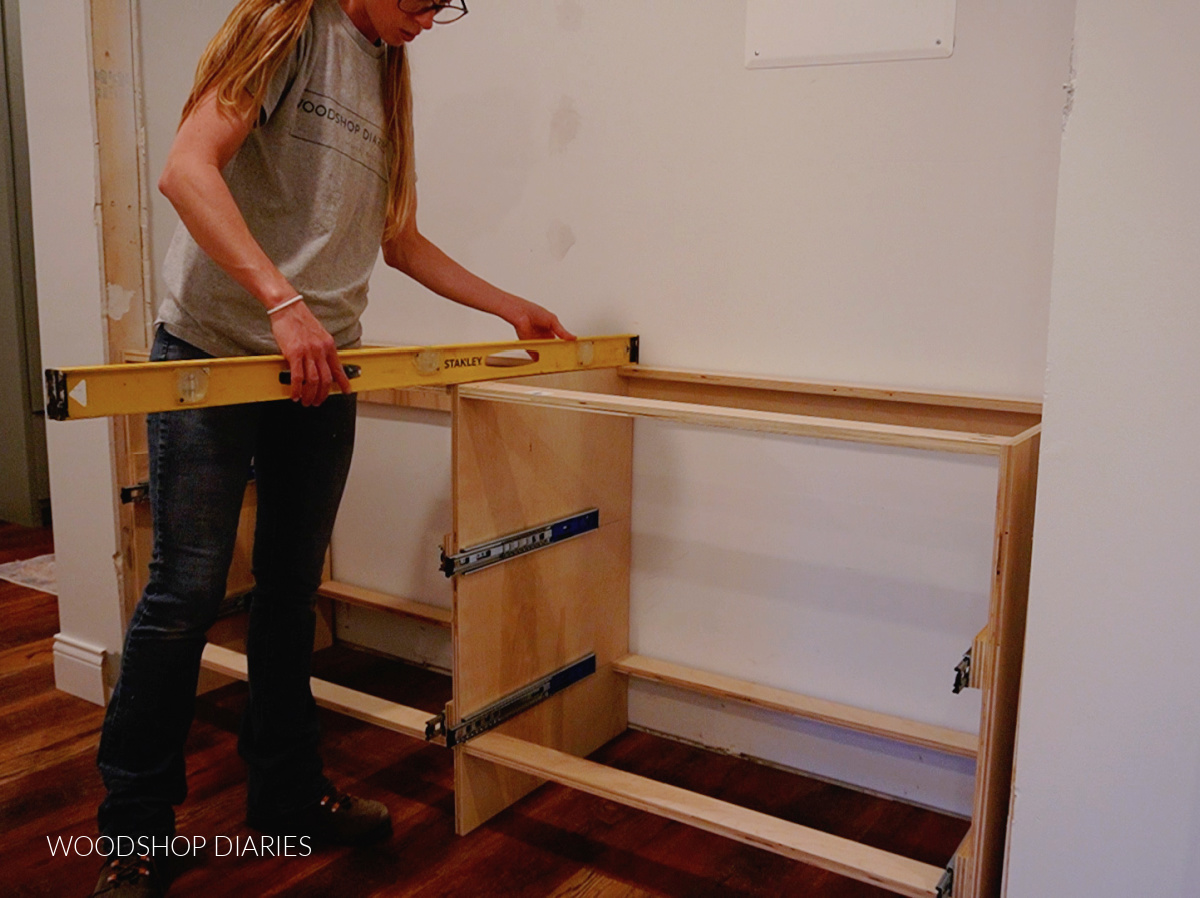
Once the drawer cabinet was in place, I slid the top cabinet in and used some 1 ¼″ wood screws through the top supports of the drawer cabinet to attach them together. Then, I screwed it to the wall studs as well.
Next, I applied wood glue to the front edges of the cabinets, placed the face frame on, and brad nailed it in place. Below you can see both the top cabinet and the face frame are in place.

The face frame should come flush (or close to it) to the front edge of the drywall around the closet opening. Some small gaps are okay, but if it’s pretty far off from flush, adjust shims as needed to get it flush.
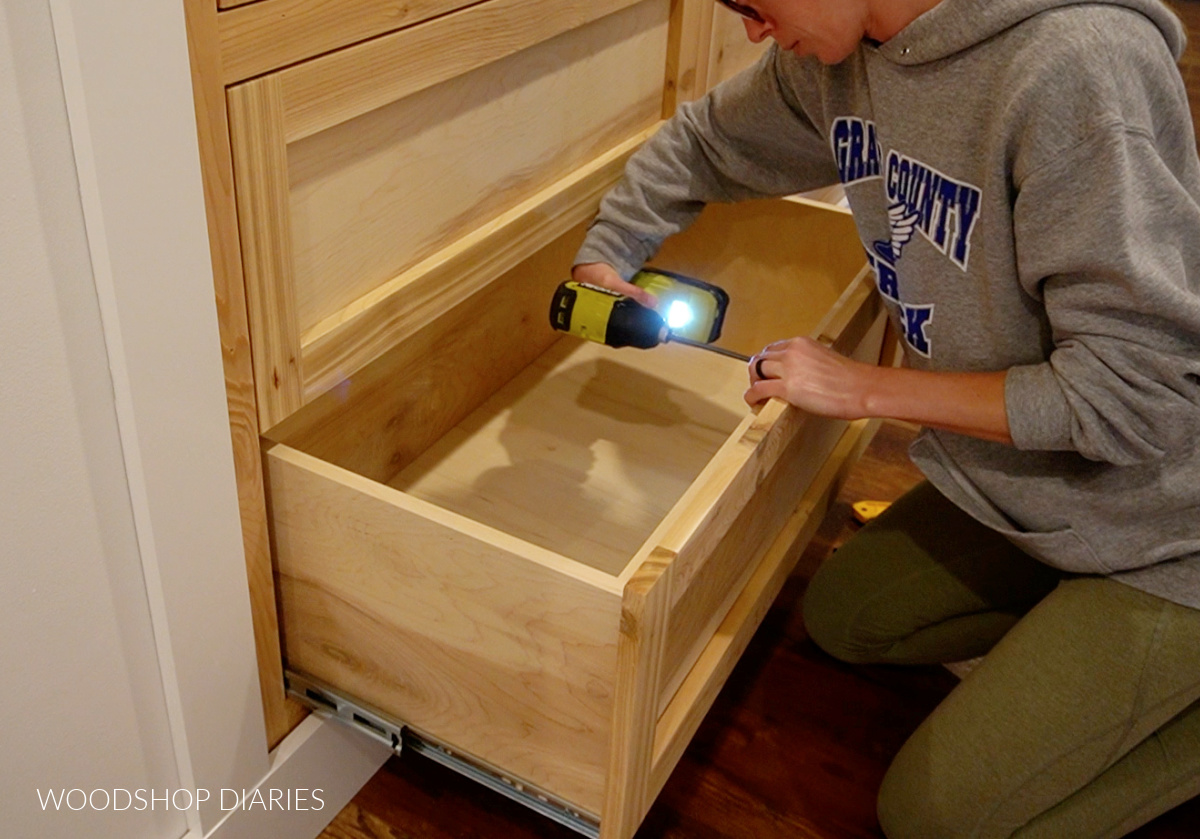
Step 6: Add Drawer Fronts, Doors, and Shelves
After the cabinets were in place, I added the drawer boxes back in and assembled four simple frames from the same material I used for the face frames–the 1x cedar. I just screwed these frames together using pocket holes and screws.
Then, I used 1 ¼″ screws to secure the drawer front frames in place from the inside of each drawer box.
Then, I assembled four doors using the tongue and groove cedar boards I ripped in step 4. Learn how to assemble cabinet doors here.
To save a few steps, I used the precut groove as the dado to install the ¼″ birch plywood panel instead of cutting my own. Then I assembled the doors using 45° mitered corners and dowel pins.
Just a tip–if you use cedar for the frames, birch plywood matches color pretty well if you look for the most colorful birch you can find. Usually birch plywood is light with some darker streaks. Those darker parts match cedar really well.
After the glue dried and the doors were sanded, I installed them into the cabinet using concealed hinges for inset doors. You can see some tips for installation in the video here.
RELATED: How to install cabinet doors
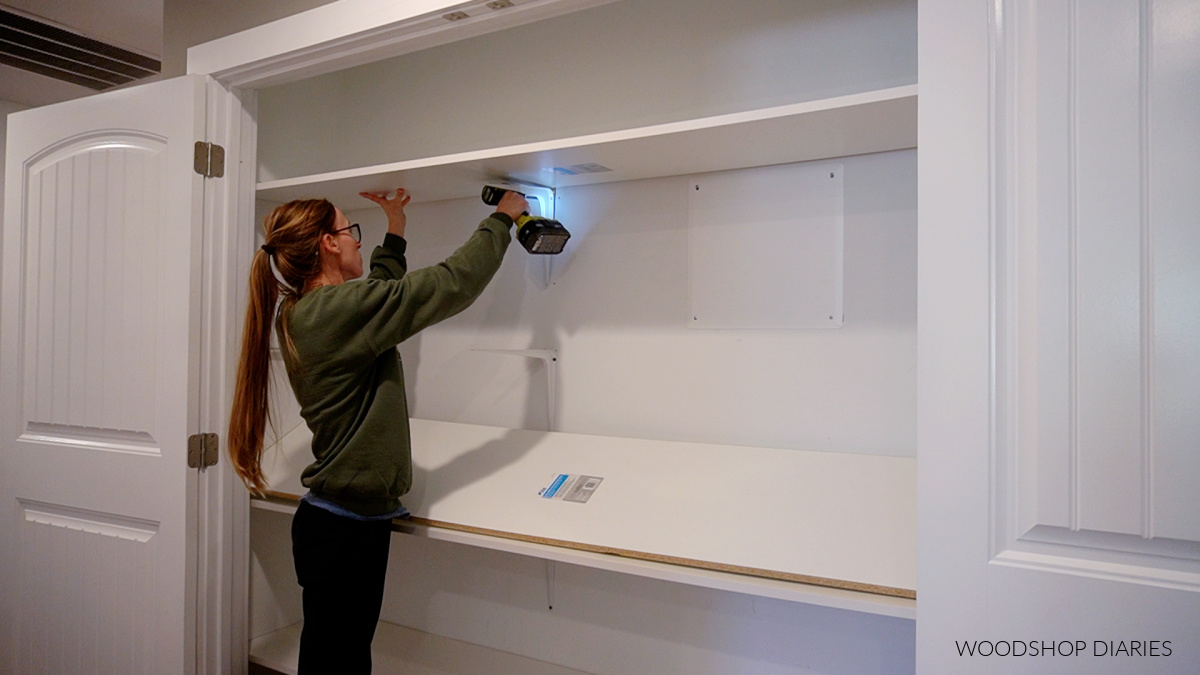
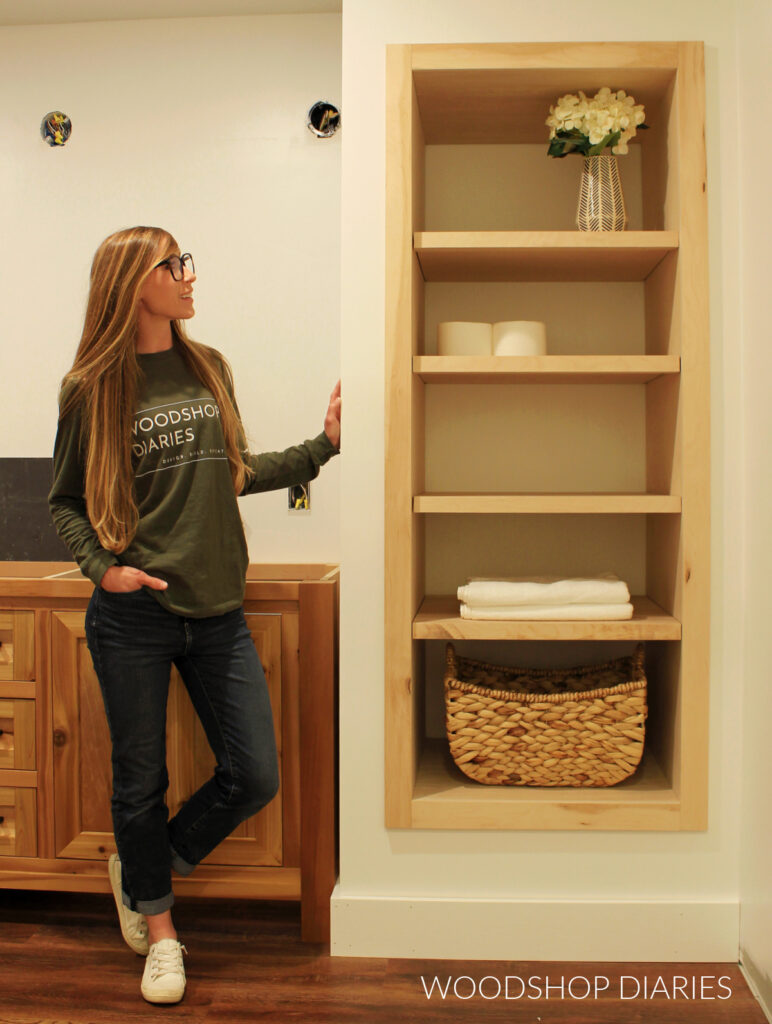
For the shelves, I always like to add adjustable shelves so I can rearrange as needed depending on what I’m storing on them. So I used a Kreg Shelf Pin Jig to drill shelf pin holes in the cabinets.
Then I cut some plywood panels for the shelves and installed them with shelf pins. Learn how to add adjustable shelves to cabinets and furniture here.
Step 7: Add Trim
Finally, it was time to trim out the closet to finish things up. I added a 1×6 board (painted white) along the bottom to replace the baseboards that I removed during demo in step 1.
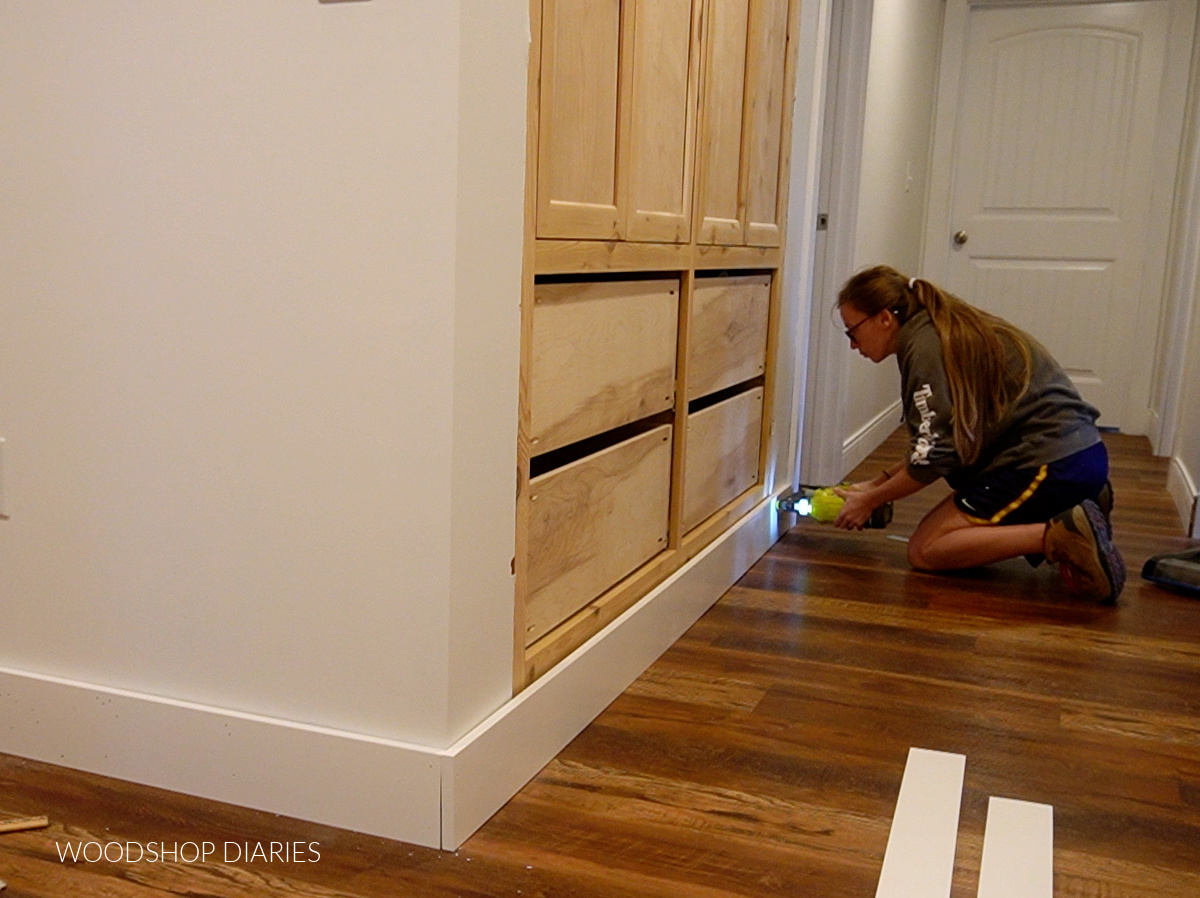
Then, I nailed 1x4s vertically along the sides and one along the top to trim out the closet opening. These boards should cover all the gaps between the face frame and the door framing from the original closet.
To dress it up, I also added some crown molding along the top similar to how I trim out my windows in this post.
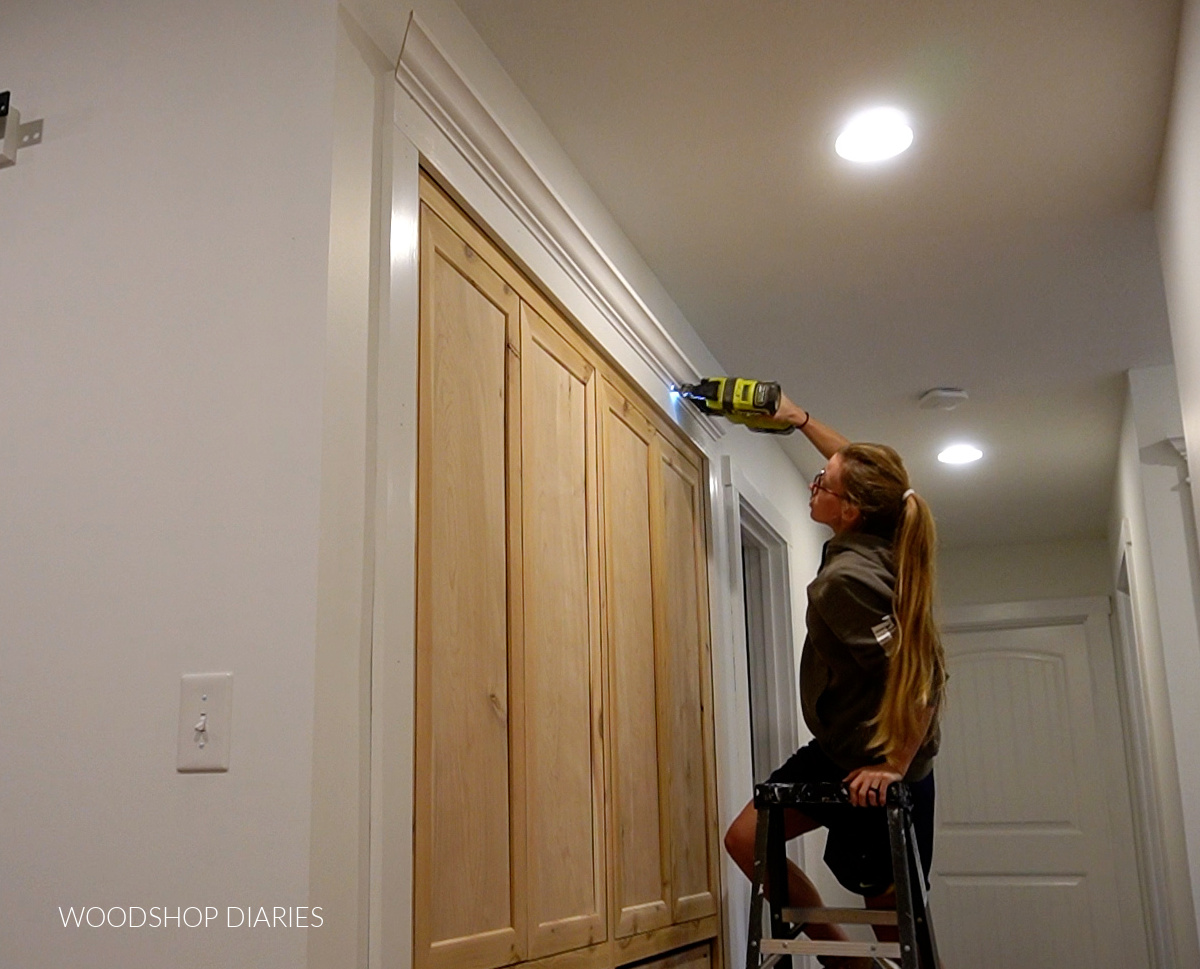
After installing the trim around the sides, I felt like it needed one more detail, so I also cut and nailed cove molding around the cabinet between the face frame and the trim. This helps hide any remaining gaps and adds some detail to the trim work.
Step 8: Finish Closet Built Ins
Finally, I applied a few coats of Minwax Helmsman Water Based clear coat to seal the drawer fronts, doors, and face frame, added some simple black knobs, and it was ready to fill back up.
This closet transformation was a huge improvement to the look and function of this hallway and I love having these large storage drawers in addition to the shelving.

Looking for More DIY Closet Ideas?
Enjoy this hallway closet built in project, but still looking for more? Here are a few more closet themed projects to check out!
If you enjoyed this project and want to save it for later, be sure to pin it or share to your favorite social channel!
Until next time, friends, happy building!