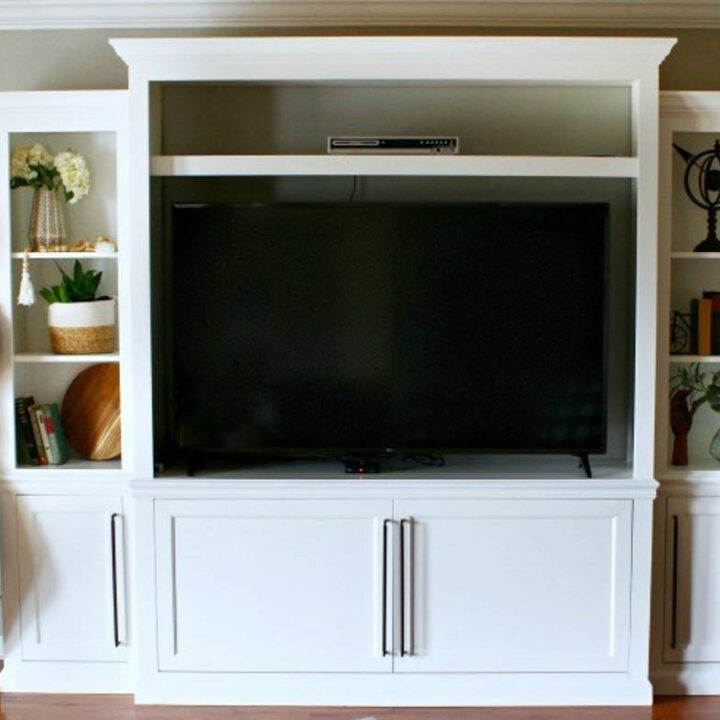
In this post, I’m sharing how to build a beautiful DIY entertainment center with shelving and storage.
This large entertainment center can be used as a stand alone piece or built in. It’s the perfect piece to gather around for family movie night or the big game!
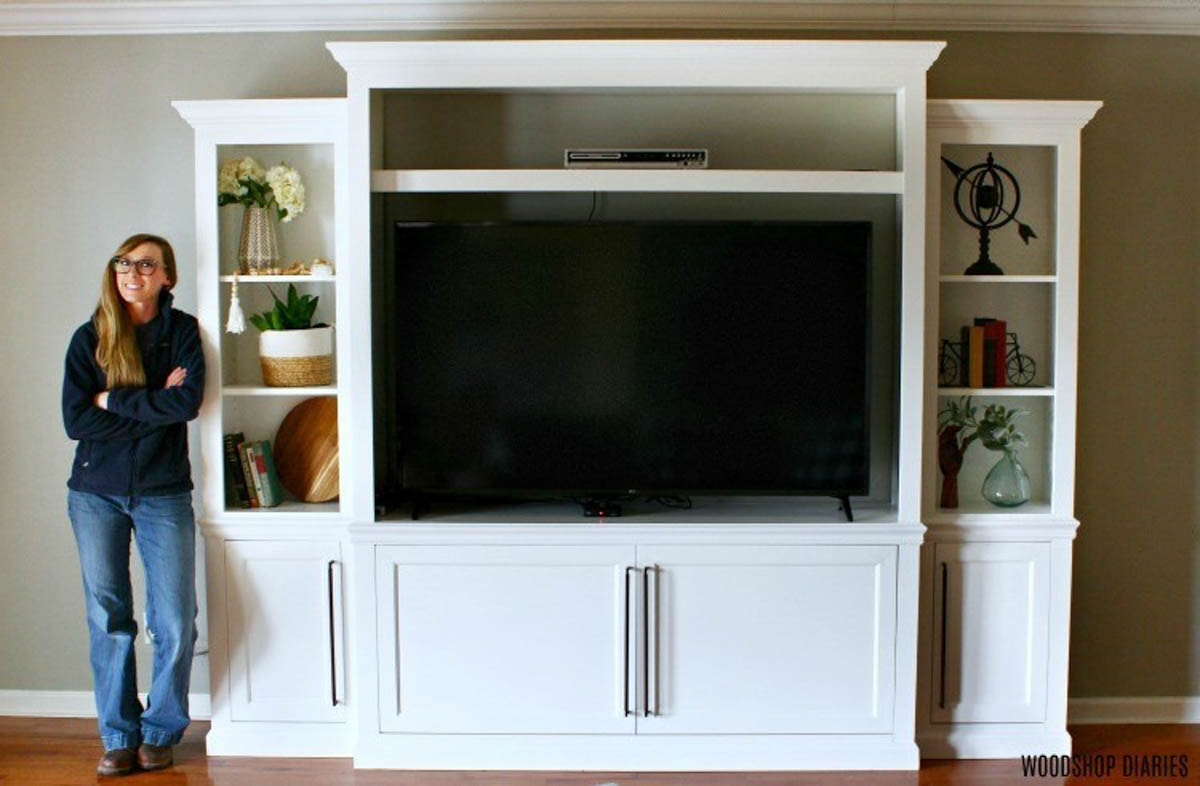
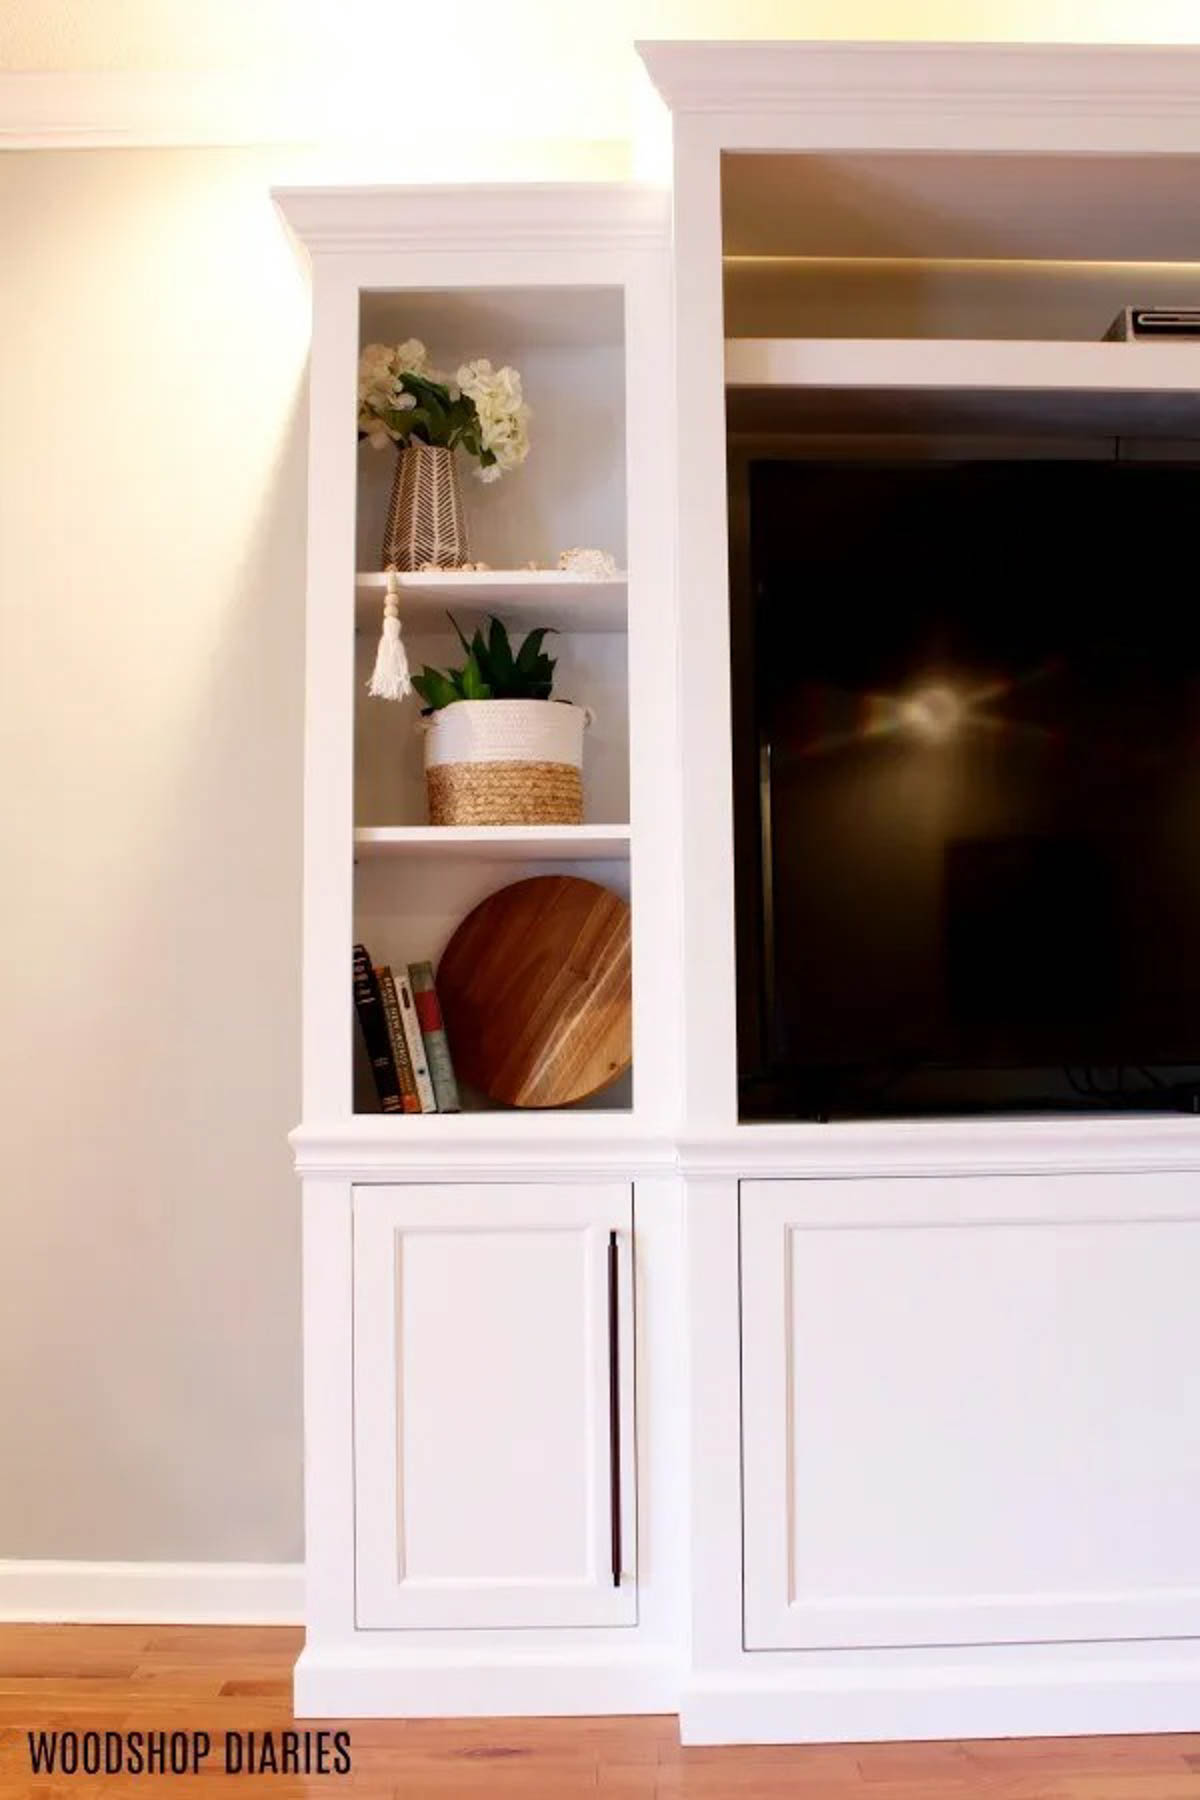
This design packs plenty of storage underneath for DVDs (does anyone still use those or is it just me?), board games, and gaming systems. And it’s got shelves on each side for displaying your family photos, your favorite books, and décor.
But, since its main purpose is to be used as a TV stand, it obviously leaves room for a large TV to be front and center. Got to keep the main thing the main thing, you know?
It was such a fun project to build (and USE!) so I’m excited to show you how to build your own in the steps below.
*This post contains affiliate links. See website policies.
**This post was originally published in December 2019, but was updated in April 2025.
What to know before building
This project is large in size, but is broken into three pieces to keep things simpler (and easier to move!)–two side cabinets and one center cabinet.
The trim adds a lot of extra detail to make it look more “high end.” Feel free to customize the trim types to make it better fit your personal style.
Overall Dimensions
The overall dimensions of this project are approximately 18 ¾″ deep x 87″ tall x 111″ wide. These dimensions include the crown molding around the top.
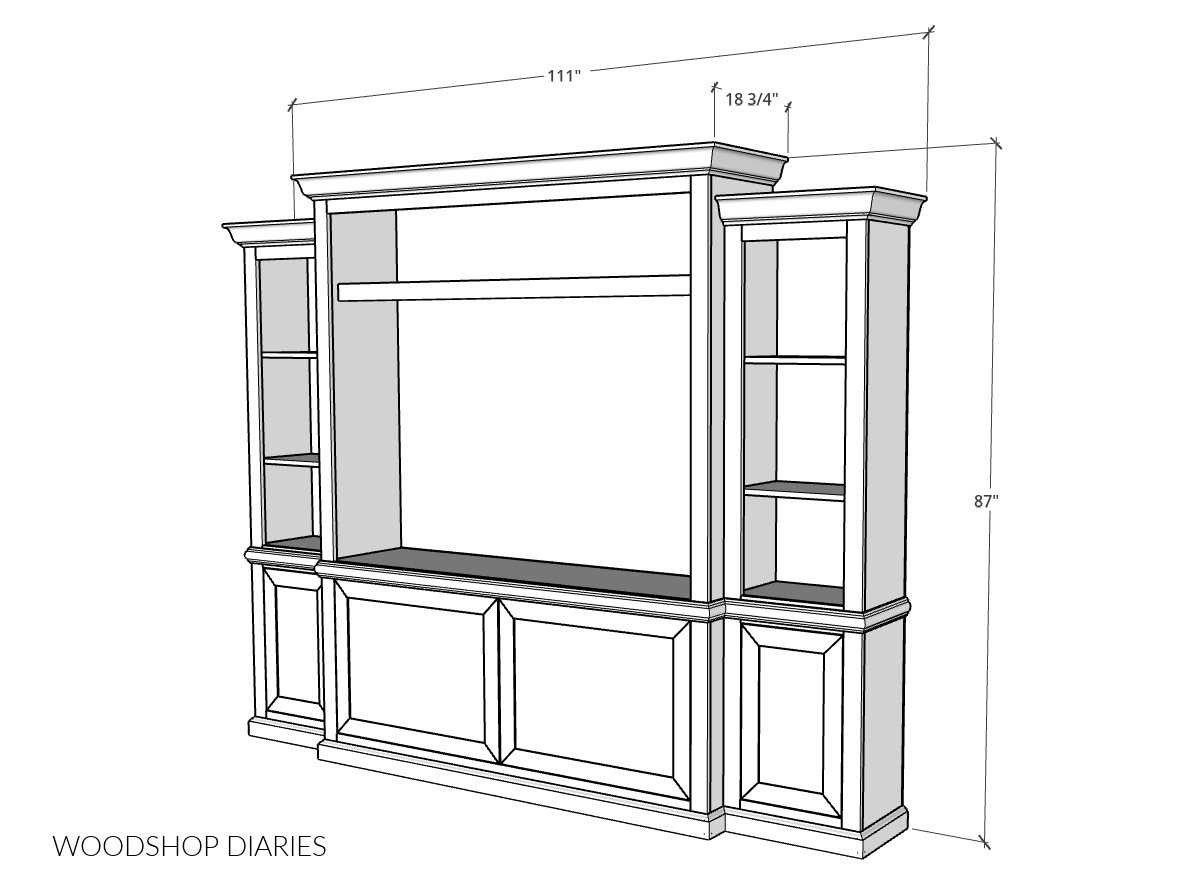
Keep in mind that crown molding comes in various sizes, so the overall dimensions may vary a bit depending on what size crown molding you use. Without the molding, the cabinets alone measure approximately 16″ deep x 84″ tall x 106 ½″ wide.
What size TV can this fit?
The center opening is approximately 62 ½″ wide, so it can fit a TV with overall width of about 62″ or less. Keep in mind that TV size is measured across the diagonal of the screen–not the overall width. The TV shown in the photos is a 65″ screen and there is still room on both sides.
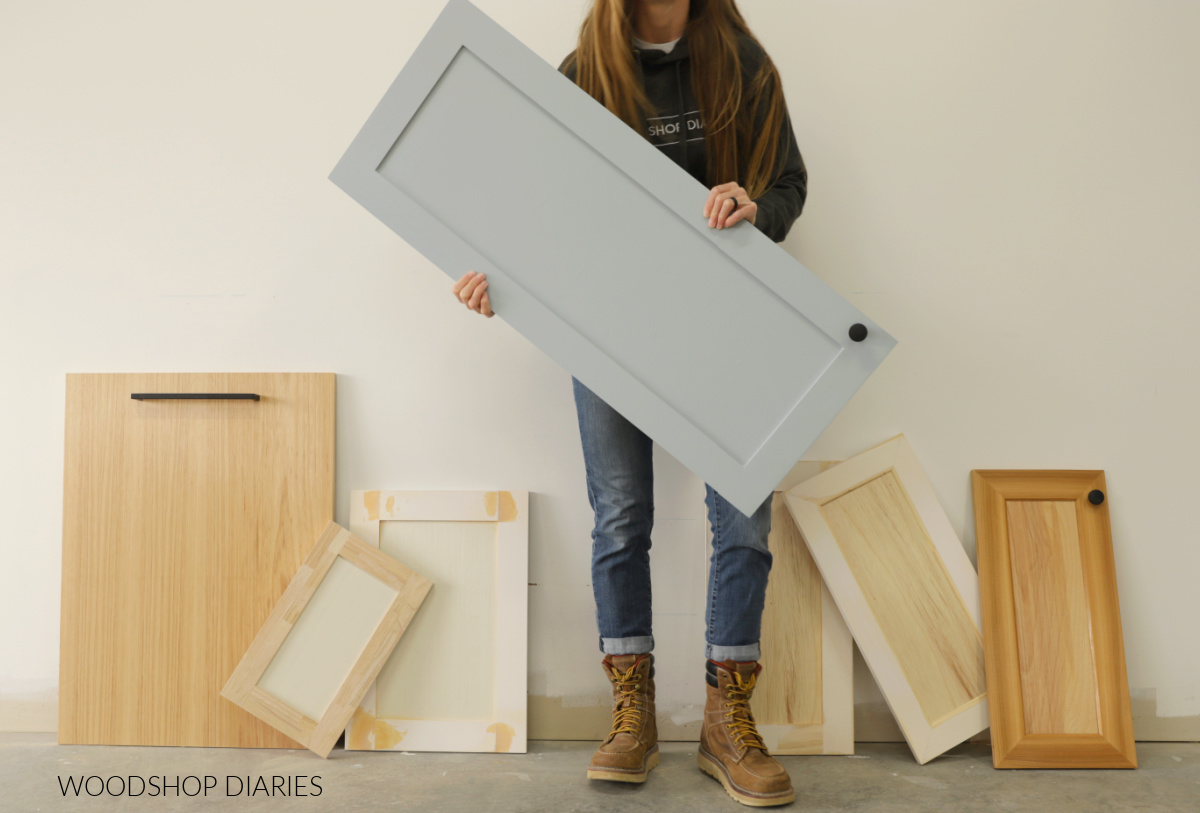
Cabinet Door Options
There are hundreds (probably thousands, really) of ways to build a cabinet door. The method shown here requires using a table saw or router to cut a dado to install the center panel.
But, if you don’t have a table saw or a router, that’s OKAY! You can make very similar cabinet doors without them. This post details 7 ways to build a cabinet door.
You might find these resources helpful throughout the build:
Are DIY projects your thing? Sign up for our newsletter for priority access to the latest projects and build plans!
How to Build a DIY Entertainment Center
If you prefer to watch, I’ve shared the full build video with tons of tips, behind the scenes, and additional details on my YouTube Channel here.
Love watching how-to videos? Subscribe to my YouTube channel for plenty more where that came from!
Prefer to print? Grab the printable entertainment center building plans here:
Tools & Materials
Tools:
- Circular Saw
- Kreg Rip Cut and AccuCut
- Miter Saw
- Drill/Driver
- Pocket Hole Jig
- Brad Nailer
- Table Saw or Router (to cut dadoes for doors)
- Dowel Jig
- Shelf Pin Jig
- Concealed Hinge Jig
Materials:
- (3 ¼) 4’x8′ sheets ¾” plywood (3 full sheets plus 2’x4′ piece)
- (2) 4’x8′ sheets ¼” plywood
- 16 foot of crown molding
- 16 foot of chair rail molding (2 ½” wide)
- 16 foot of 3 ¼” baseboard molding
- (12) 1x3x8 boards
- (2) 1x4x8 boards
- (1) 250 count box 1 ¼” Pocket Hole Screws
- 1 ¼” Brad nails
- Wood Glue
- (4) pair inset concealed hinges for face frame cabinets OR inset concealed hinges for frameless cabinets (see step 7)
- (32) 1 ½″ long dowel pins
- Shelf pins
- Edge banding (optional)
Not sure what type of lumber to use for this project?
1x LUMBER & TRIM: If painting, preprimed pine, spruce, or poplar are great budget friendly options. And if staining, usually, you want to use the same wood type as your plywood so that they match once stained. Check out this post to learn how to shop for and purchase lumber for your project.
PLYWOOD: I recommend using cabinet grade hardwood plywood (like birch, maple, oak, etc). Check out this post to learn how to choose the right plywood for your project.
Step 1: Assemble Side Cabinets
To get started, I cut down the plywood sheets to build my two side cabinets with. These cabinets are made using ¾″ plywood for the body and ¼″ plywood for the back panel.
RELATED: How to cut down plywood sheets
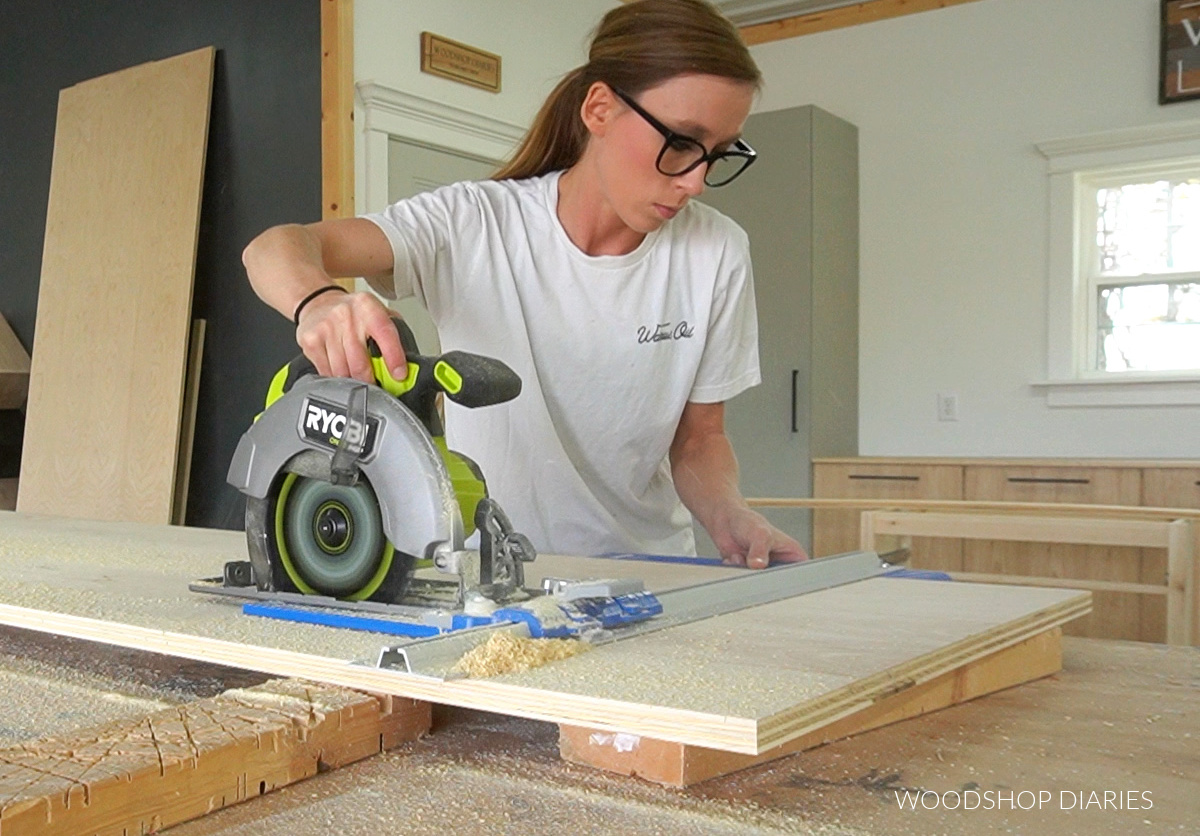
The full cut list and plywood cut diagrams can be found in the printable plans.
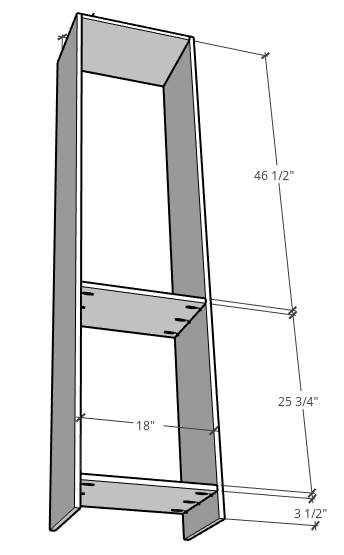
Each side cabinet body consists of two tall side panels and three smaller panels for the top, middle, and bottom.
I assembled the two side cabinet boxes using ¾” pocket holes and 1 ¼” pocket hole screws.
RELATED: How to use a pocket hole jig
After these were together, I cut and stapled a ¼″ plywood back panel onto both cabinets.

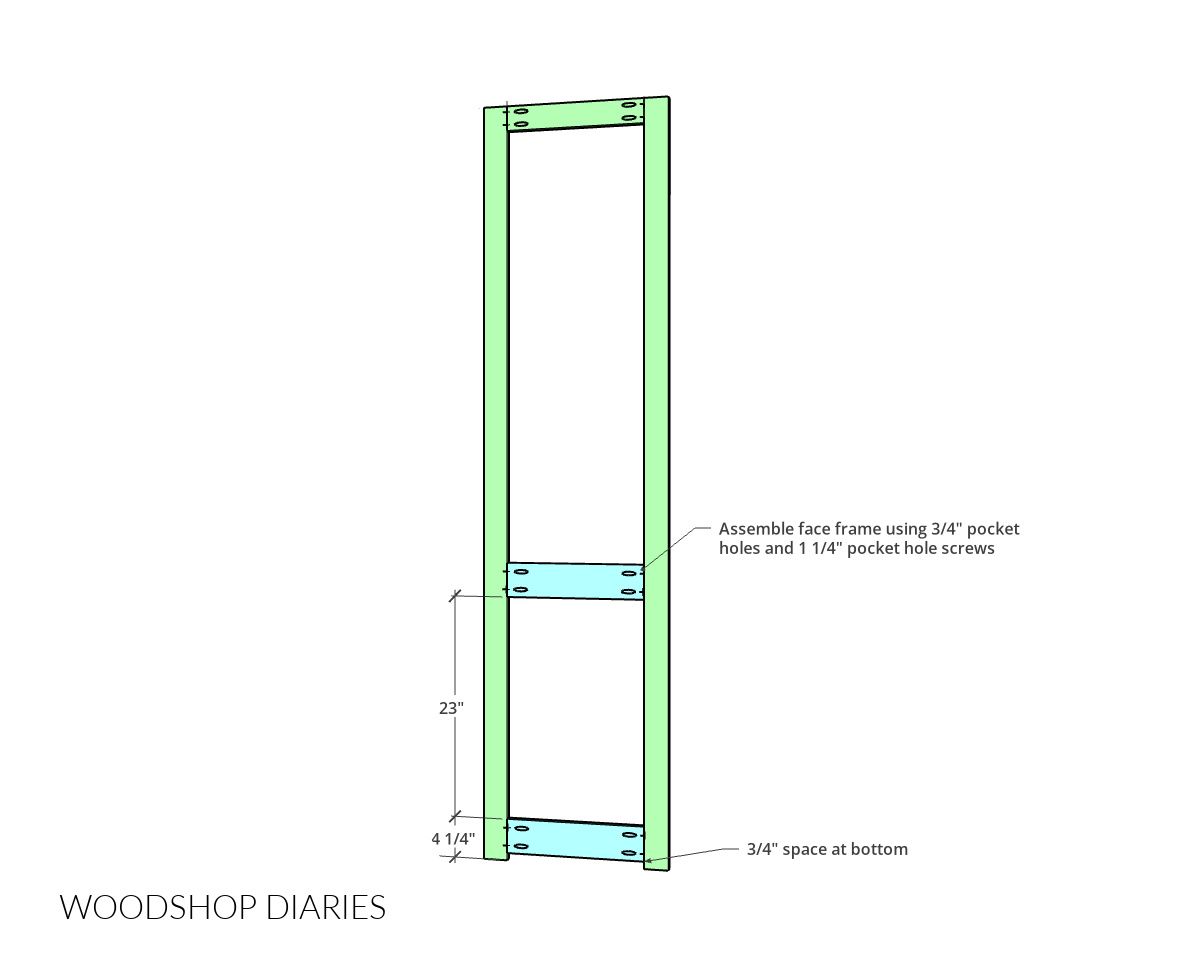
Next, I assembled two face frames to frame out the front side. I used 1x3s for the sides and top and 1x4s for the middle and bottom pieces.
I attached the face frame together using wood glue with ¾″ pocket holes and 1 ¼″ pocket hole screws.
A standard size pocket hole jig can work fine, BUT, when building face frames, I recommend using a Kreg Micro Jig with pan head pocket hole screws. The smaller holes and screws are less likely to cause splits.
Learn more about how, when, and why to use the Kreg Micro Jig here.
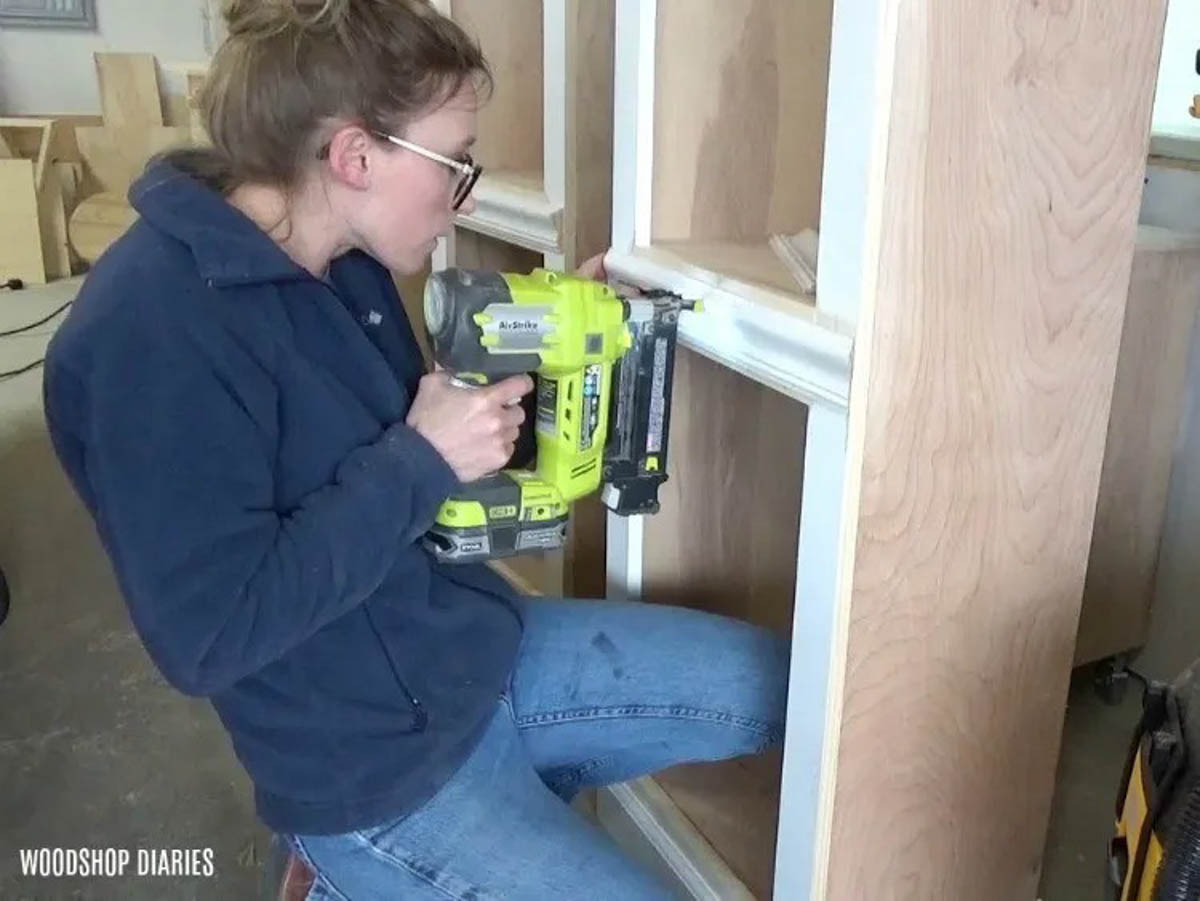
I attached the face frames to the front of both cabinets using wood glue and just brad nailed them in place. The frames should be flush along the bottom and the sides of the cabinet.
Prefer to print? Grab the printable plans complete with cut list, dimensions, and diagrams here.
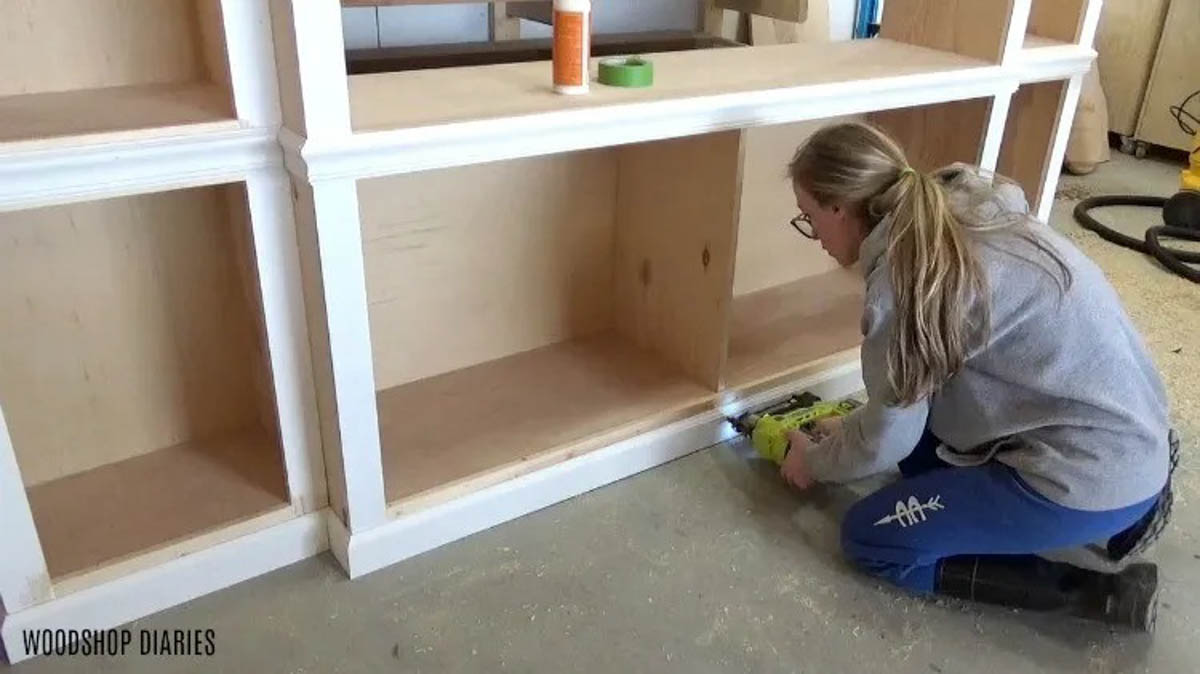
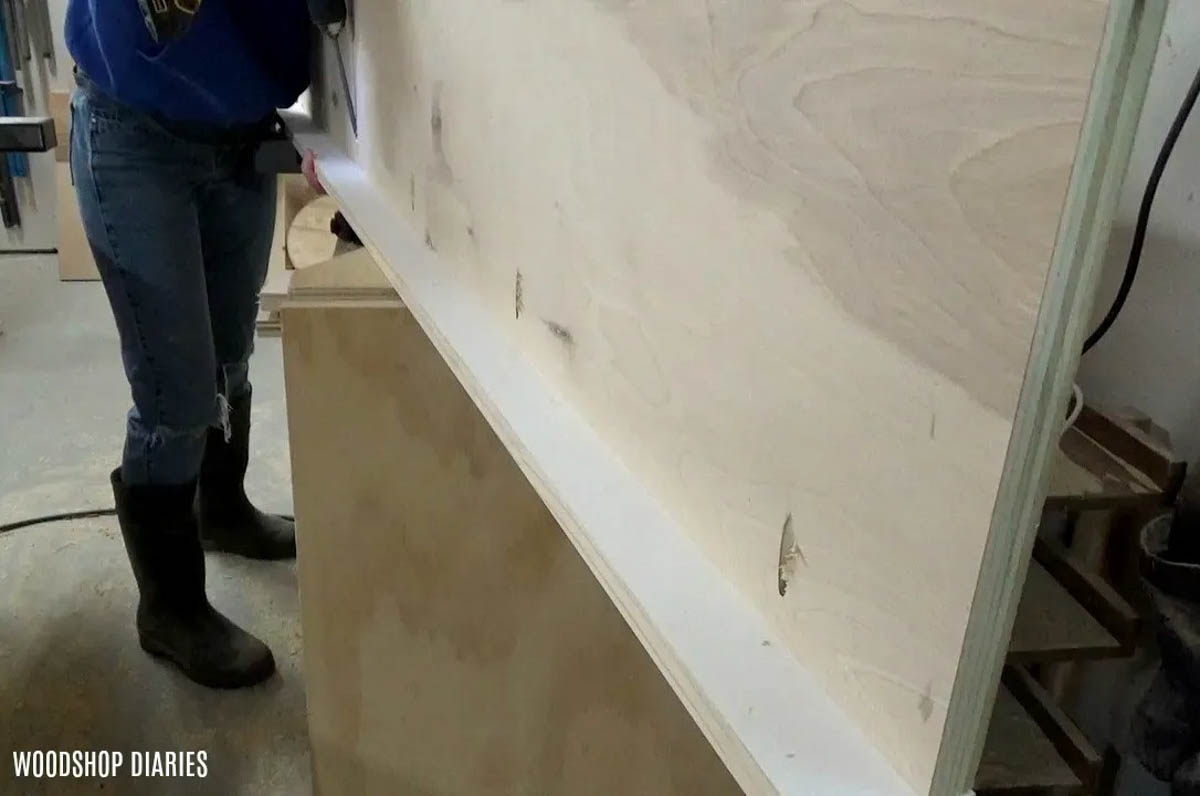
Step 2: Add Trim and Molding to Side Cabinets
Now that the cabinets are built, it was time to add the molding to dress them up a little.
NOTE: These two smaller cabinets will butt up to the larger center cabinet once complete, so the trim shouldn’t wrap around both sides. It should only be added to the front and left side of the left cabinet and to the front and right side of the right cabinet.
You can customize the trim details on this however, you’d like, but, first, I cut to fit some crown molding around the front and ONE side of each cabinet.
RELATED: How to cut crown molding
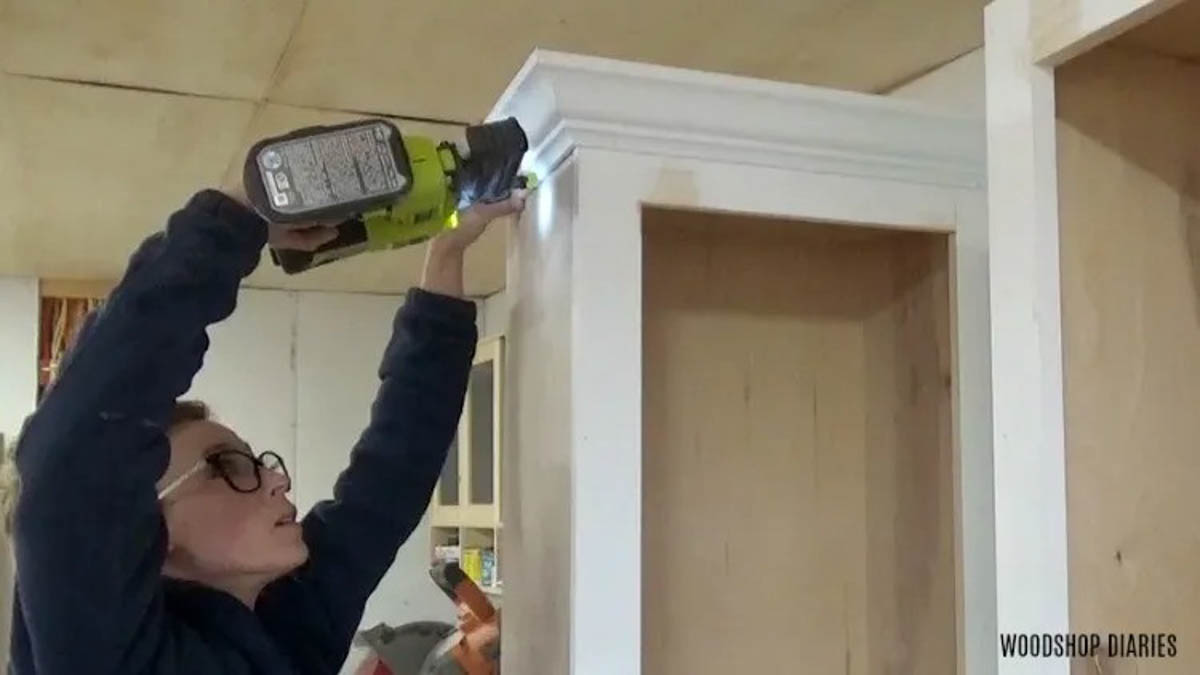
The crown molding gets cut square at the ends, but I also added some baseboard around the bottom and chair rail molding around the middle.
The base and chair moldings should be cut square at the back edge of the cabinets but at the front, on the end that will butt up to the middle cabinet, they should be beveled 45 degrees for an inside corner.
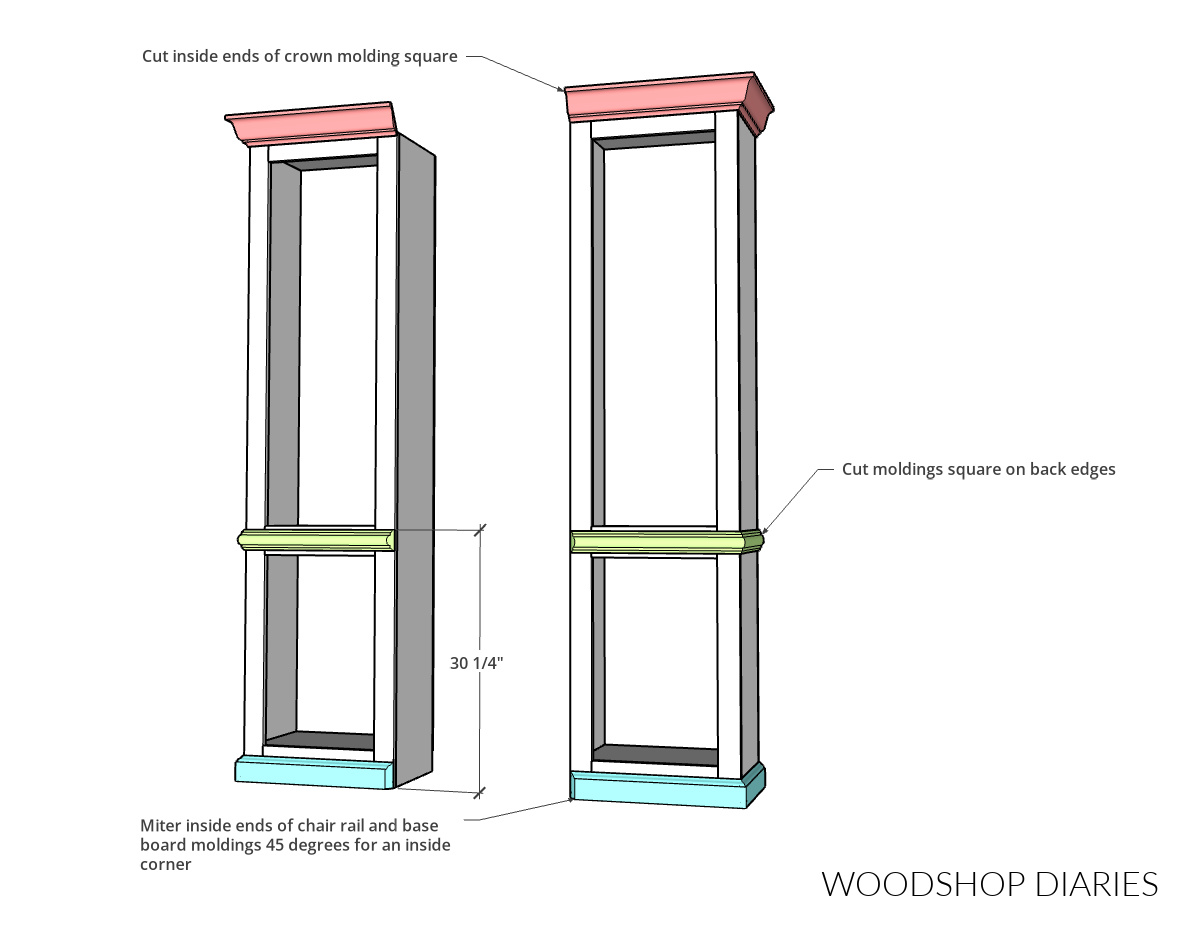
That way, the trim details can butt together at the corners. You’ll see this more in a later step.
Step 3: Build Middle Entertainment Center Cabinet
Now the two side cabinets are finished (except for shelves and doors–we will come back to that later), so it’s time to build the center cabinet to go between them.
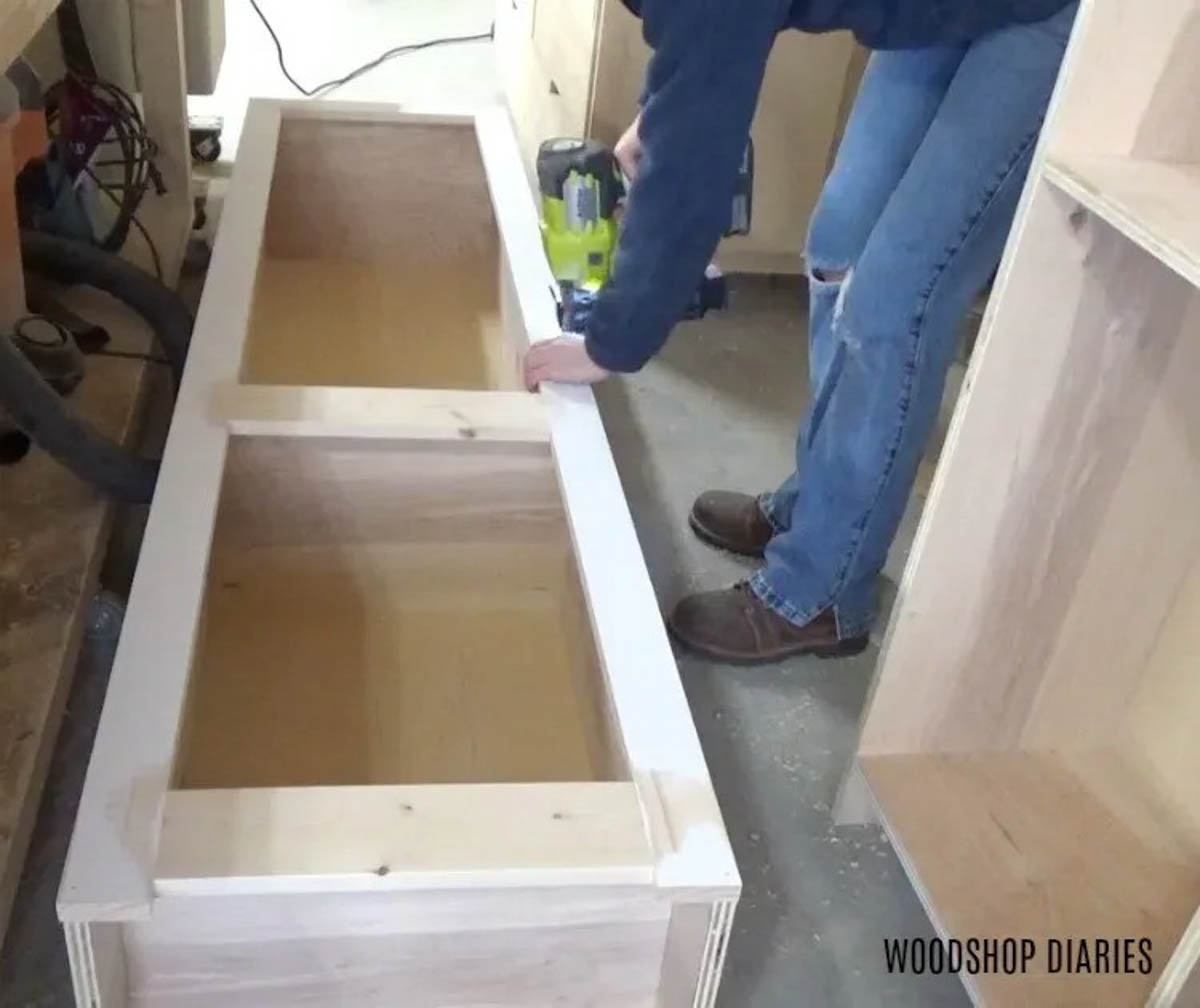
This cabinet, just like the others, is made with ¾″ plywood for the main body. So I cut two tall side panels and a top and middle shelf to run between them. I assembled this large cabinet box with pocket holes and screws.
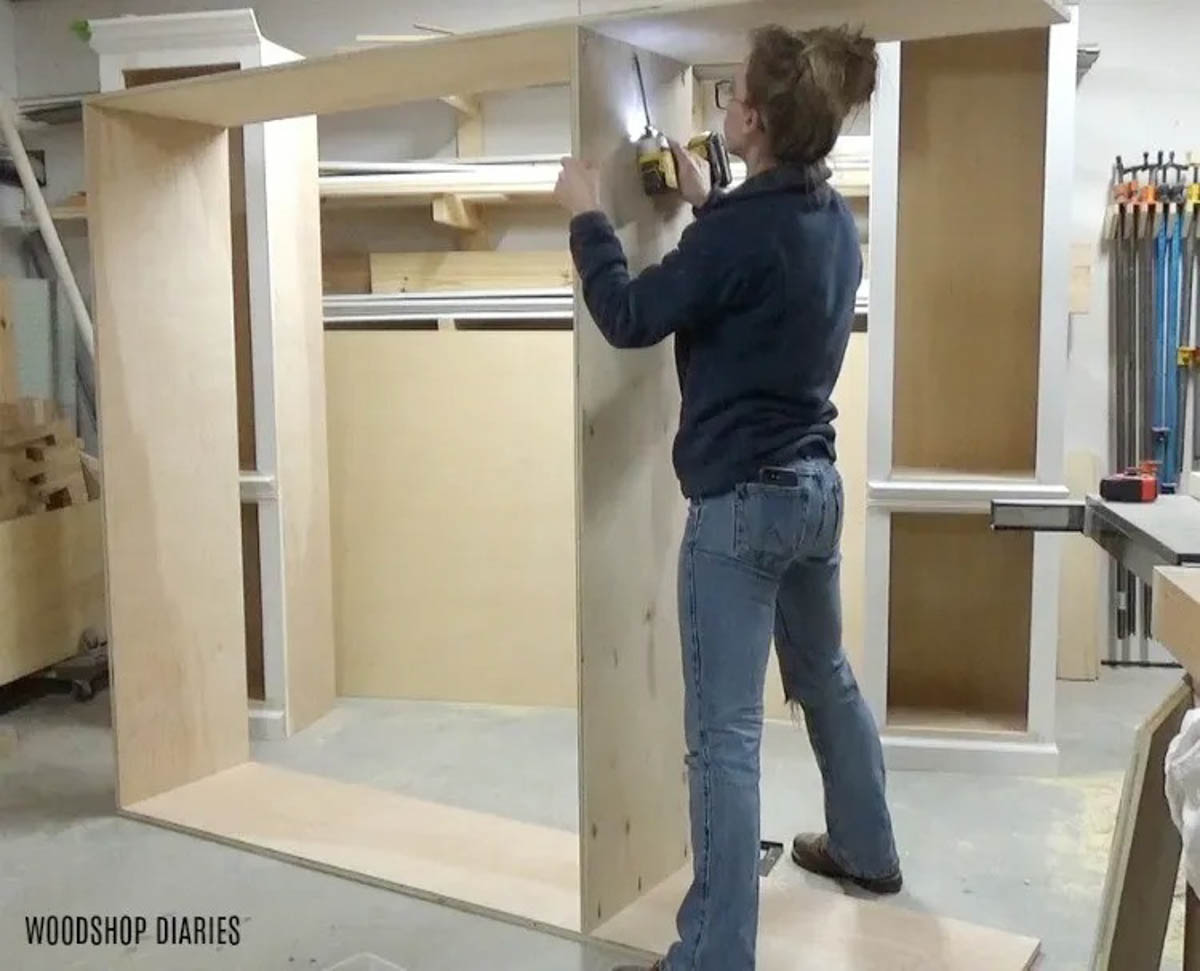
After the sides, top and middle shelf were together, I cut a divider and two bottom panels to go underneath this middle shelf. I installed each piece with pocket holes and screws.
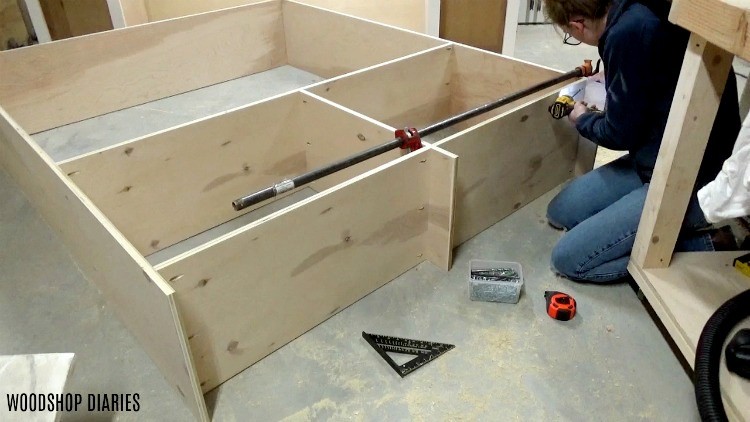
One quick note: The front edge of the vertical middle divider will be seen in the finished project when the doors are open to this cabinet. For this reason, you may consider applying edge banding to this edge to hide the plies and give you a smoother finish.
RELATED: How to apply edge banding
Once the middle cabinet body was assembled, I cut and stapled a ¼″ plywood back panel across the back side of the bottom of this cabinet. The top section was left open.
Now, just like with the side cabinets, I assembled a face frame to frame out the front of this cabinet. For this face frame, I used 1x3s for the sides, top and middle and a 1×4 for the bottom piece.
I glued and brad nailed this frame onto the front of the cabinet–it should be flush along the sides and bottom of the cabinet.

Prefer to print? Grab the printable plans complete with cut list, dimensions, and diagrams here.
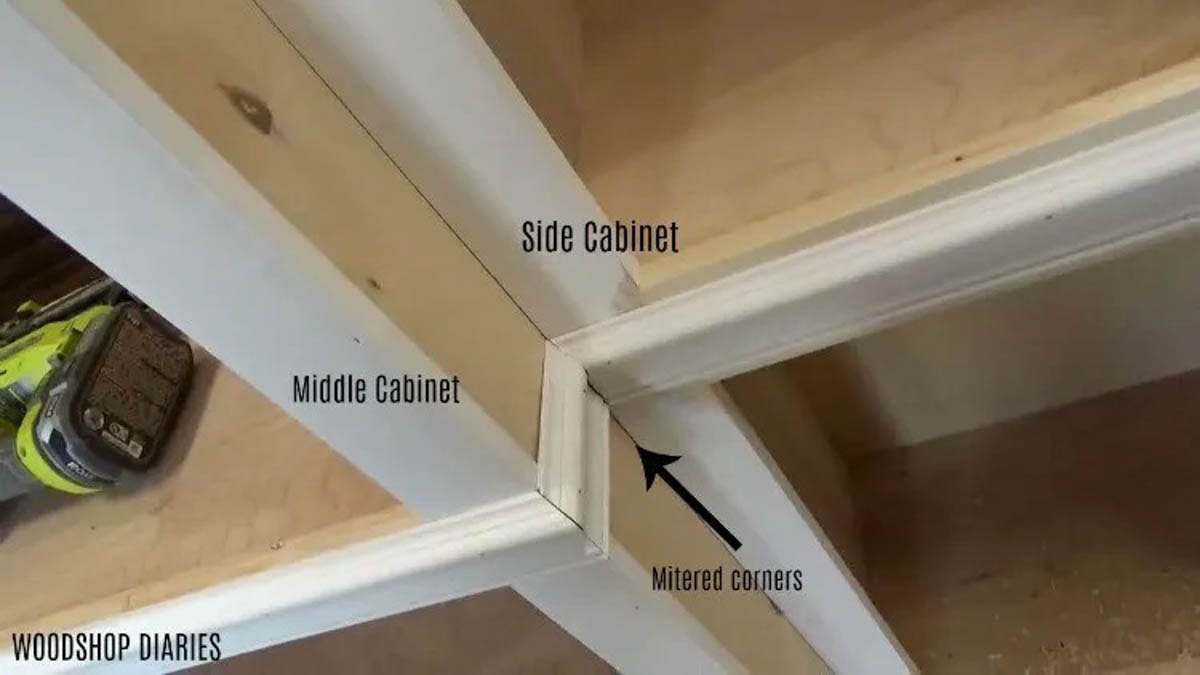
Step 4: Add Trim Detail to Middle Cabinet
Next, I added the same trim to this middle cabinet as I did to the sides. The crown molding will wrap around the front and both sides because this middle cabinet is taller than the sides, so the crown moldings don’t meet.
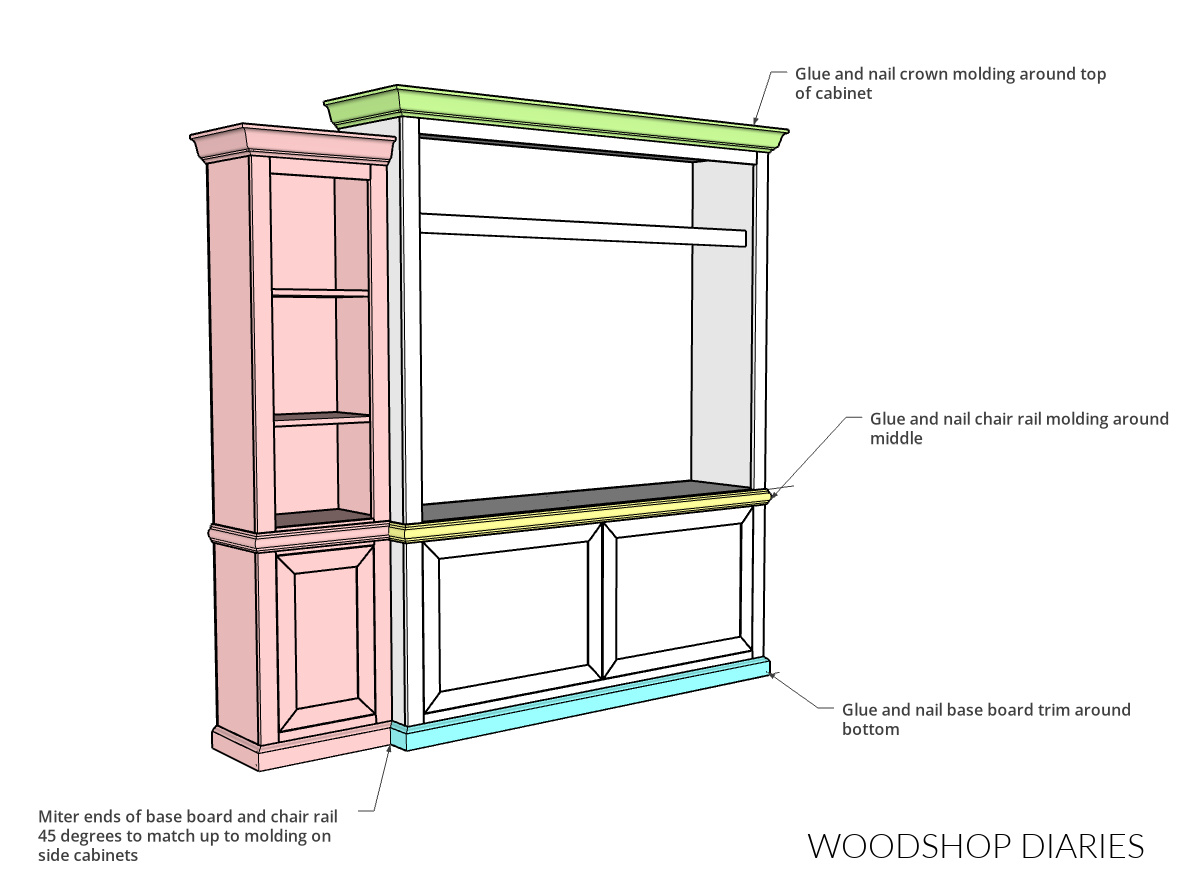
However, for the chair rail and baseboard, the trim on the middle cabinet needs to “meet up with” the trim on the side cabinets.
So, I placed the cabinets side by side to help me position my trim. I ran the chair rail and baseboard across the front of the middle cabinet and down the sides only until it reached the side cabinets.
The outside corners are beveled 45 degrees one way to wrap around the outside corners, but the inside corners should be beveled the other way so that this trim wraps around the inside corner.
Step 5: Build Doors and Shelves For Entertainment Center
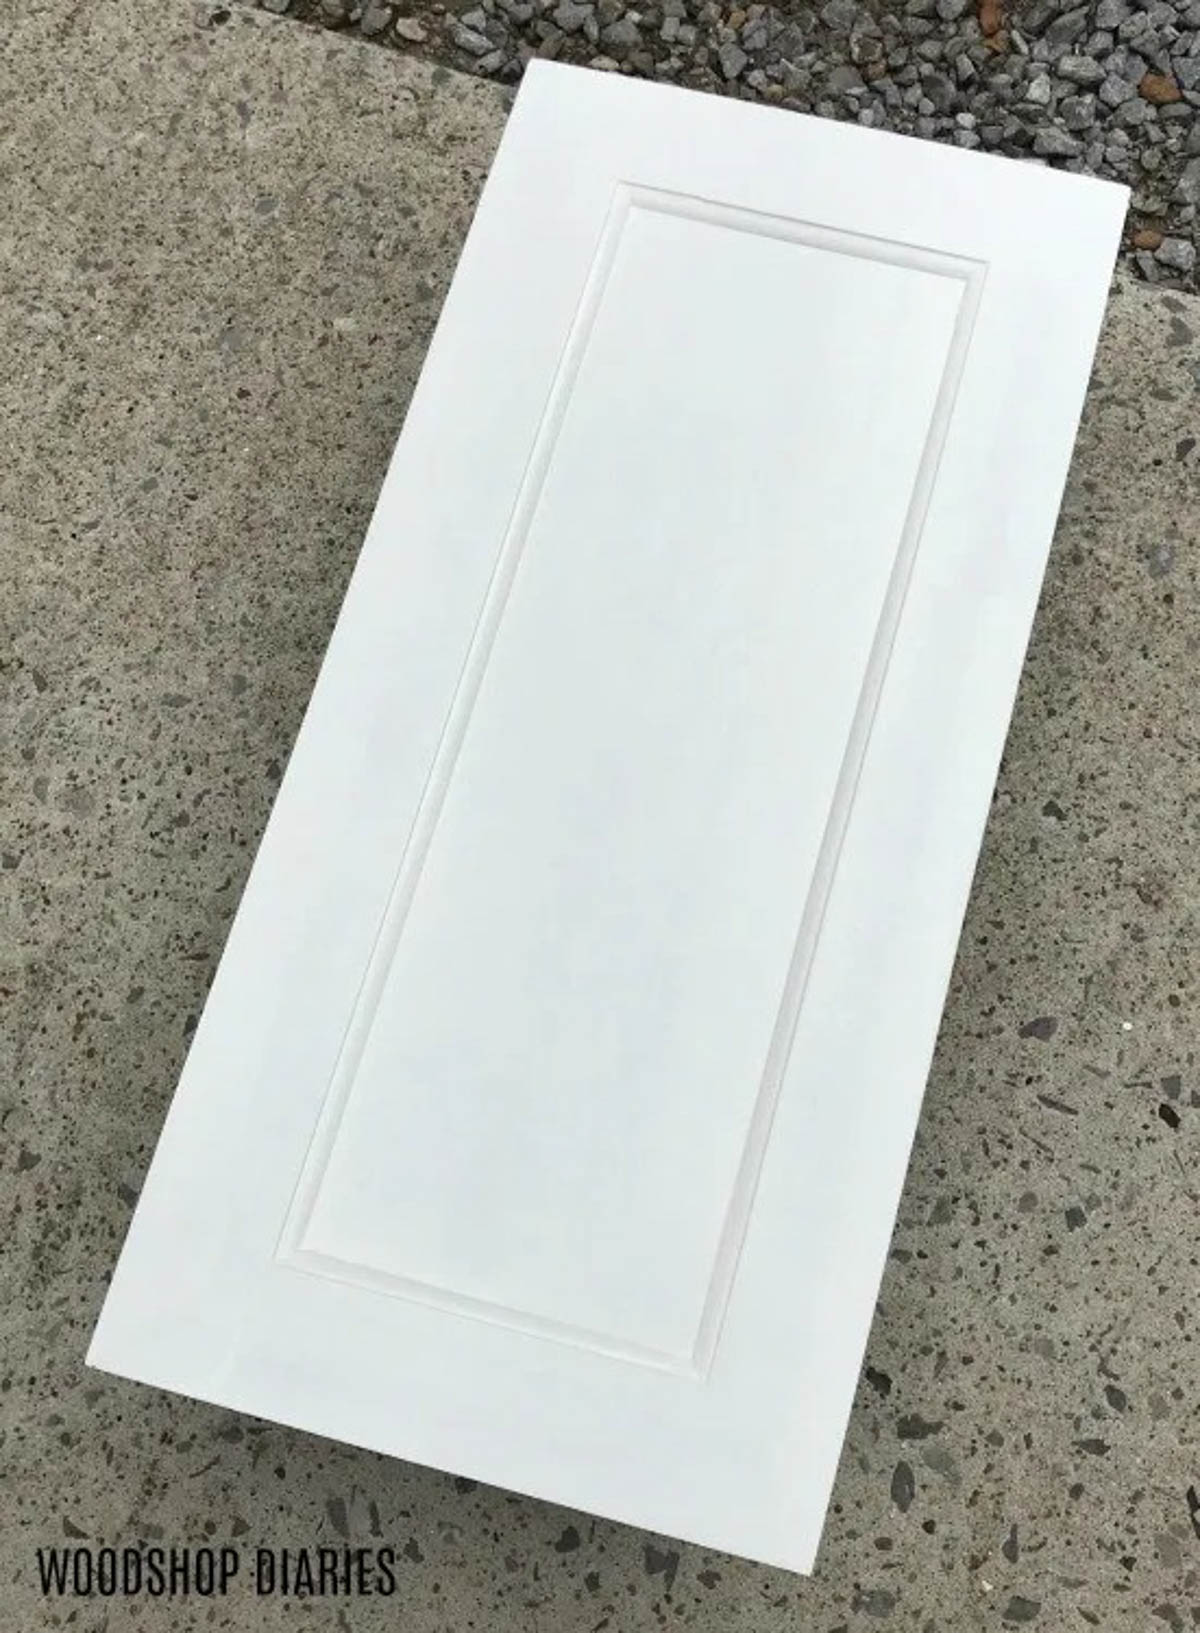
Now that all three cabinets were built and trimmed out, I circled back to build the doors and the shelving. The middle cabinet needs a pair of double doors and the side cabinets each need one door for the bottom section.
Like I mentioned in the notes earlier in this post, there are many ways to build a door, but for these, I used 1x3s for the door frame and ¼″ plywood for the door panels.
I cut dadoes in the frame pieces to install the center panel, and assembled the mitered corners with wood glue and dowels. You can see this process in detail in this post showing 7 ways to build a cabinet door–this is method number 5.
NOTE: In addition to dadoes, I also routed a roundover (that’s totally optional) on the inside of my door frame pieces to give it some extra detail and dimension.
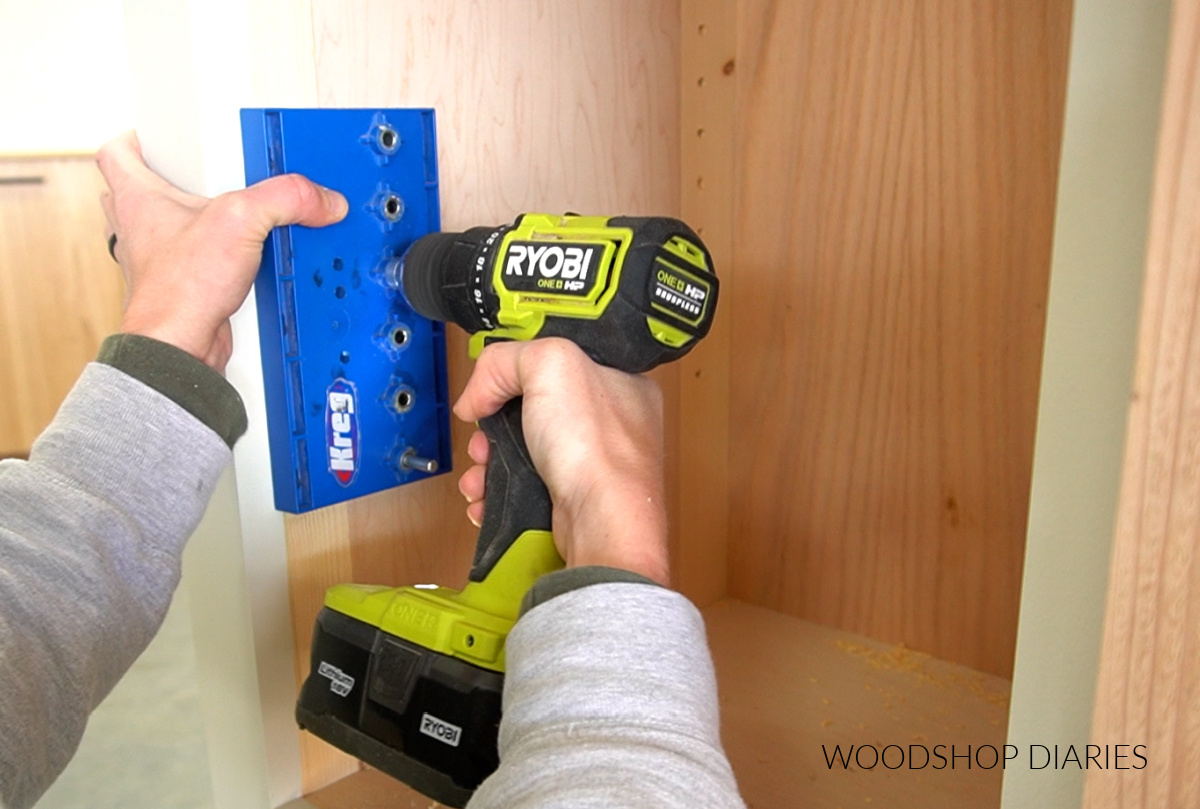
Then, I drilled shelf pin holes inside the top sections of each side cabinet so I could add adjustable shelves. I love adjustable shelves because you can rearrange, add more, or remove shelves as needed if you change your mind on what you want to place on them.
Learn how to add adjustable shelves to your projects here.
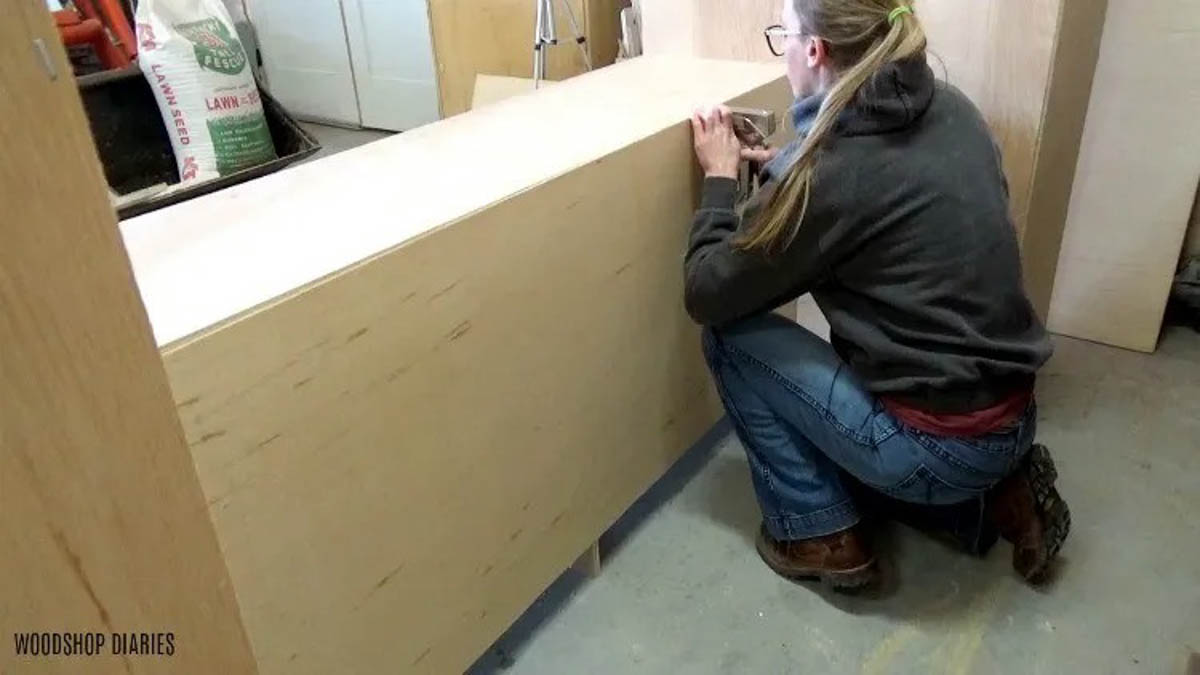
I cut two ¾″ plywood shelves for each cabinet and applied iron on edge banding across the front edges since they’ll be visible in the finished project. Edge banding will make these edges nice and smooth when they’re painted.
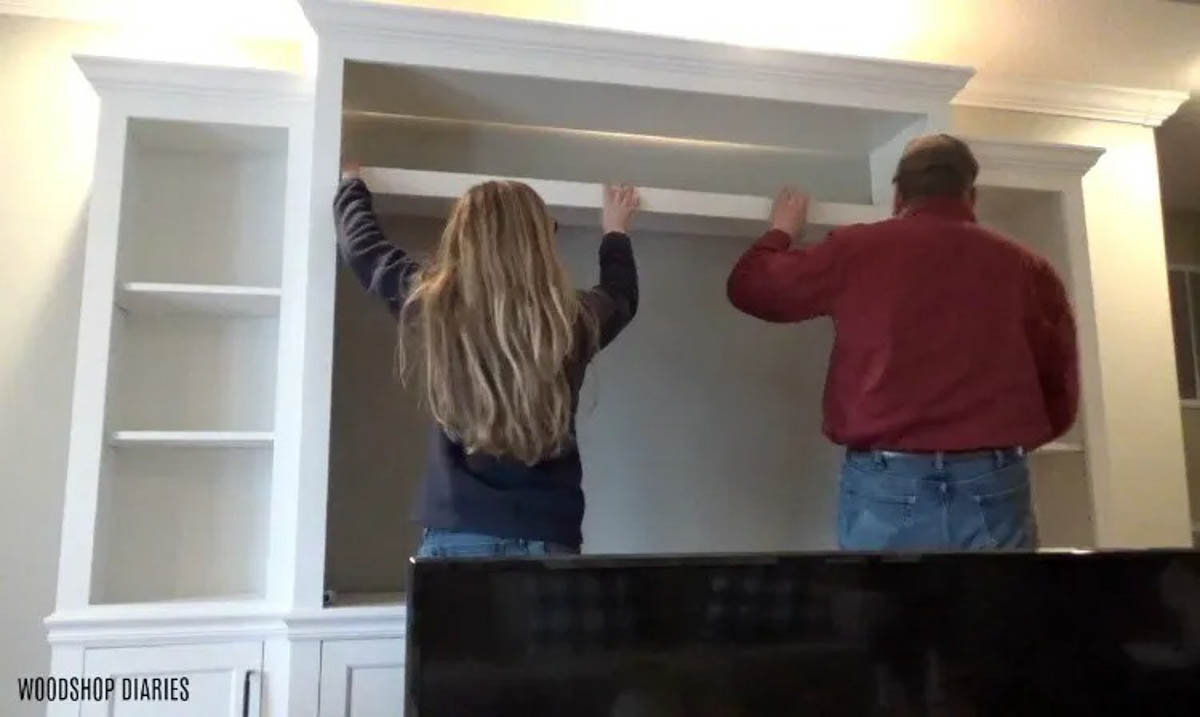
I also drilled shelf pin holes at the top of my middle cabinet to be able to add another ¾″ plywood shelf above the TV.
This shelf is really long since this cabinet is really wide. So, I wanted to give it a little extra support to keep it from sagging in the middle. To do this, I used pocket holes and screws to attach a piece of 1×3 along the front edge
Prefer to print? Grab the printable plans complete with cut list, dimensions, and diagrams here.
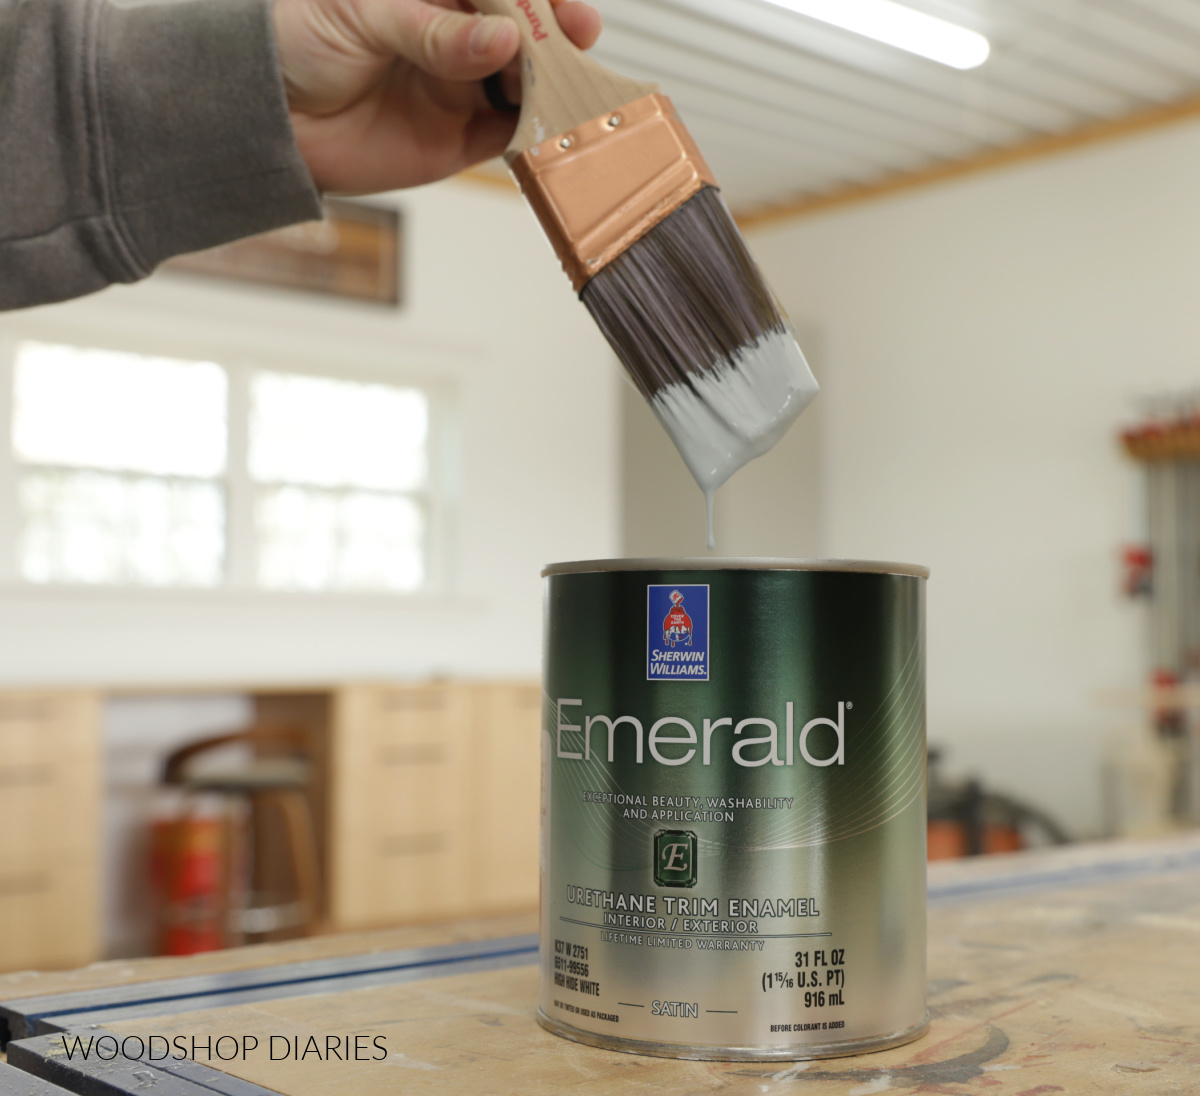
Step 6: Paint & Finish
Now the cabinets, doors, and shelves are all assembled, so before putting them all together, I painted them separately.
Painting is not my favorite part of any project, but is sometimes necessary haha. I primed everything first, then painted the doors, shelves, and cabinets in SW Alabaster.
RELATED: How to paint DIY furniture without a sprayer
Step 7: Install Doors
Once the paint was dry, I could install the doors and place the shelves to wrap this project up.
I used my Kreg concealed hinge jig to drill the holes into the doors to install the hinges.
RELATED: How to install concealed hinges
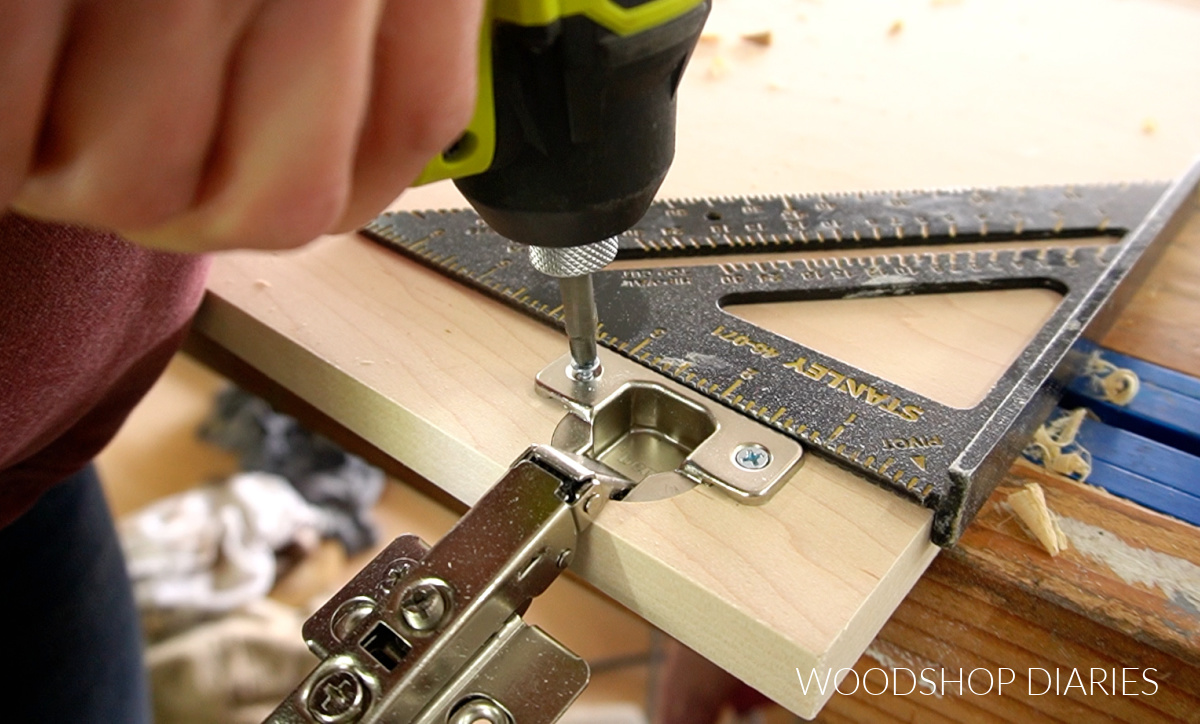
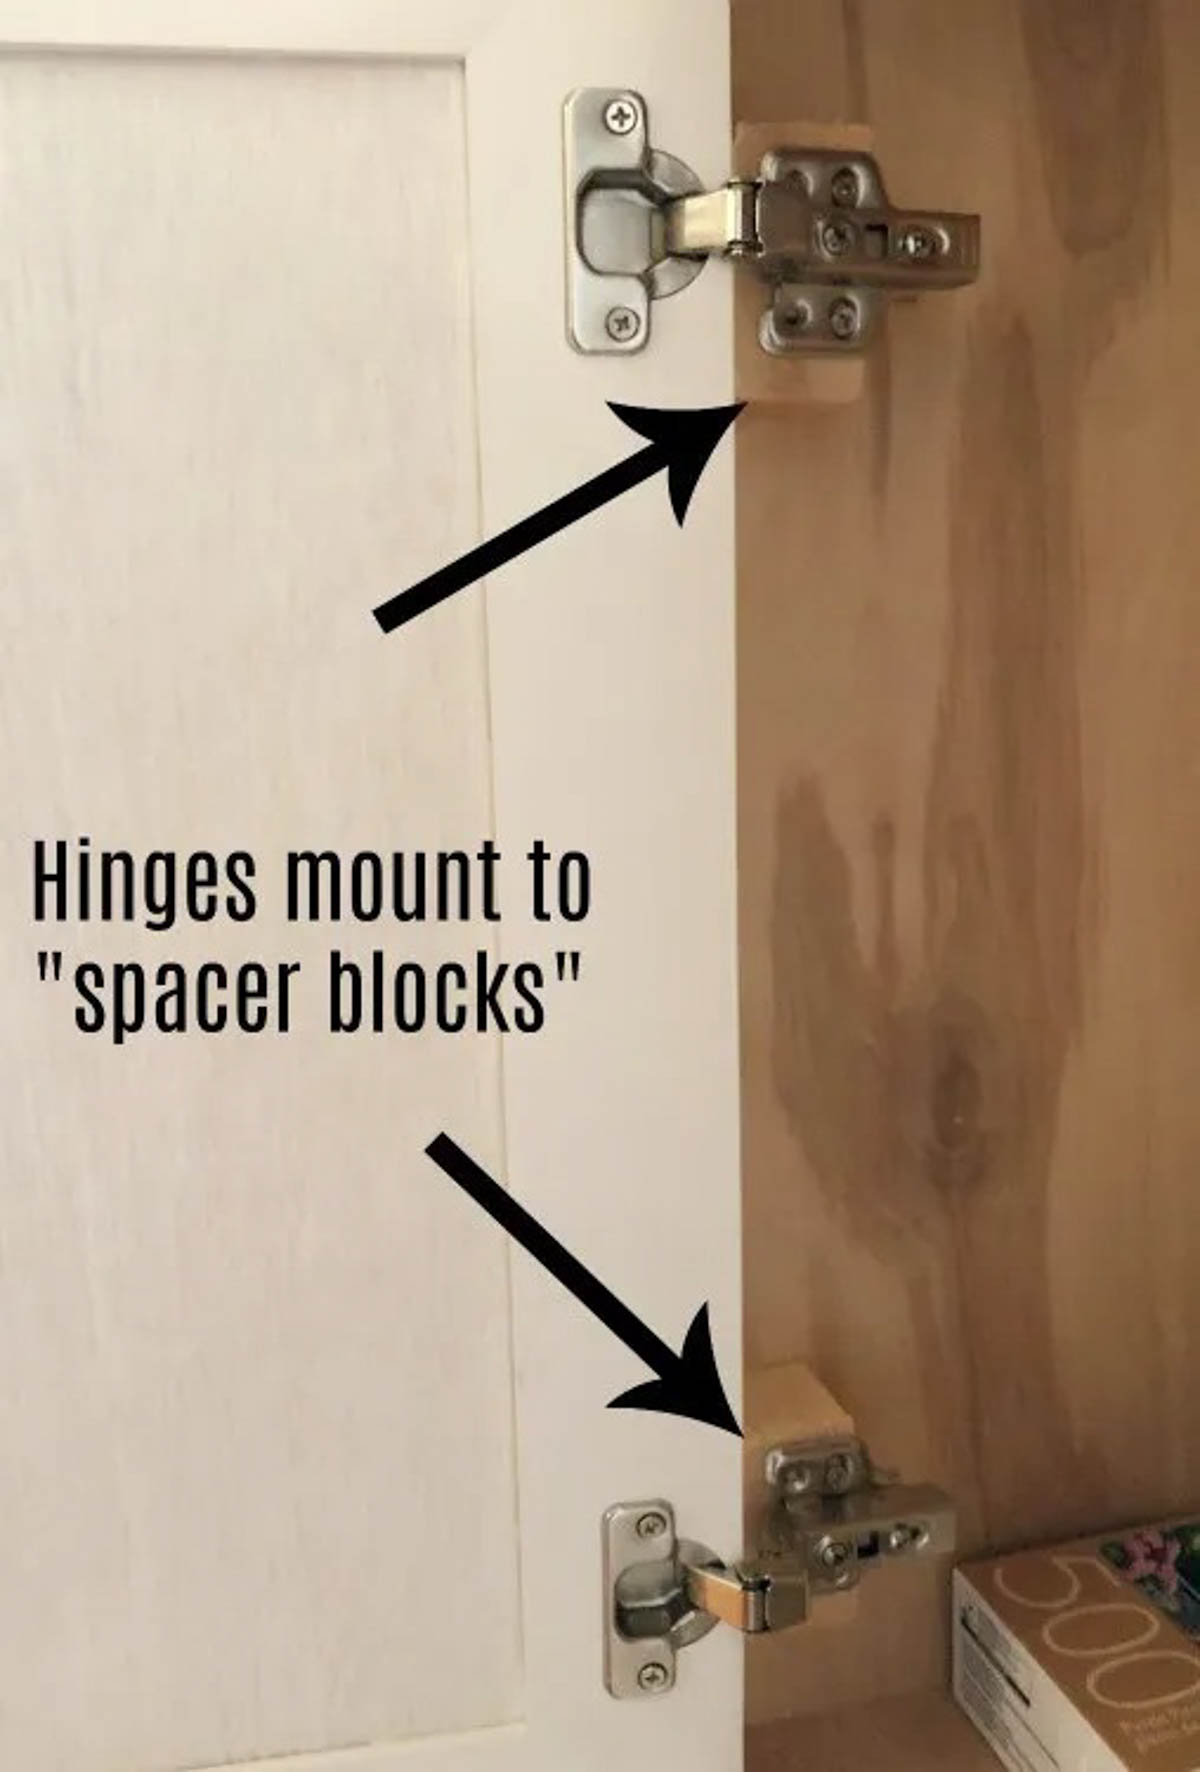
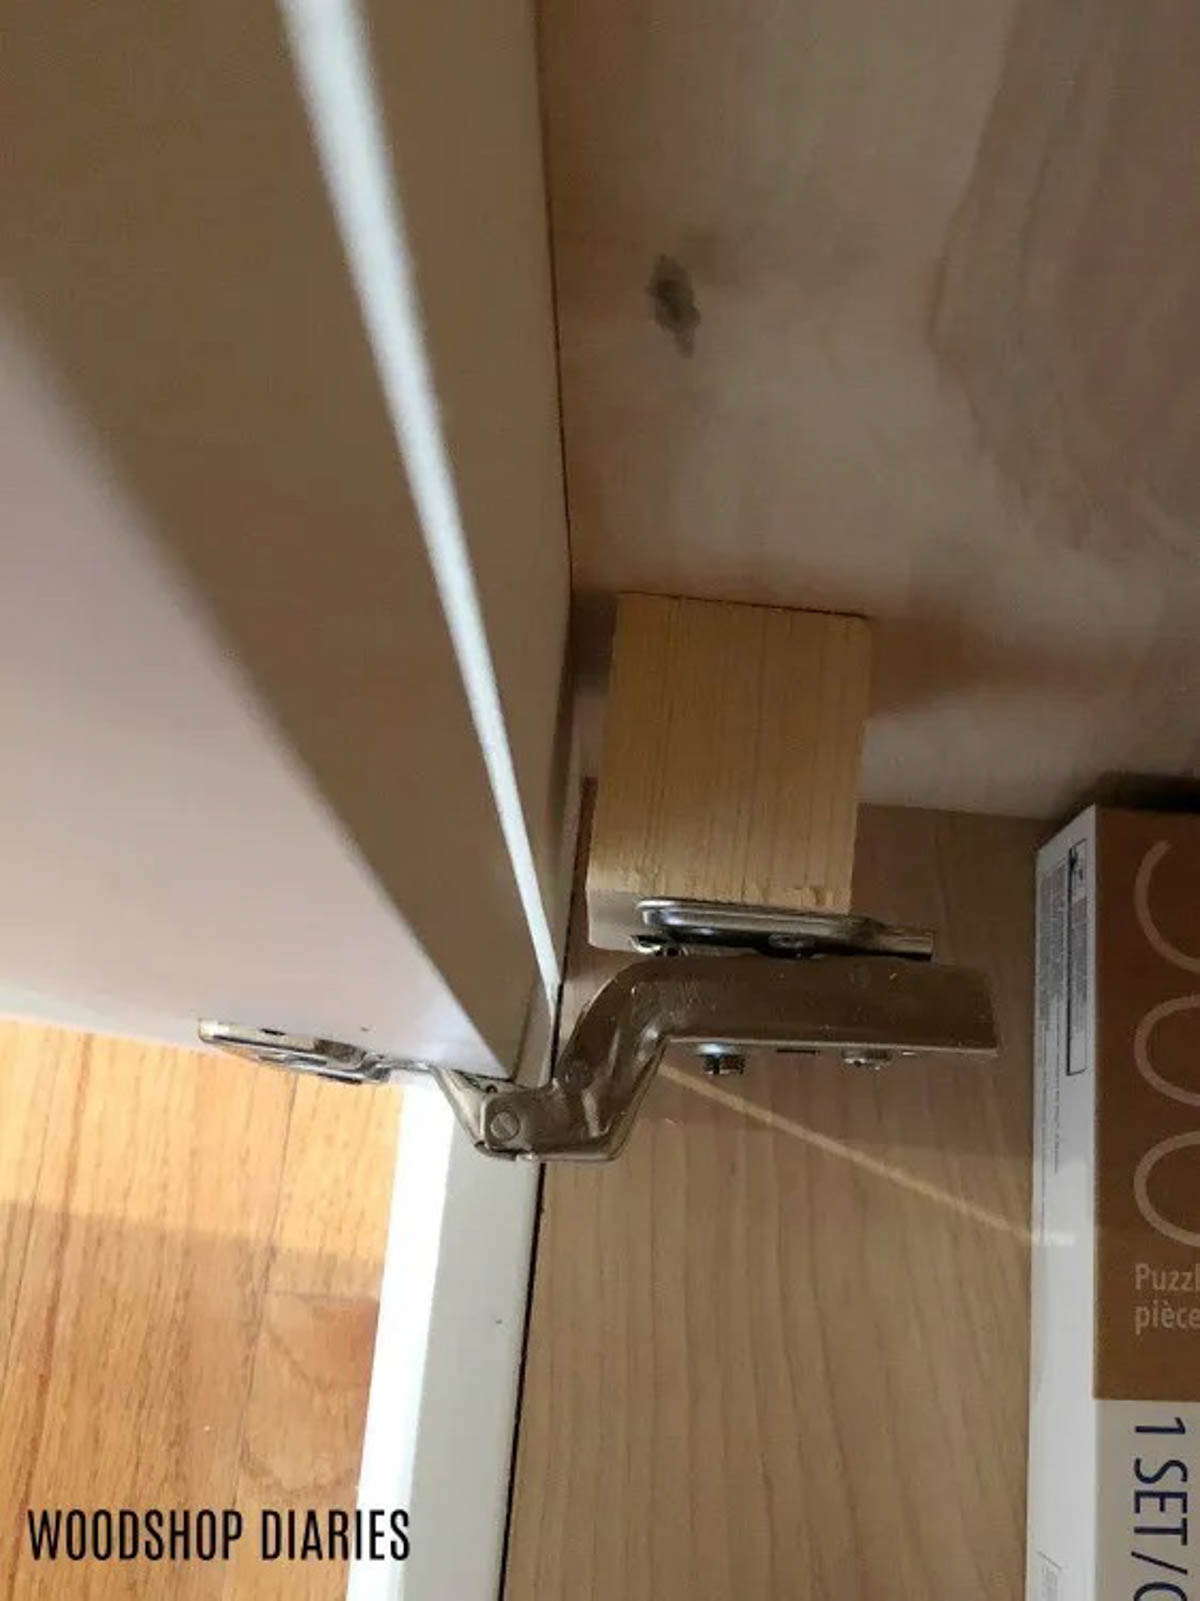
Now, these doors were designed to be inset. But inset concealed hinges for face frame cabinets (like the ones I built for this project) are hard to find and expensive.
So I used inset hinges for frameless cabinets and mounted a spacer block inside the cabinets. This allows you to “fake” a frameless cabinet in regard to how the hinges are installed.
Learn more about the different types of hinges and how to choose which ones you need here.
Double doors are installed to the middle cabinet and single doors installed to the side cabinets.
Step 8: Set Up Finished Entertainment Center
At this point, this project is ready to be moved into its final spot–my parents’ living room. We placed the cabinets side by side and secured them together with wood screws through the side panels.
TIP: Once the cabinets are screwed together, caulk the seams and the trim if desired for a more seamless look. Anchor cabinet(s) to the wall to prevent tip over.
And finally, I added some shelf pins and placed the shelves into the cabinets where Mom wanted them.
Now it was ready to add the most important part–the TV. And with that, it’s ready for the next big game or your family movie night.
This was a huge project, but it was really fun to put together. Nothing too complicated…just large in size. It’s definitely a great focal point when people come visit!
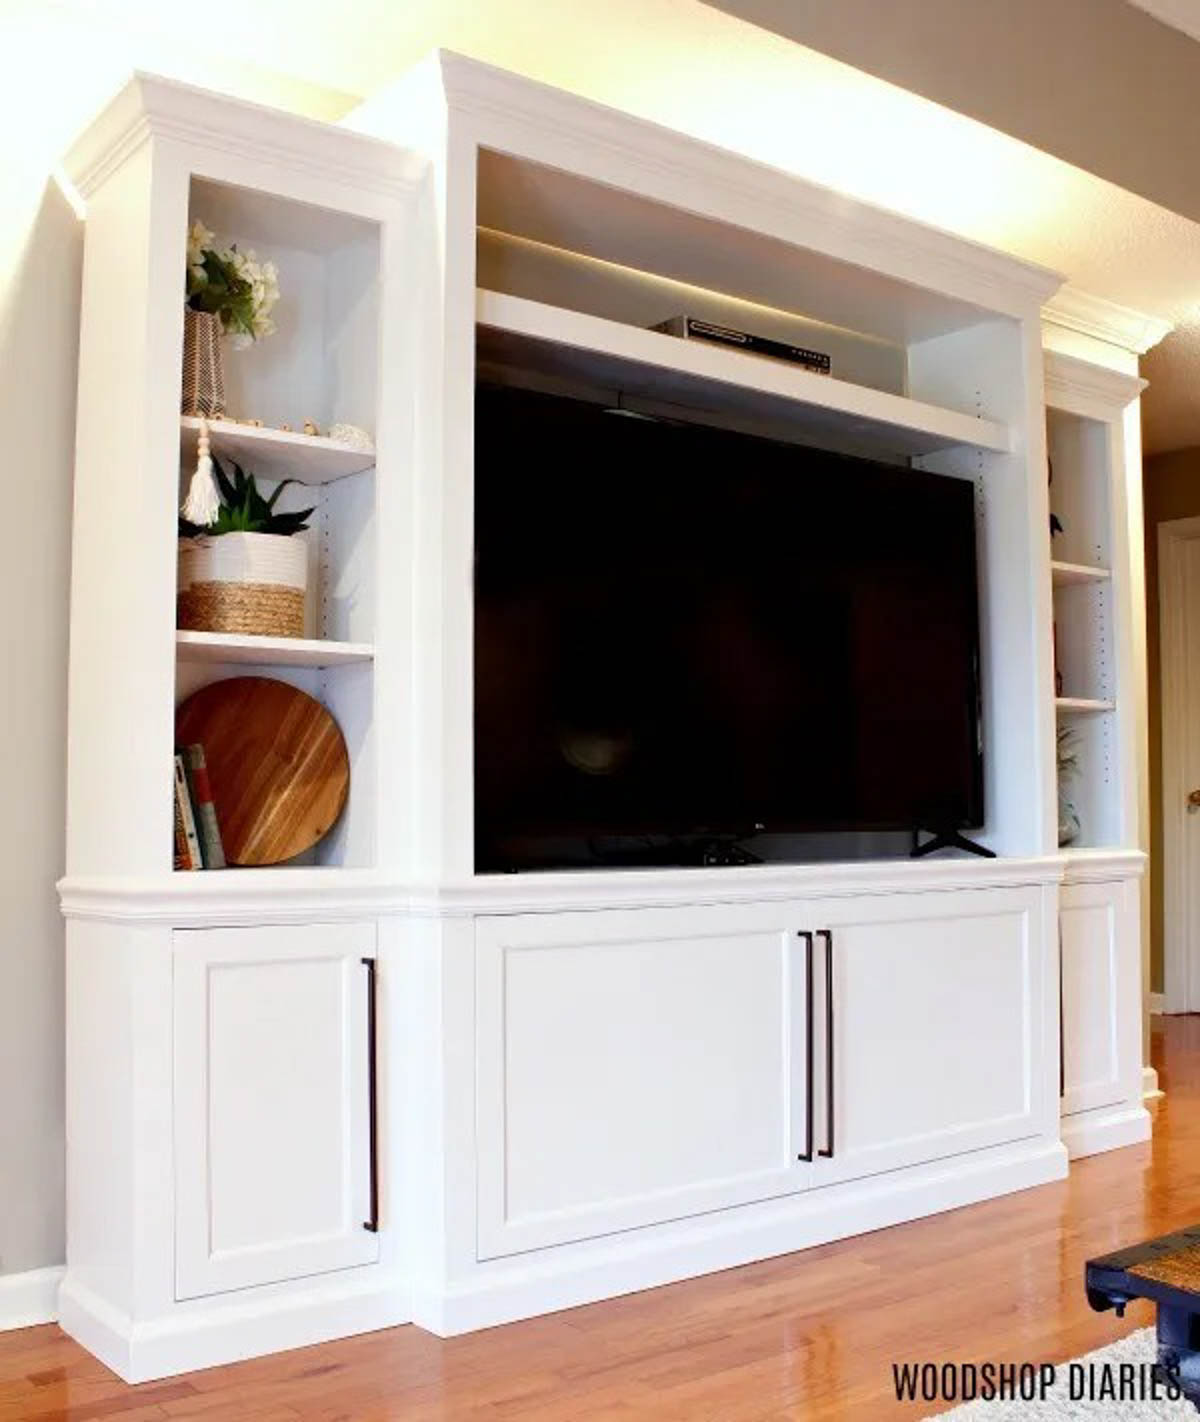
Plus it gives them plenty of storage for books, DVD’s, whatever, and mom has more surface area to display her décor.
If you’re ready to build your own, grab the printable building plans here!
Looking for more DIY furniture projects?
If you enjoyed this project and want to see more DIY furniture projects, here are a few favorites!
If you enjoyed this project and want to save it for later, be sure to pin it or share to your favorite social channel!

Until next time, friend, happy building!
DIY Entertainment Center
How to build your own DIY entertainment center for your family room or living room.
Materials
- (3 ½) Sheets ¾” Plywood
- (2) Sheets ¼” plywood
- Crown Molding, chair rail molding (2 ½” wide), 3 ¼” baseboard molding (16’ of each)
- (12) 1x3x8 boards
- (2) 1x4x8 boards
- 1 ¼” Kreg Pocket Hole Screws
- Brad nails
- Wood Glue
- (4) pair concealed hinges
- Door Pulls
Tools
- Circular Saw
- Kreg Rip Cut
- Miter Saw
- Drill
- Kreg Pocket Hole Jig
- Nail Gun
- Table Saw or Router (to cut dadoes for doors)
- Kreg Shelf Pin Jig
- Kreg Concealed Hinge Jig
Instructions
- Make all the cuts per the plans.
- Assemble side cabinet carcass boxes of entertainment center.
- Add back panel to side cabinets.
- Attach face frame to side cabinets.
- Add trim and molding to side cabinets.
- Build middle cabinet carcass box.
- Add backing to middle entertainment center cabinet.
- Add face frame and trim on middle cabinet.
- Make doors and shelves for entertainment center cabinets.
- Paint and finish.
- Drill shelf pin holes.
- Attach doors.
- Install in your living space!