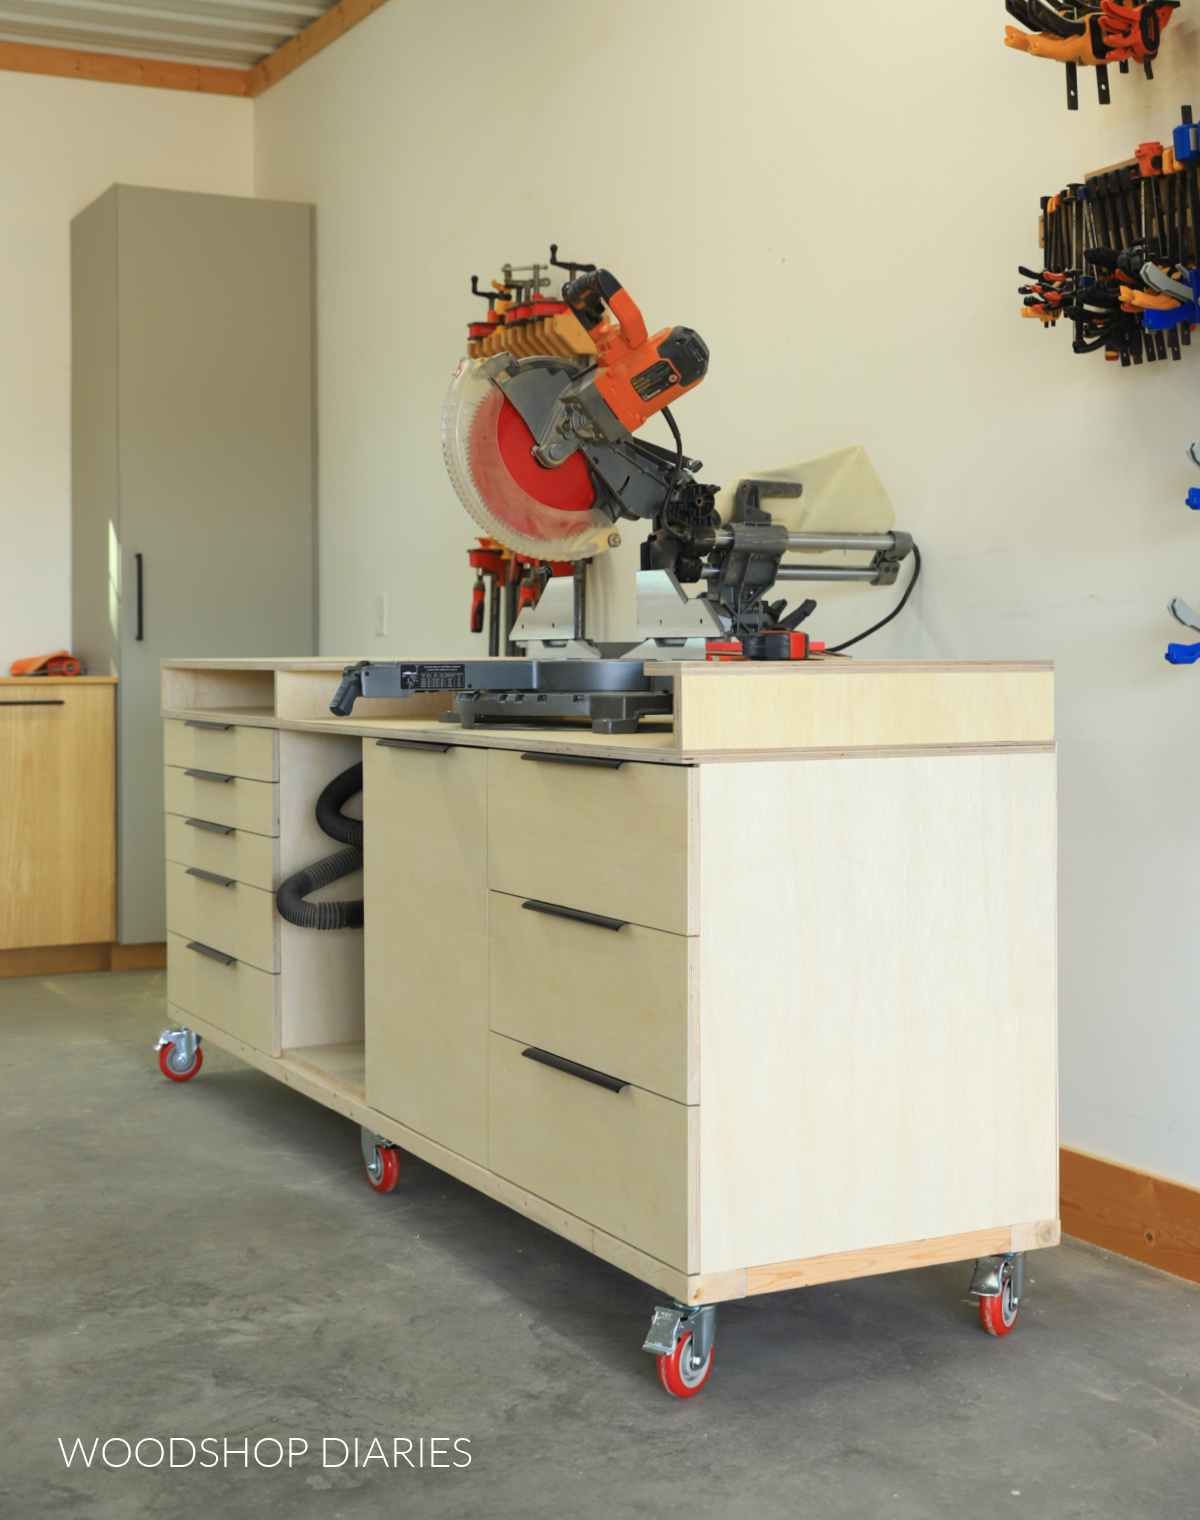
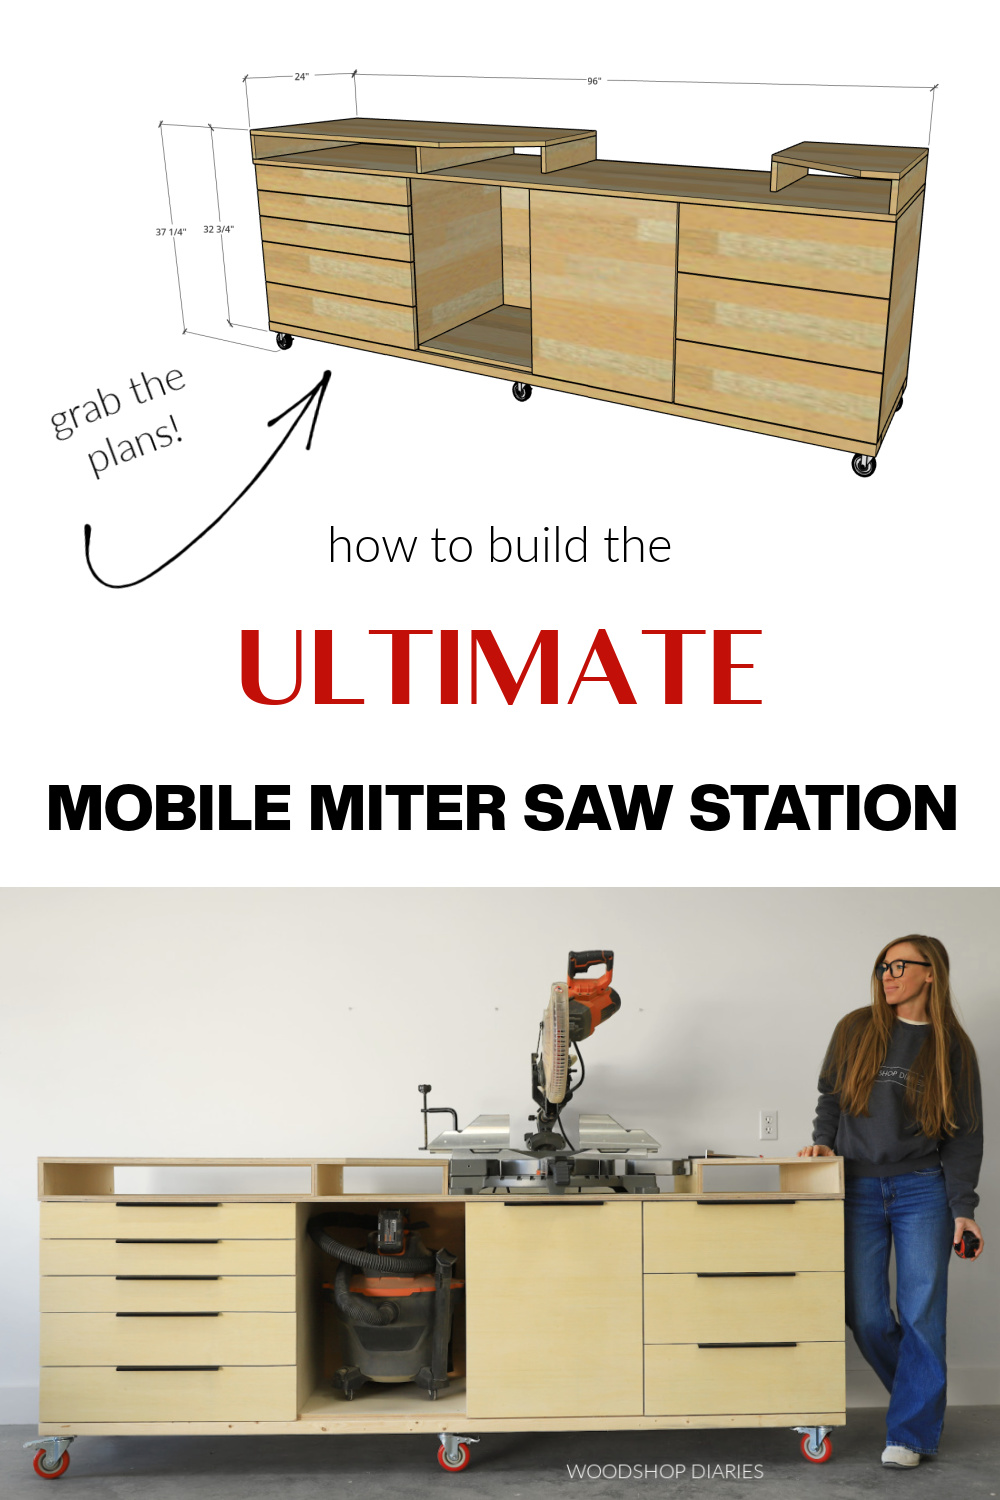
In this post, I’m sharing how to build a mobile miter saw station packed with practical storage.
My miter saw is one of my most used tools in the shop. Because of that, I love having it on a dedicated worksurface with plenty of support on each side.
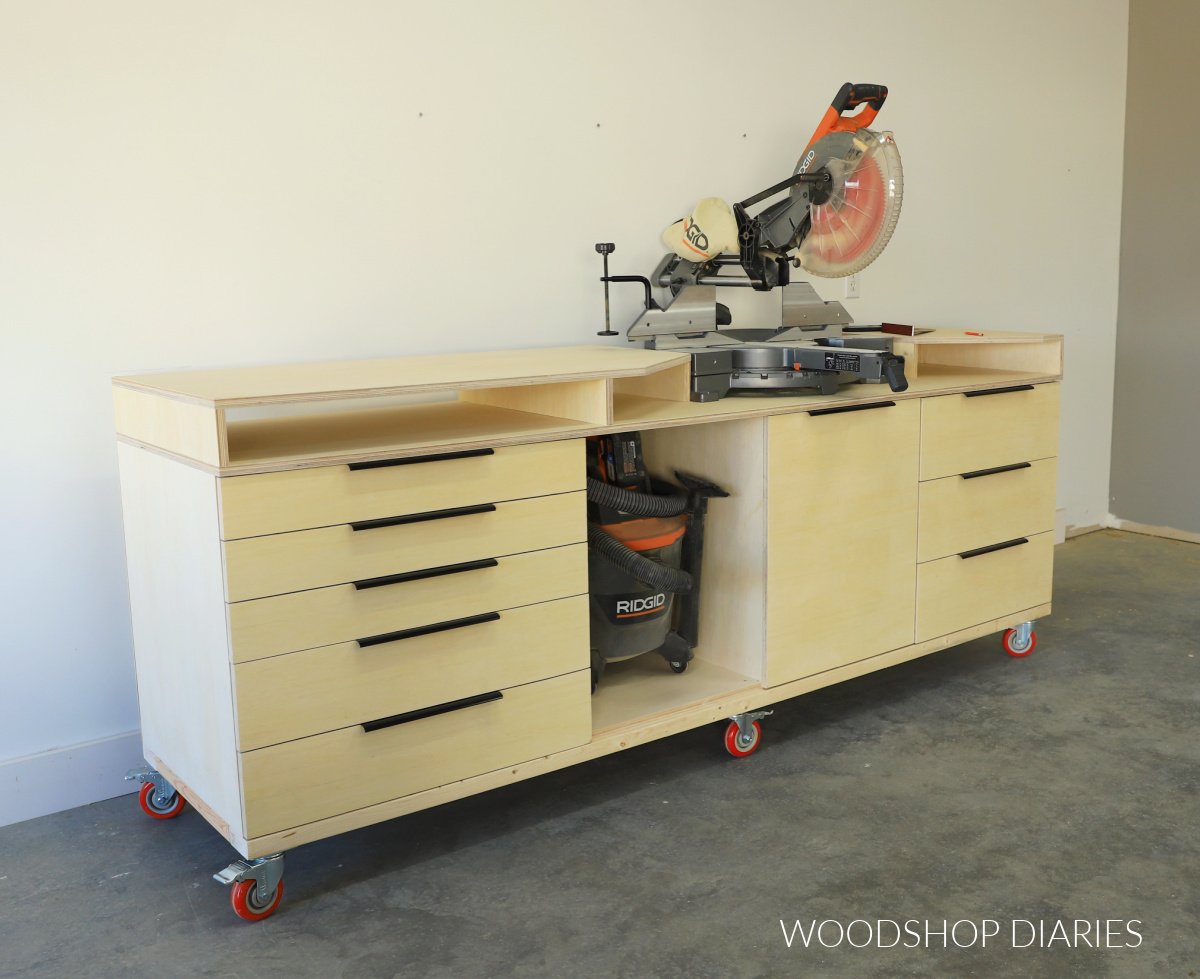
But, the only problem with a dedicated miter saw stand is that it can take up a lot of floor space.
So when I built this one, I focused on adding a variety of storage inside so that the floor space it takes up isn’t only used for the miter saw, but also for storing and organizing accessories, tools, and hardware in my shop space.
So, if you’re ready to build the ultimate mobile miter saw workbench (if I do say so myself!), I’m sharing all the details below.
*This post contains affiliate links. See website policies.
What to Consider Before Building a Miter Saw Stand
When building your own miter saw station, table, or stand for your workshop, first, think about your work space layout and how often you use your miter saw.
- How much space can you realistically dedicate to your miter saw?
- Do you need it to be mobile?
- What (if any) kind of storage do you want built into it?
Answering these questions can help you determine how to design or even if you need a miter saw stand at all.
Do I really need a miter saw stand?
You can absolutely use your miter saw without a stand. But, if you use it very often, having a dedicated stand is a really helpful upgrade.
A miter saw stand allows you to raise your saw to a comfortable working height and provides support for the pieces you are cutting. This makes your miter saw cuts more efficient, enjoyable, and safer.
Most miter saw manufacturers even offer various stand options that you can purchase along with your saw to at least raise it to a nice working level and provide some support for your pieces.
These types of stands are great for on the go as they typically fold up easily and can be carried around.
However, if you are normally using your saw in your workshop and not moving it around various job sites, building your own custom DIY miter saw stand is a great option that allows you add storage or dust collection to it as needed.
Benefits of having a mobile miter saw station
I’ve had a mobile miter saw station with foldable support wings for the last 8 years. I loved that stand, but recently decided to build this bigger one with additional storage.
There were several reasons why I decided to switch things up and some key benefits to this particular design:
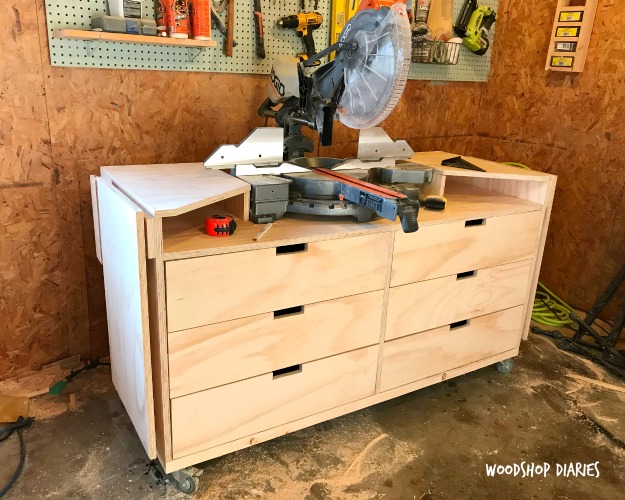
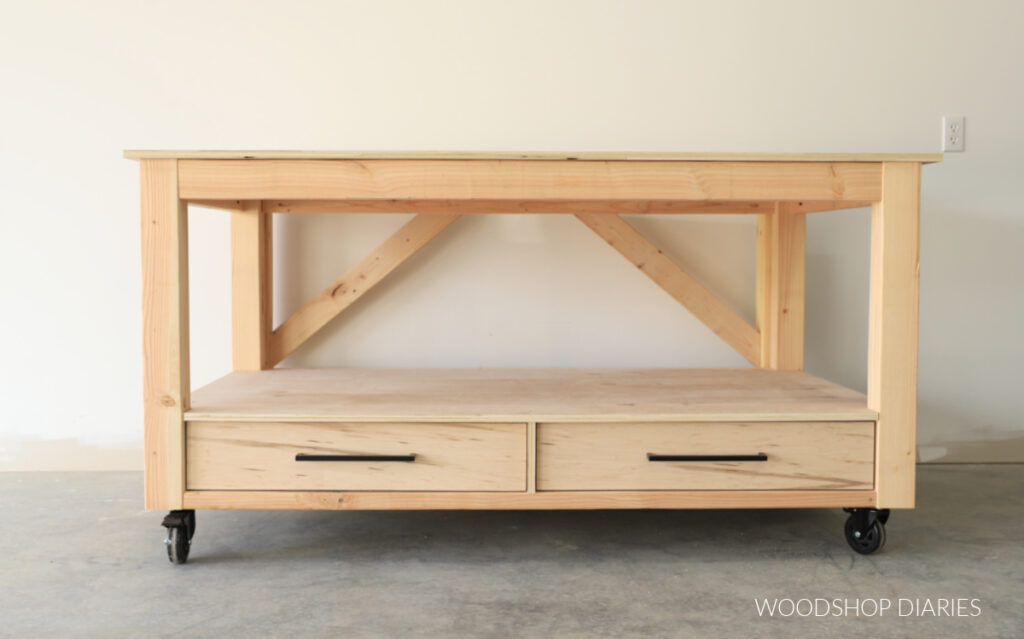
- It provides lots of storage. The 9 varying size drawers, open cubby and storage cabinet provide plenty of room to store saw blades, screws, tools, and other accessories to keep the shop organized.
- Side supports make cutting long boards easier. Cutting long pieces on a miter saw can be tough when you don’t have enough support far enough from the blade. This stand provides 8′ worth of sturdy support across the top.
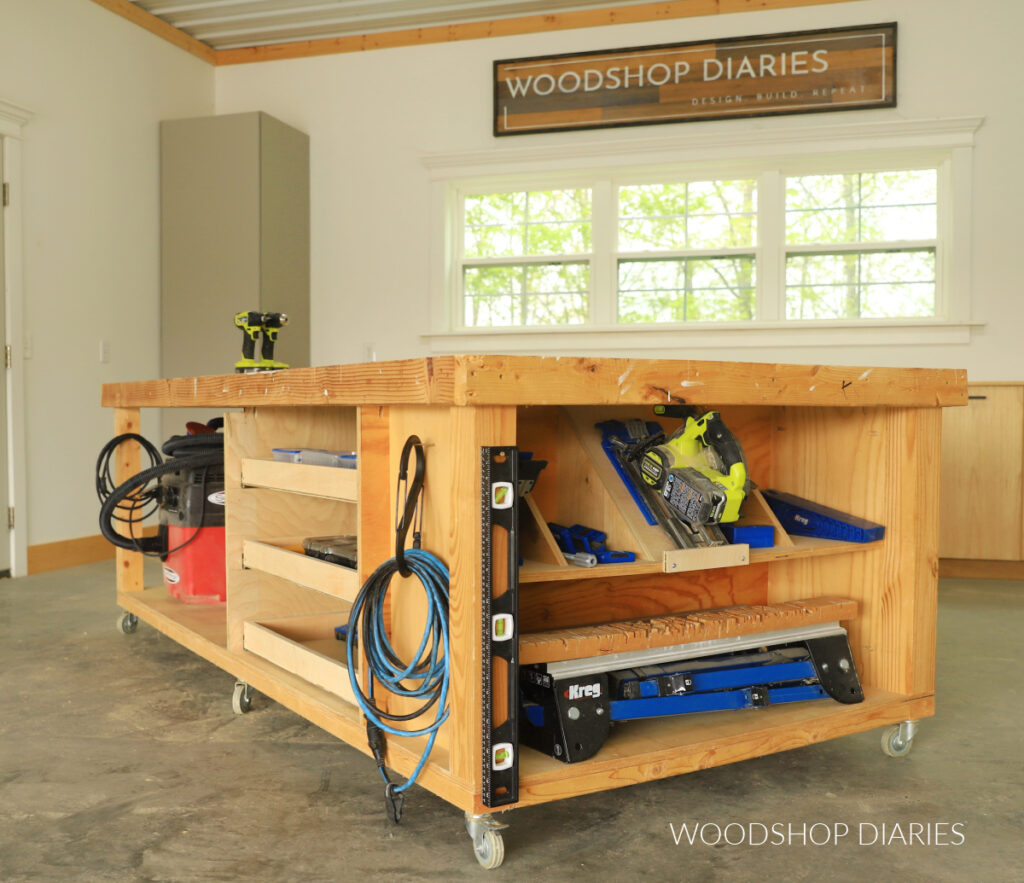
- Mobility = Versatility. Since this miter saw station is on wheels, it’s ideal for small or shared workshops, like in garages. It rolls right up against the wall when not in use and can roll out when needed.
- Safer cutting and better ergonomics. Making cuts at a comfortable working height vs on the floor allows for better control and saves on knee and back strain from bending over and squatting.
- Flexibility for the future. I designed this stand so that the top supports sit on top of the main body instead of being “built in.” That way, if you ever change saws, they are easy to remove and adjust to match the new saw base height.
Dust Collection Options
I do not use a dust collection system with this set up. I allow the dust bag on the saw to catch what it can, and after each building project, I vacuum off the stand, roll it out of the way and sweep up the dust.
That’s just another benefit of it being mobile–it’s easy to roll out of the way and sweep under.
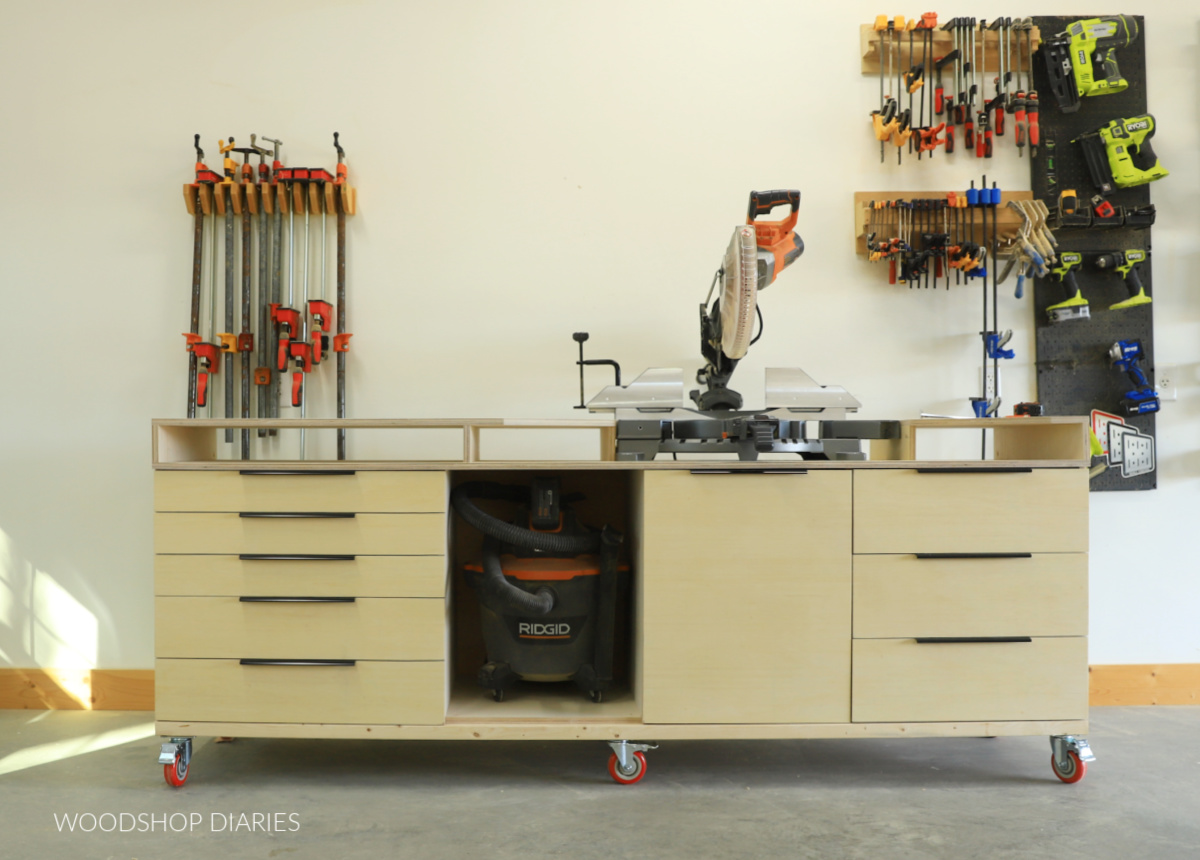
However, the open cubby in the stand is perfect for a shop vacuum that you can hook up to your miter saw, if you’d like.
DIY Miter Saw Stand Overall Dimensions
The overall dimensions of this miter saw stand are approximately 37 ¼″ tall x 96″ wide x 24″ deep.
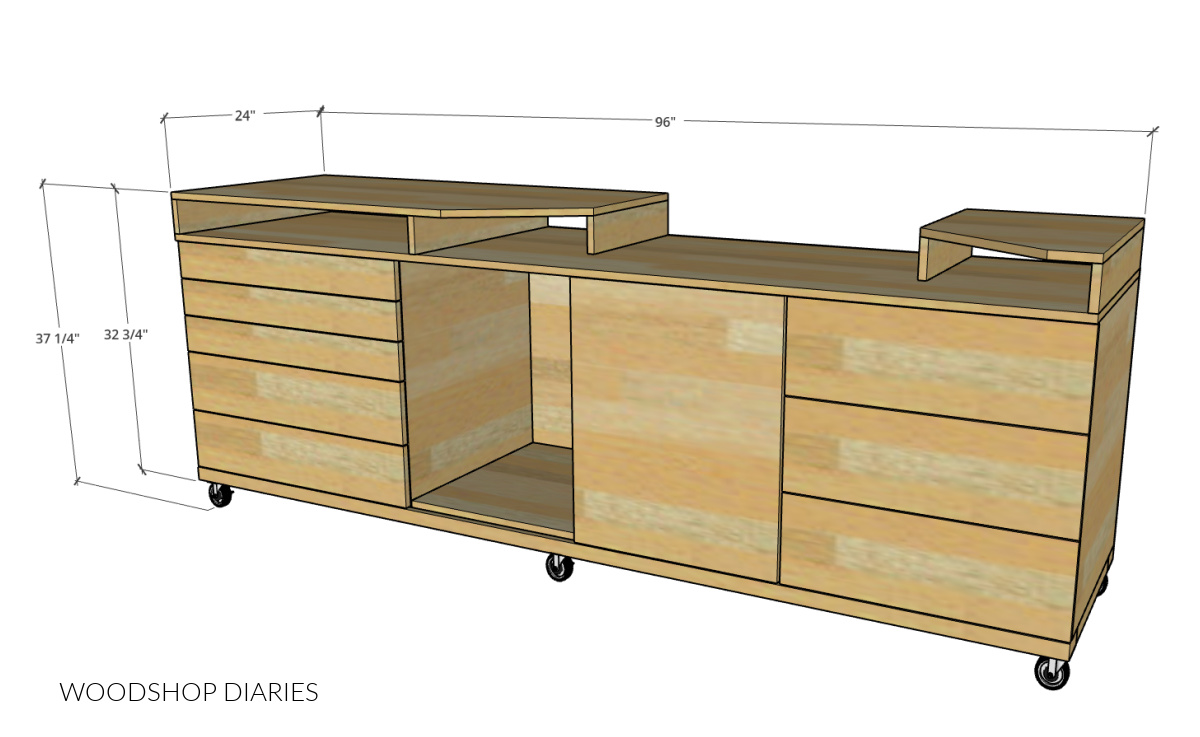
*NOTE: Total height will vary based on the exact casters used. Overall height without casters is 32 ¾″
Helpful resources for this build
You may find these posts and guides helpful during the building process:
Are DIY projects your thing? Sign up for our newsletter for priority access to the latest projects and build plans!
How to Build a Mobile Miter Saw Station
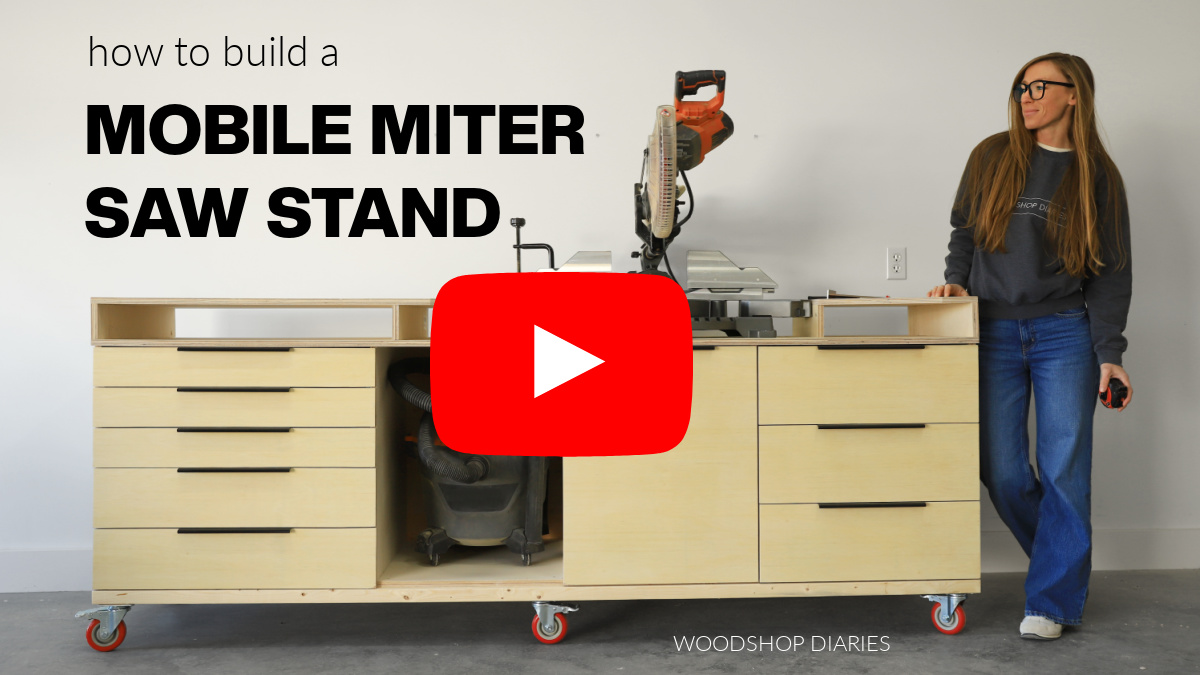
I’ve included the step by step building instructions below along with printable building plans. But, if you prefer to watch, I’ve also included a build video as well.
Check out the video for tips, visuals, and some extra clips from behind the scenes!
Love watching how-to videos? Subscribe to my YouTube channel for plenty more where that came from!
Prefer to print? Grab the printable mobile miter saw station building plans here:
Tools & Materials:
Tools:
- Circular Saw
- Miter Saw
- Cutting Guides (Kreg Rip Cut and AccuCut)–optional
- Pocket Hole Jig
- Shelf Pin Jig
- Concealed Hinge Jig
- Drill/Driver
- Table Saw (optional)
- Brad Nailer or Stapler (optional)
Materials:
- (3) 2x4x8′ boards
- (4) 4’x8′ sheets ¾″ plywood
- (2) 4’x8′ sheet ¼″ plywood
- (1) 50 count box 2 ½″ pocket hole screws
- (1) 250 count box 1 ¼″ pocket hole screws
- (1) 1 lb box 1 ¼″ wood screws
- (6) 4″ caster wheels
- (8) pair of 20″ drawer slides
- Shelf Pins
- (2) Full overlay frameless concealed hinges
- Brad nails or staples at least ¾″ or longer (optional)
To keep this project budget friendly, I used construction grade pine/spruce 2×4 boards for the base and “utility plywood” for the rest. This utility plywood was smooth and flat, but not very pretty.
Sanded pine would be another great option, as well as cabinet grade birch, maple or oak. But these options may be a little more expensive.
Step 1: Assemble Base Frame
To get started with this project, I built the base frame from 2×4 boards. Everything else for this stand will be built onto this frame, so it just makes sense to start here.
I cut five pieces of 2×4 to 17″ long and assembled them between two 8 ft 2x4s with pocket holes and screws to make my base.
RELATED: How to use pocket holes in woodworking projects
These five 2×4 pieces will “divide” my stand into four sections. I’ll use two sections for drawers, one for a shelf with a door and I’ll leave one open. You can adjust your section sizes however you’d like, but I’ve included all the dimensions I used in the plans.
Prefer to print? Grab the printable miter saw station building plans here.
If you wanted a bigger or smaller stand, simply adjust the size of the frame to fit your needs.
Step 2: Assemble Miter Saw Main Body
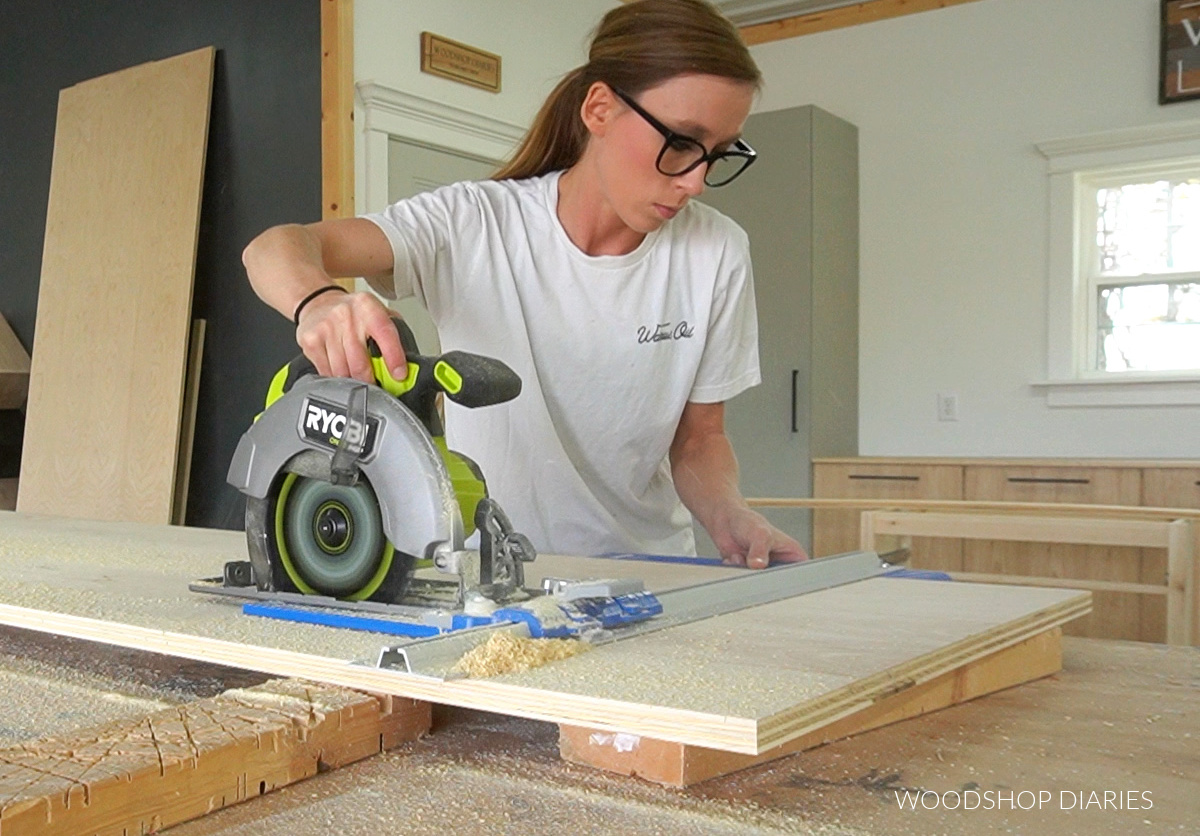
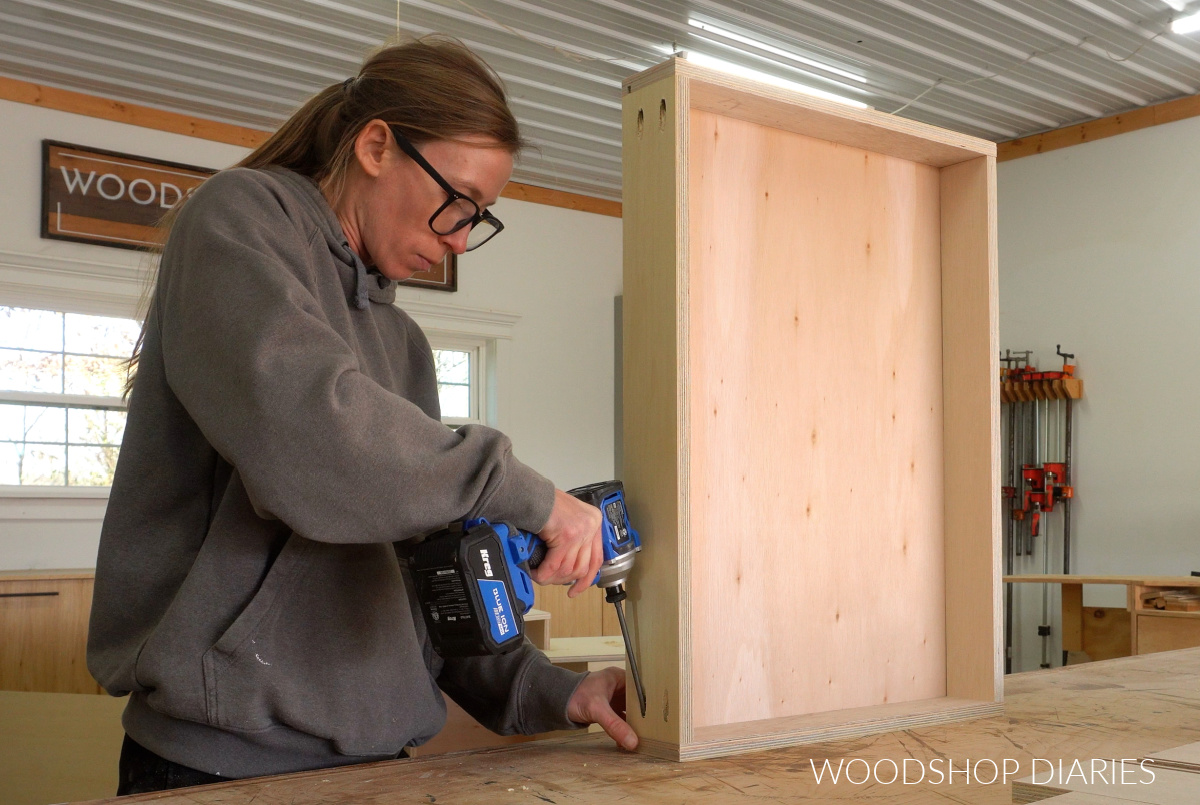
Once the 2×4 frame was together, I cut five ¾″ plywood panels for the sides and section dividers.
Then, I cut two more ¾″ plywood pieces to use as bottom panels in the middle two sections of my stand (these will be the cabinet and the open cubby).
RELATED: How to cut plywood sheets
I drilled pocket holes into both ends of the side and divider panels and secured them to my 2×4 frame (from step 1) using pocket hole screws. But, for the bottom panels, I just secured them to the frame with a screw at each corner.
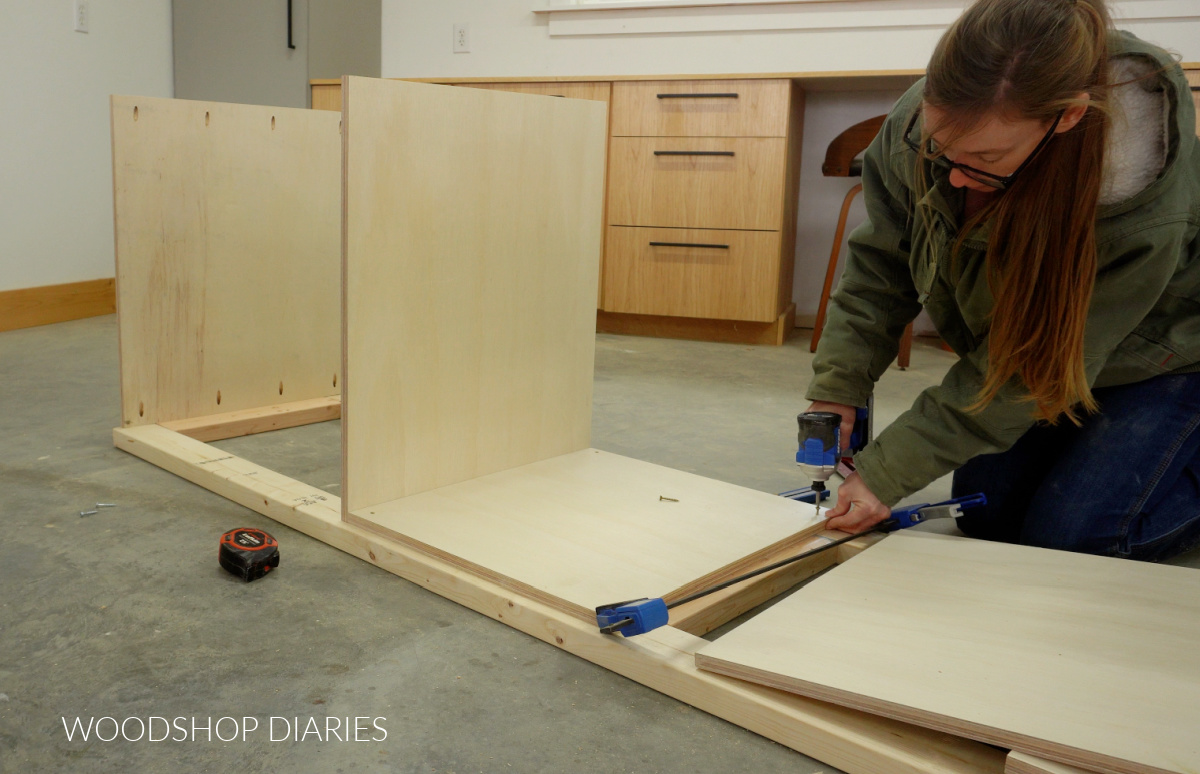
TIP: This is really just a design preference, but I cut and installed all of the side, divider and bottom panels to the frame so that they were inset from the front edge about ¾″. So when I add the drawers and doors later, it’ll all be flush across the front.
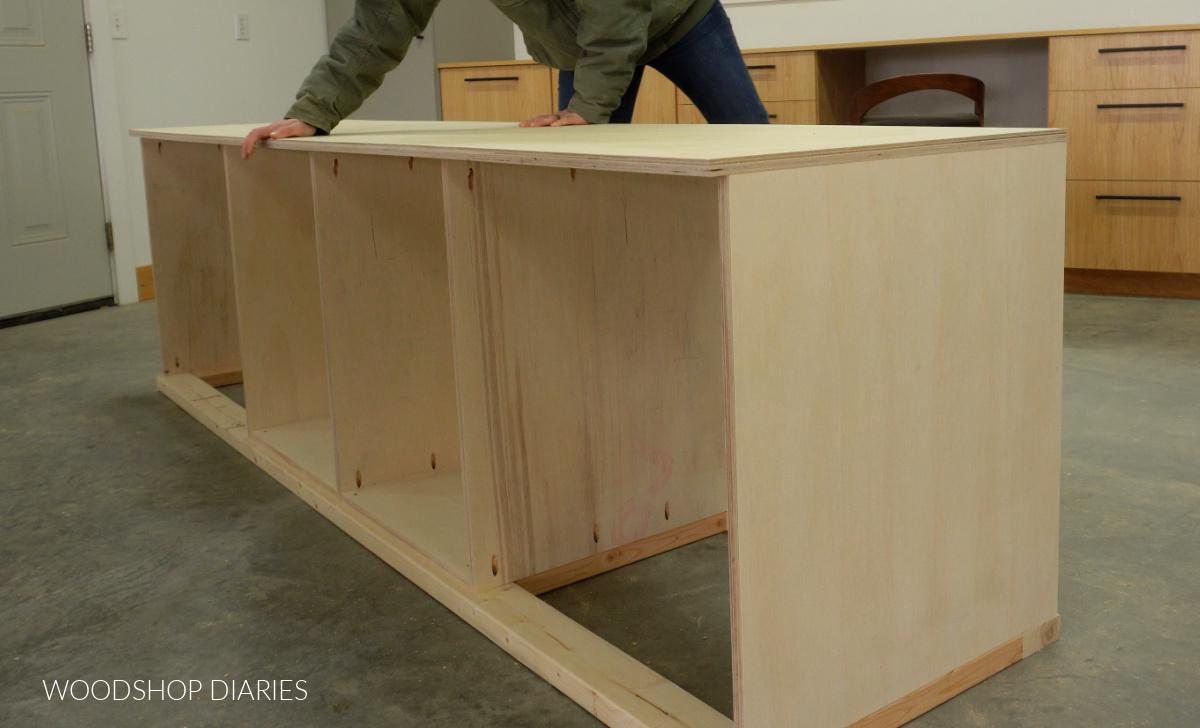
Finally, I cut a ¾″ plywood panel for the top to 24″ x 96″. I placed this on my stand and secured with screws through the pocket holes I had already drilled in my side and divider panels.
Prefer to print? Grab the printable building plans and full cut list here.
Step 3: Add Door and Shelf
In one of the middle sections (one with a bottom), I decided to add some shelves, so I drilled shelf pin holes on both sides of the cabinet. That way, I can place shelves inside to help me store some of my bulkier tools (like sanders!).
RELATED: How to add adjustable shelves to any project
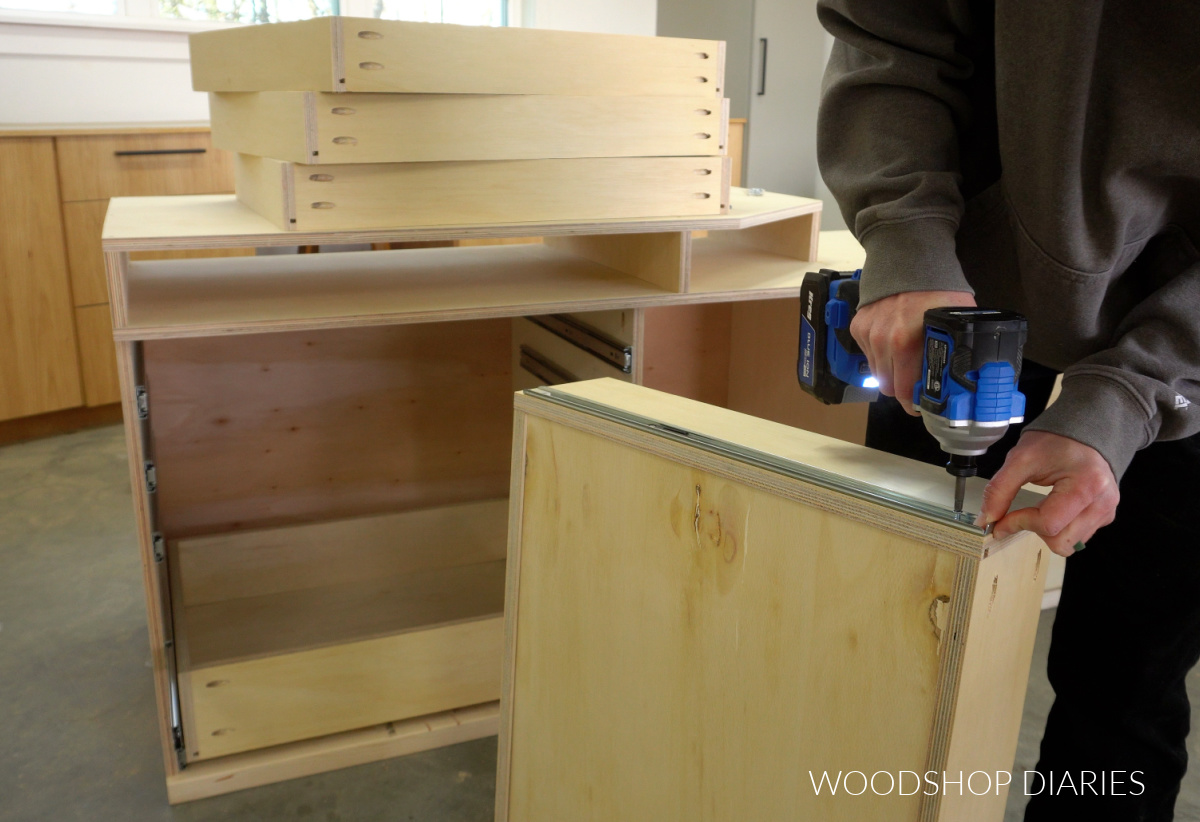
Then, I cut another piece of ¾″ plywood to use as the door for this section of the stand. This will help keep dust out of this cabinet and also hide the clutter inside (which is always nice ha!).
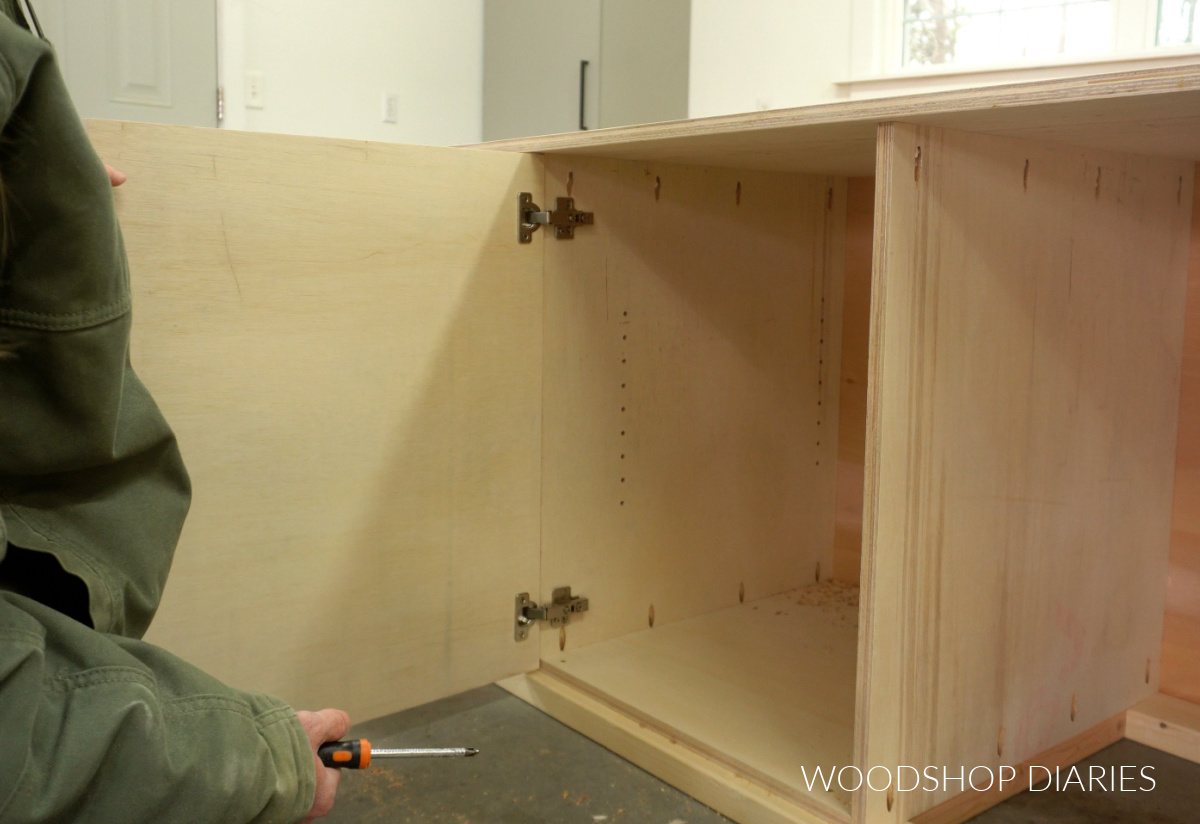
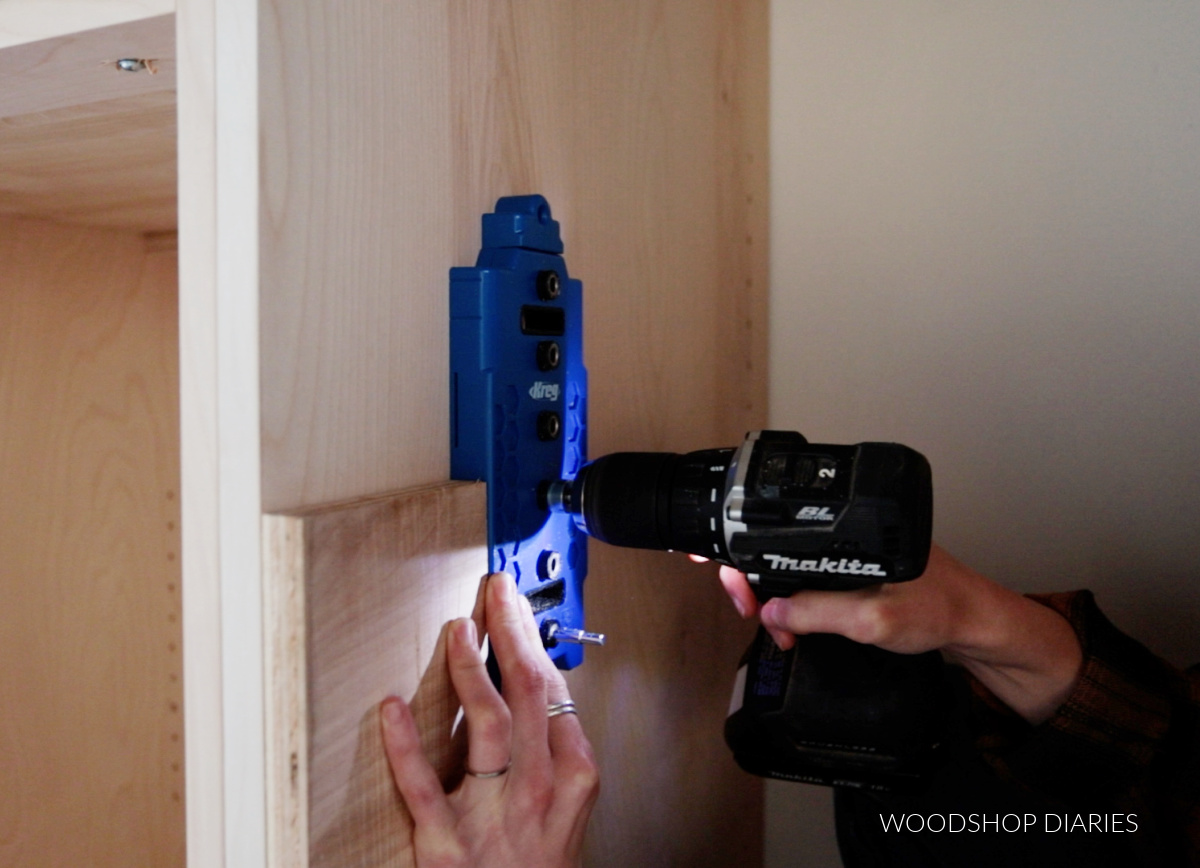
I installed this door to my stand using frameless full overlay concealed hinges.
Learn how to install cabinet doors using concealed hinges here.
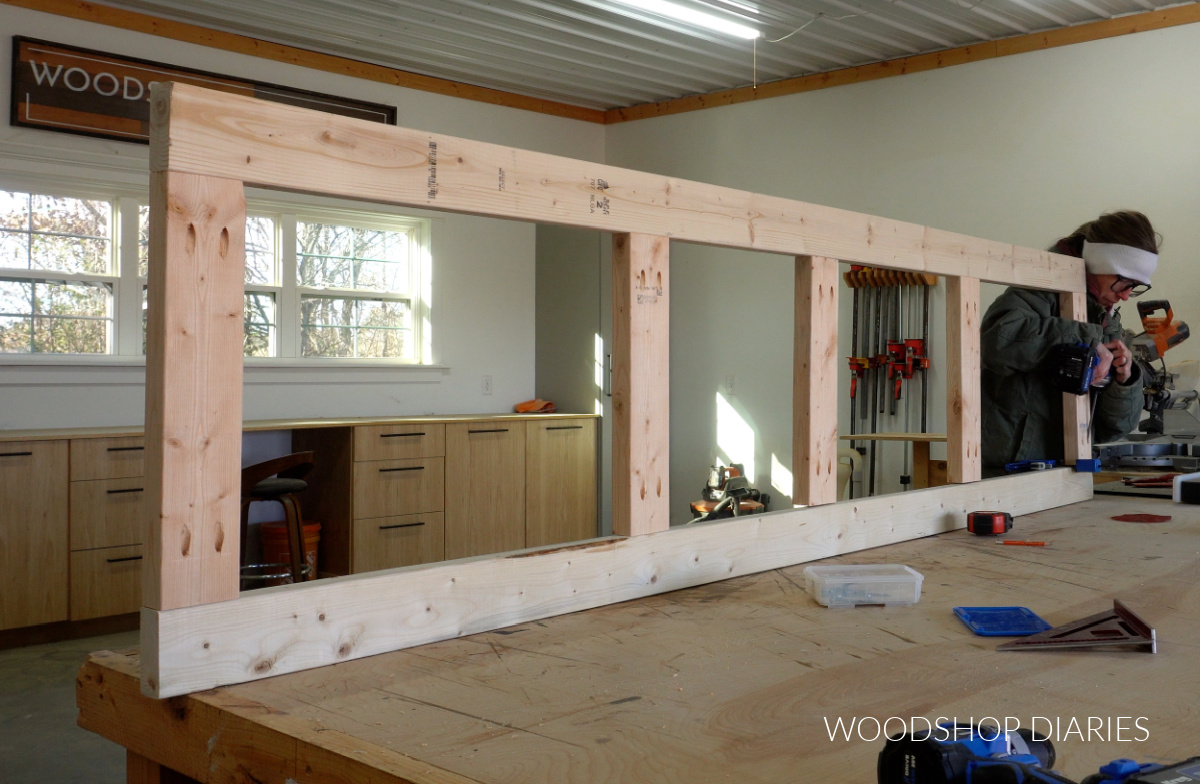
Step 4: Install Miter Saw Top Supports
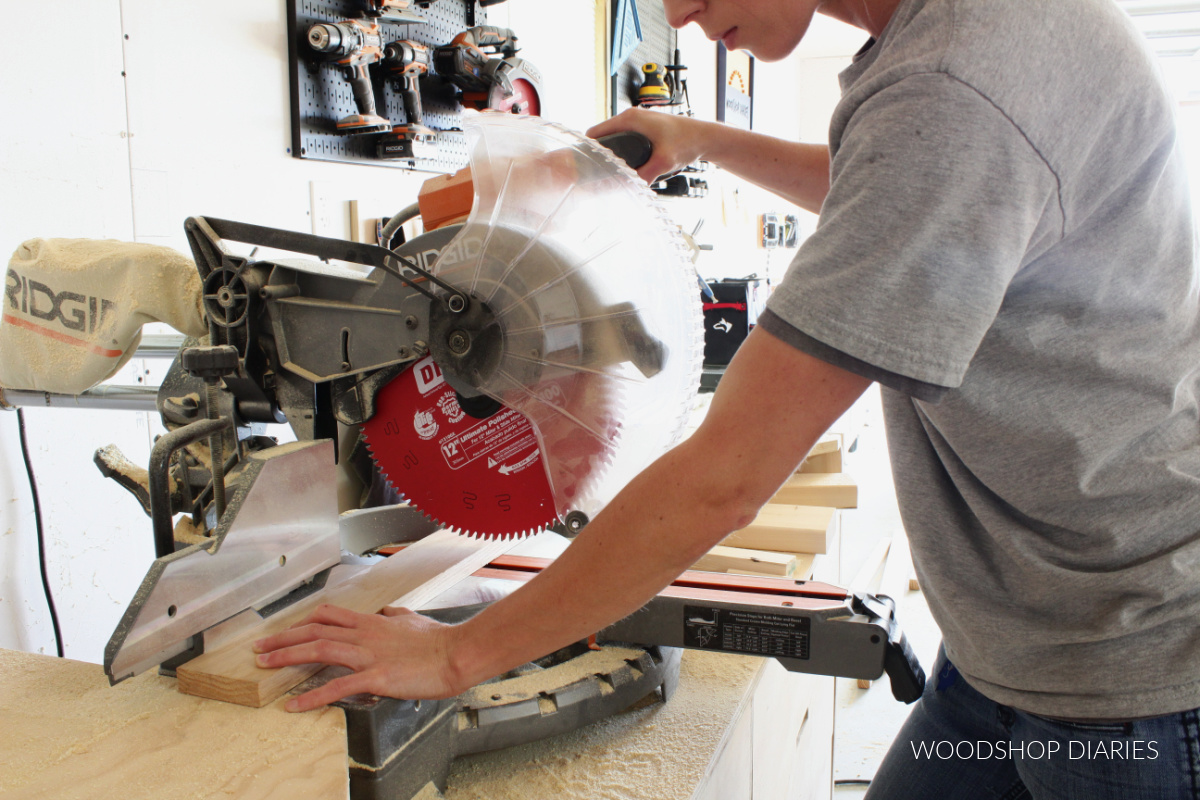
Next, I added what might be the most important part of a miter saw stand…the supports! These are what will support the boards while cutting and the key here is to ensure the supports are the same height as your miter saw base.
So, first, I measured the height of my saw base (measure your own as every saw’s height will vary) and got 4 ½″. My plywood was just under ¾″ thick, so I subtracted that to give me 3 ¾″.
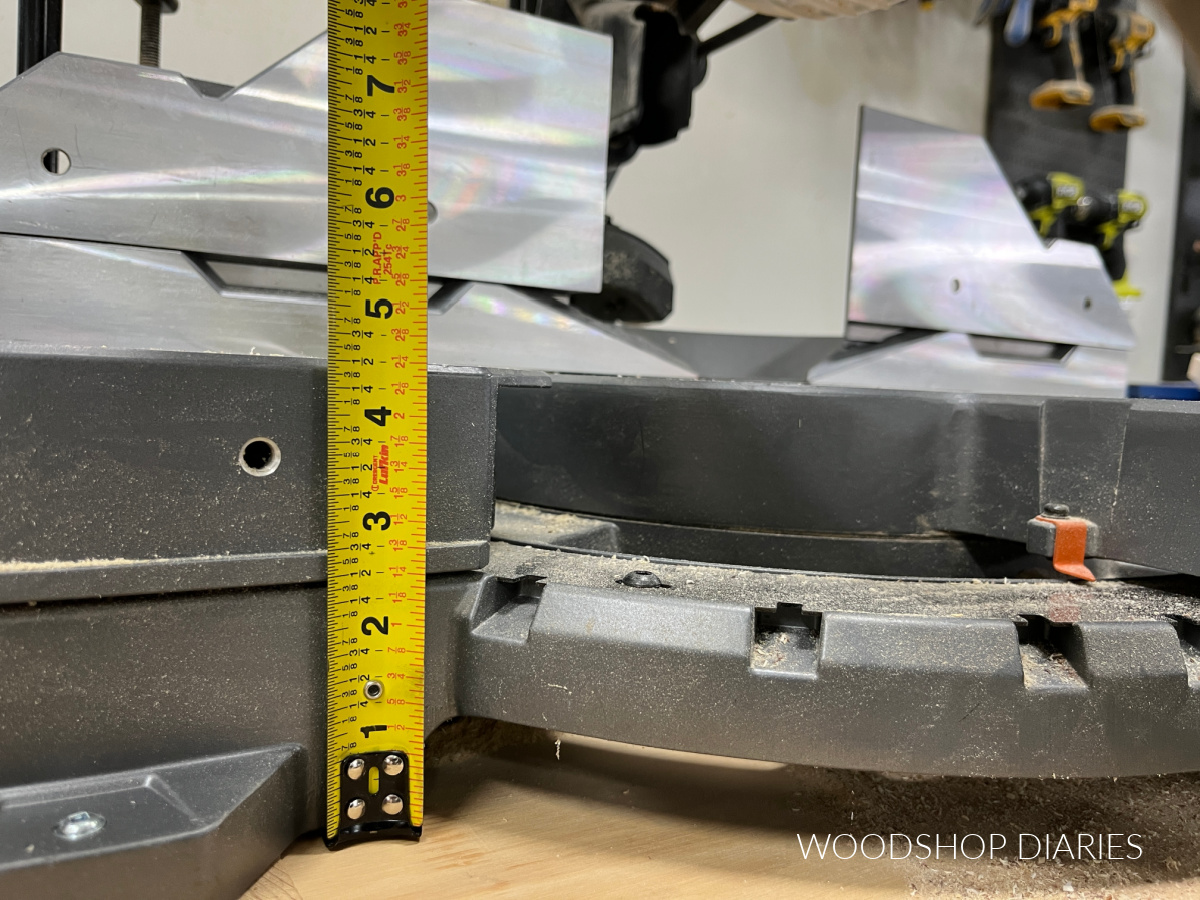
I ripped five strips of ¾″ plywood to just a hair over 3 ¾″ (it was more like 3 13/16″) to use as my “risers.” That way, when I place my plywood on top, the total height will be 4 ½″ so it will match my saw base height.
TIP: It’s best to err on the side of the supports being just a little taller than the saw base vs the other way around. It’s much easier to shim up the saw to match the supports than to shim the supports to match the saw.
I secured these risers to the top panel of my stand with screws from the bottom side.
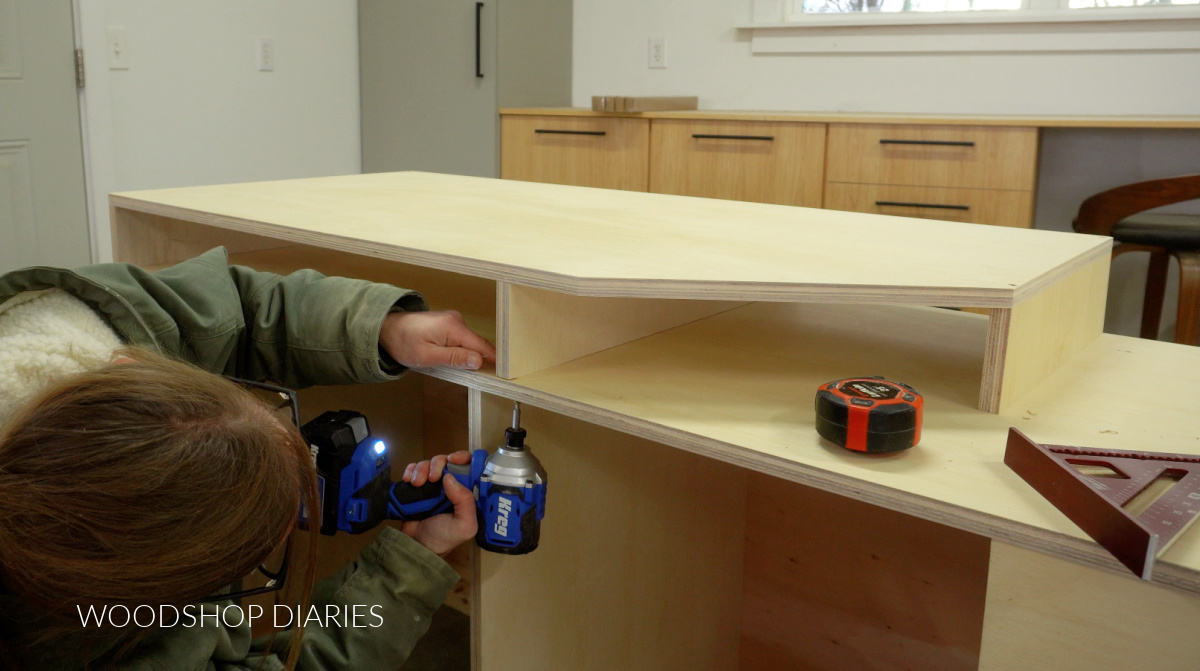
I used three to make a support box on the left side (shown above) and the other two to make a support box on the right side of my stand (shown below). I made sure to leave enough room between them for my saw to fit.
Once the risers were secured, I cut and placed ¾″ plywood pieces on top of them with a few screws. Both sides of these tops need to be cut with a miter on the front corner to allow the miter saw to miter both directions without hitting anything.
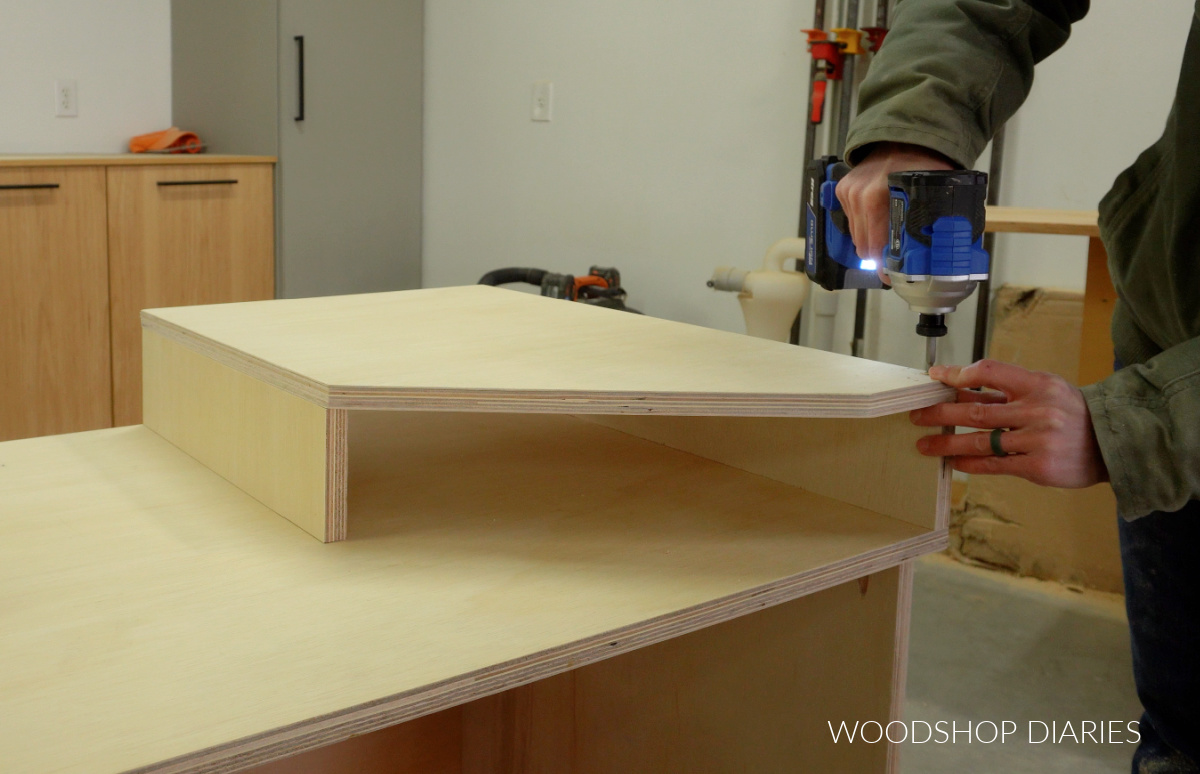
I test fit my saw between the supports and used a level to ensure the saw height matched the supports. It’s important that these be flat all the way across.
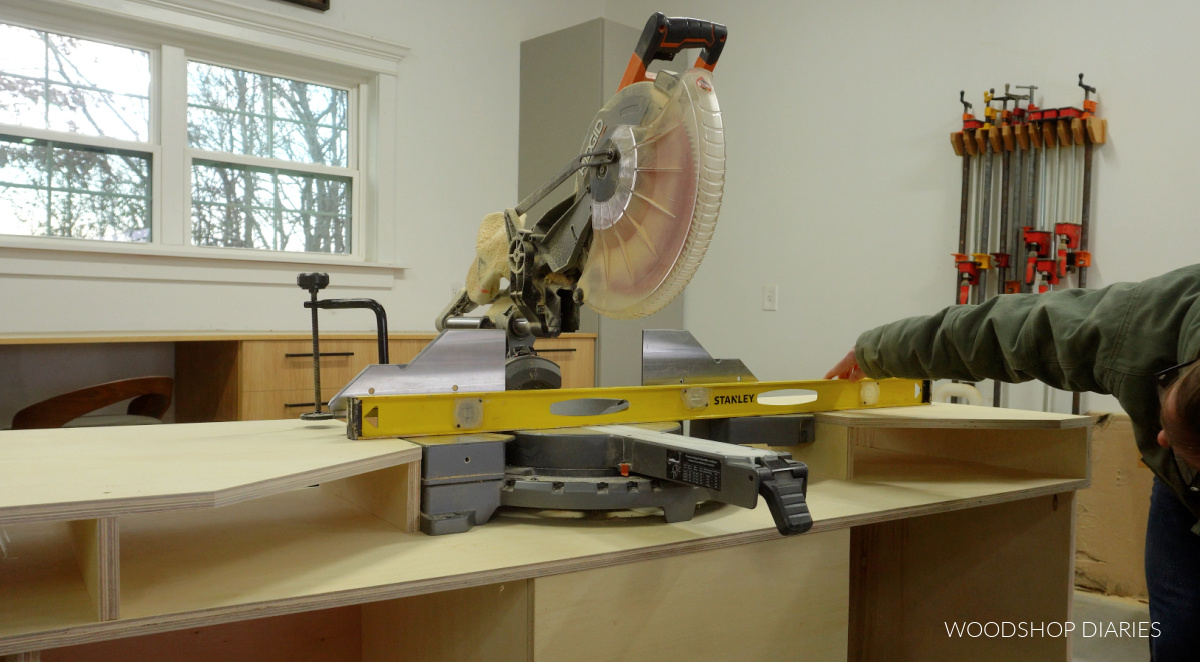
If the supports are too high, it can cause the pieces to pinch the blade when cutting and result in kickback. If they’re too short, the pieces will not be properly supported and can cause inaccuracies in your cuts.
These can be shimmed as needed (see step 7) for a perfect fit, but they should be pretty close at this point. After checking the fit, I removed the saw to finish the rest of the build.
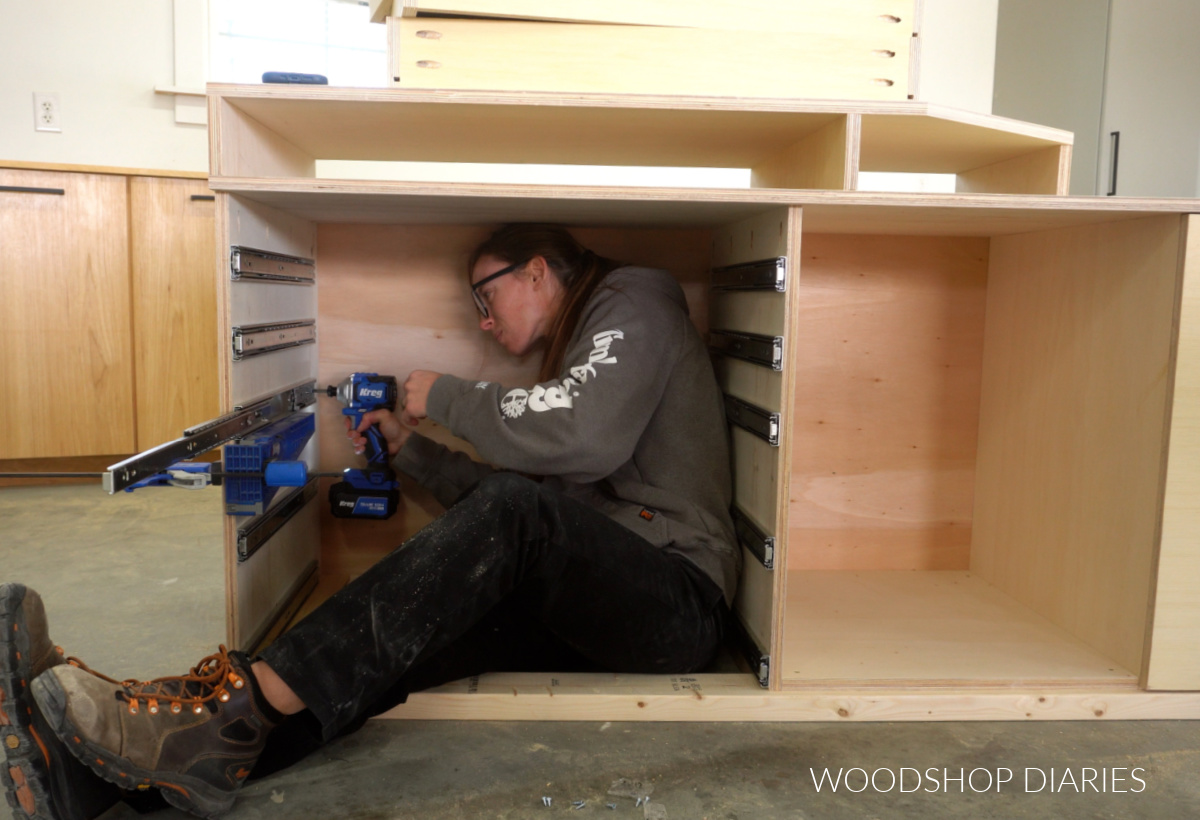
Step 5: Add Storage Drawers
Next, I moved on to installing the drawers into my new stand. My old stand had six deep drawers, which provided a lot of storage.
But, because all the drawers were so big, I was constantly losing stuff in them. So for this stand, I opted for a combination of big and small drawer sizes. I added three shallow and two medium sized drawers in the left section of my stand and three deep drawers in the right section.
So I installed 20″ ball bearing drawer slides into these two sections. You can find all the dimensions and slide placements in the printable plans.
RELATED: How to install side mount drawer slides
Then, I assembled my five shallower drawer boxes for the left section of the stand.
RELATED: How to build a drawer box
I installed these onto the slides in the stand. Learn how to install drawer boxes on drawer slides here.
And finally, I added some simple ¾″ plywood drawer fronts using screws from inside the drawer box.
RELATED: How to install drawer fronts
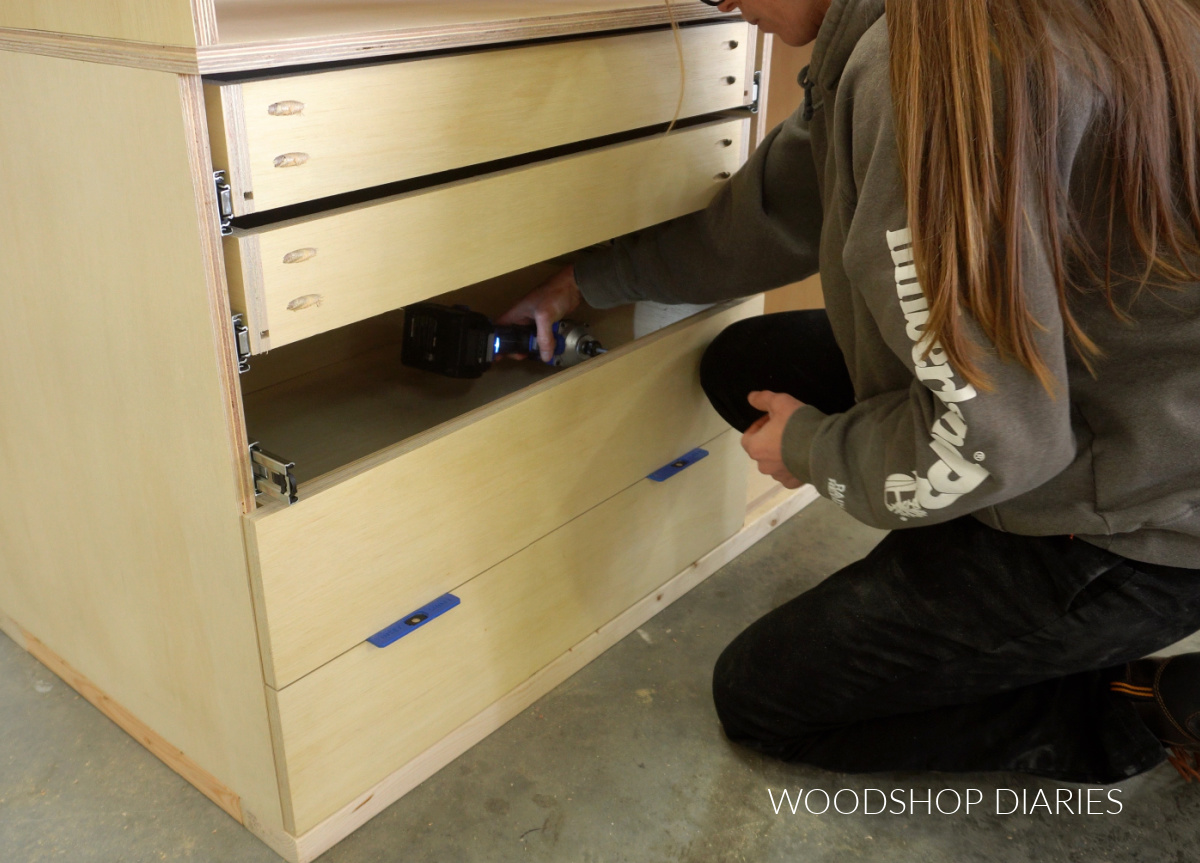
And after the five were in on the left side, I repeated to add three deep drawers the same way into the right side of my miter saw stand.

Then, I carefully removed (and labeled…trust me) the drawers so that I could flip it over to add the casters in the next step.
FYI: side mount drawer slides have little tabs on the sides that allow you to easily remove the drawer boxes from the cabinet. Then, you can simply slide them back in as needed.
Step 6: Attach Back and Caster Wheels
Because I wanted my miter saw stand to be mobile, I opted to add some heavy duty caster wheels to the base frame.
I flipped the stand on its back and screwed on 4″ caster wheels, one at each corner and two in the middle. Make sure to use caster wheels with brakes so that you can lock the miter saw stand in place while cutting.
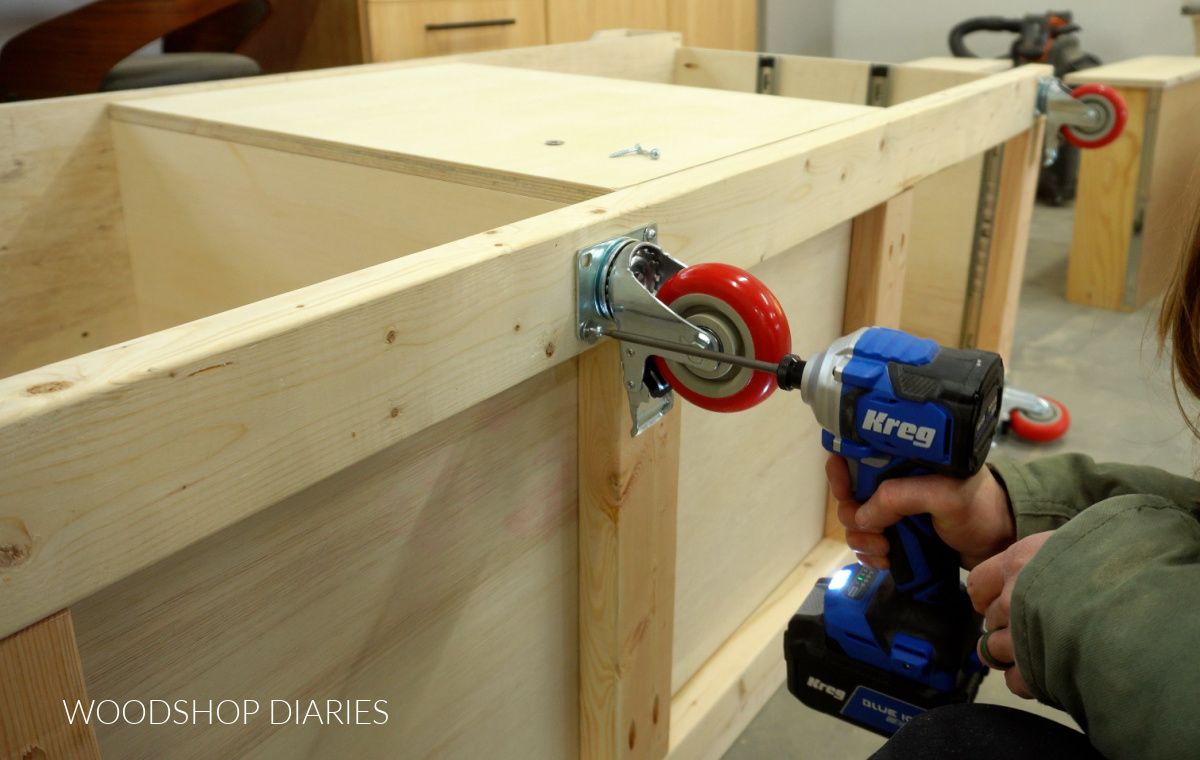
Now, you may notice in the photos (and if you watched the video), that I installed the back panel onto my stand well before this step. However, having the back panel on made several parts of the build more difficult.
So in hindsight, this is where I’d recommend adding the back panel. I simply cut a piece of ¼″ plywood and stapled it over the back side of the stand.
Step 7: Secure Miter Saw & Finish
At this point, I replaced the drawers back into the cabinets and placed my miter saw back on top. After ensuring the miter saw was level, I screwed it to the stand.
TIP: If you need to shim up your saw or your supports, you can to ensure it’s as flat as possible across the top for proper support.
Then, I finished up by adding some minimalist drawer pulls to the drawers and the door.
And now my new stand is ready to roll into action (I’m sorry, was that too cheesy?) and I’m excited to use it on many projects to come!
This extra storage and sturdy top supports are an awesome upgrade. If you’d like to build your own, be sure to grab the printable plans here!

Looking for more workshop and garage storage ideas?
If you enjoyed this project and want to see more workshop and garage organization and storage projects, here are a few favorites!
If you enjoyed this project and want to save it for later, be sure to pin it or share to your favorite social channel!
Until next time, friend, happy building!