
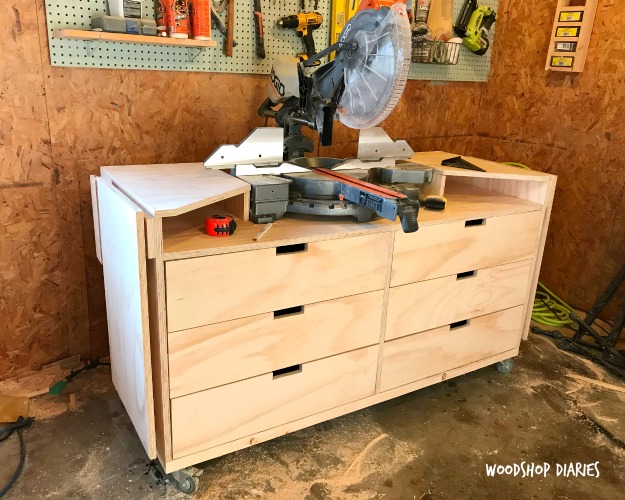
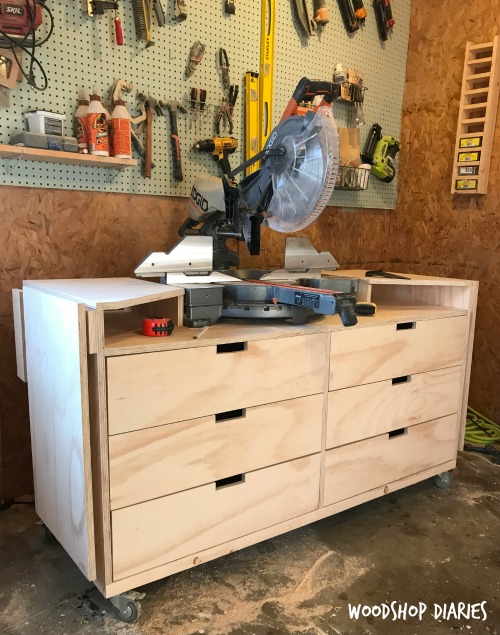
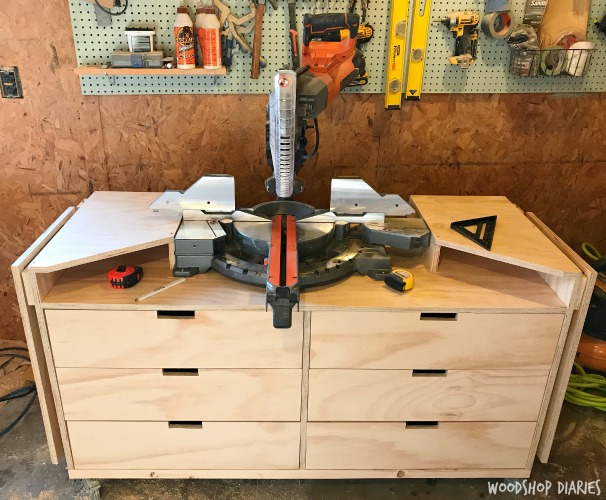
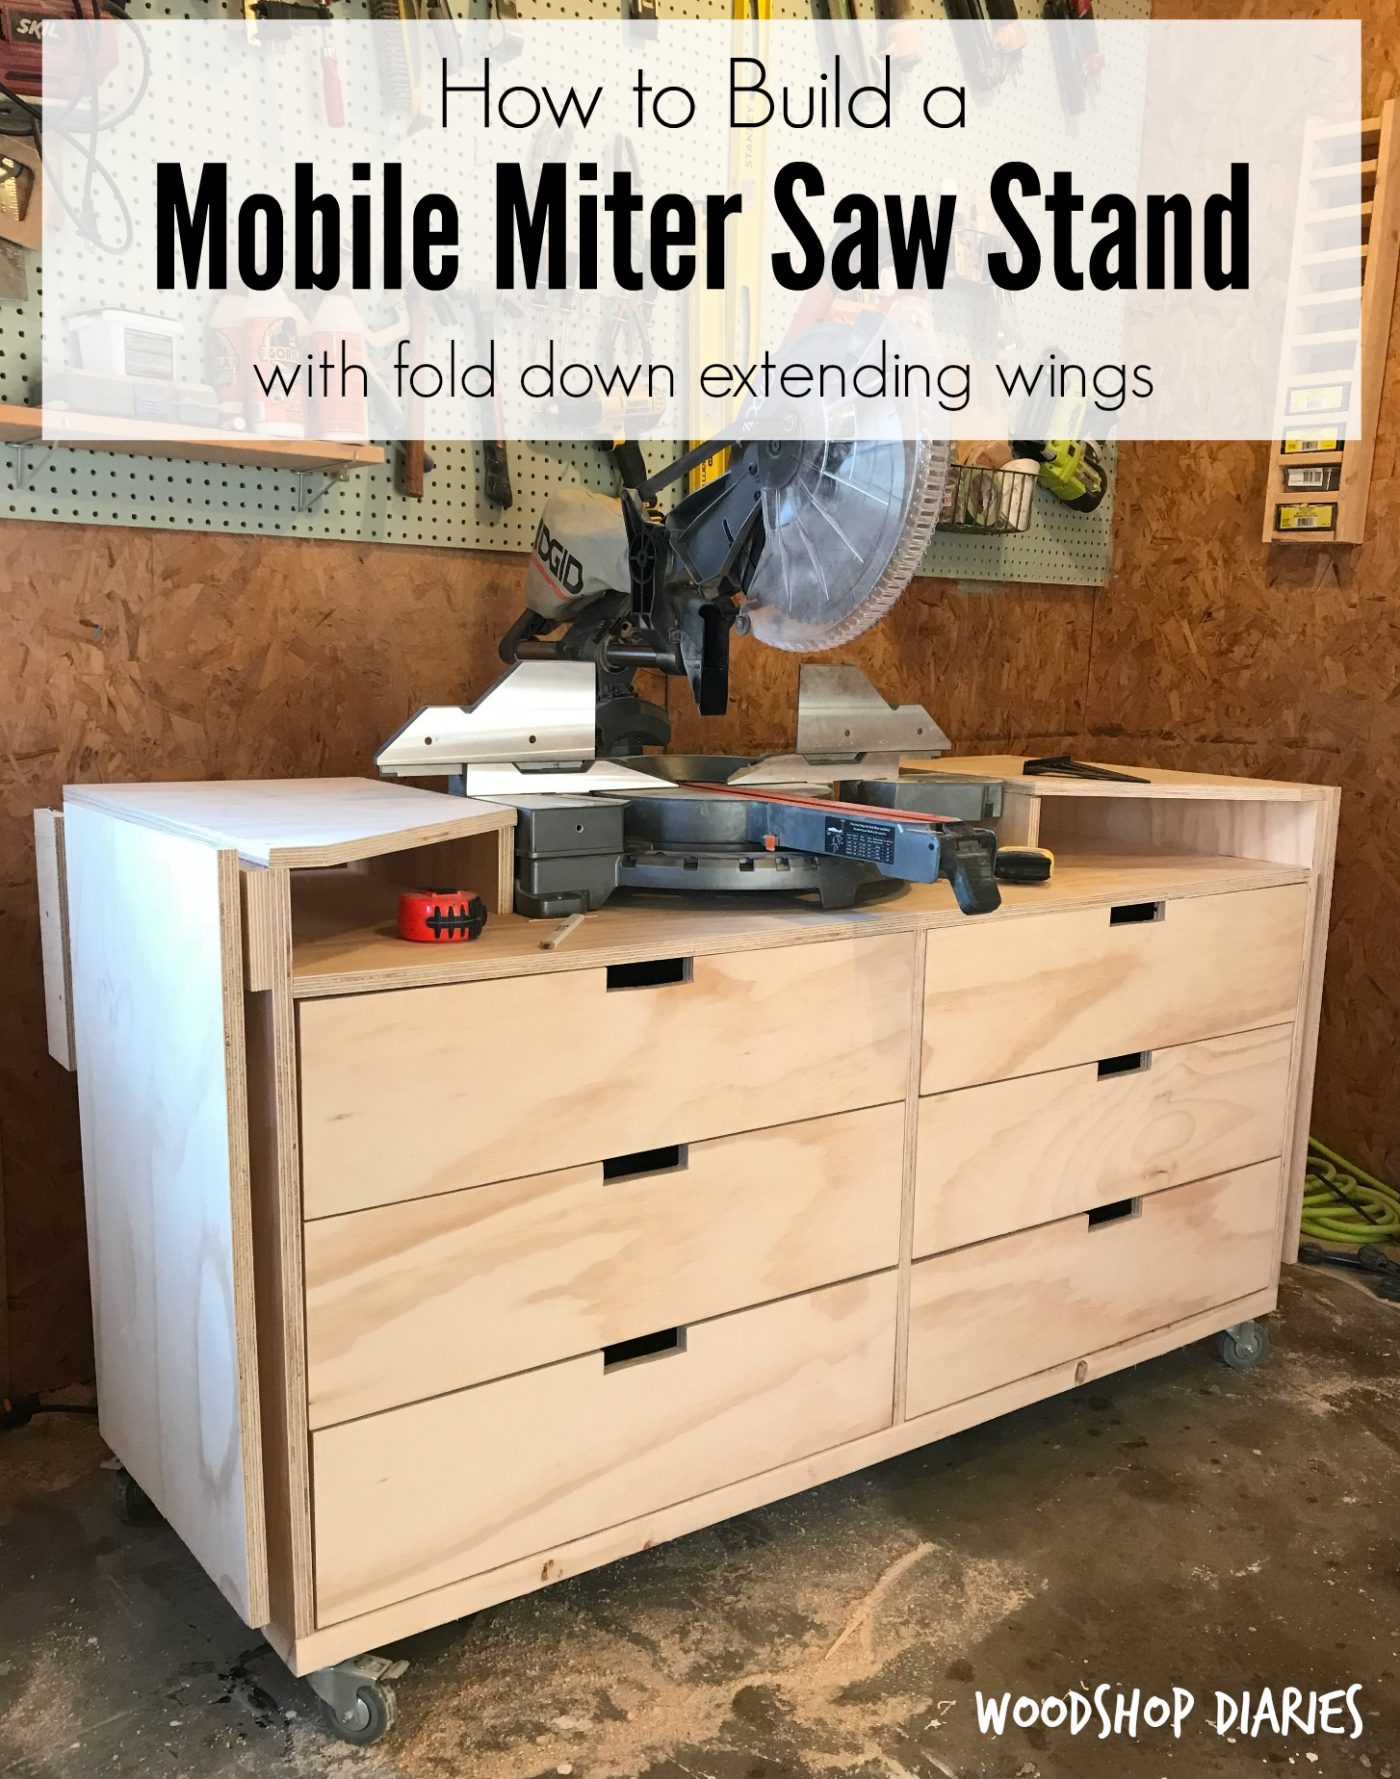
In this post, I’m sharing how to build a DIY miter saw stand with foldable wings that’s on wheels so it can roll around the shop and out of the way!
Miter saws are often the most used saw in a woodworking shop. That may not be the case in EVERY shop, but it’s true for many, including my own!
Because of this, often times, miter saws are placed in the center of a workshop, in elaborate built-in stations that take up a whole wall.
And that’s a great option if you have a huge dedicated woodworking shop (and don’t change your layout often like I tend to do).
But when I decided to build a miter saw stand for my own shop, I actually went with a smaller mobile option with foldable wings instead!
This allowed me to roll it out and expand it to cut long boards if needed, then fold it back down and tuck it into the corner when not in use.
If this looks like the perfect addition to your workshop, I’ve got the mobile miter saw stand building plans below.
What to Consider Before Building a Miter Saw Stand
There are a few things to consider when building your own miter saw station, table, or stand for your workshop.
Think about your work space layout and how often you use your miter saw. How much space can you realistically dedicate to your miter saw? Do you need your miter saw stand to be able to move? Will it need storage space built into it?
This will help you determine how to design or even if you need a miter saw stand at all.
Do I really need a miter saw stand?
Of course you can use your miter saw without a stand. But having one is a helpful upgrade, especially if you use it very often.
A miter saw stand allows you to raise your saw to a comfortable working height and provides support for the pieces you are cutting.
This makes your miter saw cuts more efficient, more enjoyable, and safer.
There are lots of options for stands out there from inexpensive general use miter saw stands to elaborate custom built-in miter saw stations.
Most miter saw manufacturers offer various stand options that you can purchase along with your saw to at least raise it to a nice working level and provide some support for your pieces.
These types of stands are great for on the go as they typically fold up easily and can be carried around.
However, if you are normally using your saw in your workshop and not moving it around various job sites, building your own custom DIY miter saw stand is a great option that allows you add storage or dust collection to it as needed.
Benefits of having a mobile miter saw station
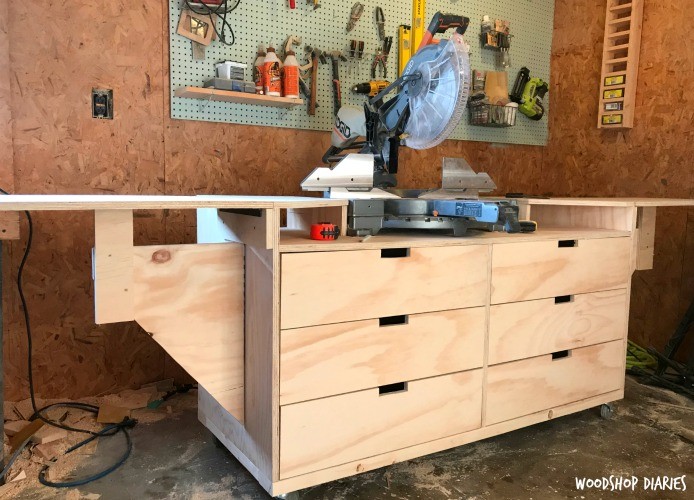
In this case, I built a custom miter saw station, but I made it mobile and with expandable support wings.
There were several reasons why I chose this particular set up and some key benefits I’ve gained from using it:
- It’s great in small work spaces. When folded down, the stand only takes up approximately 24″ x 64″ so it can be easily stored away when not in use.
- It provides lots of storage. The six large drawers provide plenty of room to store saw blades, screws, tools, and other accessories to keep the shop organized.
- Expandable wings make cutting long boards easier. Cutting long pieces on a miter saw can be tough when you don’t have enough support far enough from the blade. The expandable wings on this stand provide support up to approximately 60″ from the blade.
- Mobility = Versatility. Since this miter saw station is on wheels, it’s easy to move it around and use the expandable wings as an additional workbench surface anywhere I need it.
- Safer cutting and better ergonomics. Making cuts at a comfortable working height vs on the floor allows for better control and saves on knee and back strain from bending over and squatting.
Is a fence on a miter saw station necessary?
Miter saws come with their own built in fences. These are the raised parts toward the back of the saw base that you push your pieces against when making your cuts.
However, the length of the fence is typically limited to the width of the saw base…which isn’t usually very long.
Many people will add an additional fence onto their saw stations to add stop blocks and other accessories.
This is certainly an option and can be helpful. But it’s not a necessity. I don’t personally use a fence extension beyond what’s included on my miter saw.
But this stand allows for that option if you want to add one onto the foldable wings and the top of the cubbies.
Dust Collection Options
Dust collection is always a topic of interest. I do not use a dust collection system with this set up.
I allow the dust bag on the saw to catch what it can. And after each building project, I vacuum off the stand, roll it out of the way and sweep up the dust.
That’s just another benefit of it being mobile–it’s easy to roll out of the way and sweep under.
To be honest, this hasn’t really bothered me in the 6 or so years that I’ve used it. It only takes about 5 minutes to sweep up every week or so.
However, if you can’t stand the dust, you can roll it away from the wall a foot or two, slide in a shop vacuum behind it and hook it up while making your cuts. Again…just another benefit of it being on wheels.
You could also leave the drawers out of one side of the stand and use that space to store a designated vacuum inside to collect the dust.
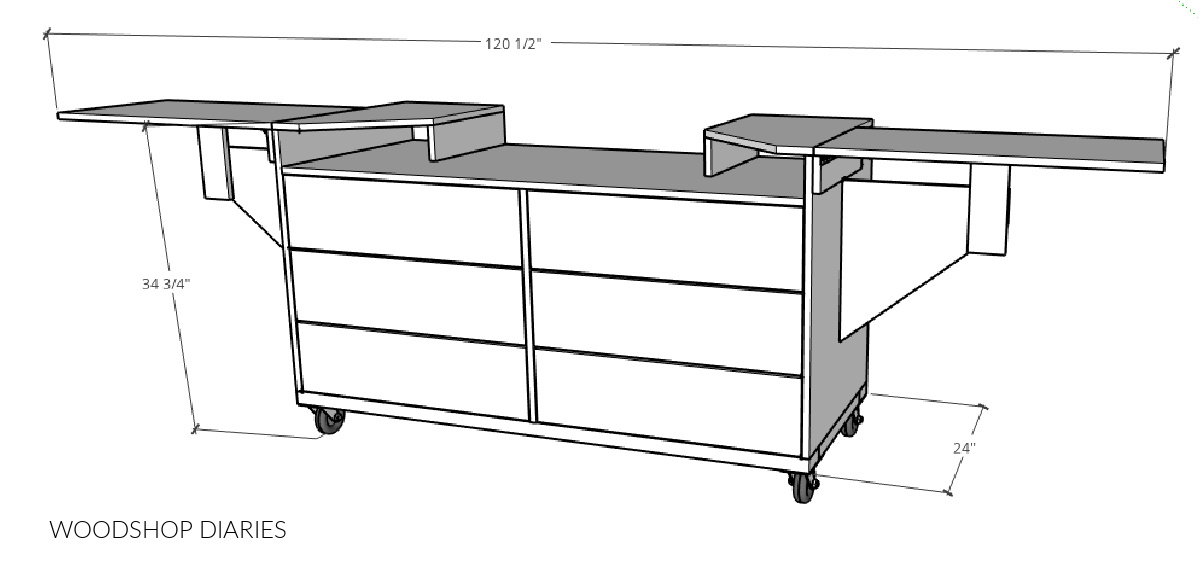
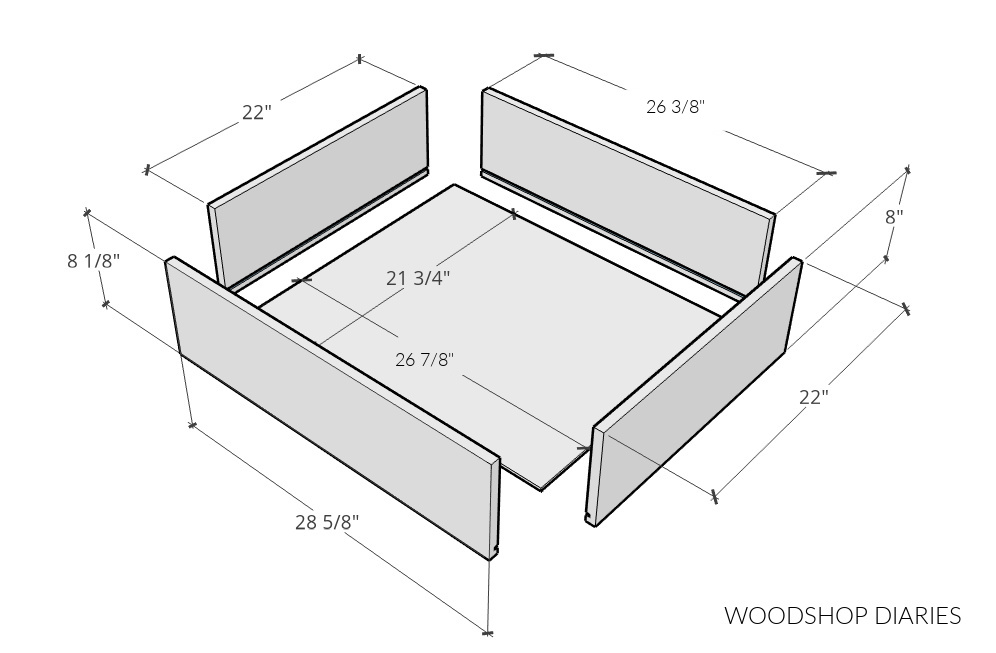
DIY Miter Saw Stand Overall Dimensions
With wings fully extended, the overall dimensions of this miter saw stand are approximately 34 ¾″ tall (may vary depending on caster wheels used) x 120 ½″ wide x 24″ deep.
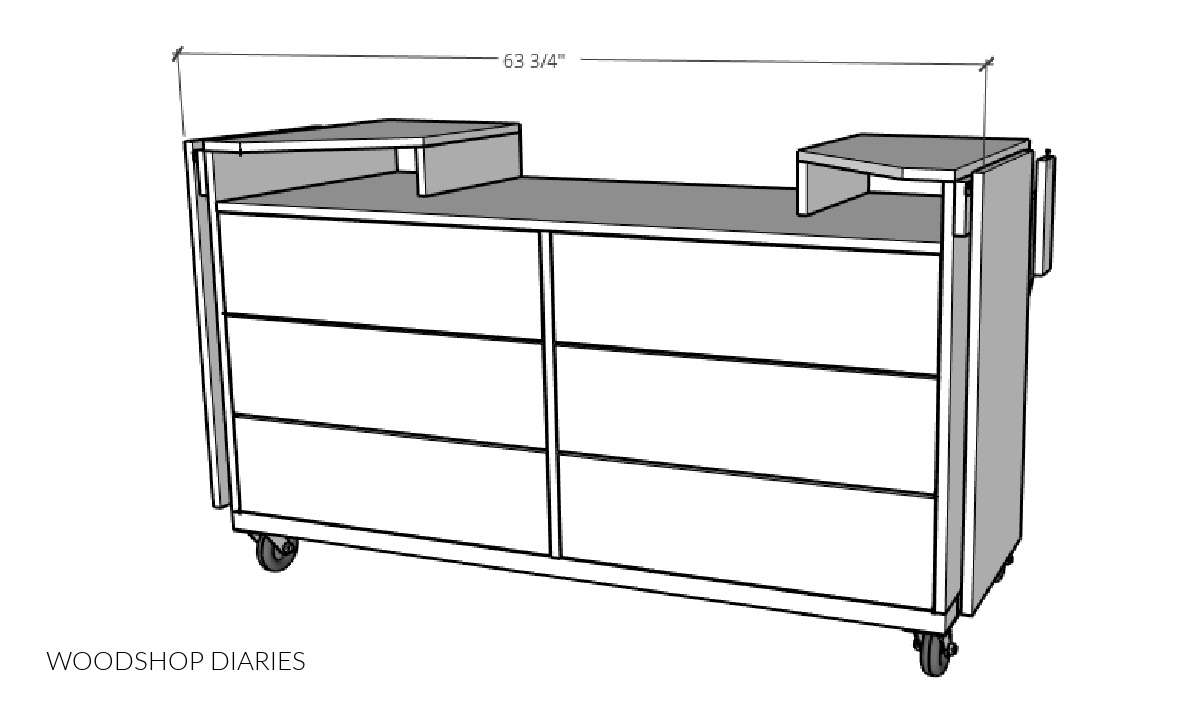
With wings folded down, the height and depth remains the same, but the width is 63 ¾″ wide.
Helpful resources for this build
You may find these posts and guides helpful during the building process:
Tools & Materials
This post contains affiliate links. Please see disclosure policy for details.
Tools:
- Jig Saw
- Circular Saw
- Kreg Rip Cut (optional, but helpful)
- Kreg Accucut (optional, but helpful)
- Kreg Pocket Hole Jig
- Drill/Driver
- Miter Saw
- Table Saw (optional)
- Tape measure
- Speed square
Materials:
- (3) sheets ¾″ plywood
- (3) 2x4x8 boards
- (1) sheet ¼″ plywood
- (6) pair 22″ ball bearing drawer slides (buying the 10 pack saves a ton of $)
- (4) 12″ piano hinges
- 1 ¼″ wood screws
- 1 ¼″ pocket hole screws
- 2 ½″ pocket hole screws
How to Build a Miter Saw Stand with Extension Wings
This is a great intermediate build that utilizes basic materials and simple construction.
The great thing about building projects for the workshop is that you don’t have to spend a lot of time sanding and applying edge banding. These builds don’t have to be pretty, they just have to be strong.
I’ve got the step by step walk through detailed in the post below, but if you prefer to watch, I’ve also got a video tutorial here.
(Please don’t judge too harshly. This is an old video and things have much improved since then ha!)
If you prefer to print your plans, you can grab the mobile miter saw station printable building plans, too.
This printable PDF including cut list, plywood cut diagrams, and step by step instructions.
Step 1: Cut Plywood Down to Size
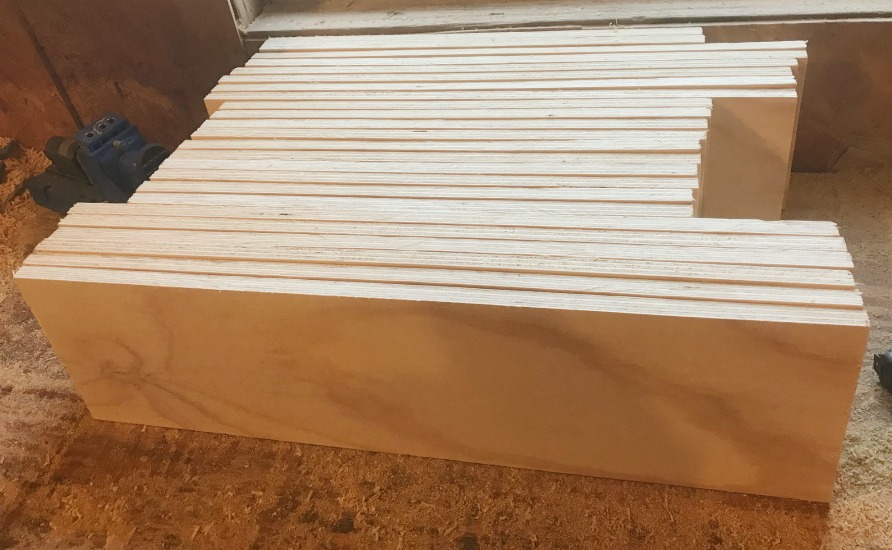
Since this DIY miter saw stand was built almost entirely from plywood, the first step was cutting down the sheets into manageable pieces to build with.
First, I ripped one sheet down the middle into 2 ft x 8 ft strips using my circular saw and Kreg Rip Cut.
RELATED: How to cut plywood sheets
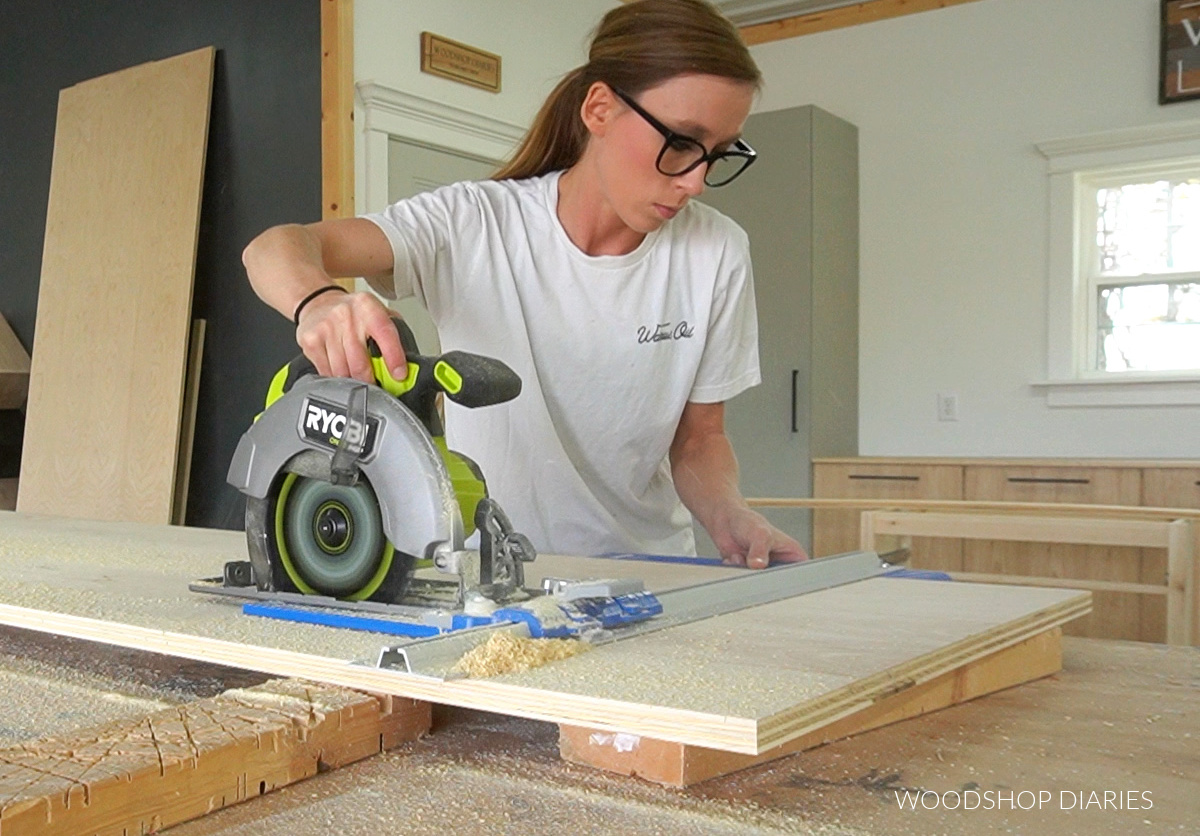
Then, from one strip, I cut a 58 ½″ and a 29 ½″ piece. And from the second strip, I cut another 29 ½″ piece. The 29 ½″ pieces will the the side panels.
I cut these using a circular saw and Kreg AccuCut. The complete cut diagram can be found in the printable building plans.
I drilled ¾″ pocket holes along the bottom edge of the two side panels and along both ends of the 58 ½″ long piece.
RELATED: How to use a pocket hole jig
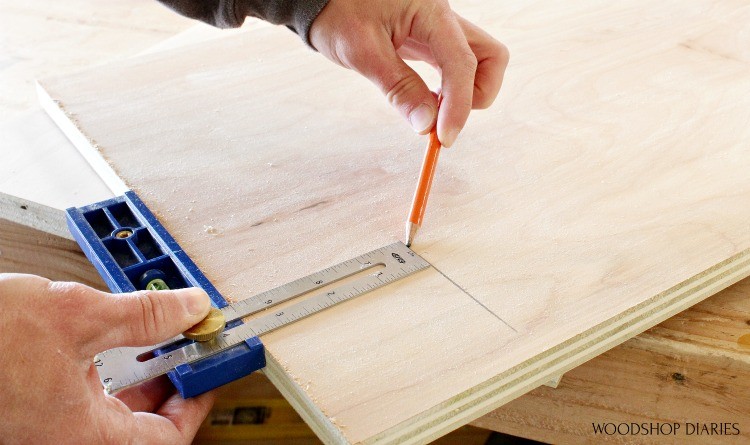
Step 2: Measure and Mark for Saw Height
Before assembling, I placed my miter saw on a flat surface and measured the height of the saw base.
Mine was about 4 ½″ tall. But different saw models will vary so check yours before building and adjust as needed.
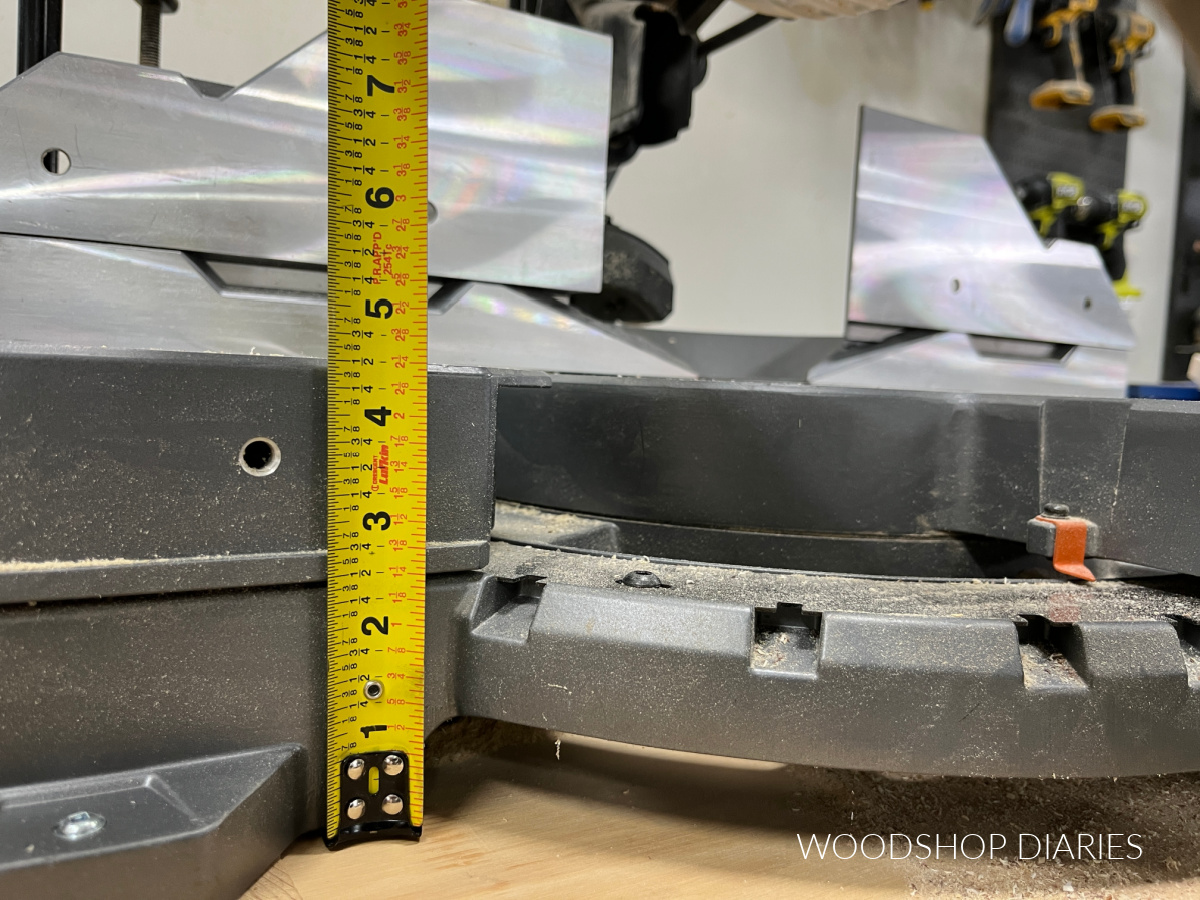
Once I had the height, I subtracted ¾″ (the thickness of the plywood) to get 3 ¾″.
This is the distance from the top that I need to install the shelf that the saw will sit on. So I marked 3 ¾″ from the TOP EDGE of the two side panels.
Step 3: Assemble the Carcass
I attached the long piece from step 1 between the two side panels using 1 ¼″ pocket hole screws so the top lined up with the mark I just made.
It’s important that this long shelf is installed the height of saw base – ¾″ from the top.
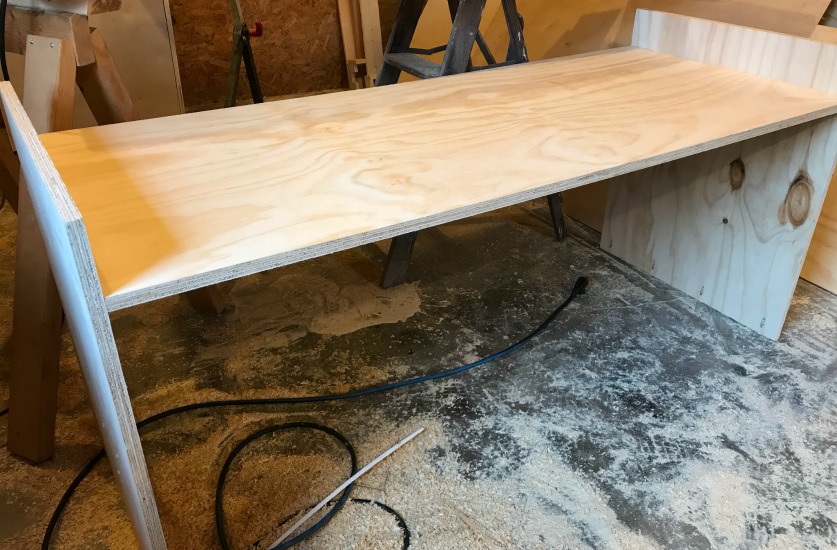
Note that the pocket holes on the side panels should face the INSIDE and be toward the bottom like shown in the image above.
Step 4: Assemble Miter Saw Stand Base
The base of the miter saw station is made from 2x4s. I cut two pieces of 2×4 to 60″ long and three pieces to 17″ long.
Then, I assembled a frame like shown using 1 ½″ pocket holes and 2 ½″ pocket hole screws.
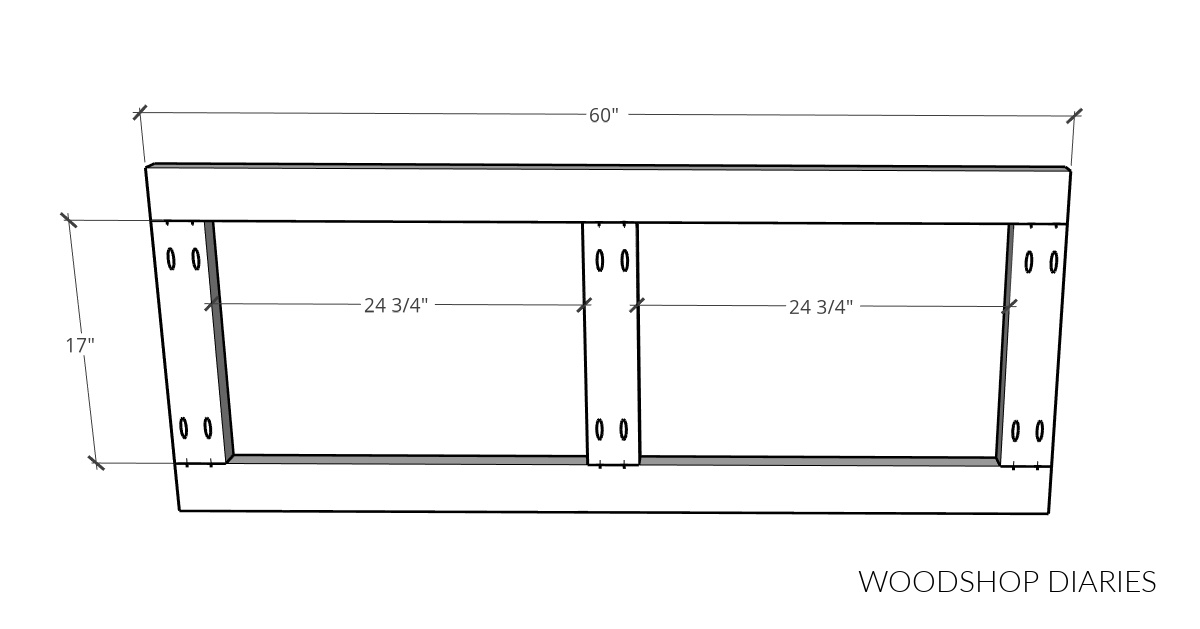
Make sure the middle one is, in fact, in the middle.
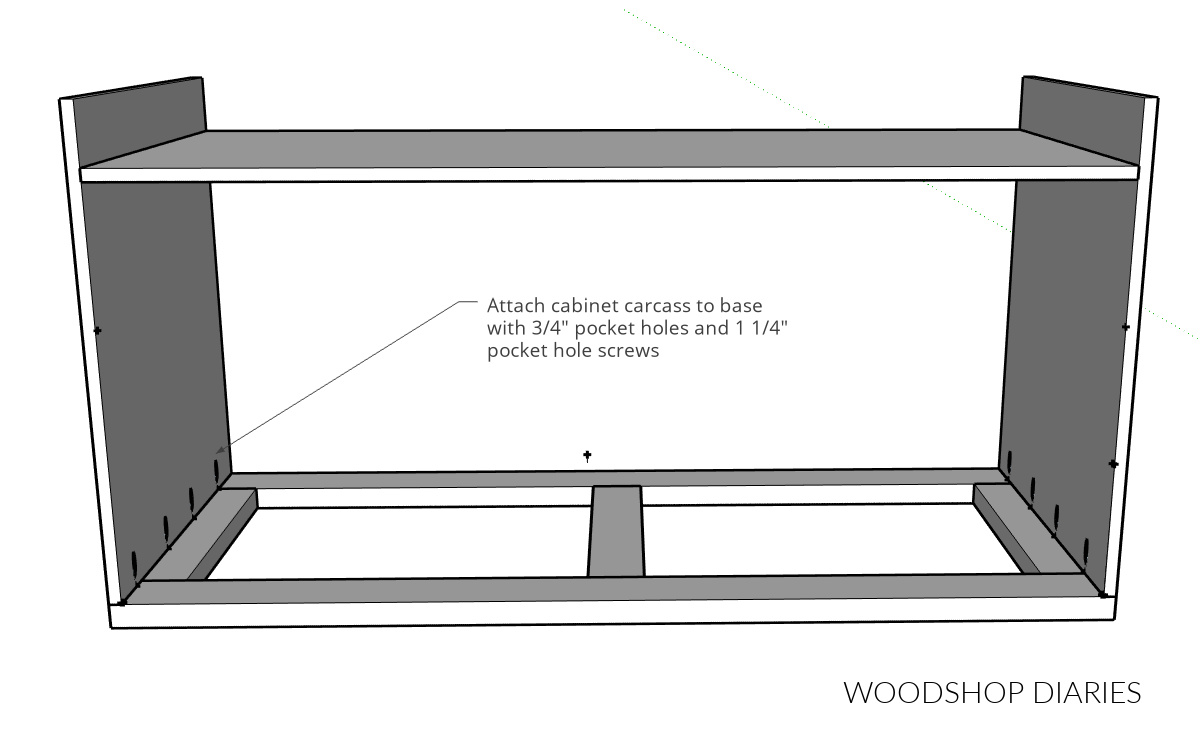
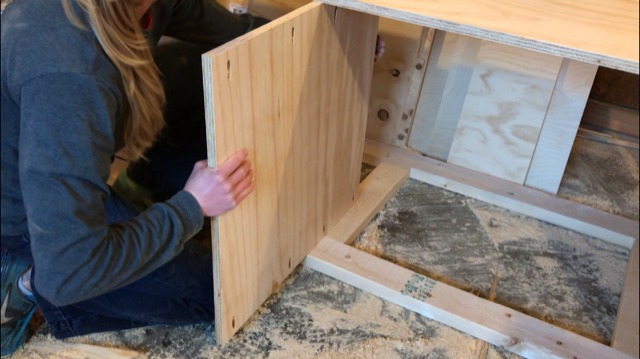
Step 5: Attach Carcass of DIY Miter Saw Stand to Base
Next, I attached the saw stand carcass to the base using 1 ¼″ pocket hole screws through the side panels.
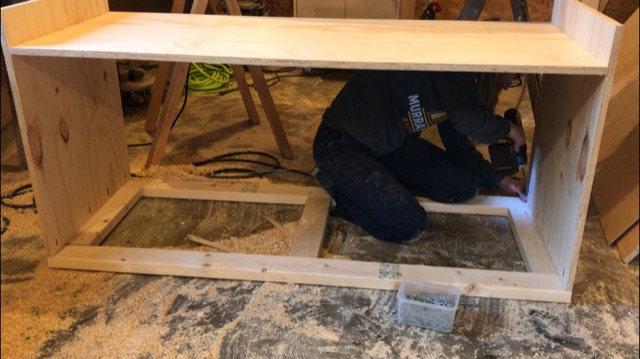
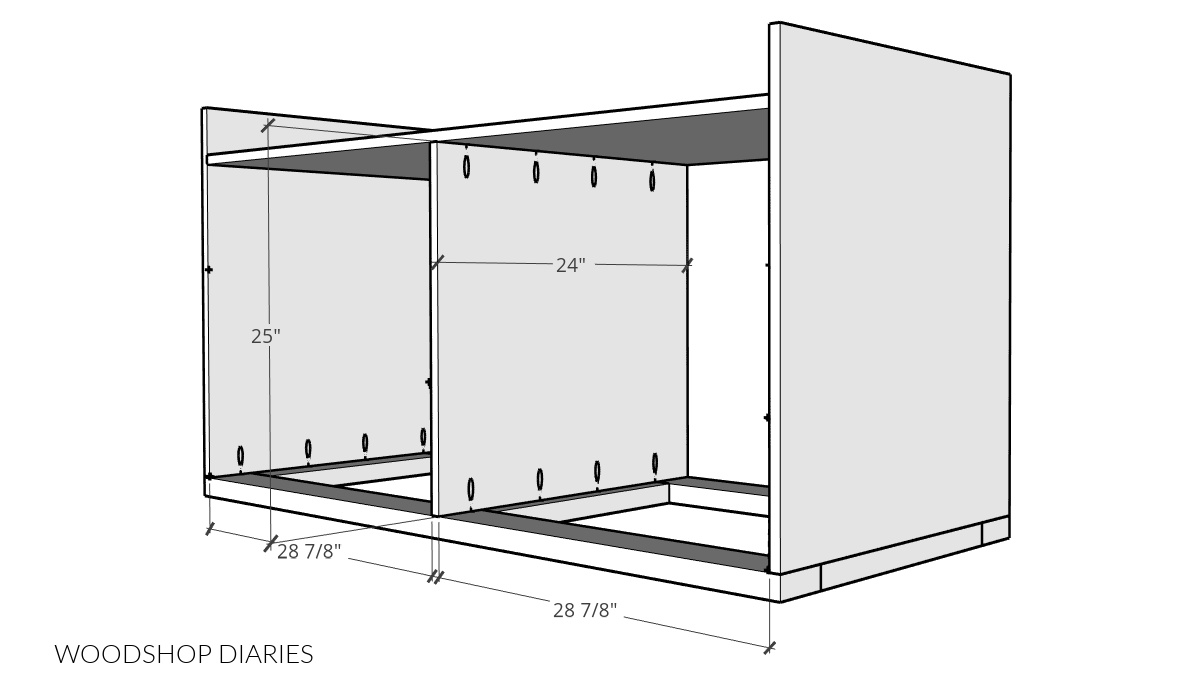
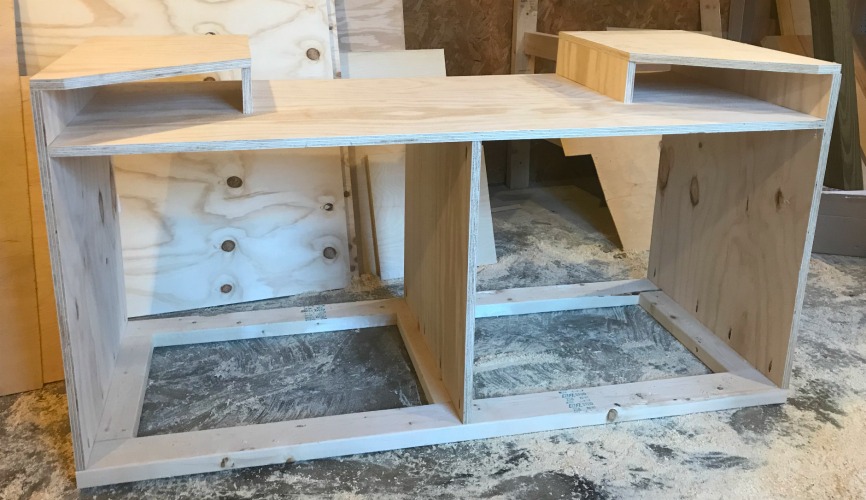
Step 6: Add Middle Divider to Miter Saw Stand
To support the long span of the top and to give me somewhere to mount drawer slides later, I added a middle divider panel.
This piece was 24″ wide x 25″ tall. But depending on the height of your saw base, your panel height may vary.
Measure the distance between the top panel and the base to figure out what the length of your divider panel should be.
From this point, depending on your saw size, measurements may vary, so yours may be different than mine.
I drilled ¾″ pocket holes into the ends of this piece and attached it at the center using 1 ¼″ pocket hole screws.
Step 7: Attach Top “Cubbies” to Miter Saw Stand
I cut two pieces of ¾″ plywood to the height of the saw base MINUS ¾″ (the measurement from step 2) x 15″ long. In my case, these were 3 ¾″ x 15″, but you’ll need to adjust based on your own saw height.
Then, I measured the WIDTH of my saw base and placed these pieces on the top like shown so that my miter saw would fit between them with about ¼″ wiggle room.
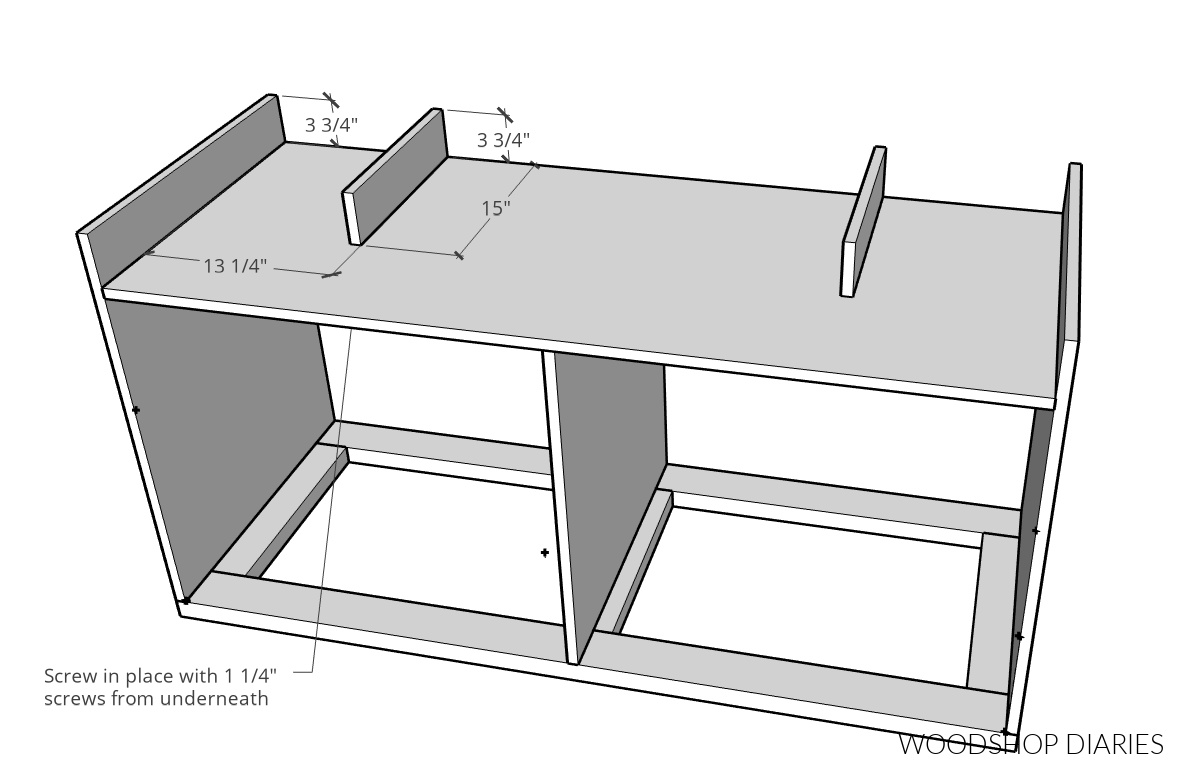
Again, your measurements may differ depending on your saw base size.
I used 1 ¼″ wood screws to secure these through the bottom side of the top panel like shown below.
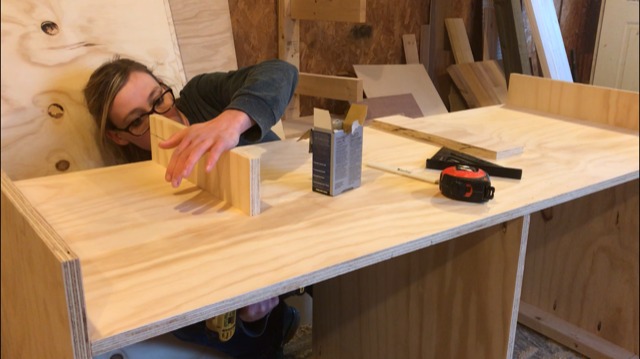
Before moving on, I double checked that my miter saw would fit between these pieces. Adjust as needed to ensure it fits.
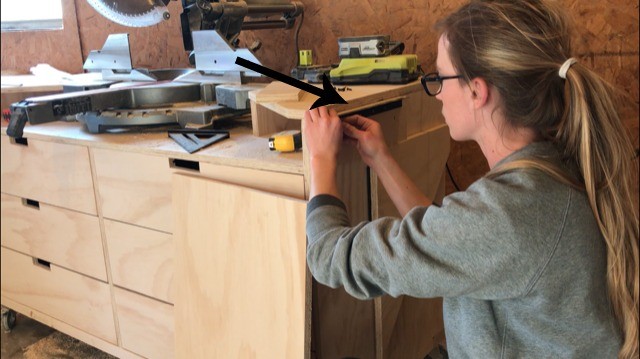
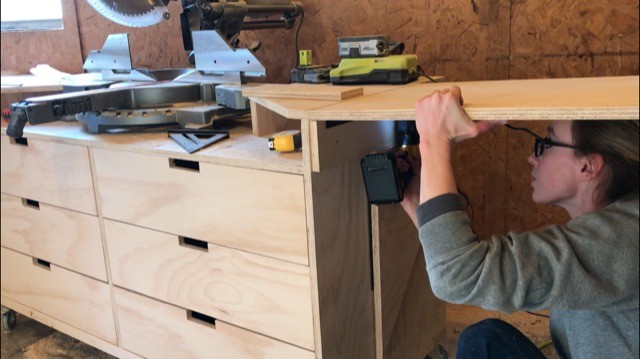
Then, I cut two pieces of ¾″ plywood to fit over these outside sections to make “cubbies” and screwed them on using 1 ¼″ wood screws.
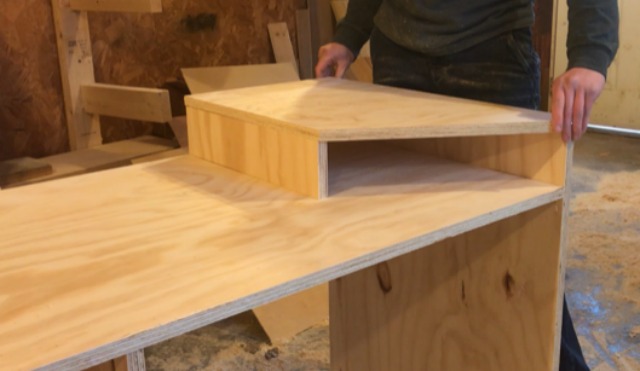
I placed my miter saw onto the stand and checked that the top of the base is flush to the top of the cubbies. You can use a long straight edge or level to check for gaps.
Shim and adjust as needed to make sure the saw base is level with the top, then remove the saw to continue with the build.
Step 8: Add Drawer Slides to Miter Saw Stand
The drawers are where it gets a little tricky. Because if you don’t have the same saw as I do, your measurements may vary. However, don’t panic! It’s easy to adjust.
Check out this drawer building guide for helpful tips on measuring and determining drawer box sizing.
I installed 6 pair of 22″ drawer slides to fit three equally sized drawers on each side of the cabinet stand.
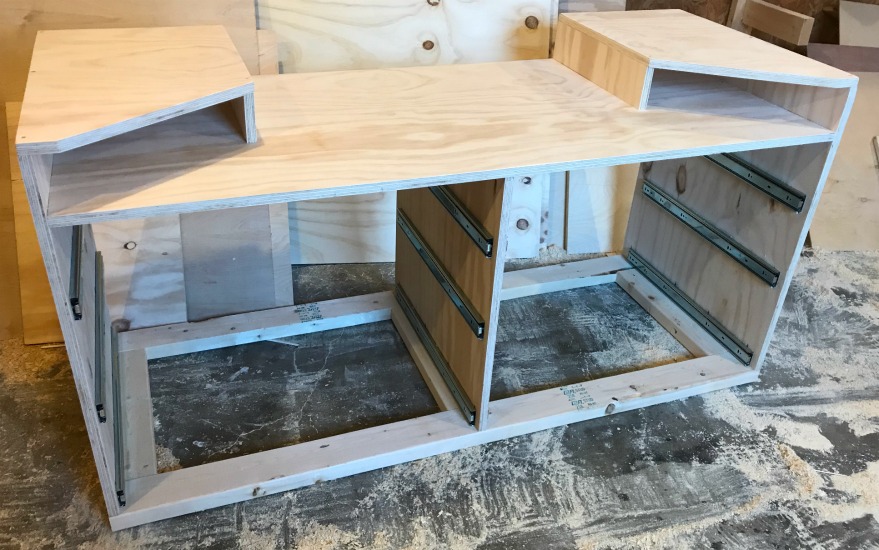
RELATED: How to measure for and install drawer slides
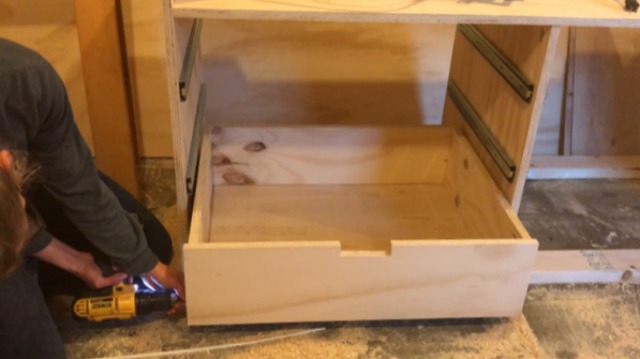
Step 9: Build and Install Drawers
Your drawer height may differ from mine slightly, but the overall width and depth should be the same.
I ripped several strips of ¾″ plywood to the height I wanted my drawer boxes. I made my drawer box sides and back 8″ tall and my drawer fronts 8 ⅛″ tall.
The printable plans have the plywood cut diagrams.
Then I cut these strips to length to make 6 drawer boxes. These lengths are:
- (12) 22″ long pieces (drawer box sides)
- (6) 28 ⅝″ long pieces (drawer fronts)
- (6) 26 ⅜″ long pieces (drawer backs)
Now, if you check out my drawer building guide, I usually build my drawer boxes separately from my drawer fronts. However, this method uses more lumber and is largely for cosmetic purposes.
Since this is a workshop project, I built this a little “cheaper” to save on wood. So you may notice this is a slightly different method.
To assemble these boxes, I cut ¼″ dados ¼″ deep ½″ up from the bottom edge of each drawer box piece. This allows me to install the ¼″ plywood bottom.
NOTE: You can skip the dados and just staple the plywood onto the bottom of the boxes if you want, but I just like cutting dados.
I drilled ¾″ pocket holes into both ends of the drawer back piece and into the FRONT ends of the drawer box sides.
Then, I screwed the six drawer boxes together using 1 ¼″ pocket hole screws. Note that the sides screw directly to the front, leaving ⅜″ overhang on each side.

Instead of adding handles, I used a jig saw to simply notch out a section of the top of each drawer front to be able to open them. This is optional, but I found it easiest to do before installing them.
I installed the drawers into the drawer slides in the stand making sure to keep approximately ⅛″ gap around all sides of the drawer fronts.
RELATED: How to install drawer boxes
Step 10: Add Caster Wheels to Saw Stand
I flipped the miter saw stand on its back and installed 4 heavy duty caster wheels–one on each corner.
If you wanted, you could also add two more to the center–one at the front and one at the back–to prevent sagging over time. I didn’t in this case.
I recommend using casters that swivel and that lock so that you can easily roll the cart around and lock it in place when you’re ready to cut.
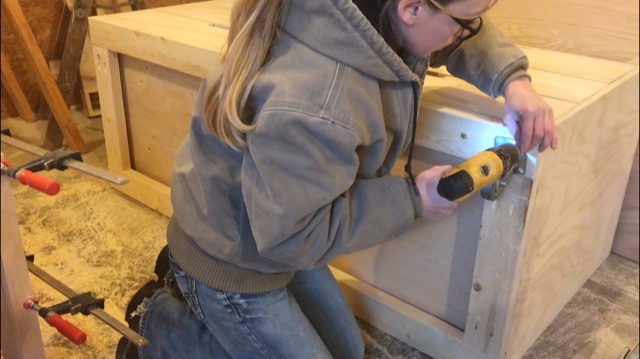
Then I CAREFULLY flipped the cart back over once the wheels were secured.
Step 11: Cut and Attach Side Support Wings
To allow the extension wings of the cart to fold up and down properly, I needed to add a spacer block to the sides.
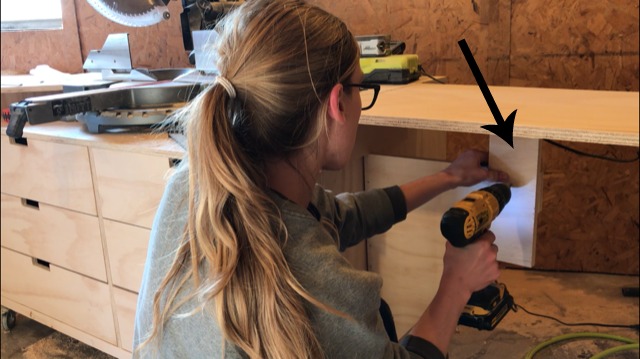
So I cut and attached a piece of ¾″ plywood cut to 3 ½″ x 16″ on each side of the stand using 1 ¼″ wood screws.
These should be flush to the front and ¾″ DOWN from the top.

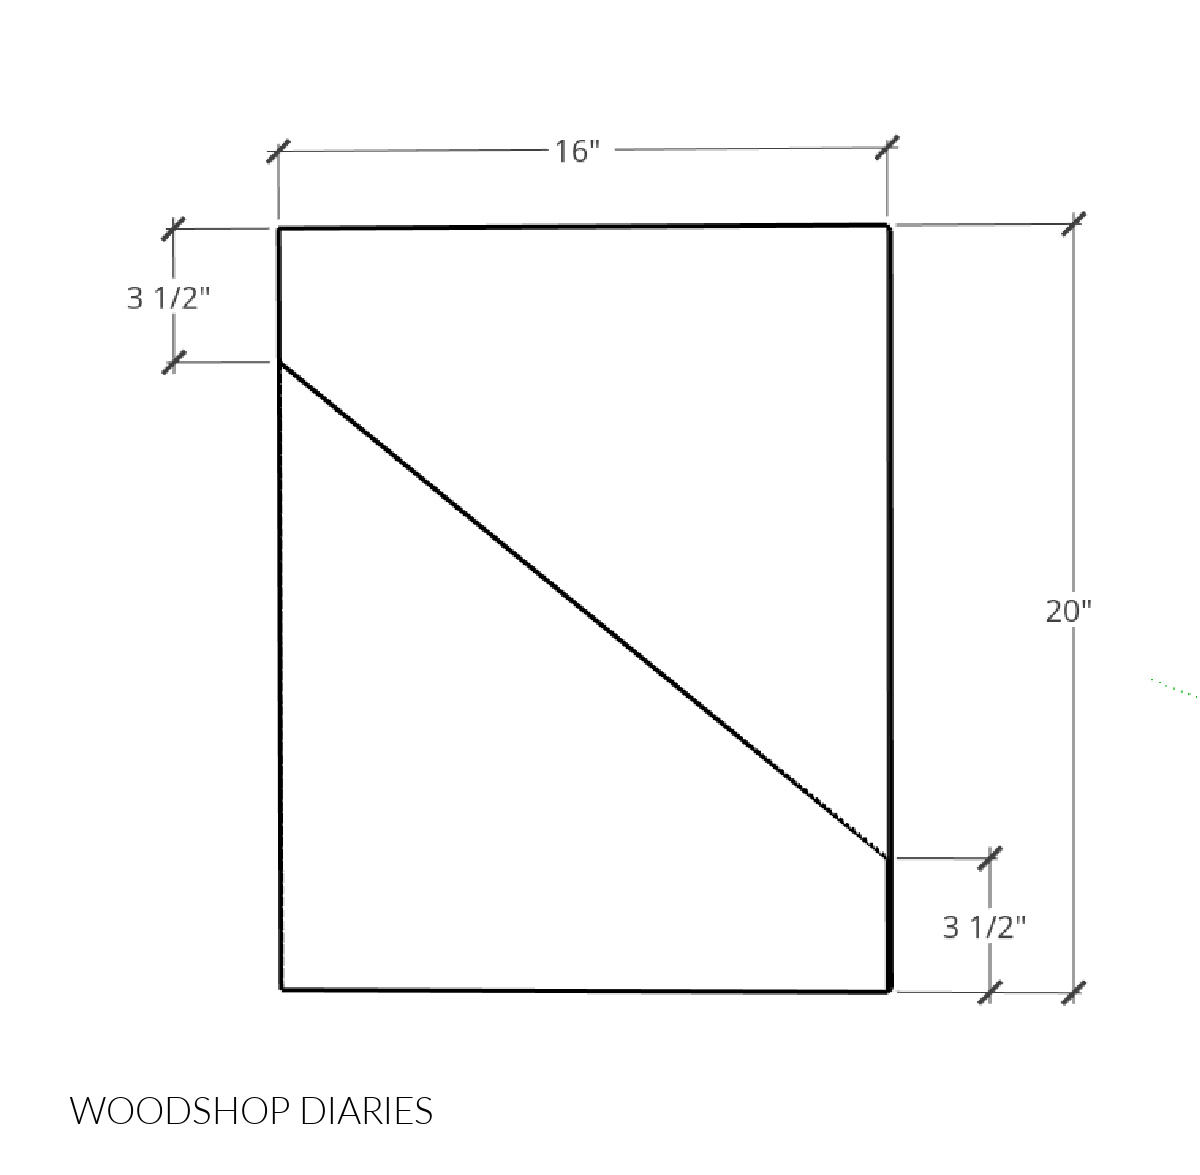
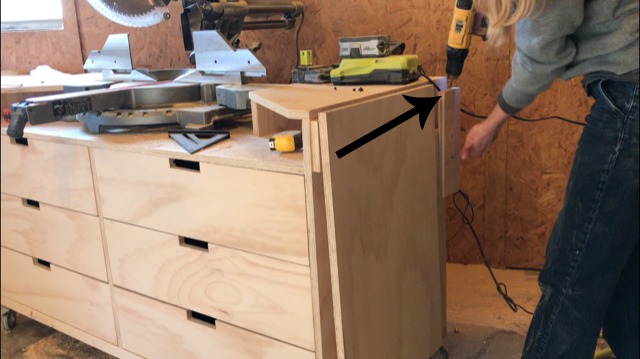
Then, I cut a piece of ¾″ plywood to 16″ x 20″ and used a jig saw to cut a diagonal like shown to give me two supports for each side of the miter saw stand.
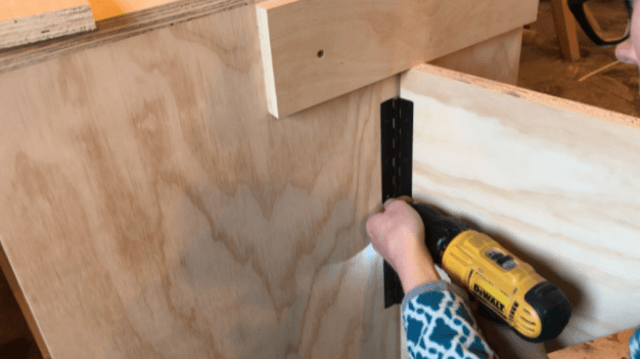
I used piano hinges to install these so they could rotate and “swing” in and out as needed.
So, I screwed a 12″ piano hinge (also called continuous hinge) onto the long ends of each support wing like shown.

Then, I secured the other side of the hinge onto the cabinet. One support wing will mount to EACH side of the miter saw stand.
Note that the supports should be installed about 16″ from the back edge of the cabinet and approximately ⅛″ down from the spacer block.
Step 12: Attach Side Extension Wings to Saw Stand
Then, I attached two more 12″ continuous hinges to the spacer blocks on the sides. These will be for the actual extension wings.
I cut two extension wings from ¾″ plywood to 16″ x 30″ and secured these to the other side of the hinge.
It helps to have an extra set of hands here, or you can just balance it on your head while you screw it in place haha.
You may notice that at this point the supports aren’t really “supporting” the wings yet.
So I added another piece to each support. These are simply pieces of ¾″ plywood that run from the supports up to the wings.
HOWEVER, to allow room for adjustments, I installed this so that when the wings rested on it, they slanted down slightly.
That way, I could install a screw into the top of this piece and use it to get my wings perfectly level.
Step 13: Level Foldable Extension Wings
You want to make sure that everything is nice and level before cutting anything for safer and more accurate cuts.
So I placed my saw into the stand and extended the wings on each side.
I used a long straight edge across the saw base and onto the wings to check for high or low spots.
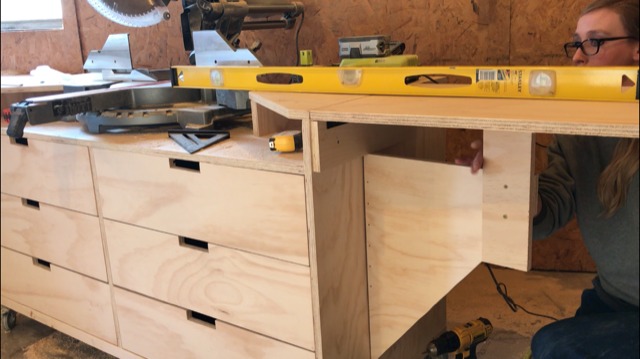
Adjust the screw in the support wing to raise/lower the wing as needed. Back the screw out to raise the wing. Drive the screw in a little further to lower the wing.
Shim up the saw, the cubby top and the wings as needed to get everything nice and flat.
Step 14: Secure Miter Saw To Stand
I secured my saw to the stand using a few screws (see manufacturer’s instructions for how to secure your saw base) to make sure it doesn’t move and then it was ready to get building!
If you want to add a long fence, stop blocks, or additional accessories, go ahead! Feel free to customize however you’d like.
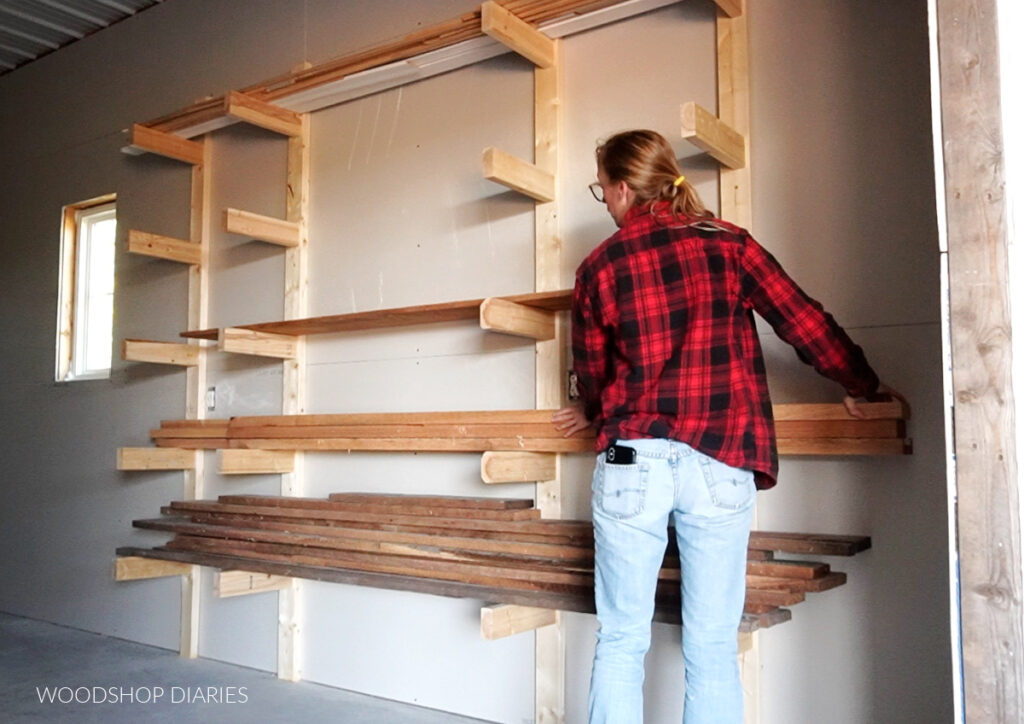
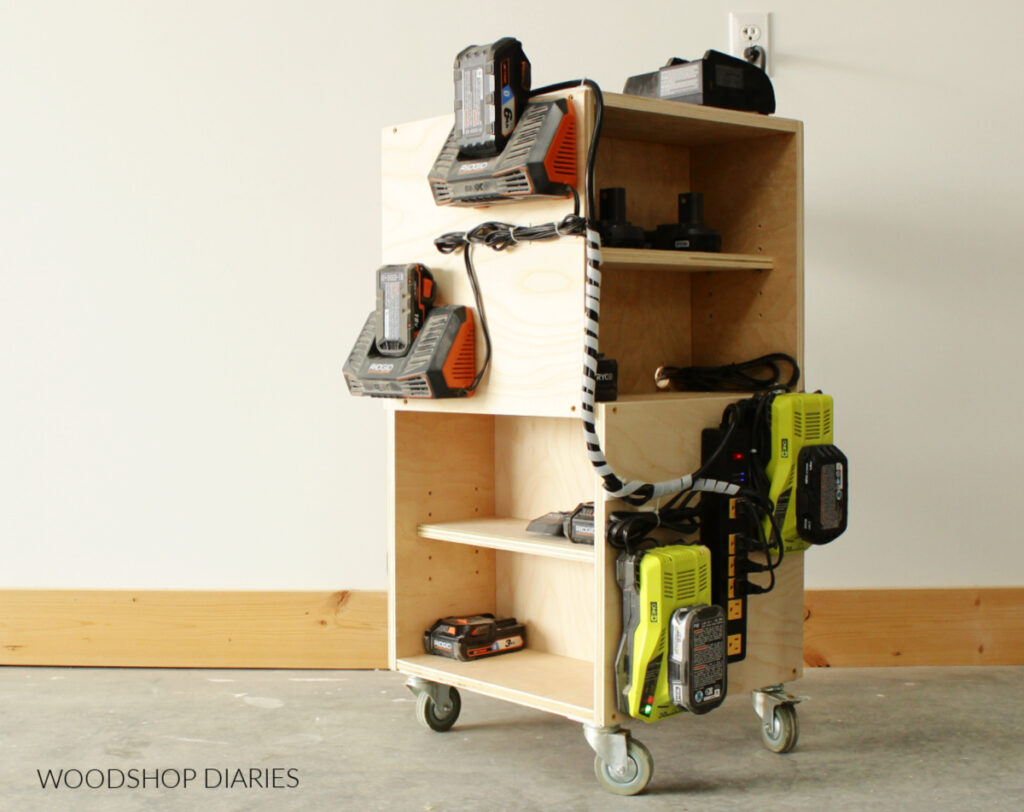
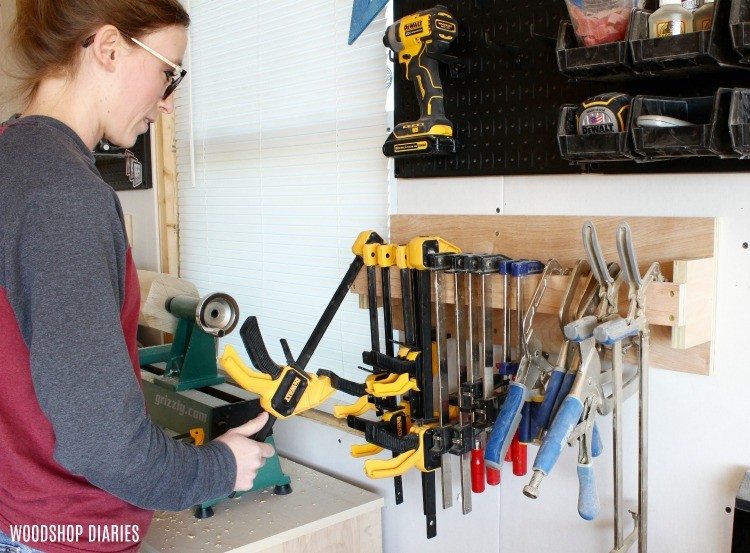
Looking for more workshop projects?
If you enjoyed this project and are looking for more workshop projects and ideas, here are a few favorites from my own shop!
If you want to follow along for more projects and plans, join the newsletter for priority access to all the latest posts and videos!
Be sure to save this for later by pinning it or sharing to your favorite social channel!
Until next time, happy building 🙂
CKCSONR says
I’ve been looking for a portable miter saw stand to build. I really like this one!! I’m going to have to modify it since my “shop” is only half of a 1 car garage. I’m only going to make it 4 feet wide. Also, I’m going to not make drawers, but shelves and a floor. This will allow me to put the 10 gal shopvac in one side to use for dust collection, and the Rockwell X2 on a slideout shelf on the other side, and I’ll still have some room. Great job with this project!
Shara, Woodshop Diaries says
So glad you liked the project! Shelves and a floor would work great with this as well 🙂