
This post is sponsored by The Home Depot and is part of the ProSpective Program. It contains affiliate links. See policies for details.
I’ve spent the last three years wanting a lathe so bad that I couldn’t hardly stand it. I finally decided to quit being so cheap and just buy one (this is the one I got) this fall, but honestly my shop doesn’t have room for another large tool (but I obviously made an exception 🙂 ), so I needed a really compact DIY mobile lathe stand for it so it would take up as little space as possible and be easy to move out of the way.

So I built this little DIY mobile lathe stand from a single sheet of ¾” plywood and a little scrap ¼″ plywood. Because I love drawers, I built it with a couple of drawers to store my sandpaper and accessories, some shelves for spare turning blanks, and a chisel holder to keep them easily accessible while I’m turning. (I’m 30 now, so I don’t want to bend down to grab a chisel in my old age haha)

I’m sharing the link to the downloadable PDF plans with cut list and instructions here and the step by step tutorial and some tips below. And I’ve also got the video tutorial here as well:
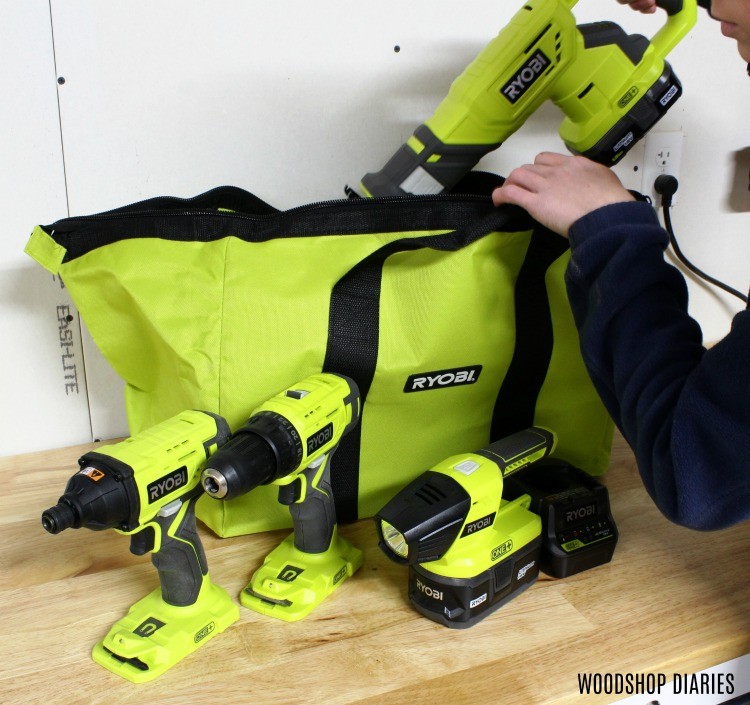
As part of this project, I reviewed this Ryobi 4 pc combo kit from Home Depot. I also put these Bosch DareDevil Spade bits to the test as well. Check out my thoughts on them below.
For this project, I used:
Ryobi 4 pc Combo Kit (Drill, Driver, Worklight, Recip Saw)
Kreg Rip Cut (optional to help cut down plywood)
Table saw (Optional or drawer dadoes)
(1) sheet ¾″ plywood
¼″ plywood scraps for drawer bottoms
Step 1: Cut Down Plywood
To get started, I set up my ¾” sheet of plywood onto my Kreg Trak horses and grabbed my Rip Cut and Circular saw and got started cutting it down into more manageable sizes. I’ve provided a detailed diagram and cut list in the plans here.

Step 2: Assemble DIY Mobile Lathe Stand Cabinets
I used my Kreg pocket hole jig and Ryobi drill to drill pocket holes along the edges of the cabinet bottom and a couple of thinner slats as the top supports.

I assembled two identical boxes using 1 ¼” pocket hole screws. Also note that I added shelves to the middle of these later and that would have been a TON easier to do at this point than how I did it towards the end of this project. So in the plans, I add the middle shelf here vs at the end.

Step 3: Cut Out the Lathe Stand Top
Once the two cabinet boxes were assembled, I moved on to making the top. I cut the top piece then marked a cut out in the middle of it and cut this out with a jig saw.

This is optional, but I wanted to add a shelf later for my chisels between the cabinets and having this cut out allowed me to easily reach down to grab a chisel vs having to step back and reach underneath the top.
.
Once the top was cut, I flipped it upside down on my workbench and attached the cabinets to it using 1 ¼” screws through the top slats.

You’ll notice that I’m using a Ryobi Drill and Driver in this project. It’s part of a 4 pc Ryobi combo kit that I reviewed as part of this project. This kit is also included in my Christmas gift guide post here.

It’s a nice combo kit for a beginner and it includes several tools to get you started–two batteries, a charger, the drill and driver you see me using in this project, a worklight, a reciprocating saw and a bag. This was my first time using a Ryobi drill and driver in a project, and I was really surprised at how well they both performed during this build.
.
The worklight is SUPER bright, and the recip saw has a 1″ stroke length for fast cuts. I plan to use it to cut down a few limbs that fell in my sisters yard this fall into pieces short enough to turn on my new lathe 🙂 Kind of like a mini battery powered chain saw haha. But if you’re into cutting down pallets for projects, it would work well for that, too.

Step 4: Add Casters and Bottom Shelf
Once the body of the stand was assembled, I added some casters to the corners. Although my shop is a decent size, I still struggle to find the room I need to build large projects, so I make sure to keep every cart in my shop on casters so I can move them around and out of the way as needed.

Then, I cut a piece for the bottom shelf to connect the cabinets. This helps sturdy up the cart, but also gives me a place to store extra blanks, accessories, etc. I added this using pocket holes and screws and made sure it was flush to the back of the cabinets.

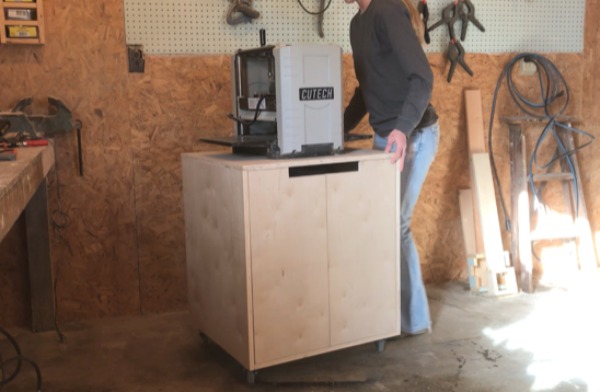
At this point, I thought it would be a good idea to test fit my new lathe. Perfect fit. I played around on it a while and finally decided to build the drawers to finish it up. Side note: It’s not recommended to leave the lathe in place…it’s really unmotivating to finish the project, when you could be turning instead haha.

Step 5: Add Shelves and Drawers
I cut some dadoes into the drawer pieces to insert the bottom, then drilled pocket holes and assembled using pocket hole screws. I slid the ¼” bottom in place, then attached the fronts.

I installed 16” drawer slides into the bottom of the cabinets, then realized it would be easier to attach the shelves before installing the drawers, so that’s what I did next. Cut two shelves to fit inside the cabinet and drilled ¾” pocket holes into the ends.
.
Now, things would be easier if I hadn’t already put the lathe on top, but hindsight is 20/20. It was really difficult to get the driver in such a tight spot, so I used this 90 degree driving attachment and it made things a little easier…only it was so low to the ground it was hard to see.
.
So I ended up removing the lathe and flipping it over to get the shelves installed. See what I said about not recommending putting the lathe on until it was finished?? HA.

Once the shelves were in place, I installed the drawers onto the slides and it was ALMOST ready!

Step 6: Install Chisel Holder Shelf into Mobile Lathe Stand
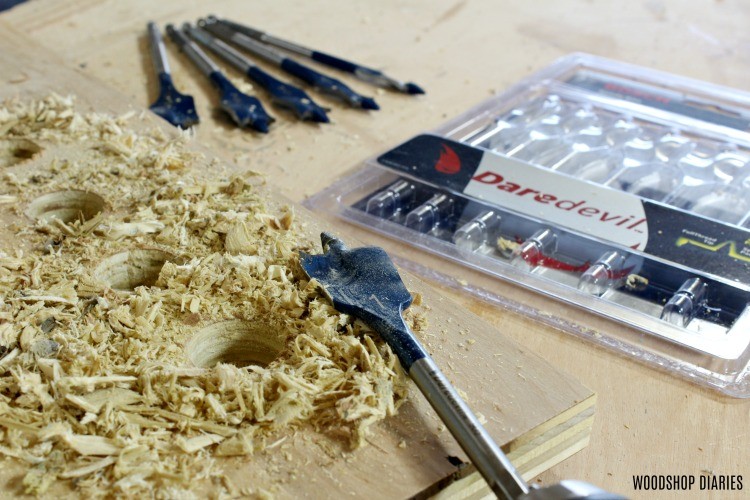
The last thing I did was add a shelf that would hold my chisels so they would be easy to grab while I’m turning.

So I grabbed a piece of plywood to fit between the cabinets and these Bosch DareDevil spade bits and marked 6 evenly spaced holes for my six chisels. I used the 1” spade bit from this set to drill holes large enough for my chisels to fit down into, but small enough, they wouldn’t go all the way through.

These spade bits have a fully threaded cone tip that helped quickly get my holes started and keep me centered. Now, here are my honest thoughts on spade bits…I avoided using spade bits whenever possible in the past because my old set would end up giving me egg shaped or just really ugly looking holes vs nice, clean round ones…ugh. Plus, it took so long to drill them out that it would eat up my drill battery.
.
So I expected these to do the same thing and really didn’t want to use them for this. However, I was pleasantly surprised that with these bits, my holes did actually come out round and clean. (I think it’s got something to do with the spurs and the reamer edges.) And even with my drill on low speed, it only took about 7 seconds to drill each one. Who knew not all spade bits were created equal??

Once the chisel holes were drilled, I drilled pocket holes into the ends of the board and placed it in the stand. I put a couple chisels in so that I could adjust the height of the shelf as needed. I wanted the chisels to be high enough where I could comfortably reach them, but also low enough so that they were out of the way.
.
Once I got the shelf where I wanted, I screwed it in place with pocket hole screws.

I rolled the stand into place and put my chisels into the holes. Now I’m ready for lots and lots and LOTS of wood turning practice. I’m brand new, so I have a lot to learn, but I’m excited to play around with it and see what I come up with. Let me know what you’d like to see me make with my new lathe and if you are a wood turner, I’d love any tips you feel would be helpful for getting started!

So if you’re in need of a DIY mobile lathe stand…or just a general shop cart, check out the downloadable PDF plans for this one here. Or check out some of my other mobile shop cart and workbench projects as well.
If you’ve enjoyed the project, please feel free to pin this for later or share on your favorite social channel!

Thanks so much for following along and until next time, happy building!

Carrie Krumrie says
You are my hero!!!! Using power tools to build things!! I took industrial arts for several semesters with my special education students!!! Loved it!
Praying for direction in this time between employment. Take your time!
Shara, Woodshop Diaries says
Aww thank you so much!