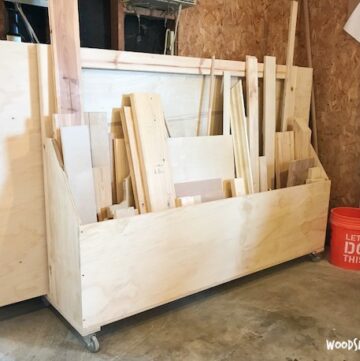
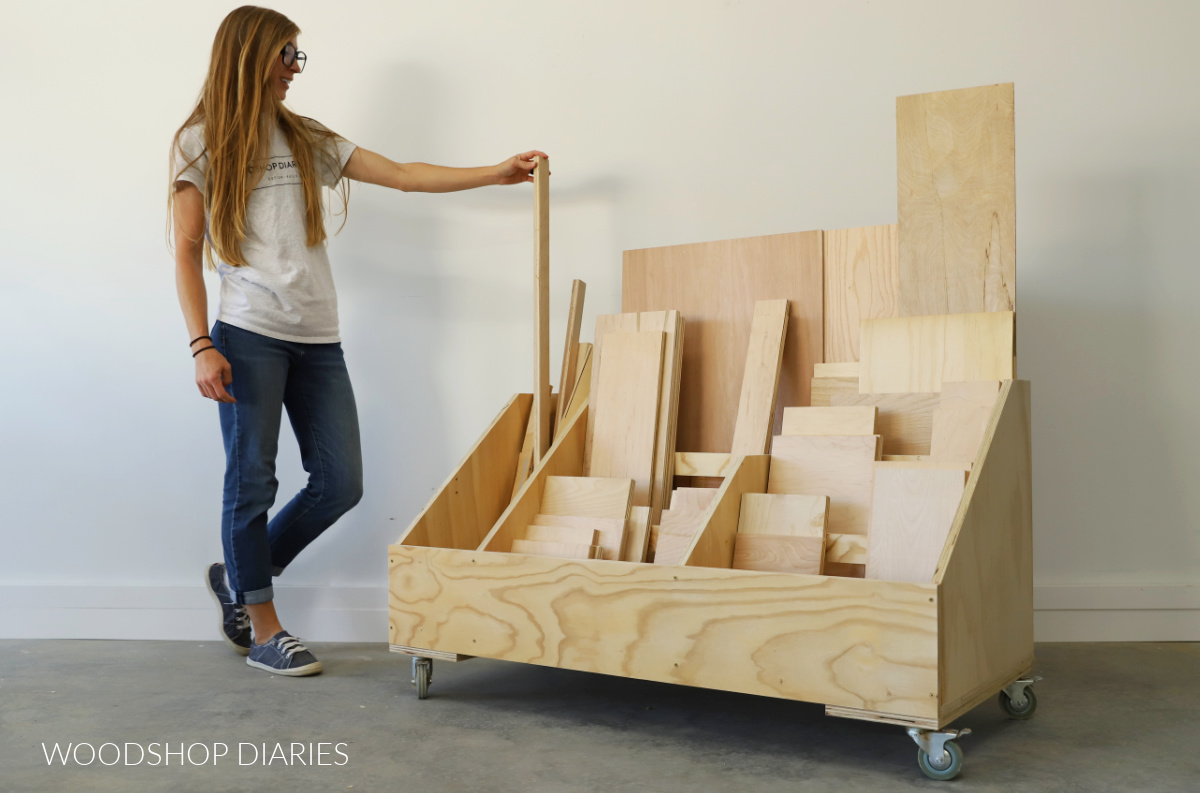
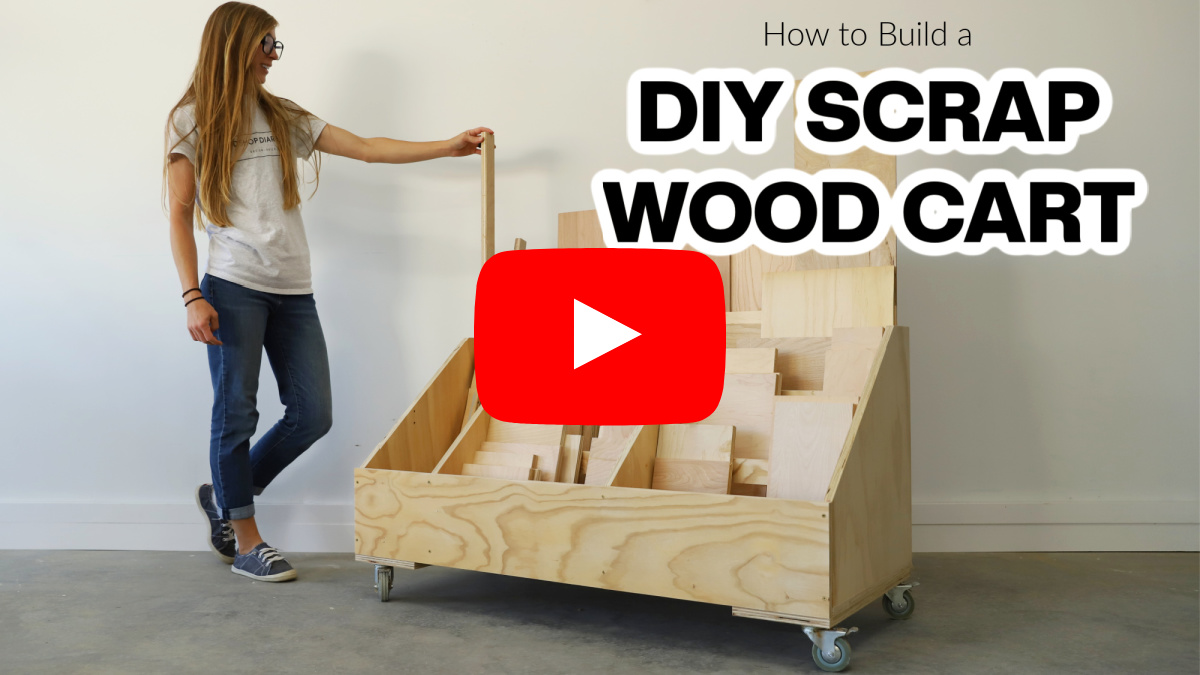
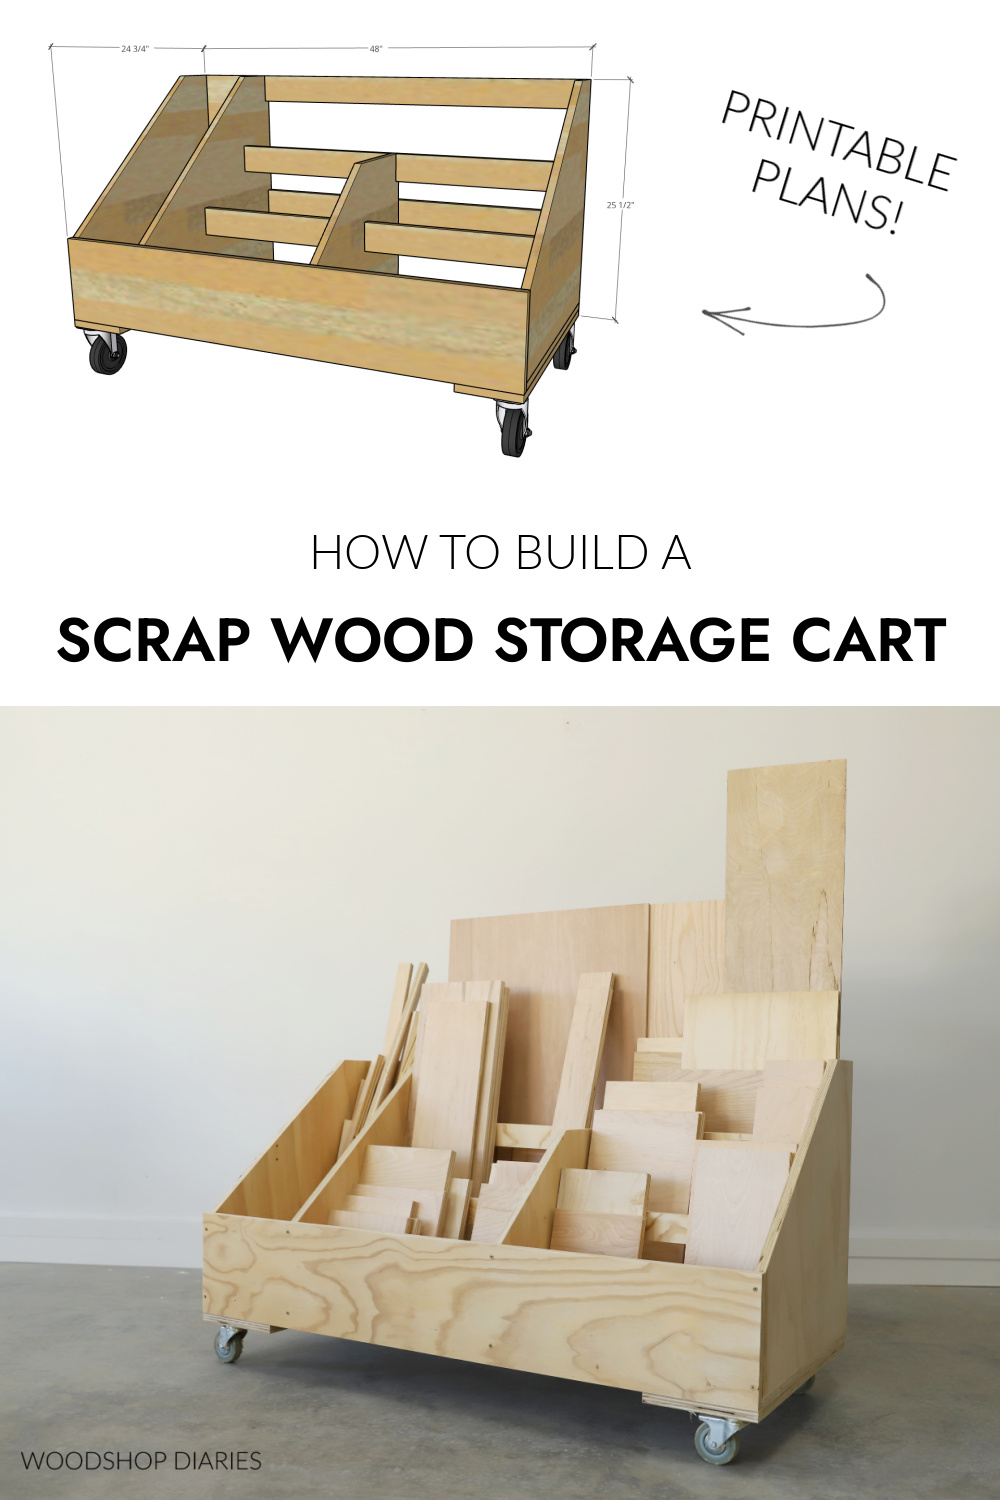
In this post, I’m sharing how to build a simple mobile storage cart for your wood scraps!
This project is the perfect addition to any workshop for storing and organizing your wood scraps and making them easy to move out of the way.
If you have followed along for very long, you may have figured out that I love to build with plywood.
But, the problem with plywood is that the scraps can end up being ANY SIZE–which makes it difficult to store and organize. Some plywood scraps are long and skinny, others square, some pieces small, some pieces huge.
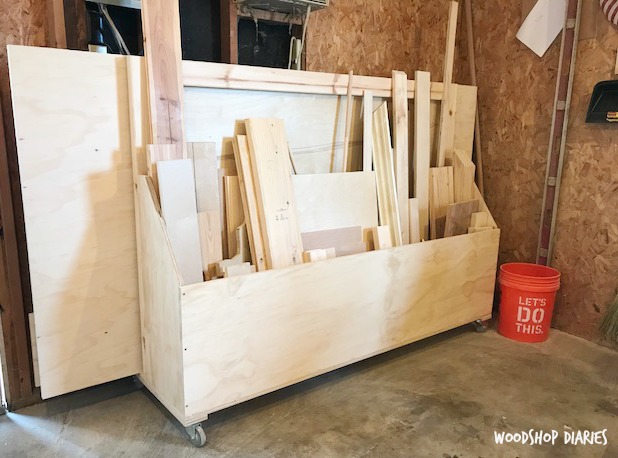
For years, I just made do by leaning my plywood scraps against the shop wall and just digging through them any time I needed something. But I finally decided it was time for something better and I built this storage cart.
Although I made this scrap wood cart with plywood in mind, it would also work great for storing your other scrap boards, too!
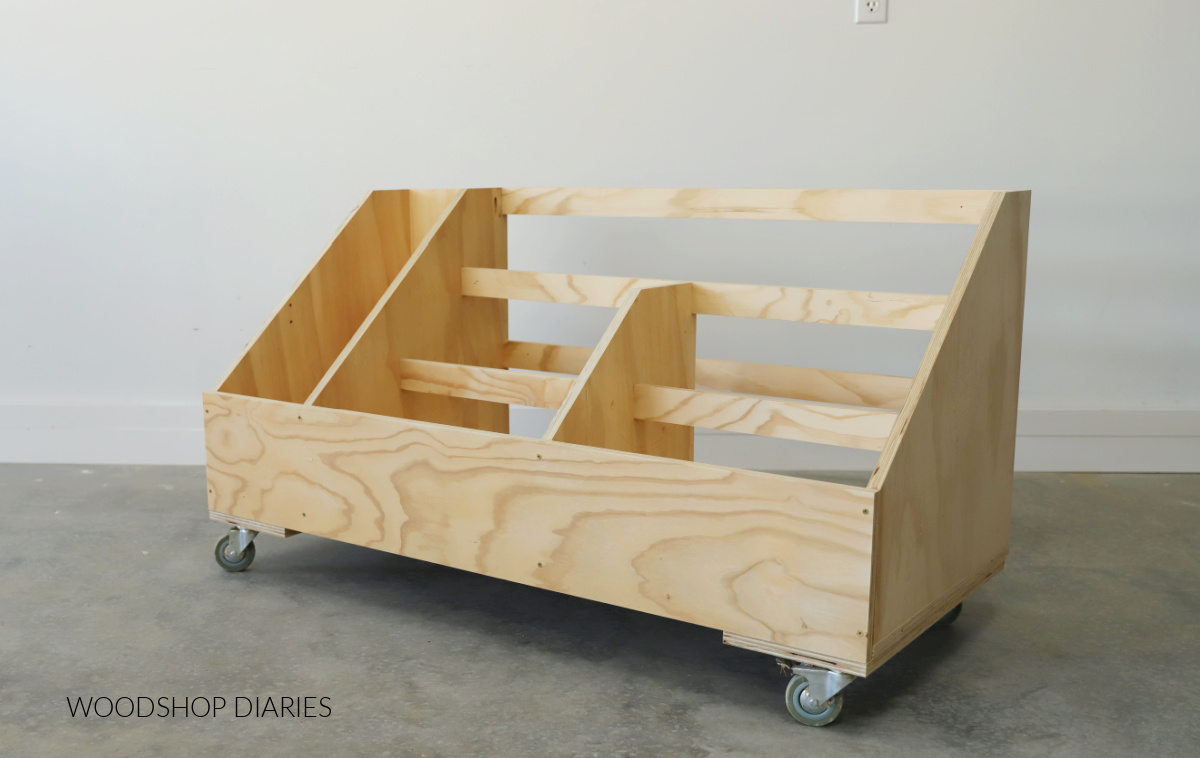
This was a huge game changer in my own shop, so I’m excited to share how to build it in the post below so that you can make one for your shop, too!
*This post contains affiliate links. See website policies.
What to know before building
This is my second scrap wood cart. You may remember this mobile plywood and wood scraps cart from years past.
I still use that cart in my shop, but since building it, I realized two things: 1. I needed more scrap wood storage that that could hold and 2. It’s easier to organize pieces by size if you section it off.
So for this cart, I made a few changes/improvements by adding multiple sections to help me sort pieces by size.
Scrap wood storage size considerations
Depending on what you’re building, how you’re building it, and what materials you’re using, your scrap wood usage may vary from mine.
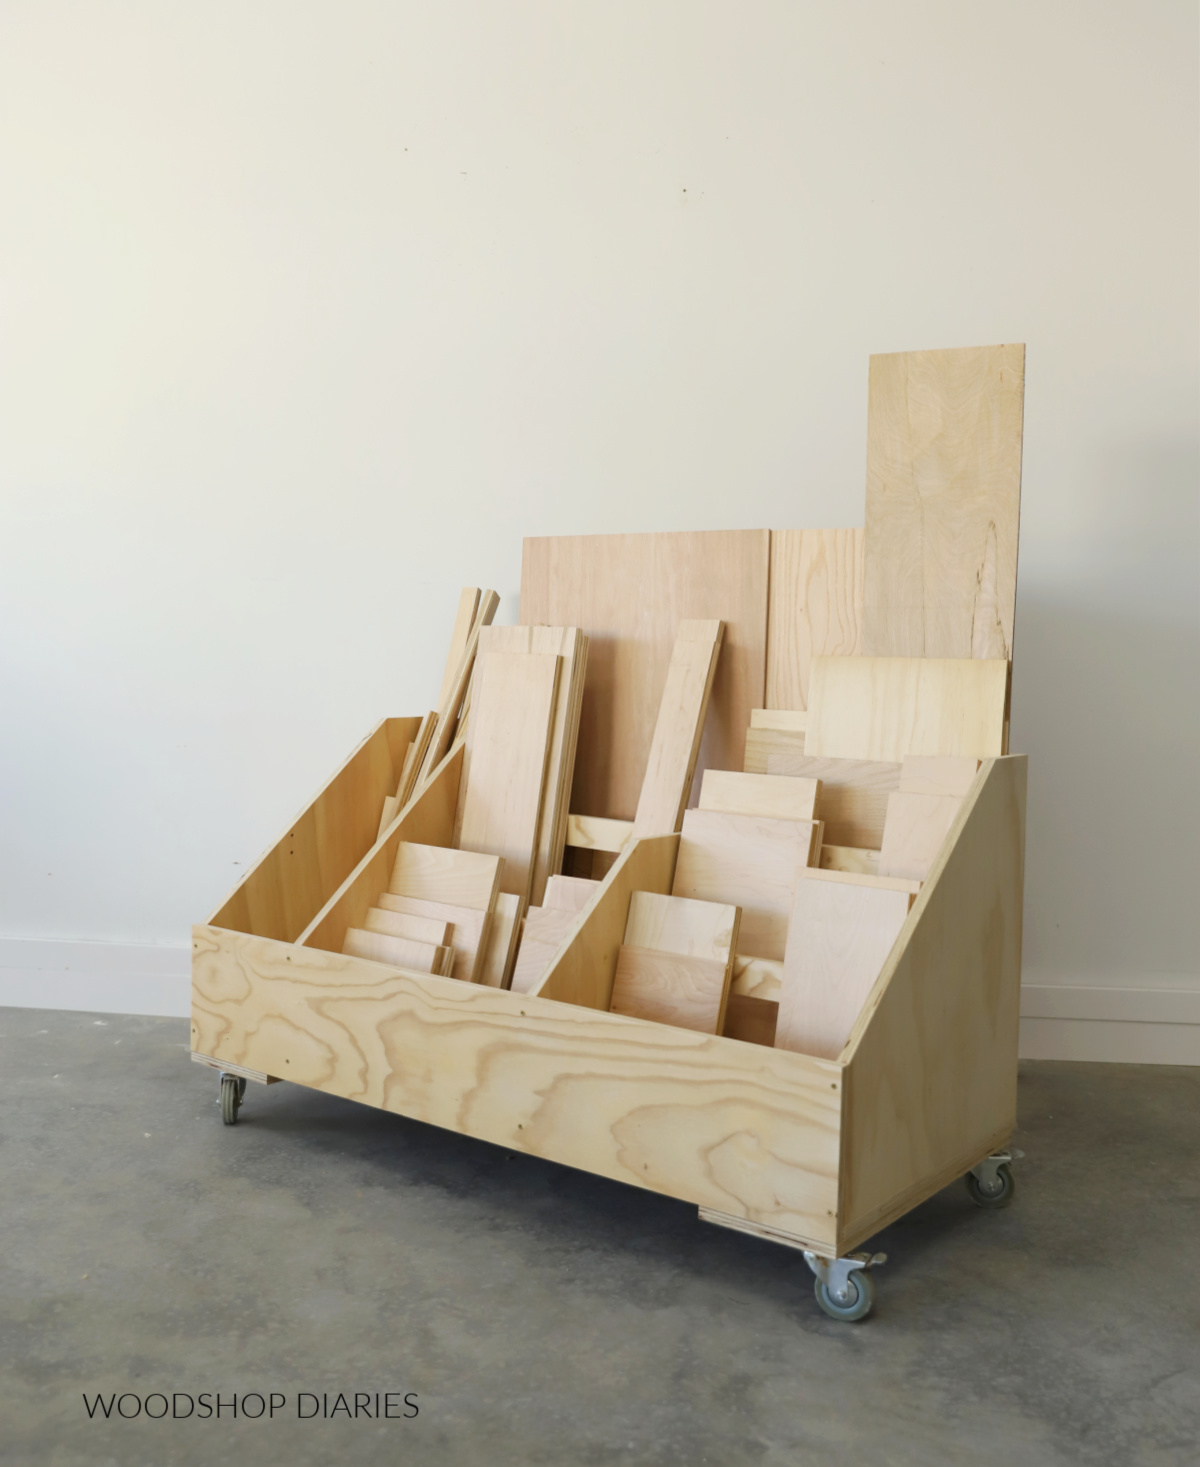
This is how I arranged the sections in my scrap wood cart: larger panels in the back (up to 38″ wide), thin strips on the left, pieces 16″ or longer in the middle, and pieces 10″-16″ long in the front.
I don’t typically have a use for pieces smaller in both dimensions than 10″, so I usually toss these.
However, feel free to modify the placement of the dividers and section supports in step 3 to accommodate your scraps and how you’d prefer to sort them.
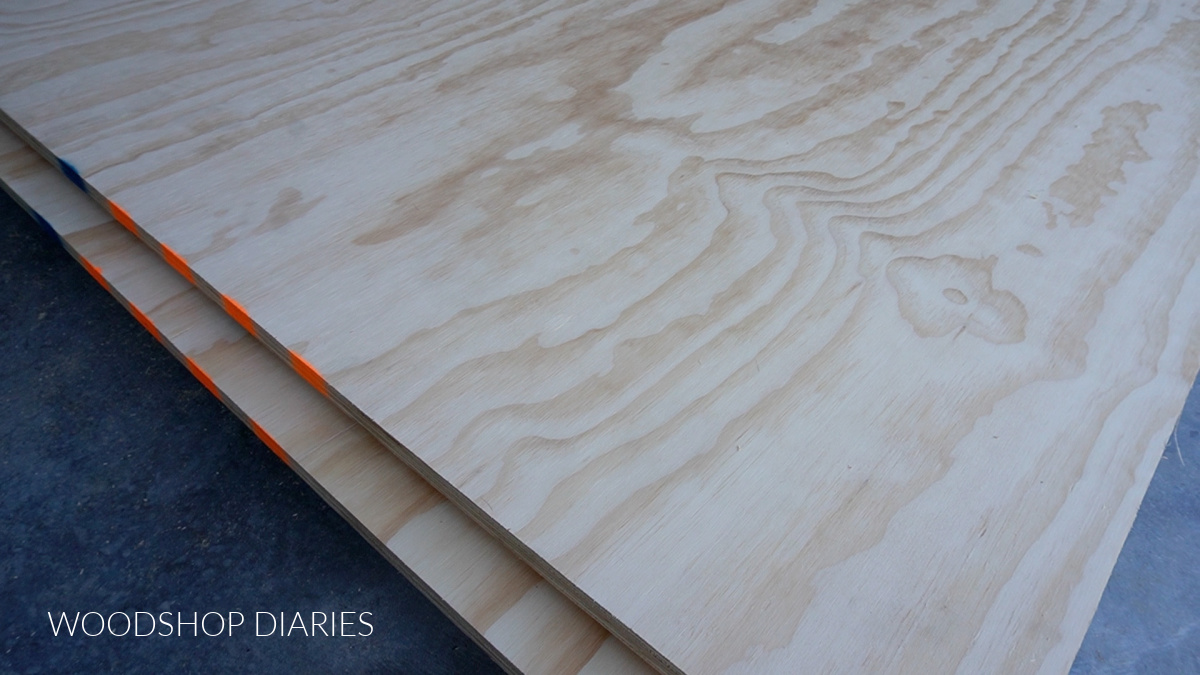
Choosing your materials
Since this is a workshop project, there’s no need to use the nicest plywood (unless you’d like to!). Of course, if you want to get “fancy,” birch, oak, and other hardwood plywoods would be great.
But to save some money, sanded pine plywood would also work fine–that’s what I used here.
RELATED: How to choose the right plywood for your project
This build requires one full 4×8 sheet of ¾″ plywood plus a 24″ square panel. Most big box stores will sell these smaller 24″ square project panels so you don’t have to buy a whole second sheet.
See building plans for cut diagrams. You may also be able to find some of the pieces you need for this project in your scrap pile and avoid having to grab this extra plywood panel altogether.
Caster wheel options
Caster wheels are optional, but I always recommend them on just about any shop cart for easy mobility.
You can find caster wheels in tons of brands, sizes, and styles–and each one will have slightly different dimensions. So the overall height of this cart will vary based on the exact wheels you go with.
For best results, I’d suggest grabbing 3-5″ heavy duty caster wheels. Larger wheels are more expensive, but are easier to roll with heavy loads.
In this case, the exact wheels I used are no longer available, but these are a similar option.
Overall dimensions
The overall dimensions of this cart (not including the caster wheels) is 24 ¾″ x 25 ½″ x 48″.
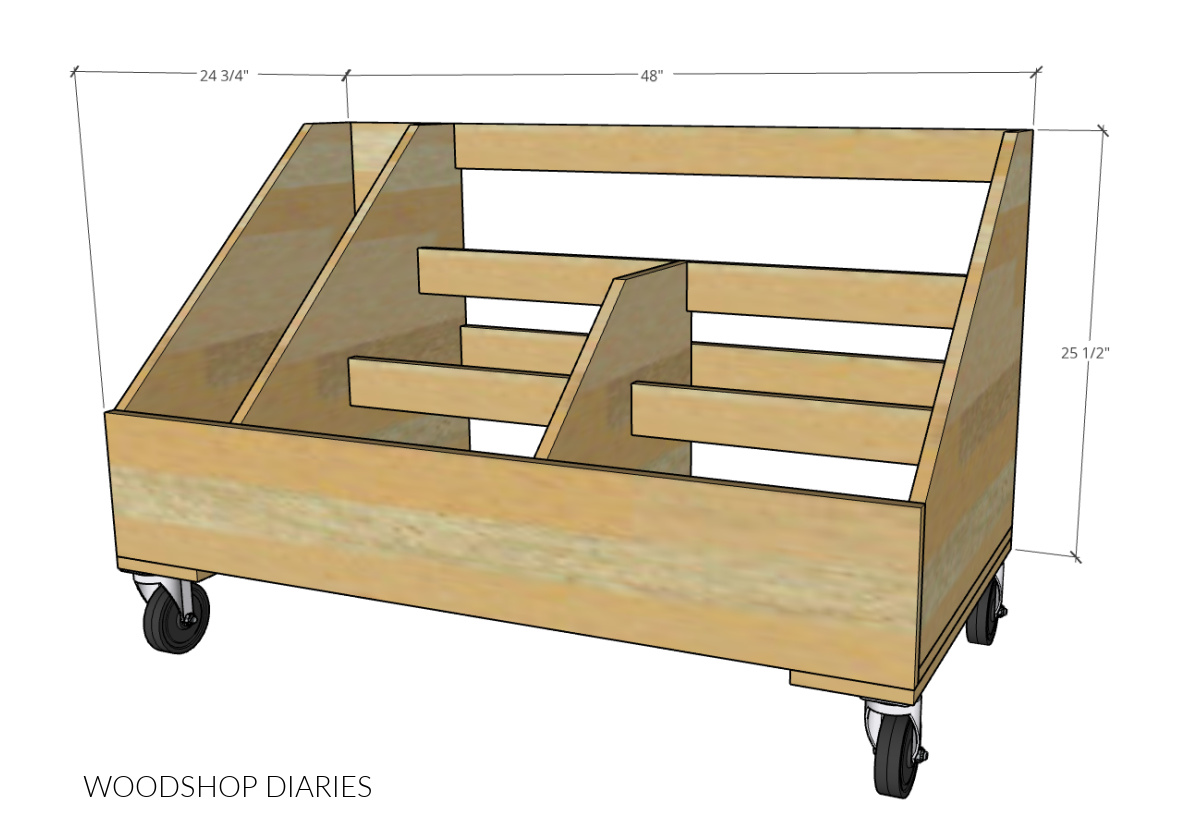
Caster wheels come in MANY different styles, and sizes, so the overall height with wheels will vary based on what casters you use. See notes above.
Here are some resources you might find helpful throughout the build:
Enjoy building your own furniture and DIY projects? Sign up for priority access to the latest how-tos straight to your inbox!
How to Build a Scrap Wood Cart
Ready to get building? I’m sharing the step by step instructions below along with a video and printable plans.
If you prefer to watch, I’m sharing the full scrap wood cart build video plus some helpful tips and bloopers on my YouTube channel. Watch the DIY Scrap Wood Cart Build Video here.
Are videos your thing? Subscribe to my YouTube Channel for more project and how to videos!
If you prefer to print it out and take the plans to the shop with you, I’ve got you covered. Grab the scrap wood cart building plans here!
Tools & Materials
Tools:
- Drill/Driver
- Circular Saw and cutting guides
- Pocket Hole Jig
- Speed Square
- Miter Saw (optional)
Materials:
- (1) 4×8 sheet ¾″ plywood
- (1) 24″ x 24″ piece ¾″ plywood
- 1 ¼″ pocket hole screws
- 1 ¼″ wood screws
- Washers
- (4) Caster Wheels
Step 1: Assemble Cart Sides to Bottom
To get started, I cut my plywood down according to the cut list and diagrams in the building plans. I gathered the bottom panel (24″ x 48″) and two side panels (24″ x 24″ each).
RELATED: How to cut down plywood sheets
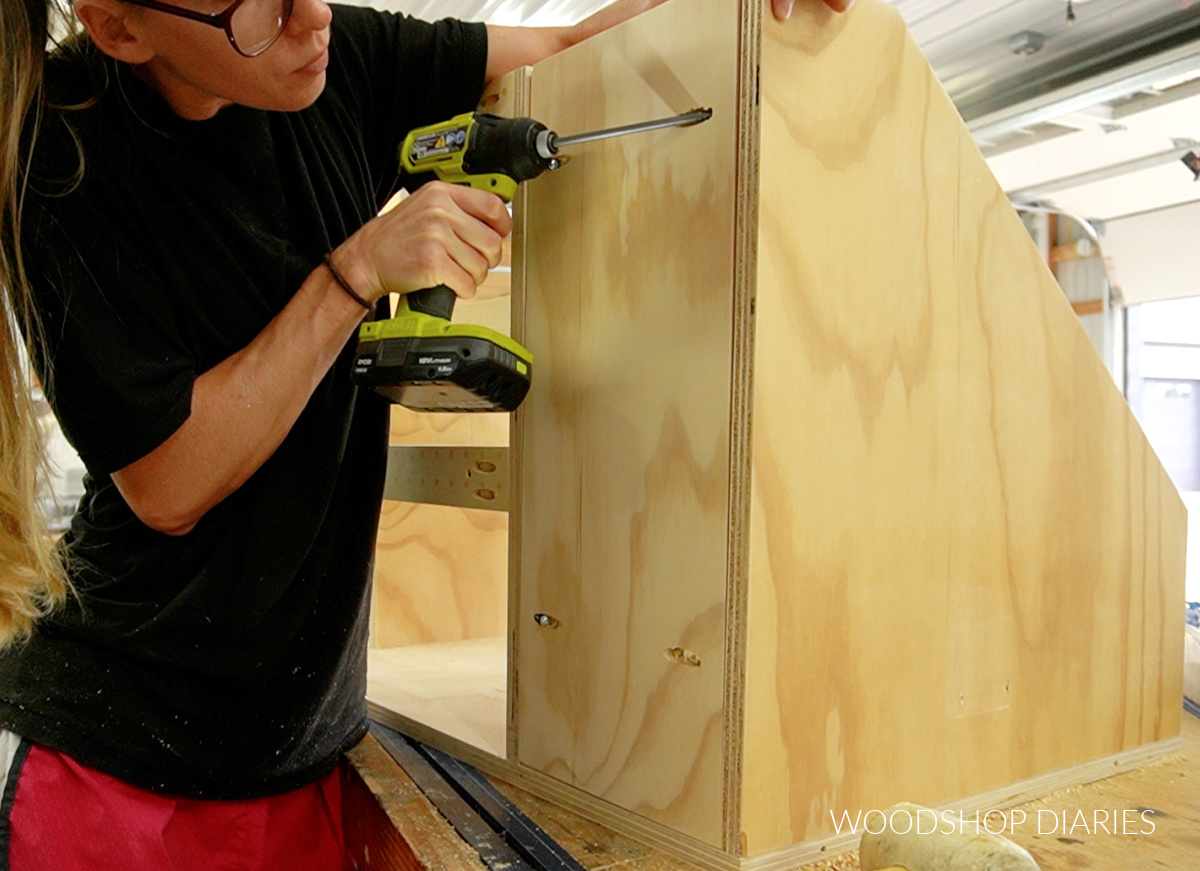
I wanted the sides of this cart to slope down from back to front, so I grabbed the 24″ square side panels and marked 8″ up from the bottom edge (along the front) and 5″ from the back edge (along the top).
I used a straight edge to draw a line between these marks, then cut along the line using my circular saw and Kreg Accu-Cut.

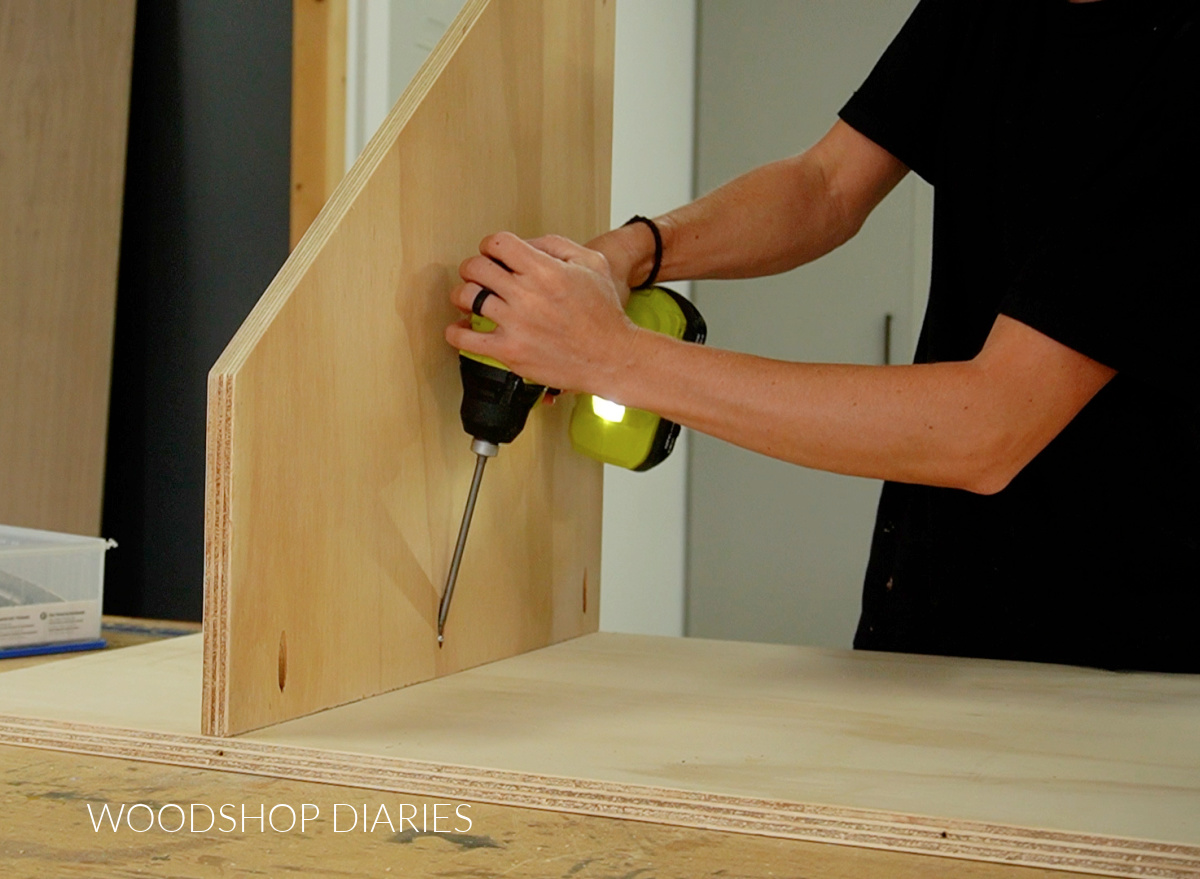
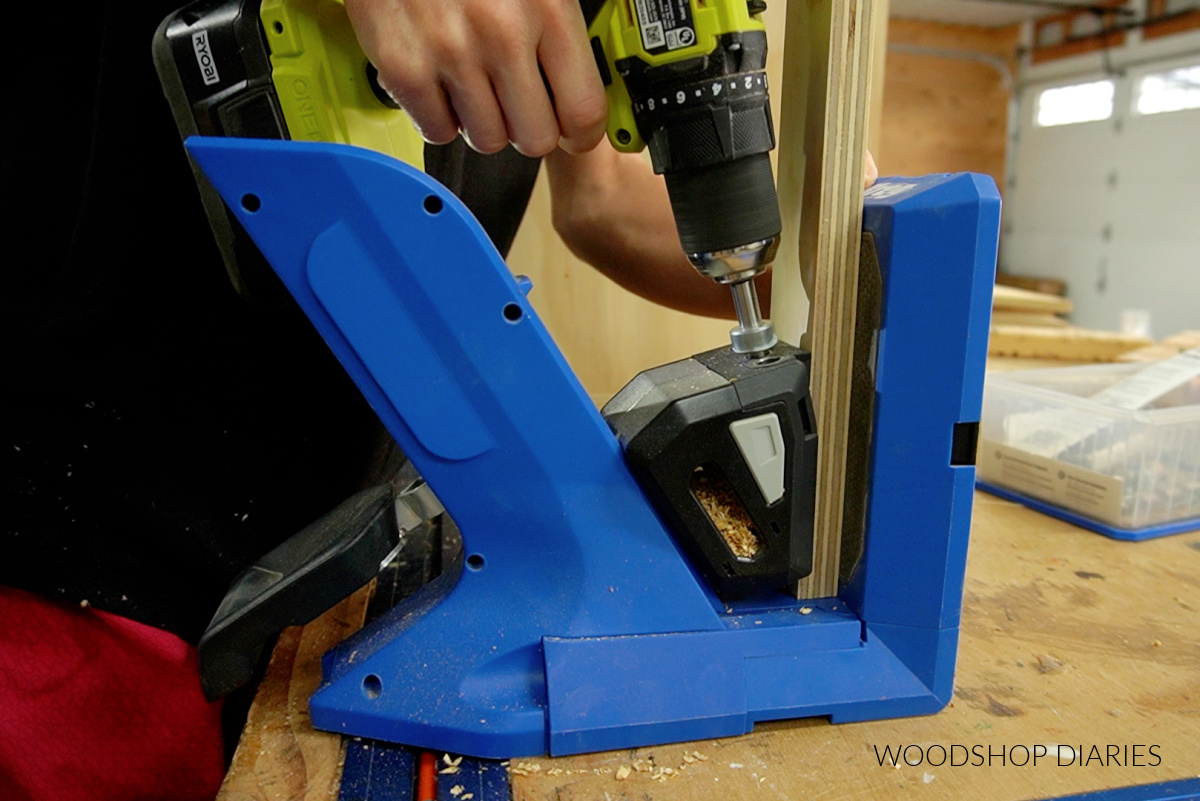
Then, I drilled ¾″ pocket holes along the bottom edge of each of these side panels and secured them to the bottom panel with 1 ¼″ pocket hole screws.
RELATED: How to use a pocket hole jig
Note: The right side panel is installed flush to the right edge of the bottom panel, but the left side panel is installed 38″ from it. That leaves room on the left side to add an additional storage cubby later.
Notice the left panel installed above is not flush to the edge.
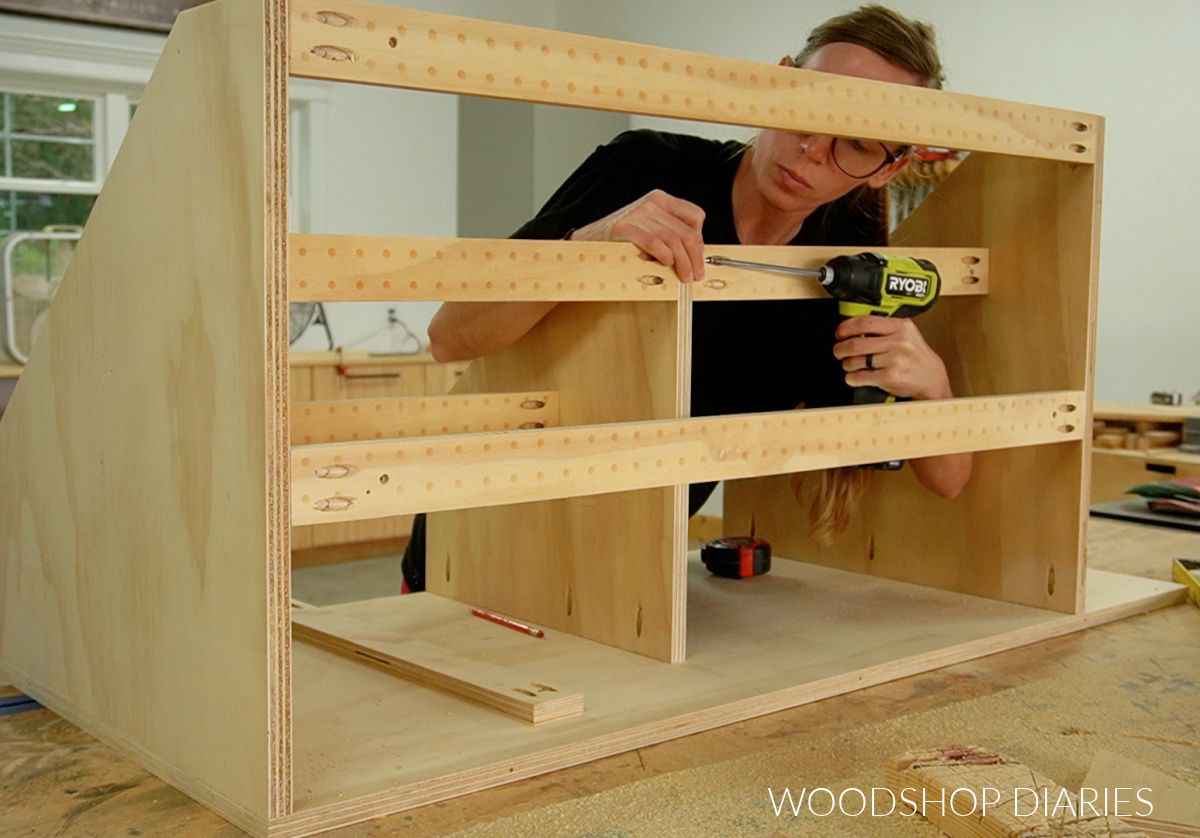
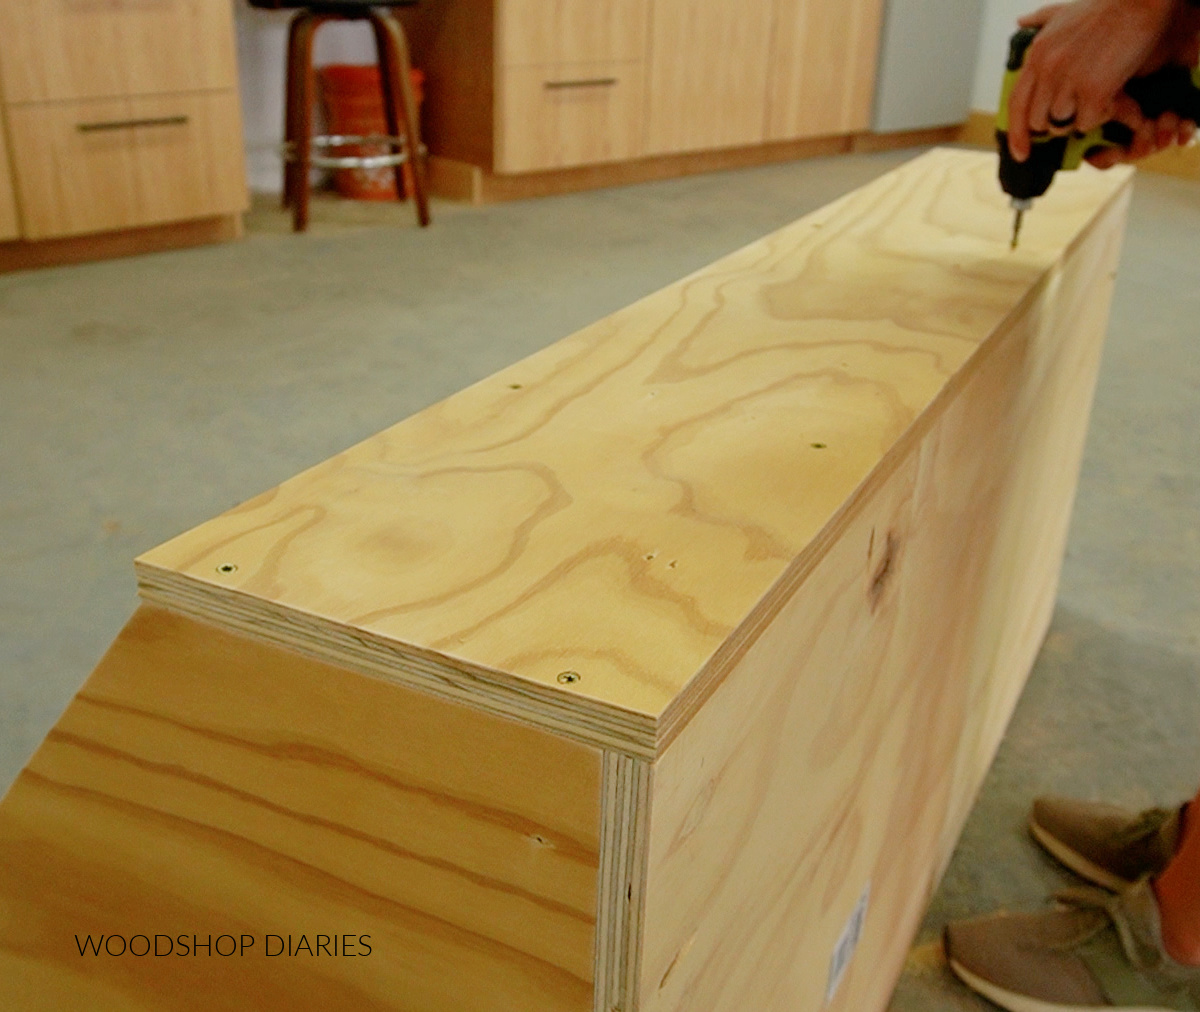
Step 2: Add Back Supports
To save on lumber, I didn’t add a solid panel in the back of this cart. Instead, I cut two plywood strips to run between the side panels to serve as the back.
I drilled ¾″ pocket holes into the ends of these strips.
Then, I installed one at the top between the left and right sides like shown in the image below using pocket hole screws. I added the second strip about halfway up.
Since I planned to use the back section of the cart for large panels, I wasn’t concerned about any small pieces falling through the gaps. However, if you planned to store small pieces in the back section, feel free to install a solid panel back here instead.
Prefer to print? Grab the printable scrap wood storage cart plans here!
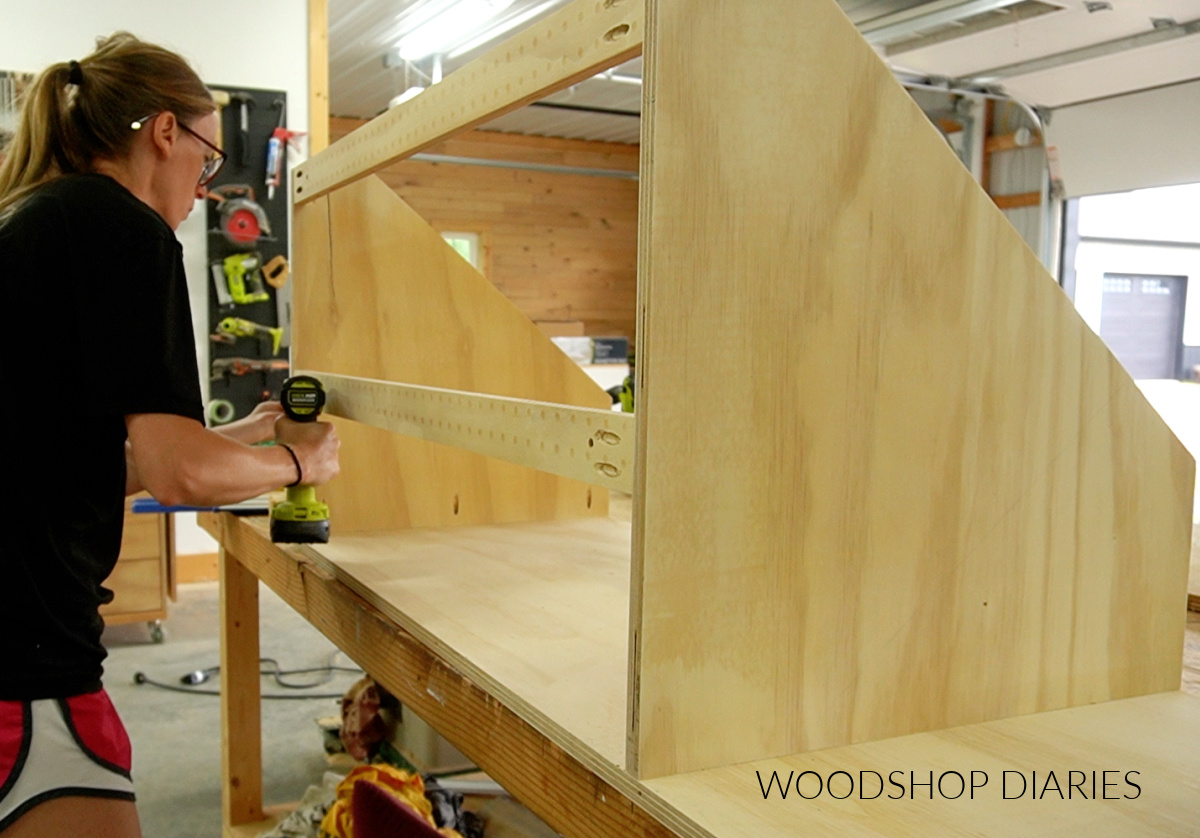
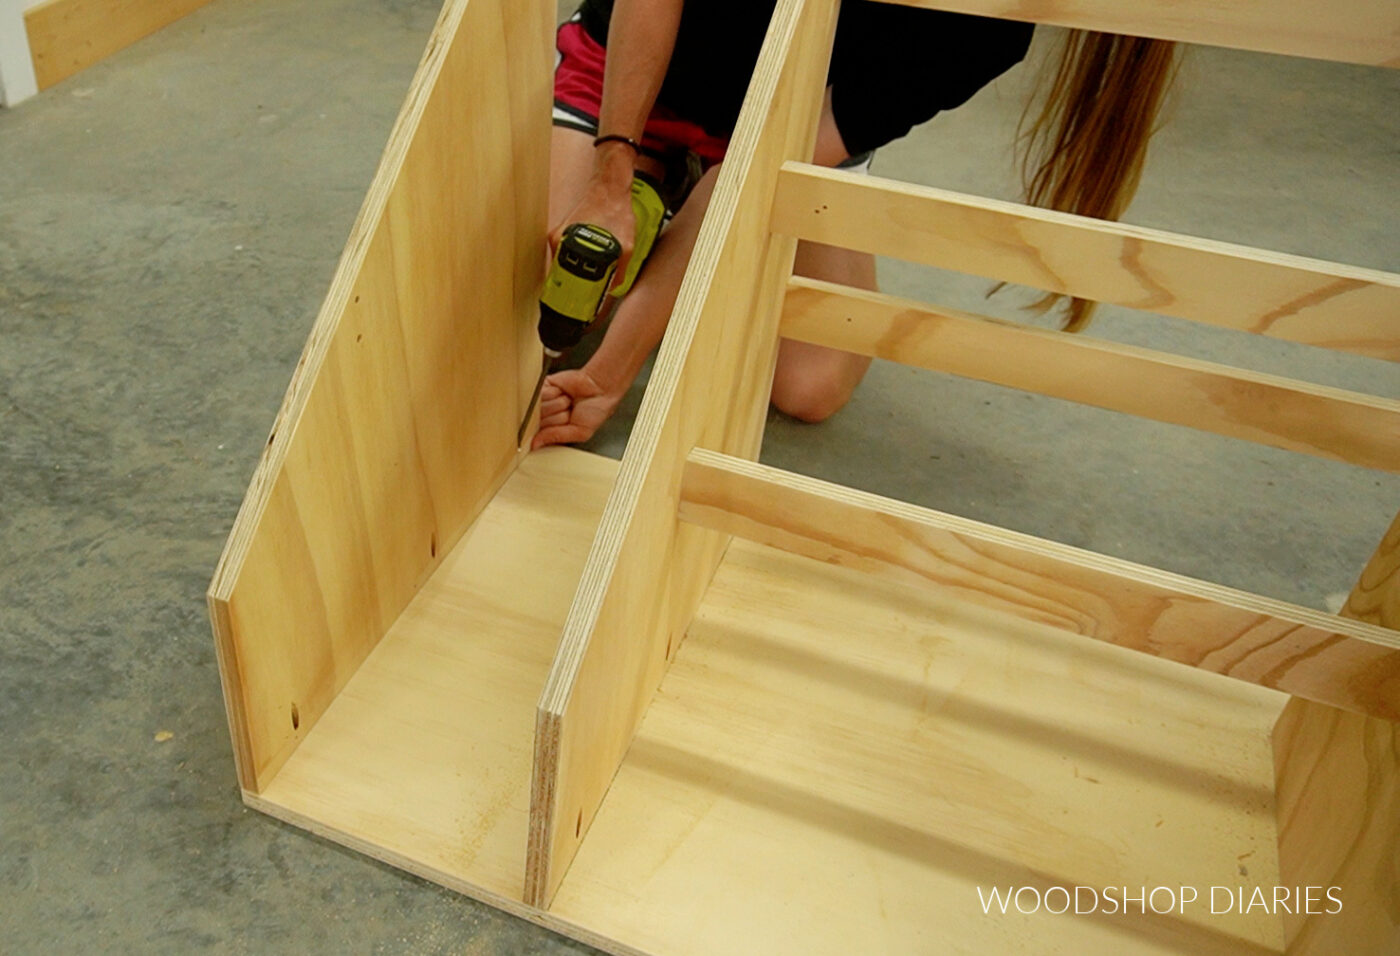
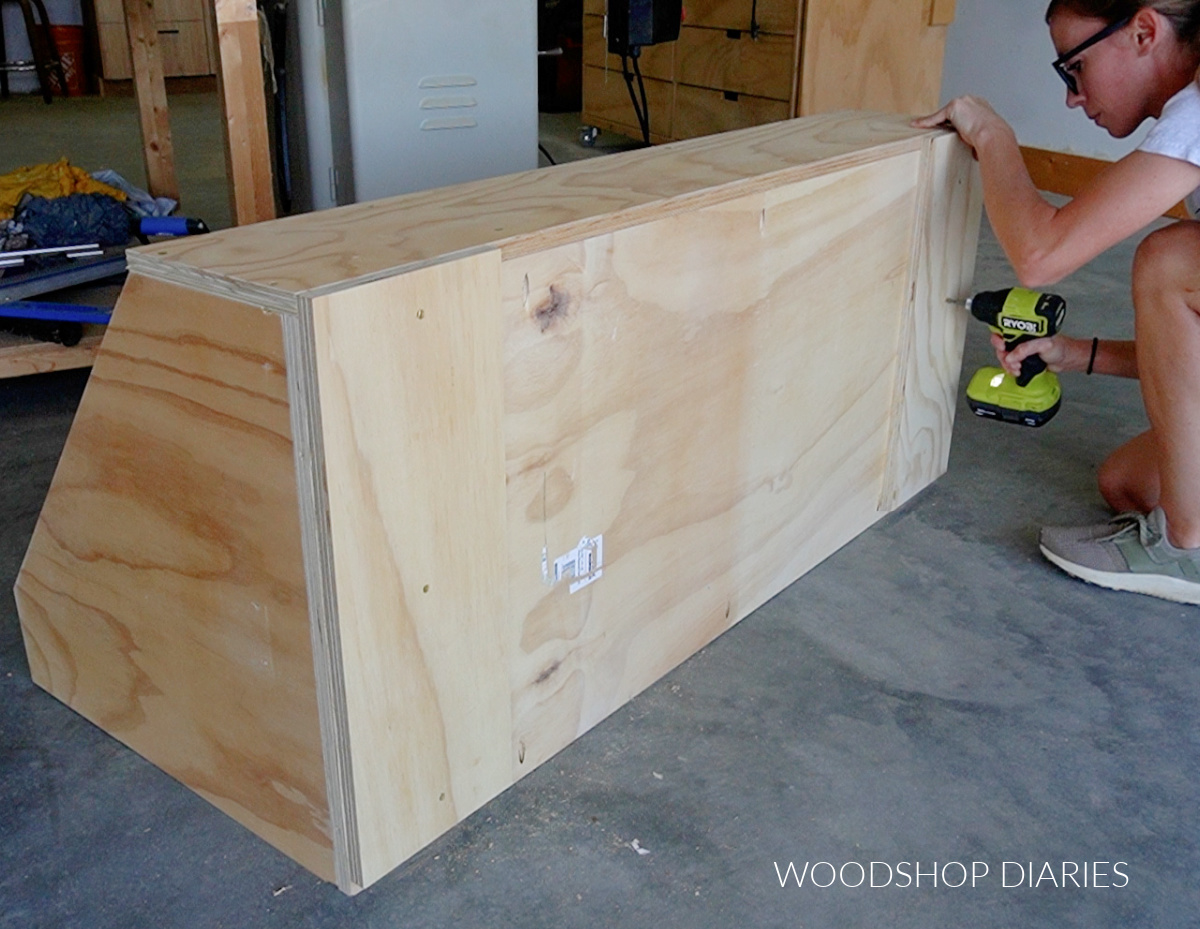
Step 3: Install Divider and Section Supports
Next, I cut a divider panel like shown in the diagram below from ¾″ plywood. I cut the front top corner off just like the side panels from step 1.
I installed this divider panel to the bottom using pocket holes and screws making sure it was centered between the left and right sides and flush to the front edge.
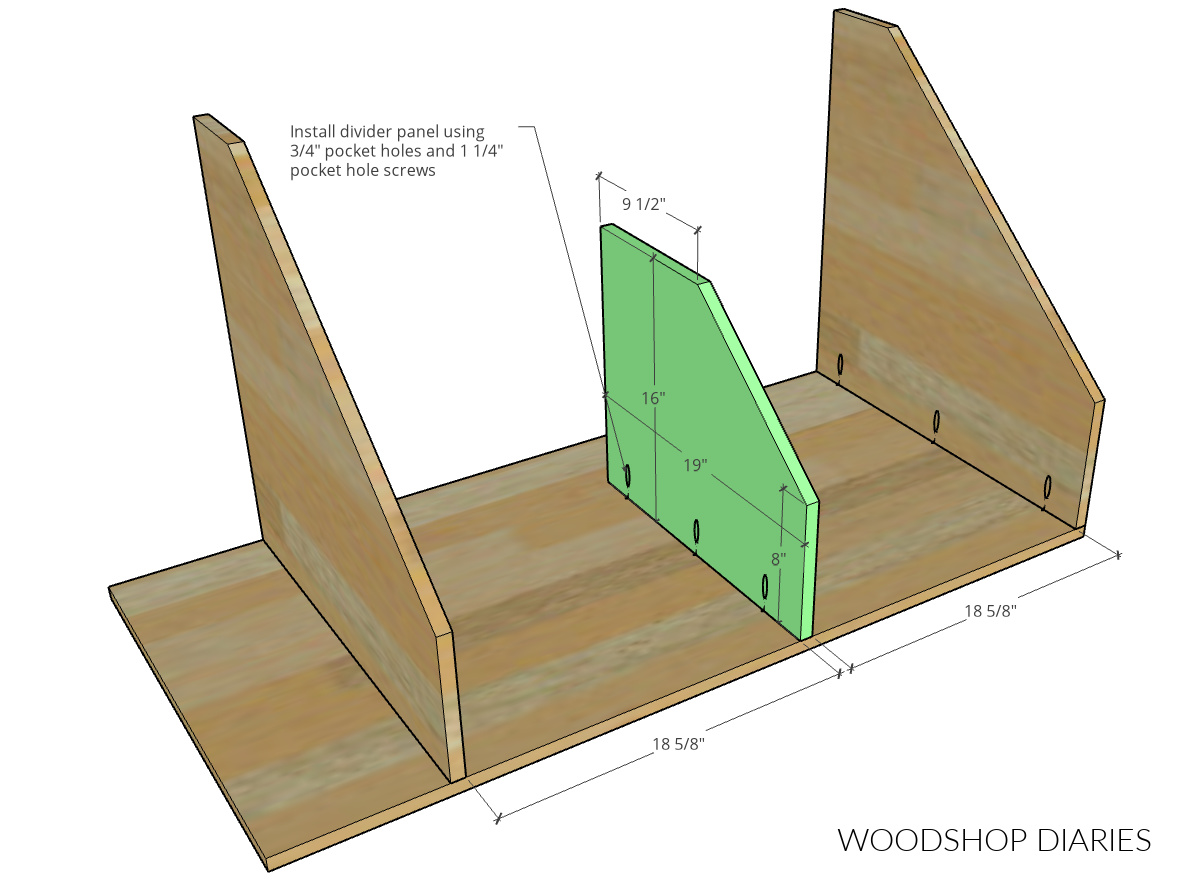
Then, I cut 4 strips of plywood to run between this divider panel and each side. Just like the back strips, I drilled ¾″ pocket holes into the ends of each to install with pocket hole screws.
You can customize the placement of these strips how you see fit for your own needs. However, I installed two 16″ up from the bottom (which makes them flush to the top of the divider panel) and 5″ in from the back edge.
Then, I installed the other two toward the front about 10″ up from the bottom and 8″ in from the front edge.
This basically divided the cart into 5 sections–one wide section in the back, and 4 smaller sections in the front. So I can store my smallest pieces in the two front sections, my longer pieces in the middle and my larger panels in the back.
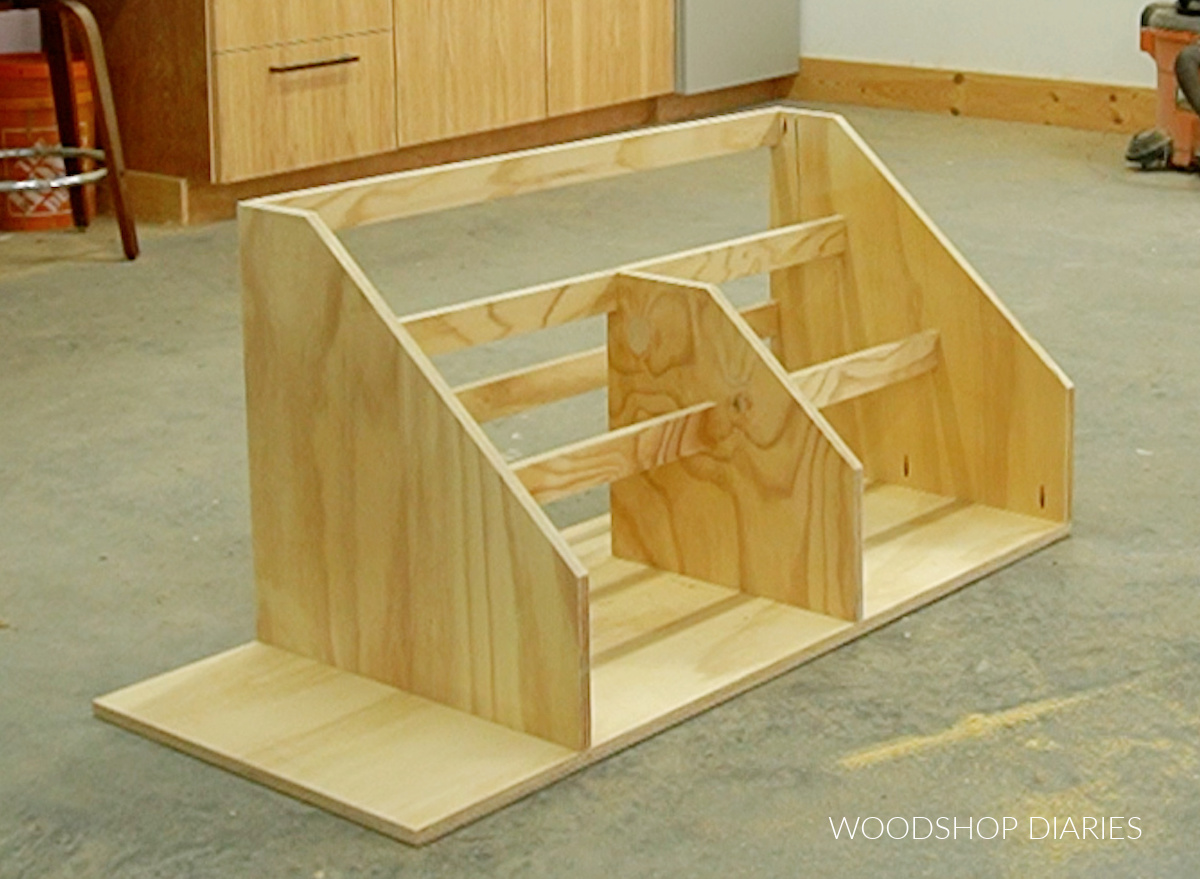
Step 4: Assemble Left Side Cubby
I used the far left section to store my thinner plywood strips. I like to keep long skinny plywood strips to use as spacer blocks, paint stirrers, and as blocks to set projects on when I’m painting.
So I cut another panel just like the sides to install on the far left edge of the bottom panel with pocket holes and screws.
Because the strips I plan to store here tend to be small, I went with a solid panel back here to keep the pieces contained.
I cut a plywood panel to fit into the back section and installed with pocket holes and screws between the side panels flush to the back edge.
Step 5: Attach Front
Finally, I cut a piece of plywood to cover the front and used 1 ¼″ wood screws to secure it into the front of each side and divider panel.
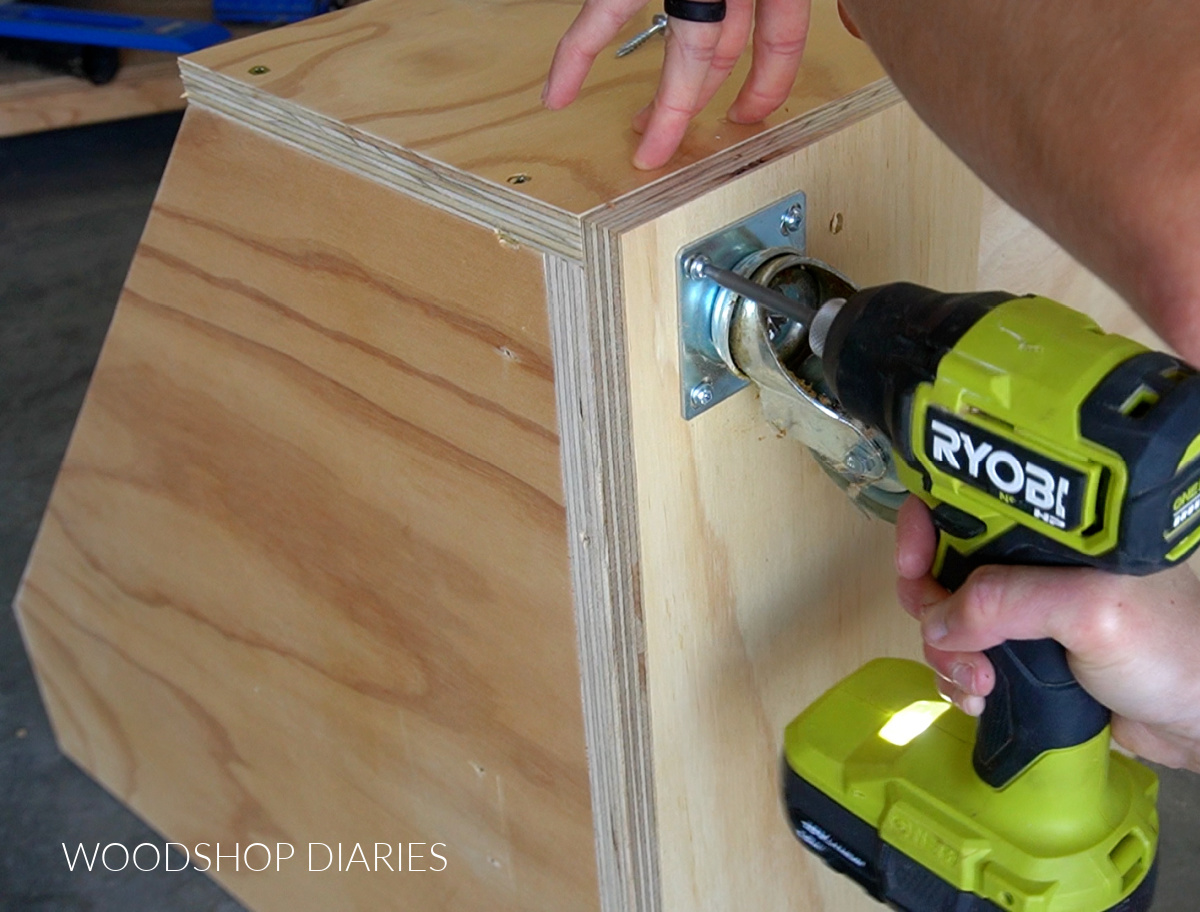
Step 6: Add Caster Wheels
You can skip adding caster wheels if you don’t want your cart to be mobile–but then I guess you can’t really call it a cart haha.
I was installing caster wheels with mounting plates and for these, I like to use 1 ¼″ long wood screws. However, if I screwed them directly into the bottom panel as is, those screws would poke through the top side because they’re too long.
So to fix that, I cut two plywood pieces to attach to the bottom of the cart–one on each side. This basically just gives me some extra thickness for my caster wheel screws to go into.
Then I attached the wheels at each corner using 1 ¼″ screws with washers. Make sure to check your specific wheels manufacturer’s instructions. If they suggest a different installation method, follow their recommendations.
And once the wheels were on, it was ready to flip over and fill up!
This cart really isn’t that big, but it stores way more than I expected it to. I’m hoping to helps hold me accountable to stop hoarding every scrap piece.
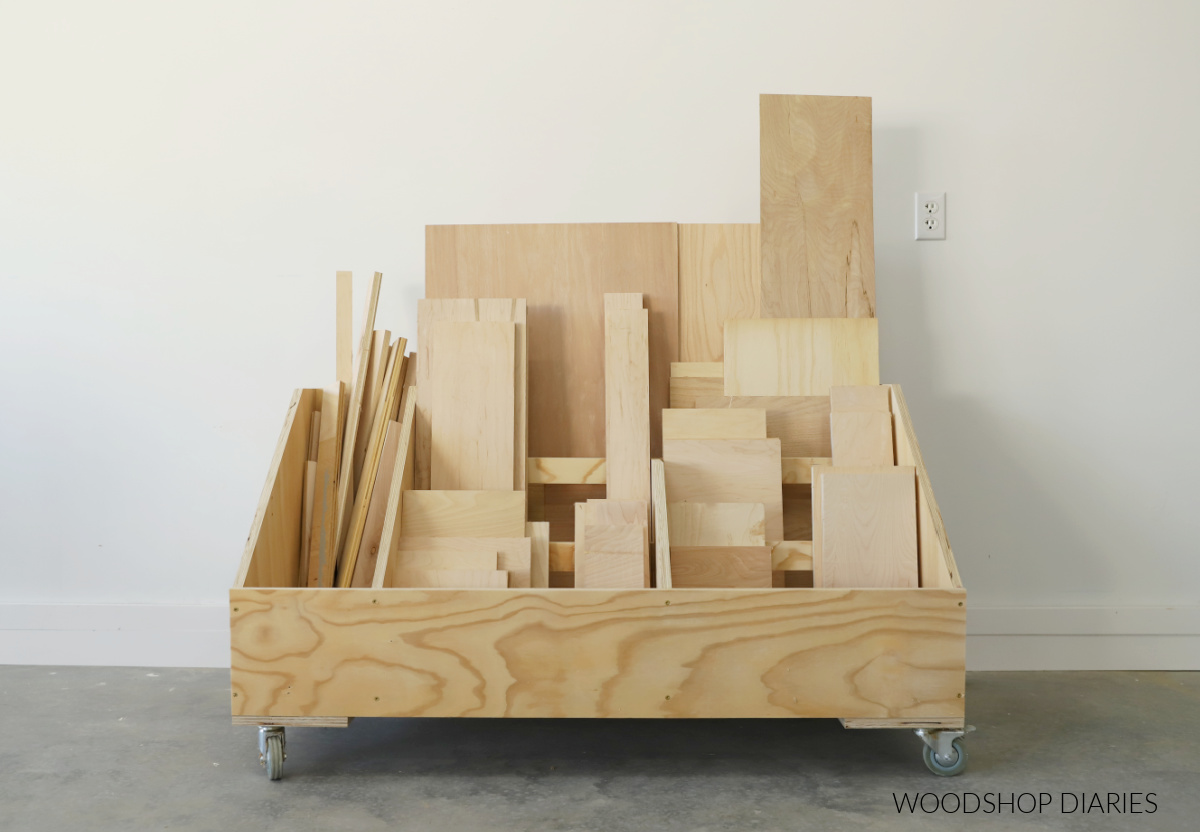
Once it’s full, I’ll know it’s time to purge because there’s no reason to keep much more than this plus my other wood cart can hold!
Ready to build your own? Check out the printable scrap cart building plans here.
Looking for more workshop projects?
If you’re looking for more projects to build for your garage or workshop, here are a few favorites!
If you want to save this project for later, be sure to pin it or share it to your favorite social channel!
Until next time, friends, happy building!