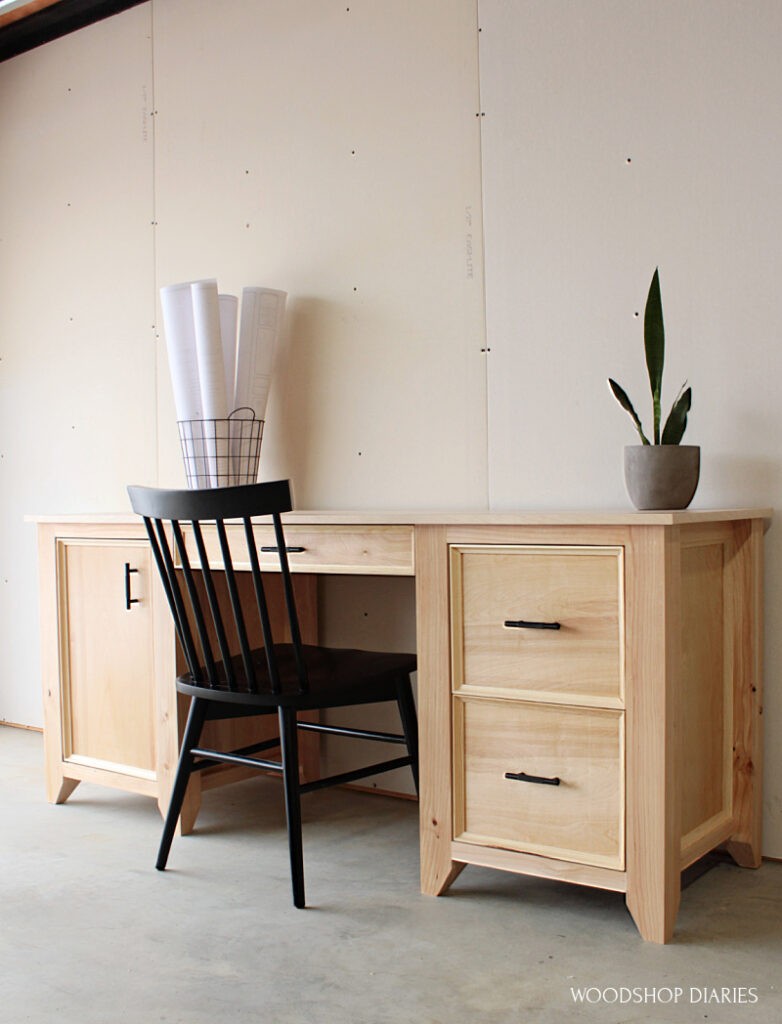
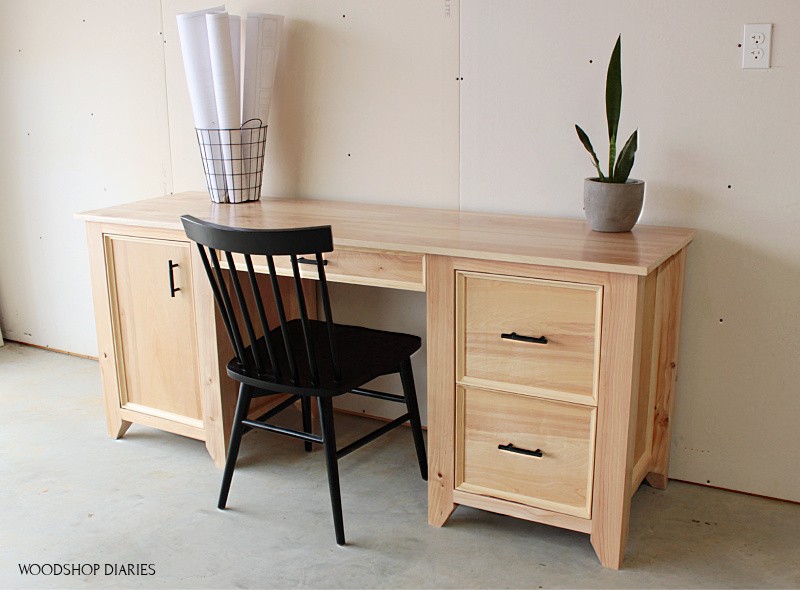
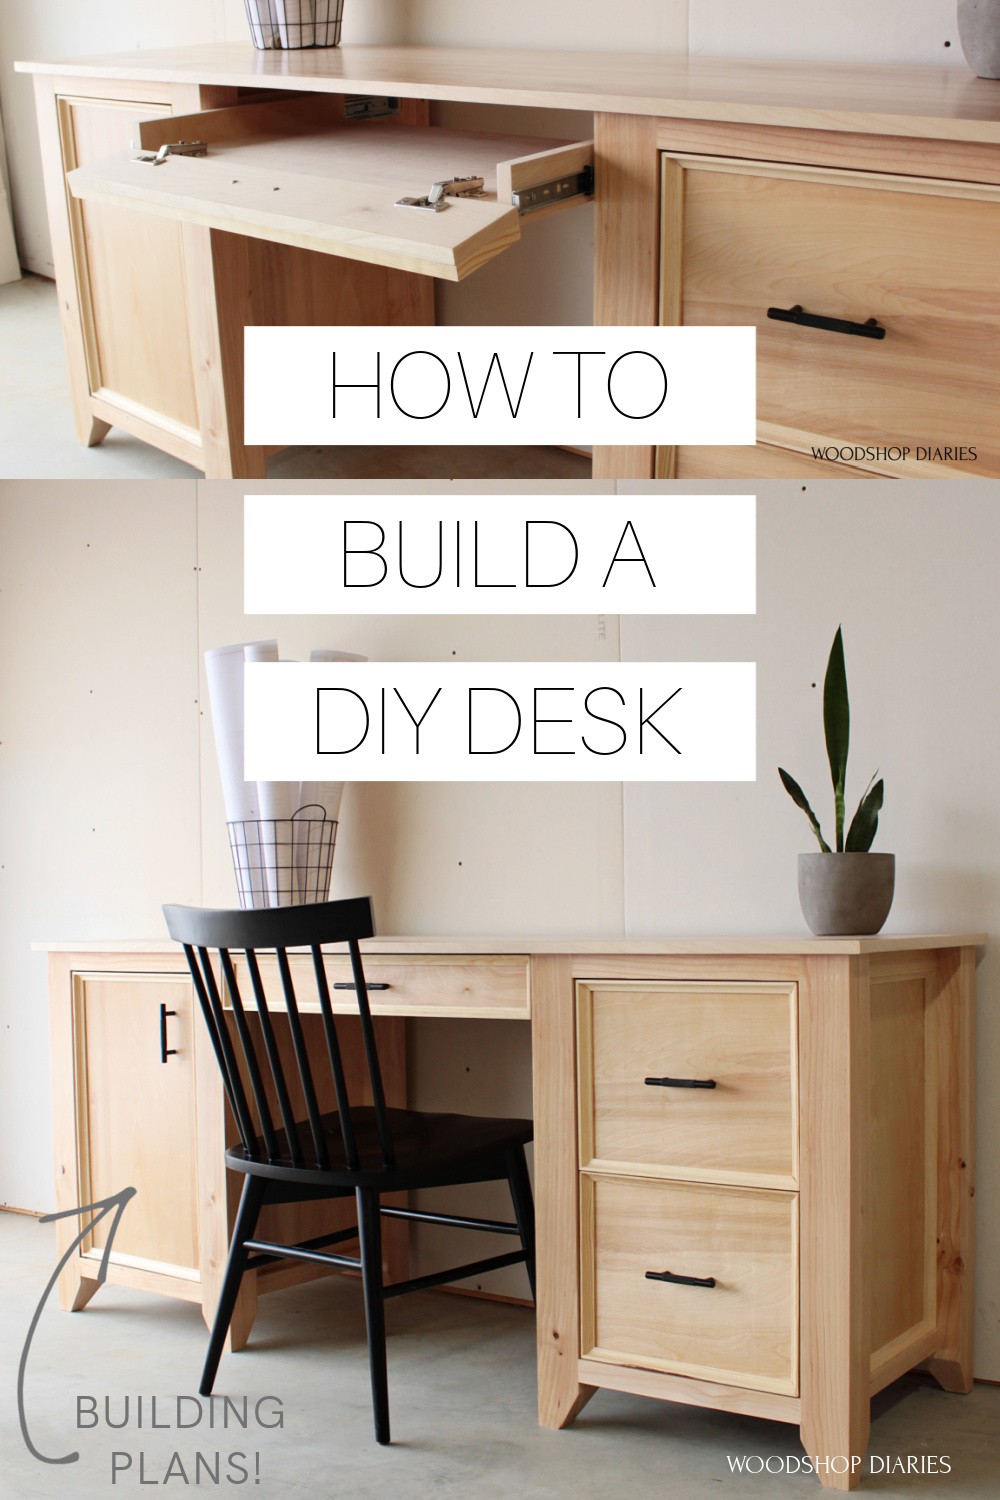
In this post, I’ll show you how to build a DIY computer desk with drawers!
This post is sponsored by Kreg Tool and contains affiliate links. See policies for details.
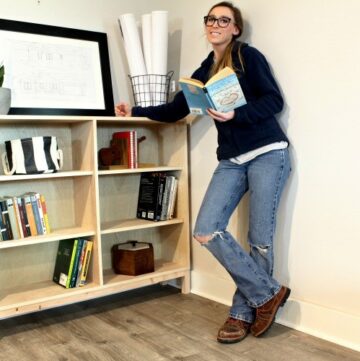
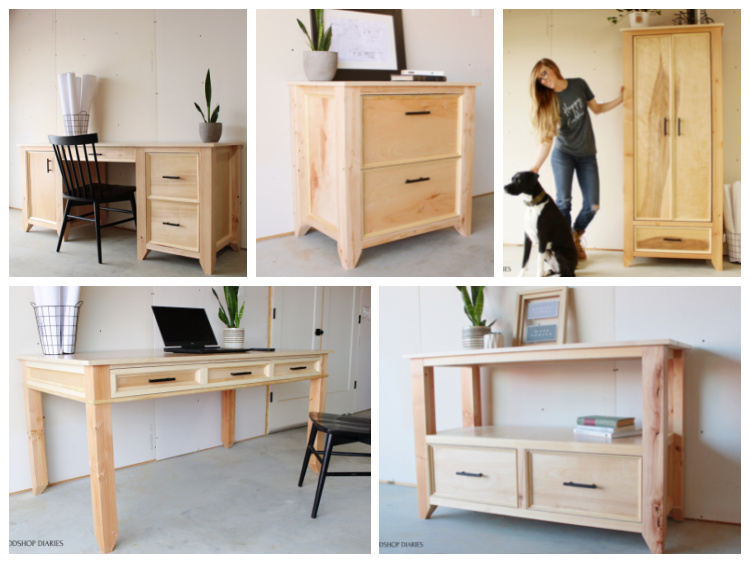
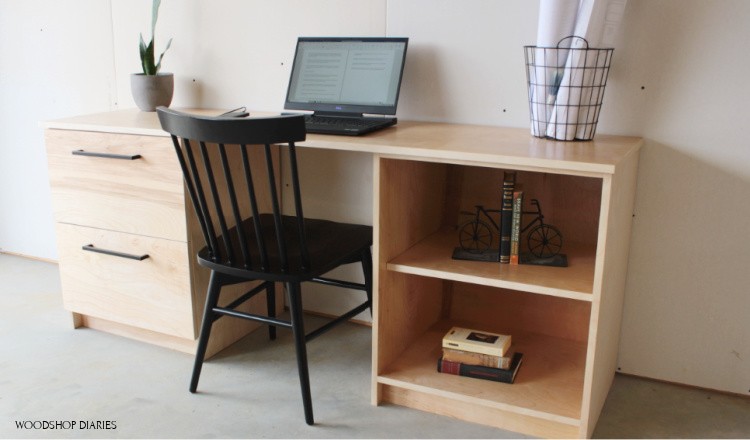
This computer desk design is part of my matching DIY home office furniture series that I’ve been building for my Dad’s business.
It’s been a lot of fun trying to build various pieces but keep a similar design style using the same basic tools and materials.
Check out the whole matching DIY office furniture series here.
This computer desk with drawers is definitely my favorite piece in the series and I’m excited to share how to build it in the plans below.
So, let’s dive in and get building. Here’s what you’ll need.
Tools & Materials
Tools:
Materials:
- (2) sheets ¾″ plywood
- (6) 2x4x8 boards
- (½) sheet ¼″ plywood
- (3) 2x2x8 boards
- (about 32 ft) Cove molding (optional)
- 1 ¼″ pocket hole screws
- 2 ½″ pocket hole screws
- 2″ wood screws
- Wood Glue
- Edge banding (optional)
- (3) pair 16″ drawer slides
- (1) pair full overlay concealed hinges
- (1) pair pivot hinges for cabinet door
What to Consider Before Building a DIY Computer Desk
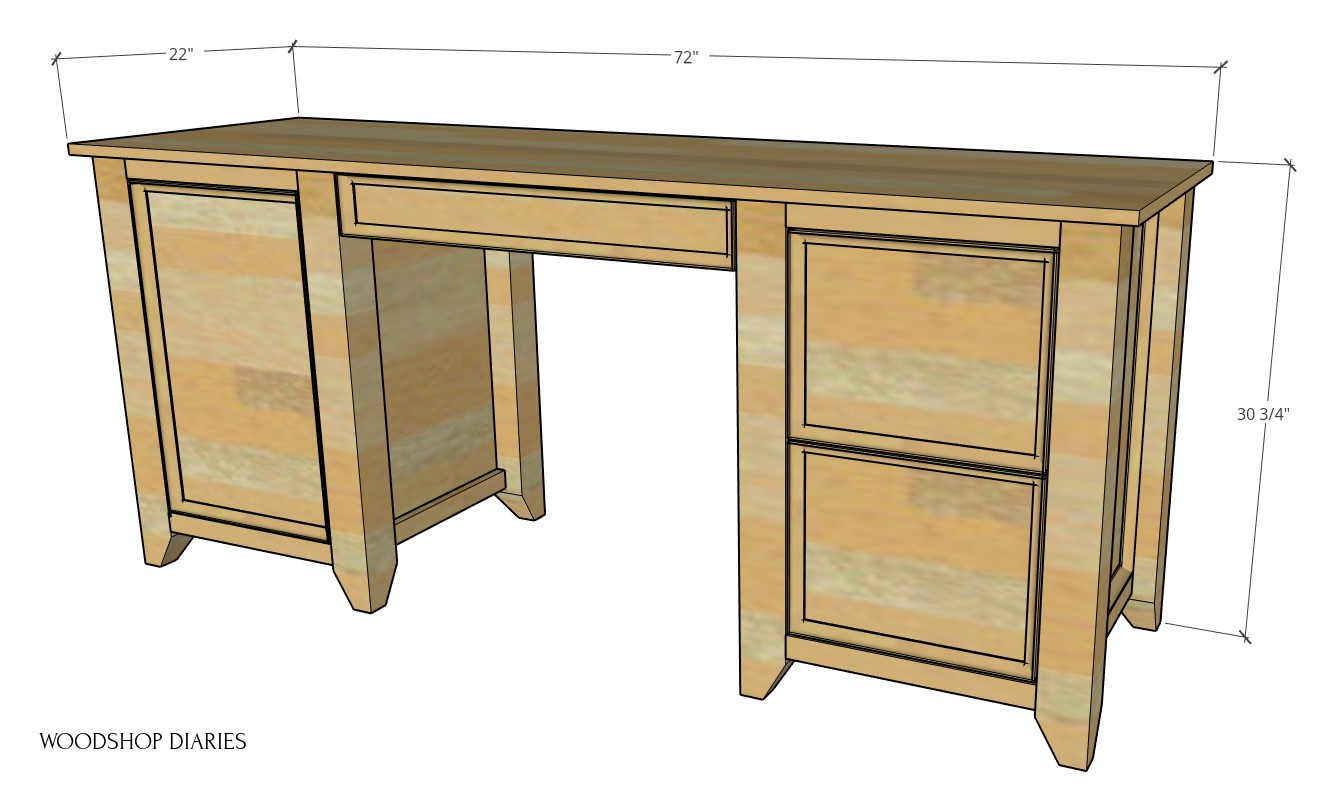
This design is constructed of basically two identically sized base sections–one has a door and adjustable shelving and the other has two large drawers.
Custom Sizing Options
You can adjust the size of the desk by simply adjusting the size of these base cabinets as needed, then adjusting the top to fit.
If you wanted both sides of the desk to have drawers, you can skip the steps to add the door…and if you want both sides to have doors, you can skip the steps to add the drawers.
Feel free to customize your desk however you’d like.
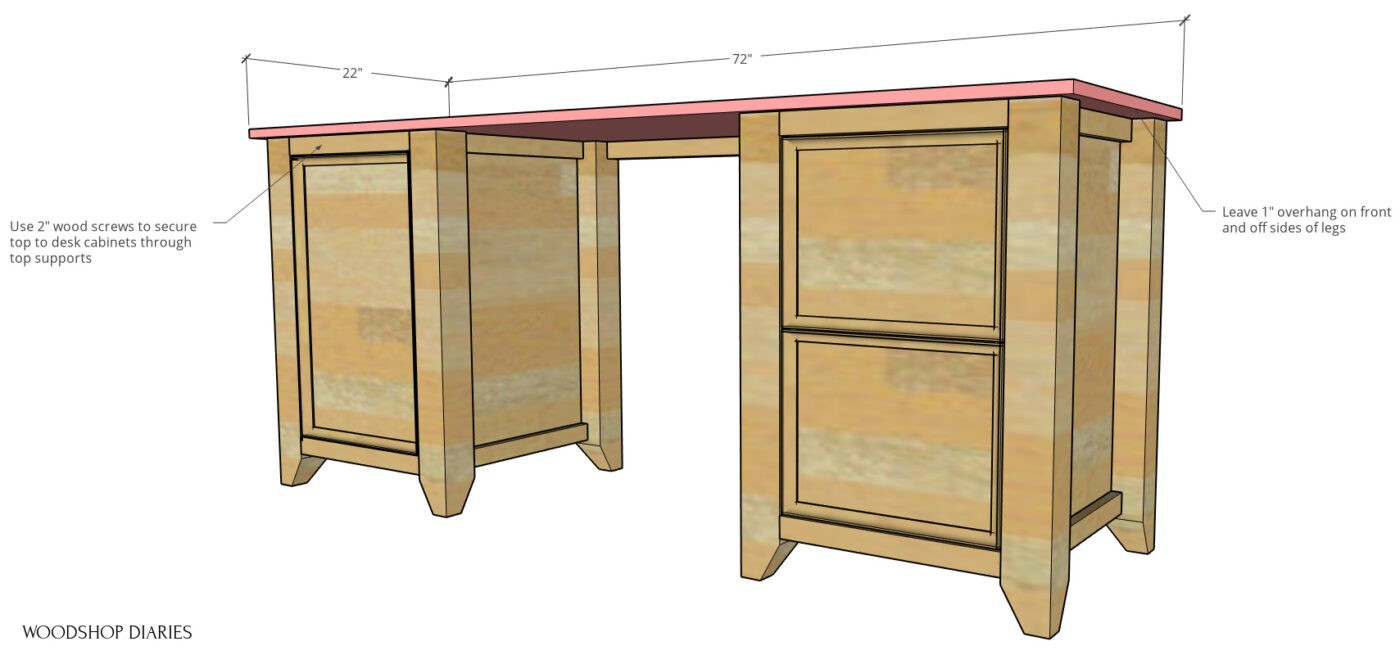
The overall dimensions of the desk as the plans lay out below is 22″ deep x 30 ¾″ tall x 72″ long.
Order of Building Steps
The video, plans, and following tutorial do not go in any specific order of steps once the two base cabinets are assembled.
You can mix and match the steps as you wish and go in what ever order makes sense to you.
Helpful Resources for this Building Project
You may find these posts and articles helpful throughout the building process:
- How to cut plywood sheets
- How to use a pocket hole jig
- How to cover plywood edges
- How to build and install drawers
- How to install concealed hinges
How to Build a DIY Computer Desk with Drawers
This desk was assembled using basic construction techniques and simple pocket hole joinery. I’d consider this an intermediate level build.
I’ve got printable plans available below, a written step by step tutorial, and if you prefer to watch, I’d also got a tutorial video here:
Grab the printable building plans for this computer desk here. You can also find the printable plans for all of the matching pieces on the same site:
Step 1: Assemble Computer Desk Legs
I started this project out the same way I started the other matching pieces in this office furniture set—by making the legs.
I made identical legs for all of the matching pieces, so this process may look familiar if you’ve seen those projects already.
To create the leg posts, I trimmed down my 2×4 boards to 32”, then glued them together into 8 total pairs to make 8 total legs for this desk.
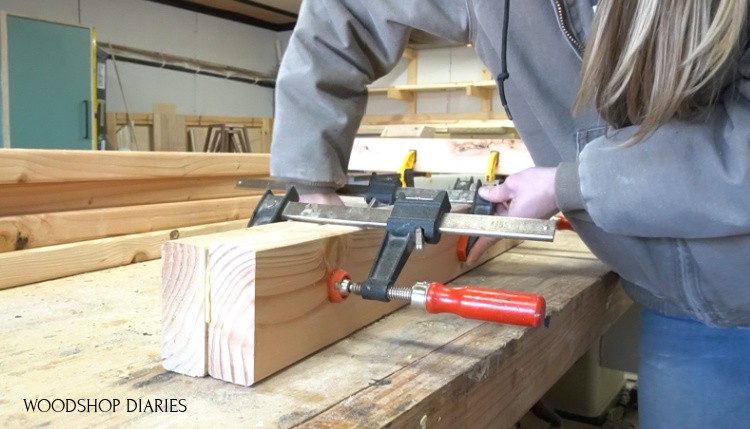
Once the glue was dry, I trimmed about ¼” off each edge on the table saw to clean them up after the glue and to make them 3” square legs.
Then, I trimmed them to their final lengths (30″) on the miter saw. And after they were trimmed down, I adjusted my miter saw angle to 60 degrees to taper two sides of each leg from the center out.
This is an optional step, but adds a little extra detail to fancy things up a bit.
Step 2: Assemble Four Side Panels
Next, I cut down some 2x2s and ¾” birch plywood to build the side panels for the two desk cabinets. If you want to learn more about how I cut down plywood sheets, I have a detailed plywood cutting guide here.
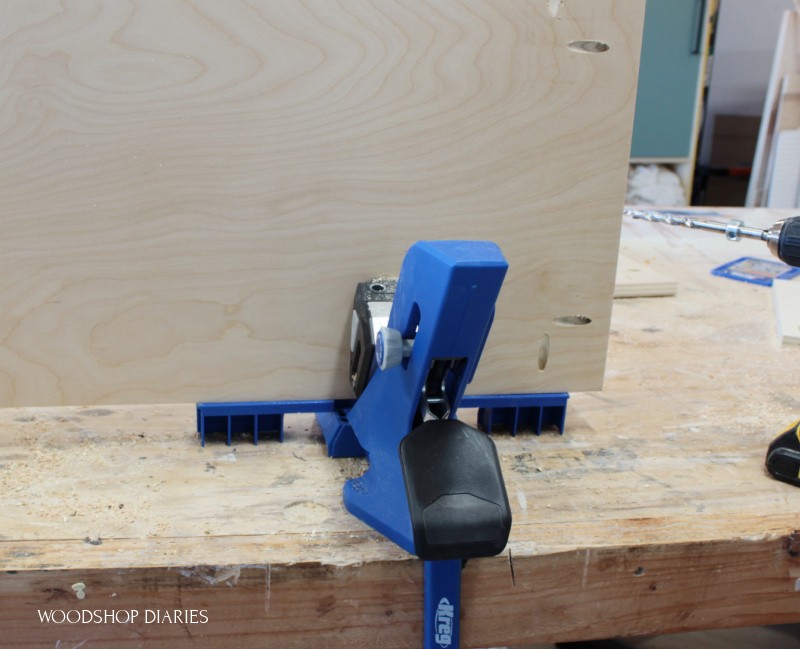
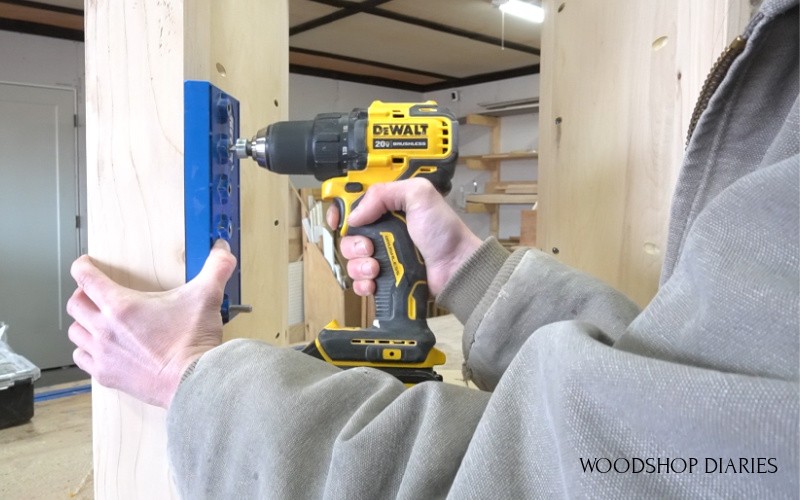
Once the legs, plywood, and 2x2s were sanded well, I brought out my Kreg 720 pocket hole jig to drill pocket holes for assembly.
NOTE: If you’re not sure which Kreg Jig is right for you, check out this post to help break down the options!
The Kreg 720 pocket hole jig is definitely my go to, personally. I love the onboard bit storage (so I can quit losing all my bits!), the fold out support wings for when you’re drilling into large panels (like you see in the image above).
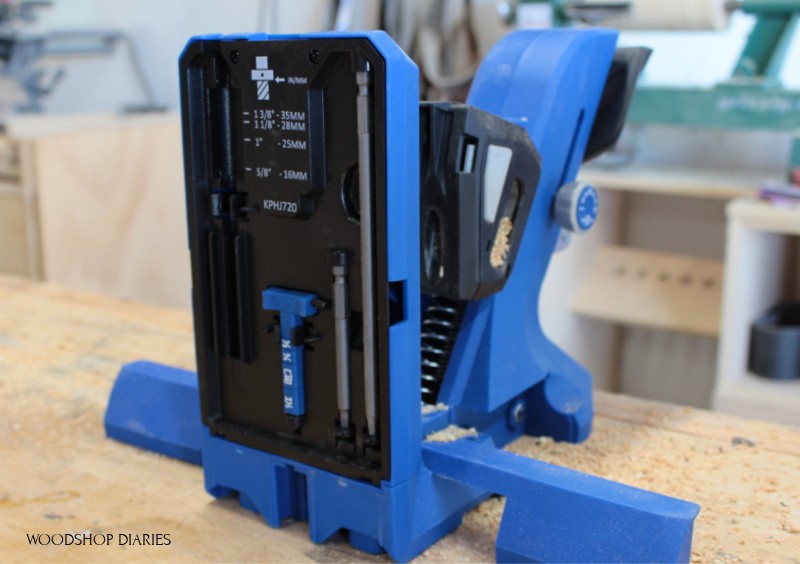
And the AutoMAXX clamping feature automatically adjusts to different board thicknesses, so you don’t have to worry about it when switching from ¾″ material to 1 ½″ material, etc.
Not sure what I’m talking about with board thickness adjustments? Check out this guide how to set up and use a pocket hole jig to learn more.
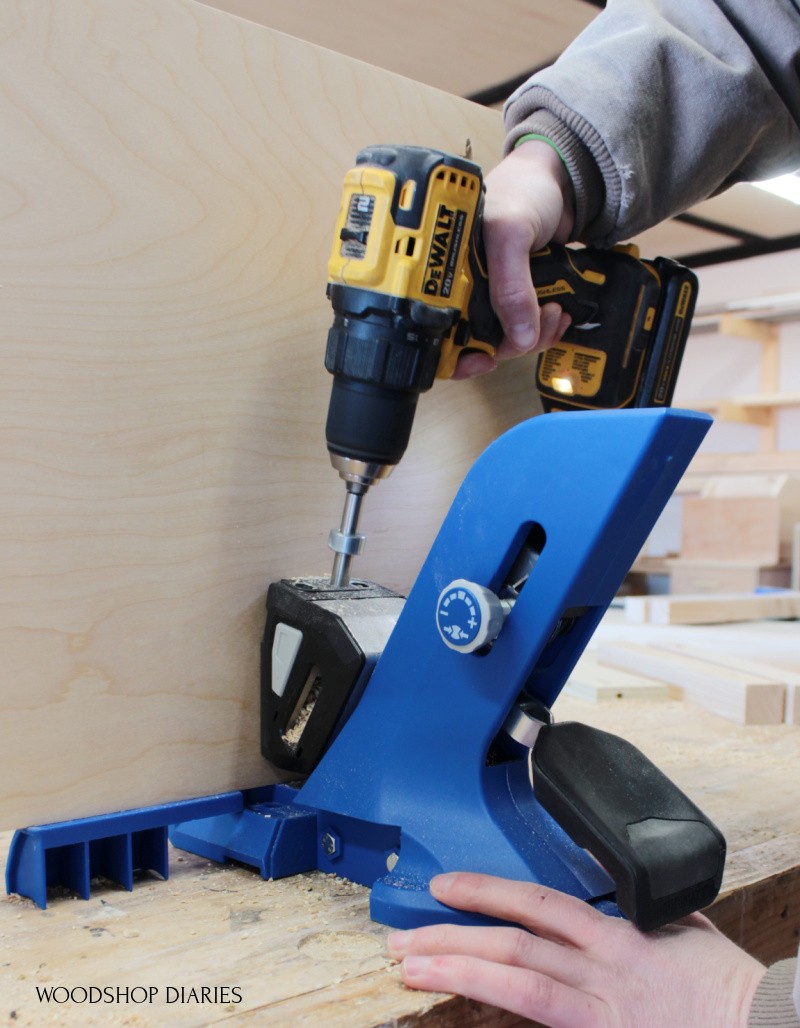
I drilled pocket holes into the 2×2 and the plywood pieces and began assembling the side panels using wood glue and pocket hole screws.
RELATED: If you want to learn more about how to use pocket holes, check out this detailed guide!
I made sure to pay attention and face the tapers the right directions on the legs when assembling. They should face the INSIDE.
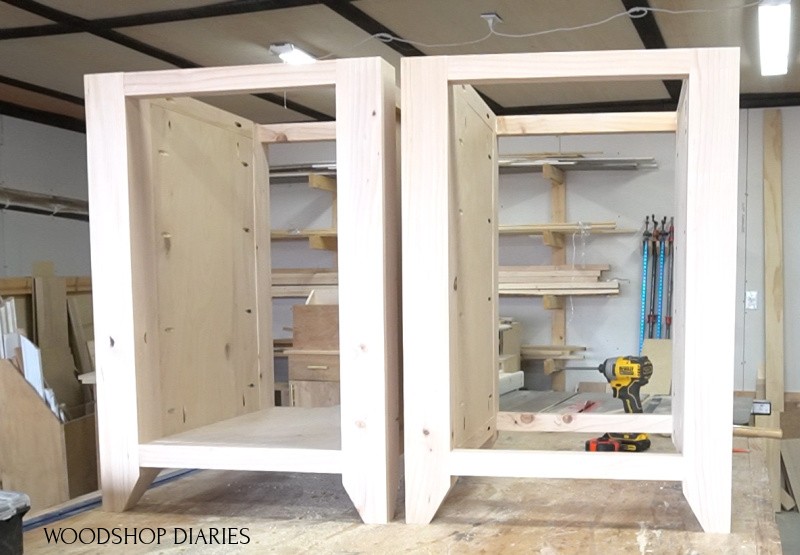
Step 3: Assemble Computer Desk Cabinets
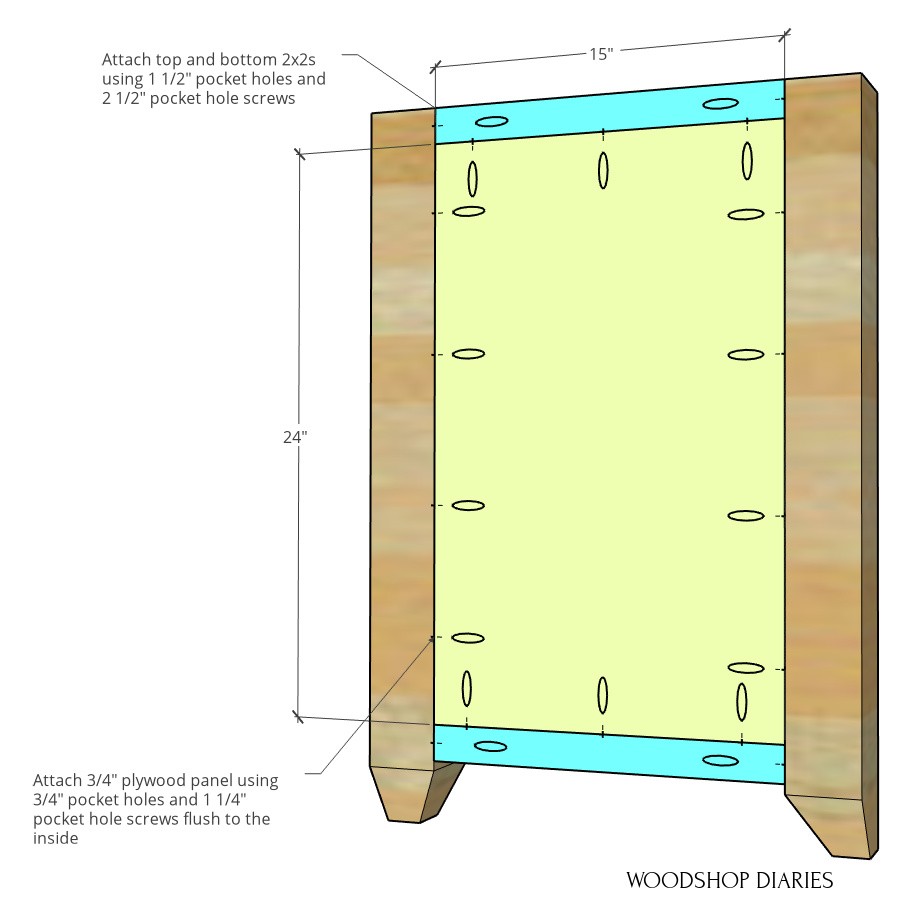
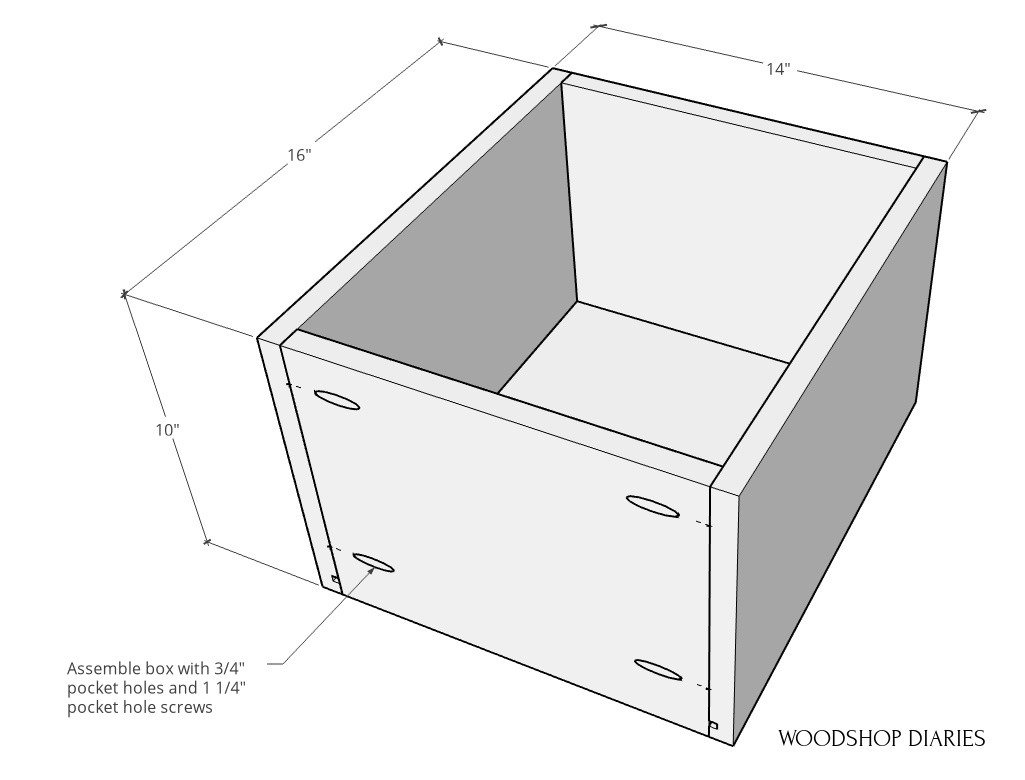
Once I had four identical side panels, I started building the two desk cabinets. One of these cabinets will have a door and shelves. So it needed a solid bottom.
For this, I cut a ¾” plywood panel and attached it between two 2x2s using pocket hole screws to make this bottom shelf.
Then, I assembled the door cabinet using this bottom shelf on the bottom and 2x2s at the top. It’s important here to attach the bottom panel equal distance from the top 2x2s to keep things square.
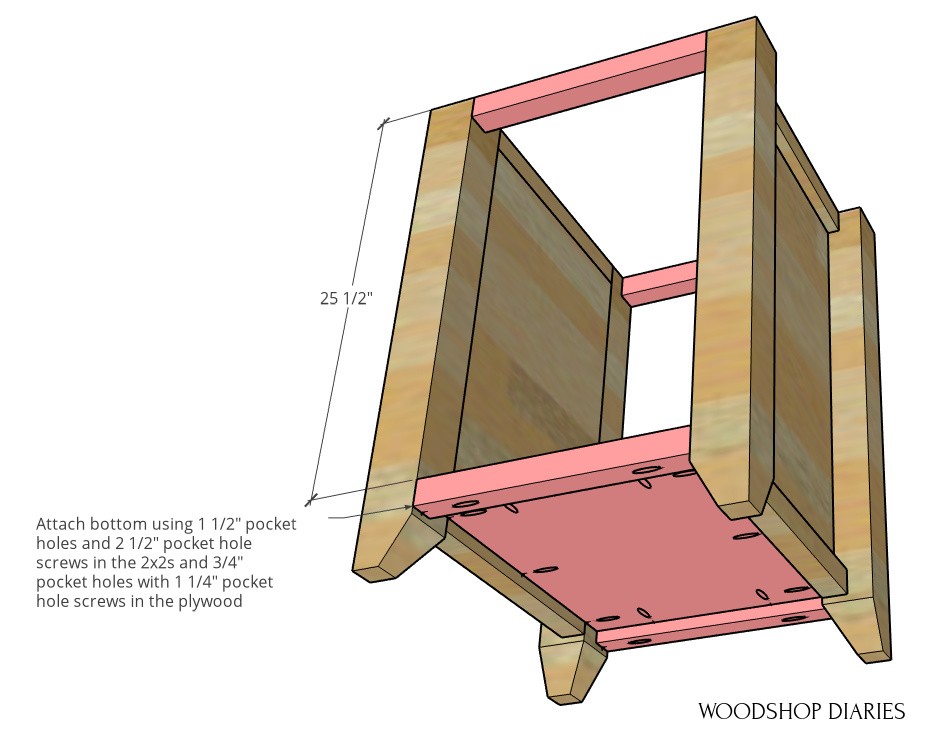
Once that cabinet was assembled, I repeated the process for the second cabinet, only this time, I just used 2x2s because there’s no need for a solid bottom since this cabinet will have drawers.
However, if you wanted to make it solid, that’s fine, too.
Now that both cabinets are built, it’s time to customize each one. Because I love drawers, I started with the drawer cabinet first.
Step 4: Add Drawers to One Cabinet
I installed two pair of 16” ball bearing drawer slides into this cabinet—one at the bottom and one 12” from the bottom.
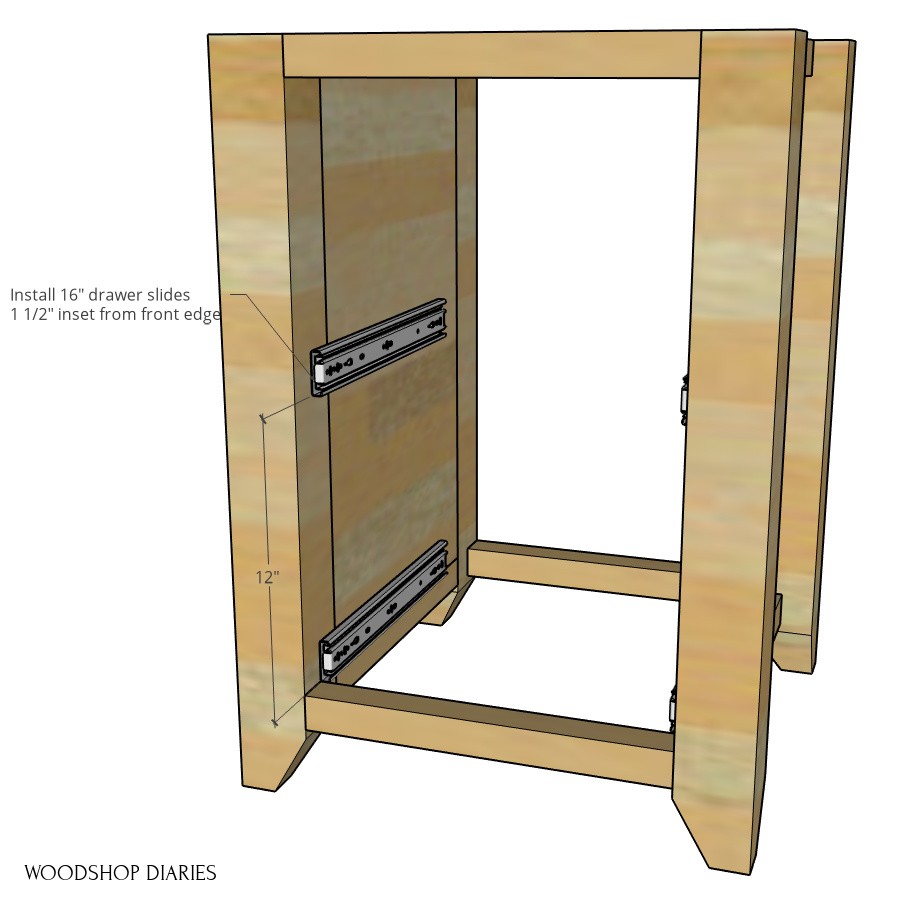
Because the drawer fronts will be 1 ½” thick, I inset these slides 1 ½”. If you want to learn more about how to build and install drawers and drawer slides, check out my drawer building guide here.
I ripped a piece of plywood off my sheet to build the drawer boxes from. I trimmed the side pieces down to size on the miter saw and cut a dado in them for the ¼” plywood drawer bottom.
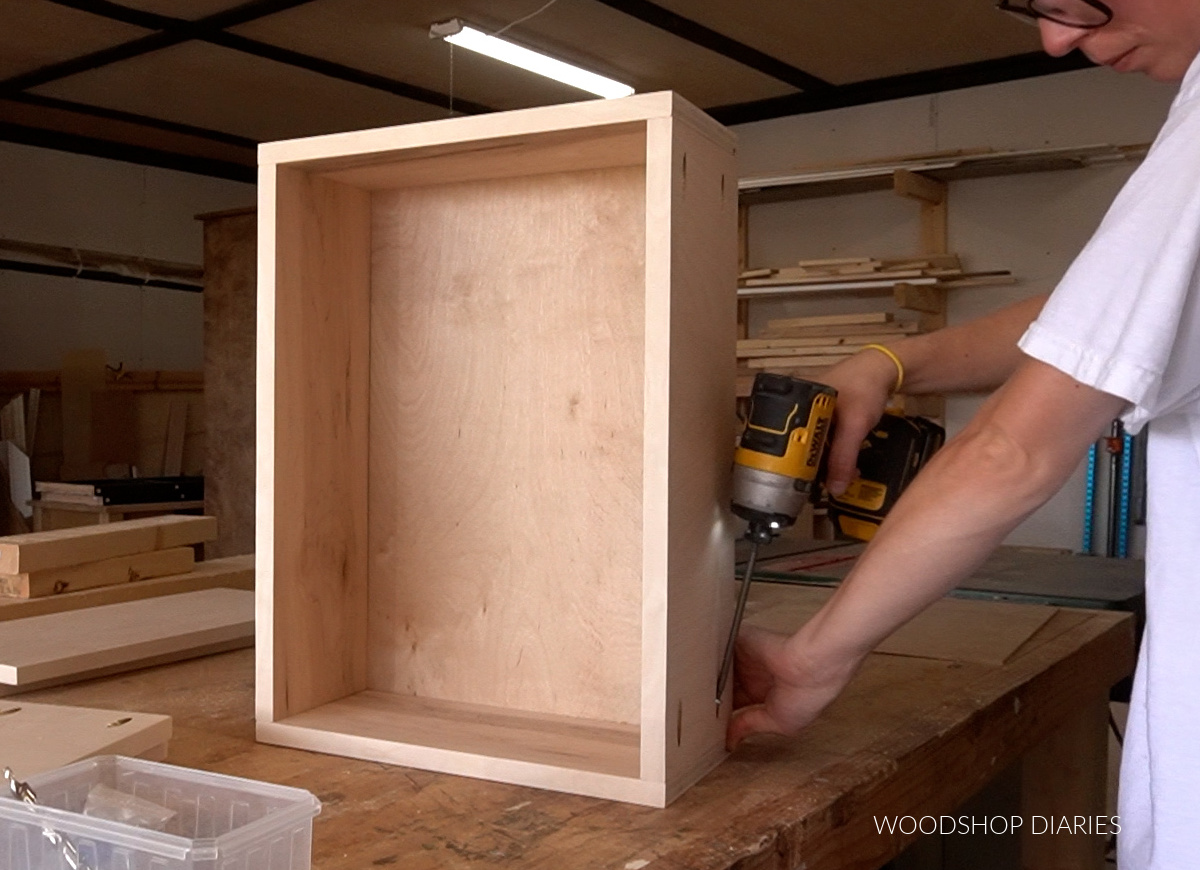
I edge banded the tops just to give it a cleaner look, and drilled pocket holes in the front and back pieces.
RELATED: How to apply iron on edge banding
Then, I assembled using pocket hole screws and installed a ¼” bottom before adding the last piece.
And finally, I installed these drawer boxes into the cabinet. If you want to learn more about how to build and install drawers and drawer slides, check out my drawer building guide here.

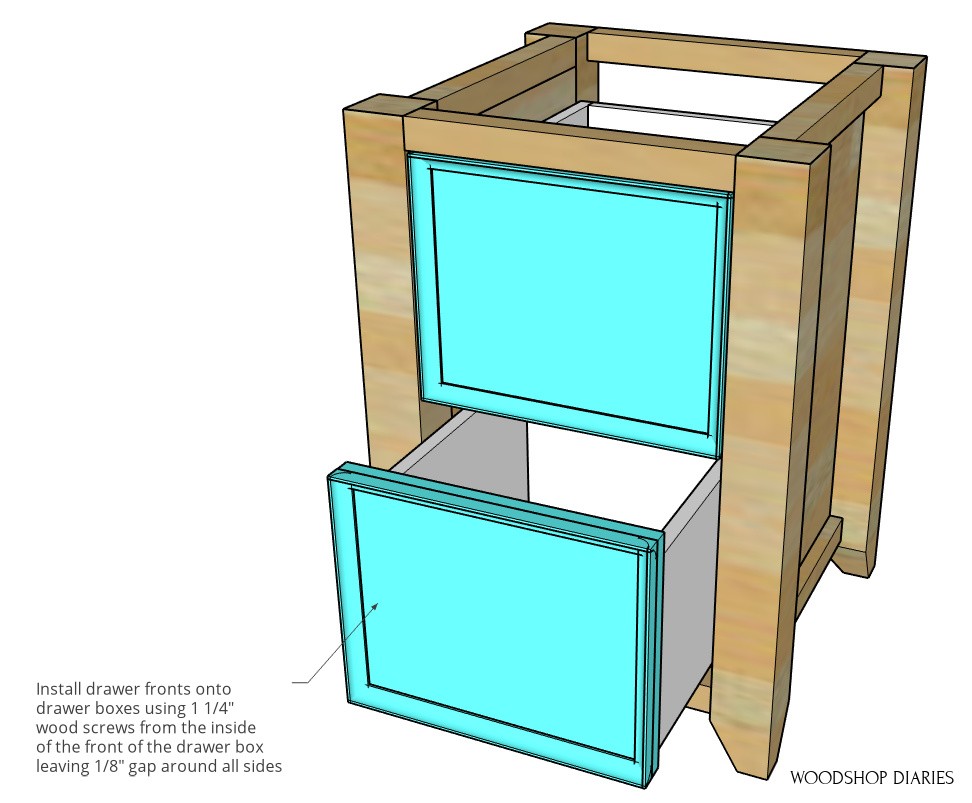
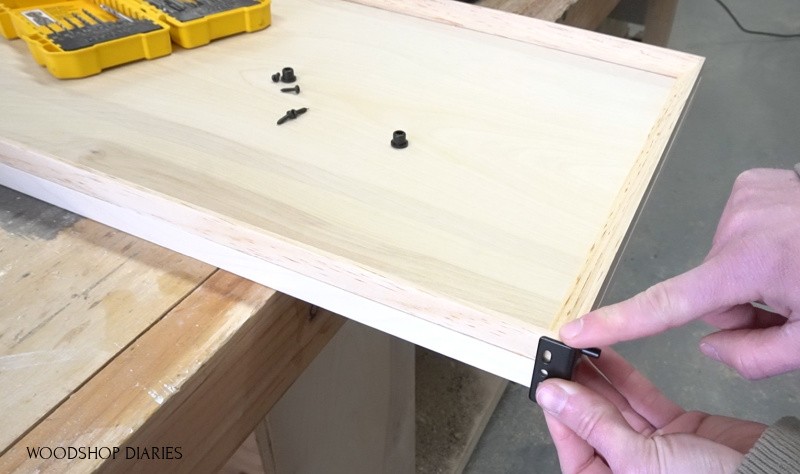
Step 5: Build and Install Drawer Fronts
I built these drawer fronts the same way I built the drawer fronts on the matching shelf build. I cut ¾″ plywood and glued cove molding cut to fit along the edges.
After the glue dried, I installed these onto the drawer boxes using 1 ¼″ wood screws through the inside of the drawer box to hold them in place.
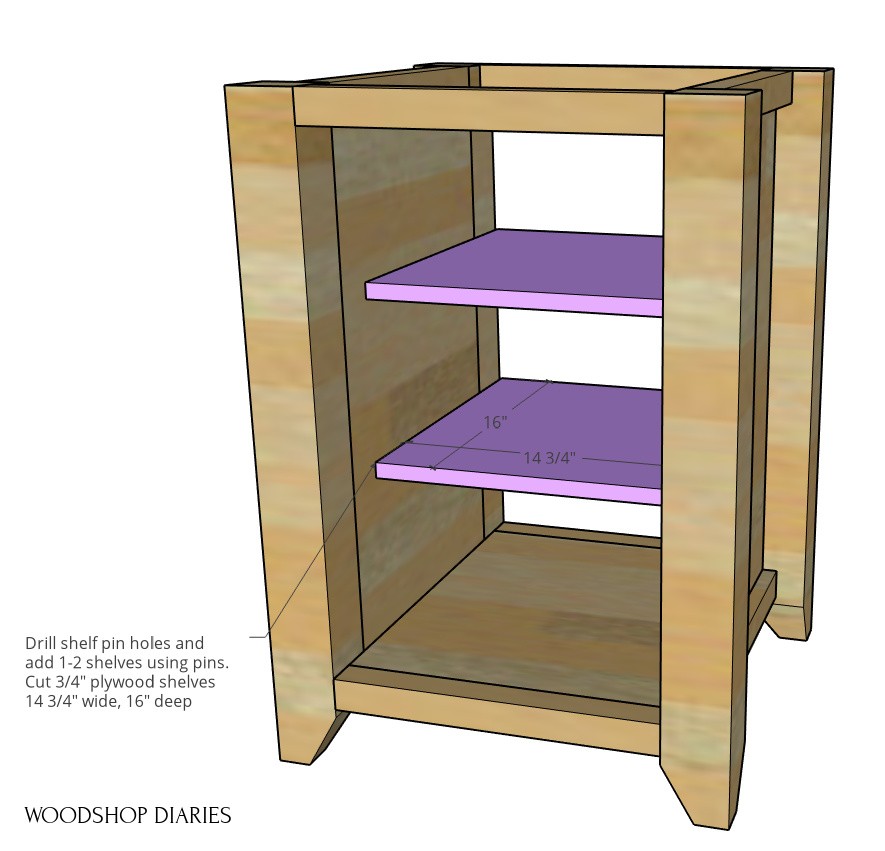
Step 6: Add Adjustable Shelves to Second Computer Desk Cabinet
The door cabinet will have a shelf or two installed in it, so to give my dad some options, I used my Kreg shelf pin jig to drill shelf pin holes in this cabinet so he can have adjustable shelves.
RELATED: The shelf pin jig is one of the top 10 tools I recommend for basic cabinet and furniture building! Check out all ten here!
Once the holes were drilled, I used shelf pins to install adjustable shelves as needed. I only added one shelf, but you could add multiple depending on your needs.
I just cut the shelves from ¾″ plywood to fit inside the cabinet.
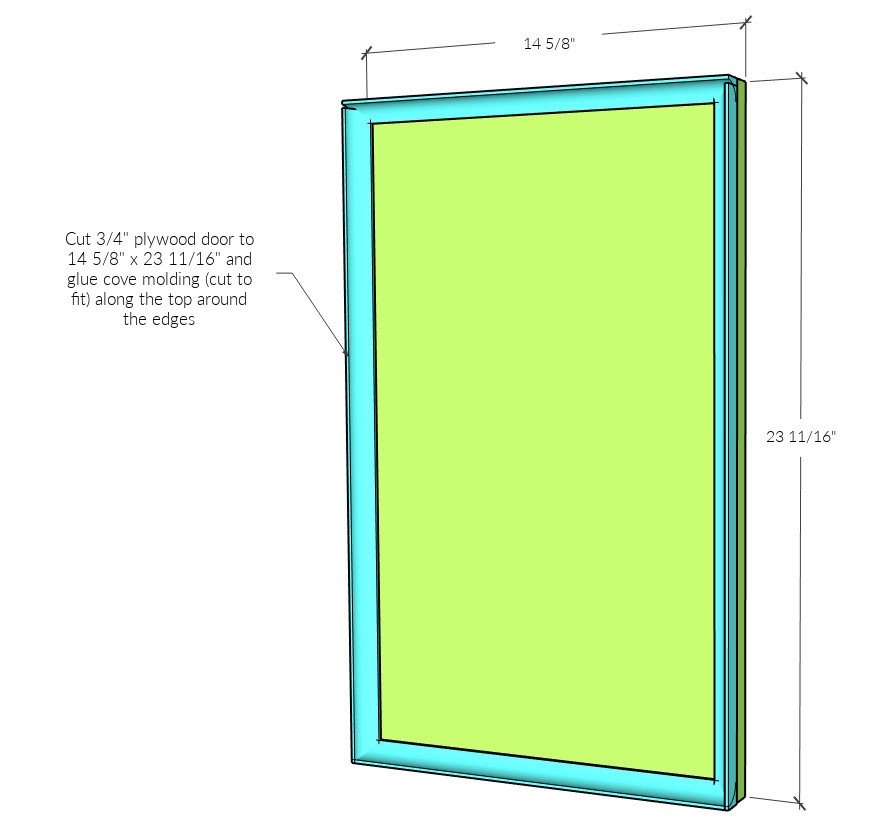
Step 7: Build and Install Door
Next, it was time to add the cabinet door. I cut the door from ¾” plywood and edge banded the sides.
Edge banding is always optional, but check out this post to see how easy it is to apply edge banding to your plywood projects!
Then, I cut to fit cove molding and glued it onto the front around the edges.
Now, just a warning here…Adding the cove molding on the front side of this door complicated things a little.
Normally, I would make an inset door ¼″ narrower and ¼″ shorter than the cabinet opening (see this post about cabinet door sizing) and use concealed inset cabinet hinges to install them.
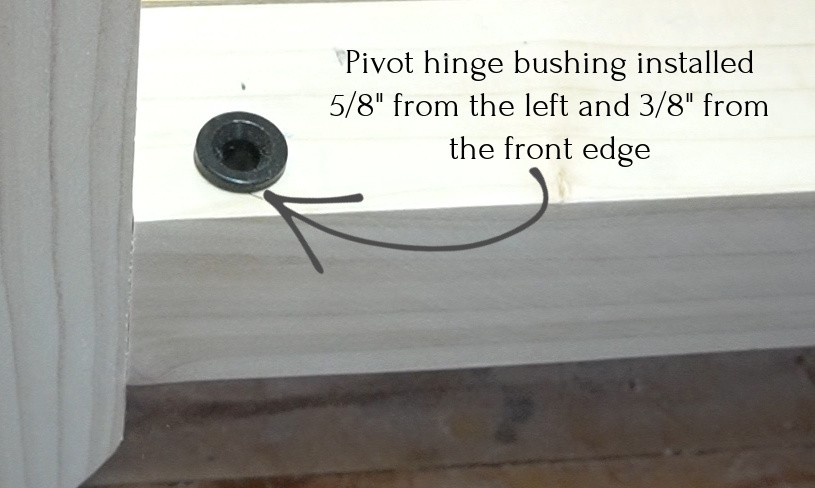
However, since this door was almost 1 ½″ thick, normal inset concealed hinges wouldn’t work. So instead, I used pivot hinges. Using pivot hinges required me to make my door slightly undersized.
So, if you are using pivot hinges in your project, you’ll need to make your door as shown above. But if you build a different style door that is ¾″ thick and use normal concealed hinges, you can check this post for sizing details.
The pivot hinges were easier than I expected to install.
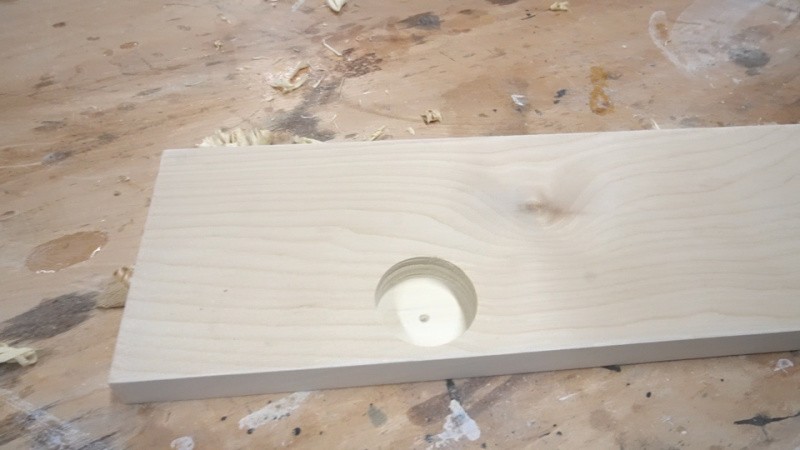
Check out the video above for installation details, but basically, I drilled a hole at the top and bottom of the cabinet ⅝″ from the side edge and ⅜″ from the front and tapped the bushing into it.
When I was ready to install the door onto the pivot hinges, I screwed the bottom hinge into the bottom corner of the door first.
Then I dropped it into the bottom bushing and pushed the door into place into the top hinge. I had to crawl through the back side of the cabinet to screw in the top…it was a tight fit haha.
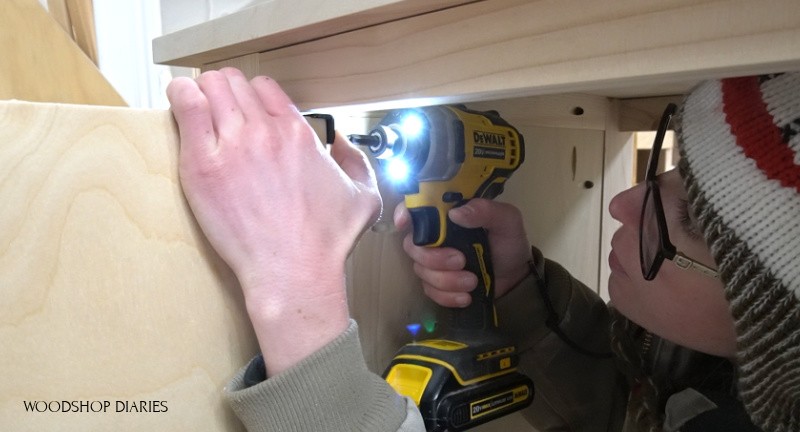
And to my surprise, this worked out really well. I may be using pivot hinges more often after this!
Step 8: Add Back Support and Desk Top
While the glue dried, I screwed a 2×2 between the two cabinets at the top back corner to prepare to attach the top panel.
I cut the top from ¾” plywood, leaving an inch overhang on each side and the front. I edge banded the sides and then centered it onto the cabinets.
I used 2” wood screws through all the top 2x2s in multiple places to secure the top. I made sure to keep the space between the cabinets equal from front to back before attaching.
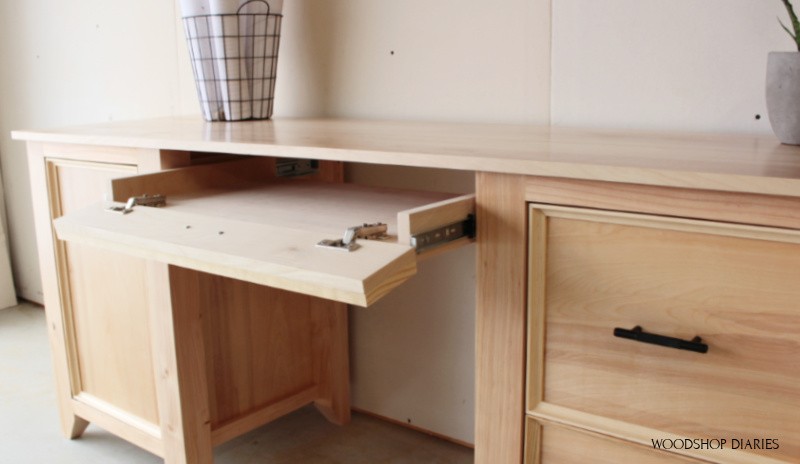
Step 9: Add Keyboard Tray
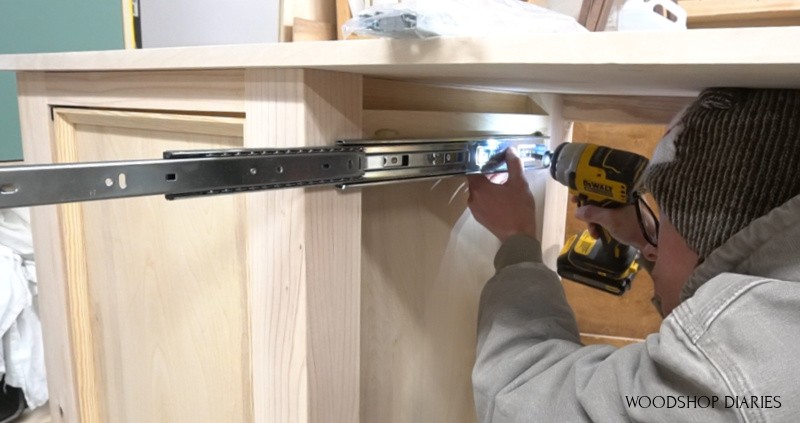
Now the middle of the desk has a keyboard tray. So to give the drawer slides somewhere to mount to, I screwed some ¾” plywood scraps between the legs on each cabinet in the middle so that they were flush to the outside edge.
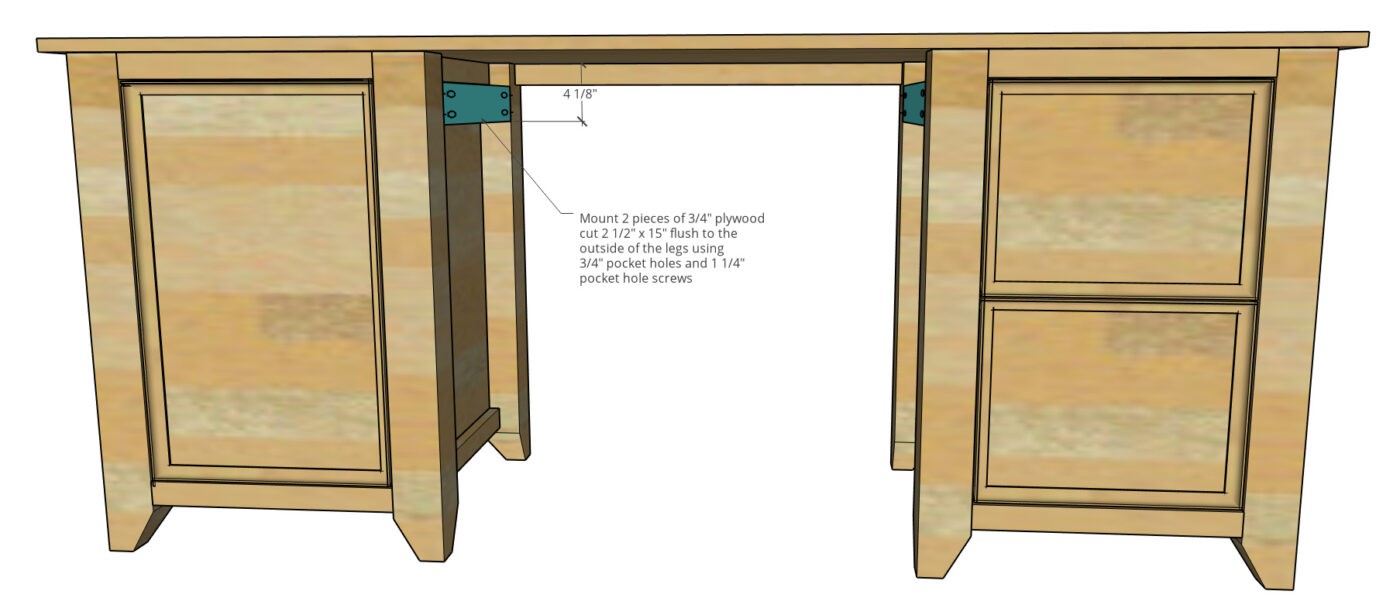
Then, I could mount the drawer slides onto these pieces.
I rummaged through my scrap plywood pile and found some pieces I could cut down to build the tray and use as the tray front.
I edge banded the sides that would show, sanded everything well, then screwed the sides onto the bottom panel.
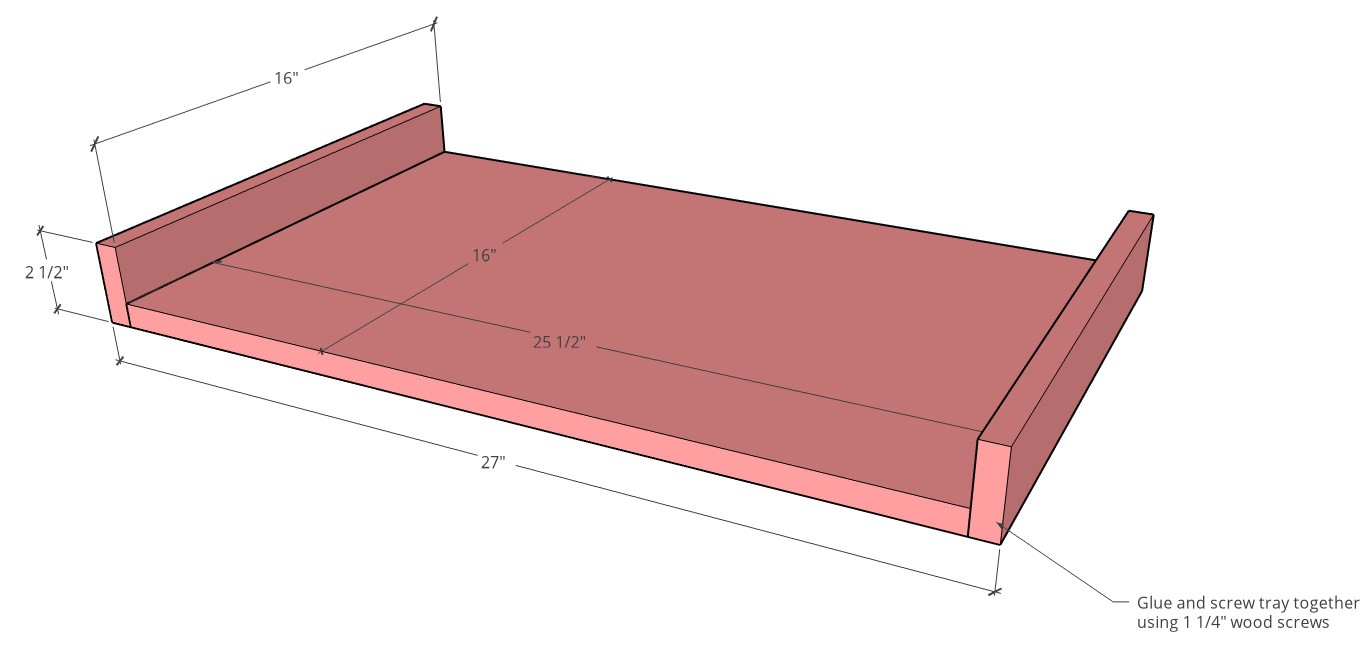
Now, I needed the bottom of this tray to be 4 ⅛” from the top edge. So I cut some scrap blocks to help me clamp the tray in position while I screwed it onto the drawer slides.

Step 10: Add Computer Desk Keyboard Tray Front
For the tray front, I cut a piece of ¾″ plywood to size and glued cove molding around the edges just like the drawer fronts and door.
BUT, before I glued the cove molding on, I used my Kreg concealed hinge jig to drill out the cup holes to install the hinges.
RELATED: The Kreg Concealed Hinge Jig is one of my top 10 tools I recommend for cabinet and furniture building. Check out all ten here!
Then, I glued the cove molding on the front. Once it was dry and I installed concealed hinges for frameless inset doors to the keyboard tray front and the front onto the tray. This will allow the front to fold open as needed for typing.
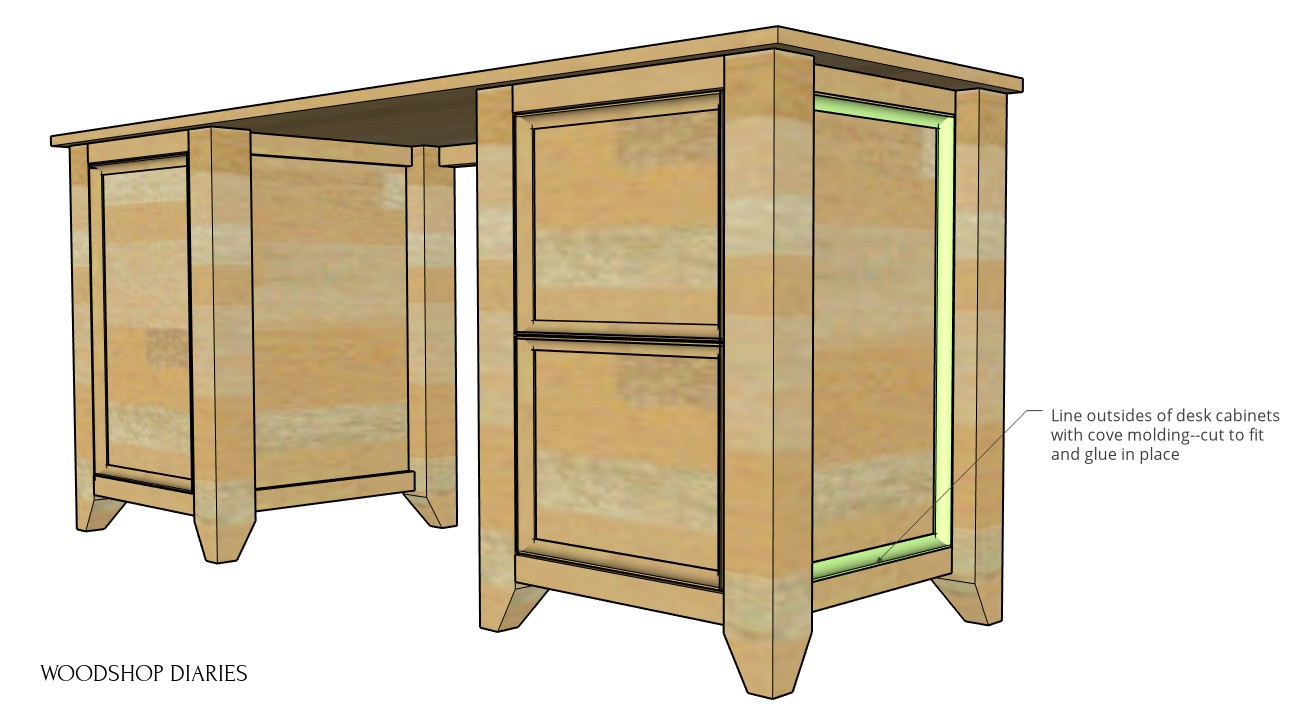
Step 11: Add Final Trim and Finish
The last detail I added was just lining the left and right side of the desk with cove molding to match the drawer and door fronts. I just glued this in place.
Once everything was dry and well sanded, I applied three coats of Minwax Polycrylic in semi gloss to the desk, and added some handles.
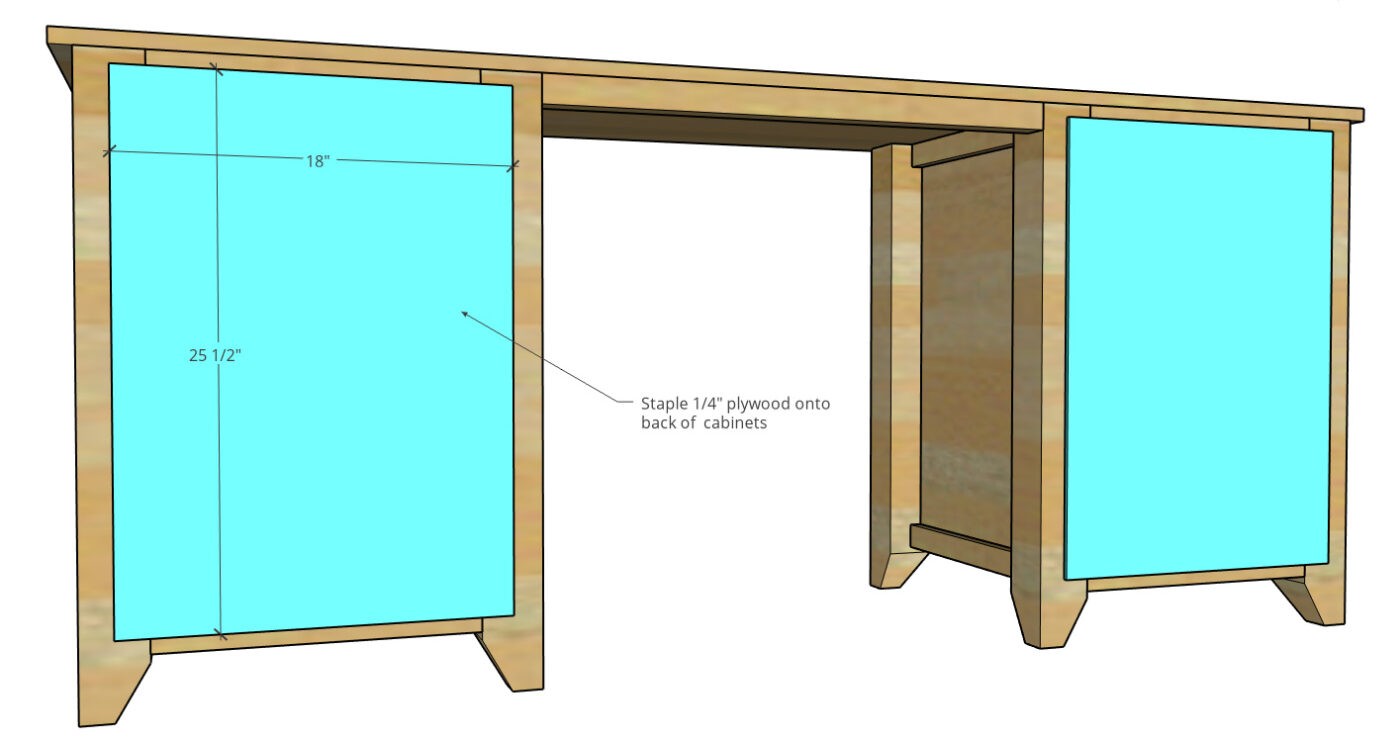
Step 12: Attach Back Panels to Computer Desk Cabinets
And finally, I cut two ¼” plywood panels to staple onto the back of each cabinet. You could drill holes in these back panels for cords if you need to.
And FINALLY, this desk was complete! This project had several steps, and several details.
BUT, all in all, it was actually a fairly easy build if you have the patience to wait for all the glue to dry 🙂
I really hope you’ve enjoyed this whole matching DIY home office furniture series and if you haven’t seen the others, be sure to check those out next:
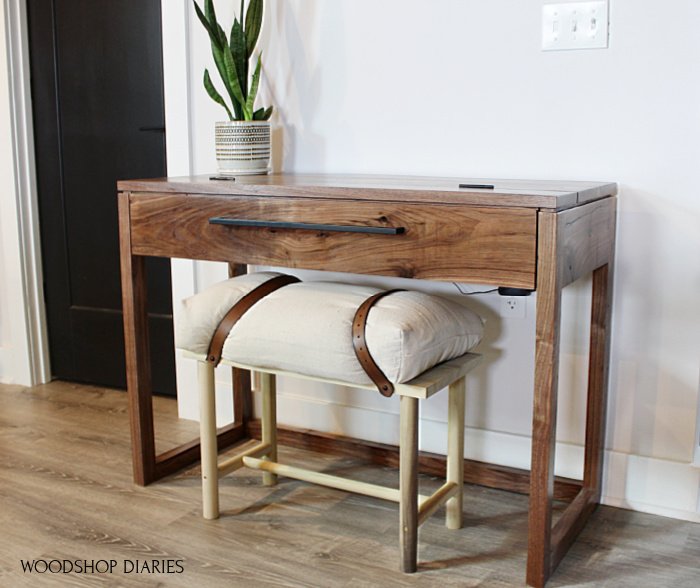
- Matching Writing Desk Table
- Matching Open Shelf with Drawers
- Matching File Cabinet
- Matching Armoire Storage Cabinet
Looking for More DIY Desk Plans?
Here are a few more desk ideas you might be interested in!
If you enjoyed this project, and can’t wait to see what’s next, be sure to subscribe below for priority access to the latest plans and videos!
If you’d like to save this for later, be sure to pin it!
Until next time, friends, happy building!