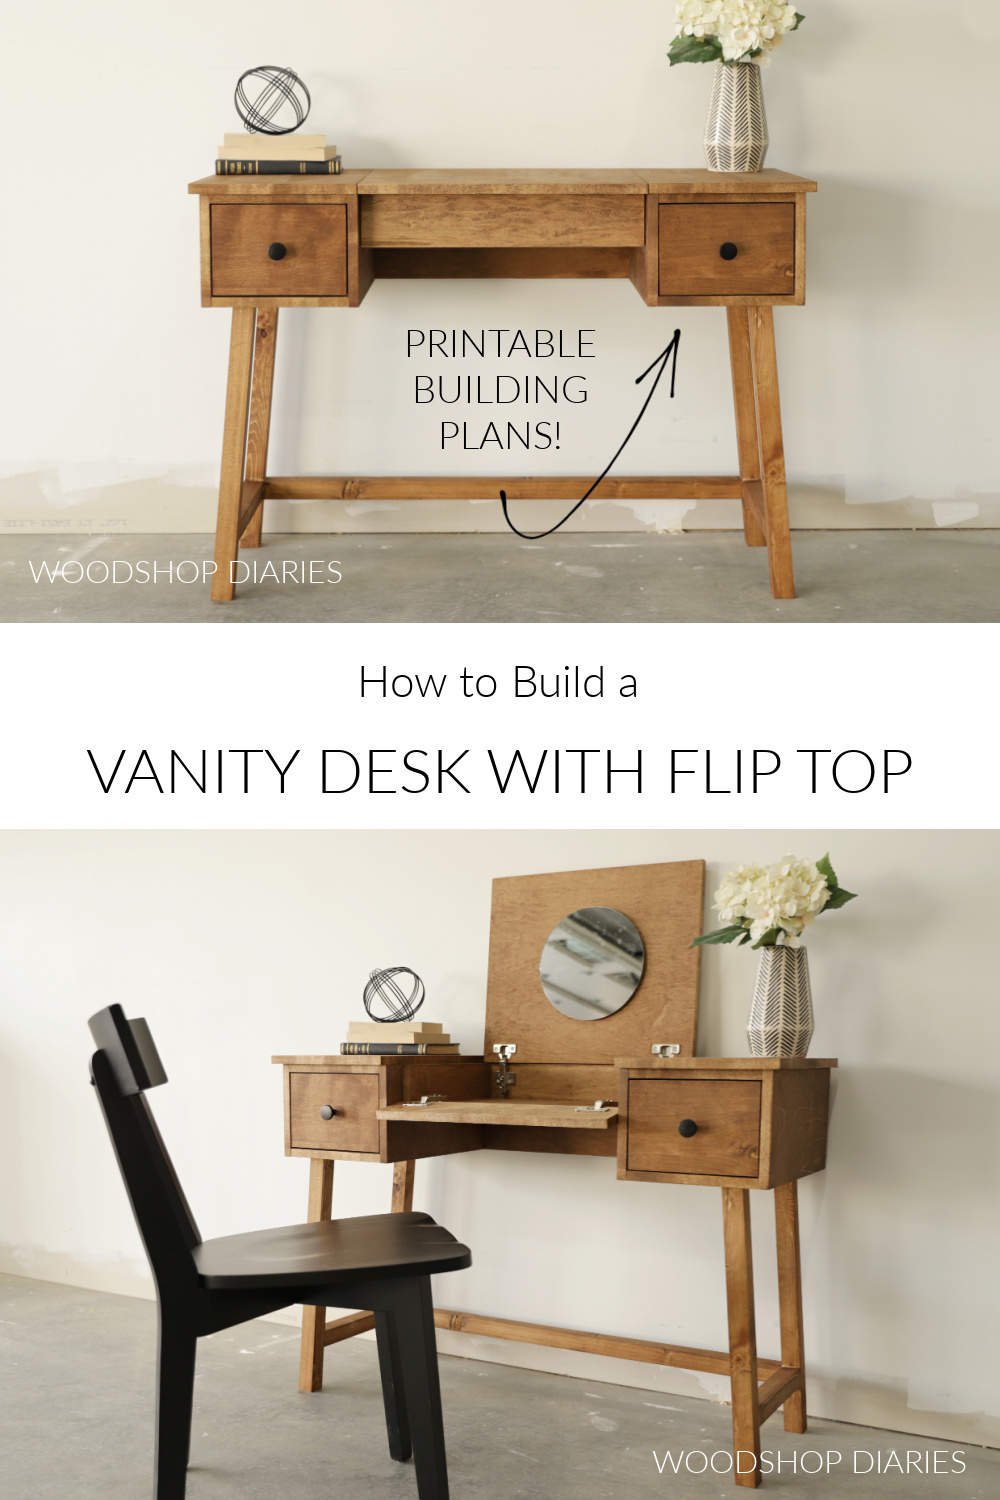
In this post, I’m sharing how to build a simple DIY vanity desk with flip top center section!
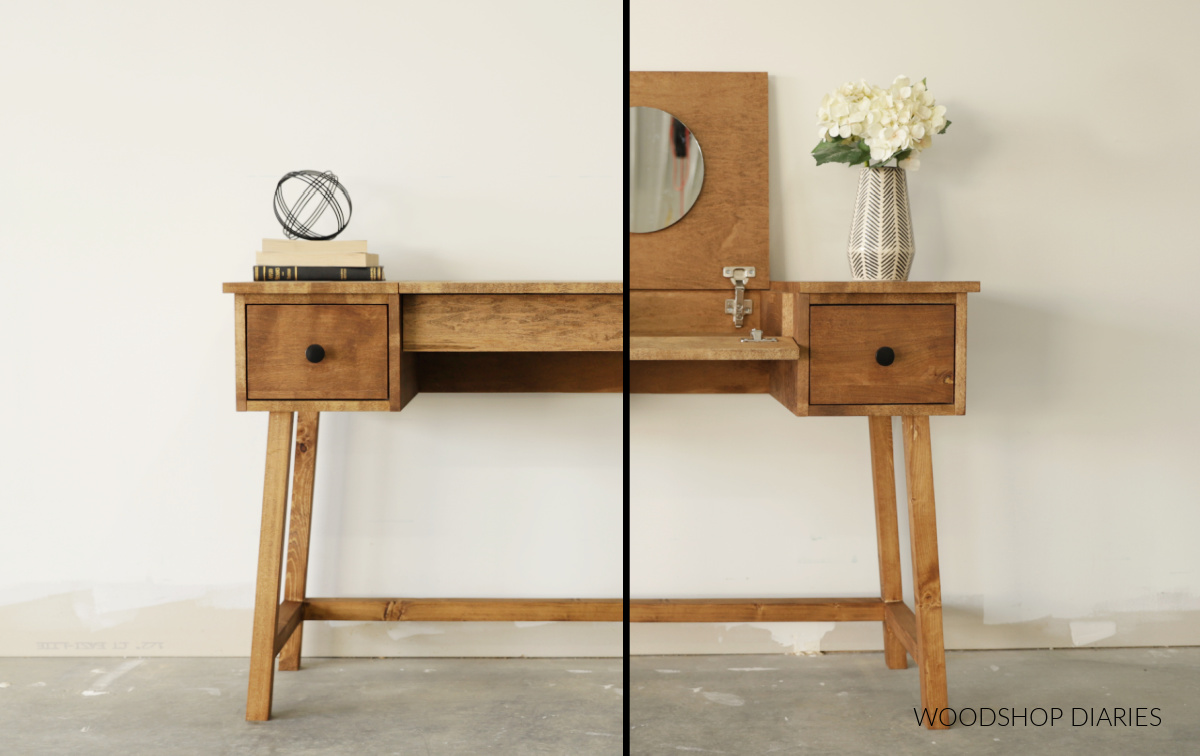
I couldn’t decide whether to call this a desk or a vanity. It could easily be both! Either way you use it, it was SO much fun to build.
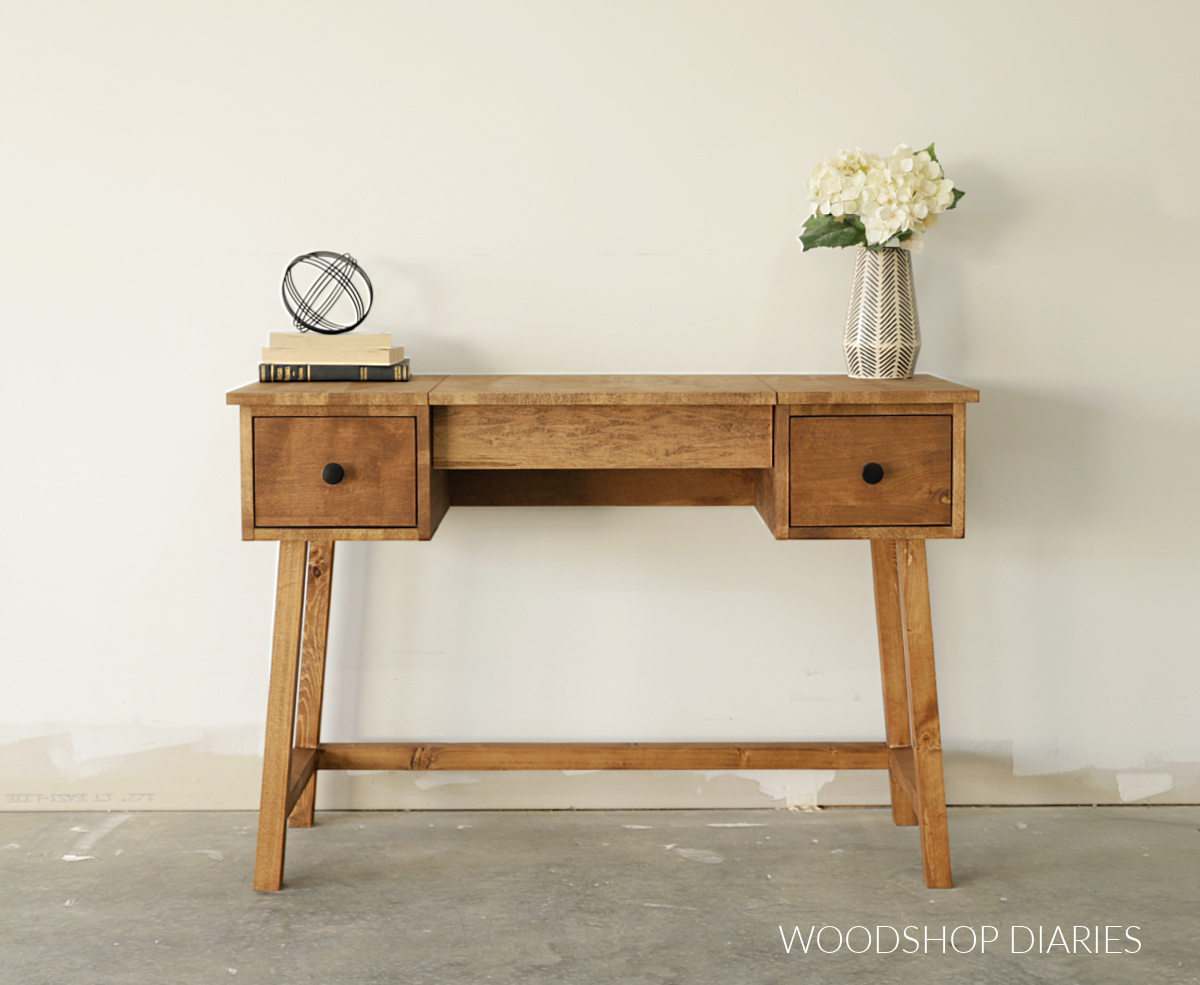
This space saving, multipurpose DIY desk project features a flip top, a flip front, two drawers and a center section for storage.
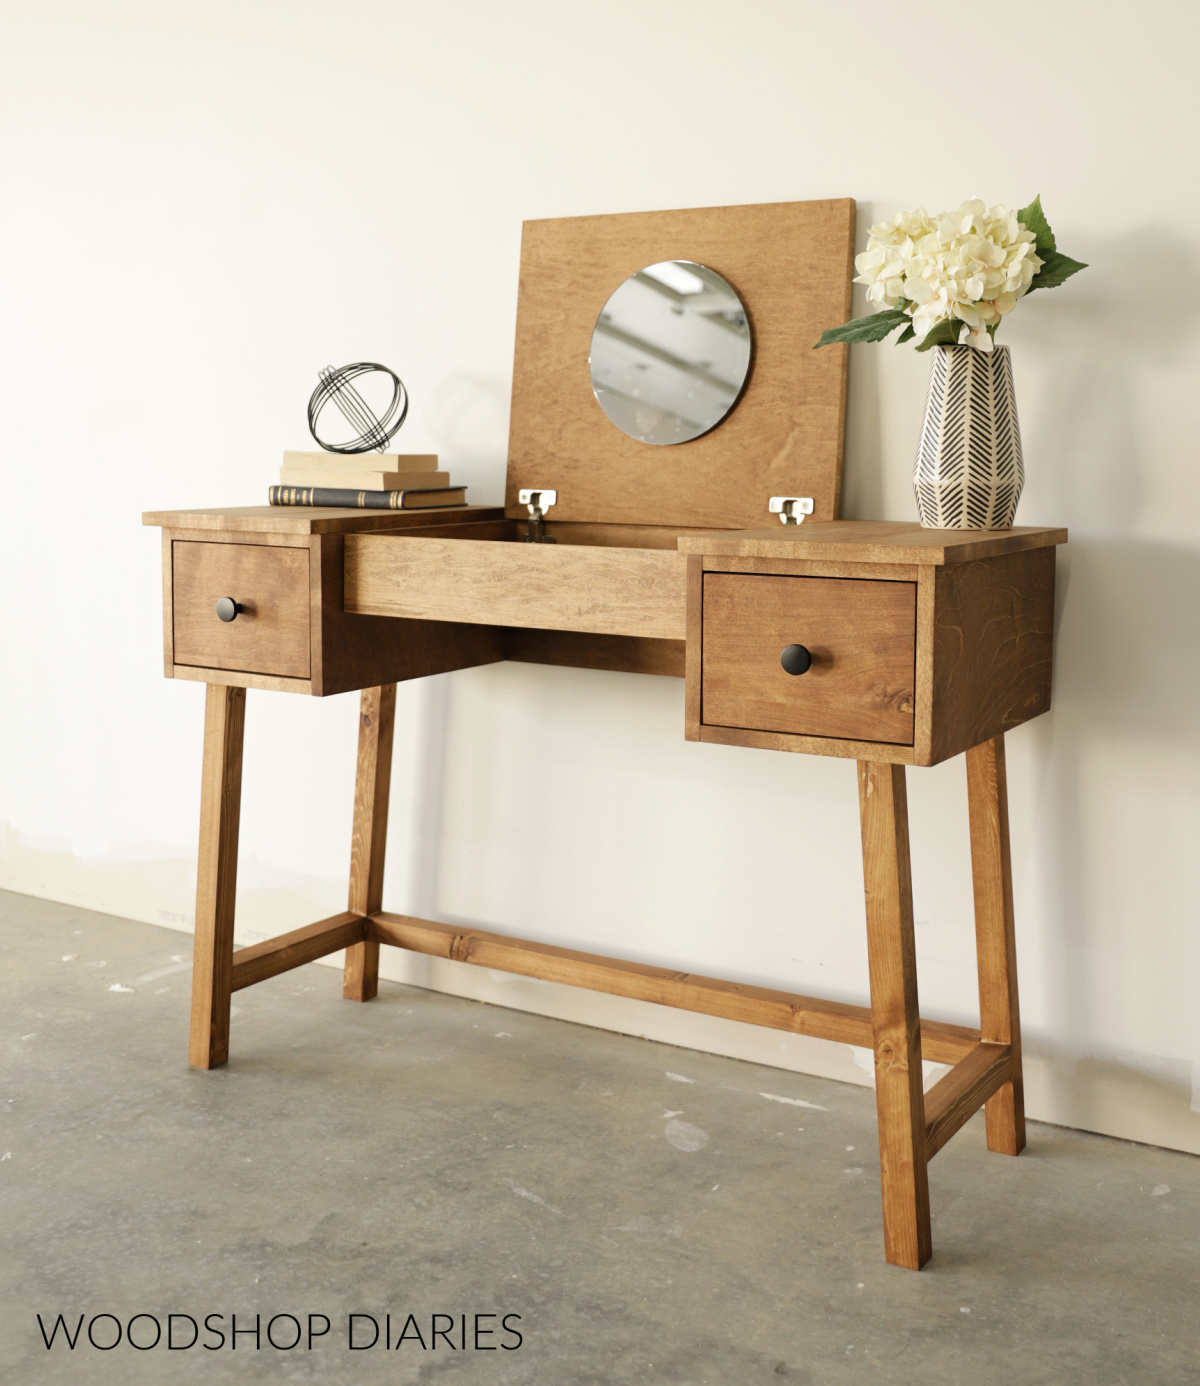
It’s perfect for small spaces, but can be easily modified if you need it a little bigger.
I actually built it because I had so many requests from people wanting plans to build a small, simple DIY makeup vanity for their daughter, granddaughter, and/or niece.
So I made this one compact–big enough to grow into, but not too big to crowd a room.
And even if you don’t want this for a makeup vanity, it’s a great little desk as well. The center section is perfect for storing pencils, notebooks, etc.
I’m so excited to share the building plans for this DIY vanity desk with flip top! So if you’re ready to get building, let’s dive right in. Here’s what you’ll need.
Tools & Materials:
*This post contains affiliate links. See policies page.
Tools:
- Miter Saw
- Drill/Driver
- 90 degree driver attachment
- Circular Saw and cutting guides (Kreg Rip Cut & Kreg Accu-Cut)
- Pocket Hole Jig
- Dowel Jig (optional)
- Table saw (optional)
- Clamps
- Sander
Materials:
- (1) 4×8 sheet ¾″ plywood
- (1) 2×4 sheet ¼″ plywood (quarter of a sheet)
- (2) 2x2x8 boards
- 1 ¼” pocket hole screws
- 1 ¼” & 2 ½″ wood screws
- Wood dowel pins OR 2 ½″ pocket hole screws (to assemble base)
- (2) pair full overlay concealed hinges for frameless cabinets
- (2) pair 14″ ball bearing drawer slides
- 12″ diameter (or other size as desired) mirror and mirror clips
- Wood Glue
- Edge banding (optional)
- Wood finish
What to consider before building a DIY Vanity Desk
This was a simple project using pocket hole joinery and basic materials. However, it combined several additional elements like the concealed hinges (for the flip top) and the drawers.
So overall, I’d consider this an intermediate level build.
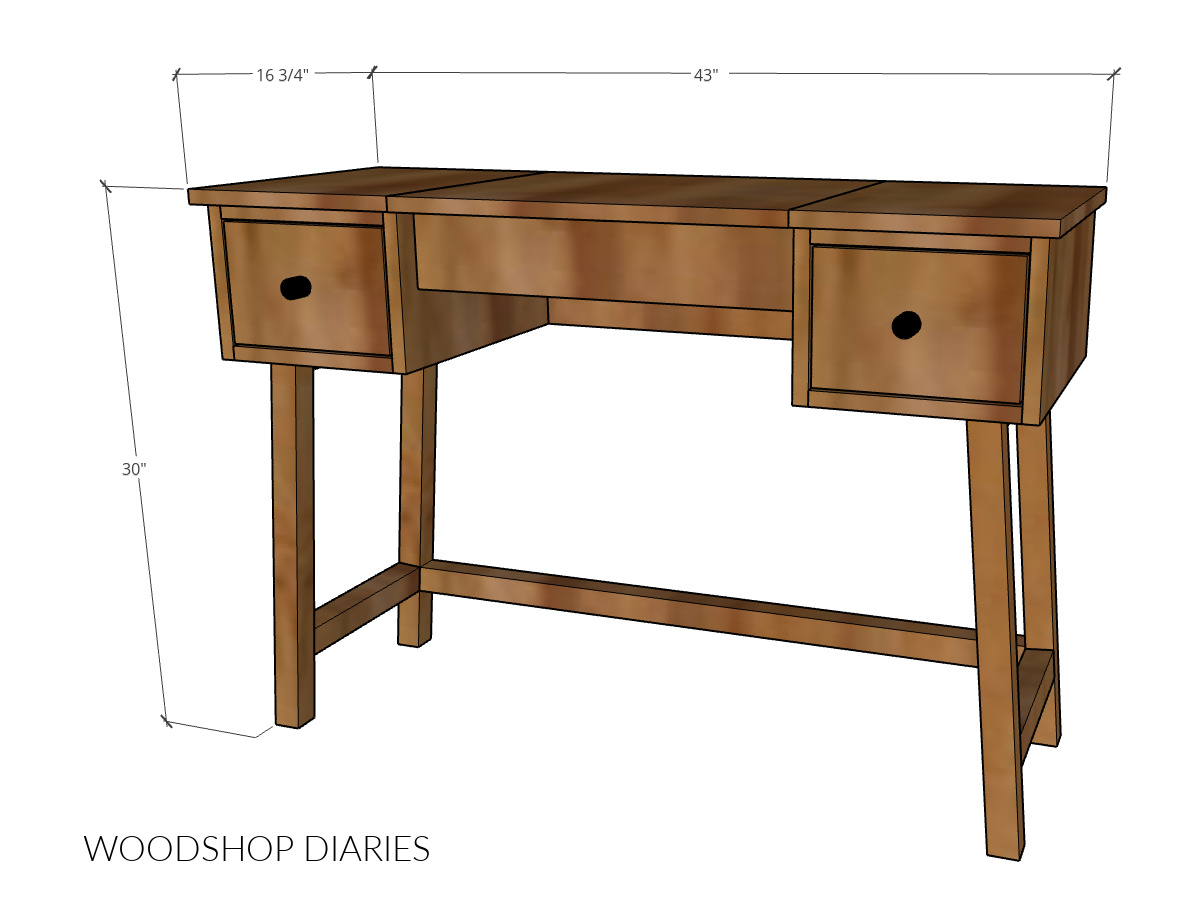
Overall Dimensions:
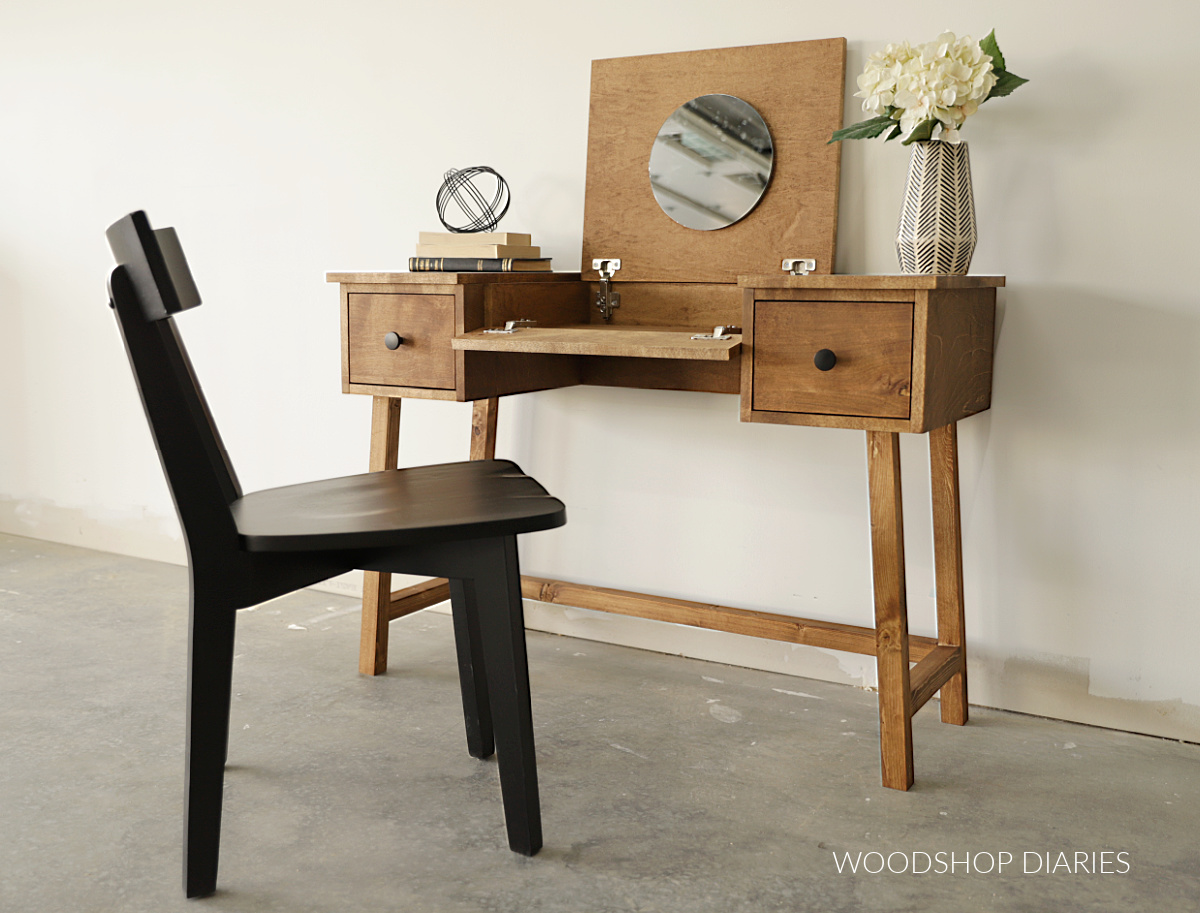
The overall dimensions of the DIY vanity desk are 16 ¾″ deep x 30″ tall x 43″ wide.
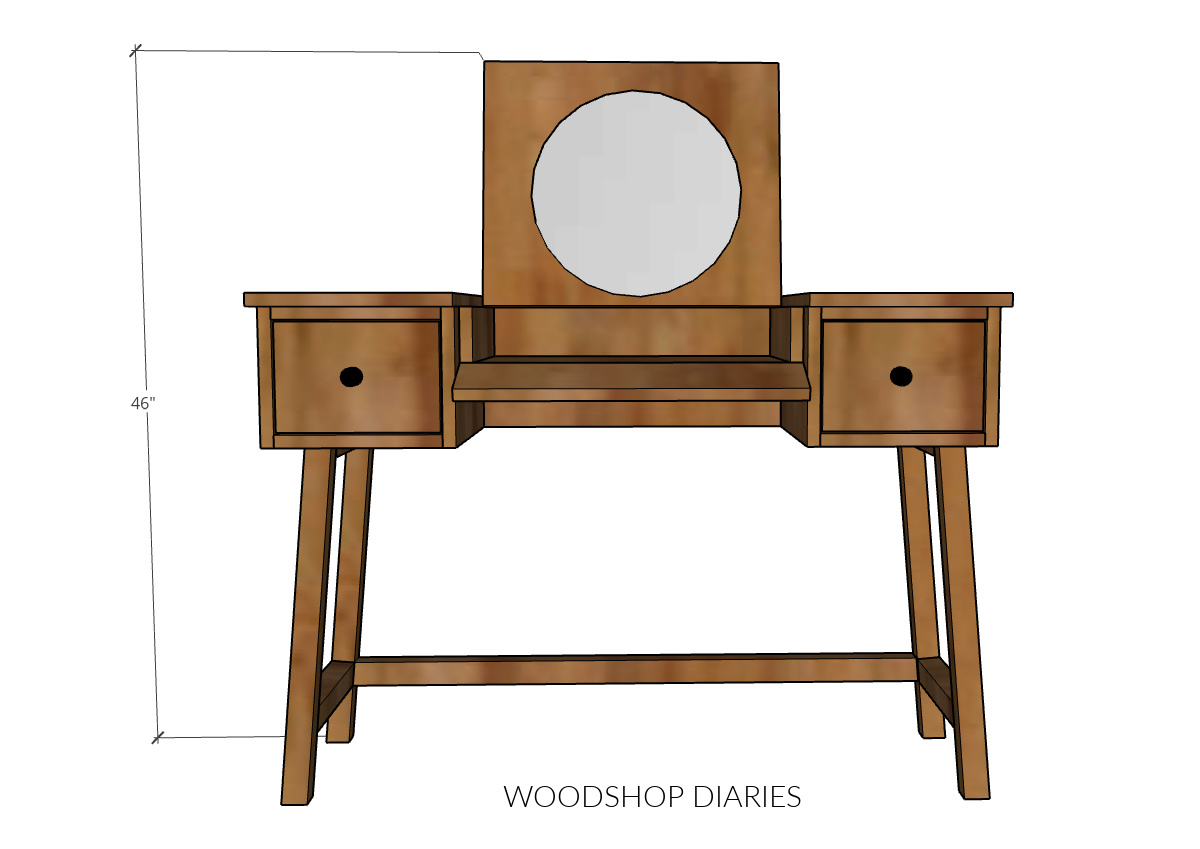
But with the top flipped open, the overall height is 46″.
Standard desk height is 30″ for adults. So this vanity desk is standard height, but I recommend using a 16″ or shorter chair with this desk to allow for ample leg room.
Before building, check out the end of the video below for additional tips on sizing of this desk.
If you plan to use this as a vanity with a mirror installed, first, sit whoever will be using it in the chair they plan to use with it and measure the eye height from the ground.
Compare this to the 46″ overall height of the vanity with flip top open and make sure the mirror height will be adequate.
Keep in mind that you can also try accordion and tilting-style mirrors to offer additional flexibility with mirror location and height.
Mirror Sizing
Ideally, a 12″ diameter mirror would work best for this. In my photos, I’m using a 10″ mirror (it’s all I had at the time haha).
The inside opening of the center section of the desk is only 13″, so if you get a mirror much larger than 12″, it won’t fit to close properly–it will hit the top of the flip front piece.
But, if you wanted, you could cut the flip front panel a little shorter to allow for some extra room for the mirror so they don’t hit when it’s closed–that’s just one way to allow for a larger mirror.
Or you can make the center section a little deeper–that’s another way to allow for a larger mirror.
You can also consider installing a tilting style mirror for more flexibility with the mirror location. Check out the end of the video below for additional notes.
Helpful Resources to Use with This Project
You may find these articles helpful while building:
- How to cut your own 2x2s
- How to cut plywood sheets
- How to apply iron on edge banding
- How to use a pocket hole jig
- How to build and install drawers
- How to install concealed hinges
How to Build a Flip Top Vanity Desk
I’m sharing the step by step tutorial to build this DIY vanity desk below, but if you prefer to watch, I’ve also got a video here.
The video has tons of helpful tips and additional notes you may find helpful.
And if you’re looking for printable plans, I’ve got those too! Grab them here:
Step 1: Assemble Back and Sides
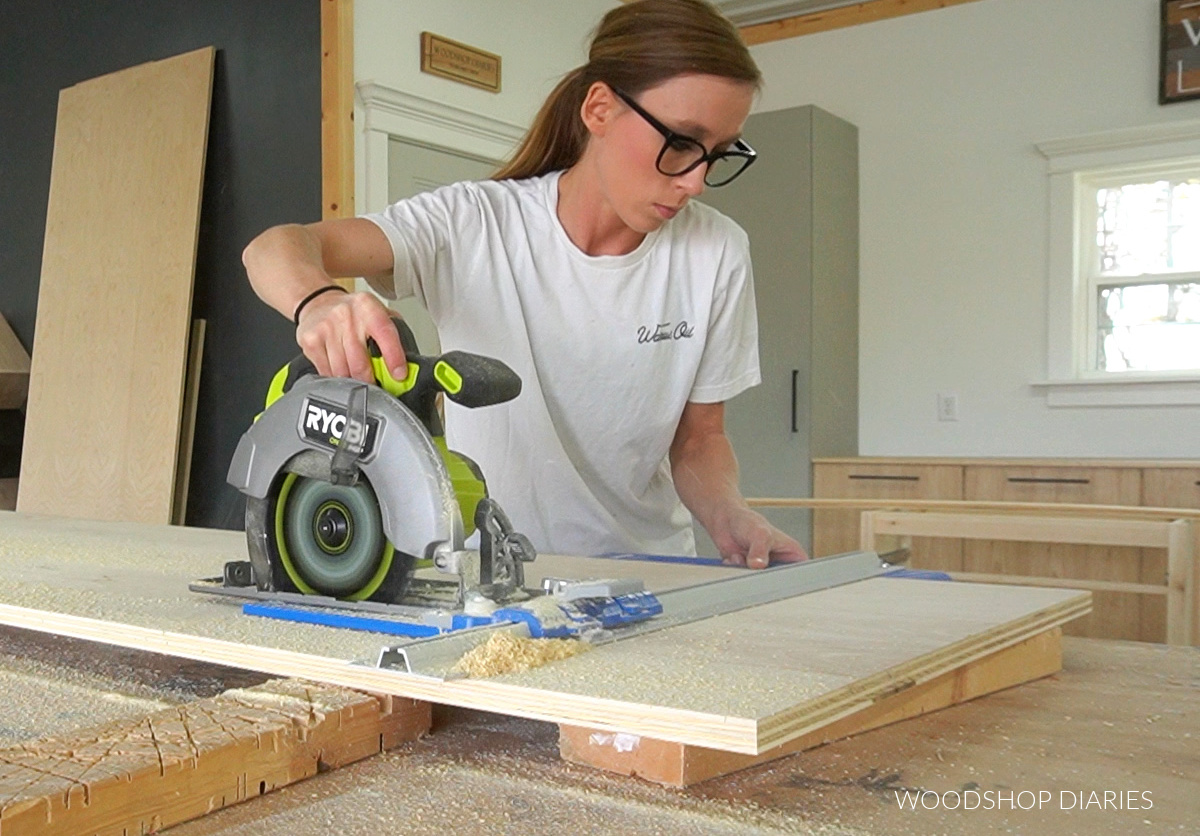
I guess, actually, the first step is cutting down the ¾″ plywood sheet into more manageable pieces to work with. I’ve shared the plywood cut diagram in the printable plans.
I used a circular saw and Kreg Rip Cut and Accu-Cut guides to cut down my plywood sheet. You can check out how I cut down my plywood sheets here.
Because I was staining this project, I wanted to make sure to cover up the exposed plywood edges.
So, at each step as I added different pieces, I paid close attention to which edges will be showing in the finished project and applied iron on edge banding to these.
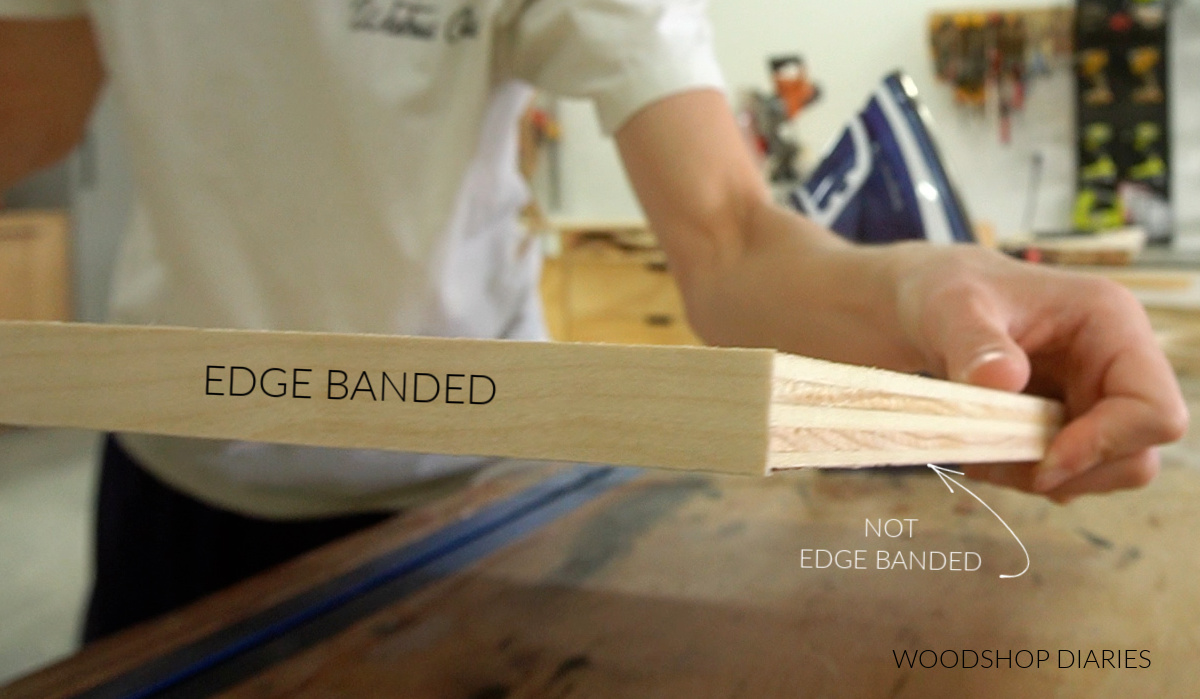
Edge banding is totally optional, but it covers the plys and makes things look a little cleaner. It stains just like wood, so if you’re staining your project, it’s a great option.
RELATED: How to apply iron on edge banding to hide plywood edges
In this step, I was assembling the back and sides. So I edge banded the top edge of the back panel and the front edges of the side panels. These will be exposed in the finished project.
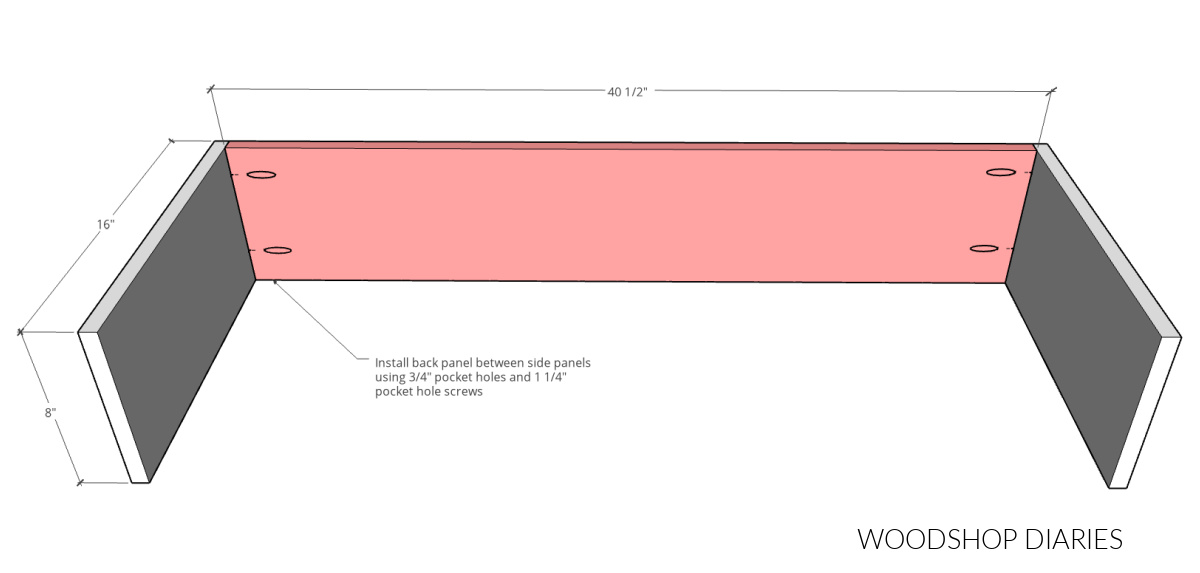
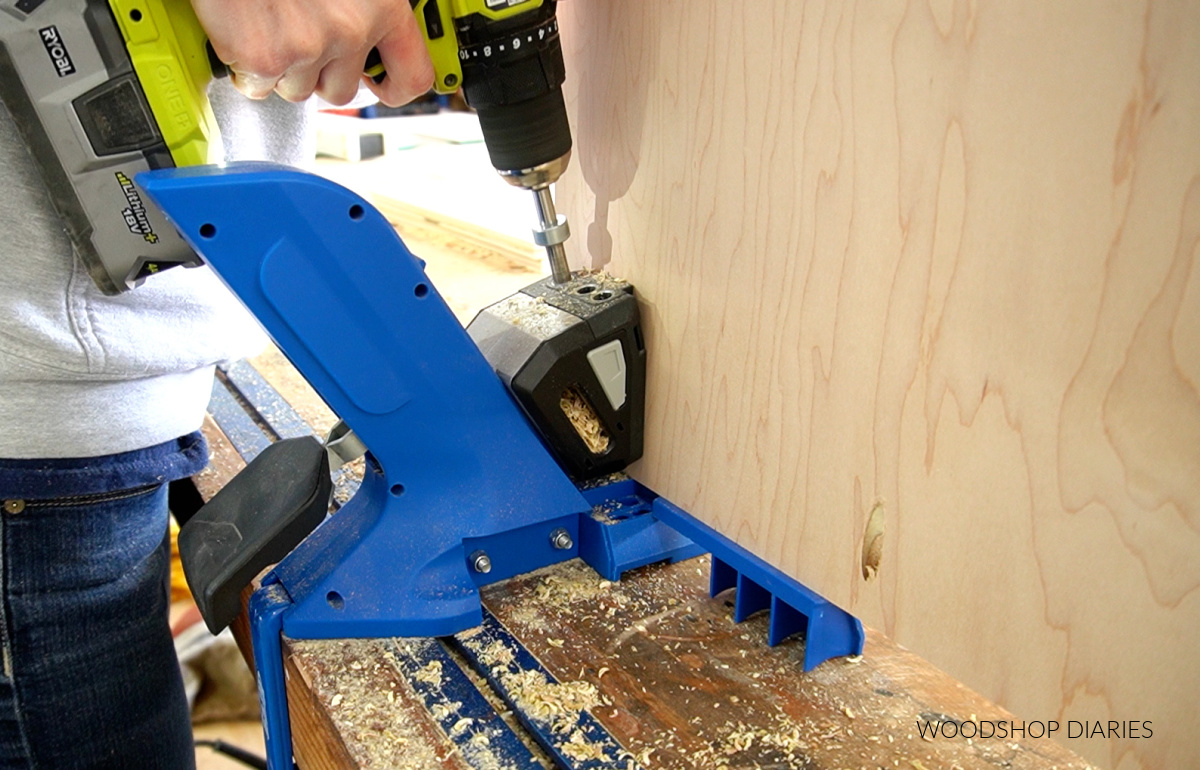
Once I had my back and side pieces cut down and edge banded, I drilled ¾″ pocket holes into the ends of the back piece and attached it between the side panels using 1 ¼″ pocket hole screws.
RELATED: How to drill and use pocket holes
Step 2: Install Bottom Panels
Then, I cut two ¾″ plywood bottom panels to go into each corner. I edge banded the front edges of these since they’ll be exposed in the finished project.
To install, I drilled ¾″ pocket holes along the long edges and one of the short edges of both panels.
Then, I screwed these into each corner flush to the bottom edge using 1 ¼″ pocket hole screws.
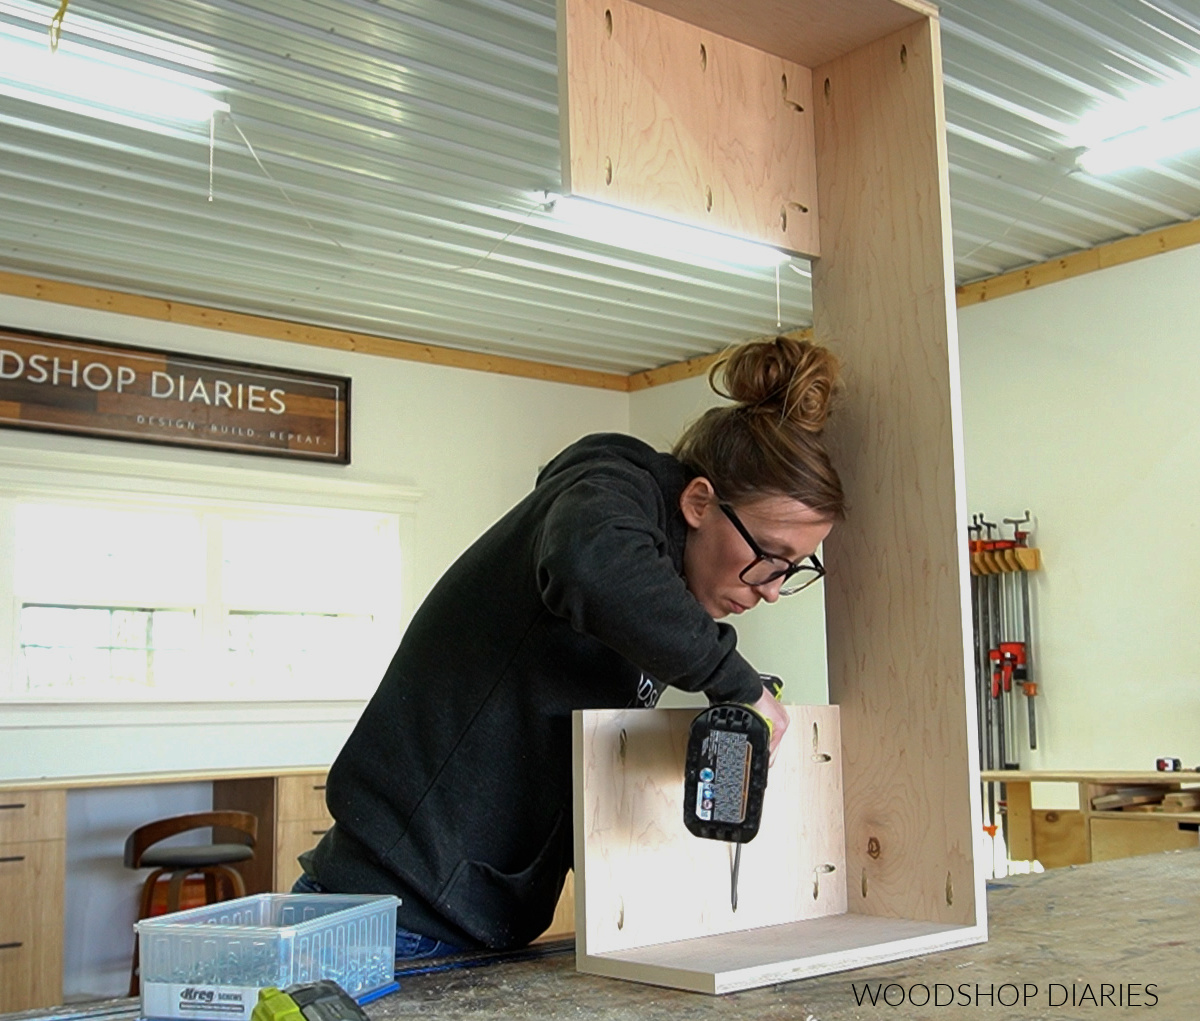
Step 3: Install Inside Panels to Vanity Desk
Next, I added two panels to the inside of these bottoms–shown in green below. I edge banded the front edges since these will be exposed in the finished project.
Then, I drilled ¾″ pocket holes along the back edge and secured it to the back panel using 1 ¼″ pocket hole screws.
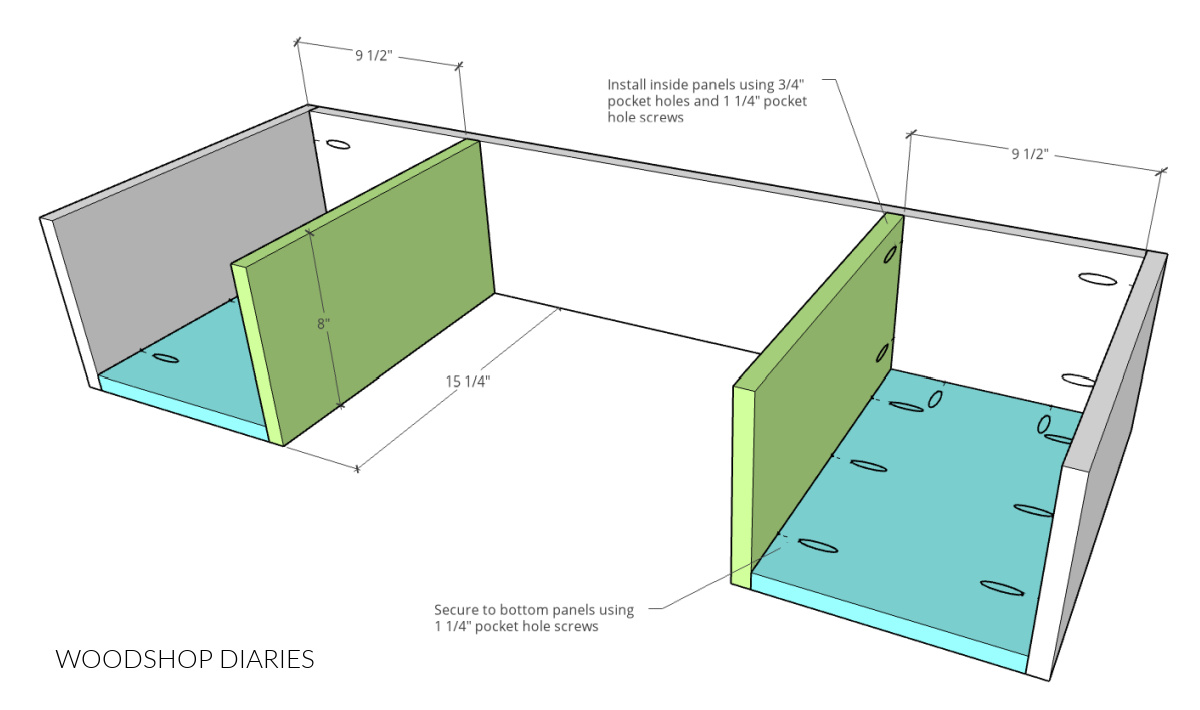
Once it was screwed to the back, I drove 1 ¼″ pocket hole screws through the bottom panel to secure it there as well.

This is a tight space, so I had to use a shorter driving bit. You could also use a 90 degree drill attachment as well.
Step 4: Add Top Supports
Then, I added some top supports into these two outside sections using ¾″ pocket holes and 1 ¼″ pocket hole screws. These are basically there in order to attach the top panel later.

Note that the front edge of two of these pieces will be exposed in the finished project, so I edge banded these.
I actually had to temporarily remove these later in order to install the base, but we will get there in a minute. If you wanted to wait to install these until after the base is attached, that would work fine.
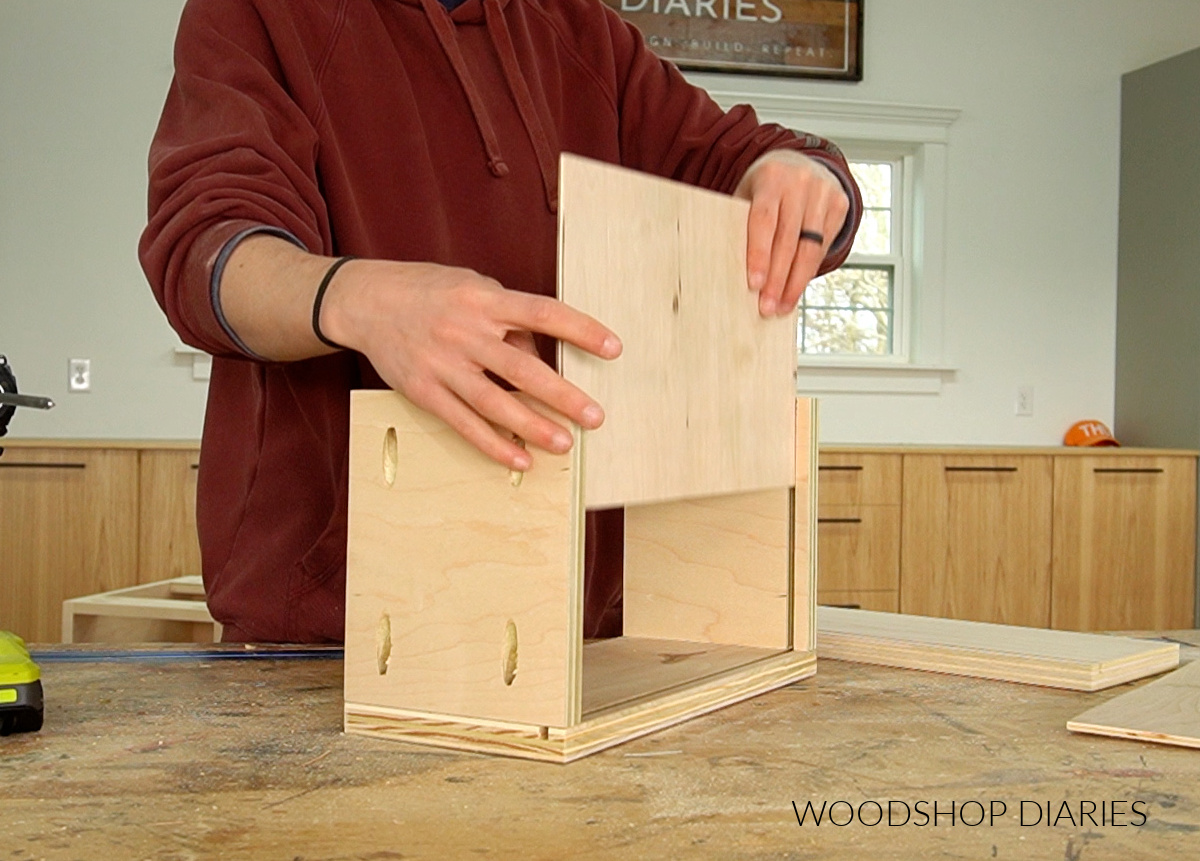
Step 5: Install Center Section of Flip Top Vanity Desk
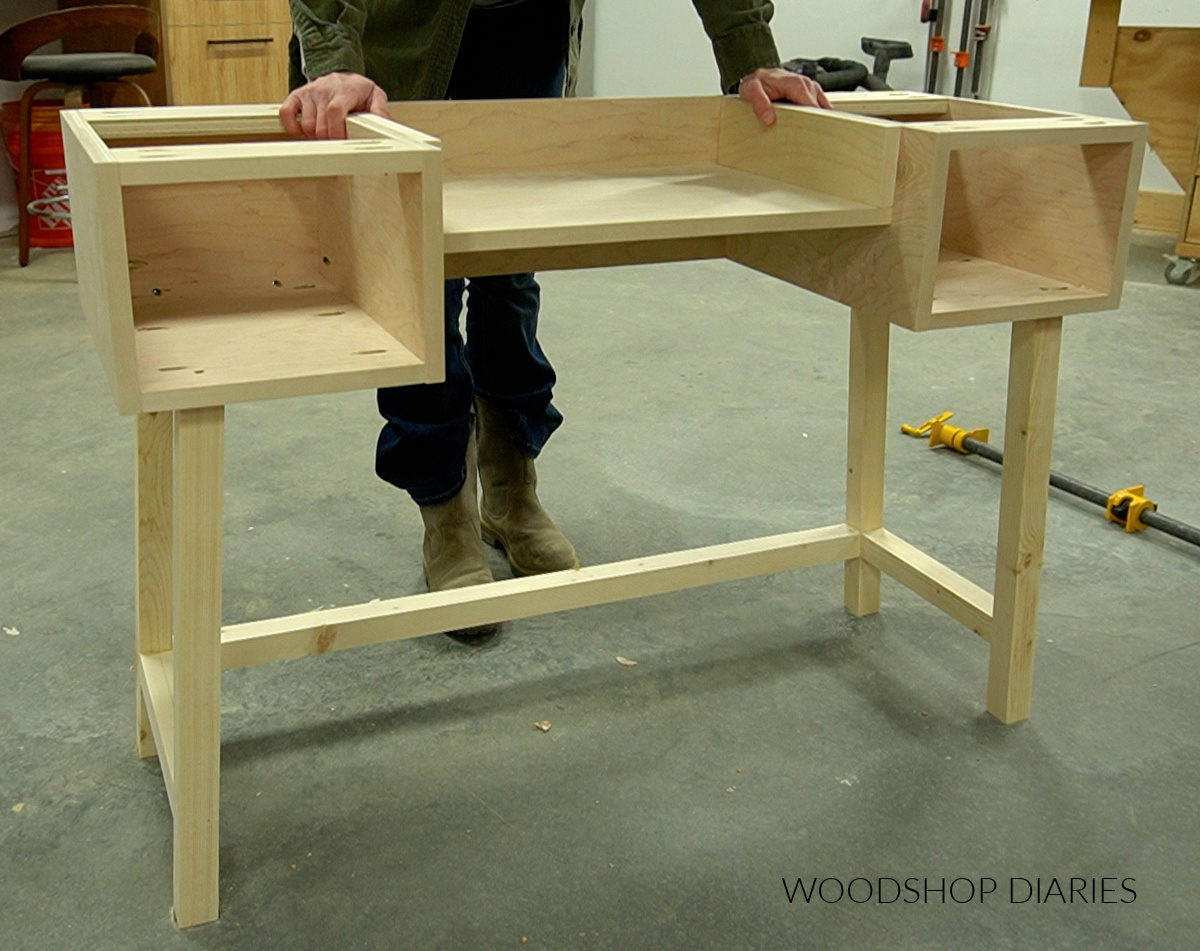
Now that the outside sections are built, it’s time to turn to the center section.
I added two pieces of ¾″ plywood on each side using wood glue and 1 ¼″ wood screws. These will be the sides of the center section.
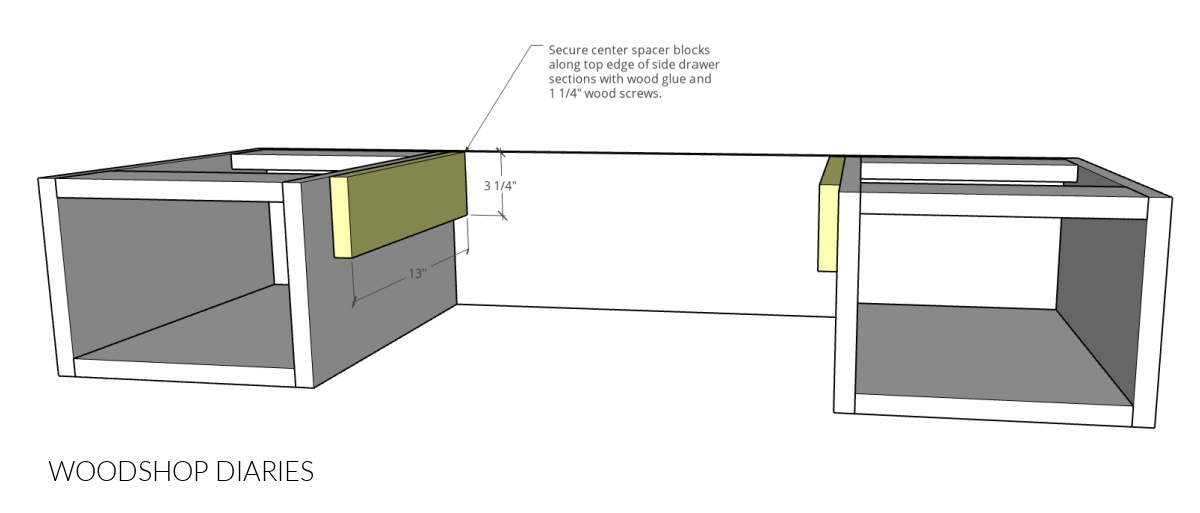
Notice that I made them only 13″ deep–so this center section will be inset from the two outside sections.
I did this because I thought it would add some extra dimension and look neat. But also, this allows the flip front not to stick out so far in the front when it’s open.
Once the two side pieces were installed, I flipped this whole thing upside down and installed the bottom panel to the underside using wood glue and 1 ¼″ wood screws.
Notice again which edges will be exposed–I edge banded all exposed edges before installing.
Step 6: Assemble Vanity Desk Base
The base of this desk was built using 2x2s. I mitered the ends of the legs 5 degrees so they slanted just slightly inward at the top. This is optional.
You could certainly assemble this using pocket holes and screws, but I didn’t want to worry with seeing or plugging the pocket holes, so I used wood glue and dowels.
First, I cut the legs and the two side stretchers and laid them out on the workbench so I could mark where to drill the dowel holes.
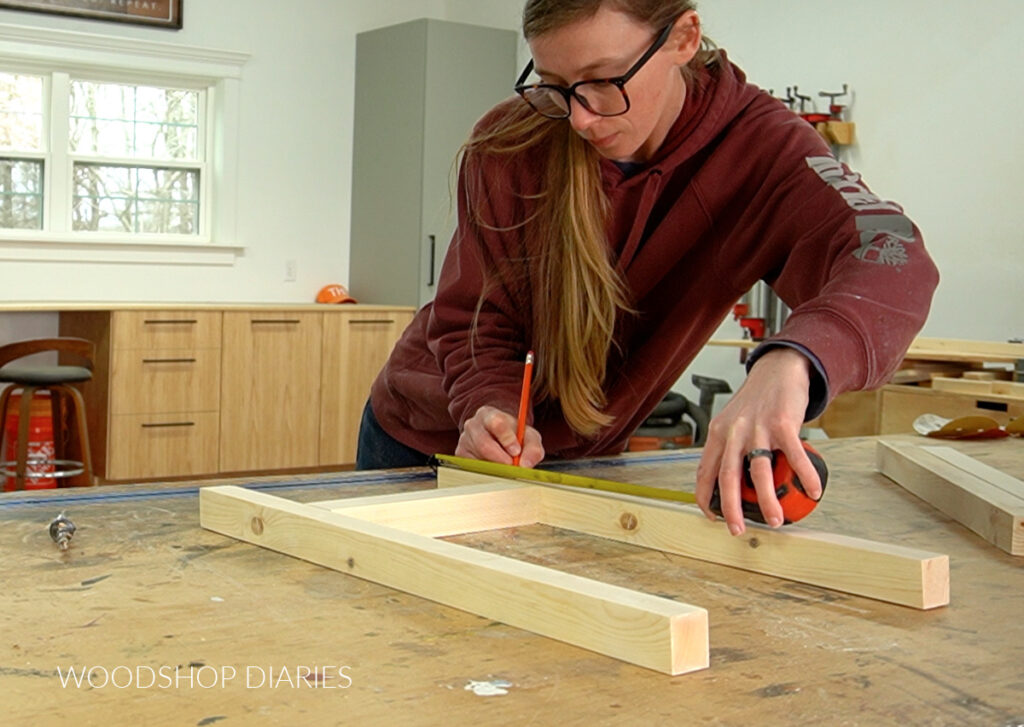
Then, I used a dowel jig to drill dowel holes at these locations. The video shows this process in more detail.

Once the holes were drilled, I assembled two identical sides like shown using wood glue and dowel pins.
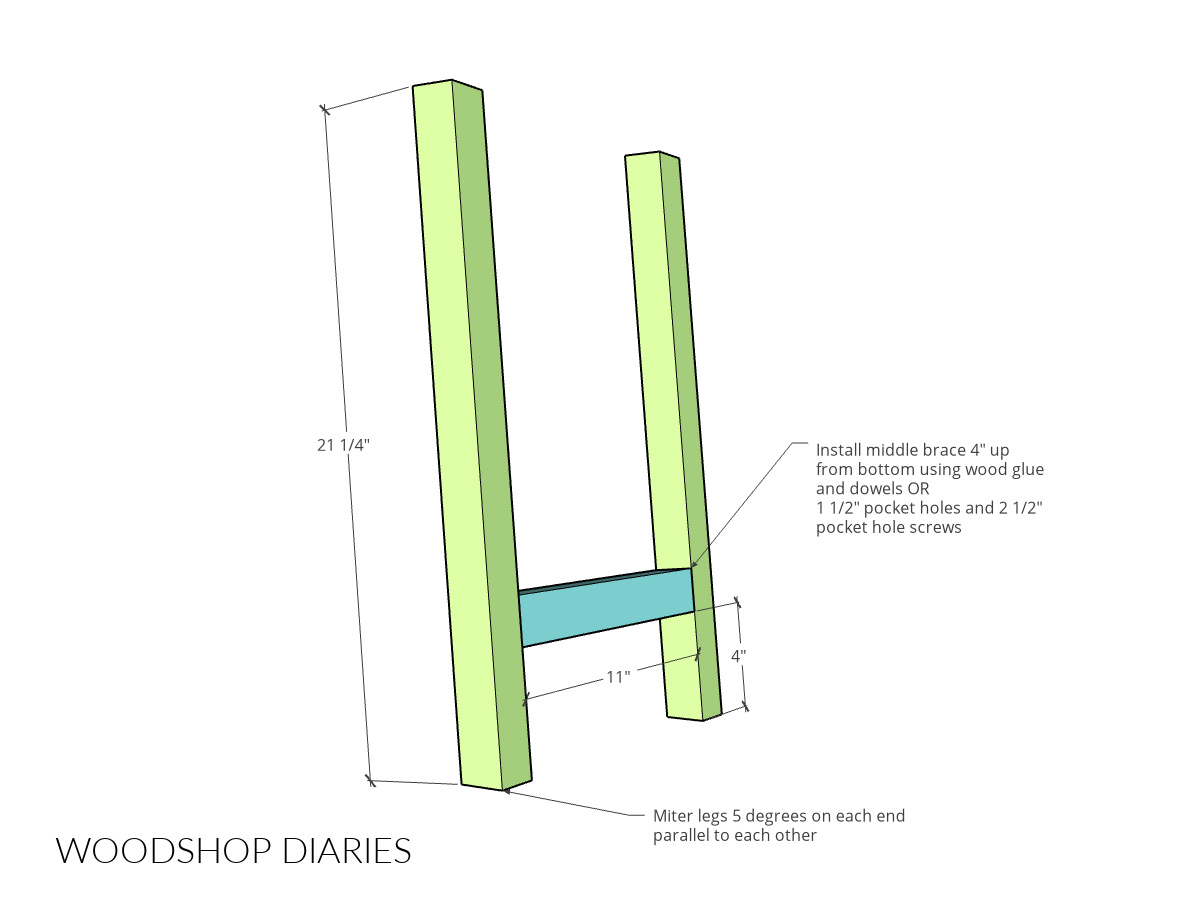
After the glue was dry, I cut another piece of 2×2 to run along the back. Note that the ends on this back piece are mitered 5 degrees to match the angle on the legs.
I attached this between the two sides using wood glue and dowels and when I clamped, I made sure to keep the sides square to the back using corner clamps.
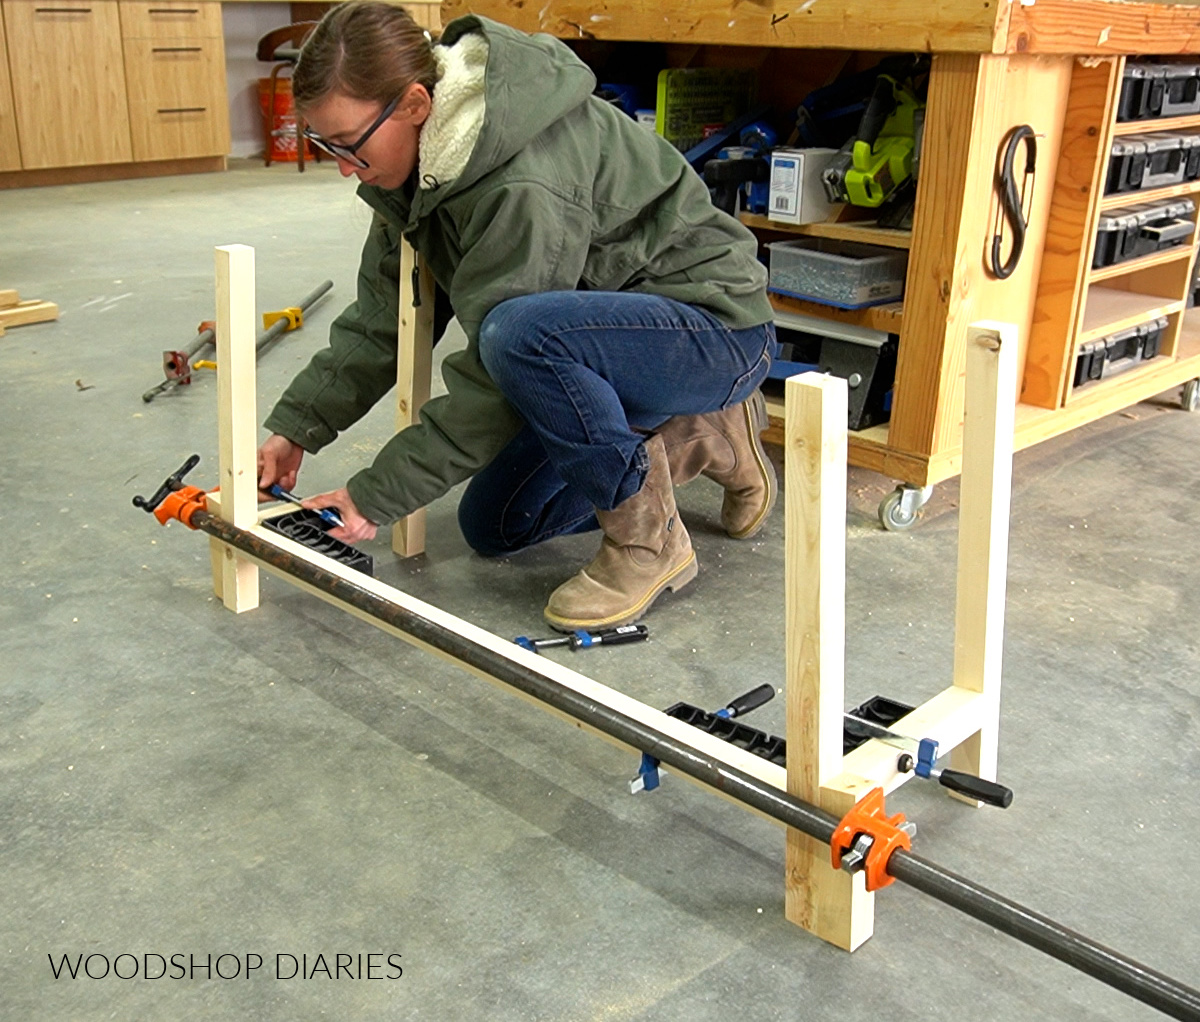
But, again, you can certainly use pocket holes and screws to assemble if you prefer not to deal with dowels and messy glue ups.
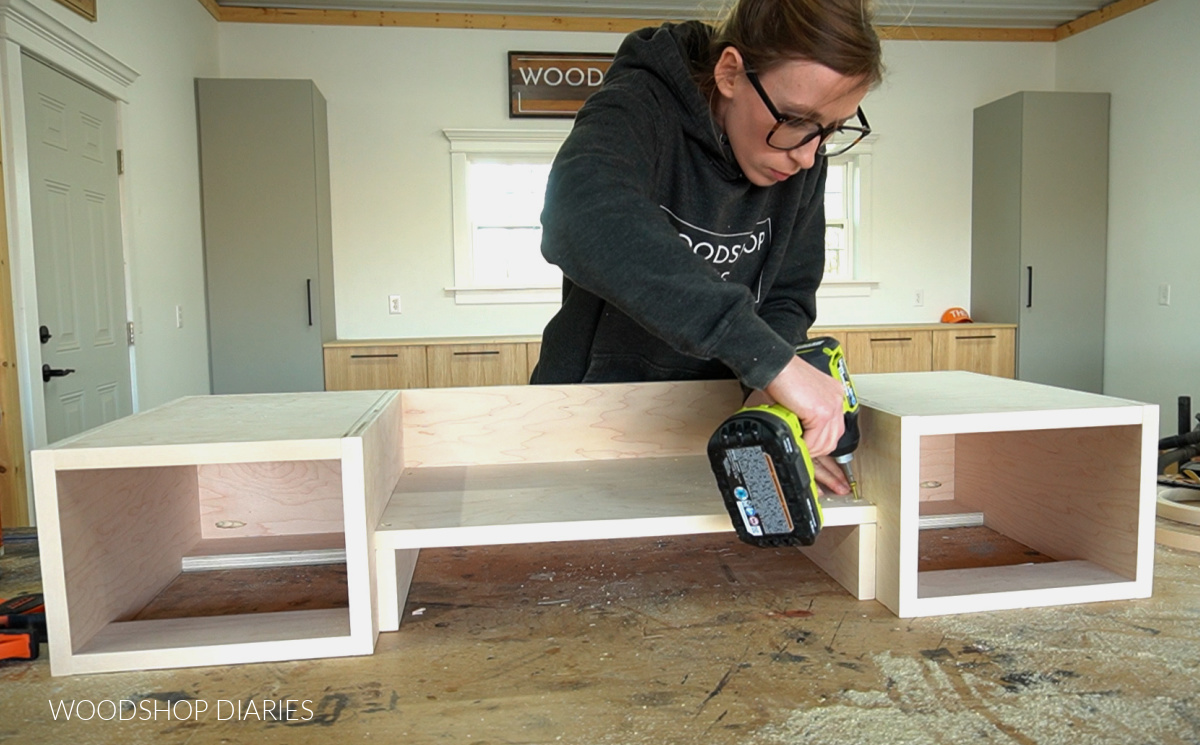
Step 7: Attach Vanity Desk to Base
After the glue was dry on the base, I sanded to remove any leftover glue residue and squeeze out. Then, I applied wood glue to the tops of the legs and placed the desk assembly from step 5 on top so that it was centered.
Here is where I had to temporarily remove the top supports in order to be able to get into these small spaces to attach the base.
So I removed the pocket hole screws and set these pieces aside, then predrilled and drove 2 ½″ wood screws through the bottom panels into each leg.
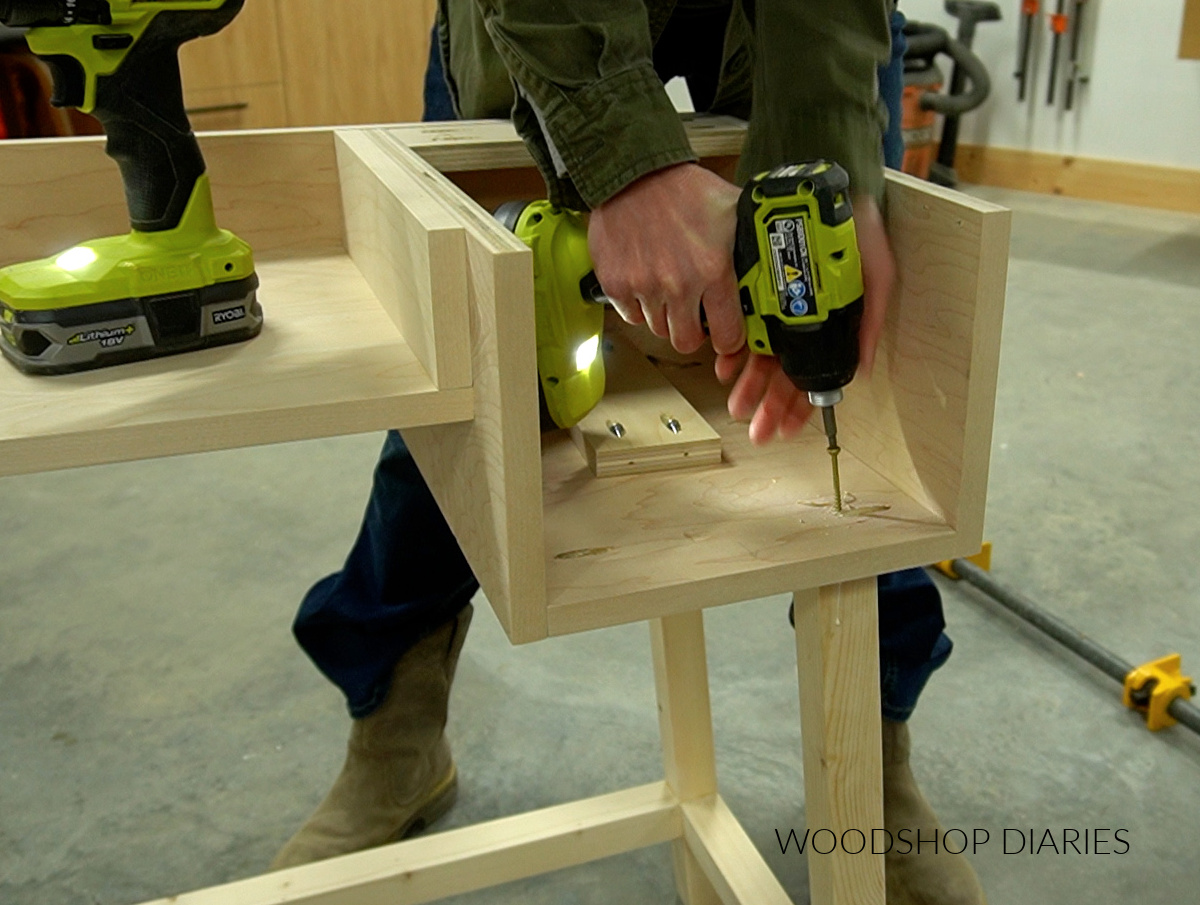
Then, I replaced the top supports back where they went into the same screw holes–which made it really easy.
Step 8: Install Drawer Slides
In order to add the drawers, I installed 14″ ball bearing drawer slides into the two drawer sections so that they were ¾″ inset from the front edge.
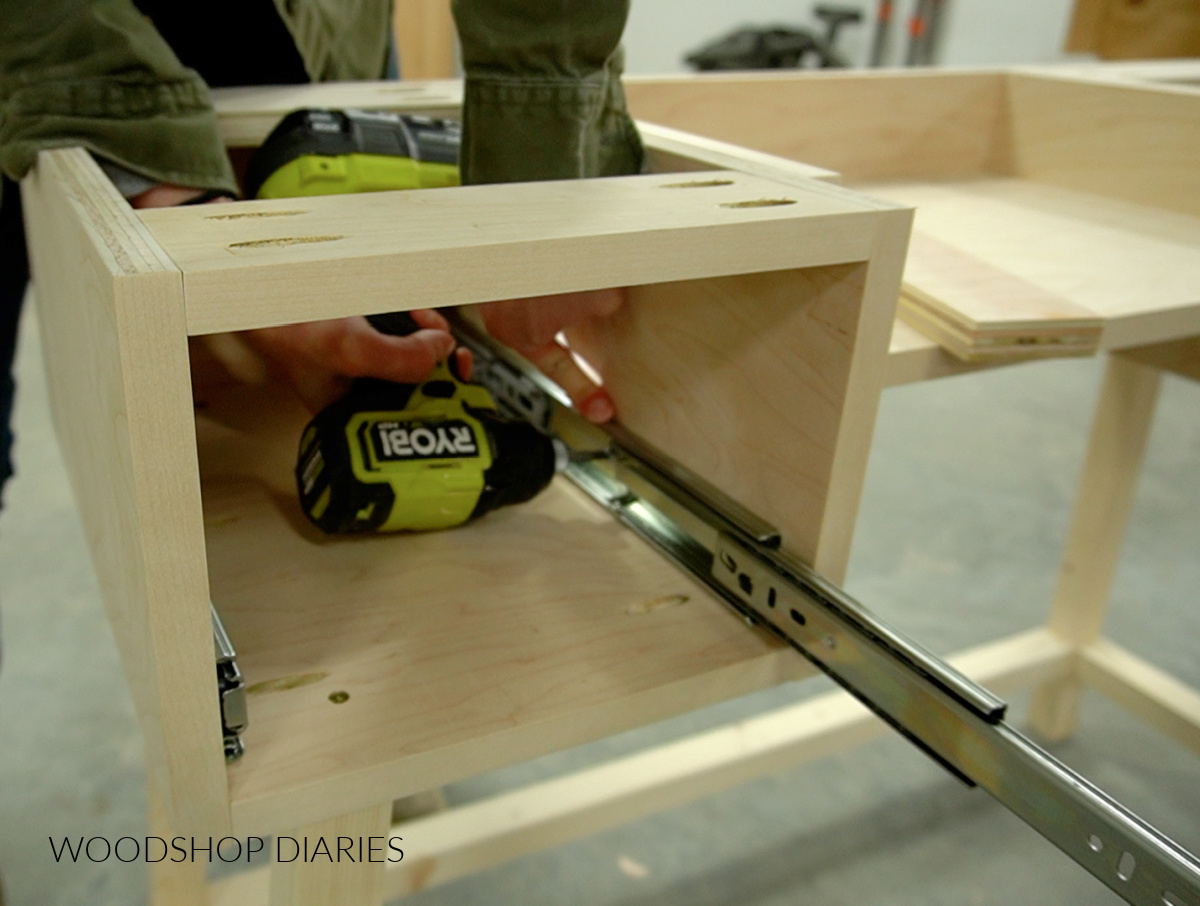
For more information on installing drawer slides, check out this drawer building guide.
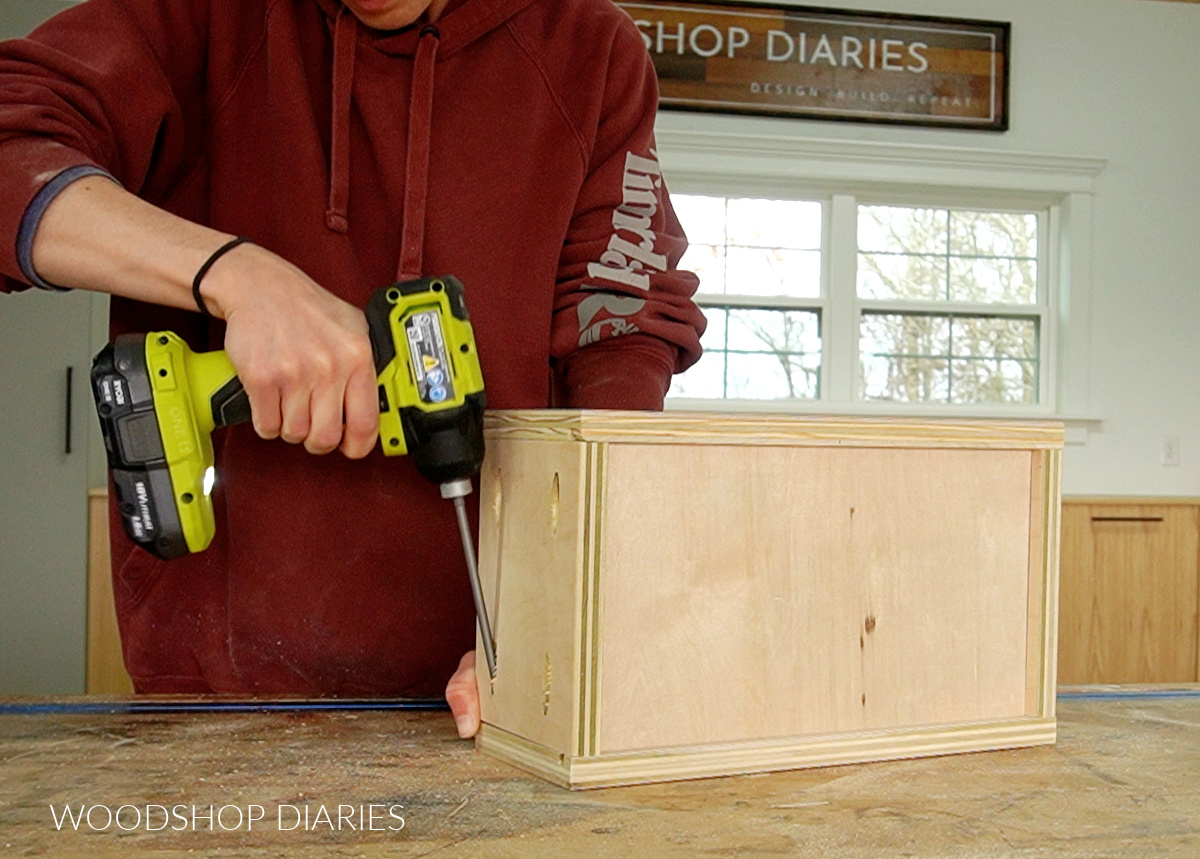
Step 9: Build and Install Drawer Boxes
Building drawers is always my favorite part of every project! If you aren’t familiar with my drawer building process, I’ve got a step by step drawer building guide here.
I cut my drawer box sides from ¾″ plywood and my drawer bottoms from ¼″ plywood.
I like to cut dadoes to install the bottom panel into, but if you don’t want to mess with cutting dadoes, you can certainly glue and screw (or nail or staple) the bottom in place instead.
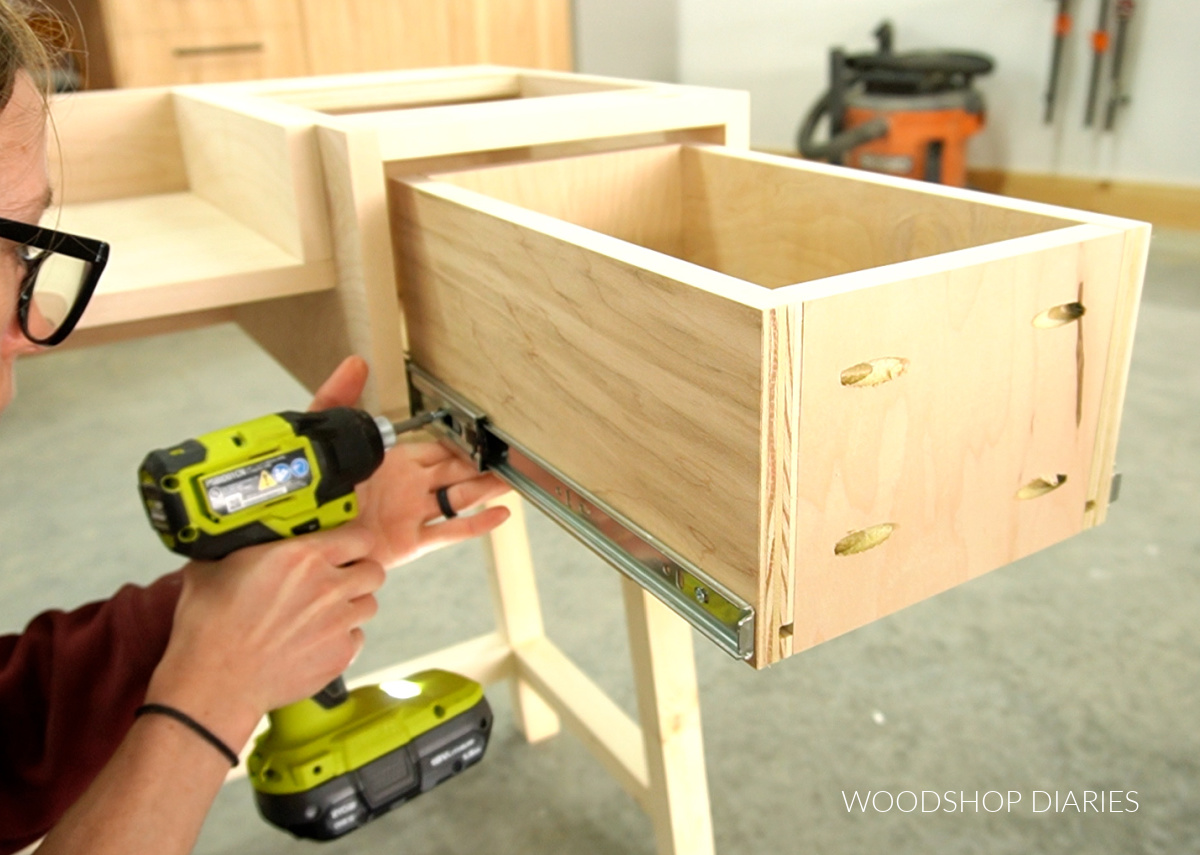
Then, I assembled the boxes using ¾″ pocket holes and 1 ¼″ pocket hole screws.
All the drawer measurements can be found in the printable plans.
Once the drawer boxes were assembled, I installed them onto the slides. This drawer building guide details step by step how to install drawer boxes onto side mount slides just like this.
Step 10: Attach Drawer Fronts
I cut my drawer fronts from ¾″ plywood. These should be ¼″ smaller in height and width than the openings since they will be inset. This allows for ⅛″ gap around all sides once installed.
Now, there are tons of techniques for installing drawer fronts evenly, but honestly, I usually just eyeball it. I placed the drawer fronts inside the opening so that the gaps around the sides all looked even.
Then I held it tight while I drove a screw through the inside of the drawer box to secure it in place.
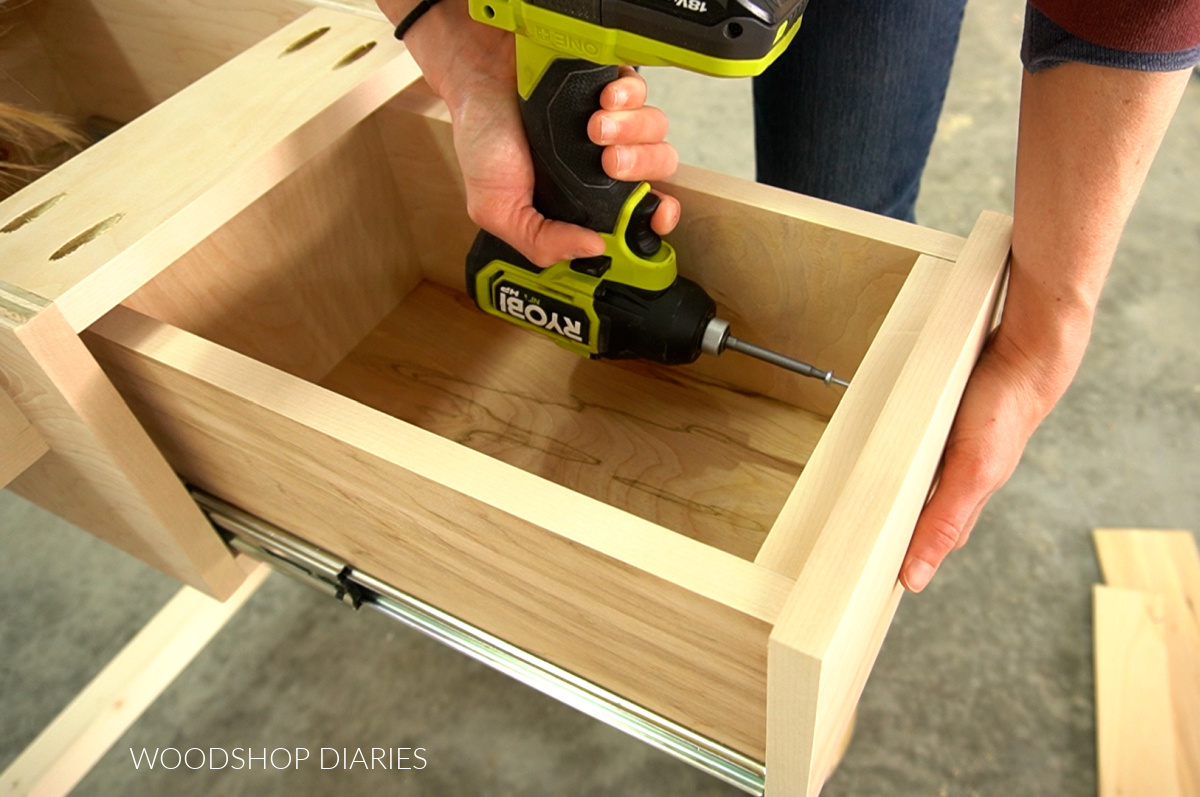
After the first screw was in, I made sure the spacing stayed right, then pulled the drawer out (for easier access) and installed a second screw.
Step 11: Add Vanity Desk Top
When the desk is closed, I wanted the top to look like one solid piece. There will obviously be some small gaps between the sides and the middle flip top, but I wanted the grain pattern to at least match across the top.
So, I cut a whole piece of plywood the overall size I wanted the top to be–16 ¾″ x 43″. Then, I cut it into three sections–the two outside pieces and the center flip top piece.
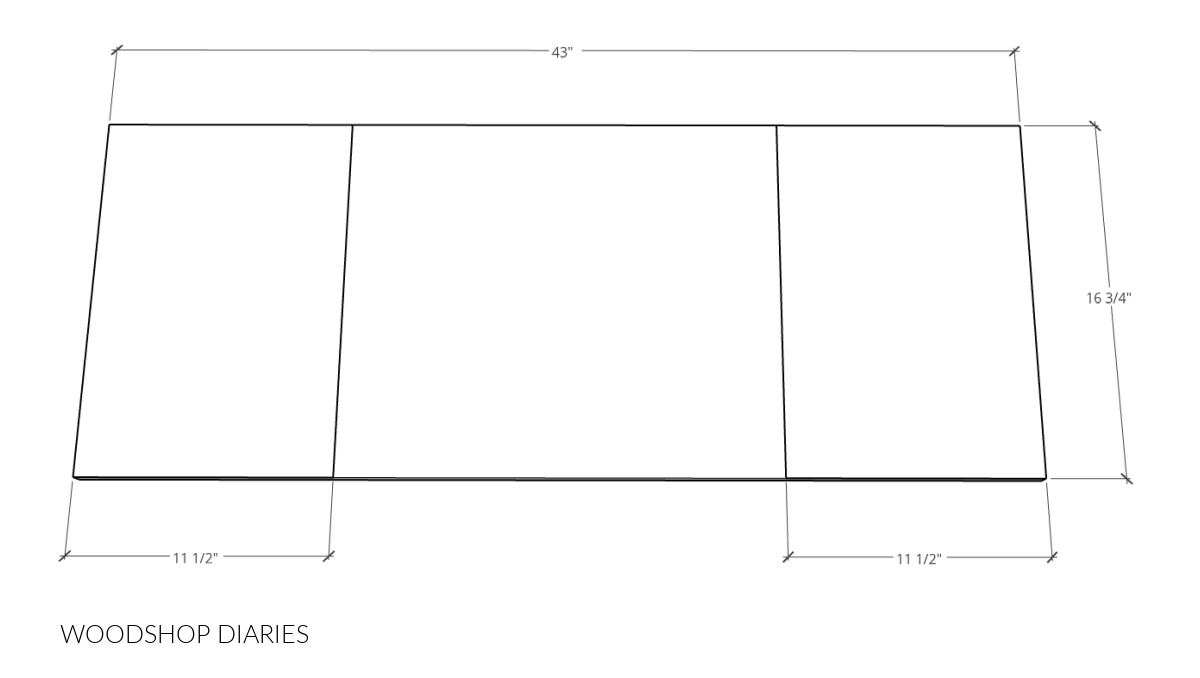
I edge banded all three pieces, then arranged them on the desk to make sure I installed them so that the grain pattern matched all the way across.
In order to access the inside to install the top side panels, I had to remove the drawers. The drawer slides have these little tabs on the side that allow you to easily slip them in and out.
Once they were removed, I made sure the top panels on the sides were flush to the back edge and flush to the inside edge of the drawer sections.
Then, I installed using 1 ¼″ wood screws through the top supports. This is a really tight fit, so I had to use a 90 degree drill attachment. These are handy to have for driving screws in tight spaces!

I used a couple screws in the front and back to attach both sides. Then, I could reinstall the drawers.
TIP: Don’t put the drawers back without first adding a knob or a pull to them or else you’ll have a really hard time getting them back open.
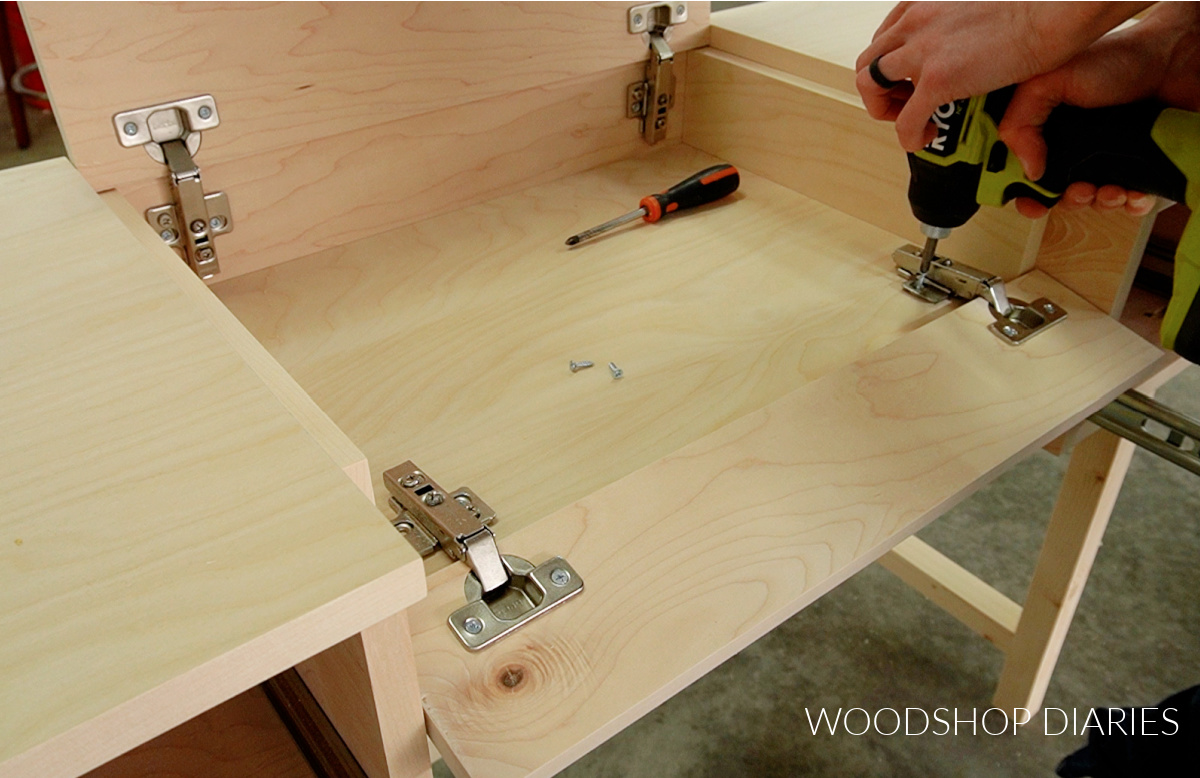
Step 12: Install Flip Top
The middle section left from step 11 will be the flip top. I made sure I knew what direction it needed to be installed, then used a Kreg concealed hinge jig to drill out cup holes to install the hinges on the back bottom side.
I installed concealed hinges for frameless full overlay doors onto this panel.
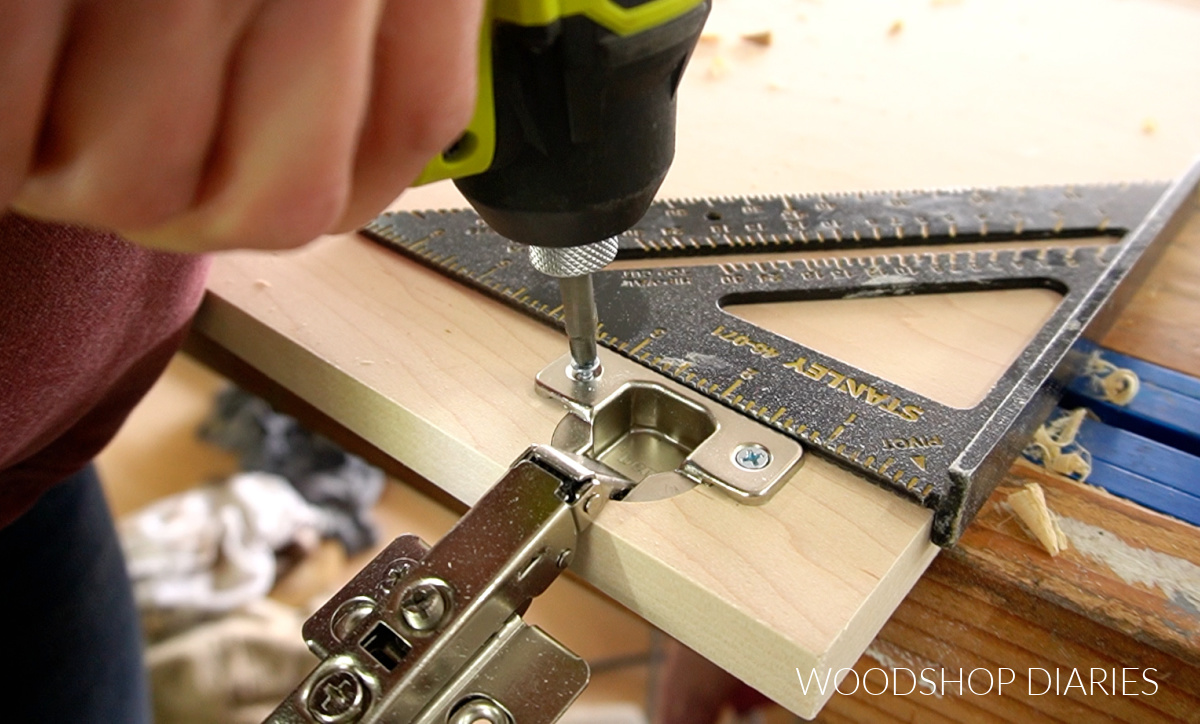
Then, I screwed the hinges to the back panel of the desk. Concealed hinges typically come with screws that allow for adjustments in all three directions–X, Y, and Z.
I adjusted the hinges as needed until it opened and closed smoothly and the panels were all aligned.
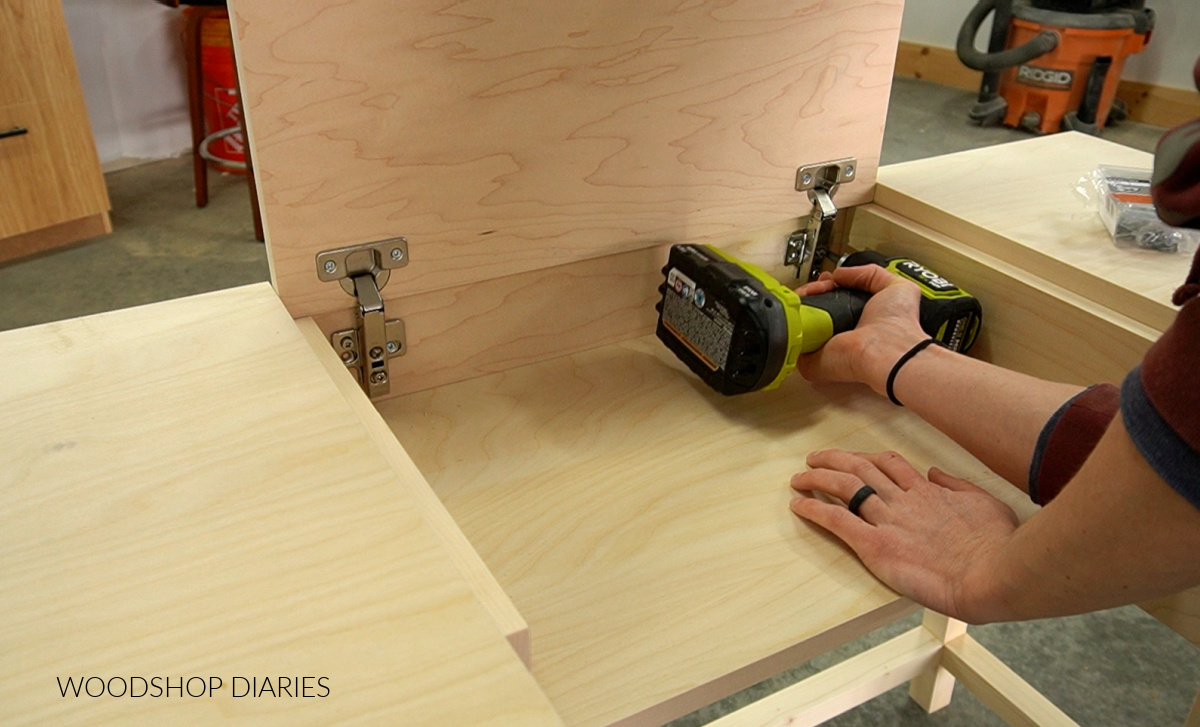
Step 13: Install Flip Front
The flip front was just a repeat of adding the flip top. I cut a piece of ¾″ plywood to fit across the front of the center section and installed concealed hinges for frameless full overlay doors.
Then, I screwed the hinges to the bottom center panel and adjusted as needed for proper function and spacing.
Step 14: Finish and Add Mirror
Now all that was left was finishing and adding the mirror (if desired). I wasn’t really thinking when I installed the flip top and front and decided that it might be easier to stain if these weren’t attached.
So I removed them and stained the pieces separately. However, since the screw holes were already there for where they needed to go, it was really easy to just screw these right back on after the stain was dry.
I applied a coat of Minwax Early American stain to the desk, then reattached the flip sections.
RELATED: How to finish raw wood furniture without a sprayer
All that’s left now is adding the mirror. I discussed the mirror in the notes earlier in this post. You can use other sizes, but a 12″ diameter mirror seems to fit best.
Depending on the particular mirror you use, the manufacturer may recommend a different mounting method, but for basic, flat mirrors, I recommend using mirror clips to install.
Make sure to install the mirror on the flip top so that it doesn’t interfere with the flip front when it’s closed.
Of course, the mirror is optional–if you aren’t using it as a makeup vanity, feel free to skip that part!
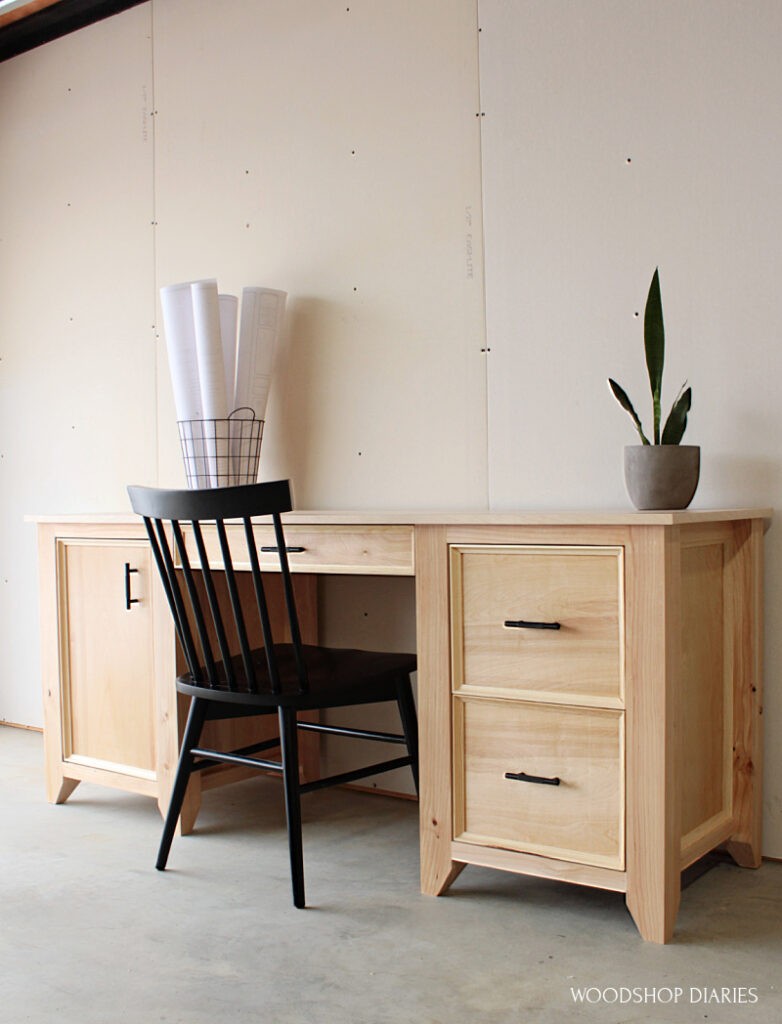
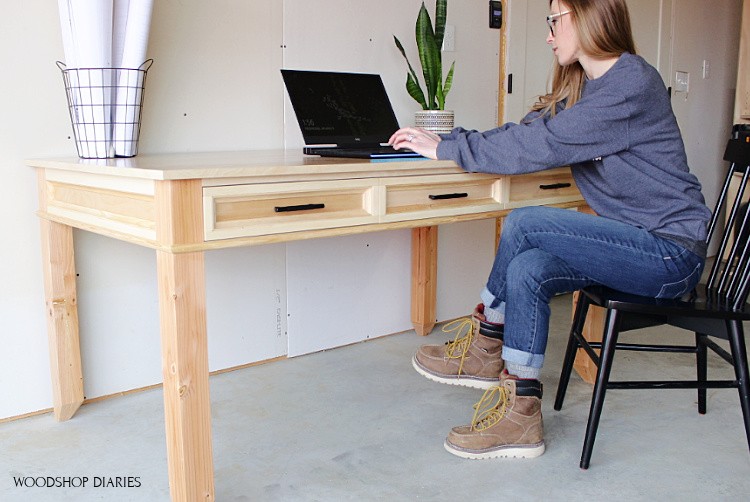
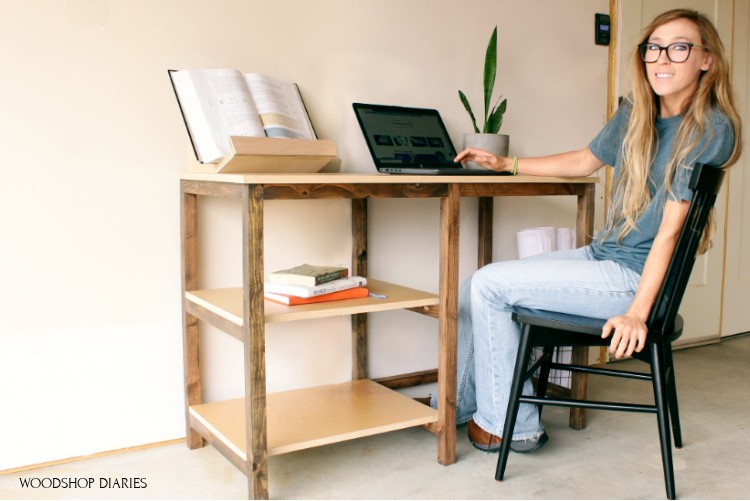
Looking for More DIY Desk Ideas?
This simple makeup vanity build was so much fun. But maybe it’s not quite what you were looking for?
Here are some more simple desk ideas you might enjoy!
If you enjoyed this project and want to be the first to know when new projects and plans come out, be sure to subscribe to the free newsletter below!
Don’t forget to pin this project or share it to your favorite social channel to save it for later!
Until next time, friends, happy building!