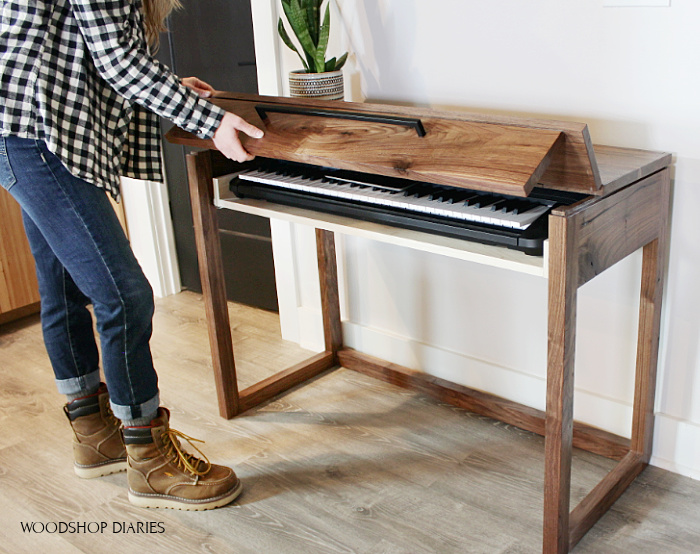
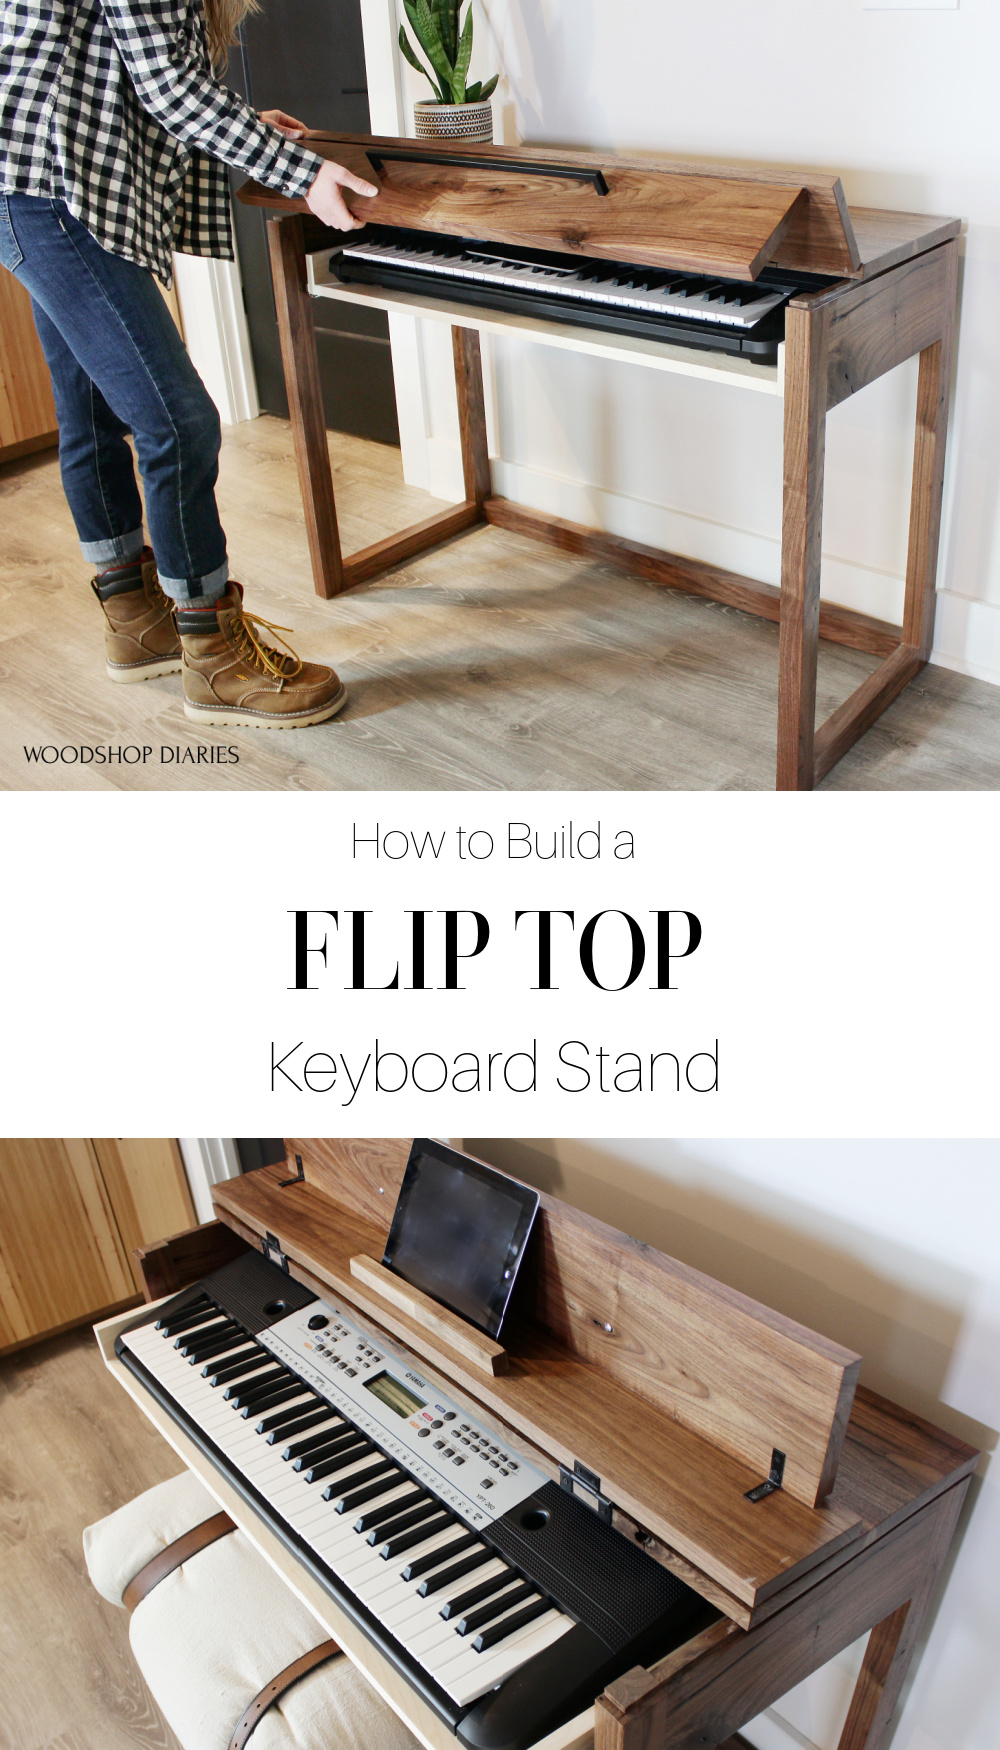
In this post, I’ll show you how to build this DIY keyboard stand that would also make a nice flip top desk with pull out drawer!
I recently bought my husband a new keyboard because he’s been wanting to learn how to play the piano.
.
When I bought it, there were so many options that I found online for stands to purchase with it.
.
But they all looked cheap and flimsy and I really wanted to be able to close up and hide the keyboard when it wasn’t in use.
.
So I built him this desk with a flip up top and a pull out drawer that will hide the keyboard when he’s not using it and it will open up when he’s ready to practice.
This project works great as a keyboard stand, but also as a simple DIY writing desk as well.
.
Now, one thing that this piece is missing is a place to store music books and notes…but I’ll be building him a storage bench to go with this shortly, so be sure to subscribe to my newsletter below and stay tuned for that post soon.
.
But, for now, if you’re ready to see how this basic writing desk/keyboard stand came together, let’s get building 😊
.
Check out the video below and the plans plus step by step tutorial following:
This post contains affiliate links. See website policies.
Some Notes About the Build:
For this build, I wanted to use what I already had in my shop and avoid buying any additional lumber.
.
I’ve actually had a stack of rough sawn walnut that a friend gave me a while back that I’ve been holding on to and decided to dig into it for this project.
.
However, plywood and/or typical lumber from the big box store would work fine for this as well.
.
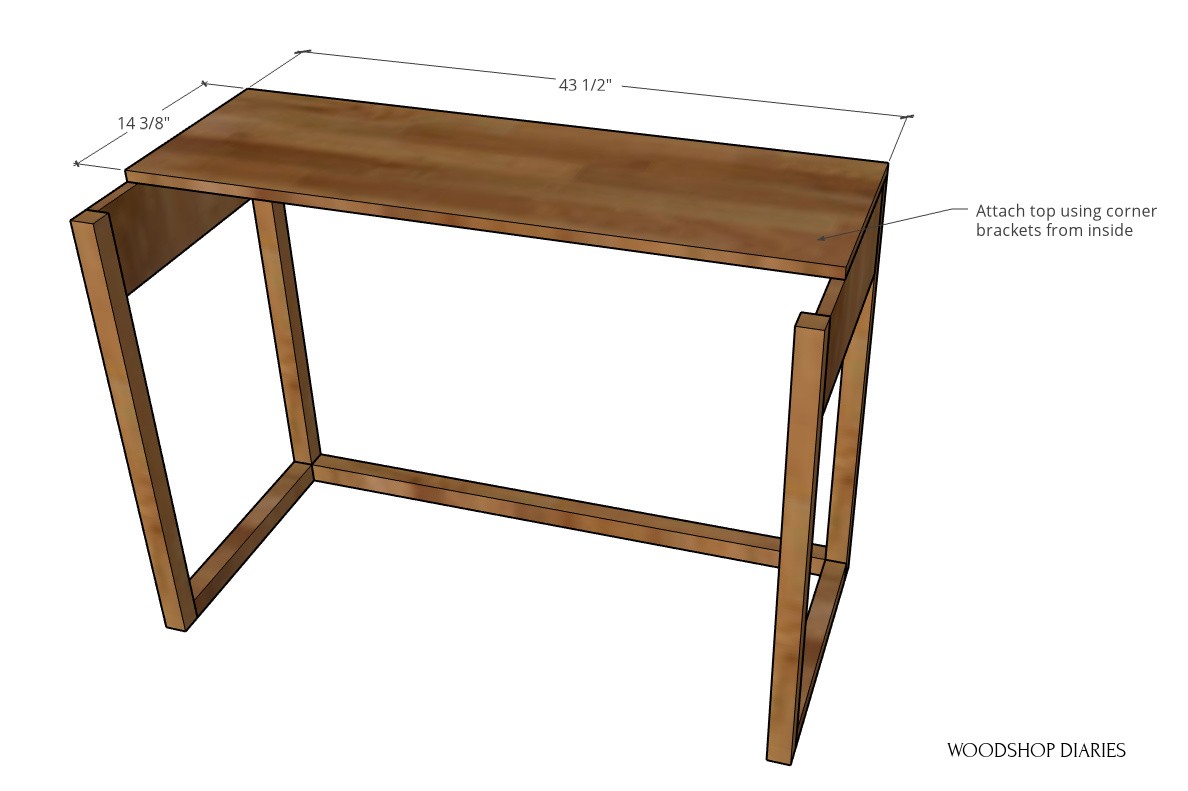
The overall dimensions of this DIY keyboard stand were 43 ½″ wide, 20″ deep, and 31 ¾″ tall.
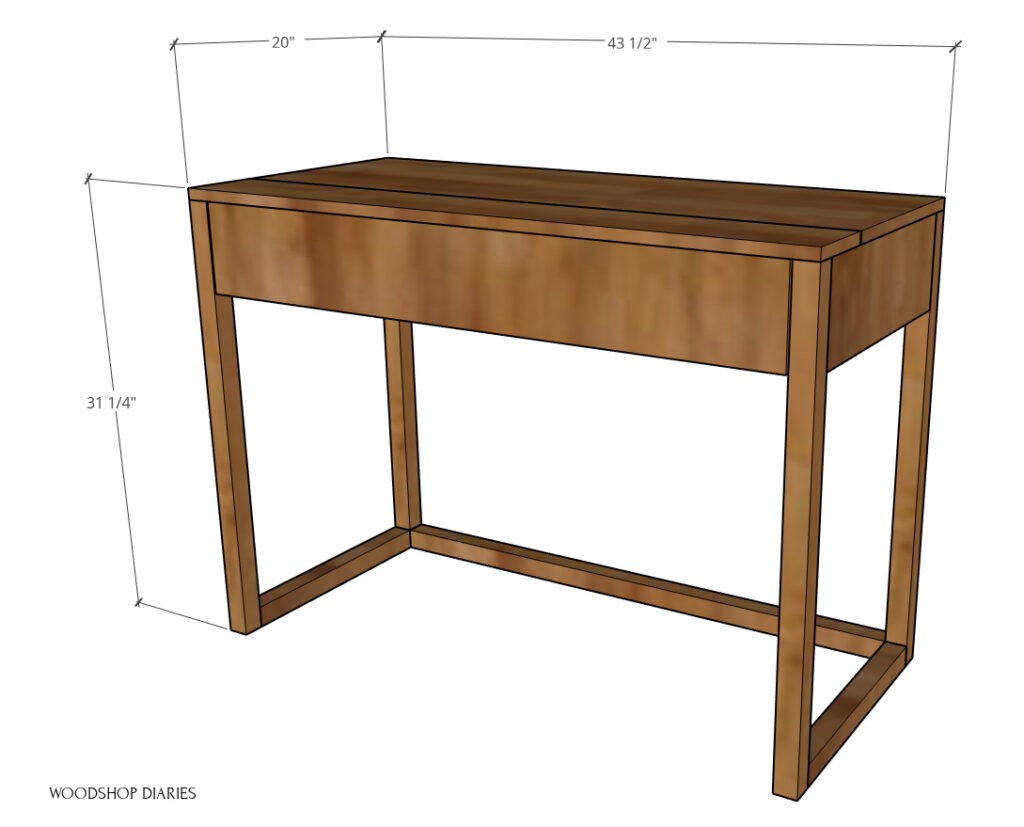
NOTE: This project is made to fit a keyboard up to 38″ long and 16″ deep.
.
If your keyboard is this size or smaller, it should fit fine. This is the keyboard I used.
.
Some posts you might find helpful for this build:
For this DIY Keyboard Stand Desk, You Will Need:
Materials:
- (½ sheet) ¾″ plywood
- (3) 2x2x8s
- (2) 1x8x8s (ripped to 6″ wide–OR just use ¾″ plywood instead)
- Dowels
- Wood Glue
- 1 ¼″ wood screws
- (1) pair 16″ drawer slides
- (1) long, modern drawer pull
- (1) pair non mortise hinges
- Corner brackets
Tools:
- Circular Saw
- Miter Saw
- Drill
- Dowel Jig
- Router and Rabbeting Bit (OPTIONAL)
- Pipe clamps
Step 1: Assemble Side Panels
Since I was dealing with rough 1x thick lumber, I had to plane and cut down some boards into 1 ½” strips.
.
Then, I could laminate (glue) them together to make the 2x2s I used for the frame.
However, you can purchase precut 2x2s from the big box stores to use, or make your own with this tutorial.
.
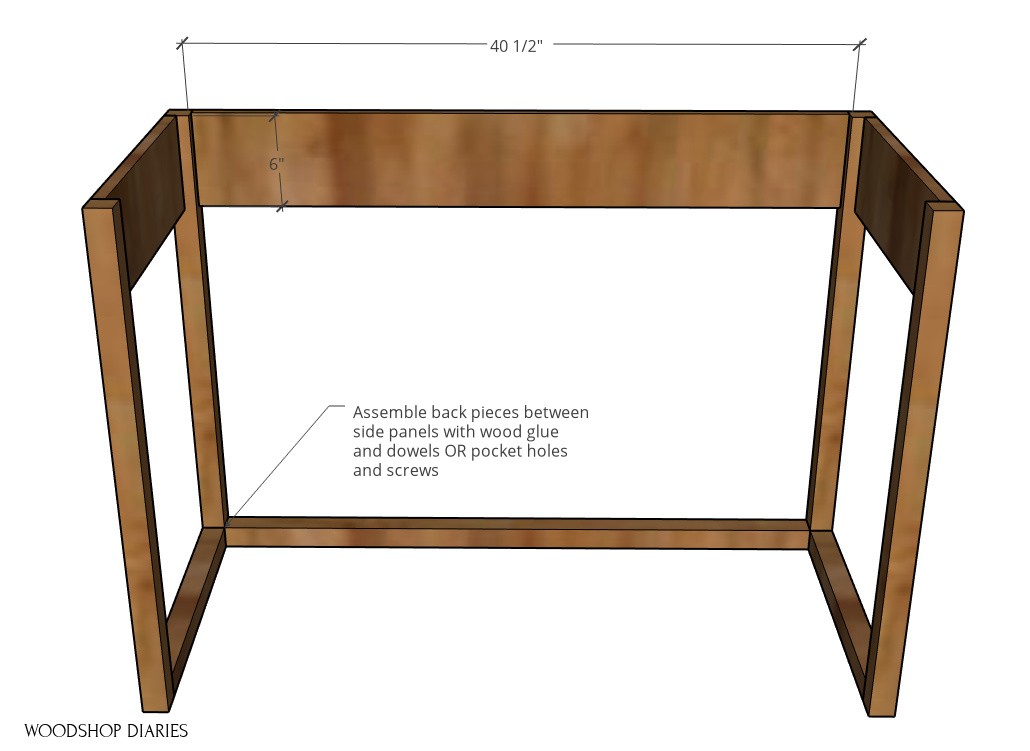
I used 2x2s for the legs and bottom of the desk, but at the top, I used 1x (¾″ thick) material.
.
You can use ¾″ plywood OR solid 1x8s ripped down to 6″ wide.
.
NOTE: You could also use 1x6s–which are 5 ½″ wide.
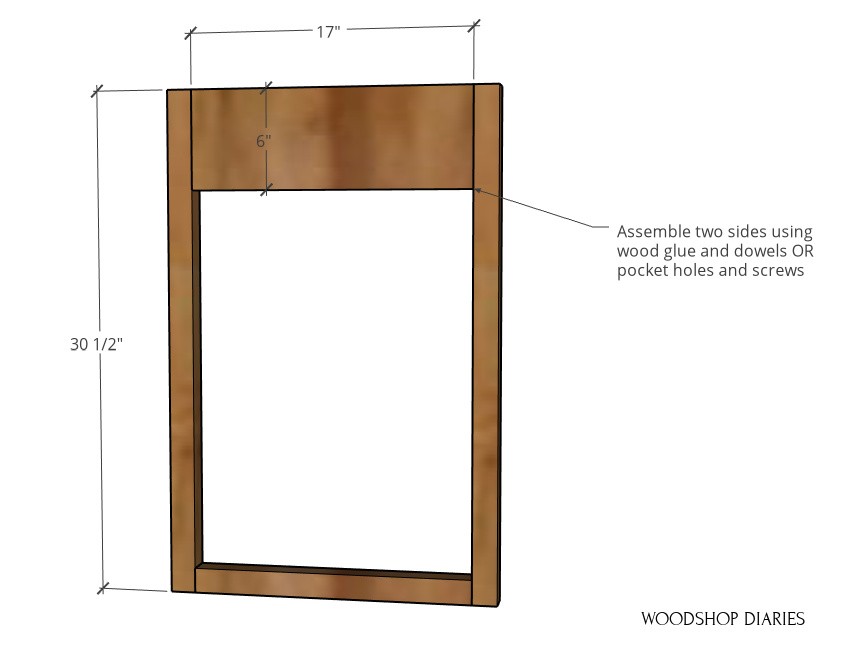
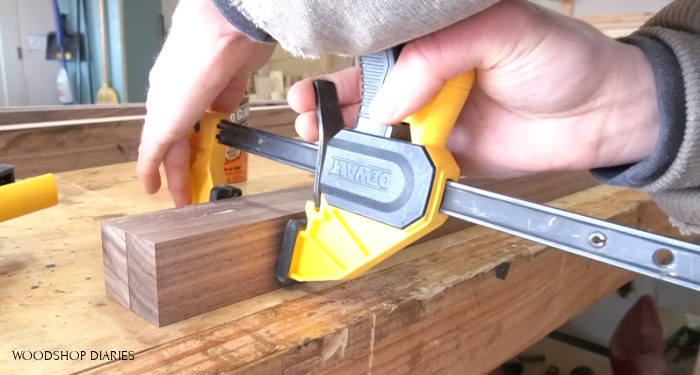
I assembled the frame of this project using wood glue and dowels.
.
However, if I was using a cheaper wood or a plywood, I’d probably just use pocket holes and screws to make things easier.
.
You can use whatever type of joinery method you prefer for this.
.
But if you’re using pocket holes, use ¾″ pocket holes and 1 ¼″ pocket hole screws on 1x material and 1 ½″ pocket holes with 2 ½″ pocket hole screws on 2x material.
RELATED: How to set up and use a pocket hole jig
.
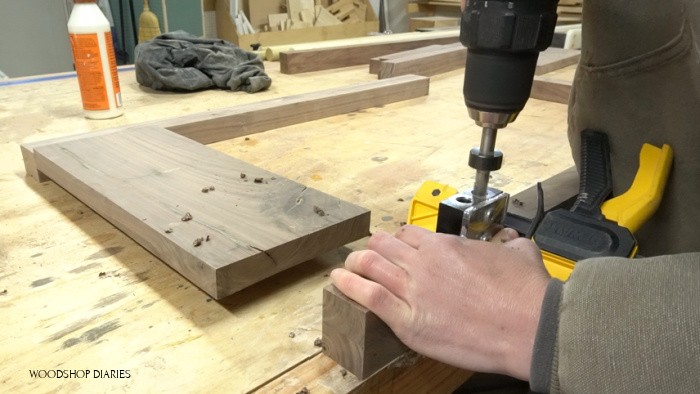
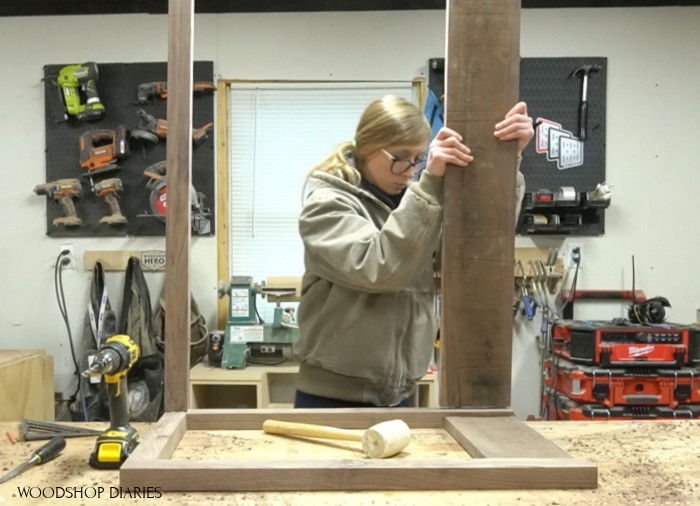
I laid out my side panel pieces with a 6” board at the top and a 2×2 at the bottom and marked where to drill the dowel holes.
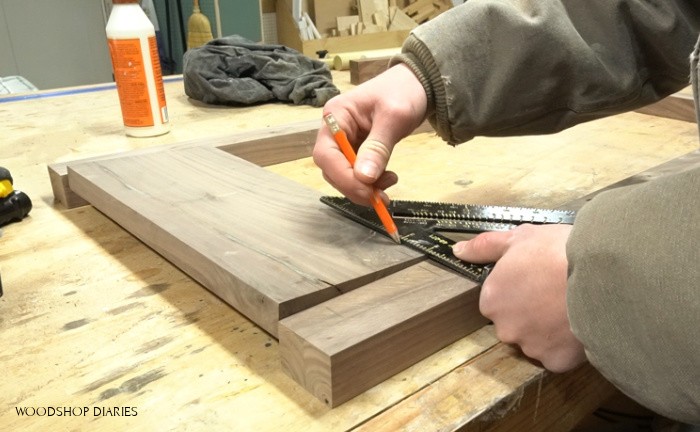
Then, I used my dowel jig and drilled ⅜” dowel holes at all my marks and assembled with wood glue and dowels.
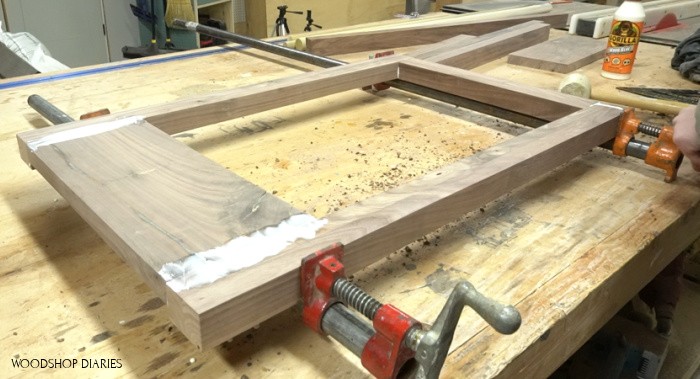
I made two identical side panels like this making sure to keep the top pieces flush to the OUTSIDE of the legs.
.
You could also install the top piece flush to the inside of the legs if you prefer, but I liked them on the outside.
.
I clamped the pieces until the glue was good and dry.
Step 2: Assemble Keyboard Stand Frame
Once the side panels were dry, I marked the dowel holes for the back pieces making sure to label everything well so I didn’t screw up the orientation.
I drilled these dowel holes using my dowel jig and assembled the rest of the frame.
Again, you could use pocket holes and screws instead if you prefer.
.
I used large pipe clamps to clamp the top and bottom pieces in place and also used some corner clamps to make sure that the side panels stayed square to the back.
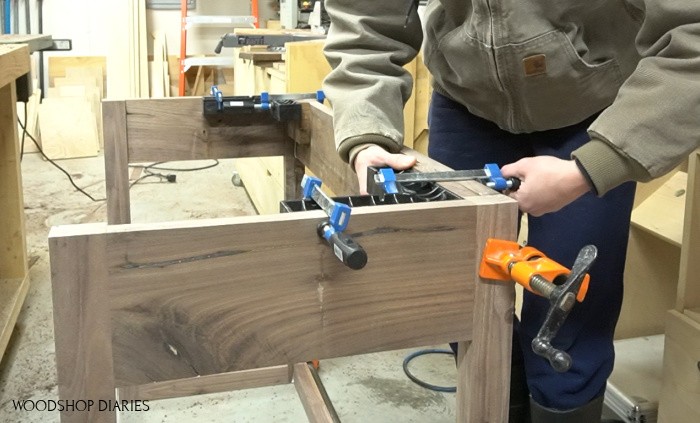
These glue ups were extremely messy, so after everything was dry, I gave it all a good sanding to remove all the glue squeeze out, then decided to add a small detail before working on the top.
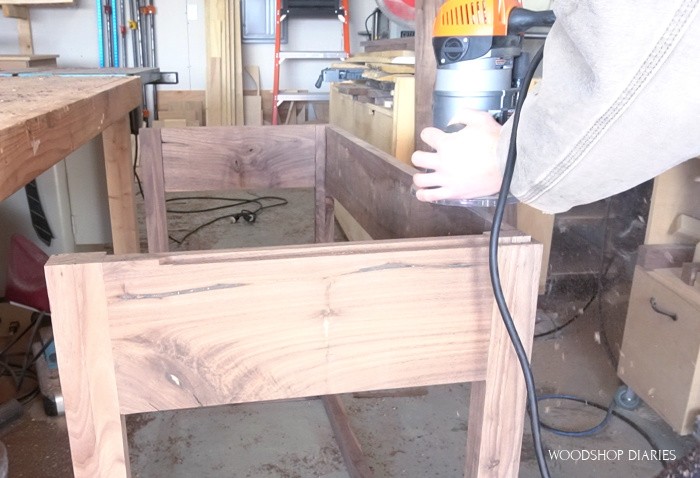
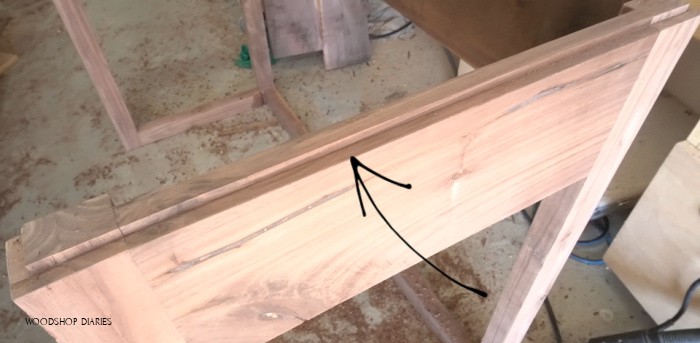
Step 3: Add Top Rabbet Detail (Optional)
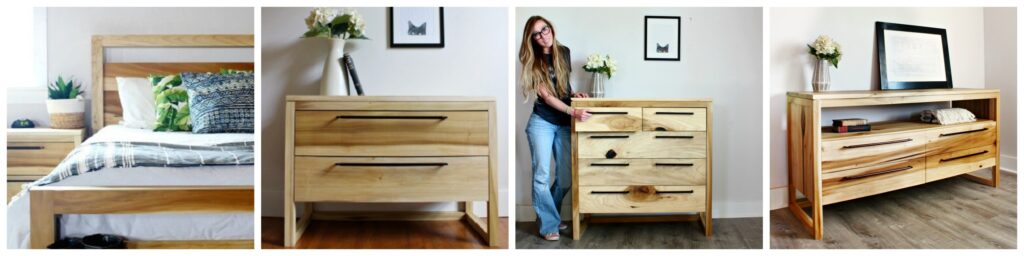
I mentioned earlier about the nightstands and dressers that matched this design.
.
I added a small detail at the top of those that I wanted to also add to this piece.
.
This is a totally optional detail, but I used a router and a rabbeting bit to make a small rabbet along the top edge of this piece.
RELATED: Want to learn more about using routers? Check out this router guide!
Step 4: Install Stationary Keyboard Stand Top
For the top, this was basically made in two sections—the back piece that stays in place and the front piece that flips open.
.
I picked out three boards to use for the top—the back two I glued together to make a solid panel and the front I set to the side for now.
.
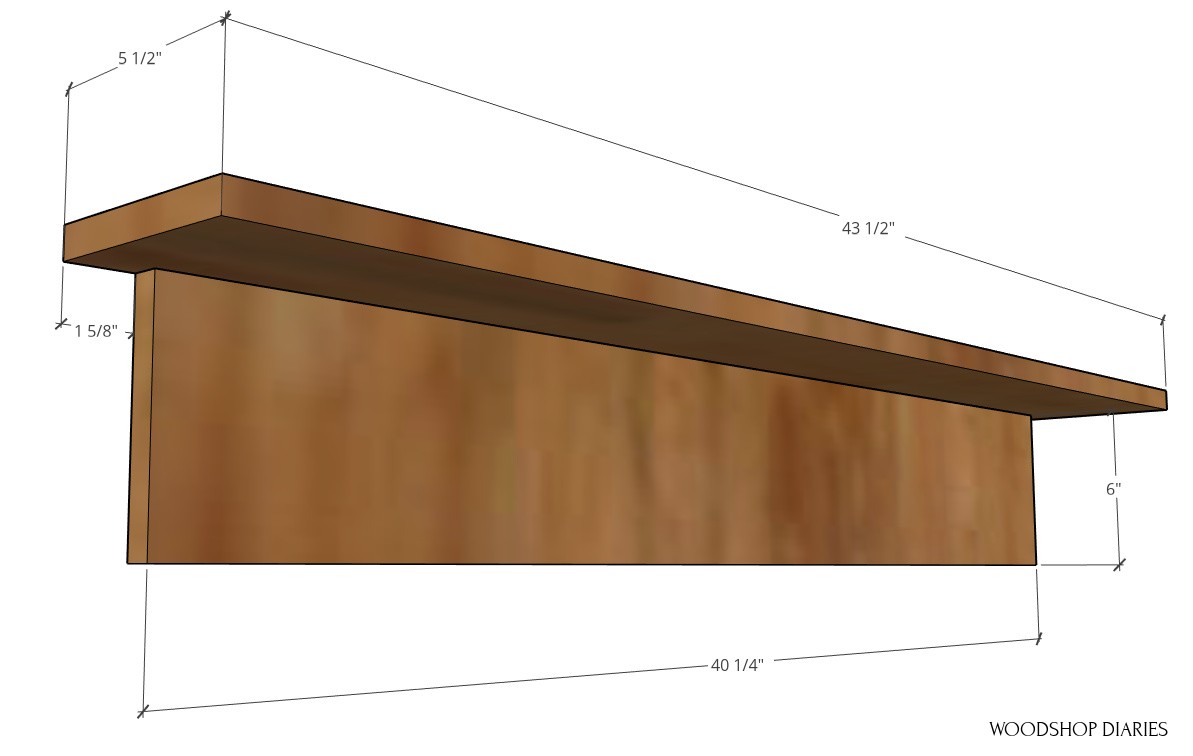
I simply glued and clamped the back two pieces of walnut to make a solid panel the size shown below, but you could also use ¾″ plywood as well if you preferred.
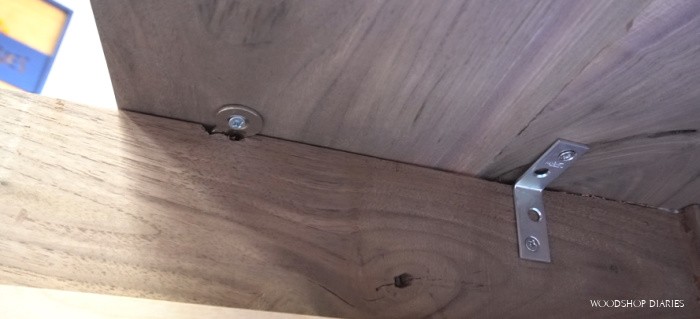
I tried to attach this top panel “properly” by using figure 8 tabs like I used in this table build that allow for wood movement.
.
BUT I ended up going back later and adding some corner brackets because they felt like they held tighter.
Feel free to do your own research and attach your top however you see fit.
.
I actually recommend plywood so movement isn’t really a concern…BUT to each his own 😊
.
Anyway, the hard part is done and it’s pretty smooth sailing from here.
Step 5: Assemble and Install Flip Top Piece
Now that the stationary top is installed, I moved to the flip part.
.
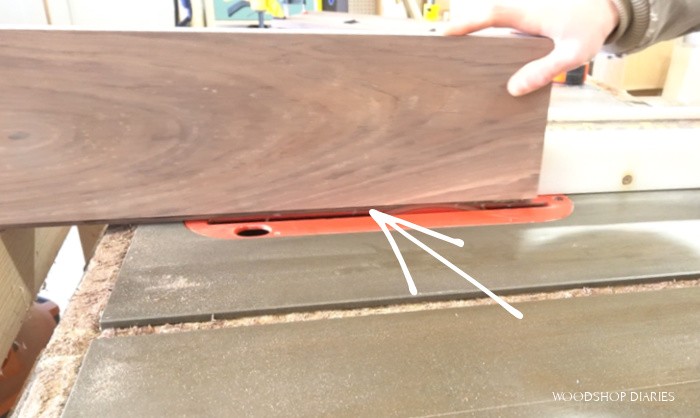
I trimmed my front pieces to the proper length (see below) and marked where I needed to cut a rabbet to match the rest of the desk frame.
.
I cut this rabbet on the table saw.
.
But you could also use the router–it’s just a little challenging to find a good way to clamp it safely for this.
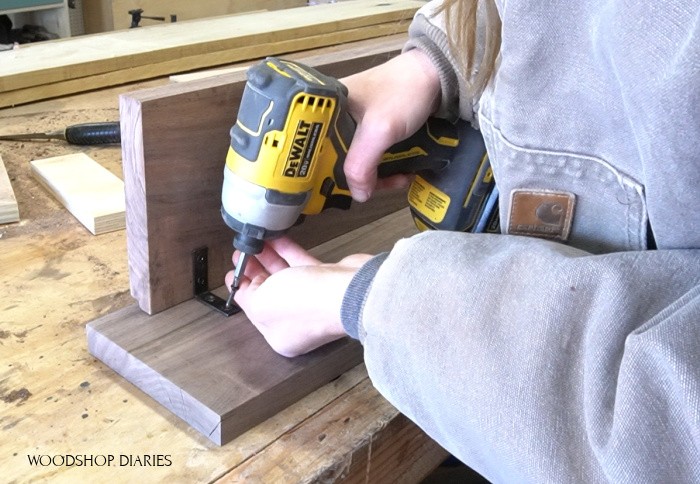
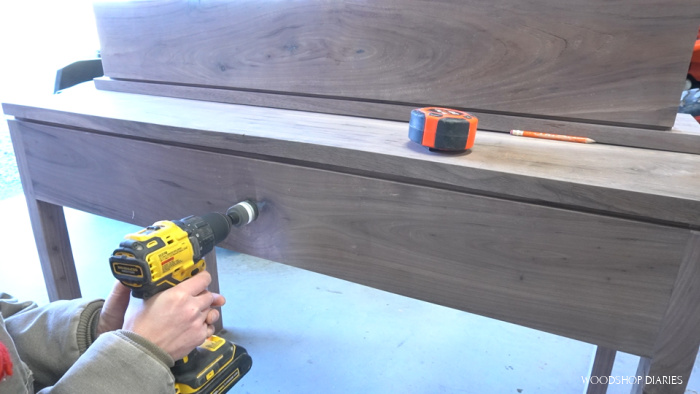
I centered the front piece on the top piece and attached with some corner brackets.
After attaching, I realized that this was pretty flimsy, so I went back and added some glue, then screwed the corner brackets back in. I checked for square and let it cure well.
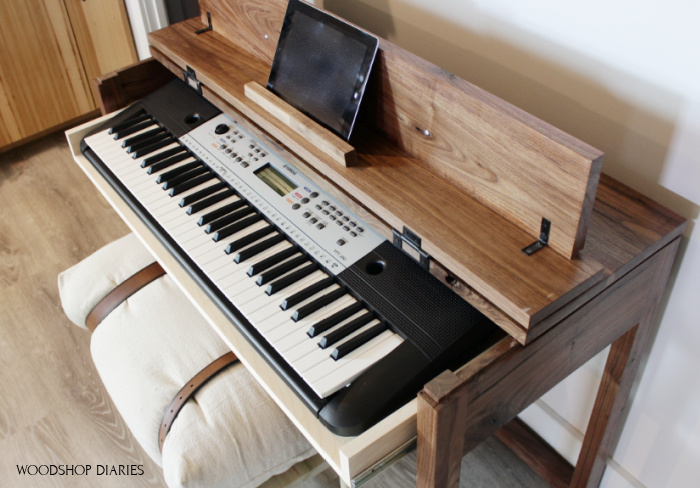
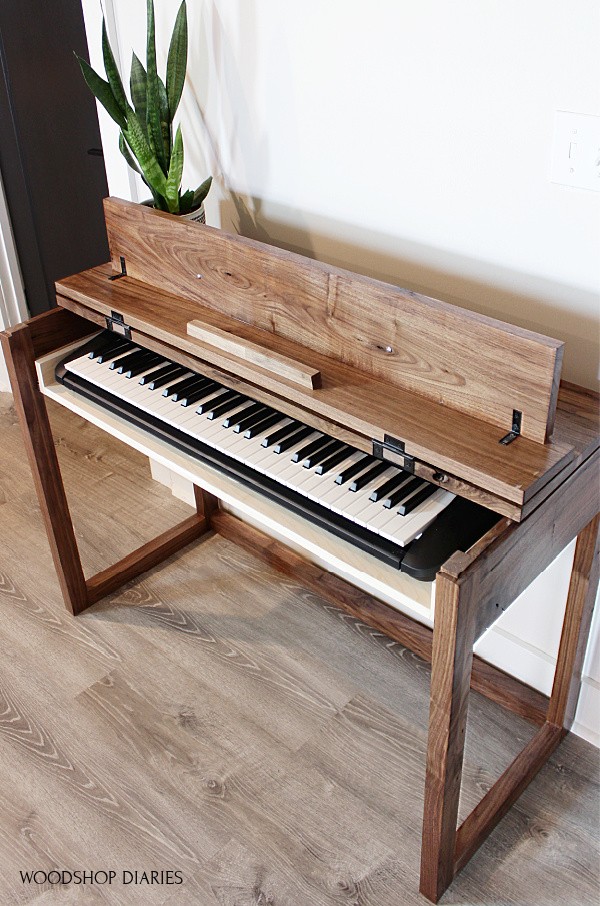
I used some non mortise hinges to install this flip up piece onto the stationary top like shown here.
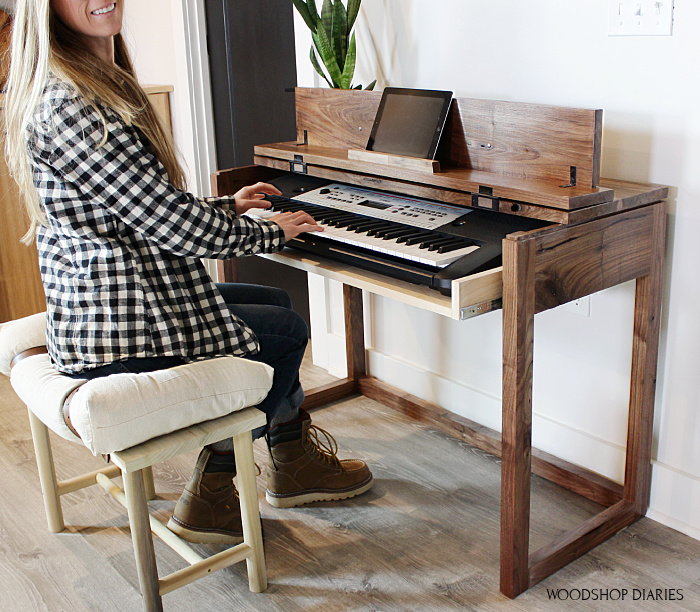
Since this was going to be used as a DIY keyboard stand, I wanted Danny to be able to set his music book or iPad on the flip top to see while he’s playing.
I used some scrap blocks and glued them onto the top at the center.
.
I used a spacer block to get them placed, then removed the spacer block so I could clean up the glue squeeze out before it dried.

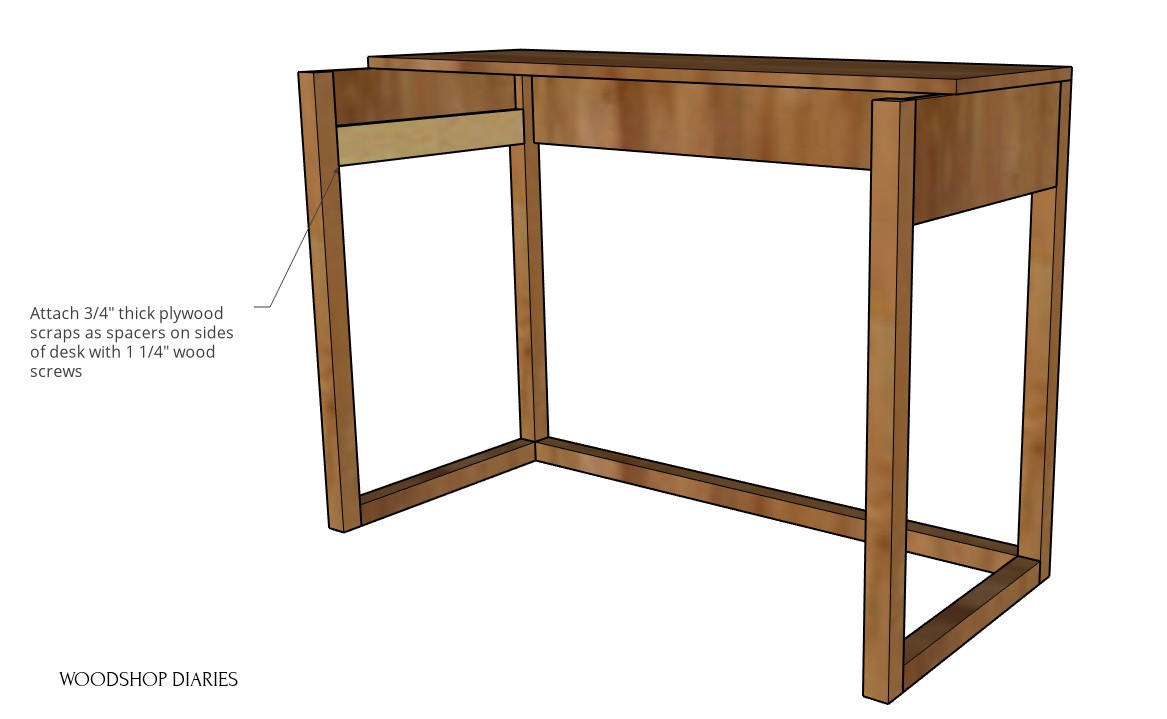
Step 6: Install Pull Out Tray
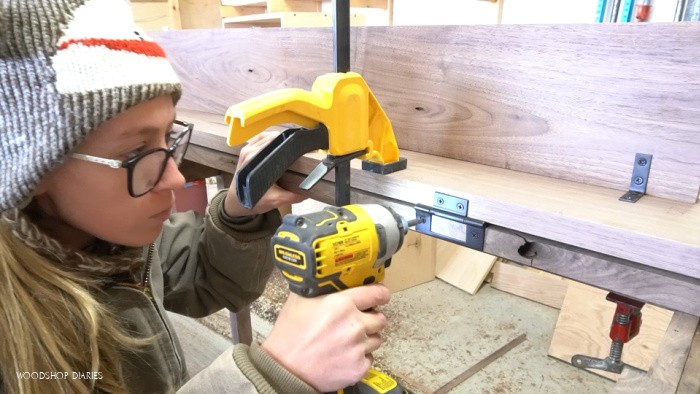
Since I installed the sides to the outside of the legs, I needed to attach some spacer blocks to mount the slides onto so the tray can slide in and out.
.
So I cut some plywood scraps and screwed them in place on both sides of the desk.
.
Then, I attached the slides along the bottom edge of them.
RELATED: For more information on installing drawer slides, check out this drawer building guide.
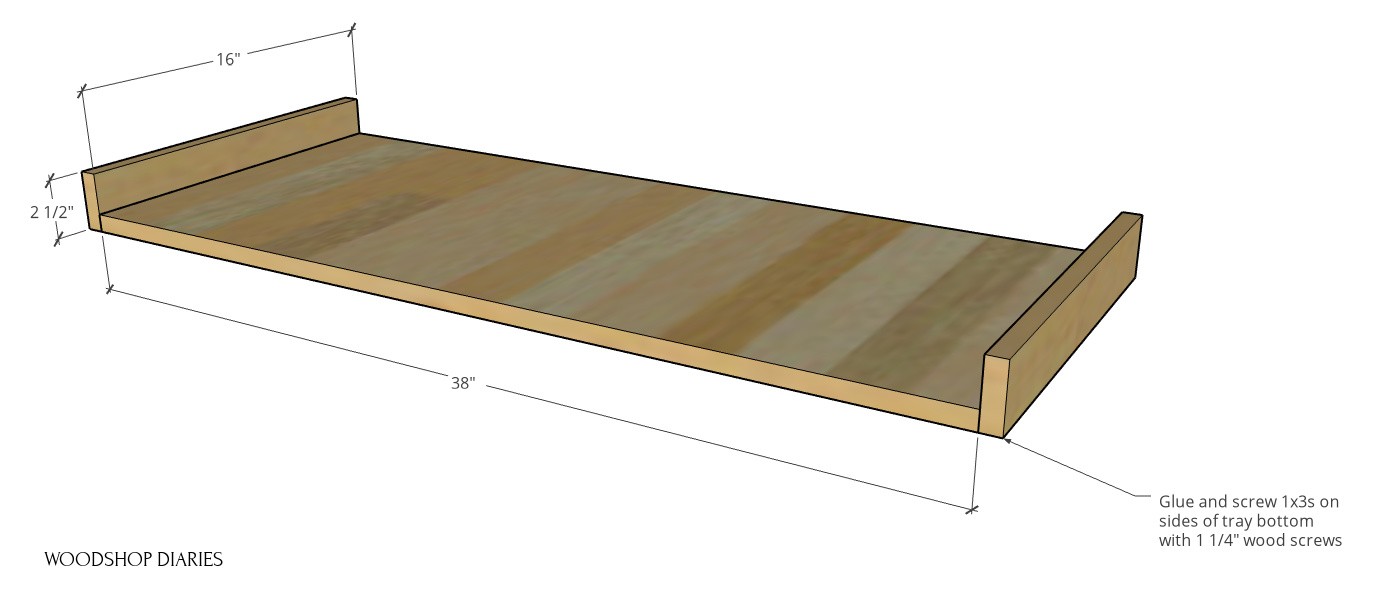
For the tray, I cut down some ¾″ plywood using my circular saw, then trimmed it to length on the miter saw.
.
I cut a tray bottom and two small pieces to go on the sides.
RELATED: Check out this guide for how to cut down plywood!
.
I glued and screwed these pieces together to make a tray that would fit the keyboard.
Once the tray was together, I removed the front part of the drawer slides (extend them fully, release the black tab on the side, and pull the inside piece out) and screwed these onto the tray at the bottom edge.
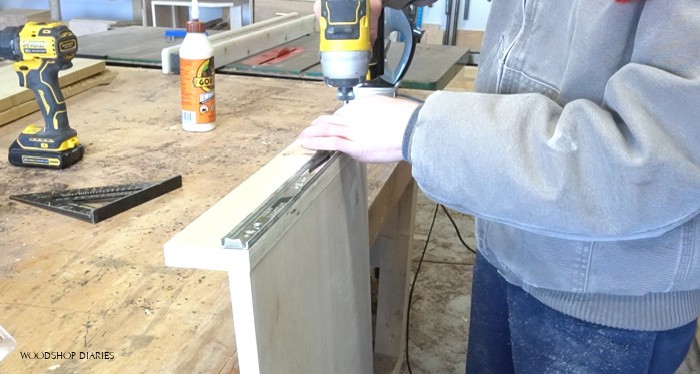
Then, I installed the tray back into the slides in the desk and made sure everything fit.
.
The last thing I did was use a hole saw to drill a hole in the back side to run the power cord through for the keyboard. This is optional.
Step 7: Finish DIY Keyboard Stand
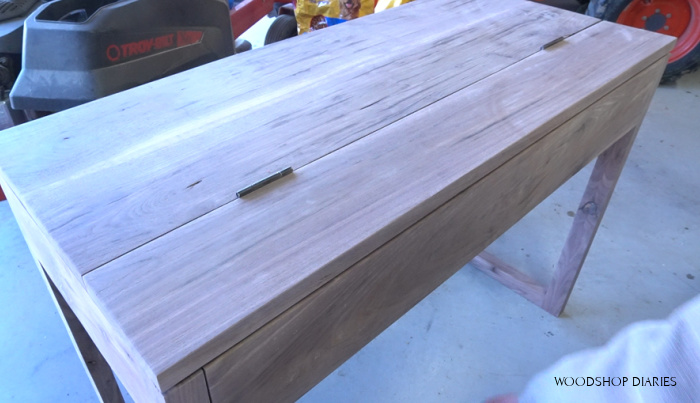
Then, I applied three coats of Minwax Helmsman Poly to finish, added a handle, and placed the keyboard inside. Feel free to paint or stain as desired.
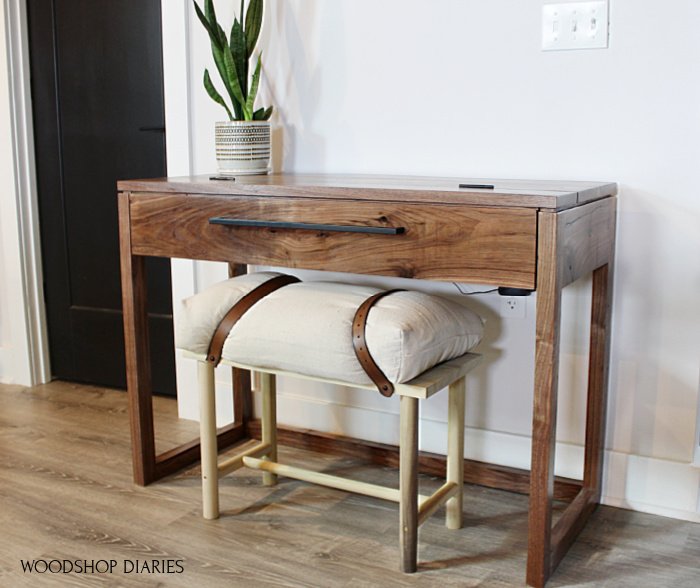
And now Danny has a new keyboard and a fancy new stand to play it on. Now I just need to hurry up and build him a new storage bench to replace this little seat.
.
RELATED: If you’re looking for some matching pieces, this bedroom set with dressers, nightstands, and a bed matches this style, but is just made from poplar instead of walnut.
.
I’m really happy with how this turned out and very happy to have this nice walnut keyboard stand vs a cheap plastic one.
It looks great in our tiny apartment and if he ever graduates to a larger keyboard or piano, we can reuse this stand as a nice desk or console table.
If you enjoyed this DIY keyboard stand project, I’d love if you’d subscribe to my newsletter below so you don’t miss out on what’s coming next!
And if you’d like to save this for later, don’t forget to pin it!
Until next time, friends, happy building 😊