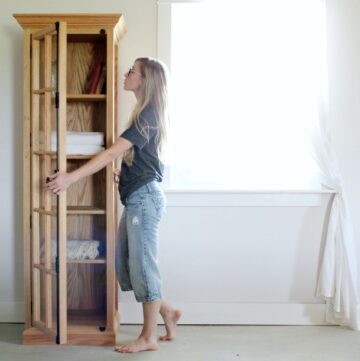
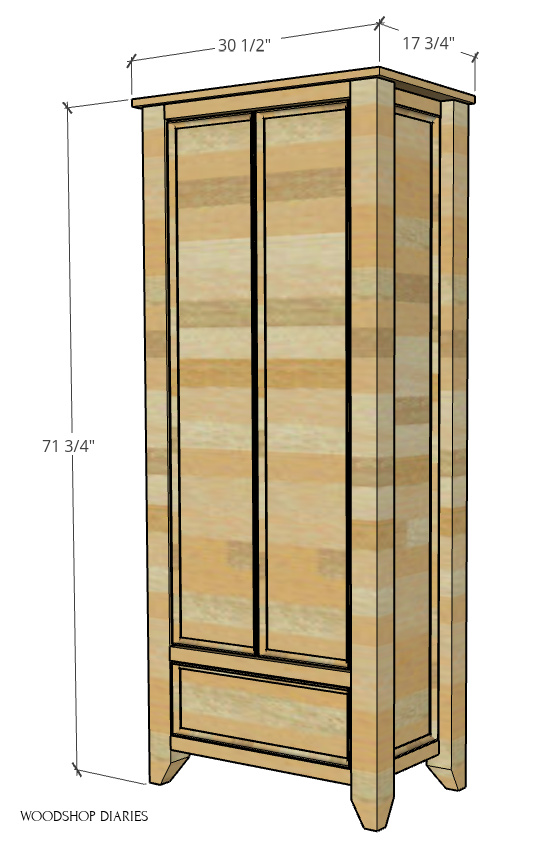
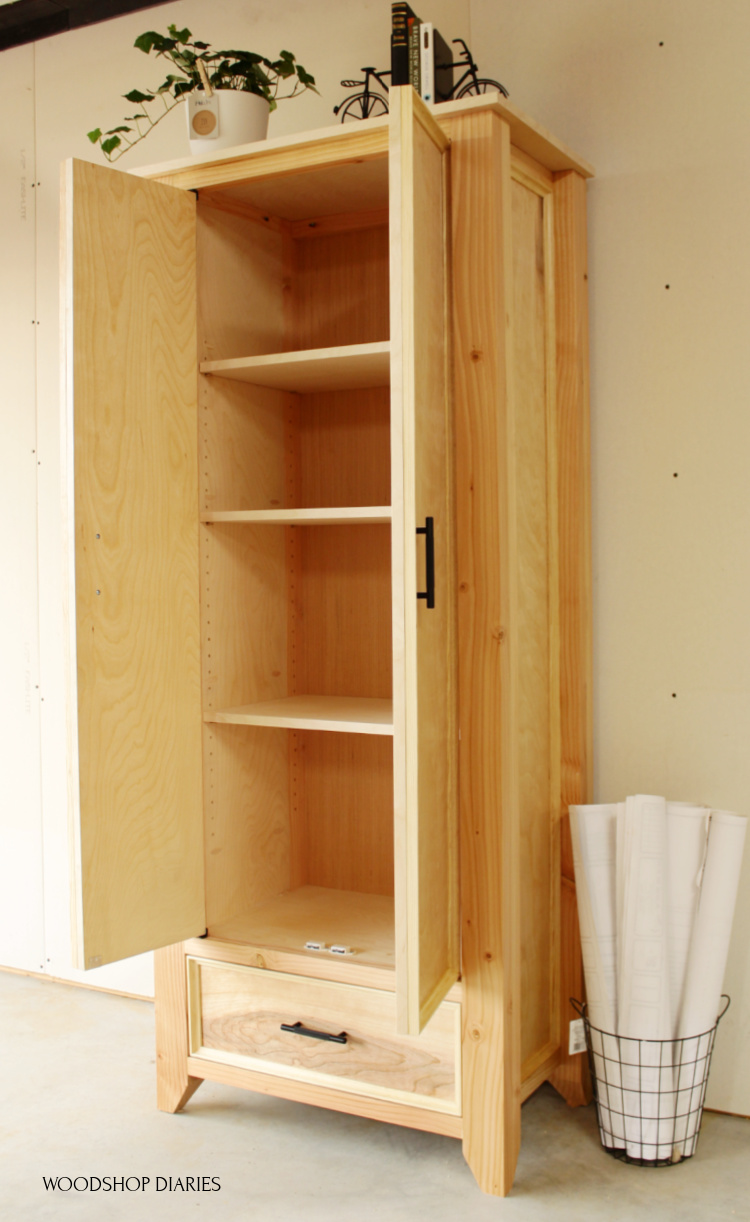
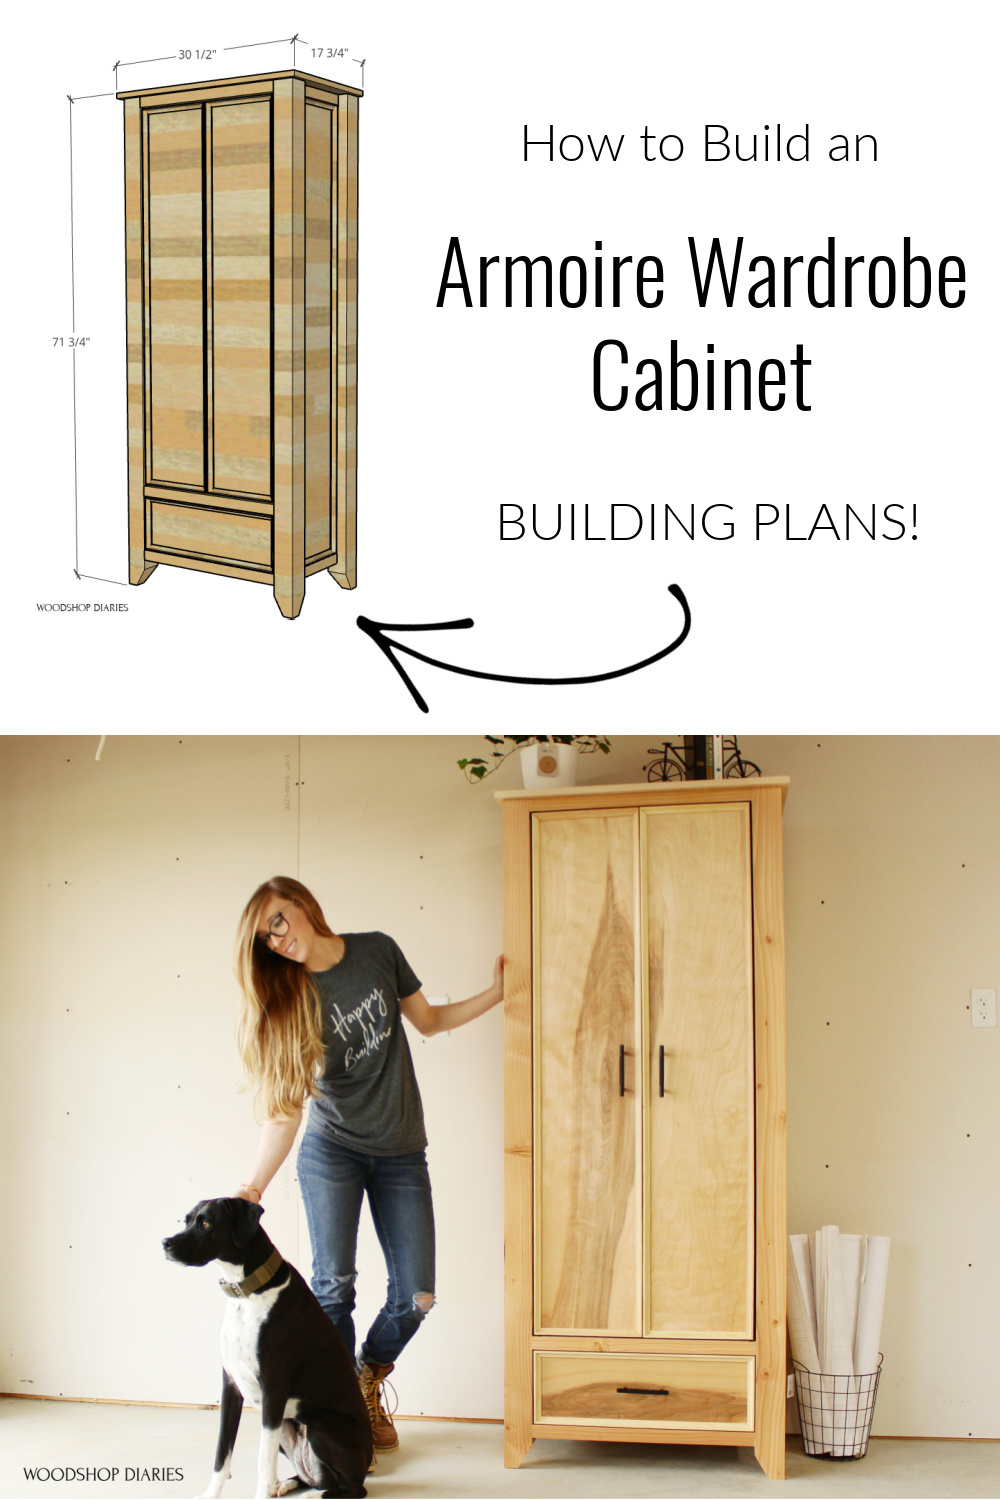
In this post, I’ll show you how to build a DIY Armoire Wardrobe Cabinet from basic 2x4s and plywood!

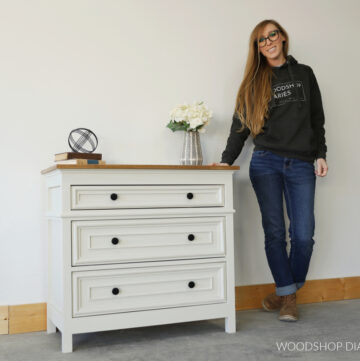
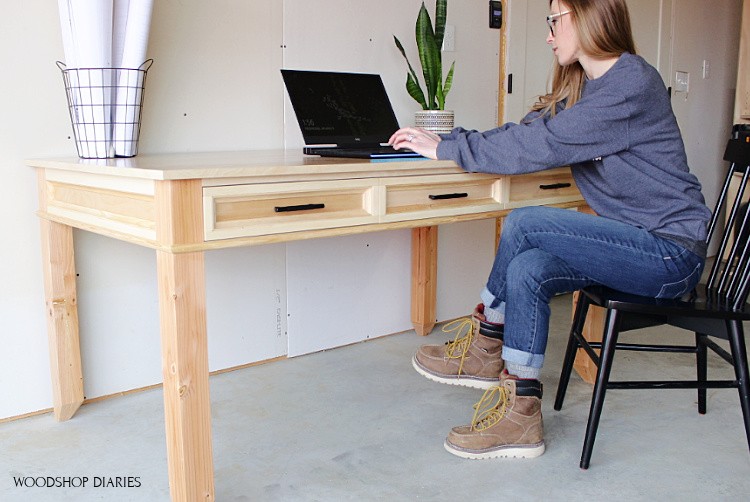
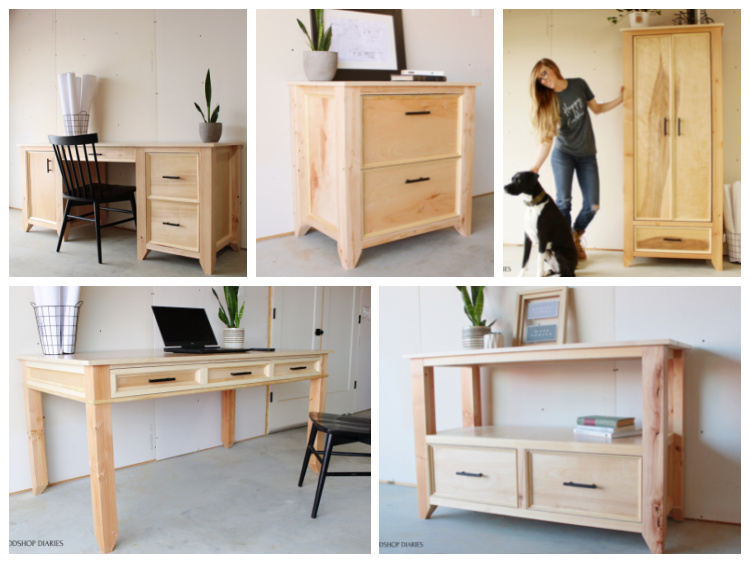
If you’ve seen some of my latest projects, you may have seen that I’ve been building my dad some matching pieces for his office.
.
I didn’t really know how many pieces would be in this “collection,” but I do think this is probably the series finale and the last piece I’ll be building for this matching set. You can check out the other pieces here.

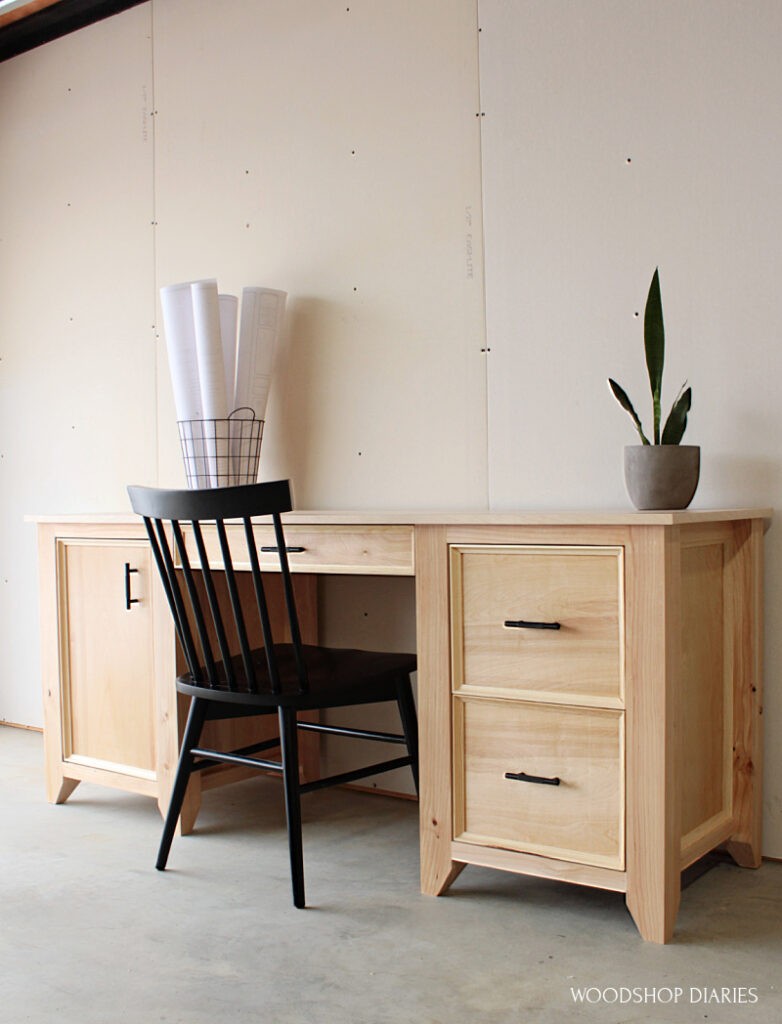
DIY Writing Desk 
DIY Computer Desk 
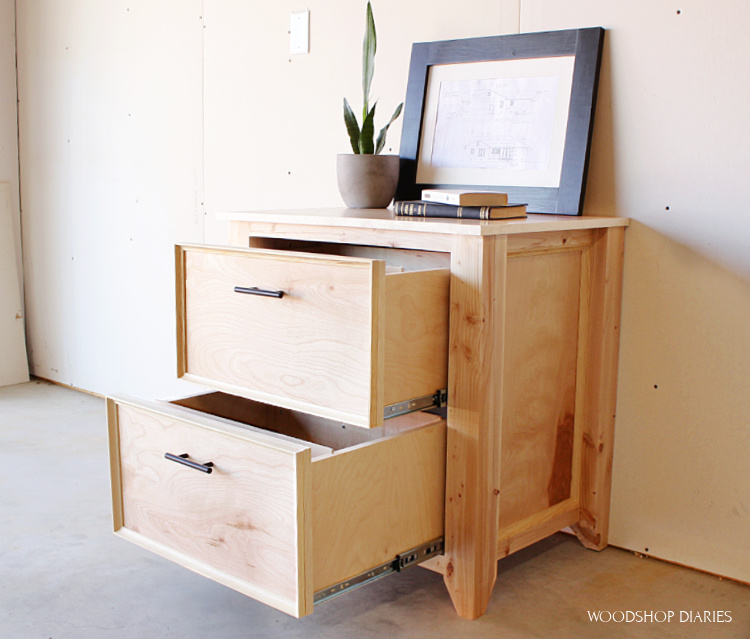
DIY File Cabinet 
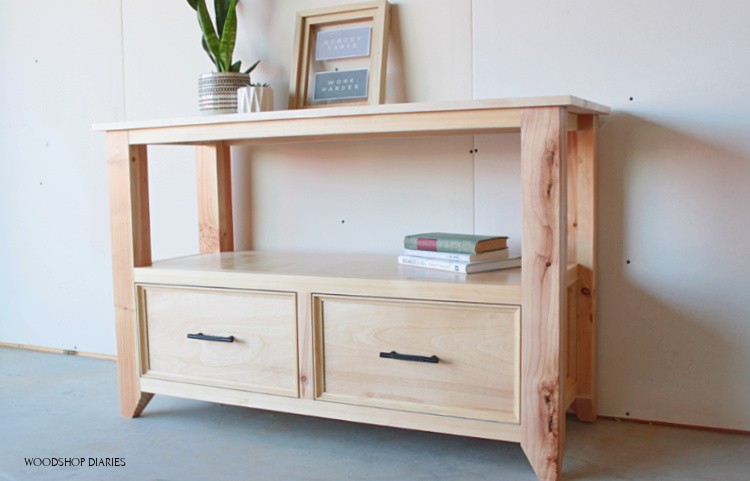
DIY Display Shelf with Storage
It’s a little bittersweet since this series has been so fun to build, but I think I’m wrapping things up with my favorite piece, so let’s jump right in.
.
I’ve got a build video here, along with a step by step tutorial and printable building plans below.
This post contains affiliate links. See policies.
About the DIY Armoire Wardrobe Build:
This project was made with basic 2×4 construction lumber and birch plywood. It was assembled with pocket holes and screws. You can use another wood type or joinery method if you prefer.
.
This would make an excellent stand alone closet or pantry, linen cabinet, or just some extra storage in any room of the house.
.
The overall dimensions of this project are 17 ¾″ deep, 30 ½″ wide, and 71 ¾″ tall.
The video above and the instructional steps below are NOT completed in a specific order. Once you get the main cabinet frame assembled, you can mix and match the order of the steps as you choose.
You may find these posts helpful in the build process:
- How to Make Your Own 2x2s
- How to Cut Down Plywood Sheets
- How to Use a Pocket Hole Jig
- How to Apply Edge Banding to Plywood
- 4 Ways to Plug a Pocket Hole
- 10 Must Have Tools for Cabinet Building
- How to Build and Install A Drawer
Tools and Materials:
Materials:
- (1 + ½) Sheet ¾″ birch plywood
- (1) sheet ¼″ plywood
- (8) 2x4x8 boards (use the off cuts to make your own 2x2s or purchase (2) 2x2x8 boards)
- (8) 8 ft sticks cove Molding
- (1) 14″ drawer slide
- (2) pair pivot hinges
- Edge Banding
- 2 ½″ pocket hole screws
- 1 ¼″ pocket hole screws
- 2″ wood screws
- Wood Glue
- Shelf pins
Tools:
- Circular Saw (cutting guides helpful, but not required)
- Miter Saw
- Table Saw (helpful, but not required)
- Drill/Driver
- Pocket Hole Jig
- Shelf Pin Jig
- Router & Rabbeting Bit (optional)
- Staple gun
You can grab the printable plans for this DIY Armoire Wardrobe Cabinet here:
Step 1: Build Cabinet Corner Posts
Just like the other builds in this series, I made the “legs” by gluing up pairs of 2×4 boards. I trimmed down eight 2x4s to about 72″ long to glue together into four corner posts.
.
Once the glue had dried on the corner posts, I ran them through the table saw to clean up the edges and cut them into square posts. This is optional, but does look a lot cleaner.
.
I trimmed them to their final length on the miter saw and then added a taper. Just like with all the other pieces in this series, I tapered the ends of the legs 60 degrees on two sides.
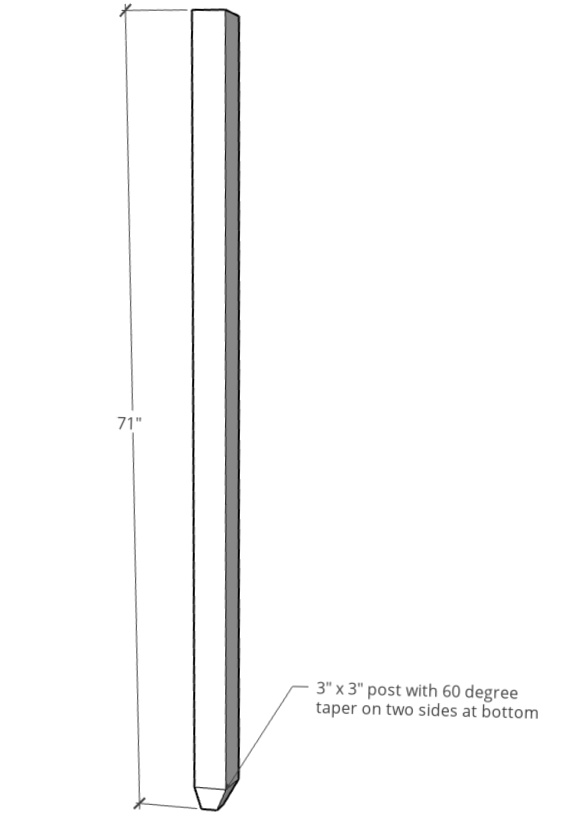
The taper is totally optional, but is a quick way to add a little visual interest to an otherwise pretty plain leg.
Step 2: Assemble Side Panels
I cut two 11″ x 64″ pieces from my plywood sheet (cut diagram can be found in the plans) using my circular saw and Kreg Rip Cut.
.
From the remaining 2×4 pieces, I cut my own 2x2s for this frame, but you could also purchase precut 2x2s instead. I cut four 2x2s to 11″ long for these sides.
.
Then, I drilled ¾″ pocket holes around the outside edges of the plywood panels and 1 ½″ pocket holes into the ends of the 2x2s.
RELATED: Check out this post for how to use a pocket hole jig.

I assembled two side panels like shown using 1 ¼″ pocket hole screws in the plywood and 2 ½″ pocket hole screws in the 2x2s. Everything should be flush to the INSIDE of the legs.
.
Take note the direction of the leg tapers and make sure they face the inside as you assemble.
Step 3: Assemble Wardrobe Cabinet Frame
I cut five more pieces of 2×2 to 23″ long and assembled the rest of the cabinet frame like shown using wood glue, 1 ½″ pocket holes and 2 ½″ pocket hole screws.
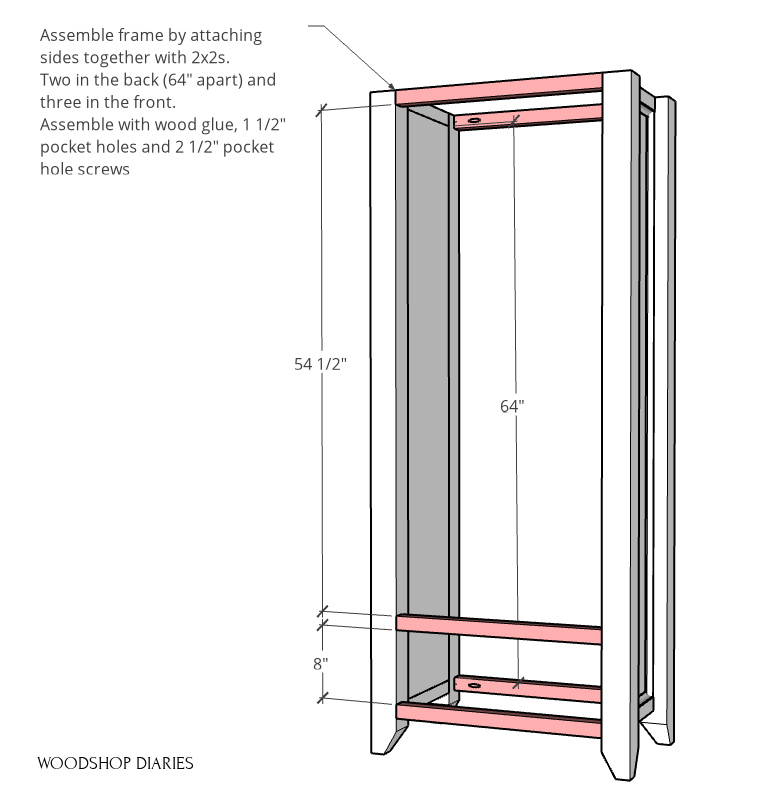
Step 4: Install Cabinet Bottom Panel
I cut another piece of ¾″ plywood to fit inside the cabinet and installed it using ¾″ pocket holes and 1 ¼″ pocket hole screws so that it’s flush across the top of the middle 2×2 in the frame.

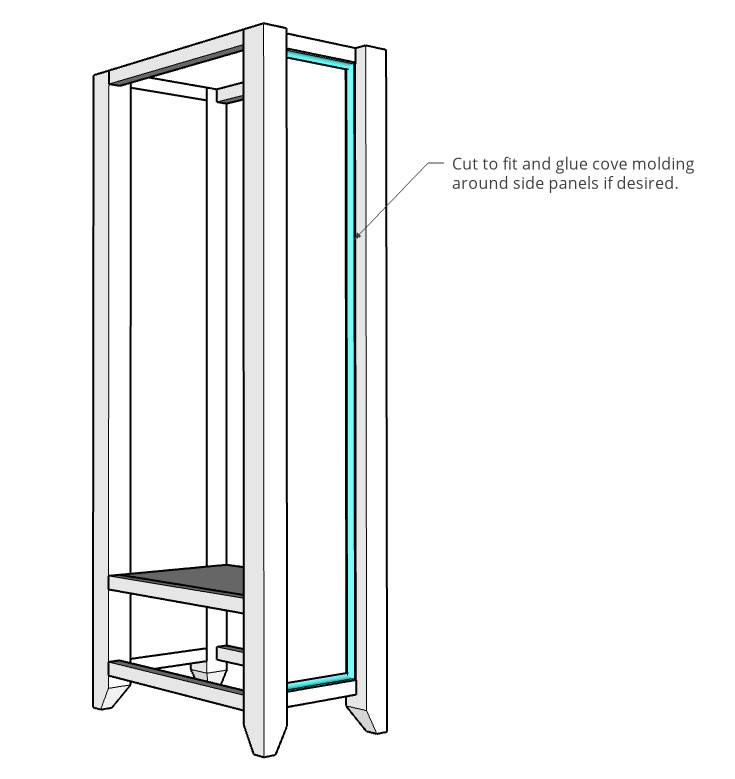
Step 5: Add Trim Molding
I cut to fit cove molding to line the side panels of the cabinet. You can nail these in place, but I used wood glue and some clamps until it dried to avoid the nail holes.
I also plugged the pocket holes on the inside of the cabinet. Now, I’m well aware pocket holes are a hot topic. Use them, don’t use them. Fill them, don’t fill them.
.
It doesn’t matter to me…but I used a little wood glue and some pre cut plugs to fill and sand these down so they are almost invisible in the inside of this cabinet.
RELATED: 4 Ways to Fill a Pocket Hole
Step 6: Attach Back Panel of Armoire
For the back panel, grabbed a router with a rabbeting bit set to the thickness of the ¼” plywood I was adding for the back panel.
.
I routed out rabbets along the back side for the plywood to fit down into and used a chisel to sharpen the corners. I cut the panel to fit inside the rabbets and stapled it in place.
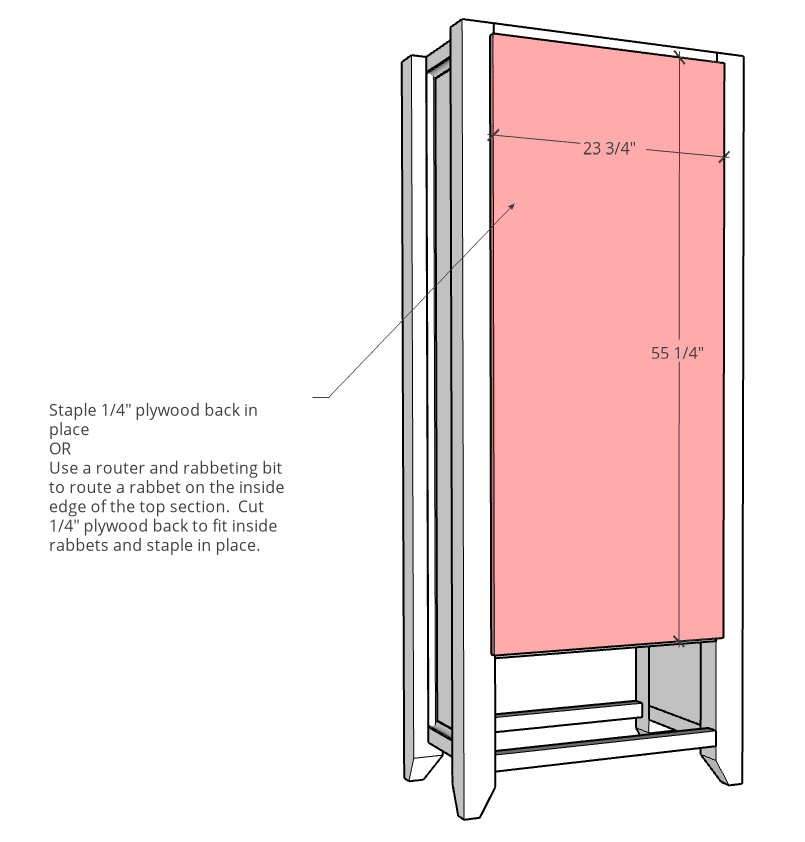
However, if you didn’t have a router or didn’t want to bother with routing this section, you could also just staple this ¼″ plywood panel directly onto the back side.
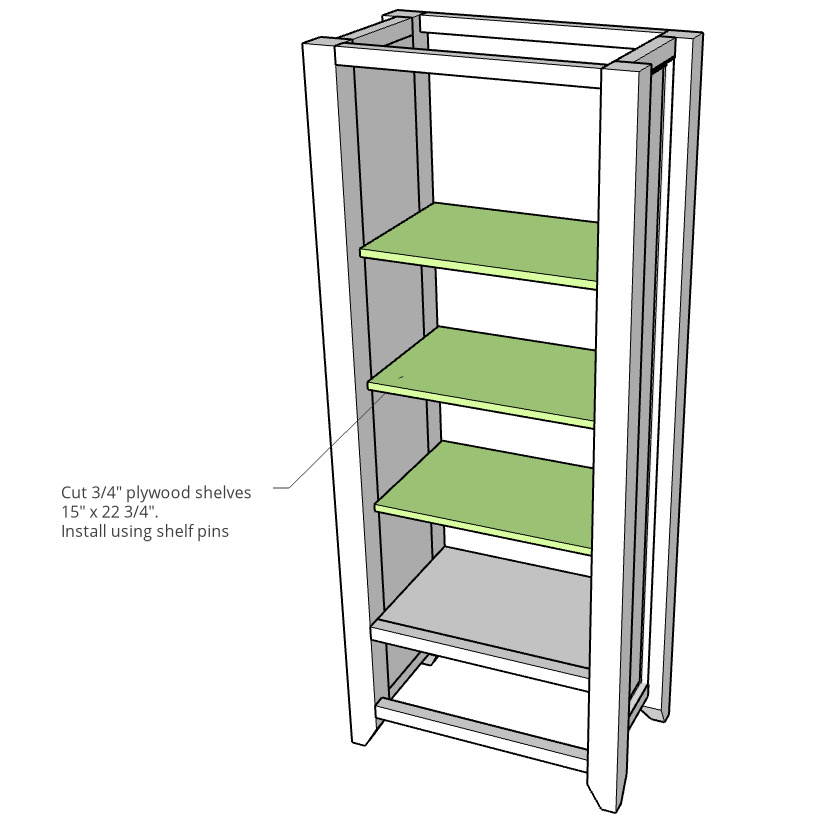
Step 7: Add Shelving
After the back was in place, I drilled shelf pin holes along the sides of the cabinet to install adjustable shelves.
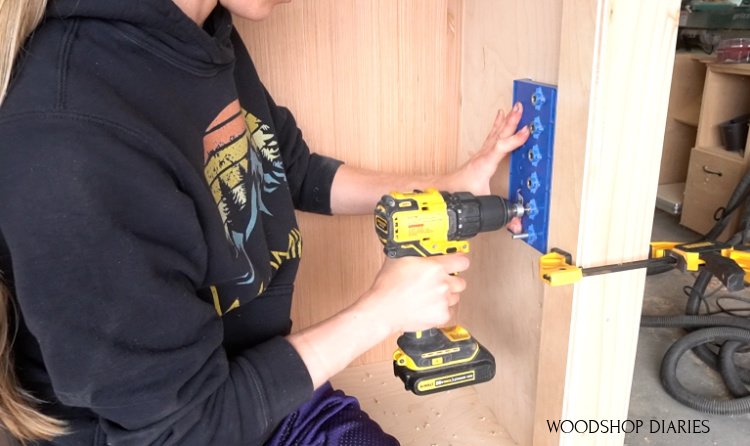
I used a scrap block clamped to the front edge to help me line up my shelf pin holes a few inches from the front edge to make sure they wouldn’t interfere with the doors once they’re installed.
RELATED: Learn more about the shelf pin jig in this post.
.
I cut three shelves to fit inside, but set them to the side until the build is complete. These will be easy to place inside with shelf pins later.
Step 8: Add Top of Armoire Cabinet
Then, I centered and secured the ¾” plywood top panel with 2” wood screws through the top frame.
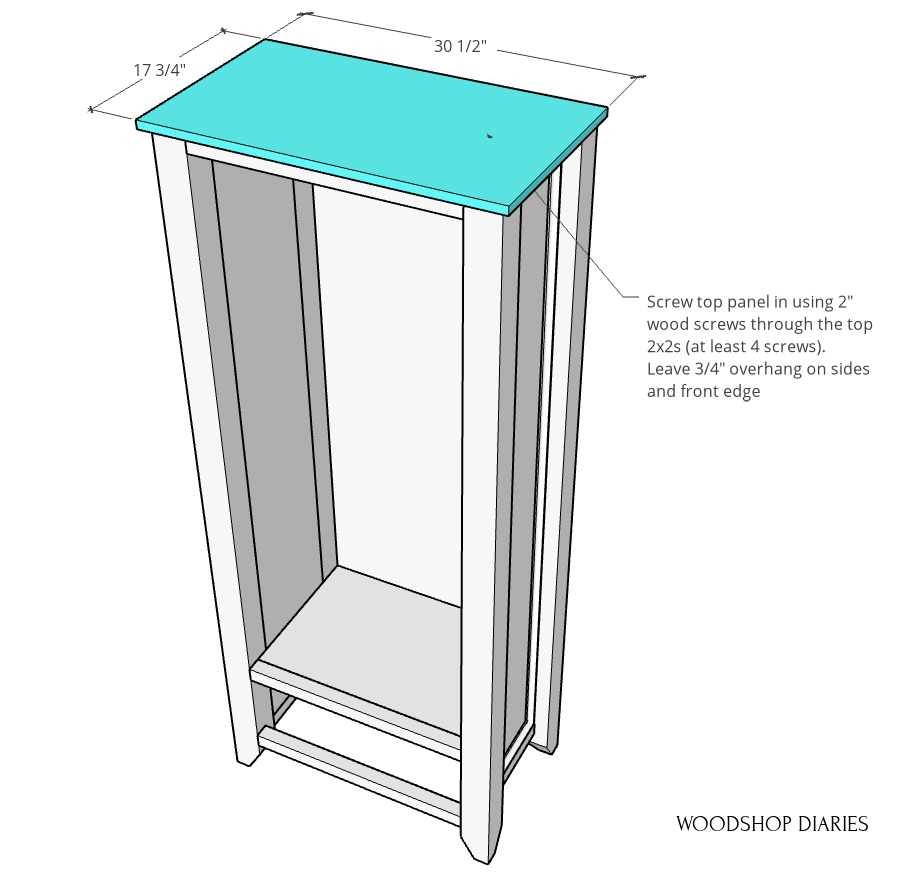
HELPFUL TIP: Don’t forget to predrill! It’ll help prevent the 2x2s from splitting.
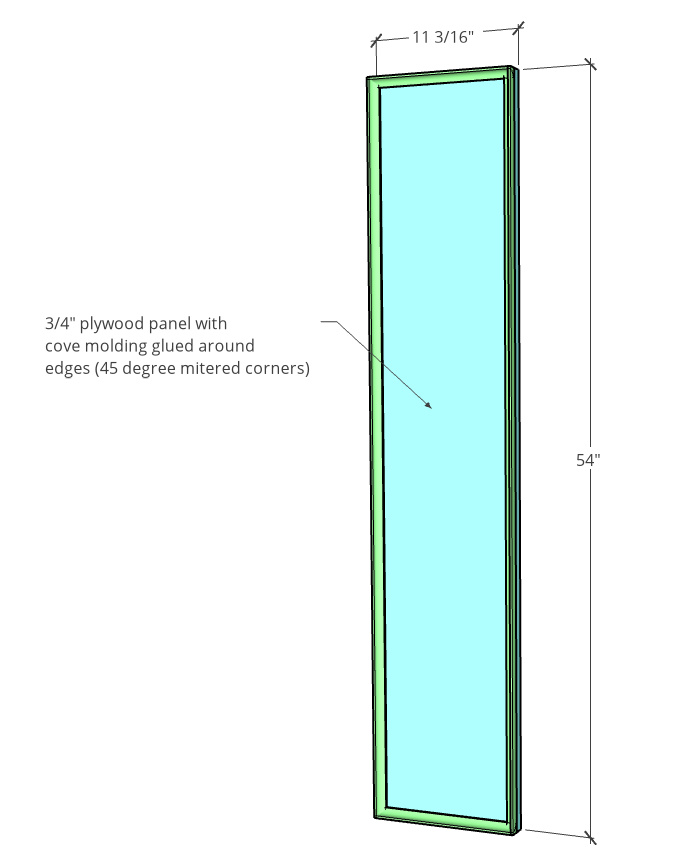
Step 9: Assemble and Install Wardrobe Doors
Normally, I would use concealed hinges for a build like this. However, if you remember from the matching computer desk build, I had to use pivot hinges with the door because with the cove molding on the front made it too thick for concealed hinges.
.
Using pivot hinges requires the doors to be cut a little smaller than usual, so take note that the “undersizing” here is intentional 🙂
.
I cut two doors from ¾″ plywood and applied iron on edge banding to cover the edges so they look a little cleaner.
RELATED: How to Use Iron On Edge Banding
.
Then, just like the matching builds, I glued cove molding around the front edges of the doors and drawer fronts. Painter’s tape works great as a mini clamp to hold the pieces while they dry.
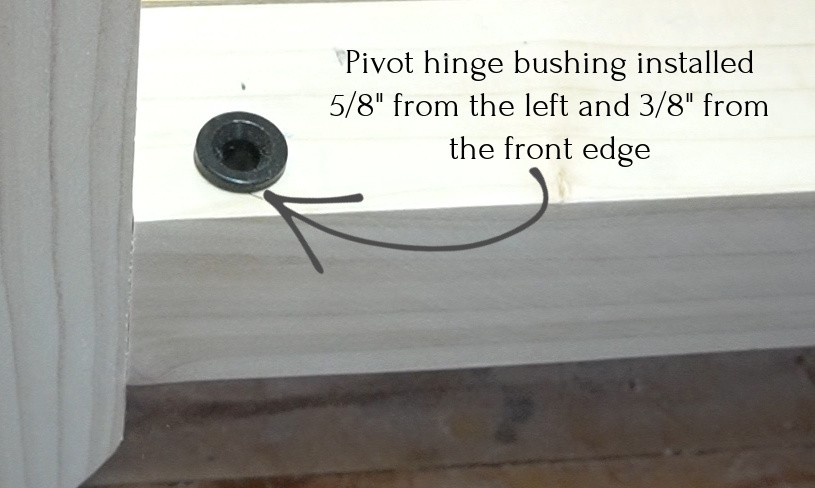
Once the trim dried on the doors, I began installing the hinges. In order to do this, I had to drill out a hole to insert the bushing.
.
I measured ⅝″ from the side and ⅜″ from the front and drilled a tiny hole to start and worked my way up until the bushing fit snuggly into the hole. You’ll have to do this at the top and bottom of each side (two bushings per door).
Then, I installed the hinge on one side of the door (top or bottom–whichever you prefer).
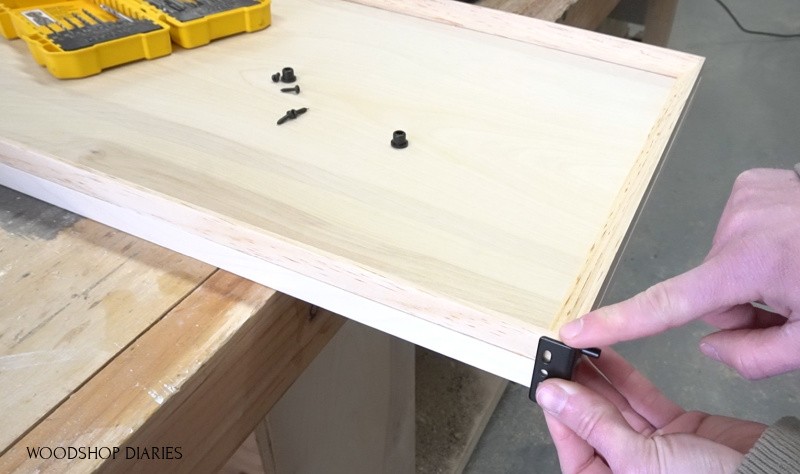
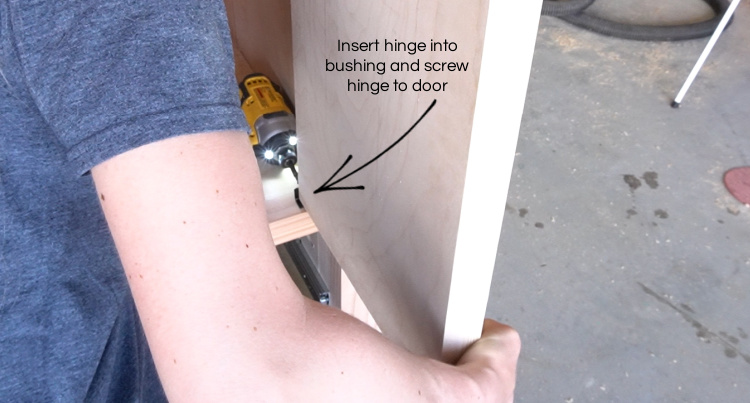
I slid the attached hinge into the bushing, inserted the other hinge (the one not attached to the door) in the bushing, and then fit the door into it.
.
Then, I screwed the door to the “unattached” hinge from the inside of the cabinet.
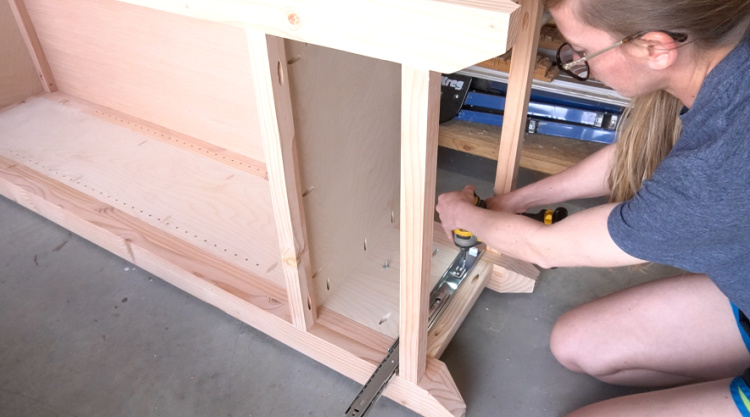
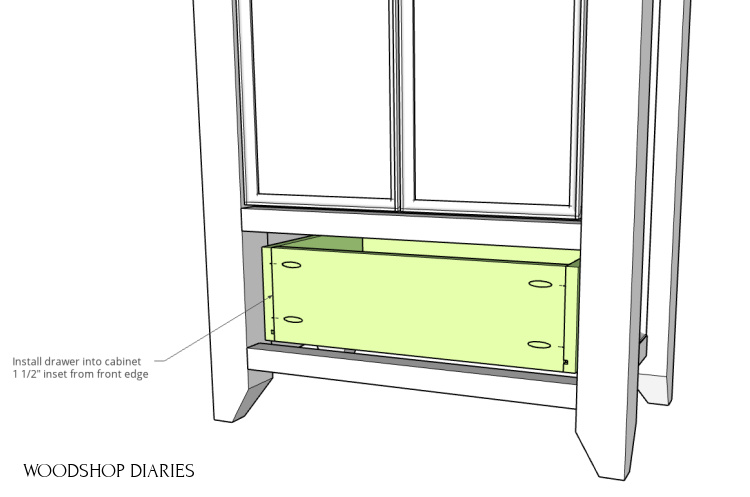
Step 10: Build and Install Drawer
I flipped the cabinet on its side and installed 14″ drawer slides at the bottom so that the front of the slide is 1 ½″ from the front edge. It might be helpful to install this slide before installing the doors, but either way is fine.
From the remaining ¾″ plywood, I cut four pieces to build the drawer and applied edge banding to the tops of the pieces.
.
Then, I cut ¼″ dadoes ¼″ deep and ½″ from the bottom edge in the drawer box sides to install the ¼″ plywood bottom. I assembled the box using ¾″ pocket holes and 1 ¼″ pocket hole screws.
RELATED: Check out this post for how to build and install drawer boxes.
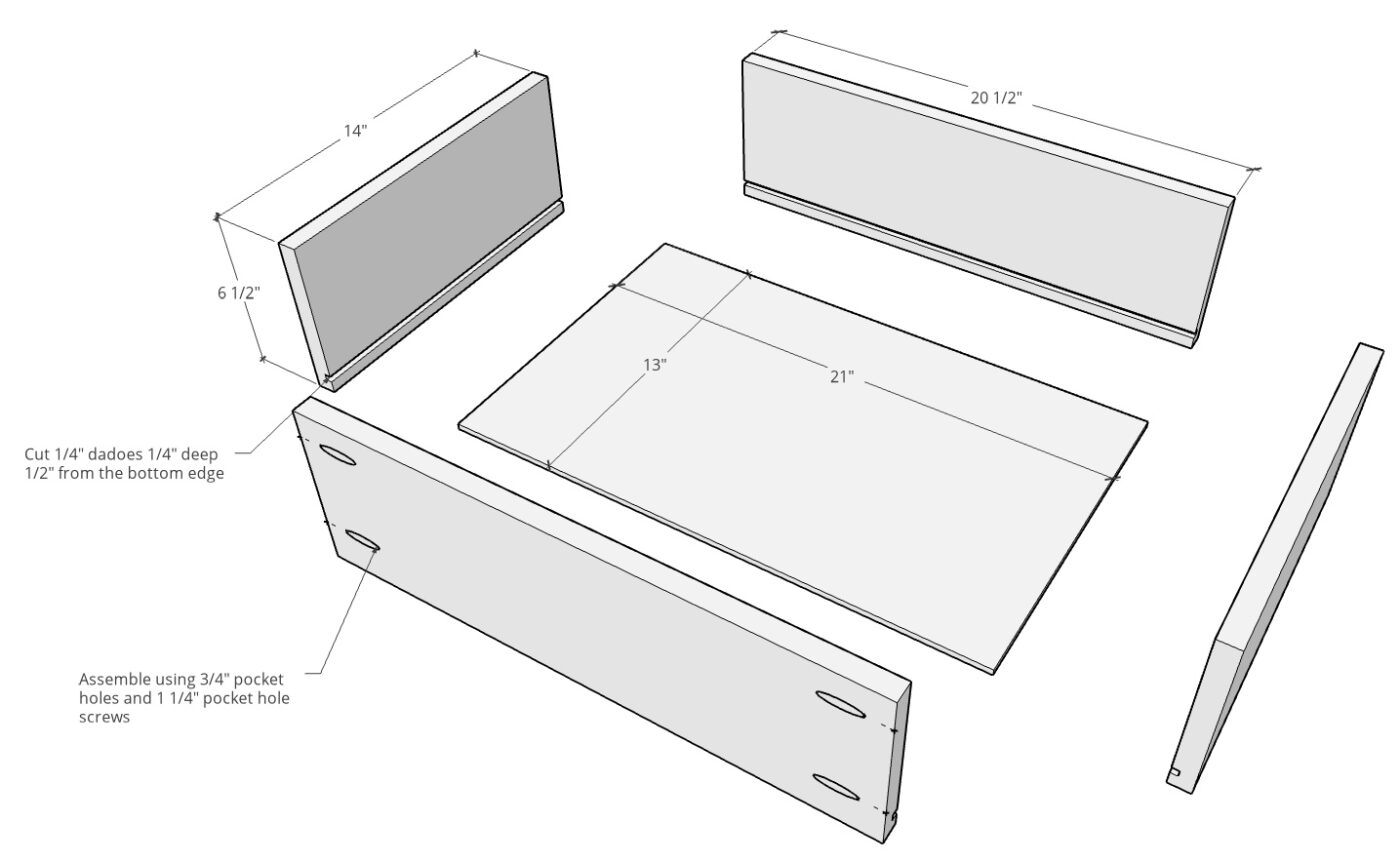
And finally, I installed the drawer box into the slides.
Step 11: Add Drawer Front
The final piece was adding the drawer front. I built the drawer front similar to the door–¾″ plywood with cove molding glued on the front.
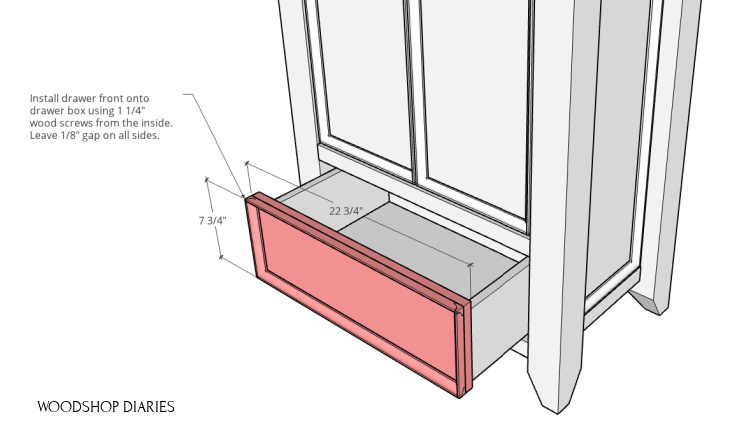
After the glue was dry on the molding, I installed the front onto the drawer box with 1 ¼″ wood screws from the inside.
Step 12: Finish Wardrobe Armoire
The last thing this project needed was some clear coat—I just applied some Minwax Helmsman like I did for all the previous matching pieces. However, you can stain/paint however you wish.
RELATED: How to Finish Raw Wood Furniture
.
And then I added the handles and installed the shelves using shelf pins.
I also decided to add little magnetic catches to hold the doors in place since these pivot hinges don’t really have a catch or a stop on them.
.
And that wrapped up this DIY armoire wardrobe/pantry cabinet project and this series on my Dad’s matching office furniture.
A lot of people asked to see it all together in his office and I’ll post a picture once we get this moved in and the office cleaned up.
.
It’s definitely not “magazine worthy” or anything, but I’ll share it anyways so be sure to subscribe and follow along if you aren’t already so that you don’t miss that post.
I really hope you’ve enjoyed this project and this entire series as much as I have. Don’t forget to grab the build plans if you want to make your own!
.
Save this project for later by pinning or sharing to your favorite social channel!
Until next time, happy building! 🙂