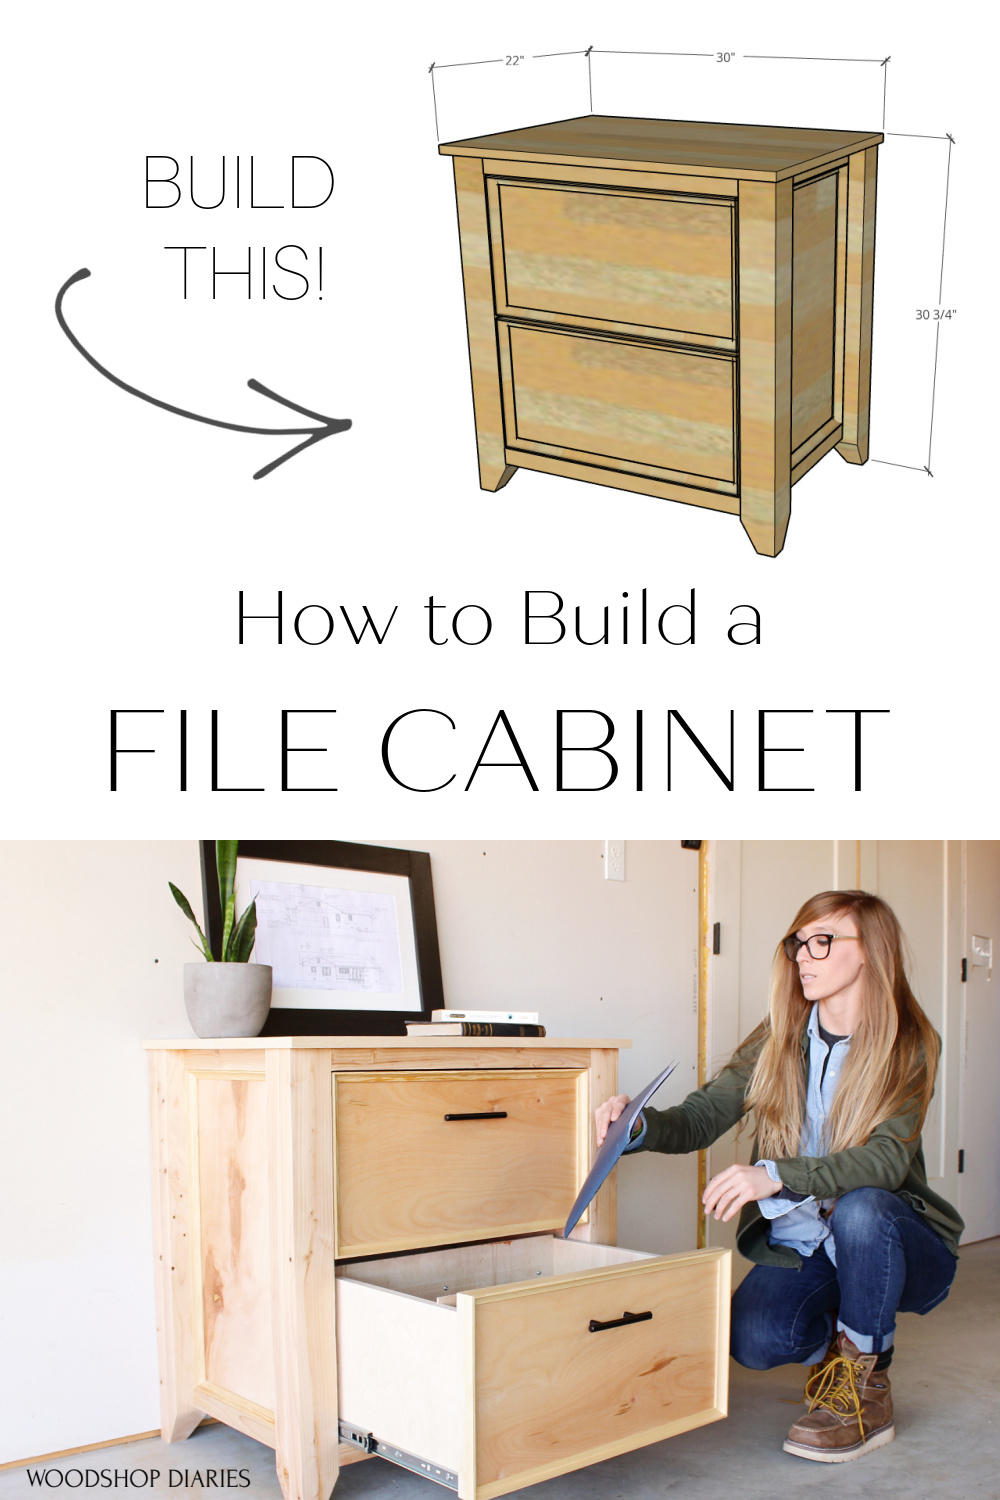
Learn how to build your own DIY File Cabinet in this post!
This project was sponsored by my friends at DAP. This post contains affiliate links. See policies.
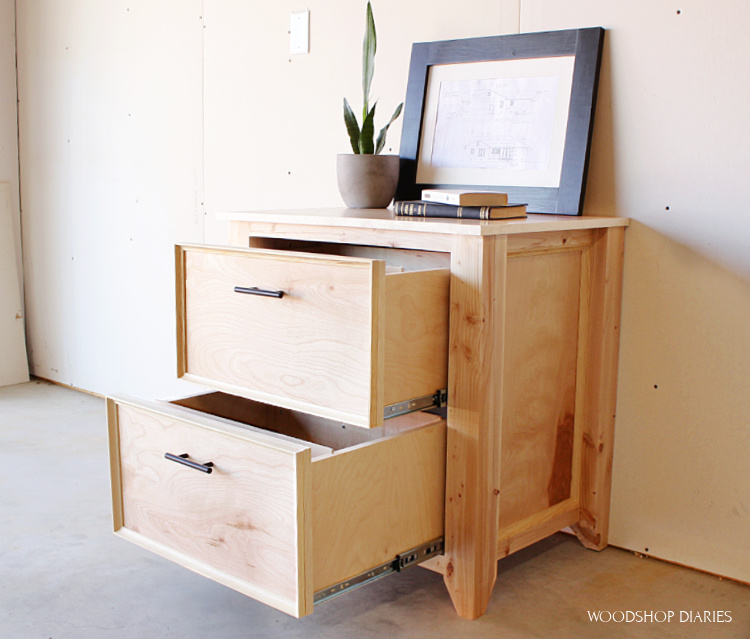
I’m bringing you another fun build to add to the matching series I’ve been building for my Dad’s office. This time, it’s a DIY filing cabinet.
.
If you’ve followed this whole series, you may be thinking—haven’t you already made your Dad filing cabinets for his office?
.
And yes—I did. I built these modular file cabinets for my dad to set his large stencil cutting machine on in his office back last fall.
.
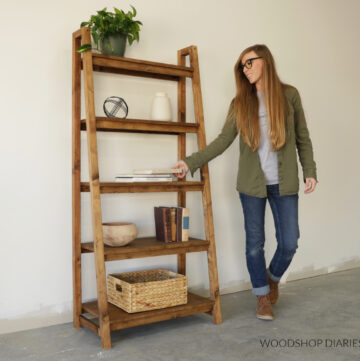
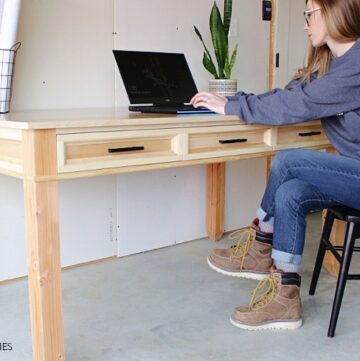
But apparently that wasn’t enough for all his papers, so I’m back at it building another one—this time in a design that matches the style I built his recent table, desk, armoire, and shelf.

This is a very basic cabinet that works well as a file cabinet, but could also make a nice printer cabinet, or even a side table or nightstand.
.
I’ve got the step by step plans to build it below, but if you prefer a video, I’ve got that, too 🙂
Tools and Materials for DIY File Cabinet:
Tools:
- Miter Saw
- Circular Saw
- Drill/Driver
- Pocket Hole Jig
- Table saw and/or router (optional)
Materials:
- (3) 2x4x8 boards
- (2) 2x2x8 boards (I make my own 2x2s using this tutorial)
- (1) sheet ¾″ plywood
- (½) sheet ¼″ plywood
- (4) 8′ sticks cove molding
- (2) pair 16″ ball bearing drawer slides (I buy the bulk package)
- 2 ½″ pocket hole screws
- 2″ wood screws
- 1 ¼″ pocket hole screws
- 1″ wood screws
- Weldwood Wood Glue
- RapidFuse Glue
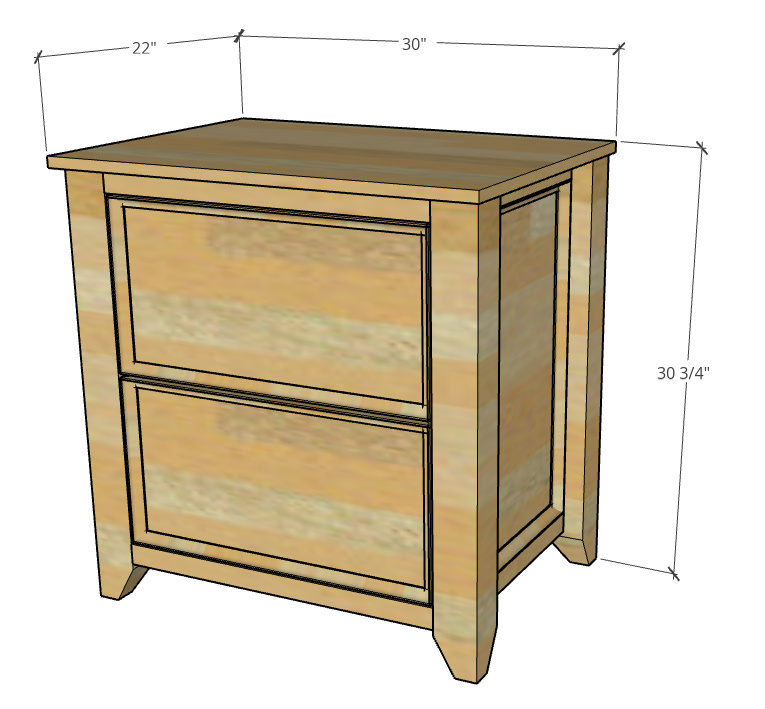
Overall Dimensions:
Step 1: Assemble Cabinet Legs
If you’ve seen the matching table, desk, or shelf projects already, this may sound like a broken record. I built these projects all with matching legs made from 2x4s, so the leg building process is the same as in the previous projects.
.
I trimmed down my 2x4s to about 32″ long, paired them up, then glued them together into 4 pair to make 4 total legs for this cabinet.
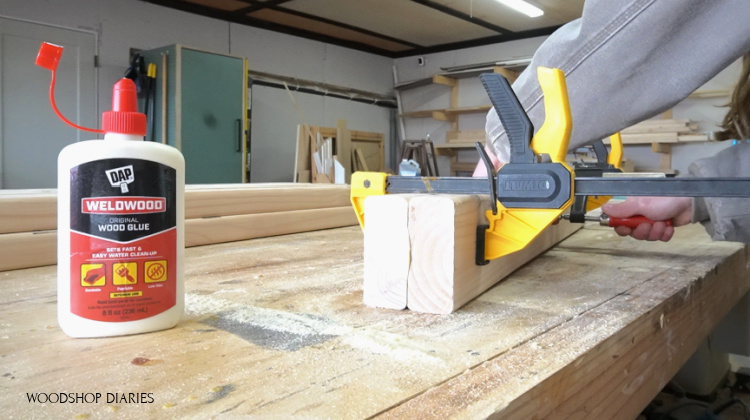
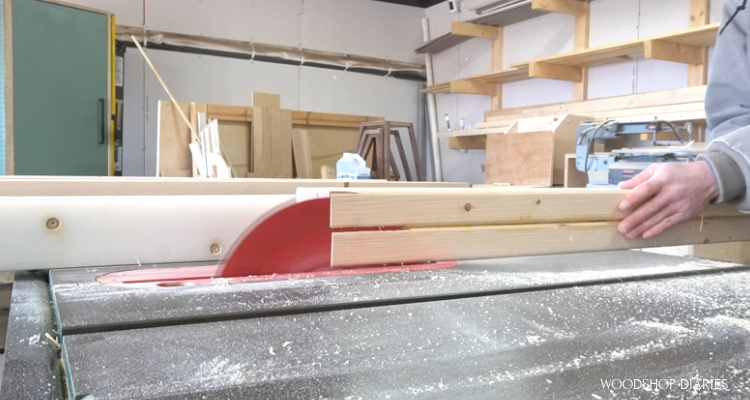
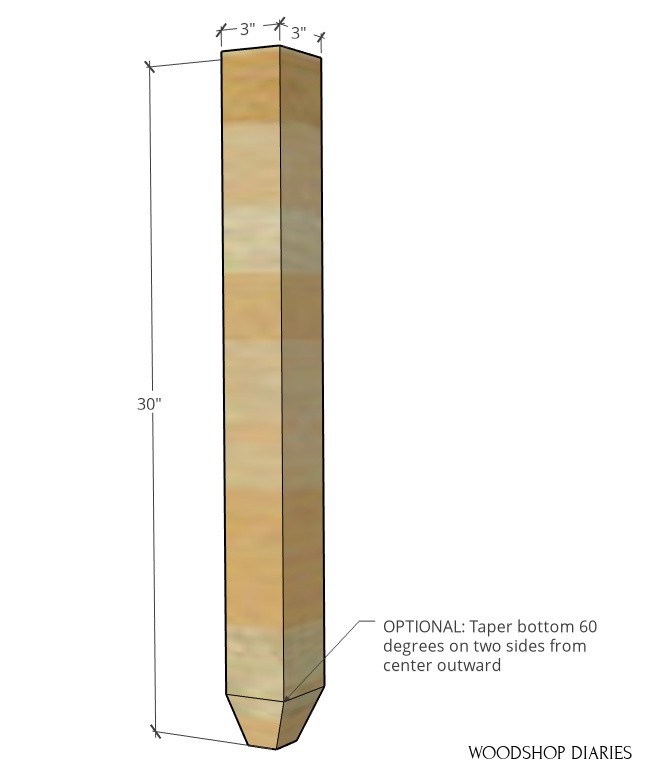
Once the glue was dry, I cleaned up the edges on the table saw and trimmed them down to 3” square posts. Basically, I trimmed about ¼″ off each glued edge.
RELATED: Check out how to clean up and square edges with this tutorial!
NOTE: You don’t HAVE to trim these down, but it does look a little cleaner. If you don’t trim them, you may need to adjust a few measurements in the project.
.
I cut them to 30″ long on the miter saw and then, just to add a little decorative detail, I adjusted my miter saw to 60 degrees and trimmed a taper on two sides of each leg at the bottom from the center out.
Step 2: Assemble Side Panels
I used my circular saw to cut down some ¾” plywood pieces for the side panels, then used my miter saw to cut down some 2×2 pieces for the frame.
RELATED: Check out how to cut plywood in this post.
ALSO RELATED: Check out how to make your own 2x2s in this post.
.
For assembly, I kept things simple and quick by using pocket holes and screws. Of course, if you prefer another joinery method, you’re welcome to use your own method of choice.
RELATED: Learn how to use a pocket hole jig in this post!
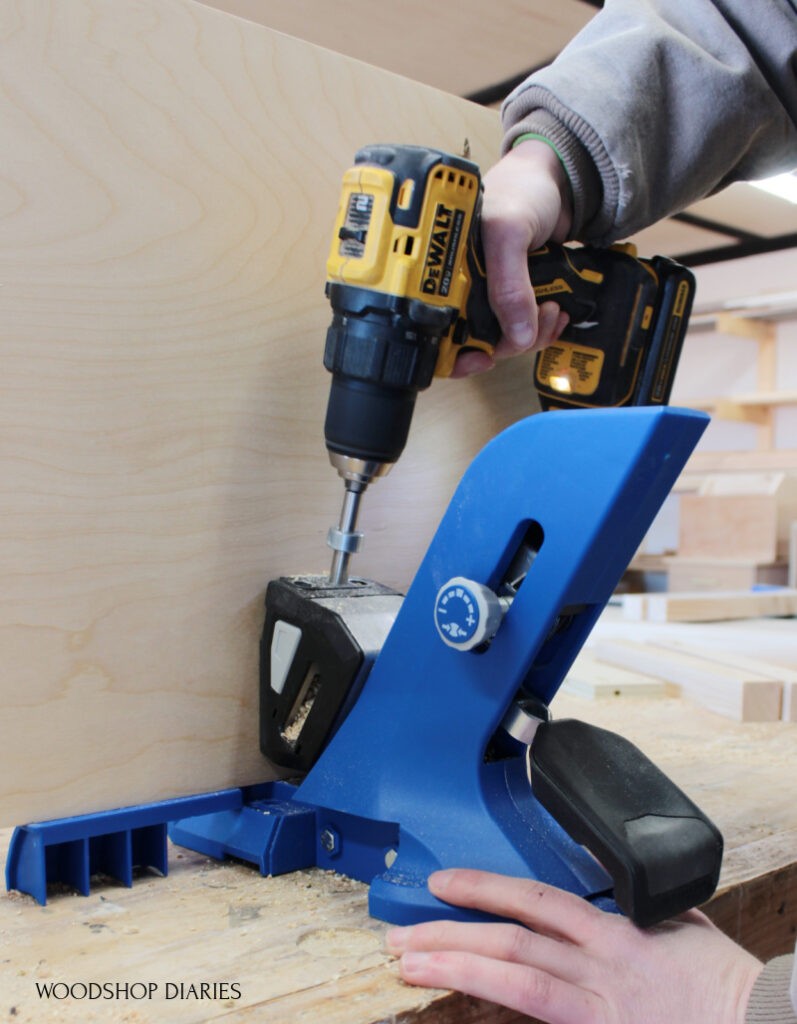
I drilled pocket holes along the edges of each plywood panel and into the ends of the 2×2 frame pieces.
.
I’ve mentioned this before, but when I use 2x2s with pocket holes, I usually just use some wood glue and 1 screw per joint. When I’ve used 2 screws, they tend to split easily.
.
Then I began assembling two side panels using pocket hole screws and wood glue.
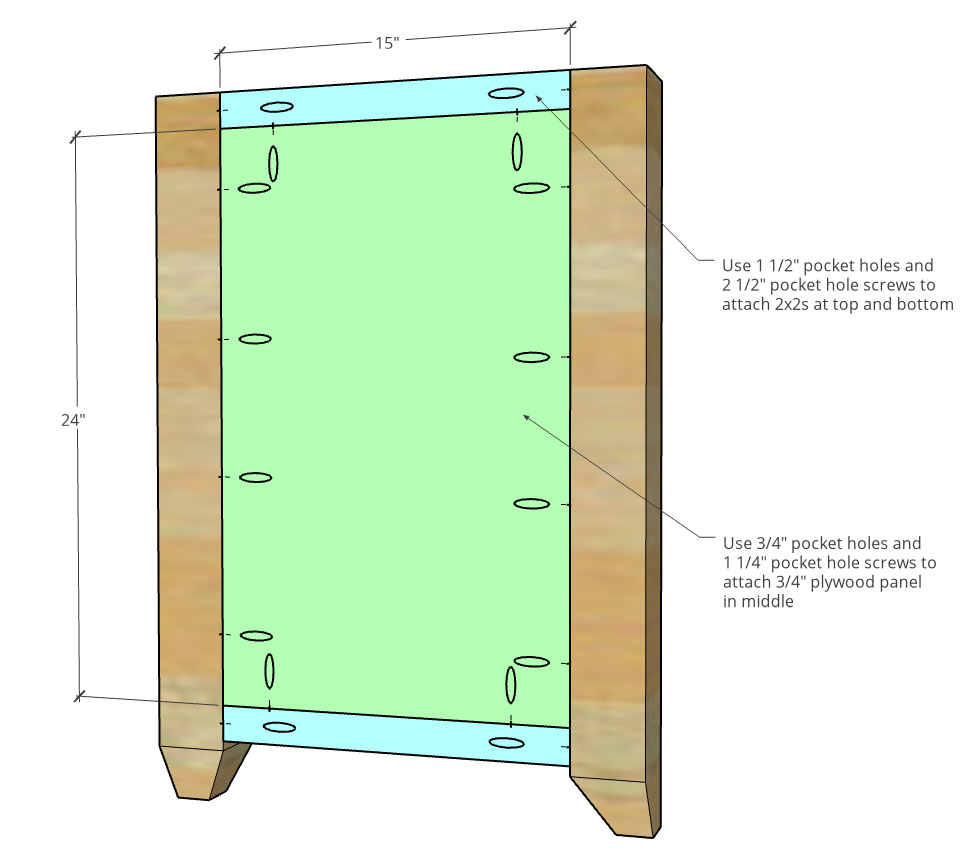
I made sure to assemble these so that all the pieces were flush to the inside of the legs.
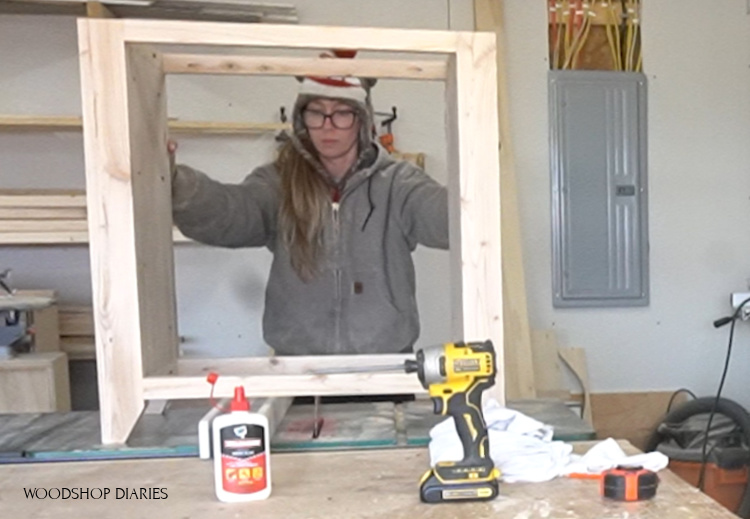
Step 3: Assemble File Cabinet Frame
I assembled the rest of the frame using 2x2s, pocket hole screws and wood glue.
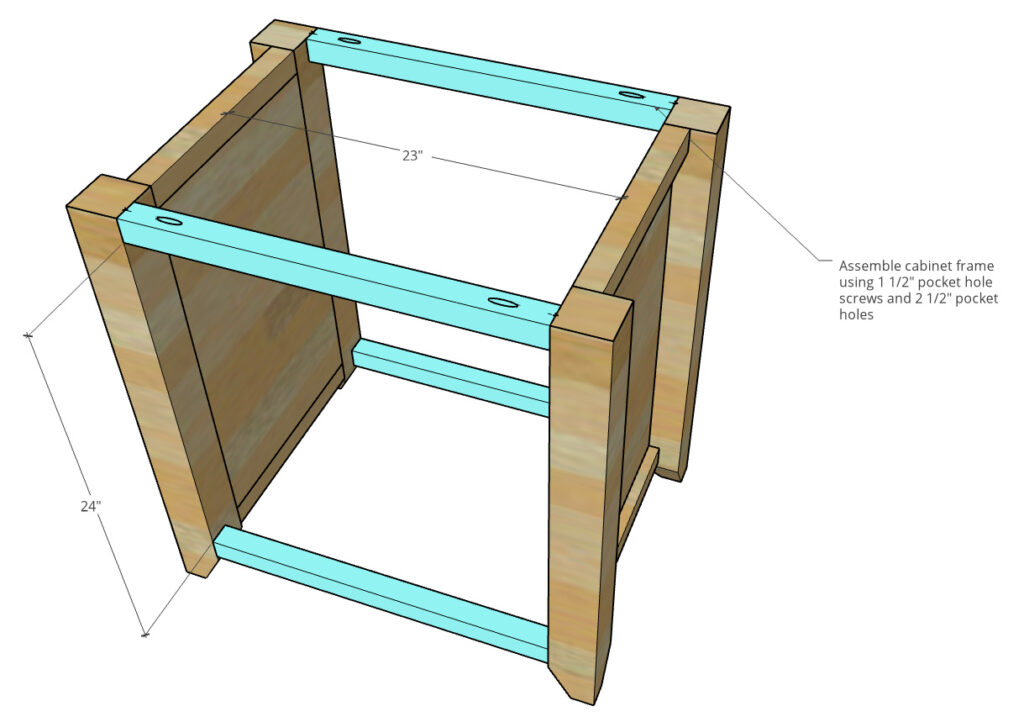
Note that I attached the bottom 2x2s so that they were in line with the ones on the sides–24″ gap between the top and bottom.
.
TIP: Many times you guys ask how I make sure things aren’t crooked with only using 1 pocket hole screw. A lot of times, I do that by assembling everything quick before the glue has time to set up, then setting it on my table saw (since it’s a known flat surface) and adjusting as needed until the feet are flat.
If your floor is level, you can also use your floor. But my shop floor is definitely not level, so it’s impossible to level anything off of it haha.
.
This time, it was flat without any adjustments, so I left it there while I took a lunch break so the glue can dry and lock it in place 🙂
Step 4: Attach Top of Cabinet
I cut the top from ¾” plywood and edge banded it. Then, I set on top, centered it and attached.
.
There should be about ½″ overhang on each side and 1″ overhang along the front edge.
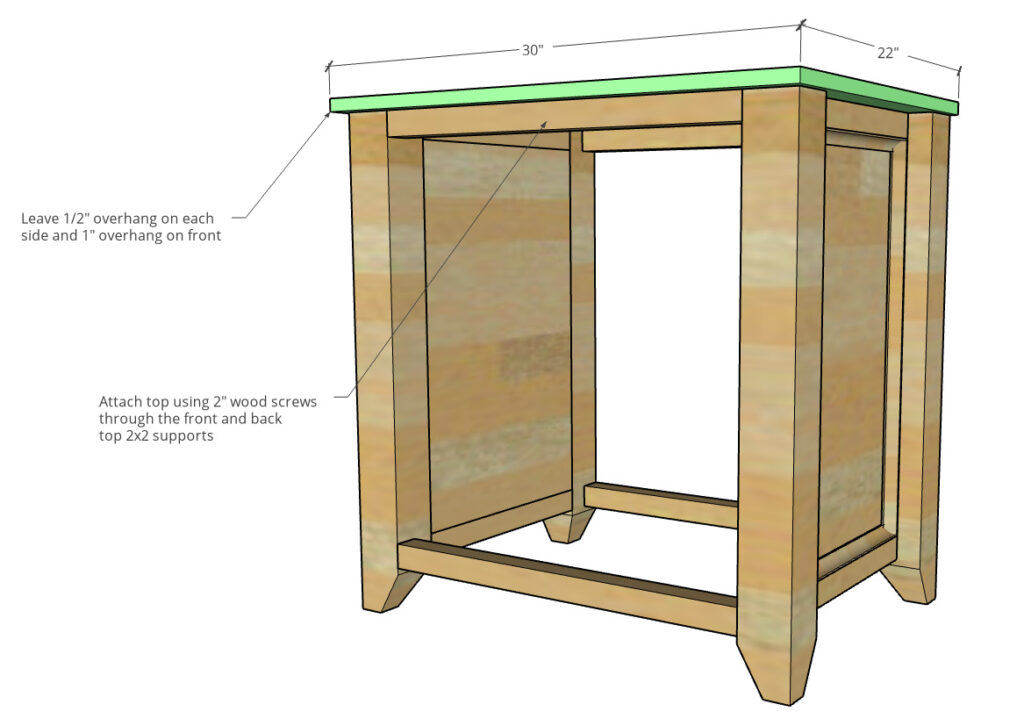
I used 2” wood screws to attach the top to the frame through the top 2x2s at the front and the back.
Step 5: Install File Cabinet Drawer Slides
I installed 16” ball bearing drawer slides into the cabinet. I installed these 1 ½” inset since the drawer fronts will be about that thick.
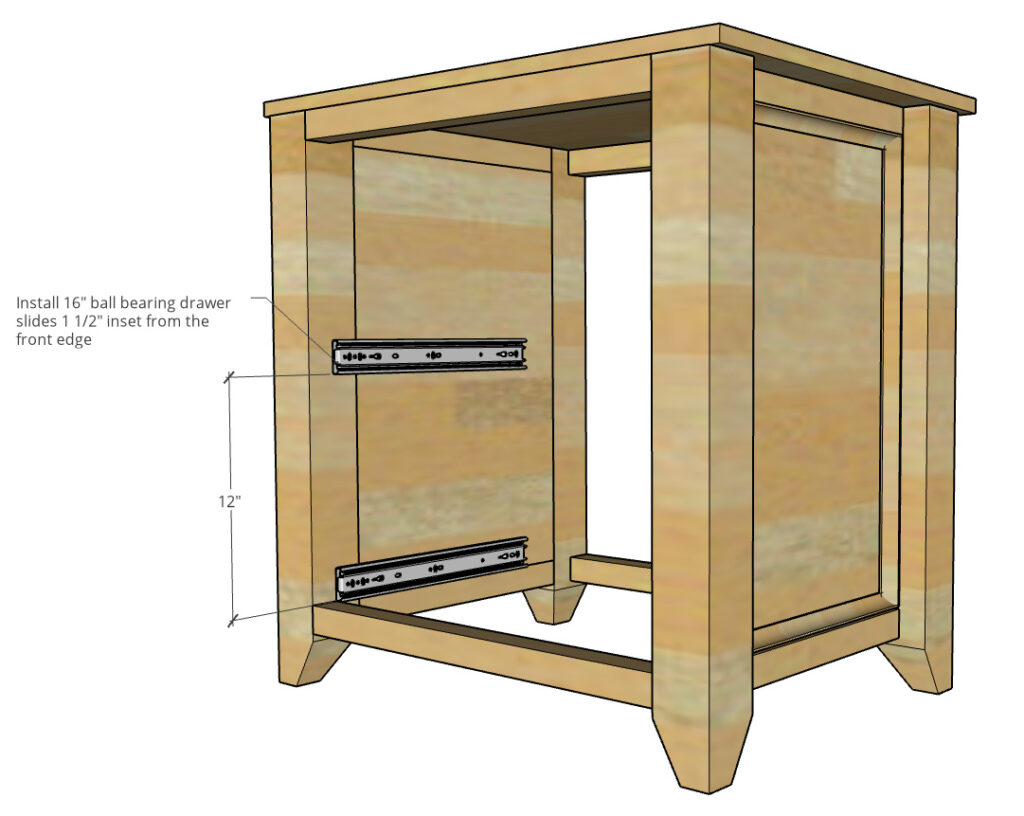
Now, you can definitely use longer slides if you want…I buy my drawer slides in bulk and usually stick with 16” because they are a pretty universal size I can use in almost any project.
.
So that’s what I keep on hand. But if you want to make larger drawers for this, go for it.
Step 6: Build File Cabinet Drawers
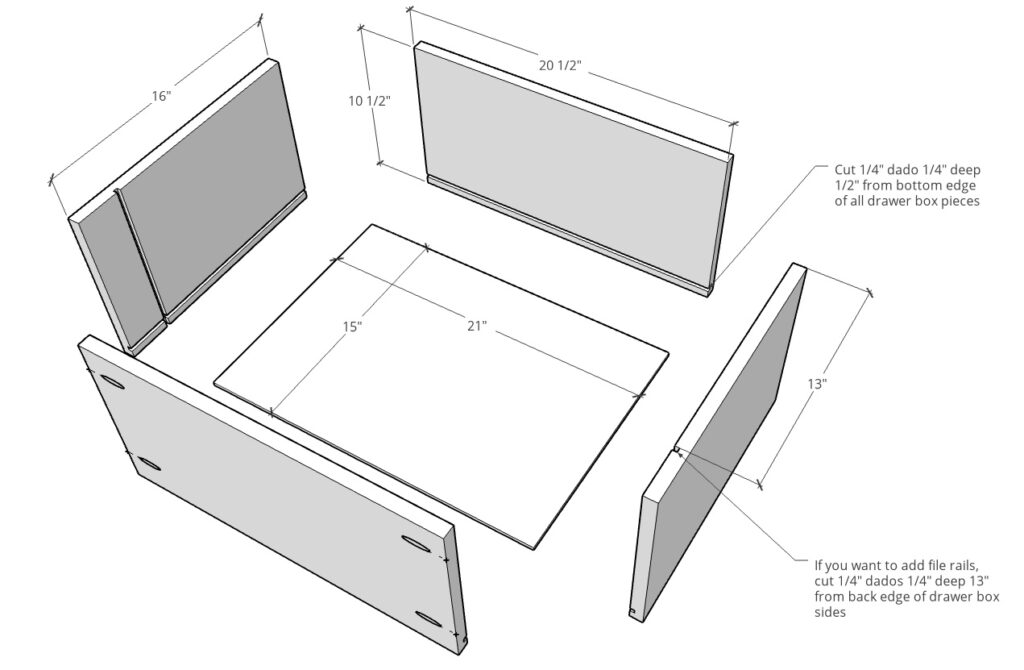
I cut my drawer box pieces from ¾″ plywood and once I had them cut to size (see diagram below), I used my table saw to cut ¼” dadoes along the bottom of each piece to install the drawer bottoms into.
RELATED: Check out this post on how I build drawer boxes!
.
HERE’S A TIP: You don’t have to have a dado blade in your table saw to cut dadoes–you can just make one cut, move your rip fence slightly over and make another cut until your cut is ¼″ wide.
.
If you don’t have a table saw, you can use a circular saw and a straight edge (like I did with this DIY pie carrier project) or a router to cut your dadoes. OR, skip the dadoes altogether and just staple the bottom in place later.
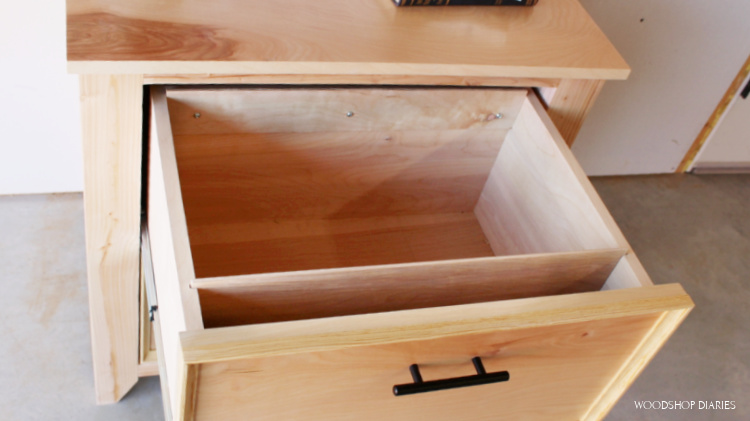
Adding the File Cabinet Option
Obviously, you don’t have to make this a DIY file cabinet–you can use these as normal, every day drawers. But, if you do want to add the file rails, here’s how I did it.
.
When I made my dad’s other filing cabinets, I used ¼” plywood as the rails for the folders to slide on. I wanted to do the same thing here, so I needed to cut dadoes on the drawer box sides to slide the plywood into.
I only need to cut these on the side pieces—not the front and back. And they each need to be cut about 13” from the edge.
.
So I didn’t get confused, I made a mark roughly where the cuts needed to be, adjusted the table saw, and cut my dadoes.
Again, if you don’t have a table saw, you can use a router OR a circular saw and straight edge to cut these dadoes.
.
Since these drawers were made using plywood, I edge banded the top edges just to give it a cleaner, more professional look. This is optional, but really takes the project up a notch.
RELATED: Learn how to apply edge banding in this post!
.
I drilled pocket holes into the drawer box pieces and assembled using pocket hole screws. I cut a ¼” plywood bottom to insert into the dadoes along the bottom of the boxes.

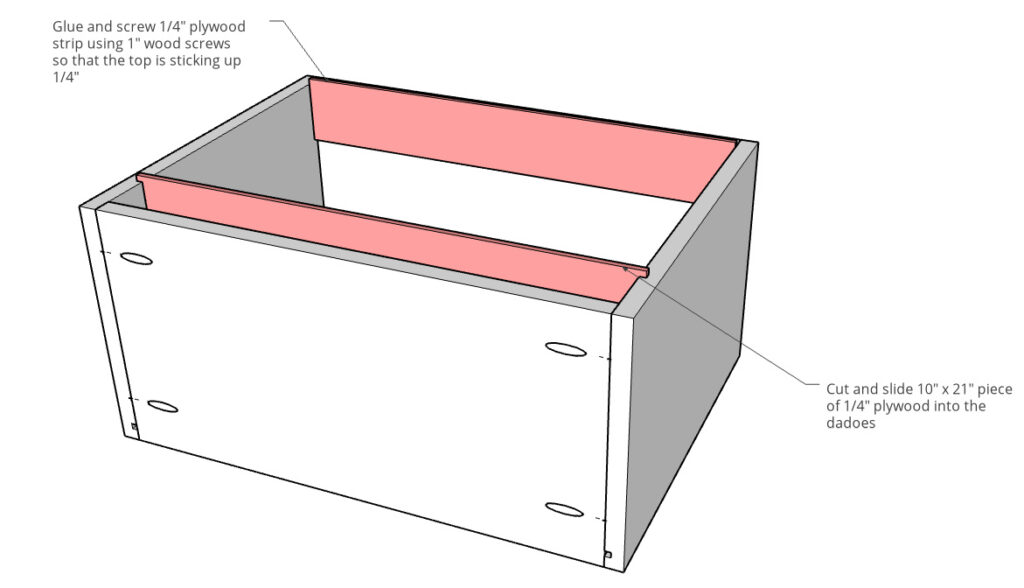
After the whole box was together, I cut some more ¼″ plywood to make the file folder rails.
.
I used a thin scrap piece to glue and screw into the front edge of the drawer box. I attached with 1″ wood screws so that there was about ¼” sticking up over the edge so the file folder tabs can hang over.
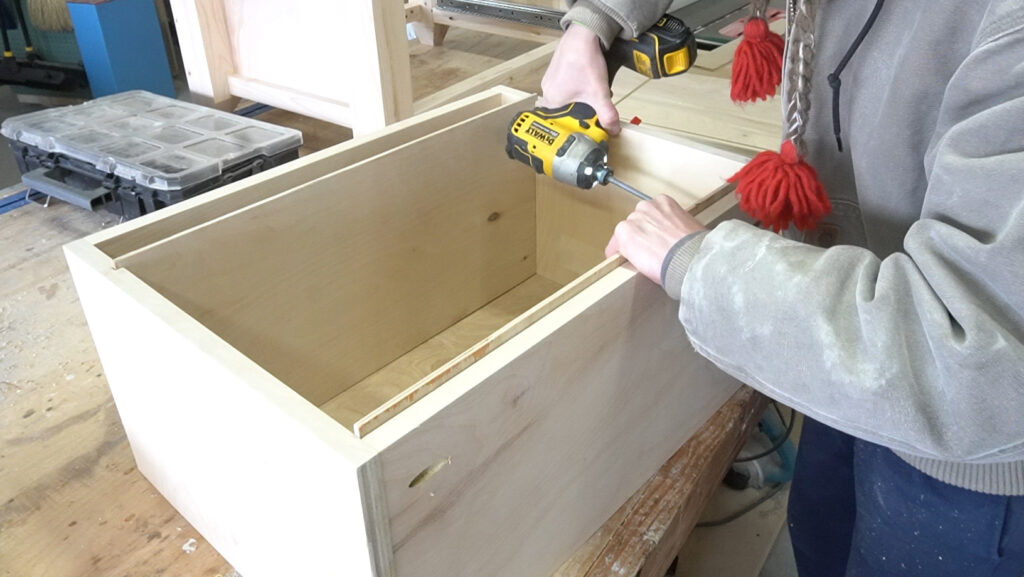
Then, I dropped a piece of ¼” plywood down the dadoes I cut earlier.
Step 7: Install Drawers into Cabinet
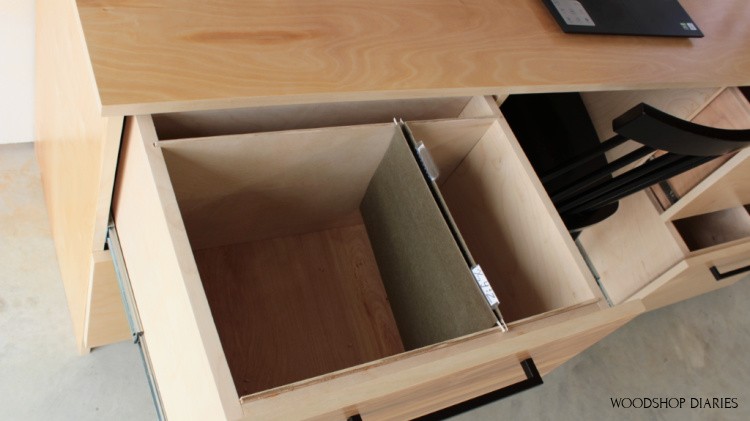
Originally I planned to install these drawers so the file folder part of the drawer was towards the front. But then, I got to thinking that the small space in the back might be hard to get to.
.
It’s a small space, but you can fit some extra files, papers, cords, whatever in there and I hated for it to go to waste.
.
So I faced those toward the front so they’re a little easier to access.
RELATED: I’ve got a detailed guide on how to build and install drawer boxes here.
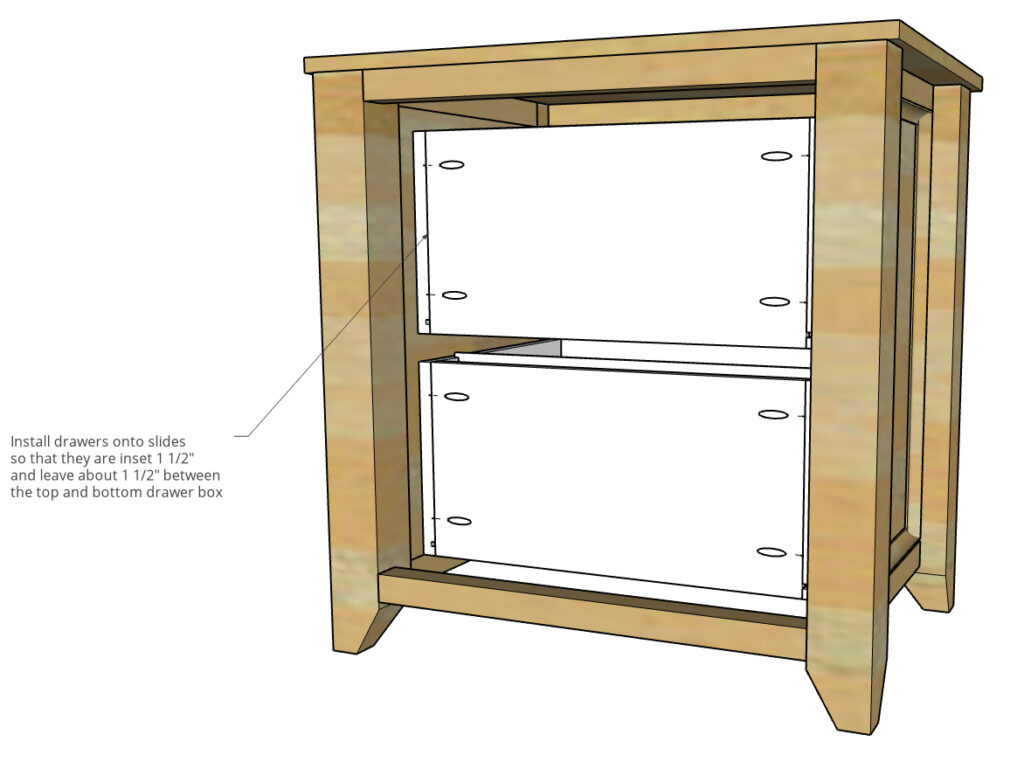
Honestly, though, I’m not really sure this was a better option because once I got this cabinet finished, I realized that the papers in the files may have to be pulled out at an angle to avoid hitting the drawer front and the frame pieces above it.
It’ll be fine, but in hindsight, I should have stuck with my original plan of keeping the file folder part of the drawer towards the front. Live and learn.
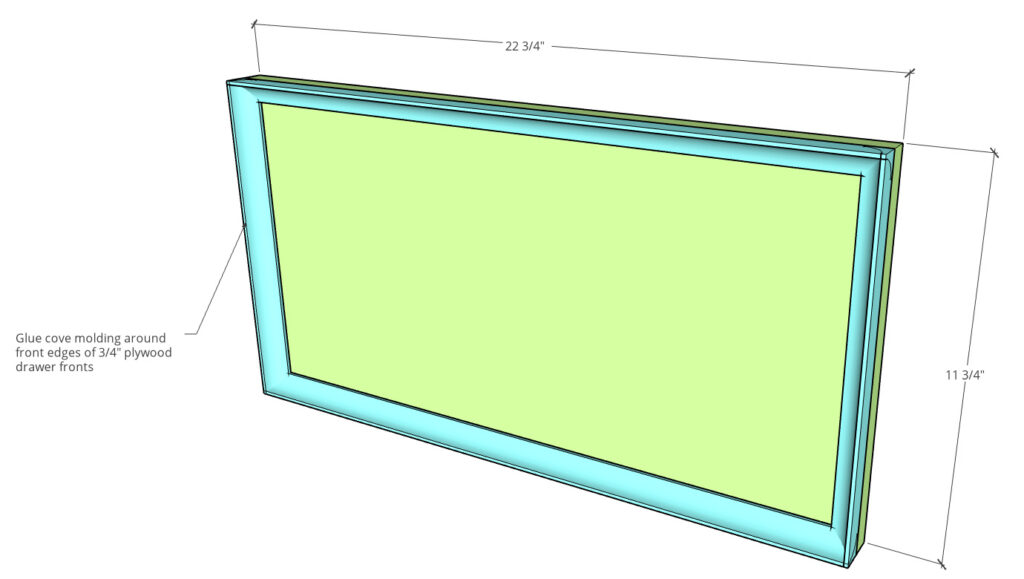
Step 8: Add Drawer Fronts and Trim
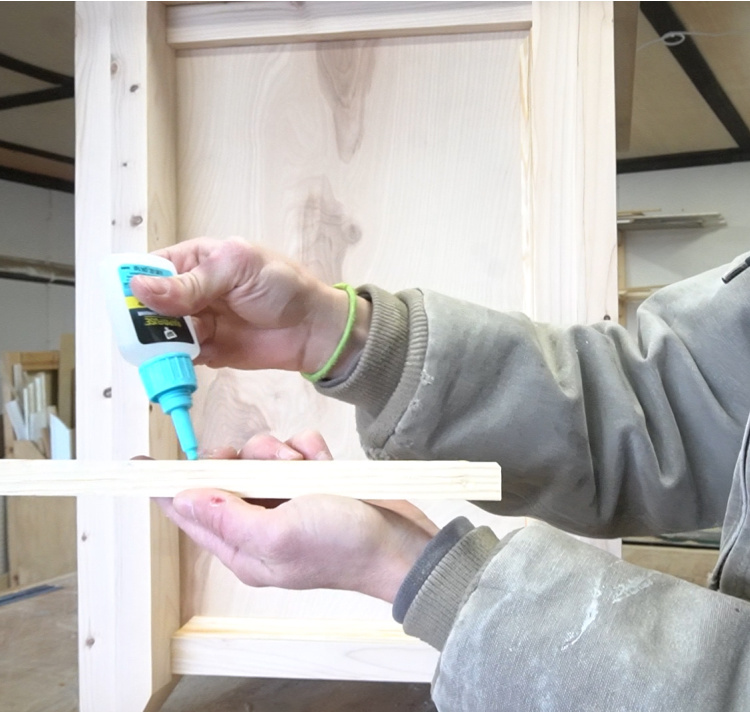
Similar to the matching pieces from this build series, I cut to fit cove molding to glue around the edges of the drawer fronts.
Now in my previous projects in this series when I added the trim here, I used wood glue and painters tape. It worked well, but I had to wait a few hours to attach the drawer fronts because of the glue.
.
I’ve seen several people do this before, but it never crossed my mind to use this method here until DAP sent me some RapidFuse. As soon as I opened the box, I immediately knew what I could use this for.
.
So this time, I used wood glue on the trim pieces, but added a few dots of RapidFuse as well.
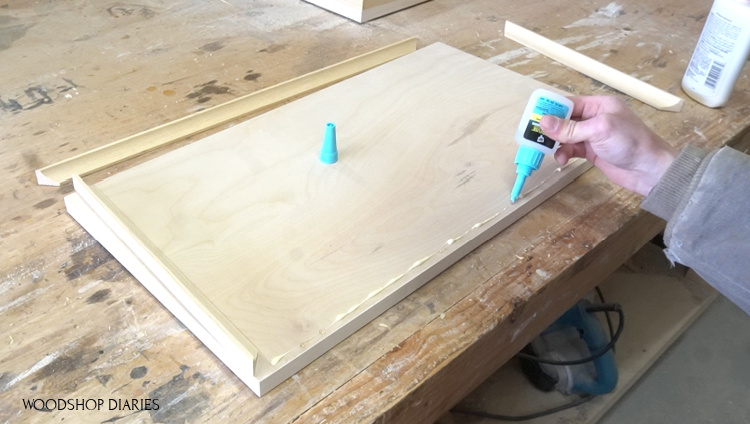
The RapidFuse will hold the pieces in place while the glue cures, so I still get the strength of the wood glue, but can almost immediately move on to the next part of the project and attach them.
.
I literally can’t believe I didn’t think of doing this before now.
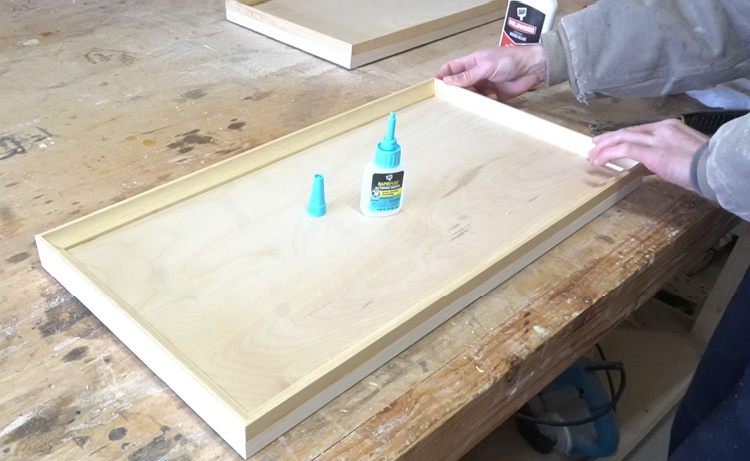
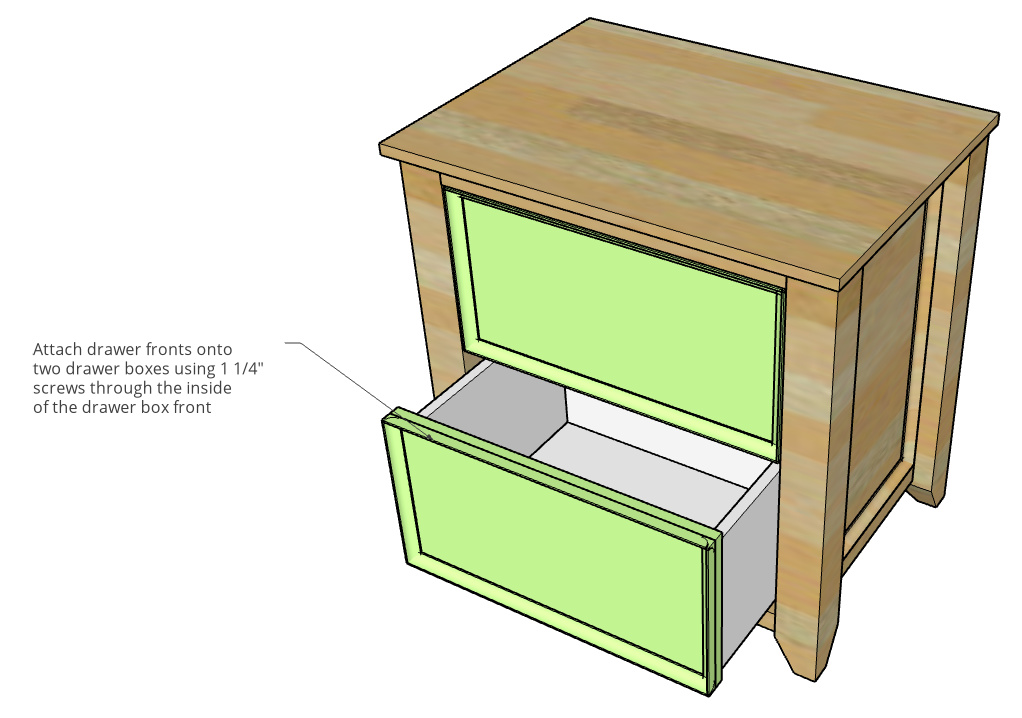
Once the trim was secure, I installed the drawer fronts onto the drawer boxes using wood screws from the inside.
.
As a note, you’ll have to remove the ¼” plywood piece in order to screw these in place. Good thing I made those removeable haha.
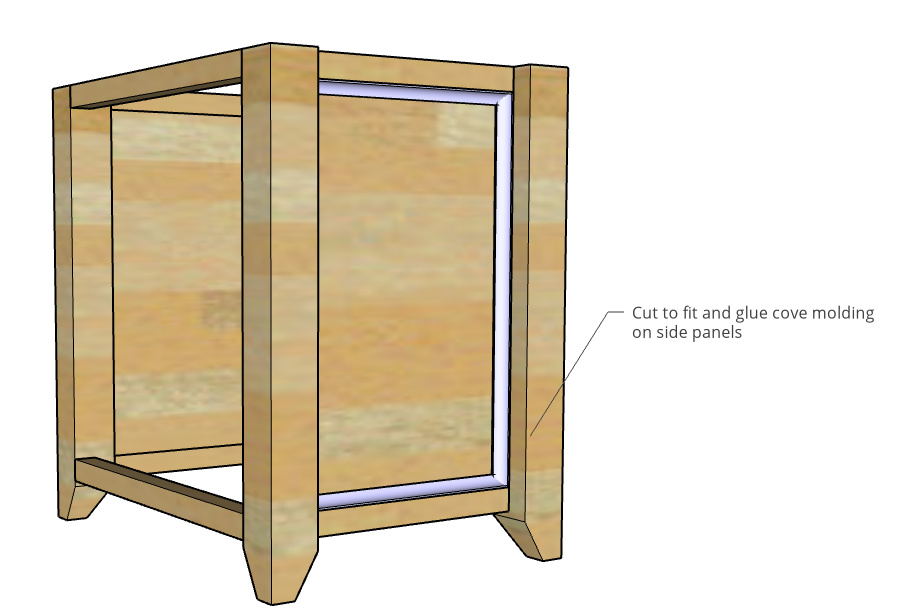
Step 9: Install Final Trim and Finish
And the final step was adding the cove molding around the sides.
.
I cut to fit cove molding to line the side panels and this time, instead of using wood glue and RapidFuse to attach, I just used RapidFuse.
Honestly, I was just curious and it was just sitting on the work bench so I thought I’d try it haha.
.
I used wood glue on the drawer fronts since those will be handled a lot, but since the sides will probably rarely be touched, I thought I could save some time having to sand off any messy glue squeeze out and just use RapidFuse here.
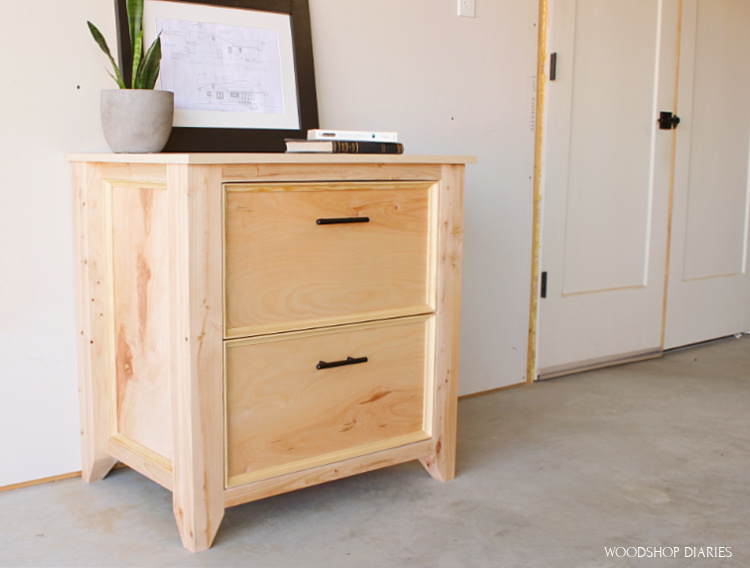
I kept with the theme and just gave this a few coats of Polycrylic, added some handles, and it was ready to hand over to my dad.
.
Now, as a side note—you can definitely add a back panel if you want—you can either cut and staple ¼” plywood on the back or rabbet the back and insert the panel so it’s flush. However, I didn’t add a back here.
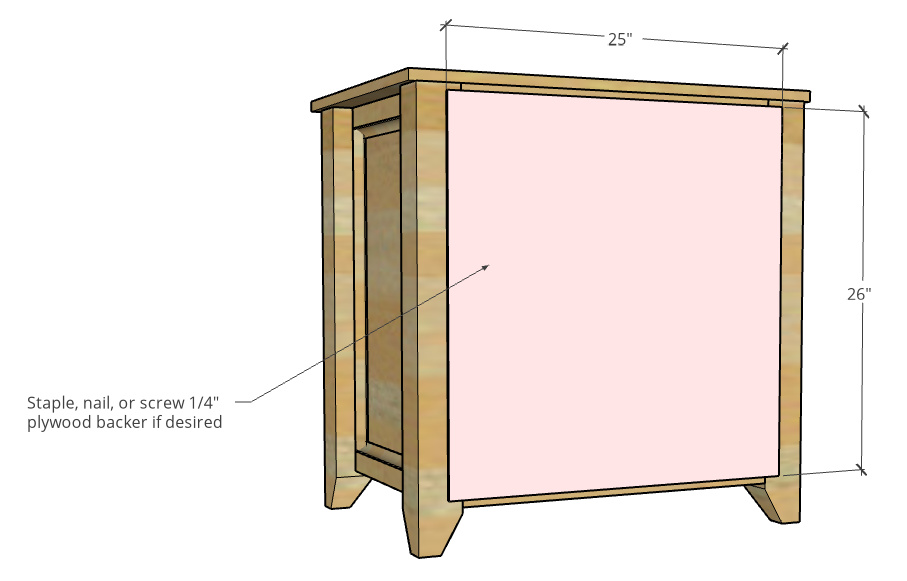
I know this is crazy, but I don’t really like adding back or bottom panels onto things with drawers—I like to leave things easily accessible in case something gets stuck.
.
I once had a bad experience with an expensive store bought dresser and it’s changed how I build my own haha.
.
So anyway, that completes part 4 of the matching office furniture set–a DIY file cabinet. That MAY be the end, but there may ALSO be one more piece to finish this whole series off. You’ll have to stay tuned to find out *wink wink*
So if you aren’t already subscribed to my newsletter, be sure to subscribe below so you don’t miss it or any of the other fun projects I’ve got coming out soon!
If you’ve enjoyed this project, don’t forget to pin it AND be sure to check out all the matching pieces here:
Until next time, friends, happy building! 😊