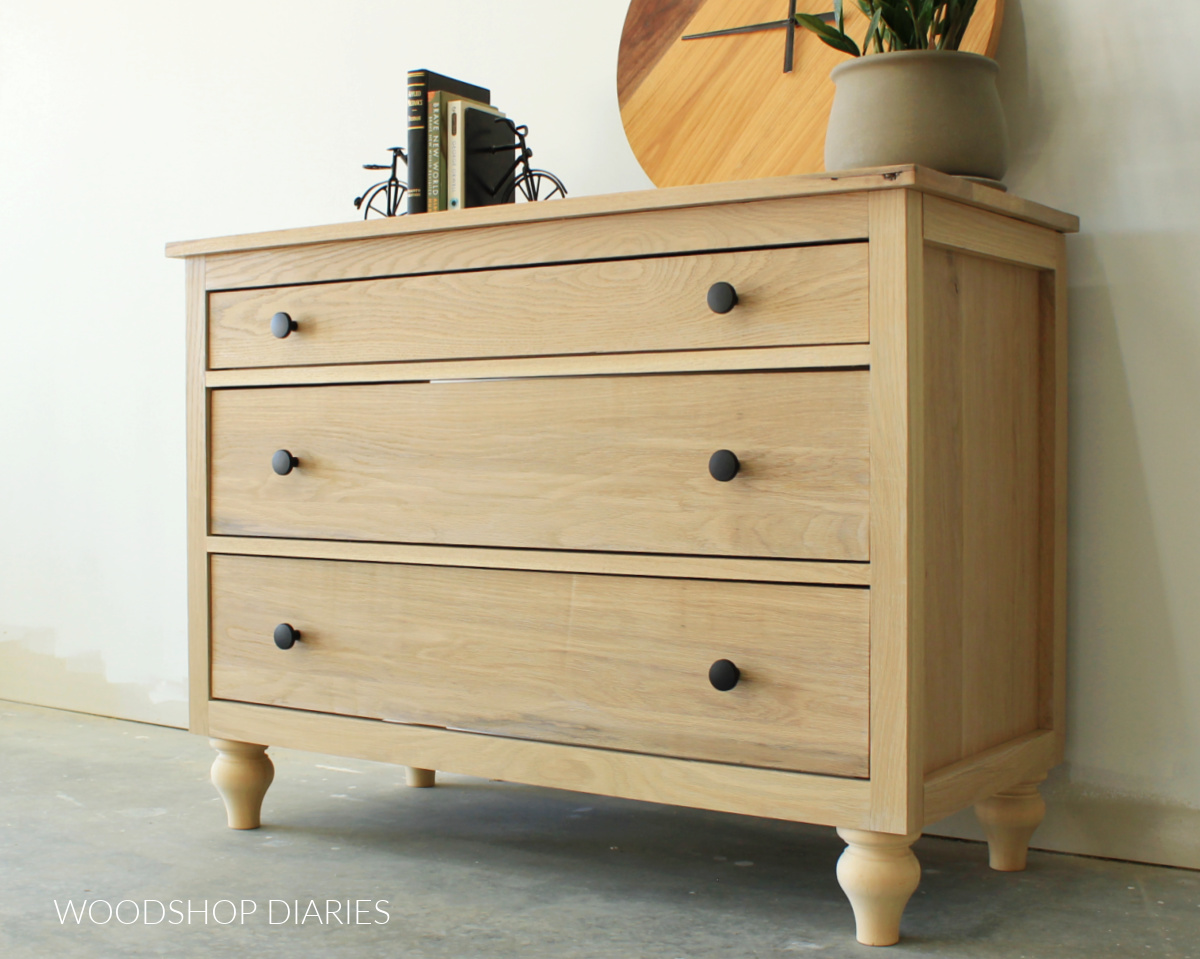
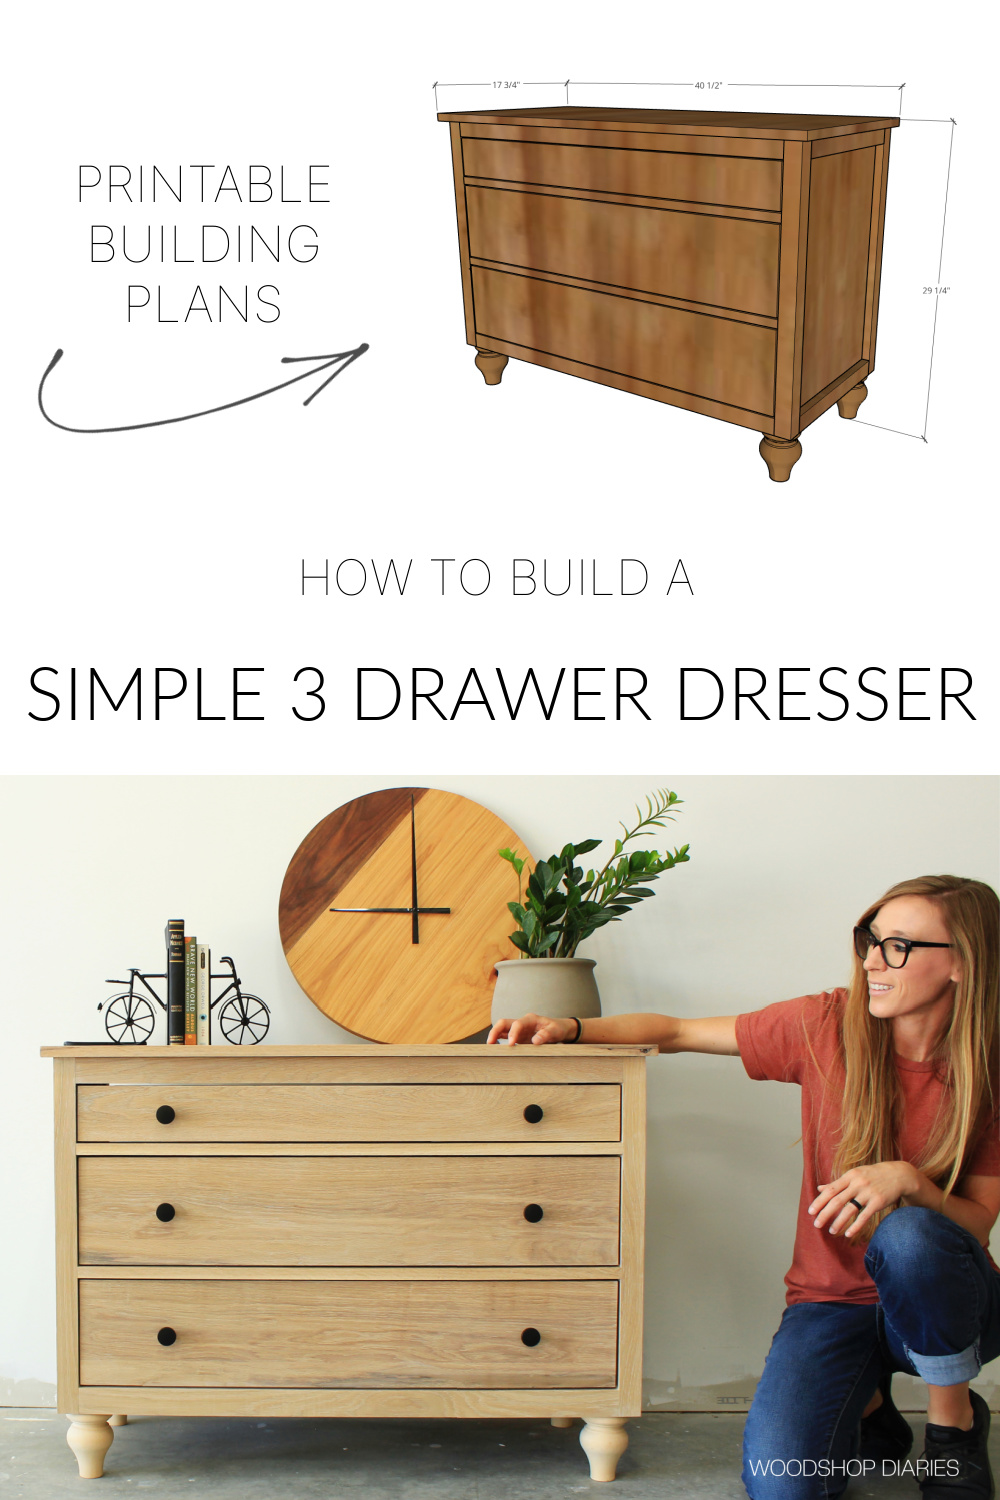
In this post, I’m sharing how to build this simple 3 drawer dresser.
*This post was sponsored by The Home Depot as part of the ProSpective Program.
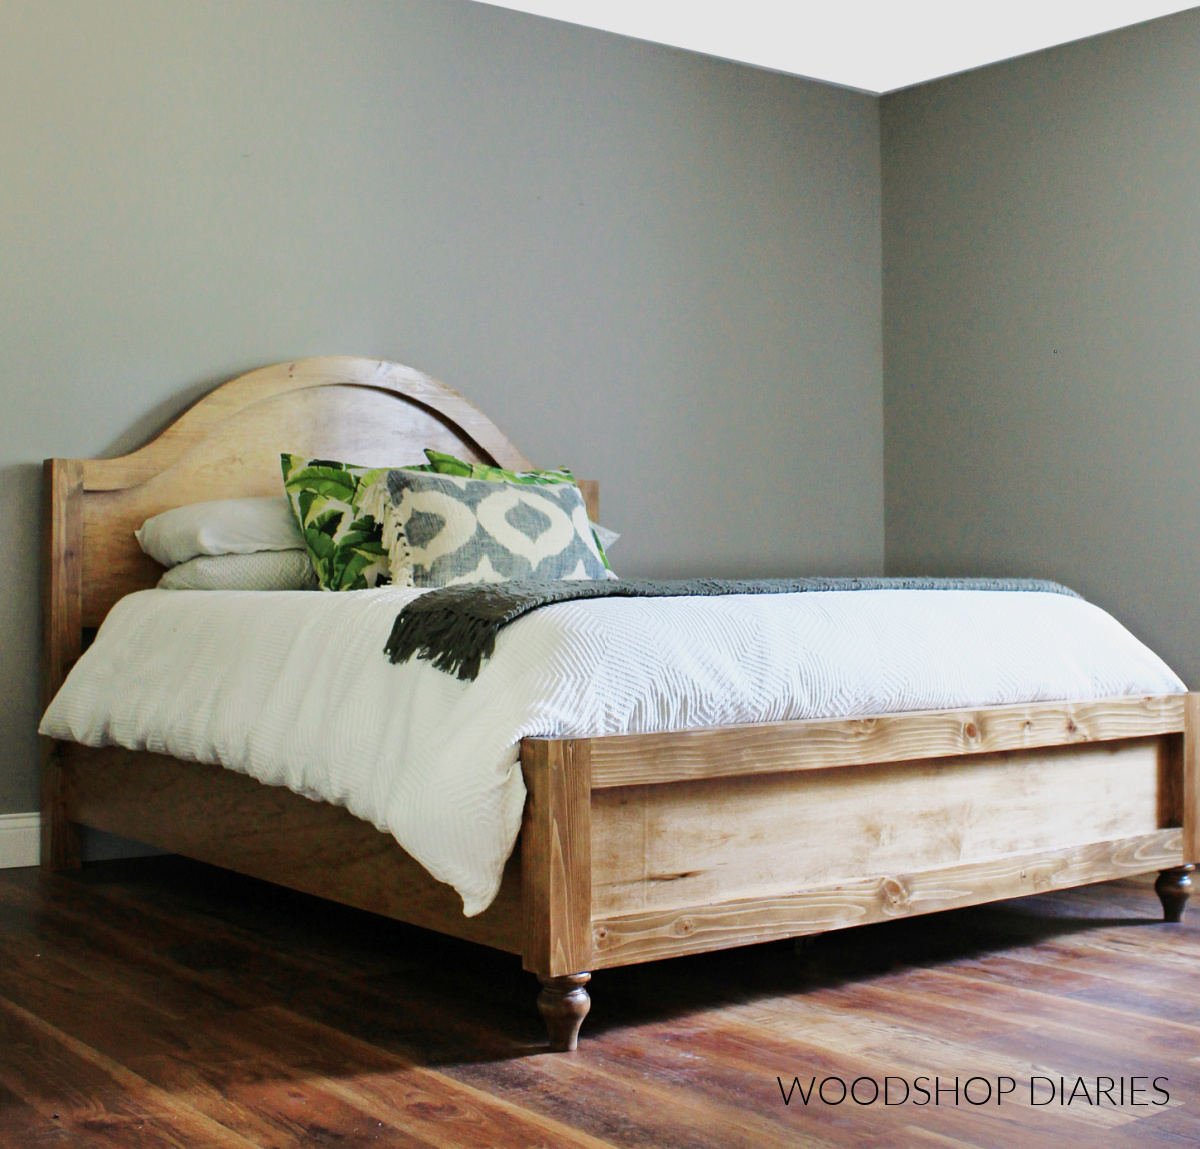
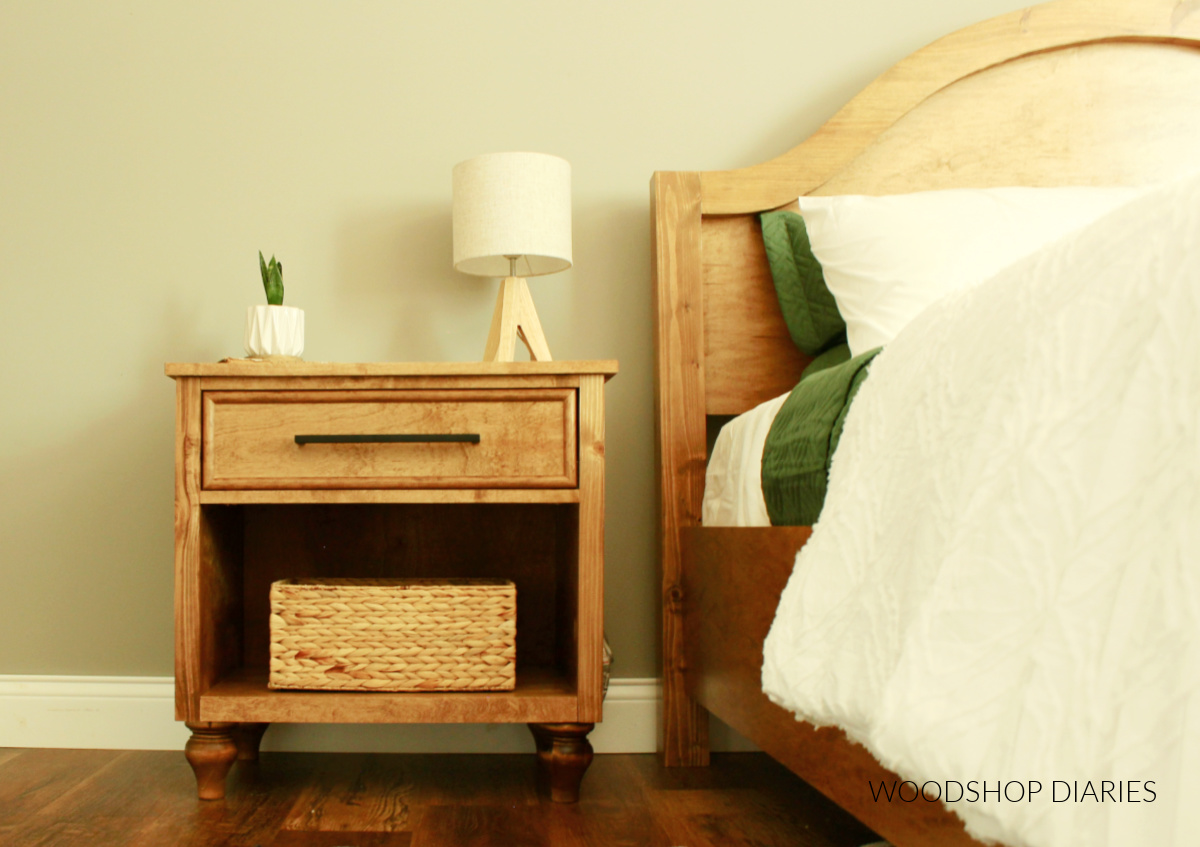
Over the last couple months, I have been building a new matching bedroom furniture set. I’ve already shared the bed with arched headboard and the matching nightstands.
While those were fun, if you’ve followed along for very long, you know that DIY dressers are my absolute favorite projects to build.
So, I saved the best for last and now, I’m finally sharing the matching dresser!
I’ve done several DIY dresser builds over the years, but most of them have been pretty big.
So, for this one, I stuck with a smaller, simpler dresser design. This size is perfect for a small bedroom, a guest room, or can even be used as a large nightstand or an entryway table.
I’ve got the printable plans, step by step tutorial, and video below, so if you’re ready to see how to build a simple 3 drawer dresser, let’s dive in!
What to Know Before Building a DIY 3-Drawer Dresser
Material Options:
I built this particular dresser using oak lumber that I had leftover from my recent display cabinet build.
You can certainly use oak lumber for this as well (or any other type of solid wood), but it will require you to glue up some larger panels for the sides and the top.
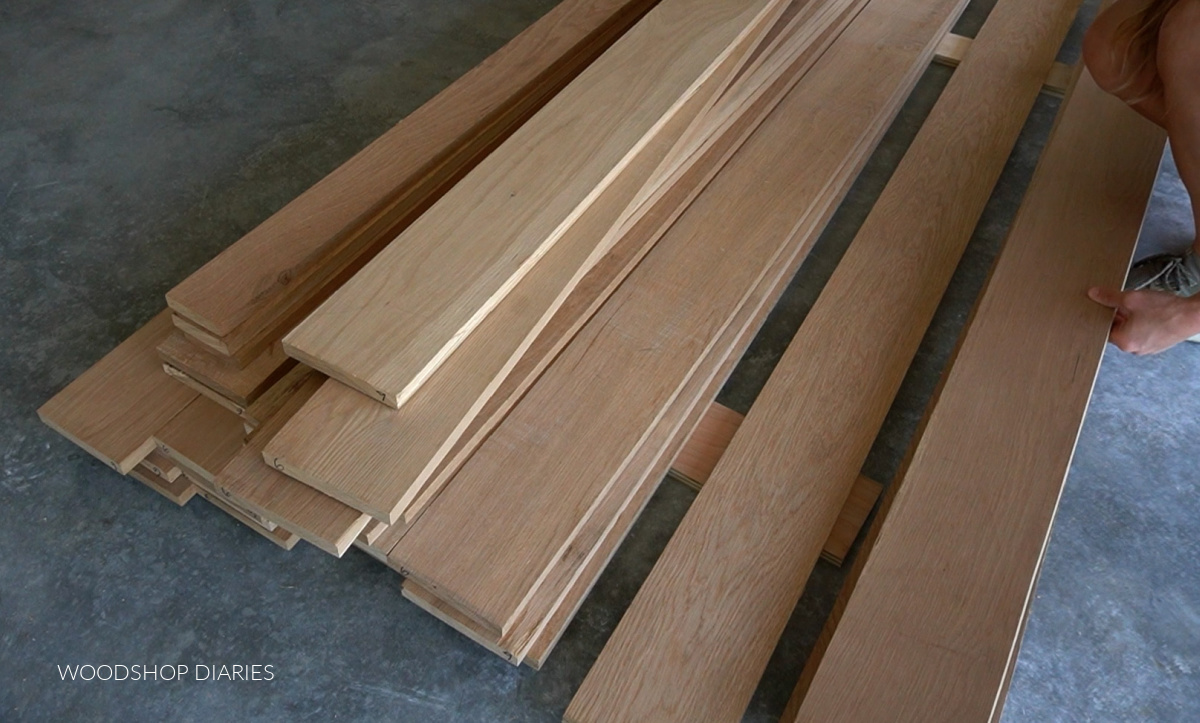
If you’d prefer to save a few bucks or skip the glue ups, I’d suggest using ¾″ cabinet grade plywood (oak, birch, or maple) instead.
The plans and tutorial below will show overall sizes of each piece in the build. So you can either cut these from plywood or glue up solid wood panels to make these size pieces.
The amount of solid wood needed here will depend on the width and length of your boards, so you will need to determine how much/what size you need based on your availability of materials.
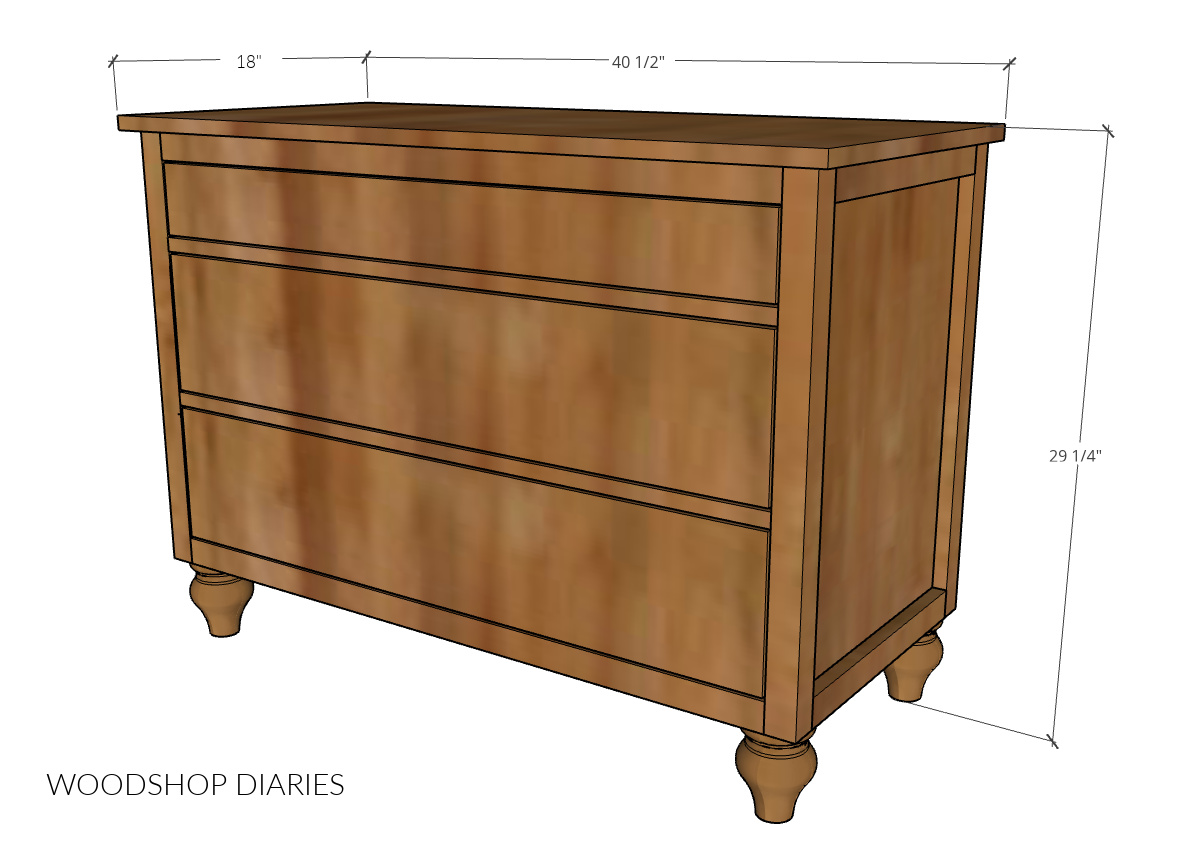
Overall Size:
The overall size of this 3 drawer dresser is 18″ deep, 29 ¼″ tall, and 40 ½″ wide.
You may find these guides and tutorials helpful throughout the build:
Tools & Materials
*This post contains affiliate links. See policies page for details.
Tools:
- Ryobi ONE+ 18V HP Drill/Driver
- Ryobi ONE+ 18V HP Circular Saw
- Cutting Guides (AccuCut and Rip Cut optional, but helpful)
- Pocket Hole Jig
- Miter Saw
- Table Saw or router (optional to cut drawer dadoes)
Materials:
- (3) 2x2x8 board
- (1) 1x2x8 board
- (1) 1x4x8 board (or 1×4 scraps)
- (1) 4×8 sheet ¾″ plywood (or equivalent solid wood–see notes above)
- (1) 4×8 sheet ¼″ plywood
- (4) 5/16-18 threaded inserts OR furniture feet plates
- (4) furniture feet
- (3) pair 16″ drawer slides
- 2″ wood screws OR Figure 8 Fasteners (to attach top)
- 1 ¼″ pocket hole screws
- 2 ½″ pocket hole screws
- Wood Glue
RYOBI ONE+ 18V HP Drill/Driver Spotlight
You may have seen me using this Ryobi 18V ONE+ HP Drill and Driver for a while now in almost every project.
So it’s nothing new to see me using them again here in this project. But, maybe you’ve wondered why they’re my go to.
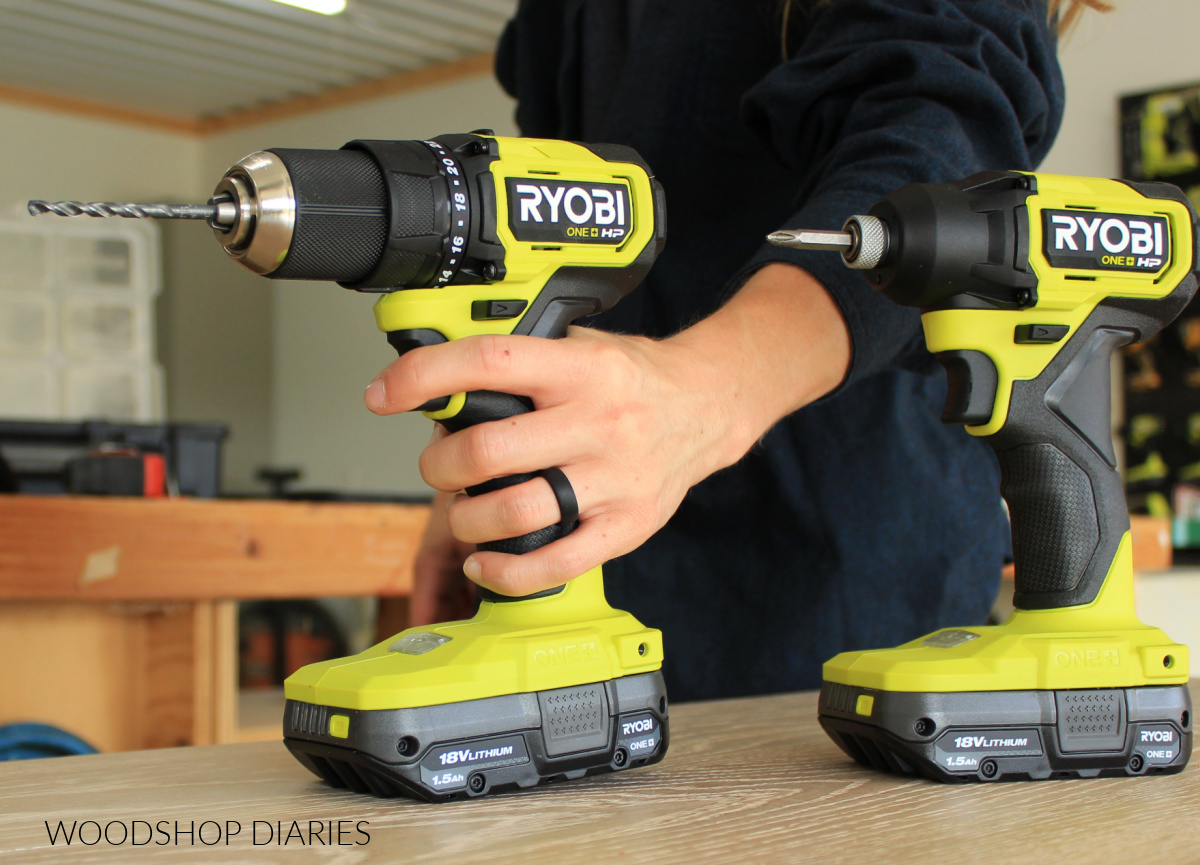
If aren’t familiar with what the “HP” stands for in the newer Ryobi tools, it’s High Performance.
These brushless tools are designed with advanced technology to provide longer battery life and longer motor life without sacrificing performance.
This drill driver combo is part of the compact HP series, so they are significantly lighter weight and smaller than their previous versions, but with noticeably more power.
And if you’re already on the Ryobi ONE+ 18 V battery platform, these HP tools work with those same batteries, so you can upgrade the tool without having to worry about getting new batteries.
You may also notice in the video that I upgraded my older Ryobi circular saw to the newer HP version as well and I’ve got it set up on my cutting guides so I’ll be putting it to good use on lots of future projects cutting down my plywood sheets.
Alright, let’s dive into this build.
How to Build a Simple 3-Drawer Dresser
The step by step tutorial to build this simple 3 drawer dresser is below. You can also grab the printable building plans with all the dimensions and details as well.
But if you prefer to watch, I also put together a quick video here and an in depth, full length build video at the end of this post as well.
Grab the 3 drawer dresser printable building plans here:
Step 1: Assemble DIY Dresser Side Panels
First, I built two identical side panels for the dresser.
These consisted of ¾″ thick panels installed between two 2x2s. Like I mentioned earlier, I used glued up solid oak panels, but ¾″ plywood would work just fine as well.
RELATED: How to cut down plywood sheets
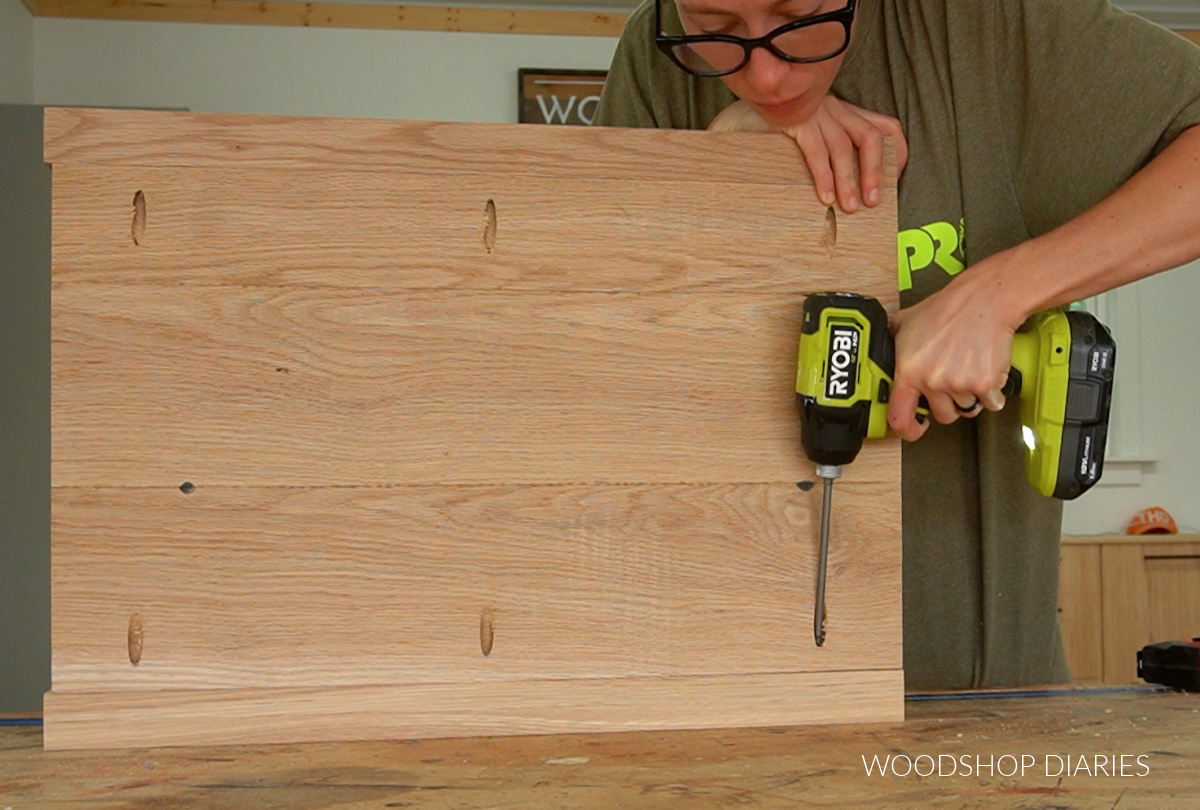
I assembled the panel between the 2x2s using ¾″ pocket holes and 1 ¼″ pocket hole screws.
RELATED: How to use a pocket hole jig
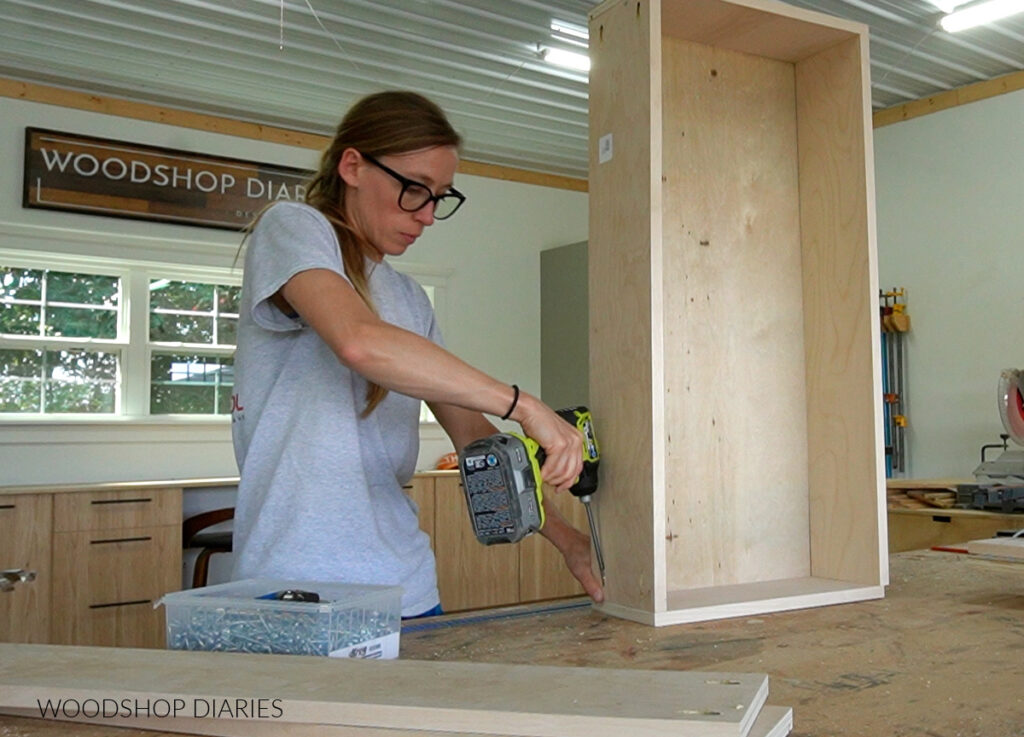
Step 2: Assemble Simple Dresser Frame
Now, I was cutting it close to have enough oak lumber to complete the build, so I tried to use it sparingly where possible, so for the rest of the dresser frame, I used 1x2s instead of 2x2s.
Since oak is quite a bit stronger than pine, this was fine in this case. However, if you’re using pine, I’d definitely recommend going with 2x2s for these pieces.
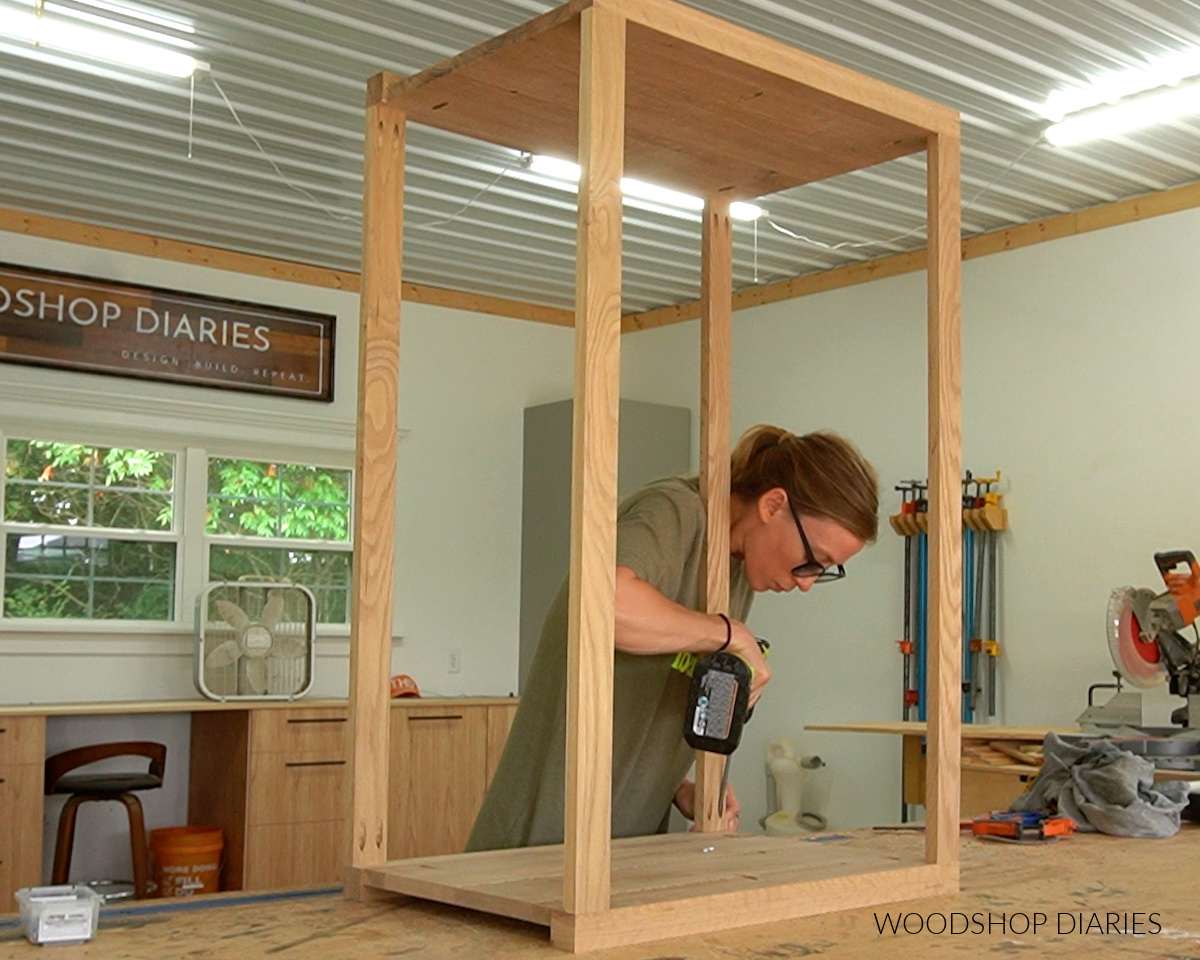
I cut four 1x2s and assembled them between the side panels at each corner using pocket holes and screws.
Step 3: Add Bottom Feet Braces
The feet I used here come with a threaded rod installed in the center. These are designed to be screwed into a threaded insert OR a threaded plate.
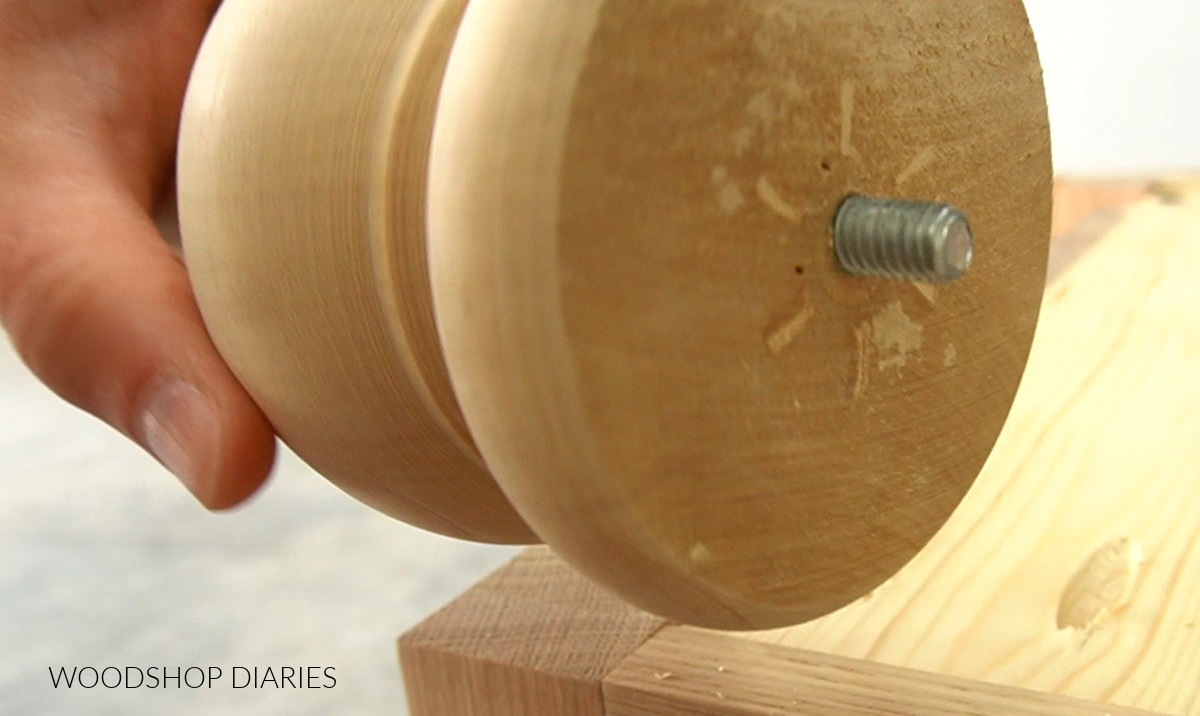
However, in order to use either of these, there needs to be something added on the bottom to screw them into.
So I cut two pieces of 1×4 scraps to fit between the 2x2s at the bottom. You can use 1×4 scraps, 1×6 scraps, etc for this.
The exact size doesn’t matter as long as they’re wide enough to install a plate or an insert into.
I installed the two braces between the bottom 2x2s so that they’re flush across the bottom edge using ¾″ pocket holes and 1 ¼″ pocket hole screws.
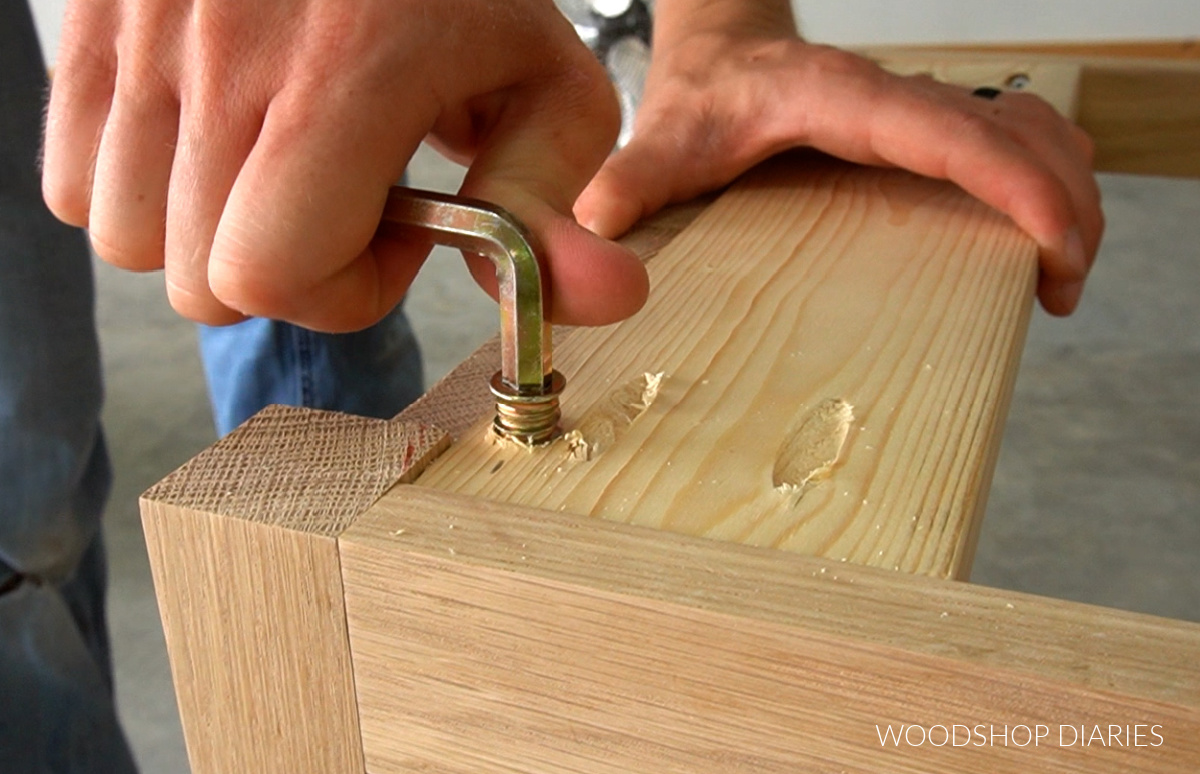
Step 4: Install 3 Drawer Dresser Feet
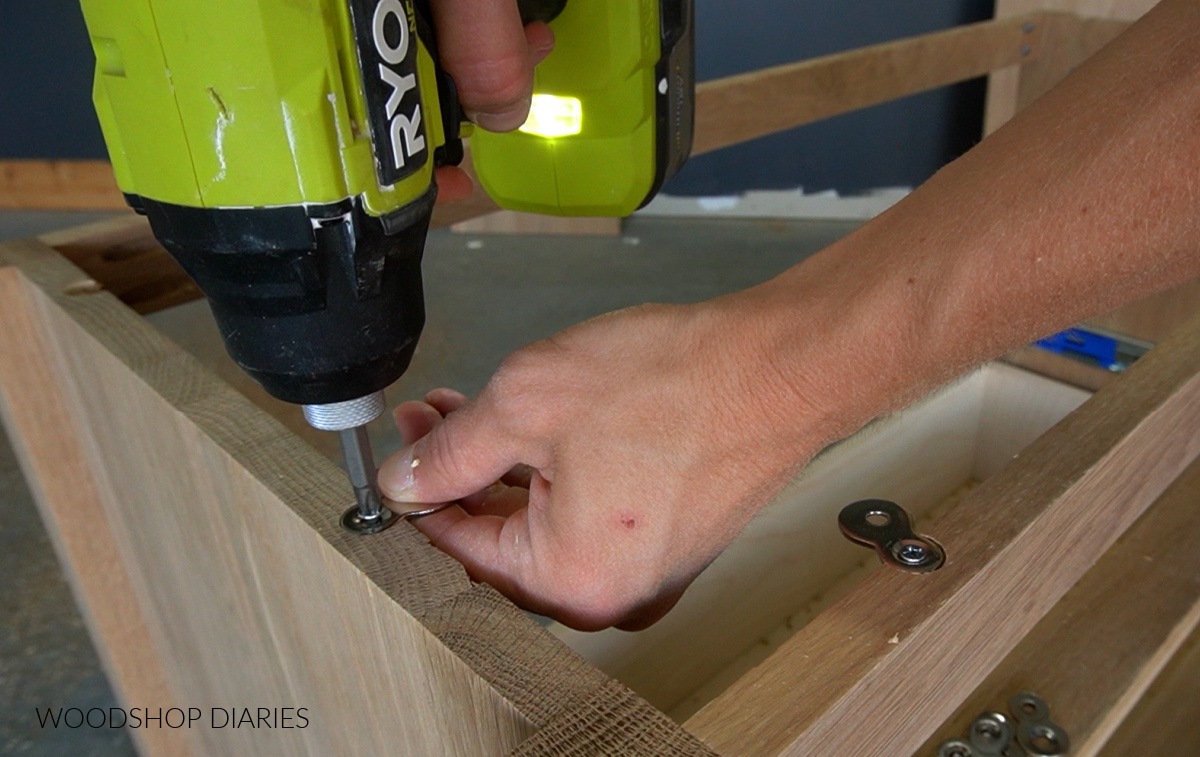
I measured and marked about 2” in from each edge and drilled out a hole at these marks into the braces I added in step 3.
Then, I installed 5/16″-18 threaded inserts into these holes.
If you didn’t want to mess with installing inserts, you could also install furniture leg mounting plates to screw the legs into as well.
Then, I screwed the feet into the inserts.
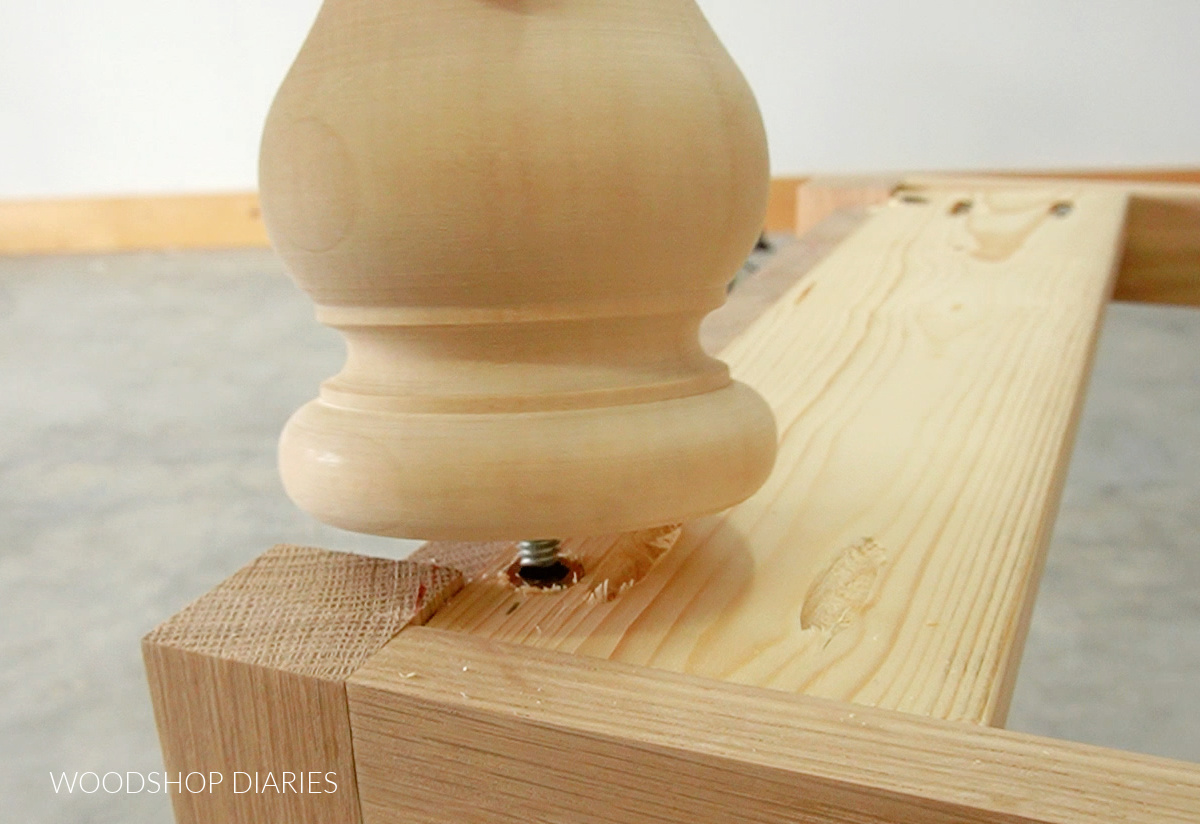
I really like these feet, but every now and then, you have to back the threaded rod out a little for them to screw into the inserts.
You can just use some pliers to carefully turn the rod back a little so it sticks out longer.
Step 5: Add Dresser Drawer Dividers
For the drawer dividers, I simply cut two more 1x2s and installed into the frame using pocket holes and screws.
You can divide these however you’d like, but I made the top drawer opening about 4” tall and divided the bottom two drawers evenly.
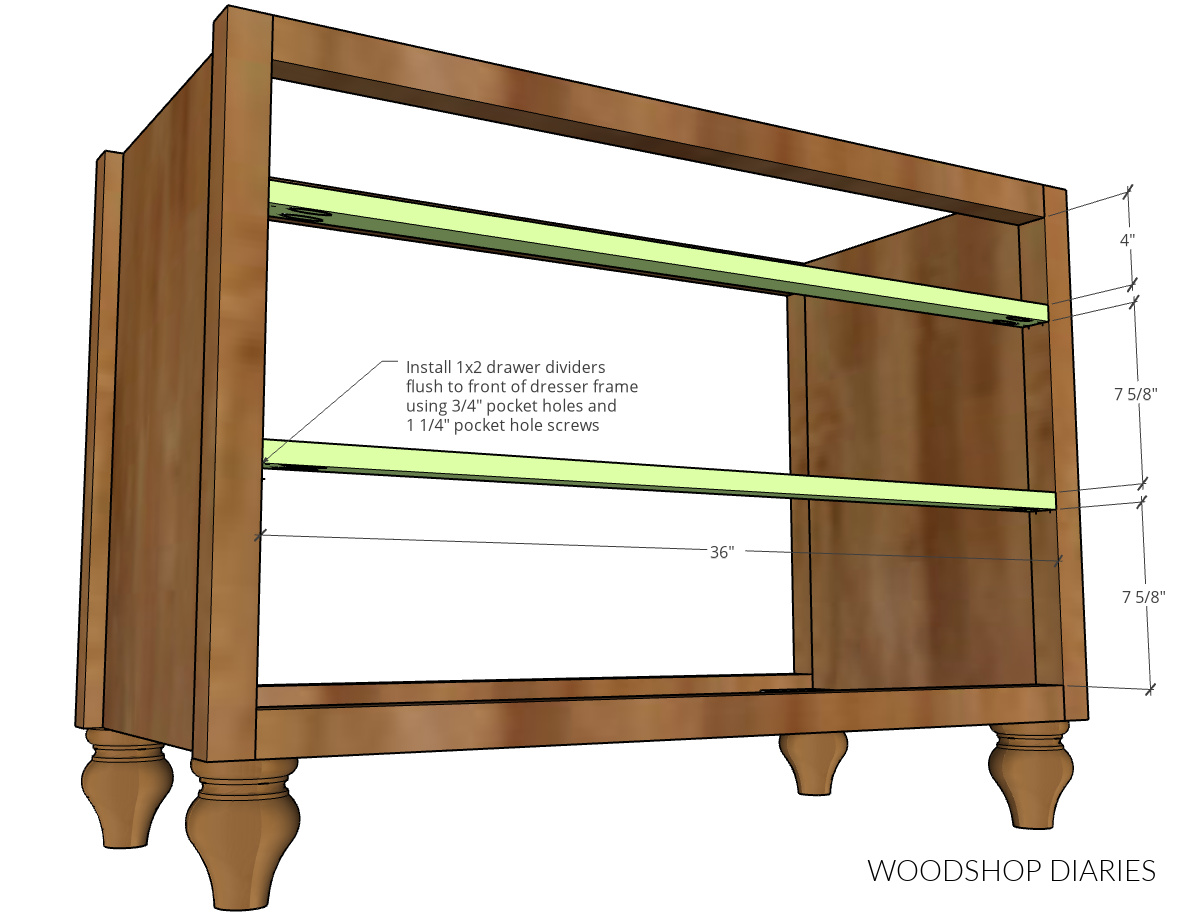
You could switch it up and do one shallow drawer at top and one deep one at the bottom, three evenly sized drawers, whatever you’d like.
Step 6: Add Dresser Drawer Slides
I installed 16” ball bearing drawer slides in each opening so that the bottom of the drawer slides sat just above where I placed the dividers.
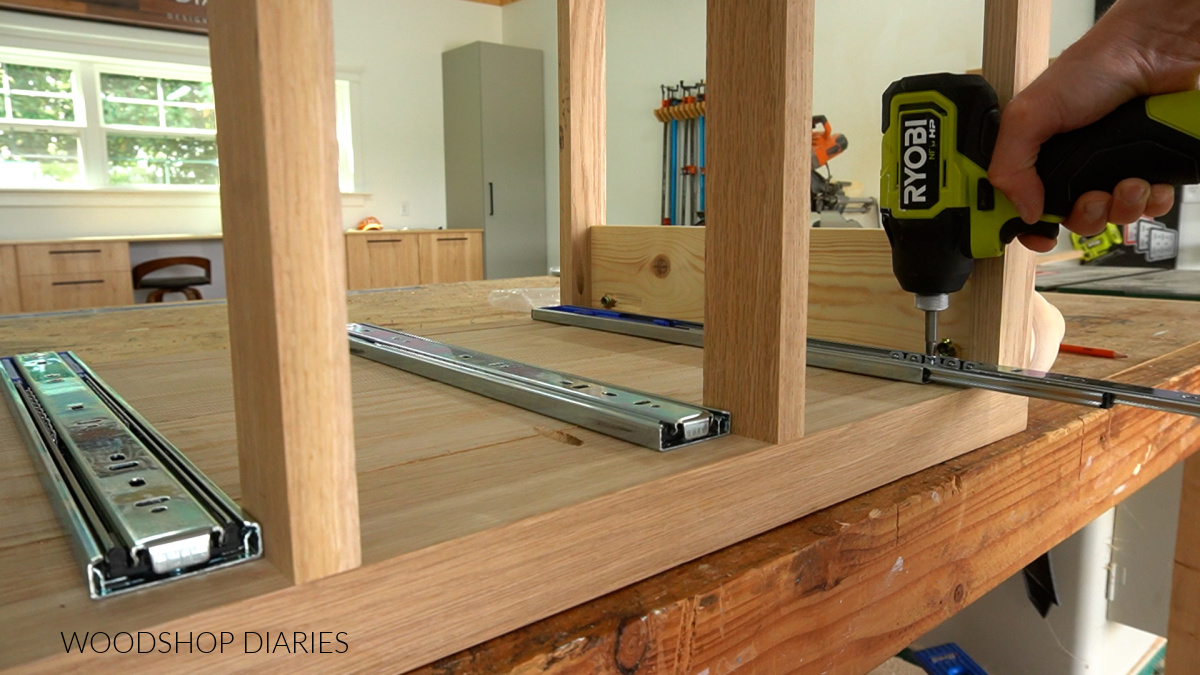
I installed these 1” inset from the front edge to allow for inset drawer fronts later.
Normally, for inset drawer fronts using ¾” material, I’d install the slides ¾” inset so that the drawer front would be flush to the frame once installed.
However, in this case, I actually made the drawer front sit in from the front edge about ¼” just to add some dimension. So that’s why the slides are 1″ inset in this case.
RELATED: How to Install Drawer Slides
Step 7: Build 3 Drawer Boxes
I used ¾″ plywood for my drawer boxes and tried to use up any of my scraps that I could since my scrap pile is OUT OF CONTROL ha!
I cut the pieces according to the plans to assemble one shallow drawer box and two deeper drawer boxes.
Much like you’ve seen in many of my past projects, I cut ¼” dadoes into the drawer box pieces about ½” up from the bottom edge to install a ¼” plywood bottom panel into.
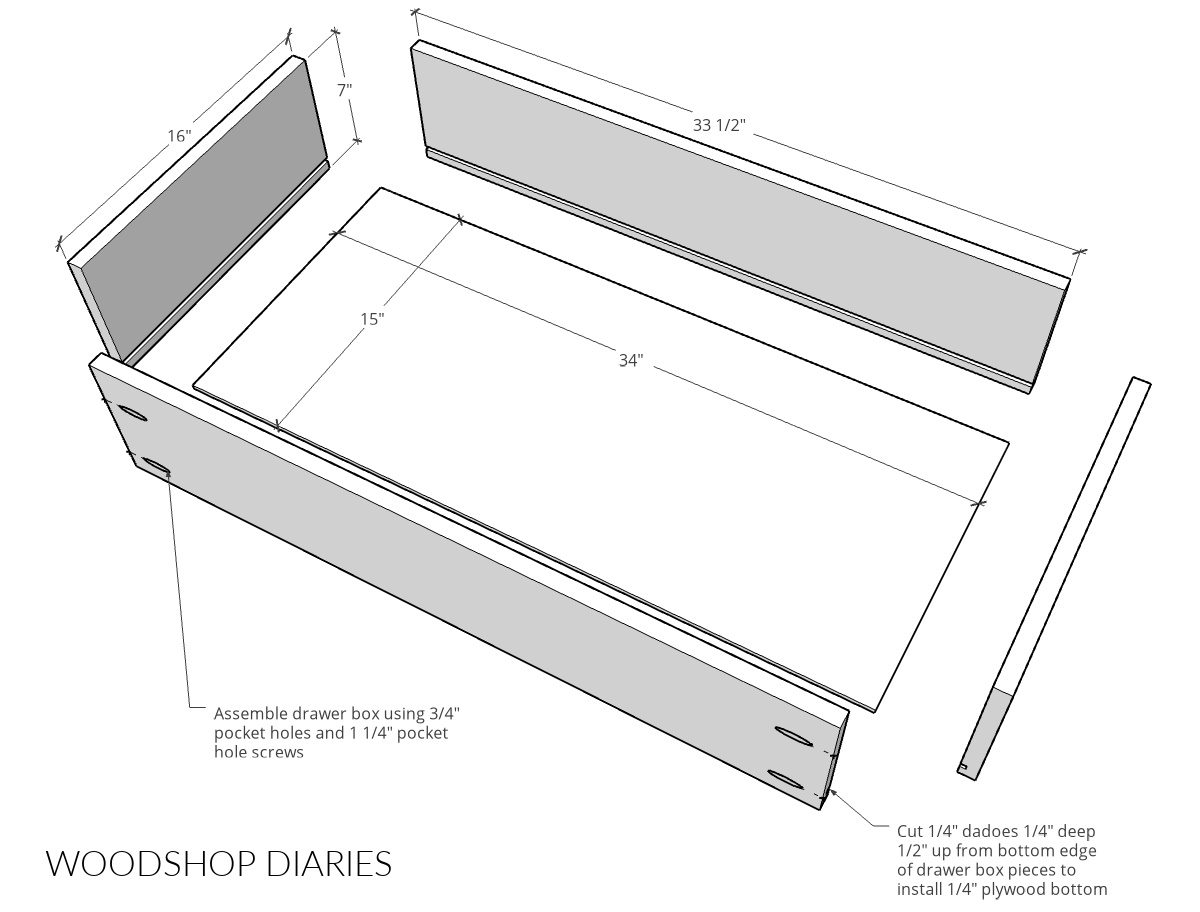
But, if you don’t have a table saw or router (or you do, but you just don’t want to cut the dadoes), you can also just cut the drawer box sides a little shorter (in height) and just glue/staple the ¼″ plywood onto the bottom.
Check out this post for more information and alternatives to building drawer boxes.
Before assembling the pieces, I applied iron on edge banding to the tops of the pieces to hide the plys. This is optional, but it makes it look a little cleaner, so I like to add it.
RELATED: How to apply iron on edge banding
Then, I assembled the boxes using pocket holes and screws and installing the ¼” plywood bottom into the dadoes before adding the last piece.
Step 8: Install Drawer Boxes into DIY Dresser
I installed the drawer boxes onto the slides using ¼” plywood on the bottom of the drawers as spacer blocks.

There are so many ways to install drawers, but I find installing them directly onto the slides in the cabinet to be the easiest for me.
Check out this post for more information on installing drawer slides.
Then, I slid them back in place.
Step 9: Add Drawer Fronts
I glued up and trimmed down three oak drawer fronts—these were ¼” smaller than the openings in height and ¼” smaller in width. That way, I can install them with ⅛” gap around all sides.
I prefer to do this before adding the top, so that I can easily access the inside of the drawers to install.
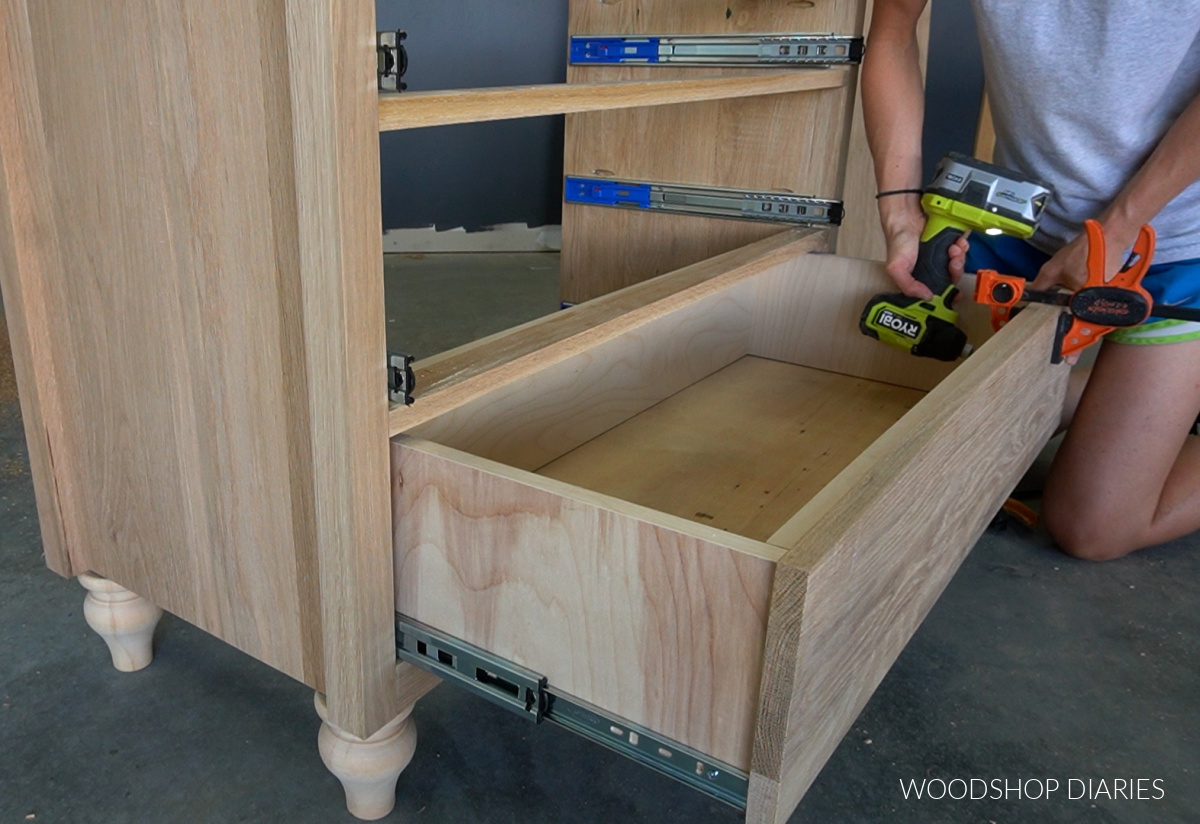
You can use playing cards or scrap wood to shim it up and screw it in, but I find it just as easy to eye ball it and either clamp or hold it in place while you drive the screws.
I installed the top drawer front first, then removed the drawer and worked my way down to the bottom.
Step 10: Add Top
Before installing the drawers back into the dresser, I added the top.
I glued up a solid oak panel for my top, but you can certainly cut this from plywood as well.
To attach the top, I used these figure 8 clips since mine was solid wood.
However, if you were using plywood, simply using 2″ wood screws through the top 2×2 supports would work fine.
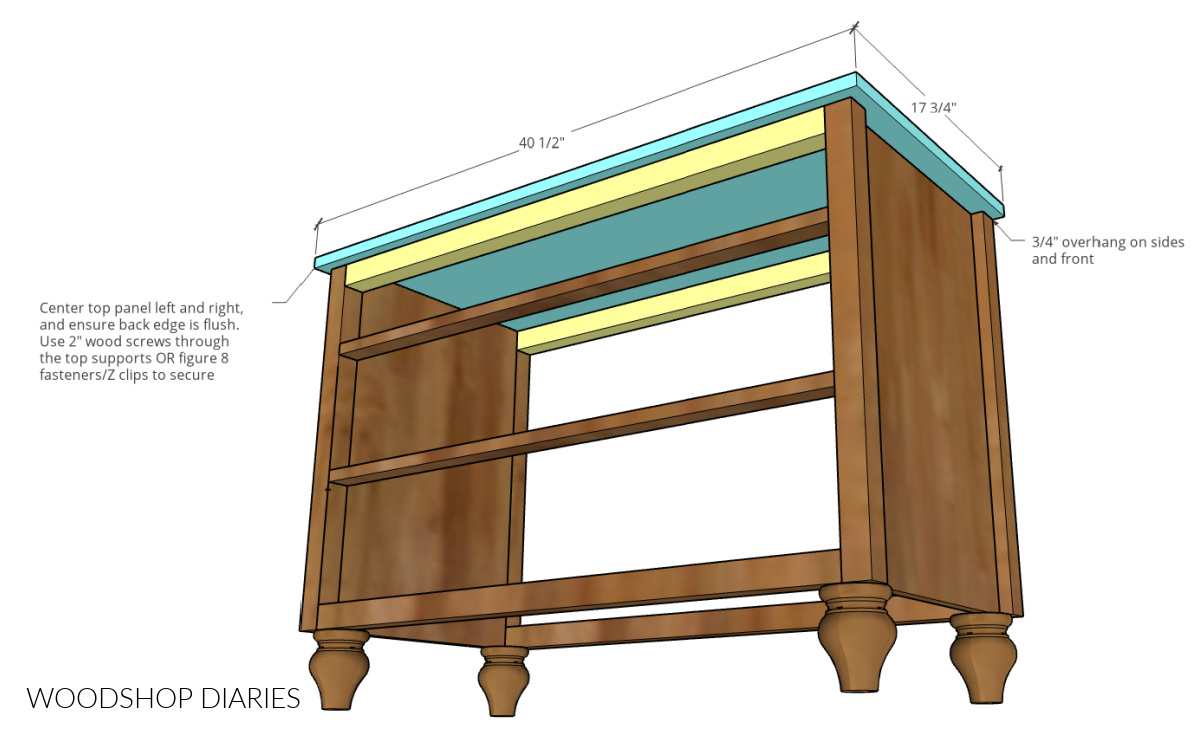
But, for the figure 8 fasteners, I used a ⅝” forstener bit to drill a shallow hole in several places around the top of the dresser frame so that these clips would sit into them and be flush across the top.
Check out more information on installing figure 8 fasteners in this post.
Then, I screwed these in place.
I flipped the dresser over on the top, centered it, then screwed the other side of the clips into the top.
After flipping it back over, I put the drawers back in, and it was almost done.
Step 11: Add Back Panel
If you’ve seen many of my previous dresser builds, you know that I rarely ever add backs to my dressers.
You can call me crazy, but it’s a pet peeve I have from past experiences.
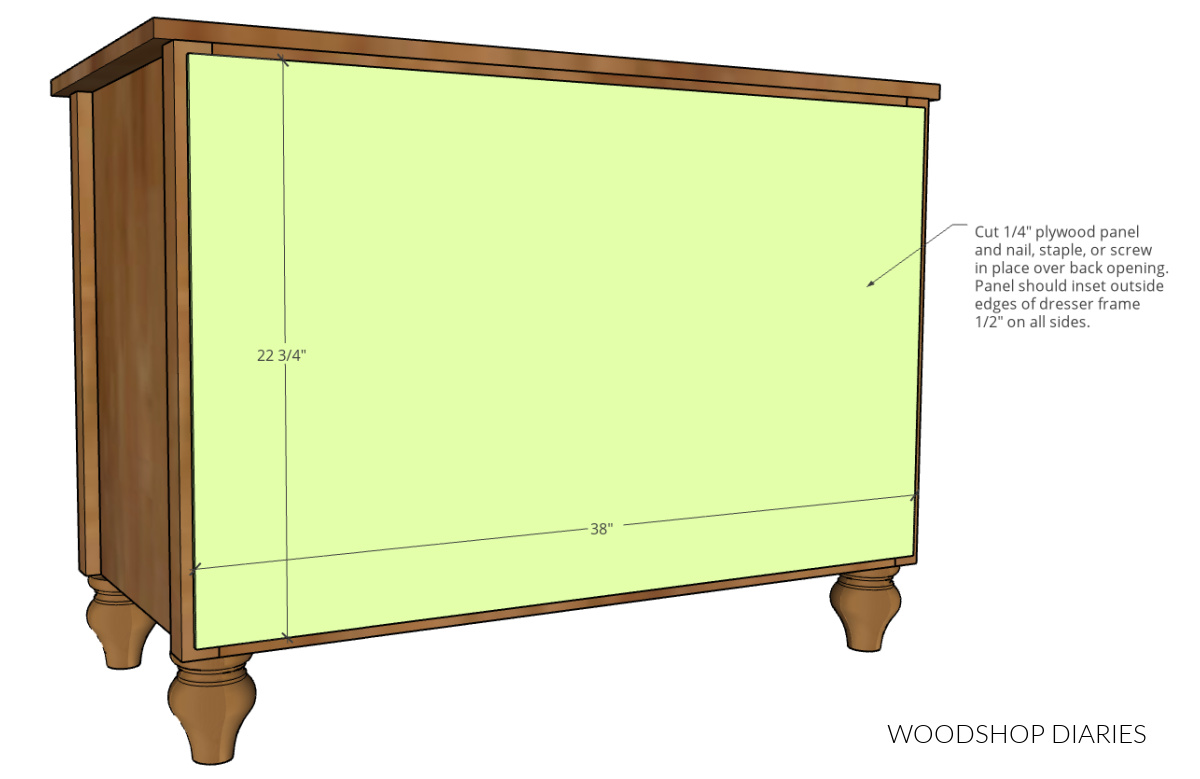
You can certainly add a back panel onto this if you’d like, but I didn’t add one here.
Step 12: Add Trim on Sides
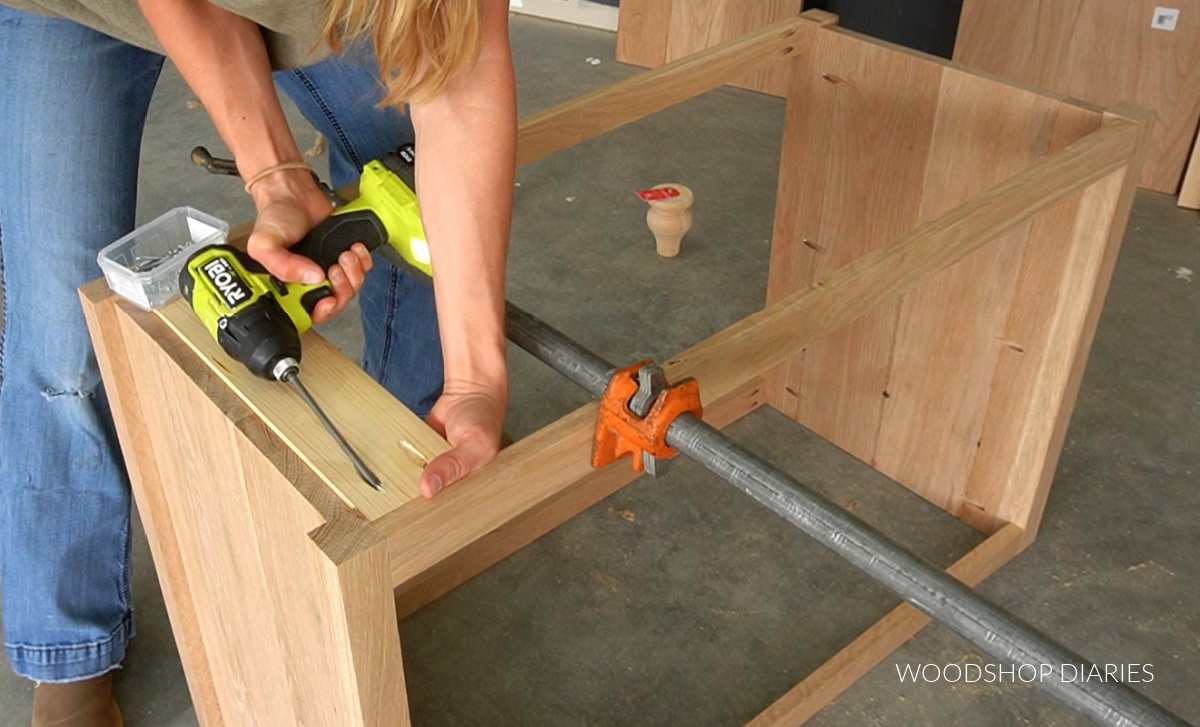
To finish this off, I cut and glued on some 1×2 trim on the sides at the top and bottom.
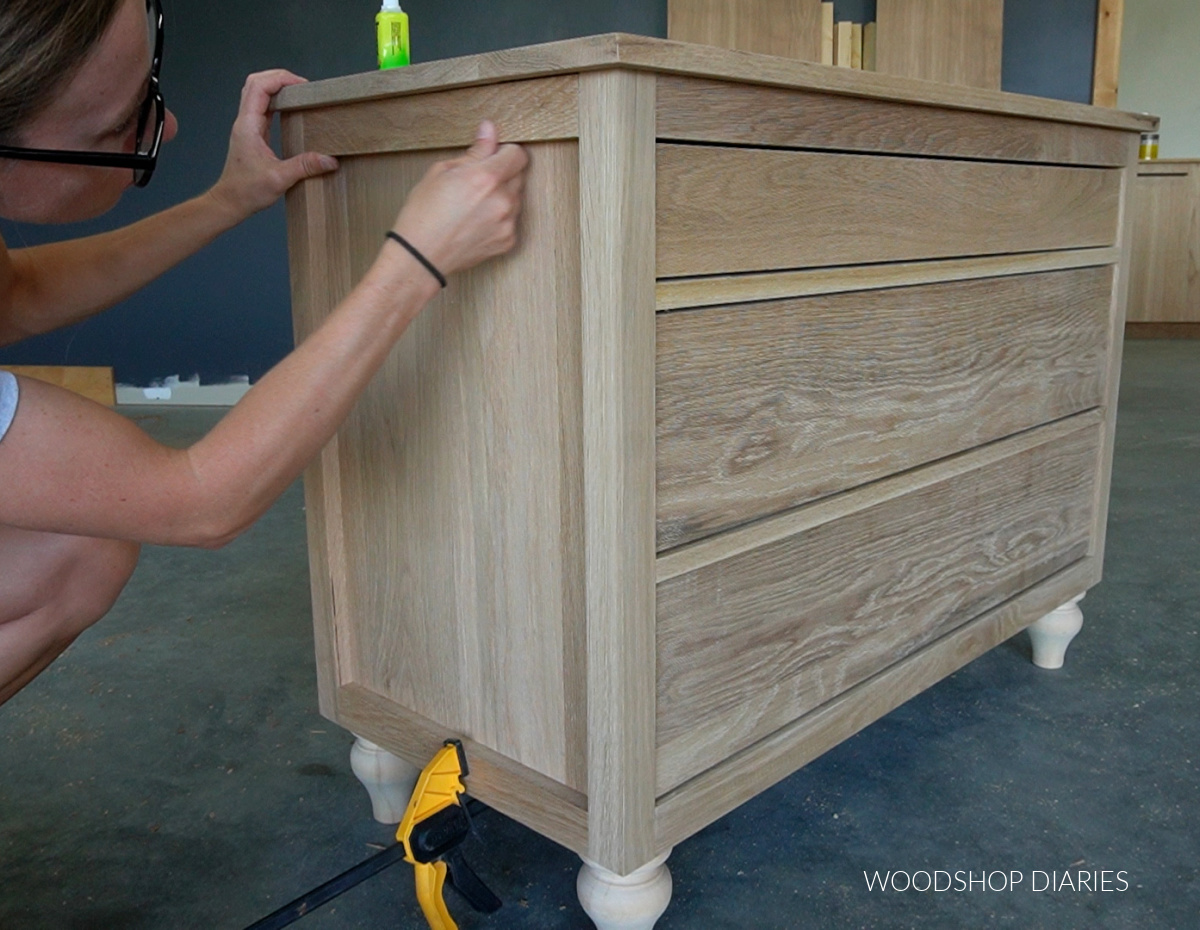
I just used some quick dry wood glue and clamped it in place for a minute or two. However, you could also just use some brad nails.
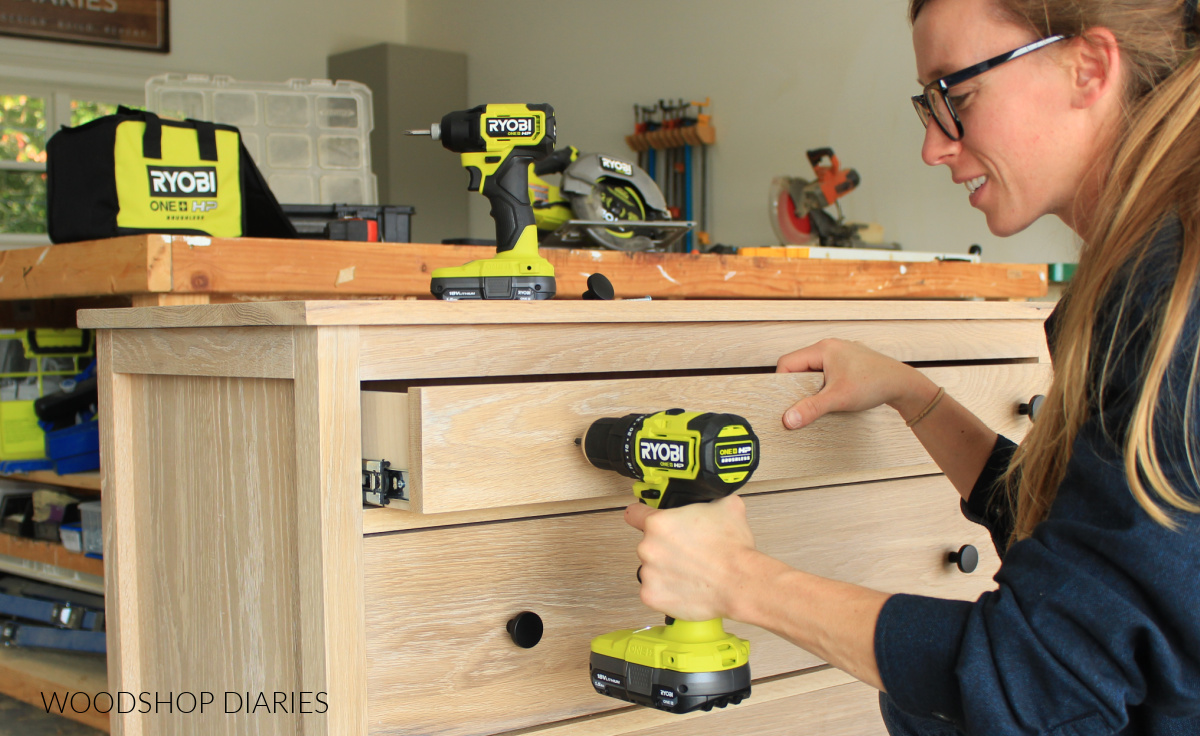
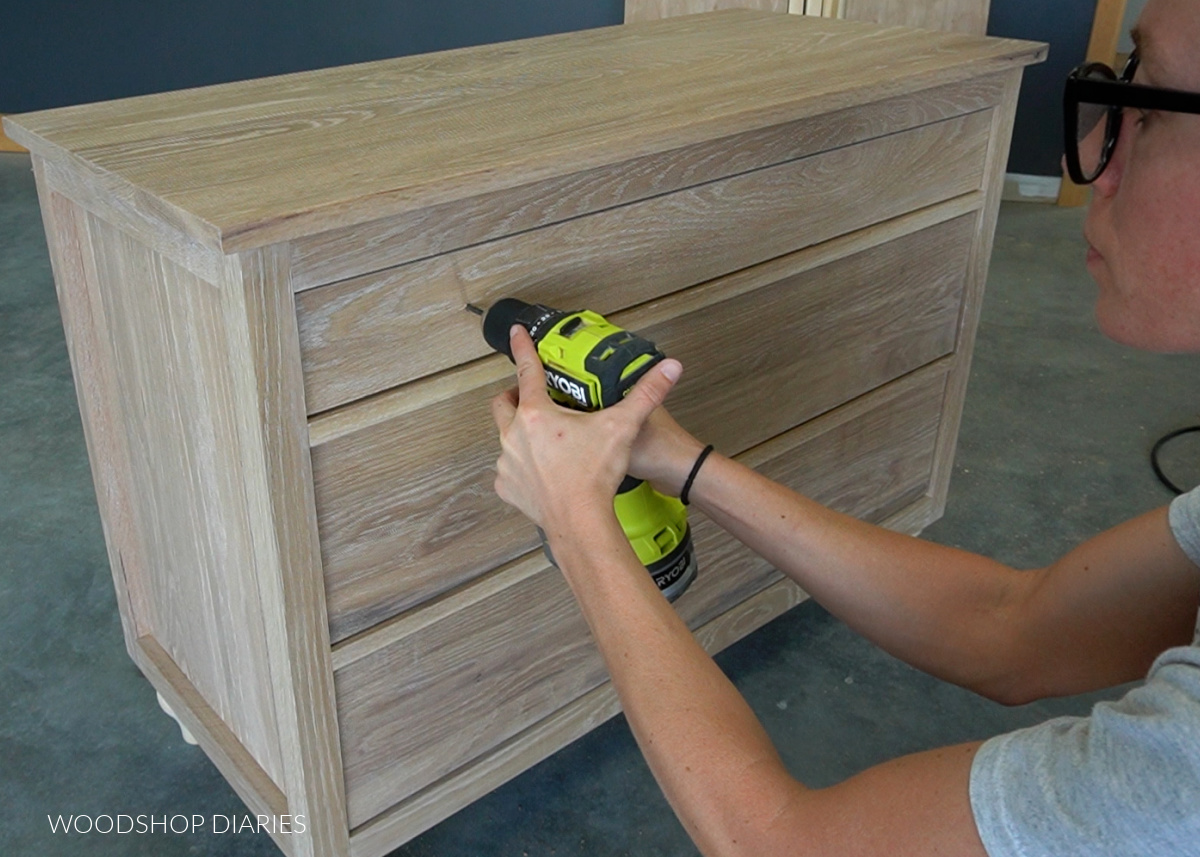
Step 13: Add Hardware and Finish
To finish the piece, I applied a white oil based stain.
Once the stain dried, I applied a clear coat poly to seal it. Then, I measured out and drilled holes to add simple black knobs and it was finished!
I think this is definitely my favorite piece of the matching furniture series—but, really, dressers are always my favorite haha.
I hope you enjoyed watching this come to life as much as I enjoyed building it.

If you’d like to build your own, don’t forget to grab the building plans.
And if you’d like to watch the full length build video, check it out on YouTube here:

If you want to see the other matching pieces in the series, check them out here:
If building plans and woodworking projects are your thing, be sure to sign up for the newsletter for all the latest projects straight to your inbox!
Save this for later by pinning or sharing to your favorite social channel!
Until next time, friends, happy building!