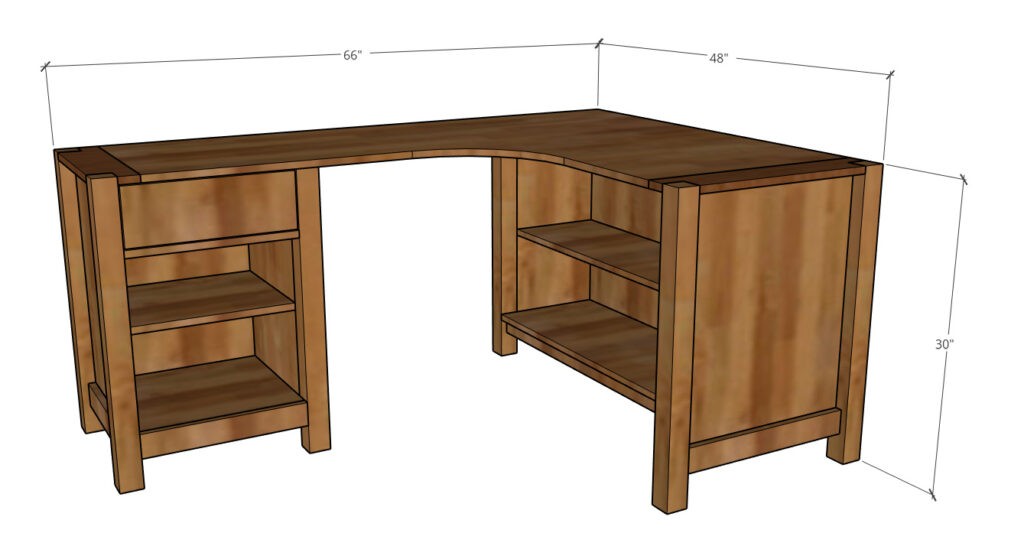
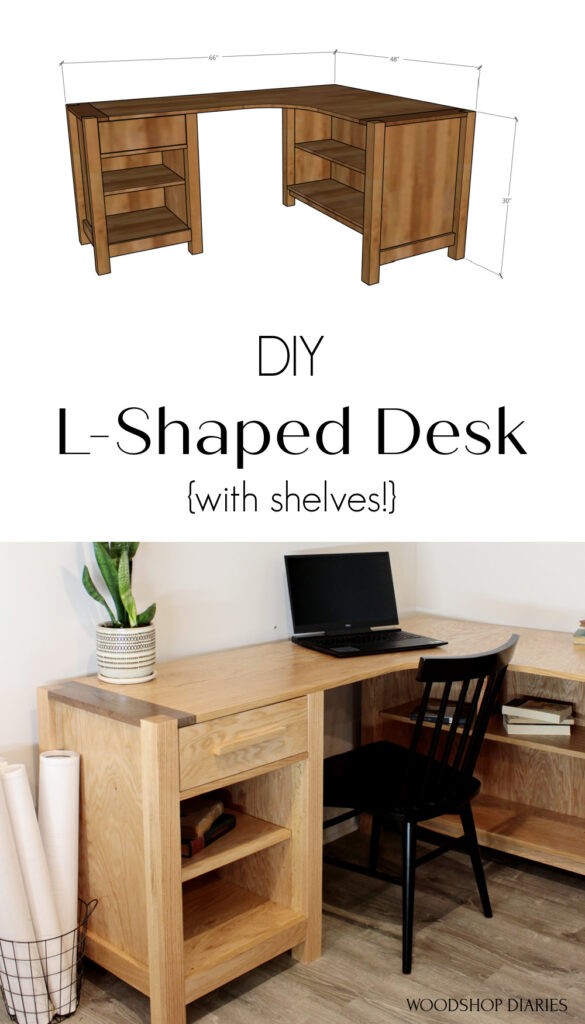
I know I’ve been sharing lots of desks lately, so this is probably the last one for a while. BUT…This one is a little different. I’m going to show you how to build a DIY L Shaped Desk with shelves.
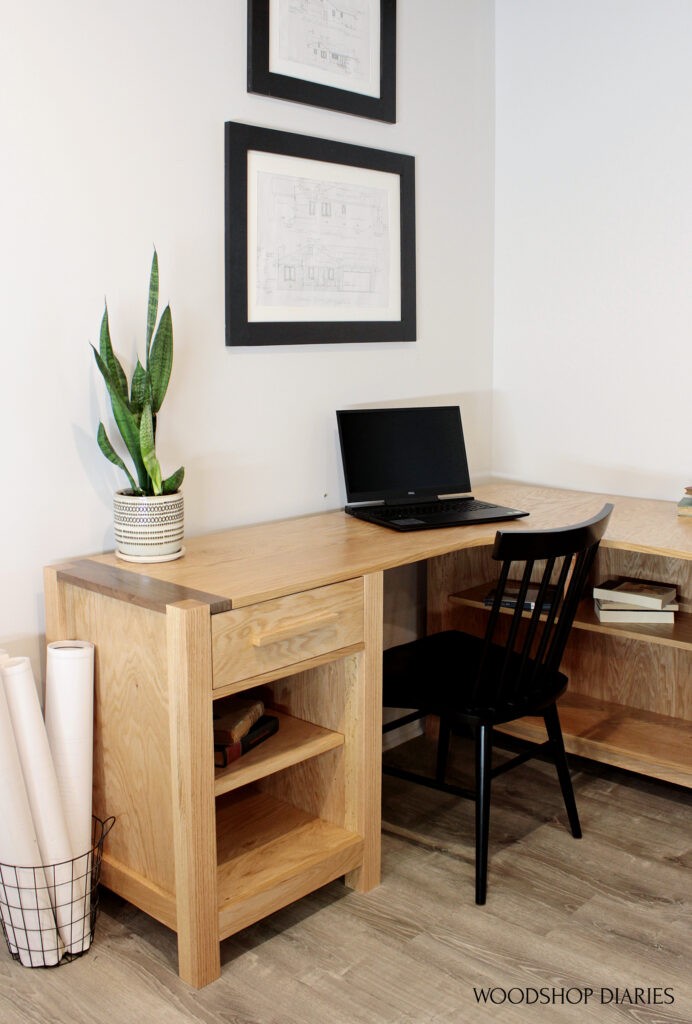
A friend of mine requested this corner desk with shelves a few weeks ago when I was in the middle of posting back to back desk builds.
.
And, though I was kind of over building desks lately, (have you seen all the desk ideas I’ve shared??) I really enjoyed adding the little details on this one with its corner design, curved top, inset shelf cabinet, and two tone wood corners.
RELATED: Check out more DIY desk ideas here.
Now, because lumber prices are insane right now (seriously…it’s nuts!), instead of using solid wood for this build, I used red oak plywood for the majority and only used solid oak for the legs and a few trim pieces. That saved a TON of money, but still kept a nice look.
.
So if you’re ready to get building, I’ve got the DIY L shaped desk video tutorial here, printable plans linked below, and the full tutorial following 🙂
This post contains affiliate links. See policies.
For This DIY L Shaped Desk, You Will Need:
- (2) sheets ¾” plywood
- ¼ sheet ¼” plywood
- (9) 1x3x8 boards
- (1) 1x6x8 (or wider–for the top end boards)
- 1 ¼” wood screws
- 1 ¼” pocket hole screws
- Dowels (if using dowel joinery)
- (1) pair 16” drawer slides
- Wood Glue
- Flat brackets
- Corner brackets
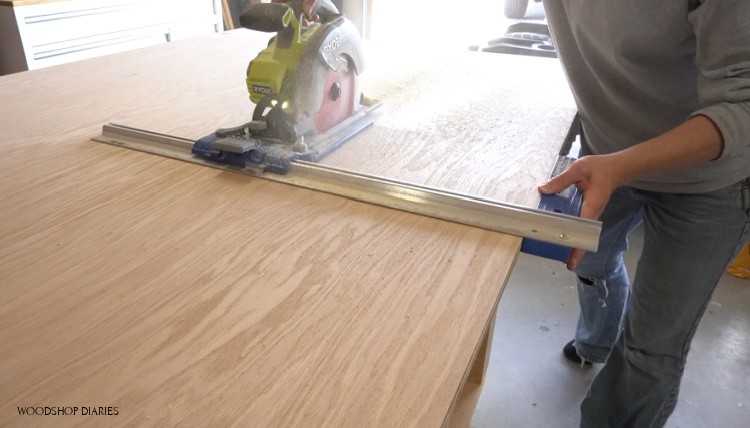
- Circular Saw and Saw Guide for ripping down plywood
- Miter Saw
- Drill/Driver
- Pocket hole jig
- Dowel jig (optional…you can use pocket holes instead)
- Shelf pin jig
- Shelf pins
- Table saw
- Jig Saw
Grab the Printable Plans for this DIY L Shaped Desk Here:
Step 1: Glue Up L Shaped Desk Legs
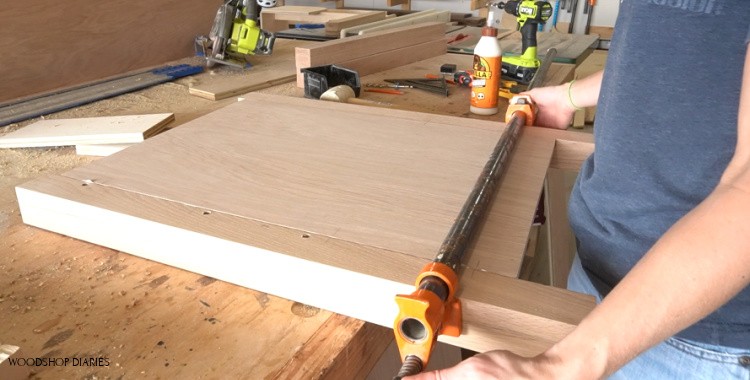
To get started, I began gluing up the legs. I trimmed down 1×3 oak boards to about 31” and glued them up in threes to make one leg. I needed 8 legs total.

After the glue was dry, I trimmed the legs to length on the miter saw. Now, because four of the legs will go under the top, and the other four will come up flush with the top, I trimmed these legs accordingly. Four will be 29 ¼” and the other four will be 30”.
.
Once they were cut to their final lengths, I cut them to their final widths on the table saw. Since gluing up three 1x3s gives me a 2 ¼” x 2 ½” post, I needed to trim ¼” off to make it 2 ¼” square.
.
So I first ran it through to just barely cut one edge to clean up the glue lines. Then, I adjusted my rip fence and cut the other edge off to make it 2 ¼”.

Step 2: Assemble Left Cabinet Side Panels
Each of the cabinets (left and right) needed two side panels, a back panel, a bottom panel, and a shelf.
.
I’ve got detailed plans with dimensions, and a plywood cut diagram linked here so if you’re looking for all the exact measurements, check out these plans.
.
I used my Kreg Rip Cut to rip a couple strips from the first plywood sheet to begin making the desk base cabinets. Then, I cut these strips to length using my miter saw where I could and my AccuCut for the larger pieces.
RELATED: Check out this helpful tutorial: How to Cut Down Plywood Sheets
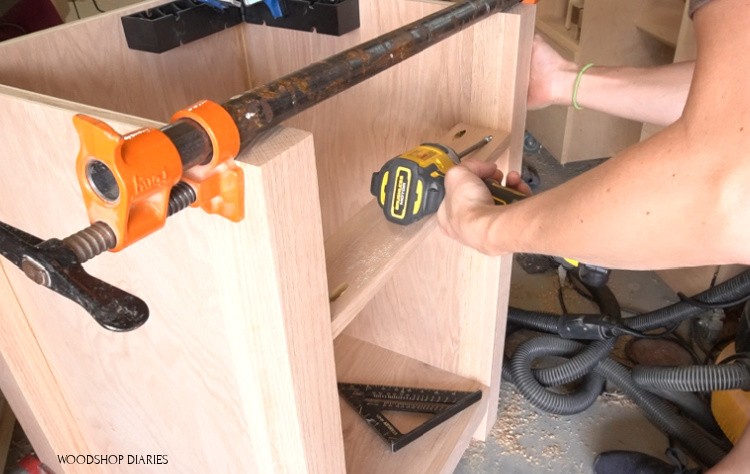
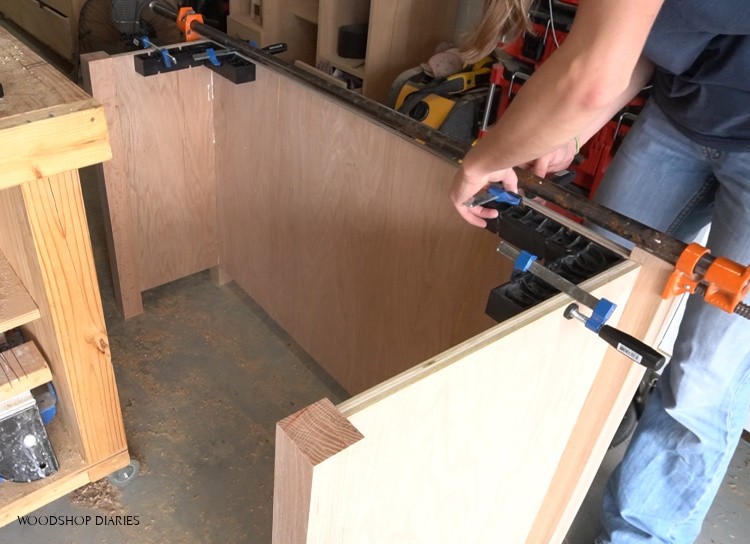
Now, finally, I could start assembling the side panels.
.
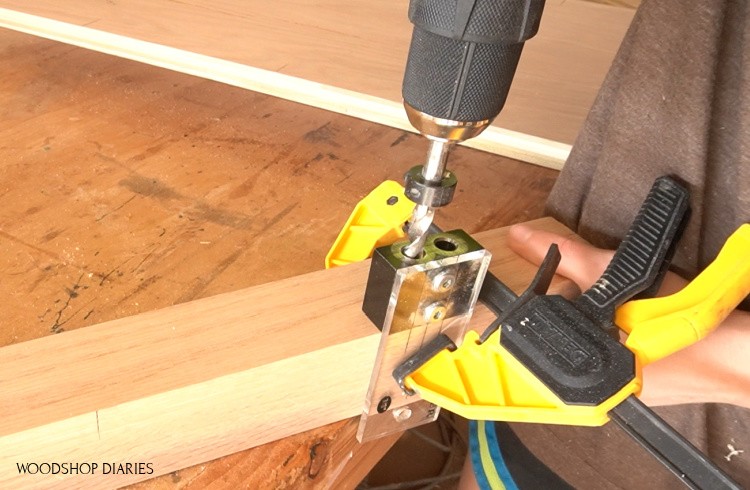
I wanted to attach both the sides and the back panel flush to the inside of the legs. Since my dowel jig laps over the edge of the leg to clamp and drill, I needed to mark and drill the dowel holes for the sides AND back panel before assembling anything.
I also wanted to make sure to make one side panel with the shorter legs, keeping it flush across the top, and the other side with the longer legs, letting them stick up ¾” on the top. The legs that stick up just add an extra detail on the top, but aren’t necessary.
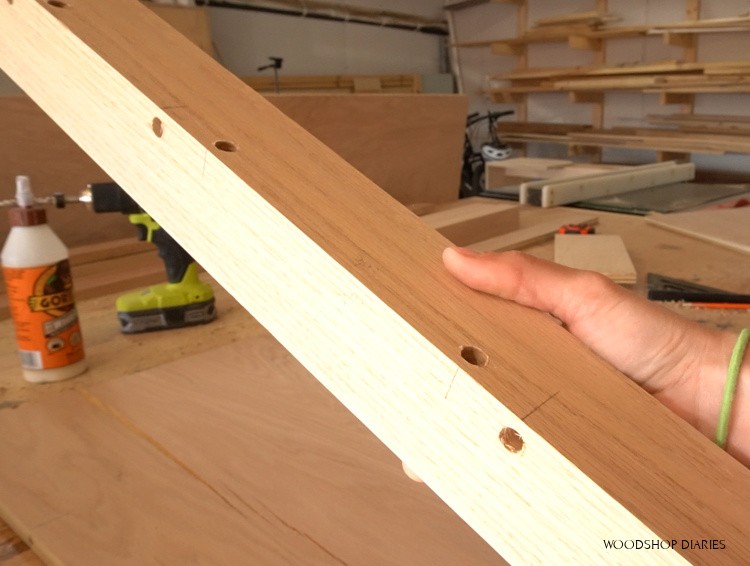
It helps to label EVERTHING here to keep markings and pieces straight.
.
Once the dowel holes were all drilled, and everything was labeled, I started gluing things up. As a note, dowels aren’t necessary here. Pocket holes would be fine, too.
I used dowels and wood glue to assemble the side plywood panels flush to the inside of the legs.
Step 3: Install Left Desk Cabinet Back and Bottom Panels
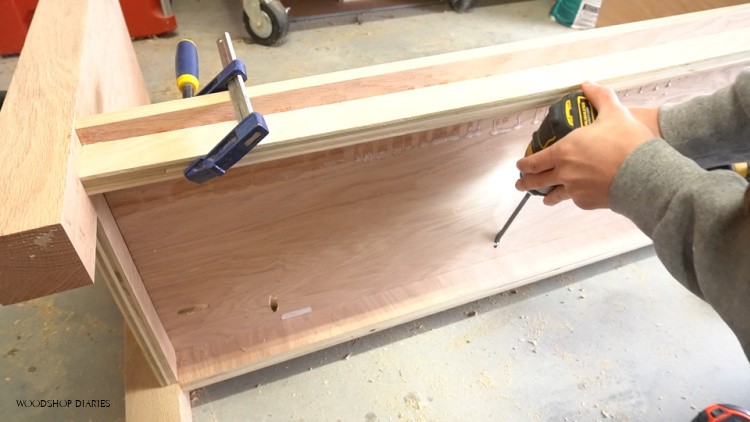
I cut a bottom plywood panel and used a 1×3 for a front trim piece. I drilled pocket holes along the edges of the bottom panel and into the ends of the 1×3.
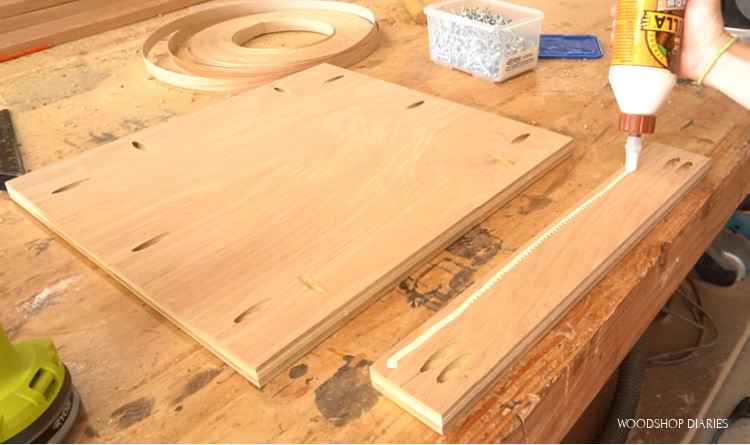
I glued and screwed the trim piece onto the front so it was ready to install after the glue dried on the sides.
.
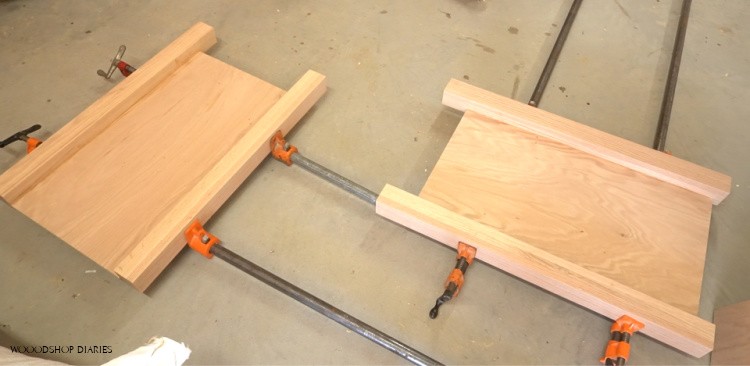
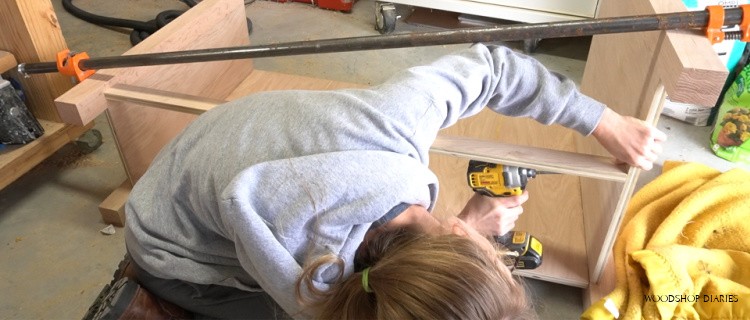
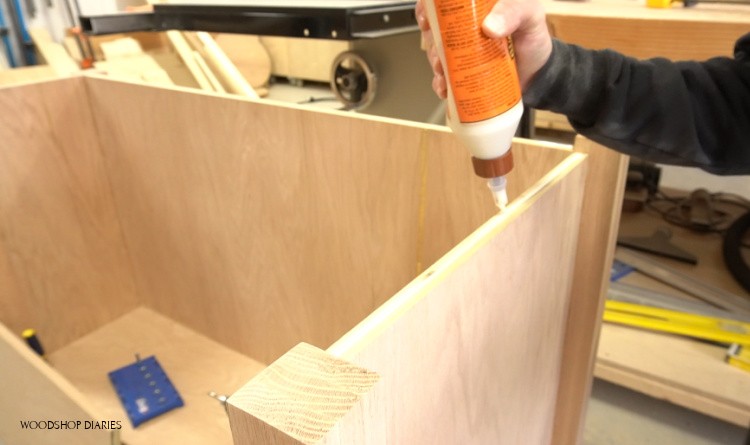
Now things start to come together a little bit. I glued the back panel into one side panel (using dowels and wood glue in the holes drilled from step 2), and placed the bottom panel assembly into the cabinet and screwed it in place with pocket hole screws.
Once one side was together, I added the other side, then clamped the back until the glue was dry.
Step 4: Add a Drawer to Desk Cabinet
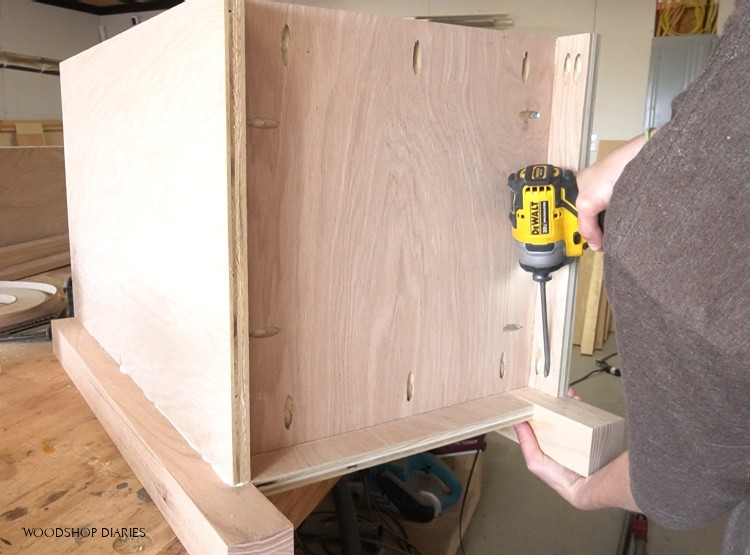
While the glue was drying, I installed a little piece into the front of the cabinet here that will sit just below the drawer box I will add. I just used some more plywood with edge banding (you could also use a 1×3) and attached with pocket holes and screws.
I installed a pair of 16” drawer slides to add an inset drawer, then built the drawer. For details on how I build and install drawers and drawer slides, check out this super detailed drawer building guide.
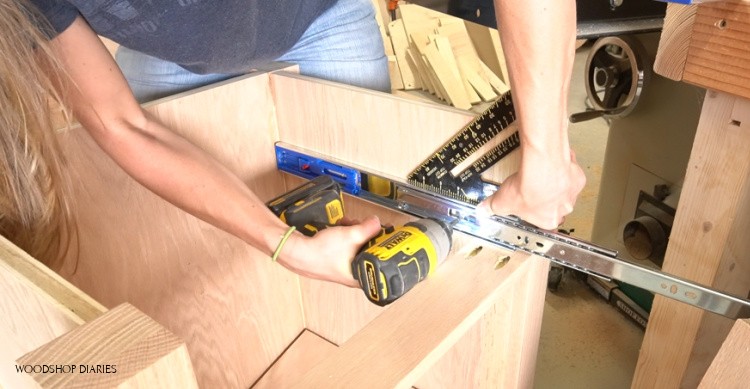
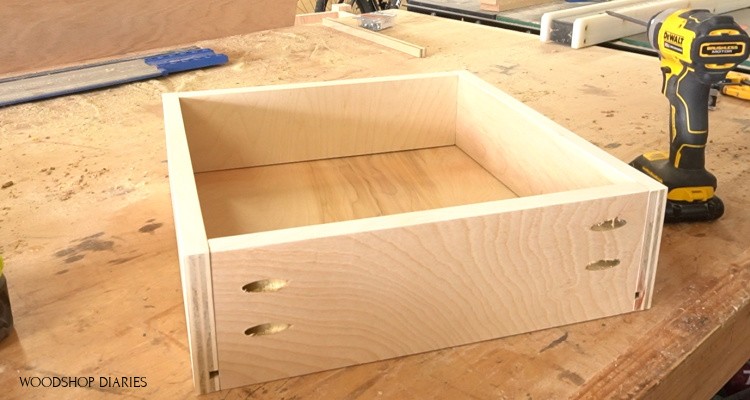
I built a single drawer here, cut dadoes in the bottom of the sides, and assembled using pocket holes and screws with ¼” plywood bottom in the dadoes.
Then, I installed it into the cabinet allowing for an inset drawer front.
.
I cut and edge banded a piece of oak plywood for this drawer front and screwed it in place through the front of the drawer.
Step 5: Assemble Right Desk Shelf Side Panels
Now, this desk isn’t huge, and I wanted the user to have some extra leg room. So, instead of bringing the entire shelf on the right side of the desk the full depth of the top, I built it inset. So one side of this cabinet will be narrower than the other side.
.
Other than the difference in dimensions, I assembled these side panels with dowels and wood glue just like the other cabinet earlier. The wider panel has the legs that stick up ¾” in this case. And just like before, I predrilled all the dowel holes for the back panel before assembling the sides together.
Step 6: Install Right Shelf Back Panel
Once the sides were dry, I attached the back. This time, I didn’t install the back and the bottom panel at the same time. I just glued the back panel in with dowels, used some corner clamps to keep it square and came back later to add the bottom.
As another side note: pocket holes work fine for all of this assembly process. Dowels are fun, but if you get frustrated lining everything up, pocket holes are a little easier.
Step 7: Install Desk Shelf Bottom Panel
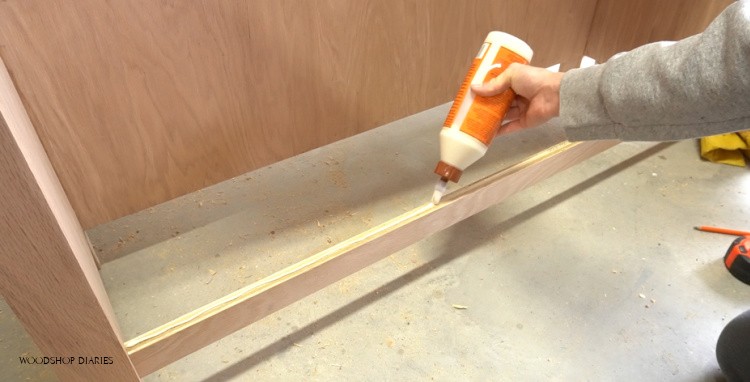
I cut a piece for the bottom panel and a little trim/support piece to go underneath it and drilled pocket holes along the edges.
.
Instead of installing this trim piece on the front of the bottom panel like the other cabinet, this time, I installed it underneath to provide some additional support.
I screwed the trim piece in first, then applied some glue to the top of it and set the bottom panel in place.
I clamped the panel on the trim piece until the glue dried and installed this panel into the sides and back of the cabinet using pocket hole screws.
Step 8: Install Trim and Desk Shelves
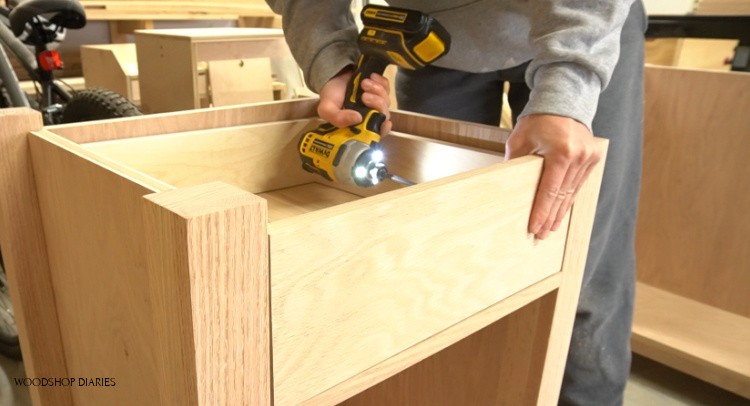
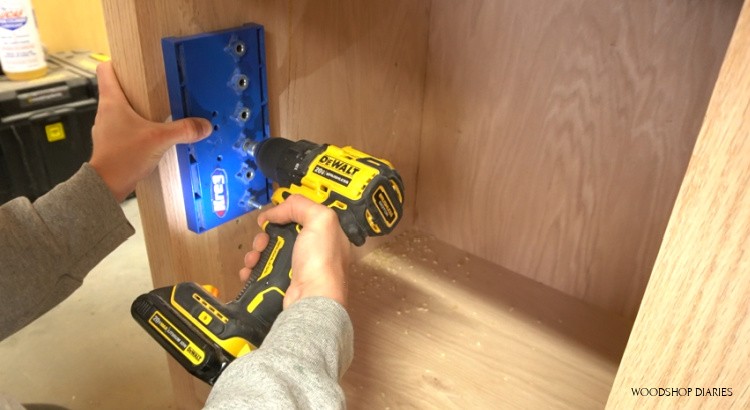
Using a shelf pin jig, I drilled shelf pin holes into both of the desk cabinets to install adjustable shelves.
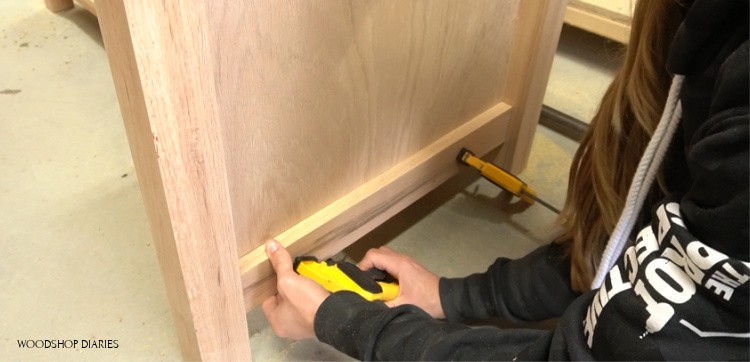
Then, I added some 1×3 trim pieces to the bottom edge of the desk as an extra detail. I just glued and clamped these in place, but you could also brad nail them.
Step 9: Cut L Shaped Desk Top
I cut the top from ¾” oak plywood and just for kicks and giggles, made the corner curve a little. This is purely decorative. I traced out where to cut to fit over the two cabinets and used a large round piece of wood I found in the shop to trace a curve.
.
I cut this top out using a circular saw for the straight edges and a jig saw for the curve.

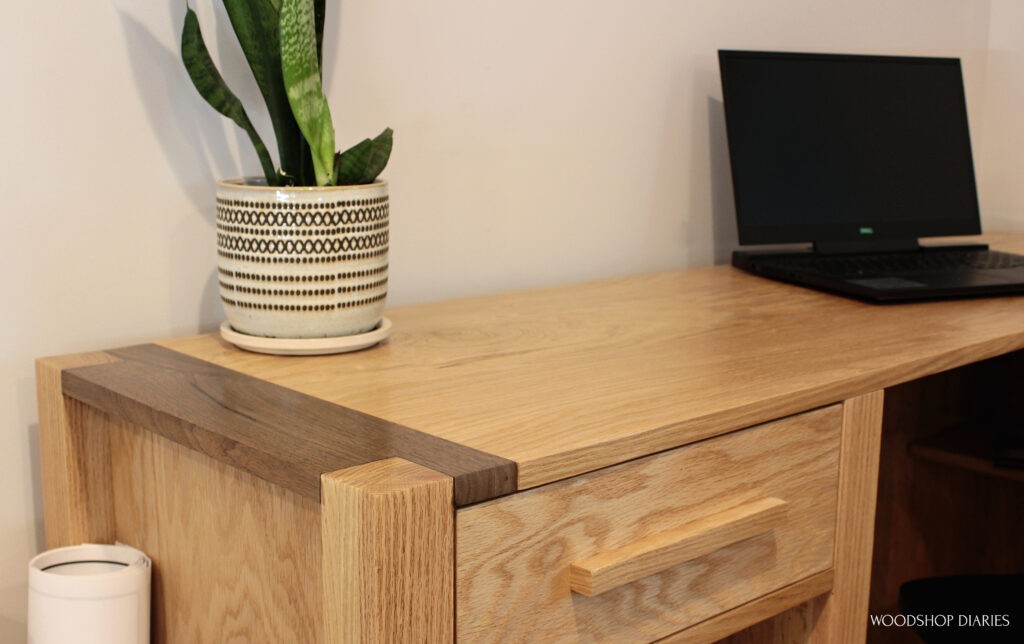
Now, I test fit it and traced where to cut the corners on this plywood top so it would sit flush with the outside legs. BUT, I ended up having some issues with the fit…the gaps were a little off.
.
Since this desk will be transported to another location once it’s complete, if I built the top as one solid piece of plywood, I couldn’t putty or epoxy the joints where the top meets the legs because the top needs to be able to be removed to get through a doorway. So large gaps or cracks around the legs here wasn’t going to be okay.
.
So I cut a scrap piece of walnut I had in the shop (I just used what I had–you don’t have to use walnut), traced and cut out the corners to fit around the legs, and glued these end pieces in place on both the left and right side cabinets.
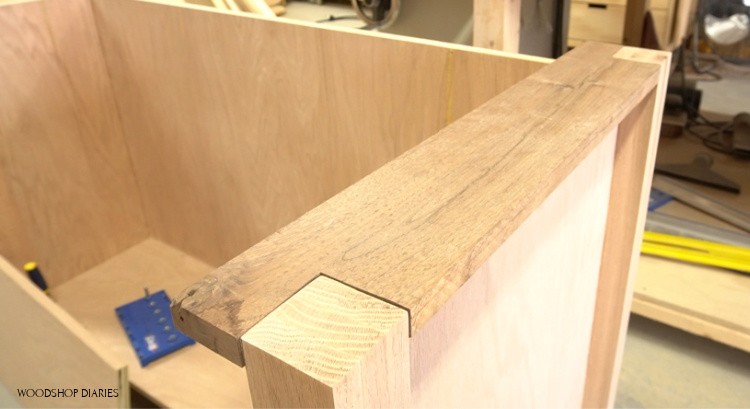
Then, I trimmed the ends of the plywood top the width of my walnut board so it would all fit together nicely.
.
Now, I could putty and epoxy these joints and leave this piece in place and attach the plywood to it with brackets underneath without any big gaps to deal with. (NOTE: you don’t have to use epoxy…putty would work fine as well!)

Step 10: Finish L Shaped Desk and Assemble
I edge banded the plywood top for a cleaner look, and once the glue, epoxy, and edge banding on all parts of the desk were dry and sanded well, I gave everything a few coats of Minwax Helmsman poly, glued a piece of scrap onto the drawer for a drawer pull, and put everything together.
.
To attach the plywood top to the walnut end piece, I just picked up some flat brackets and screwed them in from the bottom side.
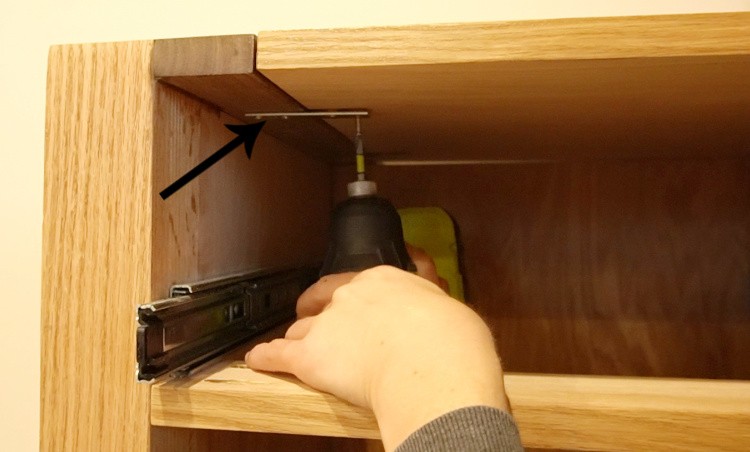
I’m sure there are plenty of other ways to do this, but this made it really easy to put together and take apart and kept it pretty sturdy. I also added a couple small corner brackets on each cabinet to keep the top sitting flat.
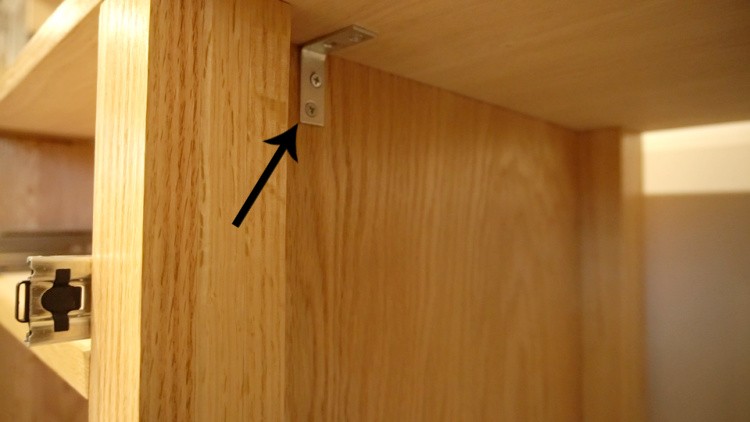
Truthfully, I was somewhat concerned the middle would flex a little without any additional support, but it’s surprisingly strong with just a couple brackets.
.
And now it’s ready to be put to good use. I really like this DIY L shaped desk design. It’s simple, but has a few unique, yet subtle details I enjoyed adding in.
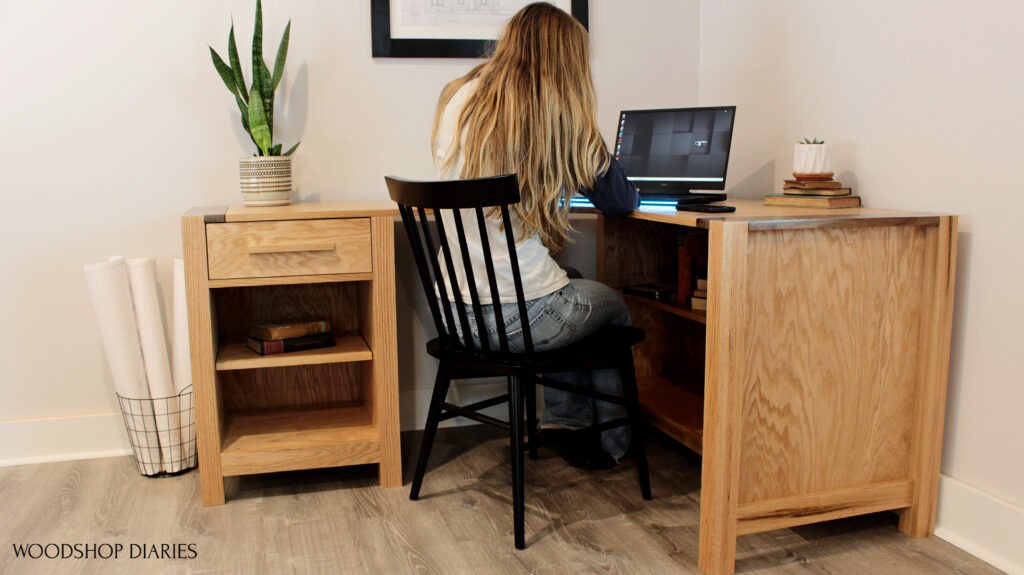
The accidental two tone is probably my favorite part…even though it’s a reminder of a pretty significant mistake haha.
.
So if you’re looking for a practical and unique DIY L shaped desk with shelves, I’ve got the printable plans here.
.
If you enjoyed this post, I’d love if you’d pin it! And if you are looking forward to the next one, be sure to subscribe to my newsletter below to be the first to get updates when a new post comes out!
Until next time, happy building!