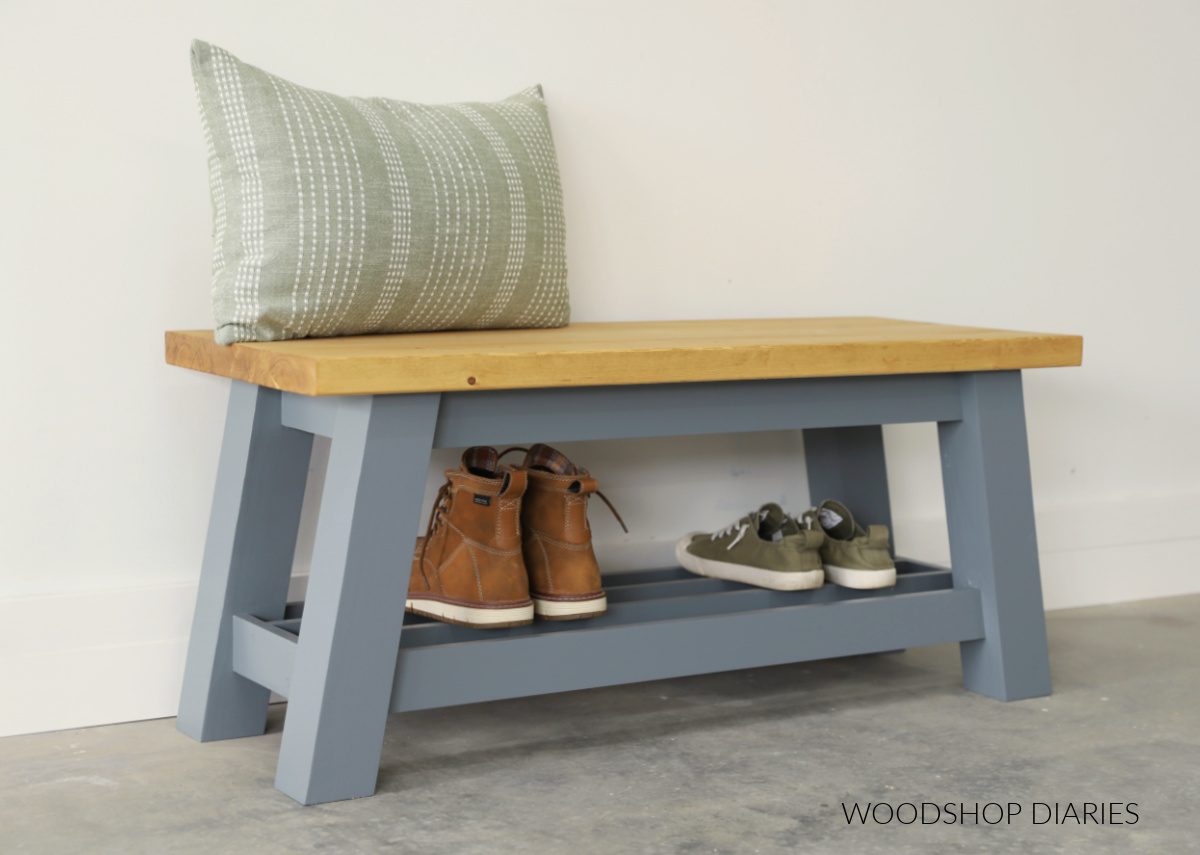
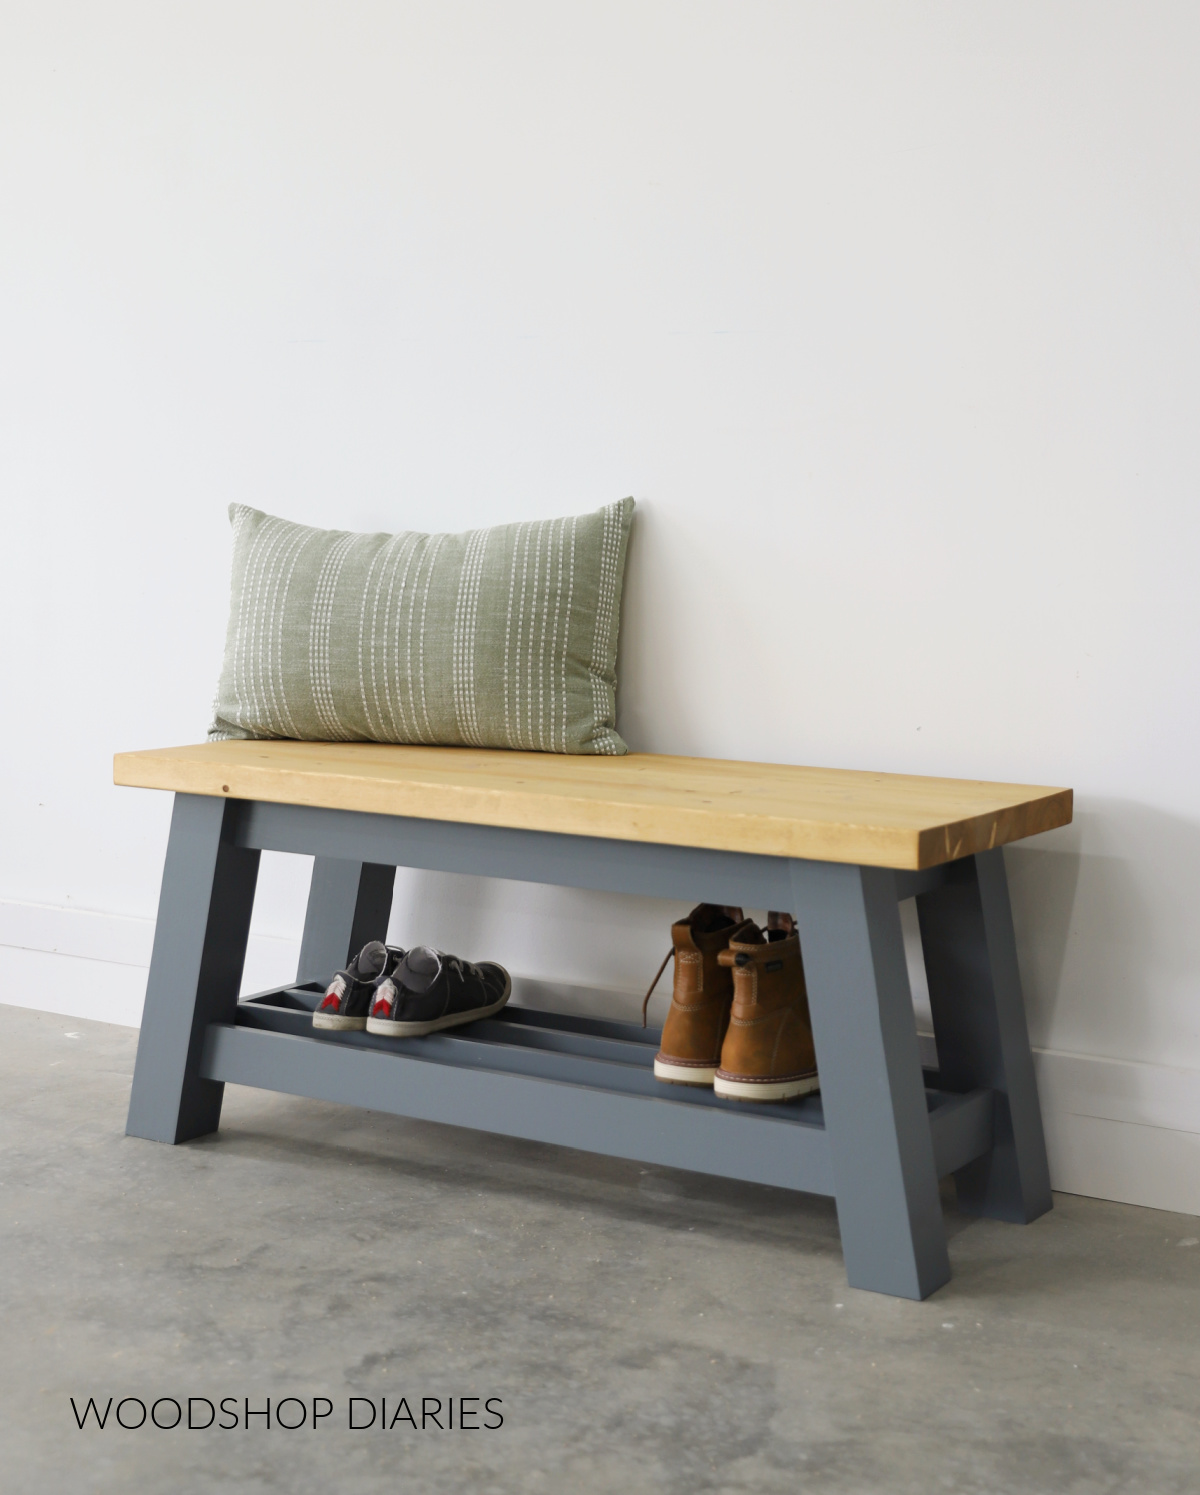
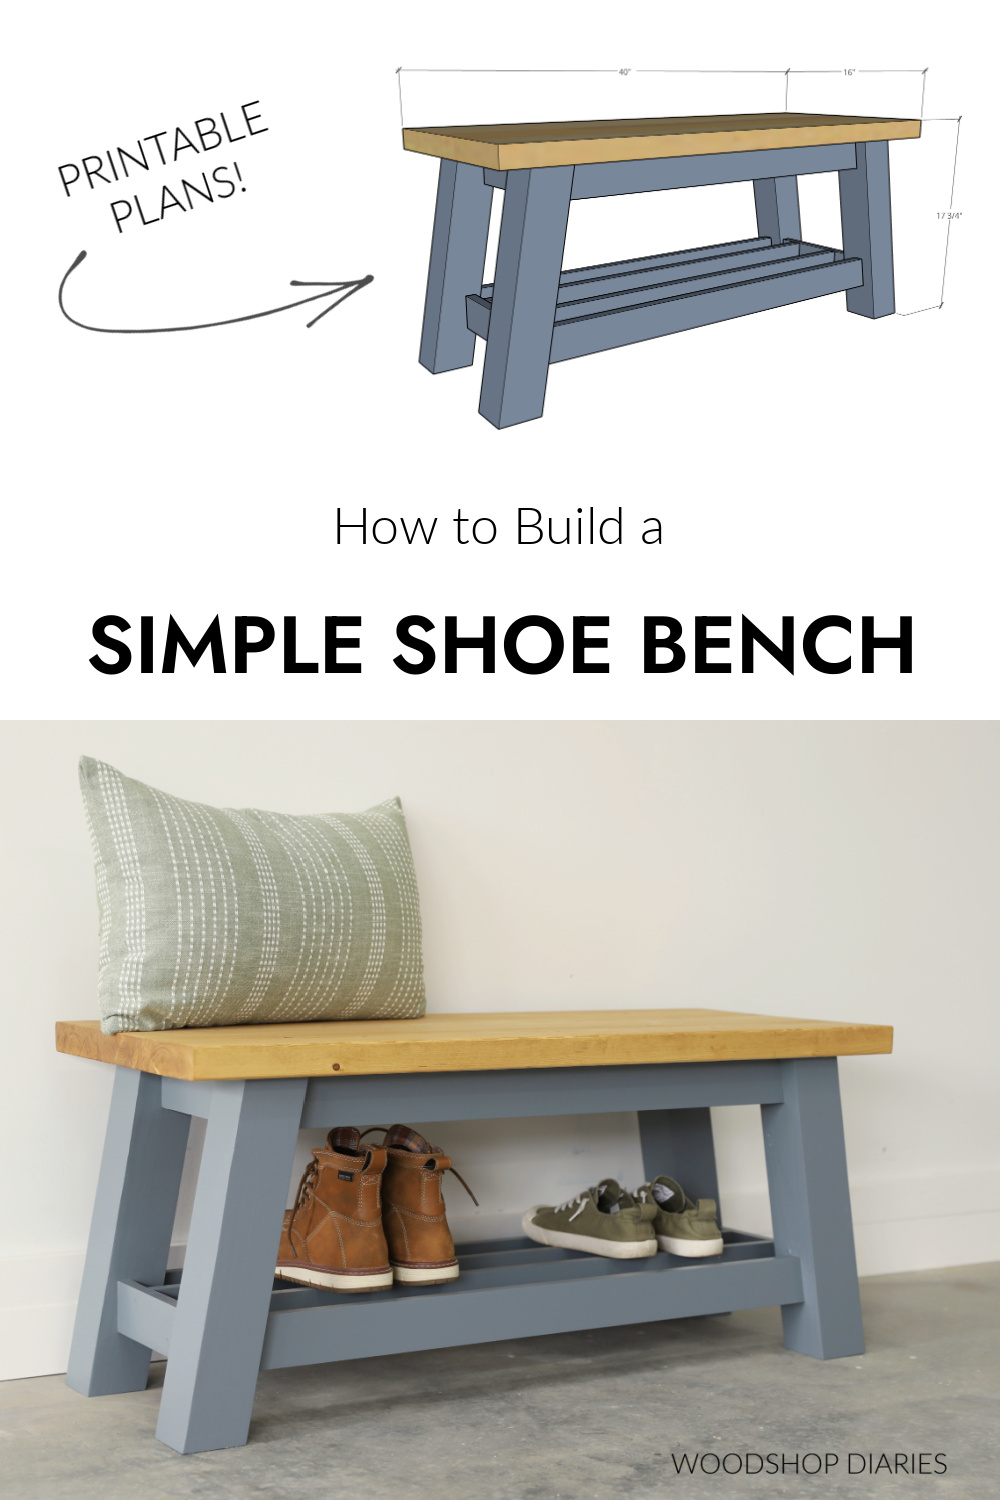
In this post, I’m sharing how to build a simple DIY shoe bench perfect for a small entryway or hallway!
This design uses basic lumber to build and is a great weekend woodworking project.
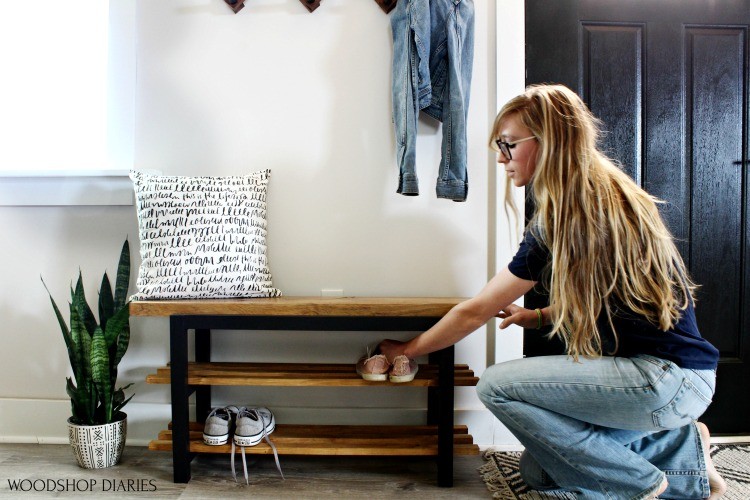
It’s always nice to have a place to sit down and take off or put on your shoes by the door (or at the end of the bed). It gives you a place to relax for a moment when coming home from a long day.
But it’s also nice if that seat has a place to actually store the shoes, too.
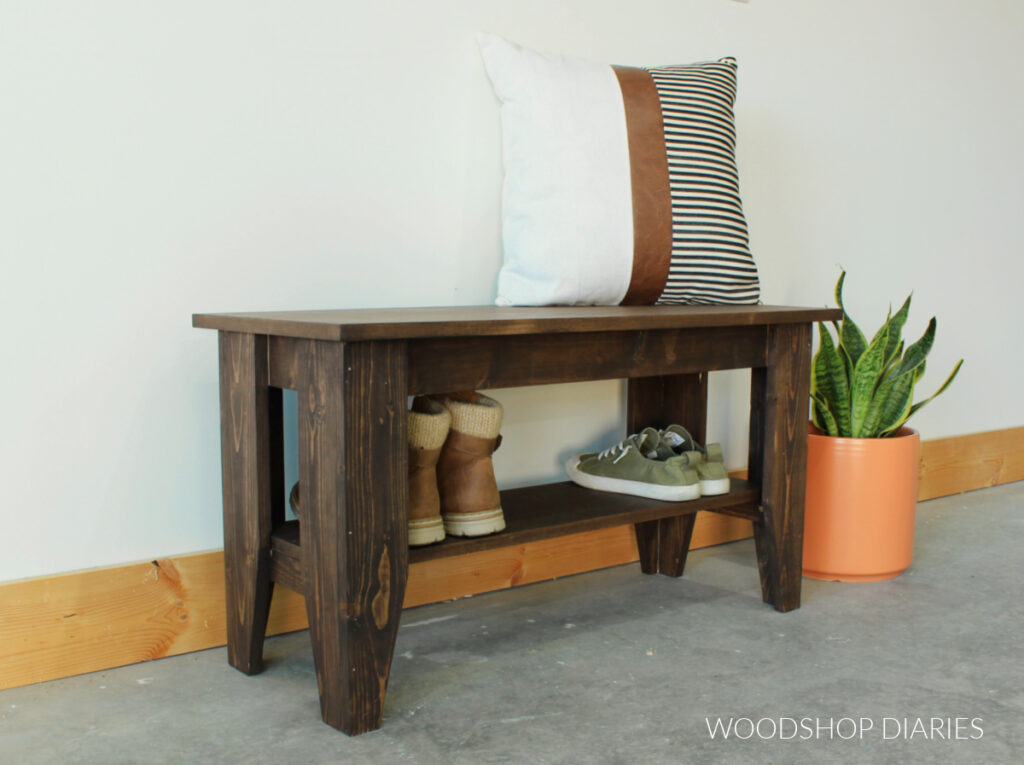
So I built this simple bench with a “slatted” shelf underneath–the perfect size for shoes.
This classic, but modern bench would be perfect in an entryway or on the porch. Or, you could skip the shoes altogether and use it at the dining table.
*This post contains affiliate links. See policies.
What to consider before building this bench
This simple DIY bench is a great beginner to intermediate build. It uses basic tools and techniques and can be completed in about a day.
Material Choices
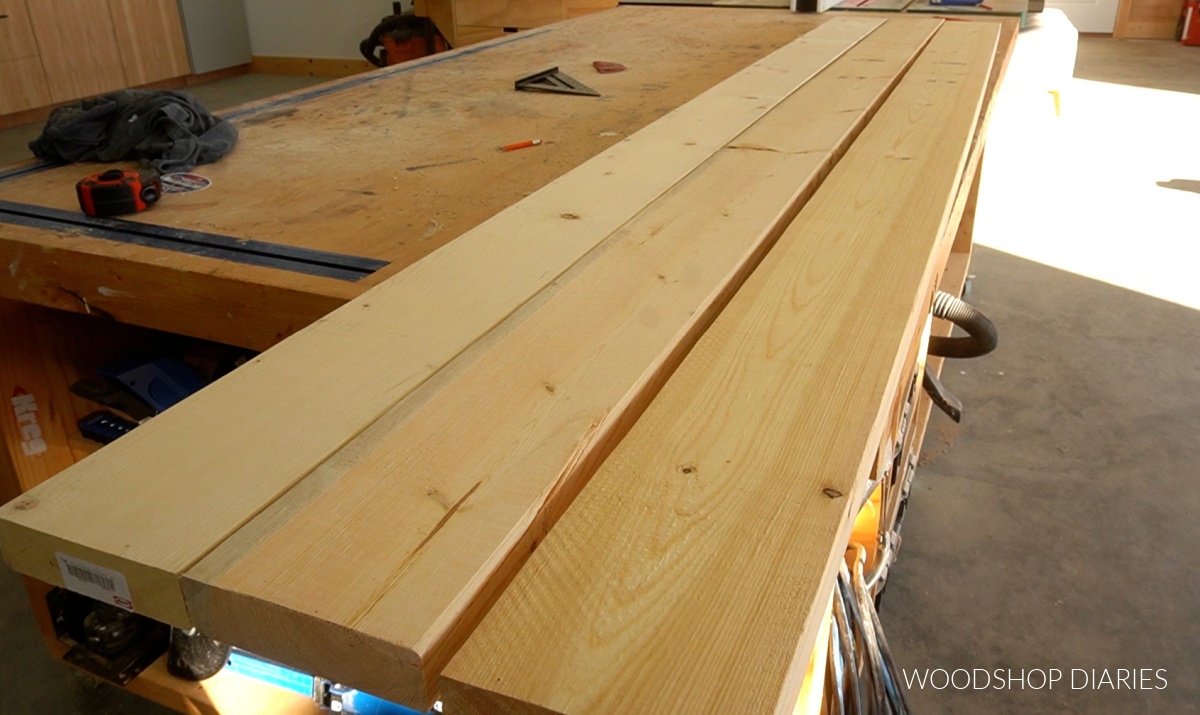
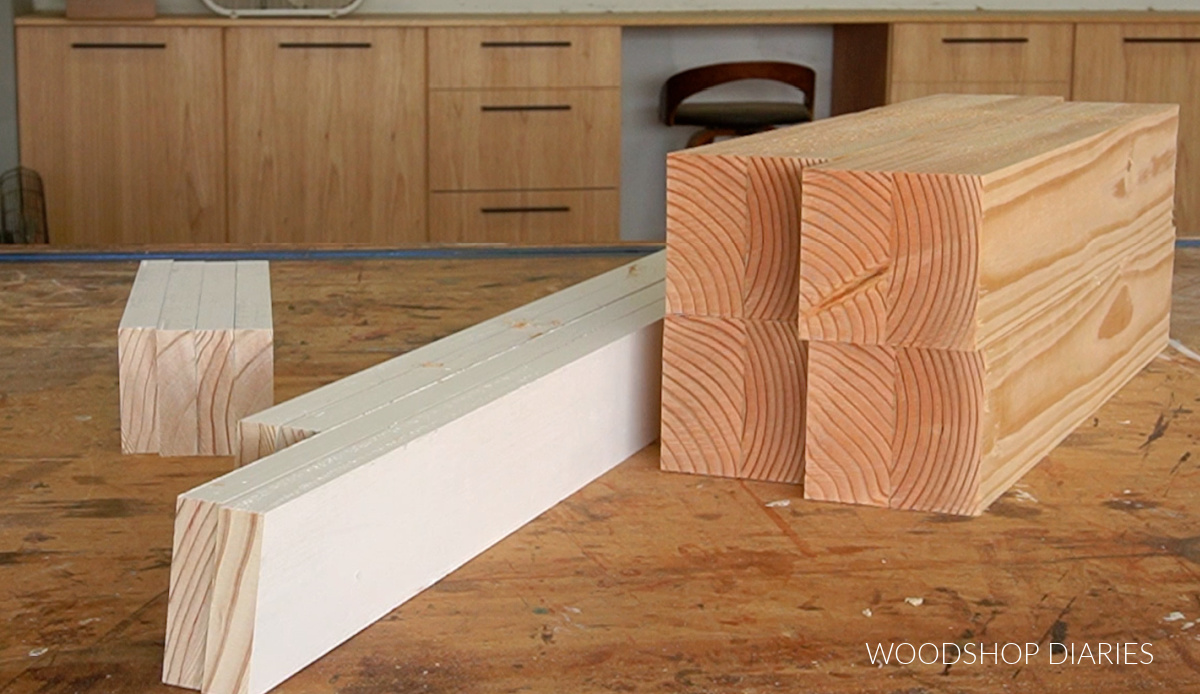
I built this bench from basic construction lumber–spruce/pine wood. I used 2x4s to make the legs, 2x6s to make the bench top, and 1x3s for the bench frame.
But, you could build this bench from whatever species of wood you prefer.
RELATED: How to buy lumber
My 1x3s were pre-primed (that’s what I already had in the shop), but unfinished, regular 1x3s would work just as well. That’s why mine are white in the photos below.
Making the bench legs
For the legs, I created my own 3″ square posts by gluing up two 2x4s. Once they were glued together, this gave me a post 3″ x 3 ½″ (see below).
RELATED: Understanding lumber sizing
To make it 3″ square, I used my table saw to trim ¼″ off each side. Then, I cut my bench legs from this post in step 1 below.
If you don’t have a table saw or don’t want to make these yourself, you could substitute a 4×4 post here instead. Just keep in mind that 4x4s are 3 ½″ x 3 ½″ so you’ll need to modify the dimensions in the plans here slightly.
OR, sometimes, the big box stores carry pre-glued and surfaced 3″ square posts. They’re usually a little pricey, but that’s another option.
Overall shoe bench dimensions
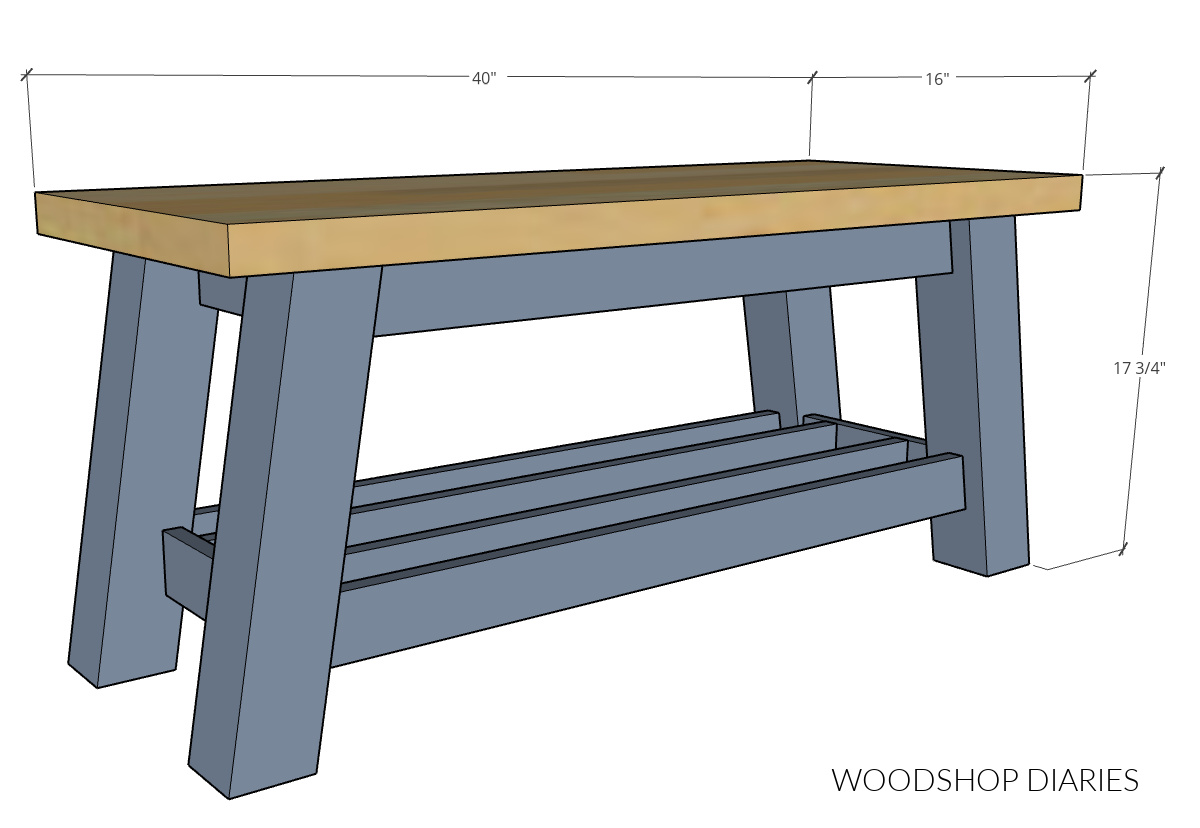
The overall dimensions of this simple shoe bench are 16″ deep x 17 ¾″ tall x 40″ wide.
You may find these resources helpful during the build
Are DIY projects your thing? Sign up for our newsletter for priority access to the latest projects and build plans!
How to build a simple shoe bench
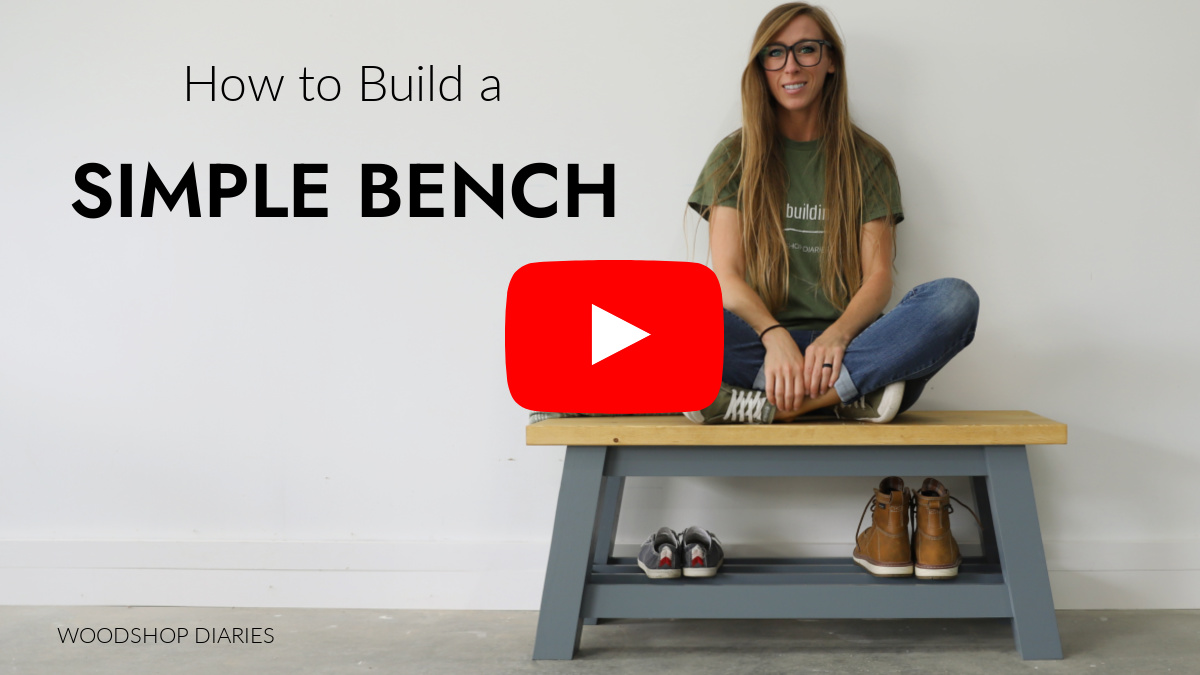
I’m sharing the step by step and building plans below, but if you prefer watching, I’ve also got a video tutorial on my YouTube channel with additional tips and resources.
Love watching how-to videos? Subscribe to my YouTube channel for plenty more where that came from!
For detailed dimensions, diagrams, and cut list, Grab the printable building plans for this simple shoe bench here.
Tools and Materials
Tools:
- Miter saw
- Drill/Driver
- Pocket hole jig
- Sander
- Clamps
- Table Saw (optional)
- Forstner bits (optional–for installing figure 8 fasteners)
Materials:
- (2) 2x4x8 boards
- (3) 1x3x8 boards
- (2) 2x6x8 boards
- 1 ¼″ pocket hole screws
- Wood glue
- Figure 8 fasteners OR corner brackets (to attach top)
- Wood finish (paint, stain, etc.)
Step 1: Assemble Bench Legs
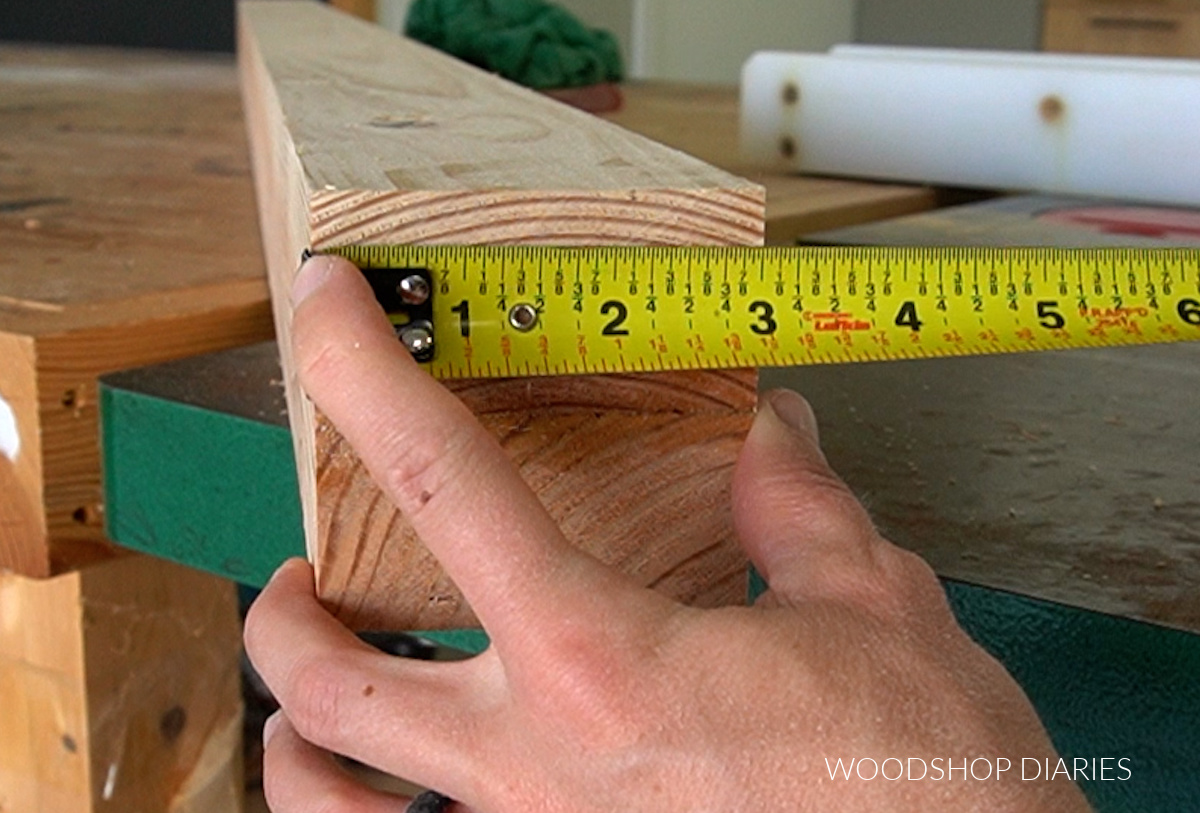
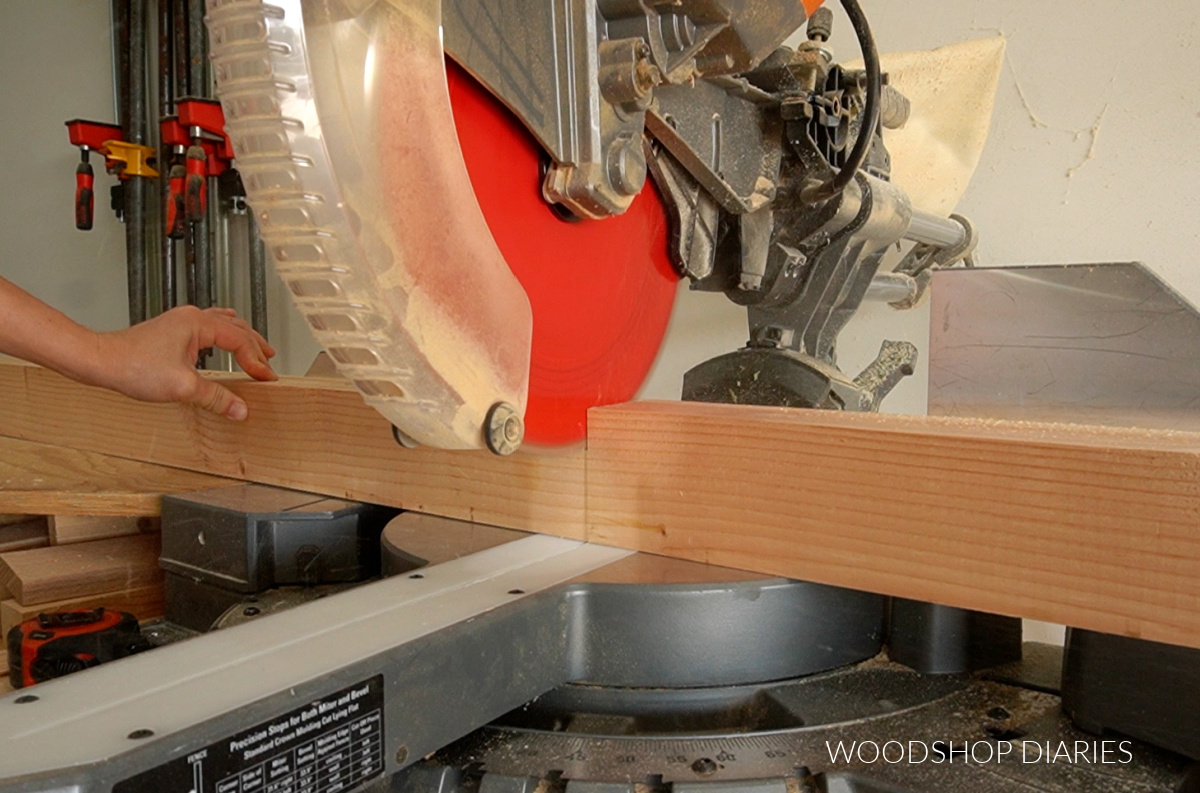
I mentioned in the notes above that I made my own 3″ square posts to use for the bench legs on this build. First, I cut two 2x4s to about 72″ long (which was a little more than I needed to cut the 4 legs from).
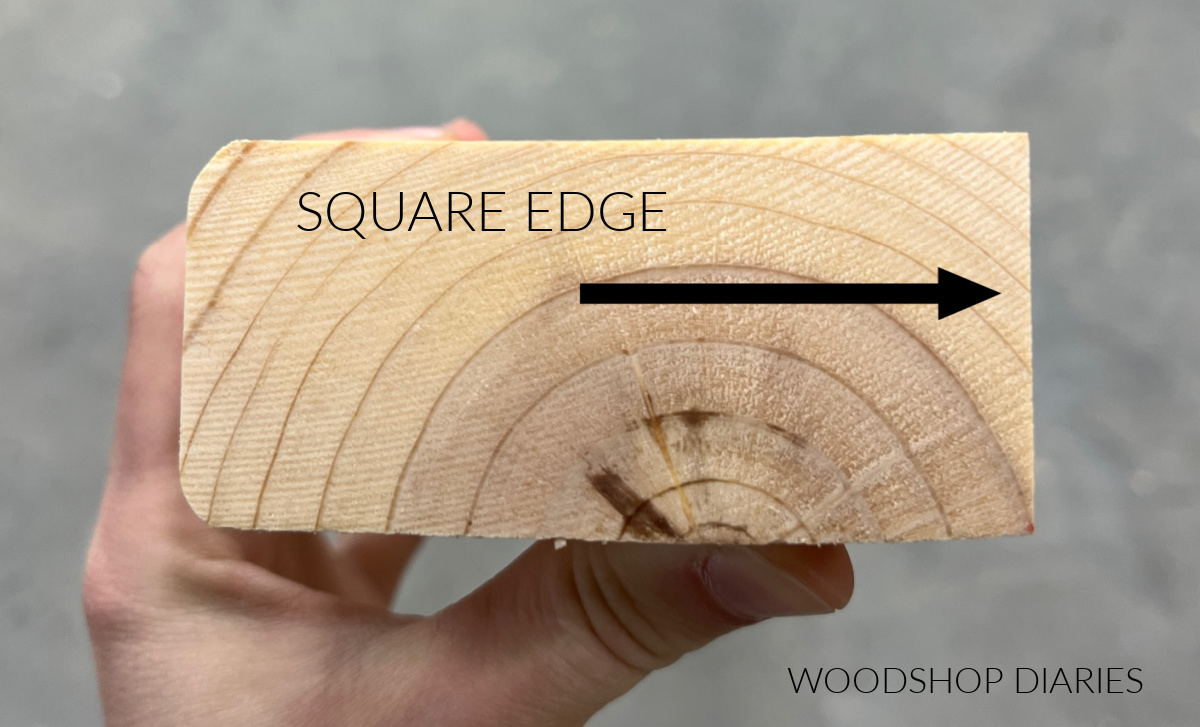
Then, I glued these together to make a 3″ x 3 ½″ post. Once the glue was dry, I ran this post through the table saw to cut about ¼″ off each side so that I had a 3″ x 3″ square post.
Check out this post to learn more about squaring board edges on the table saw.
Once I had my post trimmed, I cut my four legs from it. I adjusted the miter angle of my miter saw to 10 degrees to cut these legs. The slight angle on the legs gives this otherwise basic bench some nice dimension.
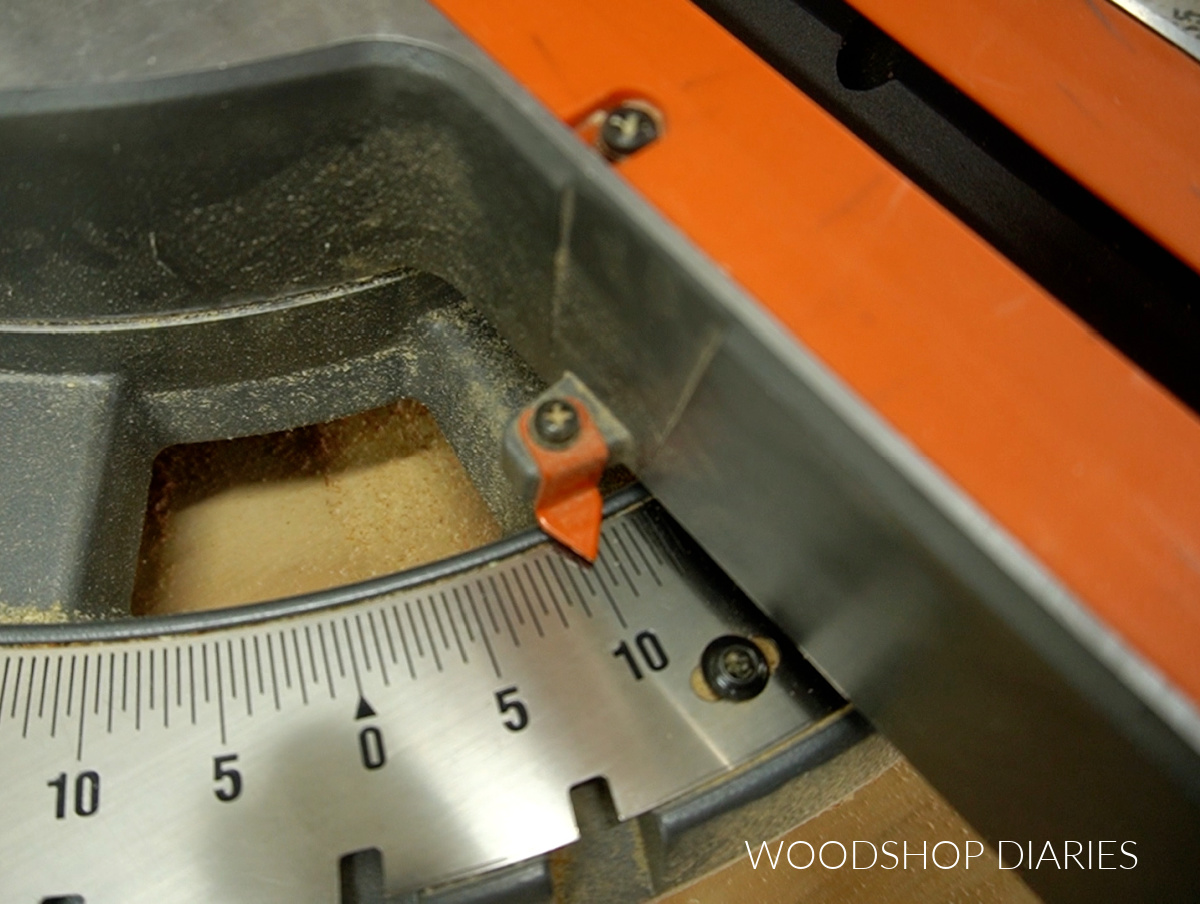
I cut four legs about 16 ½″ long with ends mitered 10 degrees parallel to each other.
To cut these parallel, simply trim one end, then just slide the board down (WITHOUT FLIPPING IT or adjusting the miter angle) and trim the other end.
Step 2: Assemble Bench Frame Sides
Next, I cut my 1x3s down for the rest of the bench frame pieces. Exact dimensions can be found in the plans here.
I cut four short 1×3 pieces (8″ long) with square ends for the bench sides. Then, I cut four longer 1×3 pieces with ends mitered 10 degrees (not parallel) for the front and back frame pieces.
The two bottom front/back pieces are slightly longer than the top since the legs are angled. Once cut, I sanded them before assembly.
I assembled this bench frame using pocket holes and screws, so I drilled ¾″ pocket holes into the ends of all the 1×3 pieces. NOTE: See video for tips on drilling pocket holes in boards with mitered ends.
RELATED: How to drill pocket holes
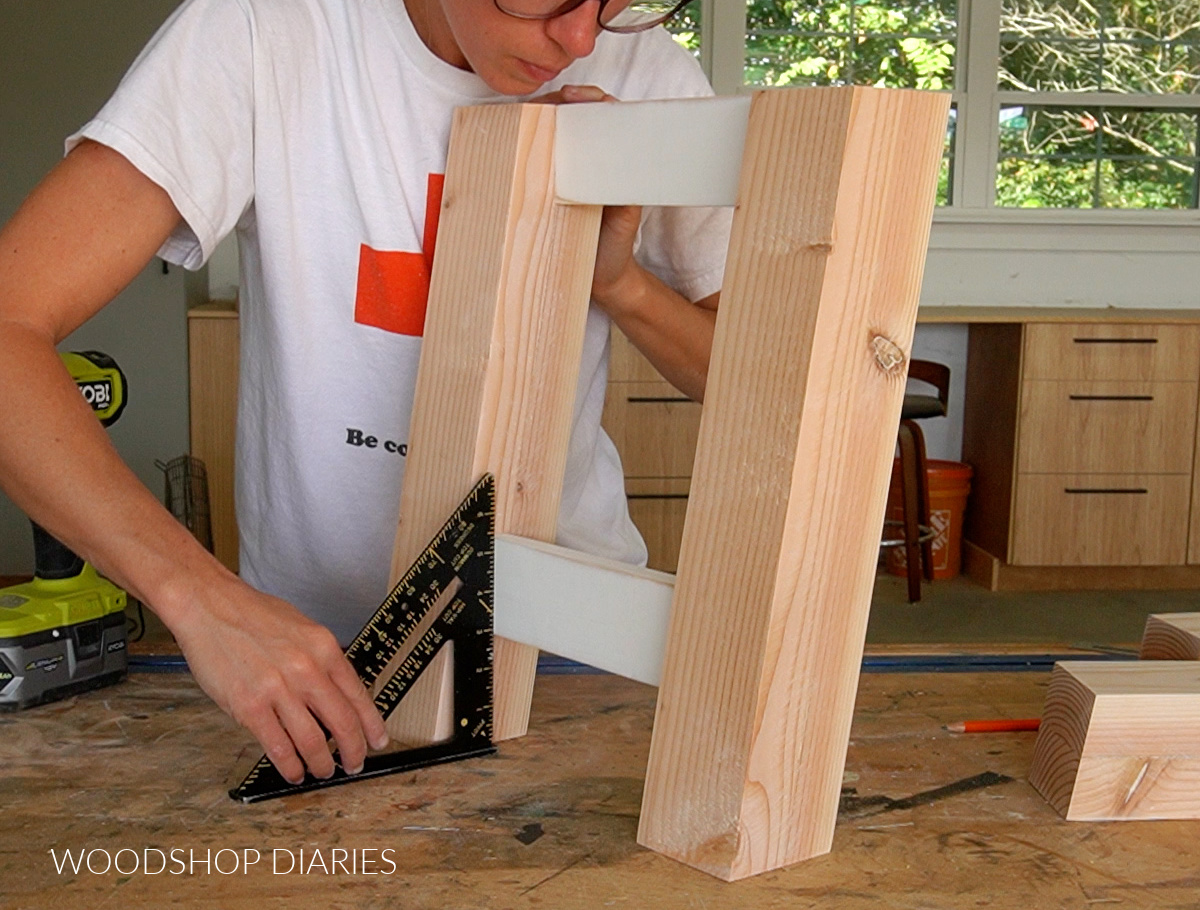
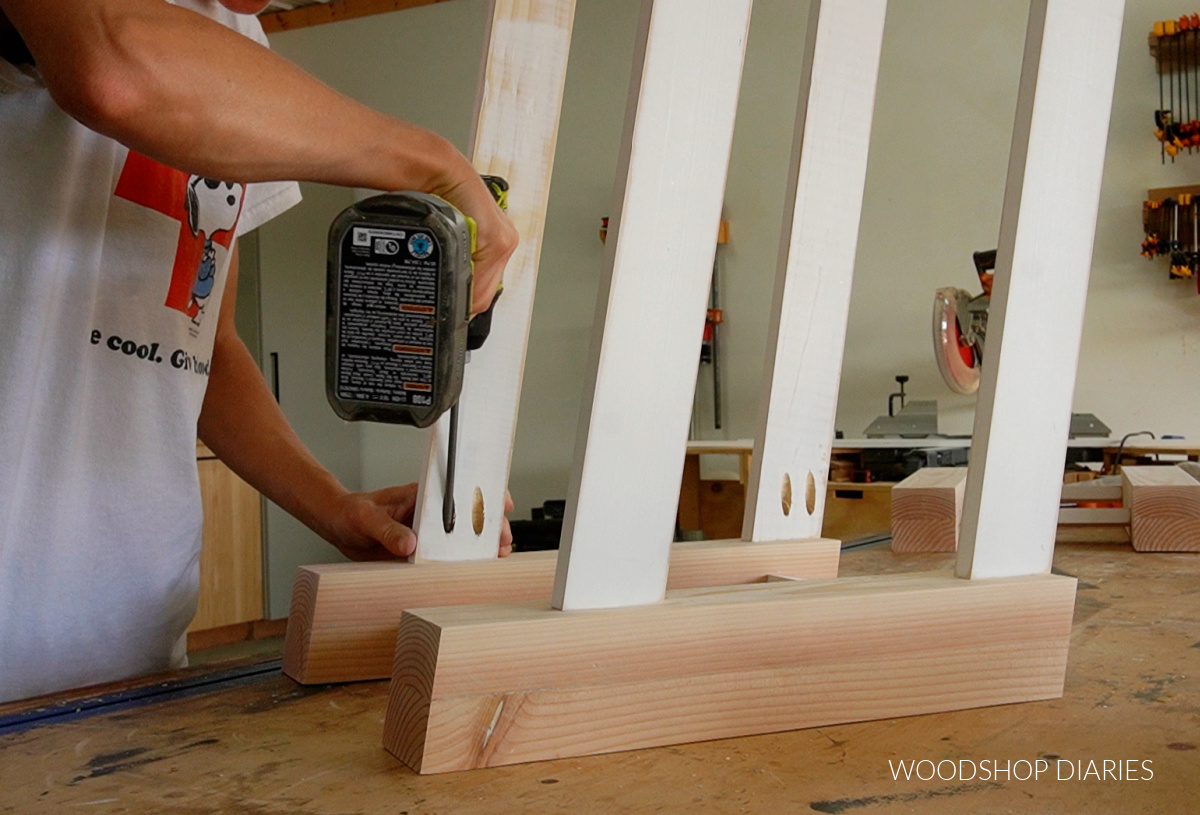
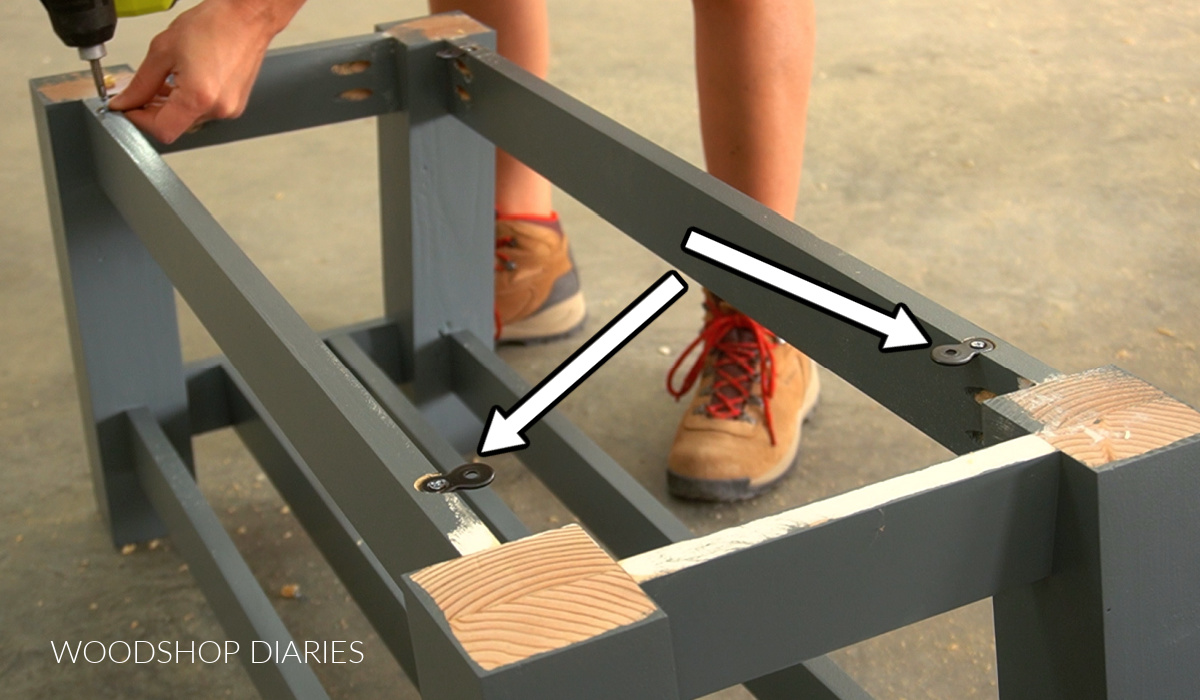
Then, I installed the short pieces between the bench legs using pocket hole screws to make two bench sides. The bottom support is installed 3″ up from the bottom of the leg.

These pieces should be installed between the legs so that they are square to the top and bottom–not angled with the legs. Notice how the bottom support is square to the table in the image below.
Step 3: Build Bench Base Frame
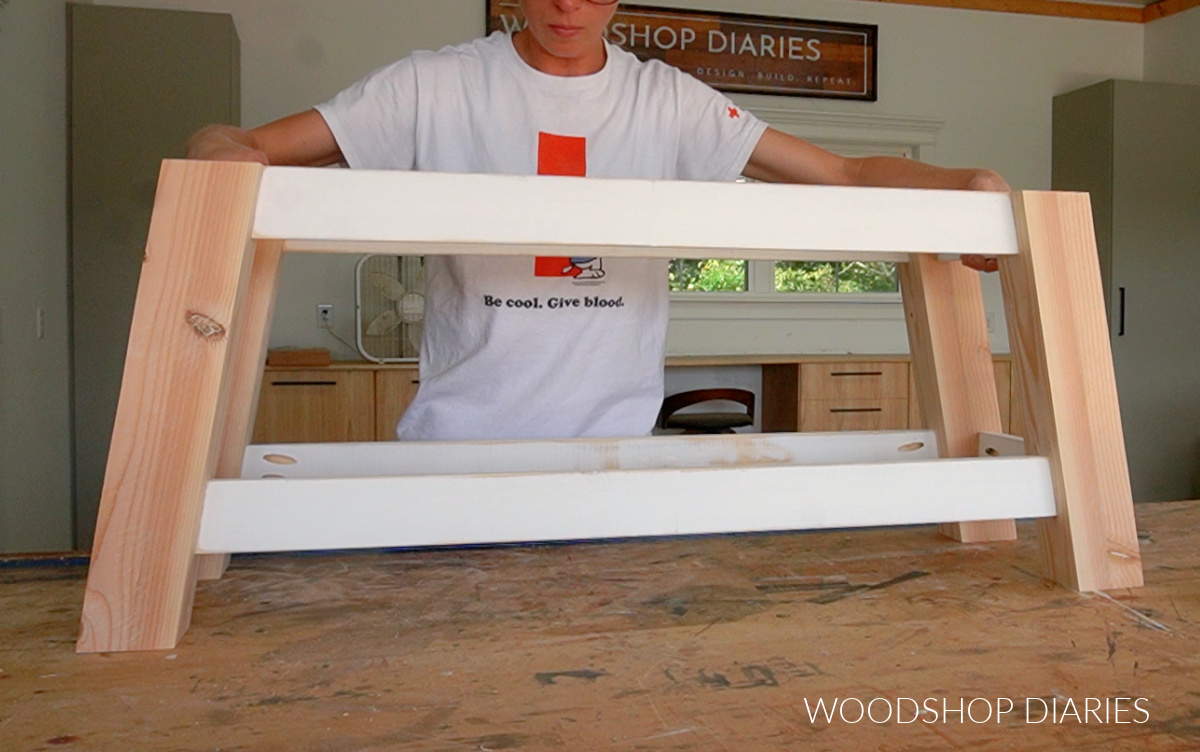
Once the sides were assembled, I installed the front and back supports between them using pocket holes and screws.
I screwed these in so that they were 1″ inset from the outside edge of the legs. The two top pieces are flush to the top of the legs and the two bottom pieces were 3″ up from the bottom of the legs.
This is totally optional, but I used some pocket hole plugs to fill the pocket holes on the bottom front, back and side supports. Here are 4 ways to fill a pocket hole.
You can fill the pocket holes on the top as well, but they won’t be seen in the finished project once the top is in place.
Prefer to print? Grab the printable shoe bench building plans here.
Step 4: Finish and Attach Shoe Rails
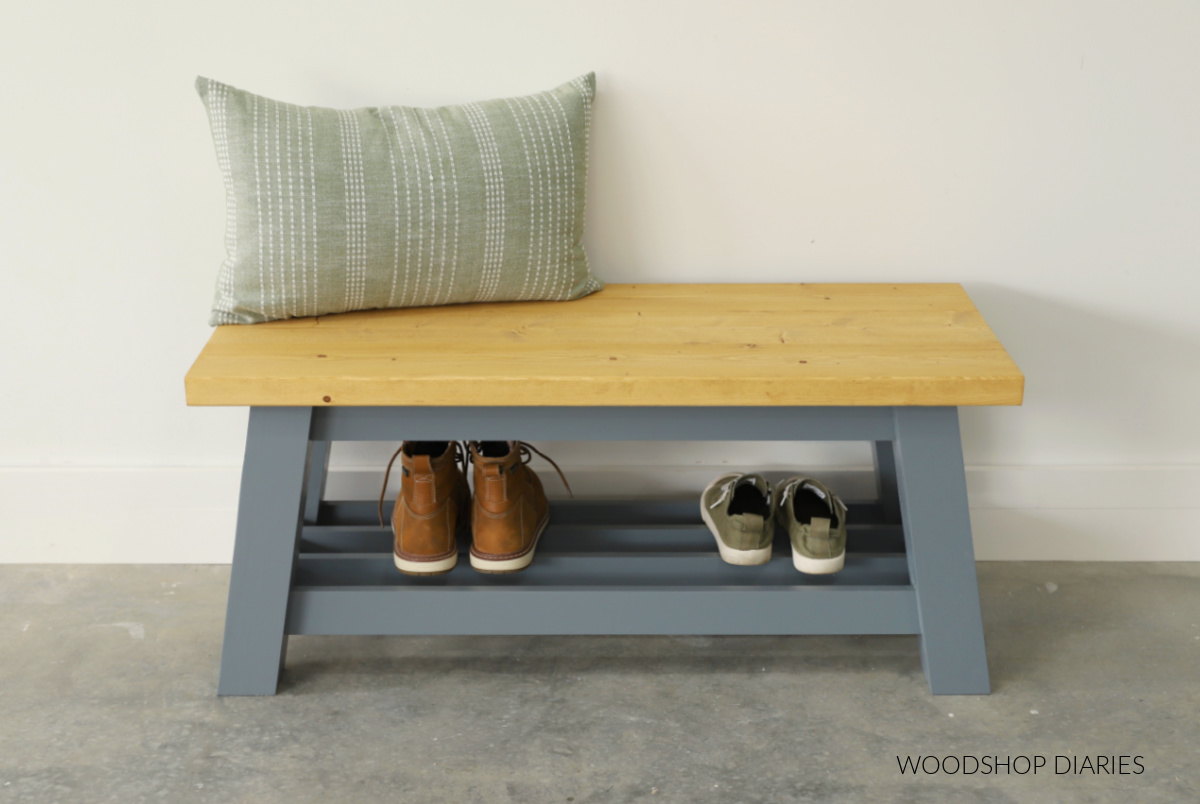
After the pocket holes were filled and sanded smooth, I cut to fit two pieces of 1×3 to run between the two bottom side supports. These pieces will kind of create the “shoe shelf” of the bench.
I didn’t install these yet because I was going to paint the bench and I knew it would be difficult to get in between them with a brush and roller (I don’t have a sprayer). So I primed and painted these two rails and the bench base separately, first.
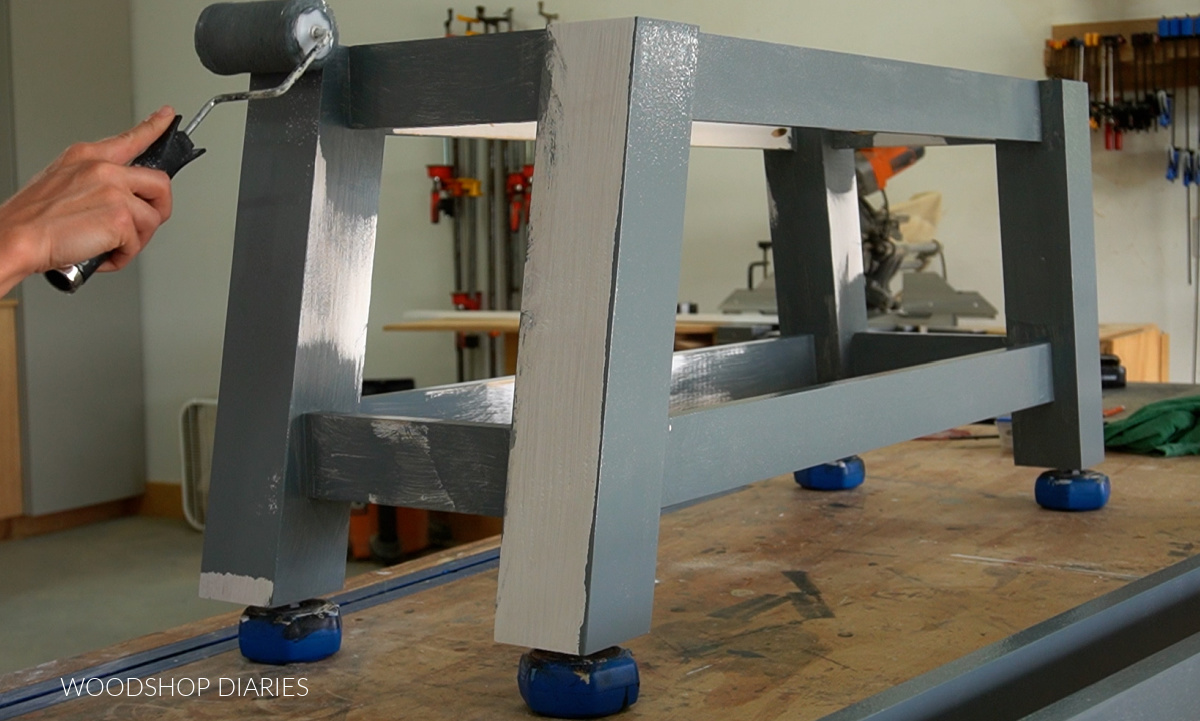
Check out this post to learn how to finish DIY furniture. I gave the bench two coats of paint in Behr Ocean Swell and allowed them to dry well before moving on.
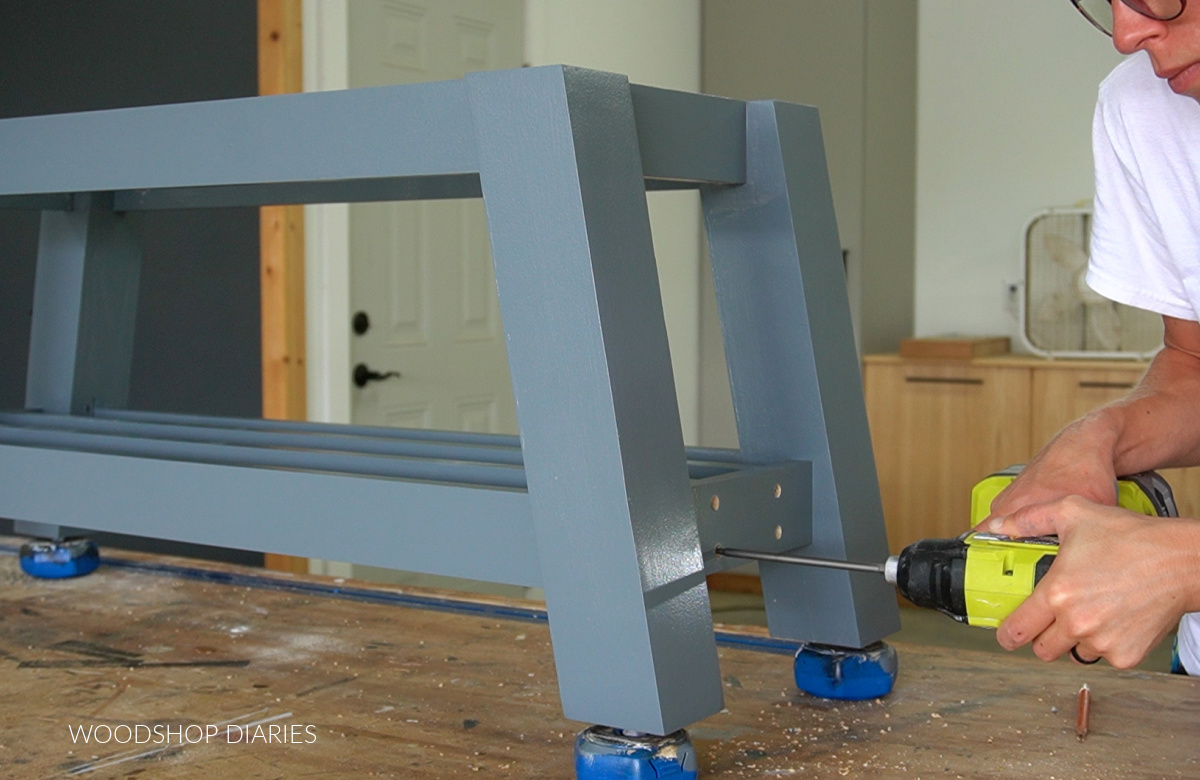
Once the paint was dry, I used a rubber mallet to carefully tap the two 1x3s into the bench frame so that they were evenly spaced between the front and back bottom supports.
Then I drilled some countersunk holes through the side supports and secured with 1 ¼″ wood screws like shown below. If you wanted, you could also install these with pocket holes and screws, BUT it might be challenging to get a drill/driver into these tight spaces.
After the shoe shelf rails were in, I filled the countersunk holes on the side supports, sanded them smooth, and touched up the paint.
If you planned to stain or you have a paint sprayer, I’d recommend attaching the shoe shelf rails before finishing to avoid having to do paint touch ups.
Step 5: Build and Attach Bench Seat
The bench seat was made using 2x6s. First, I trimmed three 2x6s to about 42″ long. I’ll be trimming the seat down to 40″ overall later, so this gives me a little to trim off the ends after they’re glued.
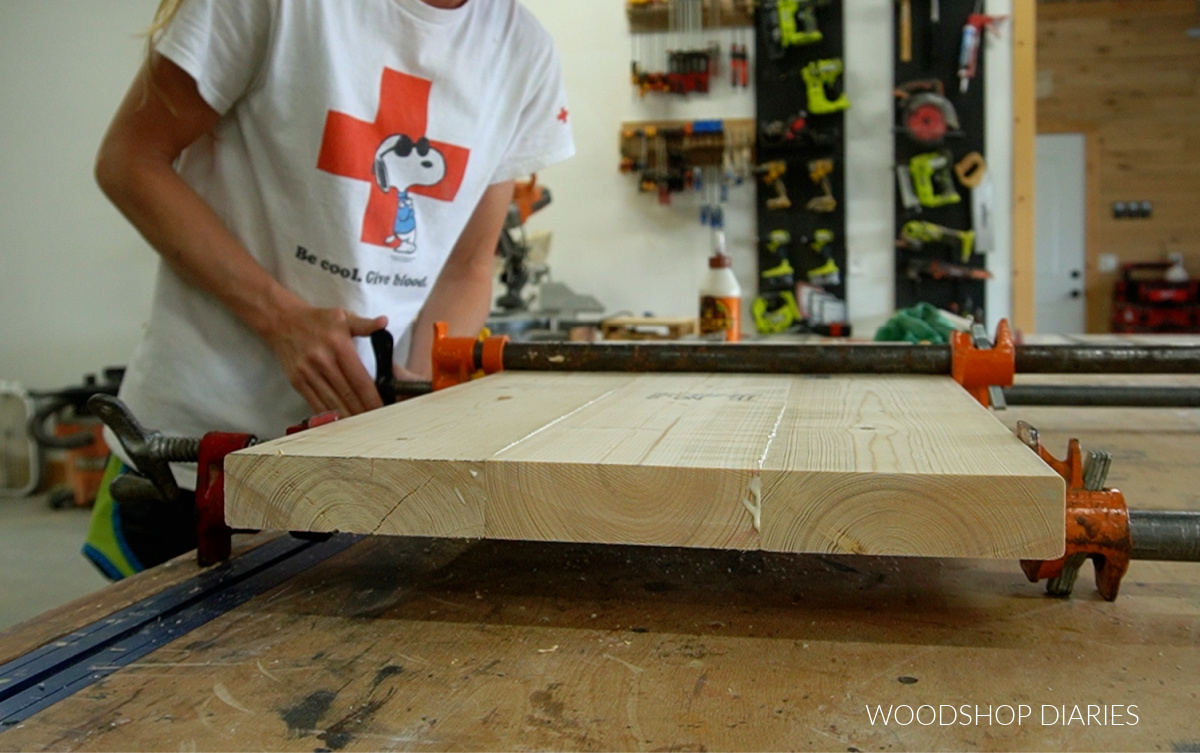
Then, I trimmed ⅛″ off both edges of the middle board and off one edge of the two outside boards on the table saw. That way, all the edges that will be glued are trimmed.
The reason I trim the edges is because 2×6 construction lumber typically comes with rounded corners. When you glue them together, the joints will have a “dip.” So I like to square the edges off before gluing so that the panel is nice and flat across the surface.
Check out this post to learn how to square board edges.
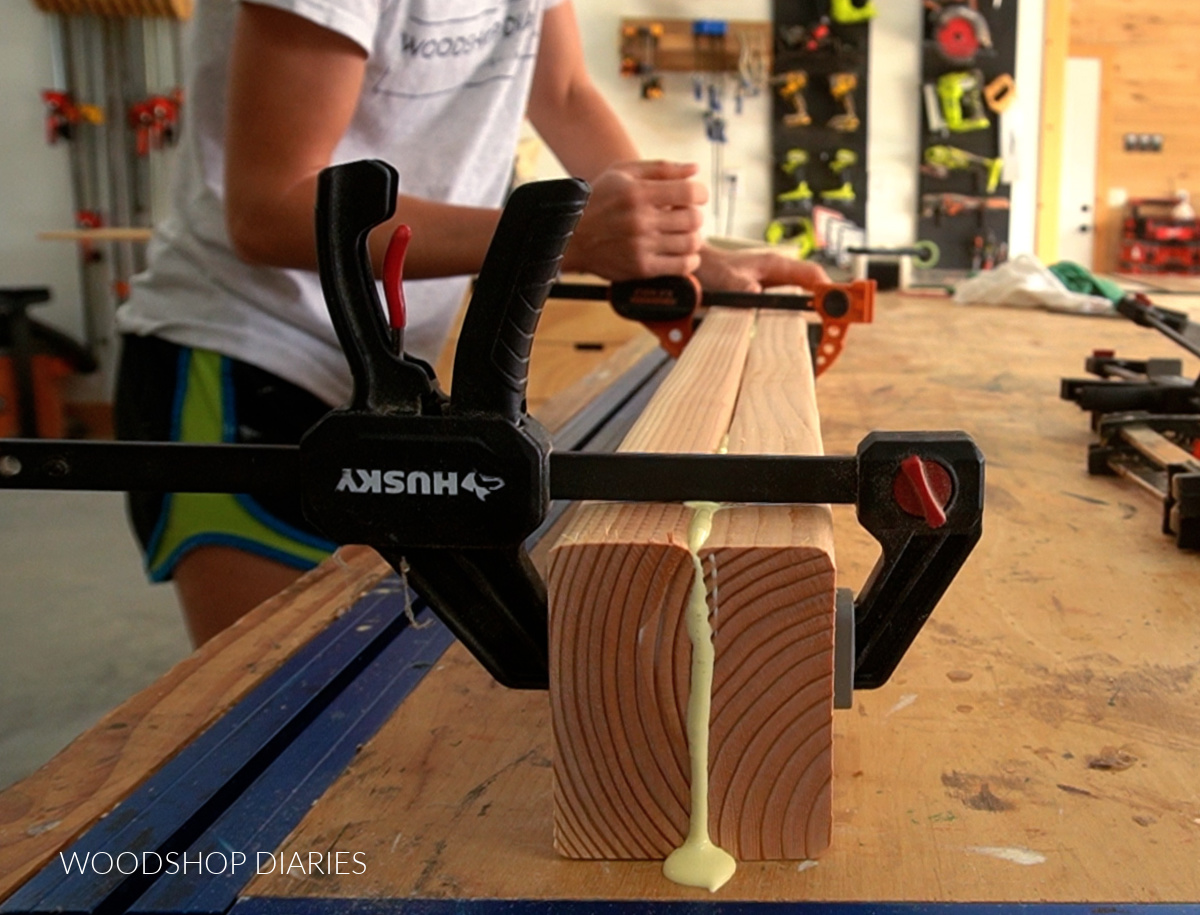
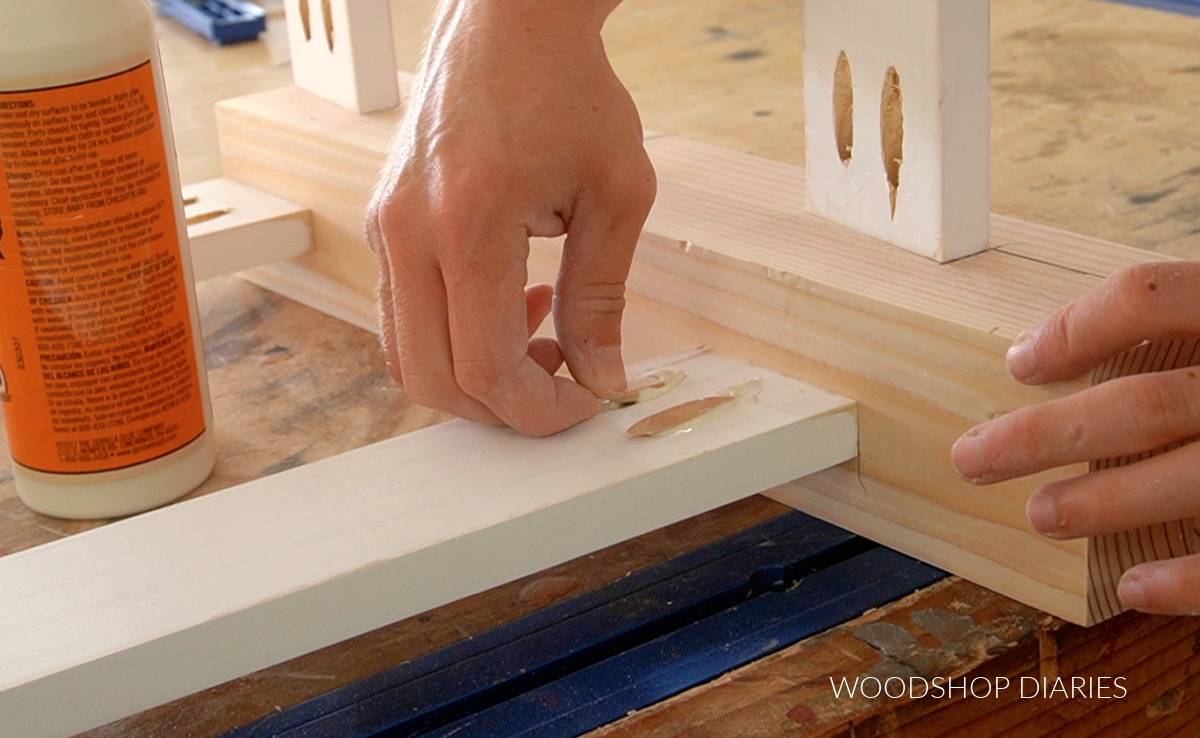
Once I squared the edges of my 2x6s, I applied some glue and clamped them together into a panel.
After the glue dried, I trimmed the edges so that I had a 16″ x 40″ seat. Make sure to sand well to remove the glue squeeze out and flatten out the joints.
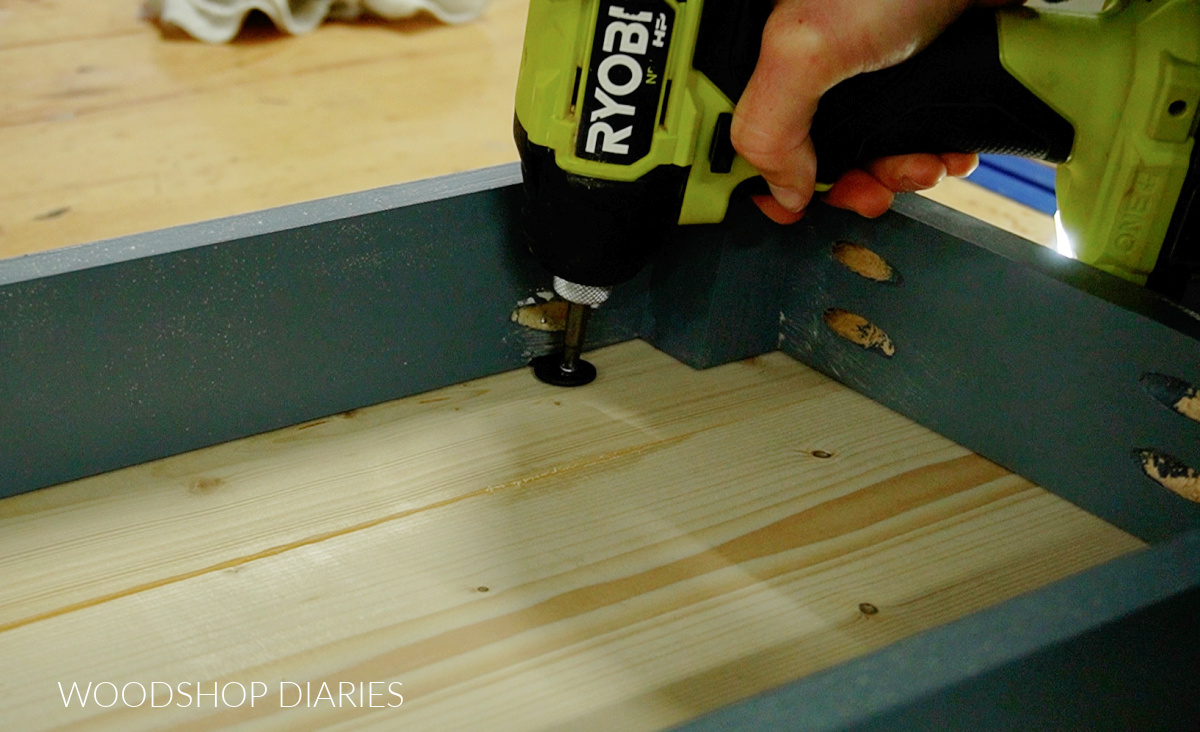
To attach this panel to the base, I used figure 8 fasteners. However, corner brackets would also work great. I installed these fasteners to the top of the bench base.
Then, I flipped the bench seat panel upside down and centered the bench base upside down on top of it.
I used wood screws through the fasteners to attach them together.
Step 6: Final Touches
I debated on whether I wanted to just apply a clear coat or stain the bench seat. Ultimately, I decided to give it a coat of Minwax Golden Oak before a few coats of poly to seal it.
Feel free to finish however you’d like–a darker stain would look nice, too! Once it was dry, it was ready to use.
The shelf underneath is perfect for sneakers and short boots and it large enough to fit 3-4 pair of shoes. I really like the slatted shelf here. It allows air flow to help dry off wet shoes, but it also gives it a unique take on the typical solid shelf.
This would be perfect at the end of the bed, in a hallway, or by the door. Don’t forget to grab the printable plans here to build your own!
Looking for more entryway and bench ideas?
Enjoyed the project, but looking for more ideas? I got you! Here are a few favorite entryway and bench ideas you might enjoy!

If you’d like to save this project for later, don’t forget to pin it or share it to your favorite social platform!
Until next time, friends, happy building!