In this post, I’m sharing how to build a DIY storage bench with drawer!
This would be perfect for a bathroom, the end of a bed, in an entryway, or for storage in a kids room.
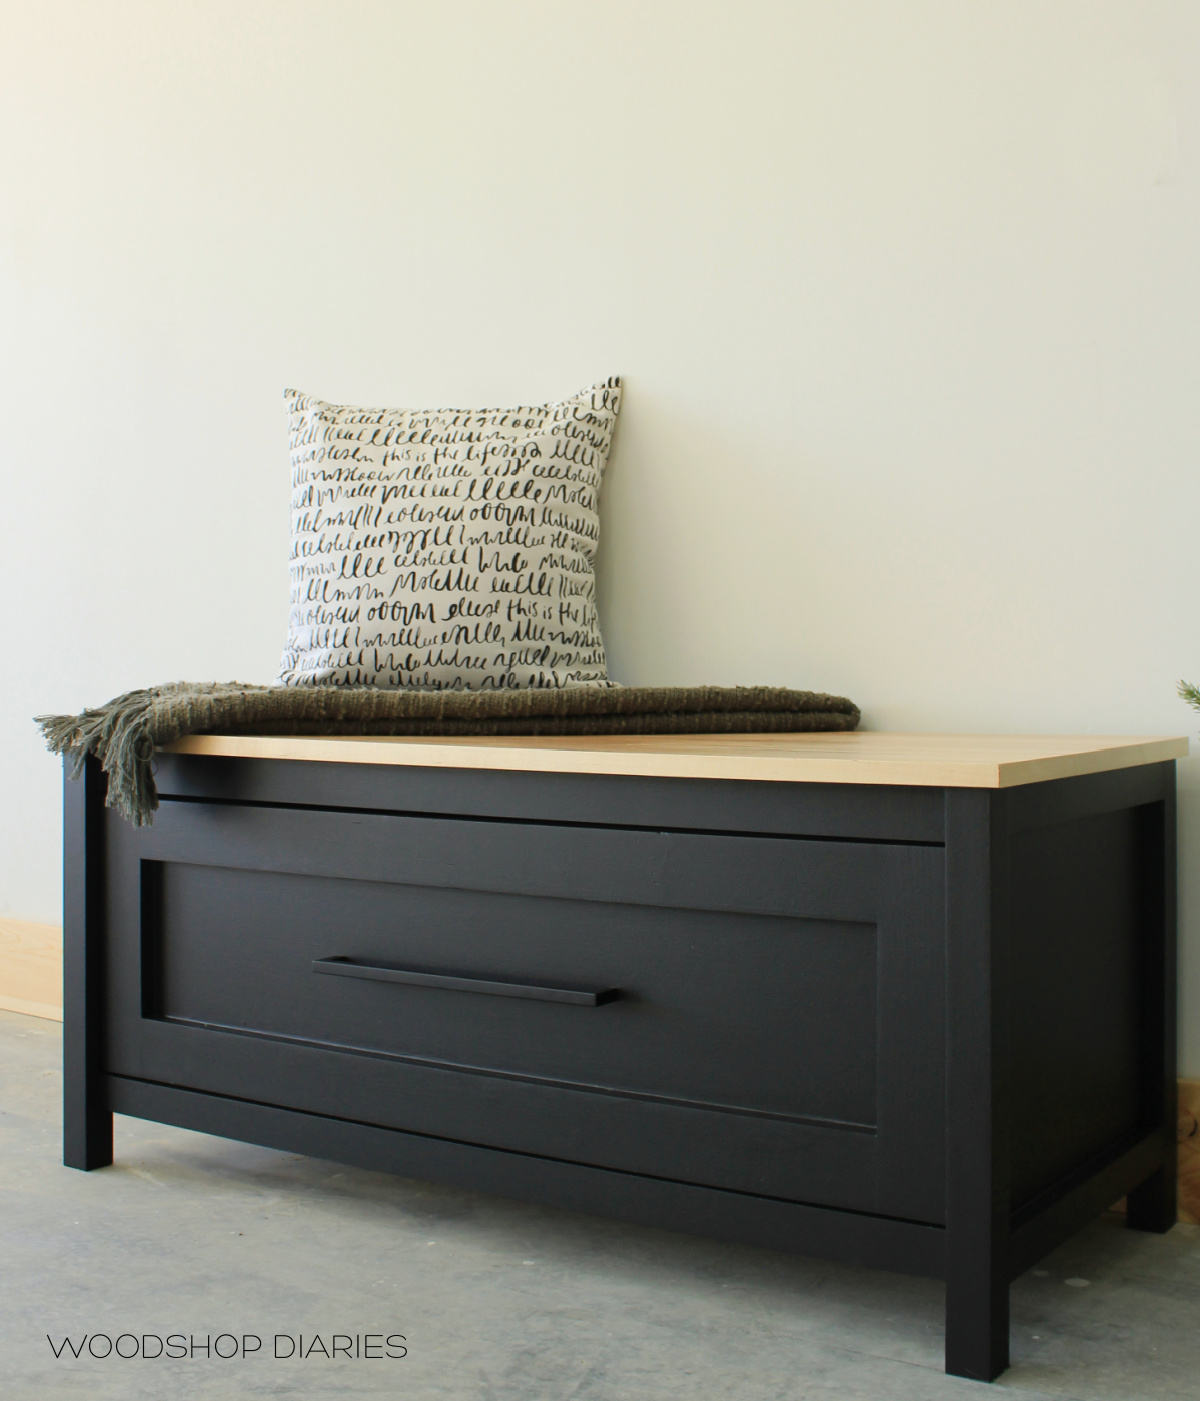
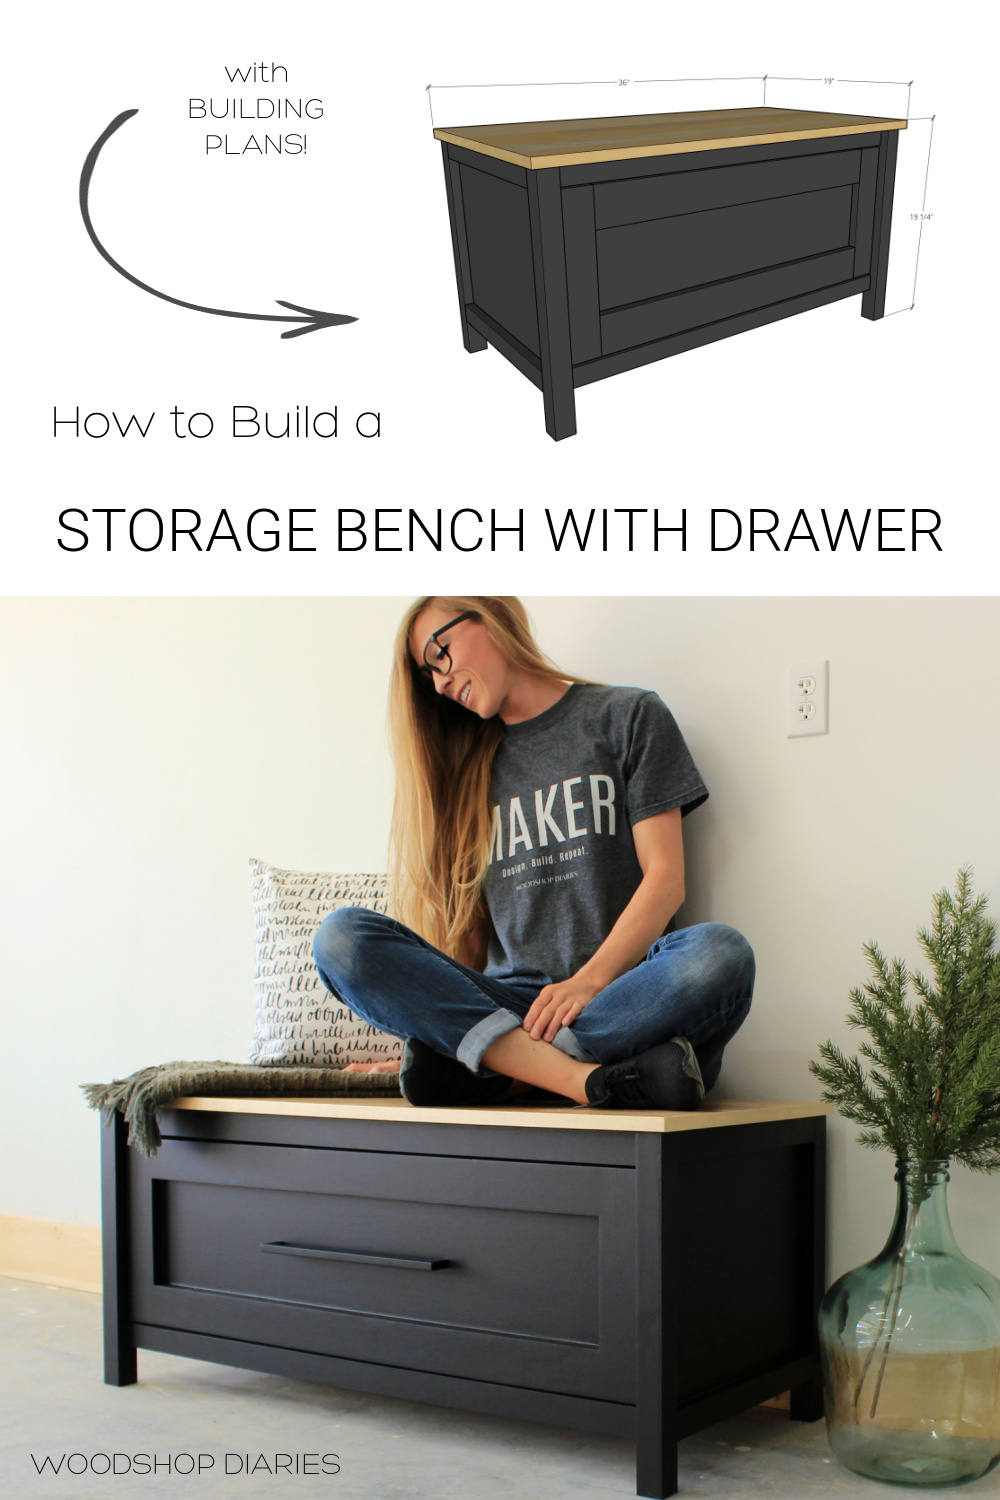
I actually built this little bench to go in our bathroom for some extra towel storage and to cover a hole in the floor where the tub used to be–but that’s another story for another day haha.
.
Anyway, this is obviously a versatile project and a pretty easy build, so let’s dive right in and get building 🙂
How to Build a Storage Bench with Drawer
I’m sharing the plans below, with a step by step tutorial and also a video here as well:
*This post contains affiliate links. See website policies.
Tools & Materials:
Tools:
- Circular saw
- Kreg Rip Cut and Kreg Accu-Cut Cutting guides (optional, but helpful)
- Drill/Driver
- Kreg Pocket Hole Jig
- Miter saw
- Nail gun (optional–used for adding trim pieces)
- Table saw (optional–for cutting dadoes in drawer box)
Materials:
- (1) sheet ¾″ plywood (I used maple)
- ¼ sheet ¼″ plywood
- (1) 2x2x8 board
- (2) 1x2x8 board
- (2) 1x3x8 board
- (1) pair 16″ ball bearing drawer slides
- 1 ¼″ pocket hole screws
- 1 ¼″ brad nails
- Edge banding
- Wood Glue
- Wood Filler
Grab the printable plans for this DIY Storage Bench with Drawer here:
Some Notes About the Build:
The trim on the bench sides and drawer front is optional and, if desired, you can use plywood strips for this vs 1x2s and 1x3s instead.
.
You can find the full cut and materials list with diagrams in the plans here.
.
You can also replace the ¾″ plywood top with a thicker top (like 2x material, OR double up on the plywood) if you’d like to make this larger.
.
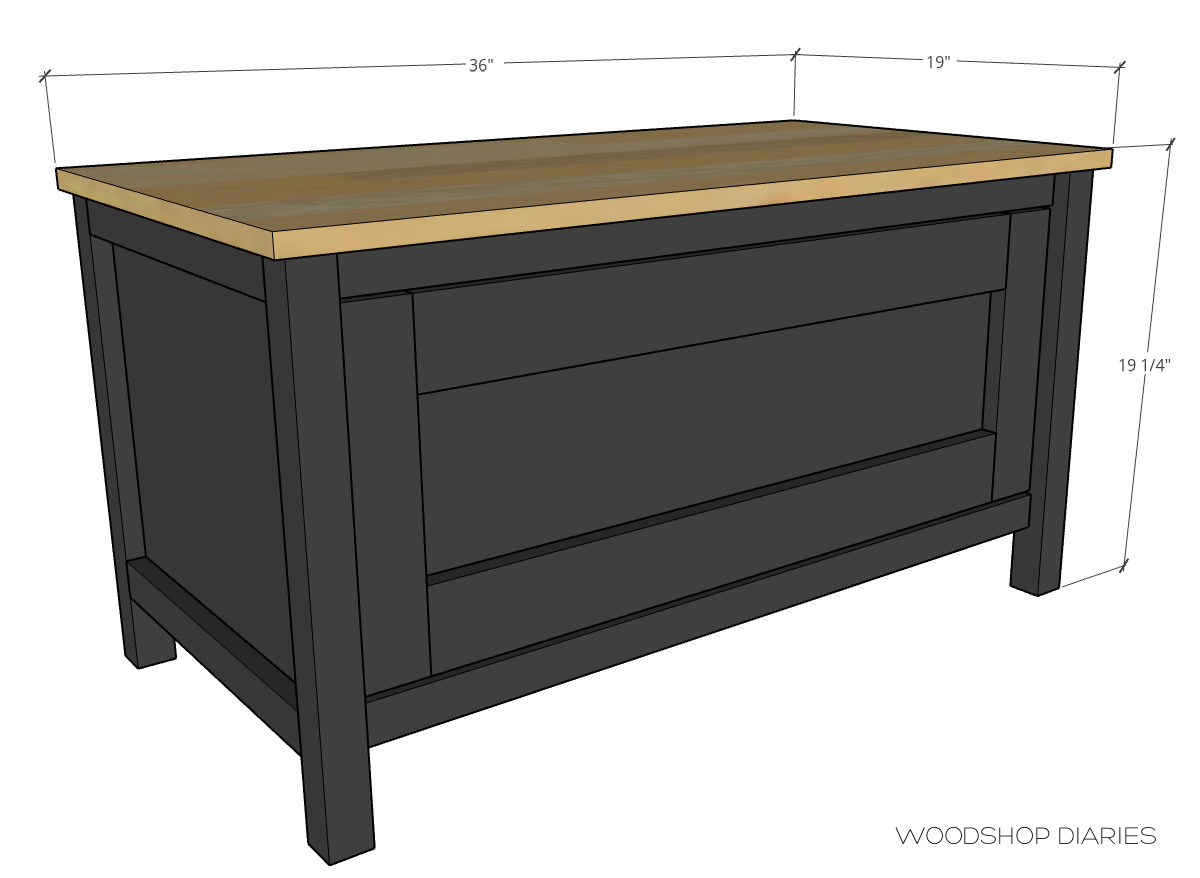
Overall dimensions for this DIY storage bench with drawer project are 19″ deep x 19 ¼″ tall x 36″ wide.
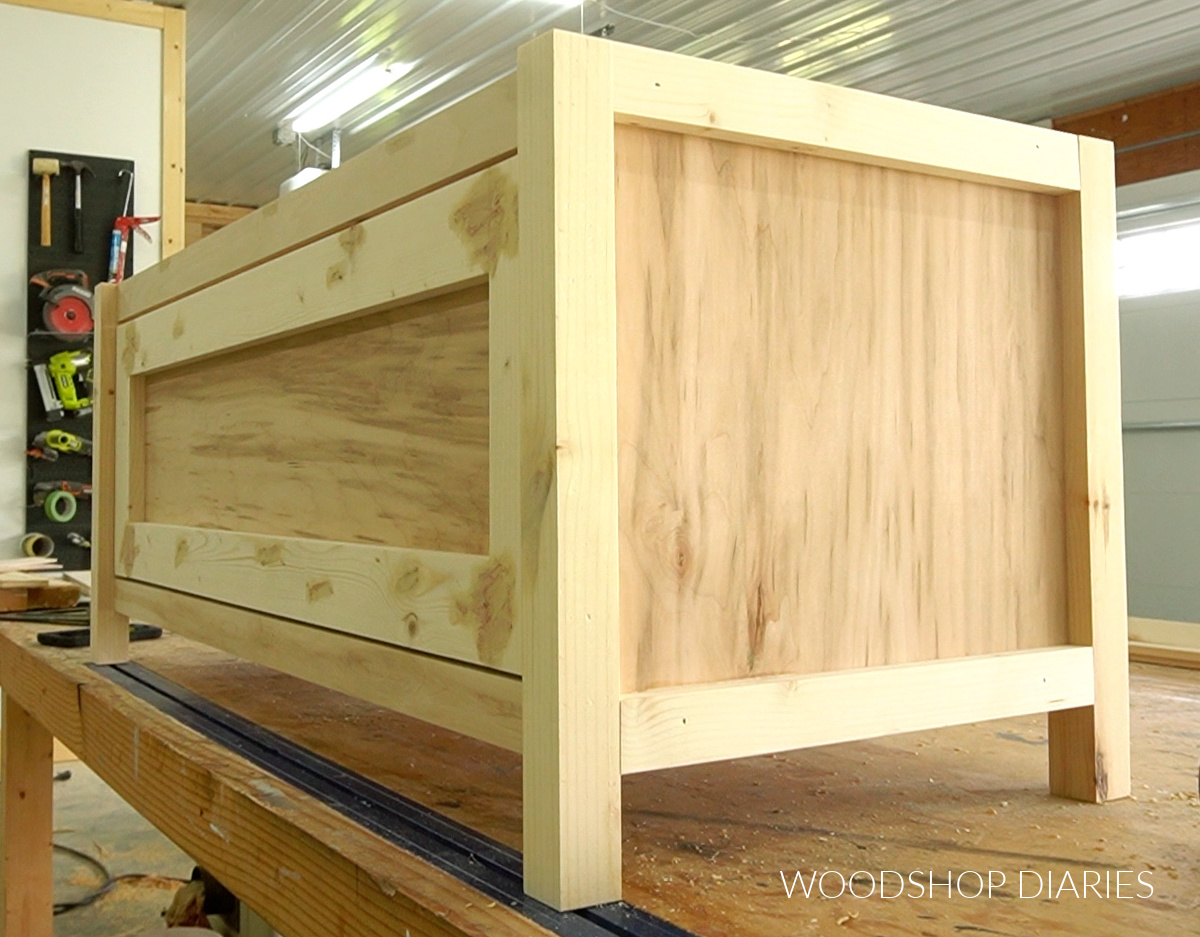
Step 1: Assemble Storage Bench Side Panels
I cut all my plywood pieces according to the cut list in the plans before getting started.
.
The side panels consist of 2×2 legs with a ¾″ plywood panel between them.
RELATED: How to make your own 2x2s
So, I cut four 2×2 legs to 18 ½″ long, and installed a 15 ½″ square plywood panel between them using ¾″ pocket holes and 1 ¼″ pocket hole screws.
RELATED: How to use a Kreg Pocket Hole Jig
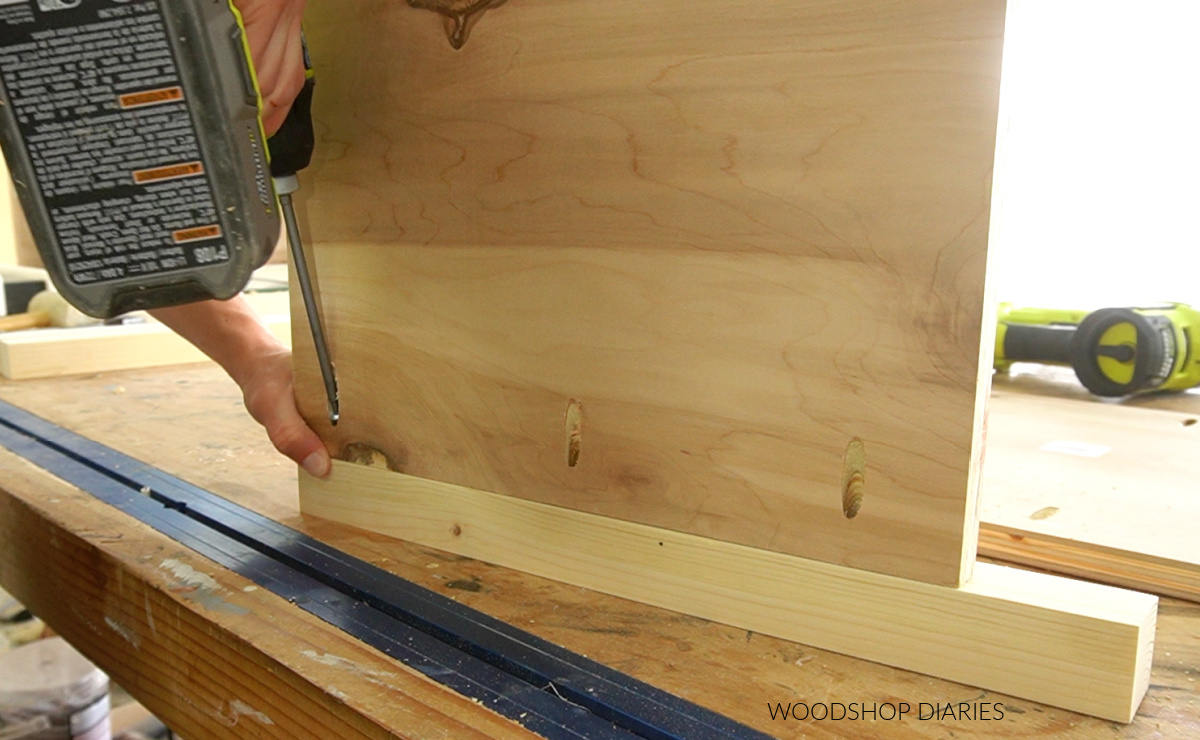
NOTE: It’s easier to sand pieces BEFORE assembling 🙂
.
I installed the panel so that these sides are flush across the inside–so they’re inset on the outside to allow for trim pieces to be added later.
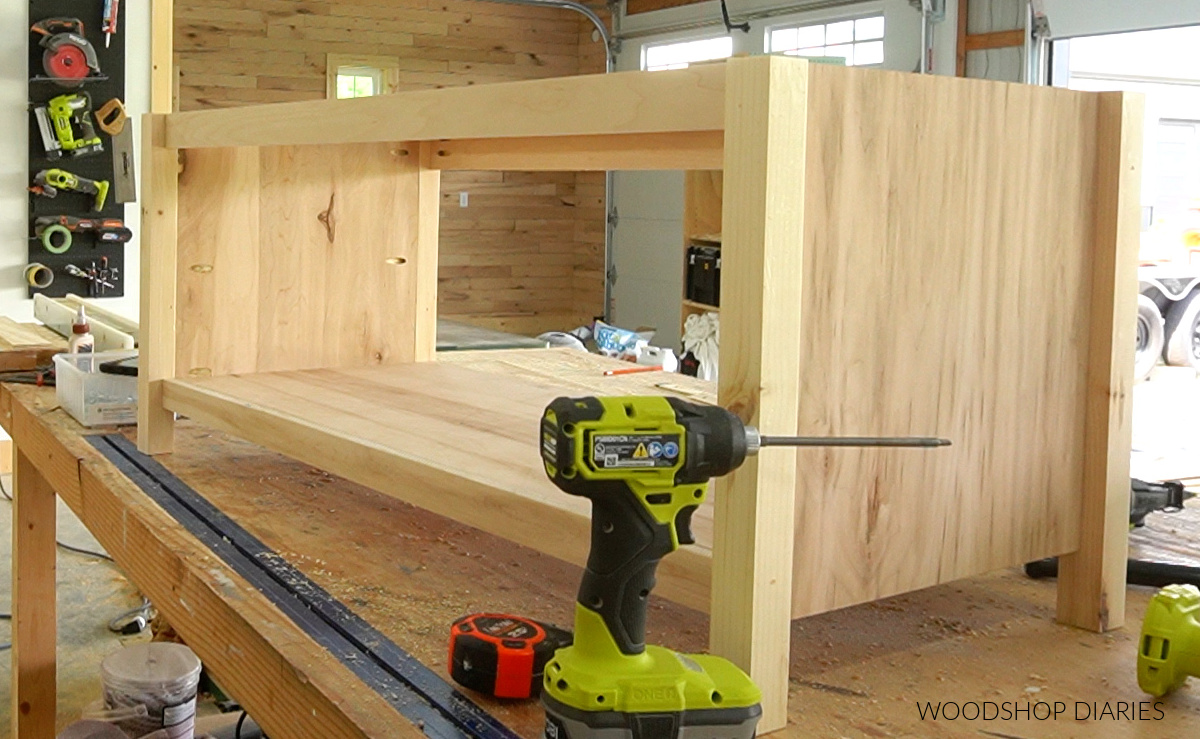
Step 2: Assemble Storage Bench Frame
Once the sides were together, I assembled the main bench frame using 1x2s.
.
Now, I actually used ¾″ plywood strips ripped to 1 ½″ wide–which is the same size as a 1×2. So whether you want to use plywood strips or actual 1x2s, either way works fine.
.
If you’d rather make this a little “beefier,” you could also substitute the 1x2s for 2x2s as well.
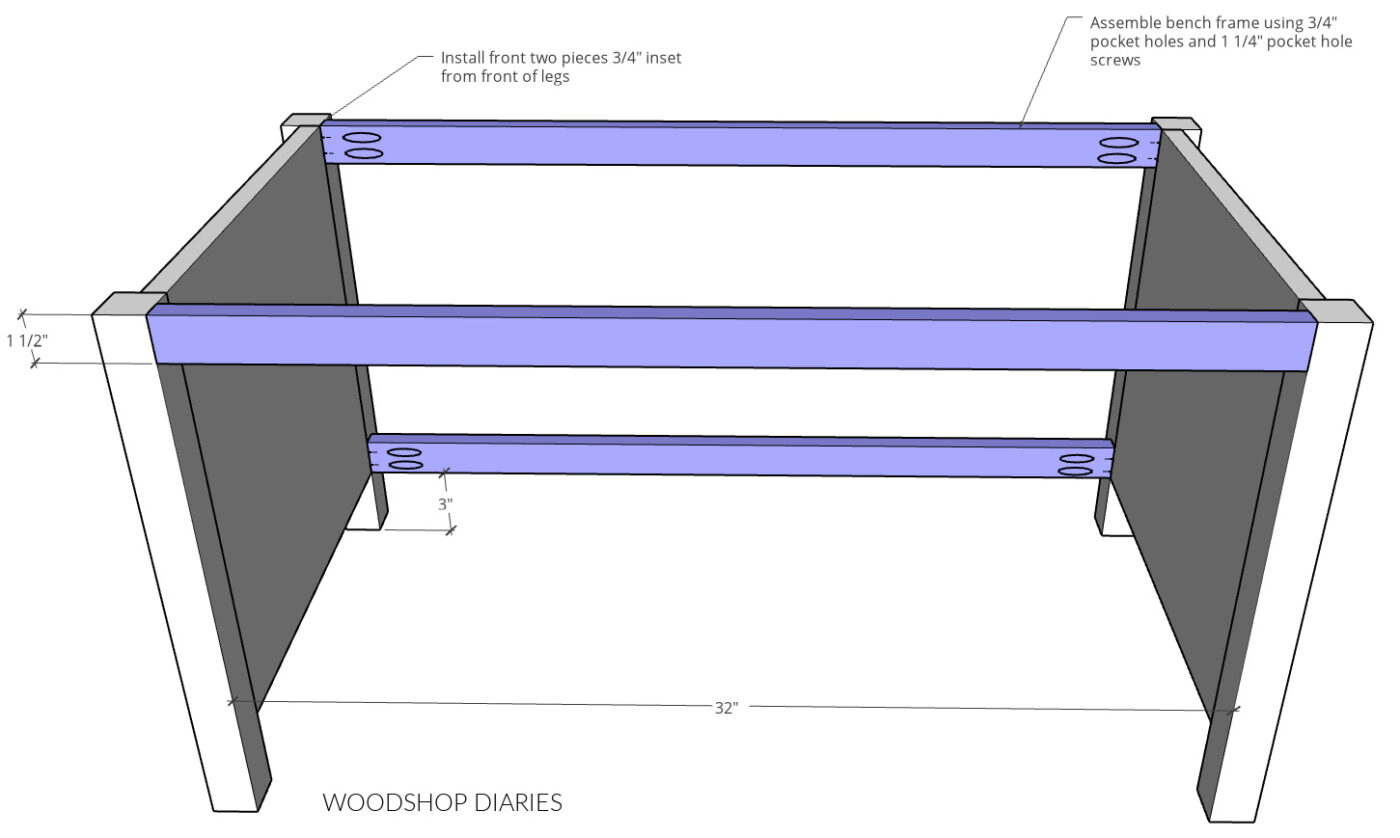
I assembled these 1x2s between the side panels with ¾″ pocket holes and 1 ¼″ pocket hole screws.
.
Note that the front pieces are inset ¾″ from the front edge of the legs and the bottom piece is 3″ off the ground.
Step 3: Install Top and Bottom Supports
Then, I used 1x3s at the top to add some support and to give me somewhere to attach the top later.
.
Now, again, I actually used ¾″ plywood strips ripped to 2 ½″ wide for this–so you can use plywood or actual 1x3s.
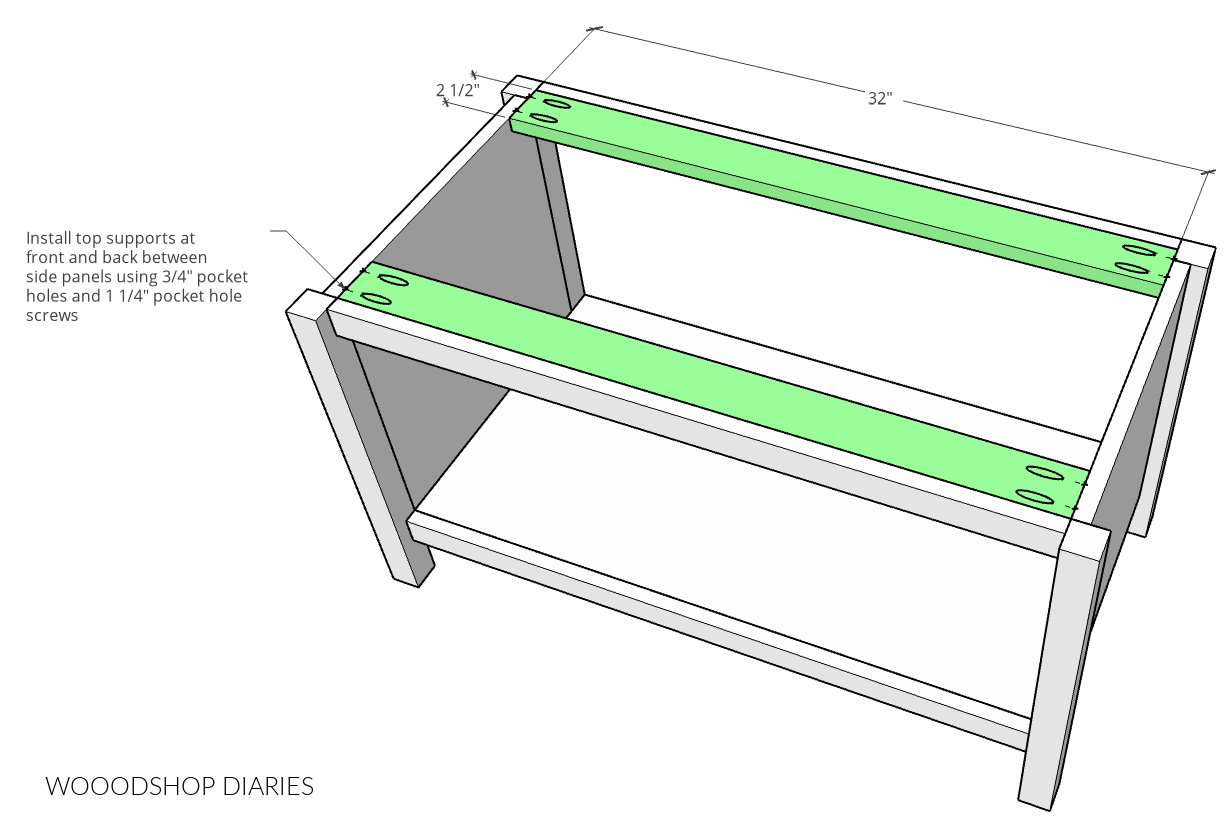
I installed one at the front and one at the back of the top of the bench frame using ¾″ pocket holes and 1 ¼″ pocket hole screws.
.
Then, I cut and installed a ¾″ plywood panel using pocket holes and screws as well.
And at this point, if you wanted to skip the drawer, the frame is complete and it’s ready for a top! But, I love building drawers so I went ahead and added one here 🙂
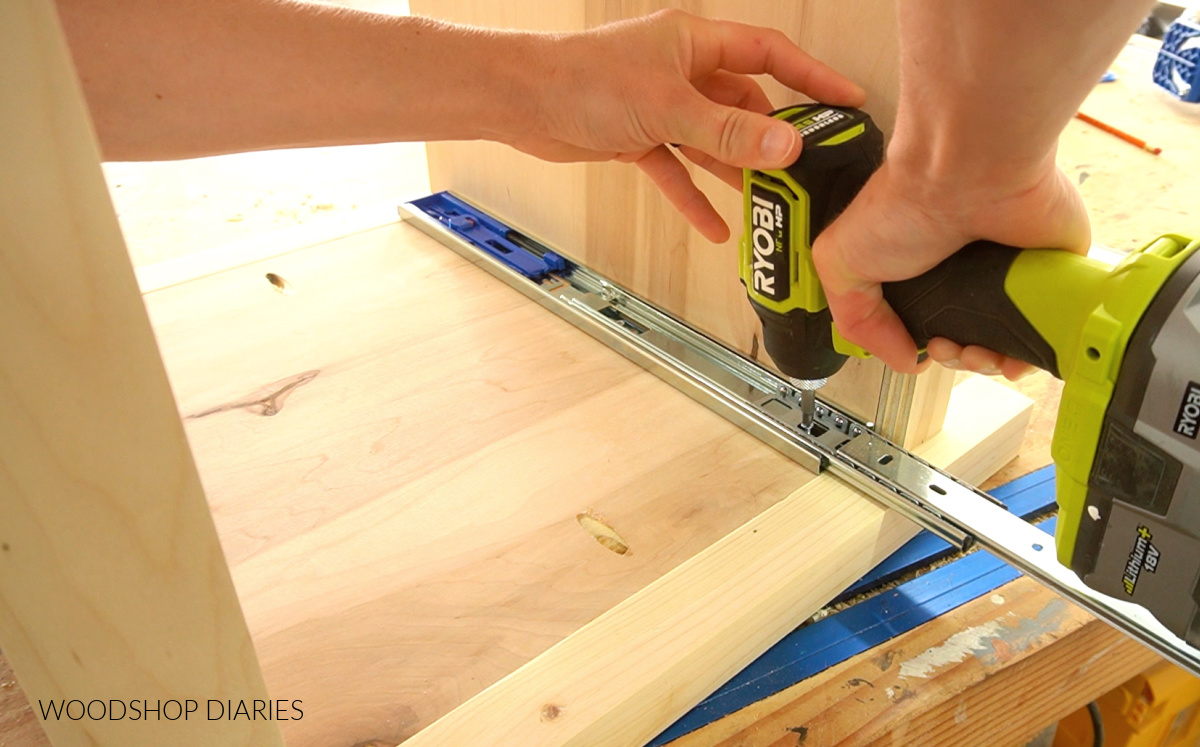
Step 4: Install Drawer Slides into Bench
I installed a pair of 16” ball bearing drawer slides into the opening ¾” inset to allow for an inset drawer front later.
Step 5: Build and Install Drawer in Storage Bench
Now, it was time for my favorite part of every build—the drawer!
.
My process for assembling drawers is pretty much always the same. You can check out how I build drawers here. The DIY storage bench plans have the exact measurements needed here.
.
I cut my four drawer sides from ¾” plywood and used a table saw to cut a ¼” dado ¼” deep ½” up from the bottom of each piece.
.
Just for a cleaner look, I like to edge band the tops of my plywood drawer boxes. This is totally optional, but here’s a guide for how to apply iron on edge banding if you’re interested.
.
I drilled ¾” pocket holes into the ends of the front and back pieces of the drawer box making sure to drill fairly close to the top and bottom so that the trim I add in a minute will cover them.
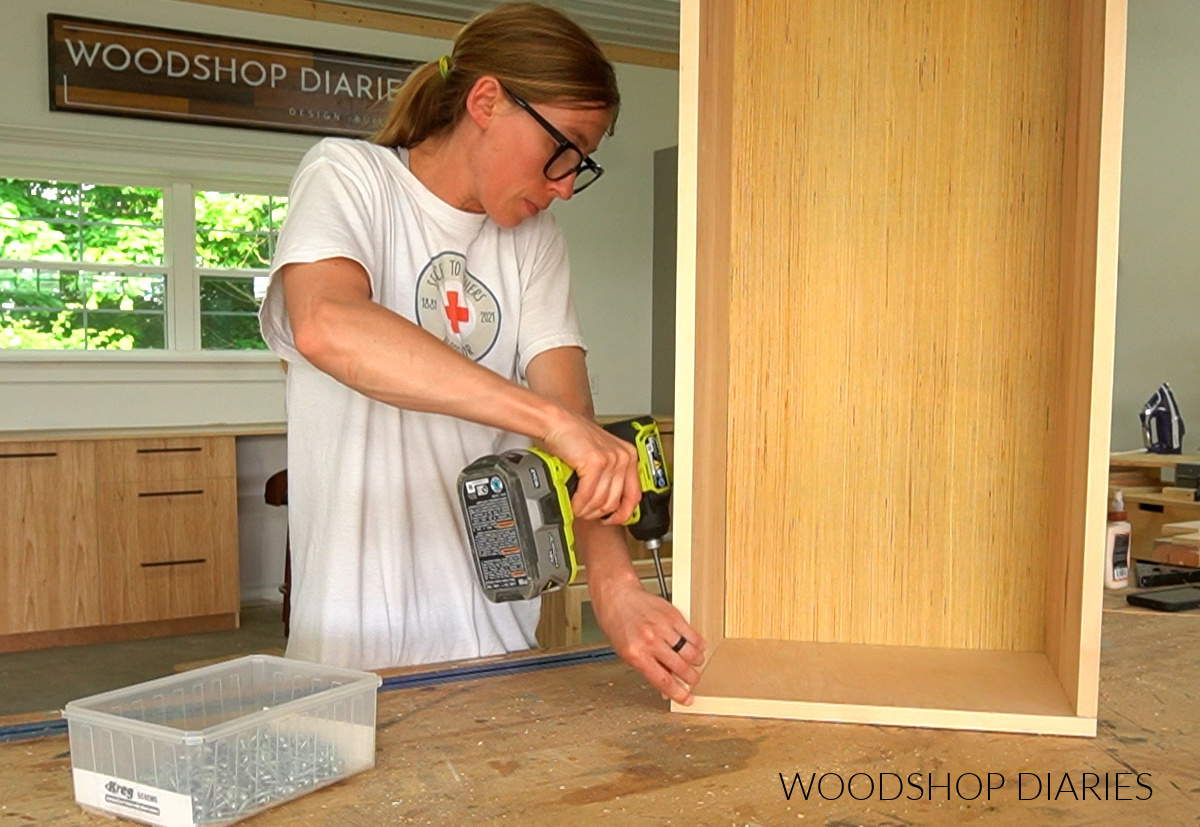
Then, I assembled the drawer box using 1 ¼” pocket hole screws with the ¼” plywood bottom installed into the dado.
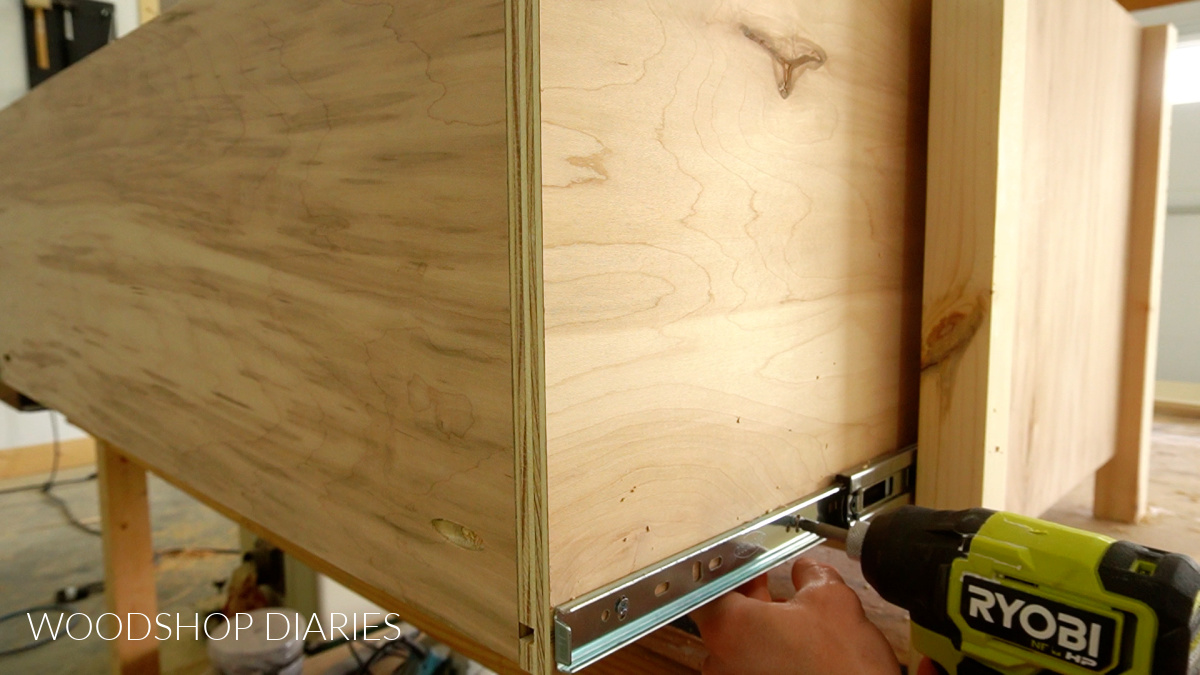
I installed this drawer box onto the slides in the opening of the bench. I have a complete guide on how to measure, build and install drawer boxes that I’ll link in here for details on all things related to drawers.
Step 6: Install Side and Drawer Front Trim
For the trim, you could use leftover plywood strips if you wanted—especially if you’re painting, but I used solid 1x2s for the sides and 1x3s for the drawer front because I did have some scraps already on hand for this.
.
I simply cut four pieces of 1×3 to piece together to glue and nail onto the drawer box front so that when put together, it left ⅛” gap around all sides.
.
I flipped the bench on its back and just glued and brad nailed the pieces on the front.
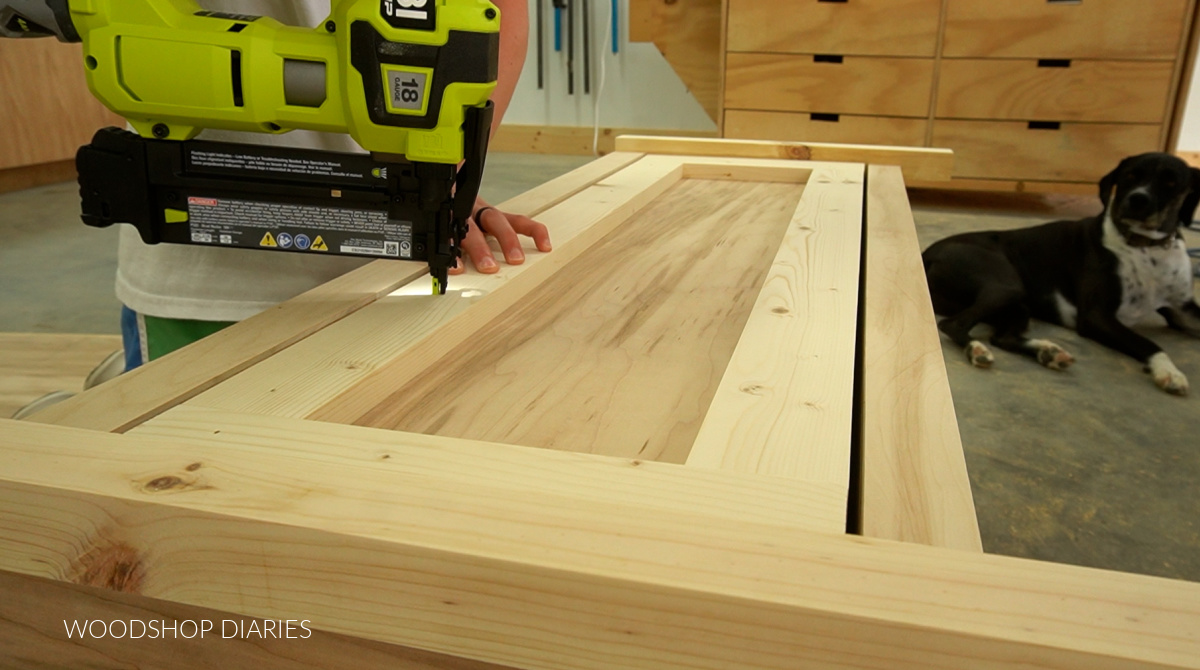
After the drawer front trim was on, I cut some 1x2s to trim the sides at the top and bottom and also just glued and nailed these pieces in place.
I puttied and sanded over all the joints on the trim and the nail holes, and gave it a final sanding after it was dry.
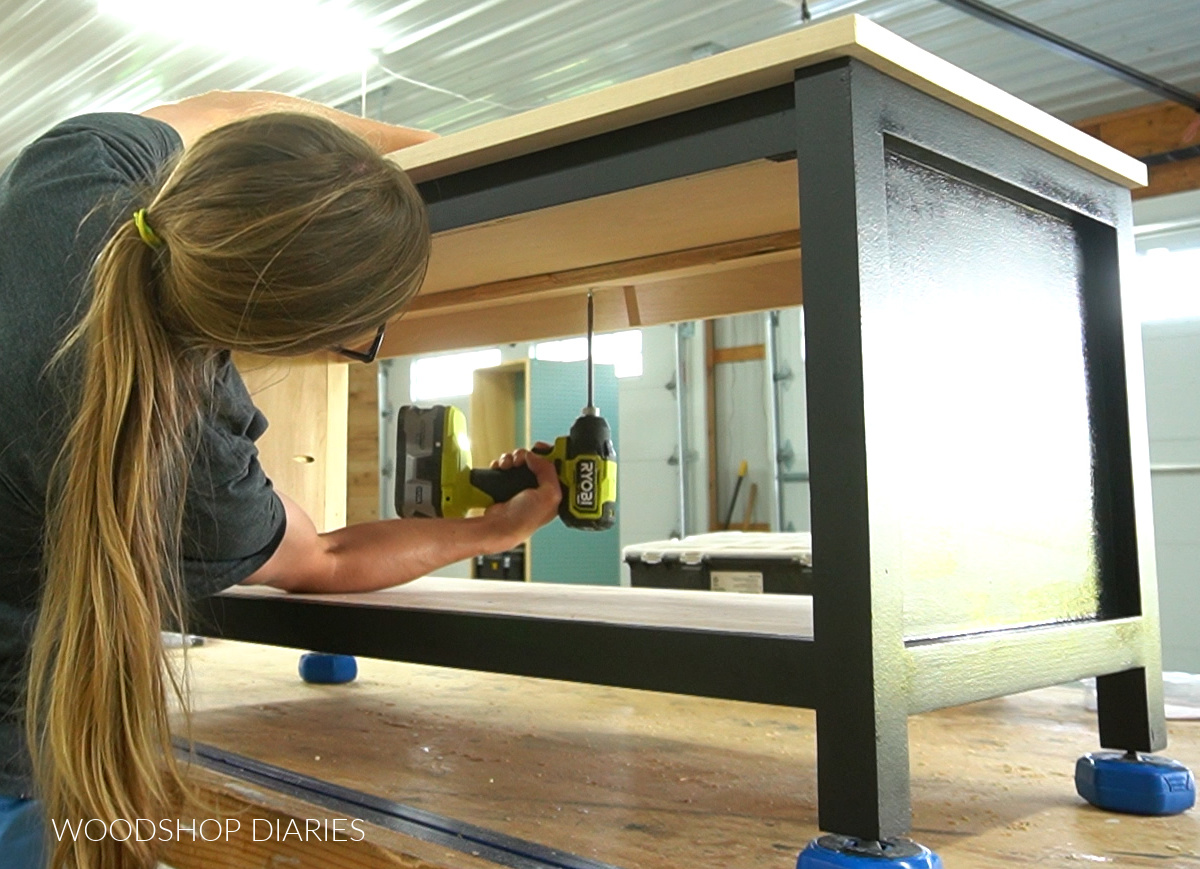
Step 7: Paint/Stain Storage Bench
I removed the drawer to make painting easier and I primed and painted the bench base and the drawer front separately.
.
I cut the top from ¾″ plywood and I chose to leave it a natural color. I just applied iron on edge banding along the edges and gave it a few coats of clear poly.
.
Since this DIY storage bench was two-tone, I found it easier to finish the pieces separately this way.
.
Before adding the drawer back in after painting/polying, I went ahead and placed the top on and used 1 ¼” screws through the top supports to secure it.
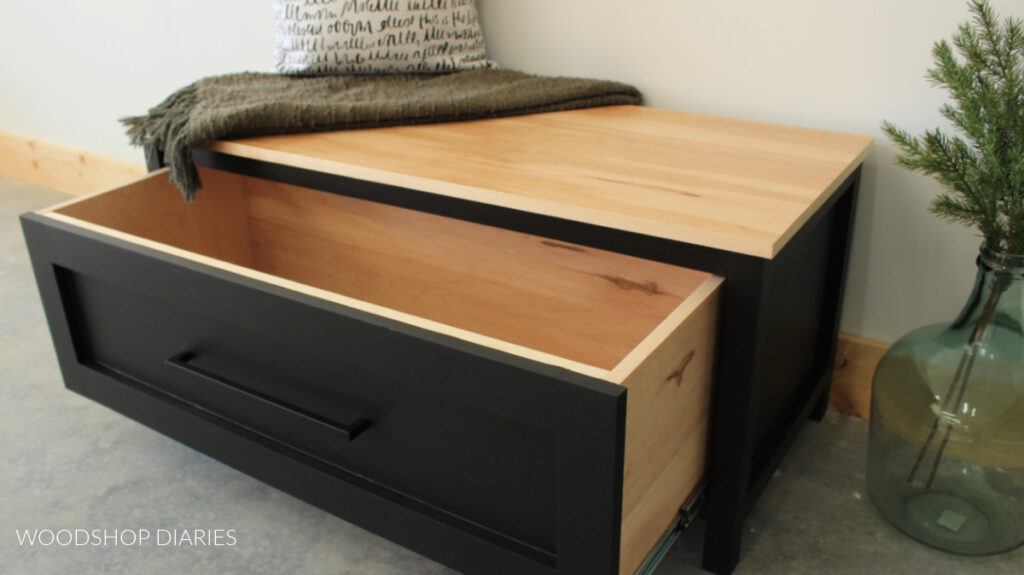
Once the top was on, I added a drawer pull to the drawer and installed it back into the bench and it was ready for use!
.
This DIY storage bench with drawer will be great for storing towels in our new bathroom, but would also work well for for blankets in a living or bed room, shoes, gloves, or hats in an entryway, or for toys in a kids room.
I hope you enjoyed this simple build and if you’d like to build your own, don’t forget to grab the plans here!
.
If you enjoyed this project, be sure to subscribe and follow along because I have so many new building projects coming soon that you won’t want to miss out on!
And if you’d like to save this project for later, I’d love if you’d pin it or share it to your favorite social channel!
Until next time, friends, happy building 😊