In this post, I’ll share how to easily install a granite countertop to a bathroom vanity!
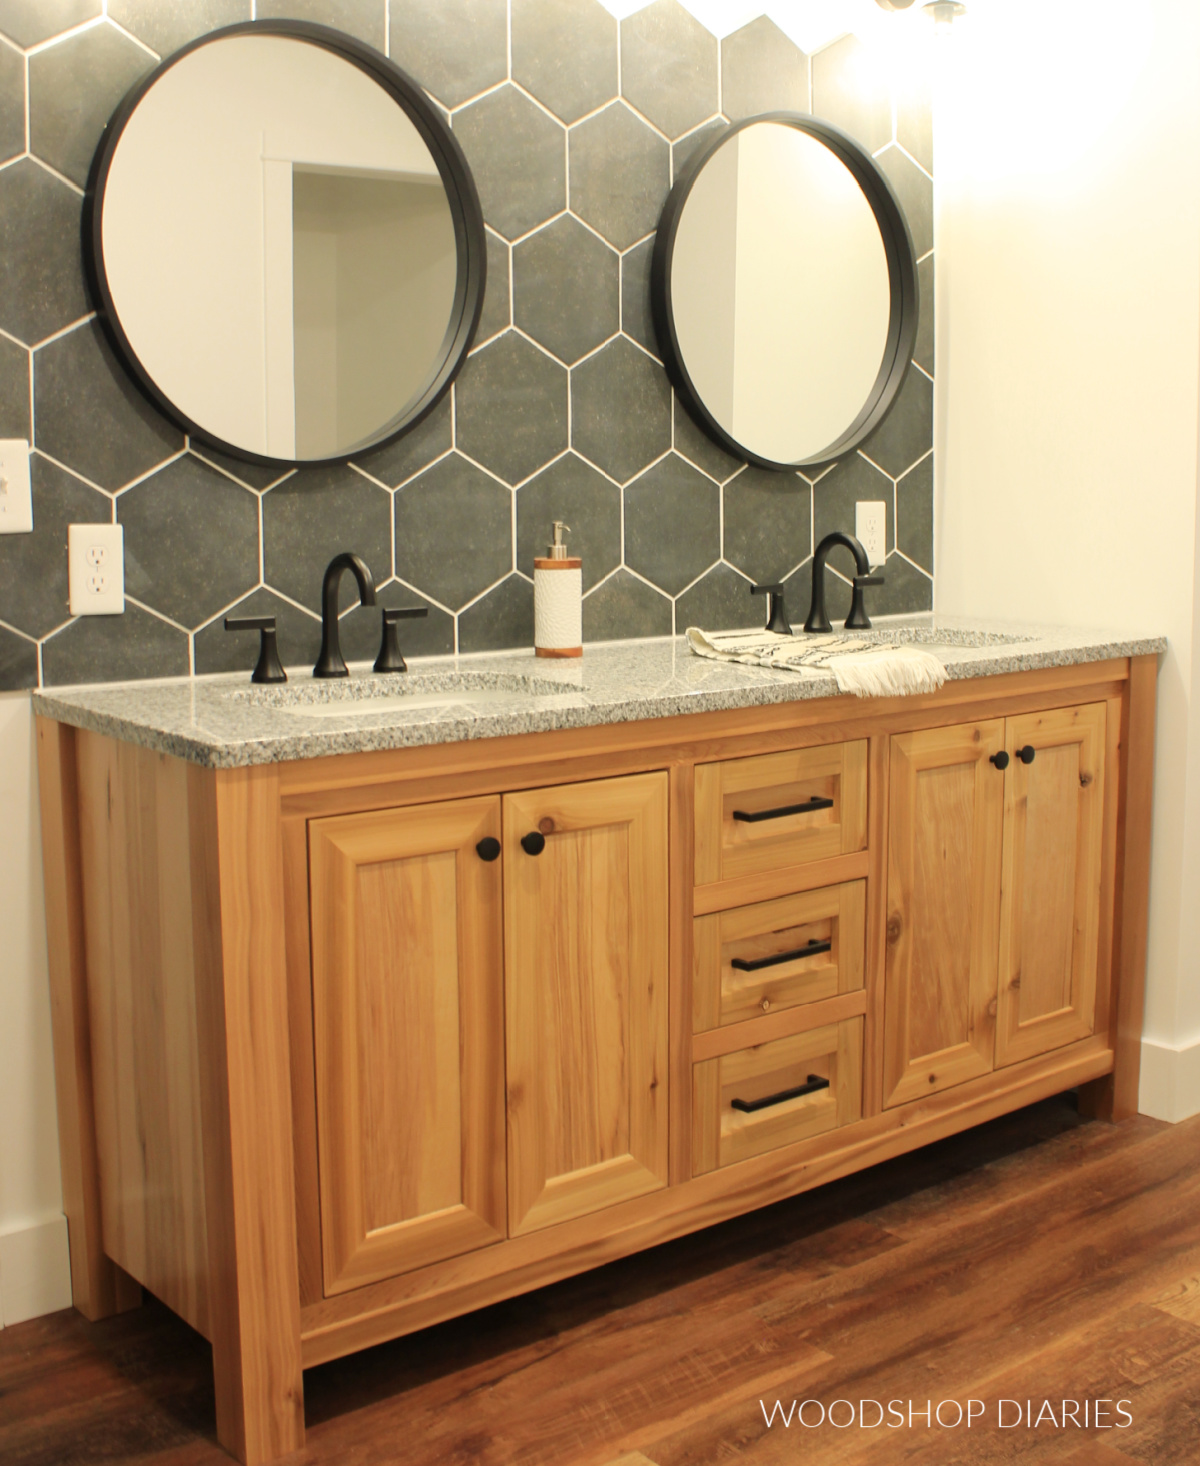
Recently, I built a double sink bathroom vanity to install in our new bathroom after it was remodeled.
.
I shared the building plans for the vanity here, and now it’s time to share how we installed it, and added the granite top and sinks.
.
Check out all the posts and updates from the bathroom remodel here:
But first, where do I find a granite countertop for bathroom vanity?
You can purchase granite, marble, quartz, etc type countertops precut to various standard sizes online, but I actually just reached out to a local granite shop and had them custom cut me a top for the vanity I built from a scrap piece they had in their yard.
.
This was actually significantly cheaper than the ones I saw online and I was able to take my pick from their remnants to get a color I liked.
.
They provided ceramic sinks with the top and they cut the holes for them and the faucets as needed, and then we put it all together on the new vanity…which I’ll show you how below 🙂
.
If you have a local granite countertop supplier, I highly recommend checking with them about using remnants (scraps) for your bathroom vanity countertop.
How to Install a Granite Countertop
Once we had the vanity, the top, and the sinks, it was time to install it. You can check out the video for this here (this also includes some info about the shower install as well!), and the step by step process below:
*This post contains affiliate links. See policies.
Tools & Materials:
Tools:
- Caulk gun
- Stud finder
- Drill/Driver
- Level
- Pipe clamp (you’ll have to have a ¾″ pipe as well)
Materials:
- DAP DynaGrip Mirror, Marble, Granite Construction Adhesive
- 2 ½″ – 3″ wood screws
- Scrap wood (at least one piece longer than the width of your sink)
- Clips/Brackets (if required–see note below)
- Kitchen and Bath sealant/caulk
NOTE: Read and follow manufacturer’s instructions for installation of your own countertop and sinks if and where applicable. Our countertop and sinks didn’t come with any instructions, so we were on our own and we found this adhesive to work well in our case.
.
But, while this worked excellent for our granite top and ceramic sinks without any additional fasteners, some manufacturer’s may specifically call out and require the use of mechanical fasteners/clips/brackets for installing the top and/or the sinks.
.
If in doubt, use appropriate fasteners in addition to the adhesive shown here.
Step 1: Secure Bathroom Vanity to Wall Studs
If you already have an existing vanity and are simply replacing the top, you can likely skip this part if the vanity is already in place.
.
However, in my case, I had built this new vanity and before I added the top, I needed to screw it to the wall studs.
.
I used a stud finder to locate at least two studs in the wall behind where the vanity was going.
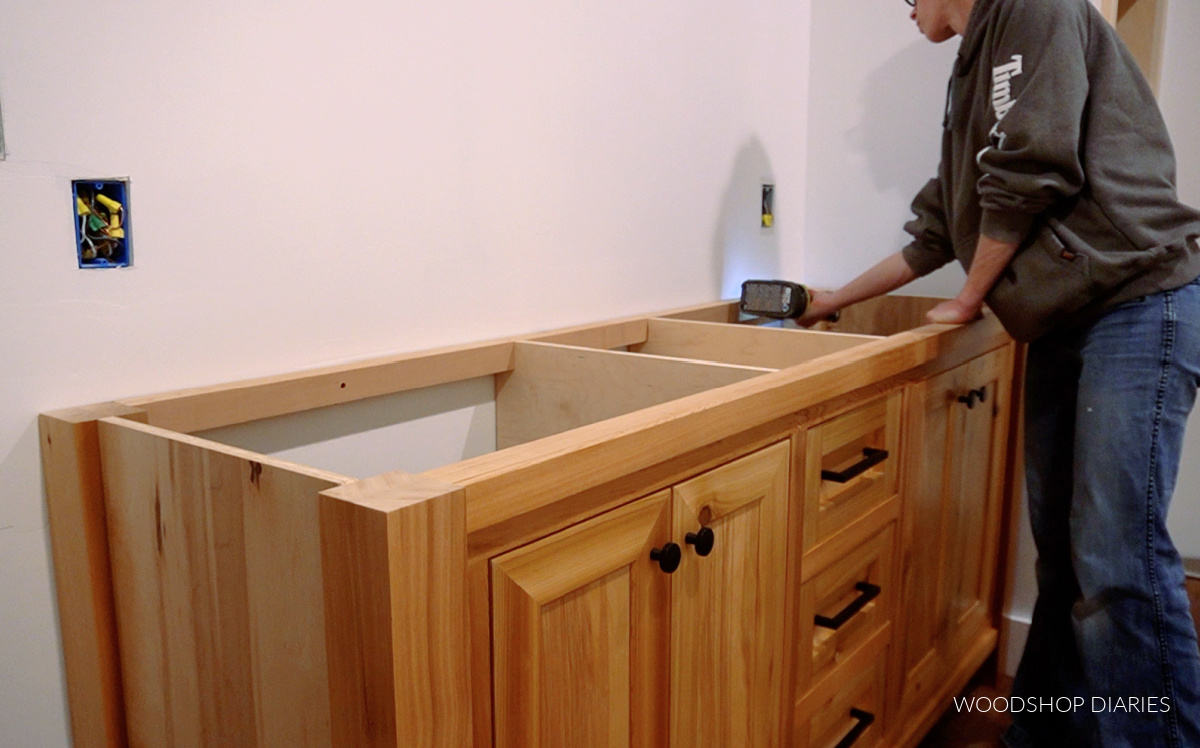
Then, I used a level and shims (as needed) to level the vanity and used 2 ½″ wood screws through the top, back support to secure it to the wall.
.
The vanity needs to be securely fastened before attempting to install a granite countertop.
Step 2: Apply Adhesive to Top of Vanity
Now…hear me out–there are many ways to do this and many opinions as well. This is not the only way, the only product, or the only method to use for this…it’s just one way 🙂
.
In the past, I’ve used clear silicone to attach granite vanity tops (just the top…NOT the sinks) and it worked great.
.
However, in this case, I opted for a construction adhesive for a stronger, more secure hold since this was a fairly large top (6 ft long).
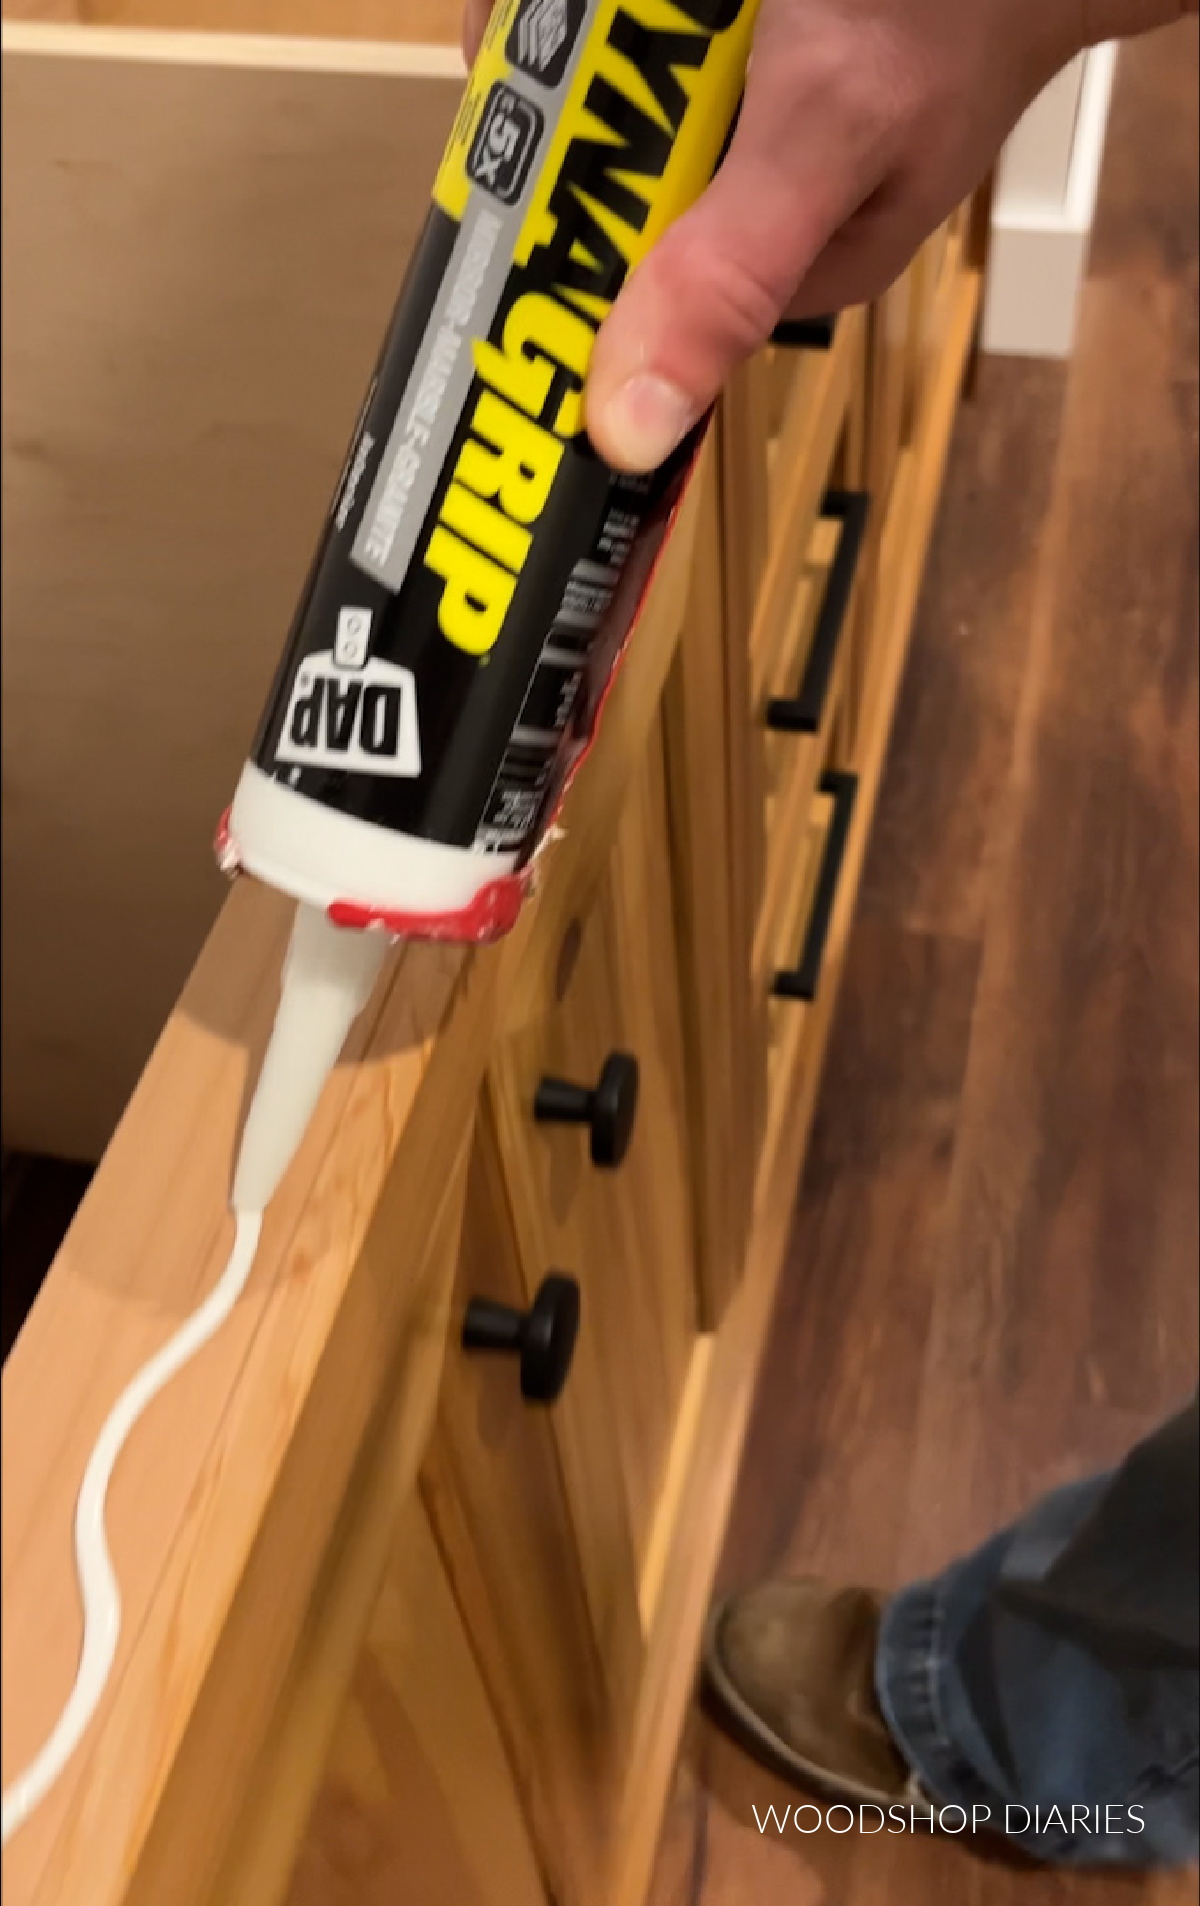
I applied a bead of DAP DynaGrip Mirror, Marble, and Granite adhesive around the top of the vanity according to the instructions.
.
This is easy to apply using a basic caulk gun.
Step 3: Place Granite Countertop
We (“we” as in multiple people, because it was heavy!) carefully placed the granite countertop on the vanity and centered it was needed.
.
The adhesive isn’t an “instant stick” so you have a little time to get it positioned where you want it.
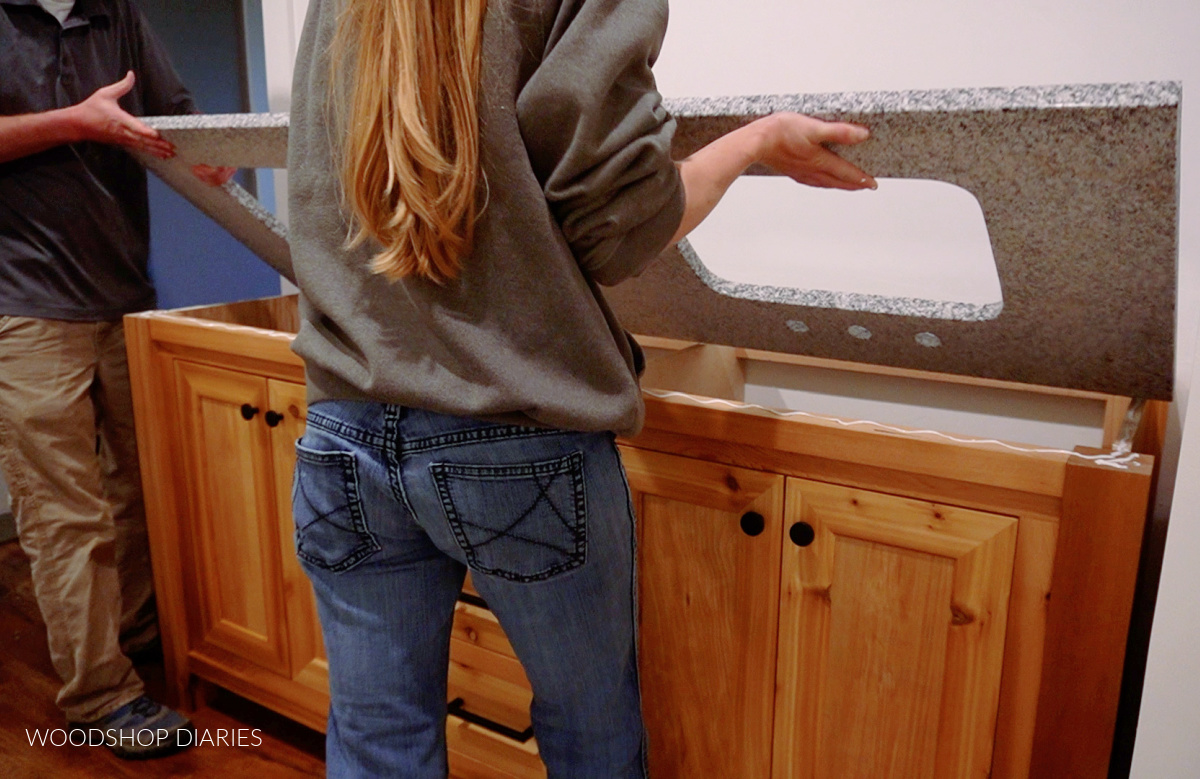
You can clamp it, but it was so heavy, once I got it in position, I just let it set. It’s so heavy, it stayed in place on its own.
.
If you clamp, clamp lightly because if there is some uneven/unlevel-ness and you clamp too hard, the granite could crack.
.
Before letting it completely set up, check around the edges for any gaps and clean up any squeeze out according to the instructions on the tube.
.
The vanity should be level already from step 1, so hopefully there aren’t any huge gaps, but if you notice any large gaps around the edges, use some shims to fill the void and give the top some support at that spot.
.
I let it sit for about an hour before adding the sinks.
Step 4: Install Sinks on Countertop
NOTE: Some sinks will come with specific instructions for installation. FOLLOW MANUFACTURER’S INSTRUCTIONS.
.
However, we were given ceramic sinks with our countertop and they didn’t come with instructions, so we were kind of on our own haha.
.
We found that the adhesive held really well, but for extra security, you may need to also add appropriate hardware (like brackets/clips) in addition.
.
To install the sinks, I applied a bead of DyanGrip Mirror, Marble, and Granite to the tip around the top.
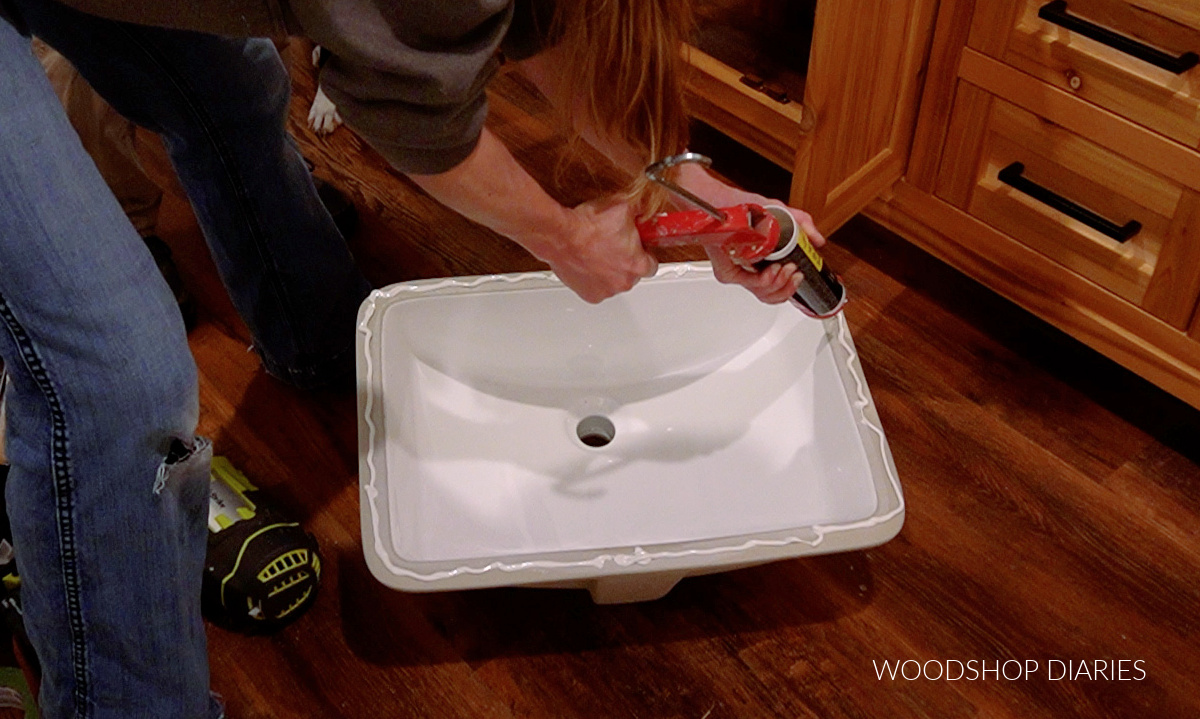
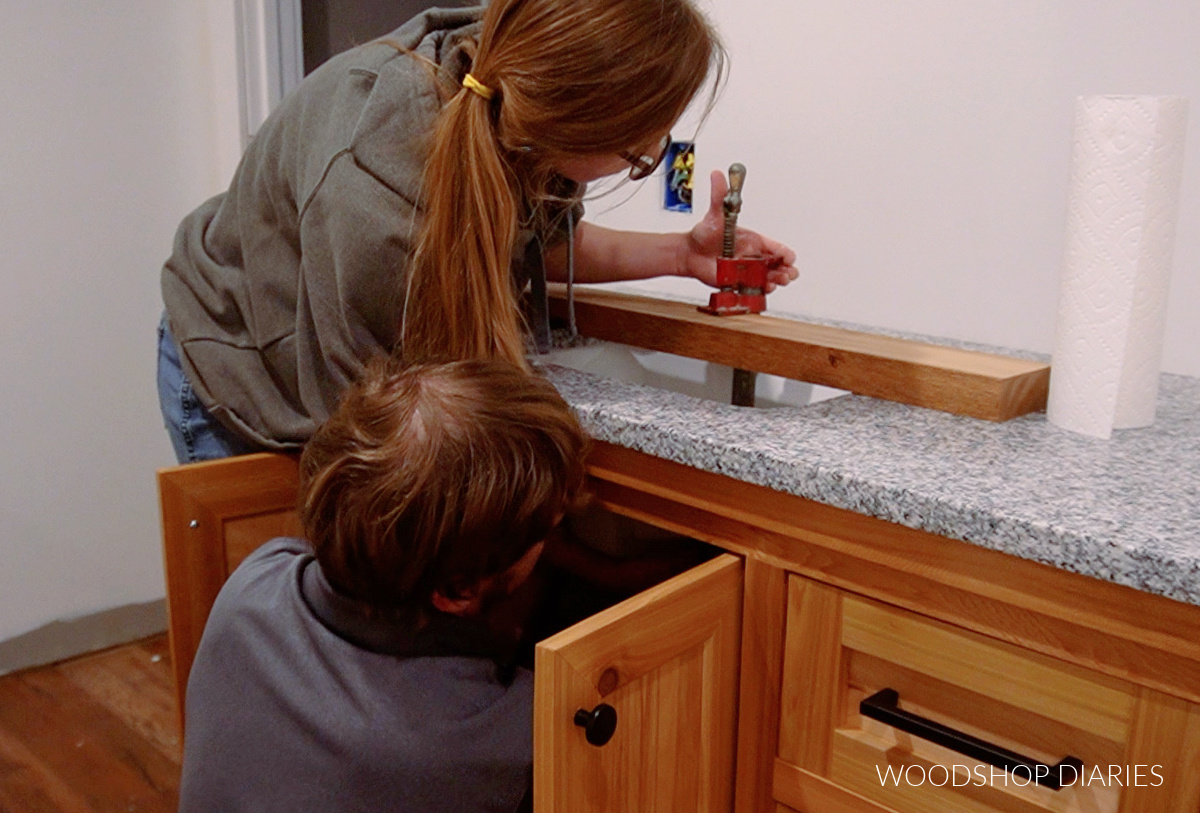
It’s VERY helpful to have an extra set of hands for this. I asked Danny to hold the sink under the countertop in position.
.
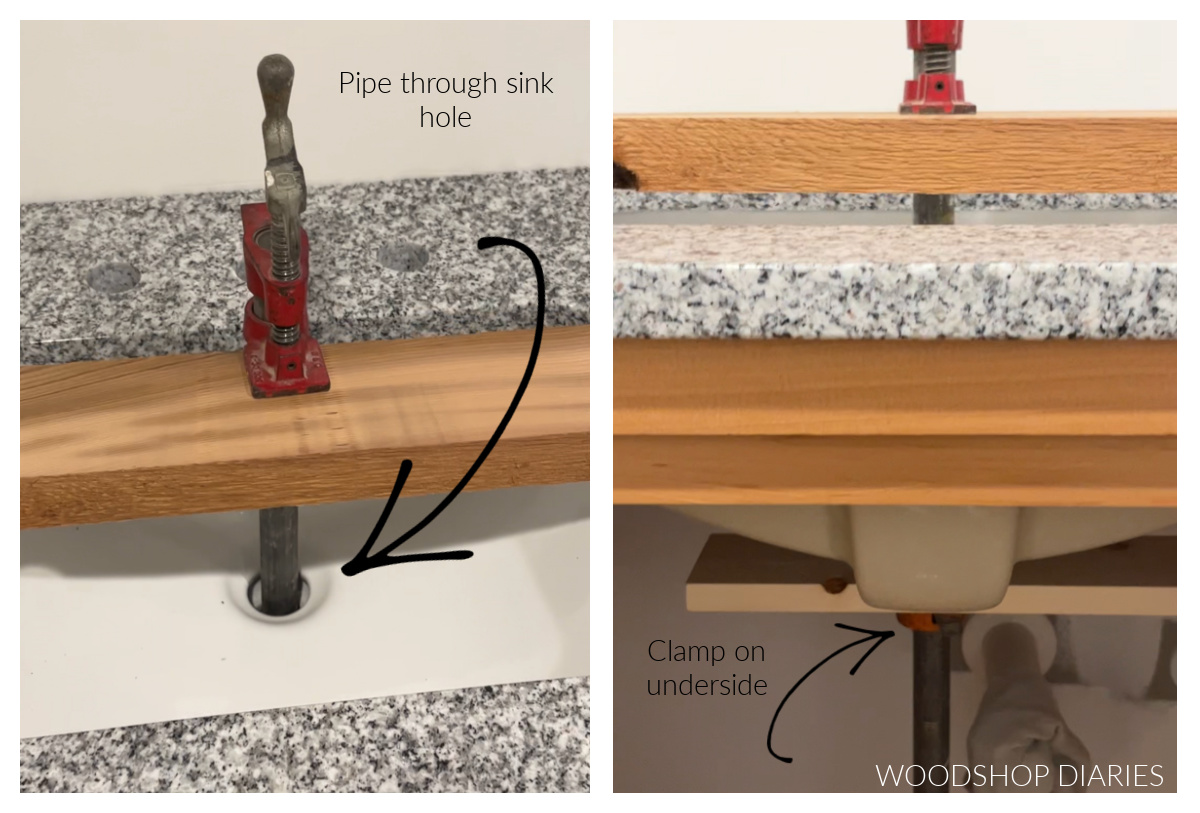
I placed a scrap 2×4 across the sink hole cut in the countertop, removed the clamp portion off the end of a pipe clamp, dropped the pipe through the sink hole, and then Danny slipped the clamp back onto the end of the pipe on the bottom side.
.
I used a scrap board on the bottom side (I don’t think it was necessary, though), and then clamped the sink tight with the pipe clamp until it dried.
A couple things to note in this process:
- Make sure the sink is centered on the hole
- Make sure the lip of the sink isn’t covering/too close to the faucet holes so there’s plenty of room to install the faucets later
- Make sure to add plenty of adhesive around the tops (don’t skimp on the adhesive!)
- Make sure to clean up any squeeze out before it sets up
- Don’t clamp too tight! Clamp the sink tight, but don’t crank down on it as you don’t want to take a chance on cracking it.
We didn’t add any brackets/clips, but you can if you’d like for a little extra hold.
.
I let this dry overnight before removing the clamps.
Step 5: Add Backsplash and Caulk
Backsplashes come in a million styles. You may opt for a granite backsplash piece to match your countertop, or you may do shiplap, or some kind of decorative wall treatment. You may even decide to skip backsplash altogether.
.
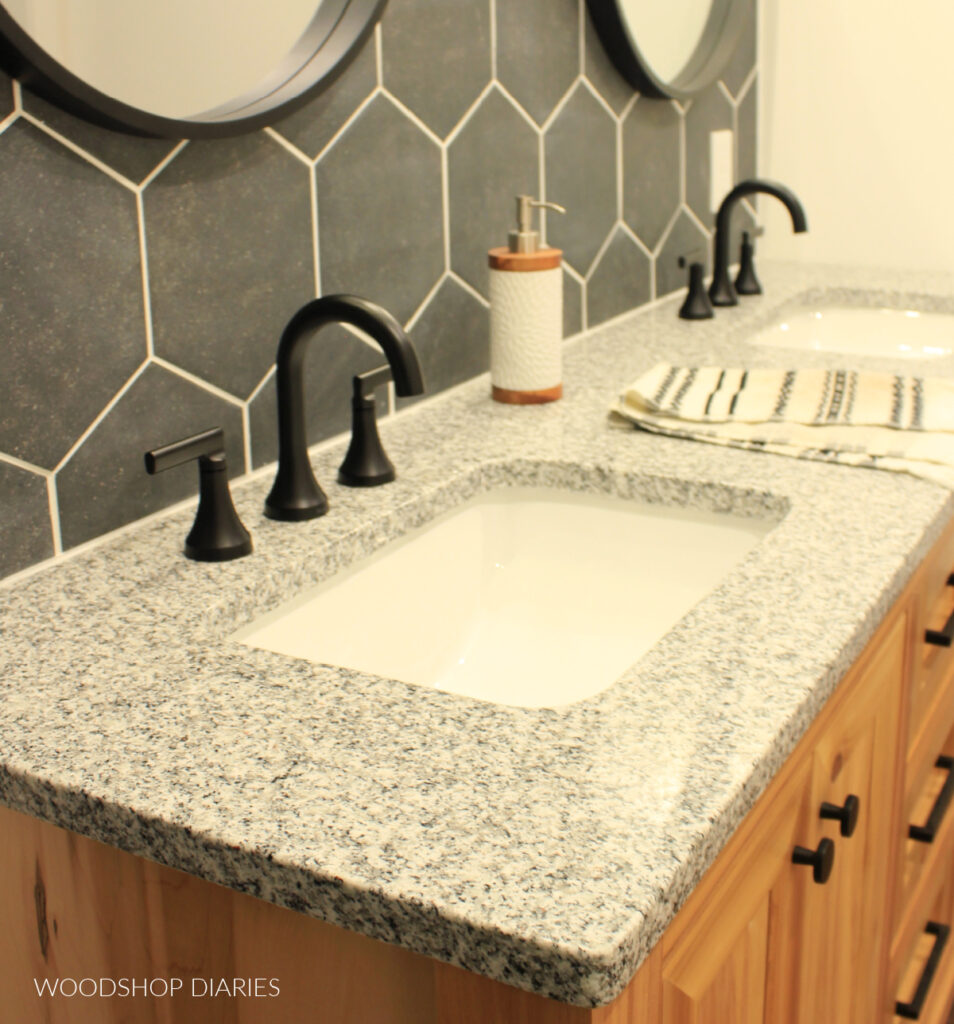
However, I went with tile. I used these hexagon tiles for backsplash here above the vanity and used white grout between them.
.
No matter what kind of backsplash you add (or don’t add), after it’s installed, it’ll need to be caulked.
.
Use painters tape to get a nice, clean, sharp line, and use a waterproof, mold resistant kitchen and bath sealant (or silicone) to seal between the backsplash (or the wall if you didn’t add backsplash) and the new countertop.
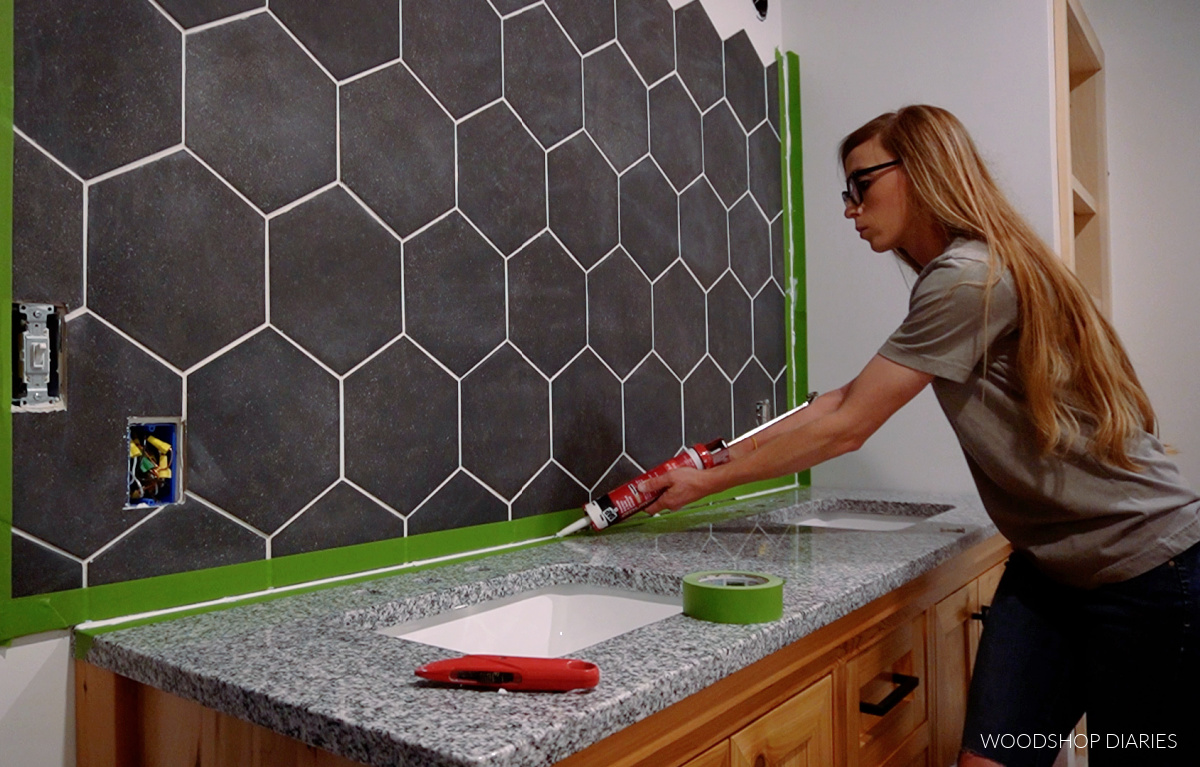
This will prevent water from seeping into cracks and causing issues down the road.
.
Then, it’s time to install the faucets, and the drains, and the mirrors and enjoy!
.
With the new vanity installed, we are one step closer to completing this bathroom remodel and I’m so excited to share the rest of it very soon!
If you want to follow along and see all the upcoming projects, videos, and DIYs, be sure to subscribe to the newsletter below to be the first to hear about new posts and plans!
And if you want to save this for later, don’t forget to pin it or share it to your favorite social channel!

Until next time, friends, happy building! 🙂