In this post, I’m sharing about our recent DIY shower remodel.
**This post was sponsored by DAP Products.
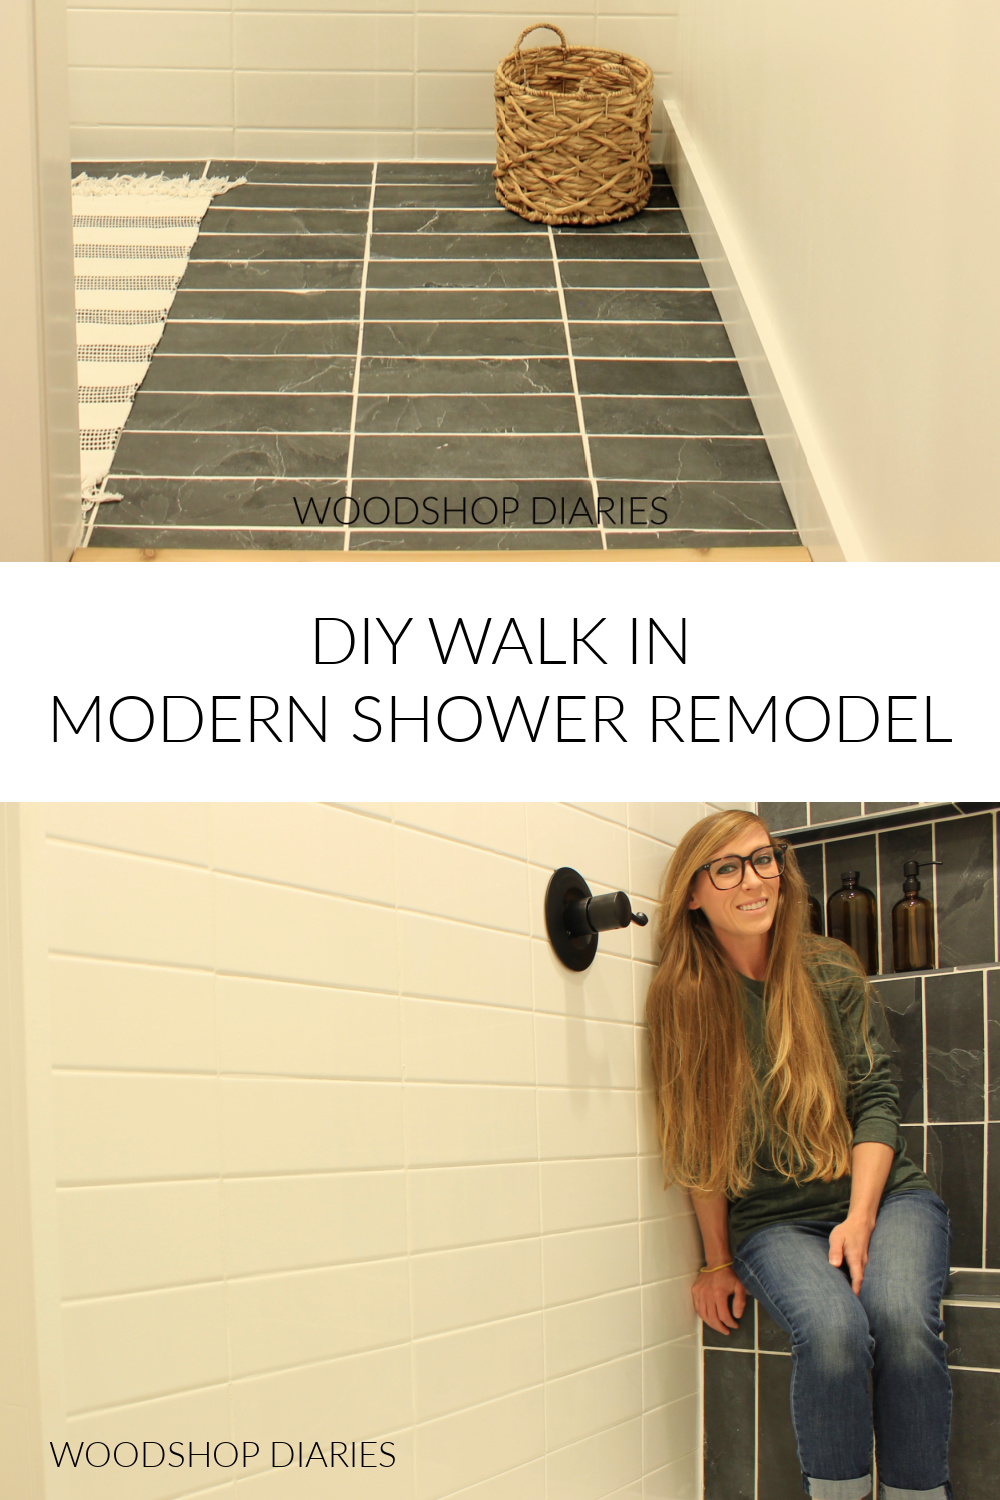
We transformed our large walk in shower into a more modern, easier-to-keep-clean shower space that I’m excited to share with you here!
Recently, I started the process of remodeling the large bathroom in our new home. Within that remodel project, there are a lot of “smaller” projects to share, so I’m breaking this down into somewhat of a series.
.
In an earlier post, I shared how I built our new DIY bathroom vanity. And I also shared how I transformed a boring corner closet into open shelf storage cubbies.
.
And now, I’m sharing about the shower.
.
You can check out the project video of this shower build here and the project details following:
*This post contains affiliate links. See policies.
Why we are remodeling our shower–The Before
Now, I know when I show you our shower “before,” many of you will ask why in the world we are redoing it. But the problems are more with the FUNCTION vs. the LOOKS.
.
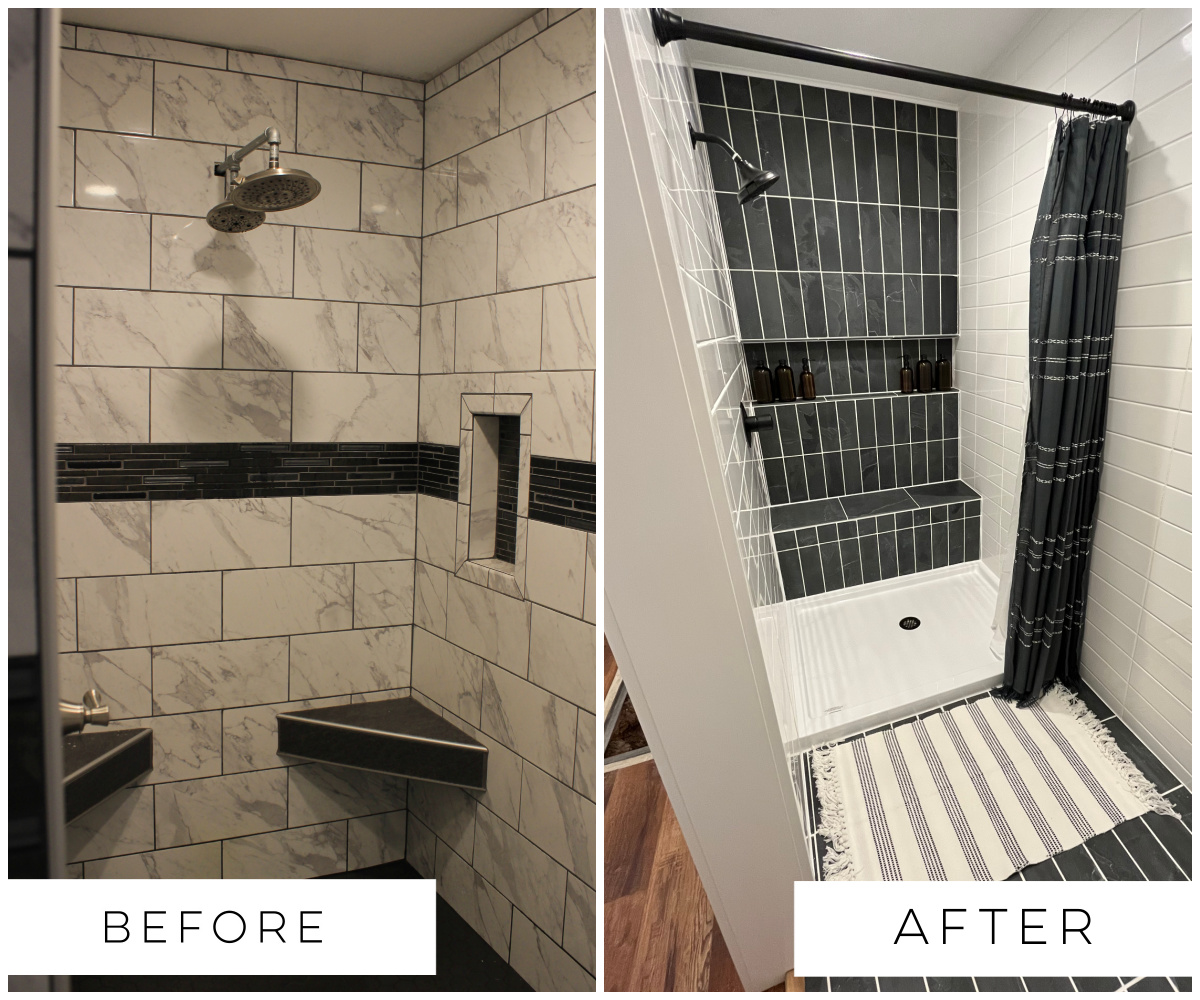
Our existing shower was a huge walk in tiled shower. It was approximately 4 ft wide by 9 foot deep and at quick glance, it looks fine.
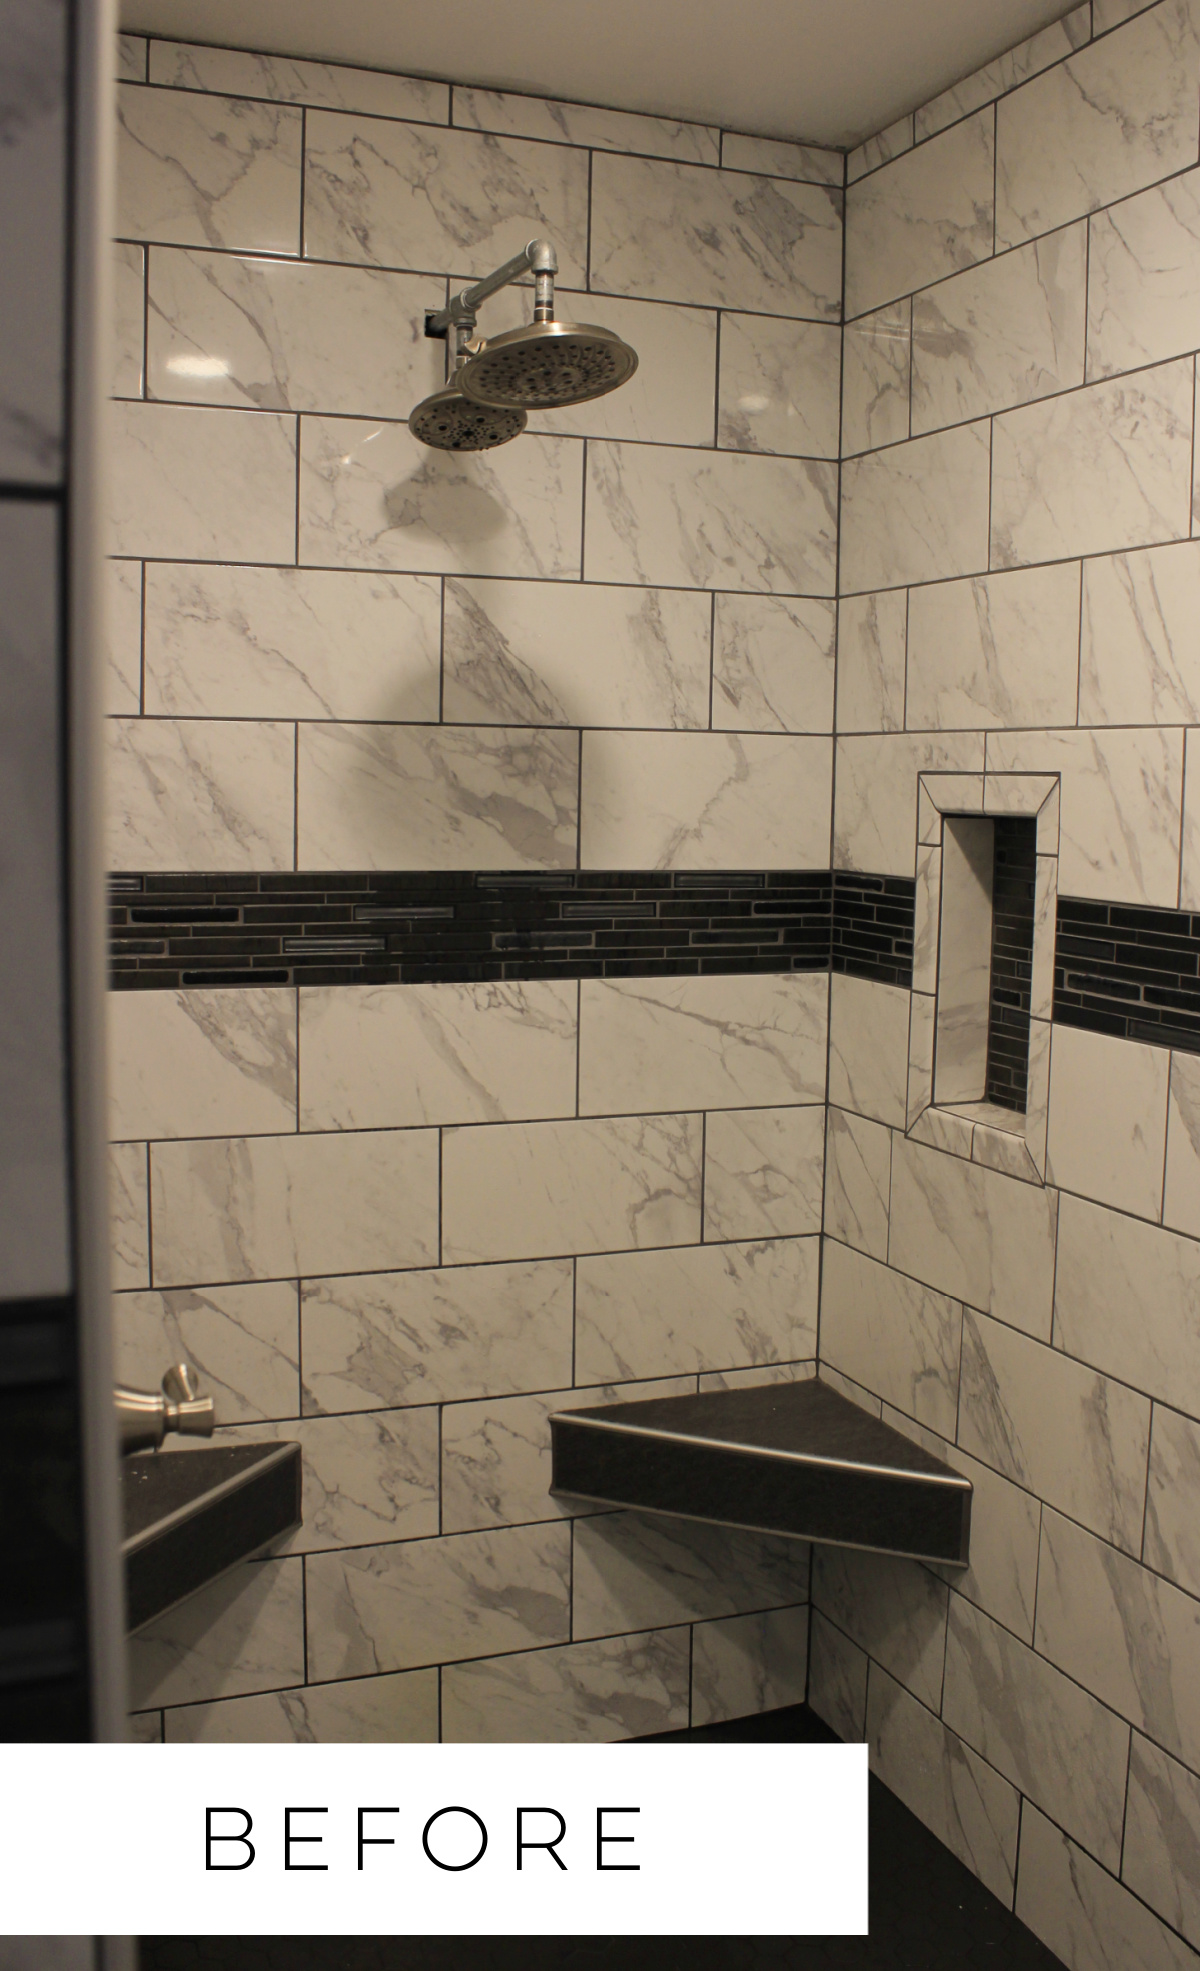
However, the shower was the main reason for remodeling the bathroom to begin with because while things LOOK okay on the surface, when you turn the water on, it pooled at the front corner vs running toward the drain.
.
There were also a few cracked and missing tiles, dark grey grout smears all over the ceiling, missing caulk at the top, and the galvanized pipe for the shower head (you’re not supposed to use galvanized pipe for a shower head, by the way…) had rusted and the water dripping from it had stained some of the tiles as well–you can see below.

So, with these things, amongst a few other issues, we just decided to rip it out and start over.
What we are changing with the shower design
Now, I know many of you will think I am crazy for what I did to rebuild the shower, but we didn’t replace the tile shower floor with another tile shower floor.
.
We replaced it with a single piece shower pan. I would 100% do it again, and I’m very happy with how it turned out, however, I do understand that not everyone would choose this option.
.
But I have several reasons for why I did.
.
While a large walk in tile shower is many people’s dream, a 4×9 tile floor shower is A LOT to keep clean. I’ve had single unit showers, acrylic shower bases, and tile shower floors.
.
And at the end of the day, tile floors are my least favorite option. They require more maintenance, are hardest to keep clean, and have more potential places for cracks and leaks that you need to constantly be checking for.
.
I also didn’t want to take a chance on replacing this shower floor only to end up with the same issue as before with incorrect sloping and pooling water.
.
So, after I tore out the shower walls and the shower floor, I decided to install an acrylic shower pan and just retile the walls.
Everyone’s situation will vary, so you’ll have to do your own research for your own project, but below is a general overview of how I remodeled our walk in shower with a new shower pan.
Tools & Materials:
Tools:
- Demolition tools–hammer, prybar, etc.
- Tile Saw
- Drill/Driver
- Trowel(s)
- Grout Float
- Grout Sponge
Materials:
- Shower Pan
- Cement Board
- Waterproofing (I used Schluter Systems, but there are other options)
- Thinset/Mortar (do your research on what type you need for your own application(s) )
- Slate 4×12 tiles
- Slate 16 x 16 tiles
- Subway 4×12 tiles
- Grout
- DAP Advanced Modified Polymer (AMP) Waterproof Kitchen, Bath and Plumbing Sealant
- Tile sealer
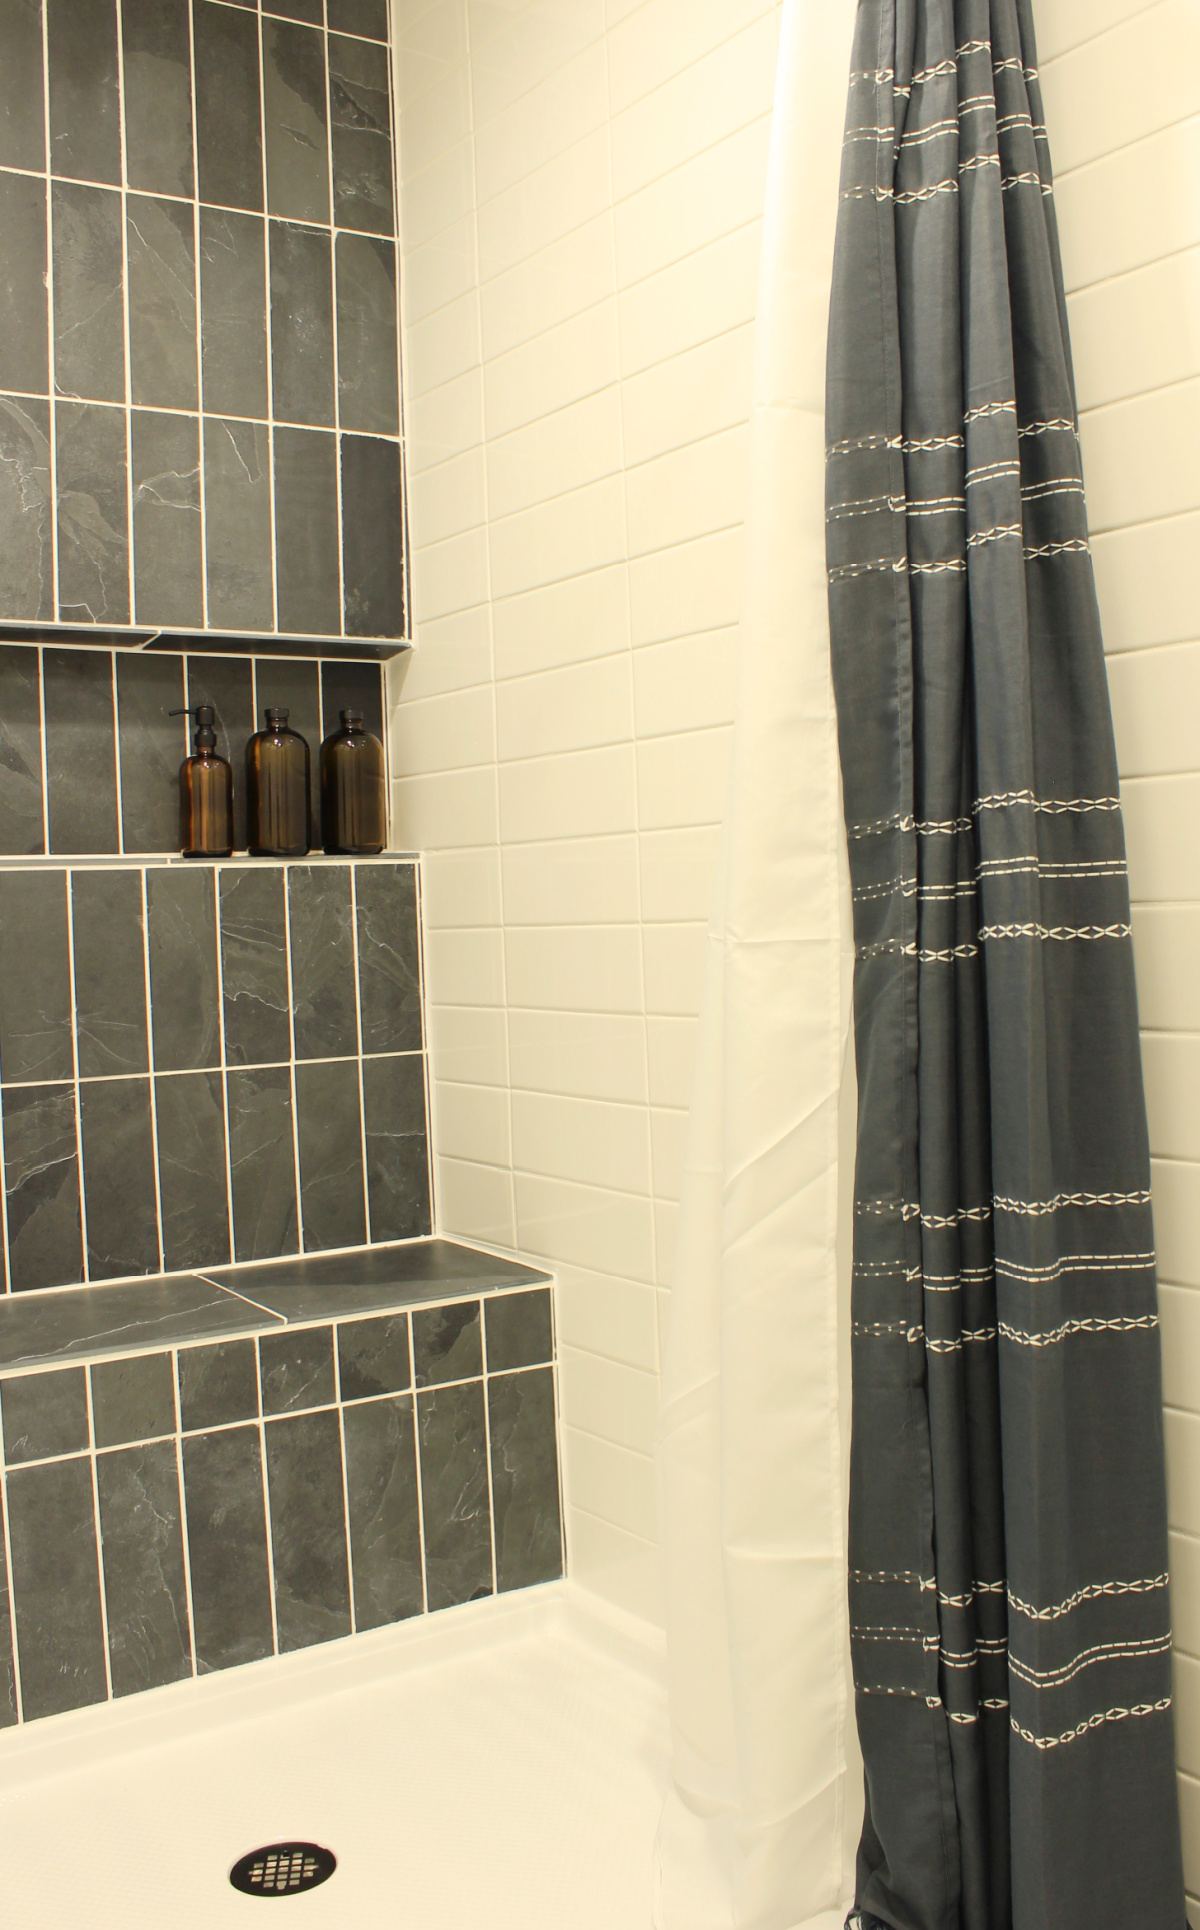
- Shower curtain
- Shower Faucet
- Shower Rug
Step 1: Demo the Existing Shower
The first step to remodeling the shower was to remove the existing one.
.
This was a chore and quite a messy job. I put on some gloves and grabbed a prybar and a hammer and removed all the tile and existing cement board from the walls and the floor of the shower.
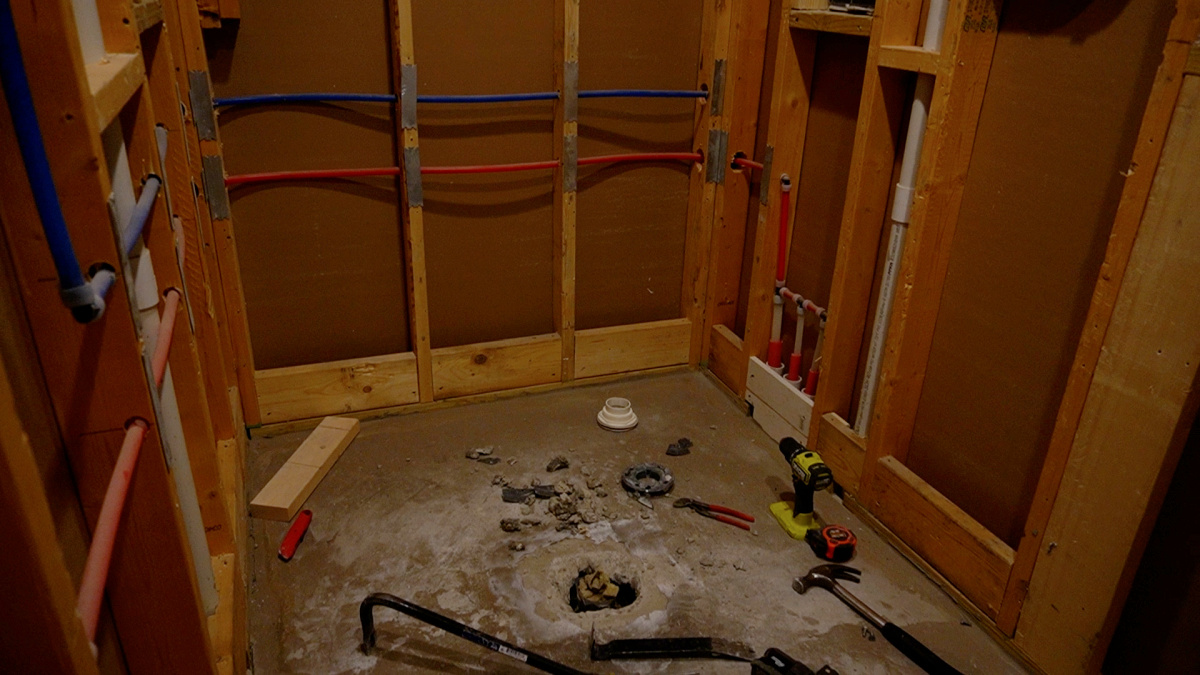
It’s important to be careful not to get into any plumbing or wiring behind the walls, so tread lightly as you start to tear things out.
.
I removed everything down to the studs and the concrete floor.
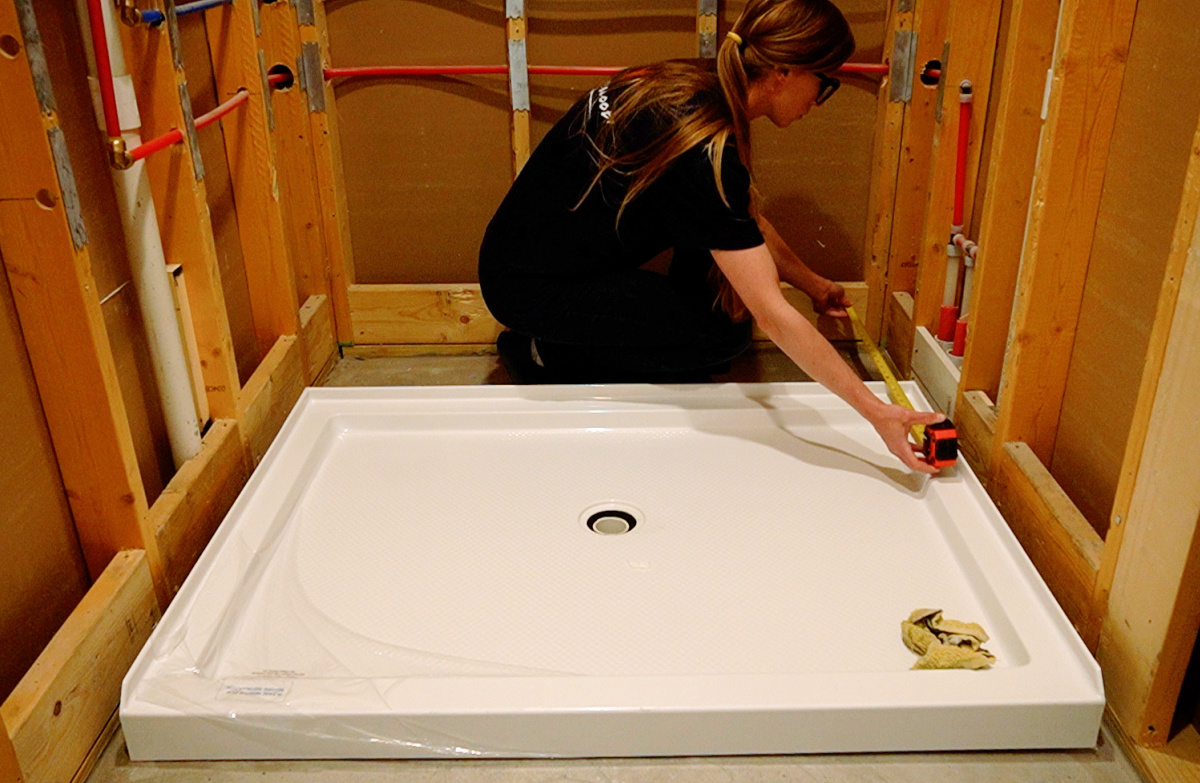
Step 2: Dry Fit and Frame Out for Shower Pan
Since the shower was already 4 ft wide, I was able to use a 3×4 pan in here with a center drain.
.
However, while the existing drain was centered left to right, it was pretty far from the front, so I had a lot of space to fill between the existing wall and the back edge of the shower pan.
So I got creative and framed out this section with a bench seat and a full length shelf.
.
I basically built a bench seat frame to fill the space and allow the back of the pan to run along the front of the bench, then I installed two false walls framed using 2x4s with space in between them to act as the shelf for shampoo and soap bottles.
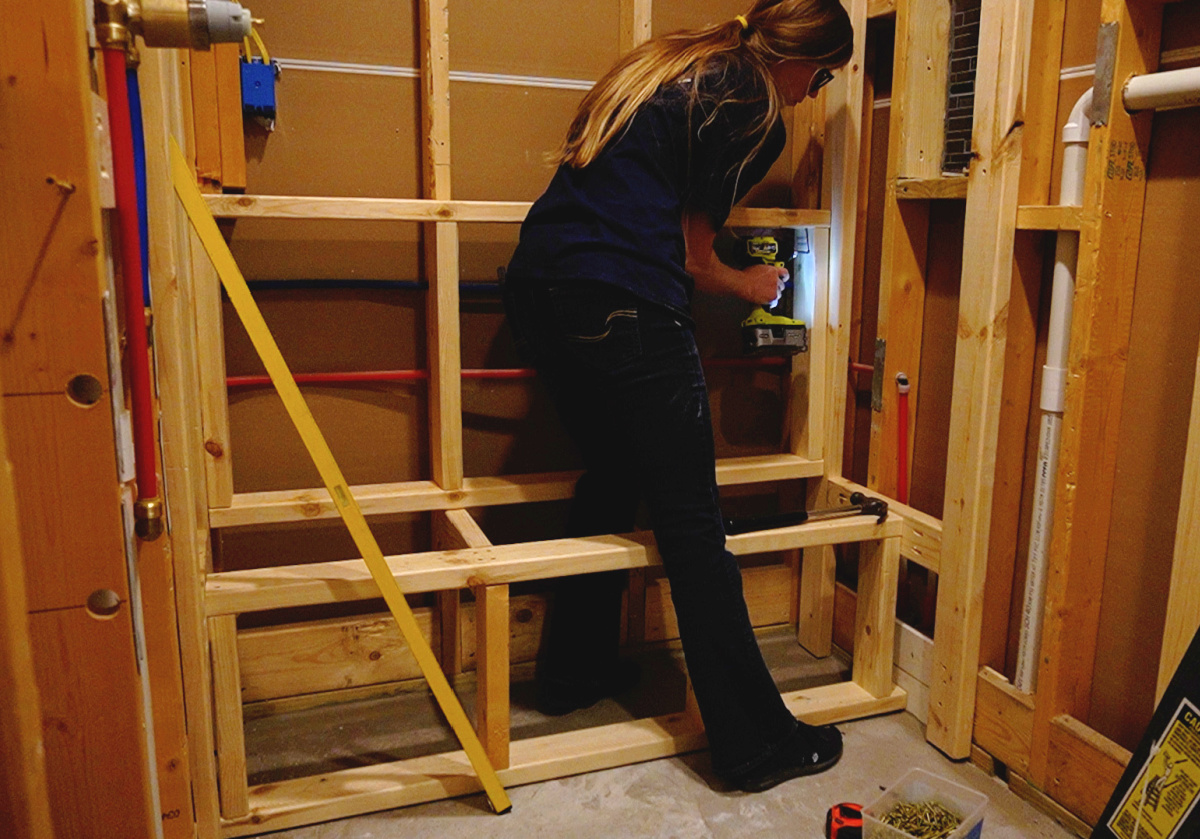
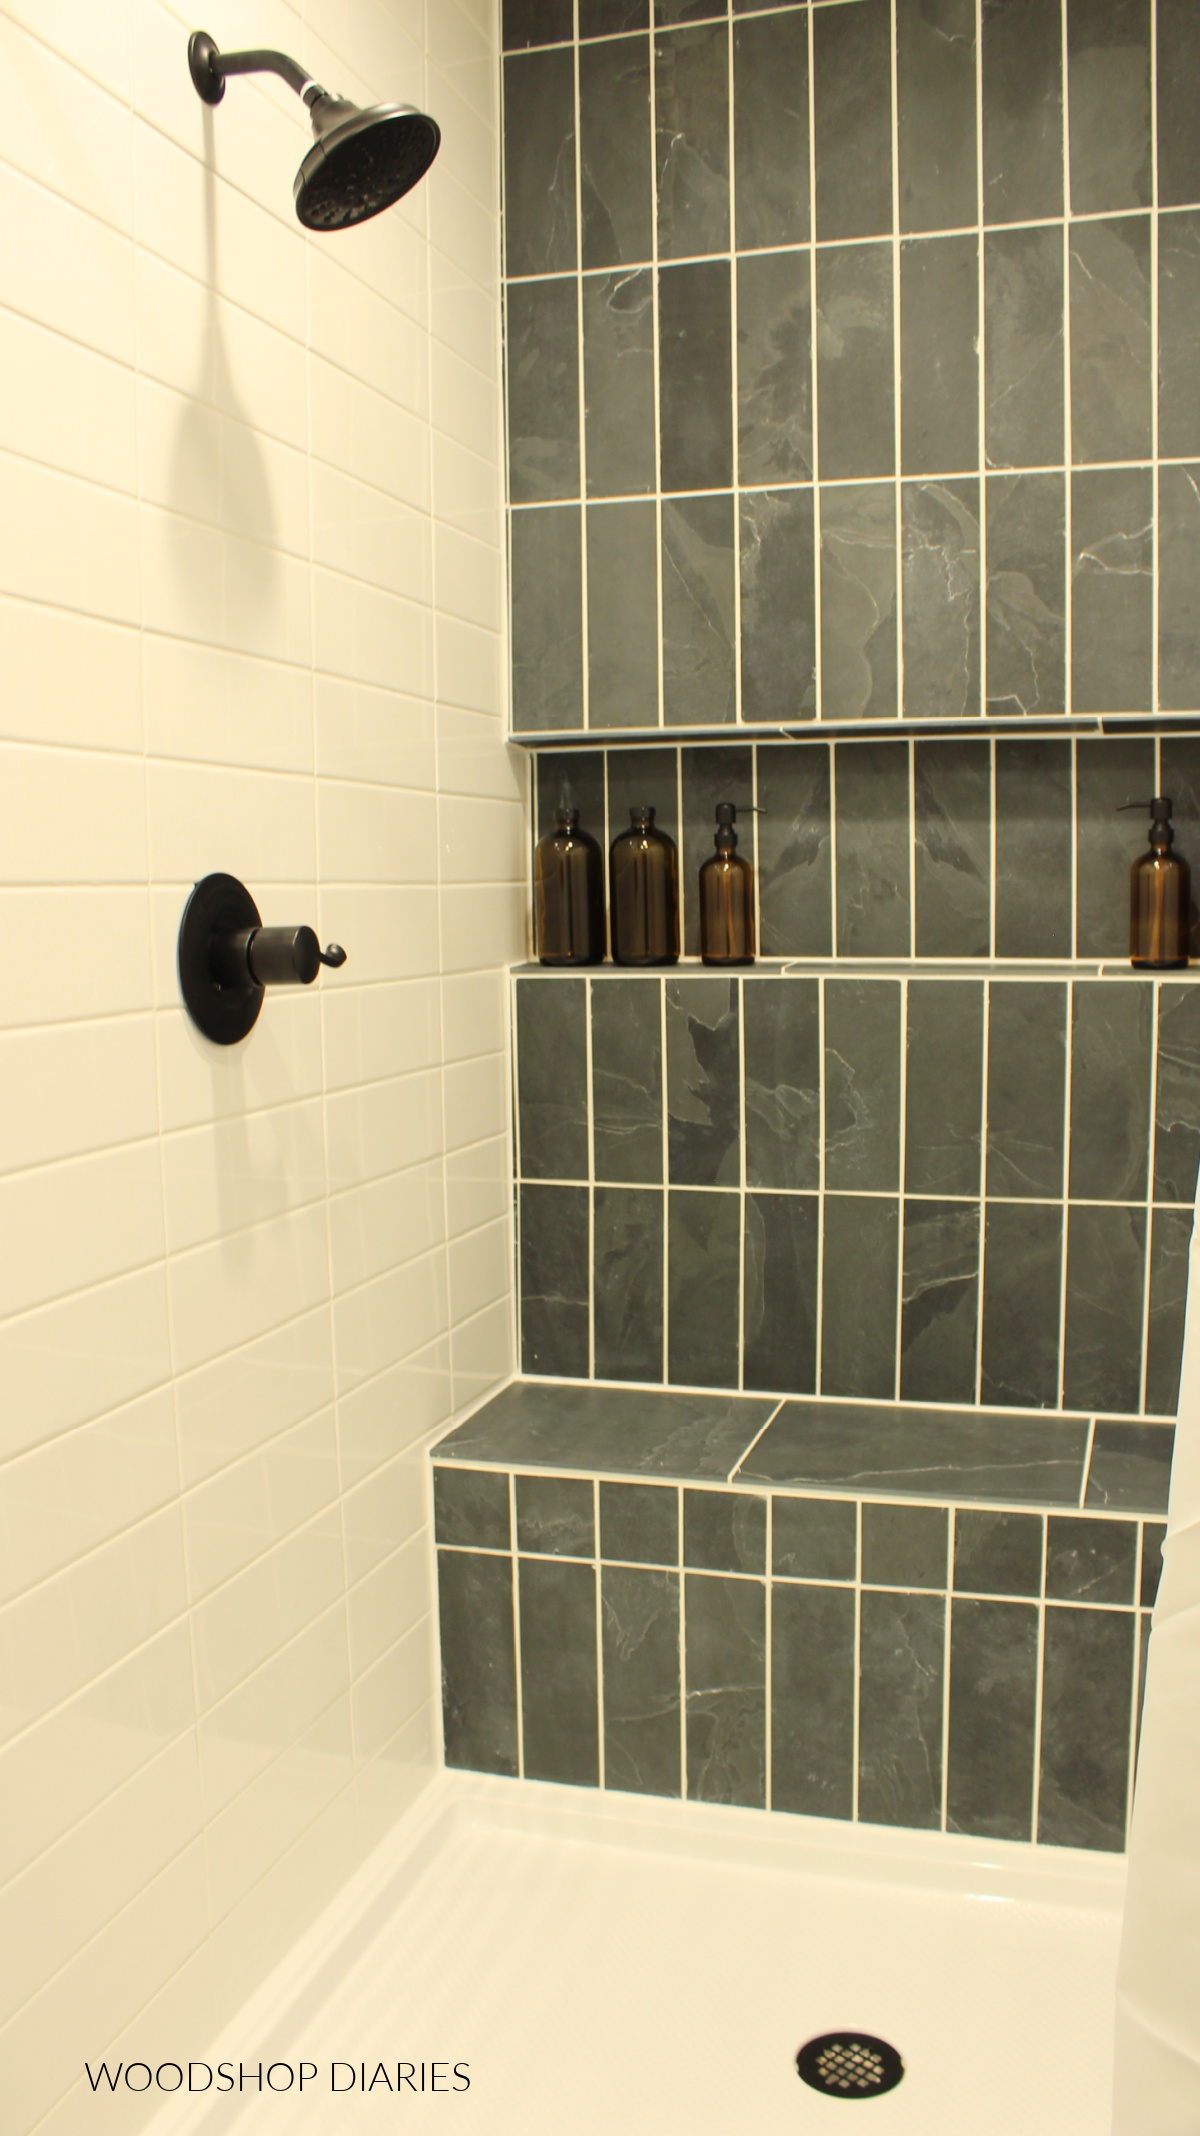
You’ll notice that we also moved the shower head so that it came out the side wall vs. the back wall.
.
Also, I had to chisel out the old drain and extend the drain pipe up a little to accommodate the pan. But luckily, we didn’t have to move it.
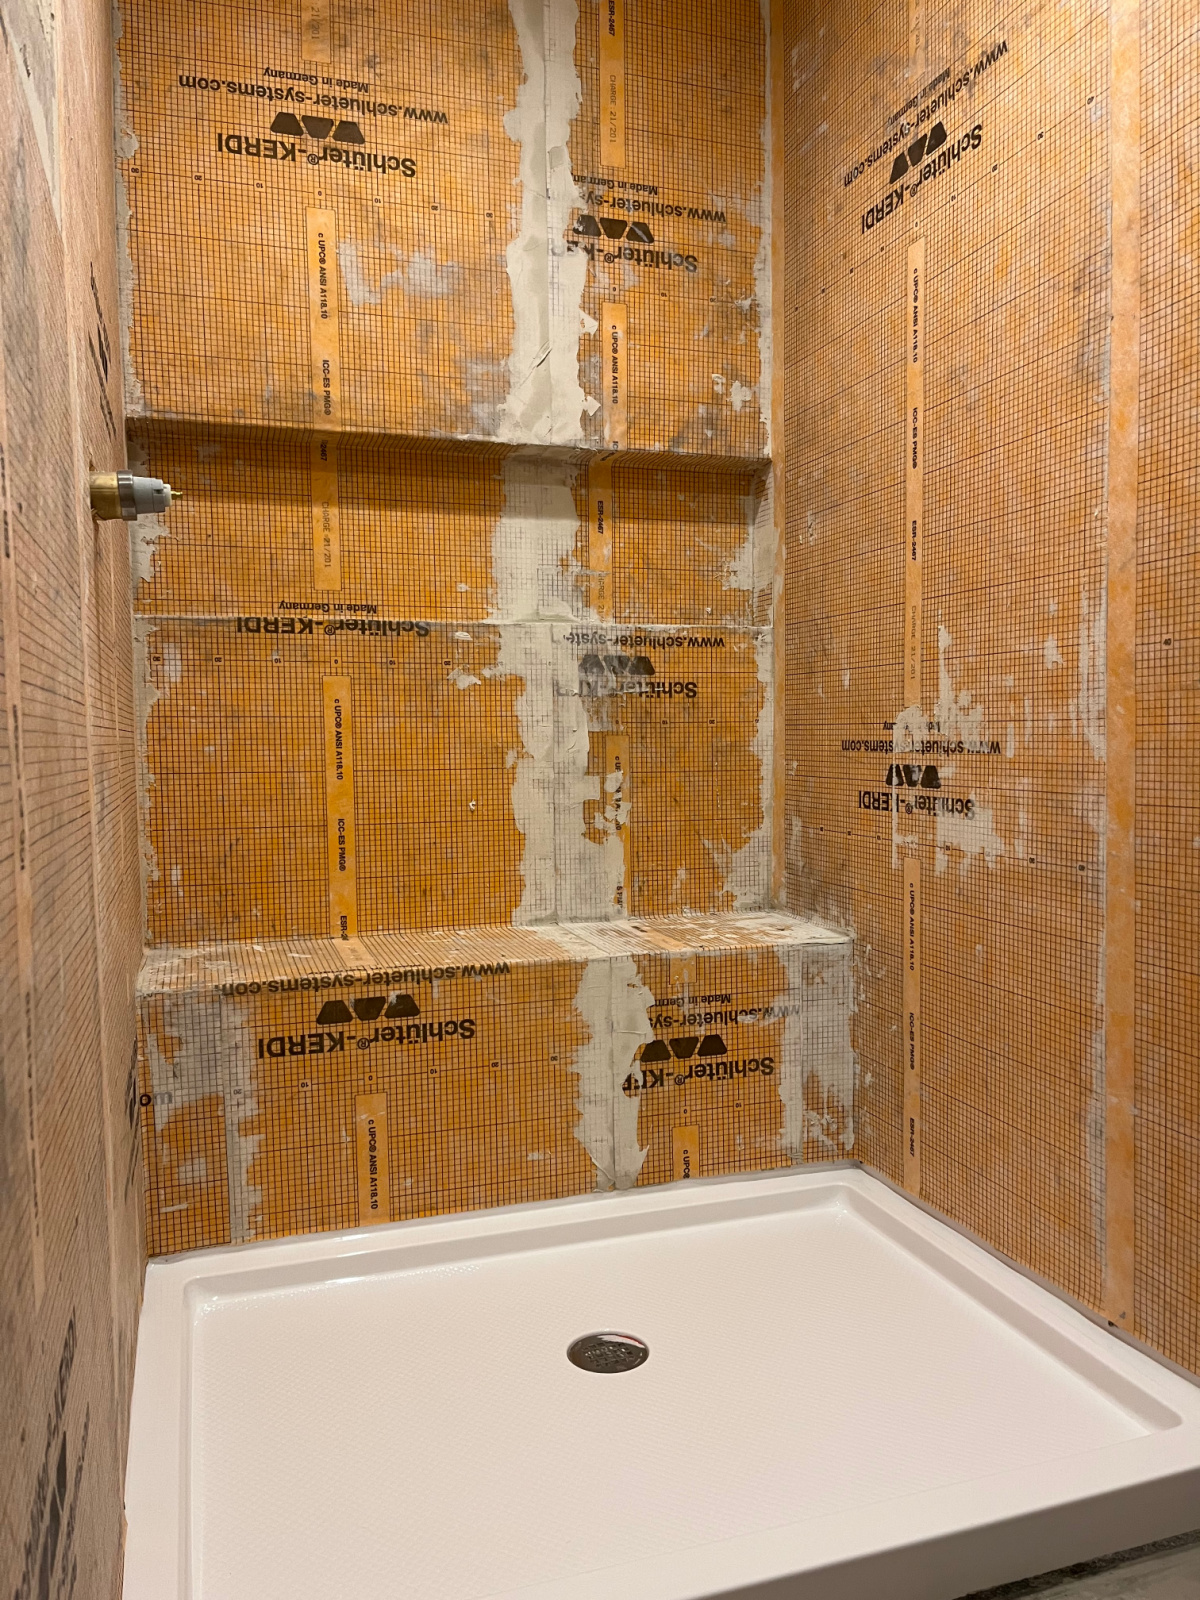
Step 3: Install Shower Pan and Walls
Once the drain was prepped and the framing complete, we installed the pan according to the instructions that came with it and made sure it was properly leveled up.
.
After the mud bed dried, I came back and installed cement board.
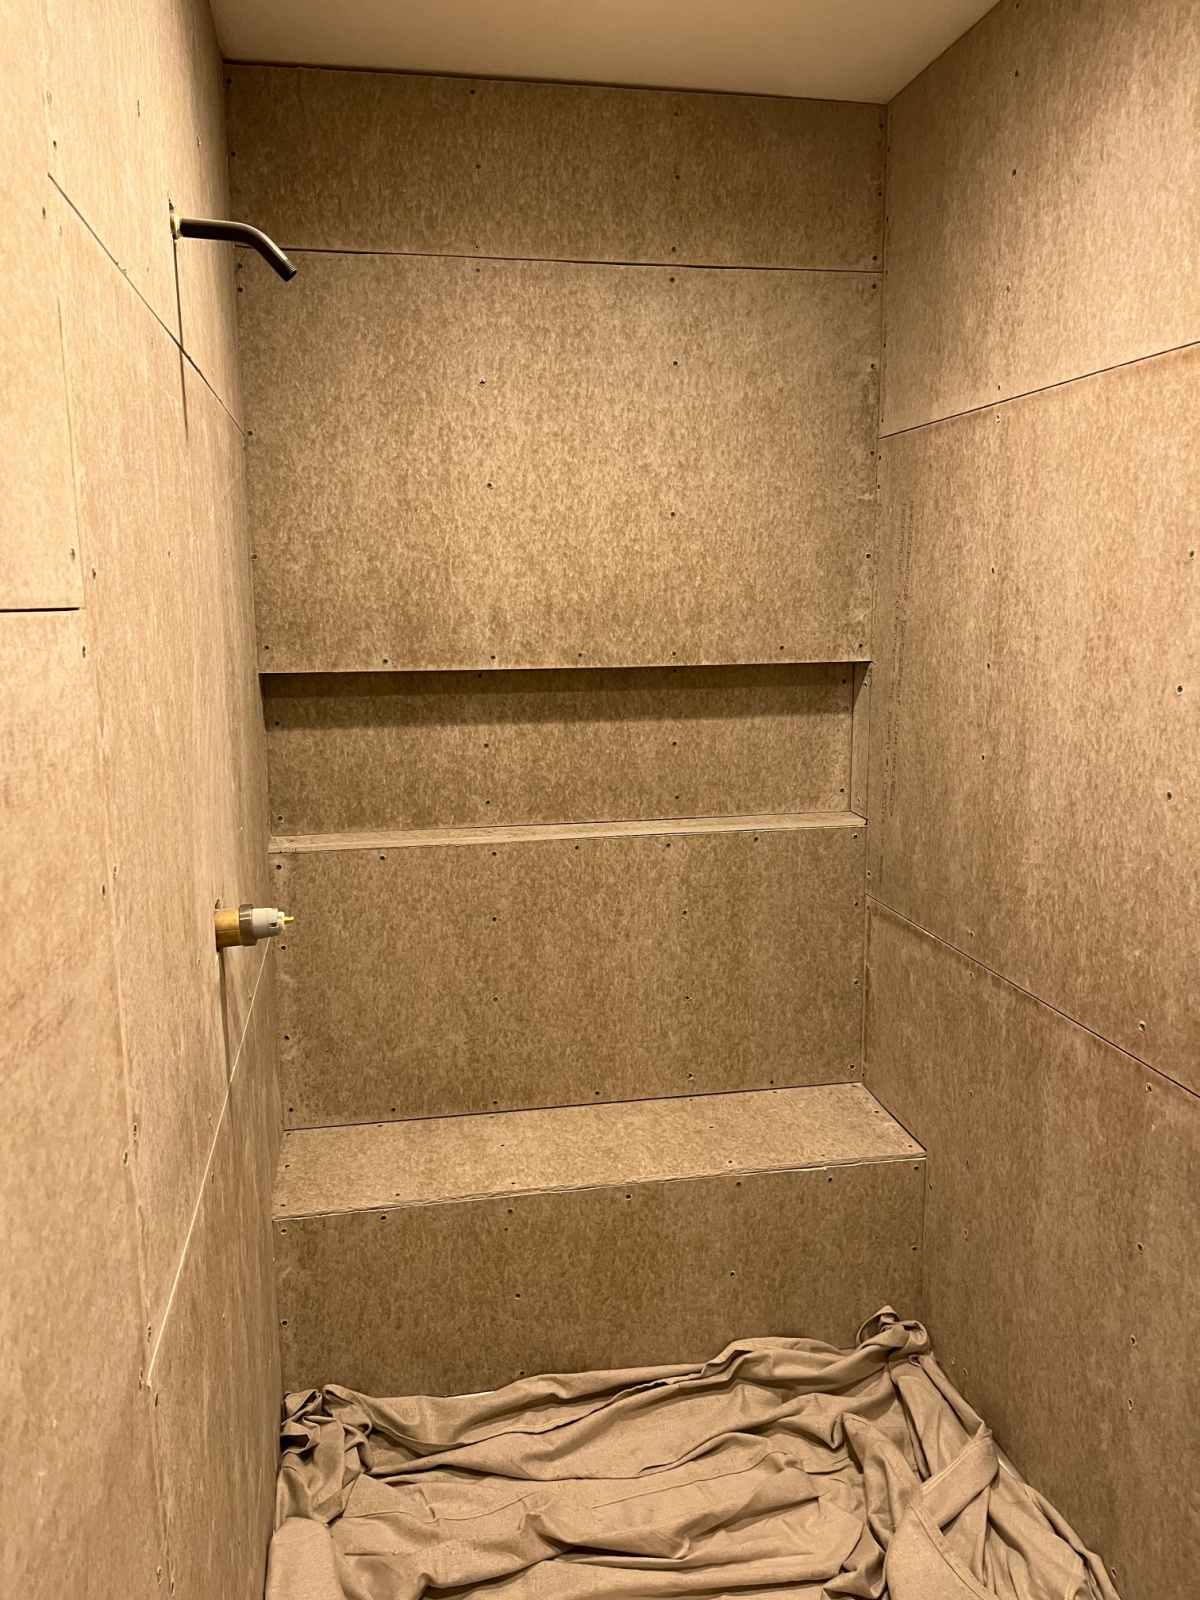
If you’ve ever worked with cement board before, it’s basically like working with drywall, only a million times harder to cut and much heavier haha.
.
After the cement board was up, I installed Schluter Kerdi membrane for waterproofing.
.
I’ve used this a few times before (you can see it in our old house tile shower redo here and in my parent’s shower remodel I did a few years ago here) and it seems to work well.
.
But there are many options for waterproofing, so this is just one way to do it. You basically “glue” this fabric onto the cement board with thinset.
You can find more details on this on the Schluter Systems website.
Step 4: Tile the Shower Walls
And once the waterproofing membrane was dry, I could come back and tile.
.
Now, this is not a detailed “how to tile a shower” post—obviously. I don’t love tiling and I’m definitely not an qualified expert to give out tiling advice.
.
I encourage you to always do your research before tackling a DIY shower remodel because there are a million situations and possibilities and options that come with tiling.
.
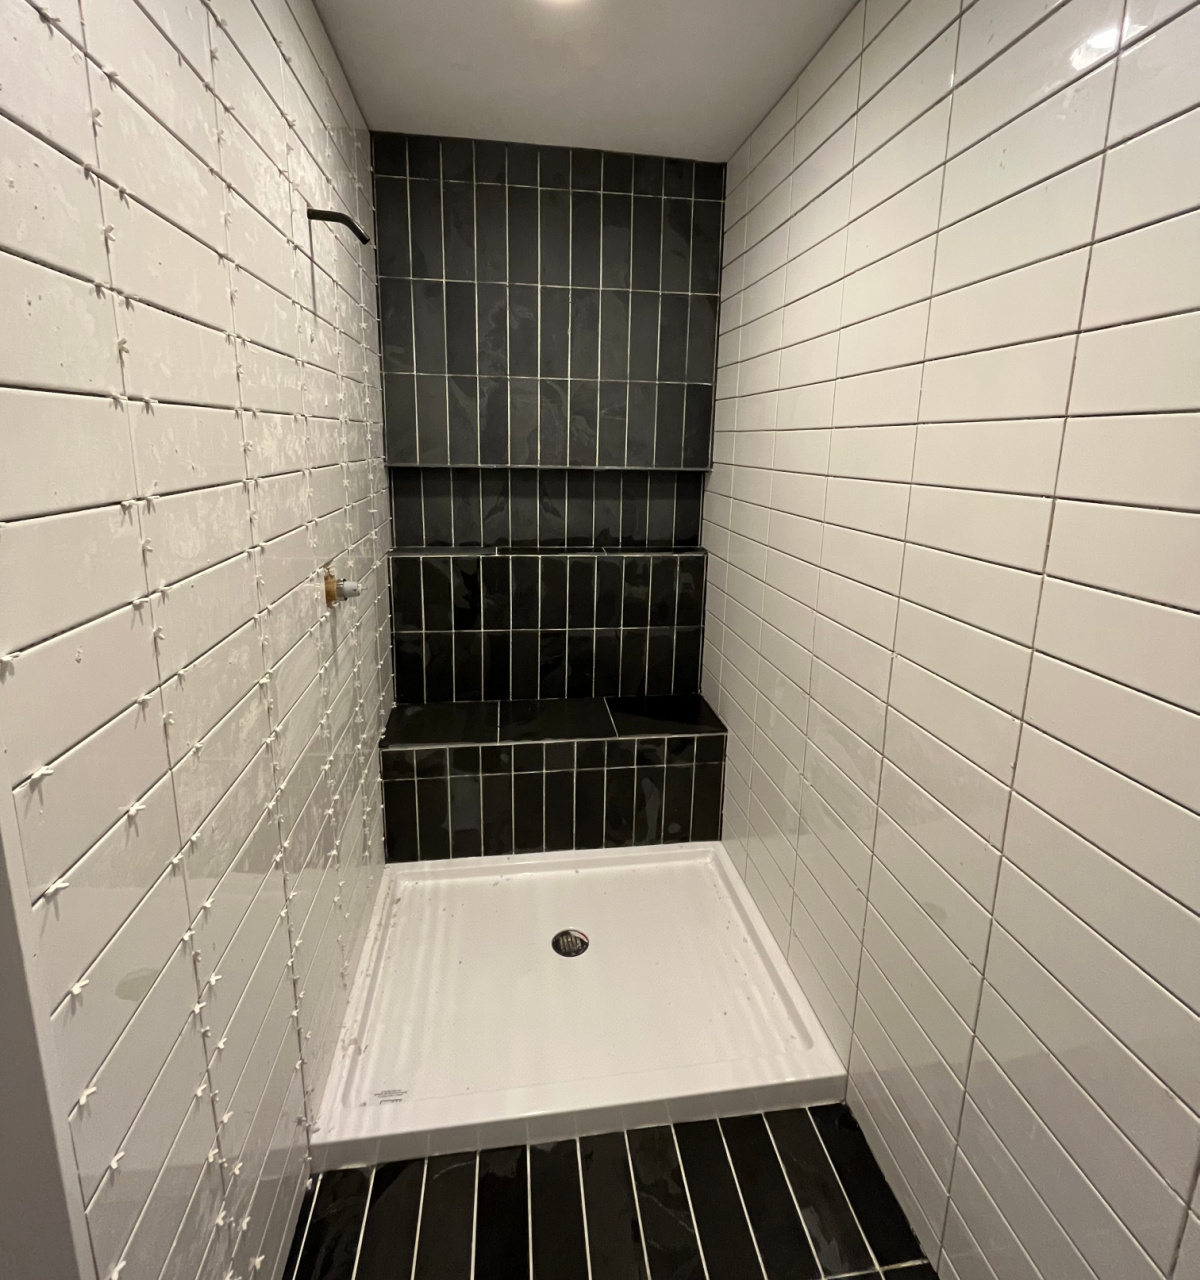
I used slate 4×12 tiles for the back wall here in a vertical pattern. And I used matching slate 16×16 tiles for the seat to minimize horizontal grout lines. (I had to cut these tiles to fit, obviously.)
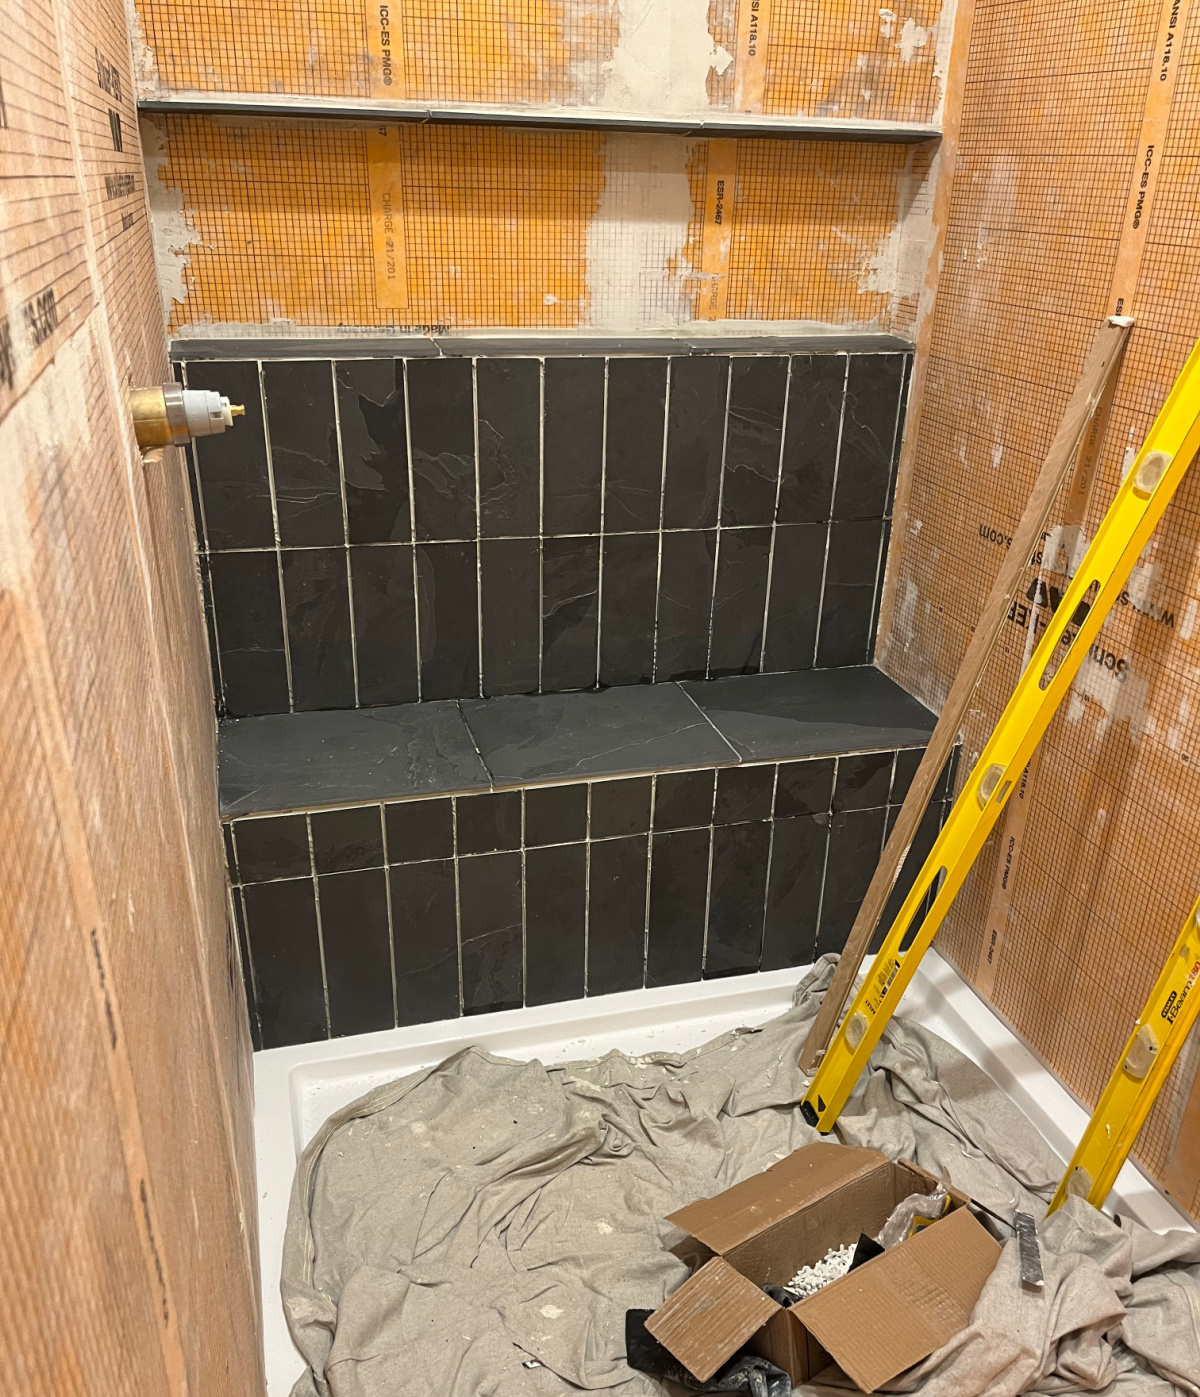
Now, I found that while these slate tiles are very pretty, they are very inconsistent in sizing and many of the edges were not square.
.
They were not all the same thickness and they were very difficult to keep straight. So laying them was somewhat frustrating and I had to embrace the fact that imperfections were just going to be part of it.
.
I used a tile saw to trim pieces as needed and I kept a level close by to check as I installed each row.
.
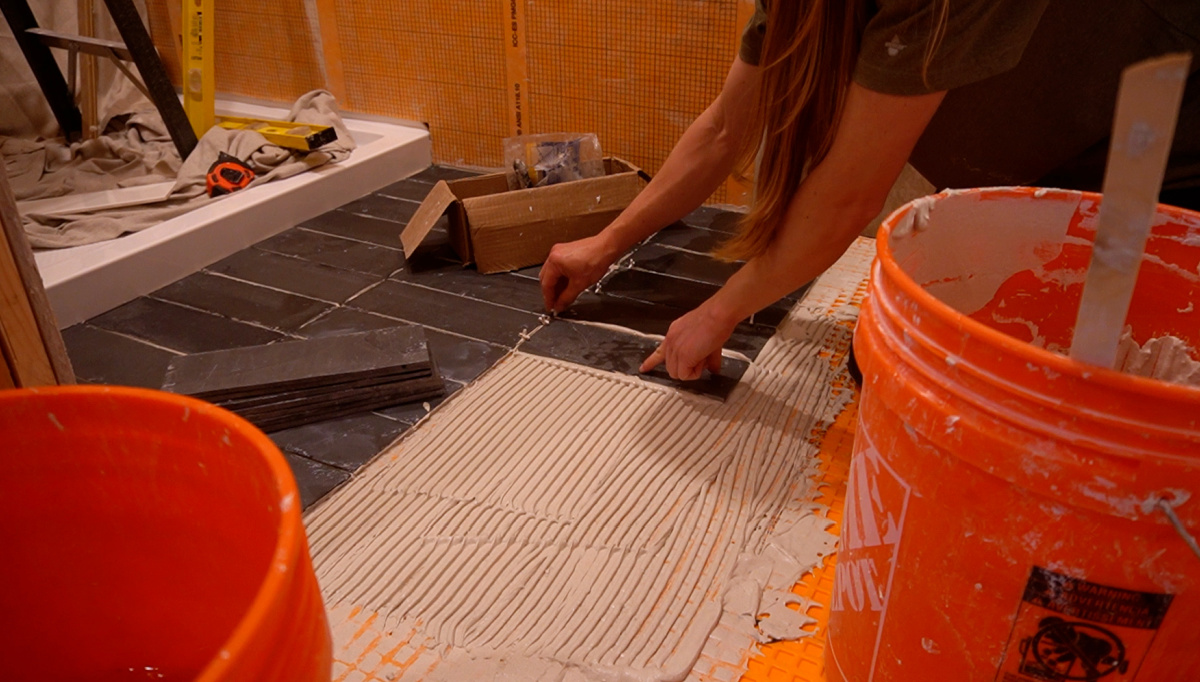
Once the back wall was installed, I continued this same tile and same pattern on the floor. I used another Schluter product called Ditra on the floor between the concrete and the tile because it was highly recommended to use between concrete floors and tile.
You’ll need to do your own research to figure out what you’d need based on your existing floor and the type of tile you’re installing.
.
I actually had wanted to continue the vinyl plank floor that was already in the rest of the bathroom up to this shower pan, but after tearing out the shower, we found that the shower floor had about a ½” step up, so we would need a transition and I thought it would look weird, so I ended up just extending the tile over this area.
.
Sometimes you just wing it and make do haha.
.
Once the slate tile was complete, I started on the other two walls adding 4×12 white subway tile. I laid the slate tiles vertically, but I laid the subway tiles horizontally.
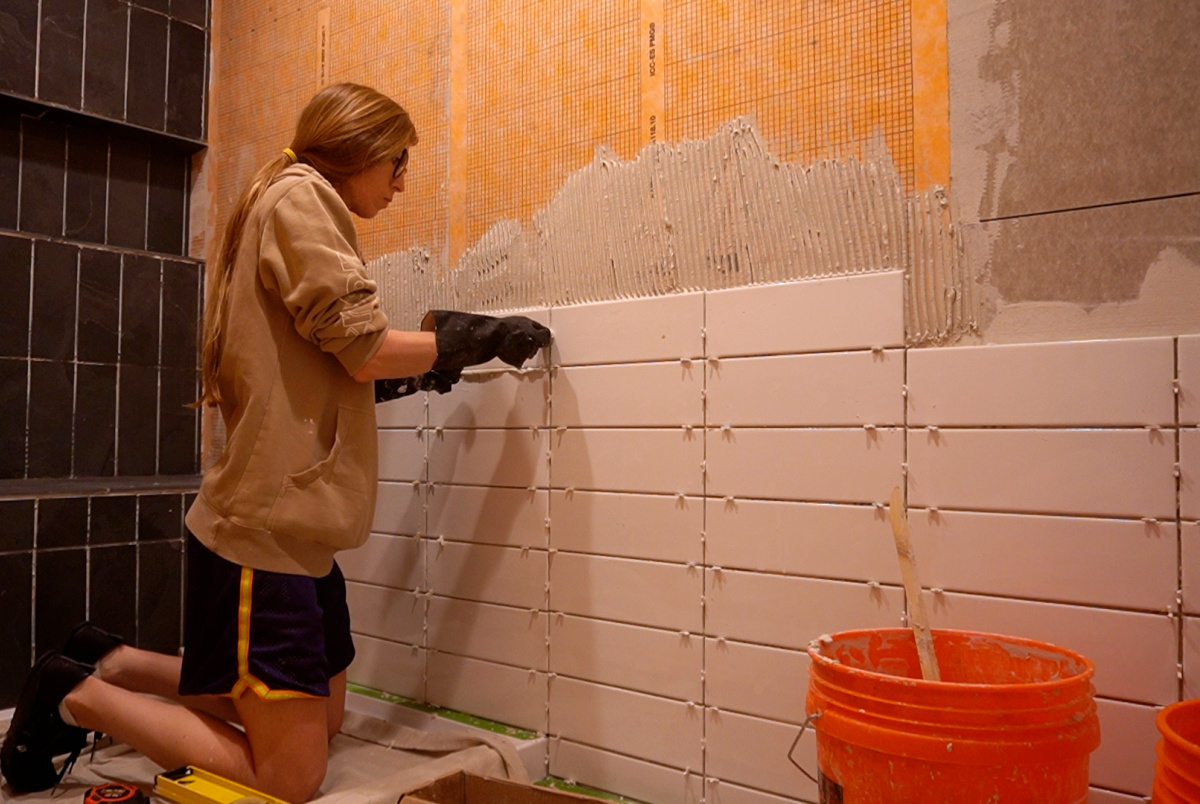
I just liked this look…you can lay them in whatever pattern you’d like.
.
I got my first row nice and level, then proceeded to kind of build on top of it all the way up the walls.
.
Also, yes, I’m aware I’m using these spacers “incorrectly” here. These were 3/16” spacers, but they were ⅛” thick. I wanted ⅛” gaps, so I flipped them on their sides.
This was days worth of tiling, and I hated almost every second of it haha. It was a very repetitive process so I was pretty excited when it was over.
Step 5: Grout the Shower Tiles
After the tiles were set and dry, I cleaned them up and applied some sealer to the slate before coming back and grouting to help prevent any possible staining.
.
Slate is a pretty absorbent material, so sealing before grout will help prevent the grout from sticking to the tiles when you apply it.
.
Grouting is also not a super fun process, but at this point, I could see the light at the end of the tunnel haha.
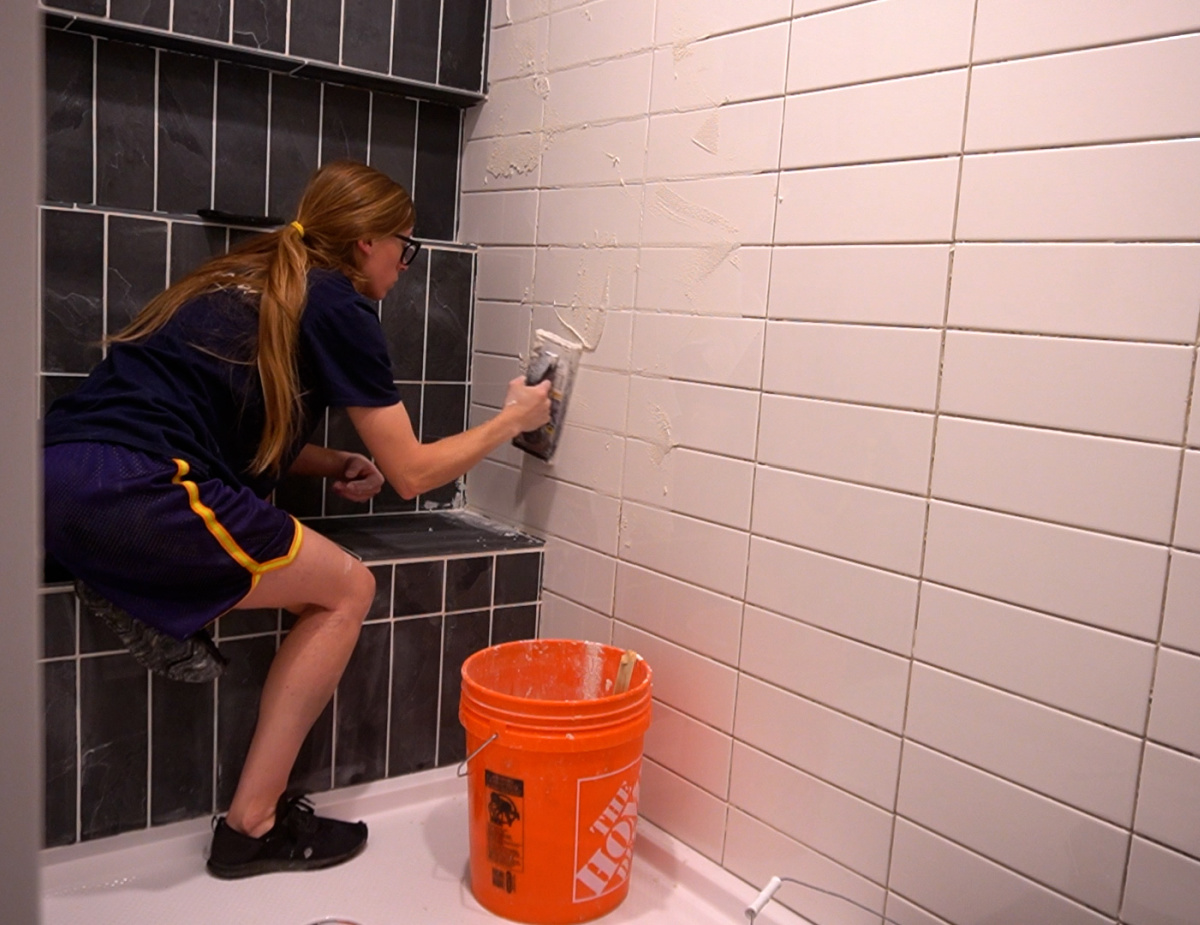
I applied white sanded grout into all the gaps and spaces between tiles EXCEPT on the inside corners. I left the inside corners clear because I’ll come back and seal with in the next step.
.
I worked in small sections with the grout and so I could clean it up with a damp sponge before it set up.
.
I cleaned the grout with a damp sponge about three times, then came back the next day and cleaned them again with a dry towel to remove any remaining residue.
Step 6: Seal Tile Joints in Shower Remodel
Grout should go in between all the tiles on the same plane and should fill any outside corners. However, for inside corners, you skip the grout and use a sealant type caulk.
.
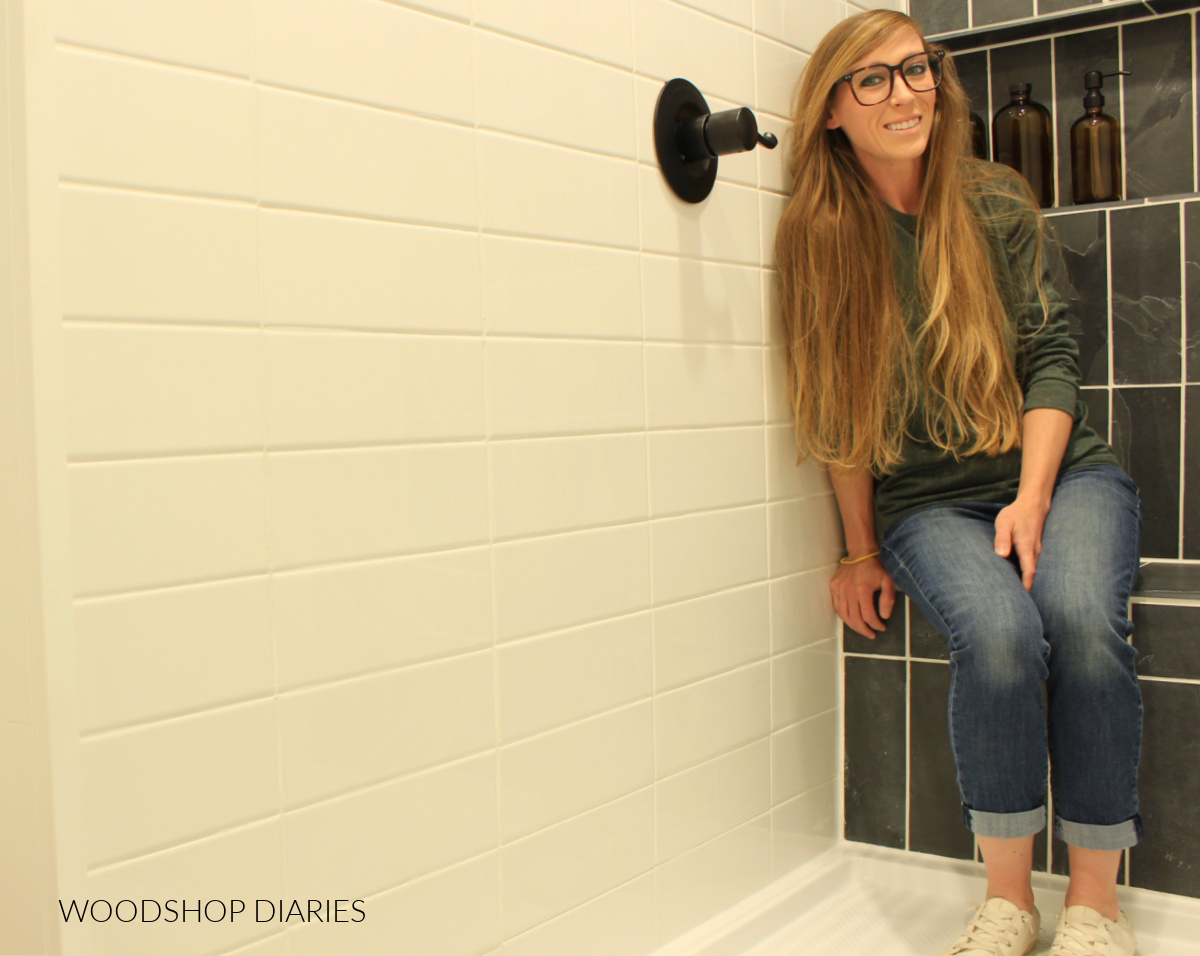
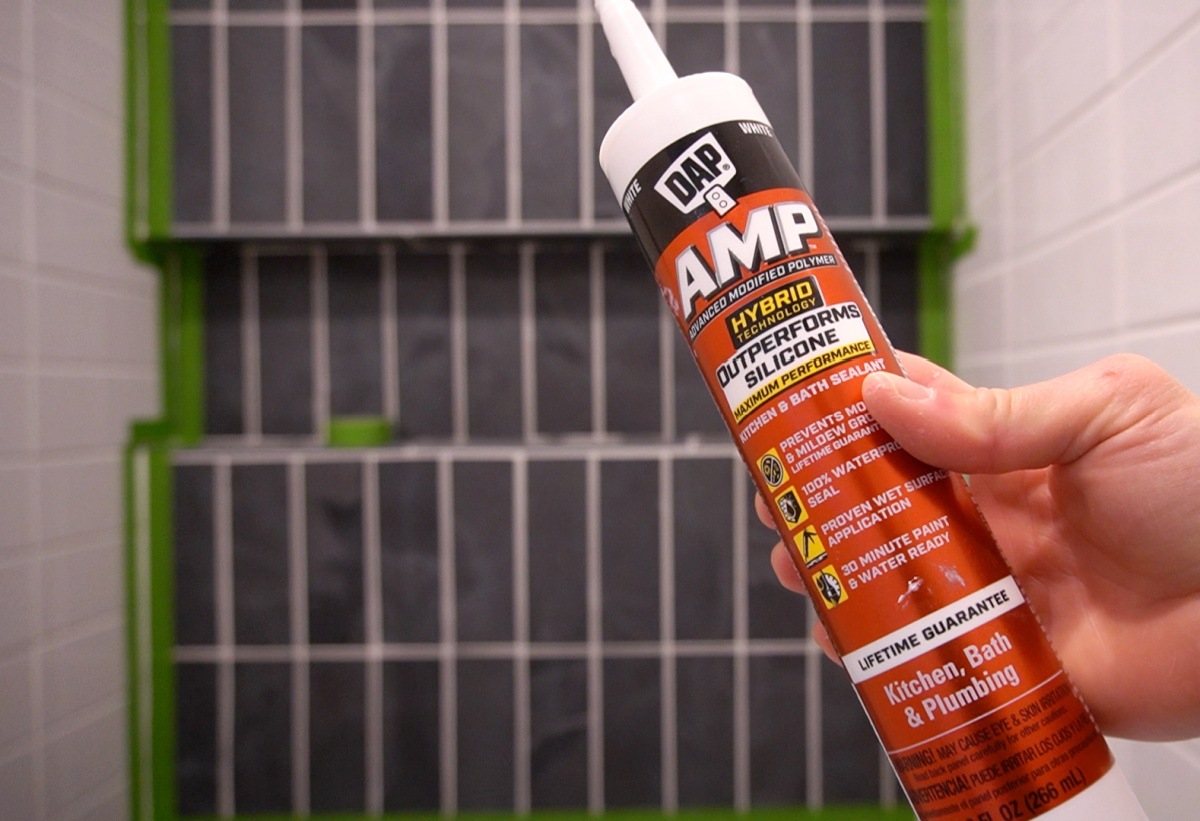
In this application, I used DAP’s new Advanced Modified Polymer Waterproof Bath and Plumbing Sealant.
Now, I’ll warm you that if you’re used to using latex caulks like I am, this is a bit more difficult to tool and requires mineral spirits to clean up (be sure to read the instructions on the tube for clean up/disposal instructions).
.
So to get a nice, clean bead, I used painters tape to tape off the areas I was sealing.
.
I worked in small sections to give me plenty of time to apply, smooth it and remove the tape before it skinned over. It’s recommended to use a caulking tool to smooth this sealant.
.
This DAP Advanced Modified Polymer (AMP) Waterproof Kitchen, Bath and Plumbing Sealant provides a lifetime guarantee, a 100% waterproof seal, and prevents mold and mildew, so it’s the ideal choice for use in a shower like this.
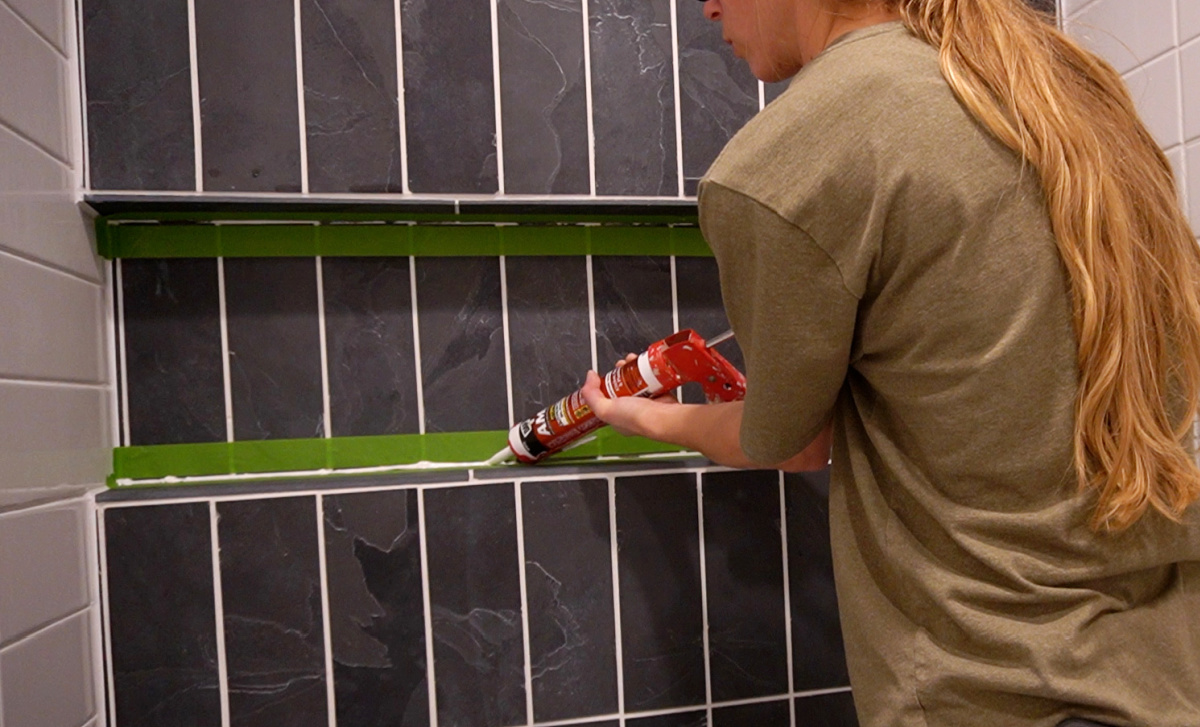
I sealed along all the inside corners of the shower and along the floor where the tile wall meets the tile floor, around the shelf, and the bench, and where the tile met the pan.
.
I used this on basically all remaining gaps and cracks after grouting to seal out water from getting in.
.
After everything was dry, I sealed the tiles and the grout with a penetrating sealer, and the DIY shower remodel is complete!
While tiling isn’t my favorite past time, this DIY shower remodel project turned out even better than I expected and I think it makes this bathroom look much brighter and will be easier to maintain and keep clean.
.
Call me crazy, but I like having a smaller shower space and more peace of mind not worrying about potential leaks.
I’m not done with this bathroom yet–there’s still at least one more fun project to tackle in here before sharing a full reveal!
.
So if you’d like to follow along so you don’t miss out on all the bathroom remodel updates, be sure to subscribe to the newsletter below!
And if you’d like to save this DIY shower remodel project for later, don’t forget to pin it or save it to your favorite social channel!
Until next time, friends, happy building!