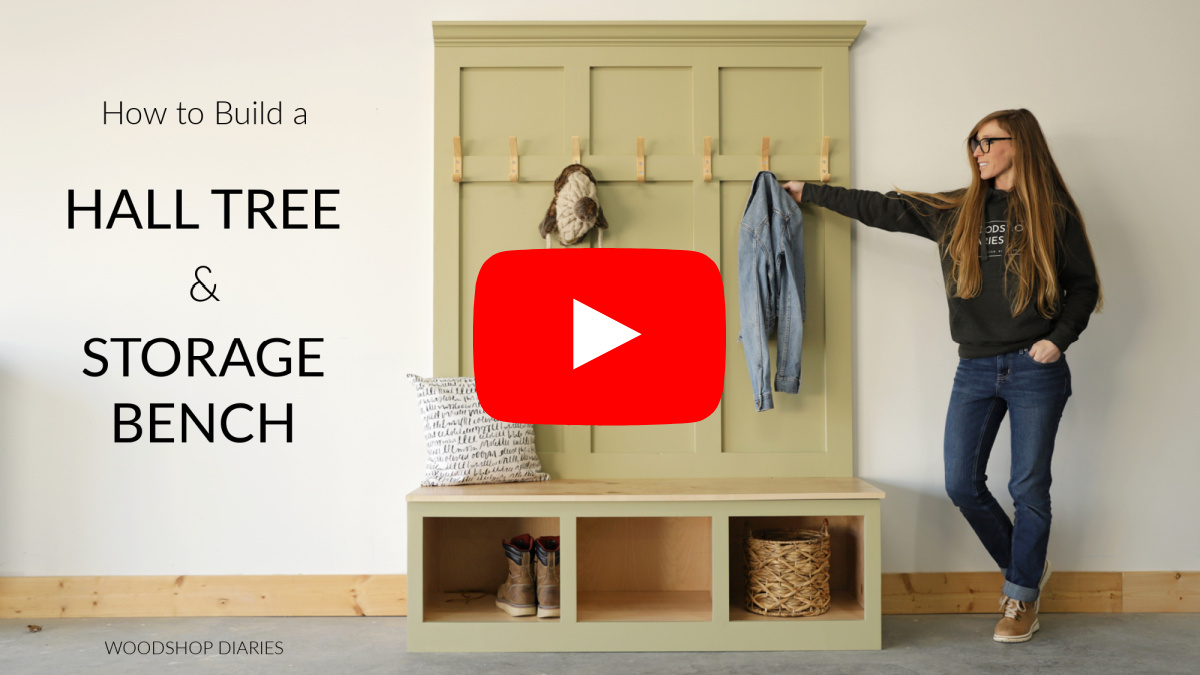
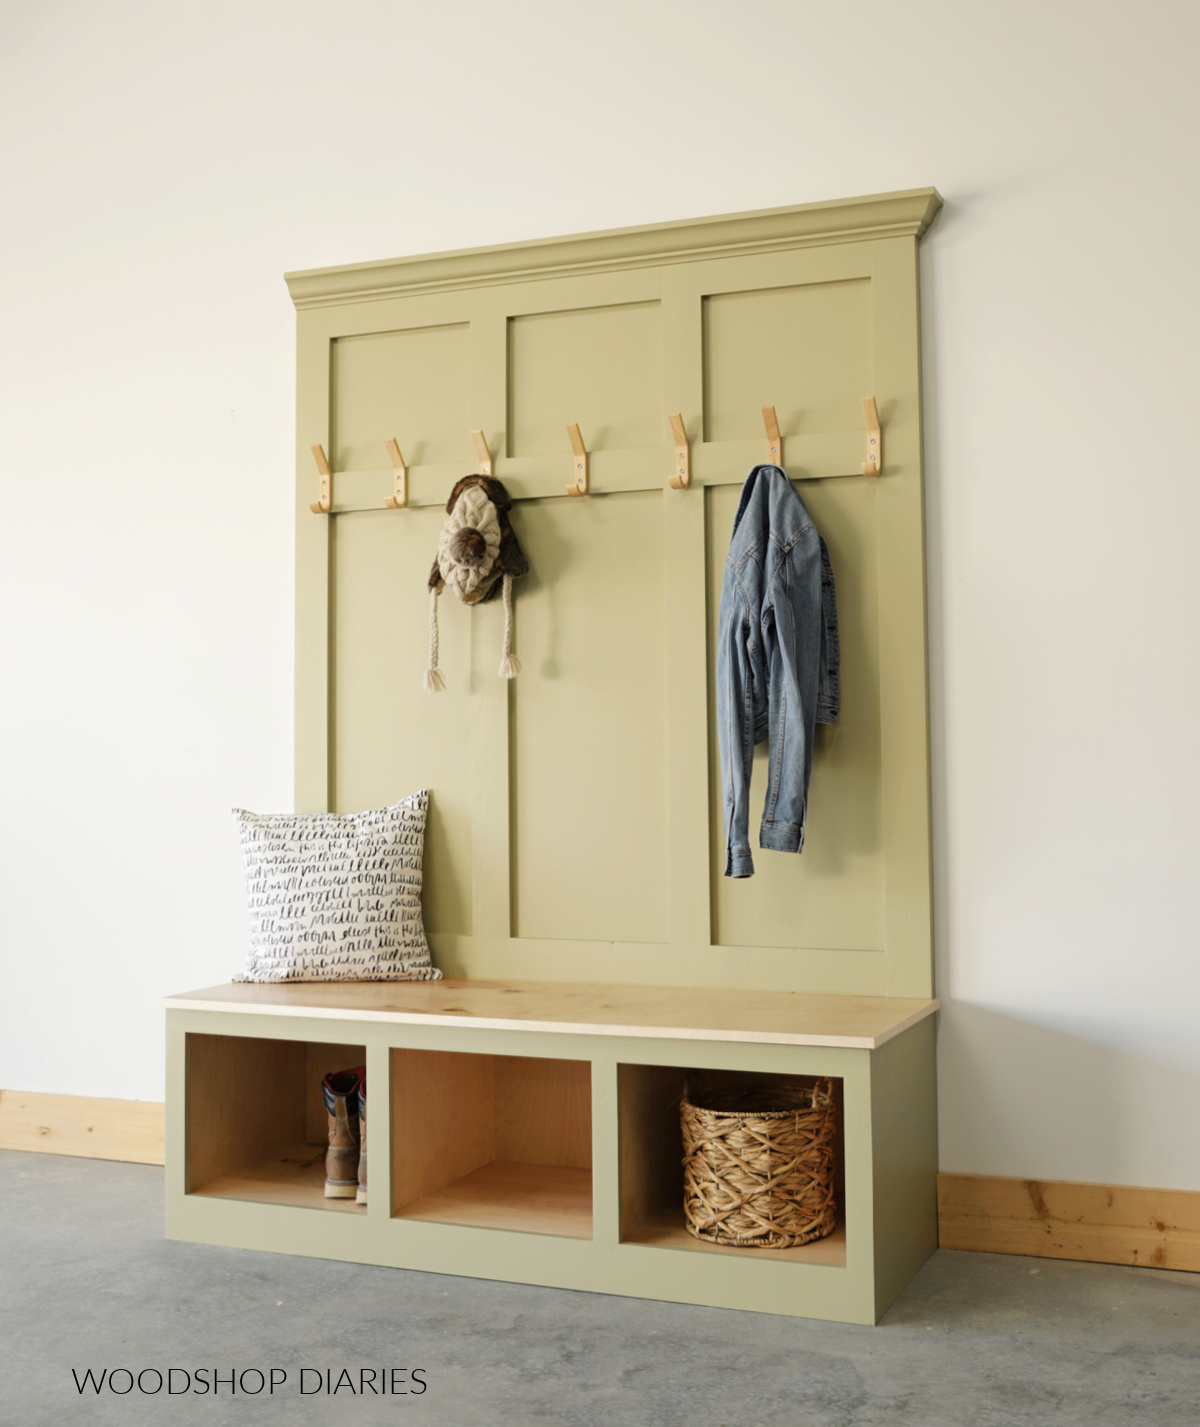
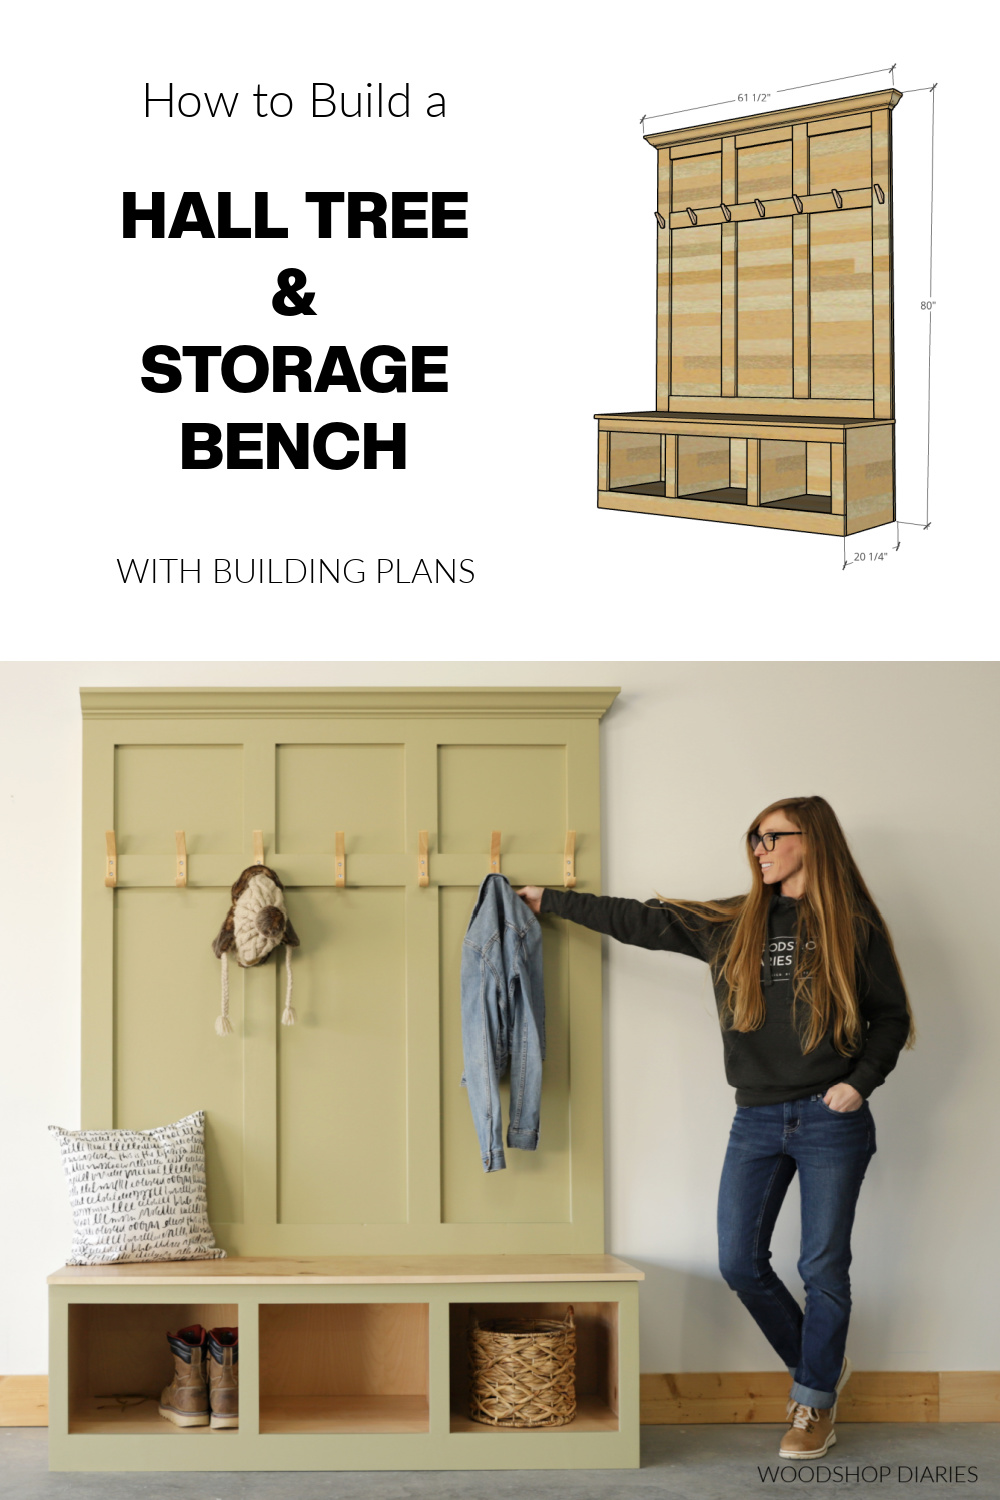
In this post, I’m sharing how to build a DIY hall tree bench with shoe storage!
This is perfect for a mudroom, entryway, extra wide hallway, or even a double door closet space.

It’s the perfect place to sit down and take off your shoes or drop your coat after a long day.
The open cubbies in the storage bench seat and basic trim design on the back make this a simple, straightforward build.
Plus, it’s easy to customize the sizing if you need to make it bigger or smaller to fit your space.
This DIY hall tree bench fits any décor style–farmhouse, modern, traditional. But, you can change up the trim, add drawers, and switch up the colors to customize it and make it your own.
I’m sharing how to build your own in the post below!
Tools & Materials:
*This post contains affiliate links. See website policies.
Tools:
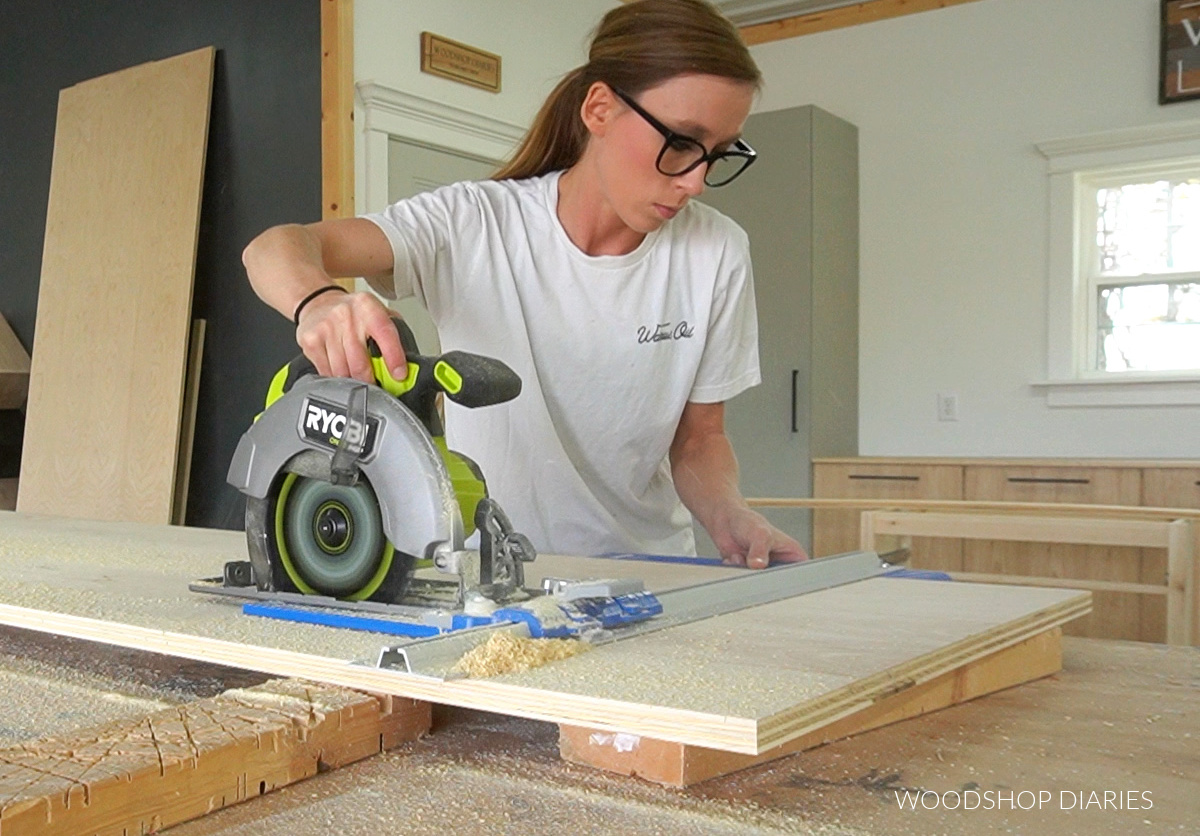
- Circular Saw
- Cutting Guides–Kreg Rip Cut & Kreg AccuCut used here (optional, but helpful)
- Miter Saw
- Pocket Hole Jig
- Drill/Driver
- Brad Nailer
Materials:
- (3) 4×8 sheets ¾″ plywood *see notes below
- (5) 1x4x8 boards
- (1) 1x3x10 board
- (1) 8′ piece crown molding (any size crown works, but I used 3 ¼″)
- Wooden Coat Hooks
- Edge banding (optional)
- 1 ¼″ pocket hole screws
- 1 ¼″ wood screws
- 1 ¼″ brad nails
- Wood Glue
- Wood Filler, caulk, and wood finish of your choice
- 2 ½″ – 3″ screws to secure project to wall studs
What to know before building a DIY hall tree bench
Building this DIY mudroom storage bench is an intermediate level project. The assembly is simple using pocket holes and screws and brad nails.
However, it’s a fairly large project and involves several pieces of trim that may require a little cutting to fit.
Plywood Cuts
You can find the complete plywood cut diagram in the printable plans below.
This project can be made from three 3×8 sheets of ¾″ plywood. I recommend using cabinet grade hardwood plywood for this–like birch, maple, or oak.
Besides the bench seat, you can build this entire project with just two sheets of plywood.
RELATED: How to cut plywood sheets with a circular saw
But, if you cut the seat from plywood, you’ll need a third sheet–and you’ll have almost ¾ of it leftover. I use a bunch of plywood in my shop, so I don’t mind having scraps.
But if you didn’t want to buy a whole sheet just to cut the seat from, you can certainly just glue up a solid panel using 1x material instead.
Trim & Seat Overhang
The plans here assume that this hall tree will be on a blank wall and that both the left and right sides will be open.
However, if you plan to place this in a corner where the left and/or right sides will be against a wall, you can.
Just note that you will probably not want to wrap the crown molding around that side and you’ll want to install the bench seat without overhang on that side.
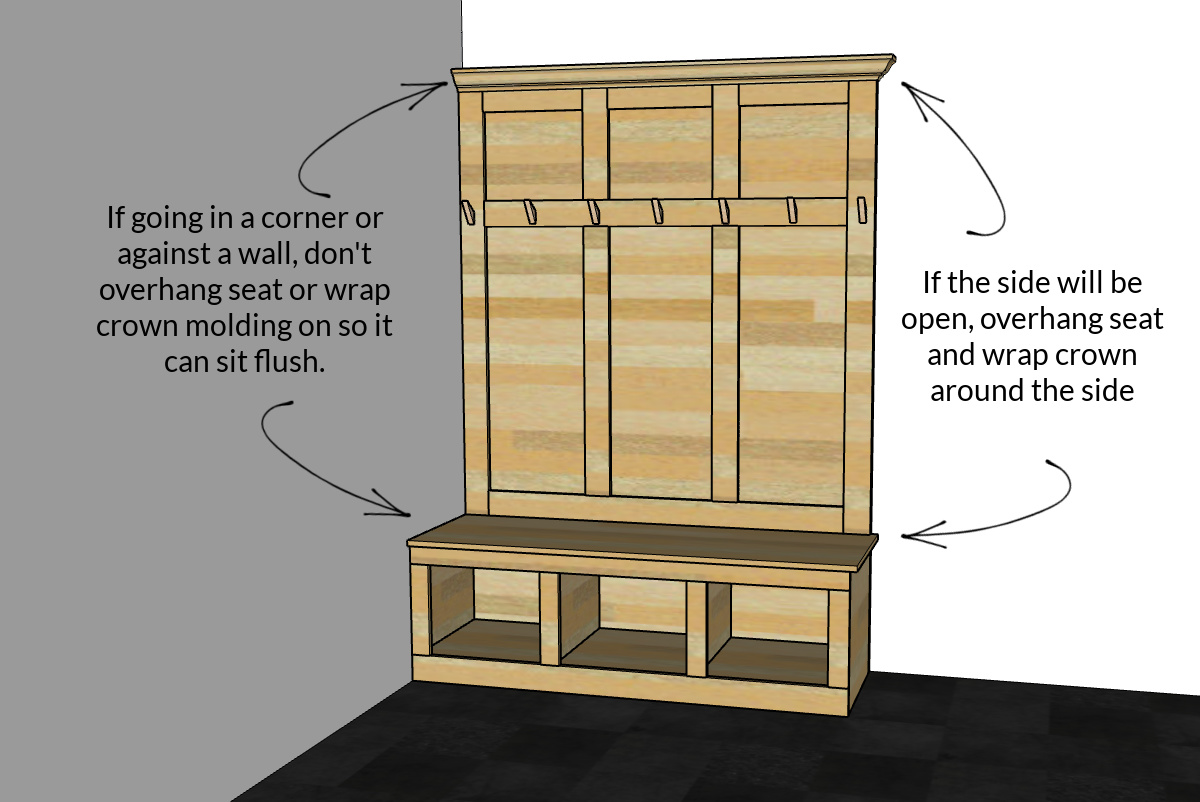
That way, this can sit flush against the wall.
Installing the Hall Tree Storage Bench
This project is built as a single piece unit. That means that the finished project will be heavy, but easier to install.
This should be securely installed to the wall once completed to prevent tip over. You’ll need to cut away the baseboard to allow it to sit flush to the wall.
Use 2 ½″ – 3″ wood screws through the back panel to secure to the wall studs–at least two screws at the bottom (inside the bench) and two screws through the back panel toward the top.
If you don’t want to see the visible screws in the back section, one alternative option is to use some corner brackets behind the crown molding.
Make sure to install securely to the wall studs and the back panel.
Overall Dimensions
The overall dimensions of this DIY hall tree bench project are approximately 20 ¼″ deep (at the seat), 80″ tall, and 61 ½″ wide (including the crown molding).
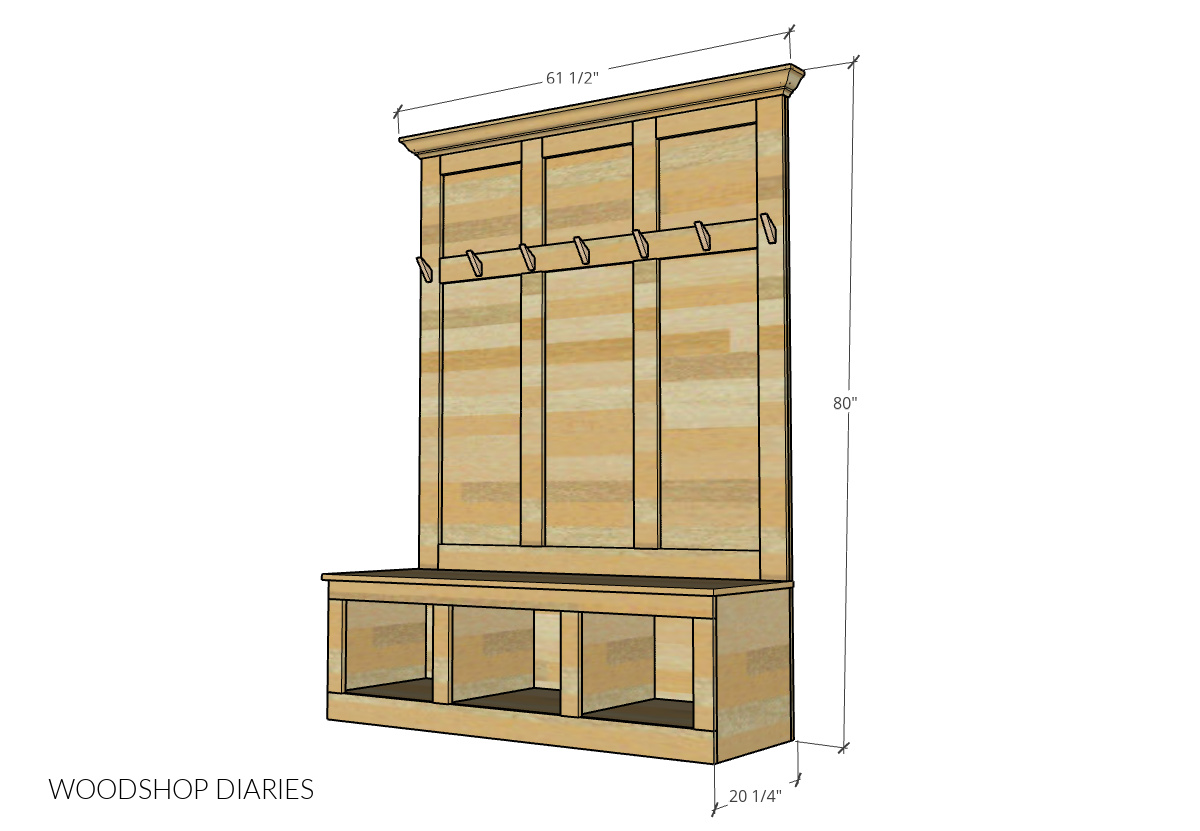
The overall width of the bench and back panel (not including the crown molding) is 57″.
Helpful Resources For This Build
You may find these guides helpful to reference throughout the project.
How to Build a Mudroom Hall Tree with Shoe Storage Bench
If you’re ready to dive in and get building, let’s go! I’ve got the step by step guide below.
But if you prefer to watch instead of read, I’ve also got the video tutorial here that includes some helpful tips on the painting process.
And if you prefer to print your plans, you can grab the printable building plans for this project here:
Step 1: Assemble Hall Tree Storage Bench
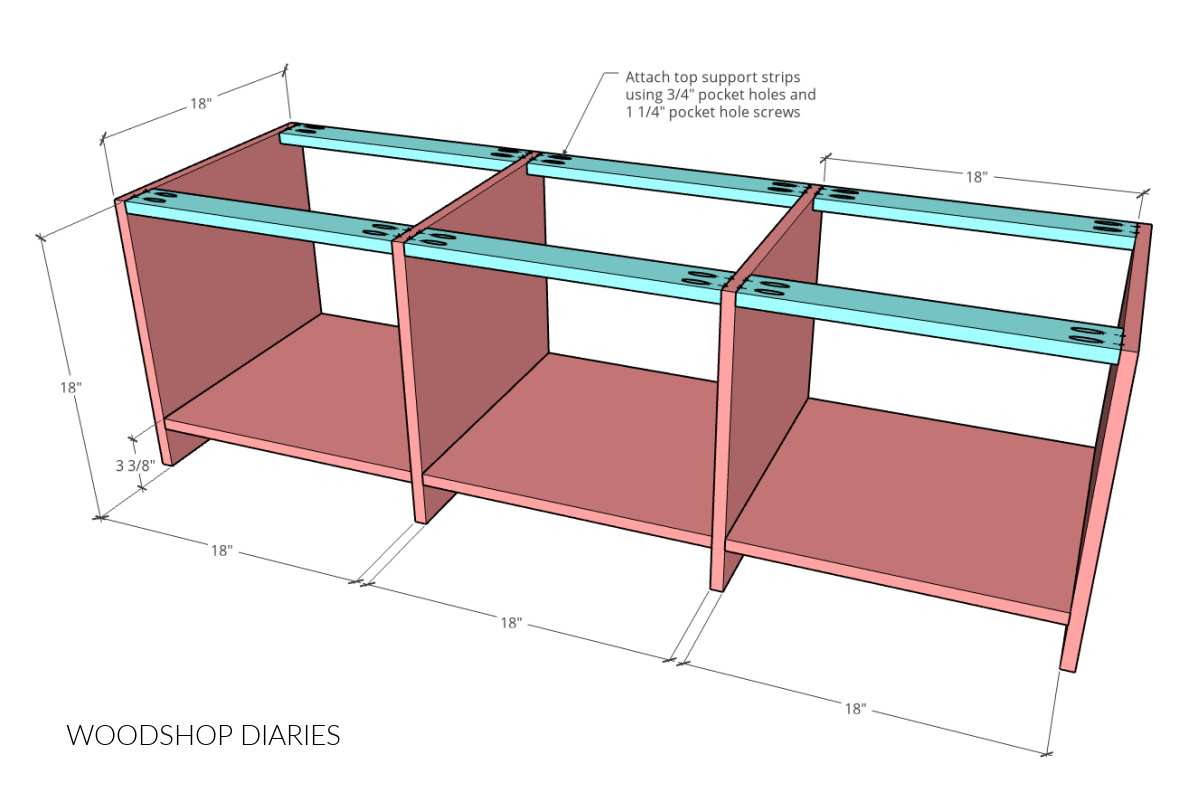
The main body of the storage bench is made from ¾″ plywood. I kept things simple by just basically building a short cabinet with three sections.
So I cut seven pieces of ¾″ plywood to 18″ square, then cut 6 strips to about 3″ wide x 18″ long.
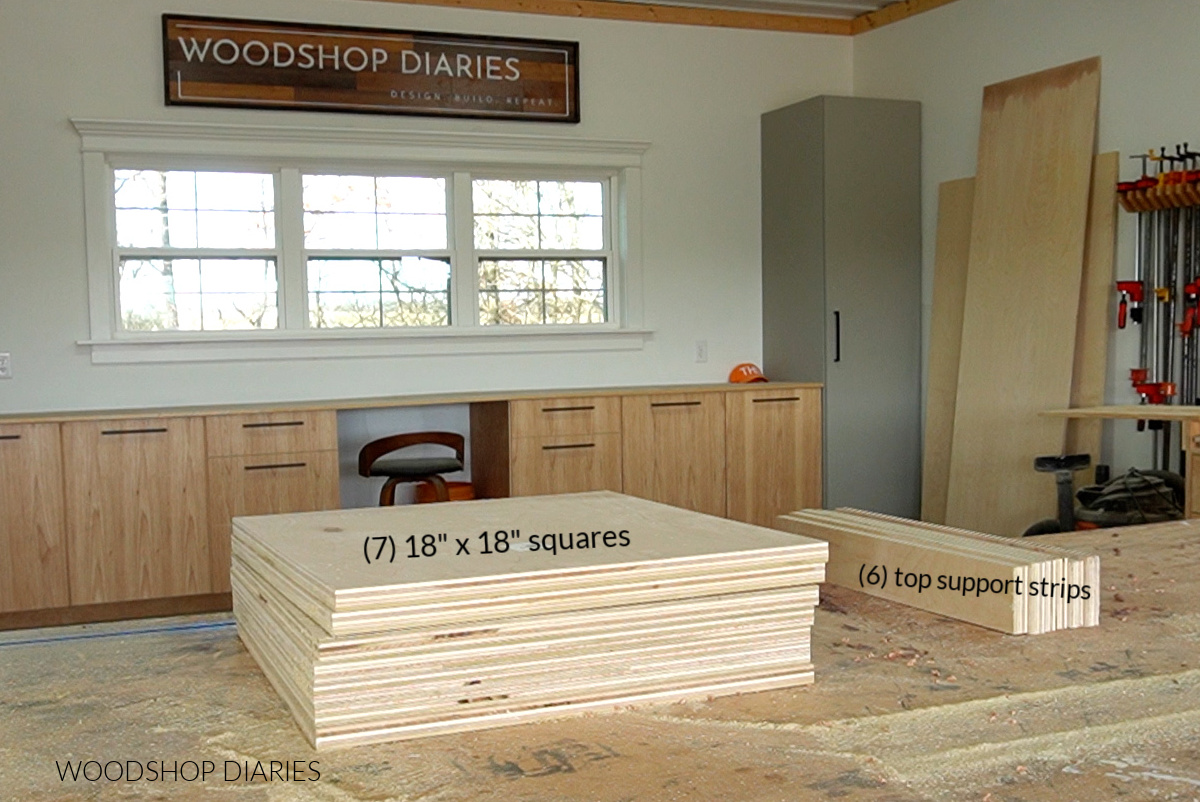
The 6 strips don’t have to be exactly 3″ wide. They’ll be the top supports and the width isn’t critical as long as they are 18″ long.
The complete cut list and cut diagrams can be found in the printable plans for this project.
I drilled ¾″ pocket holes into the ends of the 6 top supports and into the ends of THREE of the 18″ square panels.
RELATED: How to use a pocket hole jig
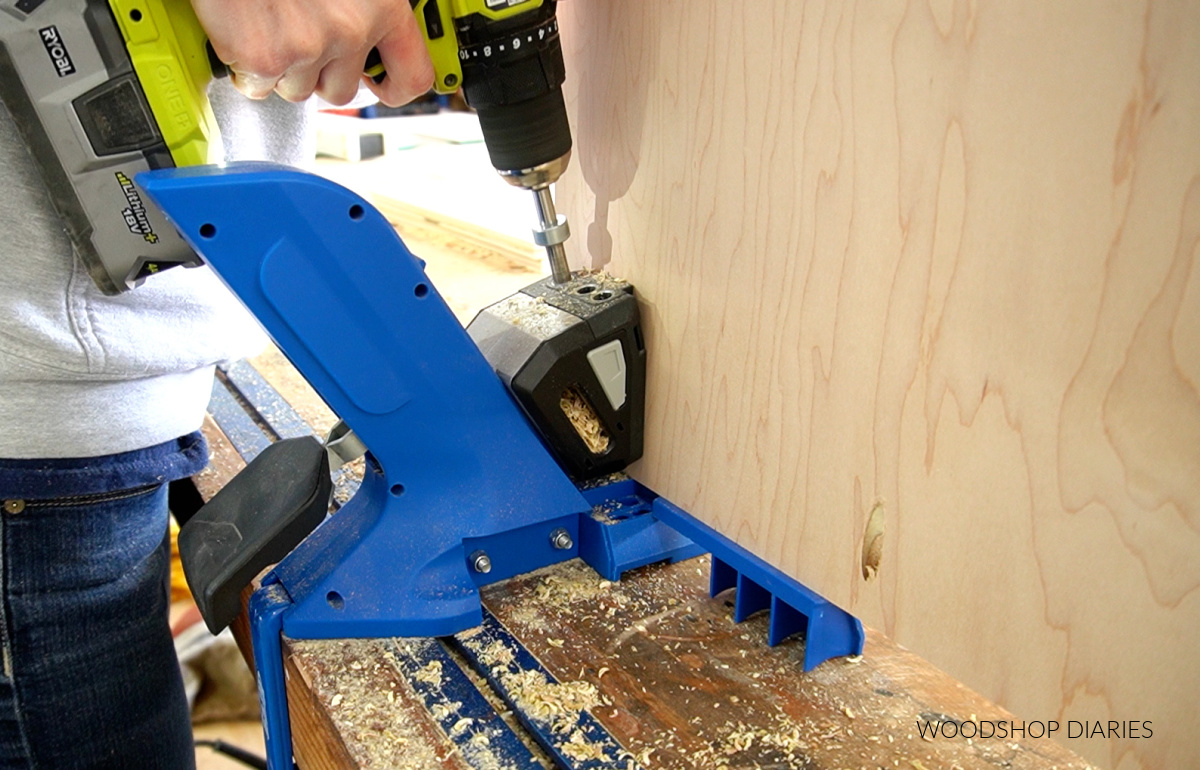
Once the holes were drilled, I assembled the bench using 1 ¼″ pocket hole screws.
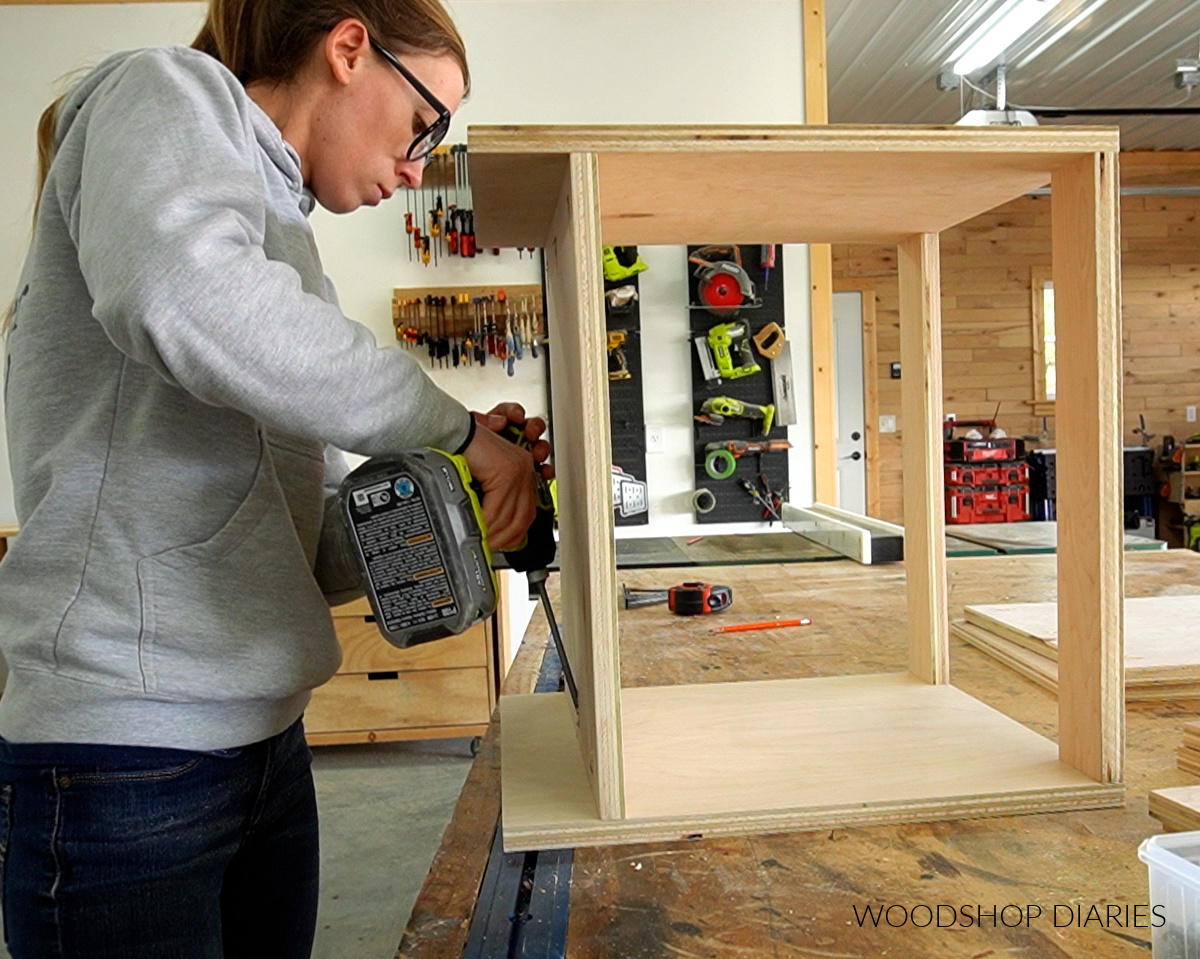
I installed the bottom panels 3 ⅜″ up from the bottom edge and added two top supports in each section–one at the front and one at the back.
Step 2: Assemble Face Frame
Once the bench body was together, it was time to add the face frame.
I built the face frame from 1x3s and a 1×4. I used a 1×4 on the bottom, but used 1x3s for the top and dividers.
This face frame’s overall size should match the front dimensions of the bench, so it’s best to measure first, then build the face frame to fit.
I cut my pieces down–one 1×4 for the bottom, one 1×3 for the top, and four 1×3 dividers–and drilled ¾″ pocket holes into the ends of the divider pieces.
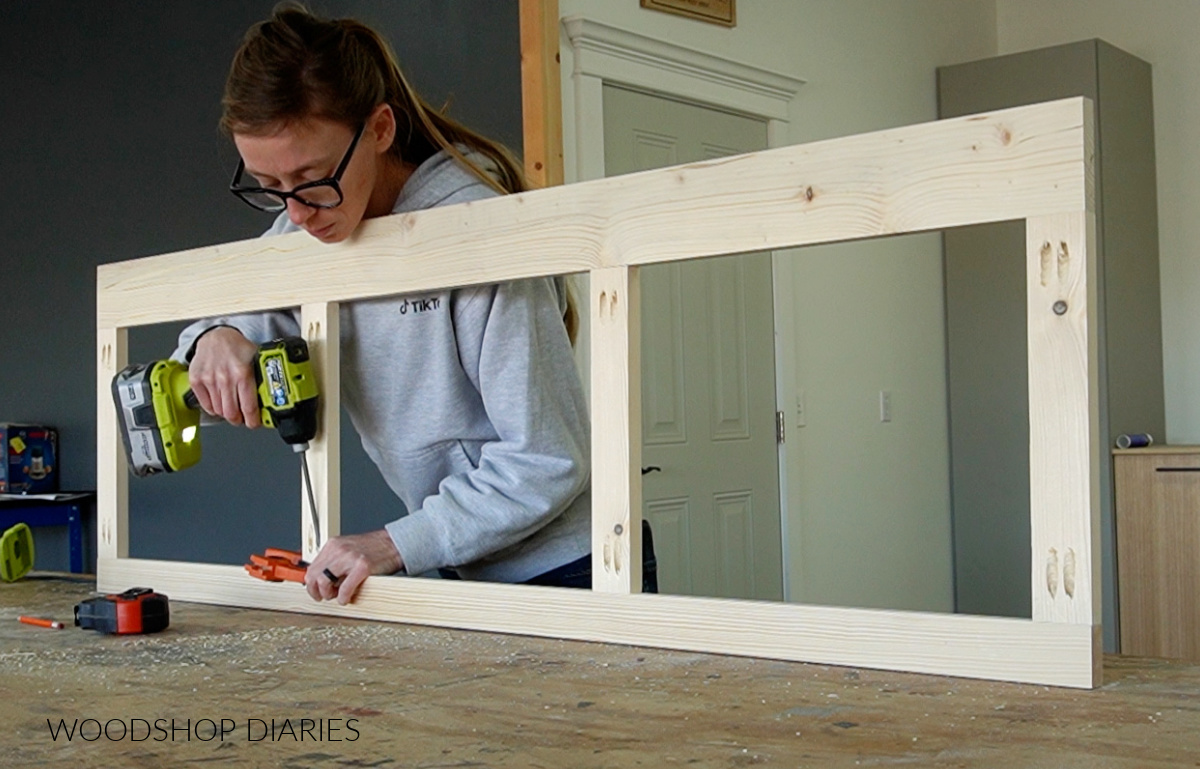
Then, I assembled using 1 ¼″ pocket hole screws.
Step 3: Attach Face Frame
Once the face frame was assembled, I flipped it over and made sure it fit over the front of the bench first.
Always test fit before gluing–glue is not very forgiving once it’s dry.
Then, I applied some wood glue on the edges, placed the frame on, and used brad nails to secure it.
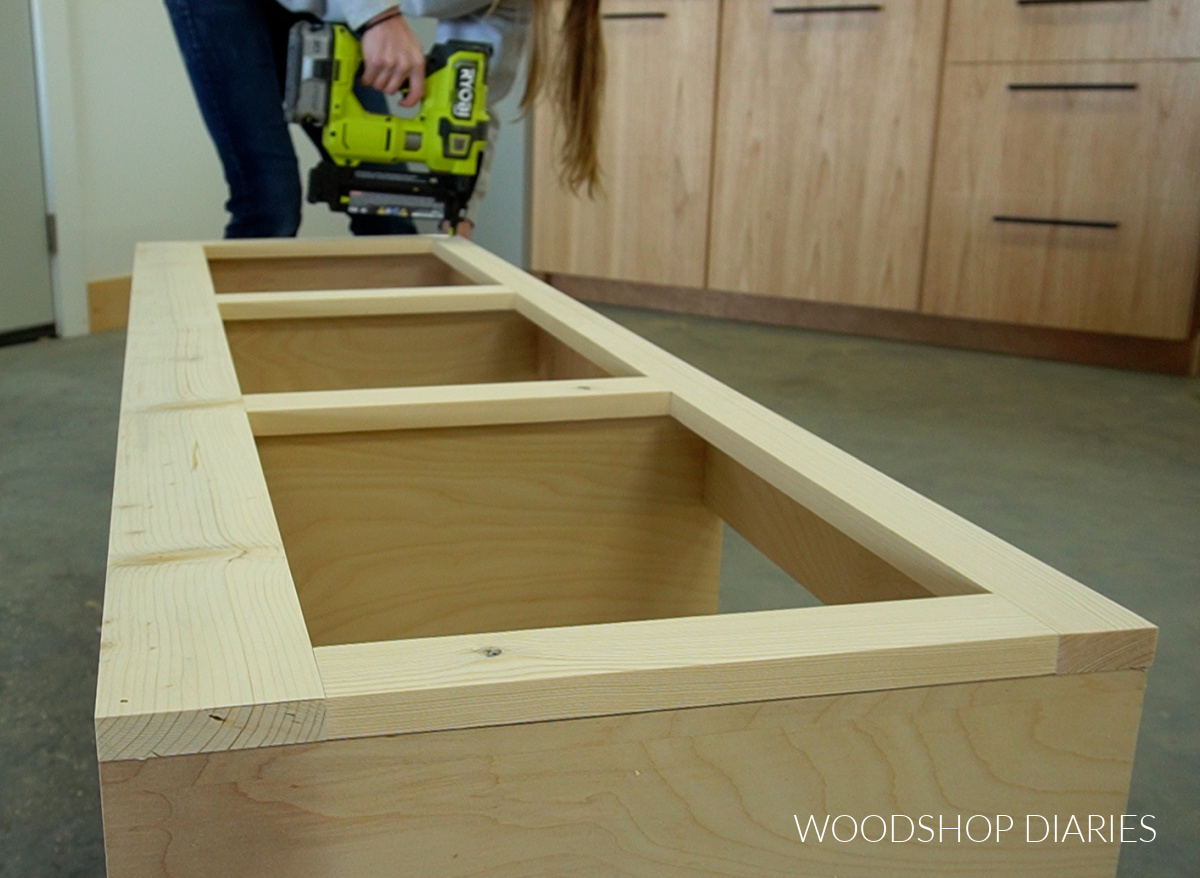
I used several brad nails around the edges and into the dividers. Once it was nailed on, I used some wood filler to putty over the nail holes and to smooth out the joints.
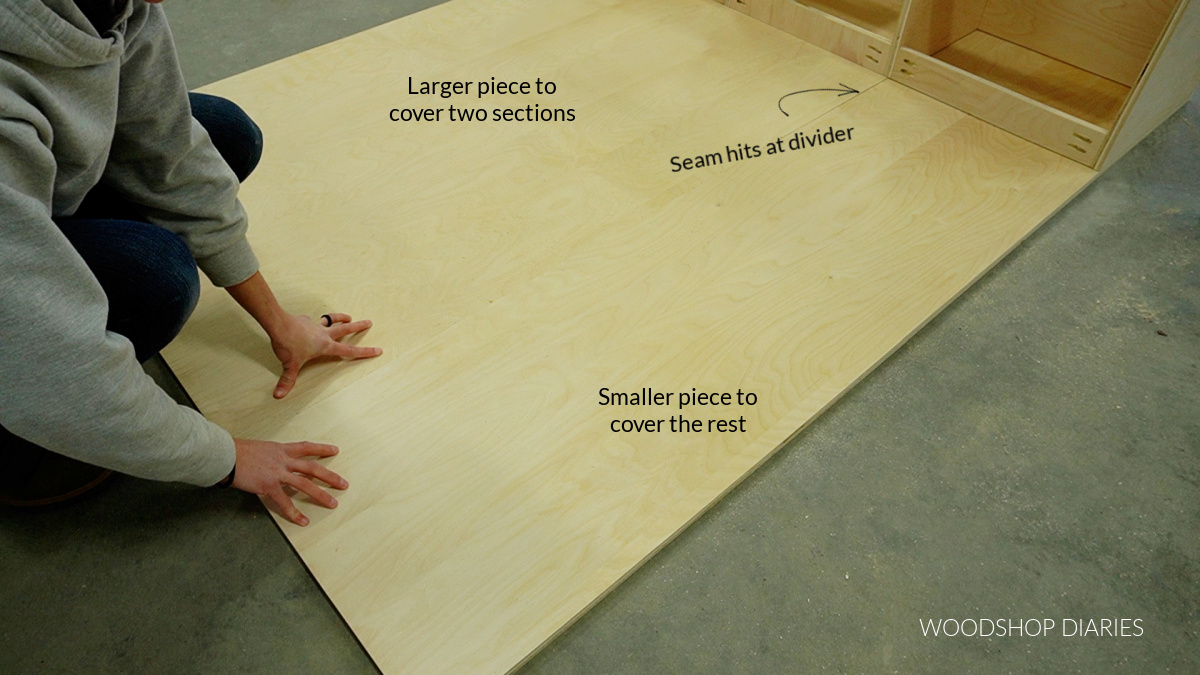
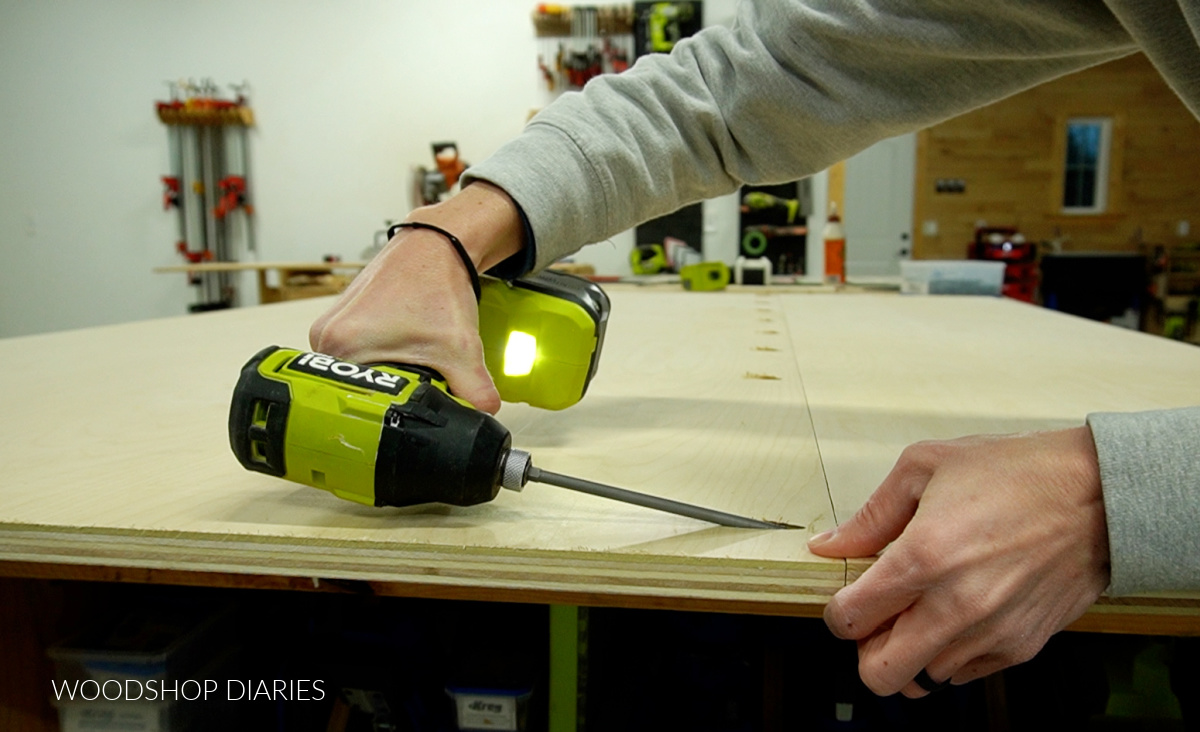
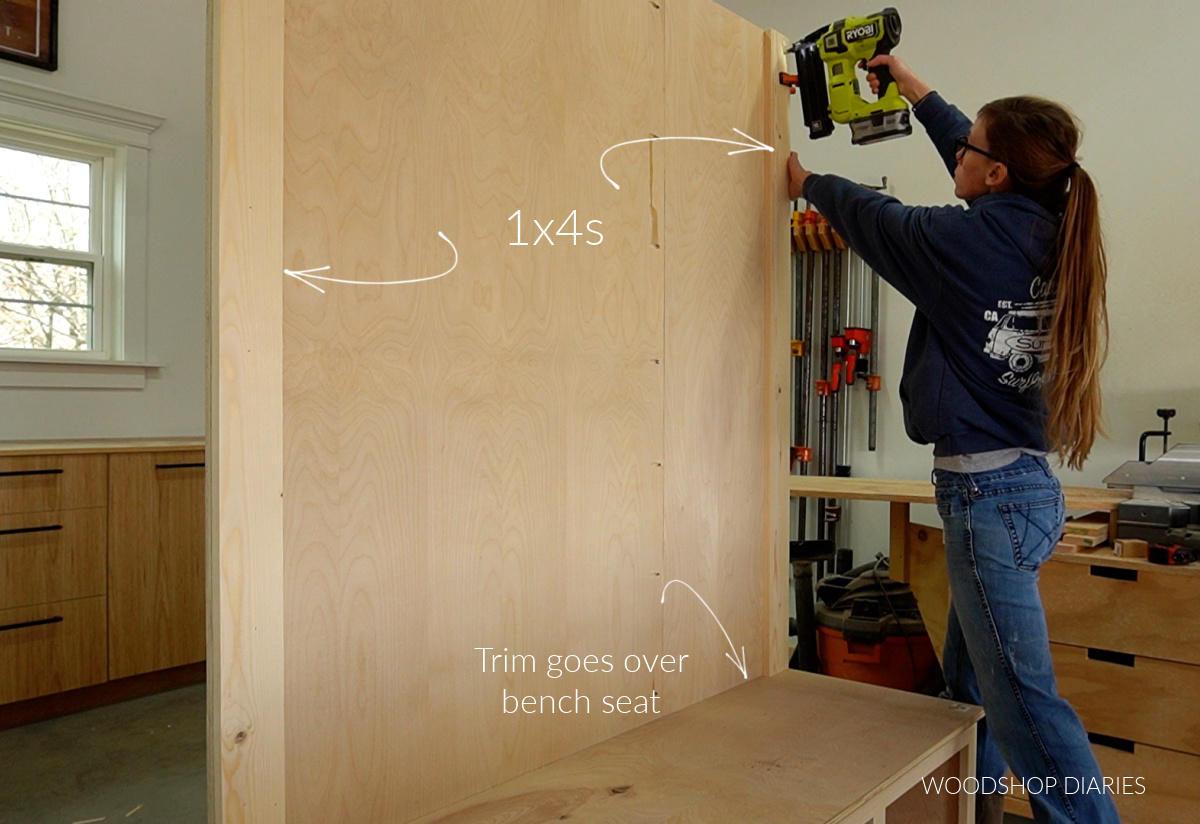
Step 4: Assemble Back Panel
I made the back panel from ¾″ plywood and I made it 6′ 6″ tall. However, it needed to be the total width of the bench, which was 57″.
A standard plywood sheet is only 48″ wide. So that meant that I needed to piece this panel together.
I cut one piece that would fit over two sections of the bench and a second piece that would make up the difference.
This way, the seam would be on a divider and could be hidden.
To attach them together as one solid piece, I drilled ¾″ pocket holes along the edge of one piece and used wood glue and 1 ¼″ pocket hole screws to attach it to the other piece.
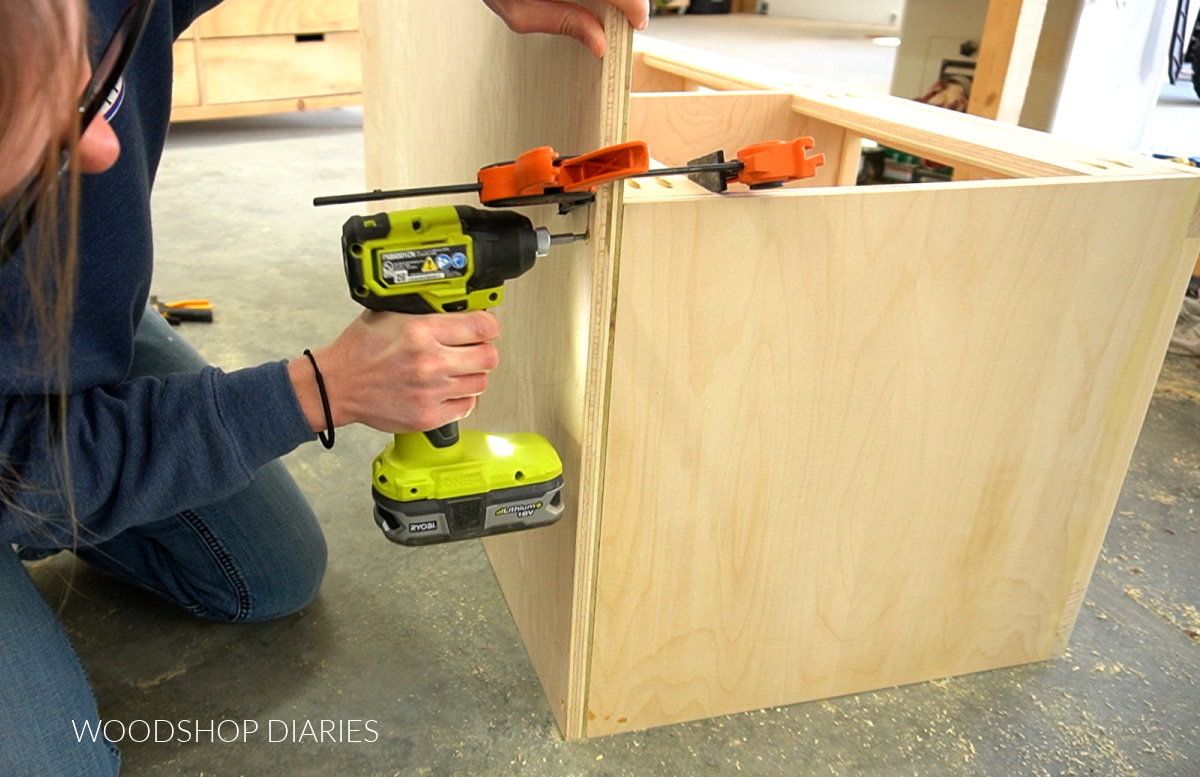
Step 5: Install Back Panel
After the glue dried on the back panel, I installed it onto the back side of the bench.

I faced the pocket holes toward the front because they’ll be hidden by trim in a later step. But you can put them on the back side as well.
I used 1 ¼″ wood screws to secure the back panel to the back side of the bench in several places along the sides, back and top.
Be sure to predrill to avoid splitting the plywood!
Once this large panel was on, it became kind of top heavy, so be careful not to tilt it over.
Step 6: Cut and Install Storage Bench Seat
I cut my bench seat from ¾″ plywood, but you could also glue up a solid panel from 1x material if you didn’t want to use plywood. Dimensions are detailed in the printable plans.
See notes in the “what to know before building” section above about overhang.
I applied iron on edge banding to cover the plywood edges.
RELATED: How to cover plywood edges with edge banding.
Then, I test fit it on the bench but I didn’t screw it in place…yet. Since I was painting the back, but not the seat, it made things much simpler to finish if the seat wasn’t installed.
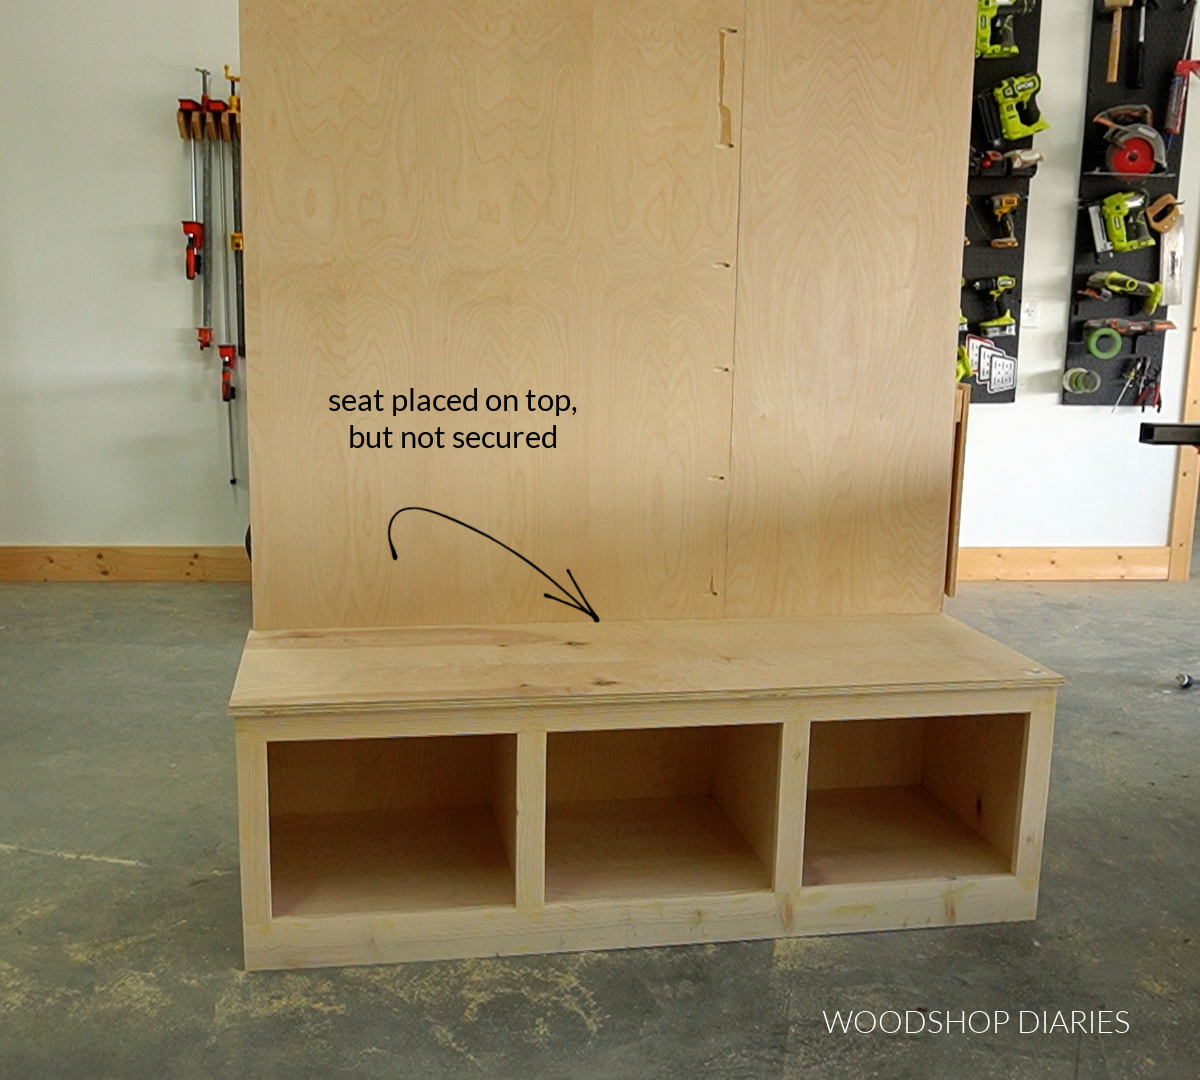
However, the trim on the back side needs to sit ABOVE the seat when it’s installed.
So I used the seat as a “spacer block” to place the trim in the next step, then removed it to paint. Once the paint was dry, I placed this seat back on and secured it in place.
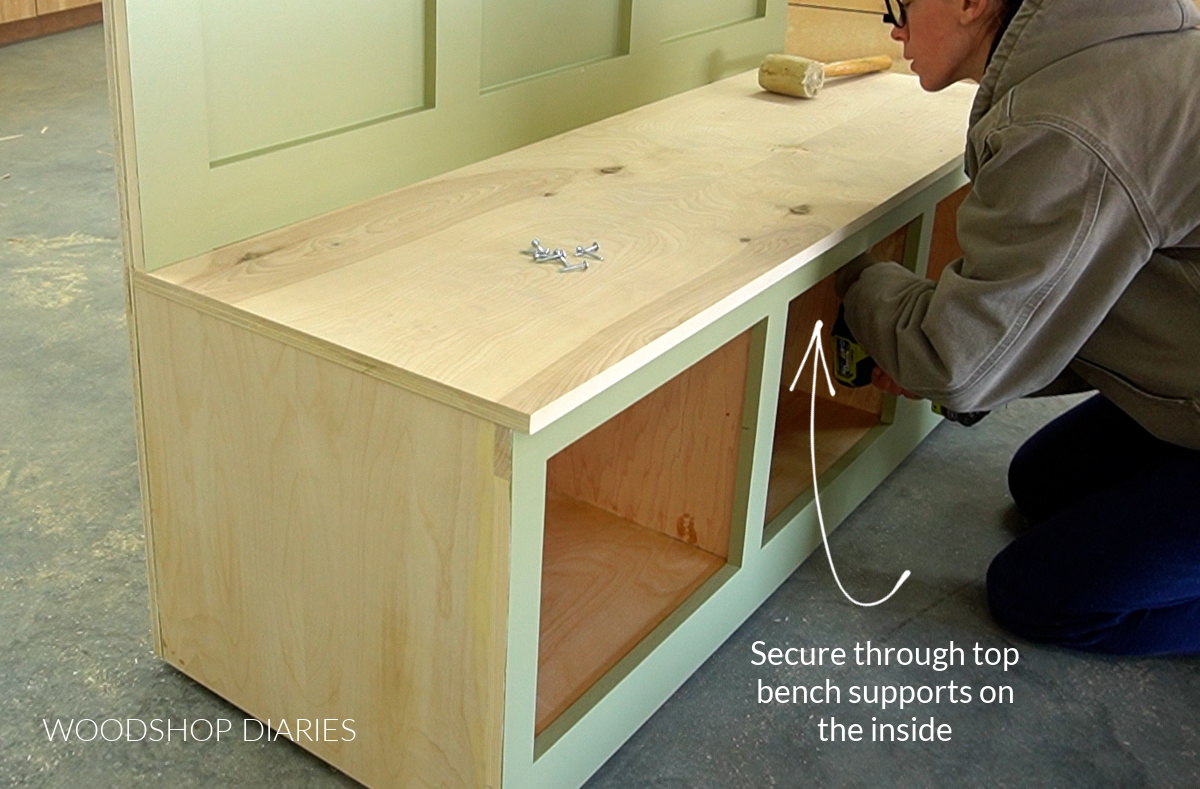
That said, you can go ahead and install the seat now, or later. But to install it, I used 1 ¼″ wood screws through the top supports on the inside of the bench.
Step 7: Add Back Panel Trim
The trim on the back panel was cut from 1x4s. You can certainly customize the trim style, spacing, size how you’d like.
But I kept it simple and just framed out the edge and added pieces inside to divide it into 6 sections–3 large at the bottom and 3 small at the top.
Remember to place this trim ABOVE the seat. I cut and installed the two outside pieces first using wood glue and brad nails.
Then, I added the bottom–again, ABOVE the seat–using wood glue and brad nails.

Then, I began working my way up installing the rest of the pieces, cutting to fit each one for a tight fit.
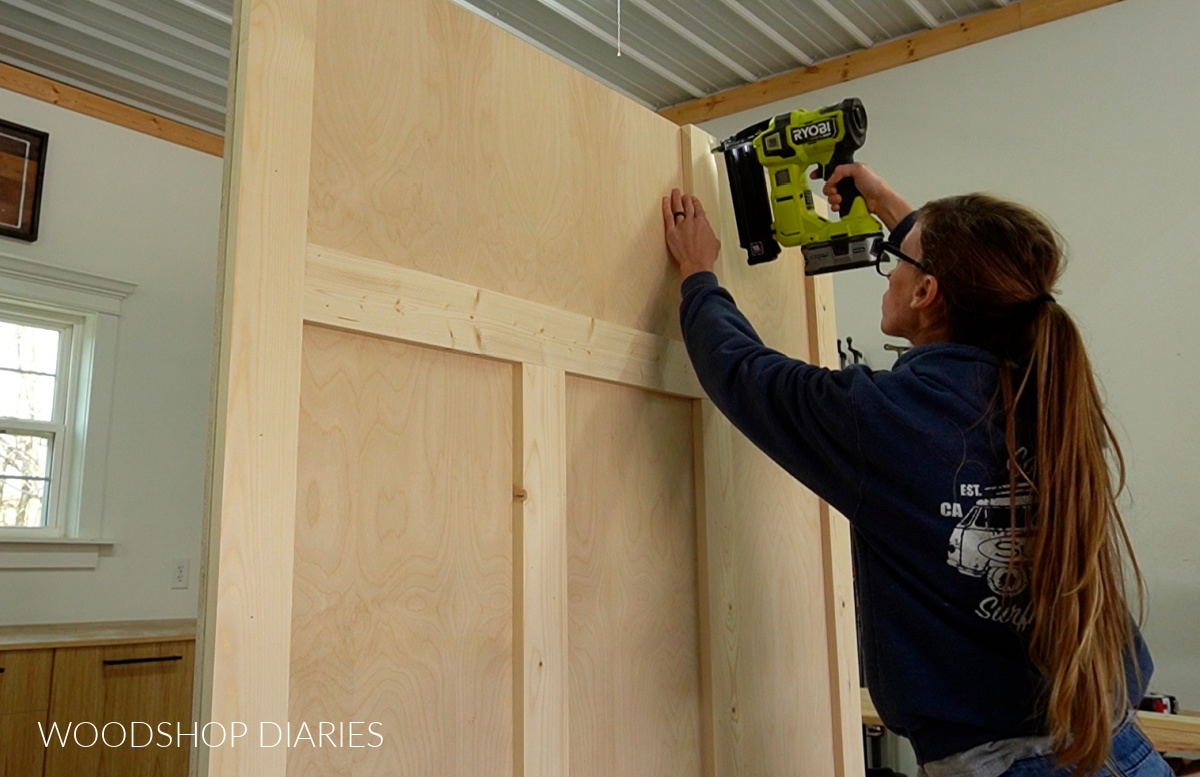
Once all the pieces were in place, I used some wood filler to putty over all the nail holes and joints.
After the filler had dried, I sanded everything well. If painting, it’s important to smooth out all the joints as even as possible for a seamless and clean looking paint job.
Step 8: Add Crown Molding
Once the back was sanded well, I applied crown molding around the top.
This is optional and you can customize your trim choices how you’d like. I cut to fit my crown molding pieces on the front and sides, then used wood glue and brad nails to install.
RELATED: How to cut crown molding on a miter saw
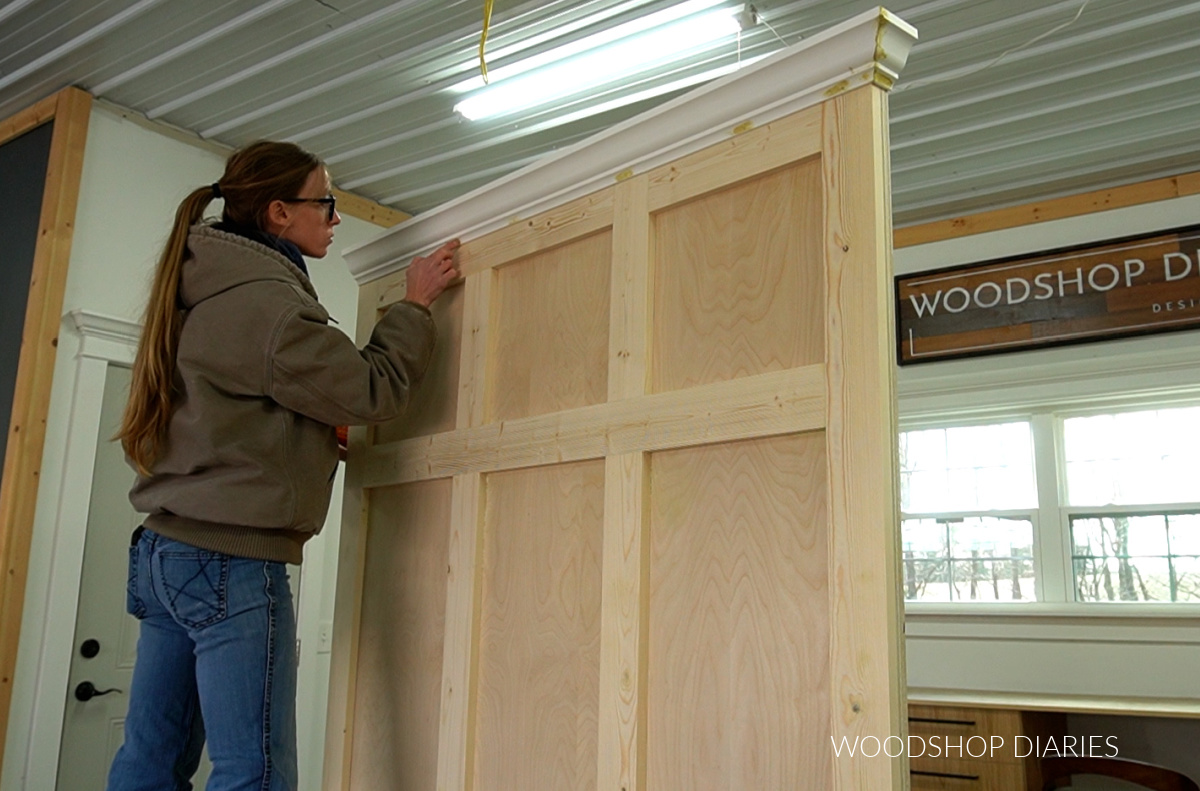
And again, I used wood filler to fill the nail holes and smooth out the corners.
Step 9: Finish and Install DIY Hall Tree Bench
I sanded any remaining wood filler smooth and removed the bench seat to prep for paint.
Then, I primed and painted the back panel, and the sides and front of the bench. I didn’t paint the inside of the bench.
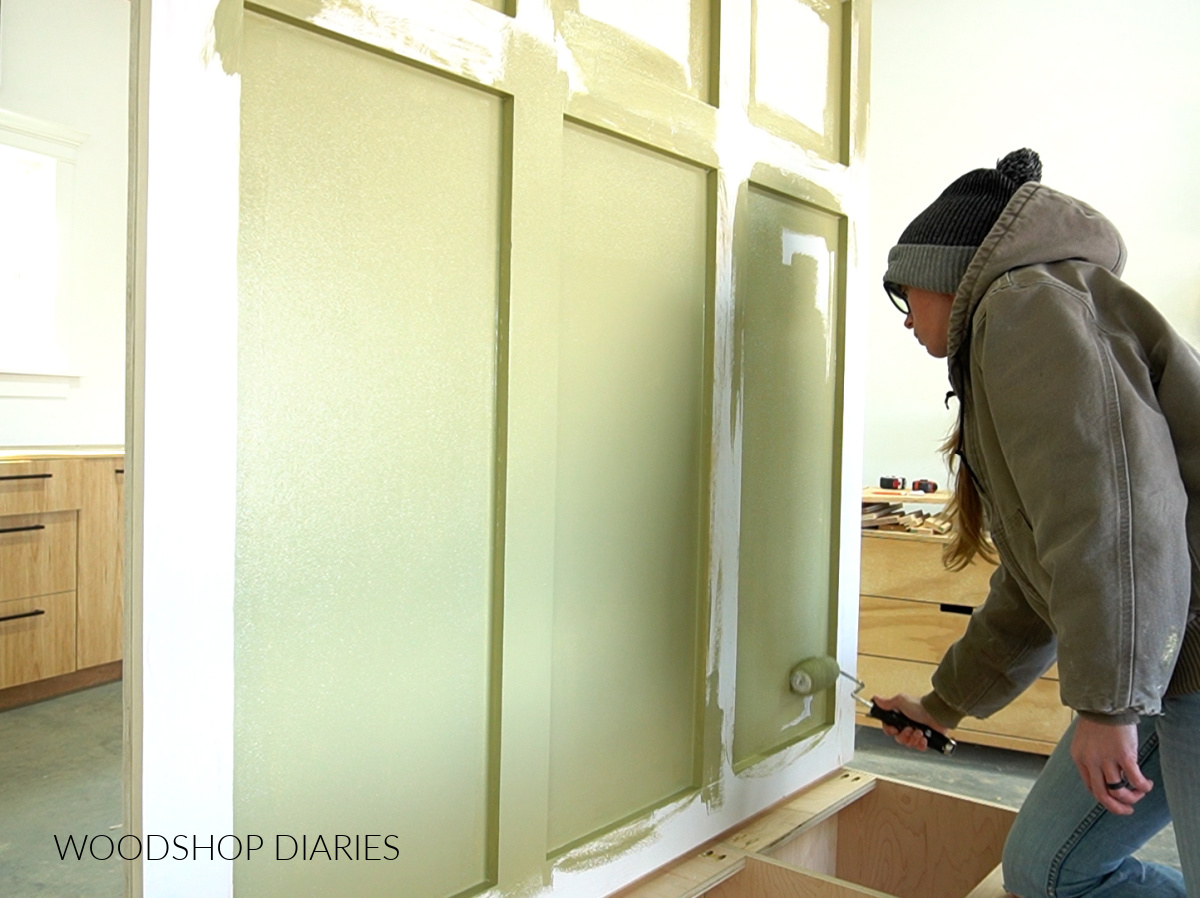
Paint color here is SW Garden Sage.
You can check out my painting process in the YouTube video and check out my tips for painting raw wood furniture in this post.
Between coats of paint, I applied a clear coat poly to the inside of the bench and to the bench seat.
Once all finish was dry, I placed the bench seat back on and secured it.
And the final step was adding some wooden coat hooks along the back side to give a place to hang coats, hats, purses, etc.
And then it was time to move it to where it’s going and secure it to the wall.
I built this for a friend, so I didn’t install it here. However, this should be secured to the wall when it gets to it’s destination.
You’ll need to trim and remove the baseboard where this will sit so that it can go flush against the wall. Once it’s against the wall, you can use wood screws to secure it to the studs.
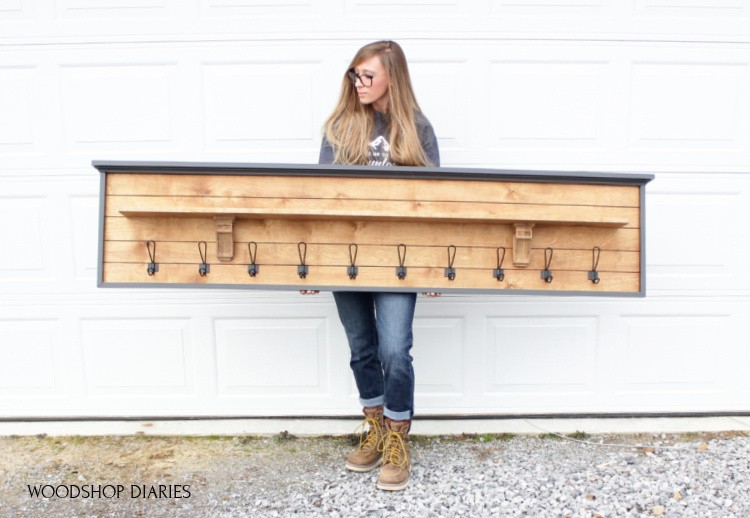
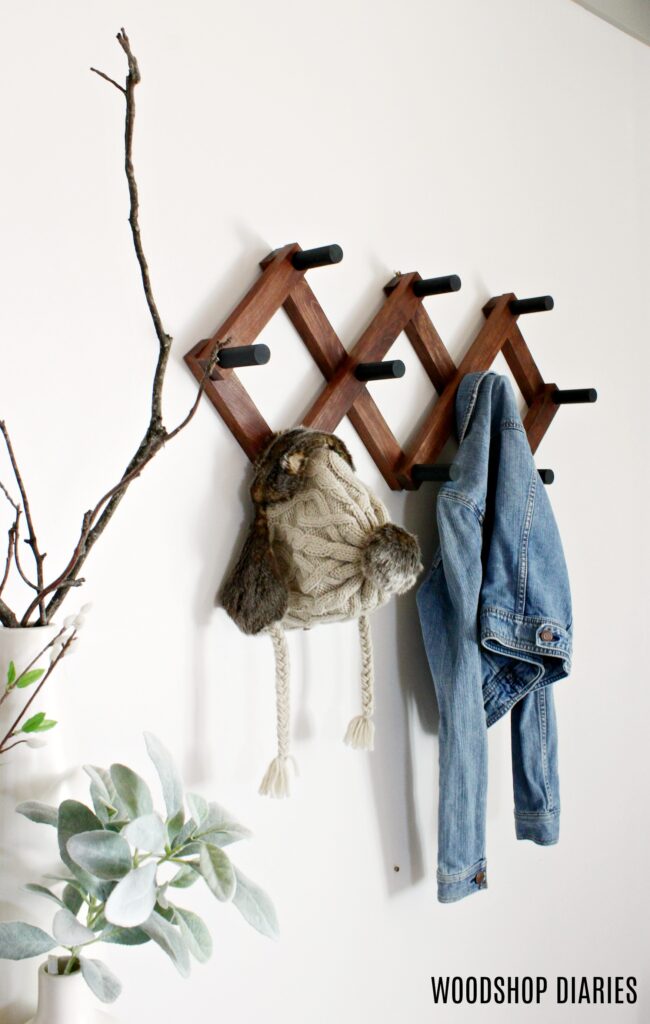
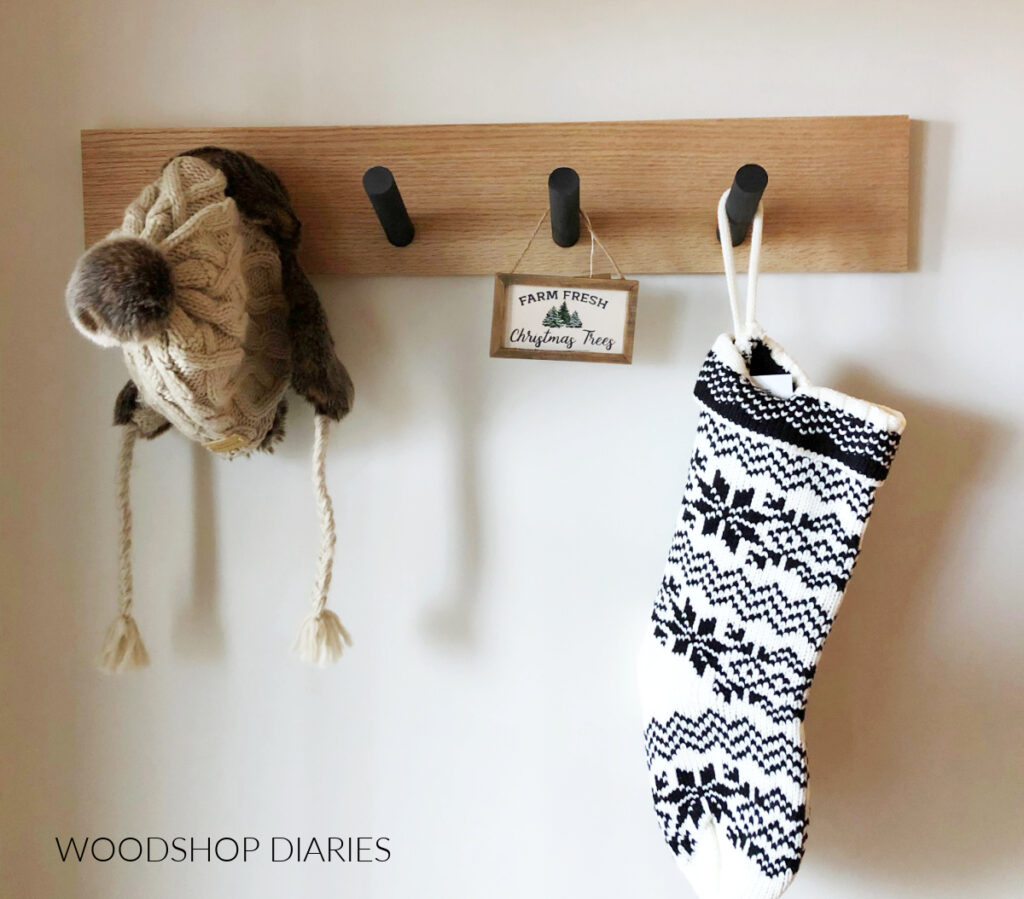
Looking for More Entryway Projects?
I absolutely love how this turned out. It’s a simple design and a simple build, but will really dress up an entryway and make it more functional.
I hope you enjoyed watching this DIY hall tree bench come together and if you want to build your own, don’t forget to grab the plans here!
If you want to check out more entryway projects, here are a few favorites I can recommend:

Stay up to date on all the latest projects and plans by joining our FREE newsletter!
If you’d like to save this for later or share with a friend, be sure to pin it or share it to your favorite social channel.
Until next time, friends, happy building!