
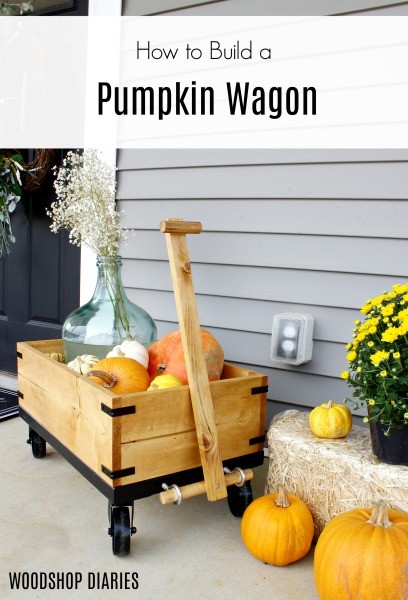
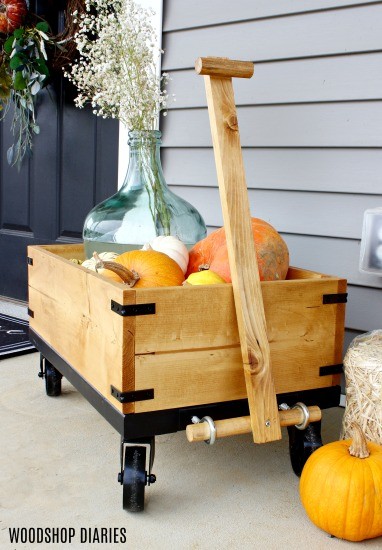
Want to make your own DIY Wooden Wagon? I’ll show you how 🙂
This post in sponsored by Kreg Tool and contains affiliate links. See policies.
I don’t know about you, but I wait ALL YEAR LONG for pumpkin season.
Fall is my absolute FAVORITE time of year and I always love creating some fun, new autumn themed DIY projects whenever the weather starts to get a little “crispier.”
This fun and simple DIY wooden wagon is a simple weekend project that is not only great for fall, but all year long!
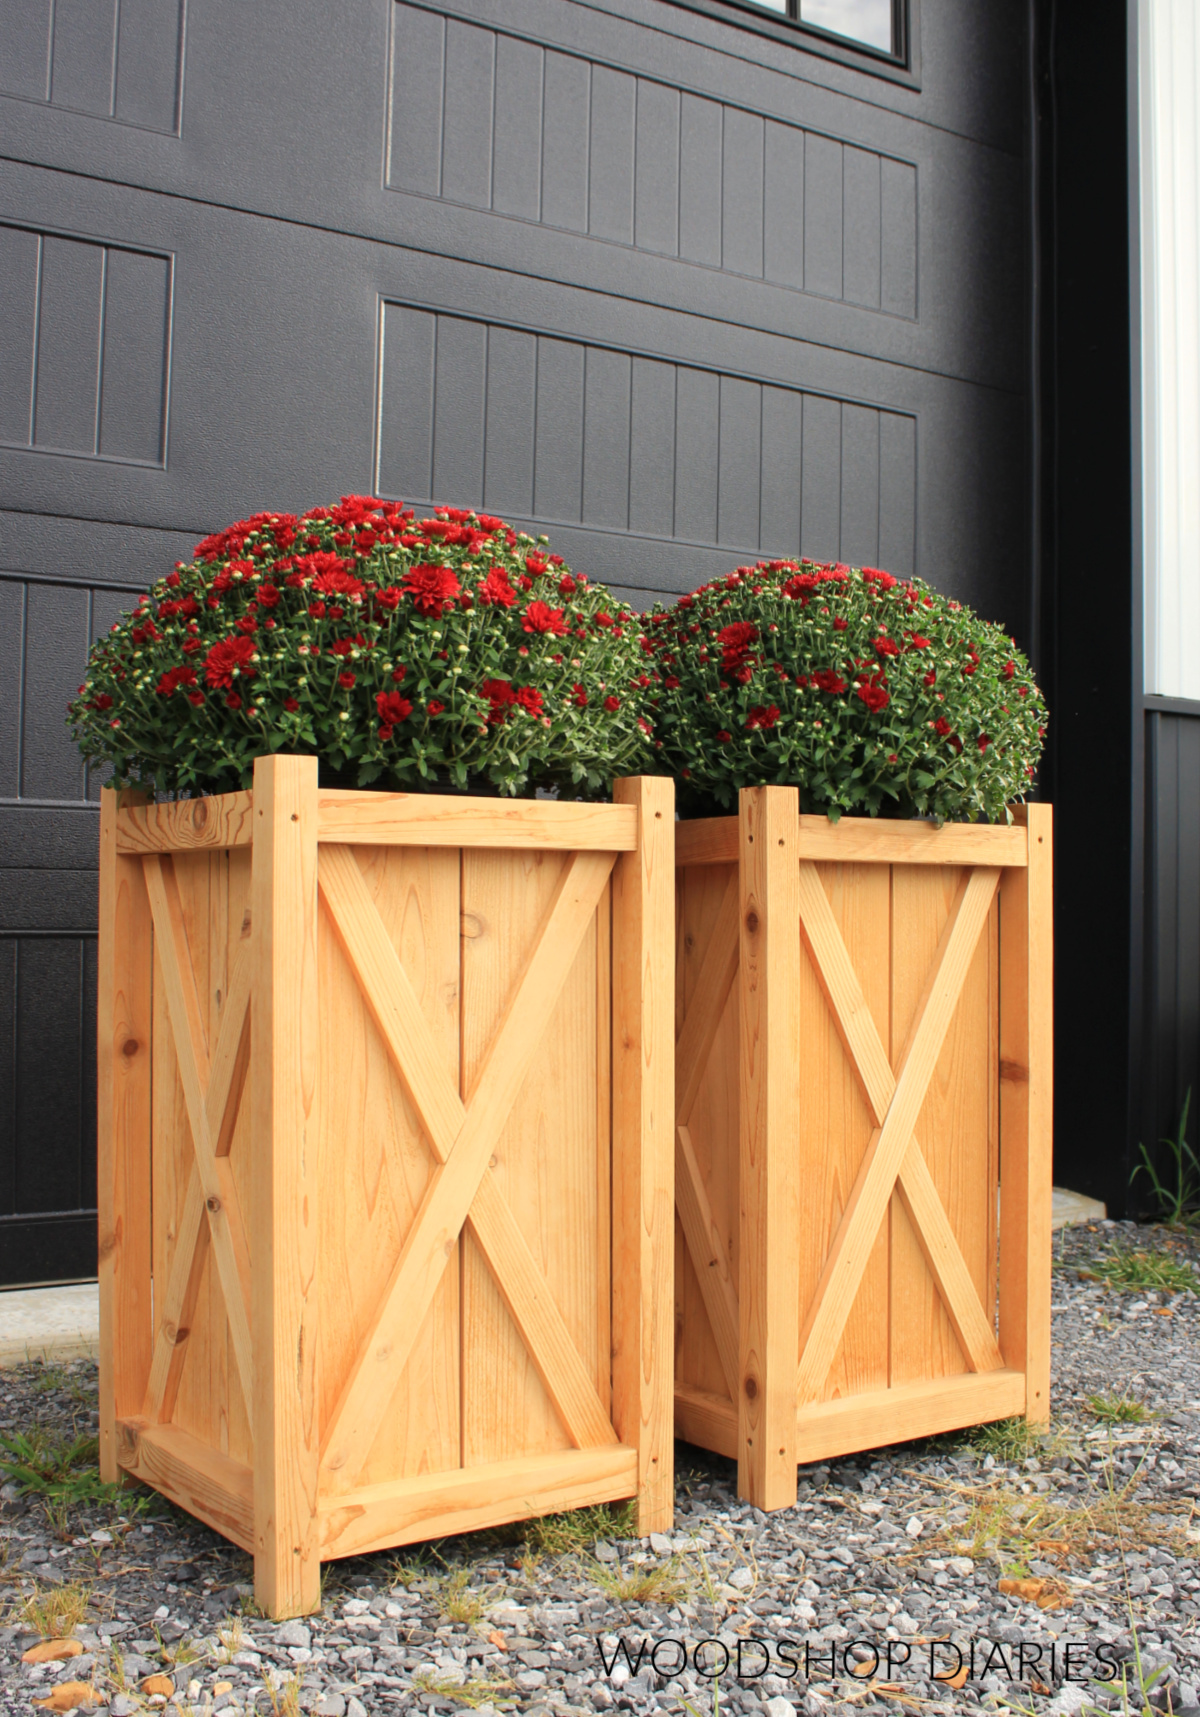
It is perfect for displaying pumpkins or mums, but also for small Christmas trees on the porch as you transition into the holidays, too!
So if you’re ready to see how to make it, let’s dive in!
Tools and Materials:
Tools:
- Miter Saw
- Drill/Driver
- Pocket Hole Jig
Materials:
- (1) 2x4x8 board
- (2) 1x8x8 board
- 1″ dowel rod
- Scrap piece of 1×2 or 1×3 for wagon handle
- (2) Eye Bolts with 1″ inside diameter
- Set of 4 casters
- Corner brackets (optional)
- 2 ½″ pocket hole screws
- 1 ¼″ pocket hole screws
How to Build a Simple DIY Wooden Wagon
This project is simple to assemble using basic pocket holes and screws.
Note that this project is intended for decoration and not as an actual wagon.
While it can function as a useable wagon, its size and structure is not intended to carry or pull a great deal of weight.
If you’d like to use this as a real, working wagon, I’d recommend making it a little larger and securing the handle with something more than just a single screw.
Cut List:
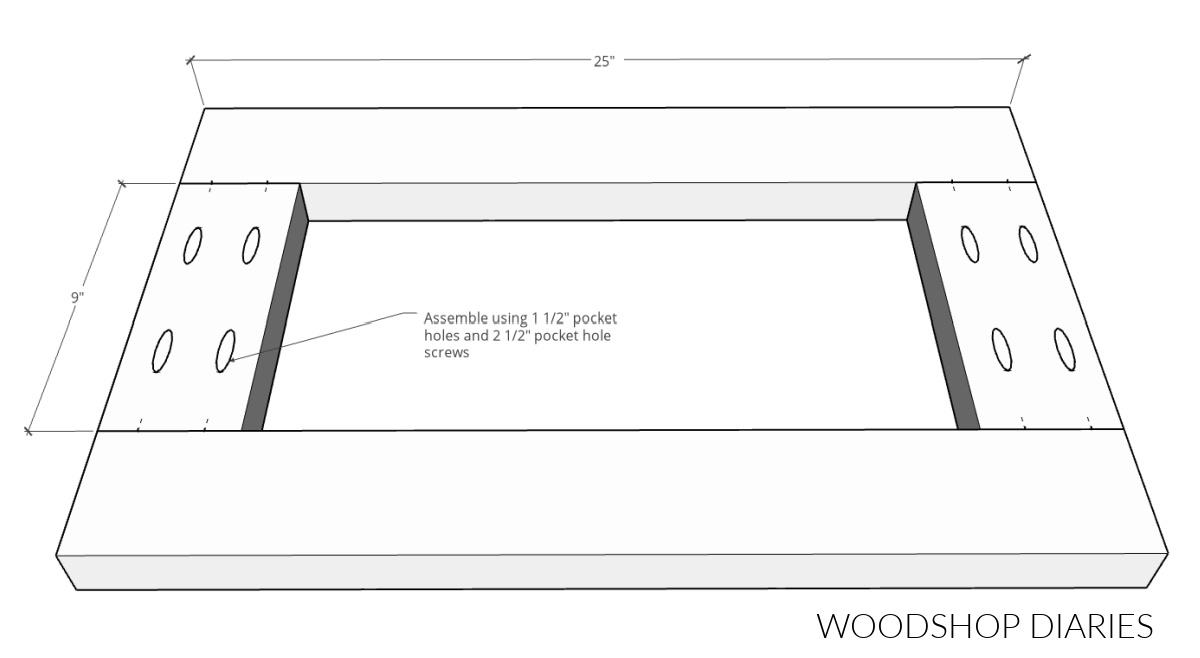
- (2) 2×4 @ 25″ long (wagon base)
- (2) 2×4 @ 9″ long (wagon base)
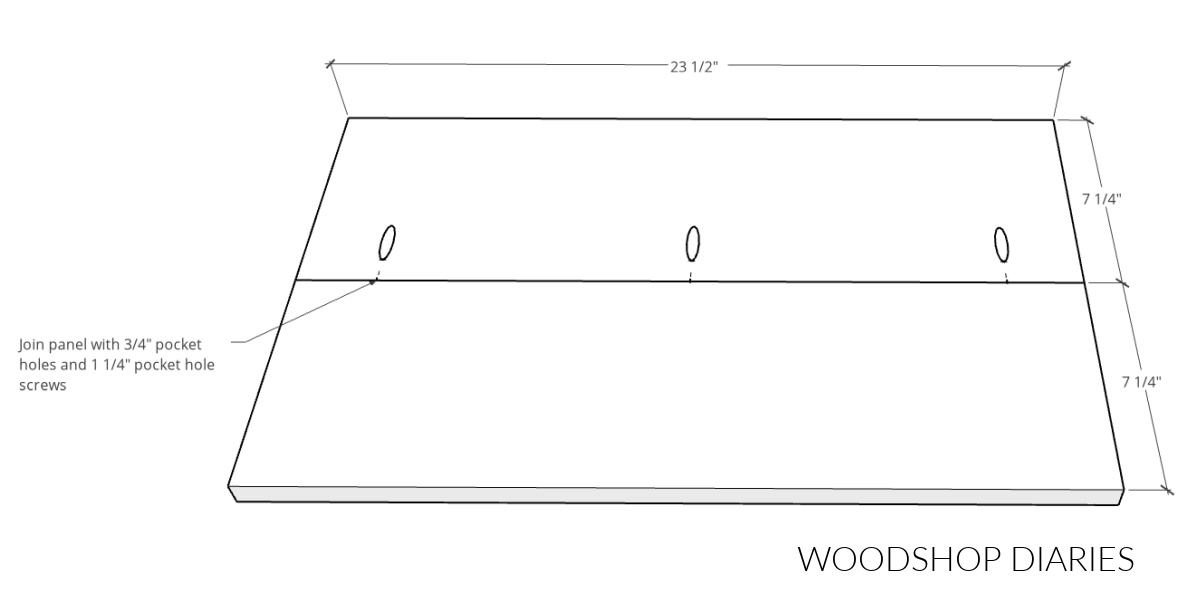
- (2) 1×8 @ 23 ½″ long (box bottom)
- (2) 1×8 @ 25″ long (box sides)
- (2) 1×8 @ 14 ½″ (box sides)
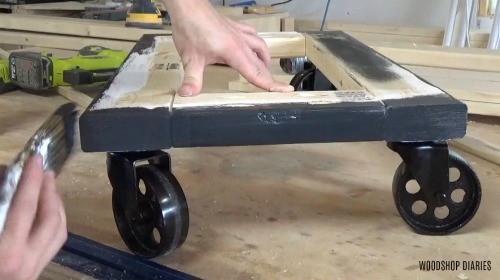
Step 1: Assemble the Base of the Wooden Wagon
To build the base of the wagon, I cut the pieces down to size on my miter saw according to the cut list above.
I like to use my miter saw for simple, straight cuts like this, but you could also use a jig saw, circ saw, or whatever type of saw you have to cut these down.
I drilled 1 ½″ pocket holes into the ends of the short pieces to assemble a simple rectangular frame.
RELATED: How to make pocket holes
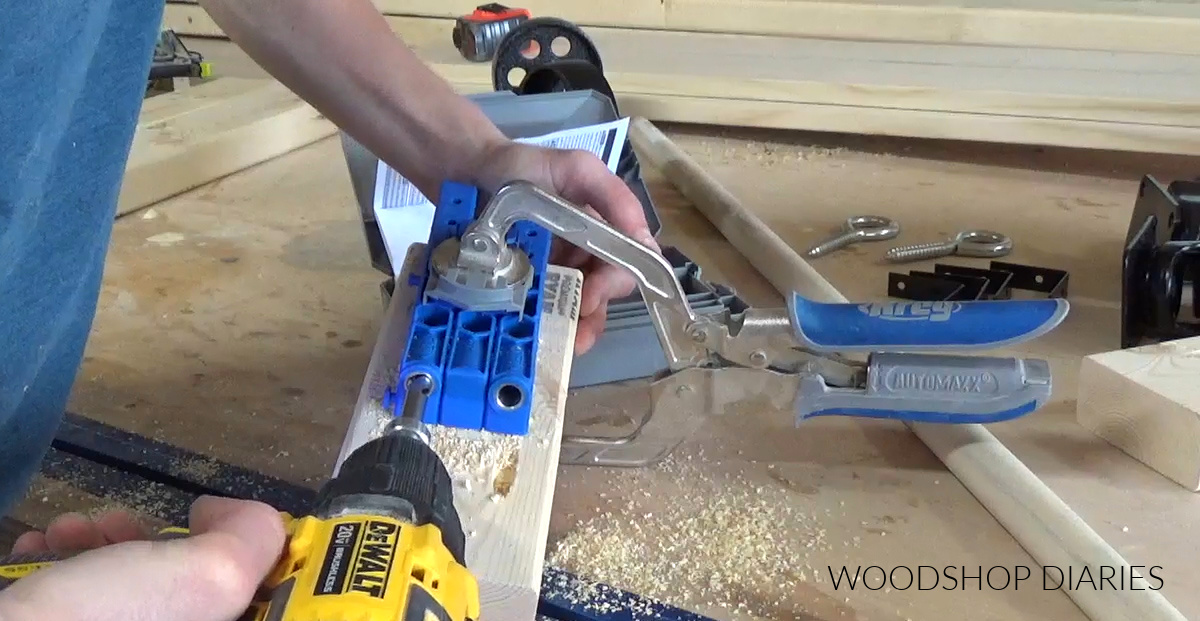
I used a 320 Pocket Hole Jig for this, but any Kreg pocket hole jig would work.
RELATED: What’s the Difference between the Kreg Pocket Hole Jigs?
I attached the bottom wooden wagon frame together using 2 ½” pocket hole screws.
Once my frame was assembled, I attached 4 metal casters like shown on the corners of the frame using 1 ¼″ screws with a few washers.
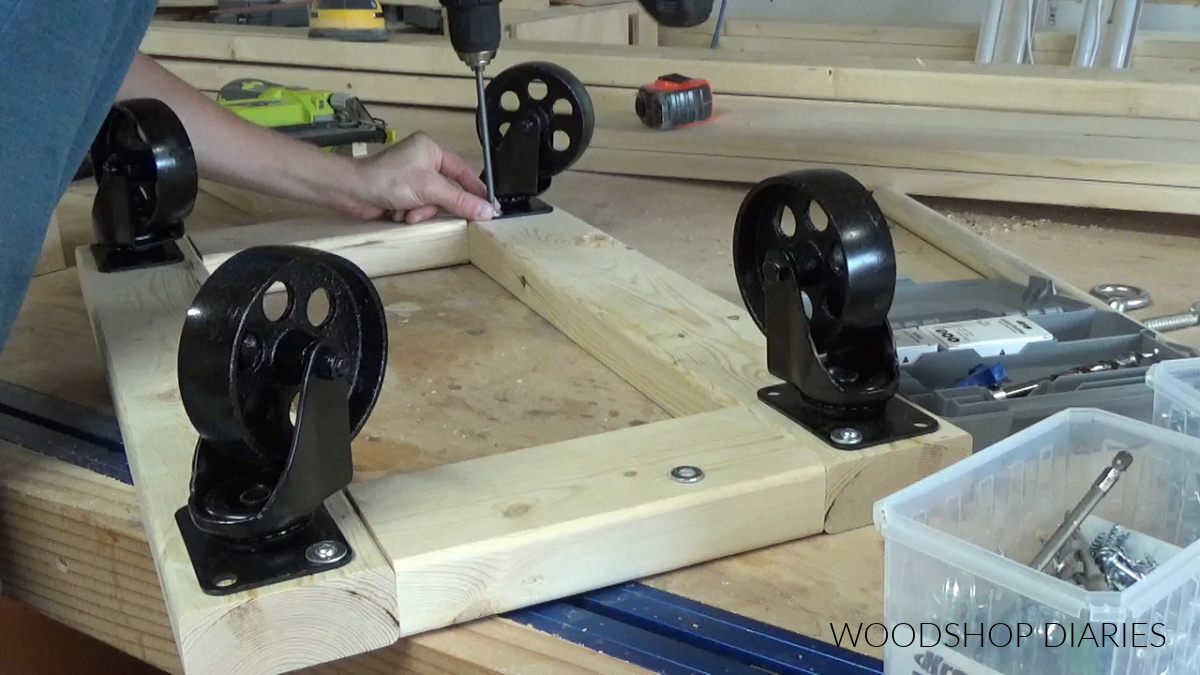
I decided to paint my base black for a more industrial look, so before moving on with the build, I went ahead and painted the base.
That’s totally optional.
Step 2: Assemble Bottom of Wagon Box
While the paint dried, I moved onto working on the rest of the wagon. It’s basically, just a simple box built from 1×8 boards.
So first, I cut two 1×8 boards to 23 ½″ long to make the bottom panel of the wagon box.
I drilled ¾″ pocket holes along the edge of one of the boards.
Then, I assembled these two pieces into a panel like shown using 1 ¼″ pocket hole screws.
Now, you can skip pocket holes for this part and simply glue and clamp these pieces together to make a panel.
Using pocket holes just saves a little time waiting for glue to dry.
Step 3: Assemble DIY Wagon Box
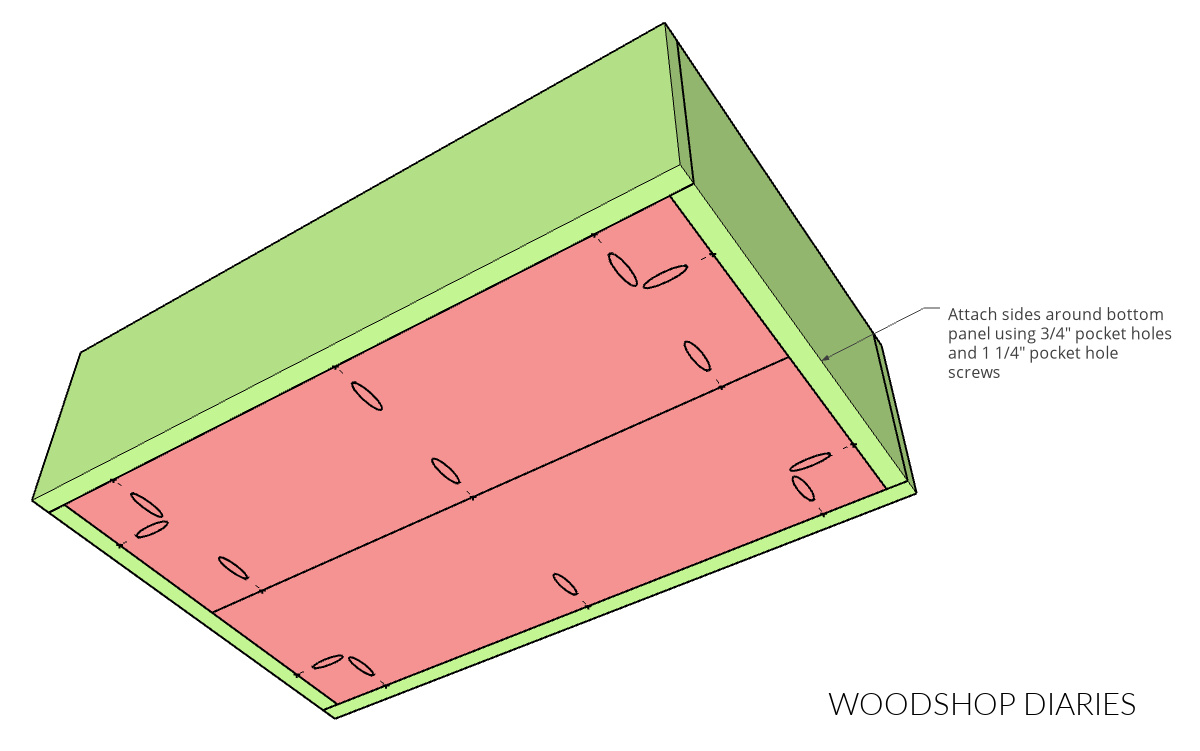
Once the bottom panel was assembled, I cut four boards to make the wagon box sides from the rest of my 1×8 boards.
These boards should all fit together AROUND the bottom panel to create a simple box. See cut list above.
Once I made sure everything fit well, I drilled ¾” pocket holes along all four sides of the bottom panel like shown below.
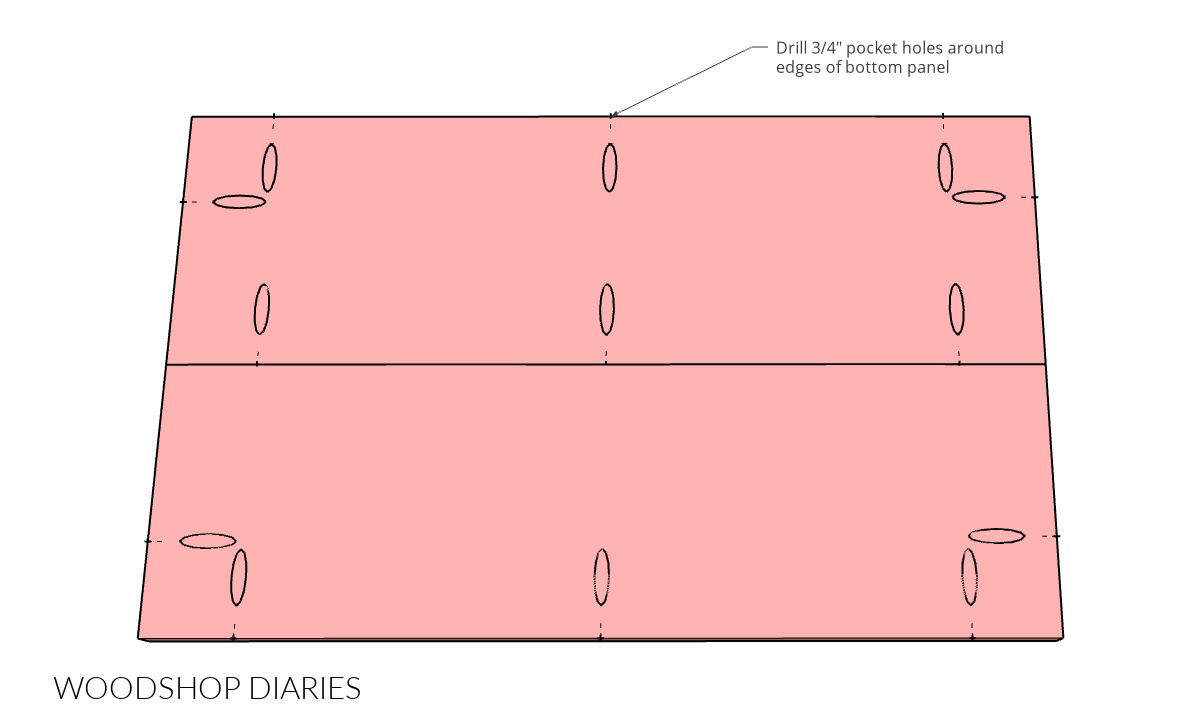
I also drilled two ¾″ pocket holes toward the top along the ends of the short box side pieces.
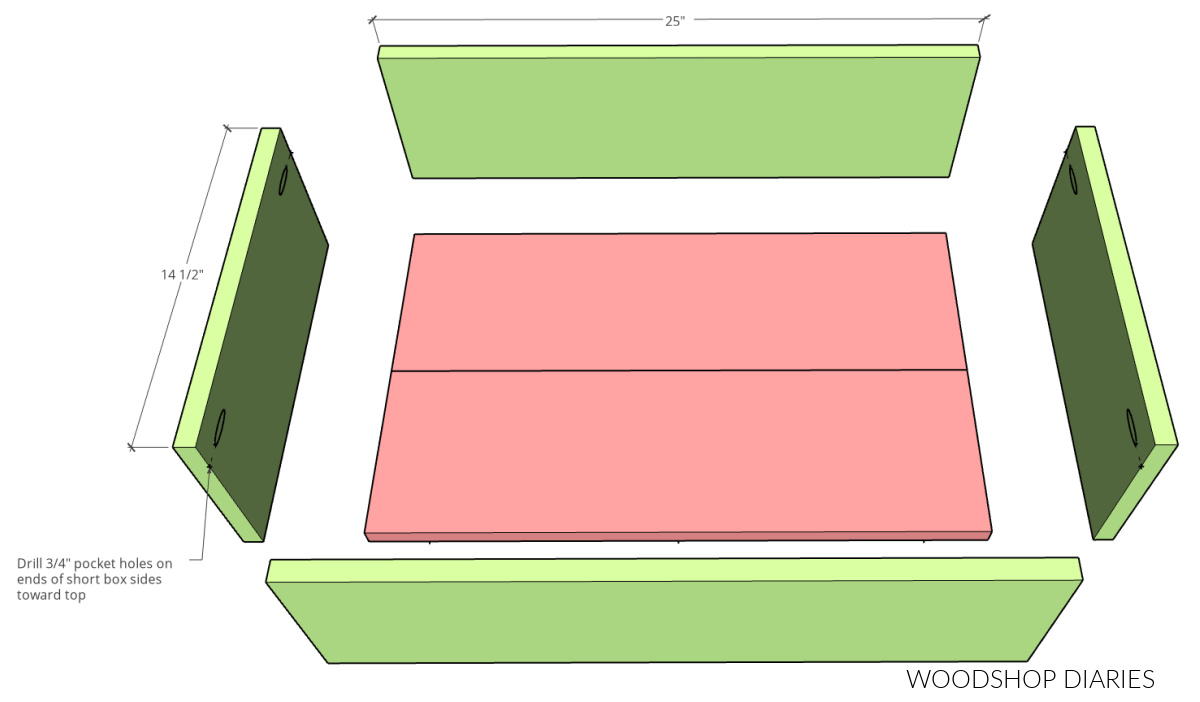
Then, I assembled all the pieces together using 1 ¼”pocket hole screws to complete my wagon box.
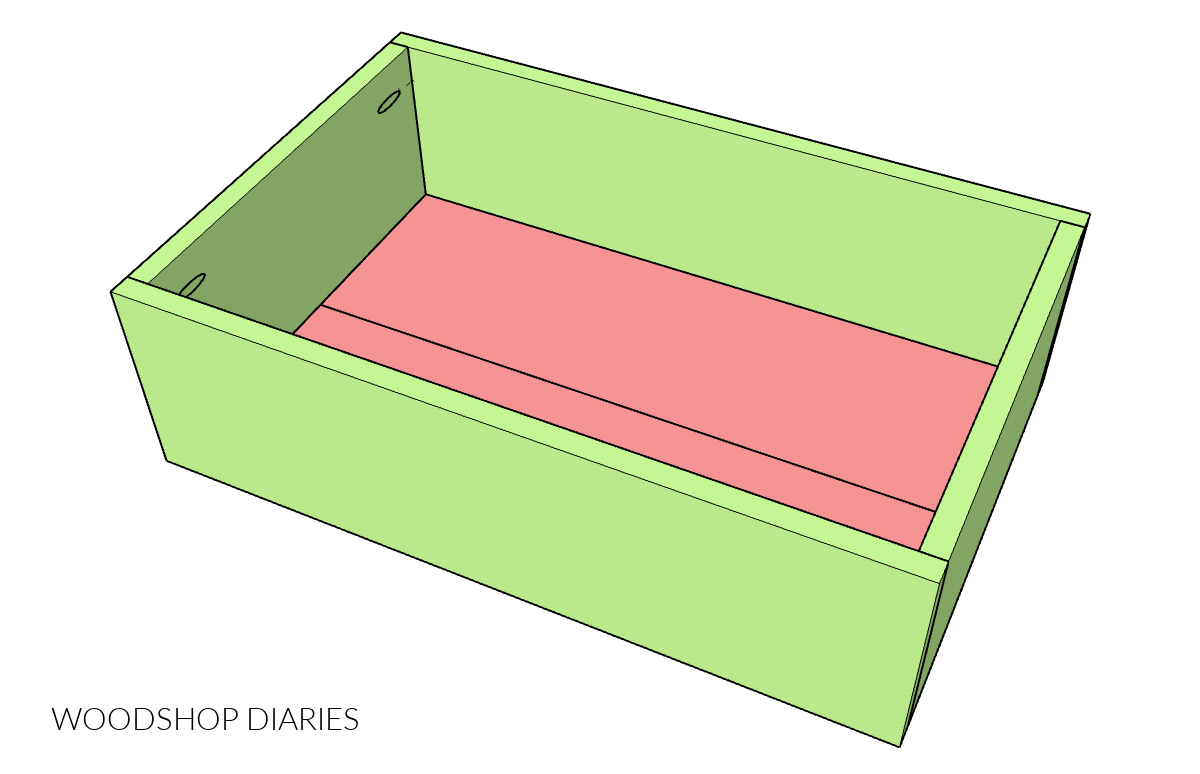
I flipped the bottom panel so that the pocket holes faced the bottom and attached each side first.
Then, I secured the corners at the top using 1 ¼″ pocket hole screws through the pocket holes on the side pieces.
Before attaching this box to the base, I gave the box a coat of stain. I used a combination of Mixwax Golden Oak and Minwax Early American to get my desired color.
You can stain/paint now or later, but since I was painting and staining the base and box two different colors, I found it easiest to finish them before screwing them together in the next step.
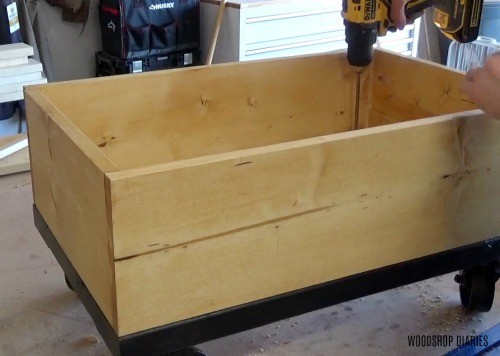
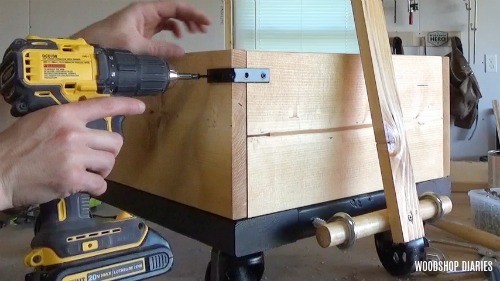
Step 4: Attach Wagon Box to Wagon Base
I used 1 ¼″ wood screws (pocket hole screws work fine for this) to secure the box from step 3 to the base from step 2 together.
I just used 1 screw at each corner through the bottom of the box into the base below.
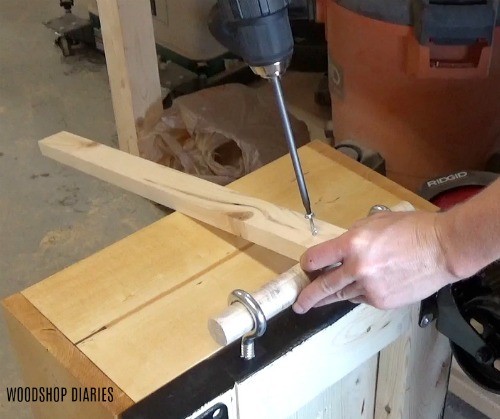
Step 5: Add Handle to DIY Wagon
As mentioned before, this handle is meant for decorative purposes and isn’t intended for pushing/pulling with.
If you intend to use the handle, I recommend attaching the 1×2 using a bolt and nut, or replacing the 1×2 with a smaller dowel that can be installed into a hole drilled into the larger dowel rod that runs between the eye bolts.
To add the decorative handle to the wagon, I used a dowel rod and two eye bolts. Make sure the dowel rod will fit into the holes on the eye bolts.
I predrilled holes into the base, then screwed the eye bolts into these holes.
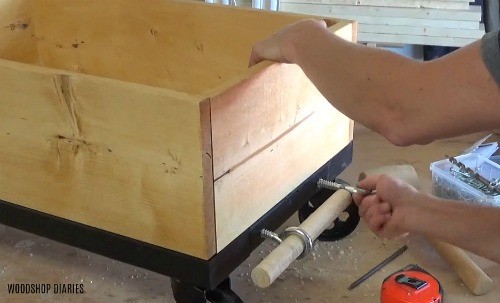
I inserted a wooden dowel rod through these bolts, then screwed a scrap piece of 1×2 into the dowel.
The 1×2 can be as long as you’d like–it doesn’t have to be an exact length.
Then, I screwed another small piece of the dowel into the top to provide a “handle” at the top.

If you didn’t have a 1×2, you could make the whole handle from a dowel if you wanted.
Then I gave the handle a coat of stain to match the box.
Step 6: Add Decorative Hardware
As a final step and to add a little more detail, I added some black corner brackets to the box.
This will help keep the box together, but it’s mainly for decorative purposes, so if you wanted to skip that part, it would be fine.
But since I was going for an industrial look, I really liked the added hardware.
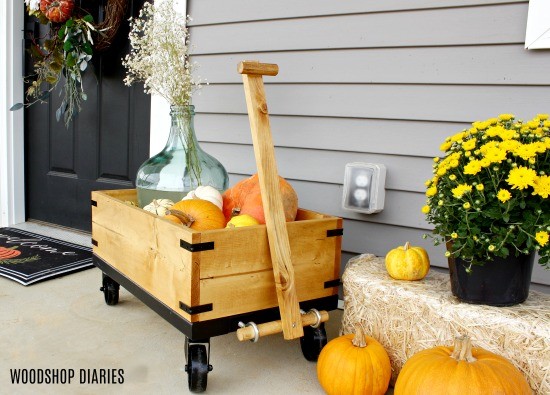
And at this point, this DIY wooden wagon was finished and ready for decorating!
So, I brought it to the porch and loaded it down with pumpkins and mums and ALL THE FALL THINGS.
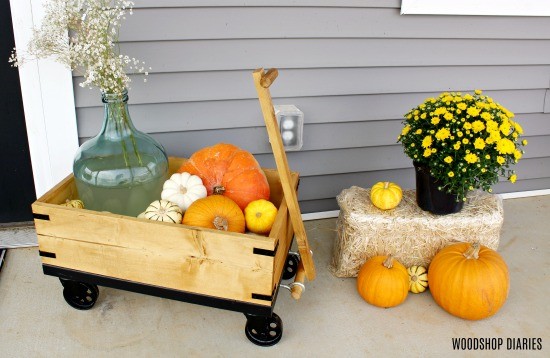
The wagon is a really cute addition to the porch this season and will be great to decorate for Christmas and even spring later.
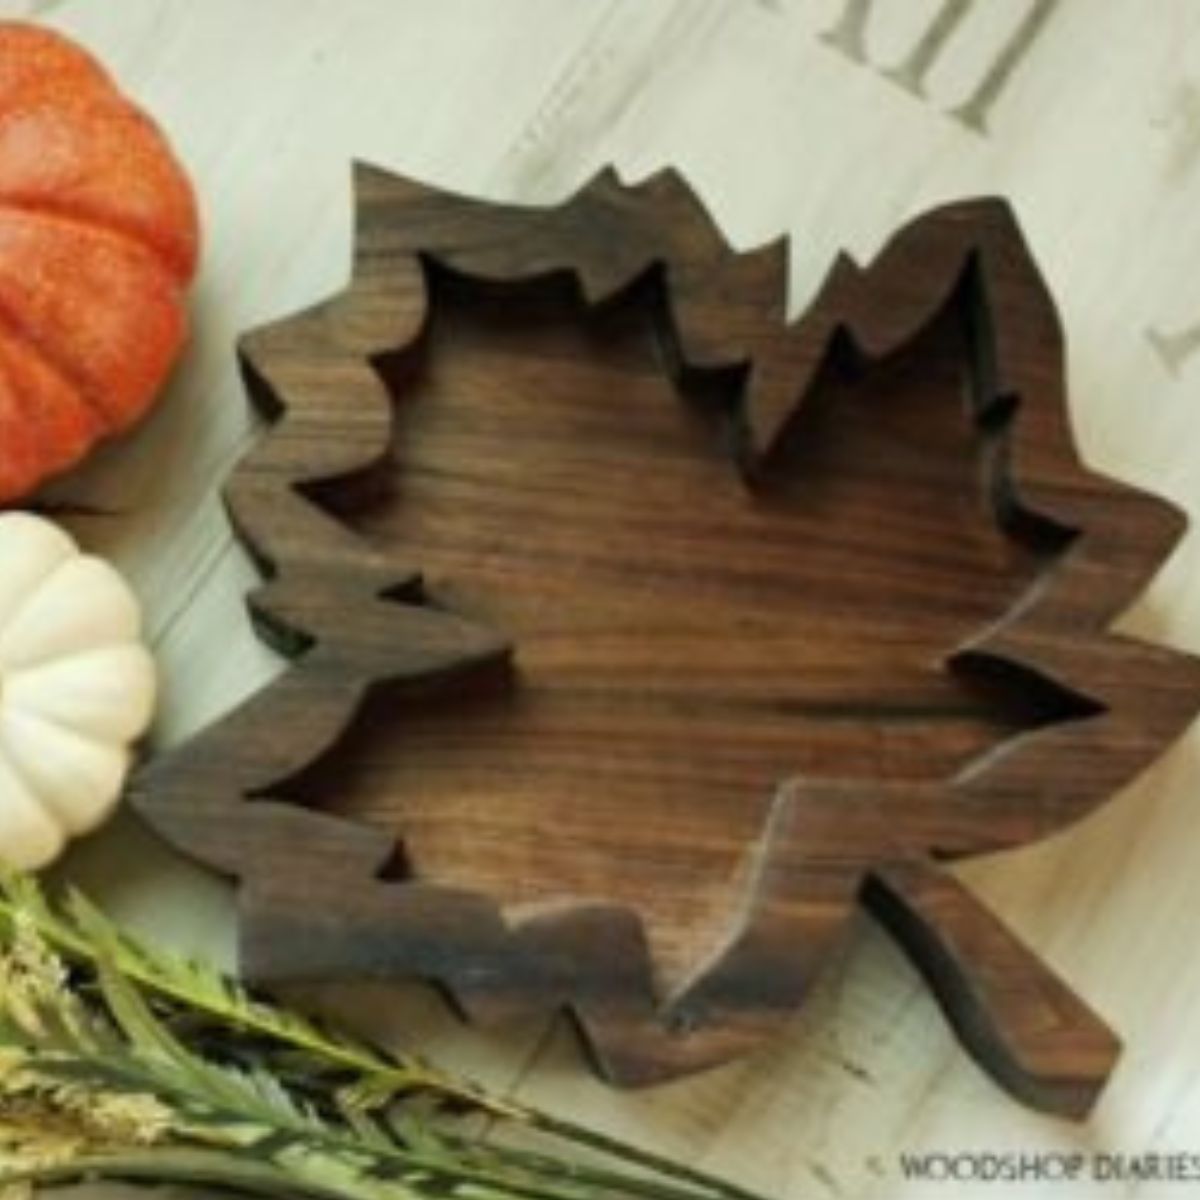
Looking for More Fun Fall Project Ideas?
I hope you guys enjoyed this project as much as I did and I hope you are prepared to enjoy the most wonderful time of the year–pumpkin spice season *wink wink*
If you’re looking for some more fun fall project inspiration, here are a few favorites!

Be sure and sign up for the newsletter to receive priority access to all the latest projects and plans as they come out!
And if you liked this project and want to give it a try, don’t forget to save it for later by pinning it or sharing to your favorite social channel!
Until next time, friends, happy building! 🙂

jane says
Your skills are crazy awesome! Beautiful cart.