Welcome to Workshop 101! This is part 1 of a five part series I’m excited to be sharing! Part 1 will cover workshop maintenance and the tools you need to keep your shop up and running.
.
This post is sponsored by The Home Depot and contains affiliate links. See policies.

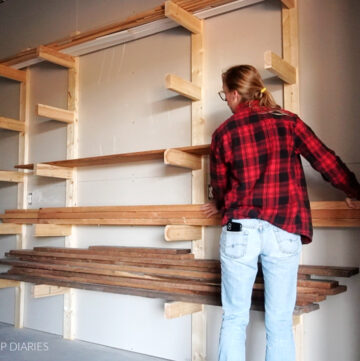
After building my sister’s kitchen cabinets a few weeks ago, my shop was a complete wreck. Nothing was organized, everything was covered in sawdust, and I had misplaced several of my favorite tools while transporting them between her house and my shop. #hotmess

So I decided to get my crap together and get my shop back in shape. And that’s what sparked me to write this series. Throughout the next few weeks, I’ll be covering the topics listed below here on the blog, but I’ll also be giving my shop an overhaul behind the scenes so that at the end of the series, I will reveal my own shop before and after.
.
Each Wednesday for five weeks, I’ll be posting a new part to this series. Today is workshop maintenance, but we will be covering the following topics in the coming weeks:
Part 2: Workshop Organization
Part 3: Workshop Most Valuable Players
Part 4: Workshop On The Go
Part 5: My Before and After Workshop Overhaul
So, let’s get to part 1—workshop maintenance.
Now, I may have picked the most boring topic to start with…forgive me. I know “routine maintenance” doesn’t really sound like the party you want to spend your weekend attending. But hang on, it’s not so bad, I promise 🙂

Routine shop maintenance is a necessary part of doing what you love—making. At some point you have to tighten a loose bolt on your favorite tool, change out a saw blade, or clean out all the saw dust inside your belt sander (been there, done that).
.
So, you need tools to work on your tools. Funny predicament to be in, huh?

I’ll tell you about two great options of tools sets that I’m using in my own shop, then I’ll show you a few tasks I do with them regularly to keep my shop running smoothly. And although this post is sponsored, I want you to know that I’ve learned many lessons the hard way and one thing I know for a sure is that you won’t regret having a good tool set in your home or garage. It comes in handy more often than not.
.
I recently got a 432 piece Husky Mechanics tool set for my shop. It’s literally got everything imaginable you’d ever need to work on almost anything. It’s a 72 pound box full of sockets, wrenches, bits and ratchets. However, it’s literally just 432 pieces inside a cardboard box…there isn’t a case or anything.

If you’re looking for all the bells and whistles, this is a great set with both metric and standard sockets and wrenches. The only downside that I see is that you’ll just need to find somewhere to store and organize all the pieces (more on that in the organization part of the series 😉 ).

I’d highly recommend this set for anyone who needs a little of everything and tinkers with cars, tractors, ATVs, and projects around the house. (Side note: keeping a good mechanics set around the house is always a good idea as a homeowner. )

But, if you’ve got a few screw drivers, and wrenches already and are just looking for a general socket set but don’t need EVERYTHING, this Husky Superior Access 125 piece set is a great option as well.

It’s got standard and metric sockets with both ¼″ and ⅜″ ratchets, and some useful accessories. It also has precision ratchets that need less than an inch of space to turn a fastener. And it comes in a case, so that’s an added bonus for anyone who doesn’t have empty drawers in their tool box to designate for sockets and ratchets.

So now that we’ve covered some tool set recommendations, what do we do with those tools?
.
These are the four tasks I try to complete on a regular basis in my shop to keep things running smoothly.
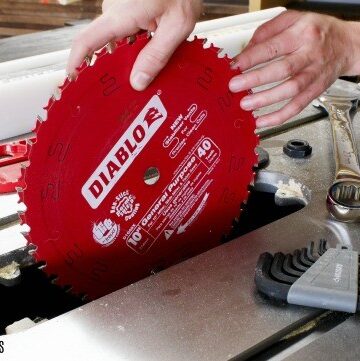
1. Routinely Check and Change Out Saw Blades
It’s a good idea to routinely check that your saw blades are in good shape (not warped, dull, or chipped), and to make sure they are still tight and secure. It’s best to check each tools’ saw blade before using the tool.
.
Changing out and tightening blades often involves using hex head wrenches and/or sockets.

I prefer hex, or Allen wrenches, but if I am wrestling with a really tight nut OR my hand is too close to the teeth and I’m afraid of getting cut, I’ll opt for a socket. And some tools, like table saws, will require normal wrenches vs hex heads to change or tighten the blade. This is where a good mechanics set comes in handy.

Obviously, you should always follow manufacturer’s instructions for routine maintenance and blade changing instructions…sometimes the nuts on certain saws are threaded counterclockwise…don’t ask me how I know that 🙂 haha
2. Clean Out Tool Dust and Particle Collection
It’s important for better performance to make sure to clean out dust collector bags or containers, and to clean out any particle accumulation areas of your tools. Sometimes, you need to remove parts of your tool to access areas that need cleaning. Refer to manufacturer’s instructions for taking tools apart.
.
A good example is in a miter saw. The throat of the miter saw is a scary place. If the blade hits a piece of debris in the throat during a cut, it can cause the saw to kickback or throw that piece of debris out at a frightening speed.
.
So, I routinely take this section off my saw and clean out any particles or wood chips so my blade can’t fling them out when making a cut.

And, if you have a table saw, regularly clean out underneath that as well. You don’t want debris hitting your blade while it’s at full speed.
3. Check and tighten outlet covers
Despite having many battery powered tools, I still use my outlets A LOT. I don’t like keeping ANYTHING plugged in when I’m not using it, so I’m always plugging in, then unplugging. Over and over and over.
.
With all the wear and tear on my outlets, sometimes my cover plates get loose. To prevent damage to my outlets, and to keep them from getting full of dust and debris, I like to check these every so often to make sure the plates are snug and in good condition.

4. Tighten Caster Wheels
If you’ve followed along for a while, you’ll know that I’ve built several rolling carts for my tools. I like to periodically check these wheels to make sure the screws are tight. One time a caster came off my VERY FULL scrap wood cart and it was a little heavy to lift up to try to repair with all the scrap wood inside.
.
Checking that your casters are tight on both your self made DIY carts, OR store bought workbenches and tool carts is always a good idea to prevent damage to the caster, or your back after you have to lift and move whatever it broke off of at some point. I know this from experience.

So, now that we’ve covered “part 1” of the series, I hope that helps you see 1. How useful having a good tool set in your shop can be and 2. How you can help keep your own shop up and running smoothly while you work on doing what you love in there.
.
I’m excited to share the next part of the series, workshop organization, with you next week, so stay tuned for that. I hope you enjoy this series and that it’s a help to you 🙂 Now, get out there and tighten your saw blades 😉 And be sure to pin this for later so you can reference it and keep up with the whole series.

Until next time, happy building! 🙂