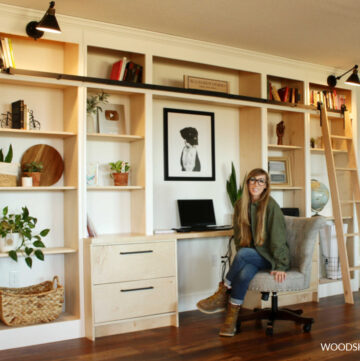
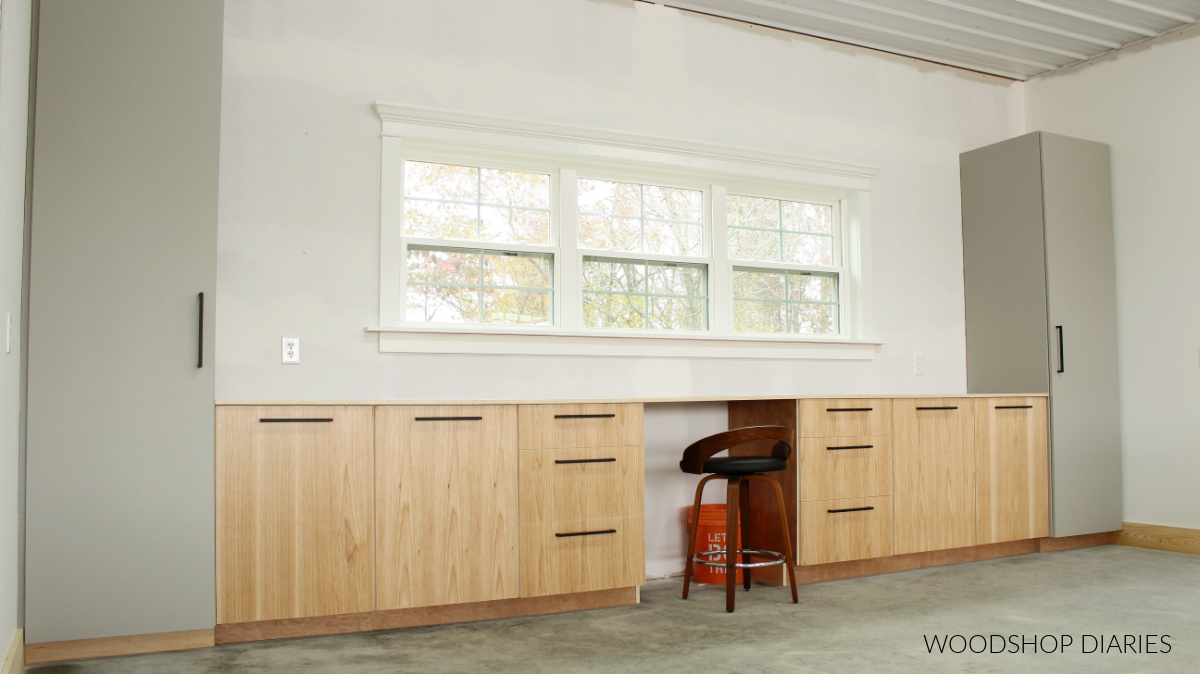
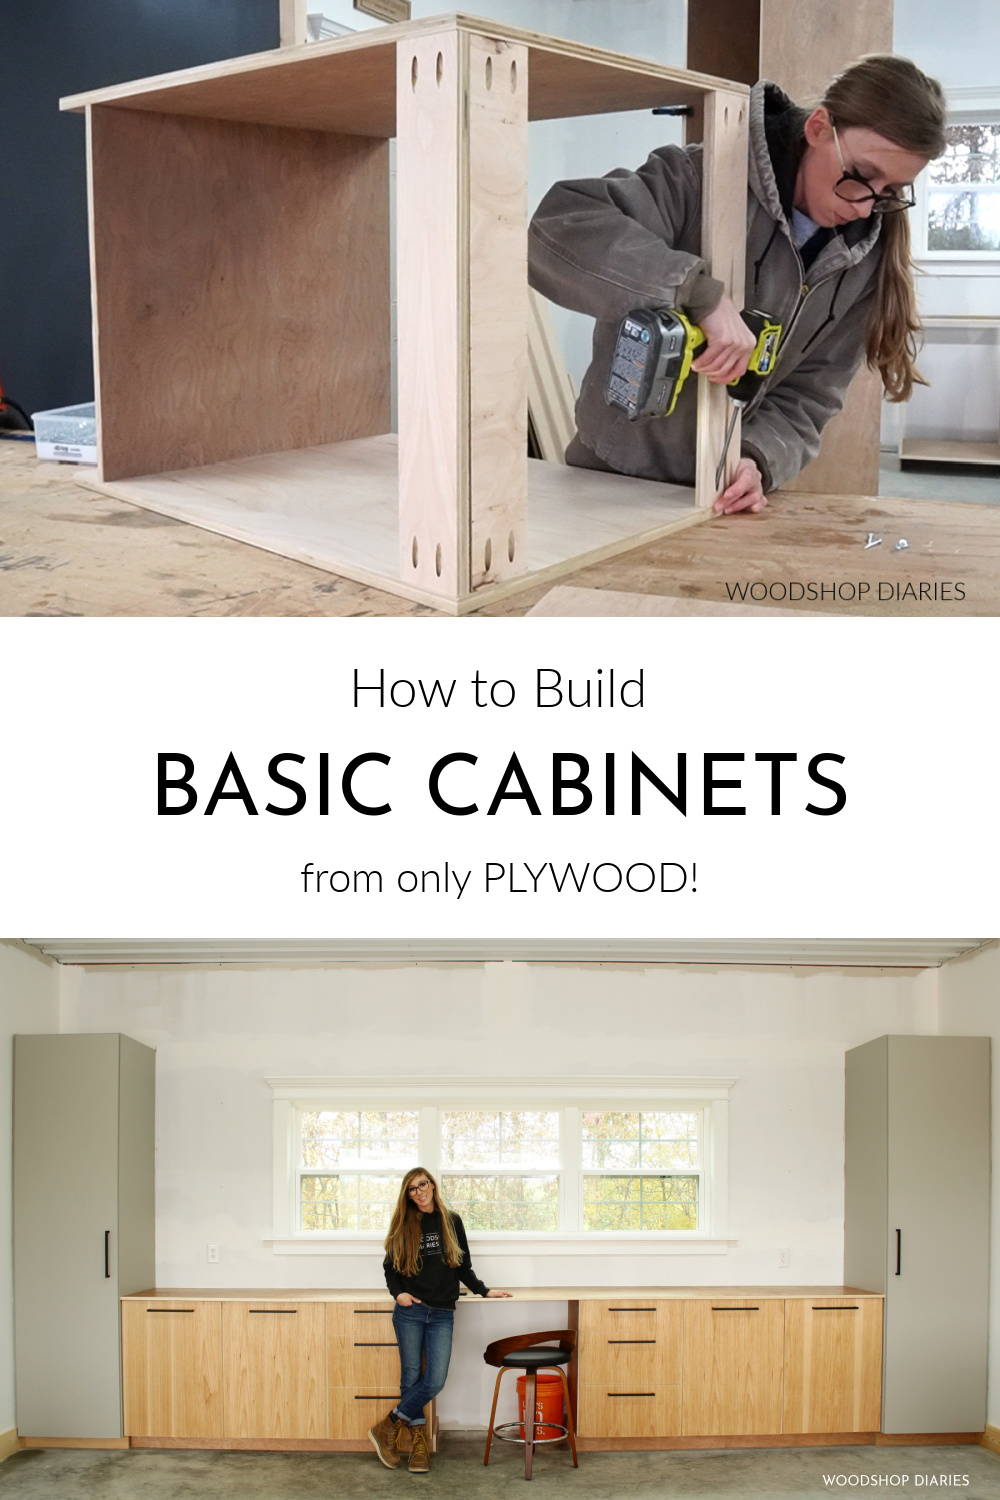
In this post, I’ll show you how easy it is to build base & pantry cabinets. I used this method to outfit my new workshop with more storage and a desk area!
After unpacking most of my stuff in the new shop, I still had some paints, spare parts, and just some odds and ends items with no where to go.
.
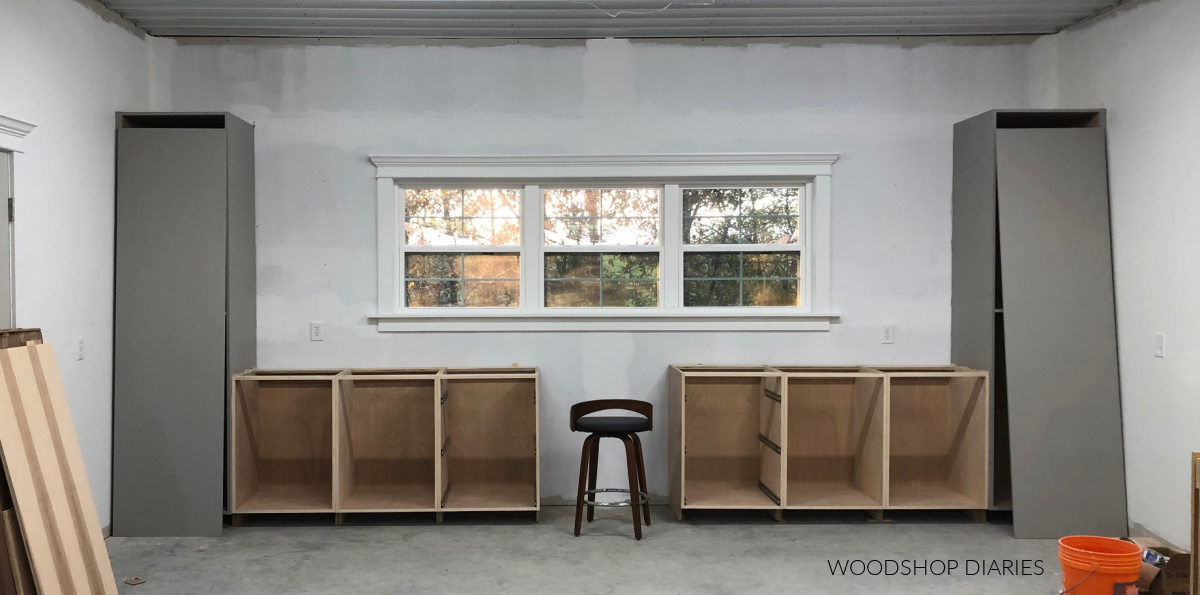
So, I decided to build out this back wall to give me some storage. I added two tall pantry style cabinets on each side and some basic base cabinets under the window with an empty space in the middle to add a little desk area.
.
I built my previous kitchen’s cabinets the exact same way, so if you’re looking to add cabinets to your shop, kitchen, or just make a built in, this is a simple way to go about it–using only plywood. I’ll explain the benefits of “100% plywood cabinets” below.
.
I’m sharing all the details plans, tools, and products for this project below, but if you’d like to watch it, I put together a video of the process here:
**This post contains affiliate links. See website policies.
Why Build Cabinets Using Only Plywood?
These cabinets were all built entirely of plywood–even the doors! This is a really great way to build them for a few reasons.
Reason #1: It saves SO much time!
I used PureBond hardwood ply for this entire build and I highly recommend going with a hardwood option when building cabinets.
.
It comes already smooth, solid, and there’s no planing or milling needed like you’d have if you used solid hardwood in your project. You just cut, assemble, and finish as desired.
.
Not having to mill down any solid wood pieces for face frames or cabinet doors will save hours of your time.
Reason #2: It requires fewer tools!
Not having to use a planer, table saw, routers or big, expensive equipment not only saves you time and wear and tear on tools, but it also makes this project more approachable for those without big, fancy shops.
.
Since everything is made from plywood, all you need to cut your pieces down is a circular saw and some cutting guides.
RELATED: How to cut down plywood sheets
Reason #3: It saves money!
Although hardwood ply (like the PureBond ply I used here) is a bit pricey compared to cheaper building grade pine ply, it’s still significantly cheaper than the equivalent amount of solid hardwood.
.
If you were to buy a sheet of red oak ply and the equivalent amount of solid red oak boards, depending on where you bought it from, you could be looking at a price difference of 200-300%!
.
So to sum it up, using only plywood and not having to factor in the cost of solid hardwood into this project saves a significant amount of time, tools, and money!
Tools and Materials:
Materials*:
- ¾″ PureBond birch plywood (for cabinet boxes and painted doors)
- ¾″ PureBond hickory 2×4 plywood panels (for wood cabinet doors)
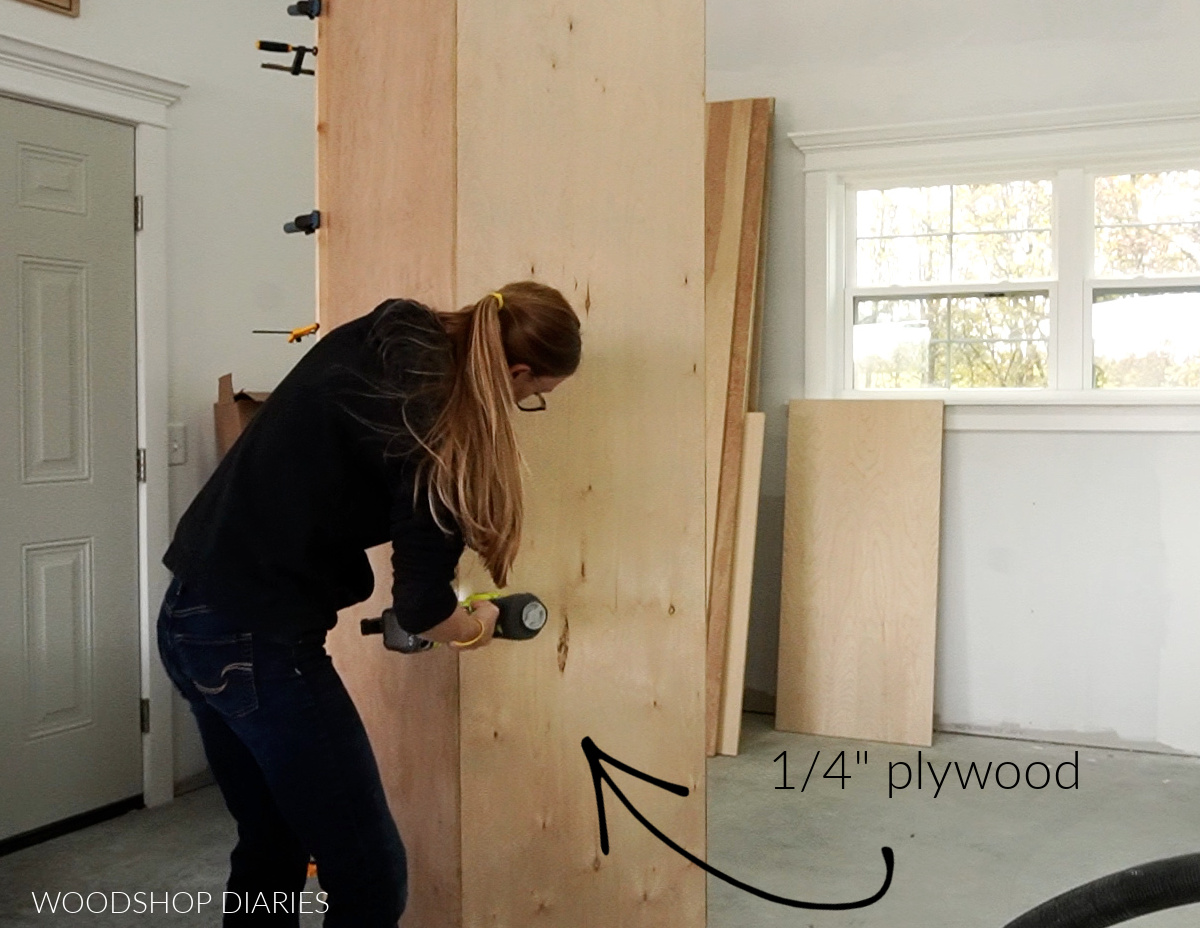
- ¼″ plywood for drawer bottoms and cabinet backs
- Edge banding
- 1 ¼″ pocket hole screws
- 2 ½″ wood screws (to secure cabinets to wall studs)
- Shims
- Wood Glue
- Concealed Overlay Hinges
- Drawer Slides (I used 22″ and 16″ slides)
- Shelf Pins
- Drawer/Door pulls
*Amount of materials you need will depend on the number/size cabinets you are building. I used 6 hickory panels, 9 full ¾″ plywood sheets, and 3 sheets of ¼″ ply for this entire project.
.
PS, if you like the bar stool I used in the desk area, here’s the link!
Some notes about this cabinet build:
Frameless vs. Face Frame
Cabinets come frameless or with a face frame. You can see the difference below. The left has a face frame and the right does not.
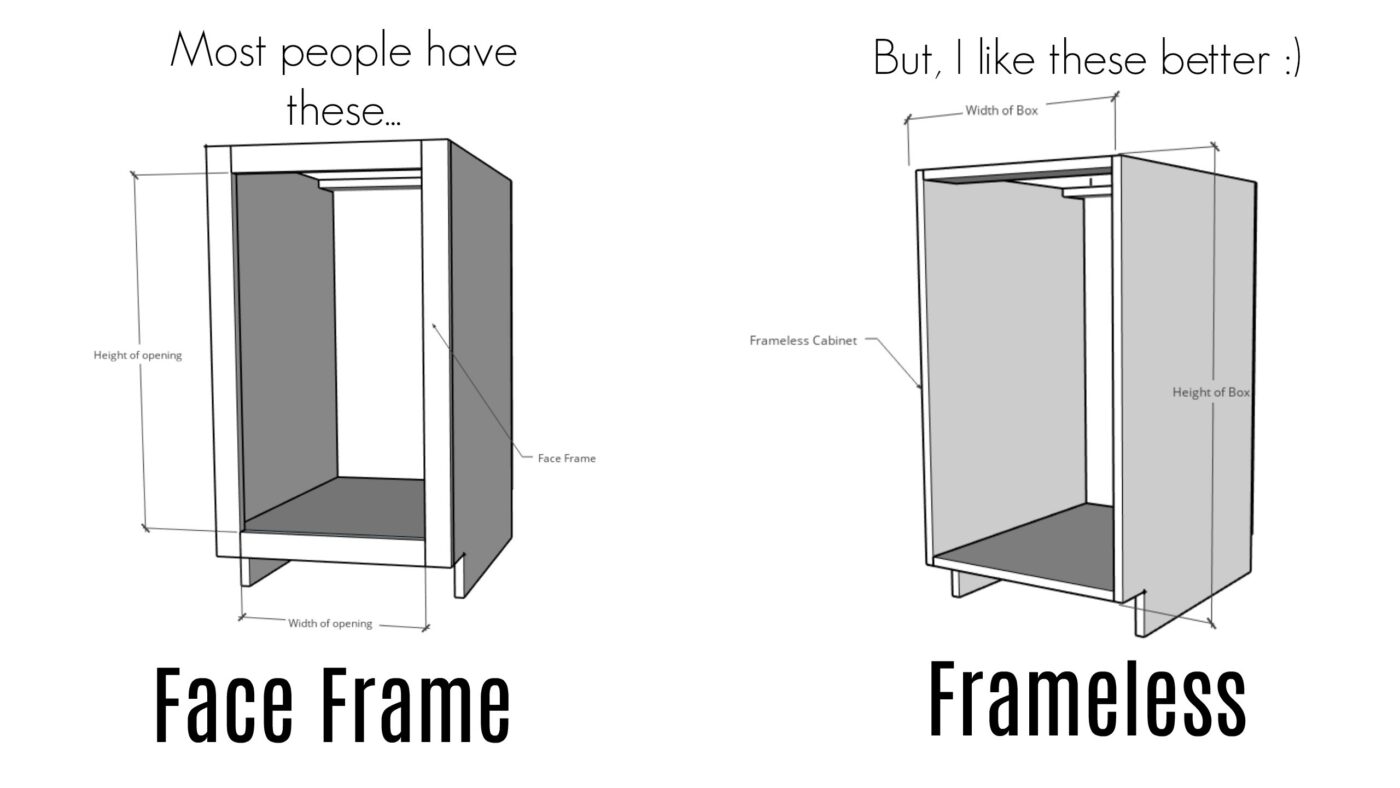
I prefer frameless cabinets because it’s a more minimalist look and they are MUCH simpler to build. So this tutorial will show building frameless cabinets.
.
On that note, since the face frame won’t be there to cover the plywood edges on the front of the cabinet box, you may want to consider applying edge banding to cover those up and make them look cleaner.
RELATED: Here’s a guide to applying edge banding.
Cabinet Sizing
You can modify your cabinet sizing to fit your own needs (see this tutorial), however, for typical kitchen cabinets, the standard height is about 34 ½″ and the countertops are usually 24-25″ deep, so cabinets are 23-24″ to allow for 1″ overhang.
.
I stuck with those standards in this project just to keep things simple.
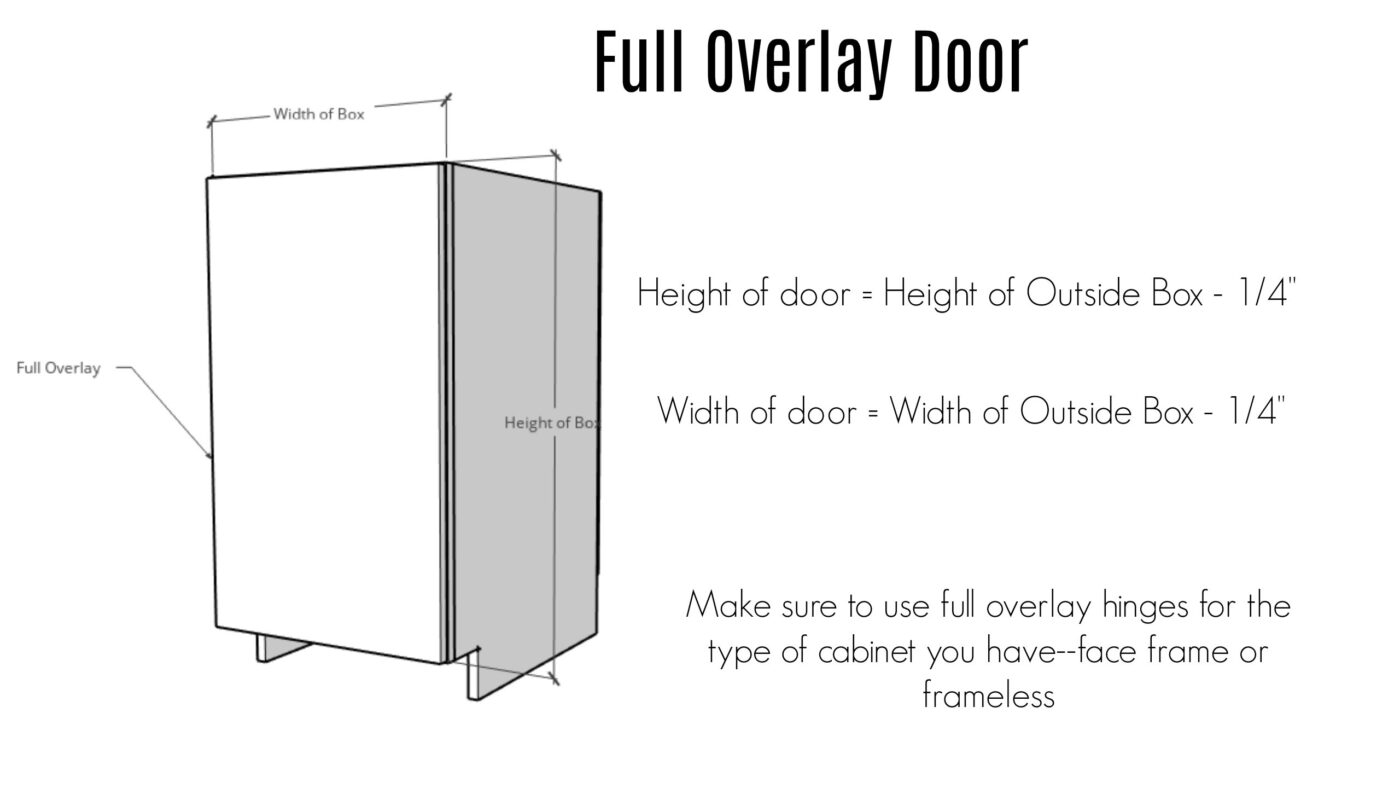
Overlay vs Inset
Cabinet doors and drawers are made either inset or overlay.
.
Inset means they are “set into” the frame or cabinet–so the door is flush to the front of the cabinet. Overlay means that the door sits on the outside of the cabinet and “lays over” the front.
.
In this case, I made my doors and drawers full overlay.
Some resources to help you with this base & pantry cabinet build:
- How to cut plywood sheets
- How to apply edge banding
- How to use a pocket hole jig
- Which pocket hole jig do you need?
- How to build and install drawers
- How to measure and build cabinet doors
- How to use concealed hinges
- How to finish raw wood furniture and cabinets
- 10 tools you need for cabinet & furniture building
- How I built my kitchen cabinets
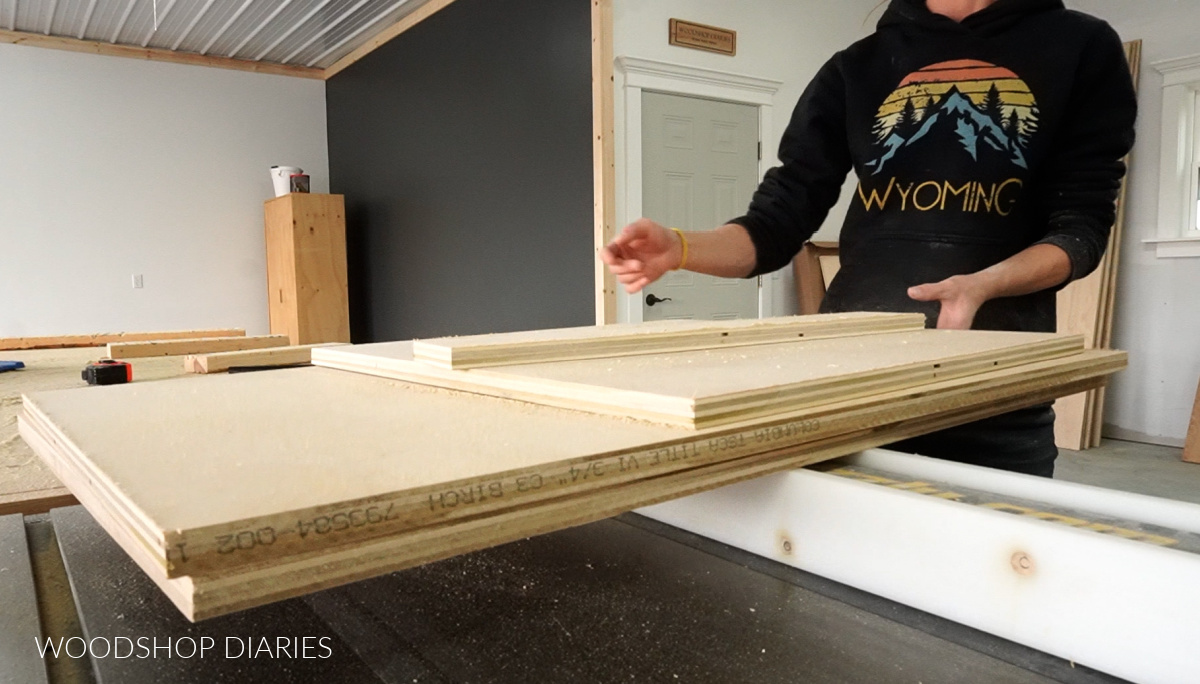
Step 1: Cut Down Plywood for Cabinet Boxes
I used my Kreg Rip Cut and circular saw to rip three ¾″ plywood sheets into 23 ¾” wide strips for the pantry cabinets–so 6 strips total. Four will be the pantry sides, and the other two will be used to cut the top, bottom, middle shelves in the next step.
RELATED: How to cut plywood sheets
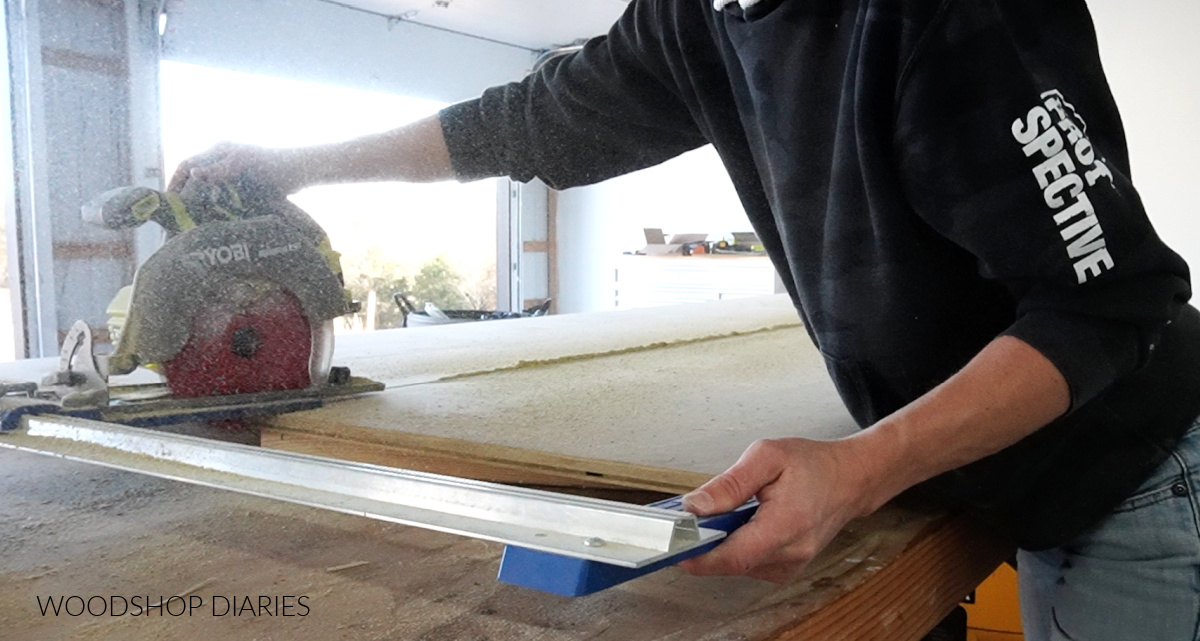
And then I ripped three more sheets into 22 ¾” wide strips for the base cabinets. This gave me six total strips and I can make one base cabinet from each. I kept the leftover ~ 2 ½″ plywood strip from each sheet to use as support pieces later.
.
You’ll notice that I made the pantry cabinets 1″ deeper than the base cabinets. This is so that when I install the 24″ deep countertop later, it will be even with the pantry cabinets, but still overhang the base cabinets.
.
I ripped one more sheet right down the center to give me two 24” wide pieces to use for the pantry doors later. I labeled everything before moving on so I didn’t get confused.
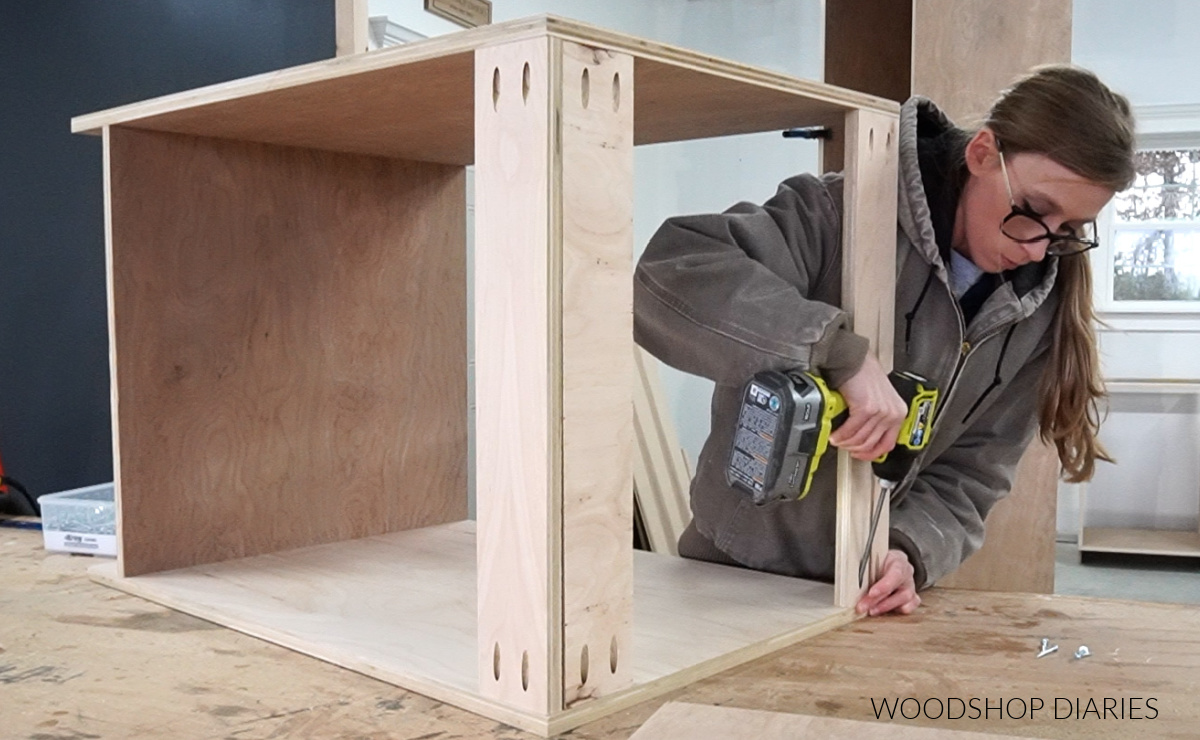
Step 2: Assemble Pantry Cabinets
To keep things simple, I just made the pantry cabinets a full 8 foot tall, so I didn’t have to trim the side panels. But if you have shorter ceilings, you may want to trim your sides and make yours a little shorter.
.
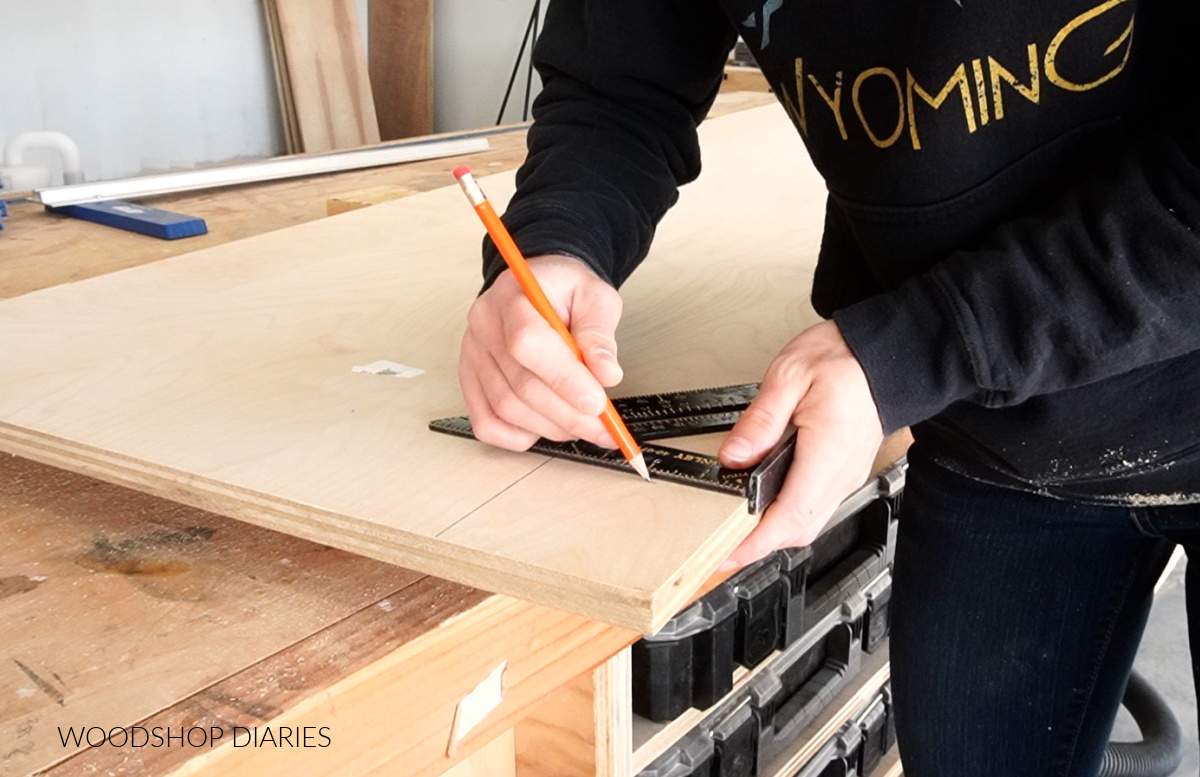
I cut three 22 ¾” long pieces for each cabinet from the plywood strips I cut for the pantries in step 1. This gave me an overall cabinet width of 24 ¼″. If you need to modify your cabinet sizing, check out this tutorial.
.
In addition to the three shelves per cabinet, I also cut two small plywood strips the same length to use as back supports to secure the pantry cabinet to the wall.
.
You’ve probably seen people build and install cabinets and use a 2×4 base to set them on instead of cutting a toe kick. And that’s a great way of doing things. But, I usually just cut the toe kick.
.
I’m not sure if there are “standards” for toe kick dimensions, but when you build things yourself, you can kind of do what you want, so usually I cut mine about 3 ½” tall and 4” deep.
I just marked these out on the front, bottom corner of my pantry sides, and cut out with a jig saw.
.
Before moving on, I went ahead and applied edge banding to the front edges of each piece of the cabinet.
RELATED: How to apply iron on edge banding
.
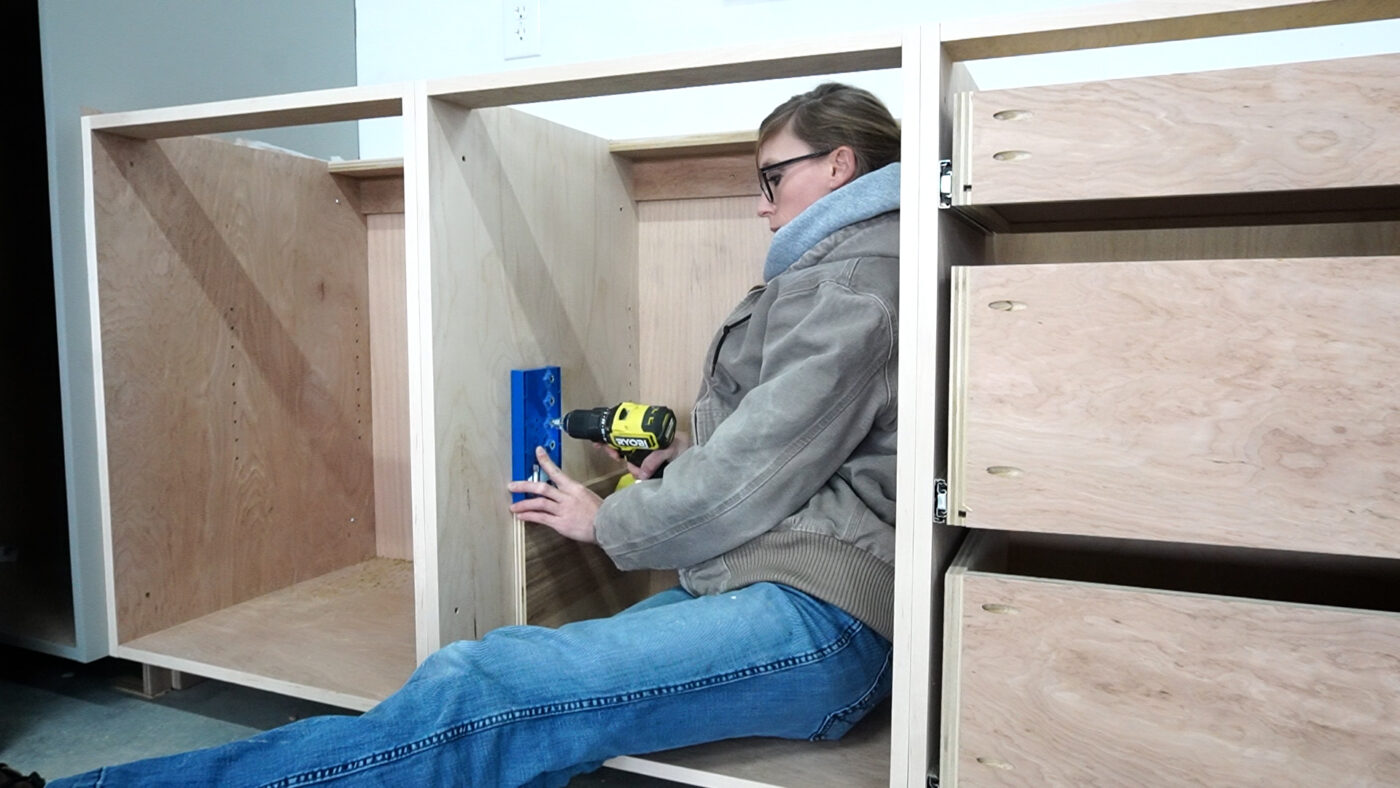
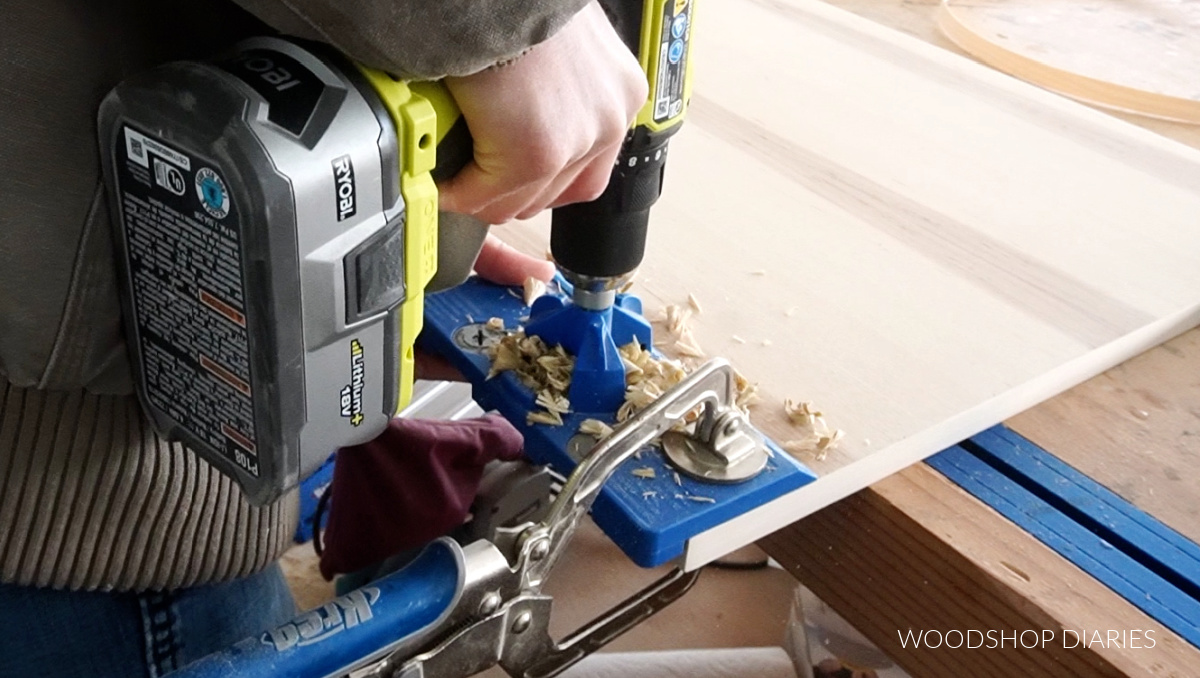
Next, I pulled out my Kreg Pocket Hole Jig and drilled ¾″ pocket holes into the ends of each of the shelves and the two support strips.
RELATED: How to use a pocket hole jig
.
I assembled using 1 ¼” pocket hole screws. You can use glue here as well if you wanted.
.
I attached the bottom panel 3 ½” from the bottom edge of the sides, the top flush along the top edge and the middle piece exactly in the middle of the cabinet.
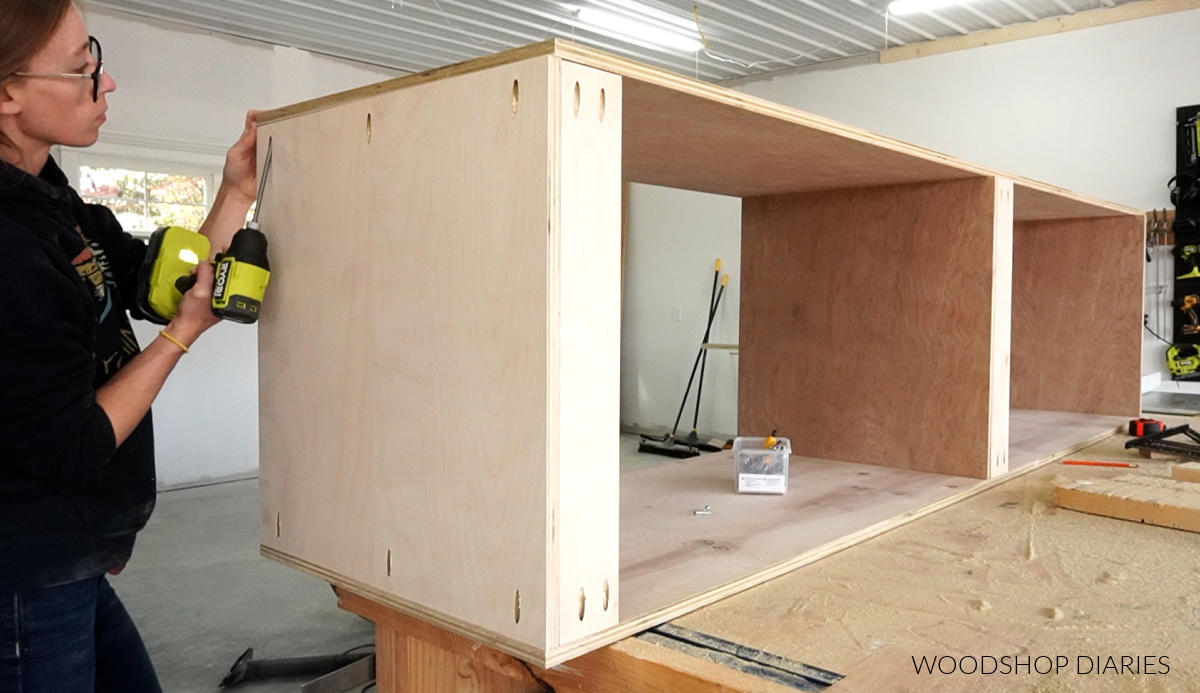
I also installed the two support strips–one directly below the top, and one directly below the middle shelf.
.
Because I was adding a baseboard later, I didn’t want to butt the side of the pantry right against the wall (see video). So I glued a ¾″ square block along the side to set the cabinet off the wall a little.

Then, I cut a piece of ¼” plywood to staple onto the back side. If you don’t have a stapler, nails or screws work fine, too.
Step 3: Install Pantry Cabinet
Once the pantry cabinet was assembled, I drug it over to where it was going and secured it to the wall.
.
I used a level and a couple shims to set up the cabinet so it was straight and square, then used a few 2 ½″ screws through the support strips to secure it to the wall studs.
.
Use a stud finder to make sure you screw through the supports (both the top and middle pieces) and into the wall studs behind it.
Then, I repeated this same process to make the second pantry for the other side.
.
I’ll come back and deal with the doors and shelves in later steps.
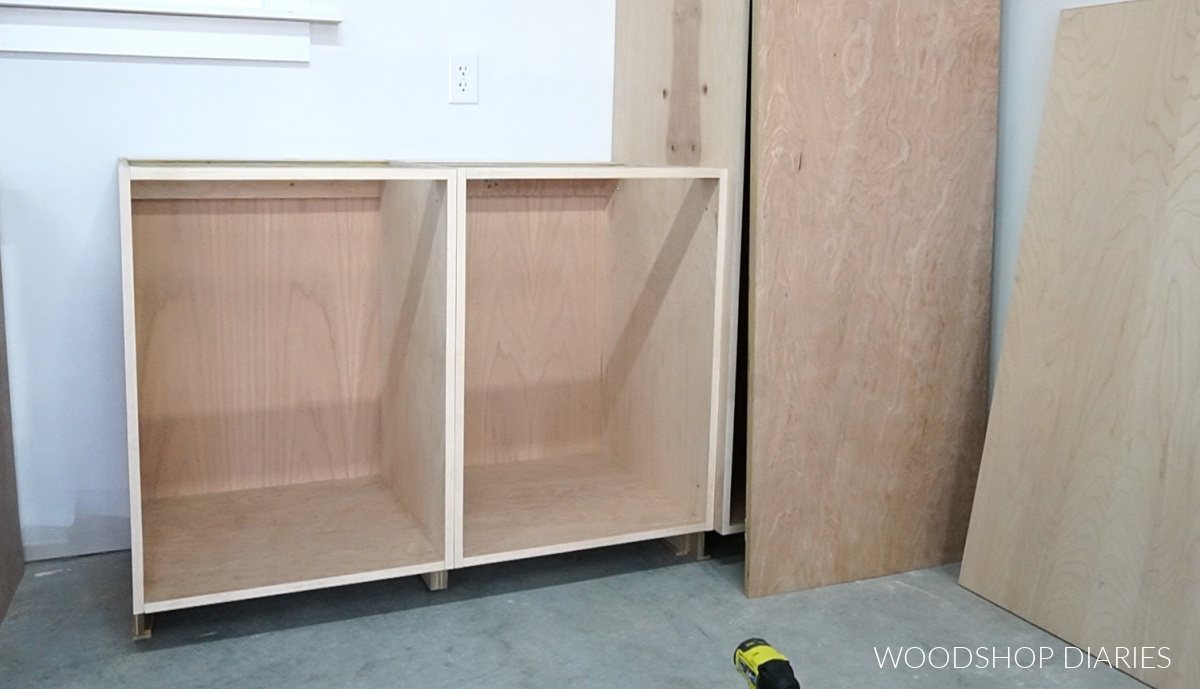
Step 4: Build Base Cabinets
I built all my base cabinets here the exact same size to keep things easy. I was using 24” wide pieces of hickory plywood for the doors and they were full overlay.
.
Usually, when I make full overlay doors, I take the overall width of the cabinet and subtract ¼”.
RELATED: How to measure for cabinet doors
.
So if I made my cabinets 24 ¼” wide, I wouldn’t have to cut my doors any narrower. So that’s what I did here. #priorplanning
.
From each base cabinet plywood strip (from step 1), I cut two pieces 34 ½” for the sides, one 22 ¾” for the bottom and then kept the little leftover strip to use as a support piece later.
I did this for all six base cabinet boxes and also cut toe kicks in the front bottom corners of the sides just like I did on the pantry sides earlier.
.
In addition to the one support piece left after cutting each plywood strip, I also cut two more for each cabinet box the same length. Two will go on the top and one at the back.
.
I edge banded the front edges of the sides, the bottom, and one support strip, then assembled using ¾″ pocket holes and 1 ¼″ pocket hole screws.
For these base cabinets, I installed the bottom panel 3 ½” from the bottom edge so that it’s even with the toe kick cut out, then I installed the edge banded support strip at the top in the front, and the two others are at the back corner.
.
The strips at the top will be used to secure the countertop and the one at the back will be used to screw the cabinet to the wall.
.
After the boxes were together, I cut ¼” plywood back panels to staple (or nail, or screw) onto each one.
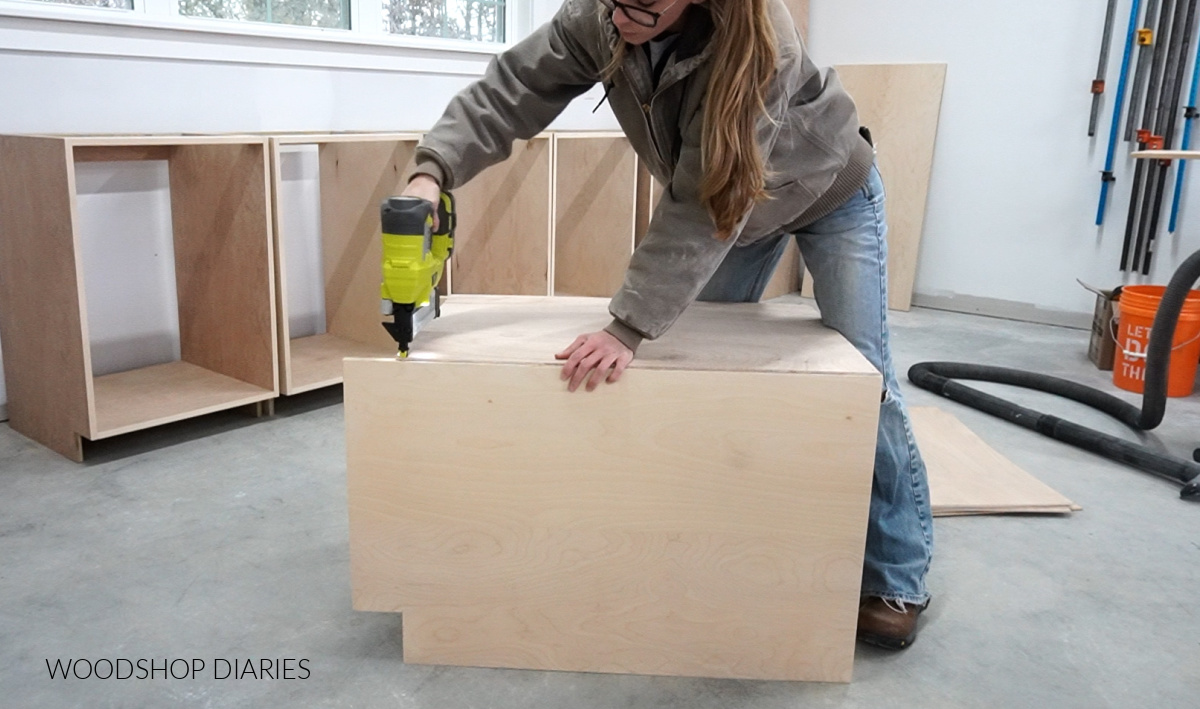
I always like to check that my back panels are square and then adjust my cabinet boxes to match when I staple it on–that way, I make sure my cabinet box is square and stays that way.
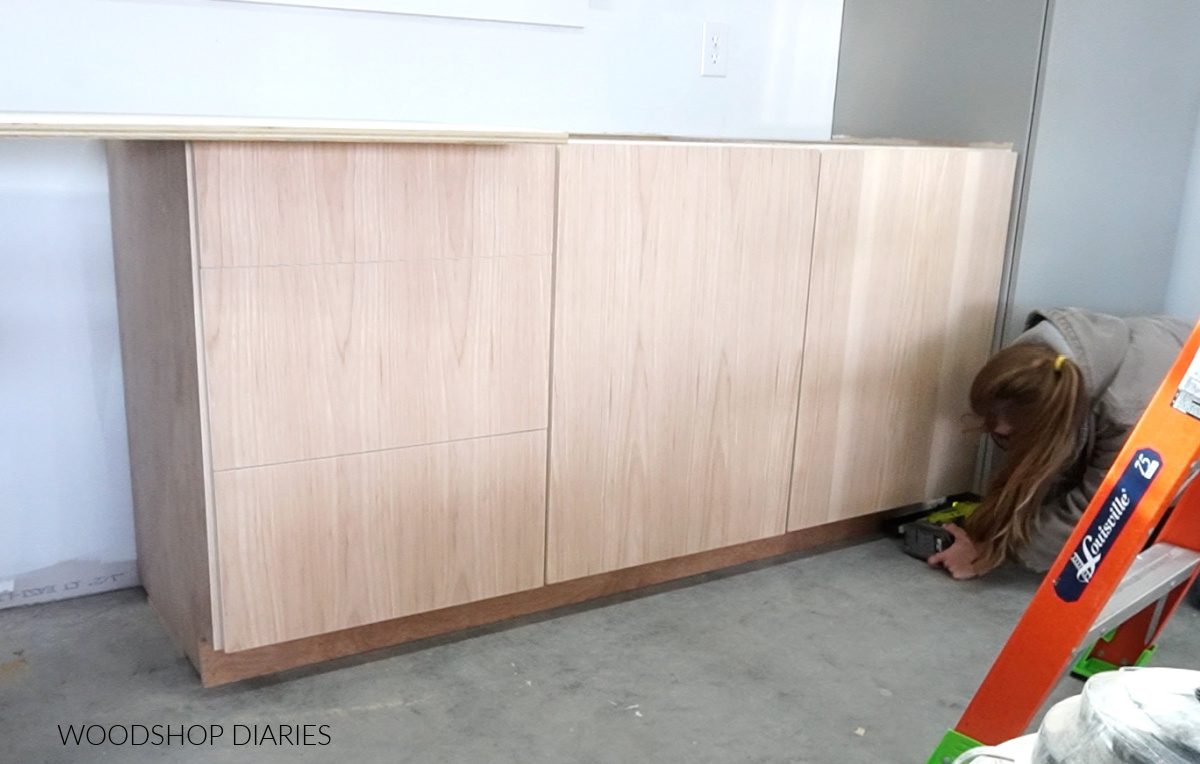
Step 5: Install Base Cabinets
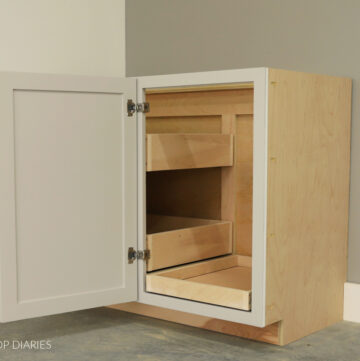
Now, of my six cabinets, four of them would be door cabinets and two would be drawers. I went ahead and installed the door cabinets, but will come back to the drawers in step 6.
.
I screwed the two base cabinets together on each side first, then used a level and some shims to get them level and square before securing them to the wall studs through the back support.
The concrete floor was really unlevel, but most are, I guess, so I did the best I could ha.
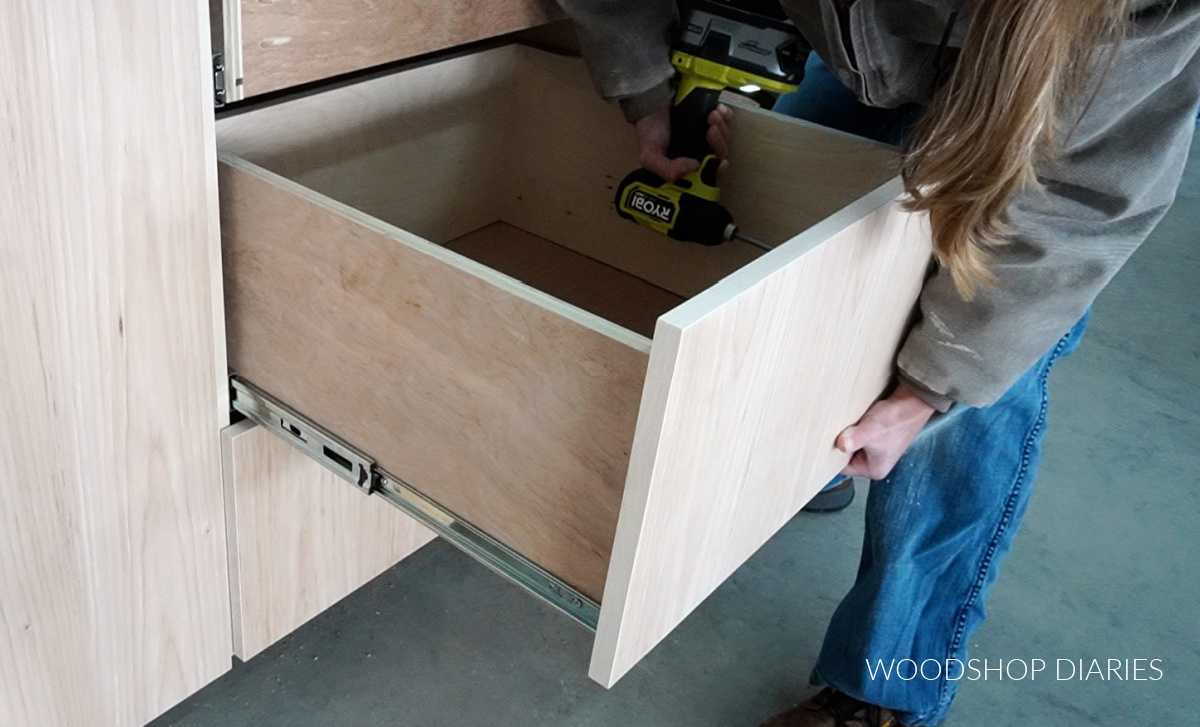
Step 6: Install Drawers (optional)
For my two drawer cabinets, I used 22” drawer slides on the bottom two drawers and 16” slides on the top drawer. I actually ordered 6 pair of 22” slides to use them on all the drawers, but realized later that the top drawer would hit the back support piece if I used 22” slides on it.
.
I keep a stock of 16” slides in my tool chest, I just swapped these out for the top drawers. I don’t have a fancy reason for why I used 16” except that I just happened to have some handy.
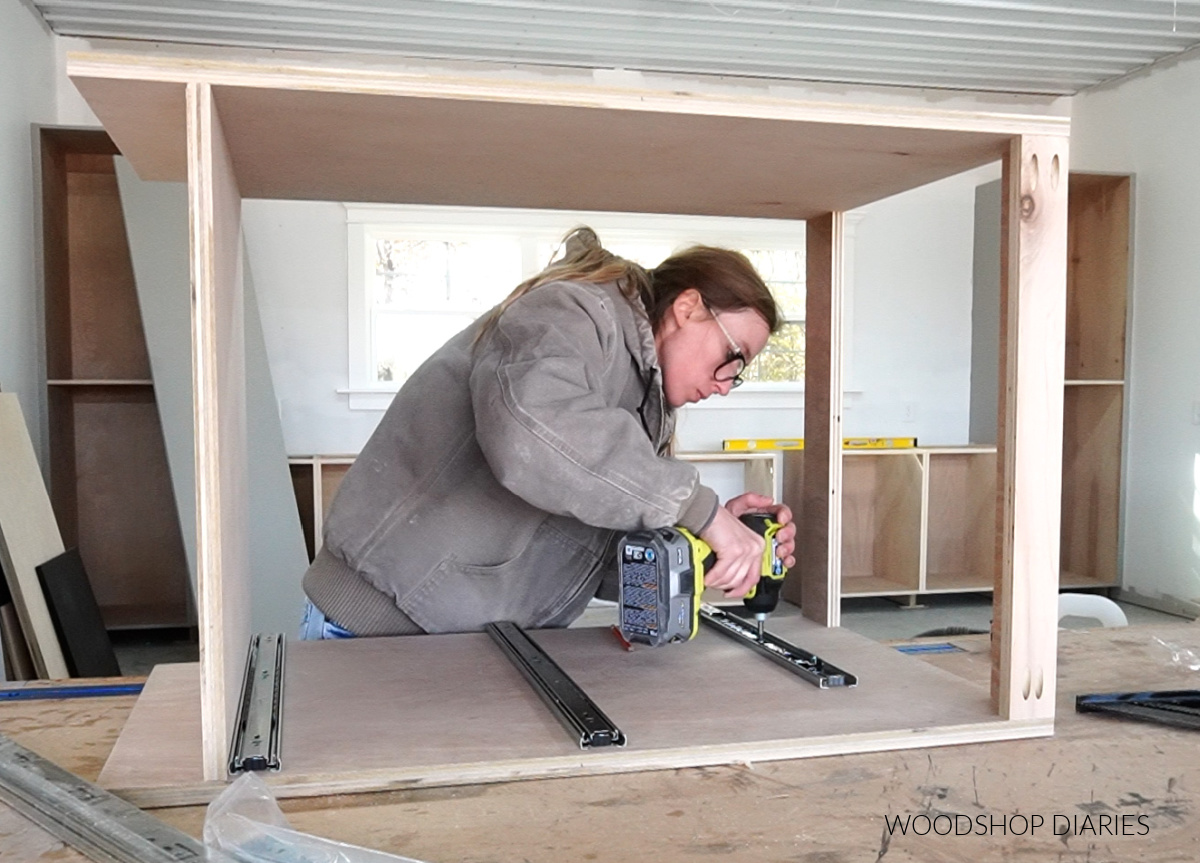
I installed these into the two drawer cabinets, added the back panel, then secured these in place on the wall next to the door cabinets.
You can check out this detailed tutorial to figure out how to measure for, plan out, build and install your drawer slides and drawer boxes to customize this however you need.
.
Once I had my drawer boxes assembled, I installed them into the cabinets.
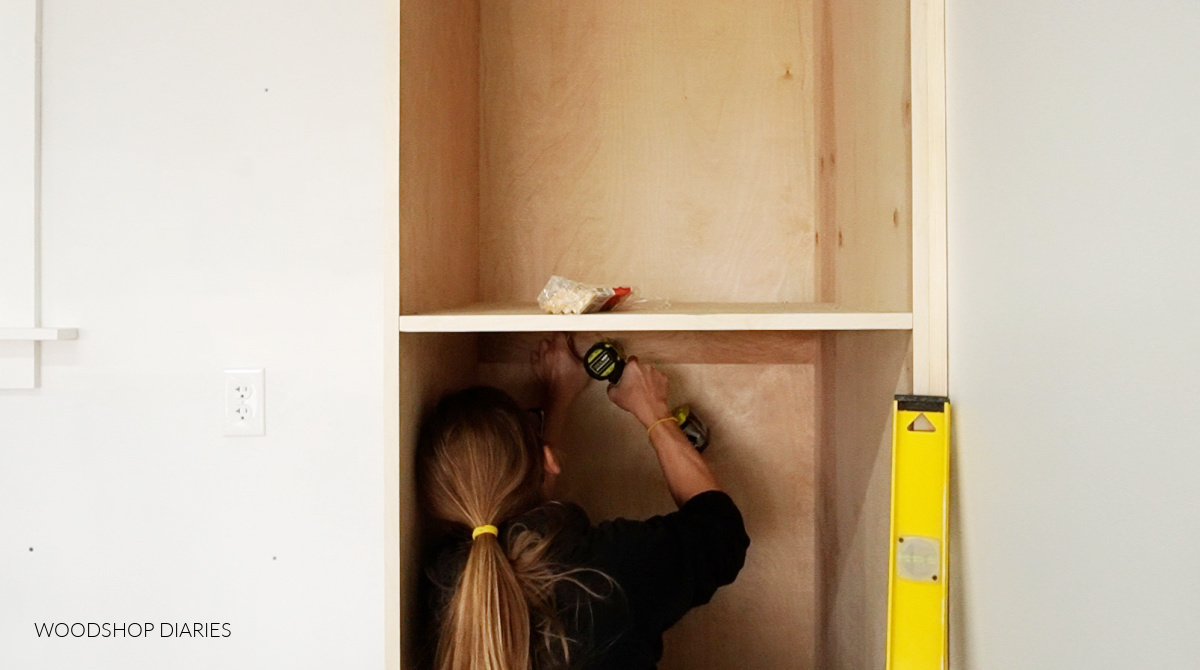
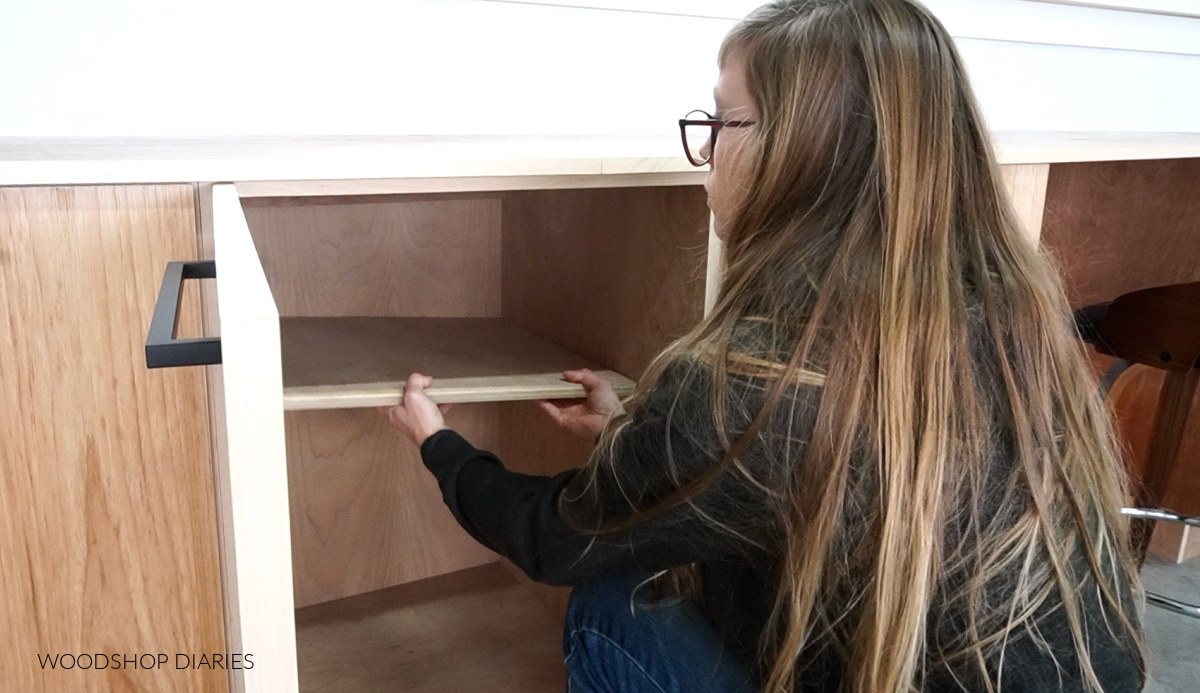
Step 7: Add Shelves (optional)
For the rest of the cabinets, I went back and drilled shelf pin holes to be able to install shelves in them as needed.
.
I used my Kreg Shelf Pin Jig to drill these holes.
Could I have drilled these earlier in the building process before everything was installed? Yes. Should I have? Probably haha.
.
But, as long as they are added at some point, it’s not that big of a deal. I drilled holes along each side of the cabinets where I might want to add shelves later.
You can learn more about installing shelves using shelf pins here.
.
Full disclosure here, I need to sit down and decide how I want to organize these, so I only added a shelf in one cabinet so far. But that’s the beauty of shelf pins—I can install them later wherever I want.
Step 8: Add Doors and Drawer Fronts
I made all the doors and drawer fronts from ¾″ plywood.
.
In step 1, I mentioned that I cut a sheet of birch plywood into 24″ wide strips for the pantry doors. I just had to trim them to the correct length to fit my pantry cabinets.
.
But for the base cabinets, I used some 2ft x 4 ft hickory PureBond plywood panels.
.
I only had to cut the length on these as well since I made the cabinets to fit the width already.

You can learn how to measure for your cabinet doors in this post.
.
Now, typically with drawer fronts, you run the grain horizontally, but in this case, I ran it vertically. So for my drawer fronts, I cut the panel the same height as I cut all the rest of the doors.
.
Then, I just measured and marked out the drawer front heights on this piece and cut along the lines. So that way, when they go in place, the grain matches and it all runs vertically to match the doors.
RELATED: How to measure for drawer fronts
.
I edge banded all these doors and drawer fronts—and full disclosure, I ran out of hickory edge banding and couldn’t find anymore, so I just used birch edge banding—the color wasn’t too far off.
.
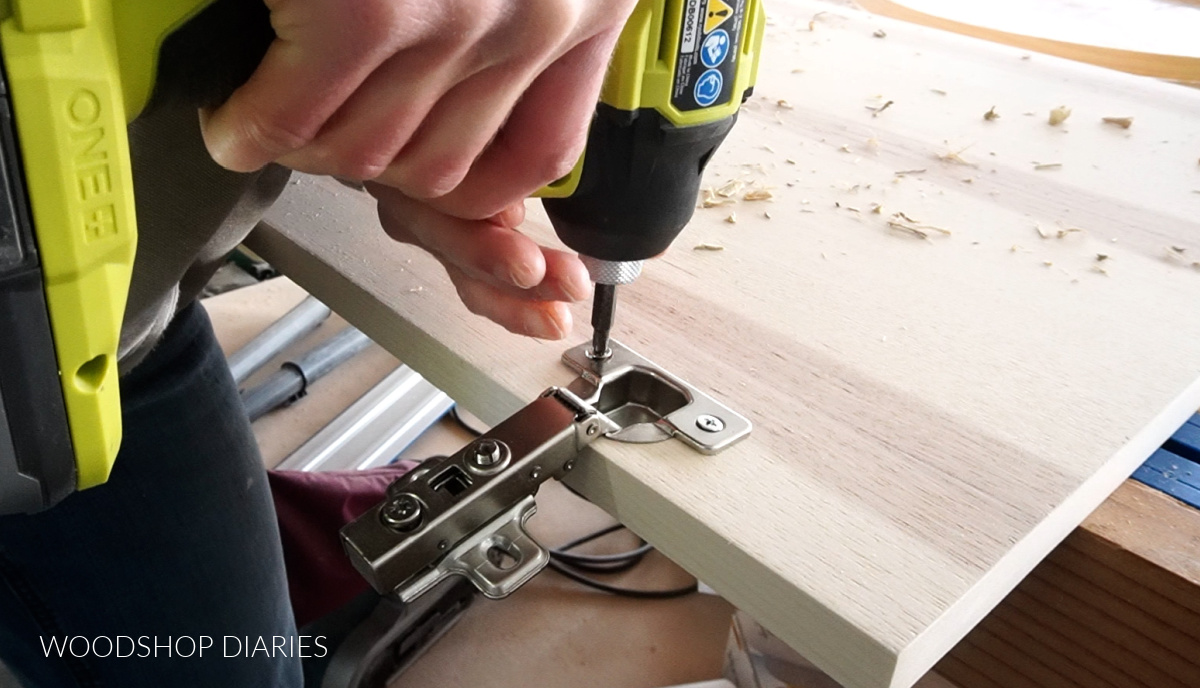
Once everything was edge banded and sanded well, I used a Kreg concealed hinge jig to drill holes for concealed hinges in all the doors.
Since these were full overlay doors, I used full overlay hinges for frameless cabinets to install them into the cabinet.
.
I have a separate video and a step by step tutorial for how to install and adjust these here.
I installed all four hickory doors onto the cabinets, then screwed the drawer fronts on with a couple screws on the inside of the drawer boxes.
You can see how to install drawer fronts here.
.
For the large pantry doors, I used three hinges instead of just two. However, since the shelf was in the center of the cabinet, I made sure to place the middle hinge slightly off center so it wouldn’t interfere.

Step 9: Add Toe Kicks to Cabinets
Now that all the cabinets are in and secure, one of the last pieces is adding the toe kick boards.
.
I cut some 3 ½” wide plywood strips for this, but you could also use 1x4s if you wanted. I just cut these to length and nailed in place along the fronts of the bottom of the cabinets. (If you don’t have a nail gun, you can also use some screws.)
I used one solid piece across the three base cabinets on each side, but since the side cabinets were 1” deeper, I cut a separate piece for them.
Step 10: Paint/Finish Cabinets
Now, you can add this step in whenever you want. I actually painted the pantry cabinets and the pantry doors before installing them (as you can see above). But you could also paint them after…it’s up to you.
.
For the pantry cabinets, I used a brush and a roller to apply a coat of KILZ 3 primer, then two coats of SW Dorian Grey (I used Captivate in Satin). I didn’t use anything fancy here.
.
One thing I love about building cabinets from PureBond hardwood ply is that it’s already smooth, and since it’s just raw wood, it takes paint really well and it sticks good.
.
I know it’s easy to overthink painting cabinets, but if you use a good primer and a decent paint on plywood, you’ll be fine.
Check out my tips for finishing raw wood furniture here.
.
For the base cabinets, I applied two coats of Minwax Helmsman clear coat, then added these modern handles to the doors and drawers.
Step 11: Add Countertop
The last piece of this cabinet build was the countertop.
.
You can use whatever you want for your countertop, but keeping on the plywood theme here, I just cut another sheet of plywood into two 24” wide strips.
.
This span was longer than 8 ft, so I was going to have to piece this together. If I just cut two pieces and had them meet in the middle, they’d meet where I wanted my desk space to go and there wasn’t any support there.
.
So instead, I put one 8 ft piece centered across the middle and added two smaller pieces on each end .
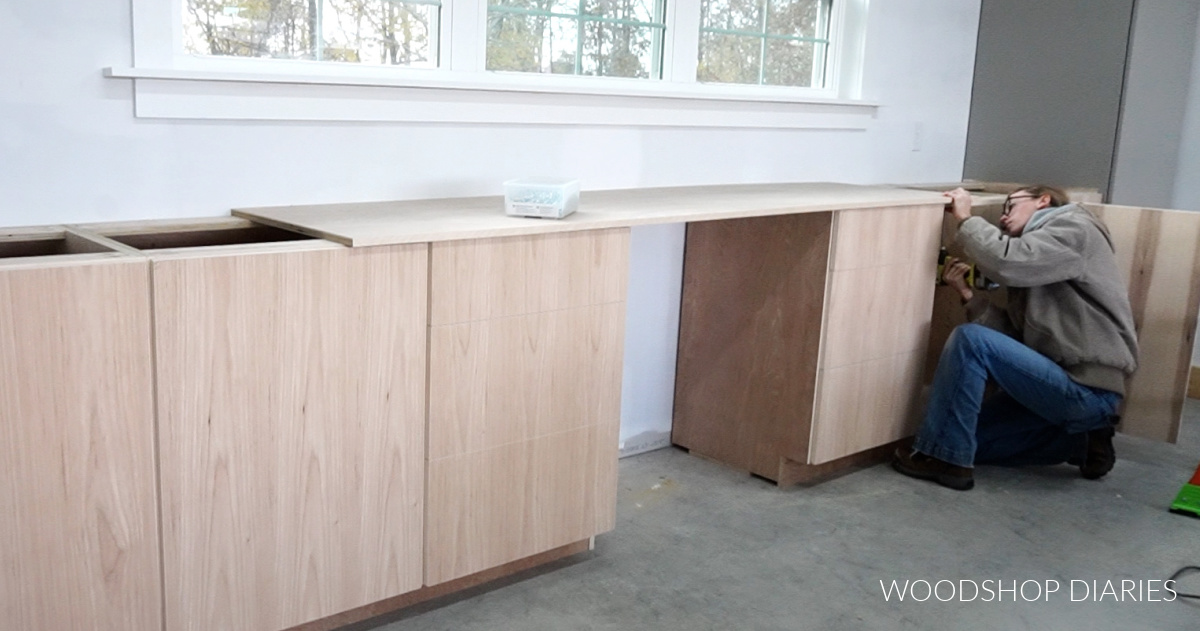
I edge banded and installed the middle 8 ft piece first. I got it fairly centered on the base cabinets, and used some 1 ¼” screws through the top supports in each cabinet to secure it. I put screws in both the front and back supports.
.
Then, I measured, cut, and screwed in two shorter sides to finish up the countertop.
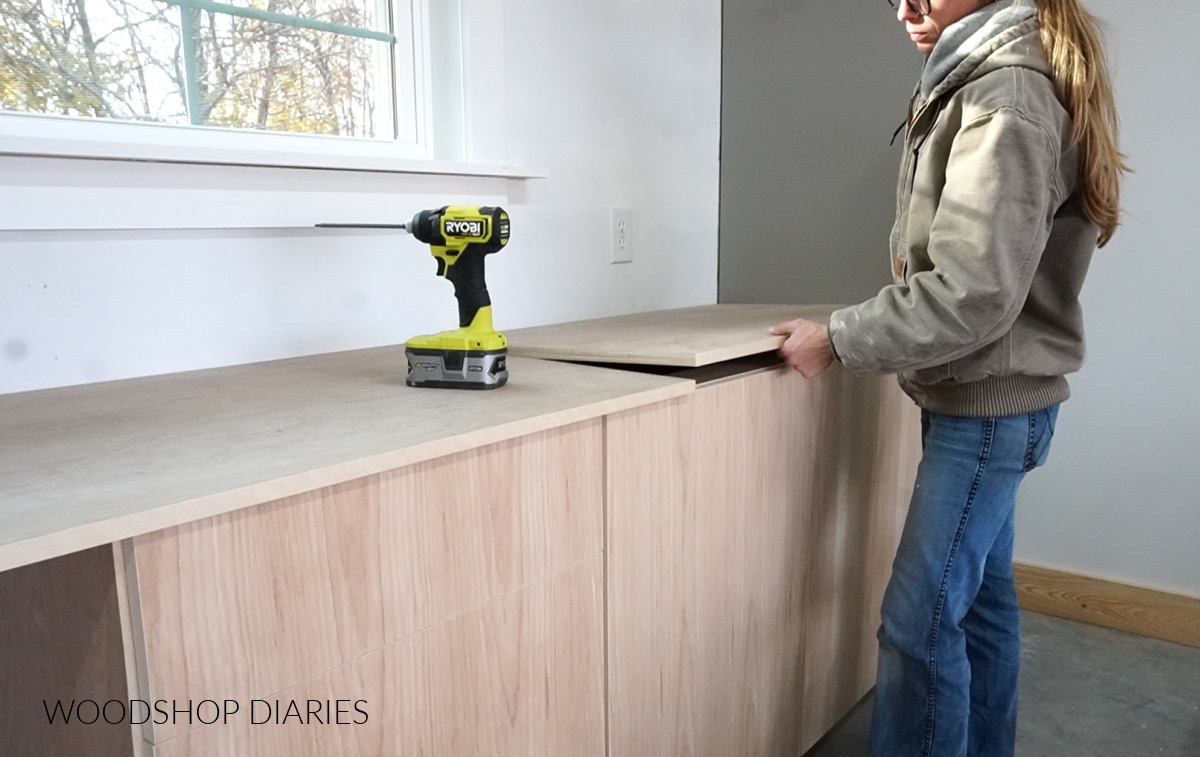
I gave this top a few coats of Minwax Helmsman like I did the base cabinets.
Step 12: Final Details
As a final detail, I went back and cut a couple pieces to put along the bottom of the inside of the cabinets (see below in the desk section).
.
Because I had to shim these up so much from the unlevel floor, the gap was kind of ugly…so I just nailed a piece here to hide it.
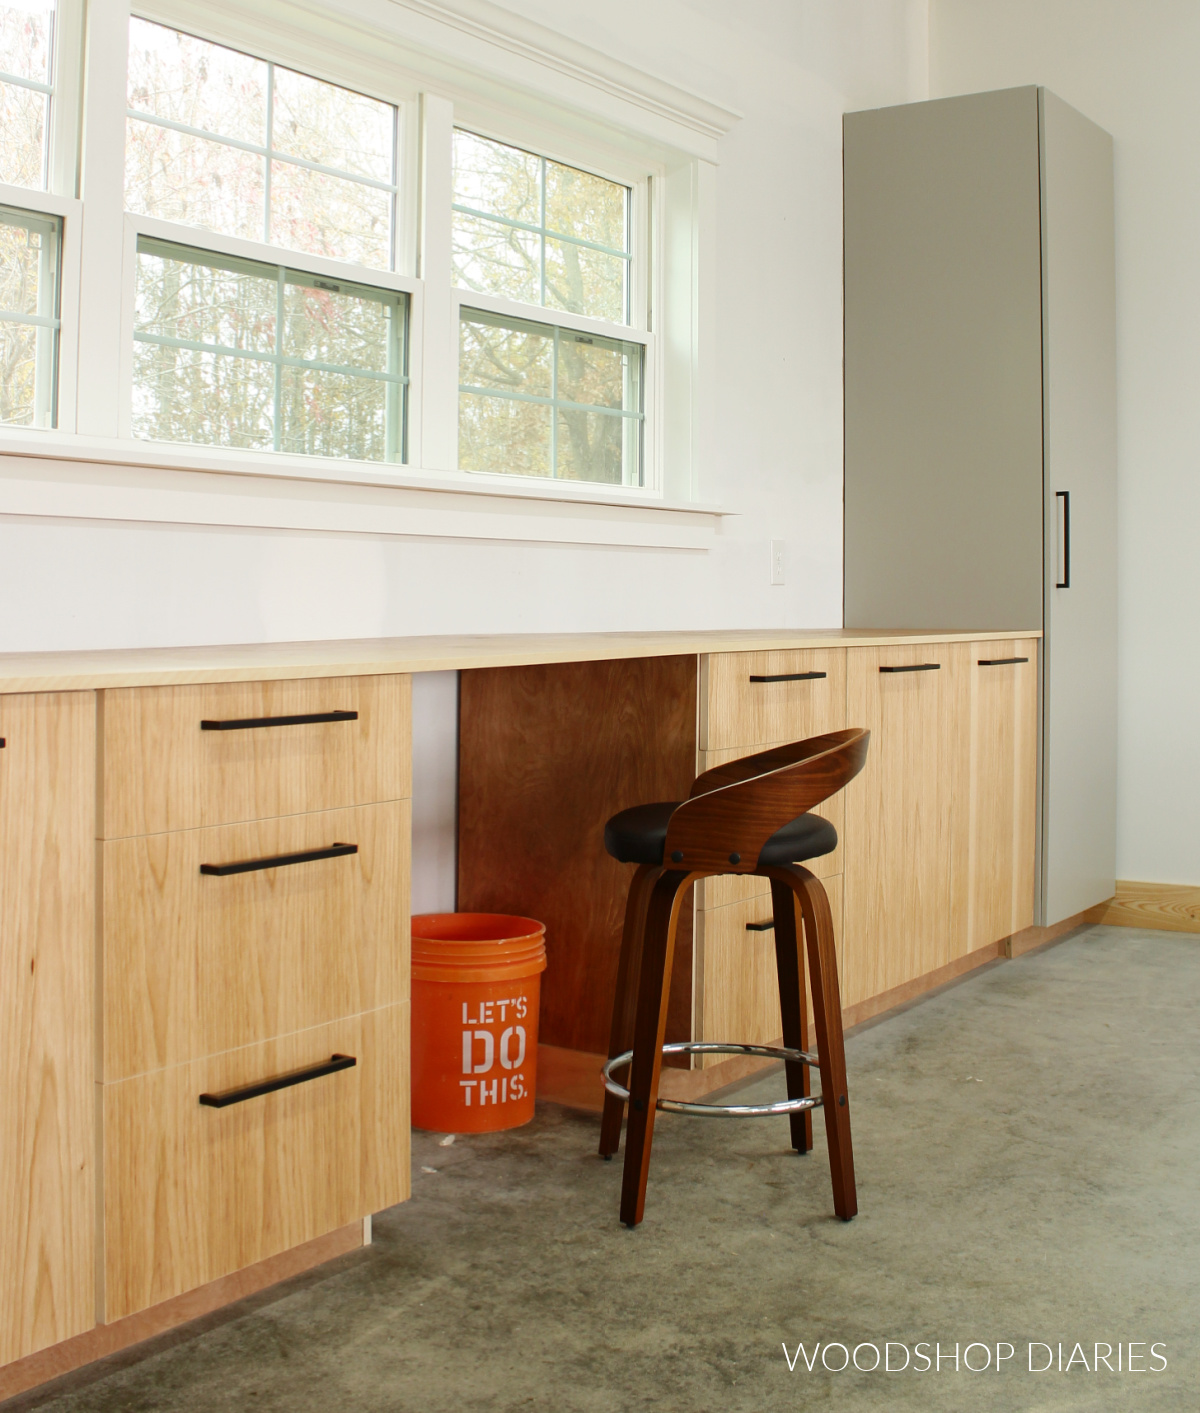
I’m so excited to have some extra storage and function now in my workspace! I’m glad I have some cabinets to keep some of my stuff free from dust and to help keep my workspace less visually cluttered by hiding all the chaos haha.
.
I’ve got some ideas for the rest of this wall, but I’m still contemplating what I want to do with it, so stay tuned to see if I ever make up my mind haha. If you’d like to follow along and keep up with all the latest projects, be sure to subscribe to the newsletter!
I hope you enjoyed this project–I know there was a lot of information to cover. Building cabinets isn’t a difficult task, but there are so many options for sizing, styles, and fits, it can get a little overwhelming sometimes.
.
For more cabinet building info, check out this cabinet building page for resources and tips!
Until next time, friends, happy building!