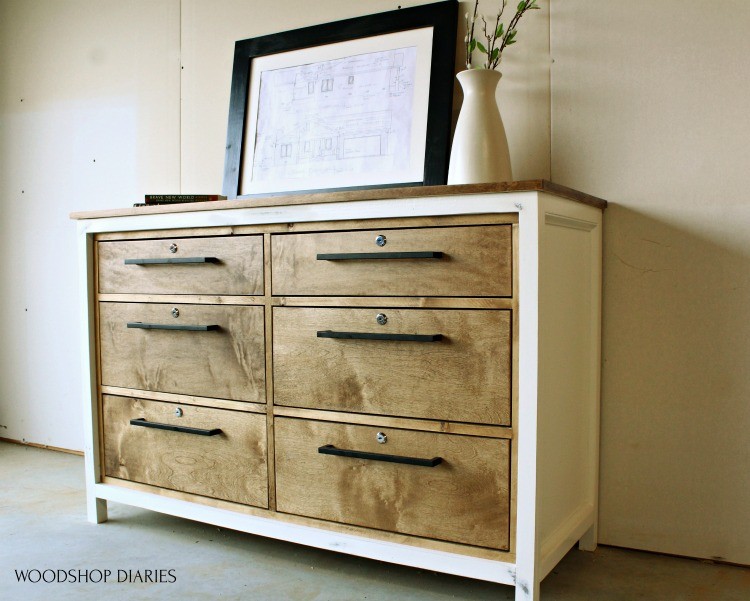
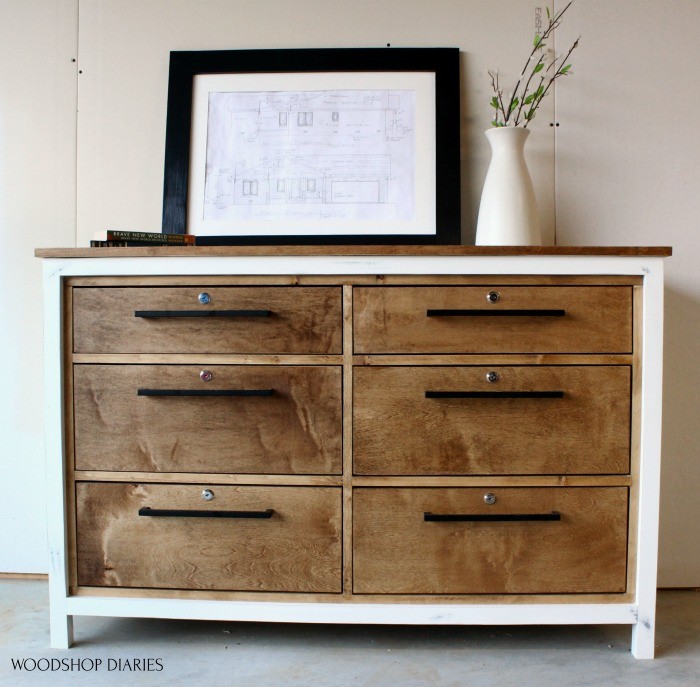
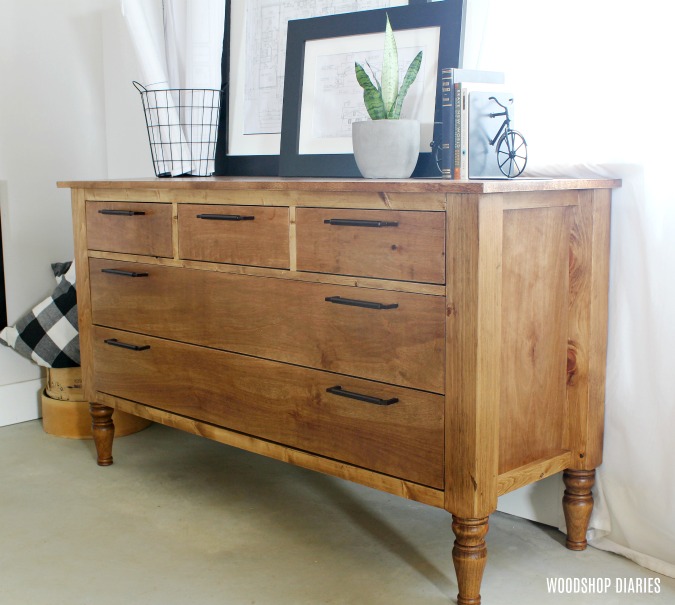
In this post, I’m sharing how to build a simple DIY 6 drawer dresser with building plans!
If you have followed many of my projects, you may already know how much I love building dressers.
The fun thing about building a dresser is that you can customize just about every single part to fit any size, style, design, or number of drawers that you want.
I’ve built over 19 different sizes and styles of dressers over the years! You can check out all my DIY dresser designs here.
But at the end of the day, a dresser is basically just a box full of drawers…which are other just other boxes haha!
So while it may seem a little intimidating, building a dresser is quite simple.
I’m excited to be sharing the plans, dimensions and details on how to build your own 6 drawer dresser in this post. Let’s dive in!
Tools & Materials:
*This post contains affiliate links. See website policies.
Tools:
- Miter Saw
- Circ Saw
- Cutting Guides (I use the Kreg Rip Cut and Kreg AccuCut)
- Kreg pocket hole jig
- Drill/Driver
- Brad Nailer
Materials:
- (1 ½) sheets ¾″ plywood
- (4) 2x2x8 boards
- (1) 1x2x8 board
- (3) 1x3x8 boards
- Cove molding (optional)
- (6) 16″ drawer slides (I buy the ten pack because they’re cheaper per slide)
- (6) drawer pulls (<–you can buy these in bulk for cheaper)
- (6) locks (optional)
- 1 ¼″ pocket hole screws
- 2 ½″ pocket hole screws
- 1 ¼″ wood screws
- 2″ wood screws
- Paint and Stain
- Edge banding (optional)
What to Know Before Building This 6 Drawer Dresser
This dresser is actually just one part of a larger project that I built for our local library’s children’s center. See it there in the middle at the bottom??
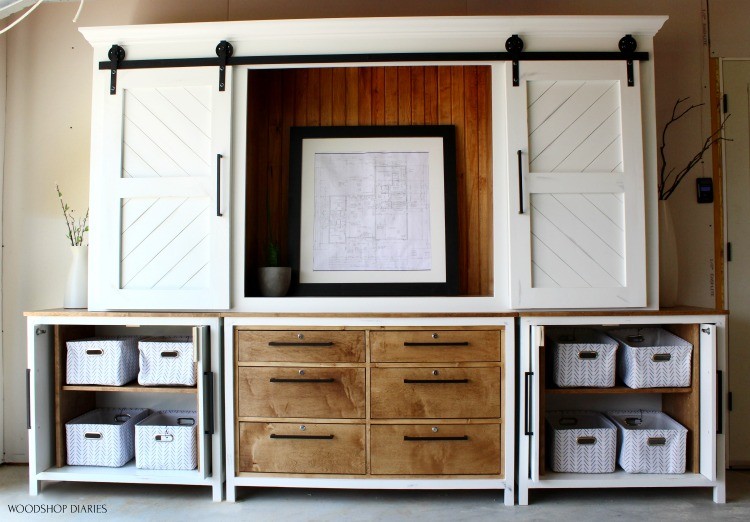
That was a HUGE project, so I built it in sections to make it a little easier to manage.
This dresser was the middle of the “base,” then I added the two pocket door cabinets on the side, and the sliding door cabinet at the top.
So this can be made as a stand alone dresser like I’m sharing in this post, or it can be made into a larger project if desired.
Adding Locks to the Dresser
Because this was going in our local library, they requested that I add locks to the dresser–and all other moving parts of the cabinet.
It’s not typical to add locks to your dresser, so just ignore that in the photos if you don’t mind haha.
However, if you are interested in adding the locks, I do explain how I installed them in the steps below and in the video.
Of course, you can skip over that part if you’re not adding them.
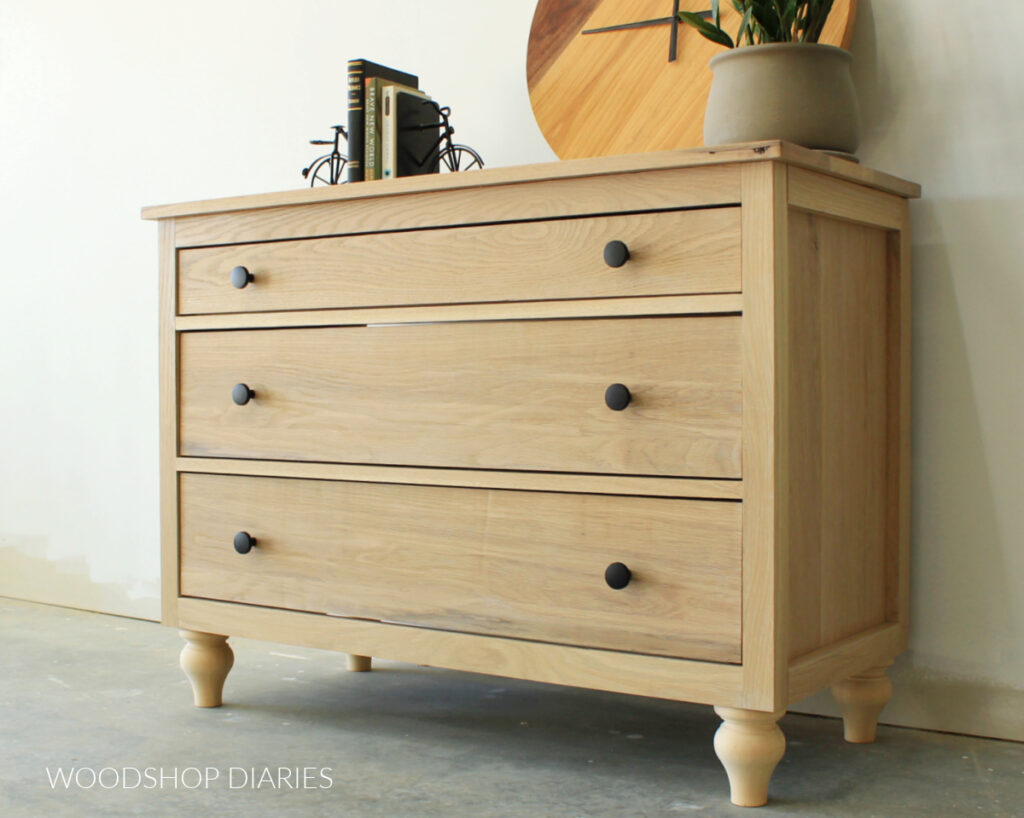
Two Tone Finish
I painted the main frame and side panels of this project white (SW Alabaster) and stained the top and drawer fronts (Minwax Early American).
It’s MUCH easier to paint/stain these pieces separately before building the entire project.
I built the main frame of the dresser first, then painted it. Once it was dry, I stained the trim pieces that I added in step 4 before installing them.
Of course, you’re welcome to paint or stain however you’d like and you may prefer to paint or stain the entire project, and skip the two tone finish altogether.
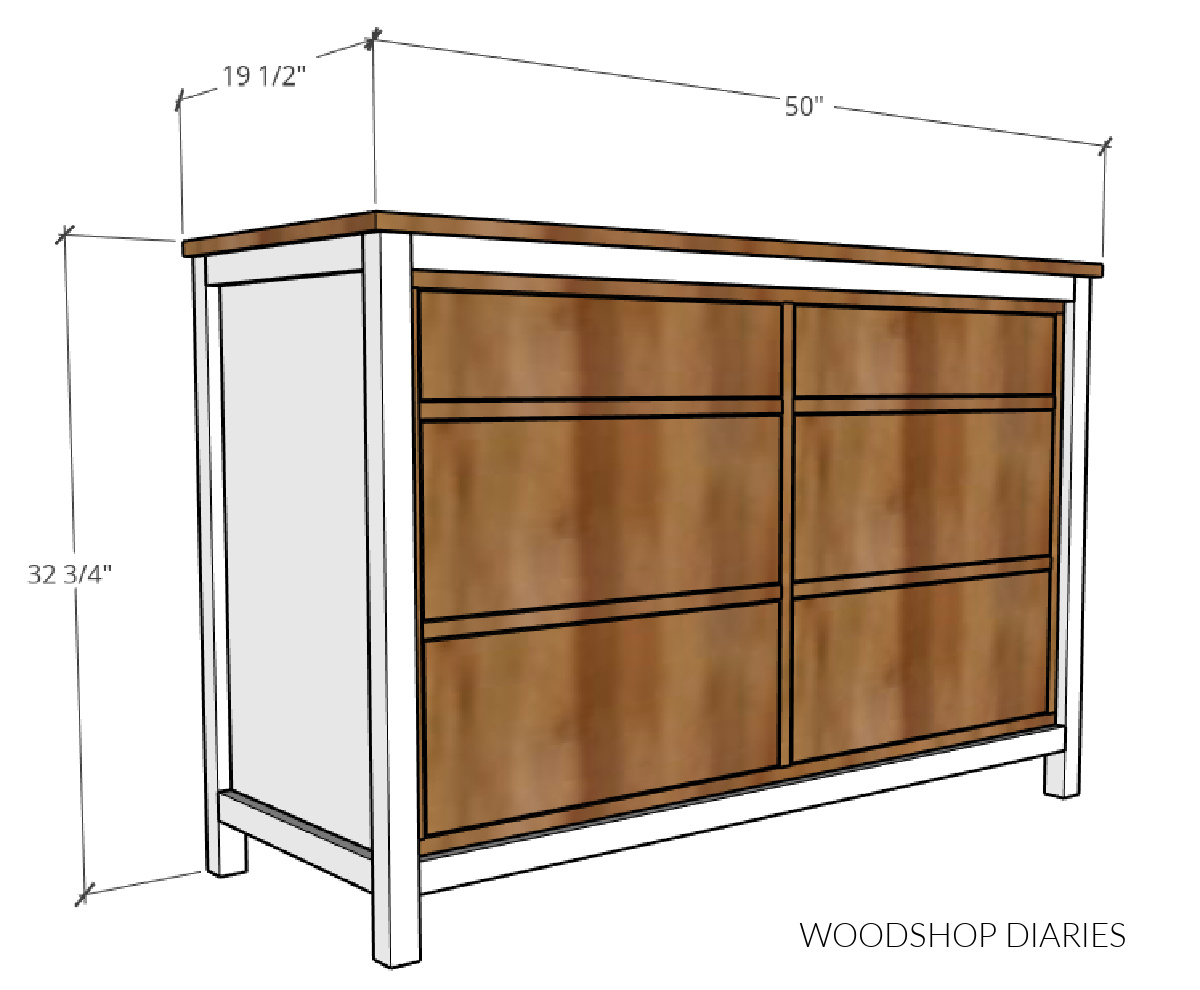
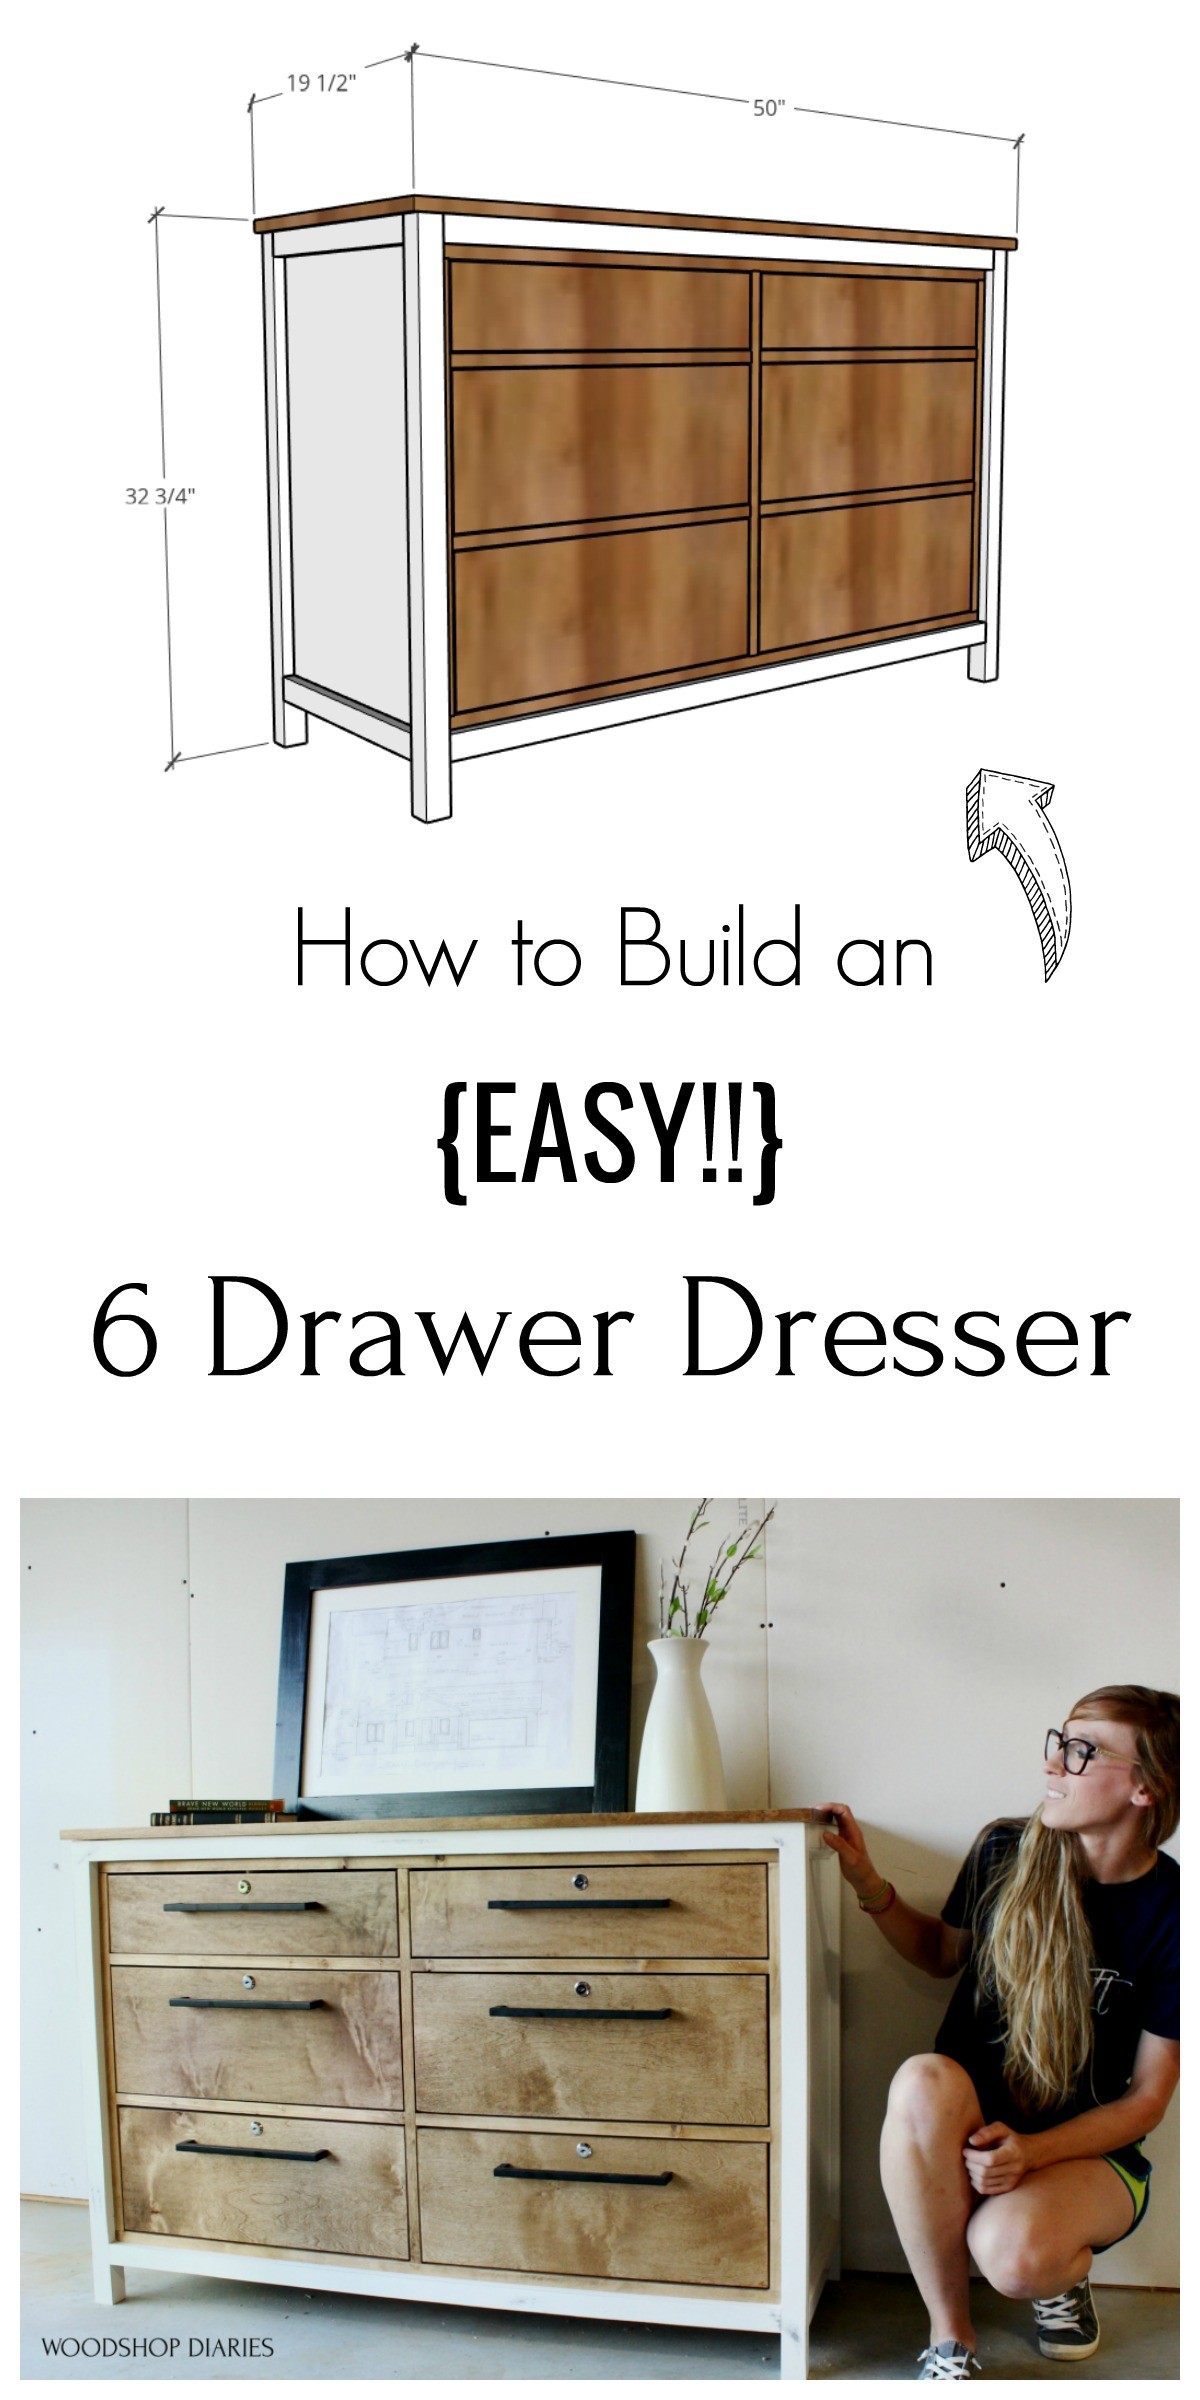
Overall Dimensions
The overall dimensions of this dresser build is 19 ½″ deep x 32 ¾″ tall x 50″ wide.
Helpful Resources to Use with these Dresser Plans:
You may find these guides and articles helpful to reference during the building process:
- How to Cut Plywood Sheets
- How to Use a Pocket Hole Jig
- How to Build and Install Drawers
- How to Apply Iron On Edge Banding
- How to Finish Raw Wood Furniture
How to Build a Basic 6 Drawer Dresser
Let’s dive into the building plans! This project is assembled using basic joinery and basic materials.
However, due to the size and number of parts, I’d consider this is an intermediate level project.
If you prefer to watch, I’ve provided a video of the build process here.
*(Please don’t judge too harshly…this is one of my older videos and they have much improved since then…I promise haha).
If you prefer to print your plans, you can grab the printable dresser building plans here:
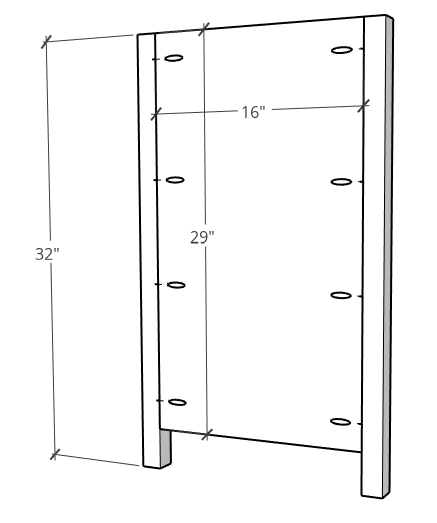
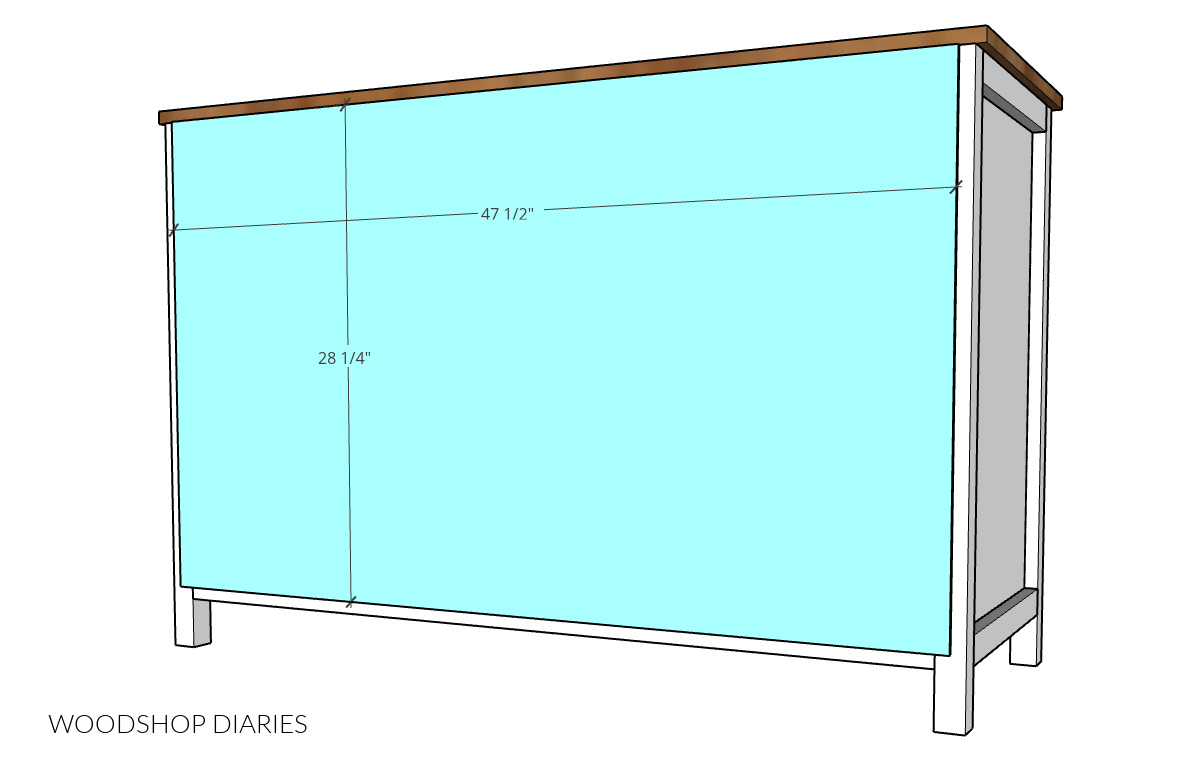
Step 1: Build 6 Drawer Dresser Side Panels
Like most of my dressers, I started off by building the two side panels.
I built this dresser frame from 2x2s and used plywood for the inside panels.
RELATED: How to cut your own 2x2s (so they’re straight!)
ALSO RELATED: How to cut plywood sheets
Once I had my dresser legs (2x2s) and side panels (¾″ plywood) cut to length, I simply attached two side panels like shown using wood glue and pocket holes and screws.
RELATED: How to use a pocket hole jig
Since these will be covered by the drawers, I made this quick by using ¾″ pocket holes and 1 ¼″ pocket hole screws.
But you could also use wood glue and dowels. Either way works fine.
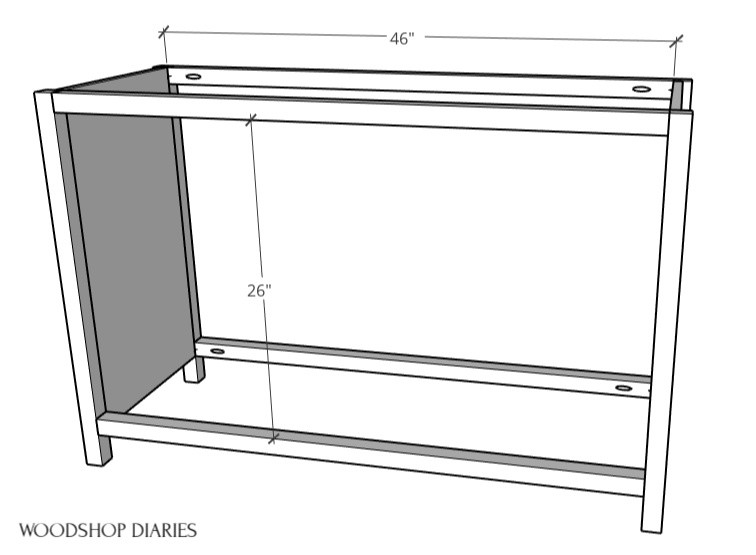
Step 2: Assemble Dresser Frame
Once the side panels were together, I assembled the rest of the dresser frame using 2x2s at the front and back.
I used wood glue and 1 ½″ pocket holes with 2 ½″ pocket hole screws…but again, you could use another joinery method here as well if you wanted.
NOTE: When using pocket holes in 2x2s and 1x2s, I usually only drill one hole on each end. Drilling two holes can be crowded and tends to split more easily when driving the screw.
However, if you only use one screw at a joint, make sure not to skip the wood glue!
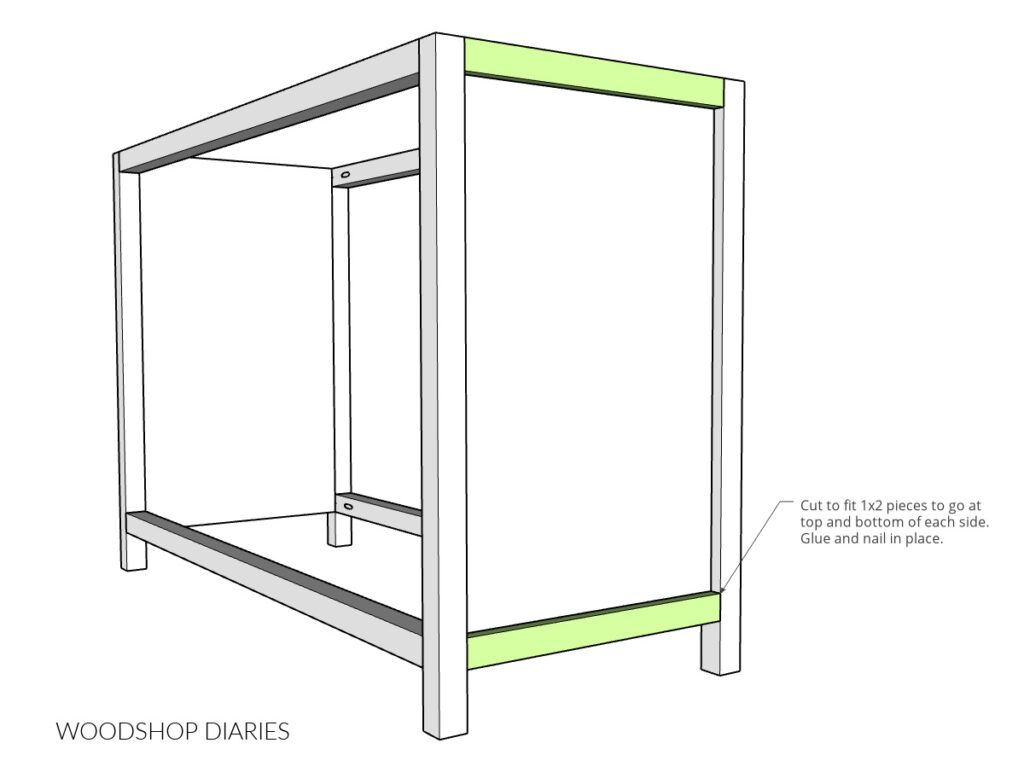
Step 3: Add Trim Detail to Dresser Sides
After the frame was assembled, I added a little decorative detail to the sides.
I simply cut to fit 1x2s to go at the top and bottom of each side panel. Then, I glued and brad nailed these in place.
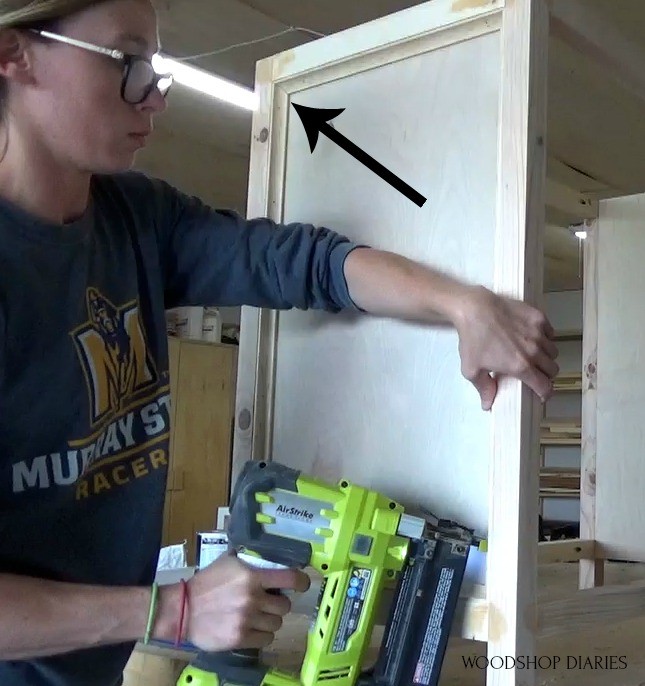
As an extra optional detail, I cut cove molding to fit so that it would line the insides of both side panels. This adds some extra dimension, but isn’t necessary.
I used wood glue and brad nails to secure each piece.
At this point, everything so far was going to be painted white and everything else following this will be stained.
So I went ahead and painted this frame before moving on to the next step.
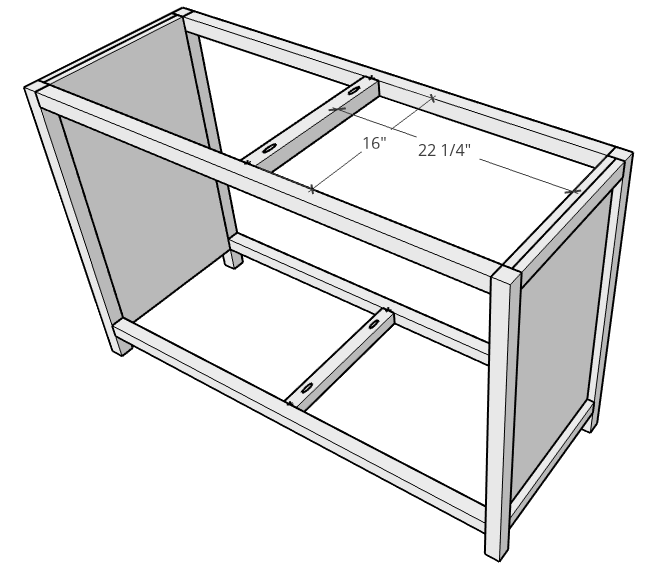
Step 4: Install Middle Divider and Front Trim
Once the paint was dry, I moved on to all the inside details. The first thing I did was install two more 2x2s into the middle at the top and at the bottom.
These will allow me to add the middle divider panel. I used 1 ½″ pocket holes and 2 ½″ pocket hole screws to install.
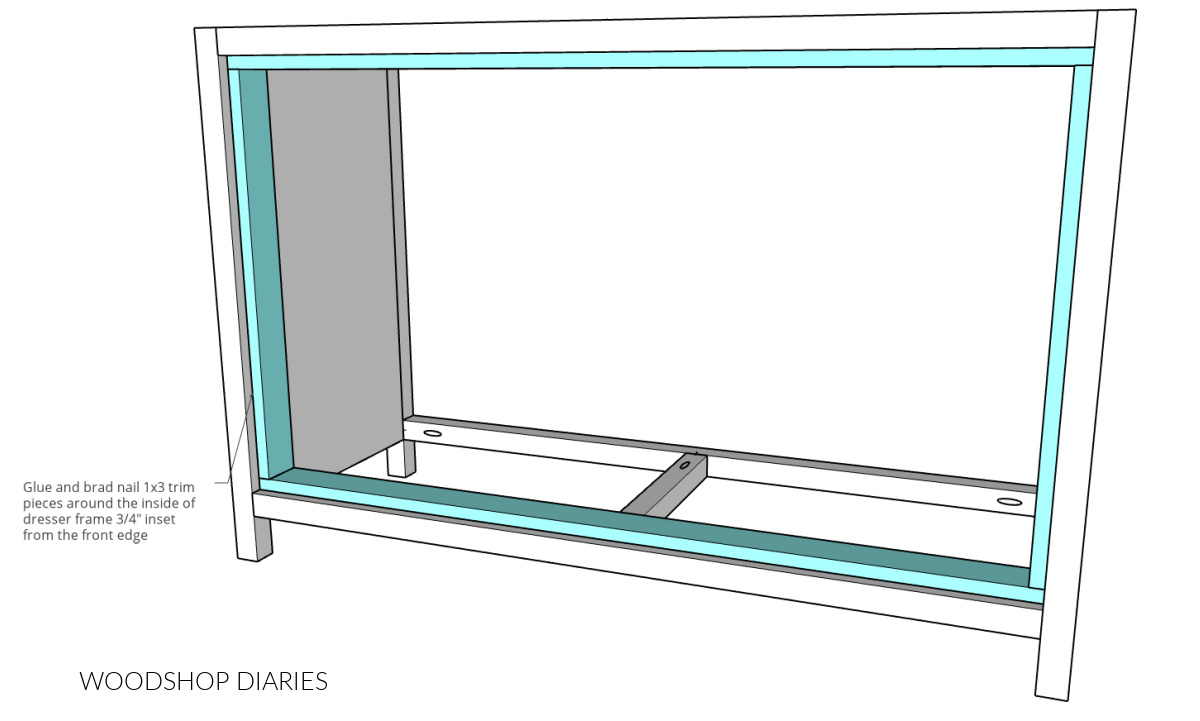
To add some extra dimension to the design, I installed some 1x trim inside the 2×2 frame so it was ¾″ inset. You can see this up close in the image below.
The main 2×2 frame is painted white and there are stained 1x pieces directly on the inside of it. These “framed out” the drawers.
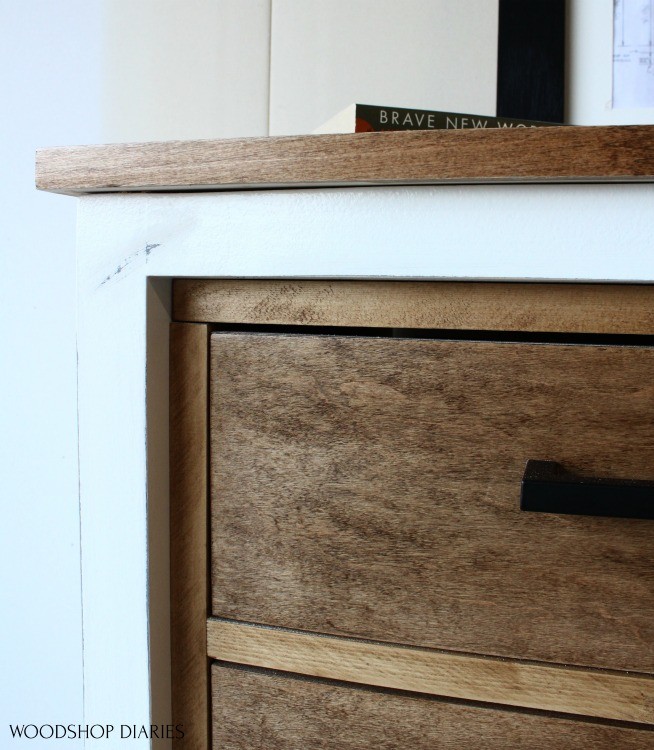
I used some 1x3s for this and cut to fit them to “line” the inside of the main 2×2 frame.
Once I made sure the pieces fit well, I stained them (Minwax Early American Stain for this) before installing.
I simply glued and nailed the 1×3 front trim pieces in place ¾″ INSET from the front edge of the dresser frame.
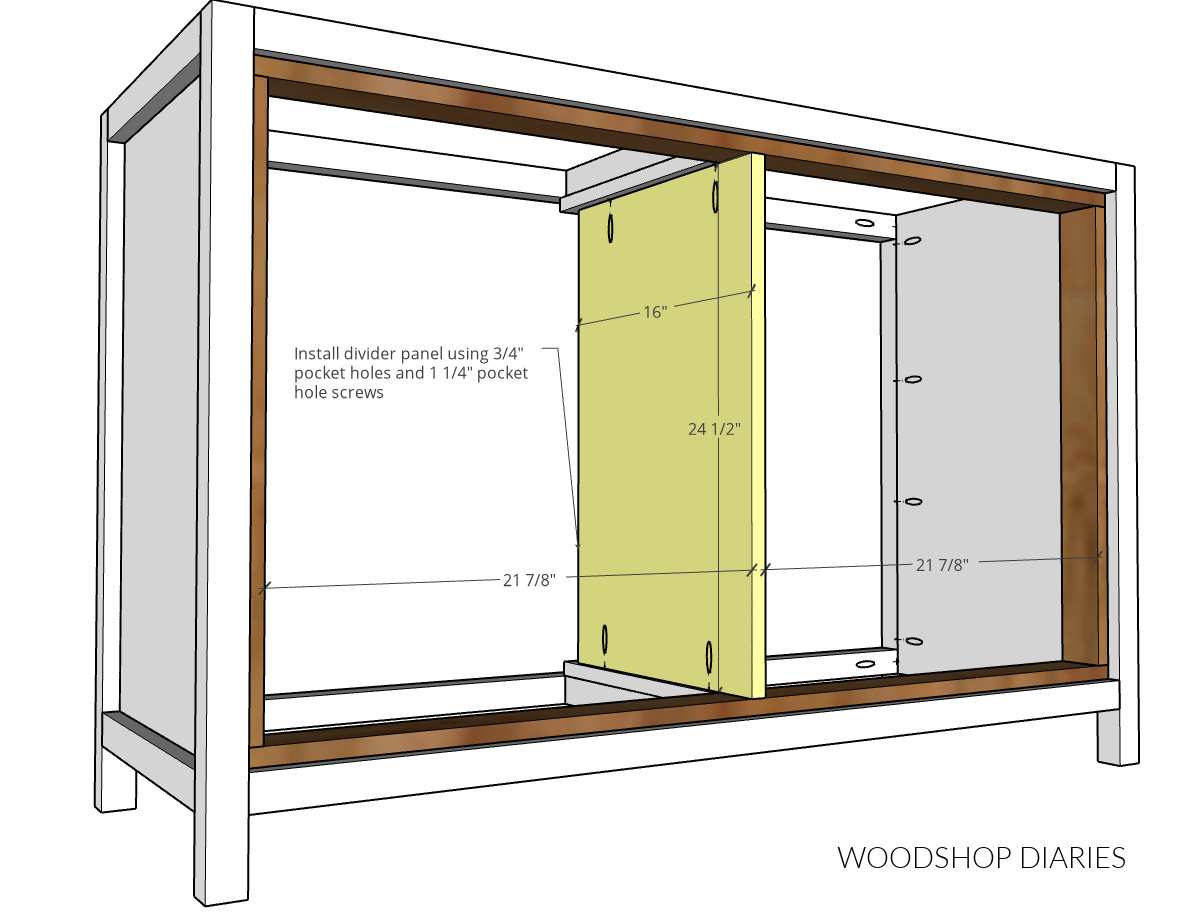
Because of the spacing, I needed to add some scrap 1x material to the 2x2s in the middle before I could install the center divider.
So I added some scrap ¾″ plywood in place with wood glue and brad nails.
Then, I could add the middle divider between them. This divider panel was cut from ¾″ plywood and the front edge will be exposed.
So, to hide the plys, I edge banded the front edge. This is optional, but always makes it look a little cleaner.
RELATED: How to apply iron on edge banding
I installed this divider panel in the center using ¾″ pocket holes and 1 ¼″ pocket hole screws like shown.
Step 5: Install Dresser Drawer Spacers and Dividers
Now, it was time for the drawer slides. I needed to install 6 pair of 16” soft close drawer slides into the dresser.
To do this on the sides, though, I had to add some more scrap wood spacer blocks where the slides needed to mount.
I cut six ¾” plywood pieces approximately 2 ½″ x 15″ for these spacer blocks–exact size isn’t critical as long as it’s big enough to mount a drawer slide onto.
Then, I used wood glue and 1 ¼″ wood screws to install three on each side like shown.
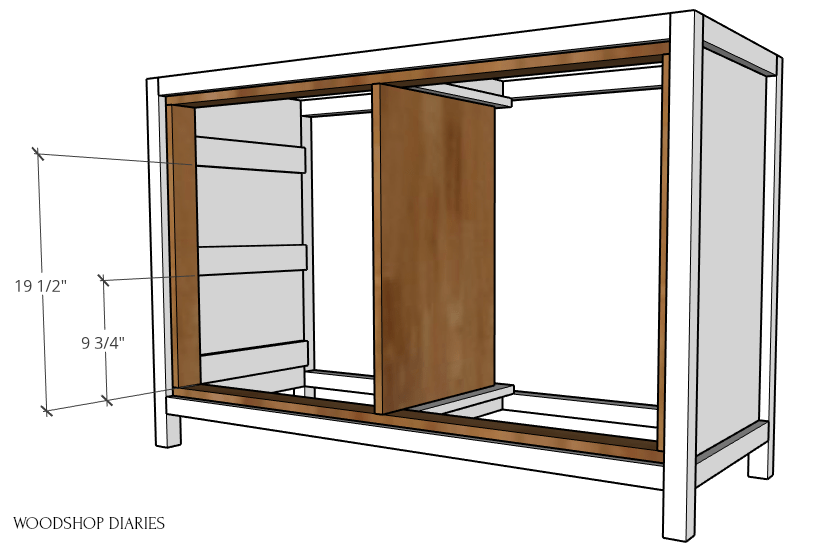
But in the middle, I could mount these slides directly onto the panel, so no spacer blocks were needed there.
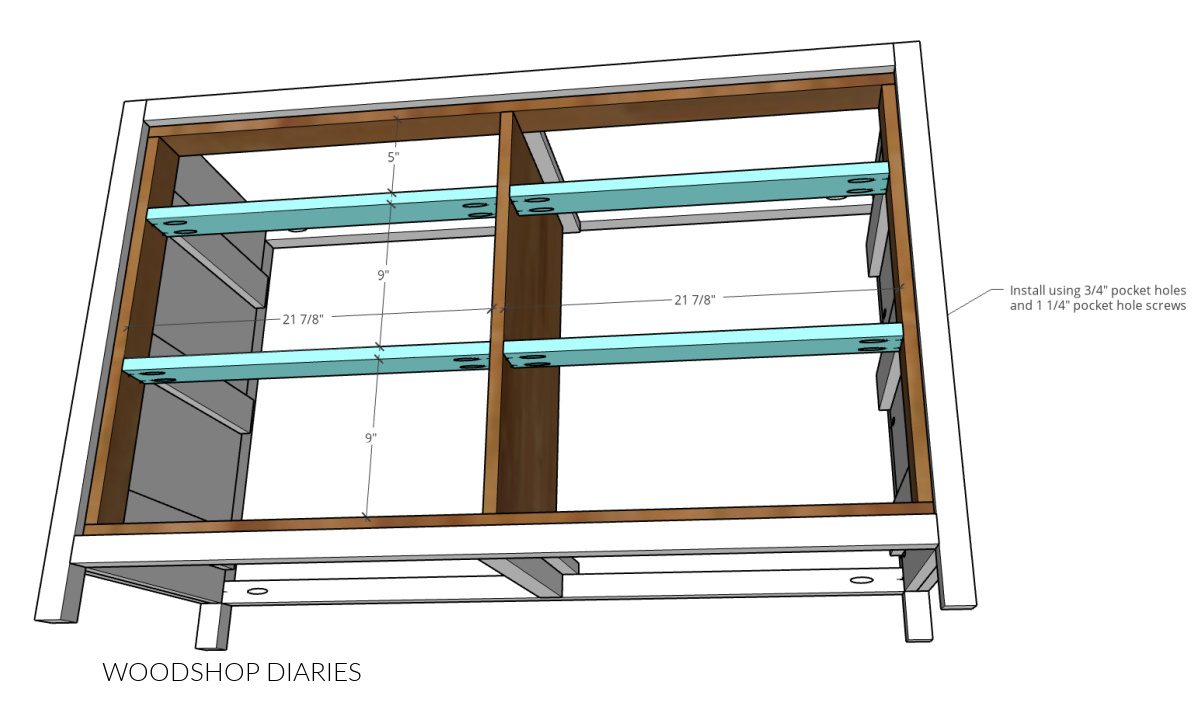
Before adding the slides, I also added some 1×3 pieces as drawer dividers like shown below. I installed them in place using ¾″ pocket holes and 1 ¼″ pocket hole screws.
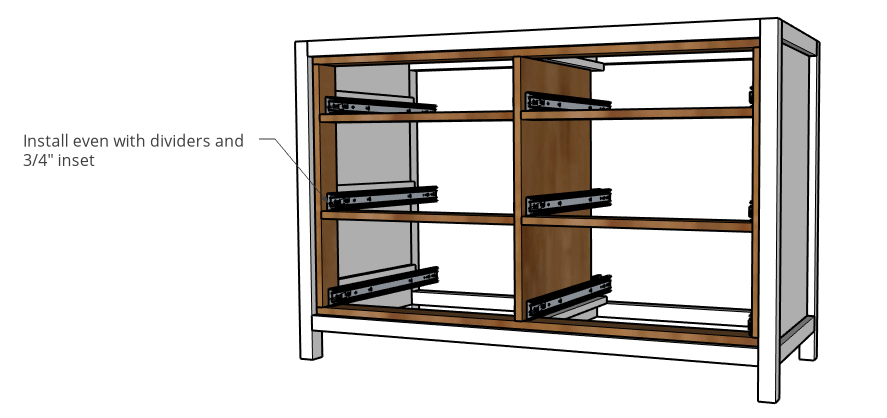
Step 6: Install Drawer Slides
Then I could finally install the drawer slides. I installed each slide ¾″ inset from the front edge of the 1x3s and so that the bottom of each slide was even with the bottom of the trim and divider boards.
For more information on how to install drawers and drawer slides, check out this drawer building guide.
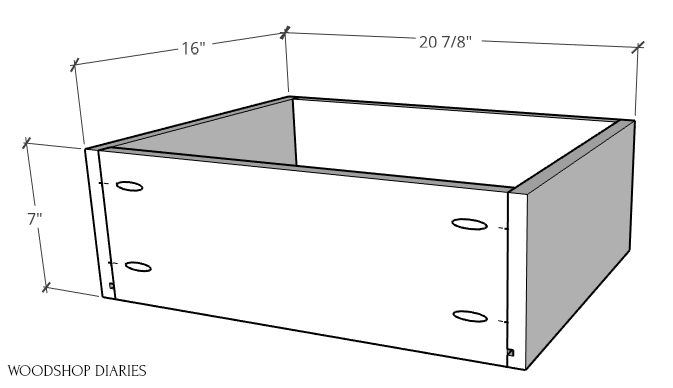
Step 7: Build Drawer Boxes
Now it was finally time to build and install the drawers. Be sure to check out the post here on how I like to build drawer boxes.
I like to make my drawers from plywood–the sides are ¾″ plywood and the bottoms are ¼″ plywood.
So I cut down all my ¾″ plywood drawer box pieces, then cut a dado in them for the ¼″ plywood bottom.
I used pocket holes and screws to assemble like shown. I also edge banded the top edge of the plywood for a cleaner look…but that’s an optional step.
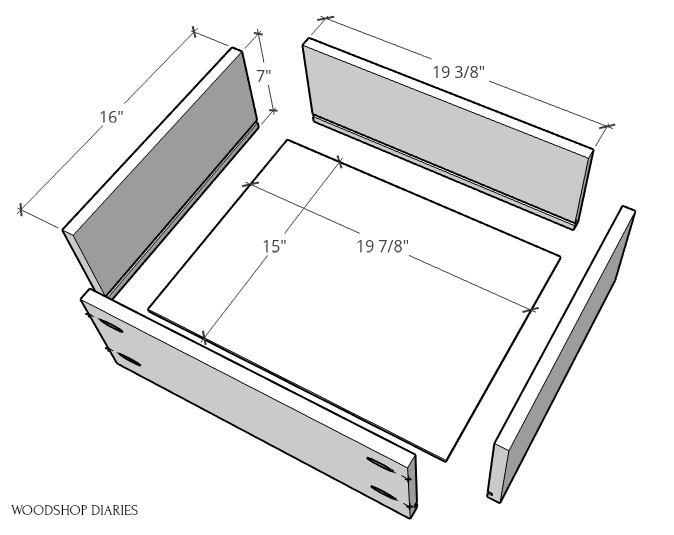
I made four drawer boxes 7″ tall like shown above in an exploded view. And I made two more identical EXCEPT only 4″ tall.
By the way, for this particular dresser, I made my drawer boxes shorter (in height) than I suggest in my drawer building guide.
The only reason for this in this particular case was so that there was more room to place the lock in the drawer front later.
If you aren’t installing locks on your dresser, feel free to make these drawer boxes a little taller, if you’d like.
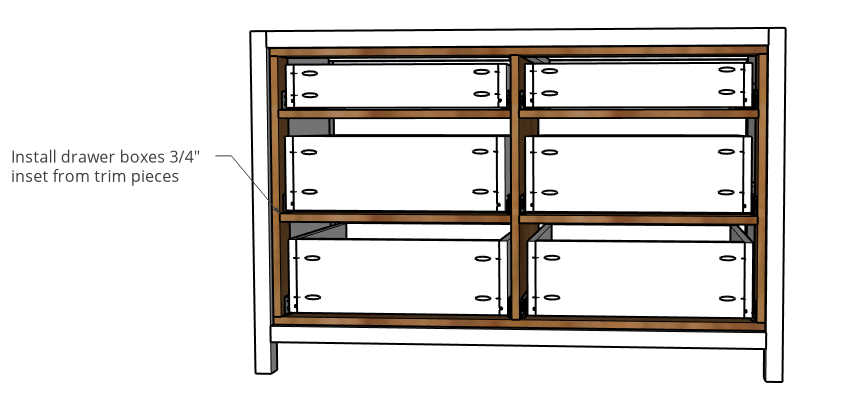
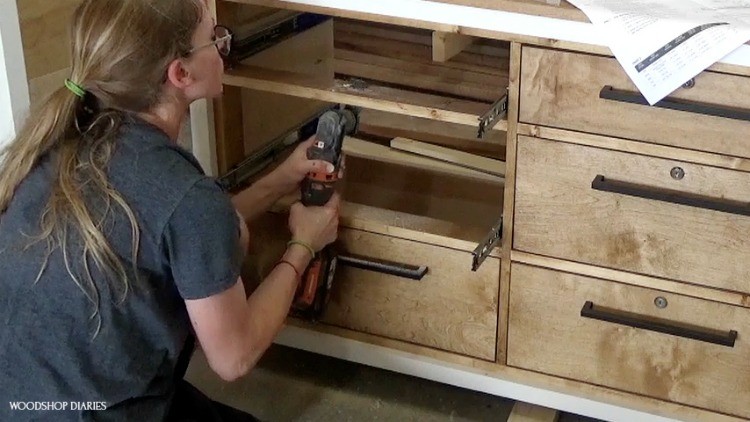
Step 8: Install Drawer Boxes
Once all the drawer boxes were assembled, I installed them into the dresser and onto the slides.
Step 9: Install Drawer Fronts
Once the drawers were in place, next was adding the fronts. I cut these from ¾″ plywood as well and covered all the edges with edge banding.
Once I made sure they fit, I stained them, then installed them using 1 ¼” wood screws from the inside of the drawer box.
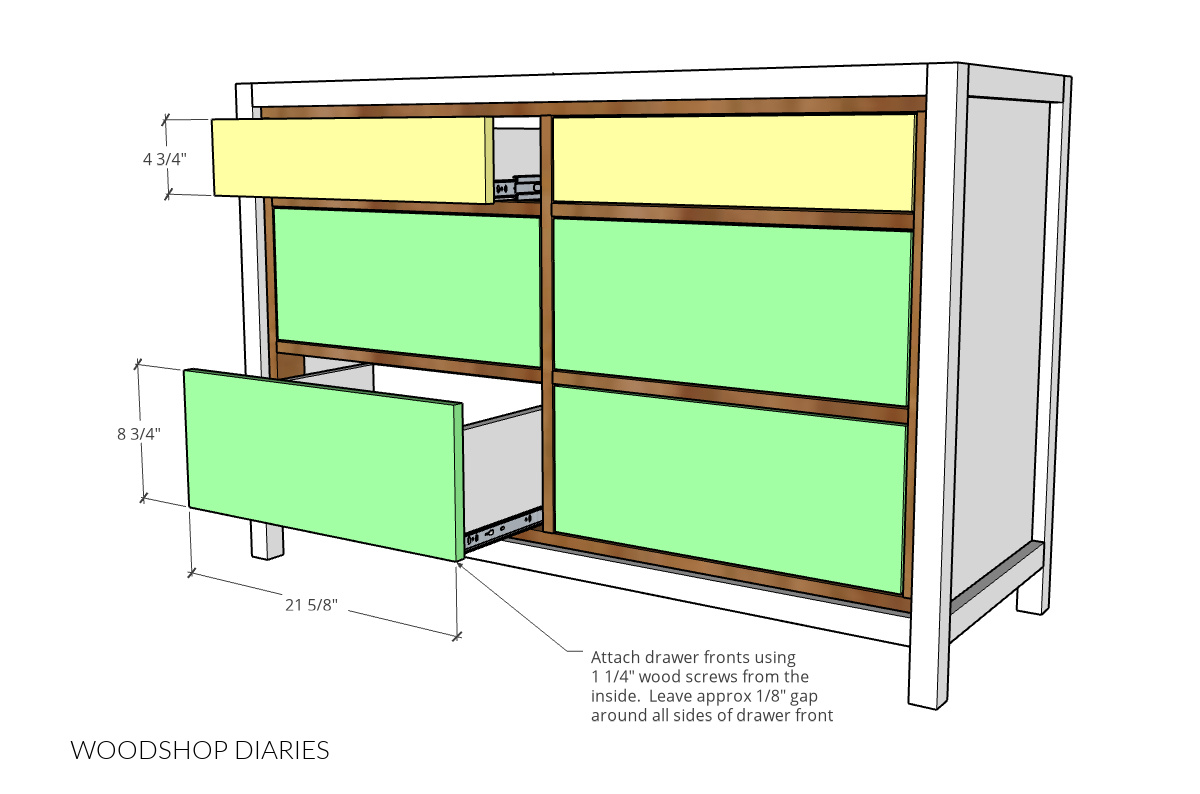
Note that there should be approximately ⅛″ gap around all sides of each drawer front once installed.
Step 10: Install Dresser Top
Next was adding the dresser top. I cut this from ¾” plywood and edge banded the sides. Again, edge banding is optional, but it helps hide the exposed plys on the edges.
I figured it would be easier to stain before I installed it, so I went ahead and stained it.
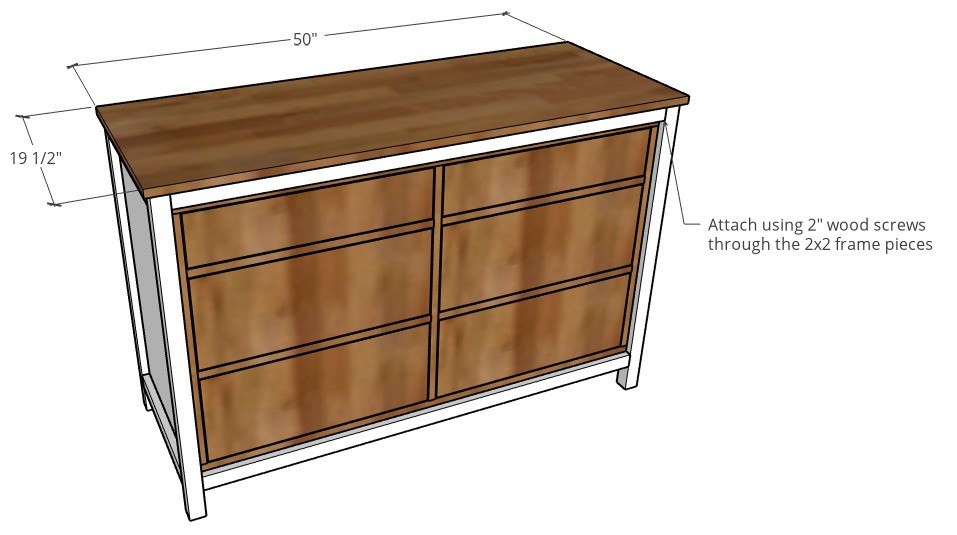
I centered it left and right on the base and made sure the back edge was flush to the back of the frame.
Then, I screwed it in place through the 2×2 frame pieces using 2” wood screws at the front and back.
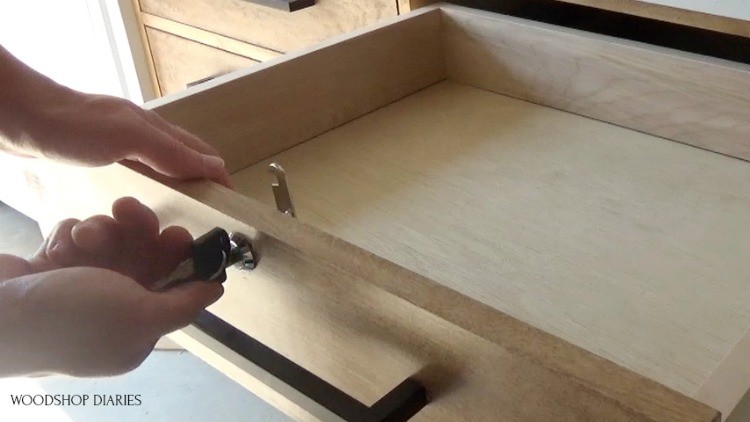
Step 11: Add Hardware and Locks (Optional)
I gave the dresser some simple, modern pulls to keep with the clean lines and finally, it was time to add the locks.
I’ve never installed locks into my furniture before, so it was a little trial and error and I wish I had thought to cut the slots BEFORE installing these pieces, but I guess now I know for next time.
I used a spade bit to drill a hole in the drawer front to insert the lock. These locks have a tab on the back that rotates 90 degrees.
So once the lock was on the drawer, I closed the drawer, turned the key, and used a pencil to mark where the tab hit the 1×3 above it.
Then I removed the drawer (the slides have tabs on the sides to allow you to remove the drawer easily) and used an oscillating saw with a flush cut blade to cut a slot at that mark.
I kept putting the drawer in and testing and seeing if or where I needed to take out more material.
Once I had the slots cut, the drawers would be able to close and when the tab was turned up (in lock position), it would go into these slots so they would stay locked until the key was used to turn the tab back sideways.
To finish up, I gave it a little distressing and it got a few coats of poly (I used Minwax Polycrylic Water Based Semi Gloss).
Then, it was finished and ready to use.
Step 12: Add Back Panel (OPTIONAL)
Now, personally, I have my own thoughts about adding back panels on dressers. I don’t normally add them to my own projects.
However, if you like to have a back panel on your dresser, you can certainly add one here.
Simply cut a piece of ¼″ plywood to fit over the back side opening and use wood glue and brad nails, staples, or screws to secure.
If you wanted to get “fancy” you could also use a router to rabbet a groove around the edge to inset the panel so it’s flush across the back. Either way would work fine.
All that’s left now is finishing off any touch ups, adding some poly, a little scuffing if you want a distressed look.
If you’d like to build your own, don’t forget to grab the printable building plans here.
Looking for More DIY Dresser Ideas?
If you want to check out more dresser designs and building plans, here are a few favorites below, but you can also check out my DIY Dressers Page here.
If you’d like to be the first to know about the latest projects and plans, be sure to sign up for the newsletter below!
If you’re enjoyed this build, and want to save it for later, don’t forget to pin it or share it on you favorite social media platform!
Until next time, friends, happy building!