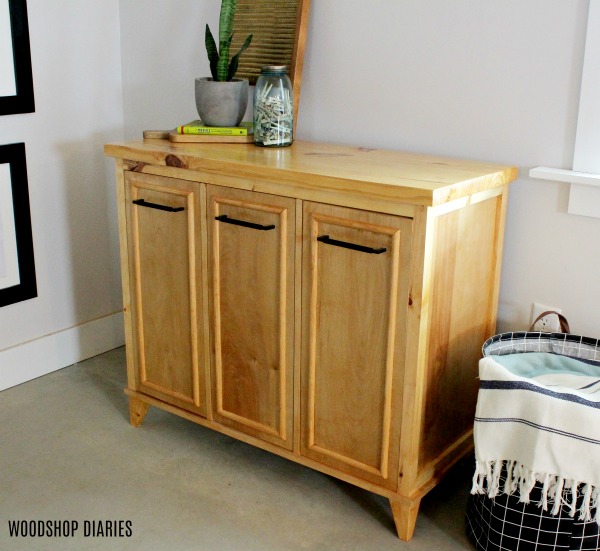
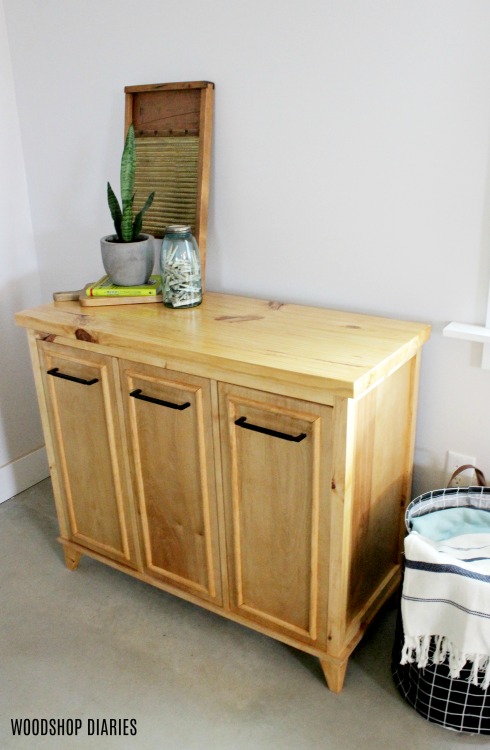
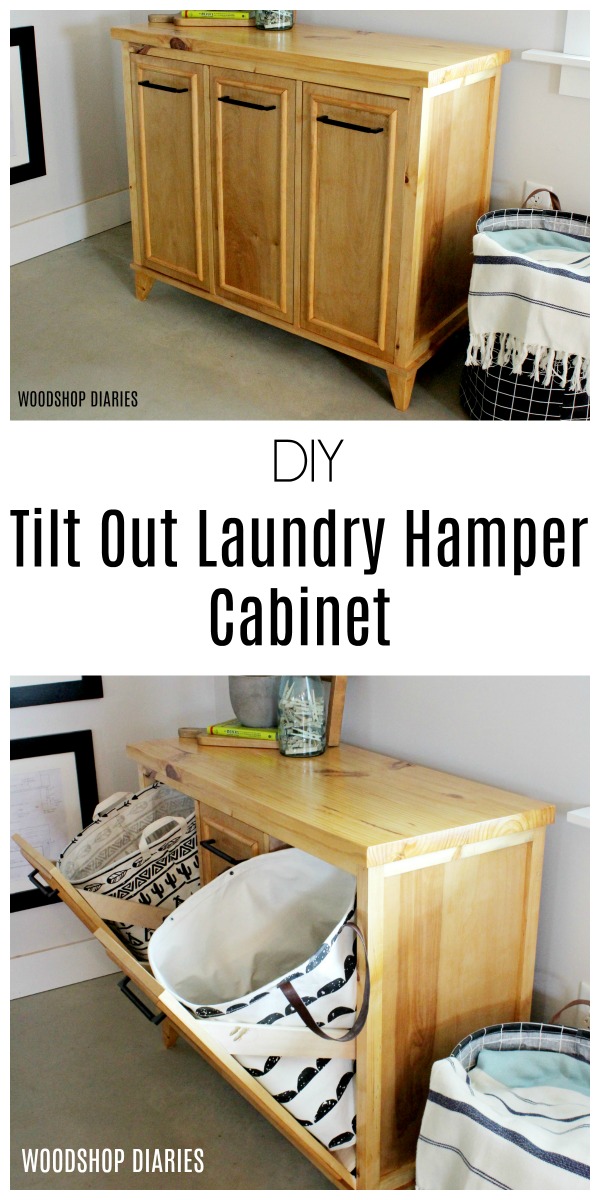
In this post, I’ll show you how to build your own DIY Tilt Out Laundry Hamper Cabinet! It’s got two tilt out sections and a middle storage cabinet!
*This post was sponsored by Kreg Tool and contains affiliate links. See policies.
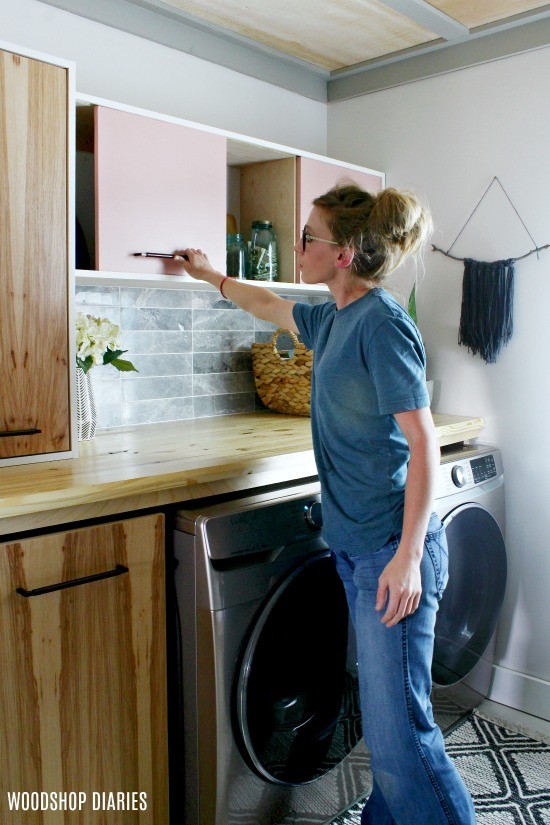
A while back my mom wanted me to help her figure out a way to add some storage to her tiny laundry room. Because it’s a really small space (like 7′ x 7′), I had to get a little creative.
.
She needed somewhere to actually put her dirty clothes hamper, some extra laundry room storage, and somewhere to fold the clothes when they got finished in the dryer.
.
So I built her this DIY tilt out laundry hamper storage cabinet and I’m sharing the plans with you! Watch the video here to see how it was built, and check out the plans following.
I’ve got all the details below and you can grab the printable plans here on KregTool.com.
.
For this Laundry Hamper Cabinet, you will need:
Tools:
- Kreg Rip Cut & Kreg AccuCut (Check out this post to see how to use them!)
- Kreg Pocket Hole Jig (Check out this post to see which jig is best for your shop!)
- Kreg Concealed Hinge Jig (Check out this post for how to use the hinge jig!)
- Kreg Shelf Pin Jig
- Circular Saw
- Miter Saw
- Drill
- Jig Saw
- Bandsaw (optional)
Materials:
- 4×4 post (You just need about 24″)
- 1 ½ sheets ¾″ plywood
- ¼ sheet ¼″ plywood
- (1) 2x10x8 board
- (3) 2x2x8 boards
- (1) 1x3x8 board
- Half Round Molding (optional…four 8′ sticks)
- 2 ½″ pocket hole screws
- 1 ¼″ pocket hole screws
- Wood Screws (various lengths)
- Wood Glue
- 3 pair concealed hinges
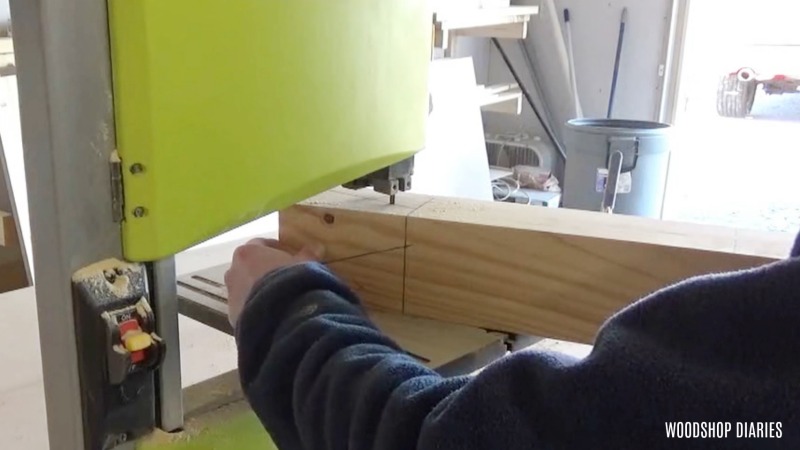
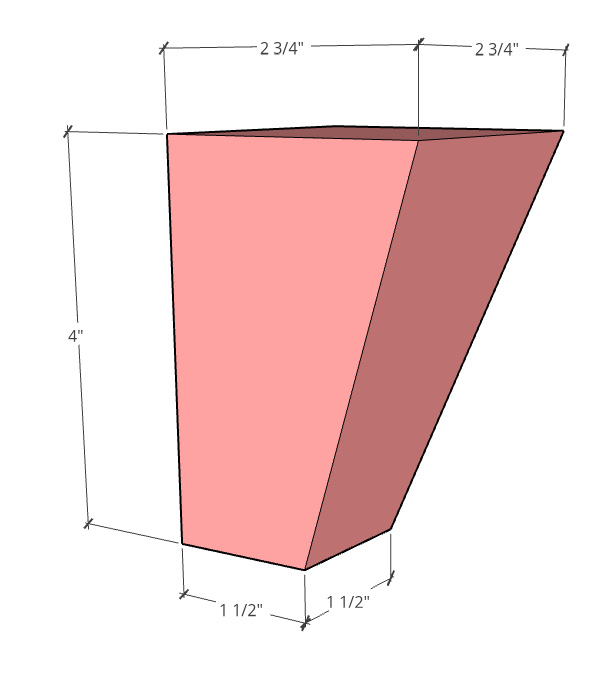
Step 1: Cut Tapered Feet
I cut the feet for this cabinet from a leftover 4×4 post I had from a previous project. However, you could definitely customize your own foot design or just buy precut feet to make it easier.
.
To make my feet, I measured out the taper I wanted on the end of my 4×4 on two sides and cut it out on the band saw. I made my feet 4″ tall with 2 ¾″ at the top and tapered two sides to 1 ½″ on the bottom.
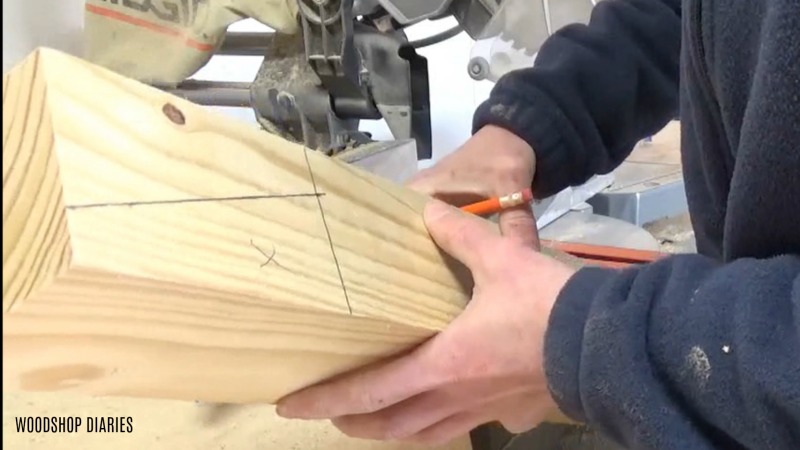
I cut out these legs on the bandsaw and sanded them well to give me 4 tapered feet for the bottom of the tilt out laundry hamper.
If you don’t have a bandsaw, you could also cut your tapered end on the miter saw, then trim it to length.
Step 2: Assemble Laundry Hamper Cabinet Base
I cut a piece of ¾″ plywood to use as the base of the hamper cabinet and edge banded the plywood edges since they’ll be seen.
RELATED: Check out how to apply edge banding in this post!
.
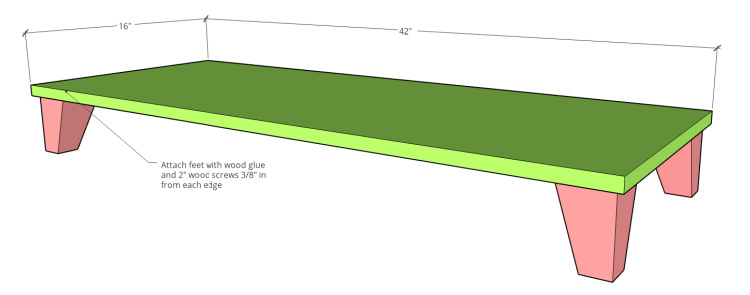
Then, I glued and screwed the 4 feet from step 1 into the corners of the base. You can use 2″ or 2 ½″ wood screws here. I attached them so that they were ⅜″ in from each edge and the tapers faced the inside.
Step 3: Assemble Cabinet Frame
I made the frame of the cabinet from 2x2s and assembled using 1 ½″ pocket holes and 2 ½″ pocket hole screws.
RELATED: Check out this post for how to use a pocket hole jig!
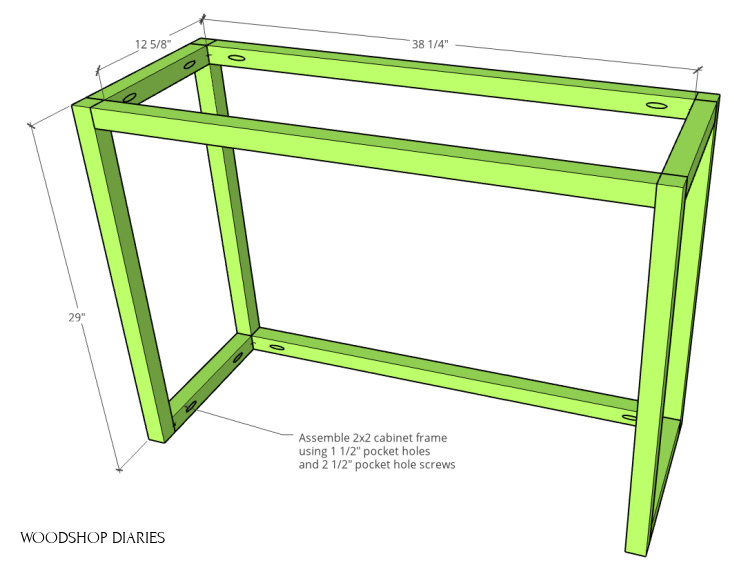
I haven’t had much luck using 2 screws on my pocket holes on 2x2s and 1x2s. I’ve found that my wood likes to crack if I get too close to a corner.
.
So when I’m working with these small boards, I only drill one pocket hole on the ends instead of two and add some glue to help hold it in place when I screw it together.
.
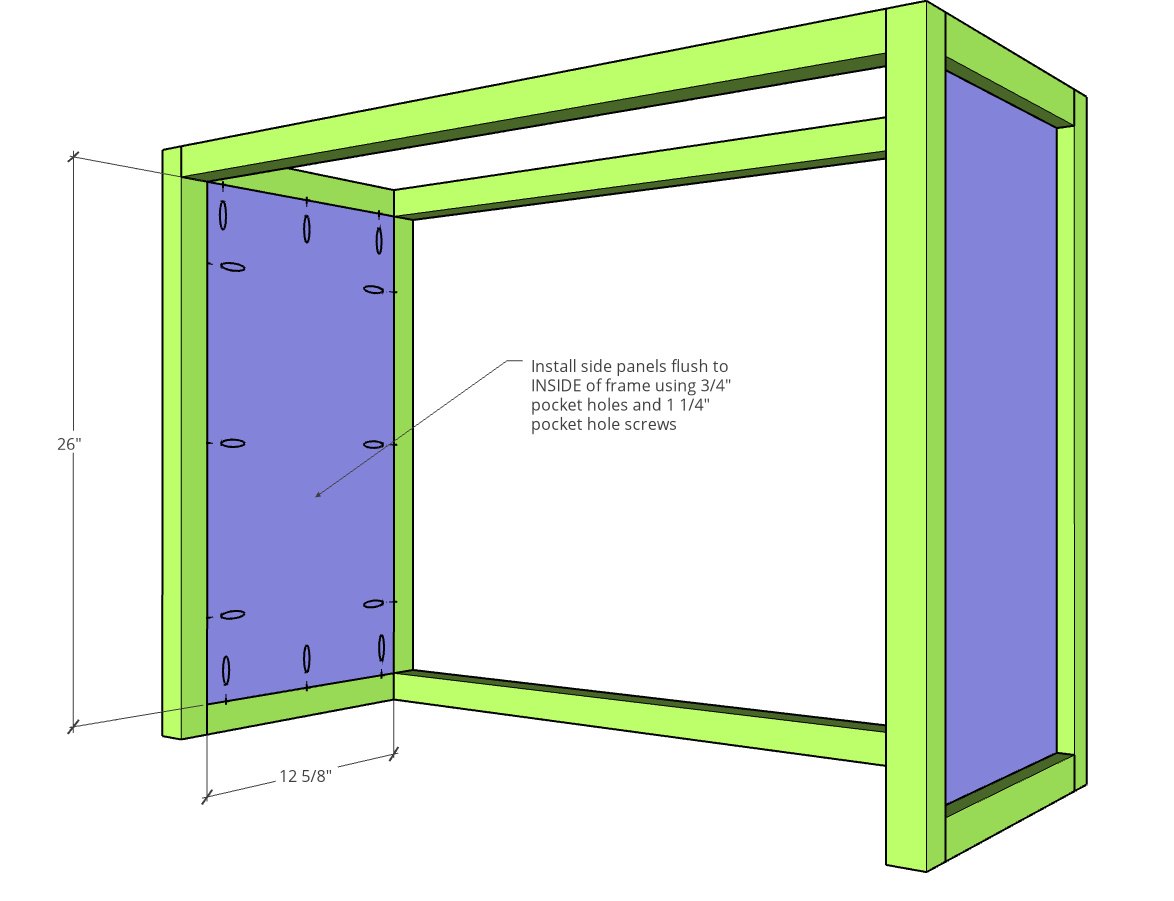
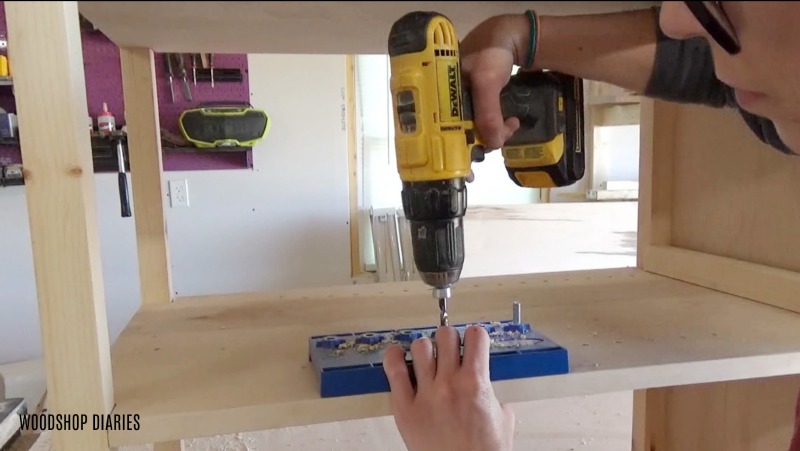
Once the frame was assembled, I added ¾″ plywood side panels using ¾″ pocket holes and 1 ¼″ pocket hole screws like shown below. I attached these so that they were flush across the inside of the frame.
Step 4: Attach Cabinet Frame to Base
Once the base and the frame were assembled, I attached them together using 2″ wood screws through the bottom panel into the bottom of the frame.
.
The frame should sit on the base with ⅜″ overhang on each side and ⅜″ overhang on the front.
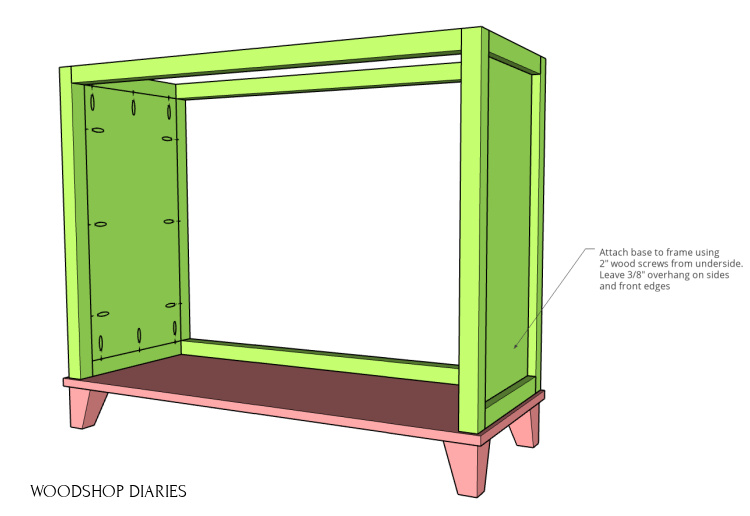
The frame should be flush across the back edge of the base.
Step 5: Add Laundry Hamper Divider Panels
This cabinet had three sections–two for tilt out laundry hampers and one for storage in the middle.
.
I used ¾″ plywood panels for dividers, but in order for them to fit within the frame, the top two corners and the bottom back corner need to be cut. I used a jig saw to cut a 1 ½″ square from these three corners and drilled ¾″ pocket holes like shown.
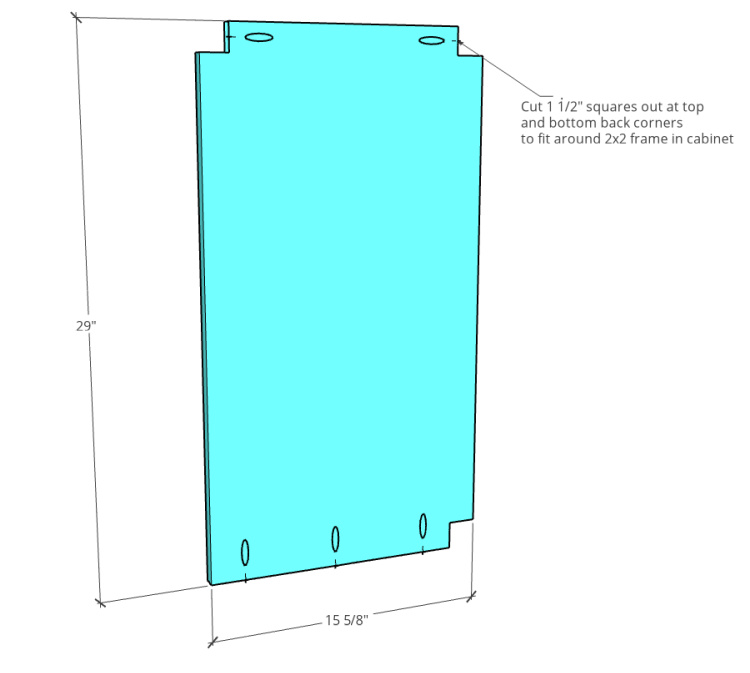
Then, I installed these panels into the frame using 1 ¼″ pocket hole screws leaving 12 ¼″ space for each section of the cabinet.
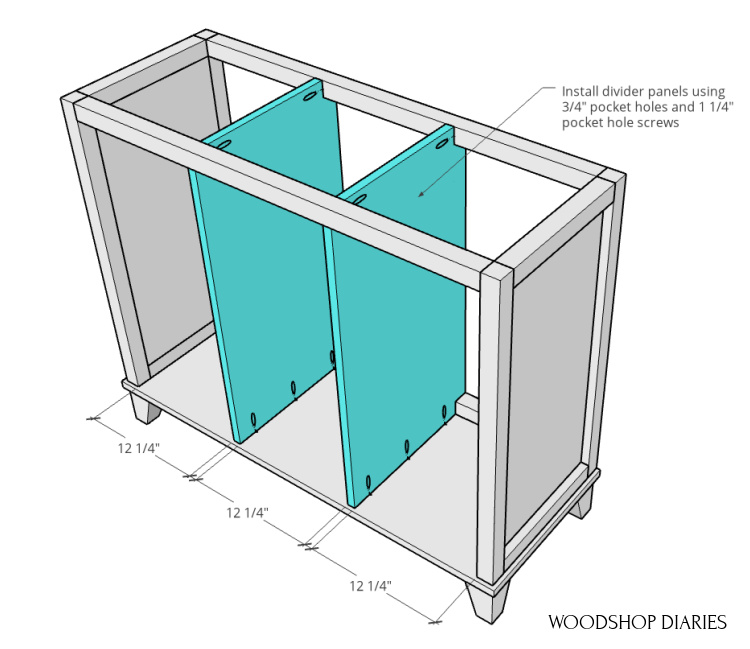
I chose to use this center section for storage space for adjustable shelves. So after these dividers were installed, I used my Kreg shelf pin jig to drill shelf pin holes down the sides of the middle cabinet dividers to install shelves later.
Step 6: Build and Install Laundry Hamper Doors
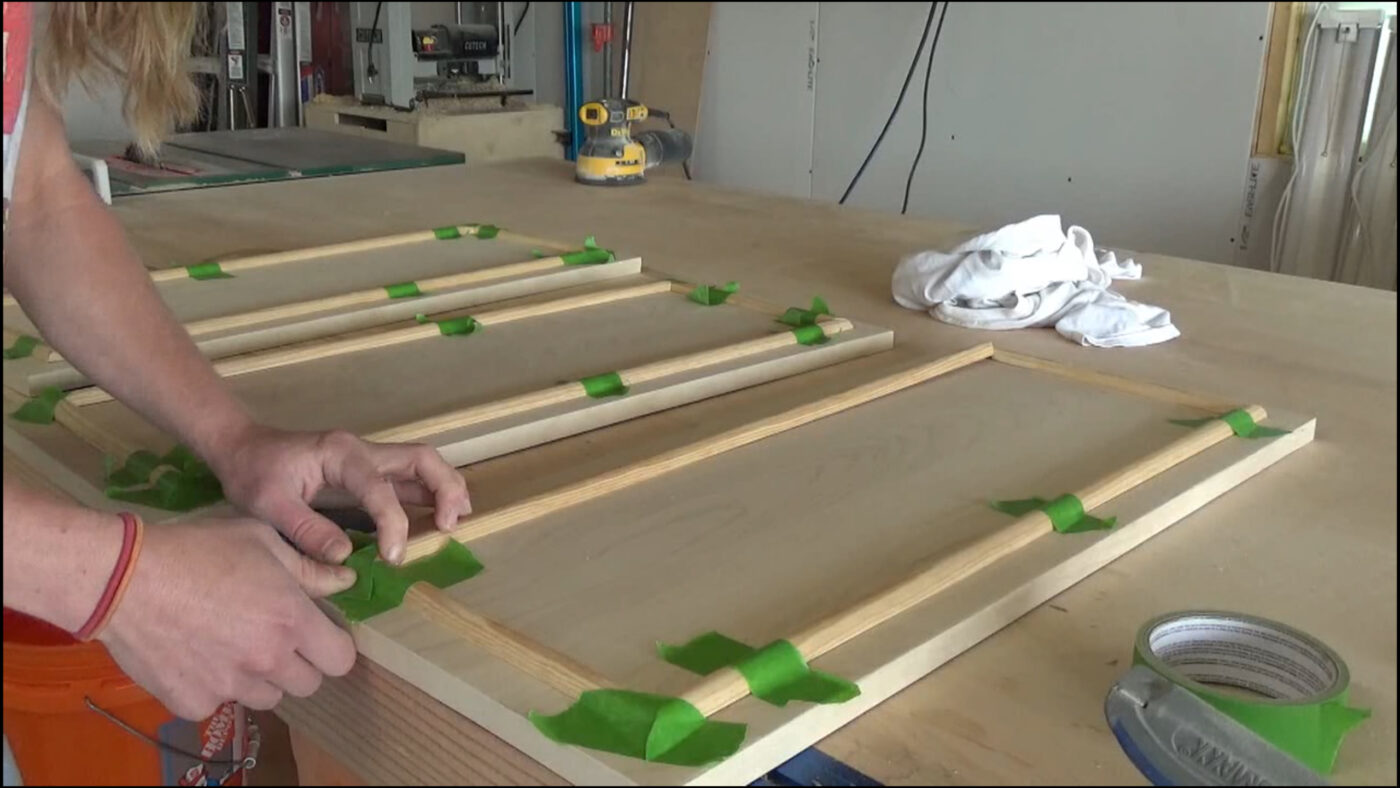
I made these doors from ¾″ plywood and edge banded all sides to cover the edges. To dress them up a little, I cut and glued half round molding onto the front.
.
To install this trim on these doors, or any other doors I’m doing, I measure out from the edges how far in I want the molding to start, then cut my pieces to fit within that area. To attach, I found it easiest to apply a little wood glue (not too much to avoid squeeze out), and tape in place using painters tape like shown.
These doors should be ¼″ smaller in both width and height than the openings they will cover.
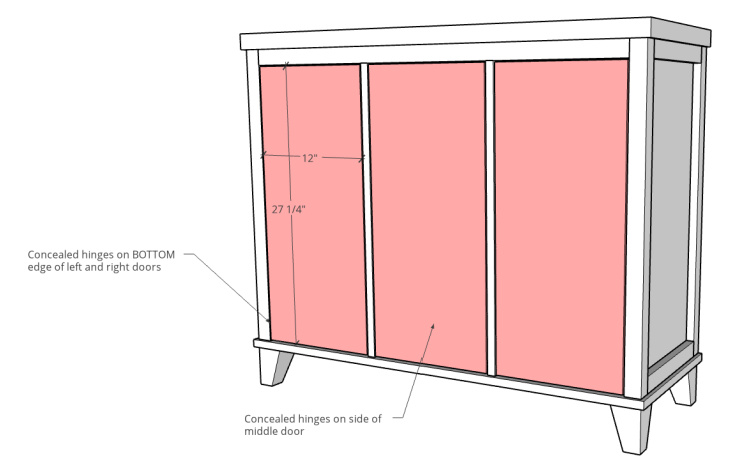
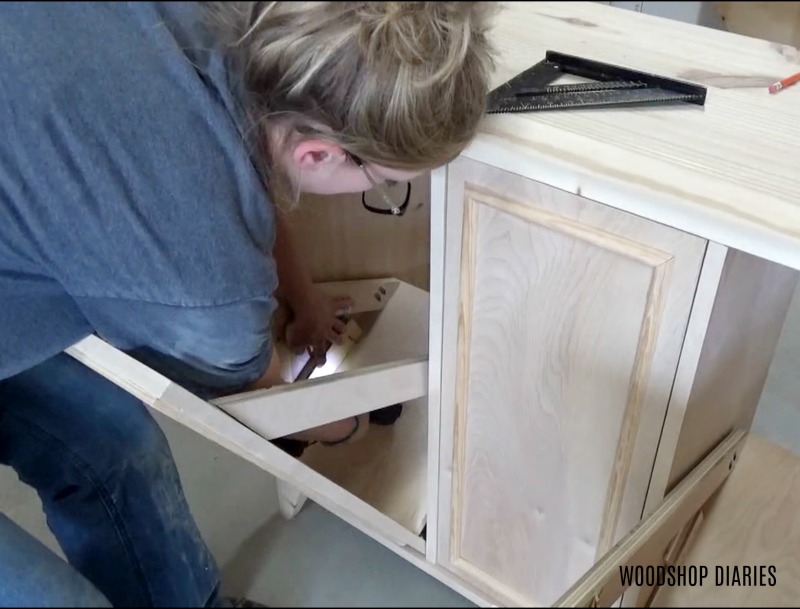
Once the doors were cut and trimmed out, I used my Kreg concealed hinge jig to drill the cups for the hinges. I drilled for the hinges on the sides of the middle door, but at the bottom of the outside doors.

I installed concealed cabinet hinges for INSET frameless doors into these holes, then installed them into the cabinet.
.
Notice that the hinges will screw to the divider panel for the middle door so it will pivot and swing open like normal, but the outside doors will mount to the base so they will pivot and tilt out from the bottom.

Step 7: Add Bottom of Tilt Out Doors
I cut two ¾″ plywood pieces (one for each side) to 11″ x 13″ to use as the bottom of the tilt out doors.
.
I drilled ¾″ pocket holes along one 11″ wide edge and attached onto the back side of each door right above the hinges with 1 ¼″ pocket hole screws.
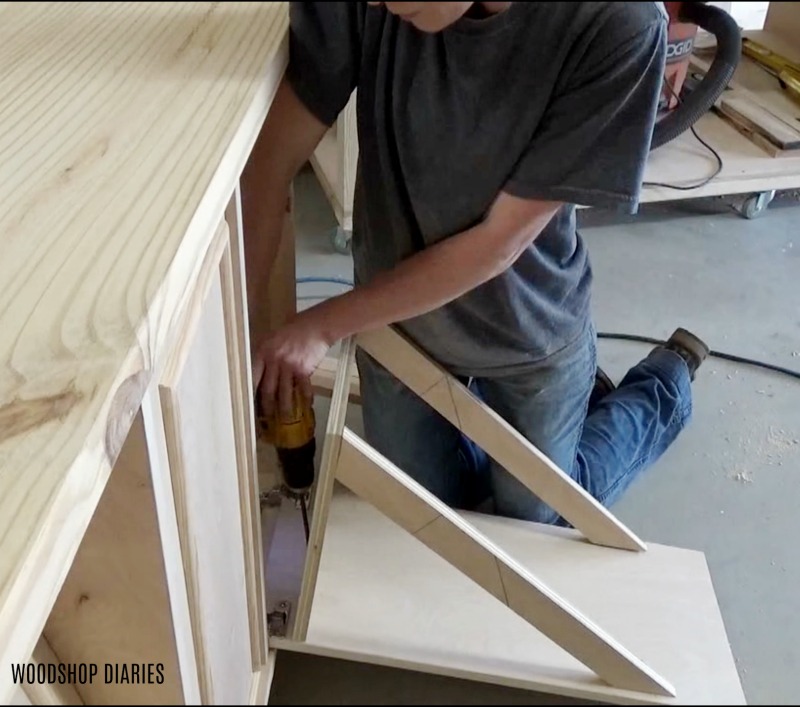
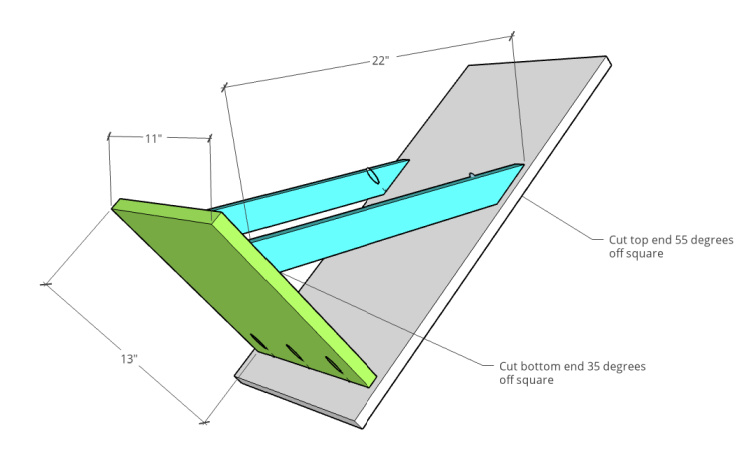
Then, I cut two pieces of 1×3 (you could also use scrap plywood strips) to 22″ long with one end mitered 35 degrees and one end mitered 55 degrees not parallel.
.
I drilled ¾″ pocket holes into each end and attached between the door and the bottom panel so that they were square using 1 ¼″ pocket hole screws.
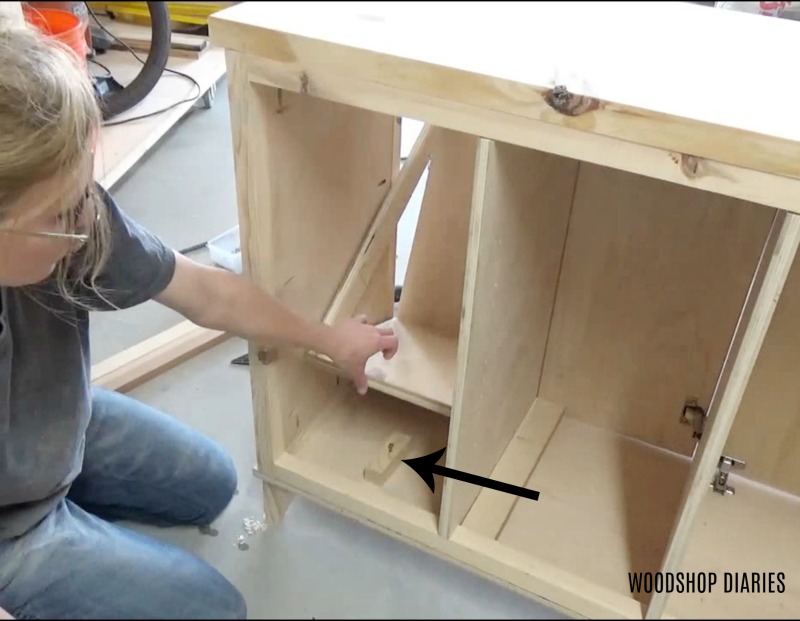
Because with inset European concealed hinges, the doors have a tendency to pull in further than you’d like, I added an adjustment block underneath these bottom panels.
.
I screwed a 2×2 block into the bottom of the cabinet, then added a screw in the top for fine tuning. The bottom of the tilt out will rest on the top of this screw, so you can screw it in to allow it to tilt in more, or screw it out to allow less tilt in.
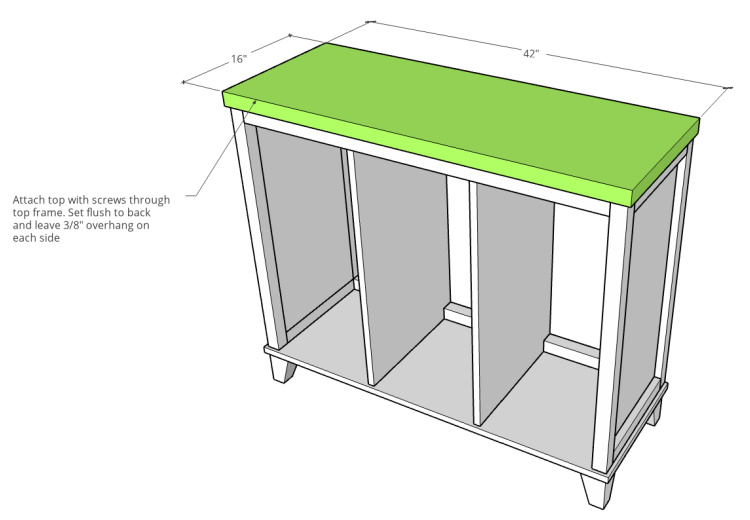
Step 8: Attach Top to Laundry Hamper
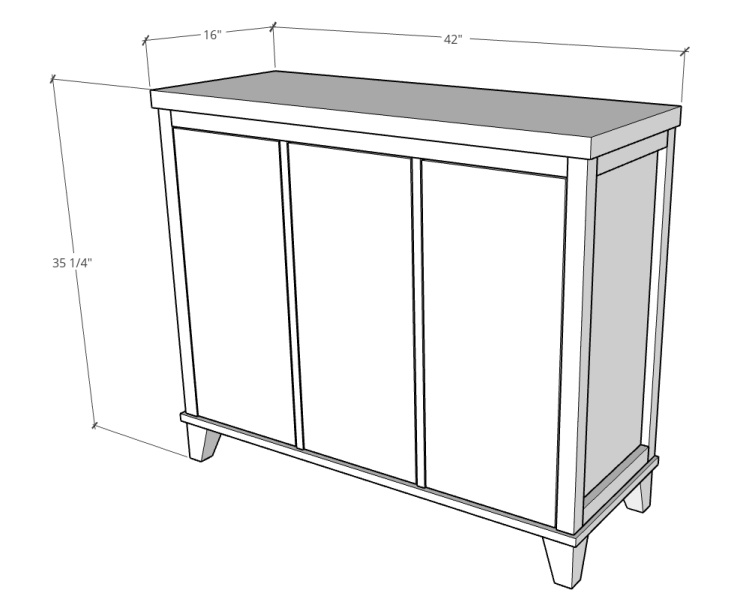
I glued together a top panel using a 2×10 and trimmed it down to be 16″ deep and 42″ wide. Check out this post for how to glue up a table top.
.
You could also use ¾″ plywood for the top if you prefer.
.
I centered the top on the frame leaving ⅜″ overhang on the sides and the front (it should be flush to the back) and screwed in place through the top frame using 2 ½″ wood screws. You could also use figure 8 tabs to account for wood movement if you want. Learn about that method here.
Step 9: Add Back Panel and Shelves
I cut a ¼″ plywood piece to staple (nail or screw is fine, too!) over the middle cabinet.
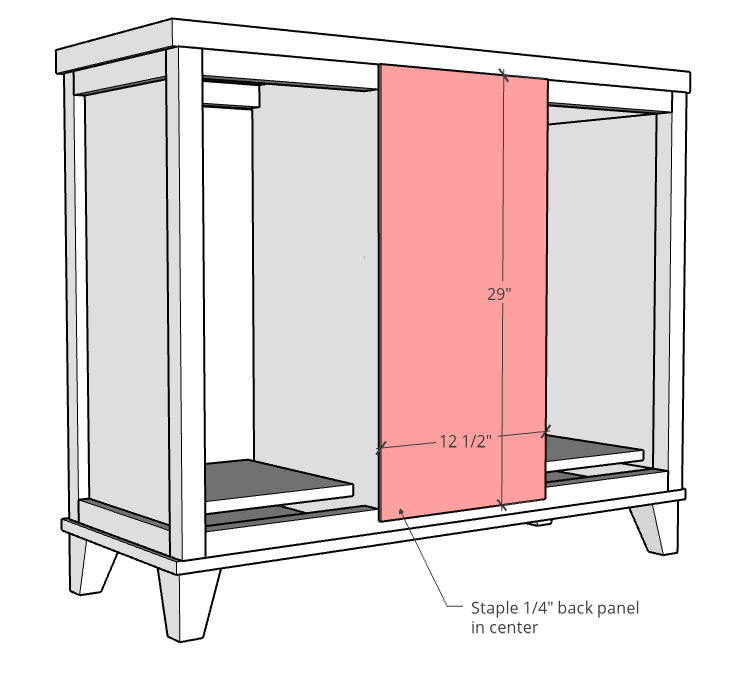
Then, I cut a couple shelves 12″ wide and used shelf pins to install them in the center cabinet using the shelf pin holes.
Step 10: Add Door Stops and Finish
All that was left was adding some door stops and some stain 🙂
.
I needed to create a positive stop for the tilt out so that my mom isn’t opening her door and it open all the way out and spill laundry everywhere.
.
For this, I used another small scrap plywood block and opened the door about as much as I thought it needed to open, then screwed the block into the side of the cabinet so that the door would catch it when it opens.
If needed, you can also add a stop block to the middle cabinet to keep the door from swinging too far in if that’s an issue.
.
I finished up this build with a coat of Rustoleum Summer Oak stain and a few coats of Polycrylic.
RELATED: Check out this post for how to finish DIY furniture.
.
I added these handles to finish it up!
What About The Hamper Baskets:
And finally, one last thing…If you want to build a DIY tilt out laundry hamper cabinet, but don’t already have hampers, I got these kind of stiff laundry hampers from Amazon.
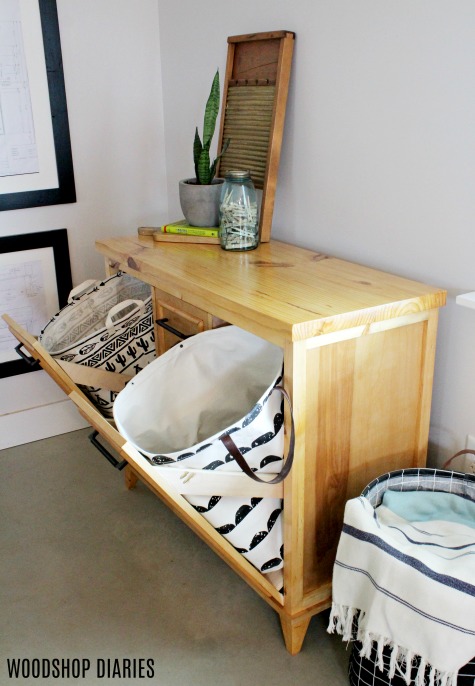
They’re a little bigger than you need for these tilt outs, but they hold their shape really well so they stand on their own in these doors and you can shape them enough to fit.
.
I really like how unexpected this cabinet is with the middle section being storage and the outside sections being laundry hampers.
.
If you wanted to skip the tilt outs and just use regular doors as well, this could also be a really cute entry way cabinet or console cabinet for a dining room. Or even a TV stand.

Let your imagination run wild haha. A huge thank you to Kreg for sponsoring this post and allowing the plans for this project to be free on their site here.
.
If you’re looking for more laundry room projects, be sure to check out one of these:

Laundry Room Storage Solutions 
Sliding Door to Laundry Room 
Washer & Dryer Pedestals
And be sure to pin this for later 🙂
Until next time, happy building 🙂