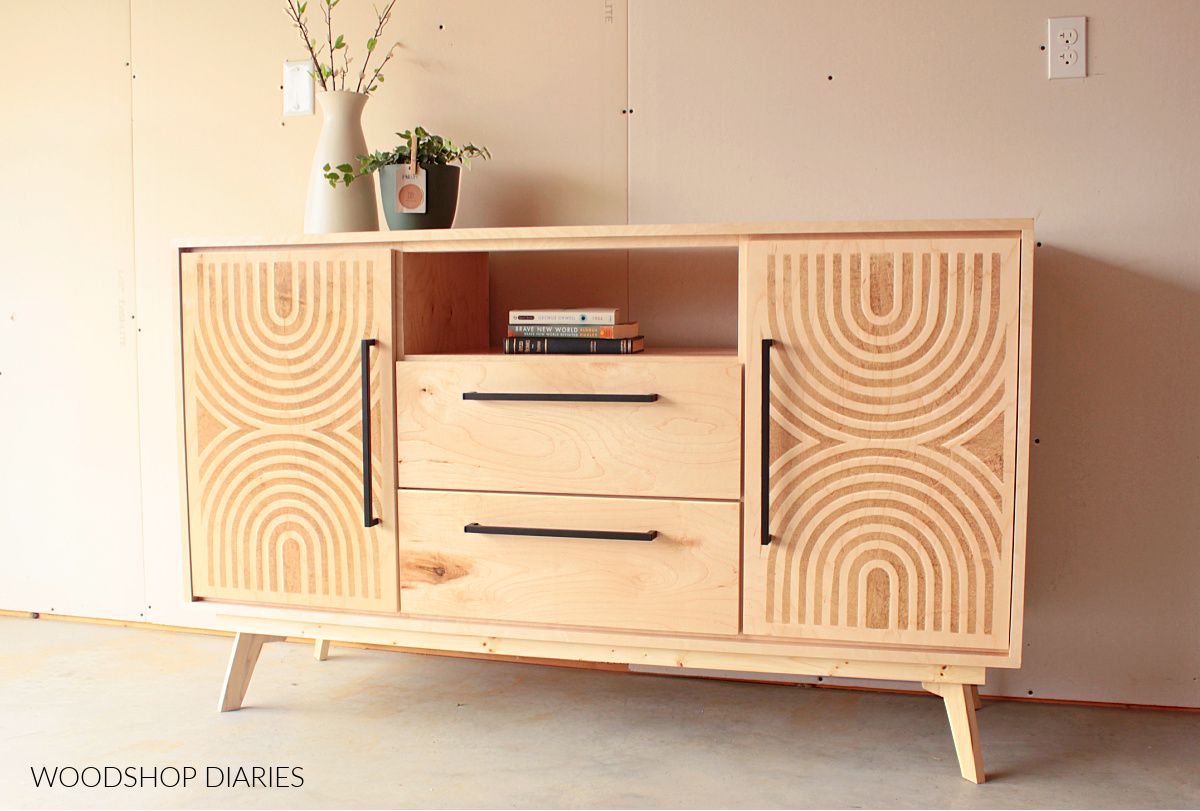
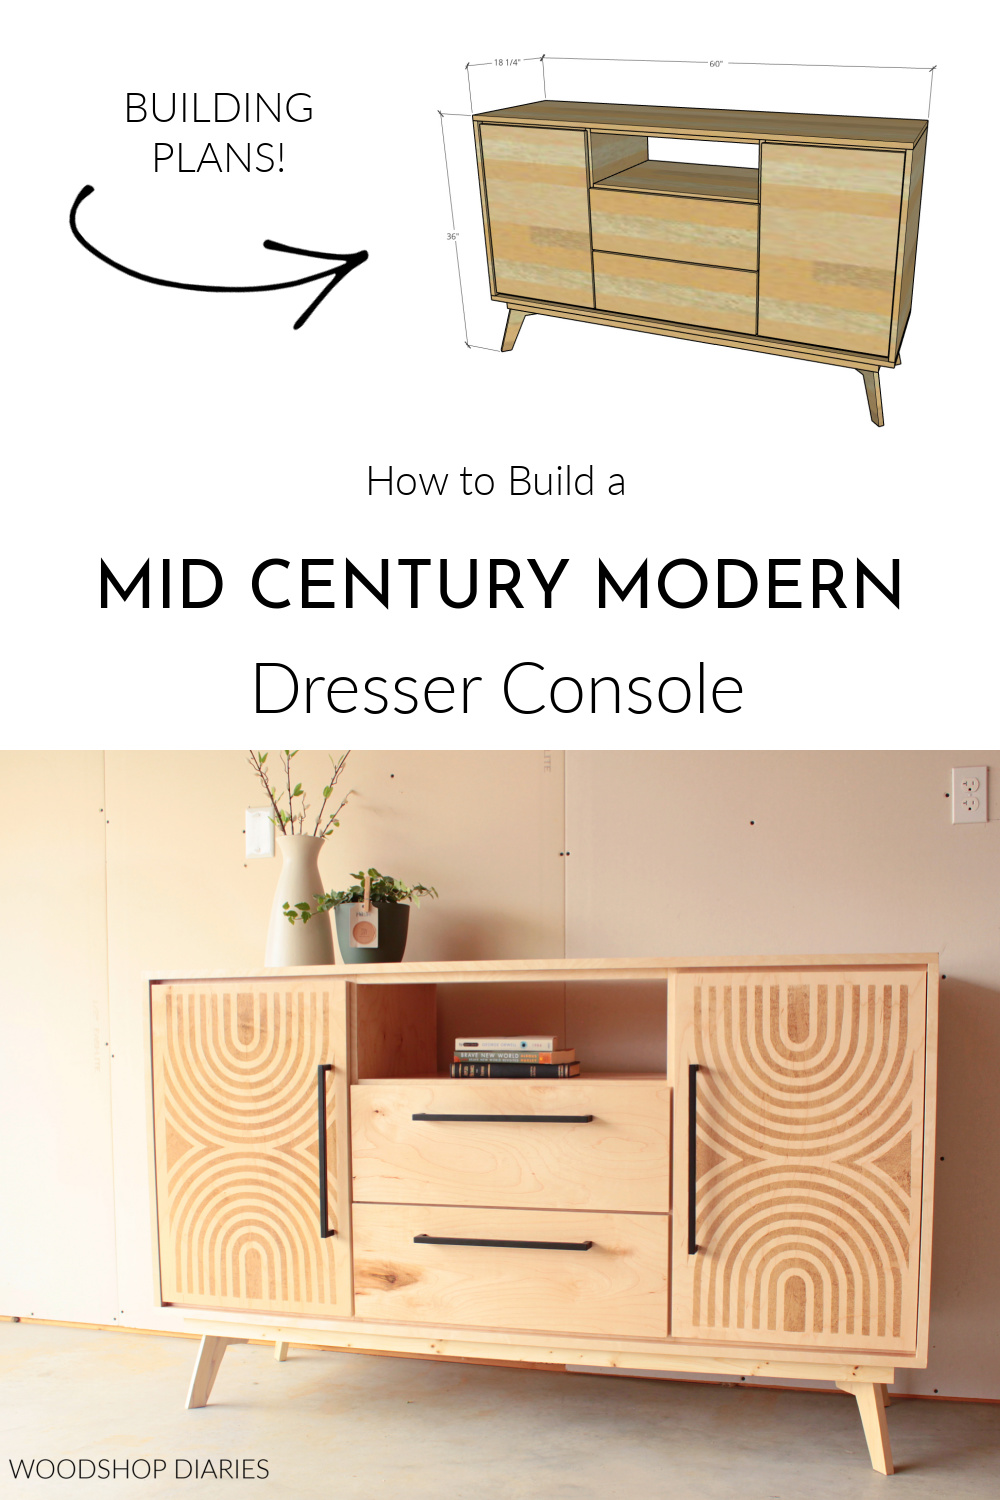
In this post, I’ll show you how to build your own DIY modern console dresser as part of the matching mid century modern bedroom furniture series!
If you’ve seen any of the other parts of this series, you’ll know that I’m building a series of matching bedroom furniture with a mid century modern feel.
.
I actually already shared a matching mid century modern dresser build here, and matching nightstands here. But because I LOVE building dressers, I decided to build a second dresser design so you’d have two to pick from *wink wink*
.
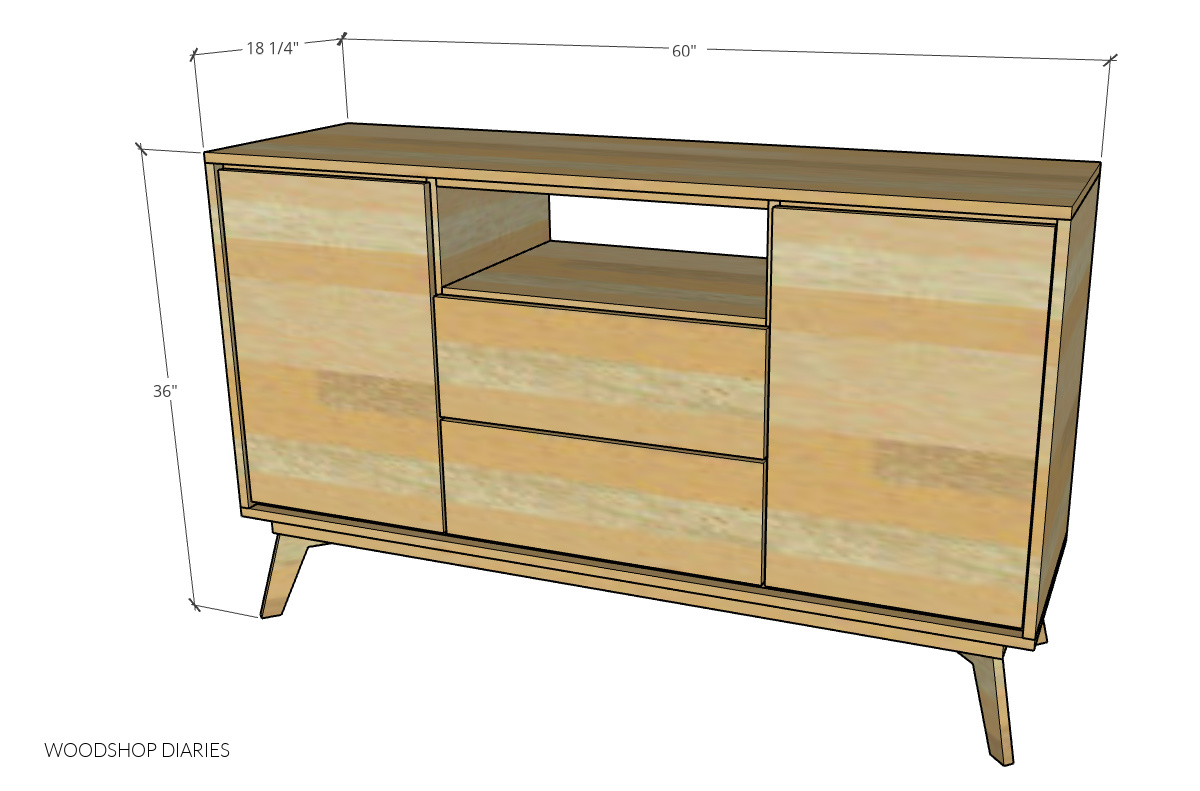
This DIY modern console dresser design has an open shelf, two large drawers, and two cabinets with doors and shelves inside. That makes it perfect for use as a bedroom dresser, dining room console, or even as a TV stand.
.
If you build your own, you can use it however you wish 🙂
.
I’m sharing the build video with details on how I stenciled the doors here and I’ve got the building plans below.
This post contains affiliate links. See website policies.
Tools & Materials:
Tools:
- Circular Saw (cutting guides optional, but helpful)
- Jig Saw
- Drill/Driver
- Pocket Hole Jig
- Shelf Pin Jig
- Concealed Hinge Jig
- Stapler (optional)
- Table saw or router to cut drawer dadoes (optional)
Materials:
- (2) sheets ¾″ plywood (I used maple)
- (2) 2x4x8 boards
- (½) sheet ¼″ plywood
- Scrap 1x or 2x material to cut legs from
- Wood Glue
- 1 ¼″ pocket hole screws
- 2 ½″ pocket hole screws
- 2″ wood screws
- (2) pair 16″ ball bearing drawer slides
- (2) pair inset concealed hinges
- Shelf pins
- Edge banding
- Stain/Poly/Wood Finish of your choosing
- Modern Handles
What You’ll Need for the Stenciled Door:
*NOTE: this tutorial will not go into great detail on the stencil design. Please refer to video for more details on the stencil how-to.
DIY MODERN CONSOLE PRINTABLE BUILDING PLANS:
Some Notes About this Modern Dresser Console:
This project is part of a matching mid century modern series. You can check out all the parts of this series below:
- 6 Drawer Modern Dresser
- Open Shelf with Drawer Nightstand
- Mid Century Modern Bed *coming soon!*
.
The overall dimensions of this project are 60″ wide, 18 ¼″ deep, 36″ tall.
You may find these guides/posts helpful to refer to during the build process:
Step 1: Assemble Main Console Carcass
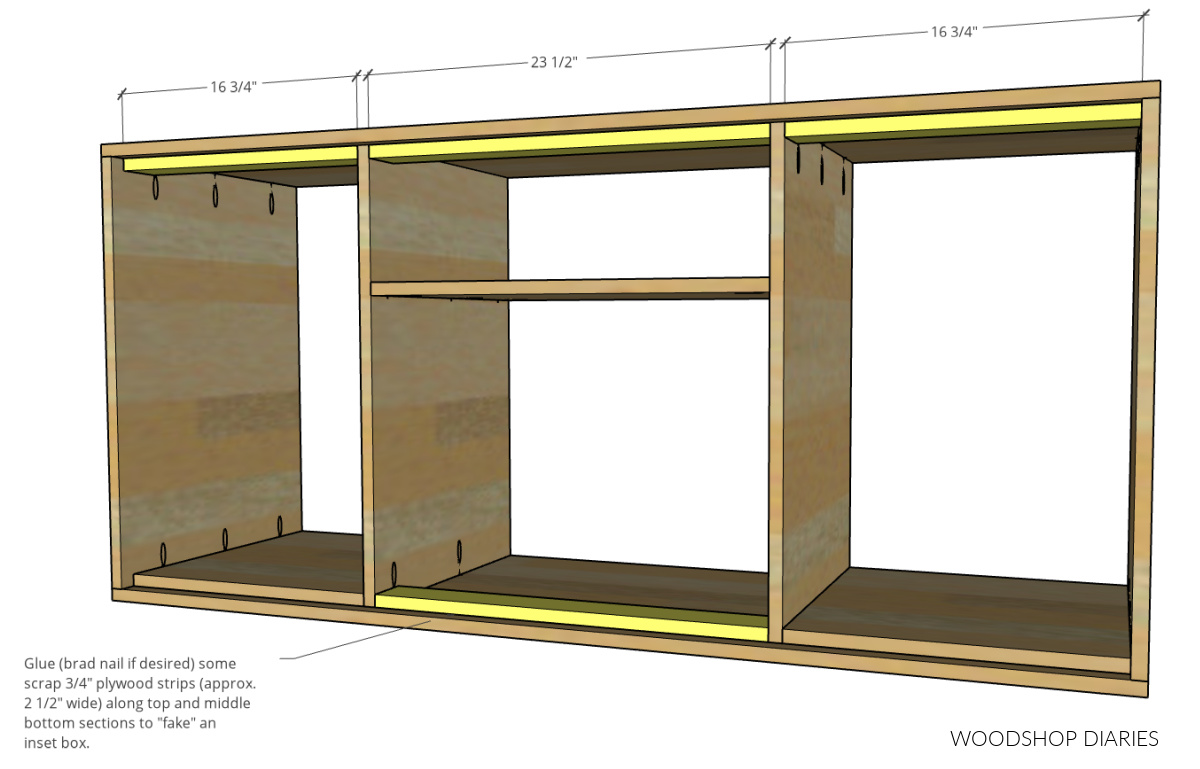
To begin, I started cutting down my plywood sheet into the pieces to build the main body of the dresser.
.
I have a plywood cut diagram in the plans for exact measurements, but I cut two top and bottom pieces, two side pieces and two divider pieces from my ¾″ plywood sheets.
.
Note that the divider panels are 17″ deep and the rest is 18″ deep here. The dividers should be inset from the front edge 1″.
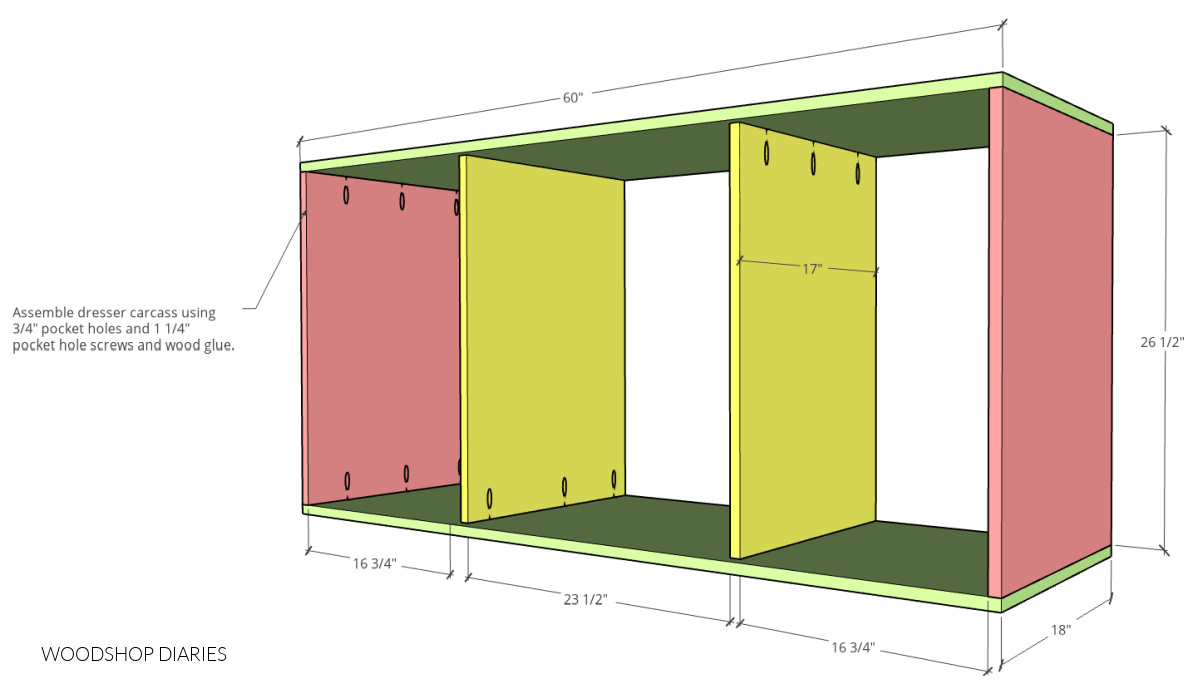
I edge banded the plywood edges that will be exposed, then used a pocket hole jig to drill pocket holes to assemble.
RELATED: How to use a pocket hole jig
ALSO RELATED: How to Apply Iron On Edge Banding
.
Note that the pocket holes are on the INSIDE of the side panels at both the top and bottom, but are on opposite sides on the divider panels. The pocket holes at the top of the divider panels should be on the CABINET side of the dresser and the holes at the bottom should be facing the middle drawer section of the dresser.
.
I assembled this dresser carcass using ¾″ pocket holes, 1 ¼″ pocket hole screws, and wood glue at each joint.
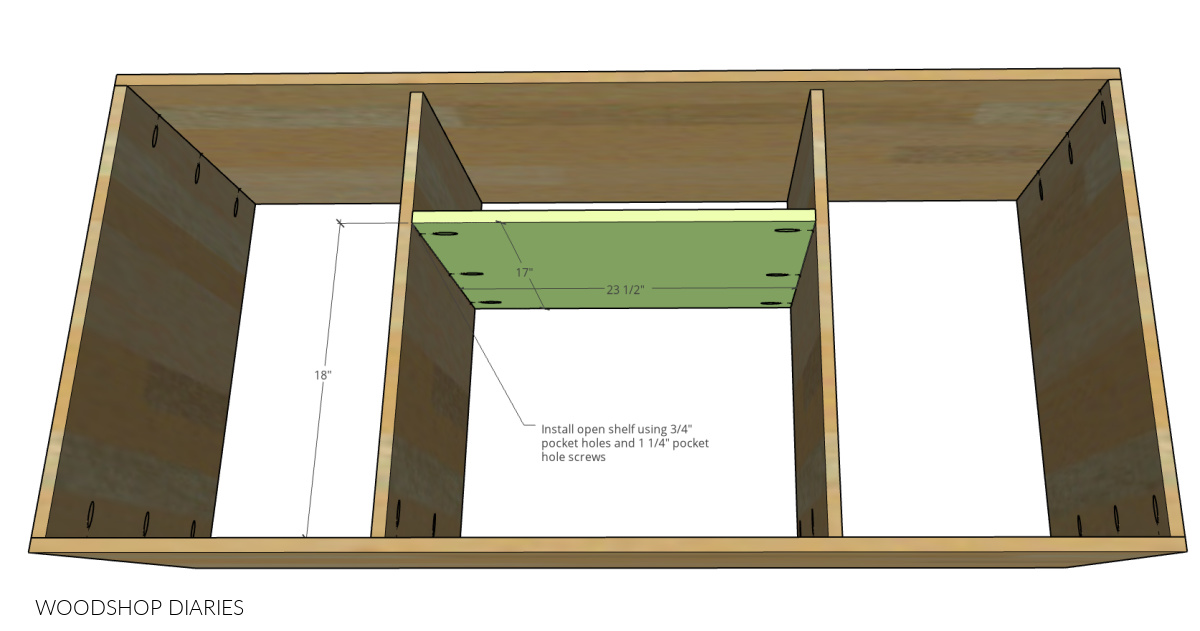
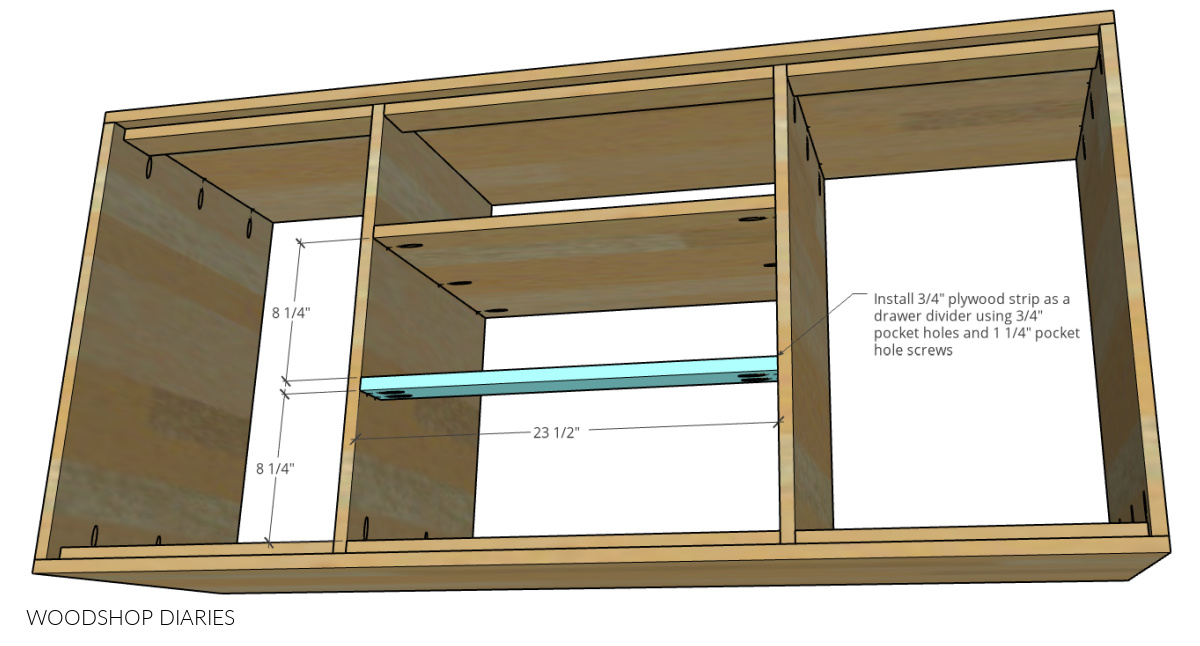
Step 2: Install Middle Shelf
I used ¾″ pocket holes and 1 ¼″ pocket hole screws again to install a middle shelf between the divider panels 18″ up from the bottom panel like shown in the diagram.
Step 3: Add Pieces to “Fake” Inset Frame
As part of the design element in this series, I’m building these pieces to have some extra dimension on the front so it looks like “a box within a box”.
.
To save on plywood, instead of actually building an entire second box inside of this dresser box, I used some smaller pieces to “fake” it.
.
I cut and glued two pieces–one at the bottom of each cabinet section like shown here so that they were 1″ inset from the front edge:
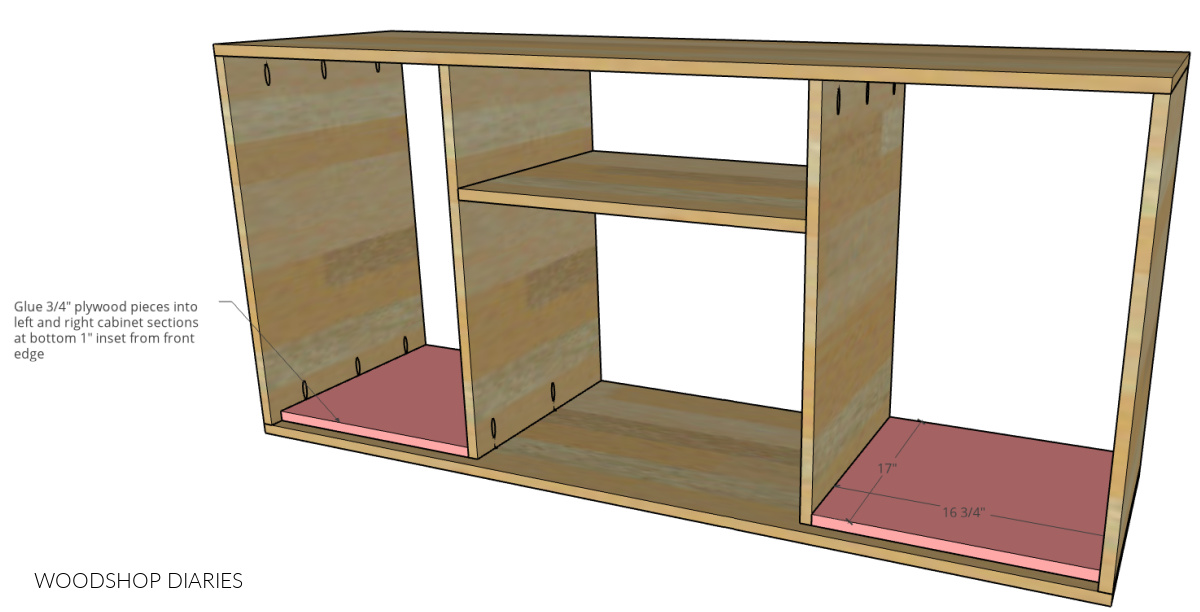
Then, I glued some 2 ½″ wide ¾″ plywood pieces in place along the top and the bottom middle sections. These areas don’t need a full pieces as they won’t be seen. Again, these should be 1″ inset from the front edge.
And the last piece of the “fake inset frame” was the drawer divider. I cut another 2 ½″ wide strip of ¾″ plywood like shown and used ¾″ pocket holes and 1 ¼″ pocket hole screws to secure it between the dividers to evenly space out the drawer sections.
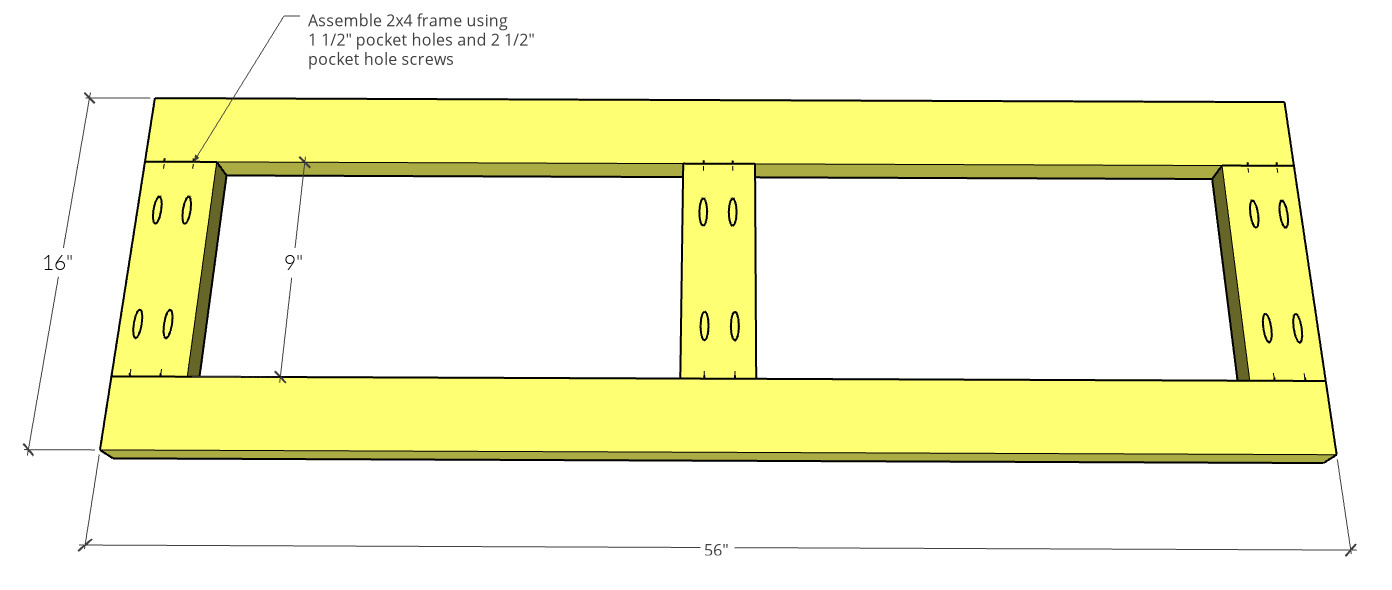
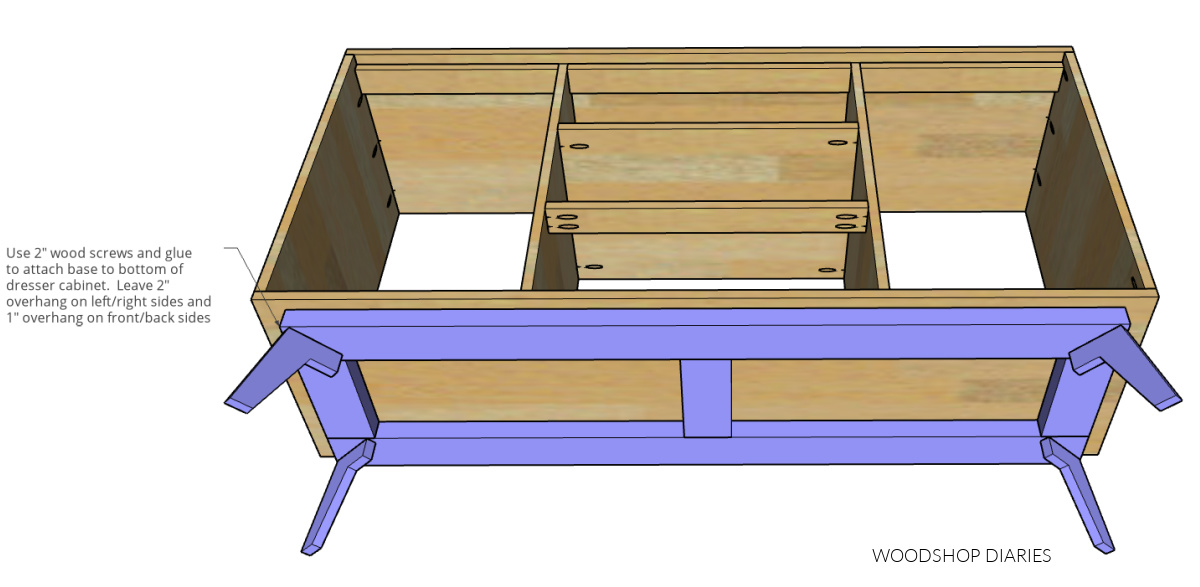
Step 4: Build Mid Century Modern Console Base
The base of this dresser consists of a 2×4 frame assembled with pocket holes like shown below.
.
Now, 2x4s typically come with rounded edges and to make cleaner joints, I like to square these off. This tutorial walks you through that process.
.
That’s totally optional, but do keep in mind that if you do trim your edges, you may have to adjust your measurements below since what’s shown below assumes a full 3 ½″ wide 2×4.
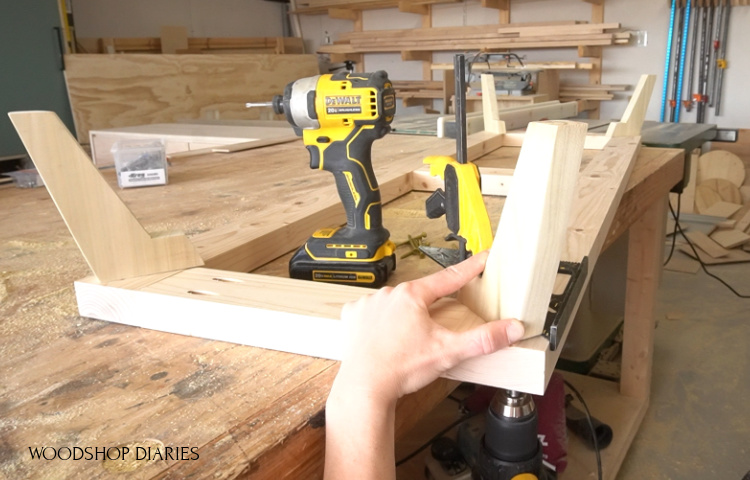
Once the base was assembled, I cut out 4 legs like shown on a scrap piece of poplar. I just cut one out with a jig saw, sanded it smooth, and traced the other three on the board to cut out.
.
You could use any 1x or 2x scrap for this or even some ¾″ plywood. I just happened to have some scrap poplar handy to use for this.
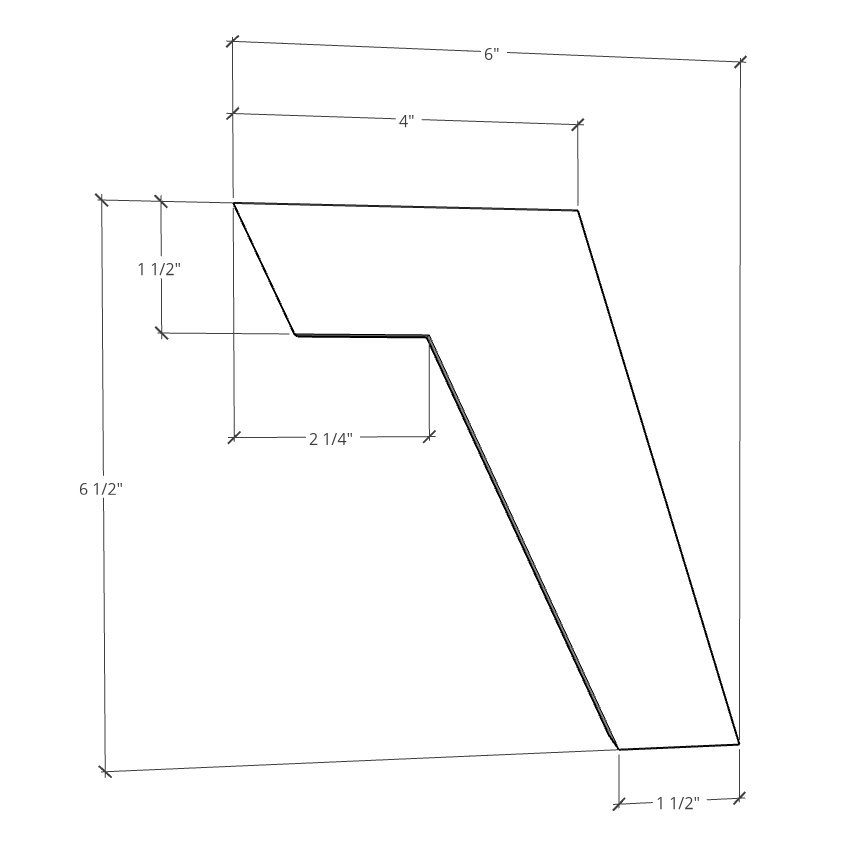
After the base frame was assembled and the legs cut, I used some wood glue and 2″ wood screws to secure the legs onto the base frame at each corner.
.
I wanted these to angle in, so I used a speed square to help me angle the legs at 45 degrees while securing.
Step 5: Install Base onto Cabinet
I used wood glue and 2″ wood screws to secure the dresser base to the dresser cabinet leaving 2″ overhang on the left and right and 1″ overhang on the front and back.
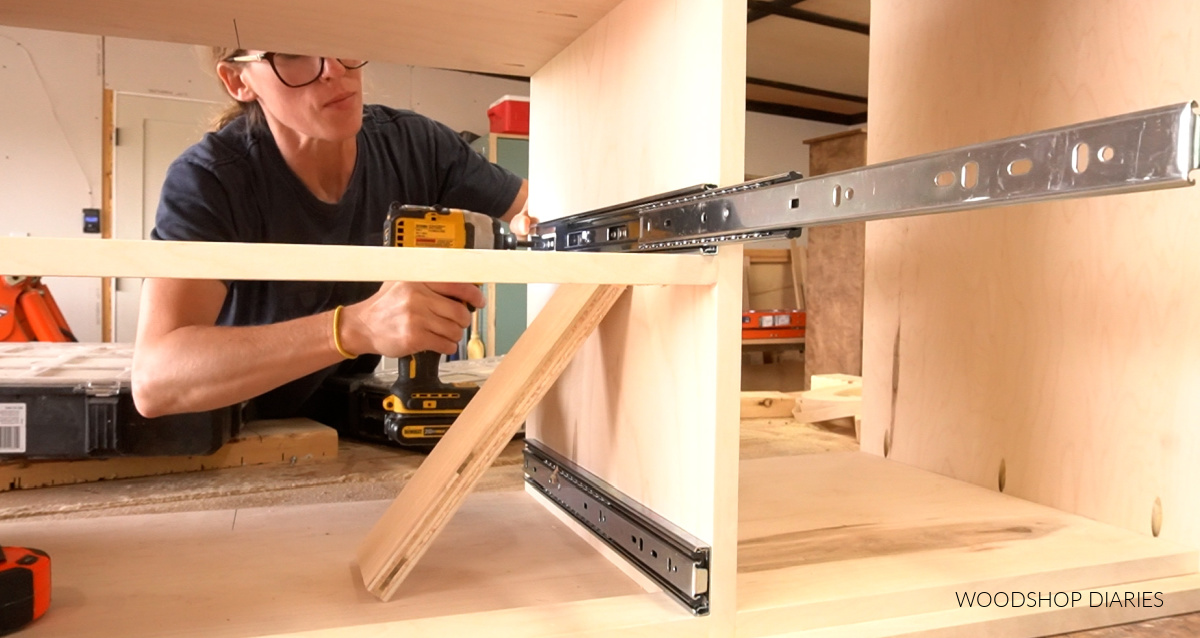
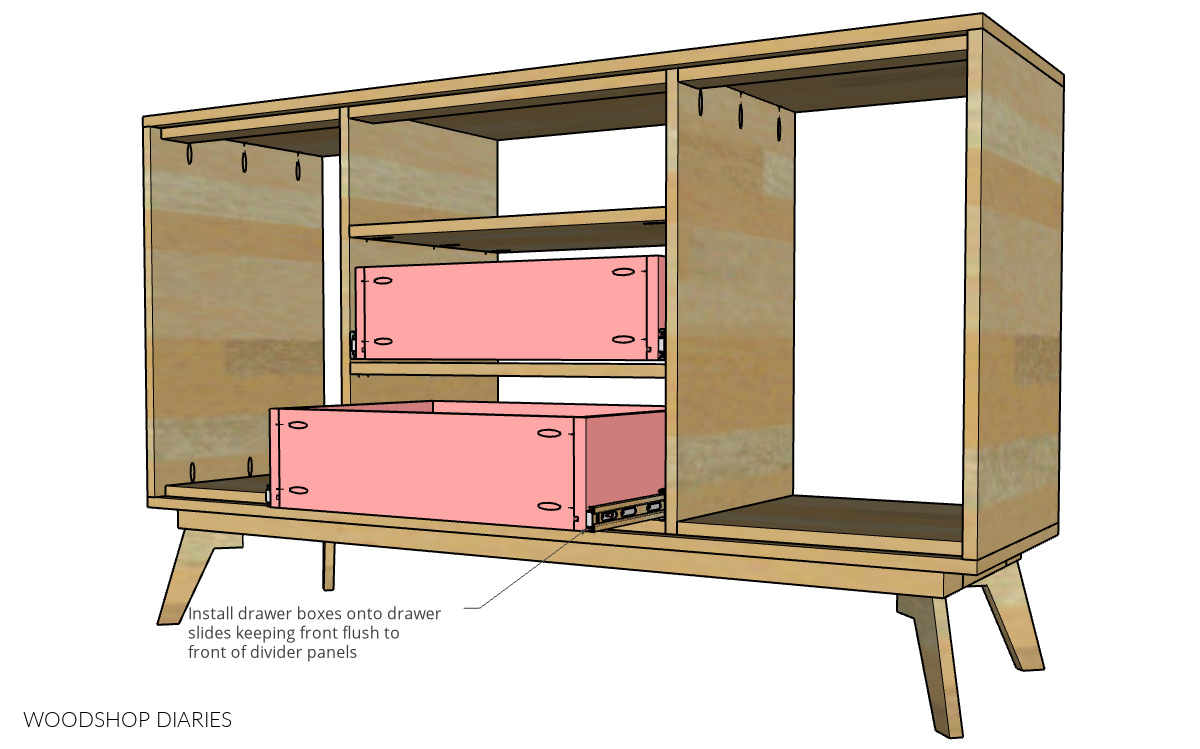
Step 6: Install Drawer Slides
I installed 16″ ball bearing drawer slides into the dresser so that the front edges were flush to the front edge of the divider panels.
.
For more information on installing drawer slides, check out this detailed drawer building guide.
Step 7: Build and Install Drawer Boxes
I built two identical drawers using ¾″ plywood for the sides and ¼″ plywood for the bottom.
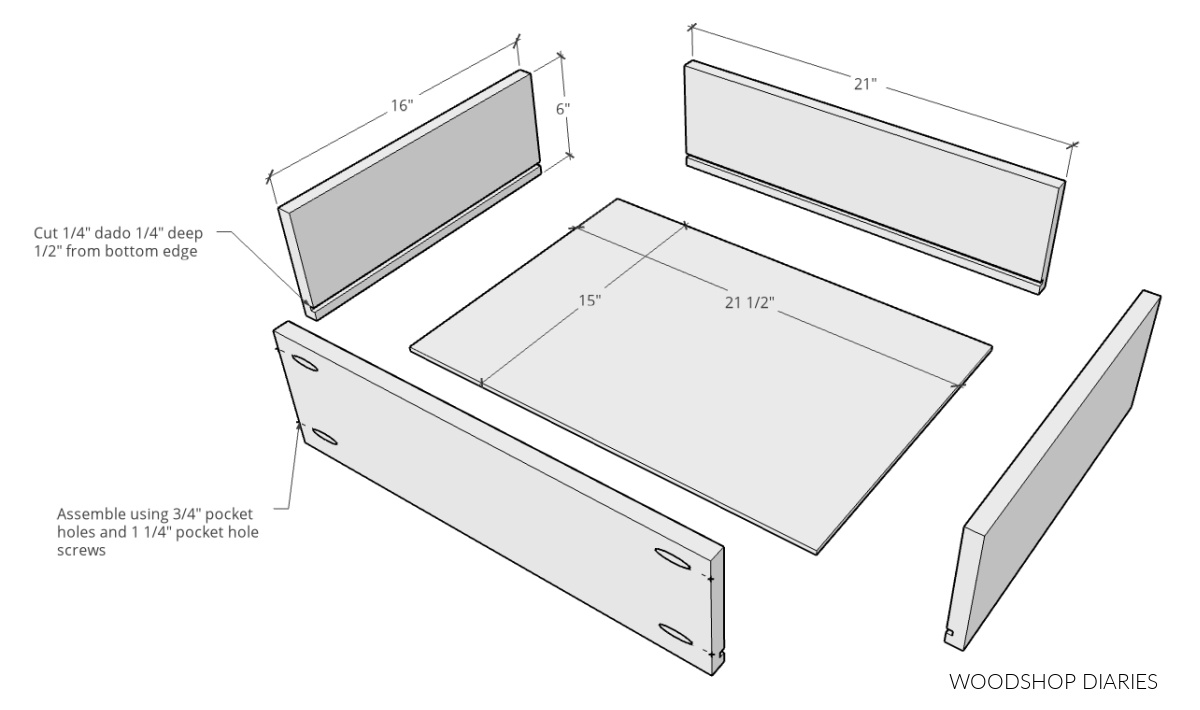
I cut ¼″ dadoes into the drawer box sides to insert the bottom panel, but if you don’t have a table saw or router to cut your dadoes, you can simply staple or screw the ¼″ plywood bottom onto the bottom of the drawer box instead.
.
I assembled these drawer boxes using ¾″ pocket holes and 1 ¼″ pocket hole screws.
.
Then, I installed them into the dresser onto the slides.
Step 8: Add Adjustable Shelves to DIY Modern Console
At this point, it makes sense to go ahead and drill the shelf pin holes before you start attaching the doors to make things easier.
.
I used a shelf pin jig to drill shelf pin holes along the sides of each cabinet section in order to install shelf pins that will allow me to have adjustable shelves.
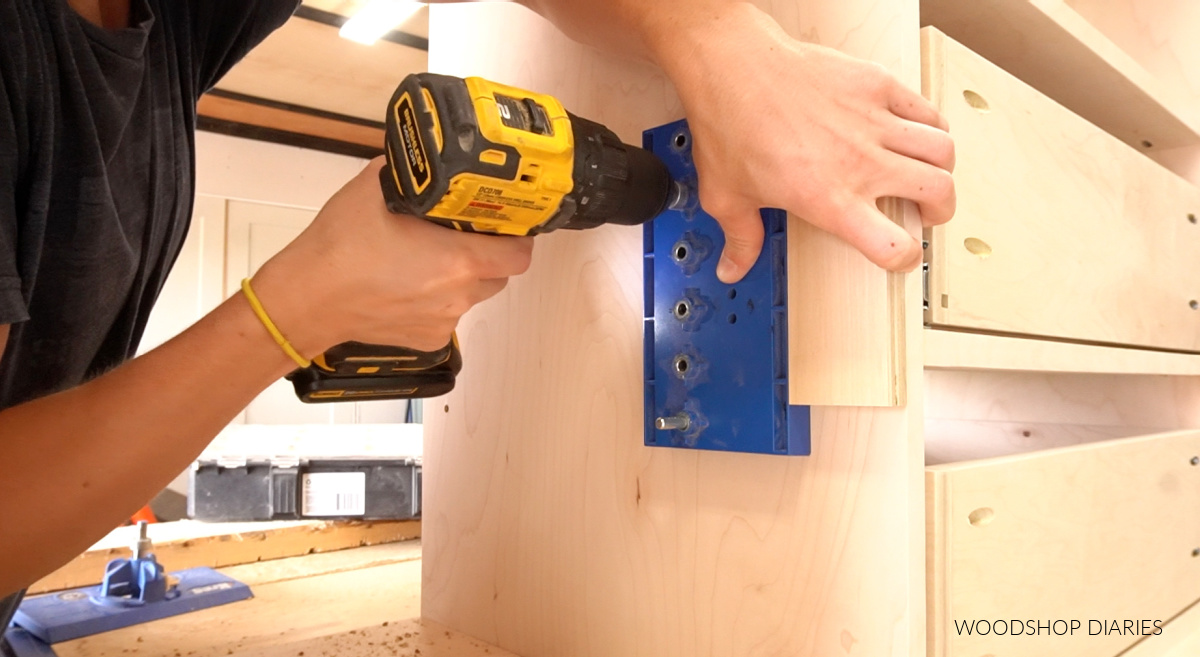
You can cut the shelves now or later, but I cut mine to 14″ deep x 16 ½″ wide, ensured they fit, then set them to the side for now.
.
As a side note, since these shelves are only 14″ deep, make sure not to drill the front shelf pin holes more than 14″ from the back edge. Don’t ask me how I learned that lesson haha.
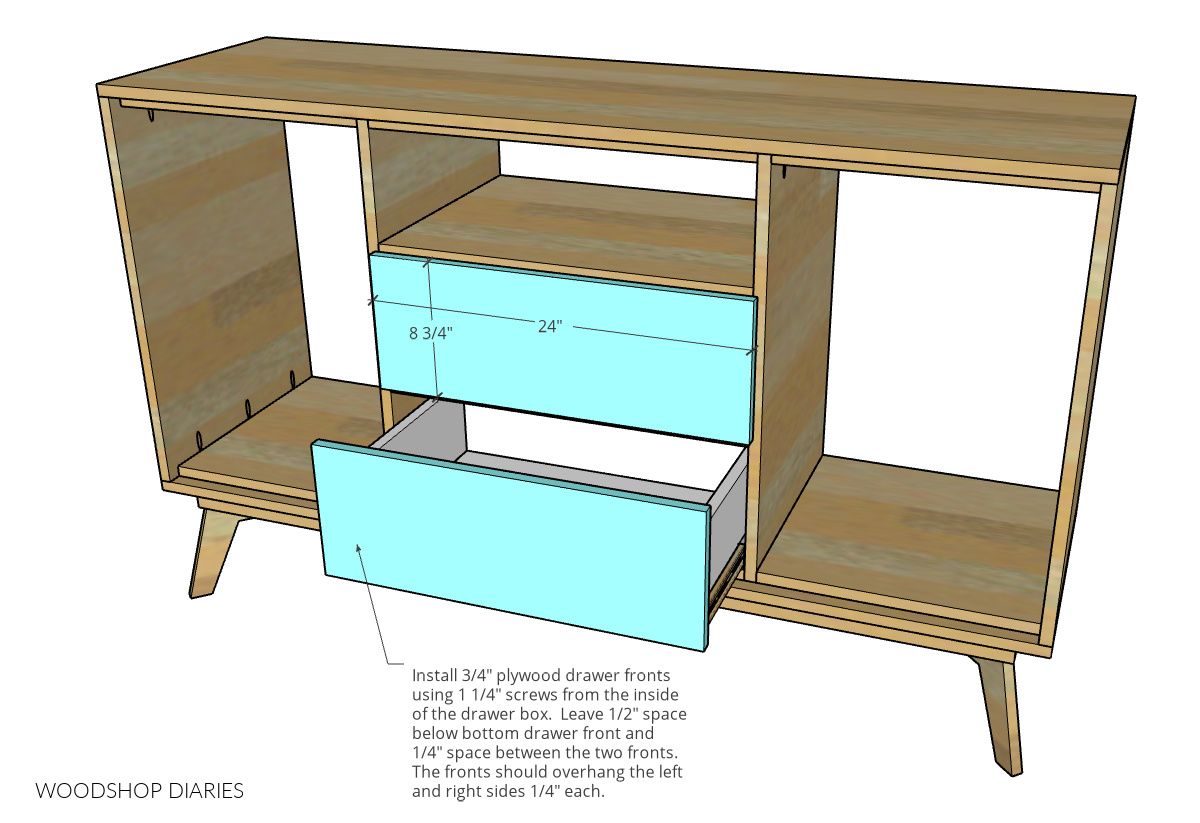
Step 9: Cut and Install Doors and Drawer Fronts
The doors and drawer fronts were a little odd here because I didn’t follow the TYPICAL spacing rules. Normally, with doors and drawers, ⅛″ is the typical spacing gap.
.
However, I cut these drawer fronts to allow ½″ space at the bottom, ¼″ between the two, and they overhang each side ¼″. I cut these fronts from ¾″ plywood, edge banded, and screwed them onto the drawer boxes from the inside.
Then, I cut the doors from ¾″ plywood, edge banded, and applied the stencil design.
Now, before I attached the doors to the dresser, I added the U shape stencil design.
.
I share the details on the stencil design and plenty of additional stencil options in the video above, so if you want to add that to your dresser, I highly recommend checking out the video.
.
But here’s a quick run through…
.
Once the doors were cut, I used my Cricut Joy machine, and Cricut Design Space to design and cut some permanent Cricut Smart Vinyl to use as my template. Then I used transfer tape to apply it to the door.
.
I added painters tape along the edges to give it a “frame” around the edges.
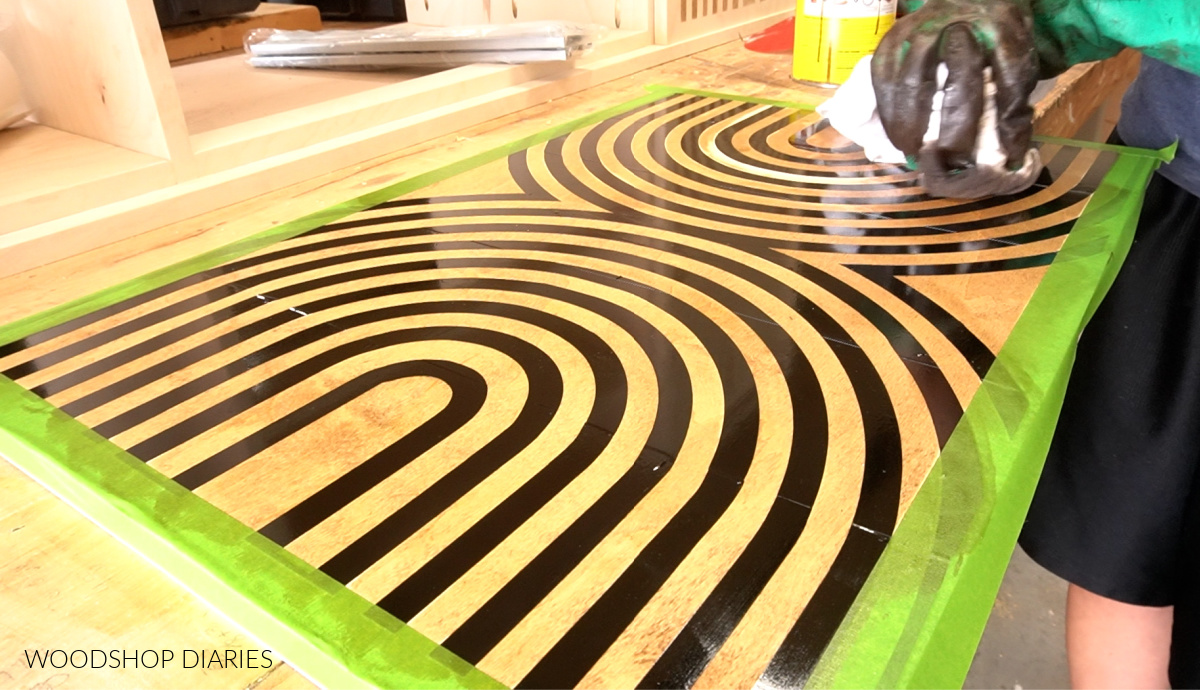
I stained over the stencil with Minwax Early American between the stripes to give it some color, then removed the stencil to reveal the natural wood left underneath. You can do so many different designs here, so feel free to get creative!
.
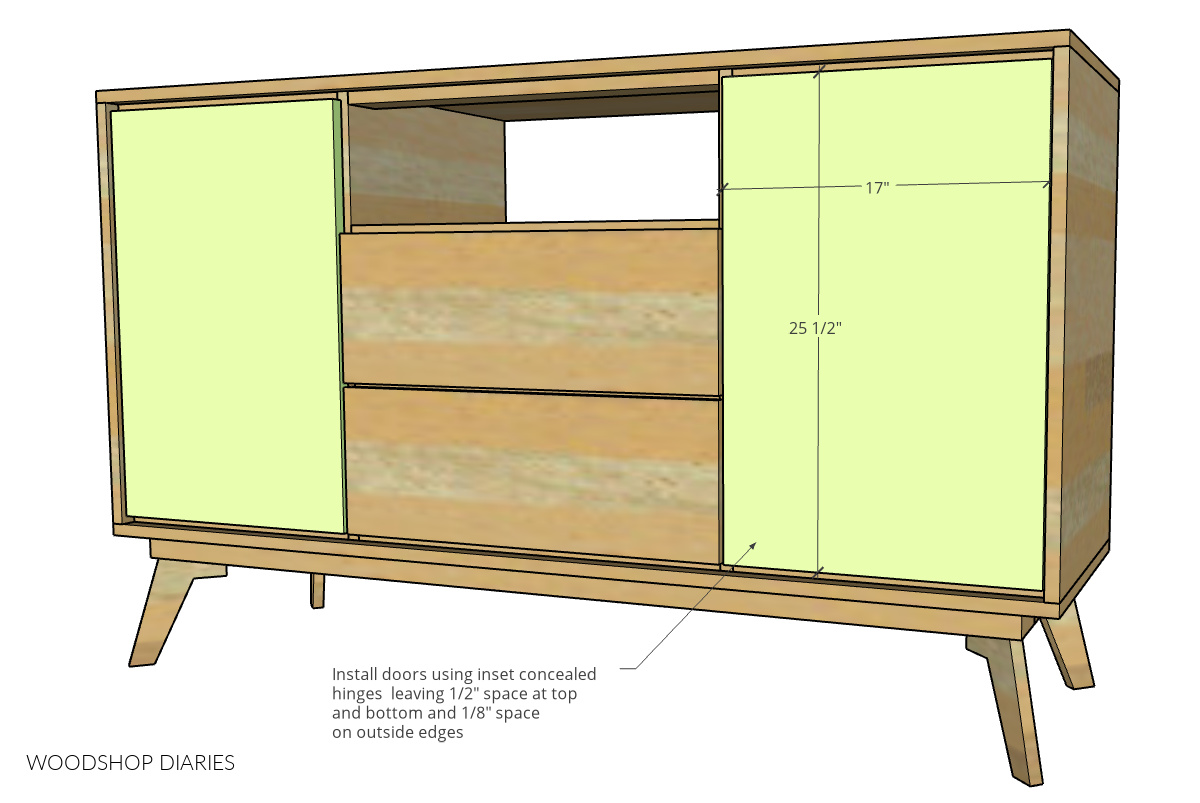
Once the design was applied, I used a Kreg Concealed Hinge Jig to drill my hinge cup holes and installed inset concealed hinges onto the door.
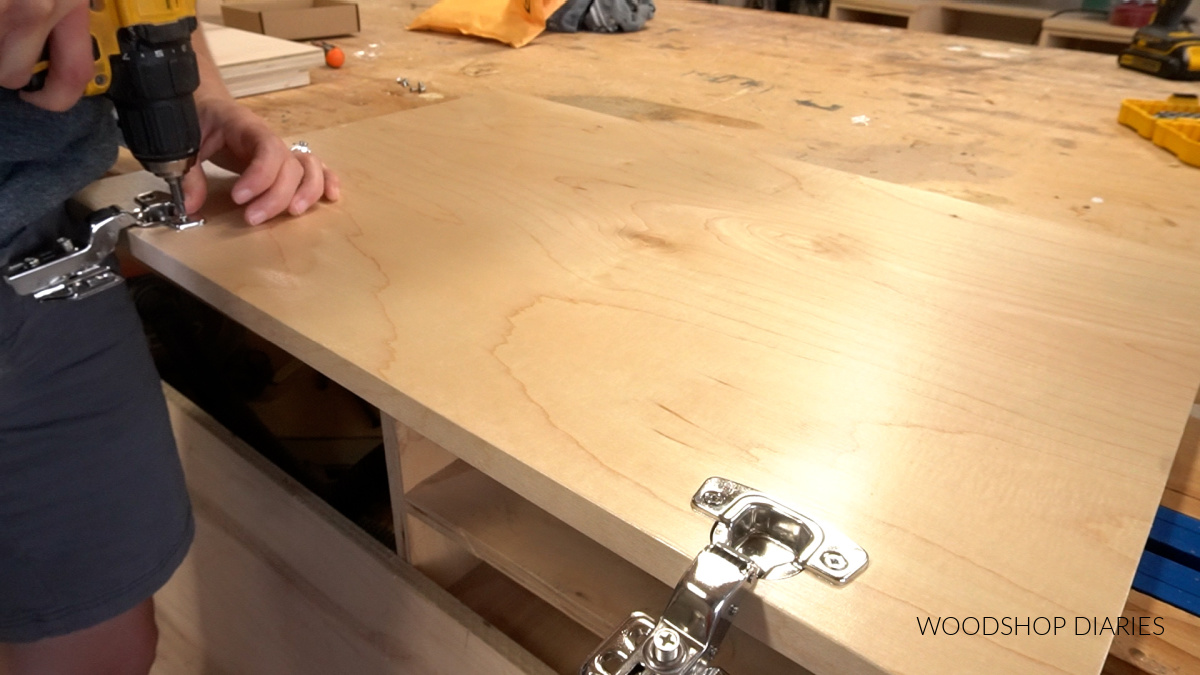
I set the doors in place on a scrap piece of ½″ plywood to help me keep my spacing correct (there should be ½″ space at top and bottom of door on front side).
.
I found it easiest to install these from the inside of the cabinet by crawling in the back side. Note that these should be about ¼″ inset from the front edge so they are flush against the inset bottom and top pieces from step 3.
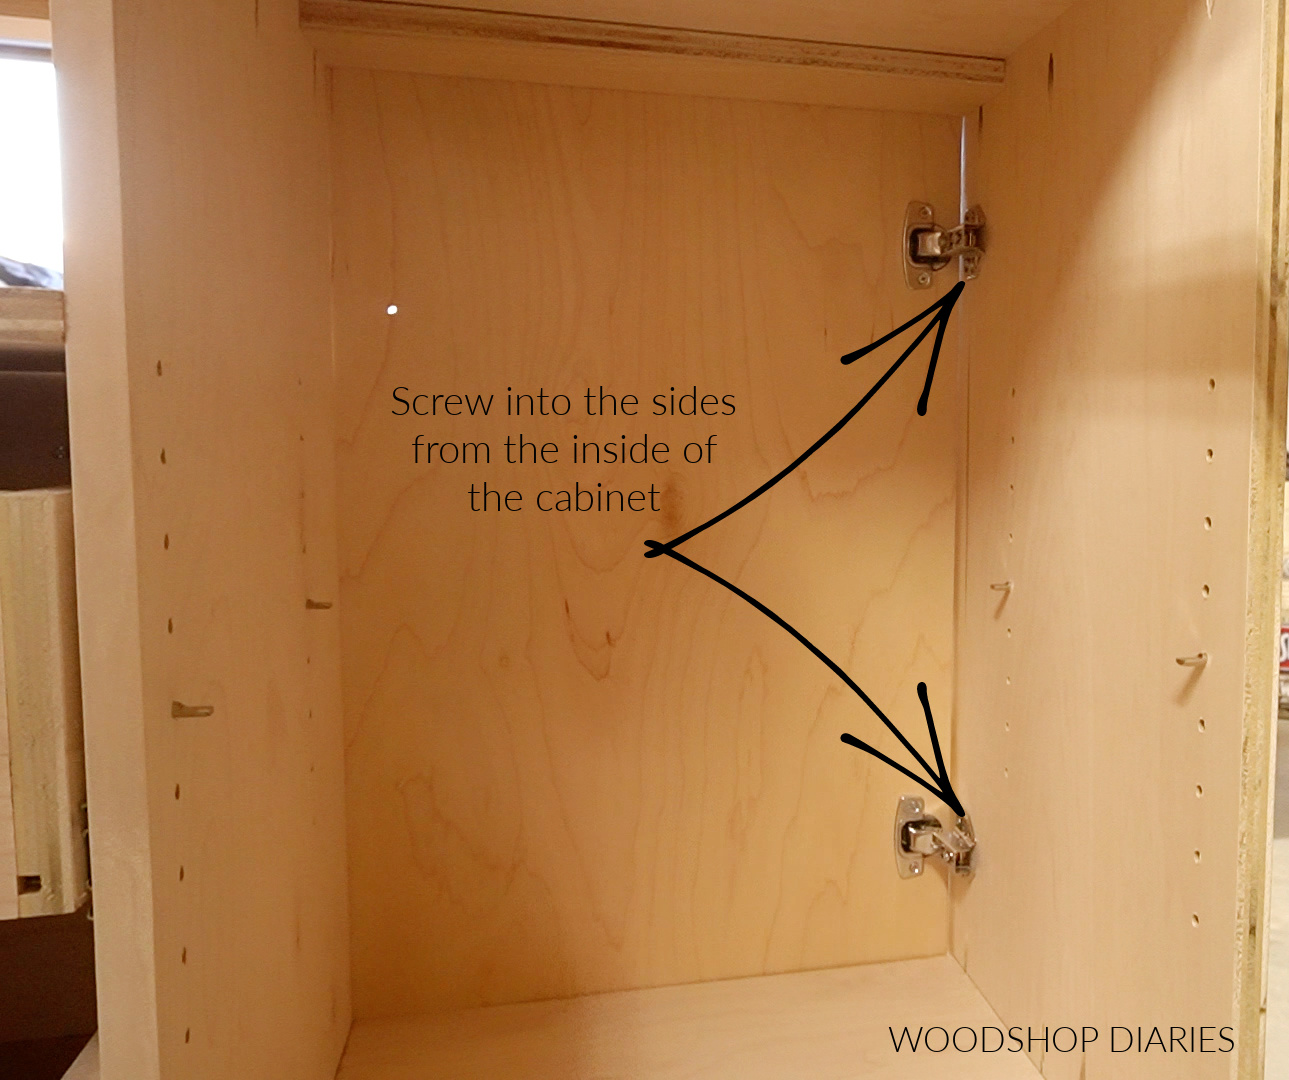
Adjust hinges so that there is about ⅛″ gap between the door and dresser side.
Step 10: Install Back and Add Shelves
Once the doors are installed, all that’s left is to add the back panels and the shelves.
.
I cut and stapled two ¼″ plywood back panels onto the cabinet sections of the dresser like shown below. If you don’t have a stapler, you can use screws or brad nails too.
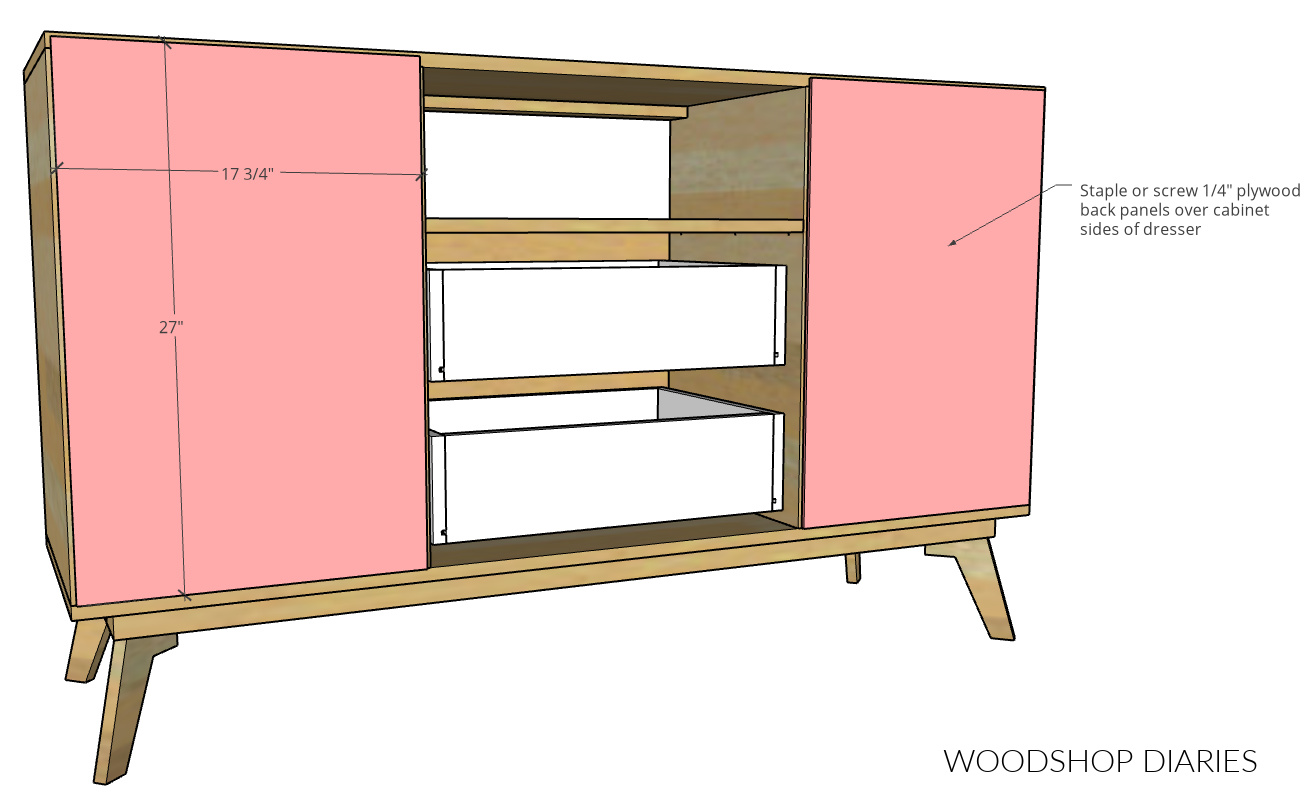
Now, install the shelf pins inside each cabinet and place shelves where desired.

Step 11: Finish As Desired
Now you can finish as desired. Paint…stain…poly…wax. You can get as creative with the finish as you wish.
.
I simply applied three coats of Minwax Helmsman Poly to the dresser to protect it, but keep it’s natural color.
.
Then, I added these simple black handles and this DIY modern console was complete!
.
PSSST…Notice that Woodshop Diaries shirt?? Check out all the latest woodworking t-shirt designs available in my shop here and grab a few of your favorites!!
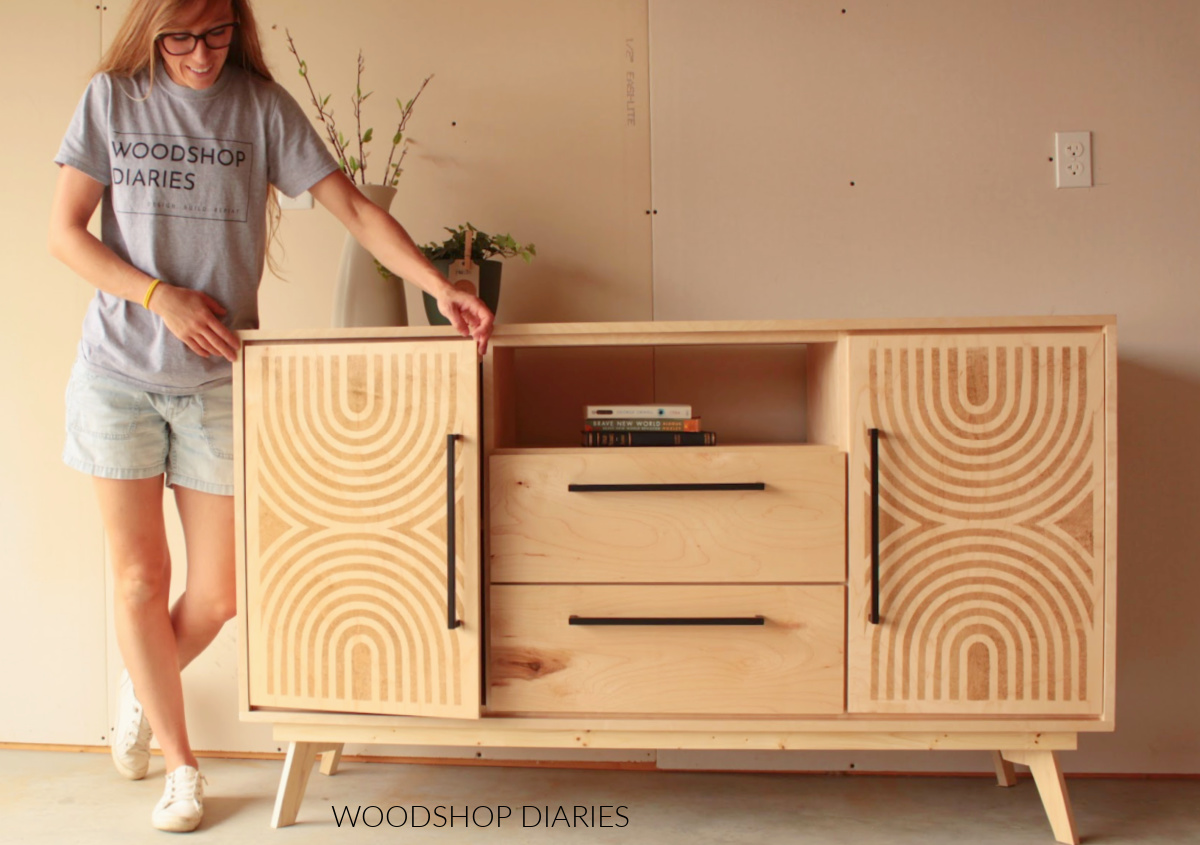
I LOVE LOVE LOVE how this turned out! I also love the idea of having cabinets in a dresser as the shelves really help add some useful storage space for things like clothes, blankets, and linens.
.
This would also be amazing as a TV stand with the open shelf in the middle for modems, DVD players, and other electronics.
.
I really hope you enjoyed this project and this build and if you want to stay up to date on the latest new projects in this matching series, be sure to subscribe below to follow along!
And if you want to build one of these for yourself, don’t forget to grab the printable plans here!
.
If you’d like to save this for later, be sure to share it to your favorite social channel or pin it for later!
Until next time, friends, happy building 🙂