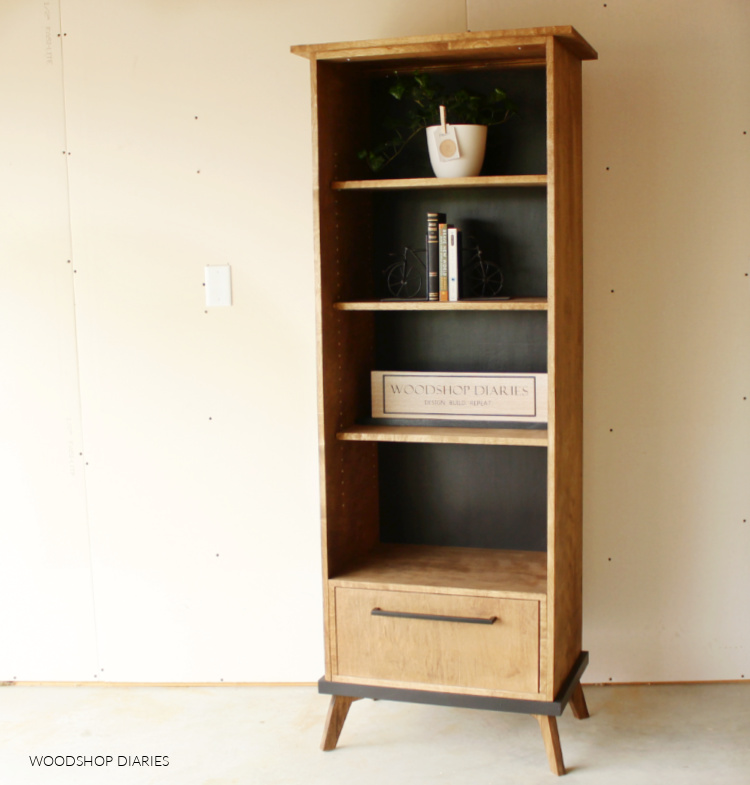
In this post, I’ll show you how to build a Modern Bookcase Cabinet with Drawer!
This post is actually part 2 of an “unplanned” bookshelf series! You can check out part 1 here. I recently decided to build a bookcase, but I had two different designs in mind.
.
You may recall that I took a poll on Instagram asking which you’d rather see–an open shelf design or a cabinet style build.
.
The results were almost 50/50 and after getting several messages from people wanting to see how to build both, I decided to make two posts.
.
I shared the open shelf design here and now we are tackling the enclosed, cabinet style design in this post.
.
So if you’re ready to get building part 2, let’s go. I’ve got the video below and the build plans following:
SOME NOTES ABOUT THE BUILD:
Because both of these projects are *almost* exactly the same except for the sides, instead of making two separate bookcases, I decided to “repurpose” the first one and make the modern bookcase cabinet version.
.
You can see more of that in the video above.
.
However, the plans below will walk you through the steps to build this bookcase completely from scratch.
.
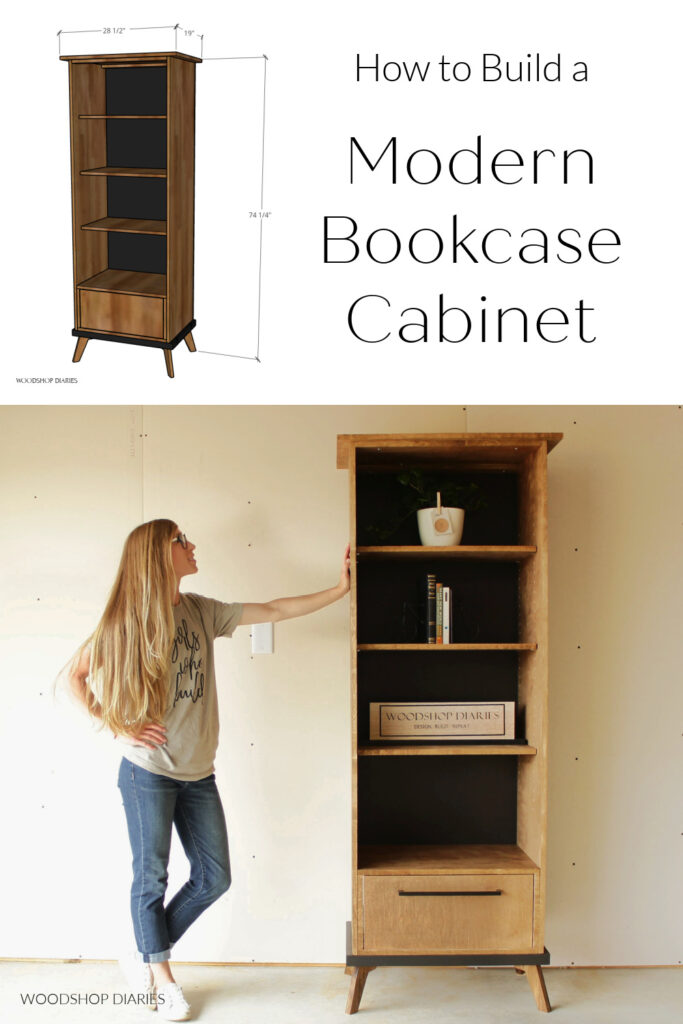
The overall dimensions are 18″ deep x 28 ½″ wide x 74 ½″ tall.
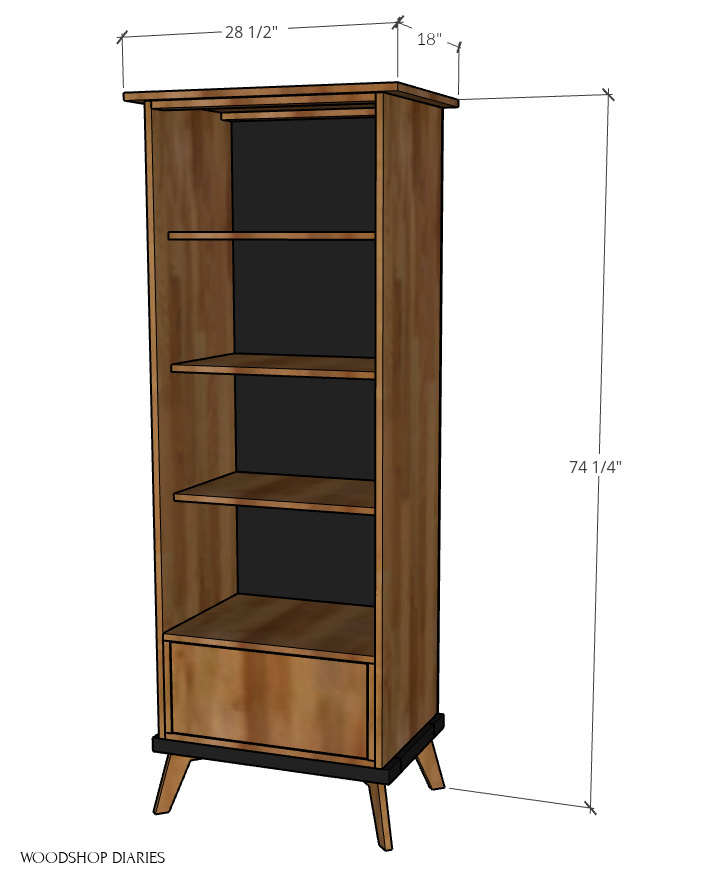
The cabinet and drawer are made from birch plywood and the base is made from 2x4s for the frame and scrap 1x material for the legs.
.
You might find these posts helpful in the building process:
- How to cut plywood sheets
- How to use a pocket hole jig
- How to edgeband plywood
- How to build and install drawers
What You’ll Need to Build a DIY Modern Bookcase Cabinet
*This post contains affiliate links. See policies.
Materials:
- (1 ½) sheet ¾″ plywood
- (1) 2x4x8 boards
- (½) sheet ¼″ plywood
- 1x scraps to cut legs from
- 1 ¼″ & 2 ½″ wood screw
- 1 ¼″ pocket hole screws
- 2 ½″ pocket hole screws
- Edge banding
- (1) pair 16″ ball bearing drawer slides
- Paint & stain as desired (I used SW Black Magic and Minwax Provincial)
- Shelf Pins
Tools:
- Circular saw (cutting guides optional, but helpful)
- Miter saw
- Jig saw
- Table saw (optional)
- Pocket hole jig
- Drill/Driver
- Stapler (optional–can use screws instead to attach back panel)
- Shelf Pin Jig
Grab the Modern Bookcase PRINTABLE PLANS HERE:
Step 1: Build Modern Bookcase Base
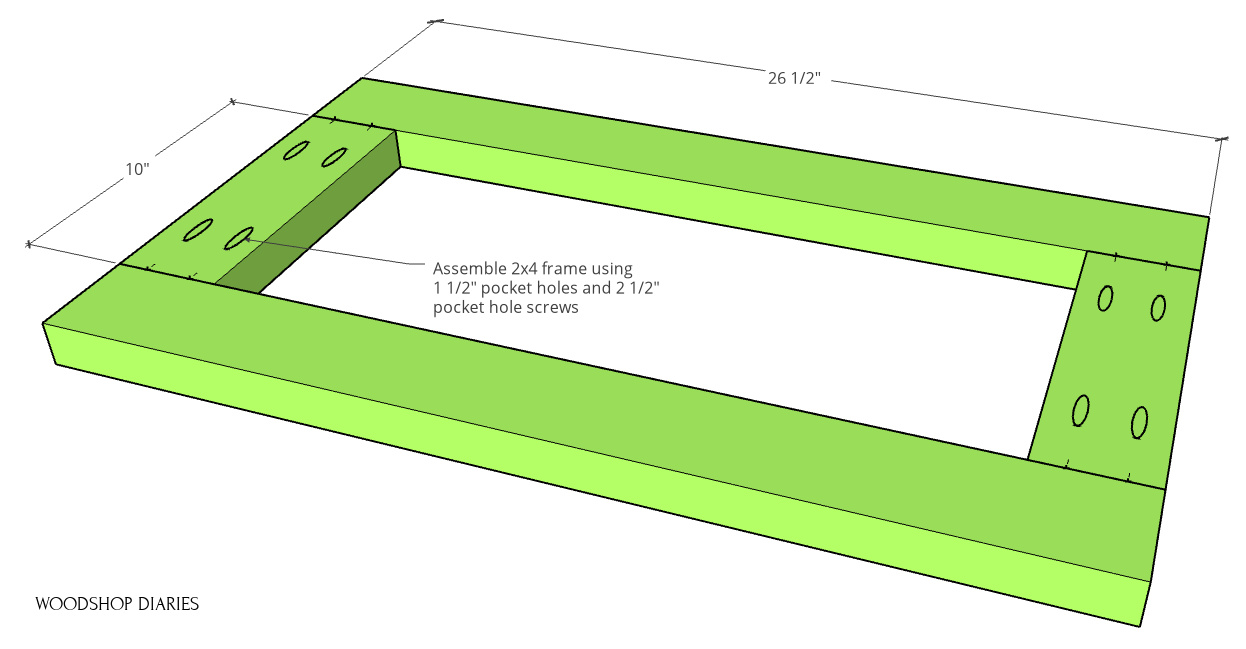
The base of this modern bookcase cabinet consists of a 2×4 frame with mid century style legs attached to the corners. So, first, I cut down 2×4 pieces and assembled a frame using pocket holes and screws plus some wood glue.
RELATED: How to use a pocket hole jig.
I puttied the joints to prep for paint later and while it was drying, cut out the legs.
.
These legs are the same style legs I used in the open bookshelf, the recent mid century dresser build, and I’ve also used them before in an upholstered bench, a dog bed, and a dog food bowl stand.
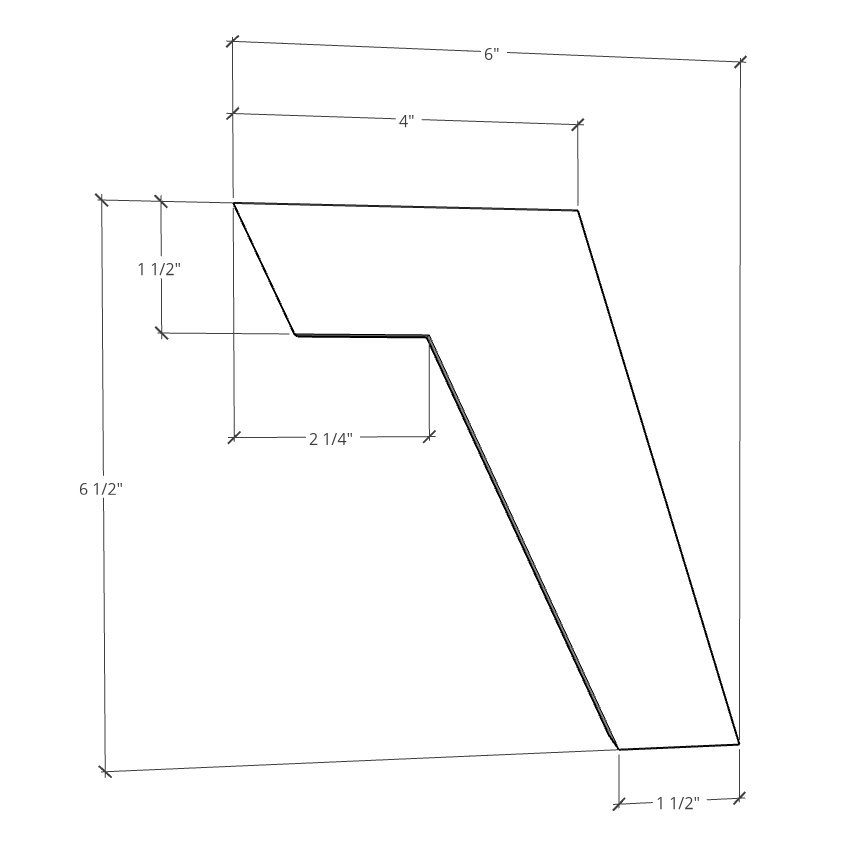
I used some scrap 1x poplar I had in the shop for these. But, you could also use ¾″ plywood, or any 1x material you have handy.
.
Once I drew out the shape shown above on my board, I cut it out with a jig saw, then cut three more identical feet and sanded them smooth.
.
I used a speed square to measure and mark 2” in from the corner at a 45 degree angle, and used wood glue and 2 ½” wood screws to attach all four legs to the base frame.
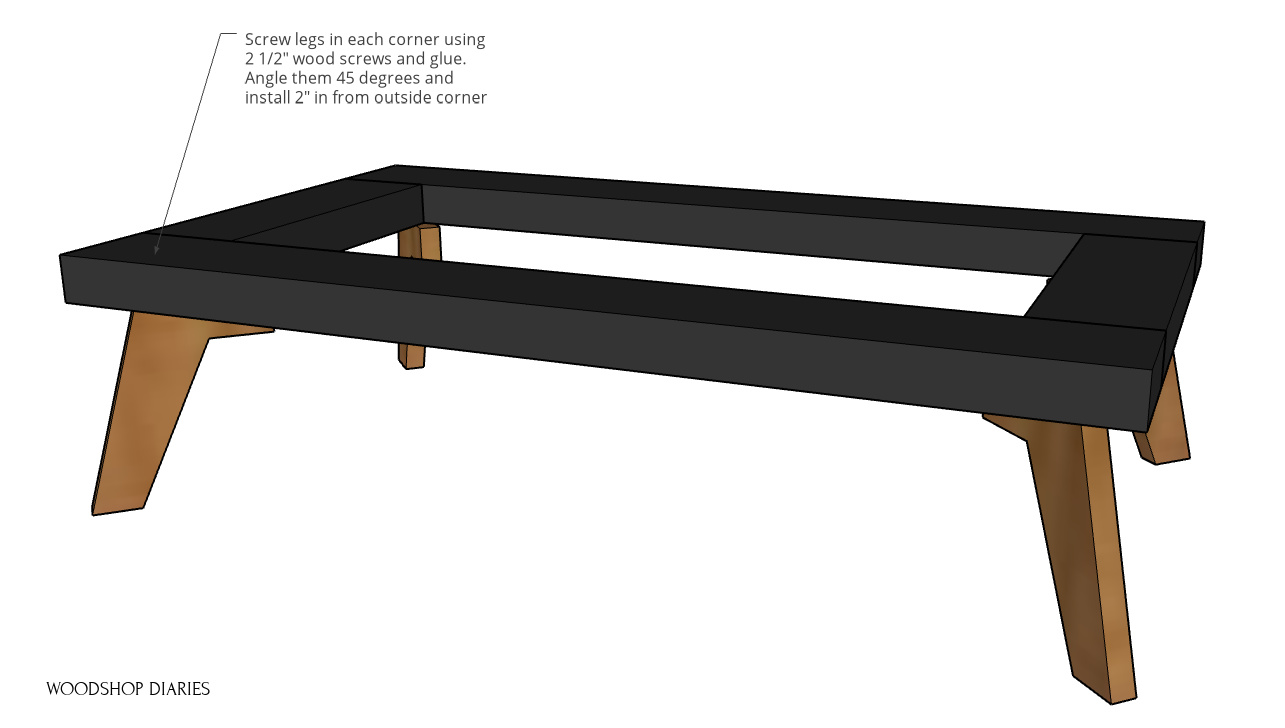
I primed and painted the base frame SW Black Magic and stained the legs Minwax Provincial. You can paint/stain later, but I thought it was a little easier to do it before adding all the pieces on top.
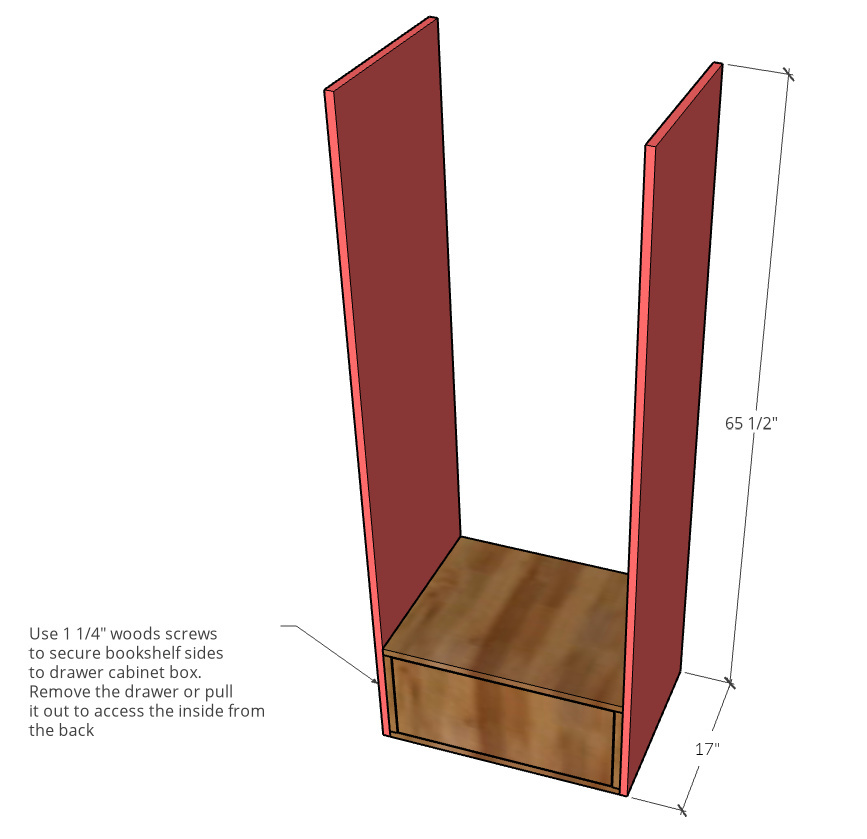
Step 2: Build Drawer Cabinet Box
I cut down my ¾″ plywood sheet and began building the box to hold the drawer.
RELATED: Check out this post for how to EASILY cut down a plywood sheet.
.
Before assembling, I applied iron on edge banding to the front edges of the box pieces. This is totally optional, but does hide the plywood edges so you don’t see them.
RELATED: How to apply iron on edge banding.
.
To assemble the drawer box, I used wood glue and pocket holes and screws to attach the top side, but since the space was so tight, I used regular 1 ¼″ wood screws on the bottom side.
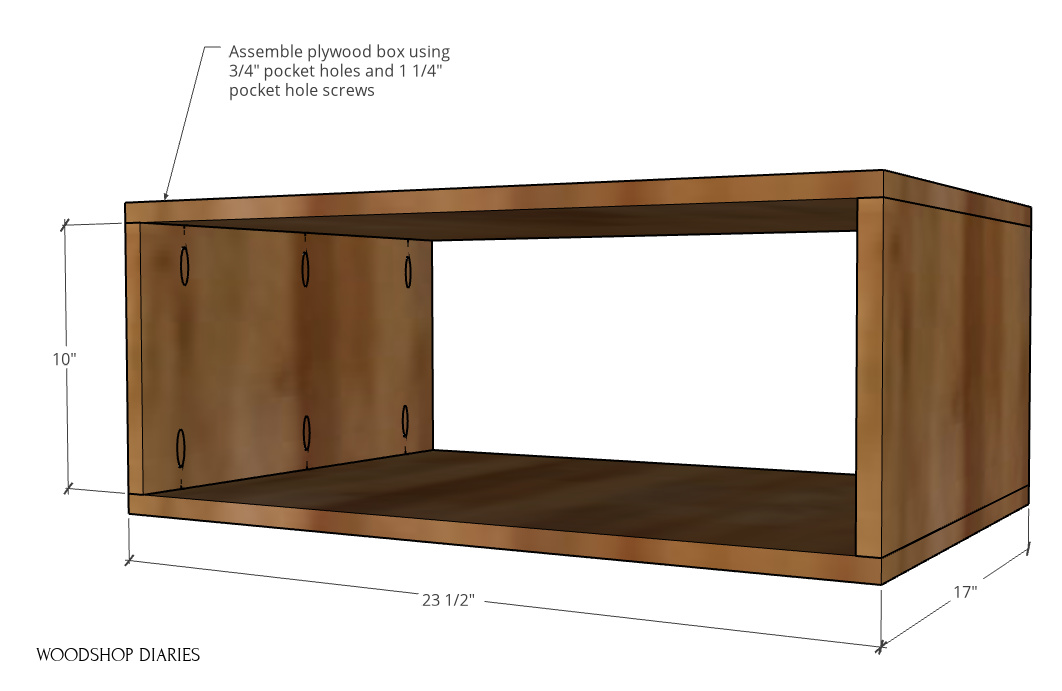
If you had a 90 degree angle drill attachment, you could use that to drive the pocket holes in this tight space, but screws on the bottom side work fine, too and won’t be seen in the finished project.
Step 3: Build and Install Drawer Box
I installed a pair of 16” drawer slides into the box ¾″ inset from the front edge.
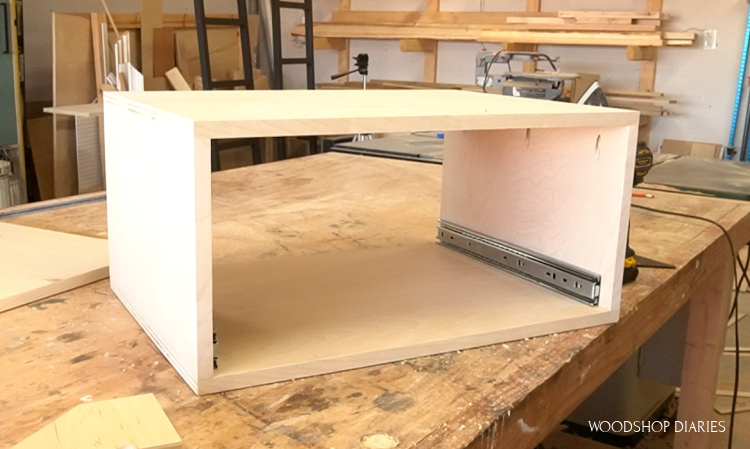
Then, I built a drawer box to fit inside. I have a complete guide to building and installing drawers here.
.
I built the sides of the drawer box from ¾″ plywood and used ¼″ for the bottom. I cut dadoes in the drawer box sides to insert the plywood bottom, but you could also just glue and staple it onto the bottom if you didn’t want to cut dadoes.
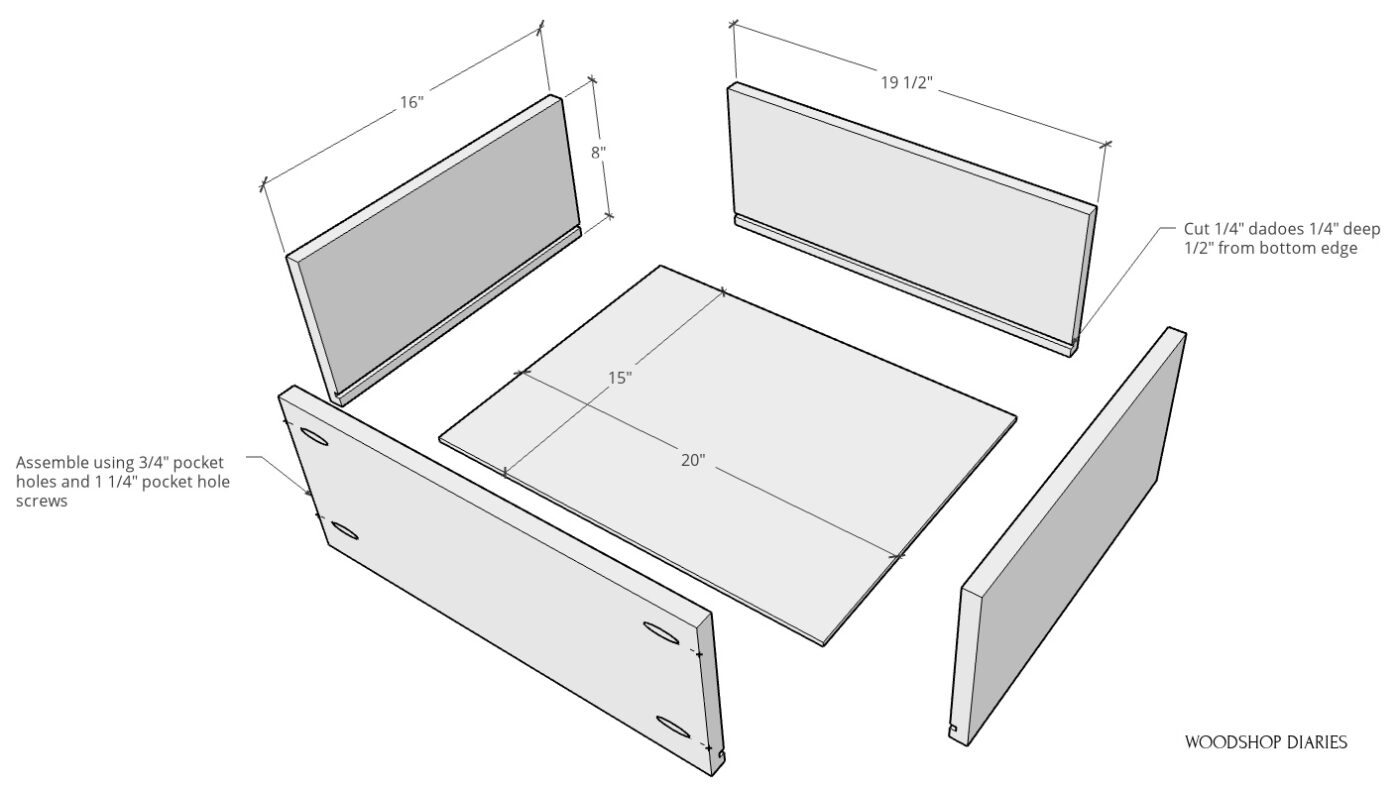
I assembled the box using ¾″ pocket holes and 1 ¼″ pocket hole screws.
.
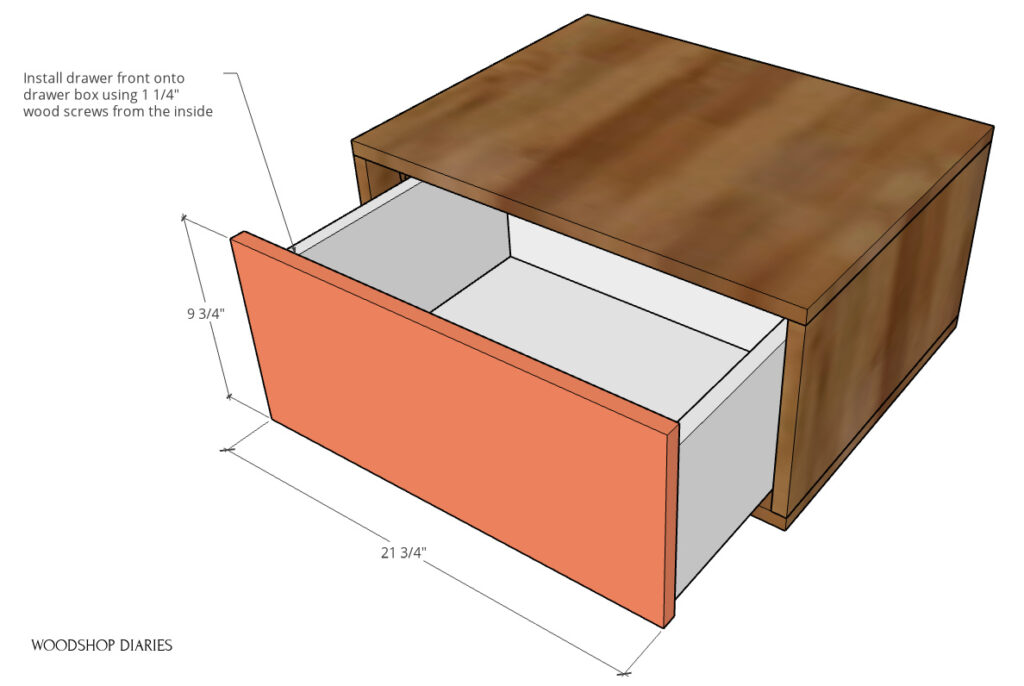
Then, I installed it into the drawer cabinet box ¾″ inset from the front edge and cut a ¾″ plywood drawer front to fit on the front.
.
I edge banded the drawer front and screwed it in place through the inside of the drawer box using 1 ¼″ wood screws. There should be ⅛″ gap around all sides of the front.
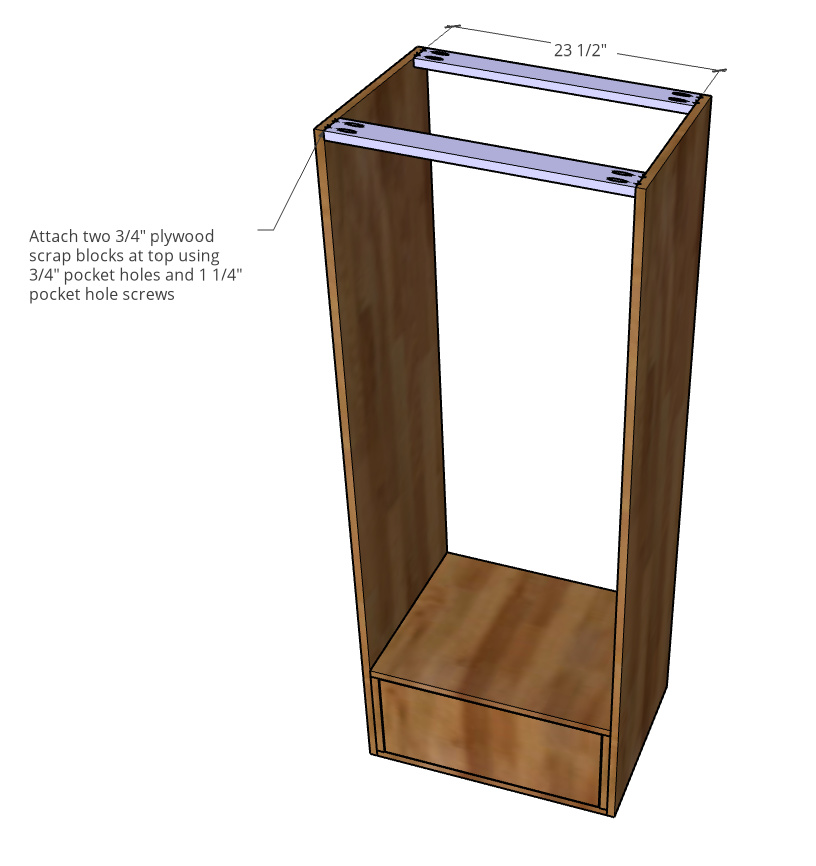
Step 4: Assemble Bookcase Cabinet
I used my circular saw and Kreg Rip Cut to cut down two strips to mount on each side of the drawer box at the bottom of this shelf.
RELATED: How to cut down plywood sheets.
.
I applied edge banding to the edges that will be exposed on the finished piece to give it a cleaner look, then I stained them in Minwax Provinial before attaching to the sides of the drawer box with 1 ¼″ wood screws from the inside.
That gives me two sides, but I needed a couple of support pieces to go at the top of this cabinet to be able to mount the top panel to.
.
So I grabbed a couple thin ¾″ plywood strips (mine were about 2 ½″ wide, but they don’t have to be exact) in my scrap pile and cut them to 23 ½″ long.
.
I drilled pocket holes into these thin top support strips stained them. Then, I attached the thin strips at the top—one in the front and one in the back.
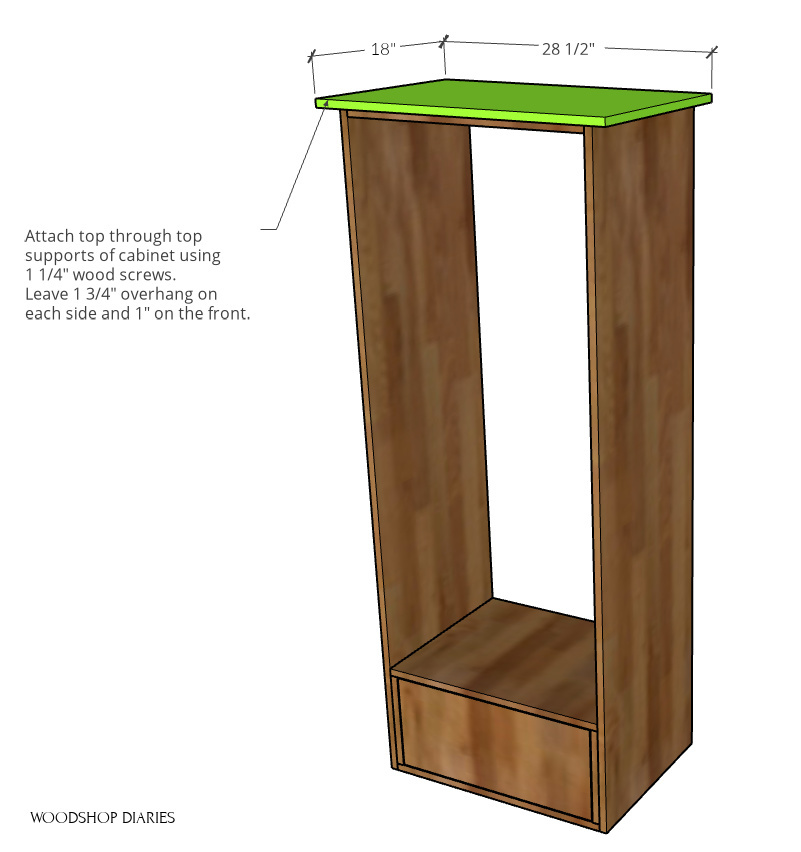
Step 5: Attach Bookcase Top
Then, I attached the ¾″ plywood top through the top supports using 1 ¼″ wood screws.
Step 6: Attach Cabinet to Base
Set the cabinet from step 5 onto the base from step 1 and attach together through the bottom side of the drawer cabinet box.
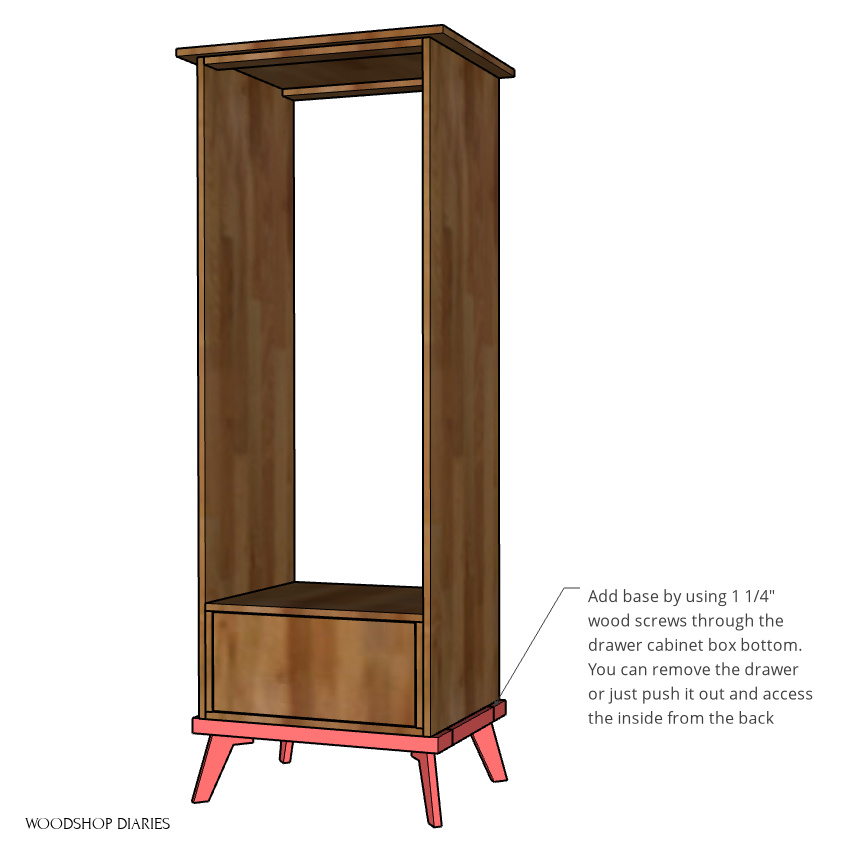
You can remove the drawer or pull it out to access the inside of the cabinet box to attach.
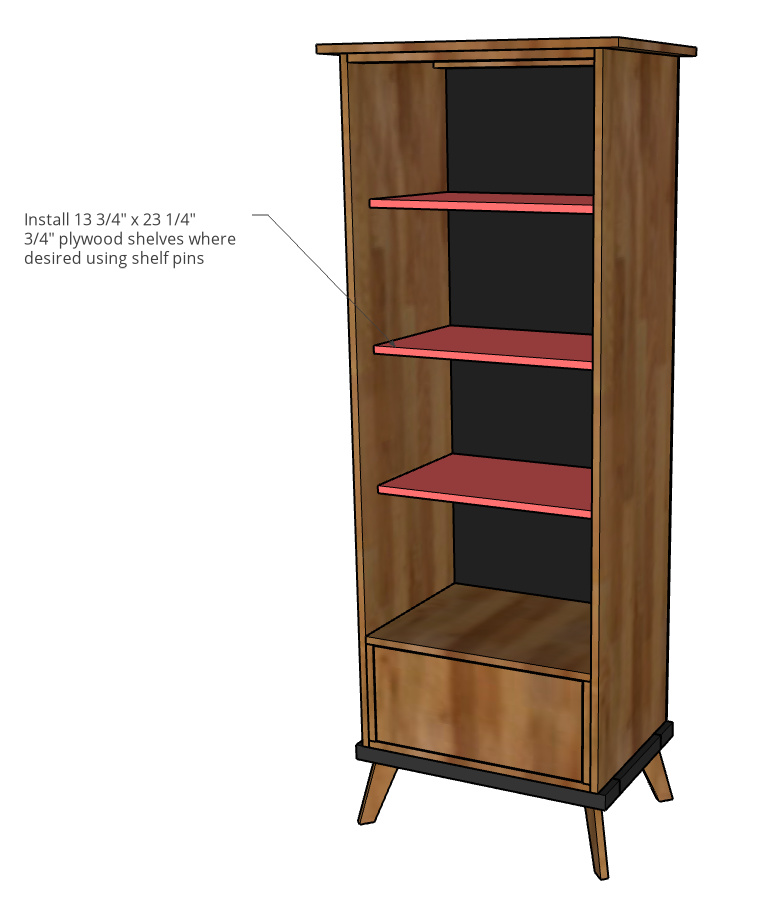
Step 7: Add Adjustable Shelves to Bookcase Cabinet
I used a shelf pin jig to drill shelf pin holes along the sides of the cabinet to position the shelves.
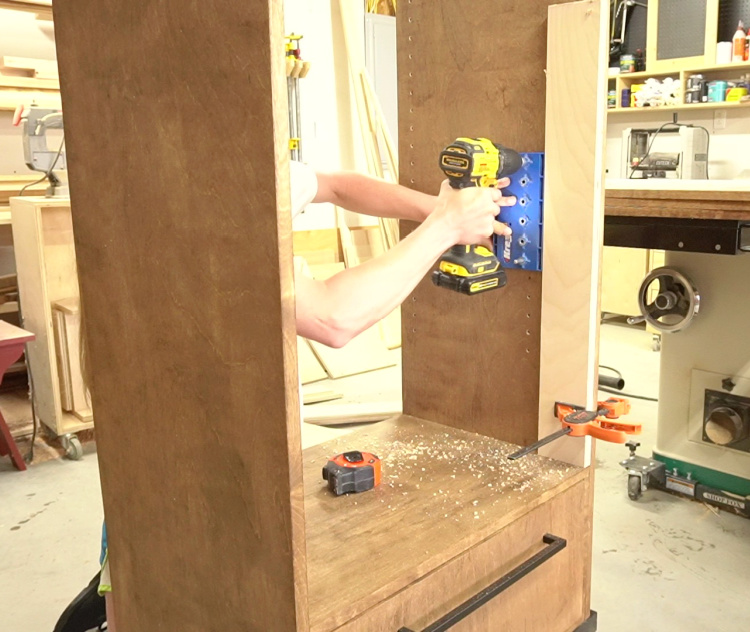
I used a scrap piece of plywood clamped to the front edge to make sure my shelf pin holes were drilled about 12″ from the back edge of the cabinet. This ensures the pins will be far enough back that the shelves will rest on them.
RELATED: Learn more about shelf pin jigs here.
.
Then I cut three ¾″ plywood shelves 13 ¾″ deep x 23 ¼″ wide and installed them with shelf pins.
Step 8: Add Back Panel
I cut to fit a ¼″ plywood panel onto the back side of this cabinet. To give it a little interest, I painted it SW Black Magic before stapling it onto the back.
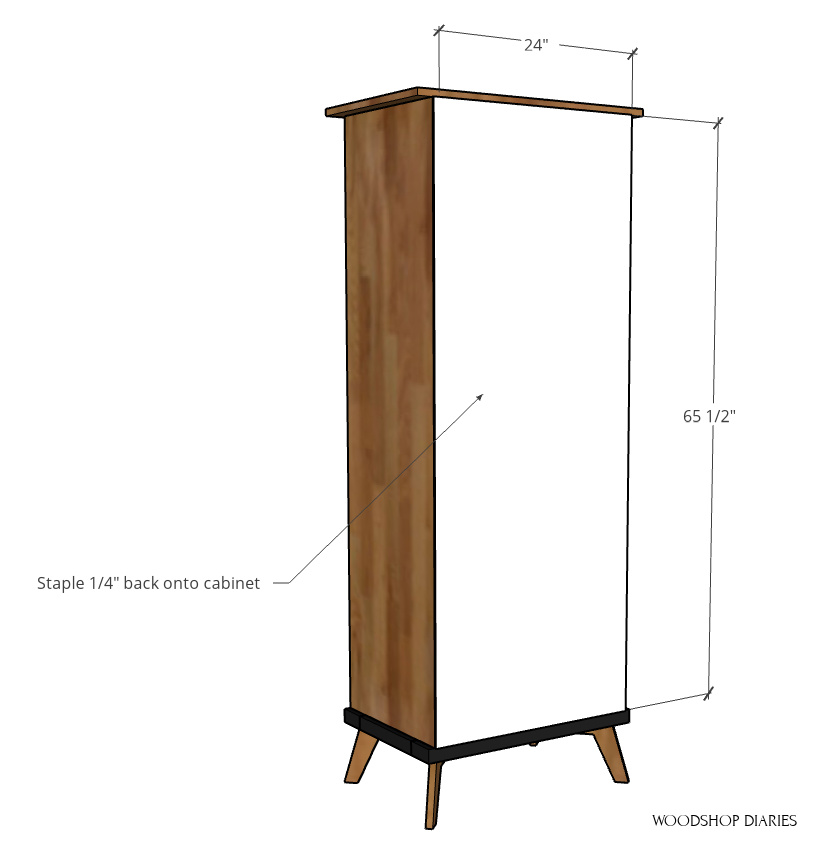
Note that you can cover or not cover the bottom section where the drawer box is. I show it covered here, but I didn’t cover it when I built it–I just covered the open top section of the bookcase.
.
Also note that I made this 24″ wide so that you could use a 2×8 sheet of ¼″ plywood to complete this project. However, that only leaves ¼″ overhang on each side of the opening. If you have a whole sheet, you might consider cutting it 25″ wide to give you more room to staple. Either way works fine.
.
And, now I have a modern bookcase cabinet with drawer!
.
Truth be told, I voted for this style bookcase when I took the poll between this one and the open shelf design. However, I’m pretty torn on which one I like better now that they’re both built!
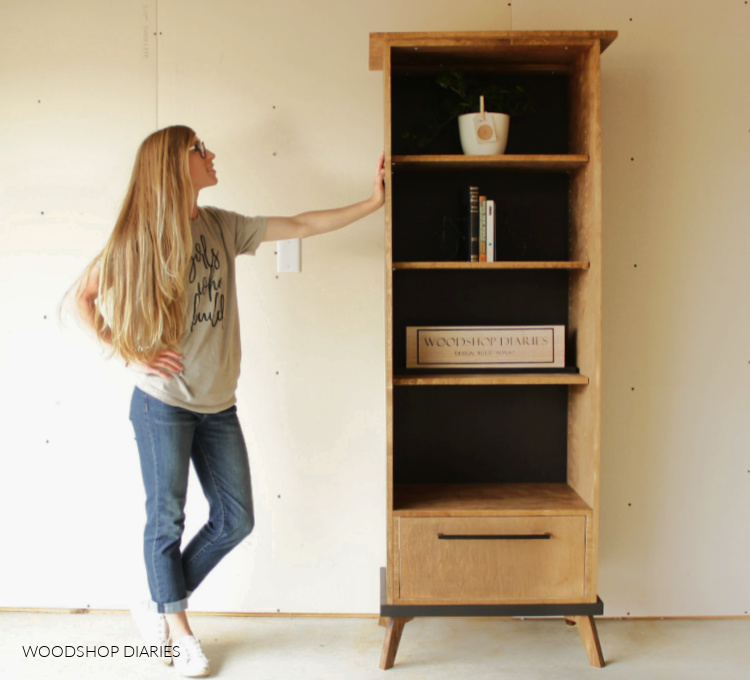
Either way, I’ve got plans for both so now matter which one is your style, I’ve got you covered 🙂
.
I hope you enjoyed this short series and watching me make two similar designs differently.
.
I’ll be back soon with more projects and plans, so if you want to follow along to see what’s next, I’d love if you’d subscribe so you don’t miss out on the latest projects!
If you’d like to save this for later, don’t forget to pin it!
Until next time, friends, happy building! 🙂