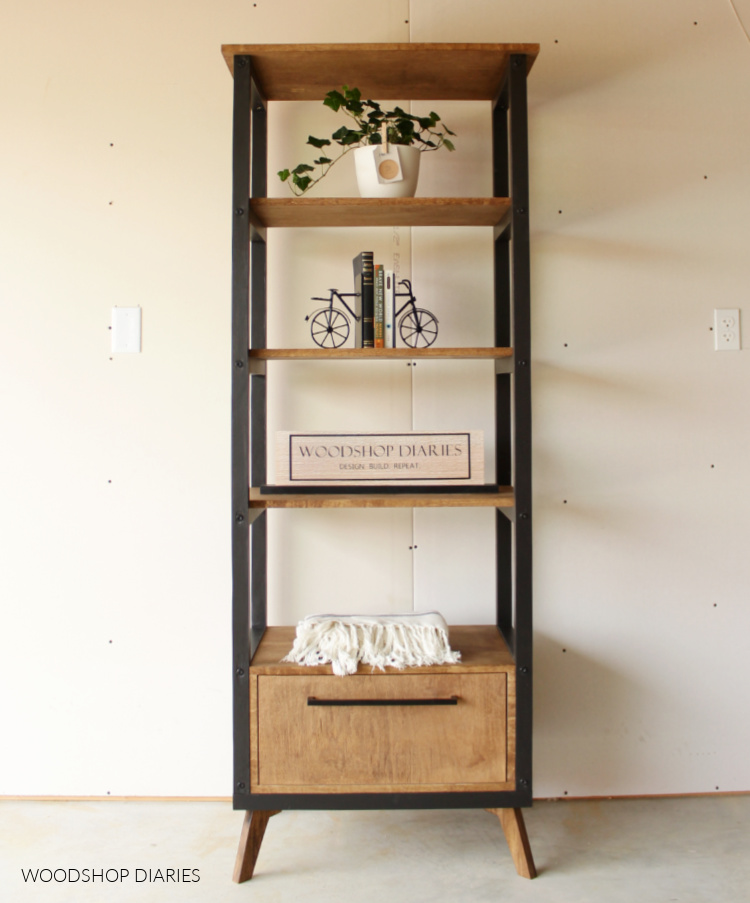
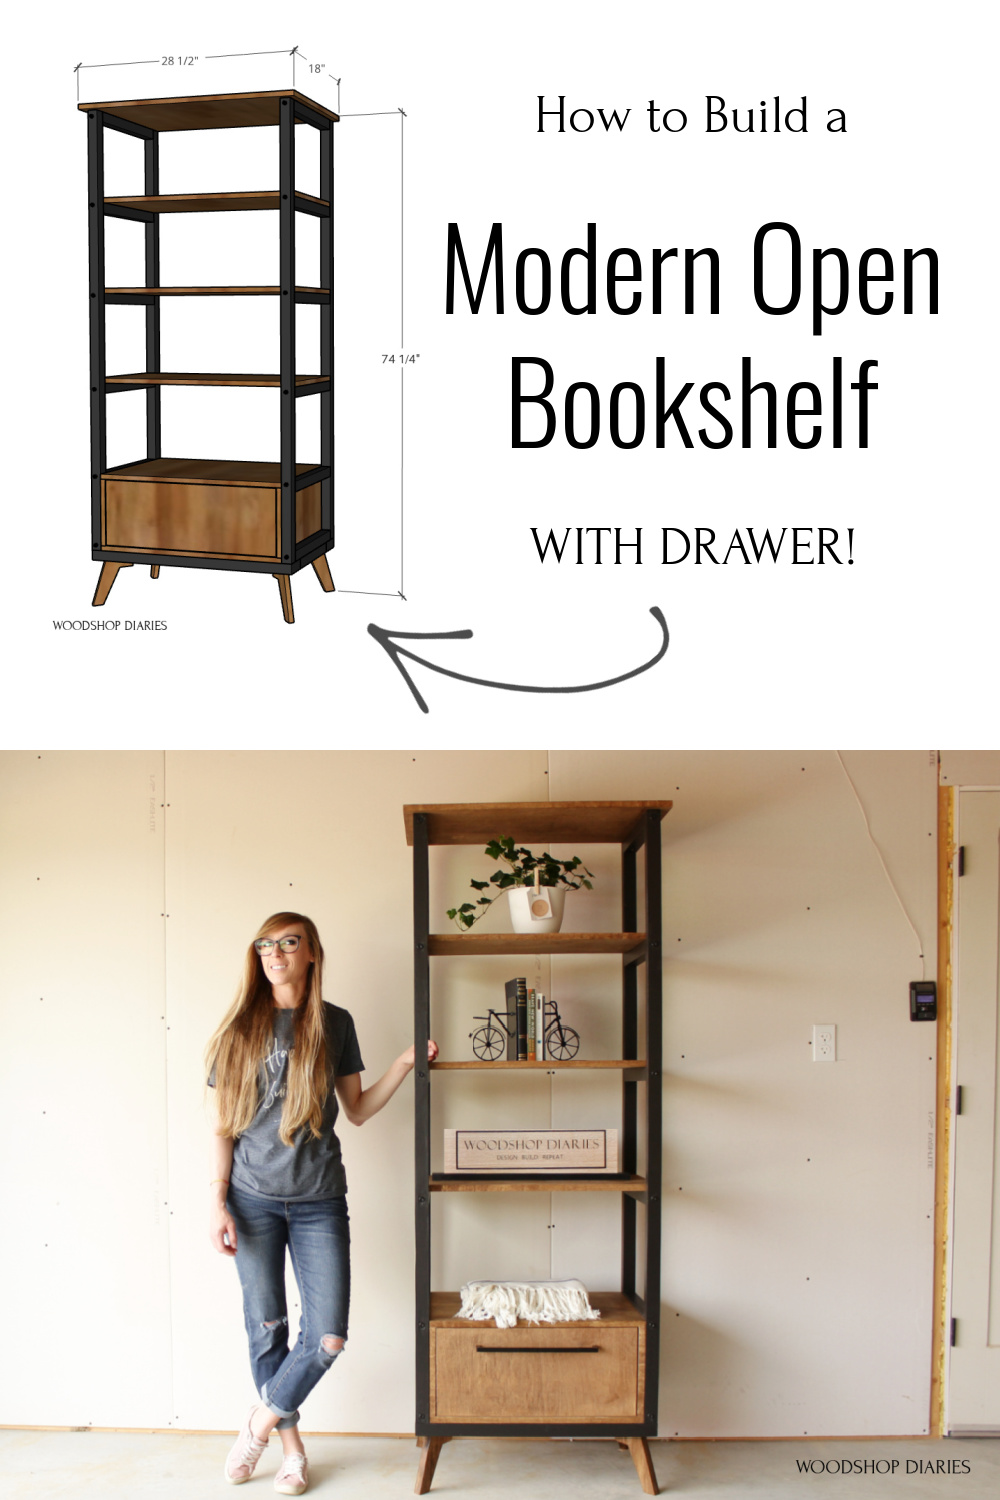
In this post, I’m sharing how to build a DIY modern open bookshelf with drawer!
This is actually part 1 of an “unplanned” two-part bookshelf series!
.
I designed two similar bookshelves and couldn’t decide which to build. So, I took a poll on Instagram and the results were pretty useless as it was almost a 50/50 split.
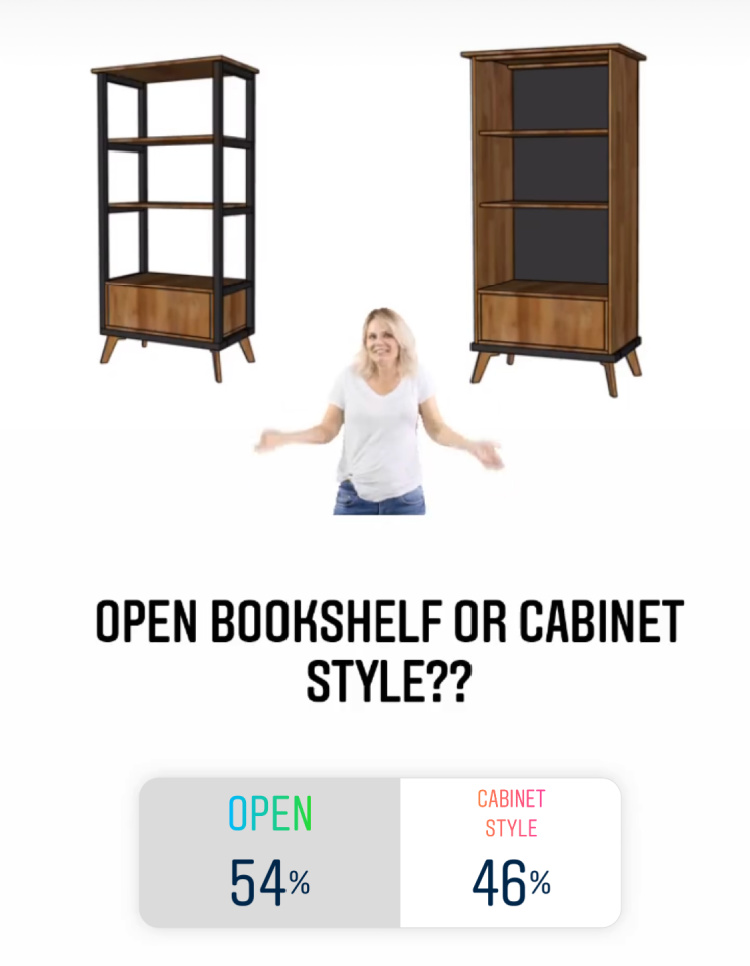
I got several messages from people saying to “build both.” So here we are…starting a series that was supposed to be one build haha. But I’m here to help, so if you guys want both, I’ll make it my job to do both 🙂
.
I’m sharing the open bookshelf with drawer design this week and I’ll follow up with the cabinet style design next. So if you aren’t already following along, be sure to subscribe to the newsletter below so you don’t miss part 2!
In the mean time, if you’re ready to get building, let’s dive in to part 1–the open bookshelf with drawer build.
.
I’ve got the plans below and the video here:
.
NOTES ABOUT THIS BOOKSHELF PROJECT :
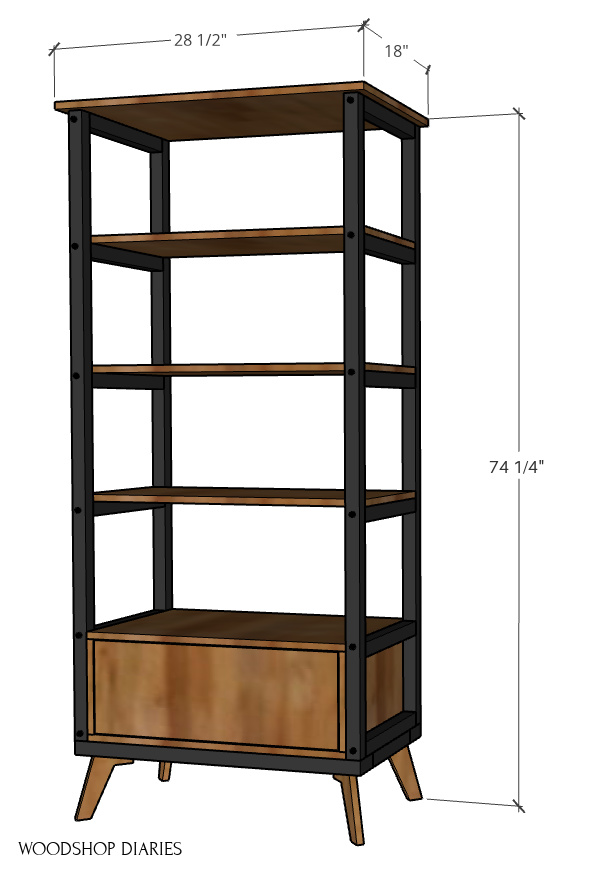
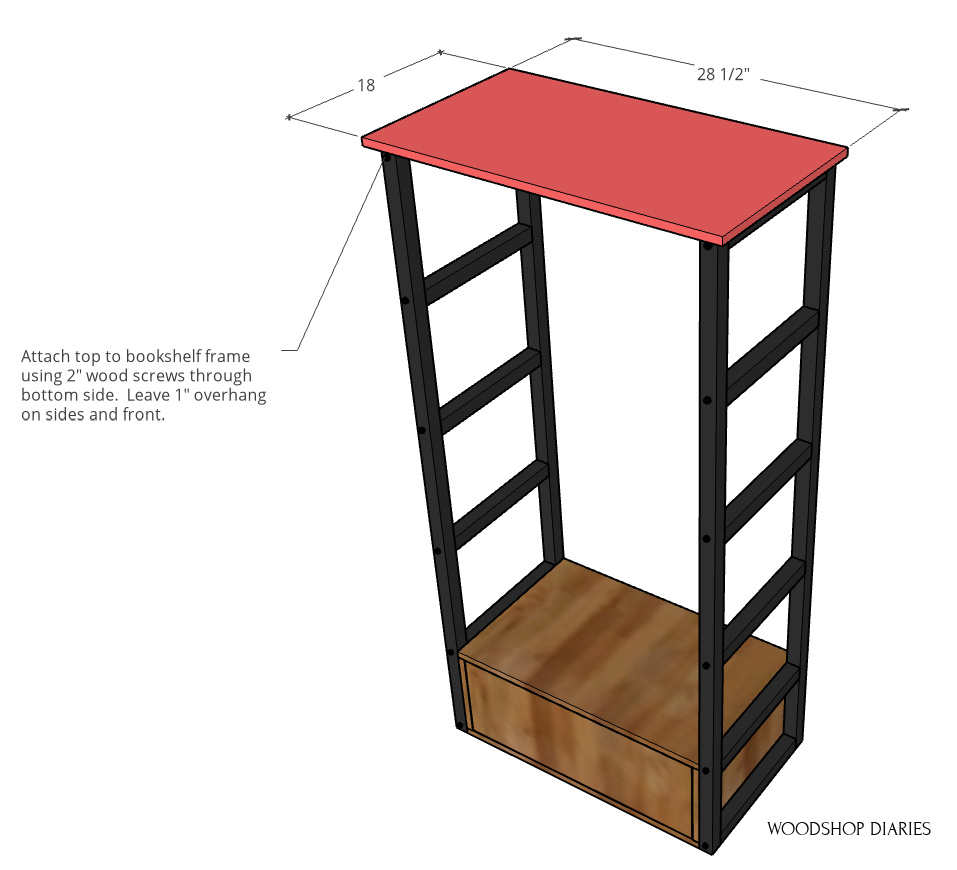
The overall dimensions of this project ended up being about 28 ½″ wide, 18″ deep, and 74 ¼″.
I built it from birch plywood and basic construction grade 2x4s. The shelf frame is made from 2x2s. I make my own 2x2s from 2x4s using this tutorial, but you can buy precut 2x2s instead if you prefer.
.
I used timber screws to assemble the frame as I thought it was a cool decorative detail, but, they are kind of pricey and were a pain to paint around. That said, if I were to do this again, I would just use 3″ wood screws instead and just putty and paint over the screw holes.
.
You may find these posts helpful in the building process:
- How to cut your own 2x2s from 2x4s
- How to cut plywood sheets
- How to use a pocket hole jig
- How to edgeband plywood
- How to build and install drawers
What You’ll Need to Build It:
This post contains affiliate links. See policies.
Materials:
- (1) sheet ¾″ plywood
- (3) 2x4x8 boards
- ¼ sheet ¼″ plywood
- 1x scraps to cut legs from
- 1 ¼″, 2″, 2 ½″ & 3″ wood screws
- Timber screws (see notes above)
- 1 ¼″ pocket hole screws
- 2 ½″ pocket hole screws
- Edge banding
- (1) pair 16″ ball bearing drawer slides
- Paint & stain as desired (I used SW Black Magic and Minwax Provincial)
Tools:
- Circular saw (cutting guides optional, but helpful)
- Miter saw
- Jig saw
- Table saw (optional)
- Pocket hole jig
- Drill/Driver
Step 1: Assemble Open Bookshelf Frame
I assembled two identical frames from 2x2s for the bookshelf sides. I used 2 ⅞″ timber screws for this for an added decorative detail, but don’t really recommend them as they were a pain to paint around.
.
You can substitute the timber screws for regular 2 ½″ or 3″ wood screws instead.
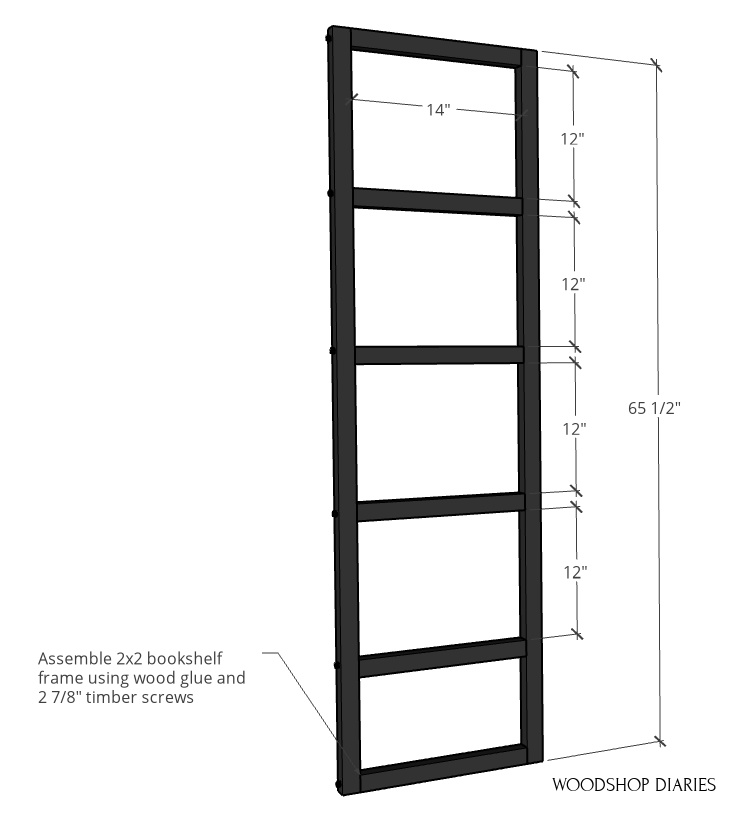
I used wood glue at all the joints as well and used a 12″ long scrap wood spacer block to equally space the shelf rungs.
.
I also predrilled all the holes before driving the screw as these 2x2s tend to split easily. See video above to watch the process.
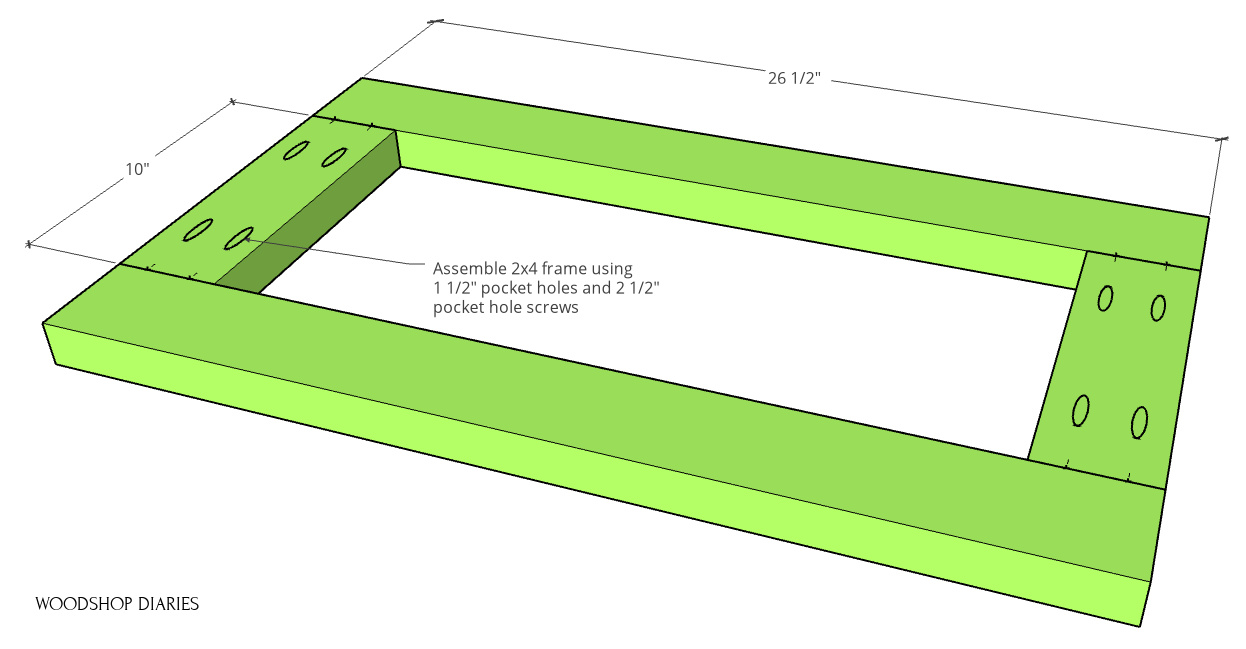
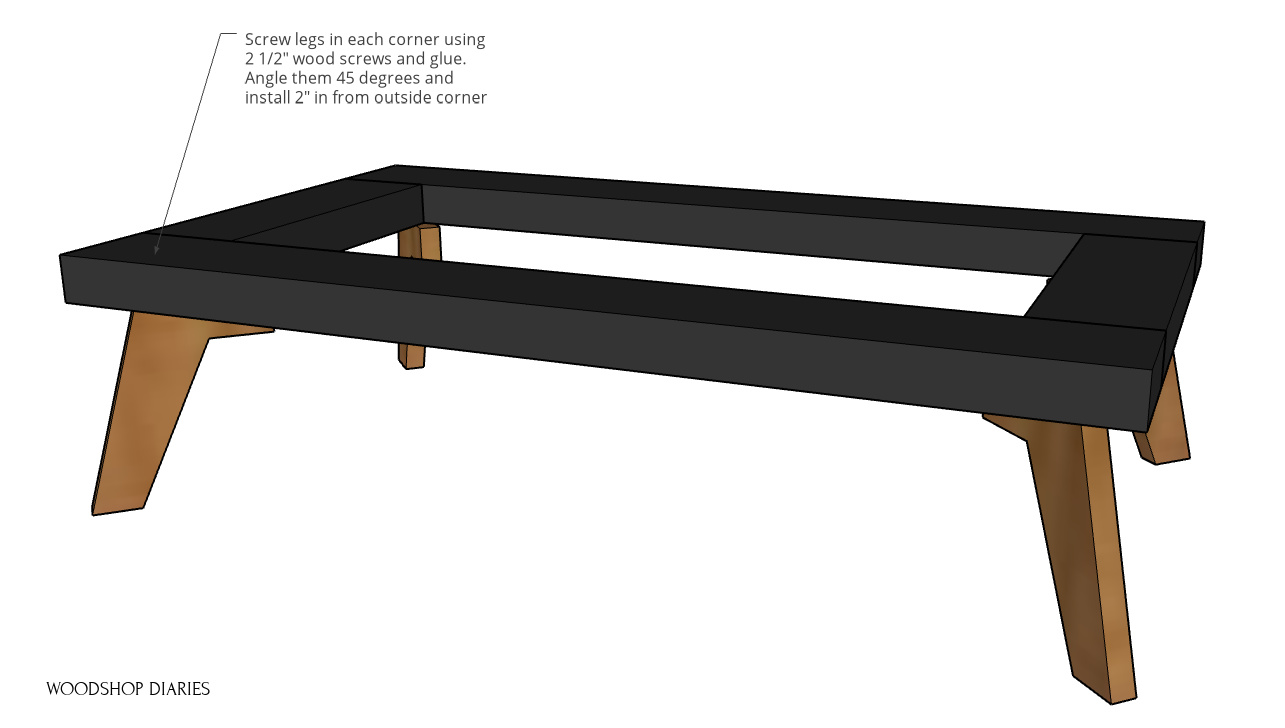
Step 2: Build Bookshelf Base Frame
The base consisted of a 2×4 frame with mid century style legs attached to the corners. So, first, I cut down 2×4 pieces and assembled a frame using pocket holes and screws plus some wood glue.
I puttied over the joints on this frame and the shelf frames from step 1 and while it dried, cut out the legs.
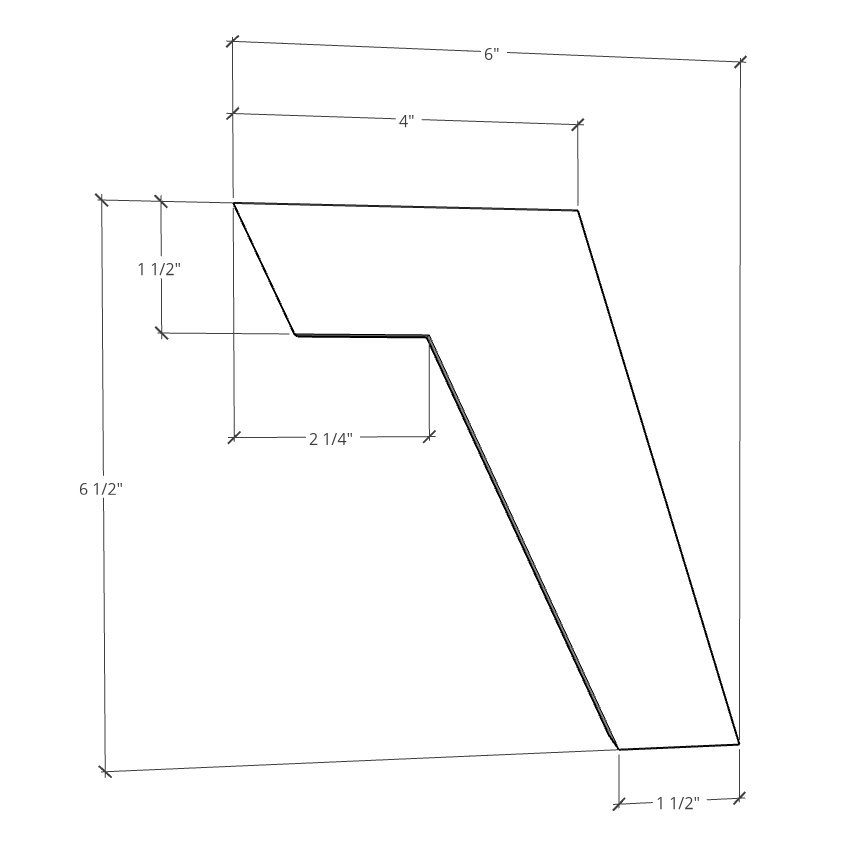
Step 3: Cut and Attach Mid Century Legs for Shelf Base
If you saw my recent mid century modern dresser, these legs may look familiar. I literally pulled them up from those plans on this website to copy them.
.
I used some scrap 1x poplar I had in the shop for these. You could use ¾″ plywood, or any 1x material you have handy. Once I drew out the shape, I cut it out with a jig saw, then cut three more identical feet and sanded them smooth.
At this point, the putty was dry on the frame from step 2, so sanded it smooth and began attaching the legs.
.
I used a square to measure and mark 2” in from the corner, and used wood glue and 2 ½” wood screws to attach all four legs to the base frame–see video above.
Once it was together, I began the process of painting.
Step 4: Paint Bookshelf Frames
This was BY FAR the worst part of this project. There was a lot of weeping and gnashing of teeth haha.
.
I primed and painted the base frame and the two side frames SW Black Magic. But before I painted, I backed out the screws on the front side of the shelf frames and wrapped them in painters tape so I didn’t paint over them.
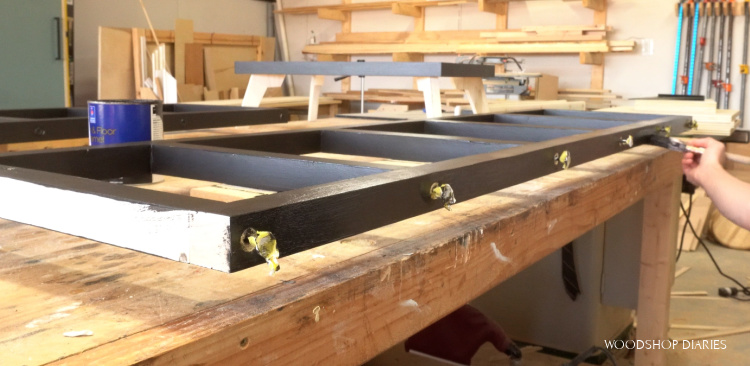
Again, in hindsight, I would have used different screws, but it is what it is.
.
Once the paint was dry, I tightened the screws back up on the side frames and set them aside to get back to building.
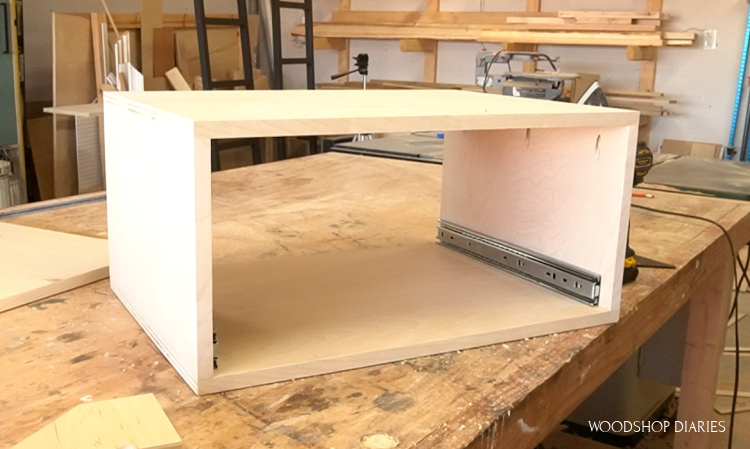
Step 5: Assemble Drawer Cabinet Box
I cut down my ¾″ plywood sheet and began building the box to hold the drawer.
RELATED: Check out this post for how to EASILY cut down a plywood sheet.
.
Before assembling, I applied iron on edge banding to the front edges of the box pieces. This is totally optional, but does hide the plywood edges so you don’t see them.
RELATED: How to apply iron on edge banding.
.
To assemble the drawer box, I used wood glue and pocket holes and screws to attach the top side, but since the space was so tight, I used regular 1 ¼″ wood screws on the bottom side.
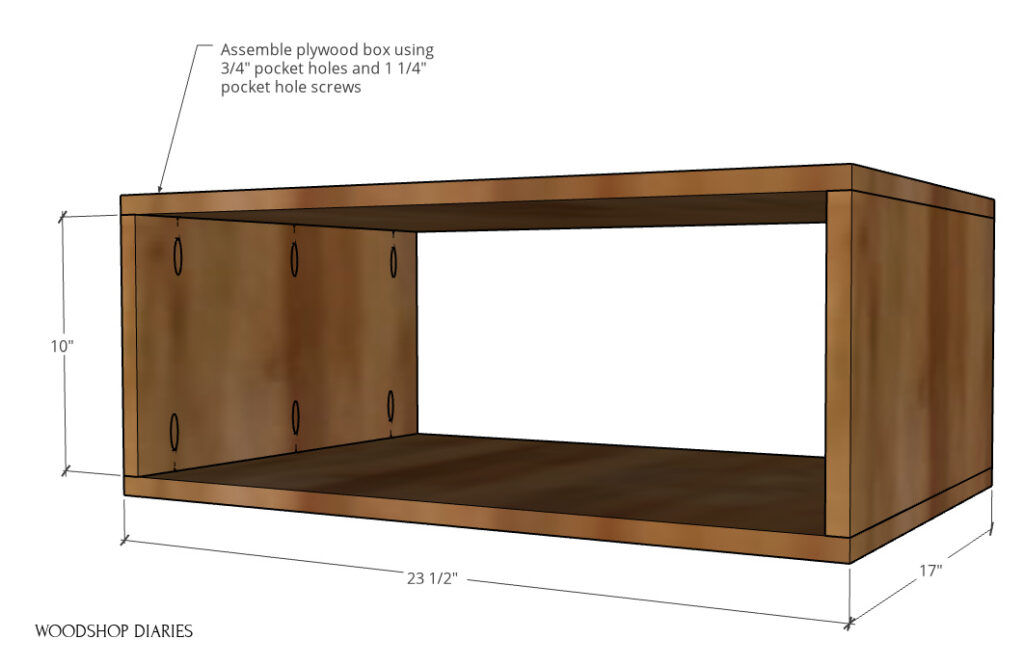
If you had a 90 degree angle drill attachment, you could use that to drive the pocket holes in this tight space, but screws on the bottom side work fine, too and won’t be seen in the finished project.
Step 6: Build and Install Drawer into Bookshelf
I installed a pair of 16” drawer slides into the box ¾″ inset from the front edge.
Then, I built a drawer box to fit inside. I have a complete guide to building and installing drawers here.
.
I built the sides from ¾″ plywood and used ¼″ for the bottom. I cut dadoes in the drawer box sides to insert the plywood bottom, but you could also just glue and staple it onto the bottom if you didn’t want to cut dadoes.
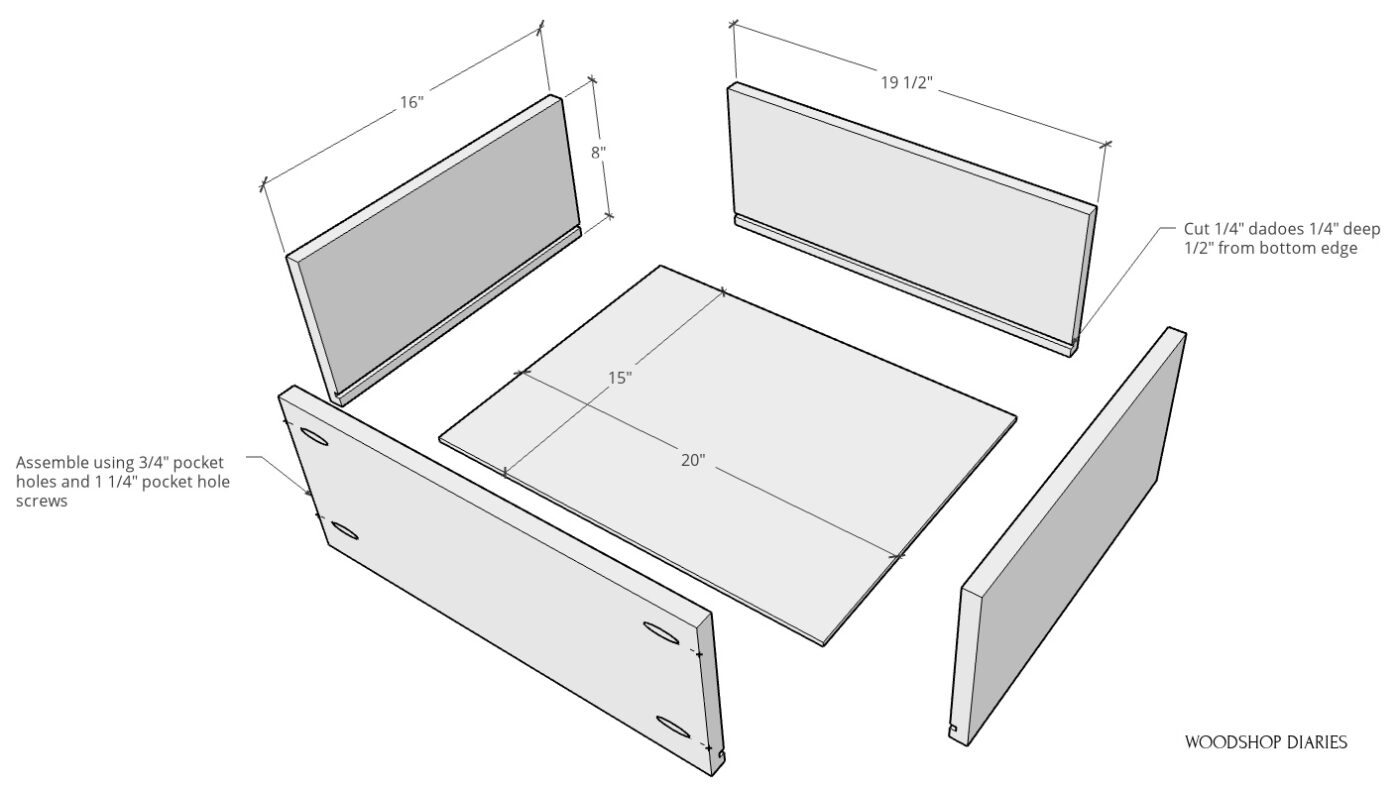
I assembled the box using ¾″ pocket holes and 1 ¼″ pocket hole screws.
.
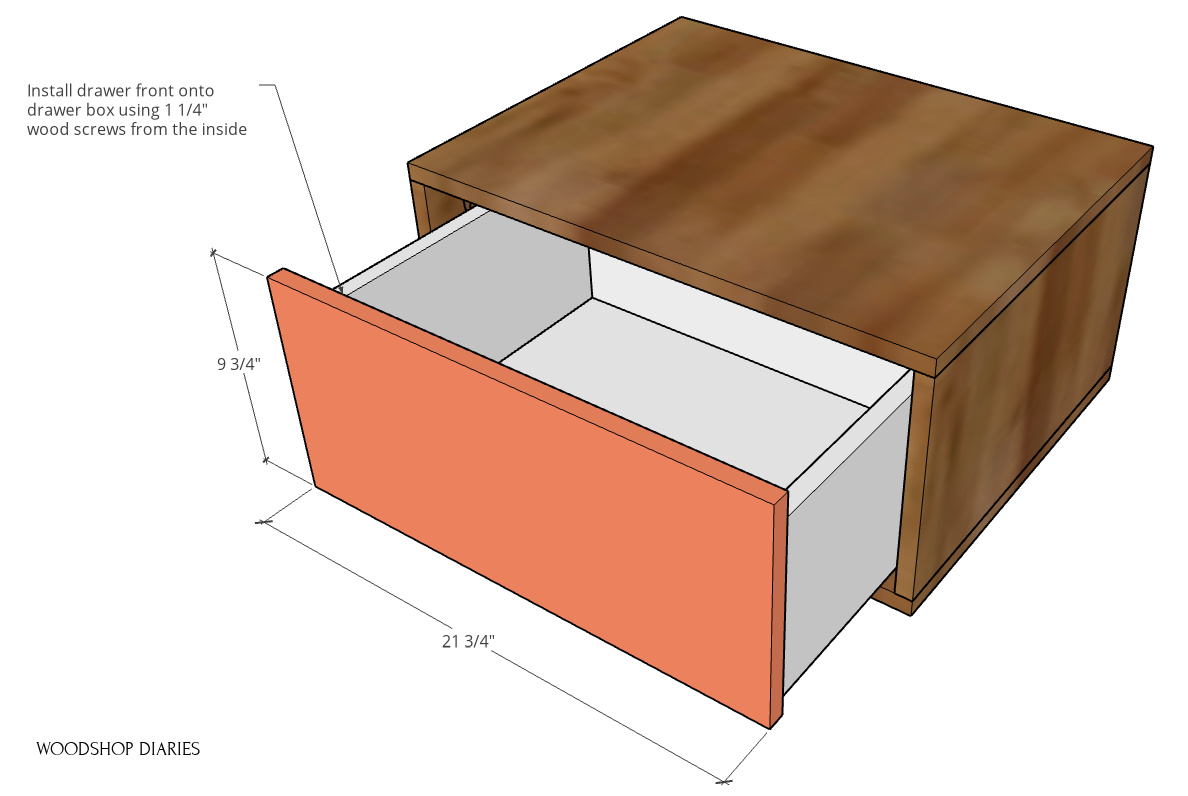
Then, I installed it into the drawer cabinet box ¾″ inset from the front edge and cut a ¾″ plywood drawer front to fit on the front.
.
I edge banded the drawer front and screwed it in place through the inside of the drawer box using 1 ¼″ wood screws. There should be ⅛″ gap around all sides of the front.
Step 7: Assemble Bookshelf and Add Top and Base
At this point, I was ready to start putting everything together, but I went ahead and stained the legs on the base and the drawer cabinet box and drawer front before doing that.
.
I stained them Minwax Provincial. It’s easier to finish things before assembling when you are doing two different colors.
.
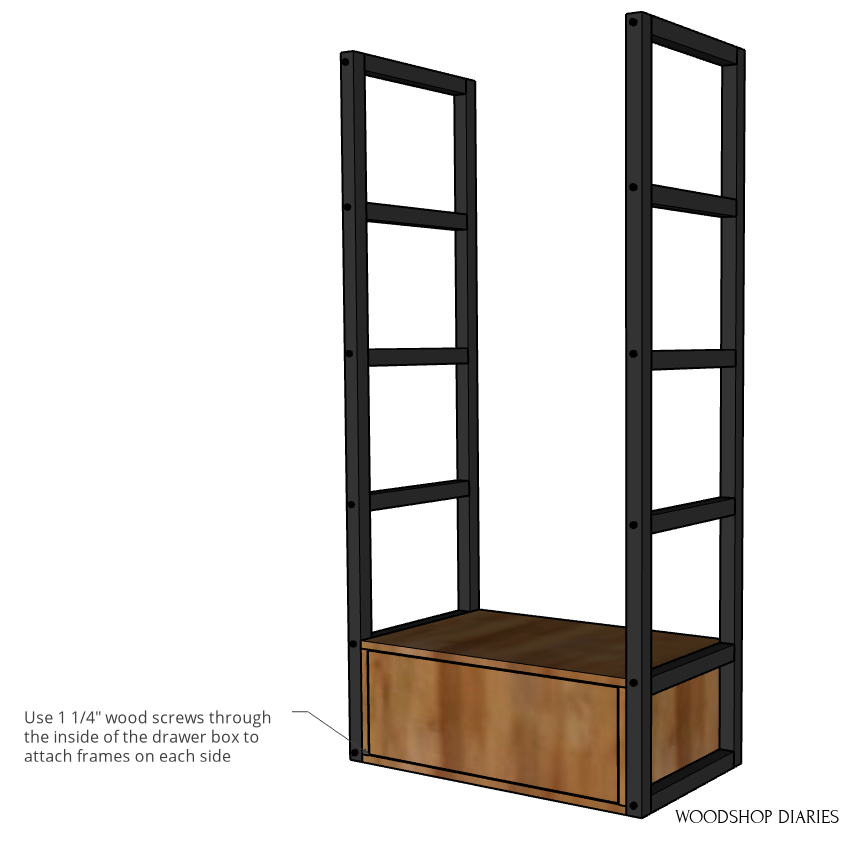
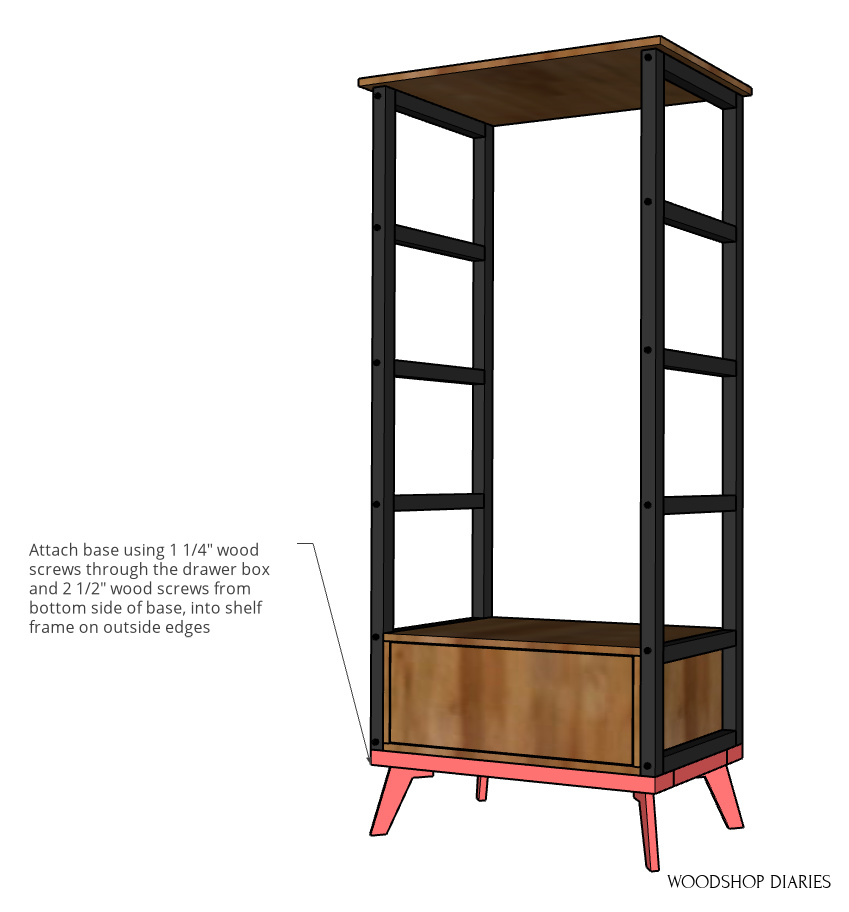
Once these pieces were stained, I used 1 ¼″ wood screws through the drawer cabinet box to attach the frame to each side. You can either remove the drawer using the tabs on the drawer slides, or just push the drawer as far out as it goes and access the inside from the back side of the box.
Then, I cut, edge banded, stained, and attached the top through the frame using 2” wood screws. I left 1” overhang on the sides and front for this.
And finally, I placed it on the base and used wood screws through the drawer box to secure it to the base frame.
Step 8: Add Shelving
Now all that’s left is the shelves. The shelves were easy—I three ¾″ plywood shelf pieces and applied edge banding to cover the edges.
.
I stained these to match the base and top and placed them on the rungs.
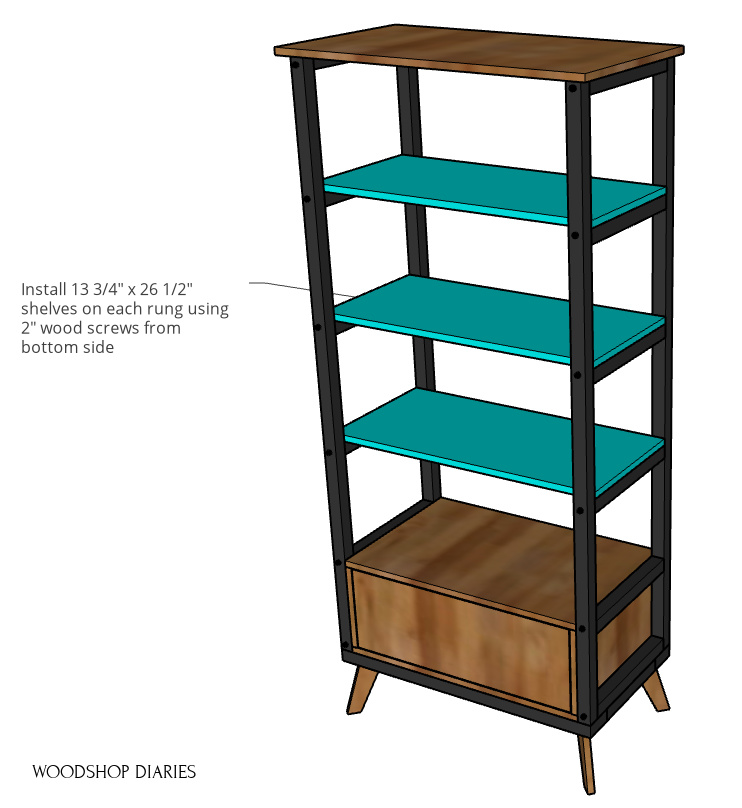
Since I am planning to take this apart as soon as I’m finished with it to build the second part of this bookshelf series, I didn’t bother screwing the shelves in place, but you can attach these shelves with 2″ wood screws from the bottom side of each rung if you wanted.
.
I polyed everything that was stained and added a drawer pull and the shelf was complete!
RELATED: Check out this post for how to finish raw wood furniture!
.
I feel like open shelves are “in” right now, so if this is your style, this would work great to display books, pictures, and décor.
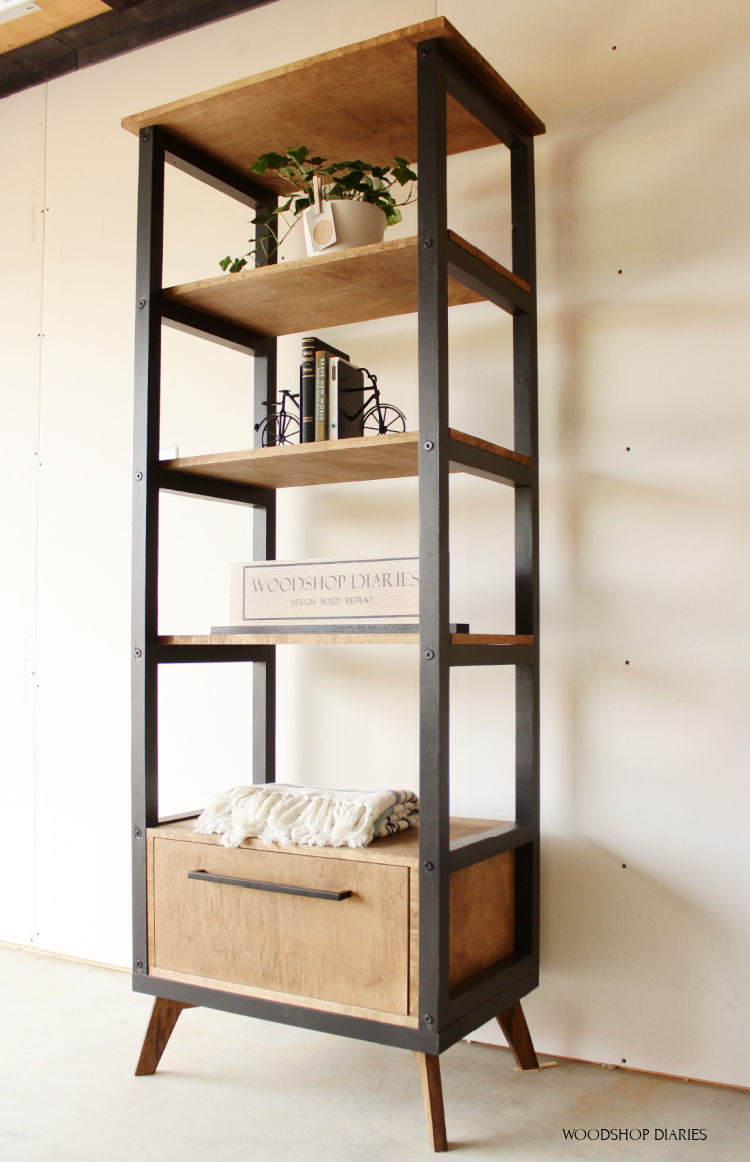
I really like the option to have both open shelves and a little storage at the bottom, but you could also ditch the drawer and just add more shelves at the bottom as well.
.
All in all, besides the painting being a pain, this open bookshelf with drawer project was fairly easy and has a lot of different uses.
.
But, if you’re into the more classic cabinet style bookshelf, be sure to follow along so you can see how I take this and make part 2 next week!
.
In the mean time, if you’d like to save this for later, don’t forget to pin it or share on your favorite social channel!
Until next time, friends, happy building! 🙂