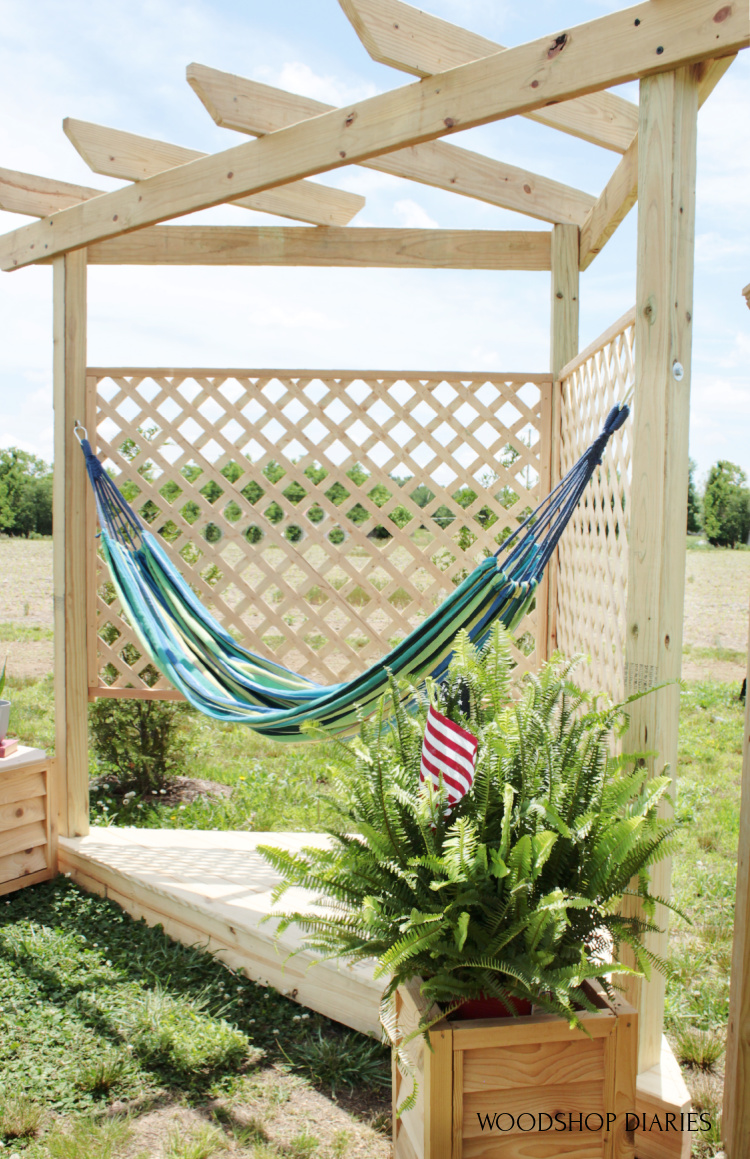
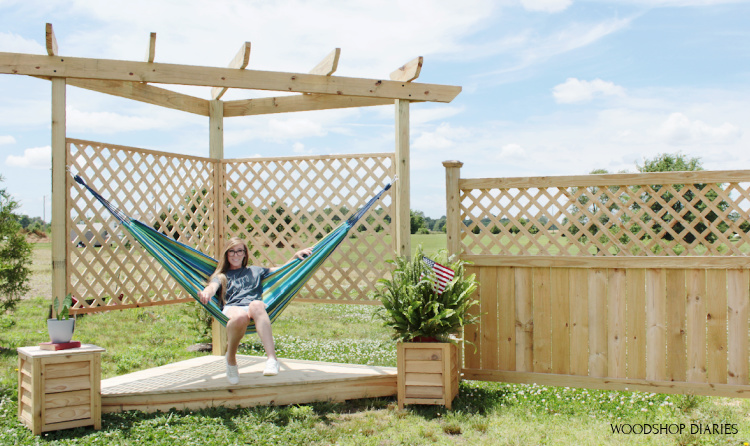
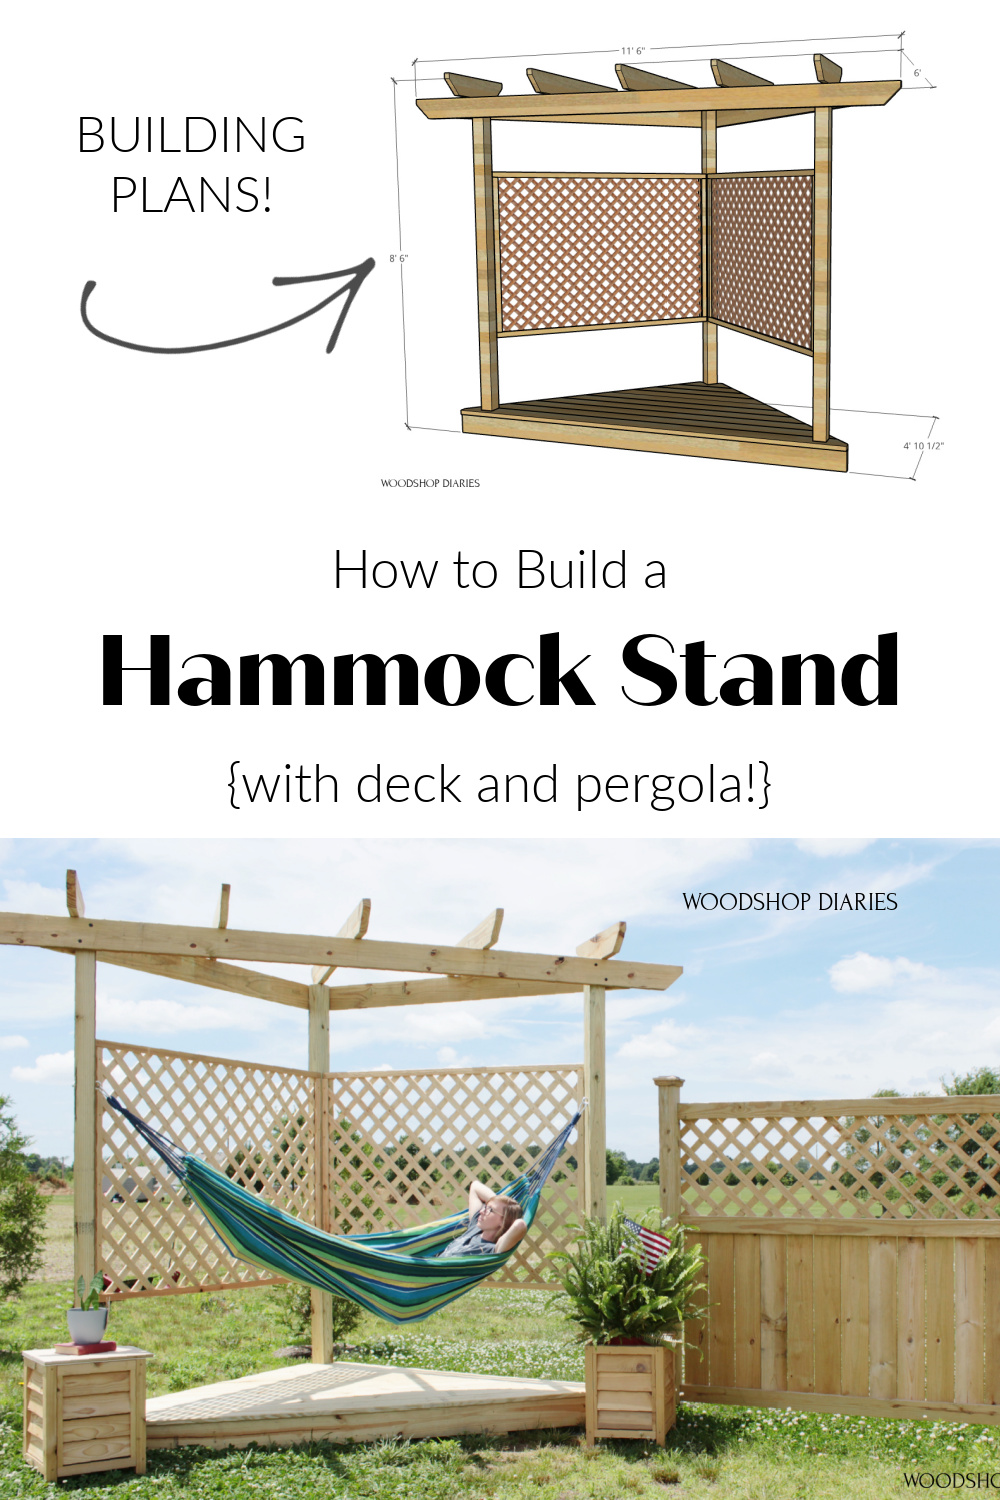
In this post, I’ll show you how to build an outdoor DIY hammock stand –with a floating deck and a pergola top!
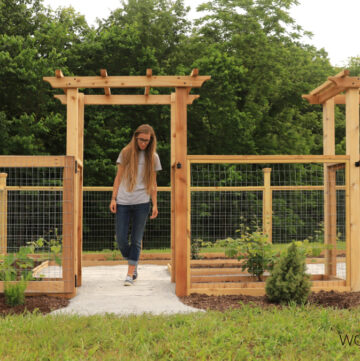
We recently turned our side yard into a large garden area and I had plans to add some seating to this space throughout the summer to give us somewhere to hang out outside of our tiny garage house.
.
I still have a lot of project ideas to tackle, but I decided to build a hammock stand first.
.
I didn’t want to put this DIY hammock stand into the ground in case we decided to move it around to another spot in the yard or we move and want to take it with us.
.
So I built it with a floating deck type base to weigh it down and a pergola top to give it some extra strength and also a little bit of shade.
.
I’m so excited about this build, so let’s dive right in with the how to! I have a video tutorial here and the printable building plans for this project linked below along with a step by step tutorial.
*This post contains affiliate links. See policies.
Some Notes About the Project:
Material Choices for DIY Hammock Stand:
Since this was an outdoor project, I used treated lumber for it so it will withstand the weather better. If you have access to cedar, redwood, or another rot resistant option, you could use that as well.
.
Also, since this is an outdoor project, be sure to use EXTERIOR grade hardware (screws, nails, bolts, staples) to assemble. Timber screws work well, but I used mostly decking screws.
Size & Weight Specifications:
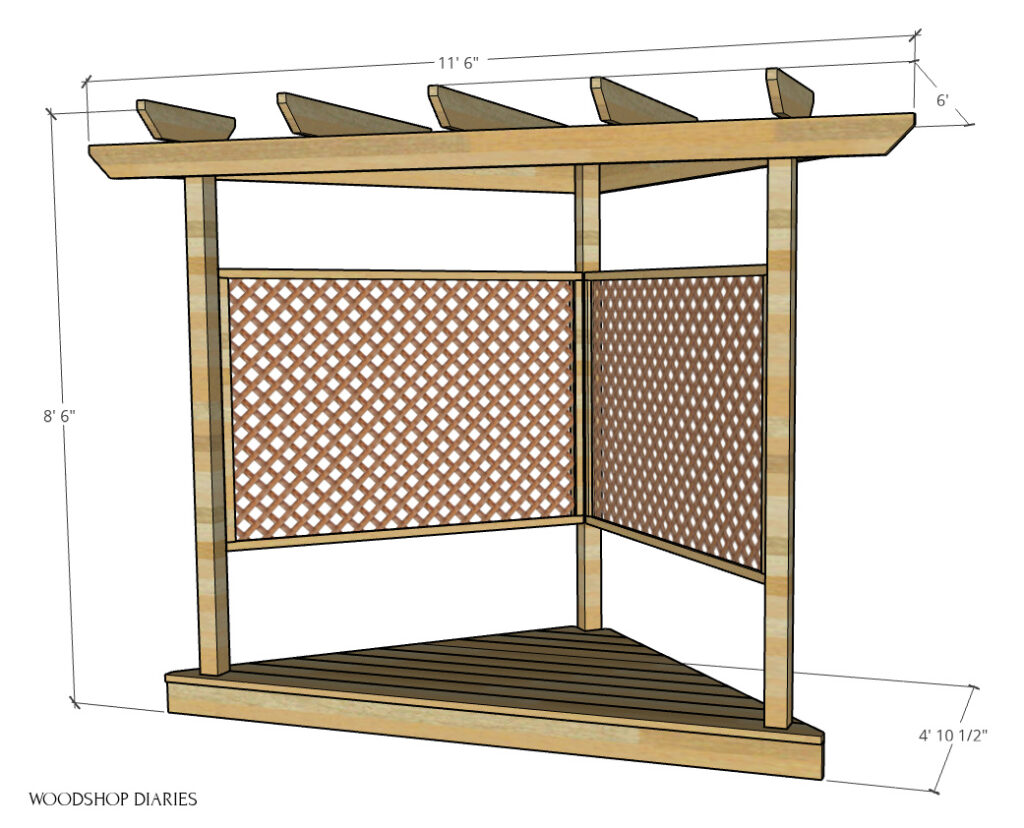
I used 4x4s for the corner posts, 2×6 for the framing and pergola part and 5/4 decking boards for the top of the deck section.
.
I used this hammock with this project and it was 9′ long overall. If your hammock is longer, you’ll need to make your stand wider to accommodate the extra length.
.
This hammock was rated for 450 lbs, so theoretically, the structure needs to hold at least 450 lbs. I didn’t have 450 lbs to test it, but it held just fine for 350 lbs in the hammock (we both crammed into it and added the dog to see if it would hold haha).
.
I don’t expect any issues with 450 lbs (which is the max the hammock would hold anyway), BUT, I’m not a structural expert and if you are in doubt as to the structure’s integrity for your application, consult a professional.
.
The overall dimensions ended up being about 11′ 6″ wide, 8′ 6″ tall, and 72″ deep at the longest pergola piece at the top.
What You’ll Need To Build This DIY Hammock Stand:
Materials:
- (3) 4x4x8 posts (treated)
- (1) 2x6x12 board (treated)
- (8) 2x6x10 board (treated)
- (6) 5/4 x 6×10 boards (treated)
- (2) 2x2x8 boards (treated)
- (6) 1x2x8 boards (treated)
- (2) Lattice Sheets
- 2 ⅞″ timber screws
- 1 ½″, 2 ½″ x 3″ exterior screws
- (2) 7″ eye bolts
- (4) washers
- (2) nuts to fit eye bolts
- Hammock
Tools:
- Circular saw
- Jig saw
- Drill/Driver
- Miter saw (optional)
- Stapler
Step 1: Build Front Frame of Pergola Hammock Stand
First, I cut and assembled the front frame of the hammock stand. I used 4×4 posts and 2×6 boards.
.
The bottom board was 9′ 6″ long, the top was 11′ 6″ long and the 4×4 posts were both 8′ long. I assembled like shown using 2 ⅞″ timber screws (2 per joint).
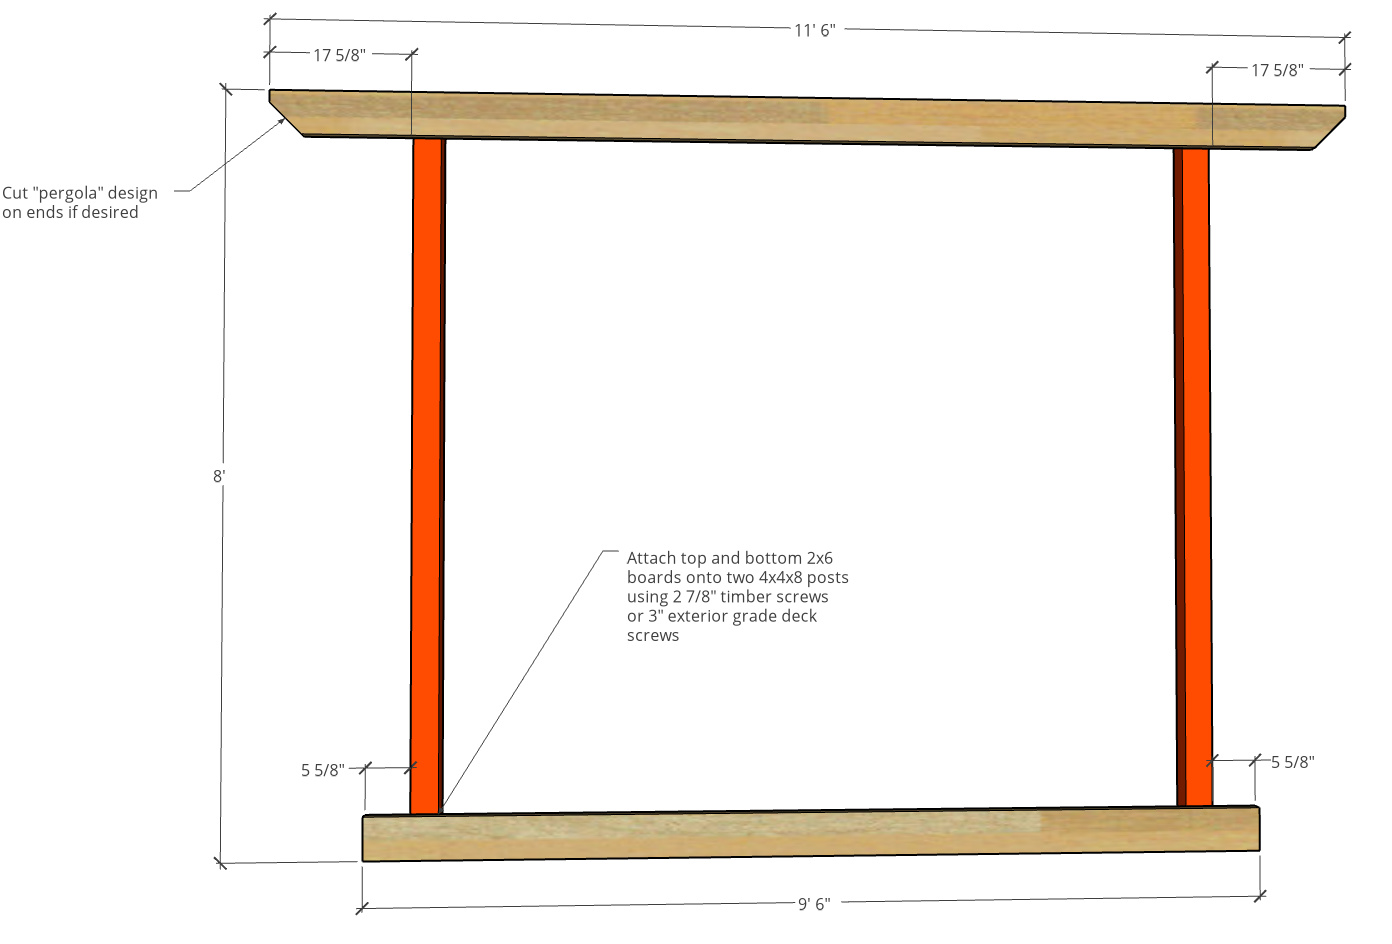
For the top board, you can use a jig or circular saw to cut a decorative “pergola-ish” design on the ends if you want. I just trimmed off the corners to give it a modern feel.
Step 2: Assemble Pergola Hammock Stand Frame
Next, I built the rest of the frame using 2x6s for the “triangle” pieces and one more 4×4 post for the back corner.
.
The 2×6 boards will have one square end and one end beveled 45 degrees. You can cut these boards to length, then bevel one end using a circular saw with angle beveled 45 degrees or a miter saw beveled to 45 degrees.
.
I cut and attached two triangles like shown below using 3″ wood screws.
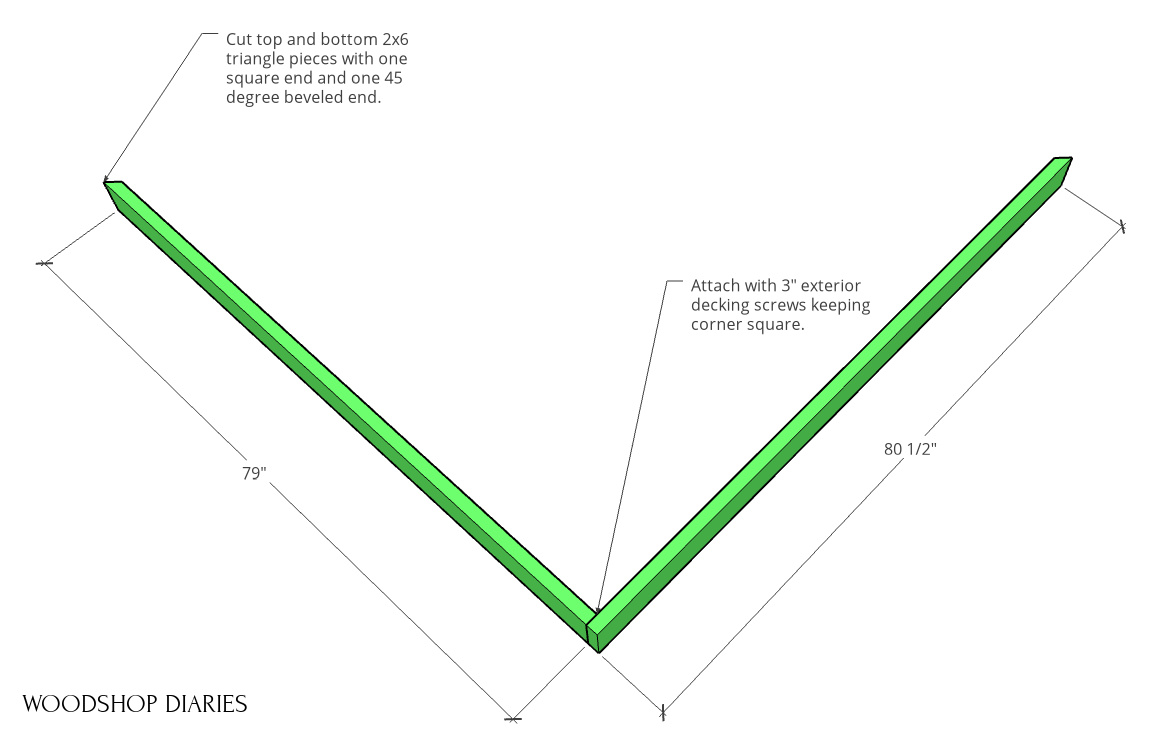
Just a note here—if you plan to add the lattice on the sides like I did, I recommend hanging onto these little 45 degree cut off pieces. You can use them again later.
.
Grab an extra set of hands (it’s much easier to attach the top triangle with two people) and screw one triangle in at the bottom and one at the top with a 4×4 post between them at the back corner. Use 2 ½″ – 3″ screws and attach to both the front 2x6s and all three posts where possible.
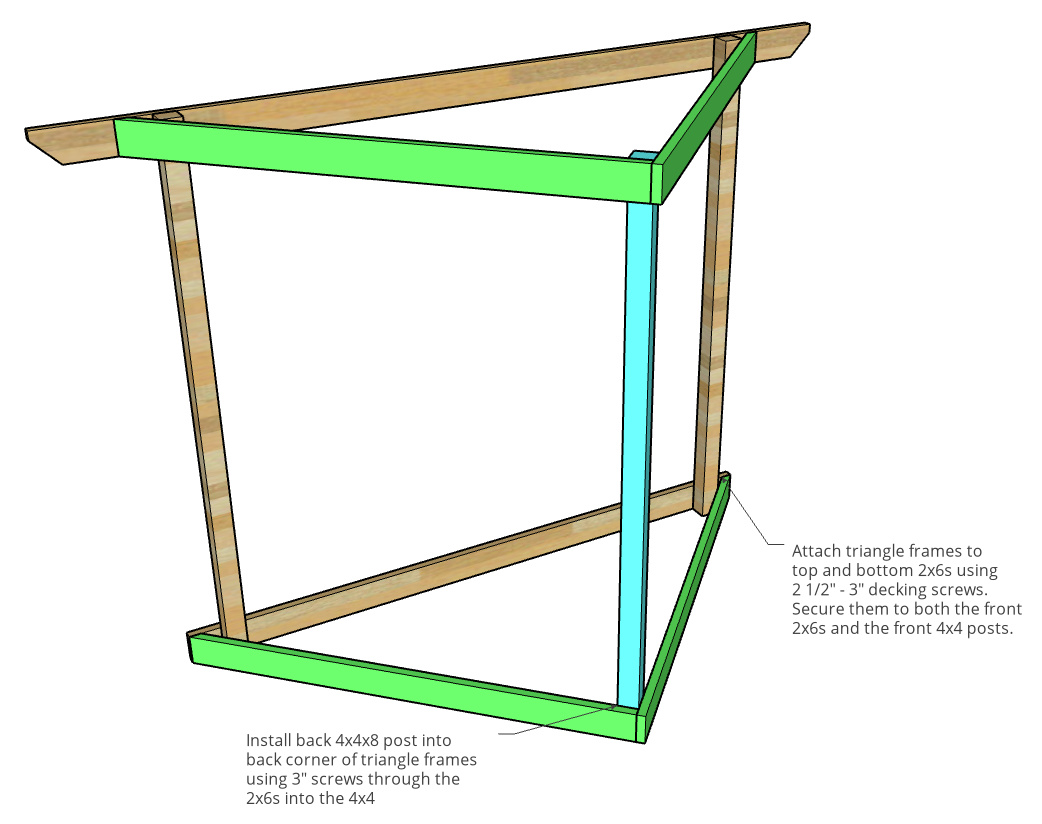
Use at least 2 screws per joint and into each post.
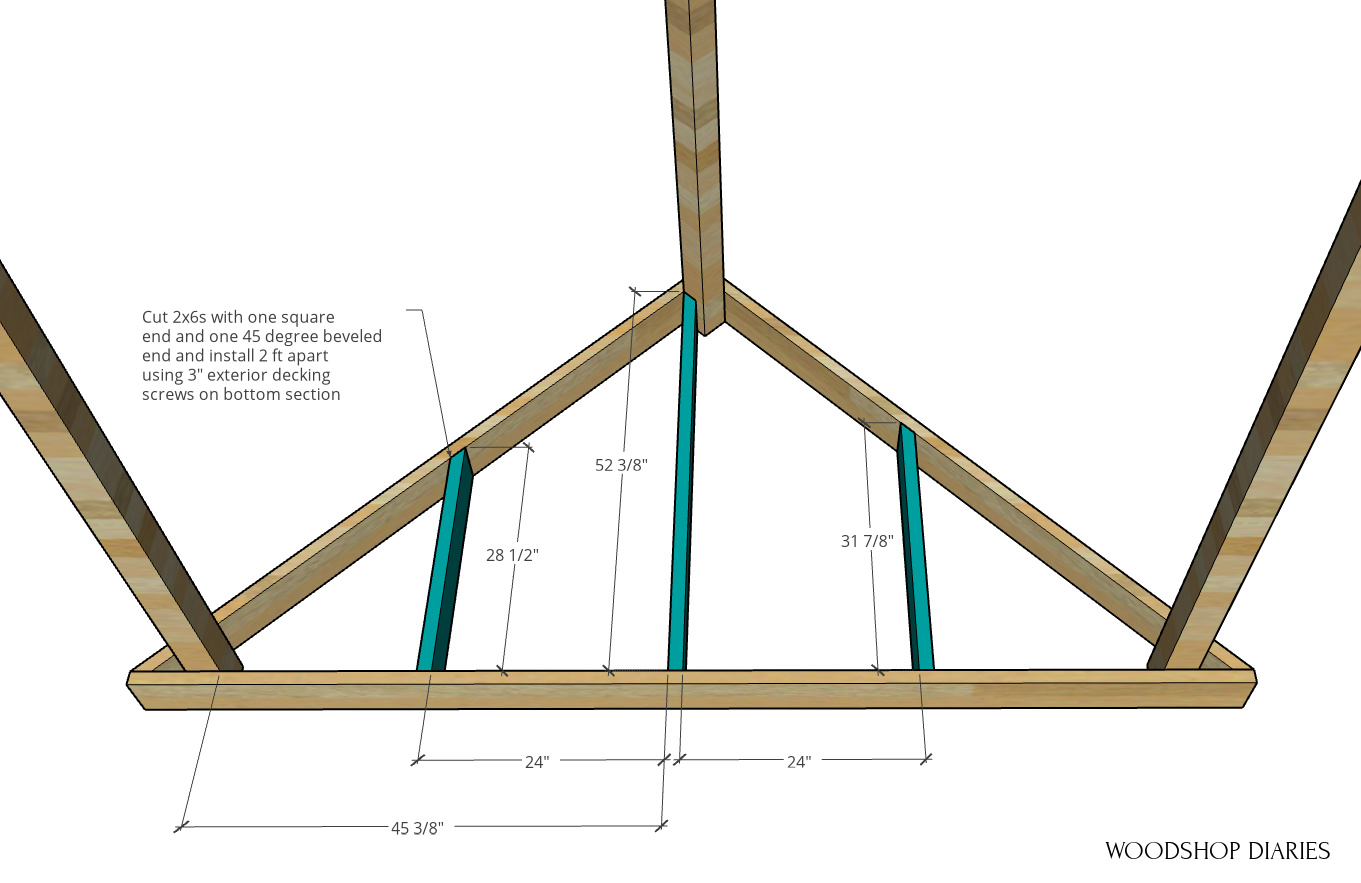
Step 3: Add Floating Deck Framing
In order to install the decking boards, I needed extra support inside the large bottom triangle. So I cut some more 2×6 pieces for additional framing supports.
.
I cut these with one square end and one 45 degree beveled end and screwed in place with 2 ½″- 3″ decking screws.
Step 4: Add Decking to Hammock Stand
I used a circular saw and a jig saw to cut down the front board to fit around the posts leaving ½″ overhang along the front. I screwed it in place using 1 ½″ decking screws.
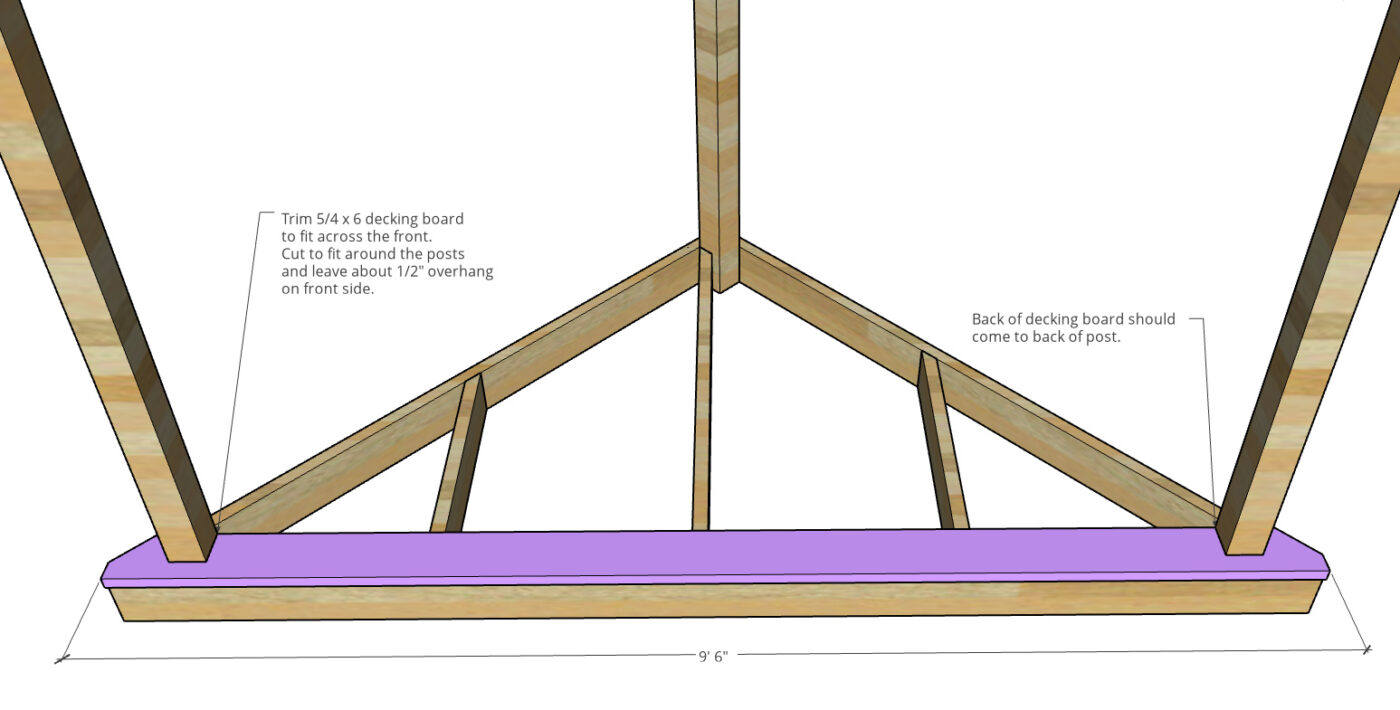
Once the first piece was in place, I laid the next piece down and marked on the underside where it needed to be cut and trimmed each end with the circular saw.
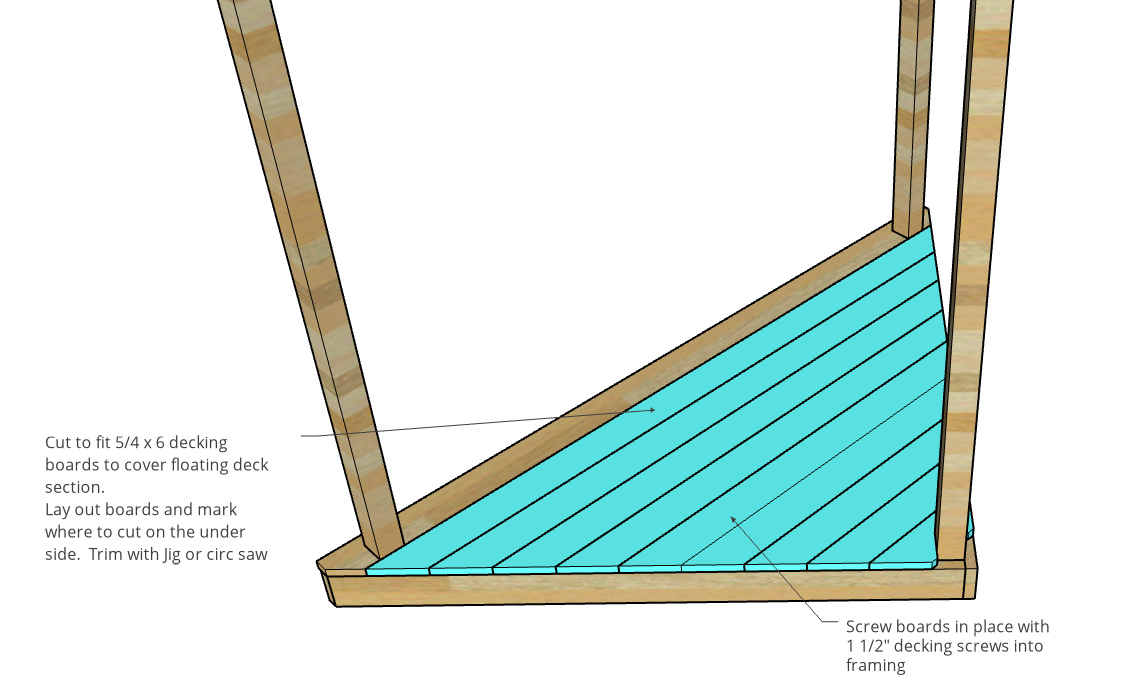
For the very back piece, I used the piece in front of it to determine it’s length, then used my speed square to draw out where to cut to fit around the back post. See video above for details.
Step 5: Add Pergola Top to Hammock Stand Frame
I cut and installed the center piece on the pergola first. This ended up being 72” long and I trimmed the corners off the ends to match the top board.
.
I placed it on the center line of the top front board and then set the other end at the back corner and left 9″ overhanging the front side.
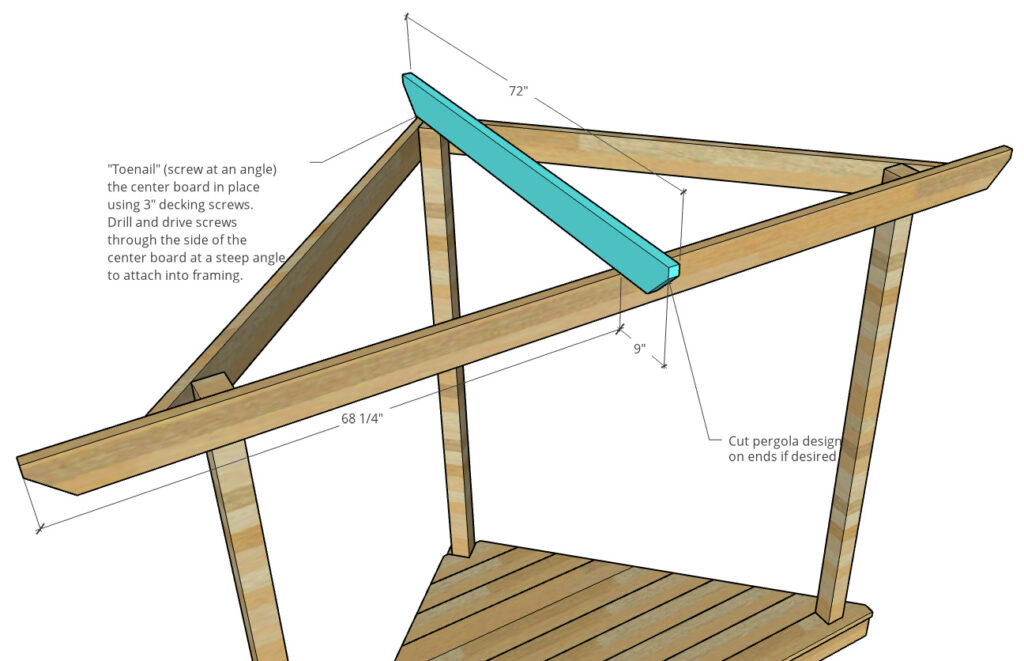
To keep things quick and easy, I just toenailed these boards in place by driving screws through them and into the framing at a steep angle.
.
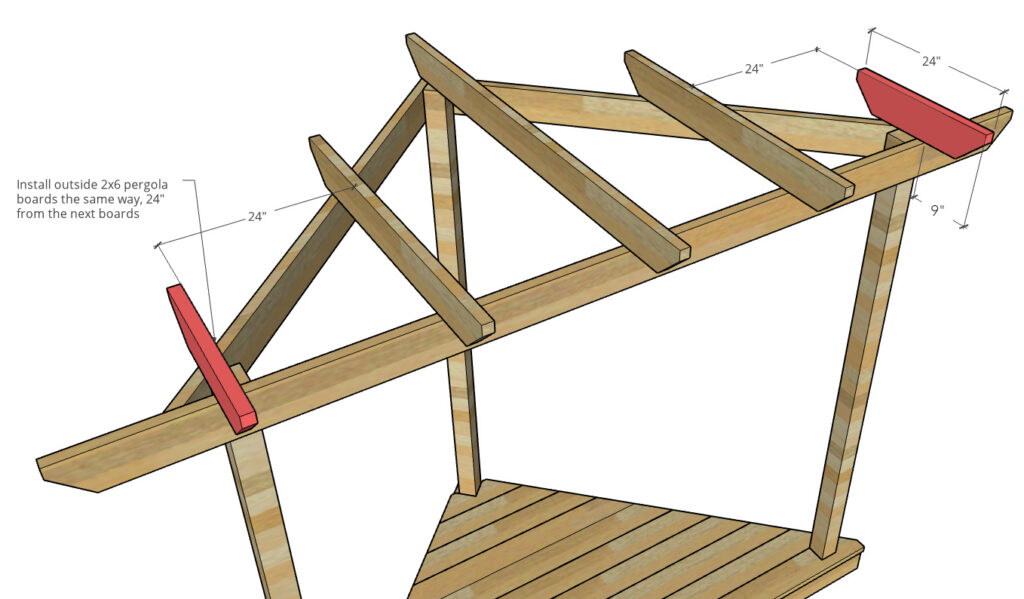
After the middle piece was in place, I added two more pieces on each side 2 ft apart. Since these were two feet away from the middle, they needed to be 2 ft shorter, so I cut those 48” long.

Before I attached, I made sure the boards were evenly spaced and had equal overhang on the front to stay consistent.
.
I followed up with two more pieces on the outside 2 ft away again, so 2 ft shorter, so 24” long.
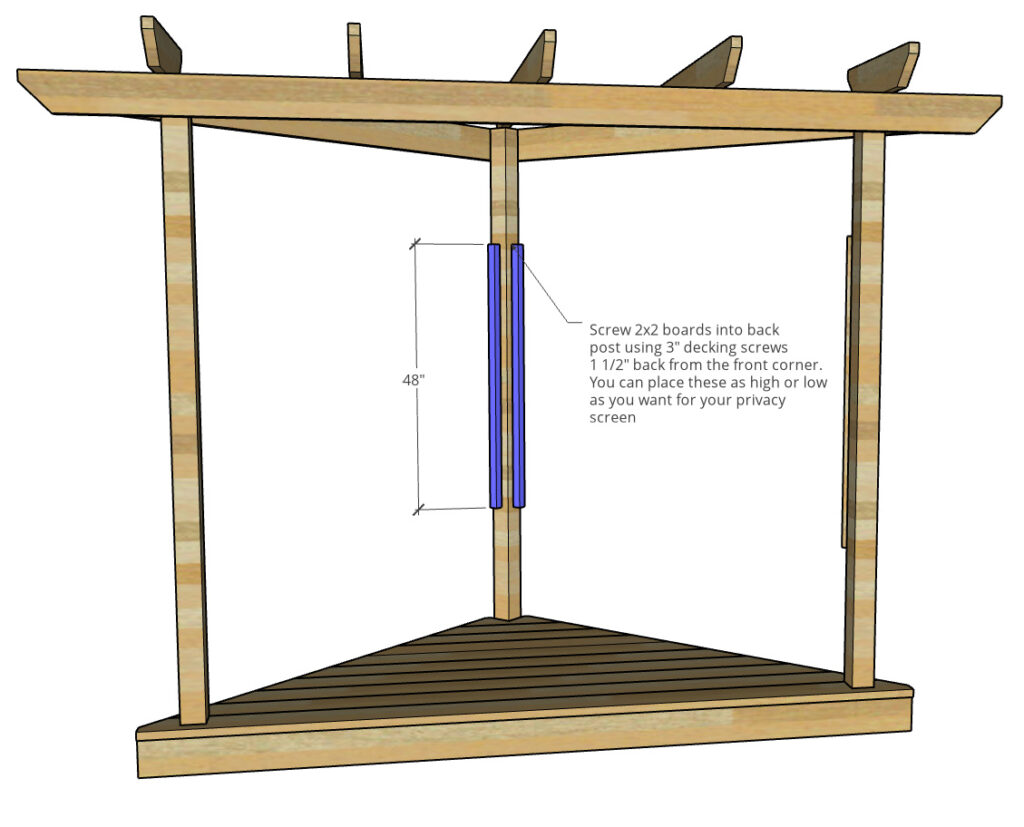
Step 6: Add Privacy Lattice Framing
I installed some braces into the corner posts to mount the lattice onto. Since the front corner posts are turned 45 degrees from the back post, I used those leftover 45 degree pieces I cut off the end of the boards and mounted them to the front posts with two 2 ½″ screws per piece.
.
See video above more more details. Then, I screwed a 48″ long 2×2 onto them.
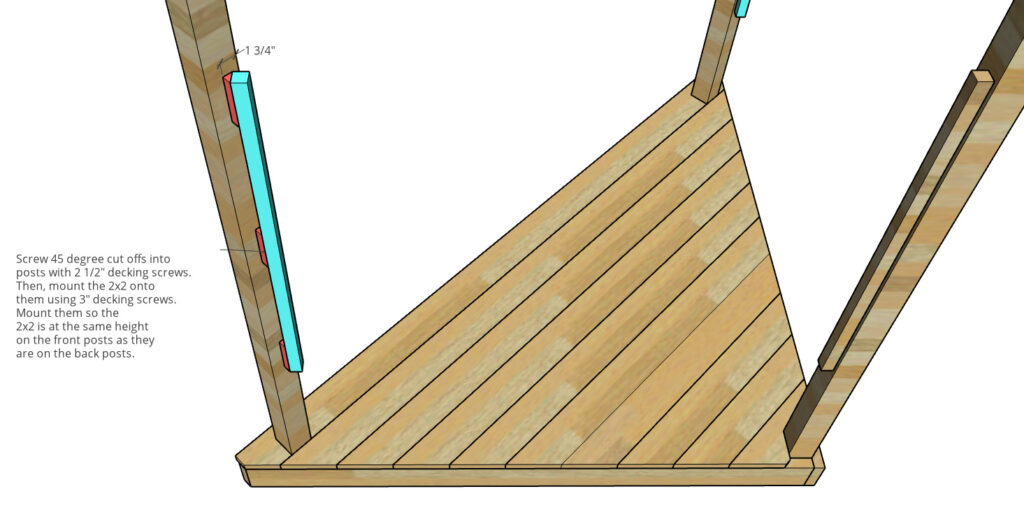
The back 2x2s can screw straight into the back post. I made sure these were the same height off the deck.
Step 7: Add Lattice and Trim
Then, I cut a piece of lattice sheet to fit between the posts and stapled it onto the 2x2s.
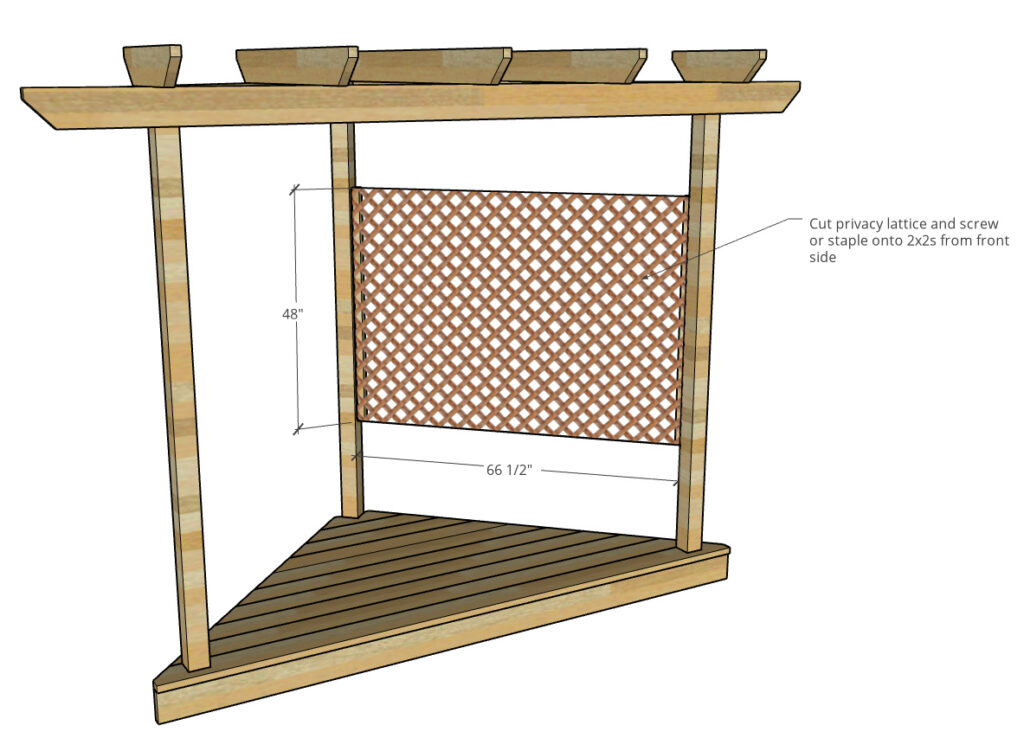
Next, I trimmed out the lattice using 1x2s. I screwed them into the 2×2 framing and stapled the lattice onto the top and bottom boards on the back side.
.
Now, if there was one thing I wish I had done differently with this project, it’s that I wish I hadn’t cheaped out on the trim around the lattice. What I used here worked fine, but I feel like it looks scrawny and I wish I had beefed it up a little more. In hindsight, I wish I had used 1x4s or 2x4s for this.
.
It would have been significantly more expensive, but I think thicker trim would have looked a little nicer and been a little easier to install.
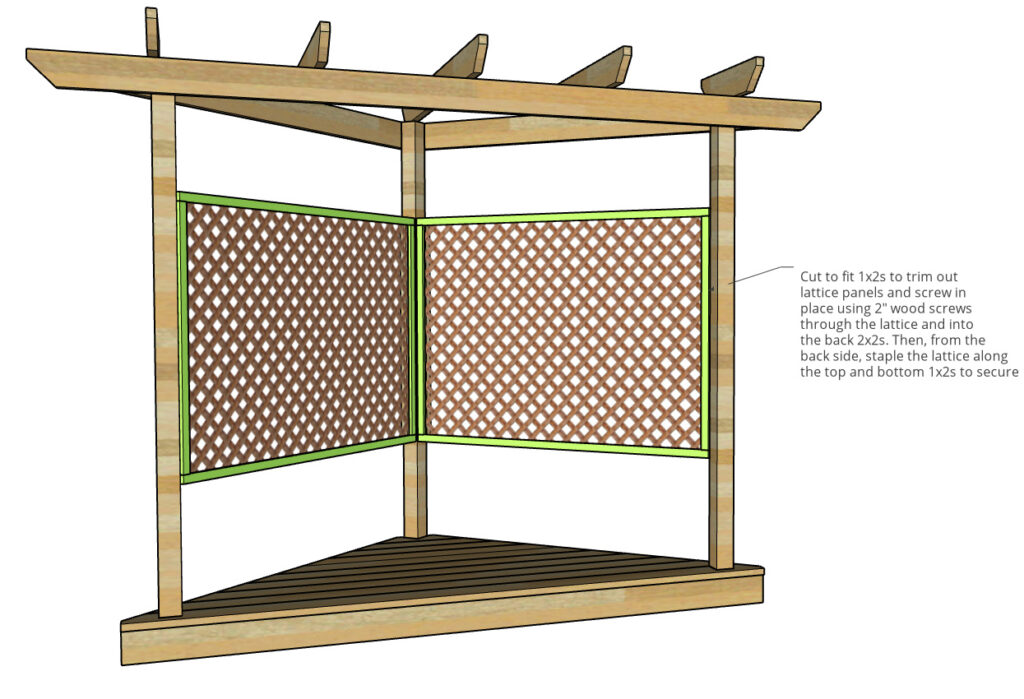
Nonetheless, here we are 🙂 The 1x2s worked perfectly fine.
Step 8: Hang Hammock
I grabbed some eye bolts for this, a couple washers and some nuts to fit the bolts. Now, I’m losing my mind and only got two washers when I meant to get 4. But I wasn’t about to drive back to town for two 20 cent washers so I made do with what I had.
.
BUT, you should have two 7″ eye bolts, two nuts to fit, and 4 washers to fit.
.
I grabbed a drill bit slightly larger than the bolt and measured about 5′ up from the deck and drilled out a hole. You could make your hole higher or lower, but 5′ was a good height for me to easily get into the hammock.
.
You want to install the bolt through the hole so that there is a washer on the front AND BACK side of the hole, then tighten the nut onto the back side.
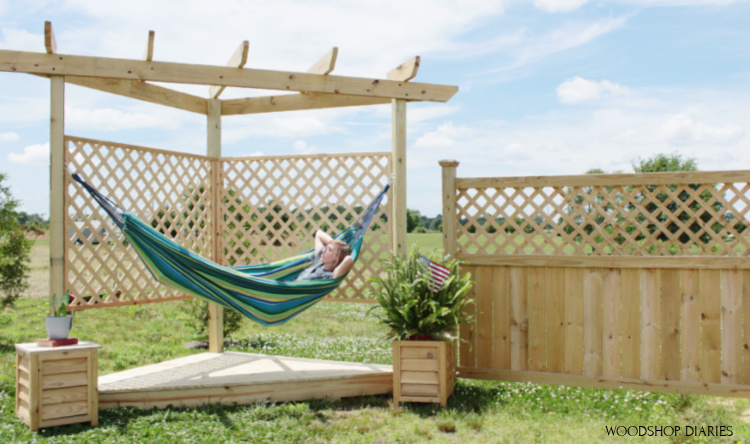
Once those were installed, I pulled out the hammock and used the included clips to hang it up. The hammock I used included two clips that clip onto the loops of the hammock and you simply clip those onto these eye bolts.
.
I was pleasantly surprised it worked, it fit, and I was finished haha.
.
This was a large project, but I had it finished in a day and a half working mostly alone and I was surprised how easily it came together. Don’t forget to grab the building plans if you’d like to build your own!
.
This will be a great place to hang out this summer and I think the dog loves it even more than I do.
I hope to add more projects to this space as the summer progresses, so if you aren’t already subscribed, be sure to follow along so you don’t miss out on what’s next.
I hope you enjoyed this DIY hammock stand project and if you’d like to save it for later, be sure to pin it or save it to your favorite social channel 🙂
Until next time, friends, happy building!