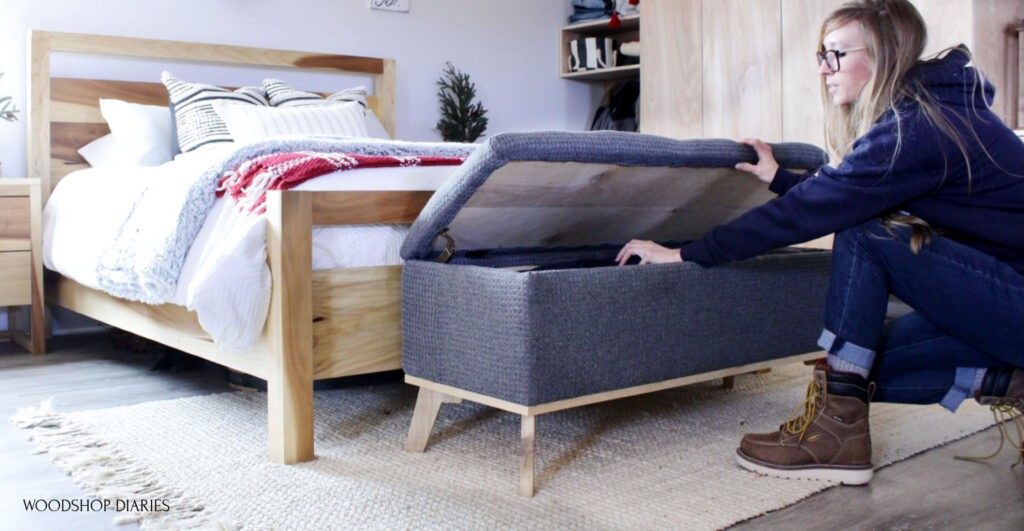
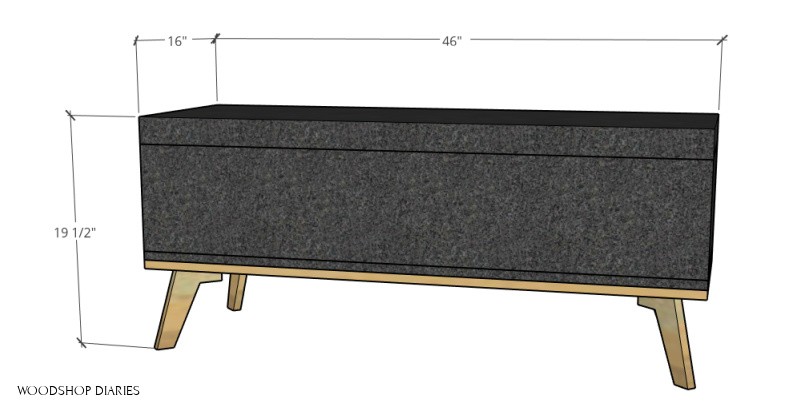
Need some stylish storage and a nice cushioned seat? Check out how to build your own DIY upholstered storage bench in this post!
.
This post was sponsored by Kreg Tool. It also contains affiliate links. See policies.
I think I mention pretty often, that we are currently living in a pretty small space. It’s the reason I build the projects I keep for myself with the most efficient storage possible.
RELATED: Like when I built this 2-in-1 Dresser Desk
.
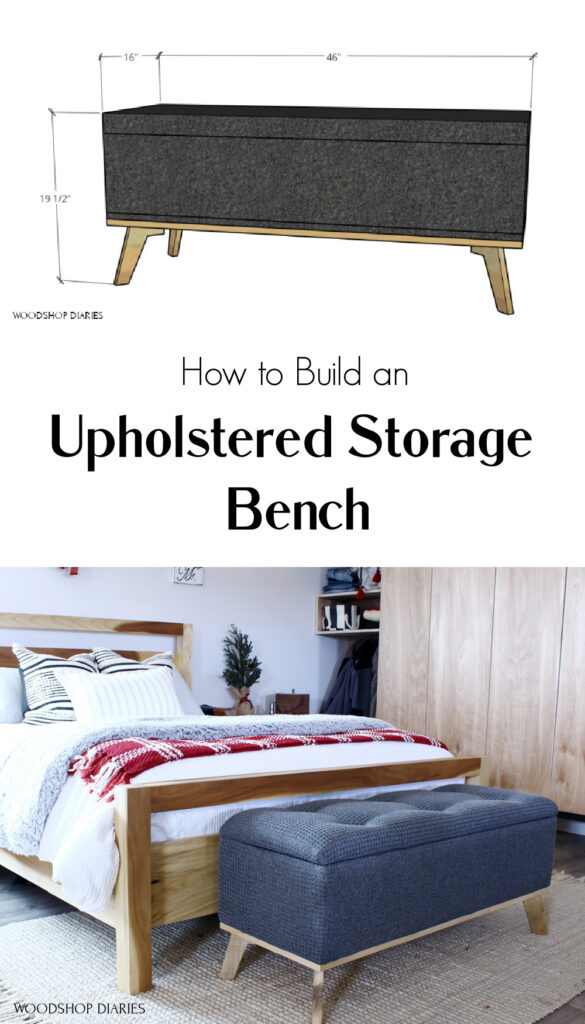
And this bench is no exception. We needed more storage for pillows, blankets and clothes and the end of the bed happened to be empty. So, I added this modern storage bench.
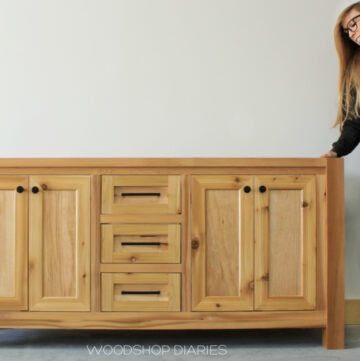
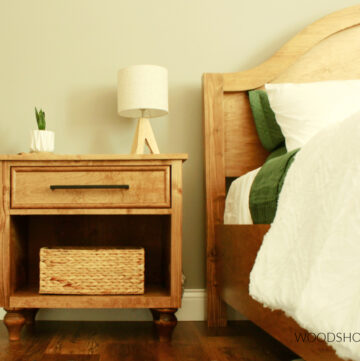
RELATED: PSST…Like this bedroom set? Check out plans for this entire matching bedroom set here!
.
This DIY upholstered storage bench is a really simple build and you’ll be surprised what I used to upholster it. So stay tuned for that *wink wink* In the mean time, let’s make some sawdust.
.
I’ve got the step by step tutorial to build your own and printable plans below. But, first, I’ve got a video for you right here:
For this DIY Upholstered Storage Bench, You Will Need:
- (1) sheet ¾″ plywood
- 2″ foam
- Batting
- Fabric (I used this for my fabric)
- Spray Adhesive
- Kreg Pocket Hole Jig (Check out this post to decide which Kreg Jig is best for your shop!)
- Circular saw & Cutting guide (cutting guide optional)
- Drill
- Jig saw
- Staple gun and 9/16″ staples
- 1 ¼″ pocket hole screws
- 2″ wood screws
- Hinges
- Chest Lid Supports
- Wood Glue
NOTE: This project is assembled using pocket holes. Check out this post for how to use a pocket hole jig! And if you need help deciding which pocket hole jig you need, check out this post to help you decide which jig is best for you!
Now, let’s build this Upholstered Bench!
I’ve got details on the process as well as how to upholster below, but you can find the free printable building plans here as well.
Step 1: Cut Down Plywood to Build Bench Box
To get started, I brought out my Kreg Rip Cut and circular saw to cut down my plywood sheet. I’ve got the printable plans with details, dimensions and cut list for this bench here.

RELATED: Check out this guide for how I cut down my plywood sheets!
I built this entire DIY upholstered storage bench from plywood except for the legs. You could cut those from plywood as well, but I used poplar to match the wood on my bed and nightstands.
.
Once I had a 16″ wide and two 9″ wide strips cut down from my plywood sheet, I took them to the miter saw to trim to length (you could use a circular saw as well).
.
I cut four sides to make a box from the 9″ wide strips and two panels to make the top and bottom of the bench from the 16″ wide strips.
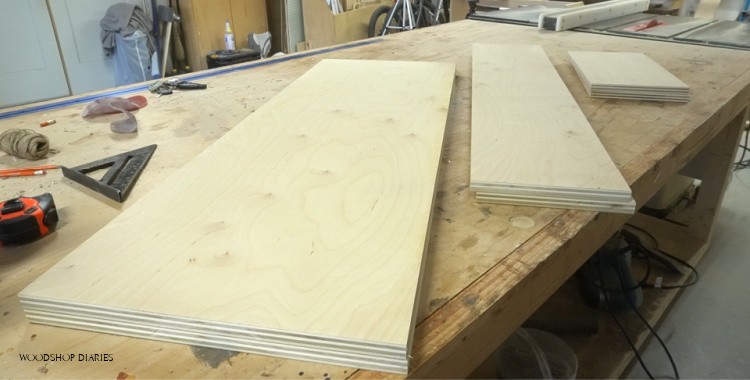
Save the remainder of the plywood sheet for the base frame and legs later.
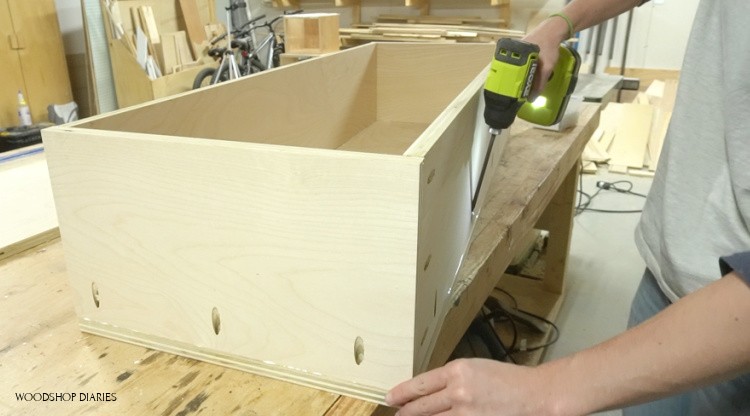
Step 2: Assemble Upholstered Bench Storage Box
With all the pieces cut down, I began assembling using pocket holes and screws. I drilled ¾” pocket holes into the ends of the front and back box panels and along the bottom edge of all four box pieces.
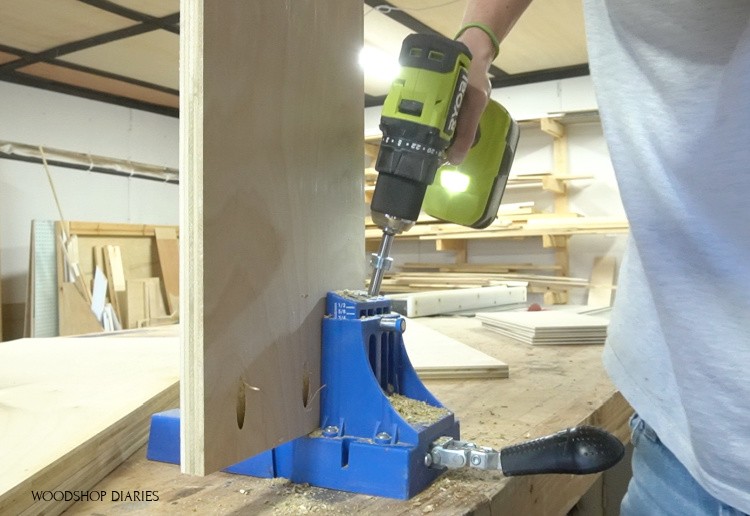
Now, because I’m covering this bench with fabric, I attached this with 1 ¼″ pocket hole screws so that the pocket holes were on the outside of the box.
If you wanted to paint or stain this instead of upholster, I’d recommend facing these pocket holes toward the inside of the box leaving the outside smooth for finish. (And I’d also recommend edge banding the exposed plywood edges, too! Check out how to apply edge banding here!)
.
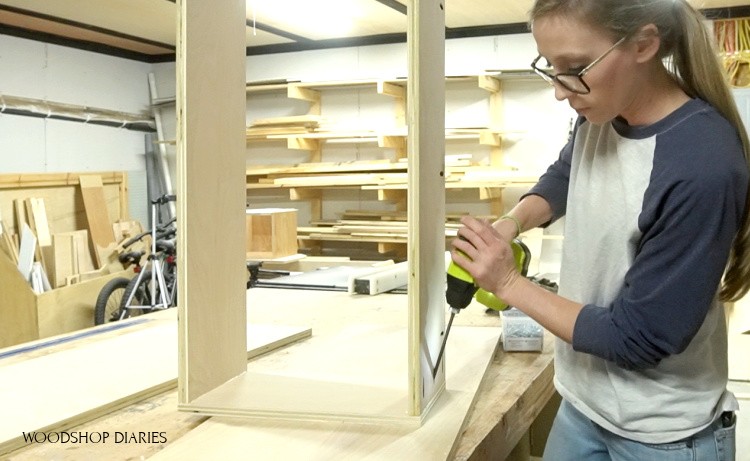
When assembling, make sure to keep the pocket holes that go along the bottom edge facing the bottom. I accidentally installed one of the sides upside down and had to take it apart and redo it haha.
.
Side note: I used wood glue on the joints as well just for extra strength.
.
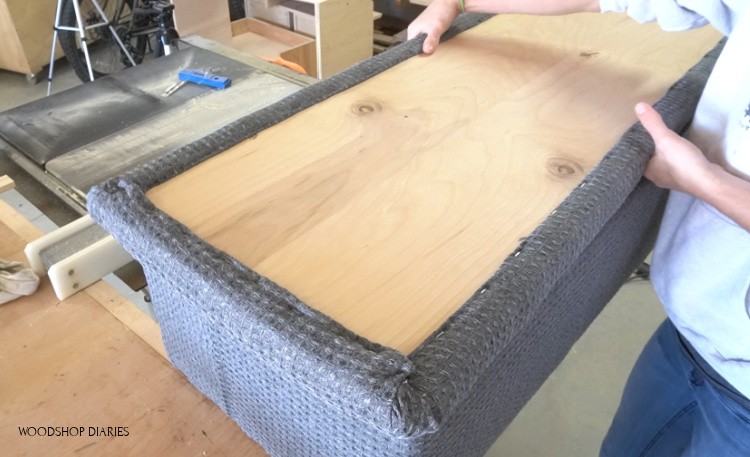
Once the sides were assembled, I screwed the bottom panel in place. Then it was time to start upholstering.
Step 3: Attach Foam to Upholstered Bench Lid
If you’ve never upholstered before, it’s actually really fun. I’m far from an expert, but I actually started upholstering before I started building things. So I’m taking it back to my roots on this project haha.
.
So for the top, I used some 2” foam, placed the top on it and used a utility knife to cut it to size. By the way, if you wanted a less fluffy top, you could use 1” foam instead.
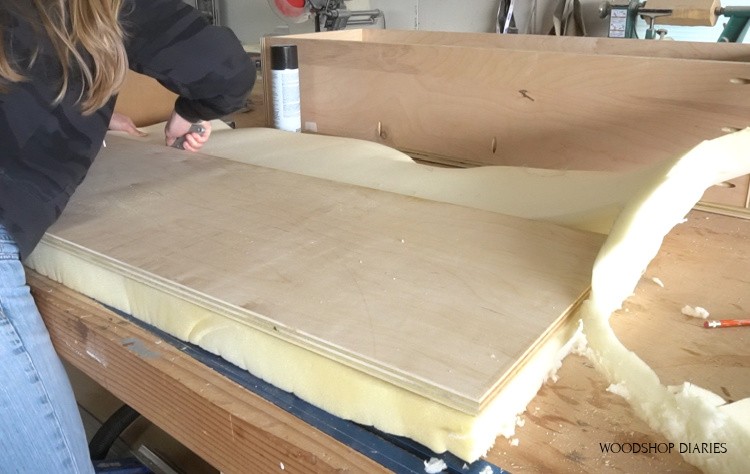
Then, I used spray adhesive and stuck the foam to the plywood. Each type of spray adhesive is different, so be sure to follow the instructions on the can.
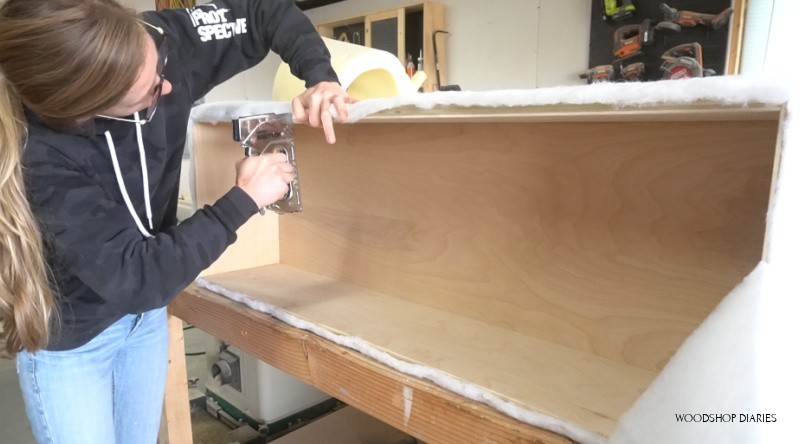
Step 4: Attach Batting to Upholstered Storage Bench
Once that was dry, I wrapped the top in batting.
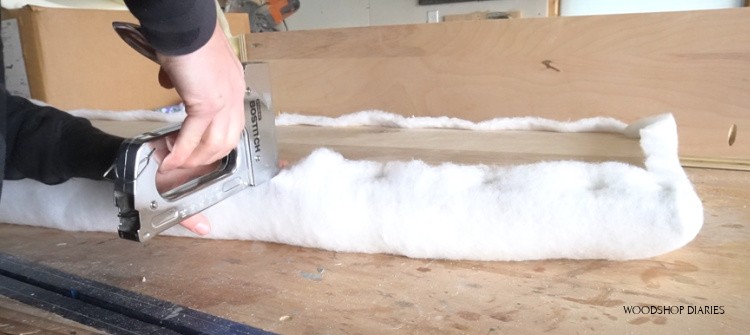
I used my staple gun to attach the batting around the top, stapling onto the bottom edge like seen here. At the corners, I just kind of pulled it tight and tried to fold it in.
.
After I had two edges attached, I could cut the batting to fit and set the rest aside for the bottom of the box later. I stapled the batting around the top until it was covered.
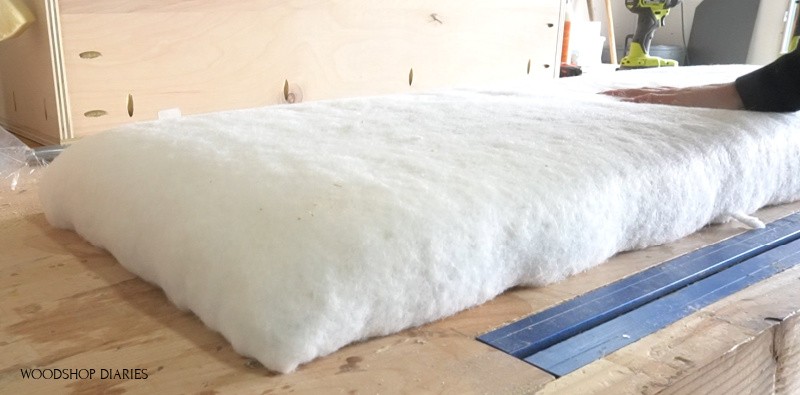
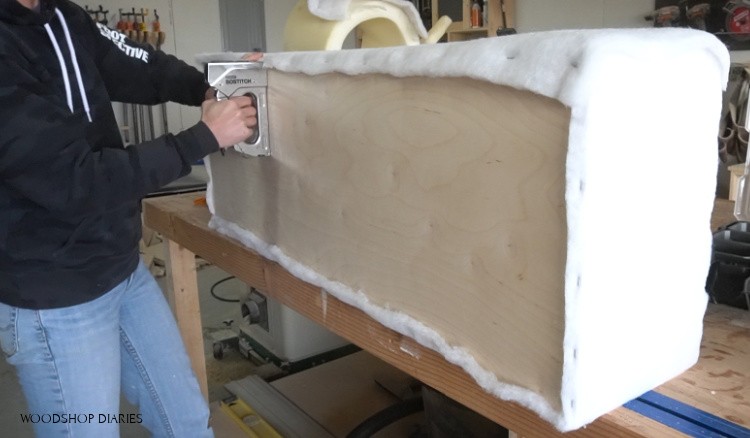
Then, I wrapped the plywood box in the leftover batting.
.
The batting will end up being cut into two strips to wrap all the way around the box. I stapled the edge of the batting along the top edge of the box and worked my way around.
Once I got to the end of the batting, I cut it so that there was just enough to wrap around the bottom corner and stapled it in place.
.
This left me with a strip of batting just wide enough to repeat the same steps to cover the rest of the sides of the box.
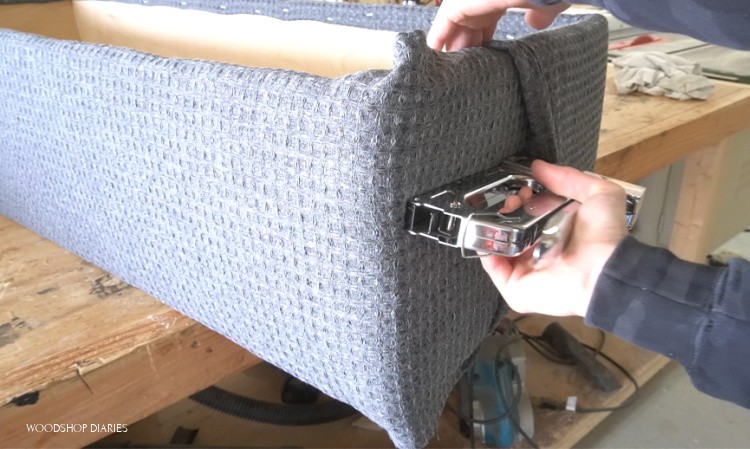
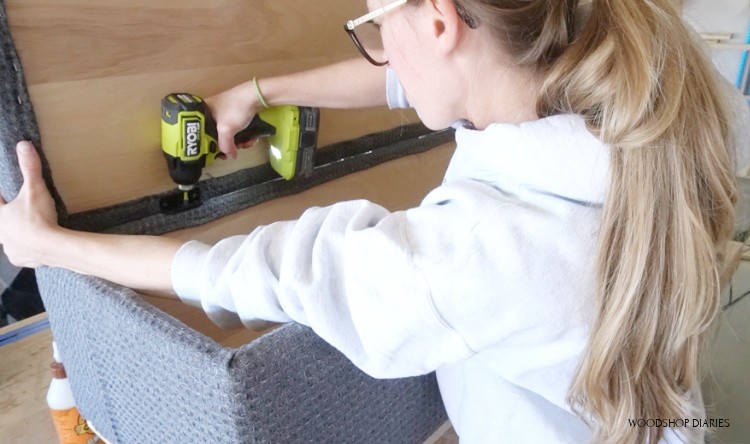
Step 5: Upholster Storage Bench with Fabric
Now, I basically repeated the process with the fabric. I had a really hard time finding fabric I wanted to use for this project. I ended up finding a Sherpa blanket to use for the top and a shower curtain to use for the bottom.
.
As you’ll see, I ended up ditching the Sherpa and keeping things monotone, but if you’re into faux fur, using a Sherpa blanket as fabric is a pretty good idea that will save you a few bucks.
.
Anyway, I measured the height of my box and cut my fabric a couple inches more than the height to give me enough to be able to wrap around the edges.
.
As a helpful tip, using fabric with lines or patterns helps you keep a straight line when cutting and stapling in place.
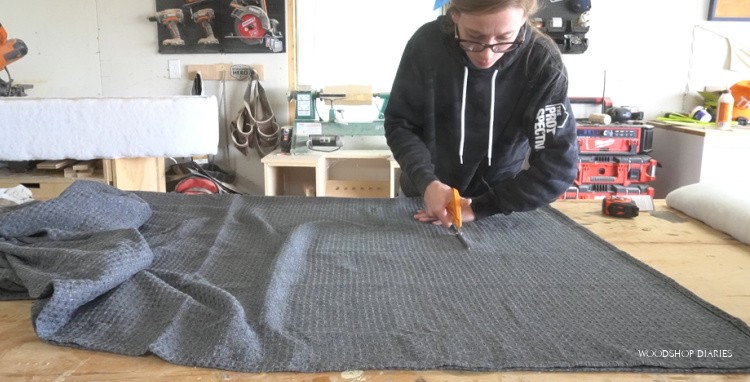
This shower curtain had a waffle pattern, which made it REALLY nice to use for this.
.
Just like with the batting, I began at the top of the box and stapled in place. This time, I wrapped it all the way around and stapled it to the inside of the box to make sure the batting was completely covered.
.
I used the waffle lines as a guide to keep my fabric straight along the top.
.
Then, I did the same along the bottom, keeping close eye on my waffle pattern to make sure things stayed straight.
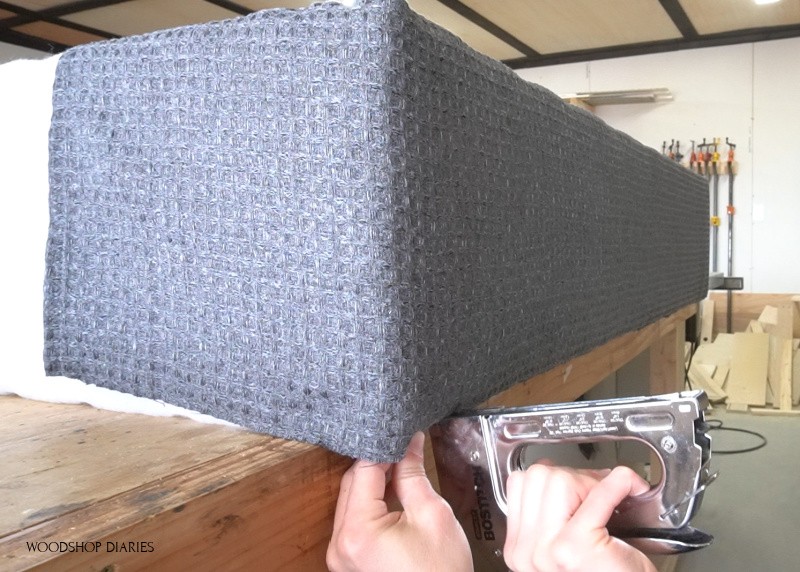
When I got to the end of the fabric, I cut another strip and continued.
.
It’s not perfect, but to help keep the seams from being super noticeable, I just tucked the second strip of fabric under the existing strip at the joints and stapled in place.
Once the box was covered, I worked on the top. I did this exactly like the batting, except I folded over the edges to prevent rough edges from unraveling and to keep it a little cleaner.
.
Again, I used the waffle pattern lines to keep things straight.
For the top, you want to pull the fabric tight for a nicer shape, but not TOO tight that it makes bulges on the sides.
.
And again, on the corners, fold and staple however you think looks best…this isn’t a science.
Step 6: Assemble Bench Base Frame
Now that that was finished, I built the bench base. I used some scrap pieces of plywood for this, but you could also use 1x3s as well. I cut pieces to length to assemble a frame the same size as the bottom of the box.
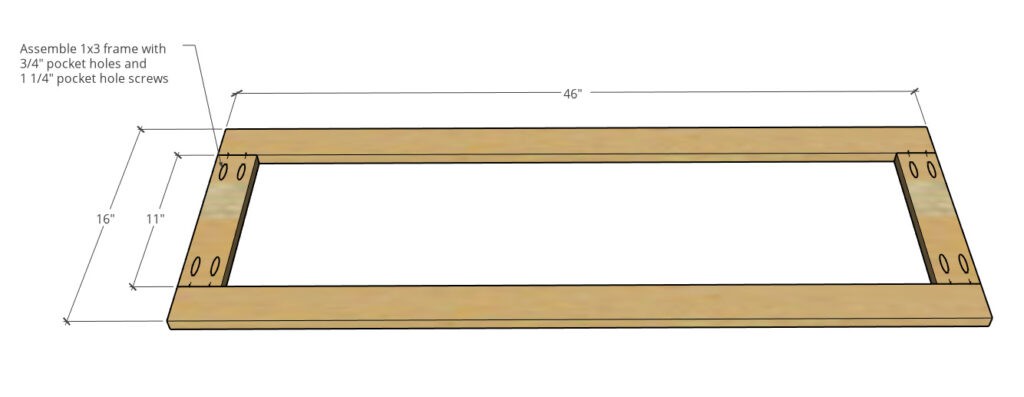
I attached the frame together using pocket holes and screws.
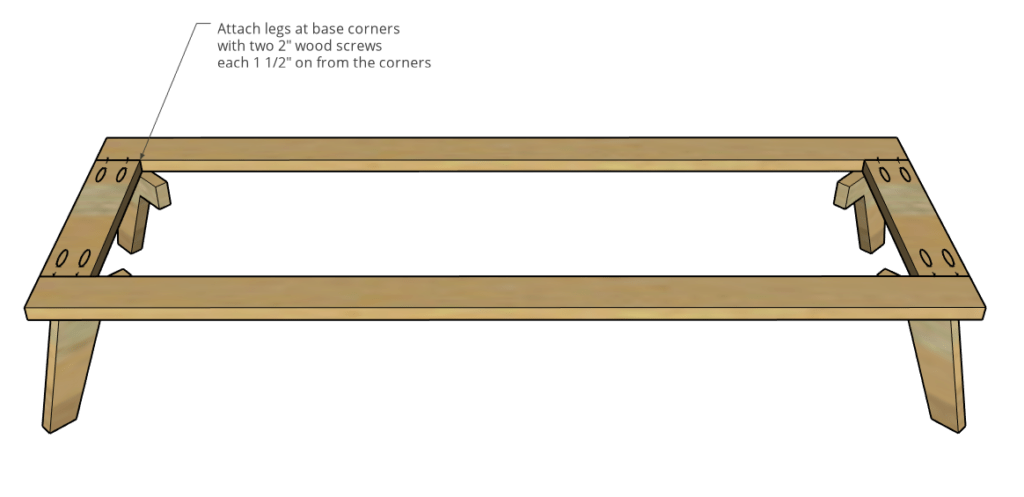
Step 7: Add Legs to Storage Bench Base Frame
Last year about this same time, I built a dog bed with modern legs on it. I used that same template to draw out legs that matched and cut 4 of them from some leftover poplar I had.
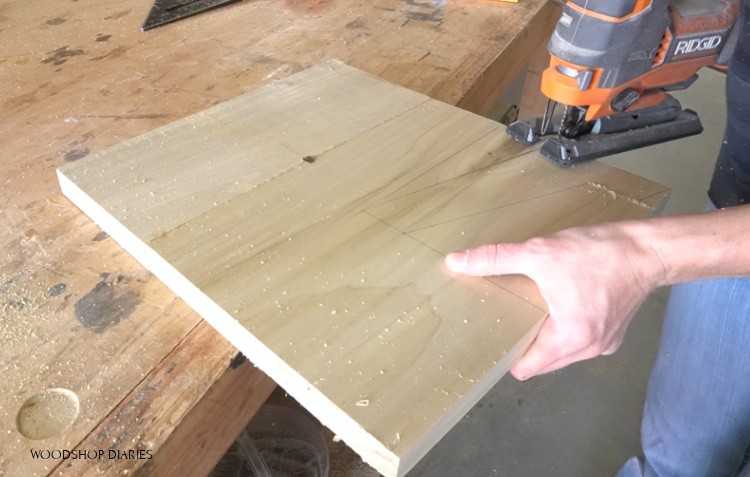
My bedroom set is made from poplar and I wanted this to match, but if you didn’t care, you could cut these from plywood or any leftover 1x scraps you wanted to.
.
You can find this leg template in the printable plans here. I cut these out using a jig saw, then I edge banded the plywood frame and sanded everything smooth.
.
Then, I clamped the legs to the frame on each corner and attached so that they were at a 45 degree angle and inset equally from each corner. I used two 2” wood screws per leg to attach.
Step 8: Attach Storage Bench to Base
Once the base was together, I could attach it to the bench seat.
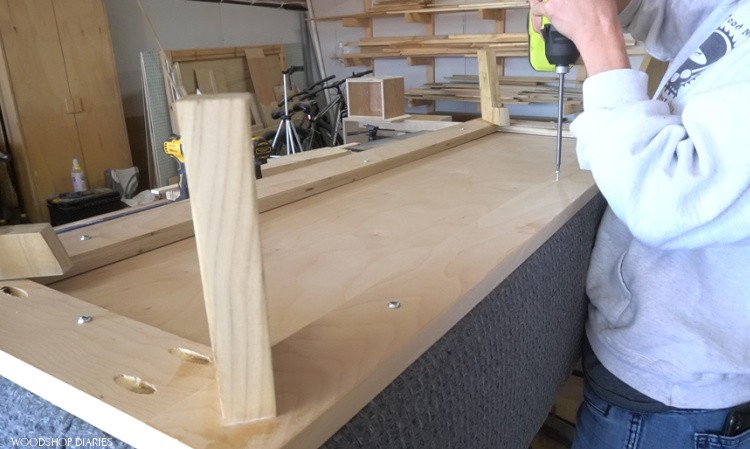
I screwed the frame onto the bottom of the storage along all the sides.
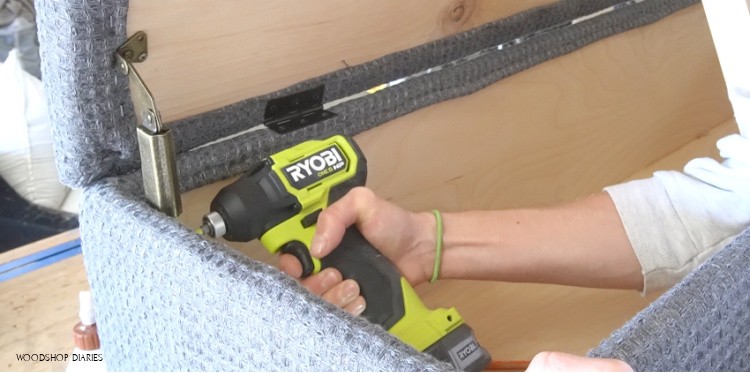
Step 9: Attach and Finish Lid
And the last thing to do was attach the top.
.
I used two small hinges to attach the top—you could also use a piano hinge if you wanted.
.
I screwed these into the top, then into the box like shown here.
And for some extra support, I added these chest lid supports, as well.
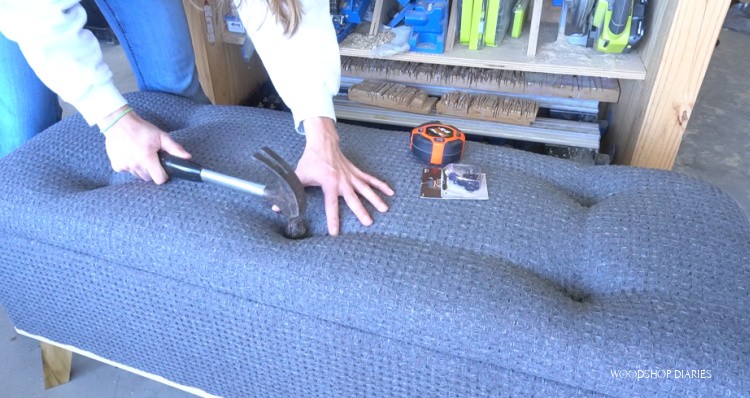
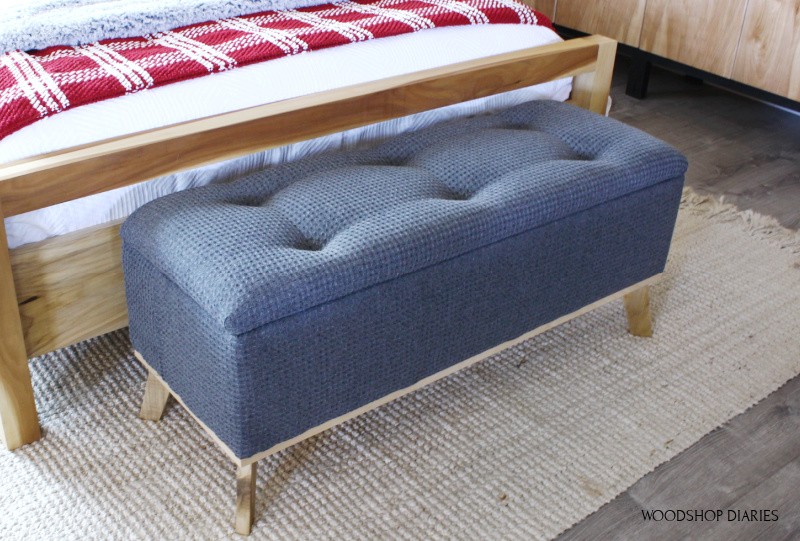
At this point, it was finished…BUT I decided to add one more detail. I had some decorative nail heads in my craft supply drawer and decided to use them to create a tufted top.
.
I simply used a hammer and nailed these where I wanted them to go. And again, the waffle lines are super helpful here to keep things lined up and spaced out evenly.
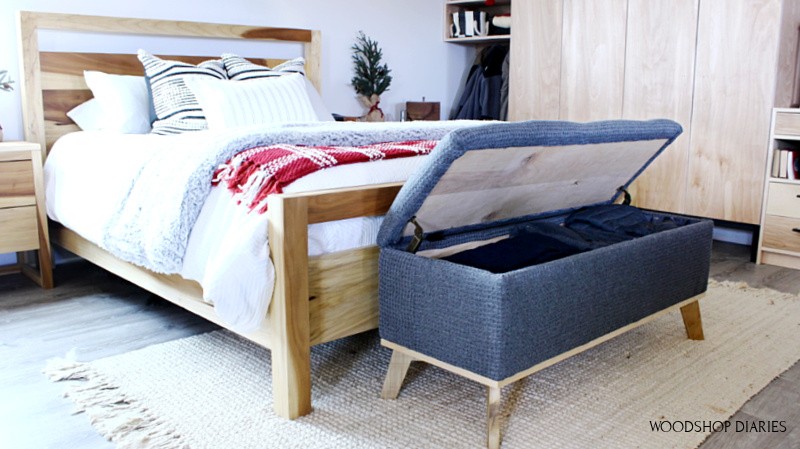
And that was it…I brought it inside and filled it with all the things in our tiny home that I needed to find a place for haha. PS…see those closet cabinets? You can build your own with these plans!
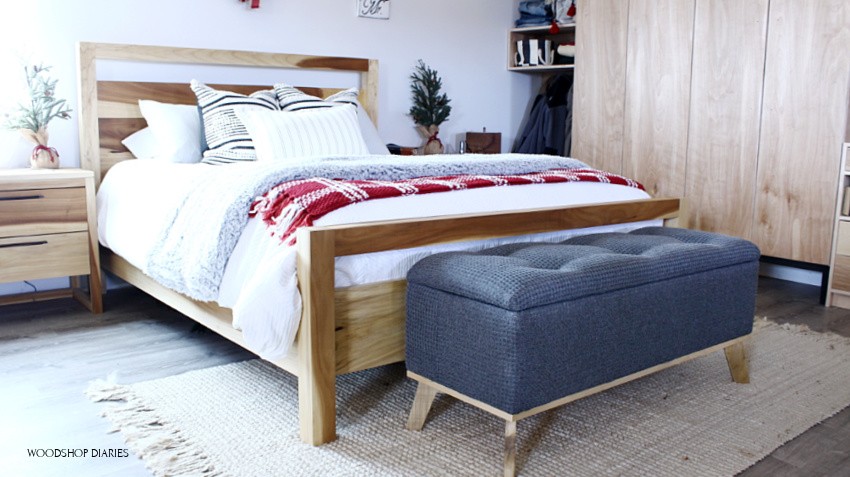
There’s room underneath to hide a few pair of shoes, and plenty of room inside for blankets, pillows, backpacks or clothes.
And if you aren’t as excited about upholstery as I am, this would be really nice simply stained or painted as well…I just prefer a nice, cushioned seat haha.
So if you’re looking to add some storage to your home, be sure to grab the printable plans for this DIY upholstered storage bench and check out plenty more storage ideas here.
.
If you’d like to save this for later, I’d love if you’d pin it!
Until next time, happy building! 😊