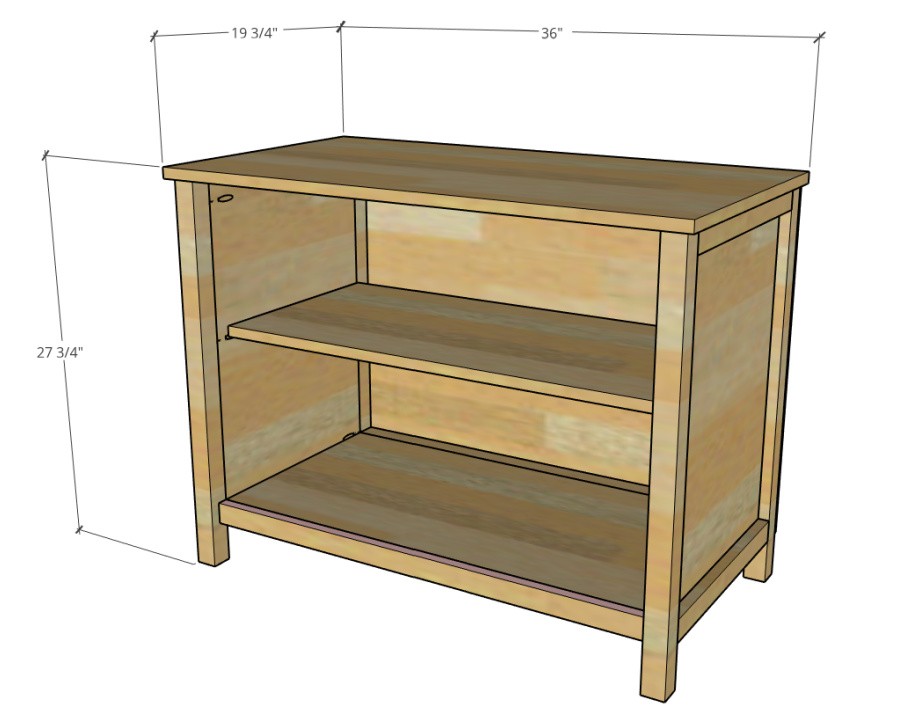
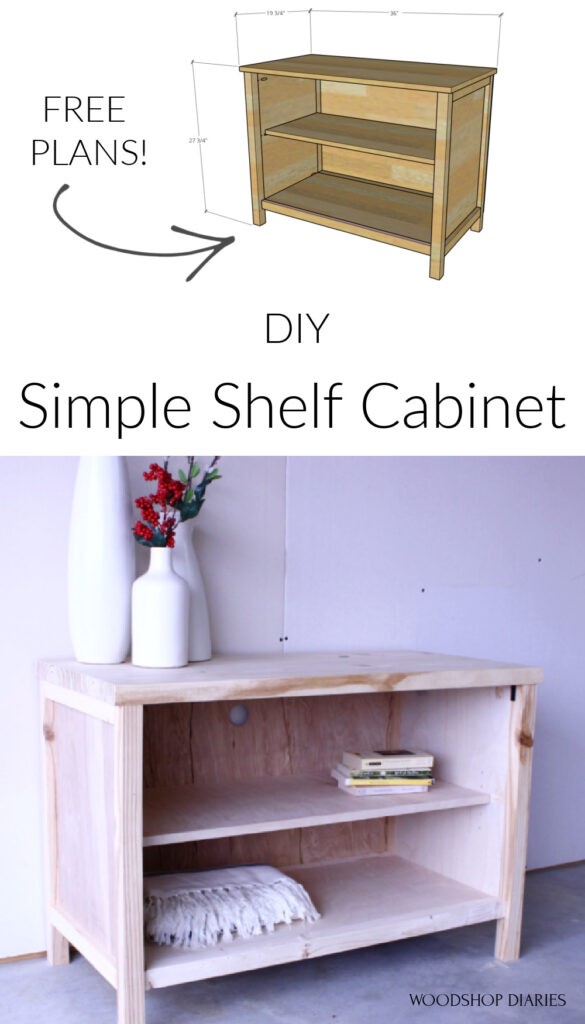
Looking for a small, simple DIY shelf cabinet–just the basics and no fancy bells and whistles? I’ve got you covered with easy plans to build one in this post 🙂
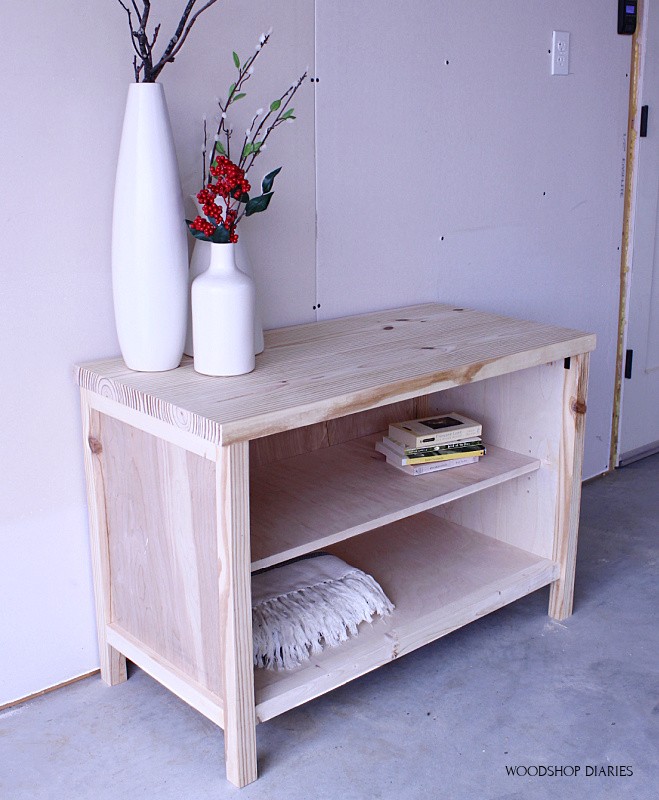
A friend recently asked me for a small, simple TV stand for her living room. Nothing fancy, just a place to set her TV and a shelf underneath for DVD player and other odds and ends.
.
So I built her this simple shelf cabinet. This design is very basic, easy to build, and works great for a TV stand, a little console, or just a simple bookshelf in any room of the house.
.
So if you’re ready to build a versatile, yet simple DIY shelf cabinet/TV console, let’s get building 🙂
This post contains affiliate links. See policies.
For this DIY Shelf Cabinet, You Will Need:
- (2) 1x2x8 boards
- (2) 2x2x8 boards
- 1 sheet ¾″ plywood
- ¼ sheet ¼″ plywood
- 1 ¼″ pocket hole screws
- 2 ½″ pocket hole screws
- Circular Saw
- Miter Saw (optional–can use circular saw for all cuts if desired)
- Drill
- Pocket hole jig
- Shelf pin jig (optional)
- Shelf pins (optional)
RELATED: Check out this list of the 10 basic tools you need to build furniture and cabinets.
NOTE: If you have some 1×2, 2×2, and/or plywood scraps, you may be able to make this project with scraps vs. buying new material–the pieces needed are fairly small.
.
I was able to build this entire project by shopping my scrap bins and using leftovers from previous projects…give it a try if you have a scrap stash 🙂
.
RELATED: Have a scrap stash and no where to put them? Build this DIY Scrap & Plywood Cart
.
Cut List:
- (2) ¾″ plywood @ 16″ x 24″ (side panels)
- (1) ¾″ plywood @ 16″ x 32″ (bottom panel)
- (1) ¾″ plywood @ 15-16″ x 31 ¾″ (shelf)
- (1) ¾″ plywood @ 19 ½″ x 36″ (OR glue up a panel this size of 1x or 2x material)
- (1) ¼″ plywood @ 24″ x 35″ (back panel)
- (4) 2x2s @ 27″ (legs)
- (2) 2x2s @ 32″ (back supports)
- (1) 1×2 @ 32″ (front bottom support)
- (4) 1x2s cut to fit (side panel trim)
Step 1: Assemble Side Panels of Cabinet Shelf
The first step is assembling the sides of the cabinet shelf. I made these using 2x2s for the legs and ¾″ plywood for the middle panel.
.
RELATED: Want to know how to quickly and easily cut down plywood? This plywood cutting guide shows you how.
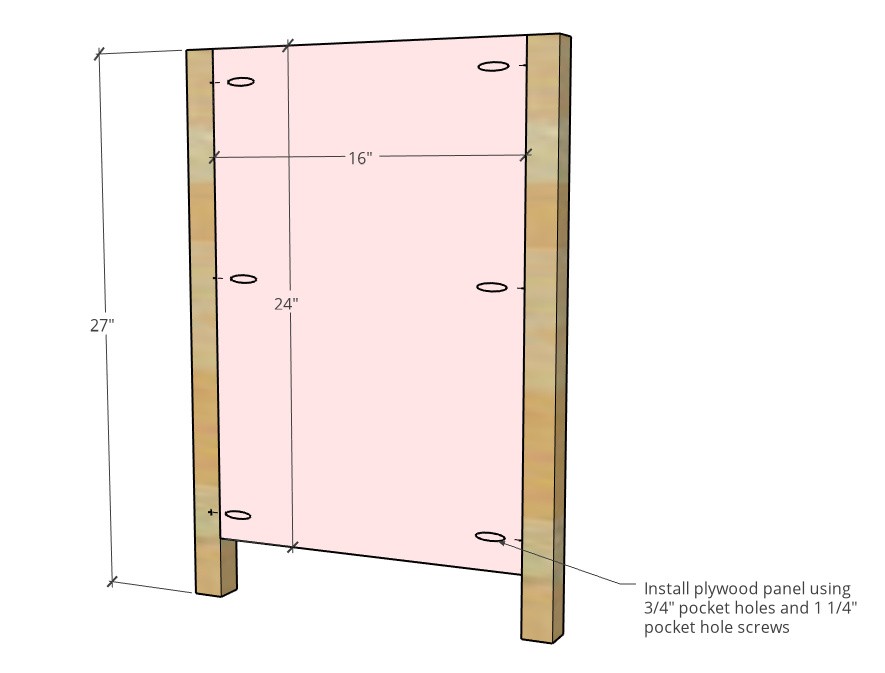
I used my pocket hole jig to drill ¾″ pocket holes along the edges of the panels and installed them flush to the INSIDE of the 2×2 legs with 1 ¼″ pocket hole screws.
.
I made two of these…one for each side 🙂
Step 2: Assemble Cabinet Shelf Frame
Now, here’s where I leave things up to you and whatever you like the look of better or whatever options you may find in your scrap wood pile 🙂
.
For the back supports, I used 2x2s, but I liked the bottom shelf kind of inset from the front edge or the legs, so I installed a 1×2 on the front so the bottom shelf will end up being ¾″ inset.
.
That’s totally up to you. Install like shown using pocket holes and screws. For 2x material, use 1 ½″ pocket holes and 2 ½″ pocket hole screws. For 1x material, use ¾″ pocket holes and 1 ¼″ pocket hole screws.
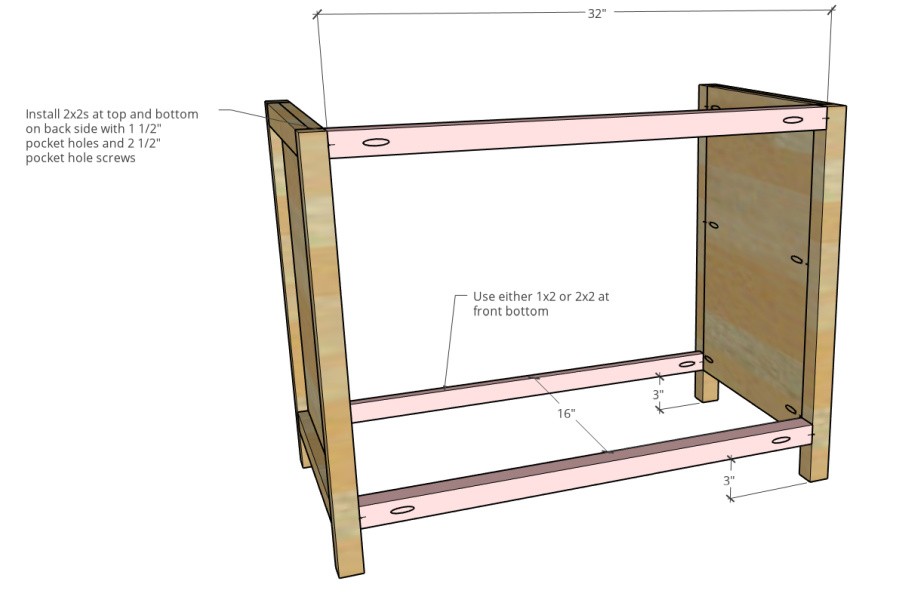
Face the pocket holes towards the back to hide them.
Step 3: Install Bottom Panel
Install a ¾″ plywood bottom panel like shown so that it is flush across the top of the bottom supports.
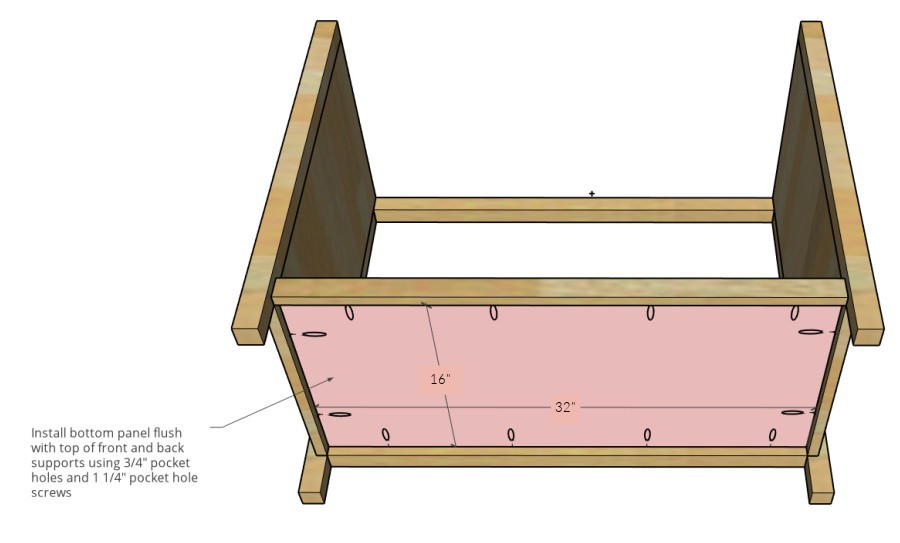
Install using ¾″ pocket holes and 1 ¼″ pocket hole screws.
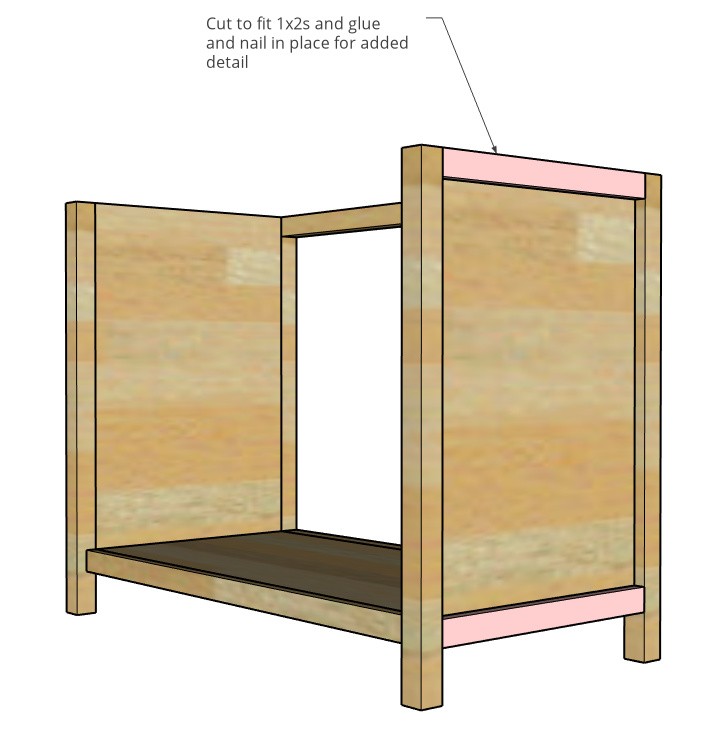
Step 4: Attach Side Panel Trim (optional)
Cut to fit some 1×2 pieces (if you want–no pressure, here!) and glue and nail (or just glue if you don’t have a nail gun) on the sides at the top and bottom for a little added detail.
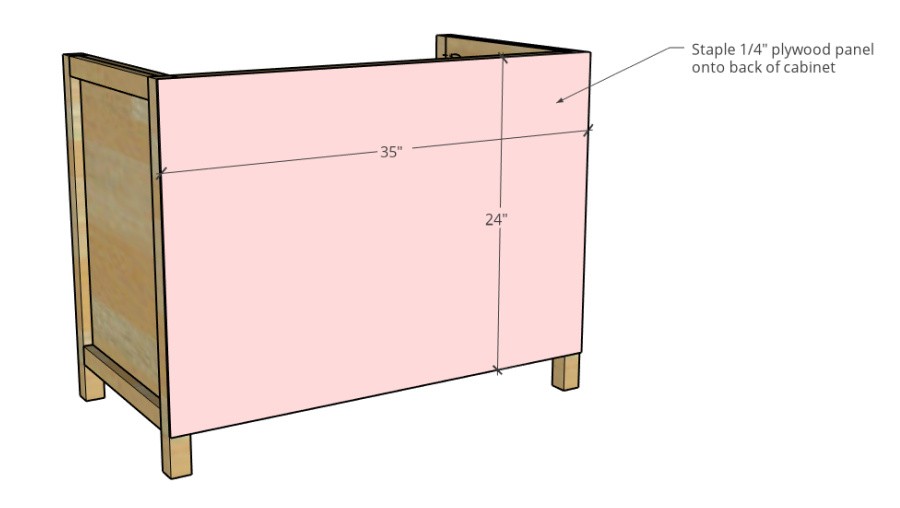
Step 5: Install Back Panel
Cut ¼″ plywood backer to fit over the back side of the cabinet and staple, nail, or screw in place.
Step 6: Add Cabinet Shelf Top
Here’s somewhere else you can totally use what you have and get creative. You can cut a piece of ¾″ plywood to use as the top here.
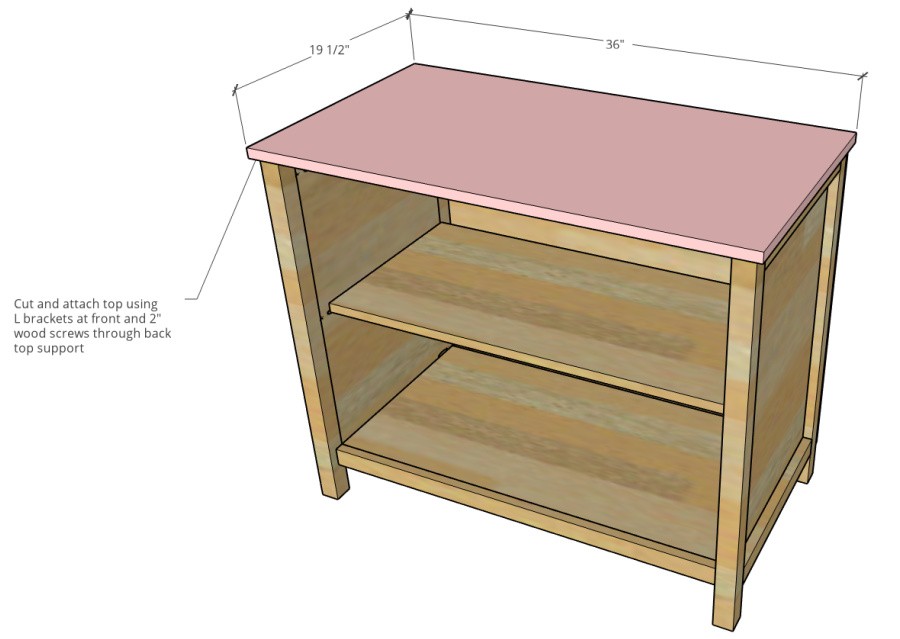
OR, you can do what I did, and glue up your own panel with what you have in the shop 🙂
.
I followed this simple tutorial for making table tops and built a top for this project using 2×10 boards and a 1×2. I glued them together, trimmed to final size with my circular saw, and attached.
.
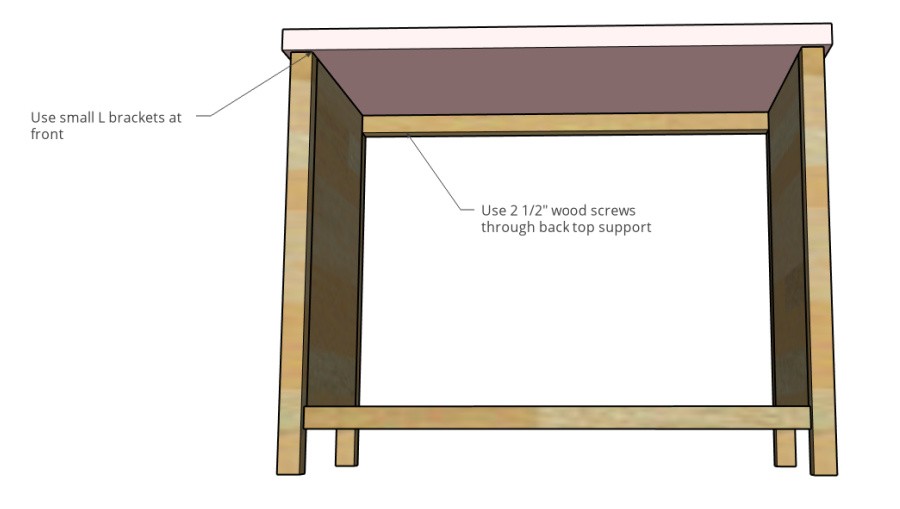
I used some small L brackets to attach the top at the front and 2 ½″ wood screws to attach at the back through the 2×2 frame. If using ¾″ plywood top, go with 2″ wood screws instead of 2 ½″.
Step 7: Install Adjustable Shelf
I used a shelf pin jig to drill shelf pins for adjustable shelves into this cabinet. Although, if you didn’t care if they were adjustable or not, you could also install a shelf using pocket holes instead.
.
For more info on shelf pins and the jig I use to drill them, check out this post.
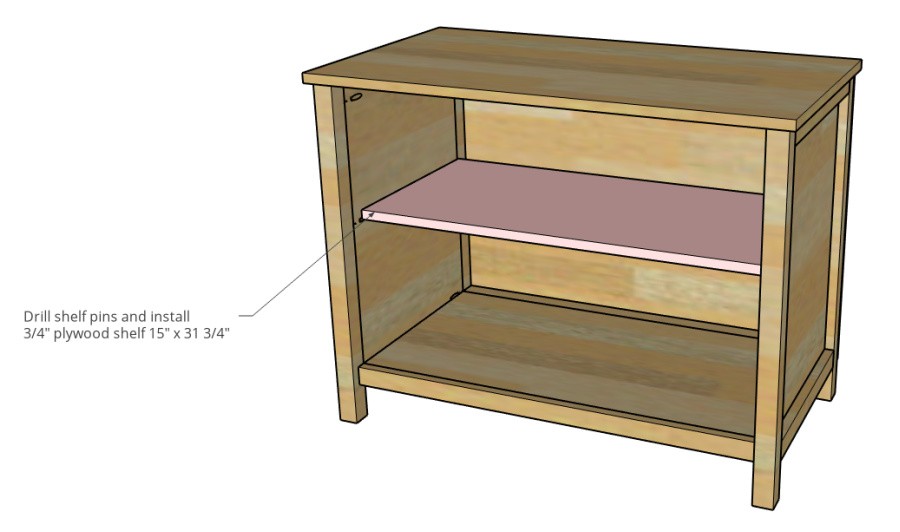
NOTE: if you do install using pocket holes, cut it 32″ long instead of 31 ¾″ long.
.
The depth of the shelf here is up to you. I made mine 15″ deep, but you could make it shallower or deeper as you wish. Just make sure to drill the pin holes in far enough that she shelf will be able to sit on them.
Step 8: Finish
I plugged the visible pocket holes on the side panels with pocket hole plugs, but you could also leave as is, or just use wood putty to fill them in.
.
I also used a 2″ hole saw to drill a hole through the back panel to run cords for the TV and DVD player since this will be used as a TV stand. That’s totally optional.
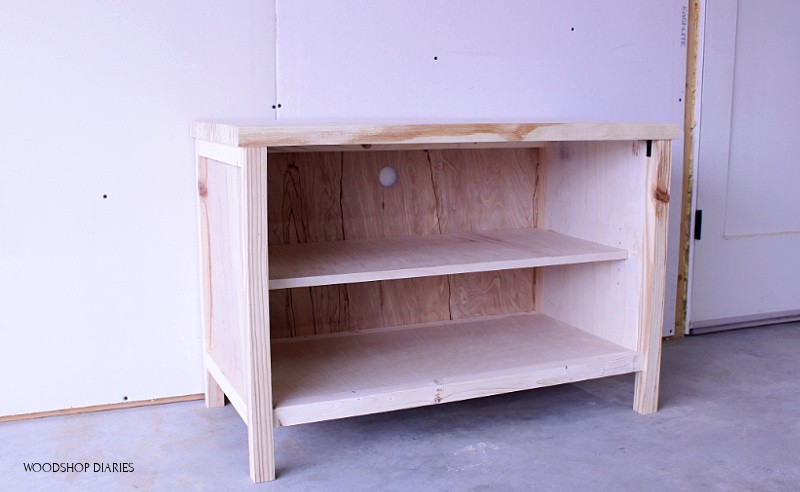
I installed some shelf pins where I wanted the shelf to go, placed it inside, and it was ready for paint or stain. My friend was planning to paint this herself, so my job was done here 🙂
.
And that’s how easy it is to build a simple little shelf cabinet/TV stand.
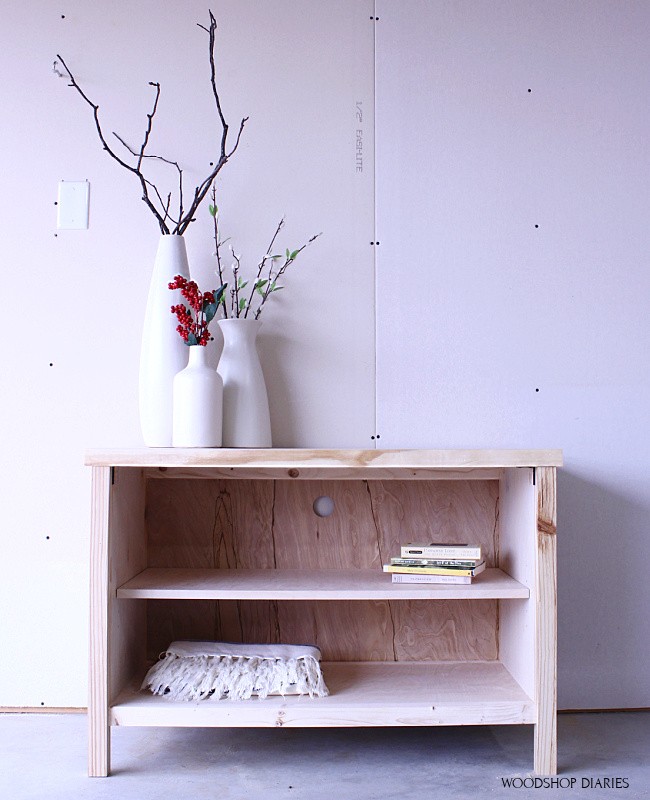
Nothing fancy, nothing extra, just a classy little cabinet. If you wanted, you could also add some doors onto it to hide what’s inside. I have a tutorial for building cabinet doors here.
.
If you’ve enjoyed this DIY shelf cabinet project and want to save it for later, I’d love if you’d pin this!
And if you can’t wait to see what the next project is, be sure to sign up for my newsletter below to be the first to know about new blog posts!
.
Until next time, friends, happy building 🙂