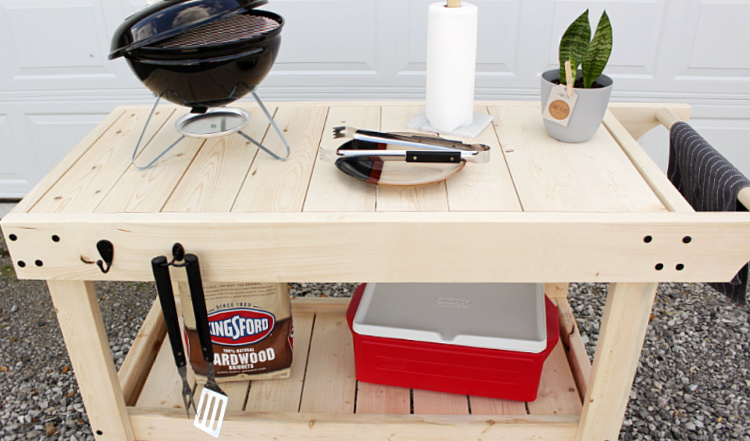
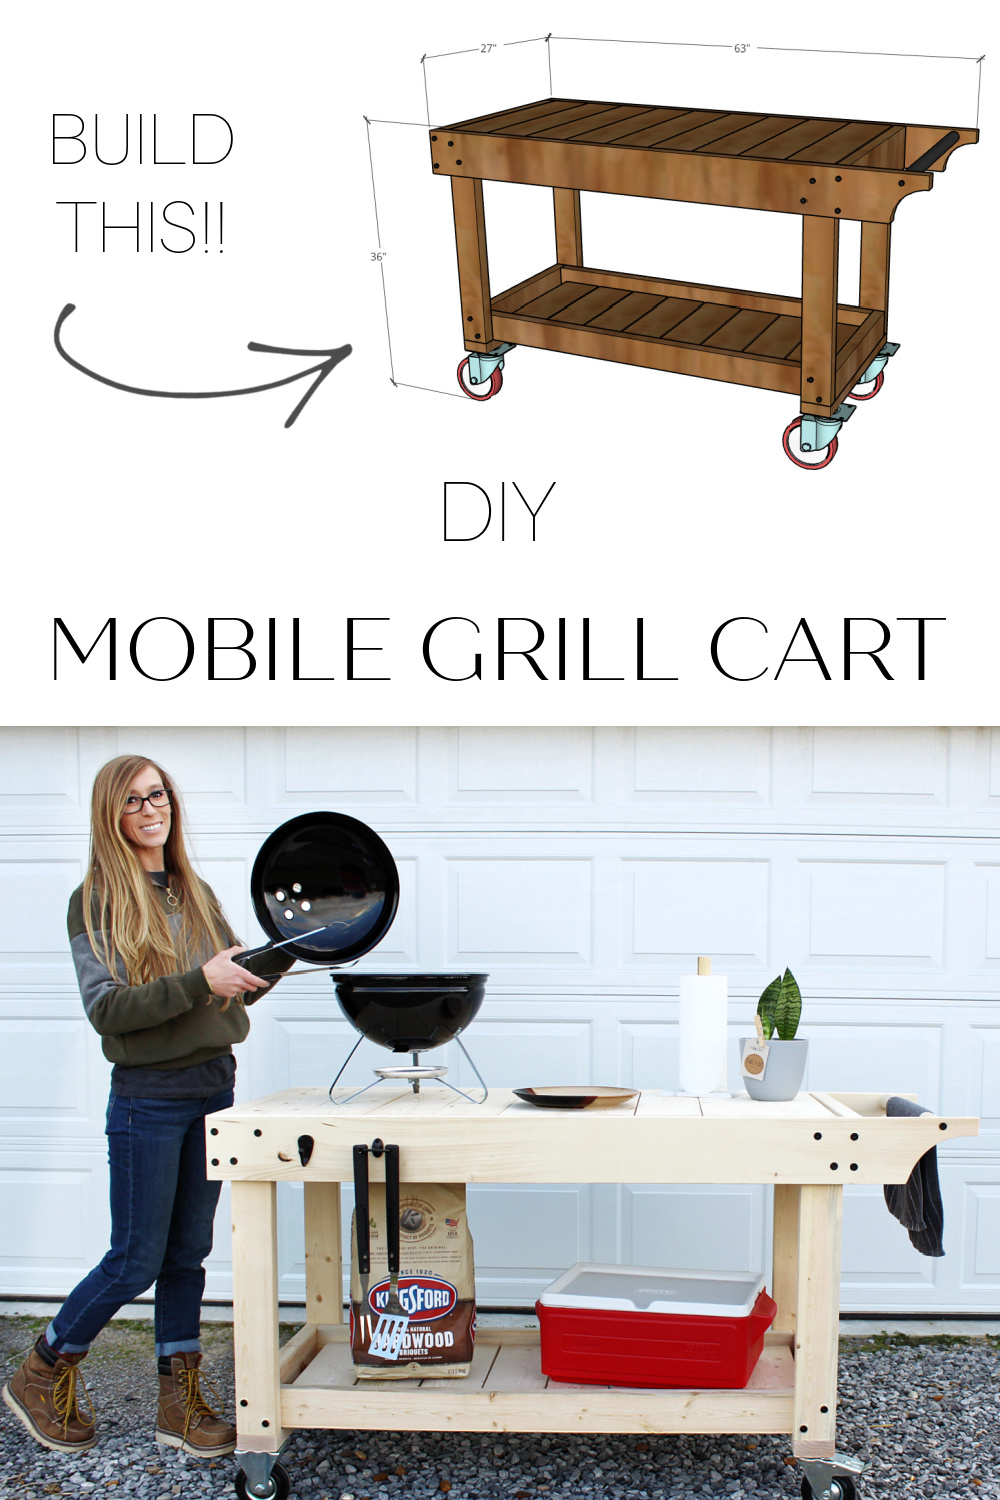
In this post, I’ll show you how to build this easy DIY grill cart BBQ prep table!
*This project was sponsored by The Home Depot as part of the ProSpective Tool Review Program. This post also contains affiliate links. See policies.
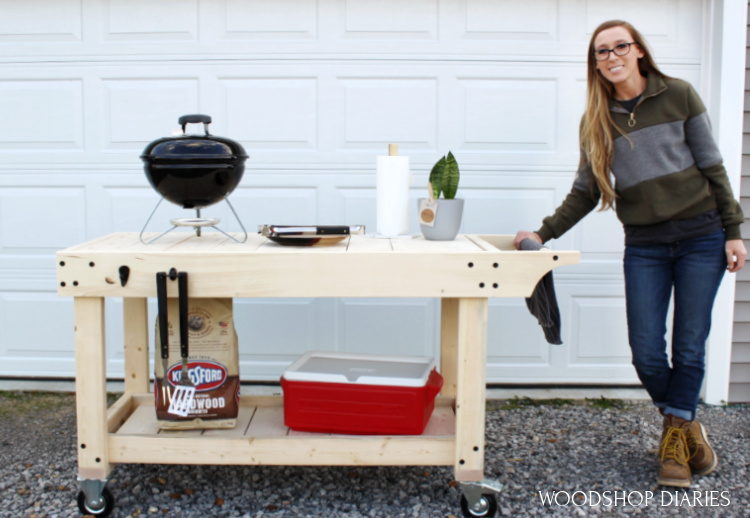
After I created our garden patio a few weeks ago, I received several requests for DIY grill cart/BBQ station and prep table plans. So I built this one!
Now, we don’t do a whole lot of grilling so I really didn’t want anything where the grill was built into the project.
So I built this cart kind of “basic” so that it can stay versatile and be used for lots of things–not just for grilling!
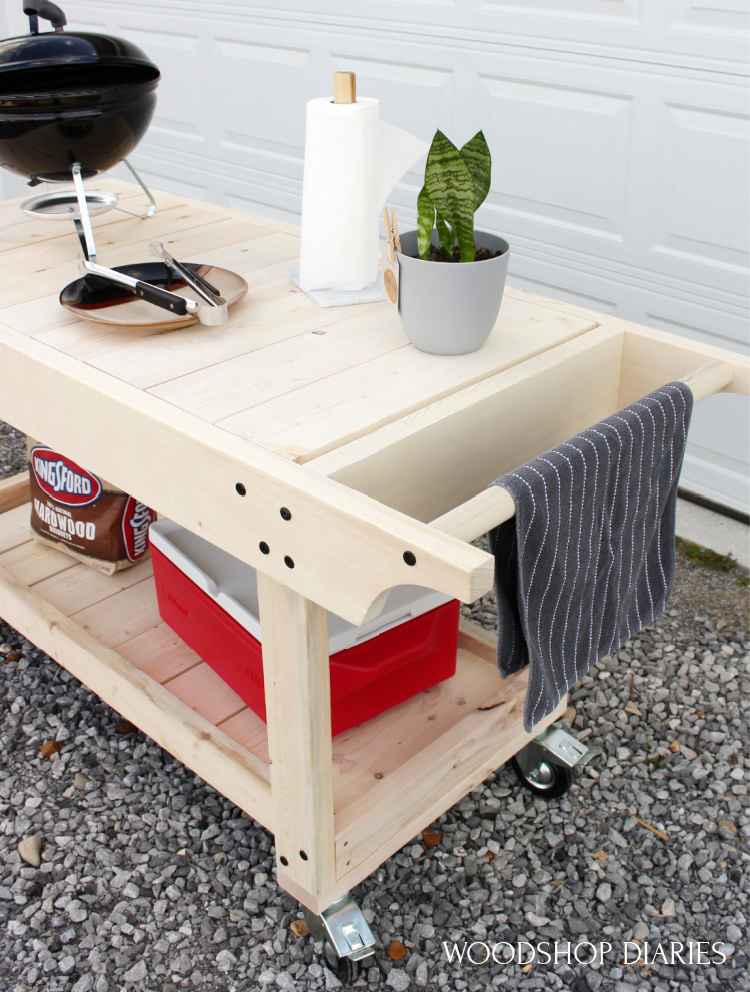
You can set a small grill on top and use it as a grill station, use it as a BBQ prep table next to your existing grill, use it as a bar cart, a serving table for outdoor parties, etc.
But, you could also use it as a simple utility cart to roll around the yard and collect your vegetable harvest if you have a large garden.
I’ve got a video tutorial and the woodworking plans below. So, if you’re ready to see it come together, let’s get building!
Tools & Materials
Tools:
- Ryobi HP Drill/Driver
- Ryobi HP Jig Saw
- Miter Saw (Optional)
Materials:
- (2) 2x6x8 boards
- (4) 2x4x8 boards
- (5) 1x6x8 boards
- (2) 1x2x8 furring strips or boards
- 1 ¼″ wooden dowel
- (2) swivel & lock casters
- (2) fixed casters
- 1 ¼″ exterior wood screws
- 2 ½″ exterior wood screws
- 2 ⅞″ black timer frame screws
- Exterior Finish
What to Know Before Building a DIY Grill Cart & Prep Table
This is an EXCELLENT weekend woodworking project that you can build in just a few hours.
It uses minimal tools, standard materials and very simple joinery methods, so it’s a great beginner woodworking project if you’re just getting started or looking for a simple build.
What type of wood should you use?
To keep costs low and assembly easy, I just used some basic untreated pine/whitewood construction lumber here—some 2x6s, 2x4s, 1x6s, and a couple furring strips.
Typically, you don’t want to use untreated pine for an outdoor project as it’s not resistant to moisture. So, basically, it just won’t last as long when exposed to the elements.
So you could definitely use treated, red wood or cedar wood for this build if you wanted something that will last a long time. Just don’t put any food in direct contact with treated lumber.
But I plan to keep this under cover on the porch and the untreated wood will still last several years especially if I apply an outdoor sealant.
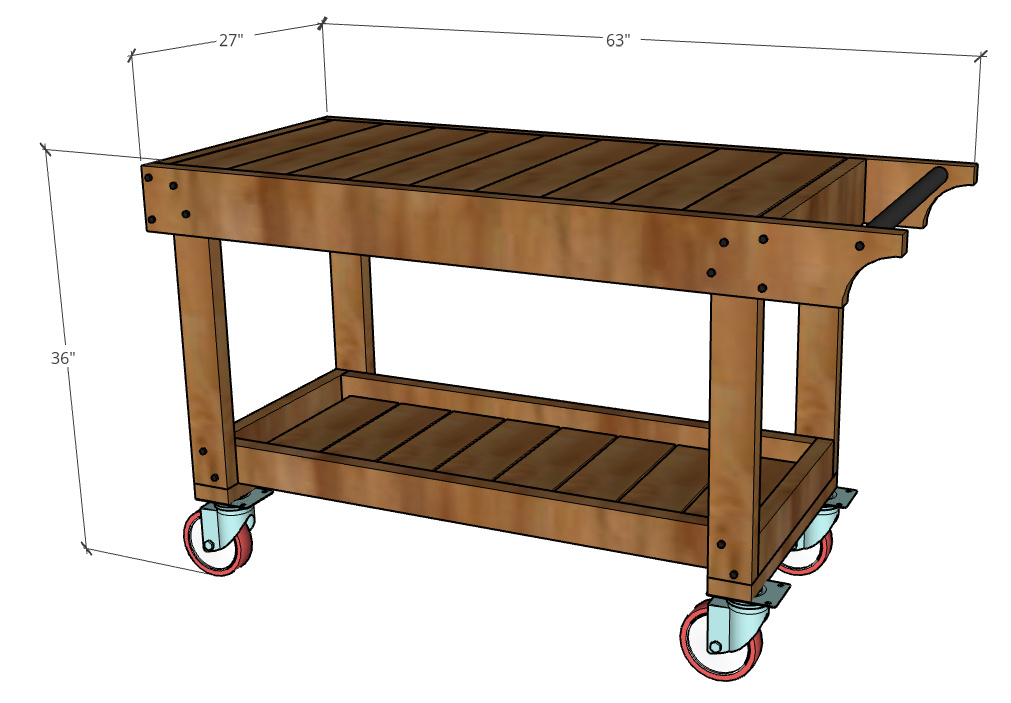
Overall dimensions
The overall dimensions for this project are 36″ tall x 27″ deep x 63″ long. Note that this includes the caster wheels.
If you opt for a different size or style caster wheel than what’s linked above, your height may vary.
How to Build a DIY Mobile BBQ Cart and Prep Table
If you’re ready to head to the shop, let’s get building!
I’ve shared the step by step instructions below with several helpful tips along the way, but if you prefer to watch, you can check out the build video here as well.
If you prefer to print your plans, grab the printable version of the plans below here:
Step 1: Cut Grill Cart Frame Pieces
The first thing I did was cut down my frame pieces.
I get a lot of comments from people that if they had a shop full of tools, they could build this or that, too.
And while certain tools make the job easier, I started out several years ago with just a hammer and a jig saw.
RELATED: Check out my list of 5 Tools I Recommend Getting Started With here!
And I was always surprised at what you could build with just those two tools if you got creative.
That said, this project could easily be completed with just a drill and a jig saw if that’s all you had.
A miter saw would make the straight cuts a little quicker, but any saw will work for the straight cuts.
Here’s the cut list for the frame pieces:
2x4s:
- (4) @ 27 ½″ long (legs)
- (2) @ 24″ long (leg stretchers)
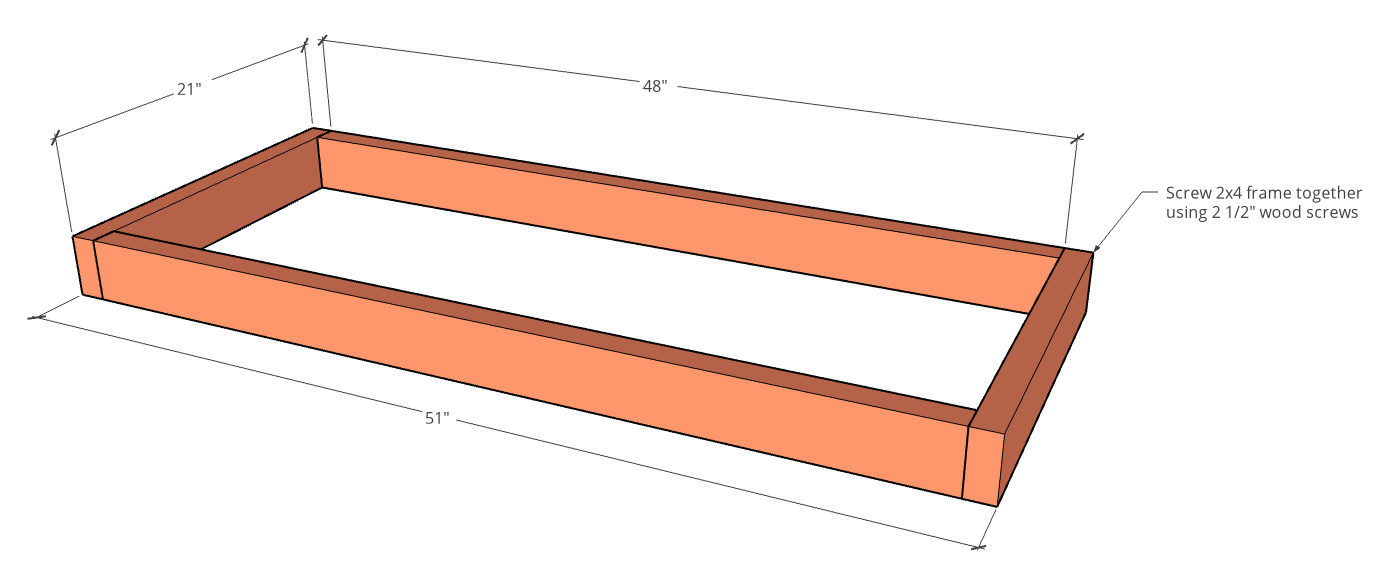
- (2) @ 21″ long (bottom tray short sides)
- (2) @ 48″ long (bottom tray long sides)
2x6s:
- (2) @ 24″ long
- (2) @ 63″ long
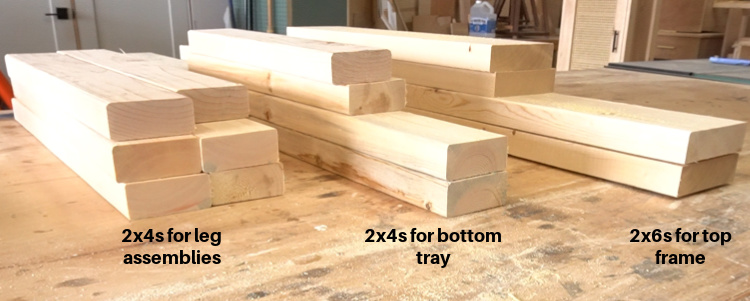
Once everything was cut, I gave the pieces a good sanding before assembling anything.
Prefer to print? Grab printable plans for this outdoor cart here.
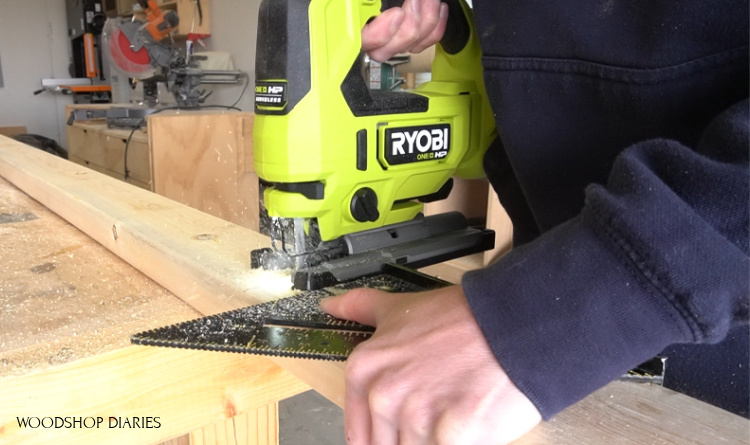
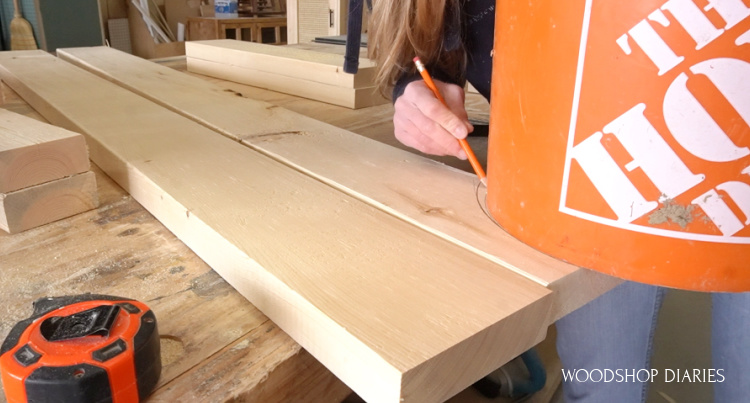
Step 2: Cut Out Curve on Top Cart Sides
Before assembling, I needed to cut a curve out on one end of both the long, top 2×6 pieces where the handle will go later.
So I found some round objects in the shop to trace the curve.
I felt like the story of the three little bears trying to trace this curve. I tried a paint can, but it was too small.
So I grabbed a 5 gallon bucket and tried tracing around the top and it was too big. So I flipped the bucket over and traced the bottom and it was just right haha.
Take note that I left about 1 ½″ between the top edge and the curve on the 2x6s to attach the handle between later.
Then I used the new Ryobi 18V HP cordless jig saw to cut out this curve.
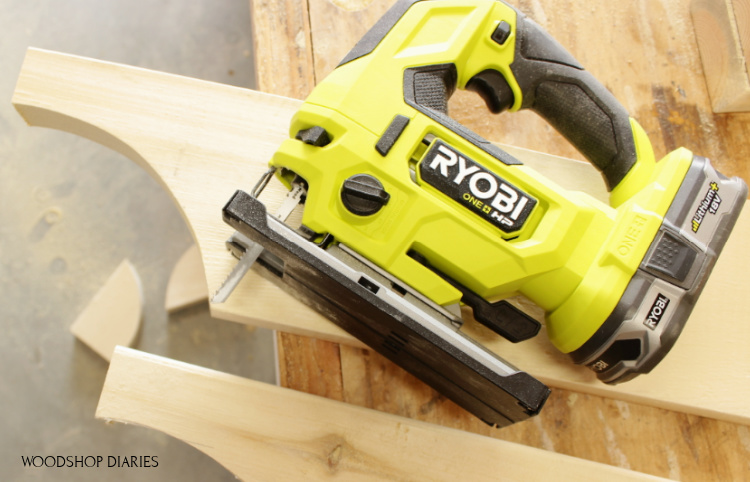
Check out the video to see it in action and check out more details on the saw here on The Home Depot website.
Step 3: Build Leg Subassemblies
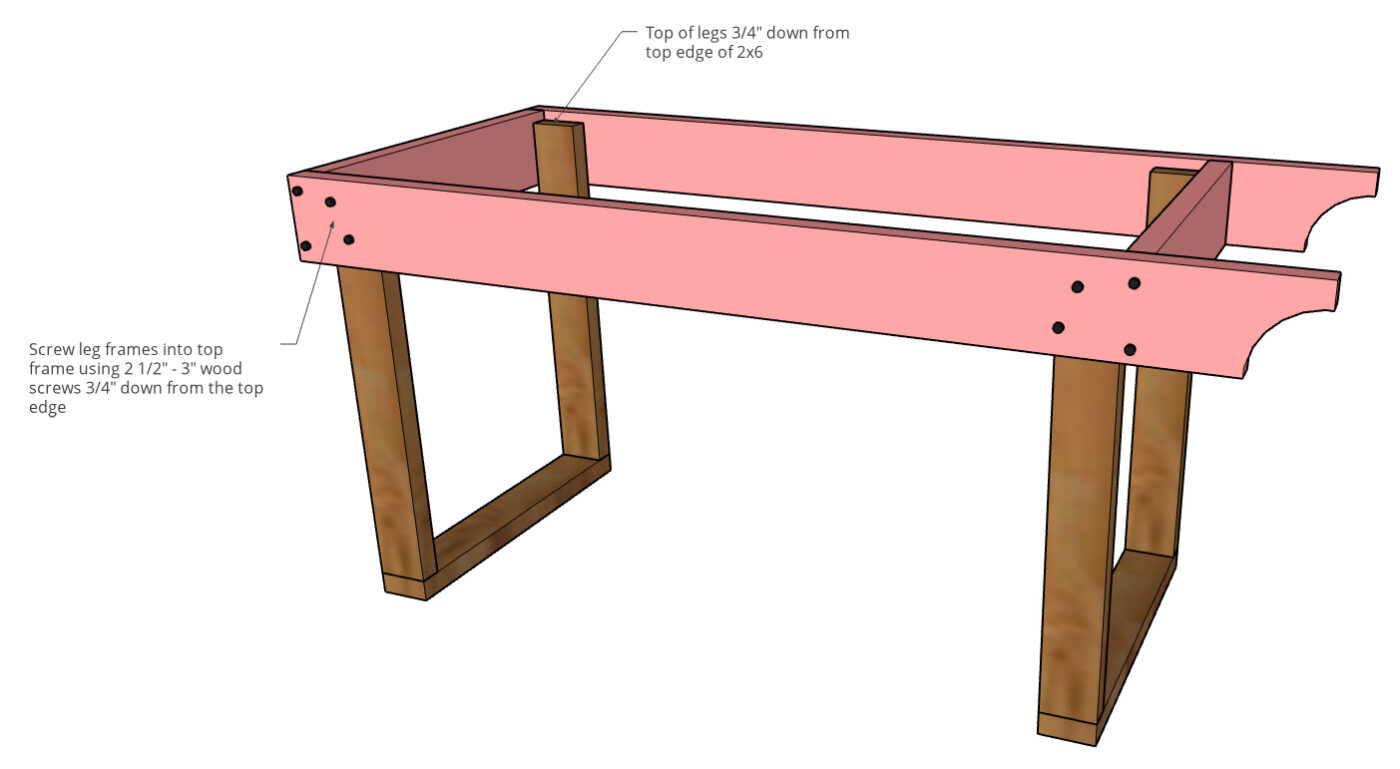
I built this project in basically three sections—two leg sub assemblies, a bottom tray, and a top frame. So I started with the legs first.
I used 2 ½” exterior screws to assemble two leg assemblies. These leg assemblies were basically just a bottom 2×4 stretcher attached between two 2×4 legs.
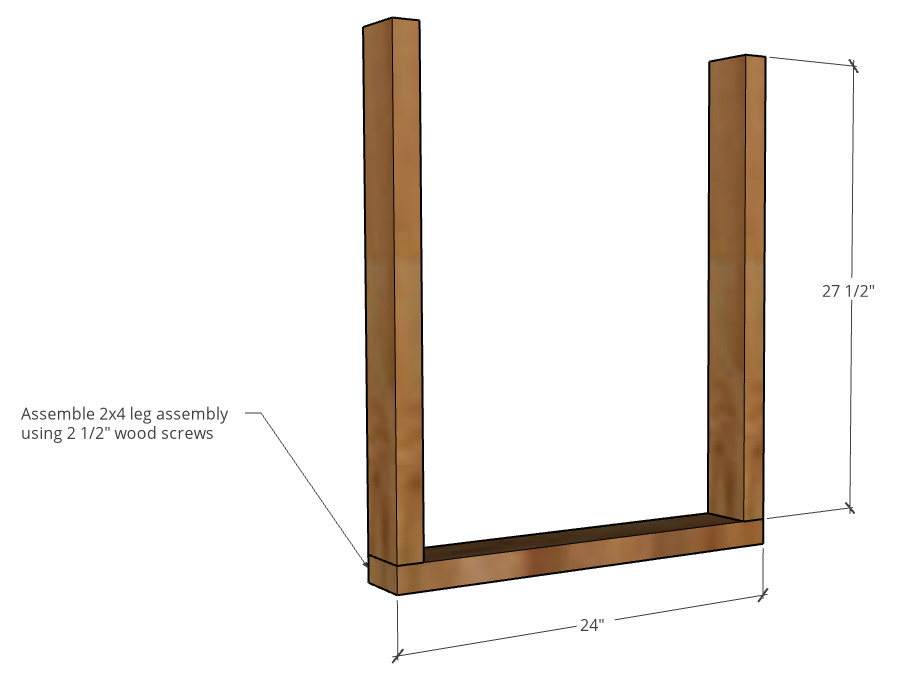
NOTE: Don’t forget to predrill all the holes before driving the screws. These 2x4s can tend to split if you skip predrilling.
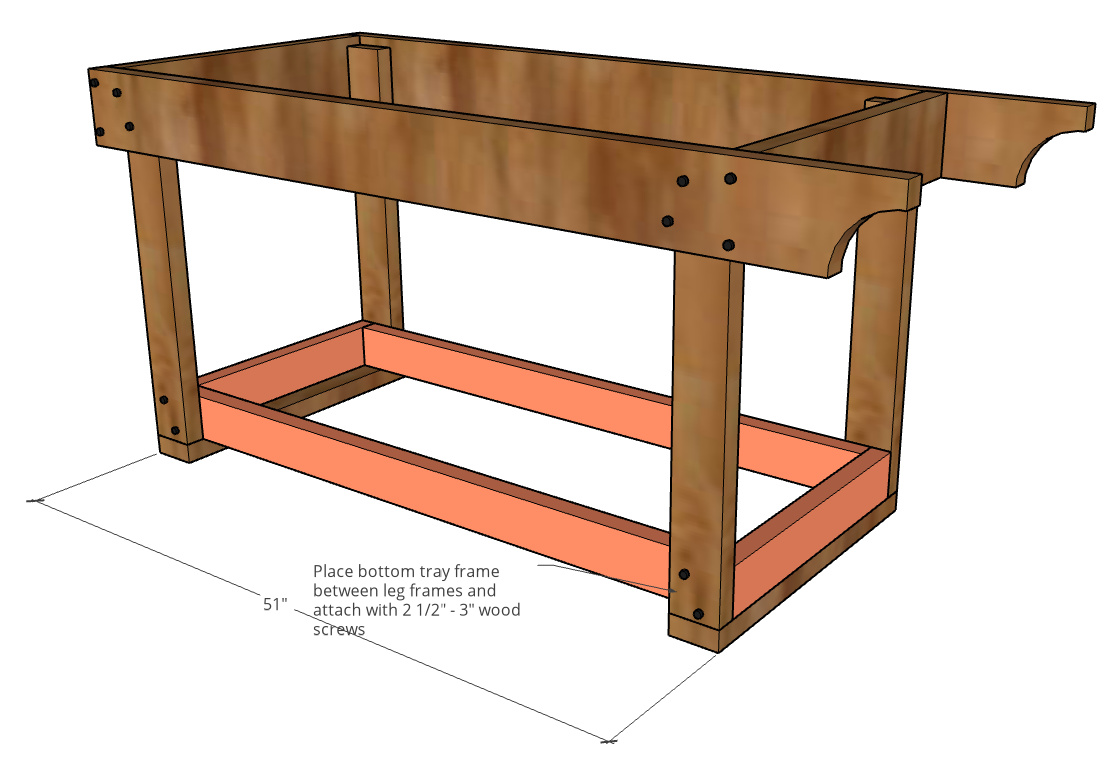
Step 4: Assemble Bottom Grill Cart Tray Frame
Then, I used 2 ½” exterior screws to assemble a tray made from 2x4s that would fit into the leg assemblies.
Step 5: Assemble Top Cart Frame
And lastly, I assembled a top frame using the 2x6s from the cut list.
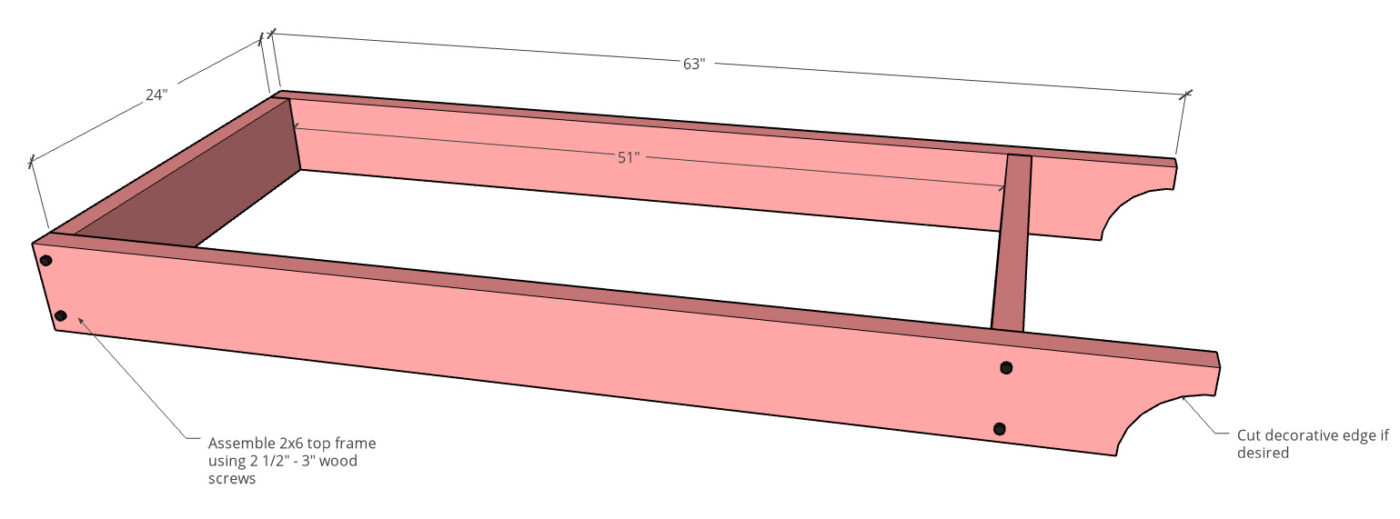
You could use more 2 ½” wood screws for this, but because these screws will be seen, I opted for a more decorative option and used these 2 ⅞” timber screws.
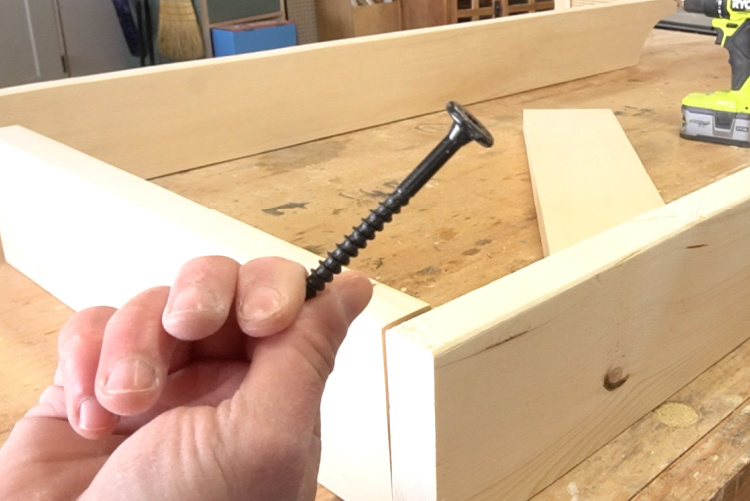
Structurally, they’re a little overkill, but I liked the black hardware accents here, so I used them for this top frame.
I used a speed square to help me keep my pieces square while assembling.
Step 6: Assemble the Grill Cart BBQ Table
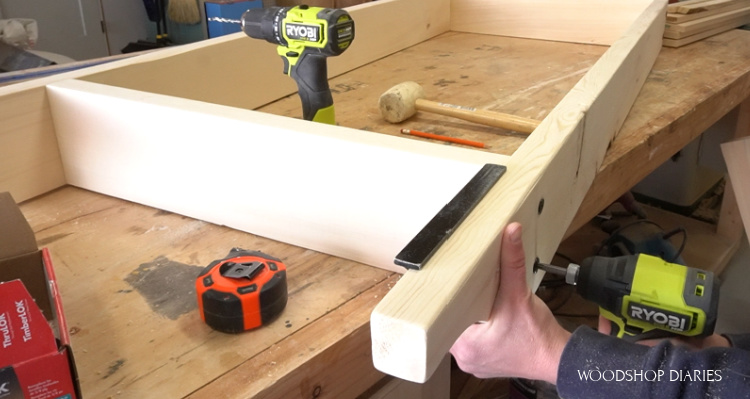
Once the legs, the bottom tray, and the top frame sub assemblies were together, it was time to start assembling the cart.
I flipped the top frame upside down and screwed the leg assemblies inside the frame so they were ¾” down from the top edge.
Again, I used timber screws for this for a little more visual interest.
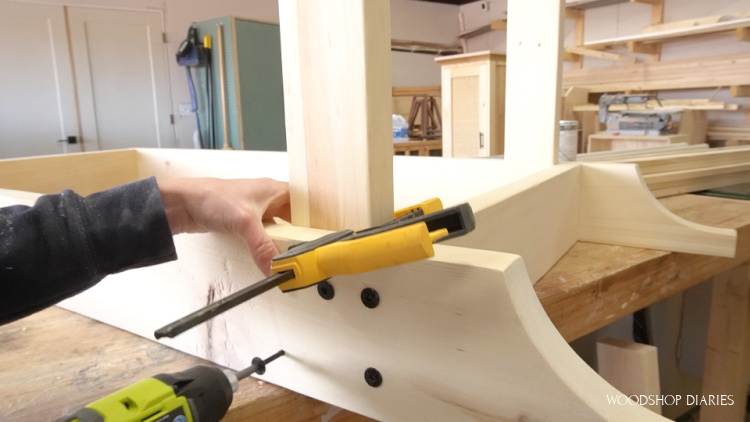
Once the legs were in place, I flipped the cart right side up and installed the bottom tray. It was a tight fit, so I used a rubber mallet to tap it into place.
Before attaching anything, I made sure the legs were square to the top, then I screwed the tray in using more timber screws.
Step 7: Install Slat Supports & Handle
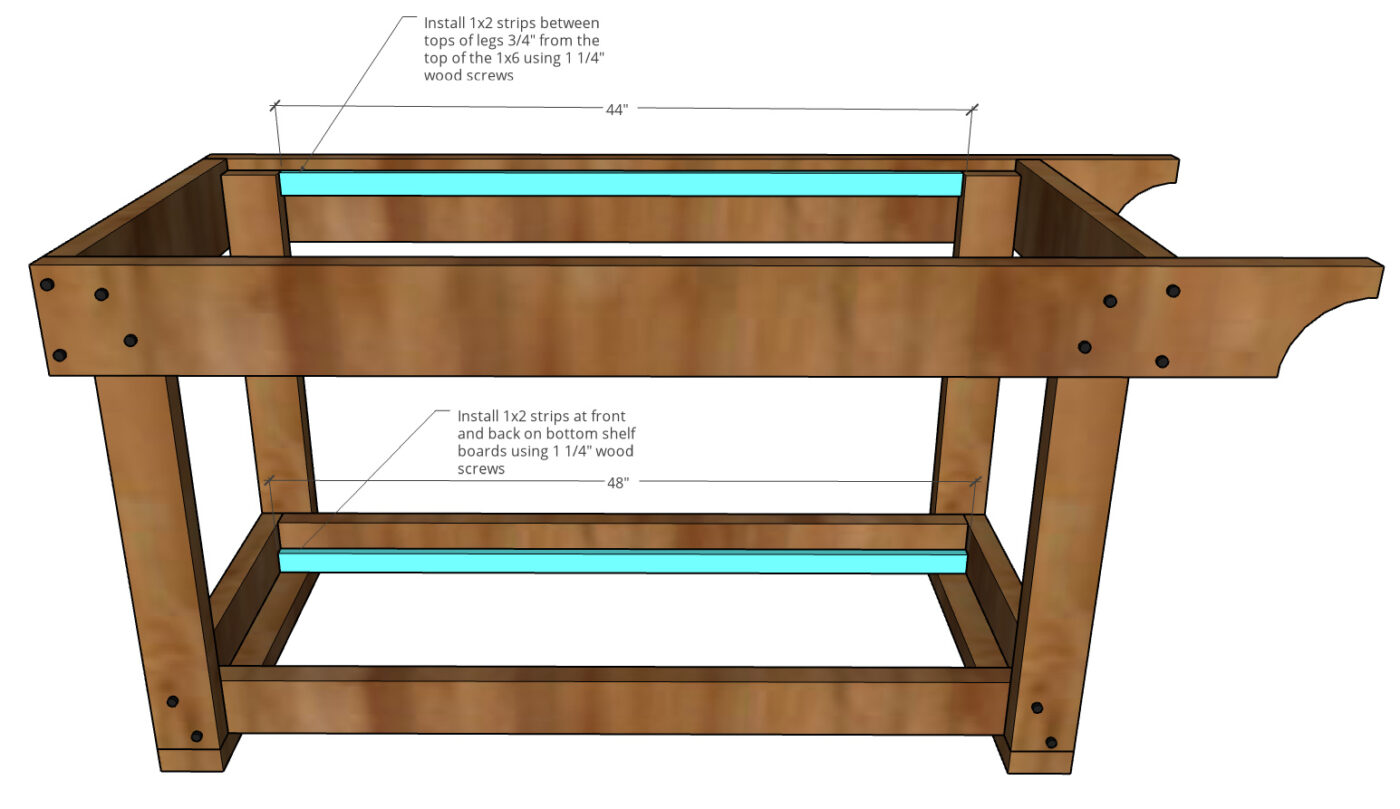
I wanted the slats for the top and bottom to simply sit in place so they could be removed later if I decided to replace them with concrete or some kind of a tile top.
So, I cut furring strips (you can also use 1x2s, but furring strips are cheaper) to screw between the legs ¾” down from the top edge so the slats could just rest on them.
I also added these along the bottom edge of the bottom tray.
For the handle, I measured and cut a 1 ¼″ wooden dowel to fit between the ends of the top frame where the curve was.
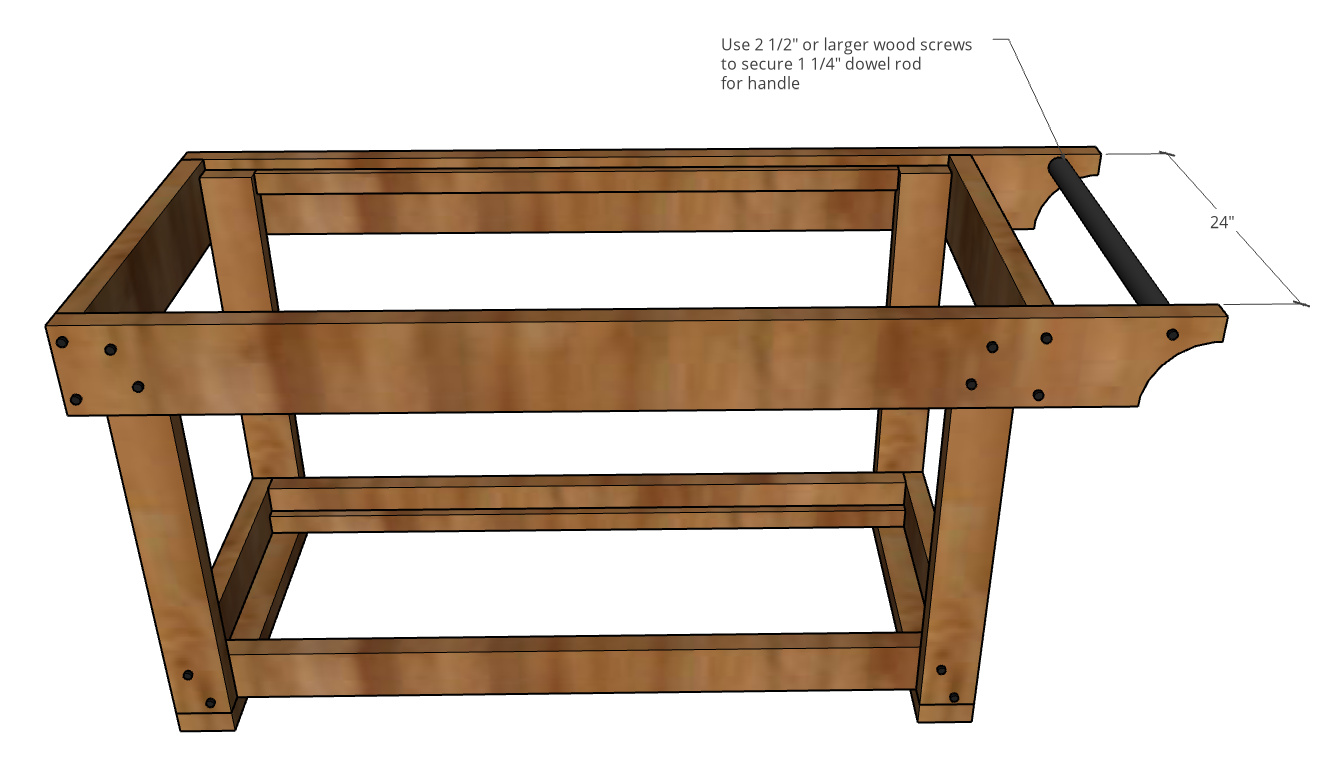
I screwed this dowel in place using timber screws.
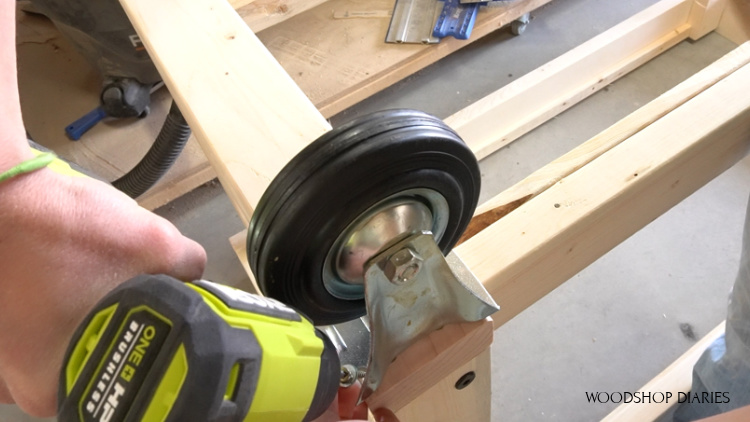
Step 8: Add Caster Wheels to Grill Cart
Now the frame is complete, and it was time to add the wheels. I got two casters that swivel and lock for the front and two fixed casters for the back.
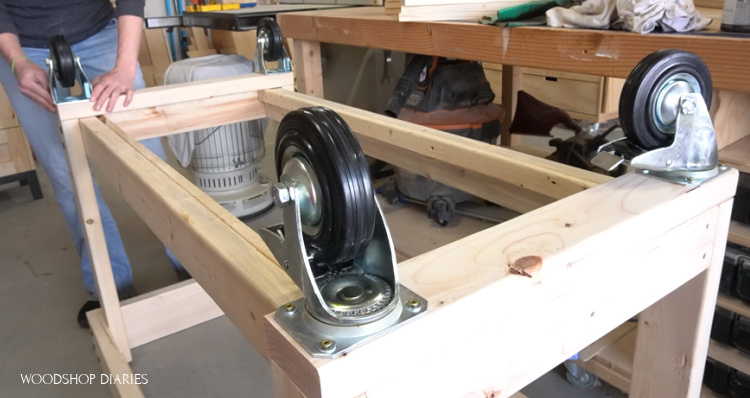
I used some 1 ¼″ wood screws with washers to install these onto the bottom braces of the leg assemblies.
The plate on the fixed casters was a little bigger than the 2×4 here, so I had to drive these screws at a slight angle, but it was fine.
I flipped the cart over and all that was left was the slats.
Step 9: Add Top and Bottom Tray Slats
I cut 1×6 slats for the top and bottom trays and simply set them in place on the strips from step 7.
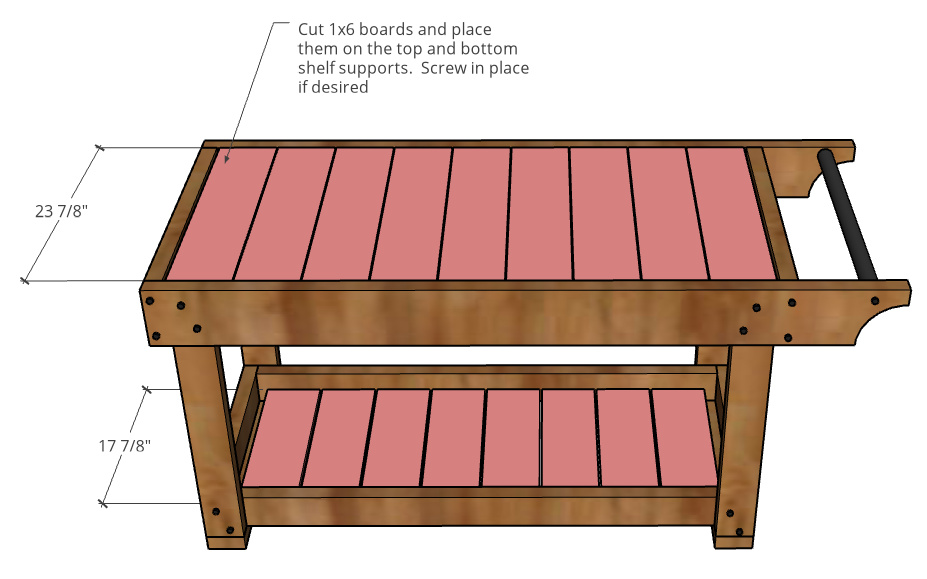
I used 9 on the top and 8 on the bottom. There should be some gaps between the boards for water drainage since this will be outside.
You could definitely screw these into the furring strips if you wanted.
Step 10: Finish Outdoor Mobile Grill Cart
Now, I actually bought an outdoor stain and sealant to use on this piece for finish, but it was way more orange than I expected when I applied it, so I decided to just give it a few coats of clear outdoor poly instead.
You can use whatever outdoor sealer you prefer. But if you plan to keep it out in the elements, outdoor paint would probably be the most durable/long lasting option.
I plan to keep this under cover for the most part, so it should last a good while as is.
I added a couple hooks for cooking utensils and got it set up and ready to grill.
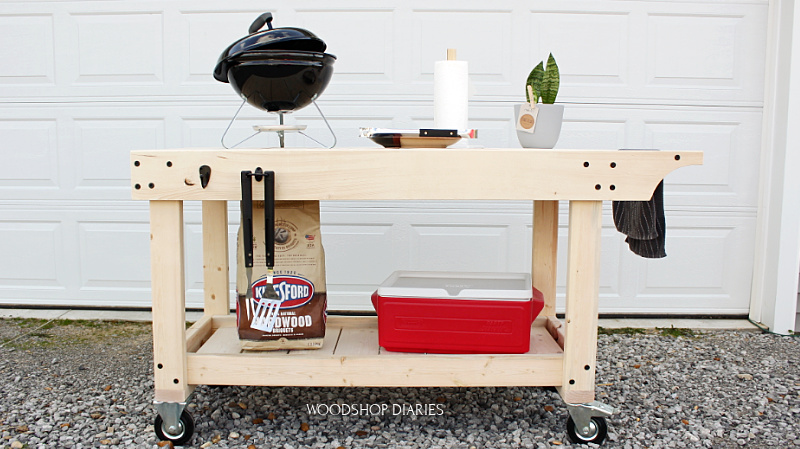
This was a super simple project, but was really fun to put together. We will definitely be using this outside this year for both cooking and entertaining.
Want to build your own? Check out the printable building plans here.
You can grab the little portable grill here and the cooler here if you need one for your own cart! 🙂
If you need some extra work or serving space for your patio, porch, garden, or grill, this is a really basic and inexpensive project you can throw together in a weekend.
If you’d like to stay up to date on all the latest projects and plans, be sure to subscribe to the newsletter for priority access to new content!
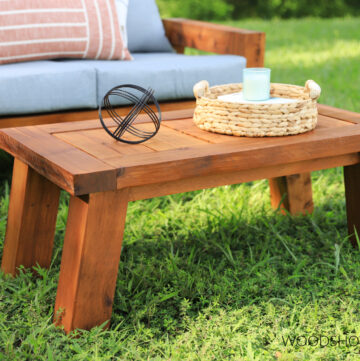
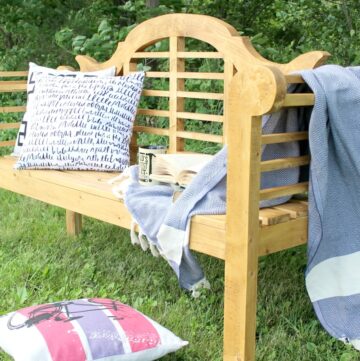
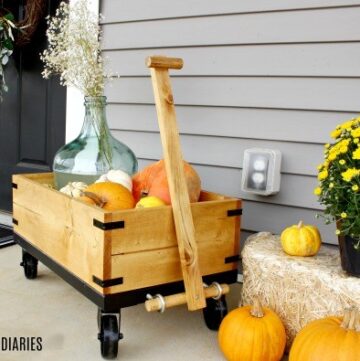
For more outdoor project ideas, check out these favorites:


I really hope you enjoyed this DIY grill cart build and if you’d like to save it for later, don’t forget to pin it!
Until next time, happy building 😊