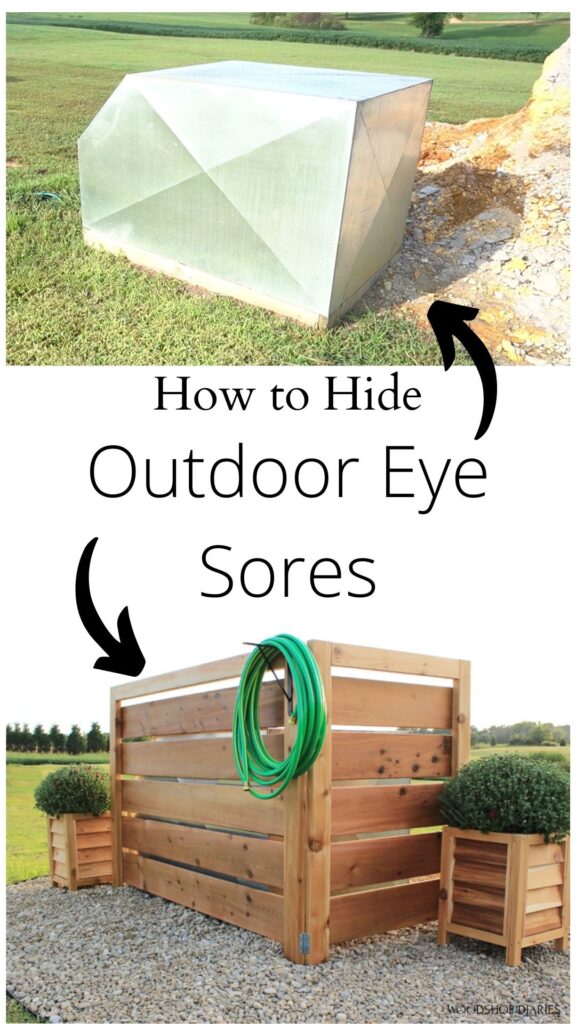
I’d bet that every yard has at least one eye sore–a propane tank, AC unit, a well house…SOMETHING. I’m going to show you an easy way to hide your outdoor eye sore in today’s post! This project is sponsored by The Home Depot and contains affiliate links. See policies.
.
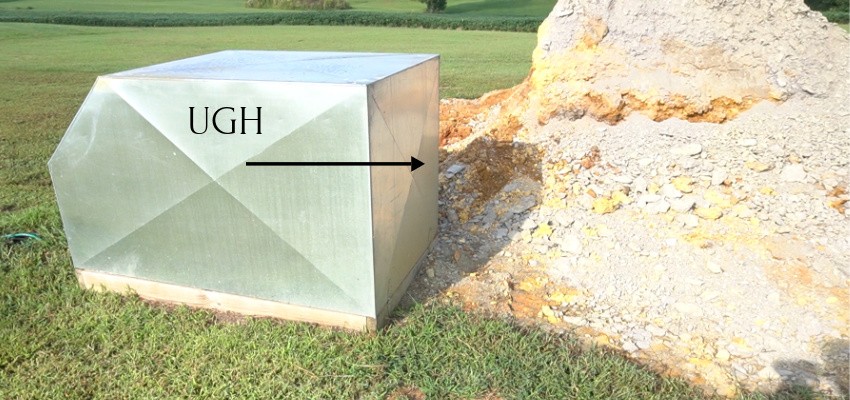
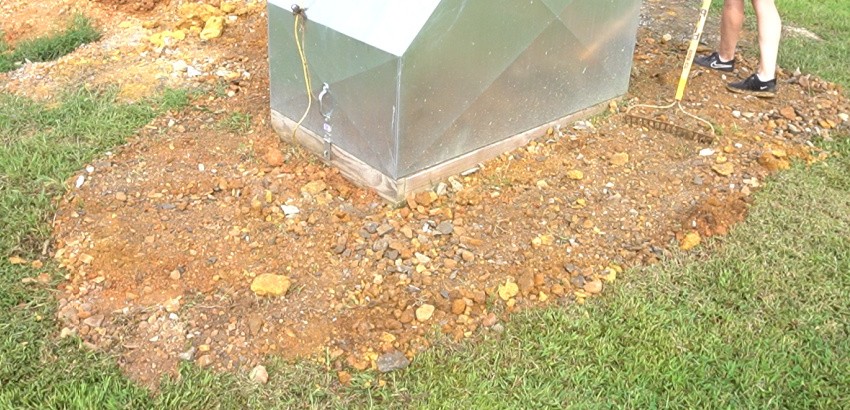
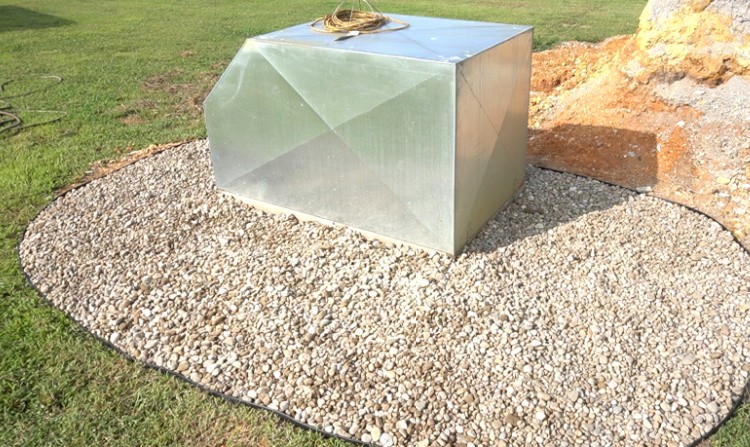
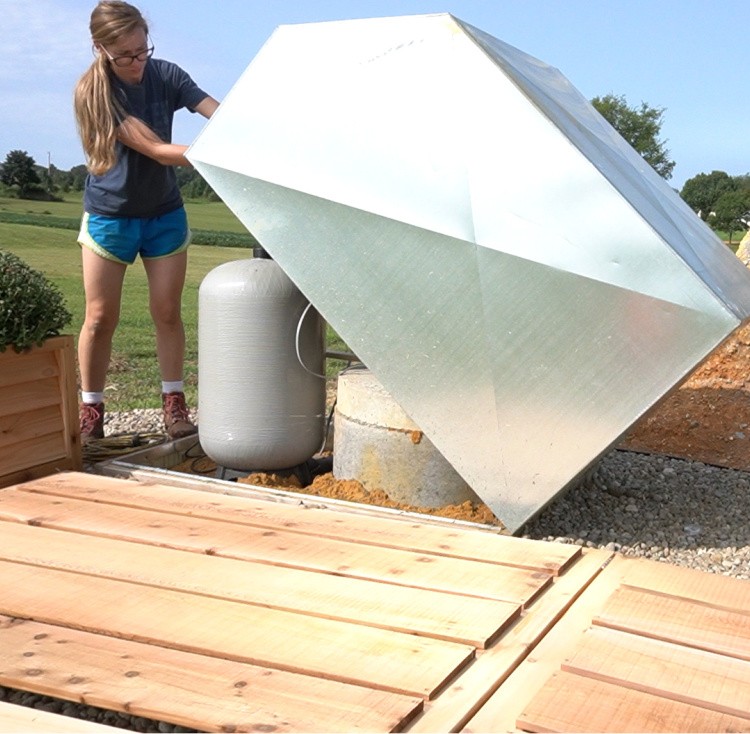
In our yard, it’s the well house. When we built our home two years ago, based on the location of the septic tank, the underground power lines, and where the water supply would come into the house, the best place to put the well was right in the middle of the yard next to the house.
.
Not only is the actual metal cover just an ugly hot mess out here in the middle of the yard, but when they initially dug the well, they just dumped the rock, clay, and dirt in a big pile next to it for us to find a place to put it.
We’ve been slowly whittling away at this dirt and rock pile this summer filling random holes and such in the yard, but don’t really have a good place to spread it.
.
So just ignore it for now. We are still working on it and plan to spread the rest of it around our field once the harvest is over this fall…if the ground stays dry enough, that is 🙂
.
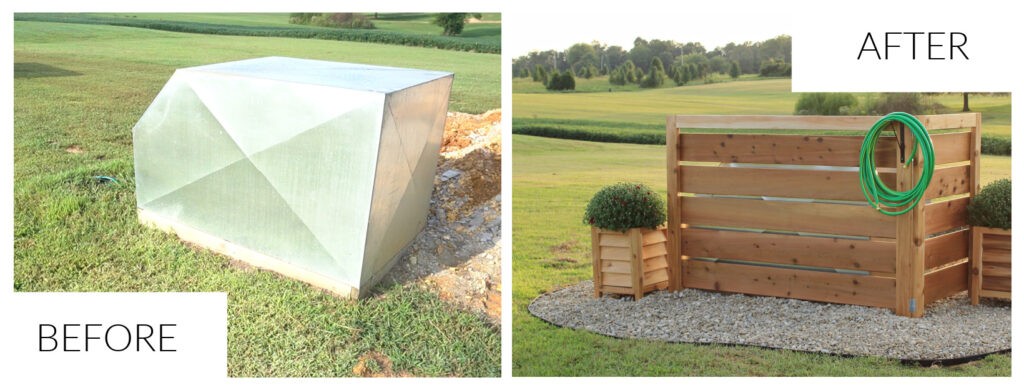
For now, my main focus is just covering up the outdoor eye sore that I can’t move later—the well house cover. So, in this post (and video below), I’m sharing with you how I took the well house from this…to that.
And hopefully this project can give you some inspiration and ideas for how to hide your own outdoor eye sore—like trash cans, AC units, propane tanks, even your grill.
.
So, if you’re ready to cover up the ugly things in your yard, let’s get to it 🙂 Check out the video here and the step by step tutorial below:
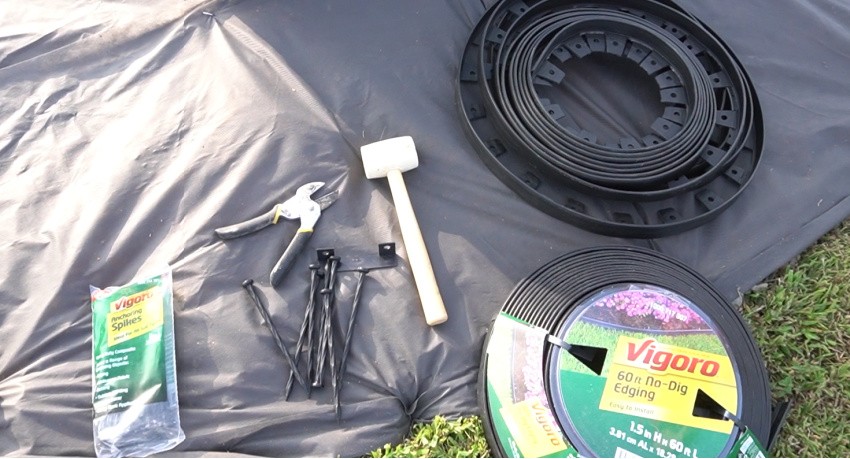
For this Project, I Used:
- Vigoro Weed Barrier
- Vigoro Garden Staples
- Vigoro No Dig Landscape Edging
- Indiana River Rock (or other covering) for Landscapes
- Cedar Lumber (2x4x8 boards and 1x8x8 boards)
- Hinges
RELATED: You may also like this post…How to Build a Trash Can Cover with Door
Step 1: Clear Eye Sore Area You Want to Hide
To get started, the first thing I needed to do was clear out this area around the well house. I moved the water hoses, and cords and covered the area I was working on with a thin layer of the clay and rock from the big pile.
You could pull up or rake off all the grass here instead if you don’t happen to have a ginormous pile of dirt in your yard 🙂 Either way, the goal is to cover or clear the grass. It just helps the weed barrier better do its job.
Step 2: Landscape Around Outdoor Eye Sore
Once I had most of the grass covered, I installed a weed barrier over the area and secured in place using these Vigoro garden staples.

After the weed barrier was secure, I installed an edging to keep the landscape rocks in their place around the well house.
.
Now one of the things about wells, is that you have to be careful what you put on top and around it. We wanted to cause as little disturbance to the soil as possible, and avoid any chemicals, digging or planting.
Because I didn’t want to dig around the well, I chose to use this Vigoro No Dig Landscape edging for this project. I also used this edging around the trees we planted along our driveway, and was impressed with how quickly and easily it installed.
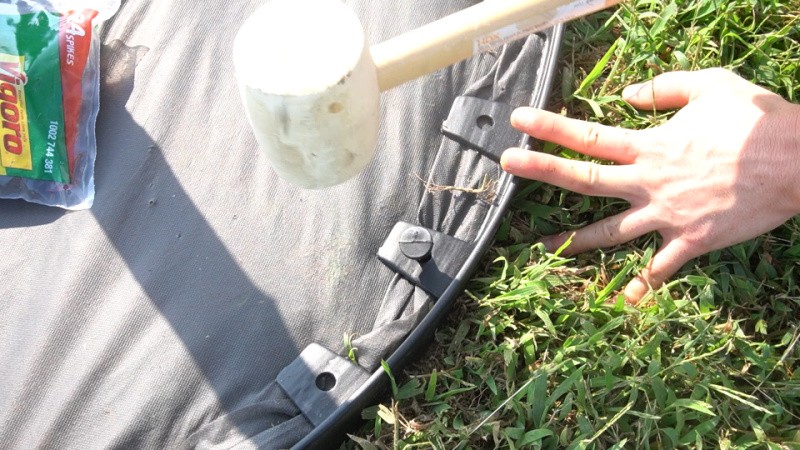
There’s literally no digging required, and you simply use the included stakes to secure the edging right on top of the weed barrier in whatever shape or design you want.
.
That saves a ton of time and energy, but also keeps the area you’re working in clean without having to deal with mud and replanting grass when you’re done.
.
So at the end of the day, it looks really clean and professional—if you don’t have a gigantic rock pile, anyway haha.
You can check out the full instructions for installation and details on these Vigoro Landscape products here:
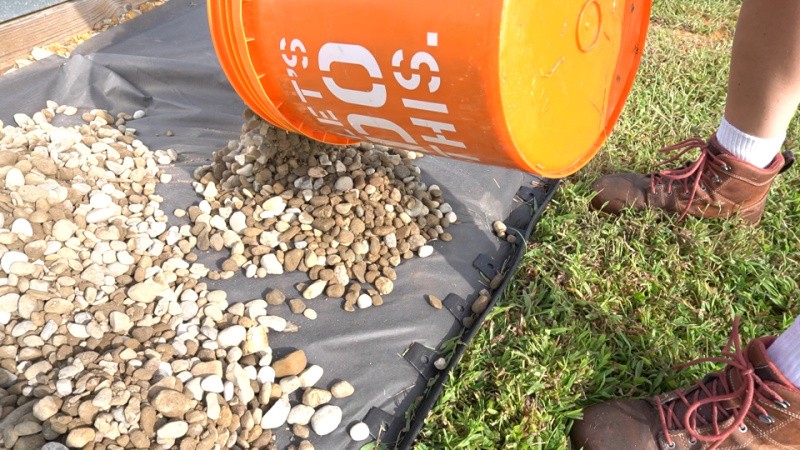
Once the edging and weed barrier was secured in place, I could fill it with landscape rock (or you could use mulch, if you wanted–we didn’t want mulch on top of our drinking water, so we went with rock). We went with Indiana River Rock (sometimes also called Illinois Rainbow…they all look pretty similar) to match the landscape around the front of the house.
Now, while this already looked better, I still hadn’t actually hid the well house cover.
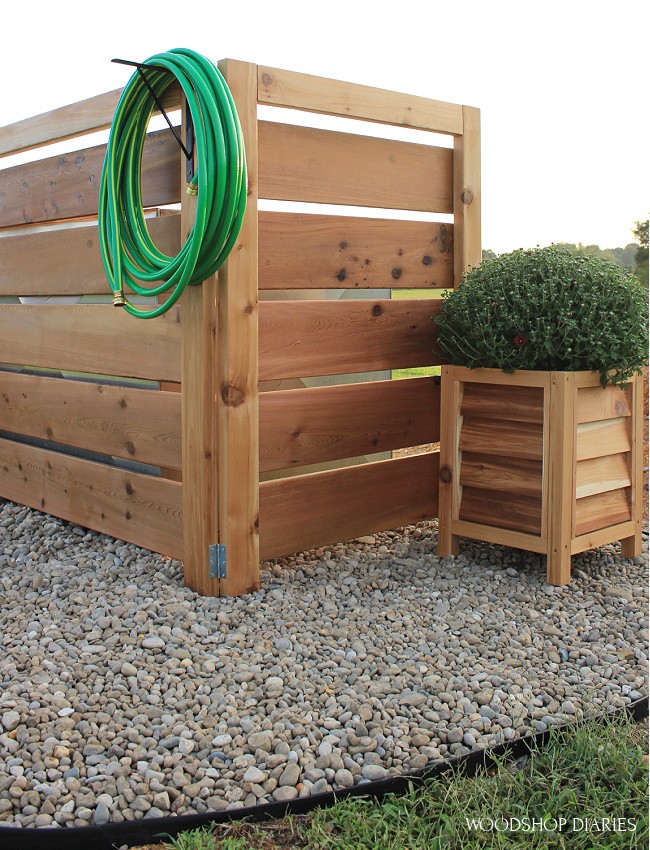
Step 3: Build Faux Fence to Hide Outdoor Eye Sore
So I picked up some cedar 2x4s and 1x8s to build a “fence” to wrap around the well house box.
.
This was SUPER SIMPLE. I measured the well house and built two fences that I could use to cover the two main sides of the cover. The other two sides face the back of the property, so I was mostly concerned with just covering the front.
.
I used three 2x4x8s and five 1x8x8s for this. I built the short side as short as it could possibly be and still cover the box.
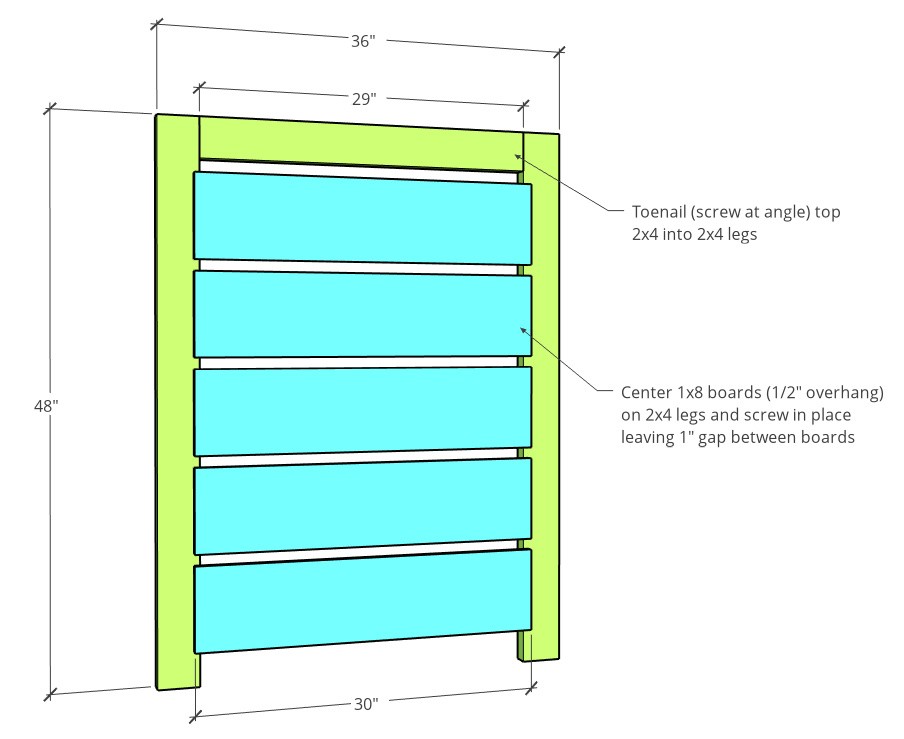
I simply toenailed the top 2×4 piece into the “legs” of the panel using 2 ½″ wood screws (you could also use pocket holes), then screwed the 1×8 boards across the back side with 2″ wood screws.
.
Then, I built the long side the same way as long as it could possibly be with the length left on the 1x8x8s.
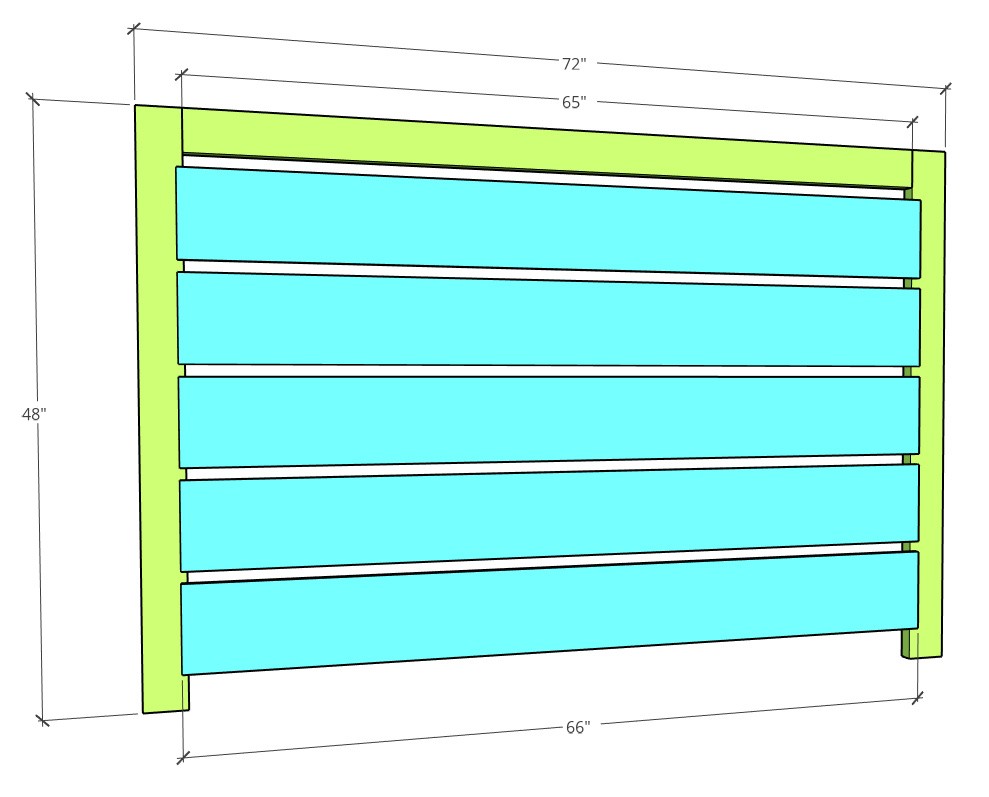
The reason I did that was to be able to make both fences from just 8 ft long boards (since cedar is a little pricey) but give as much room in the back as possible to open the well house cover without having to move the fence.
.
We can lift the cover a little with this design–enough to check and make sure the heat lamp is on in the winter time and enough to be able to hook on the water hose when needed.
.
But I added hinges to the fences to be able to move it out of the way if and when we need to open it all the way to work on anything. You’ll see that a little later.
.
Lastly, to deepen the color and give it a little more protection, I applied a few coats of exterior grade poly.
Step 4: Assemble Faux Fence Panels in Place
Now, I could easily just screw these together at the corner, but because we will eventually need to get inside the well house to work on something, I wanted to make this really easy to move out of the way.
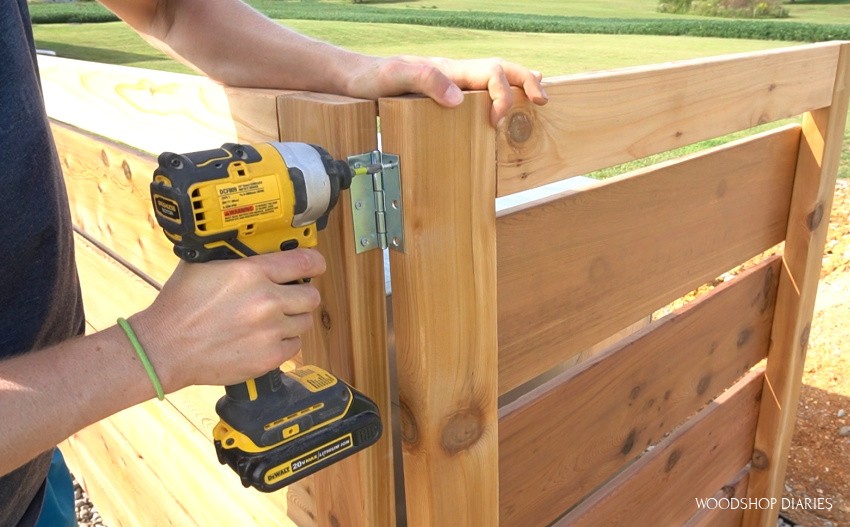
So I installed hinges at the corner. That way, I can swing the short side out, and lay this over when needed. Then, simply raise it back up, and swing it back in place.
The fence is fairly heavy and stands up fine on its own, but if you wanted, you could easily secure the loose ends to a T-post drove in the ground. Or simply add an additional side, if you wanted.
.
I also built some cedar planters (post coming soon for that), and added them here just to give it some color since I can’t actually plant anything around the well.
RELATED: Check out more planter ideas here.
Lastly, I installed a simple corner bracket and got a brand new hose to hang on the corner—the ones I pulled out of the ground earlier were not in the best shape…HA!
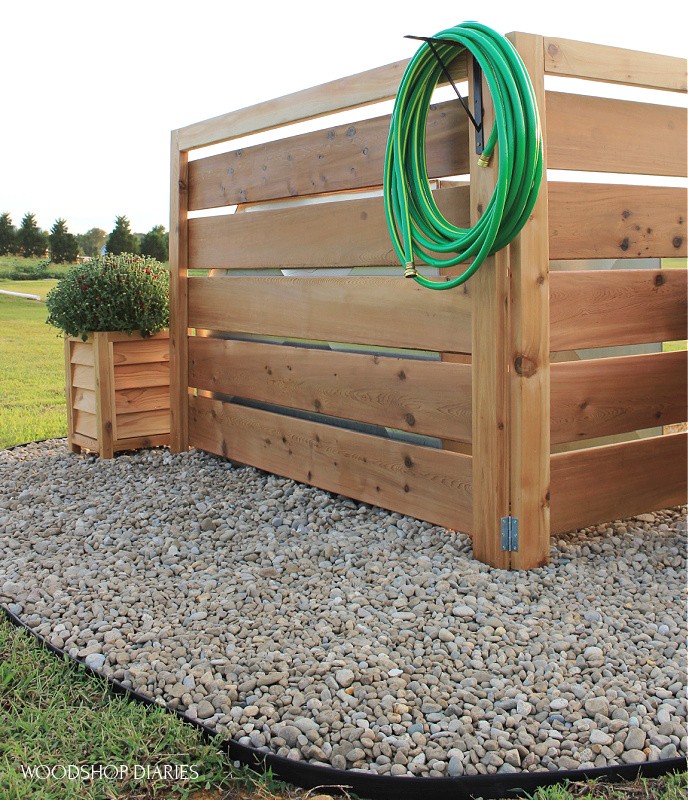
For a few hours work, I’d say that’s a pretty good curb appeal improvement. I think the passers by will appreciate seeing this much better than that old metal box 🙂

Now, we just need to get that pile of rock gone…but that’s another project for another day.
.
So if you’re looking to hide your own outdoor eye sore, be sure to check out the video for this project, too! I hope this has been an inspiration. If you want to save it, be sure to pin this for later!
Until next time, friends, happy building 🙂