In this post, I’m sharing how I gave my small, basic guest bathroom a modern makeover!
We kept this update budget and DIY friendly by sticking to mostly simple cosmetic changes (and removing an existing closet).

While I would have loved to have replaced the shower tub while we were at it, that wasn’t in the timeline or the budget at the moment.
I LOVE how this bathroom update turned out and this space feels so much more high end (even without replacing the cheap tub!).
If you want to see this bathroom transformation, I’m sharing the details below.
*This post contains affiliate links. See website policies.
The Bathroom Before
While this bathroom is fairly small, it’s not unusually small–it’s a fairly common size for a basic bathroom.
The floored space is about 5′ wide and 9′ long. If you add the tub in, the room itself (wall to wall) is about 11 ½″ long.

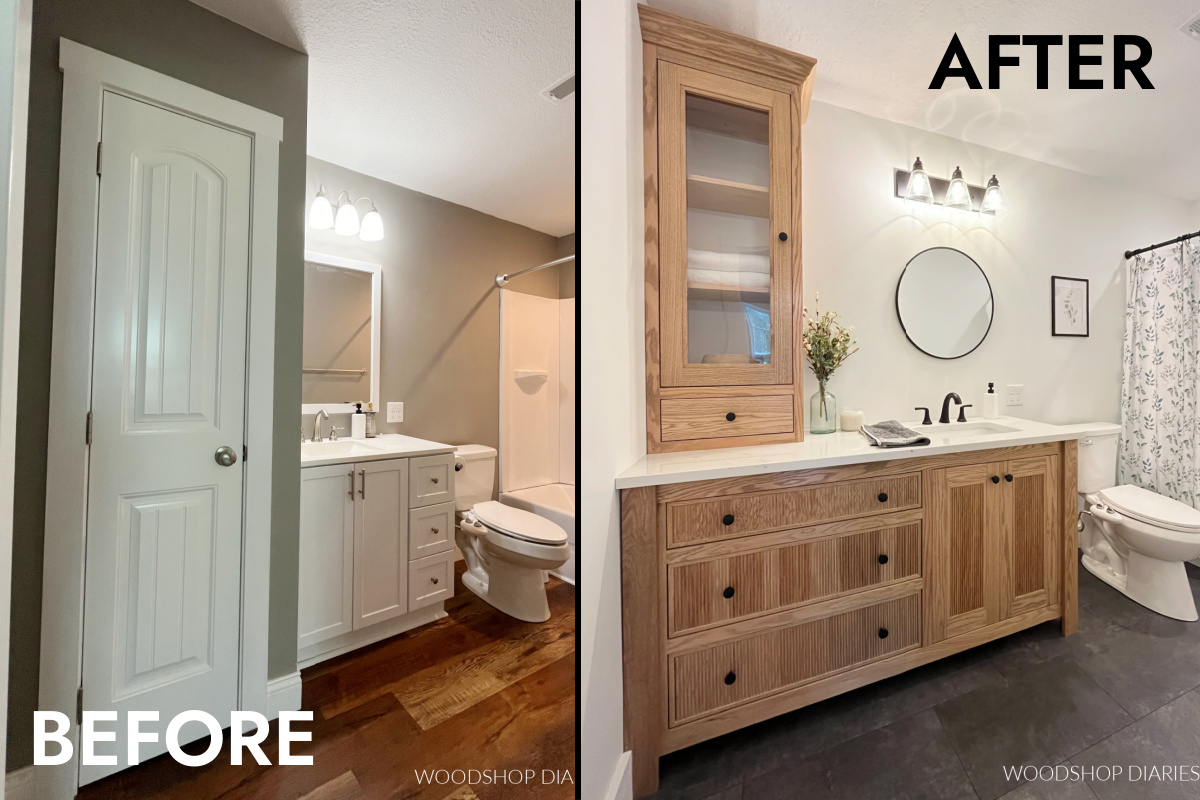
My biggest irritant about this bathroom was the layout. You walk into the room straight into the closet door.
Before I replaced the swing door with this modern wood slat sliding door, the entry door had to be closed to even open the closet door. So the sliding door was the first improvement.
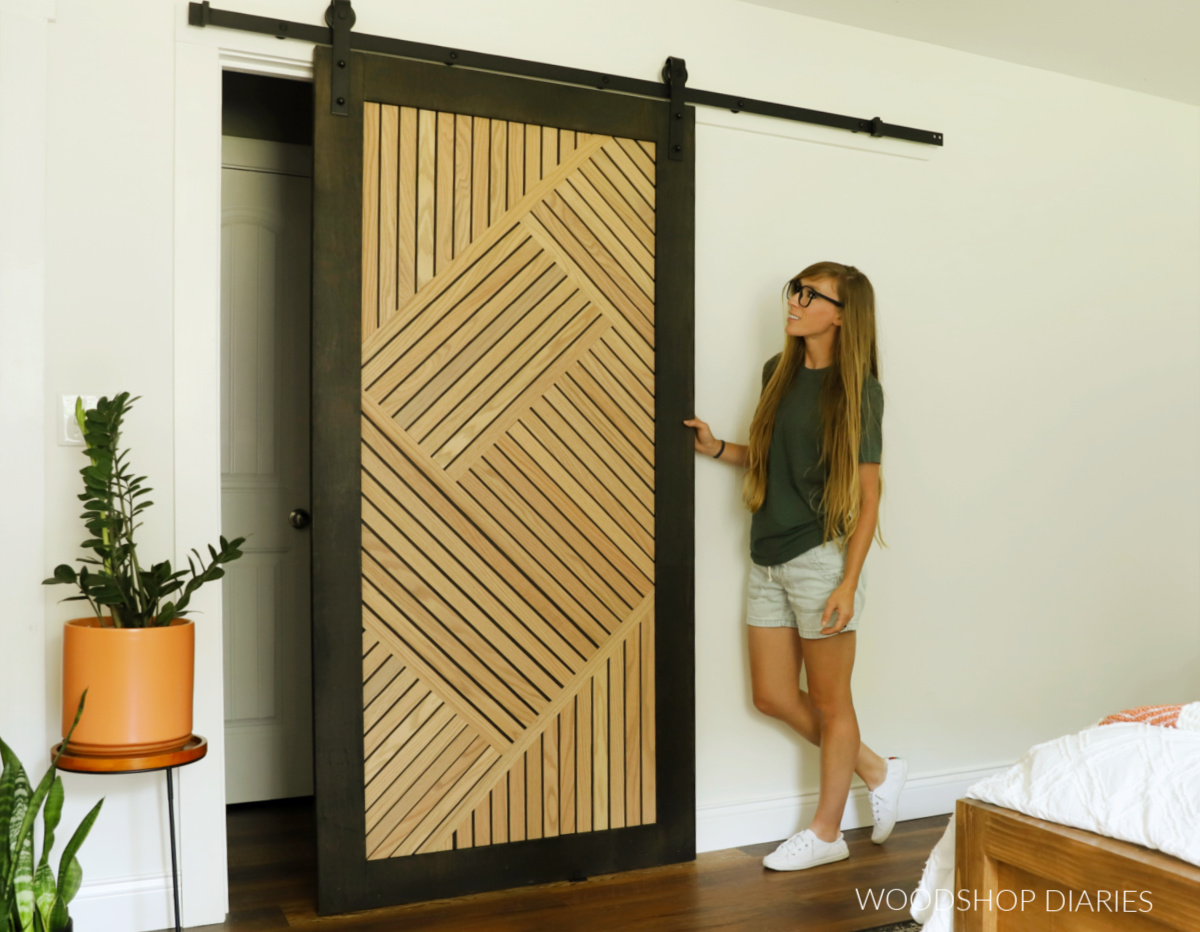
BY THE WAY: I know a lot of people have strong opinions about sliding doors, especially on bathrooms, but we are really happy with it and would definitely do it again. This bathroom is only accessible from the guest bedroom, so privacy isn’t really a concern as there are two doors to shut it off from the main part of the house.
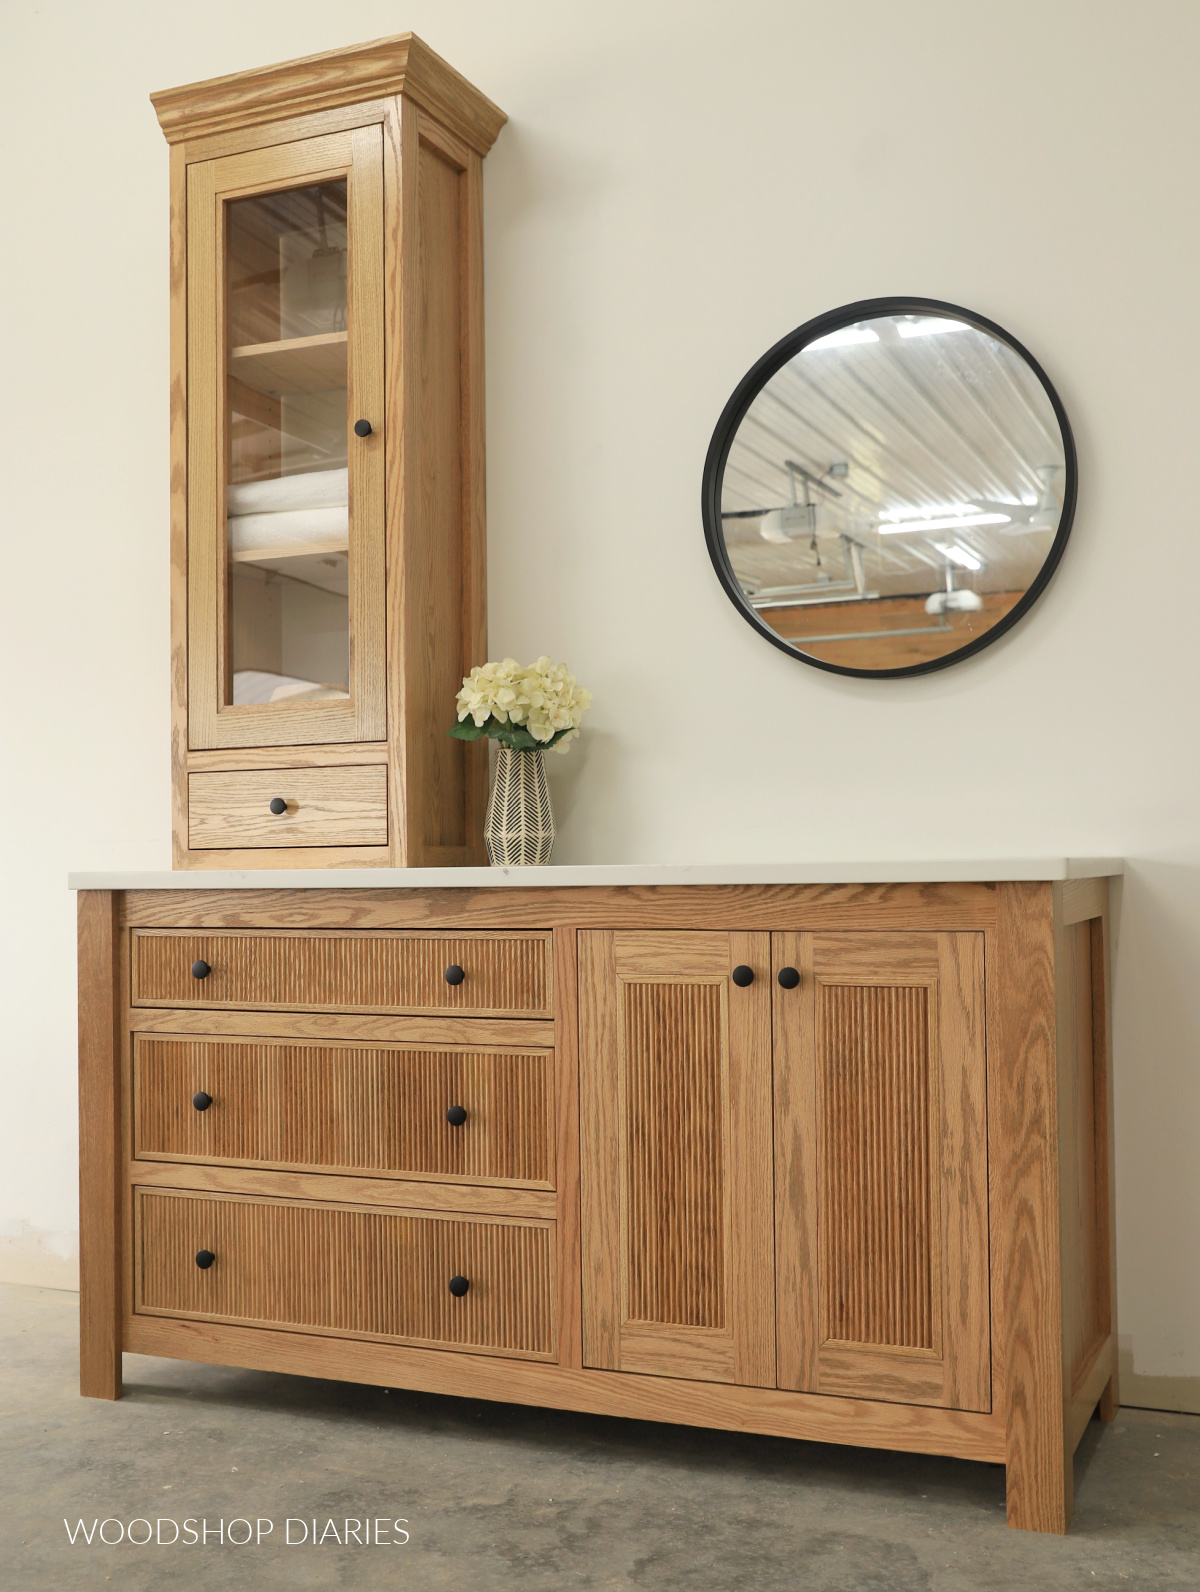
But even fixing the door situation, this closet was still on my nerves. I’d rather have that storage built into a larger vanity and make that the focal point of the room instead of a boring closet door.
Bathroom Design Plan
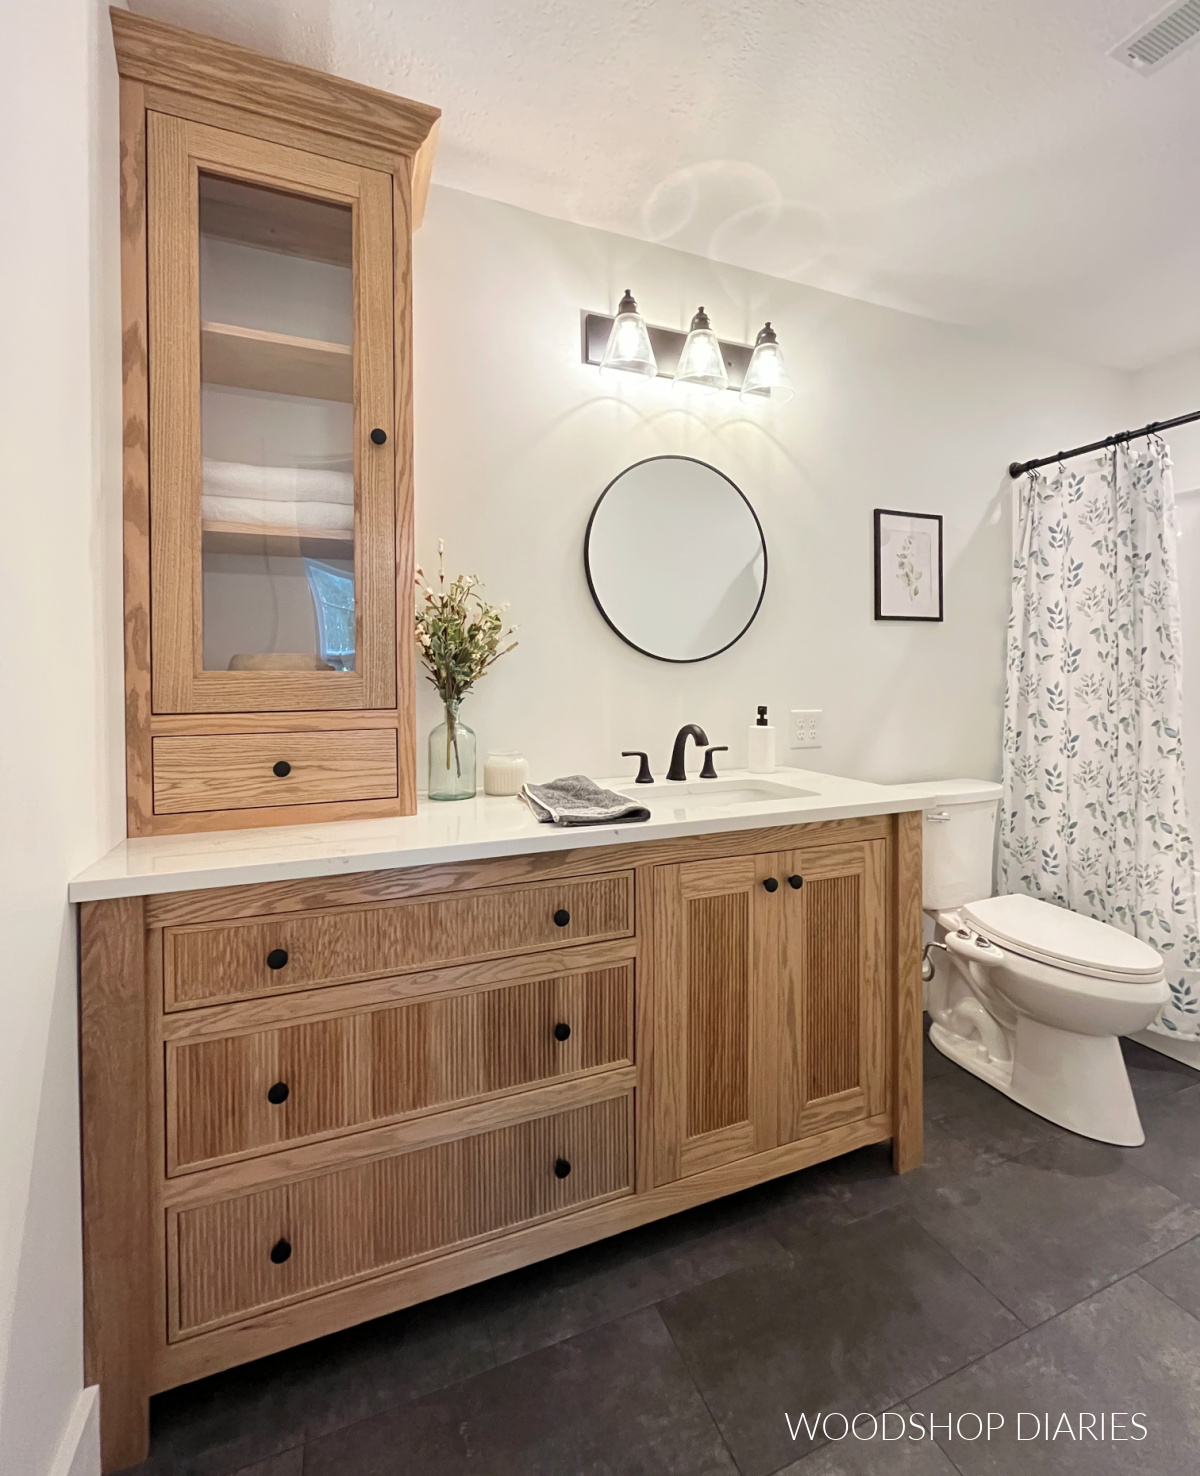
So first thing was first–I planned to tear out this closet. This would make room for a larger vanity that can serve as the focal point of the new space and make the entrance feel less cramped.
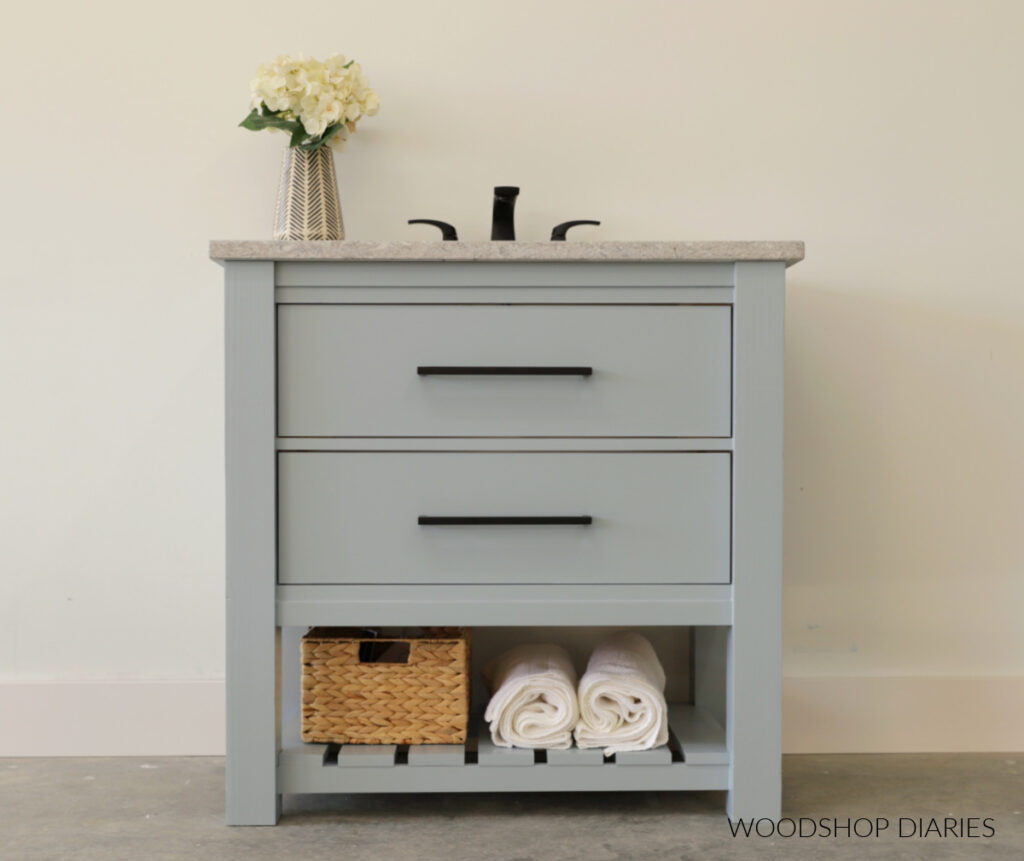
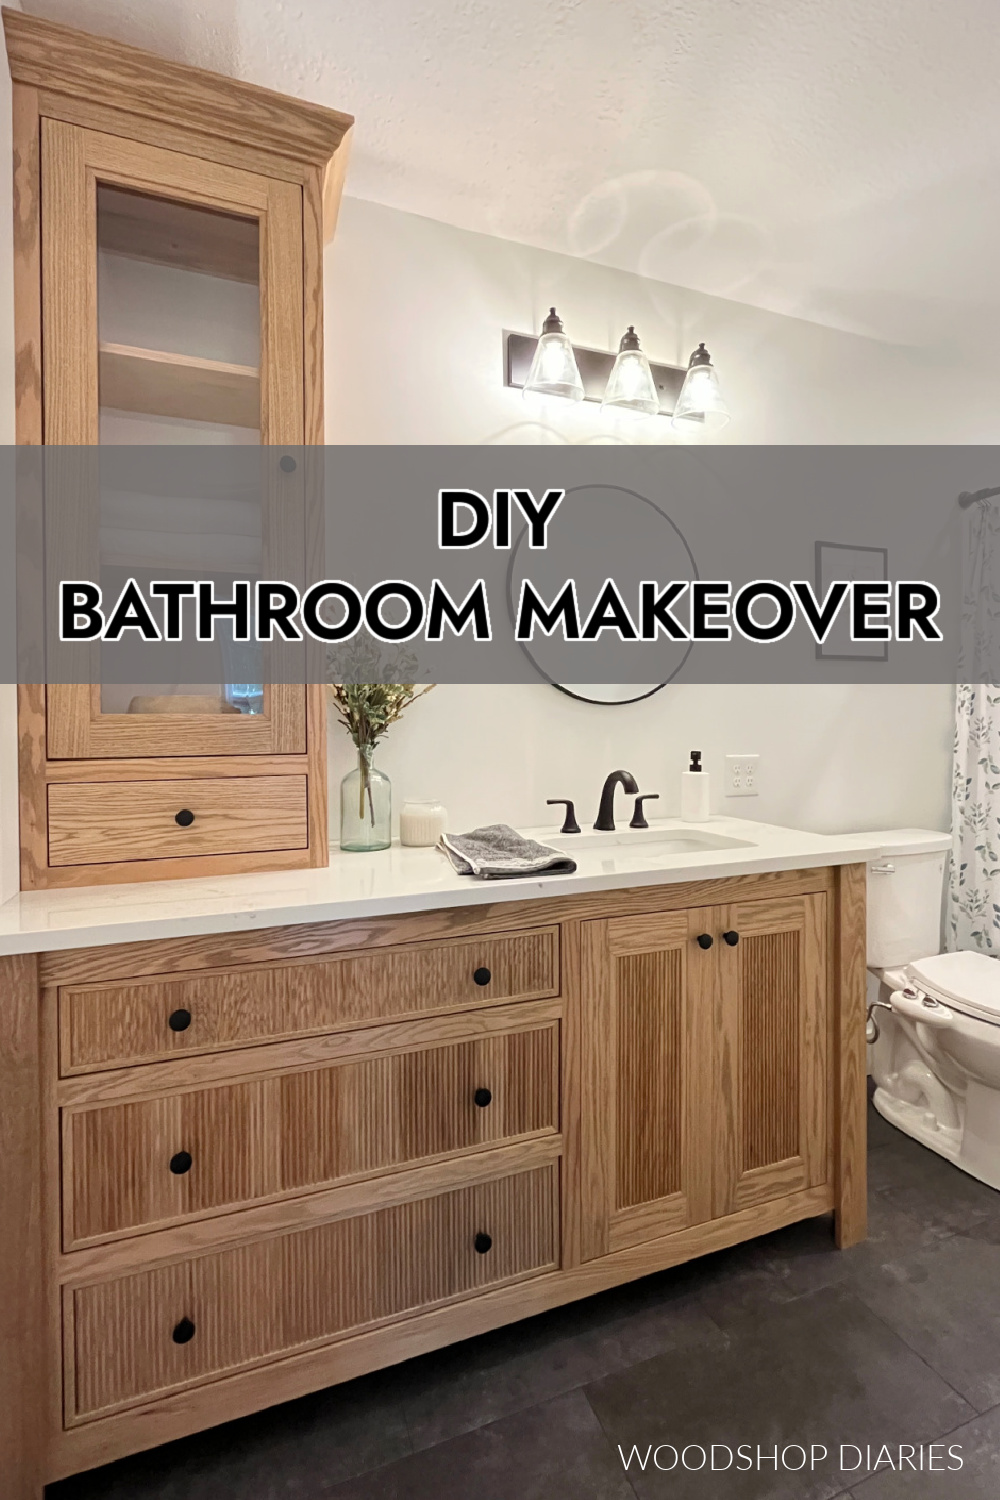
Here’s the vanity I built for the space:
But, tearing out the closet meant I’d have to patch the drywall on two of the walls and the ceiling.
And since the floor was laid around the framing and the old vanity, I knew I’d have to replace (or patch) the flooring, too.
So here was our basic to do list:
- Tear out closet
- Remove old vanity, mirror, light fixture
- Patch drywall
- Paint
- Replace flooring
- Install new vanity, mirror, light fixture
Remodeling the Bathroom
To kick things off, I headed to the bathroom with a hammer and a prybar and started removing the trim, the door, and the shelves from the closet. This was the most fun part!

Then, I unscrewed the vanity from the walls and disconnected all the plumbing, so I could pull it out, too.
I used my prybar and hammer to start pulling the drywall panels off the closet framing. Some of these pieces came off in big sections (which was nice), and other parts came off in little chunks.
I just worked away until I had removed all the drywall from the framing on the inside and out.

Then, I could get rid of the framing, too. The bottom 2x4s were anchored to the concrete, so I unscrewed those.
But the rest of the boards were just nailed together, so I did my best to carefully pry them apart and out.
NOTE: This closet wasn’t load bearing. Before removing any framing in your own home, make sure it’s not load bearing.

This left two vertical strips on the walls and an L shape on the ceiling between the existing drywall. These needed to be patched.
The ceiling was ⅝″ thick drywall and the walls were ½″ thick. I only had a tiny piece of ⅝″ drywall, so I pieced the ceiling together the best I could with what I had.

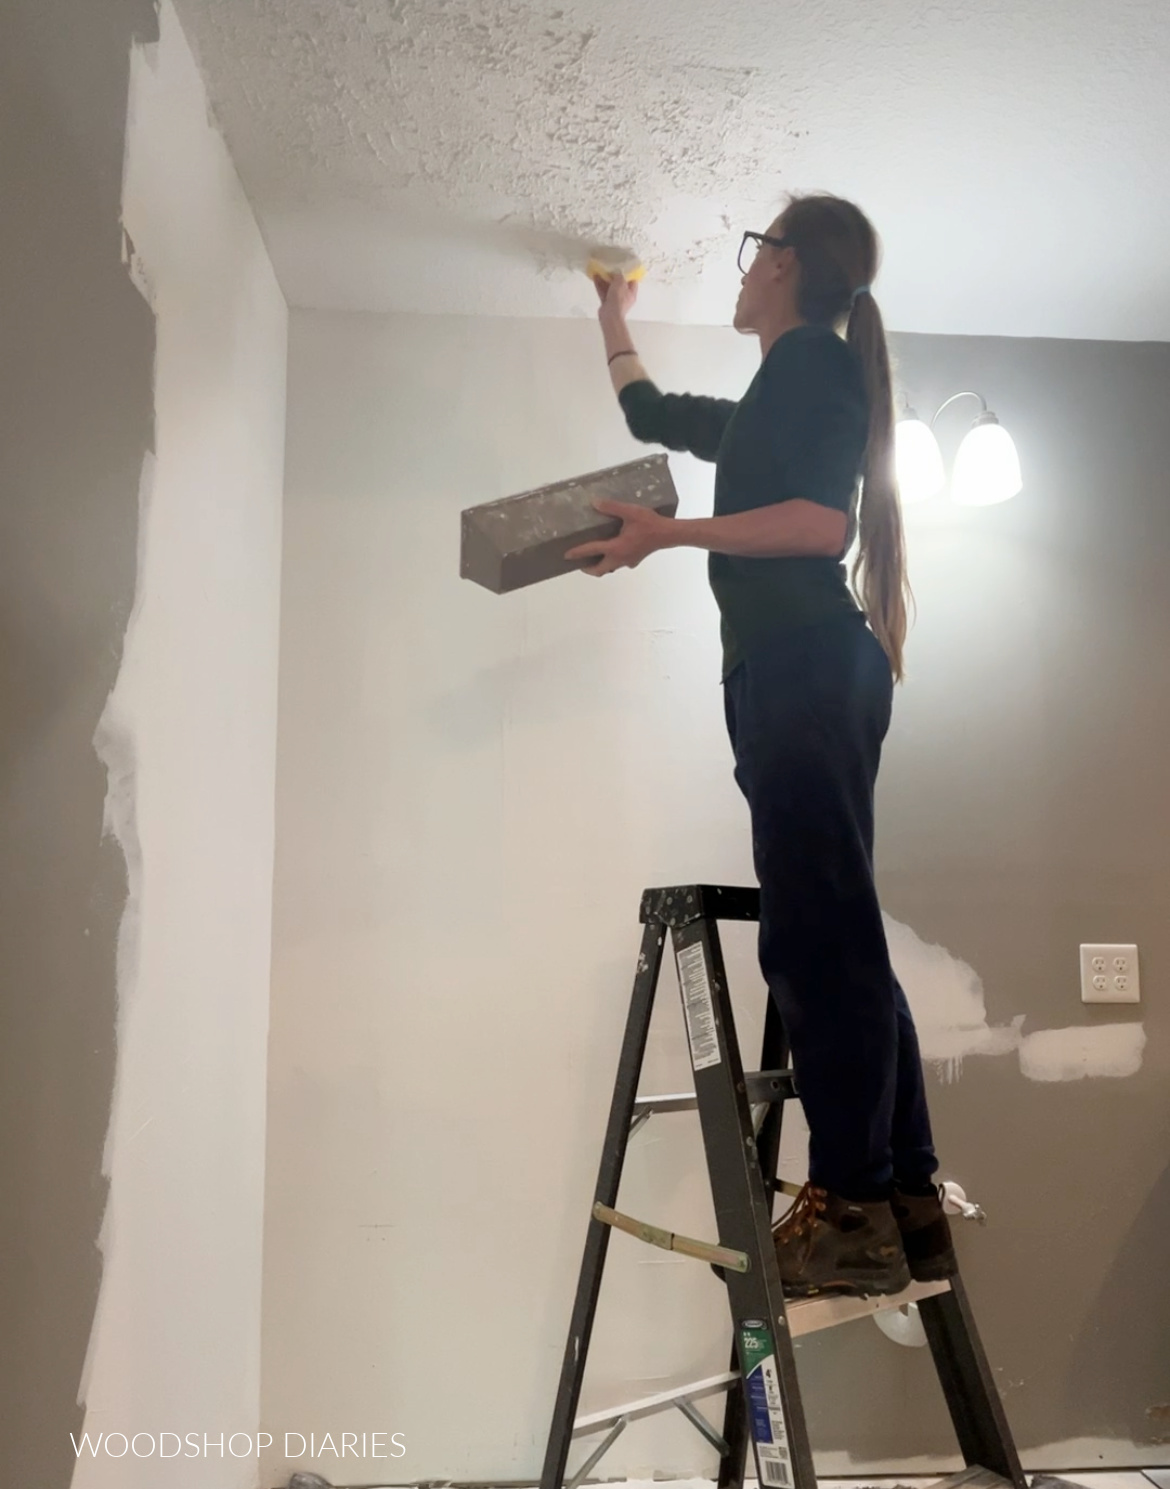
Then, I mudded and taped the joints. I did 3 coats of mud on the walls and the ceiling and did my best to smooth/sand everything out.
I used a knockdown sponge and large paddle to try to match the knockdown texture on the ceiling like in this video. It’s definitely not perfect, but it’s not too noticeable unless you’re looking for it.
Then, I painted the ceiling (Behr Flat Ceiling Paint) and the walls (SW Pure White) before installing the new floor.
I installed LifeProof Vinyl Tile in Overlook Slate and I LOVED it. It’s super easy to install–just like vinyl plank.
It just clicks and snaps together–no mortar, no grout. But it looks just like real tile.
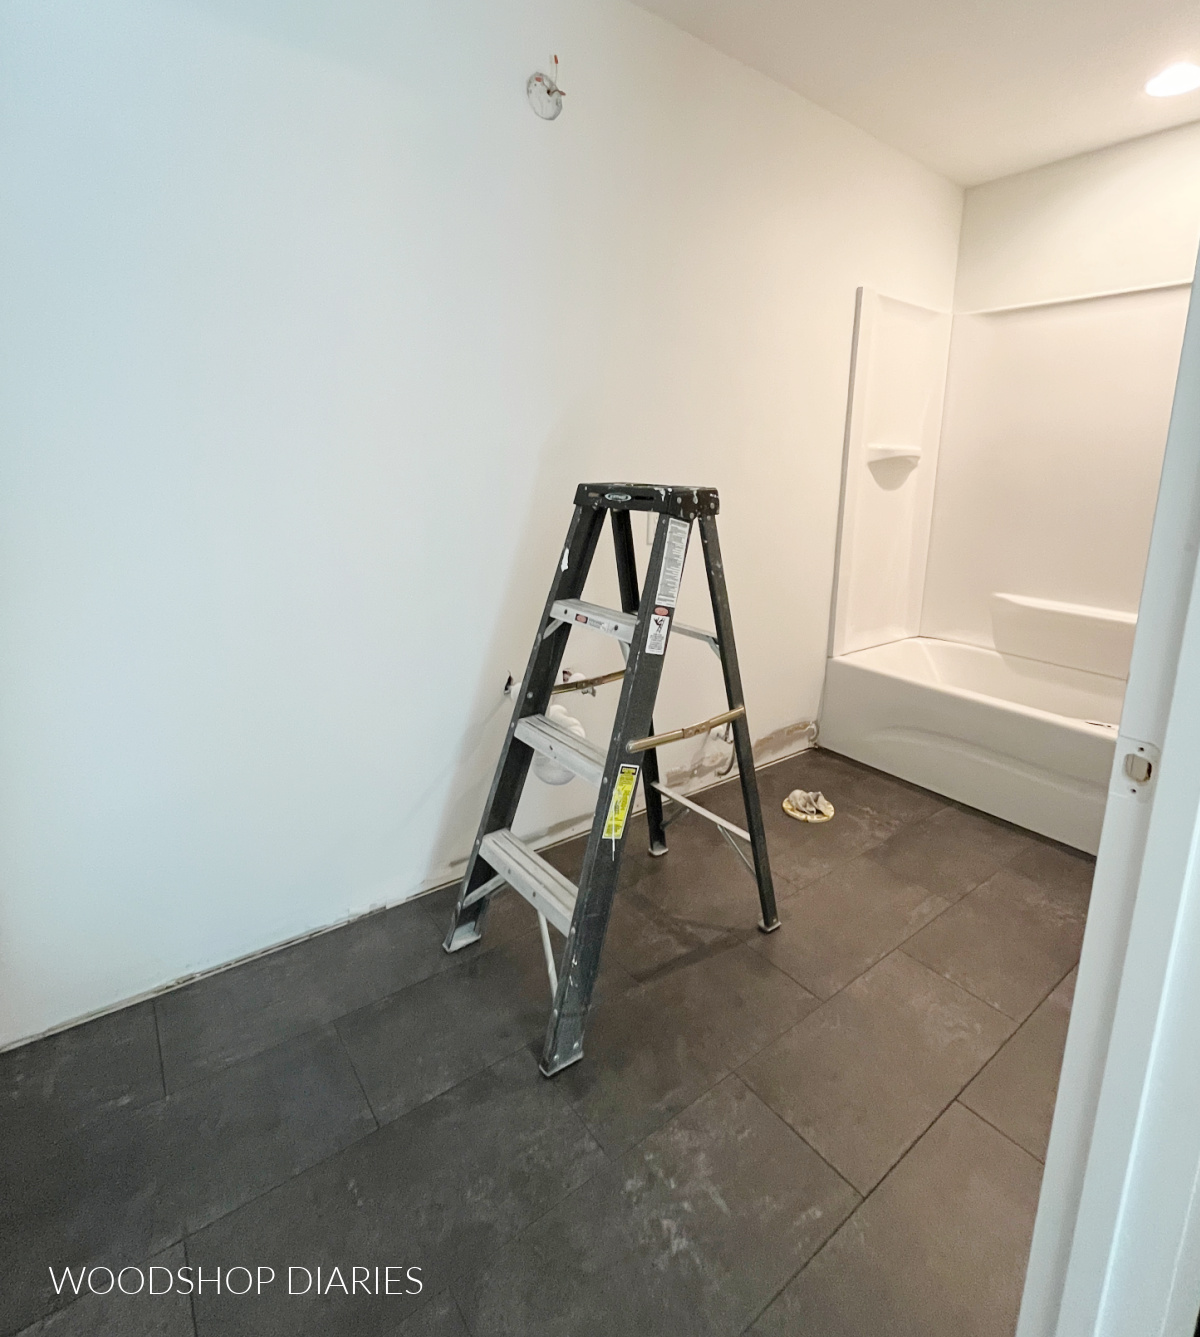
After the new floor was in, I was finally able to bring in the new vanity, install the new toilet and light fixture, and hang the mirror. Then–replace the trim.
Putting everything back in is always the easiest part–it’s getting to the point where it’s ready for the new stuff that tests your patience haha!
Small Bathroom Makeover After
And with that, this bathroom was finished and I can’t believe how much brighter and bigger it feels!

This view looking in is sooooo much more eye catching than the old closet, and I love the contrast between the white walls, wood vanity, and charcoal floor.

If you’d like a list of everything we used here, I’ll link what I can below! (I bought some items from local shops so I don’t have a link.)
- Bathroom Vanity
- Countertop & Sink (custom cut from local granite shop)
- LifeProof Vinyl Tile
- Light Fixture
- Faucet
- Toilet
- Shower Curtain, Hooks, Rod, Mirror (from TJ Maxx)
- Picture Frame
- Art in Frame
Looking for more bathroom DIYs? Here are a few favorites you might enjoy browsing!
If you enjoyed this DIY bathroom remodel and want to save it for later, don’t forget to pin it or share to your favorite social channel!
Until next time, friends, happy building!