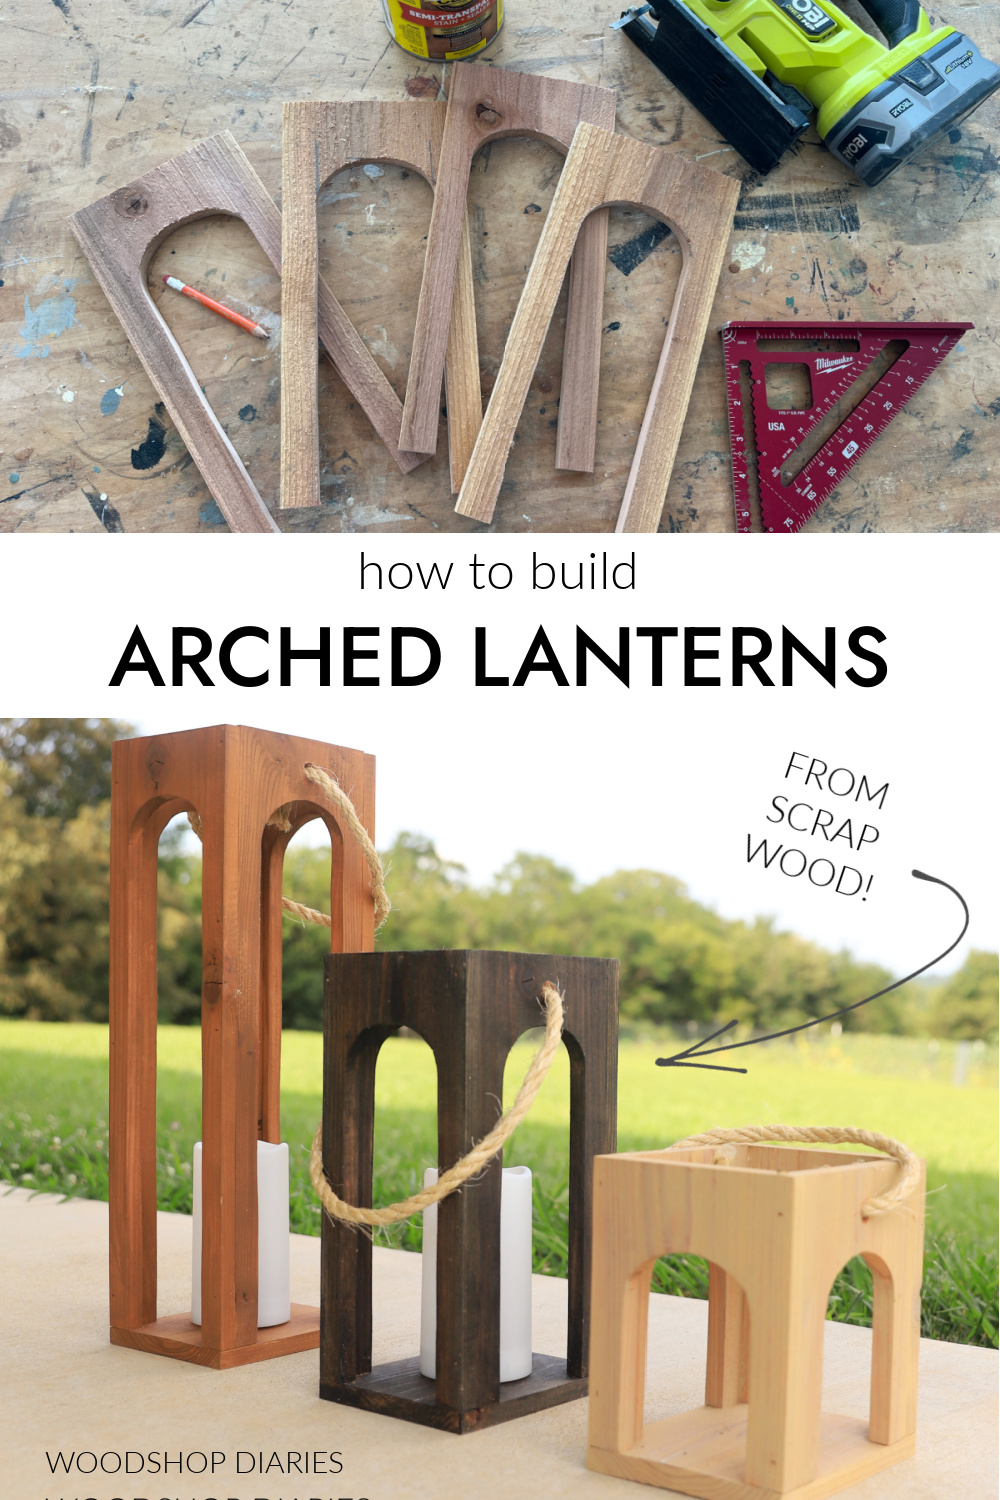
In this post, I’m sharing how to build simple arched lanterns using scrap wood!
These DIY wooden lanterns are SOOOO easy to make and you can customize them to whatever sizes and colors you’d like.

Plus, you only need three basic tools to build them: a jig saw, a drill and a brad nailer! Of course, if you didn’t want to add the rope handles, you can also skip the drill.
I made these three lanterns in different sizes to dress up my front porch a little, but they’d be perfect either inside OR outside as a simple, but eye catching accessory.
If you’re ready to see how easy they are to build, I’m sharing all the details below.
*This post contains affiliate links. See website policies.
A Few Notes Before Building
These DIY arched lanterns are an EASY beginner woodworking project and you can build a few of them in less than an hour.
They would make an excellent weekend woodworking project and could be a great handmade (and inexpensive!!) gift idea as well.
Material Choices
I made these simple wood lanterns from cedar fence picket scraps.
Fence pickets are roughly the same size as a 1×6, so if you don’t have fence picket scraps, 1x6s would be a great substitute.
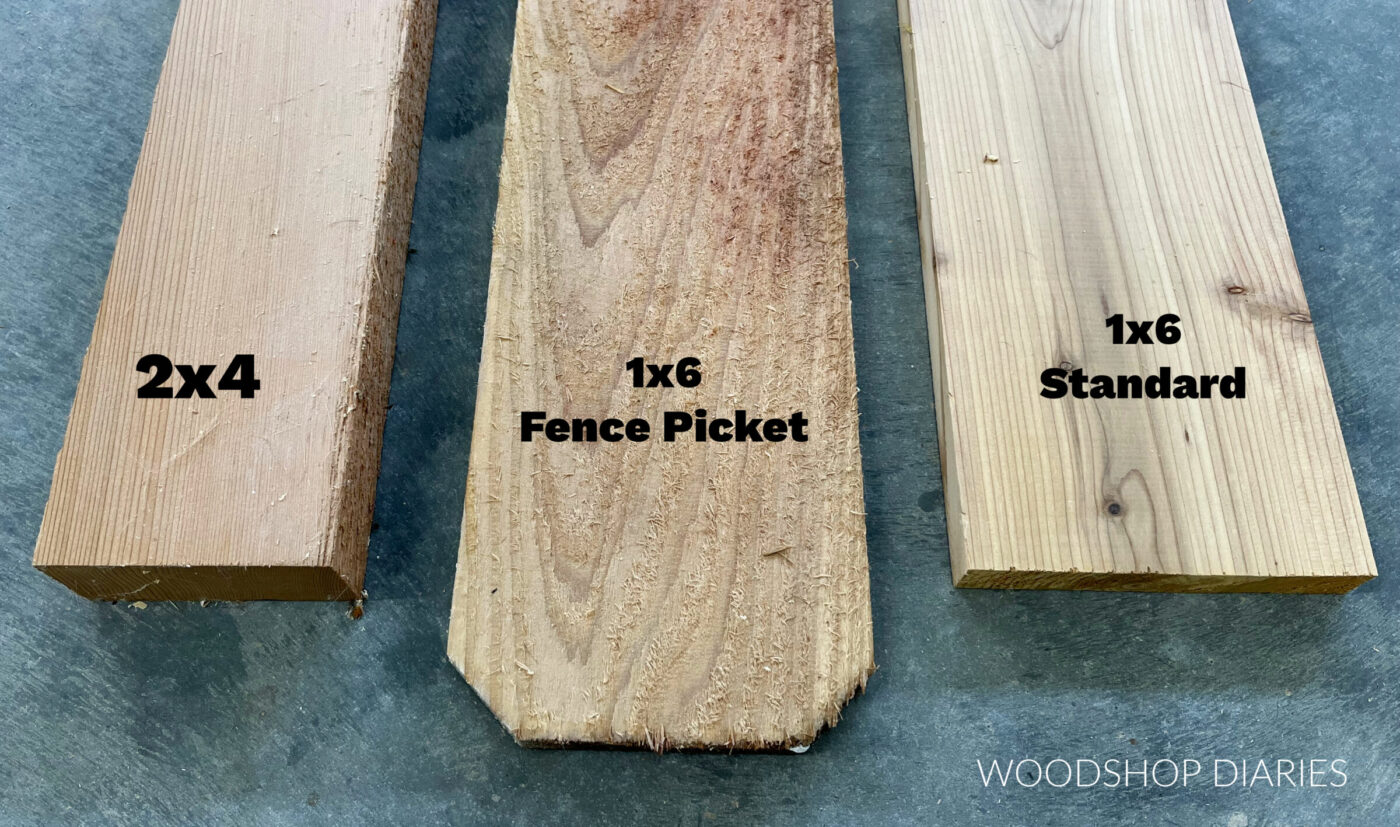
NOTE: 1×6 lumber is actually ¾″ x 5 ½″. Fence pickets are roughly ⅝″ x 5 ½″. So fence pickets are a little thinner than standard 1x material, but for this project, either one would work just fine.
RELATED: Understanding lumber sizing
Fence pickets are readily available year round, so if you don’t have any scraps, you can pick up a few picket boards from your local home improvement or building store for pretty cheap.
Fence pickets are sold (at least where I live) in two options: pressure treated and cedar. Pressure treated fence pickets are a little cheaper than cedar, but cedar usually looks nicer. Either option works great for outdoor use.
They’re generally only a few bucks each, and you just need 2-3 boards (depending on what size lanterns you make) for this project.
If you plan to use your lanterns inside, feel free to choose whatever wood species you prefer (in fence pickets or 1×6 lumber), but I don’t recommend using pressure treated lumber for indoor projects.
DIY Lantern Size
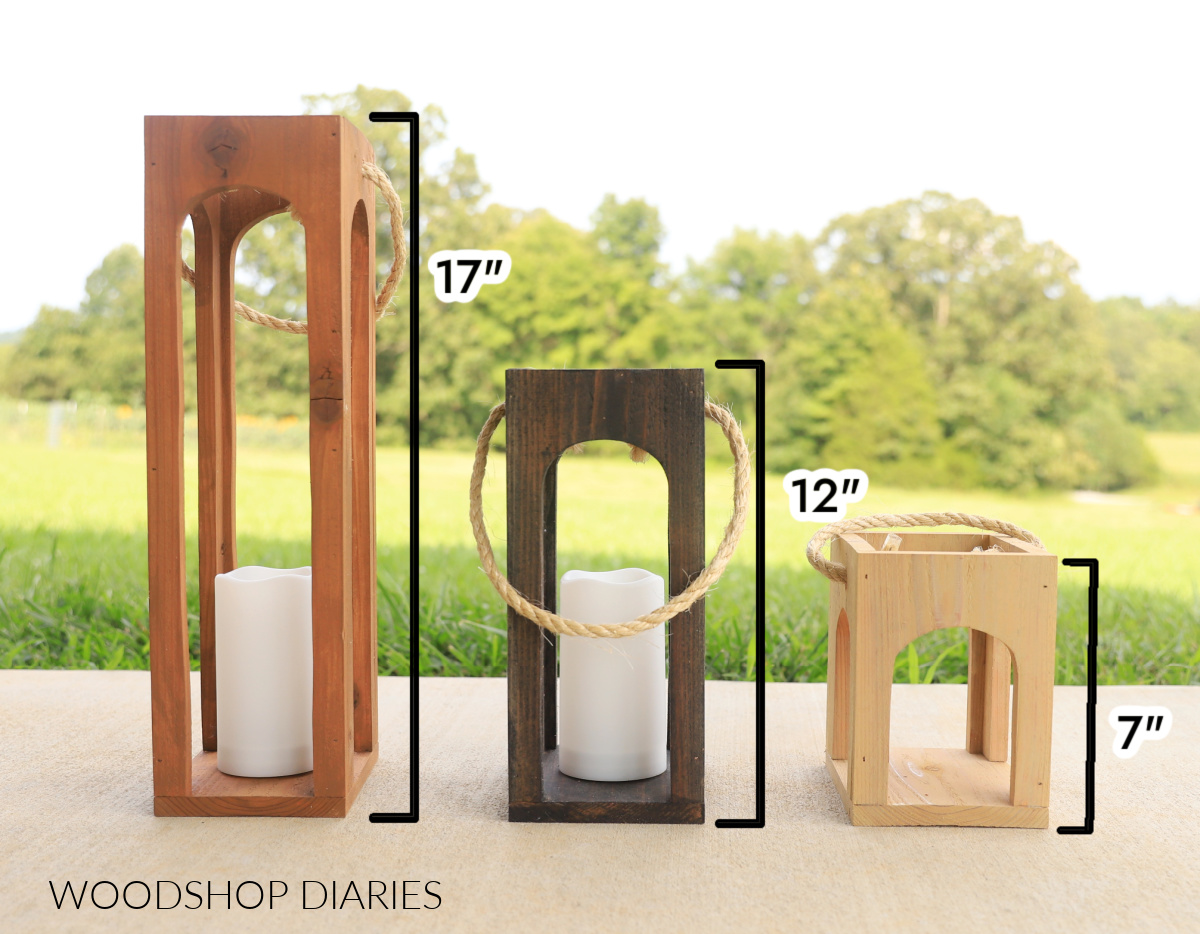
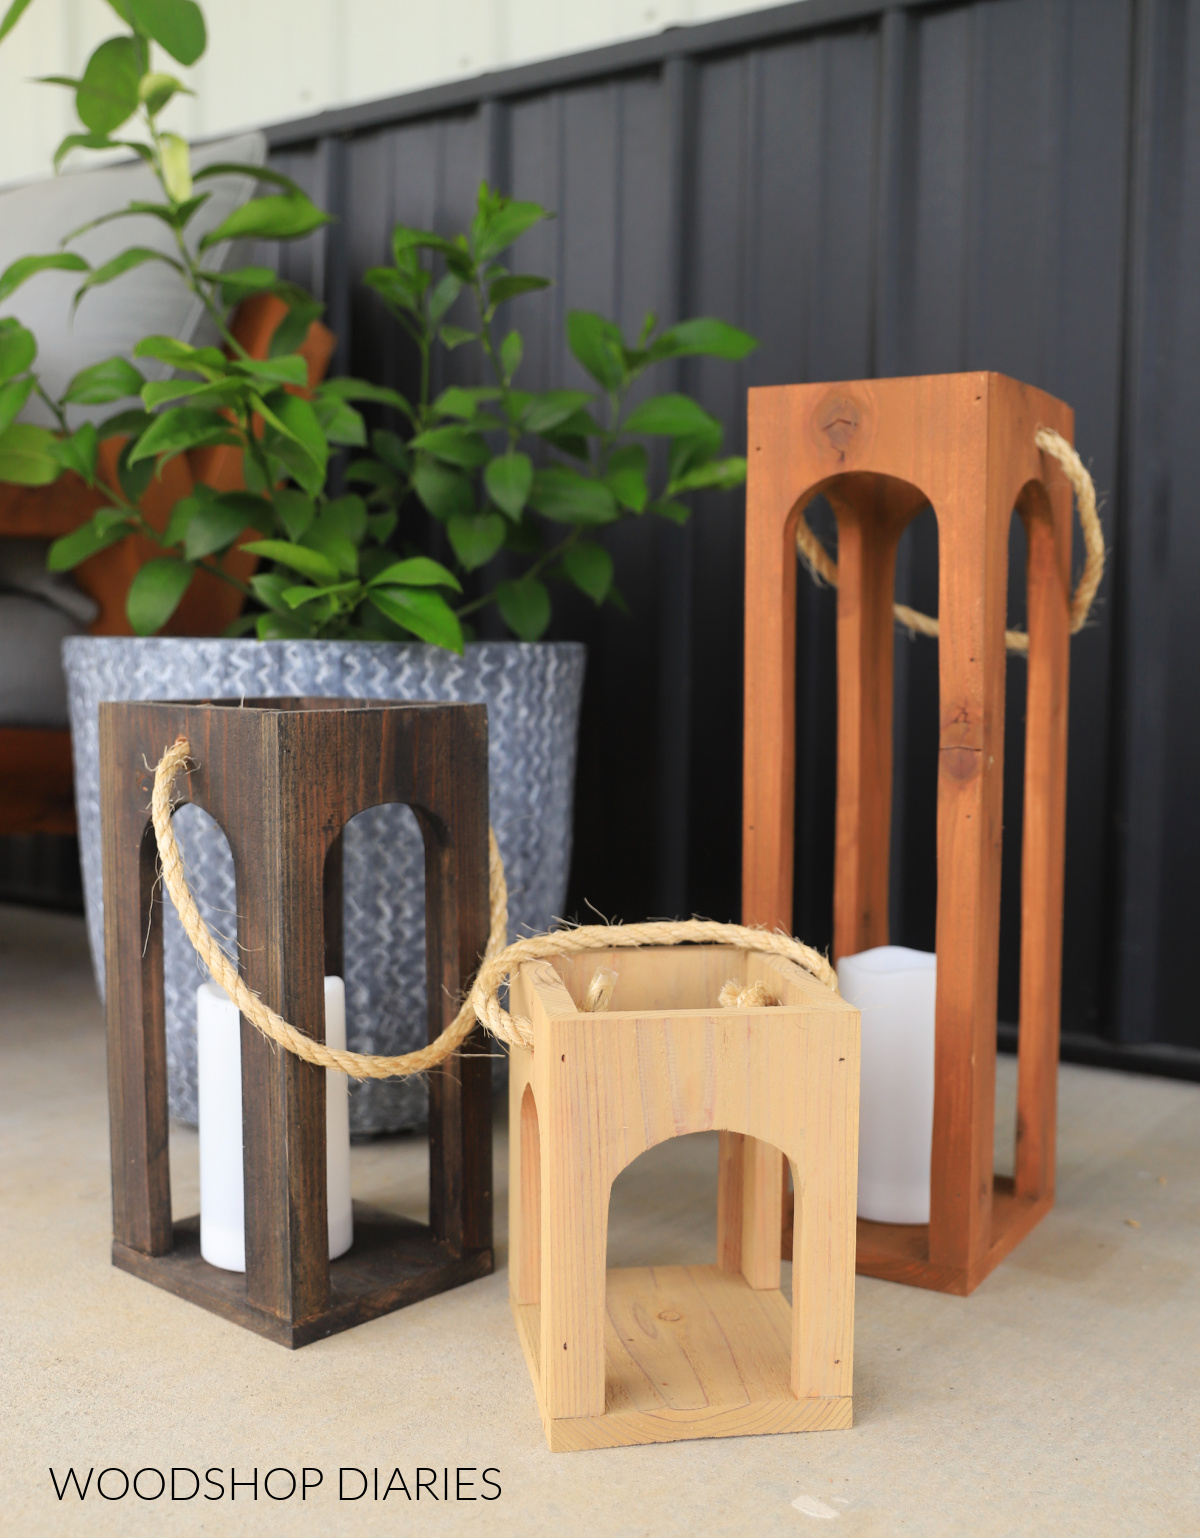
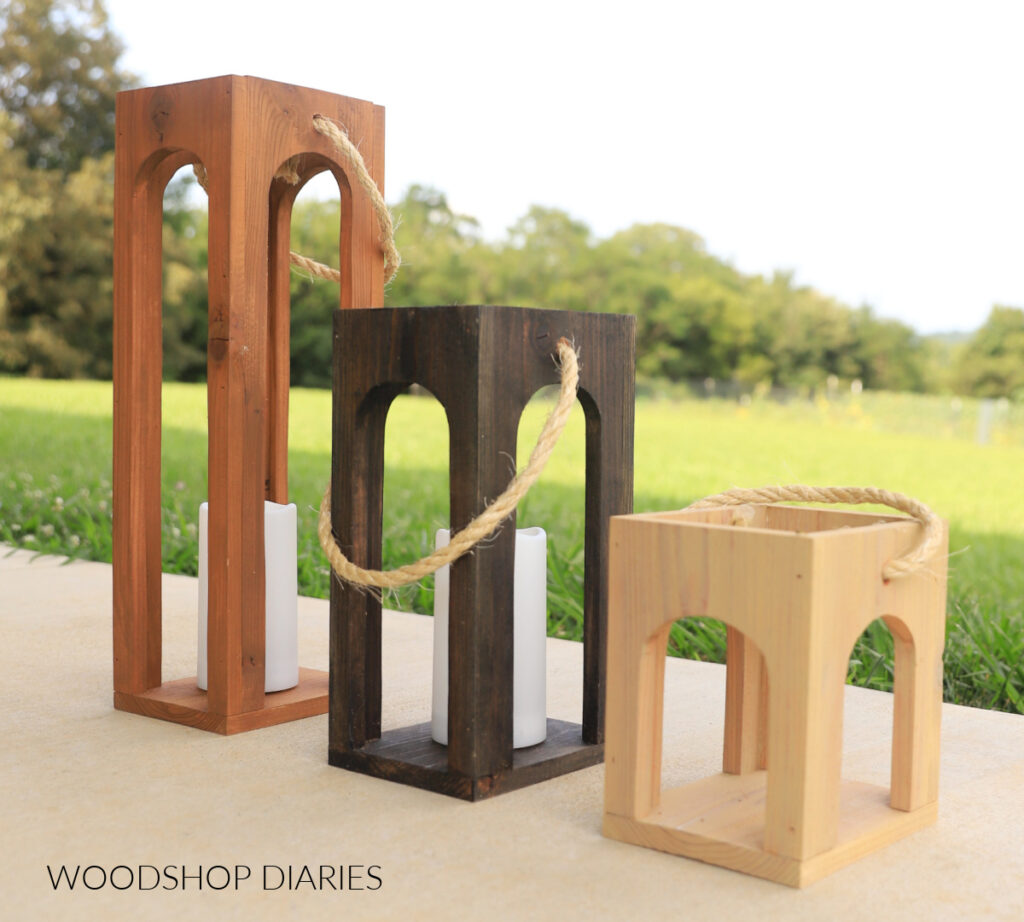
You can build your lanterns any size you wish. I built my smallest one about 7″ tall, the middle one about 12″ tall, and the largest one about 17″ tall (each size is 5″ taller than the last).
But, after building, I realized that the solar candles I bought to use with these were too tall for my smallest lantern.
That was a bit disappointing, but not a huge deal. I can get a smaller candle for that one. They still fit my other two sizes perfectly.
So, with that said, I encourage you to keep in mind how and what you plan to use these for and size them accordingly as needed.
Enjoy DIY projects and woodworking plans? Sign up for priority access for the latest posts on Woodshop Diaries!
How to Build Arched Scrap Wood Lanterns
This is an excellent easy and inexpensive weekend woodworking project you can complete in about an hour (minus the time for the stain to dry). And it requires minimal tools and materials.
But it provides plenty of options for customization and creativity. I hope you enjoy this one as much as I did! Here’s how they came together.
Tools & Materials
Tools:
- Jig Saw
- Brad Nailer
- Drill (optional for rope handles)
- Miter Saw (optional–makes straight cuts faster)
Materials:
- Fence picket or 1×6 scraps (amount depends on lantern sizes)
- Wood glue
- 1″ or 1 ¼″ brad nails
- Rope (optional for handles)
- Solar candles (optional)
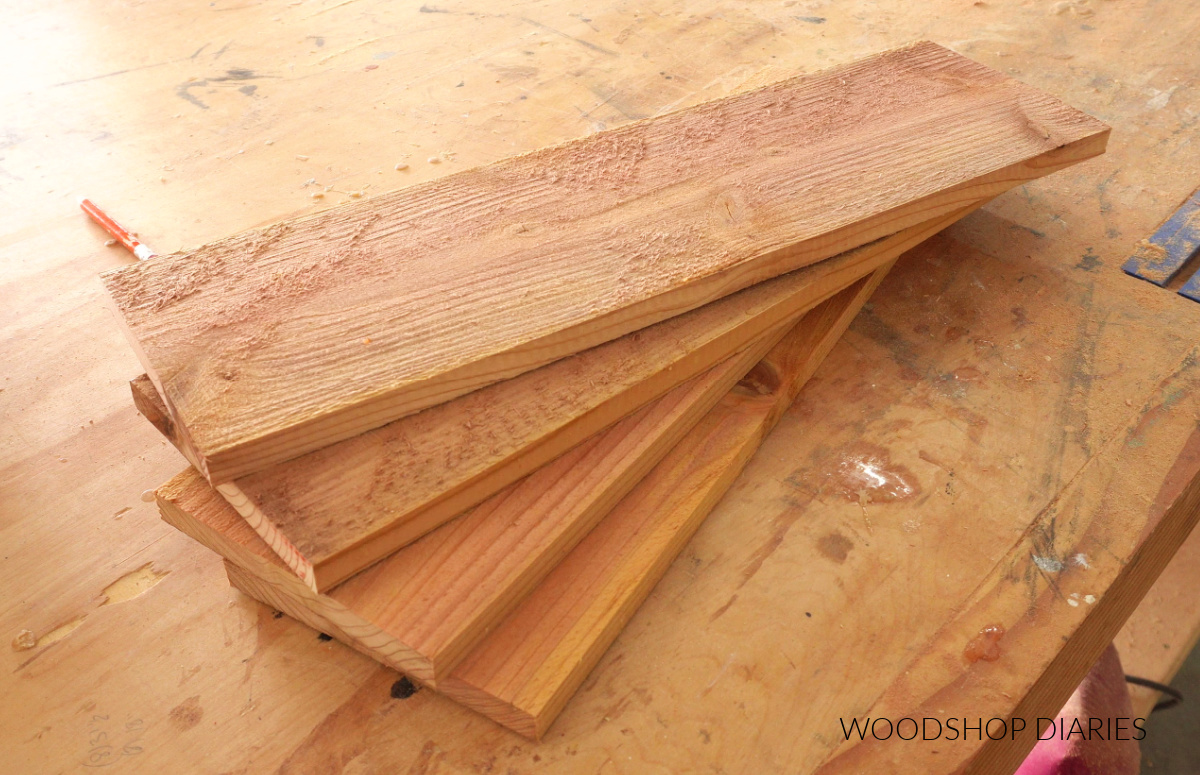
Step 1: Cut Lantern Sides to Length
Each lantern has 4 sides (which I know is an obvious statement). So I started the project by cutting the four sides to length for each lantern.
- For the smallest lantern, I cut four pieces of fence picket to 7″ long.
- For the middle lantern, I cut four pieces of fence picket to 12″ long.
- For the tallest lantern, I cut four pieces of fence picket to 17″ long.
And again, feel free to modify your lantern size however you’d like.
TIP: You can cut these pieces using a jig saw, but if you have a miter saw, it’s probably quicker to use that for these simple, straight cuts.
Step 2: Cut out Arches
Once the sides were cut to length, I started drawing the arches on them to cut out.
First, I used a speed square to help me draw a straight line down each side of the boards 1″ offset from the edge.
RELATED: How to use a speed square
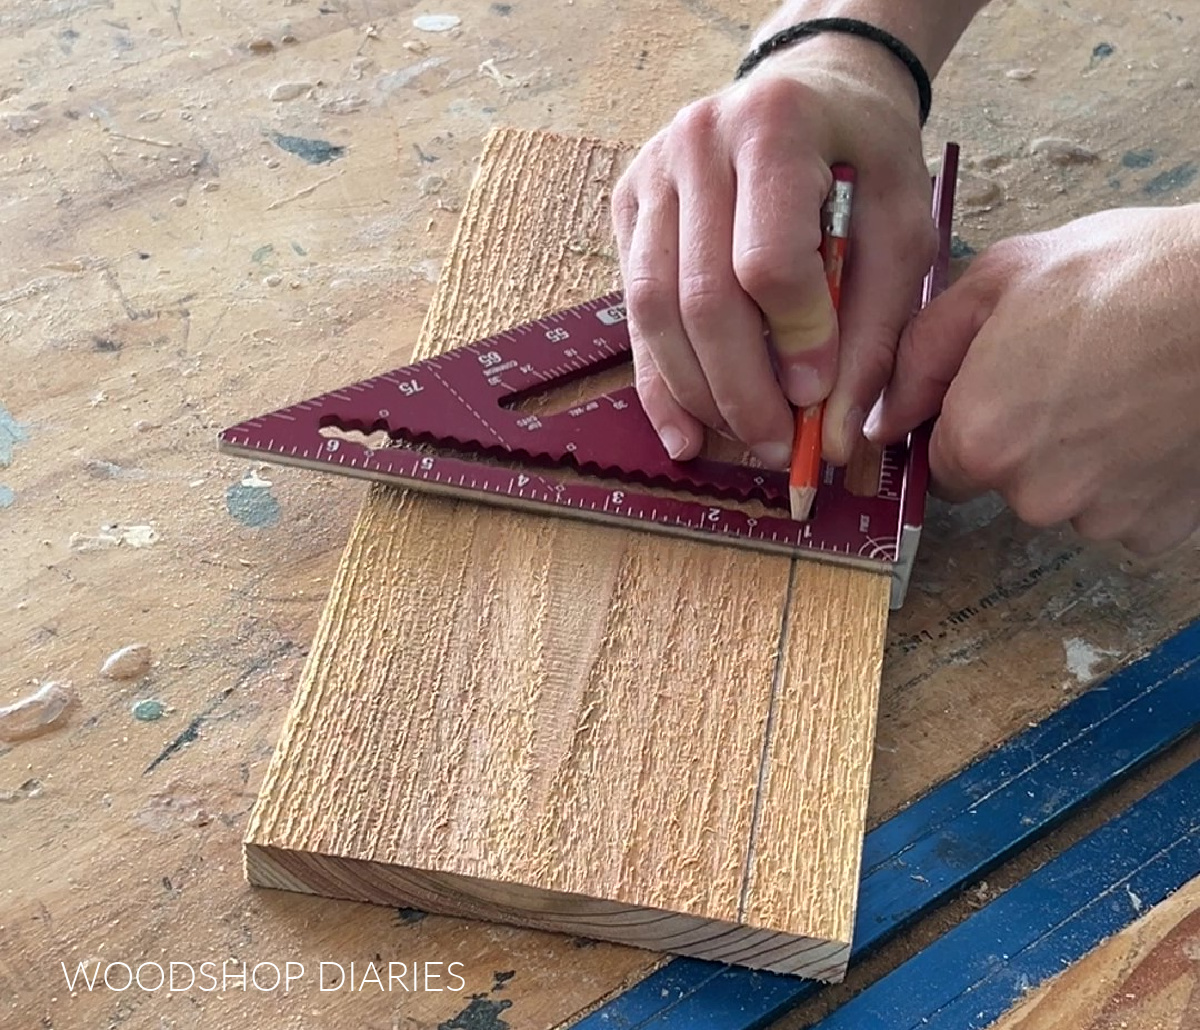
If you don’t have a speed square, I highly recommend adding one to the shop as it’s a SUPER useful tool.
But, an alternative method is to simply make a mark at each end of the board 1″ from the edge, then use a straight edge to draw a line between them.
After I marked lines 1″ from each edge, I made another mark 2″ from the top edge of the board. I lined the edge of a 1 quart stain can with this mark and used it to help me draw my arch.
NOTE: You can use a roll of tape, paint can, cup, any round object to help draw your arch.
Then, I cut this out using my jig saw. Take your time and follow the lines as best you can, but don’t panic if it’s not perfect.
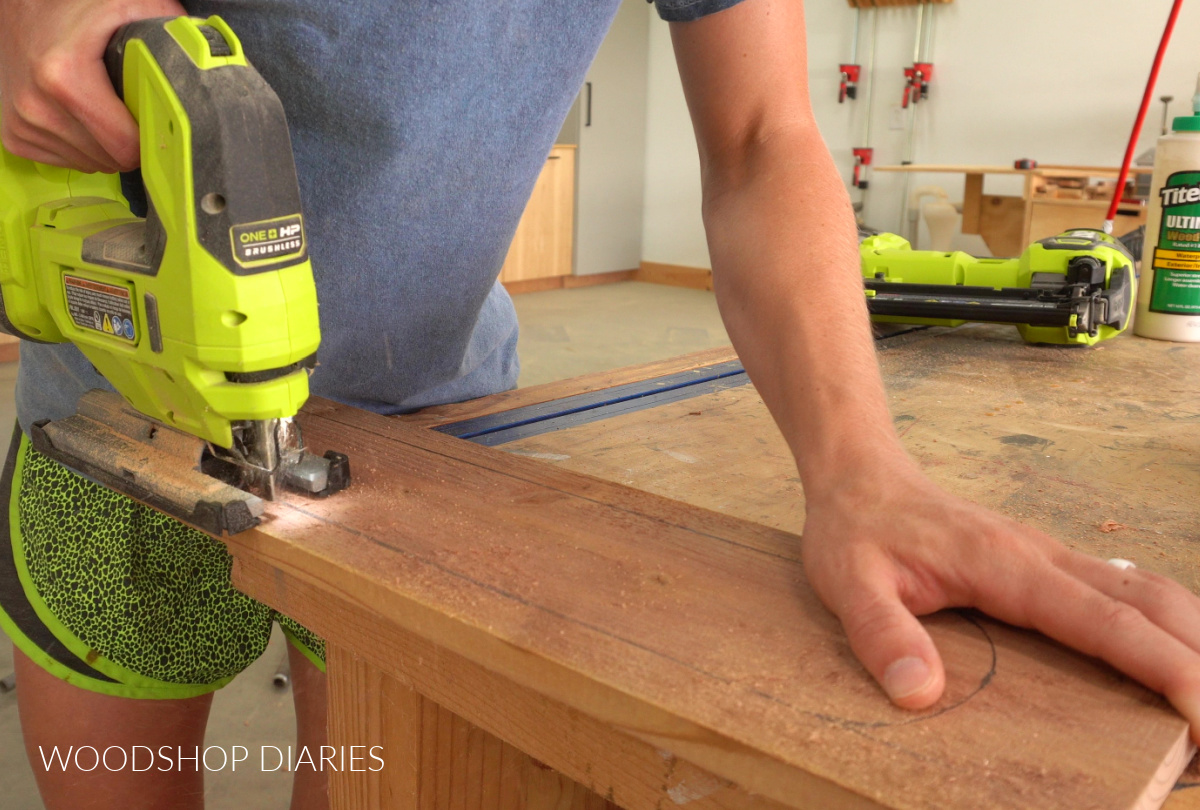
TIP: I recommend using fine finish blades in your jig saw for this project. If your jig saw has orbital settings, set it on the 0 setting for the cleanest cuts.

I repeated for all four sides for all three lanterns. Then I sanded each piece well using 80 grit sand paper.
A sander is helpful here, but hand sanding is fine. Fence pickets are pretty rough, so using 80 grit paper will help smooth them out pretty quickly.
However, if you’re using regular, already smooth 1×6 material, you can probably skip up to 120 or 180 grit.
Step 3: Assemble Lantern Sides
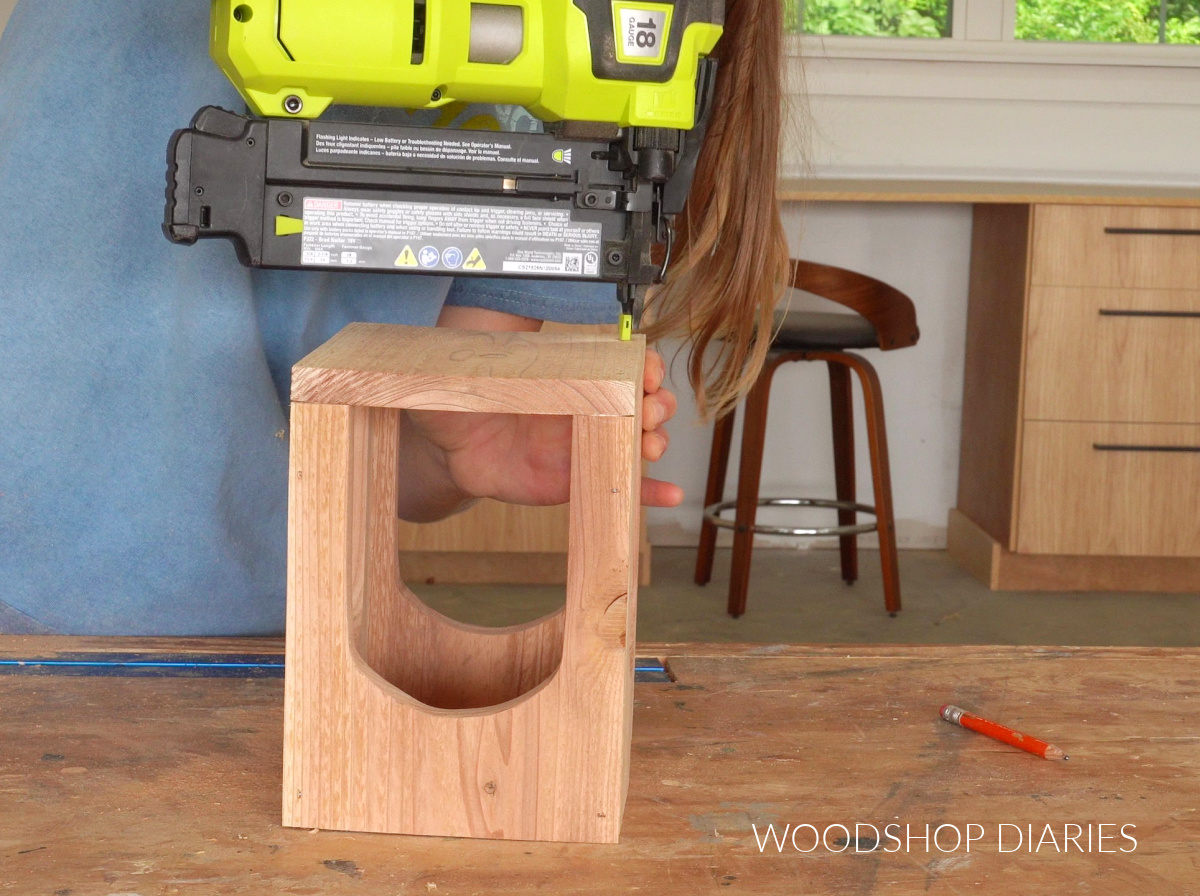
Then, I glued and brad nailed the four sides of each lantern together. DON’T SKIP THE GLUE.
Make sure if you’re using these outside, that you use wood glue rated for exterior use. Gorilla Wood Glue or Titebond III are great options.
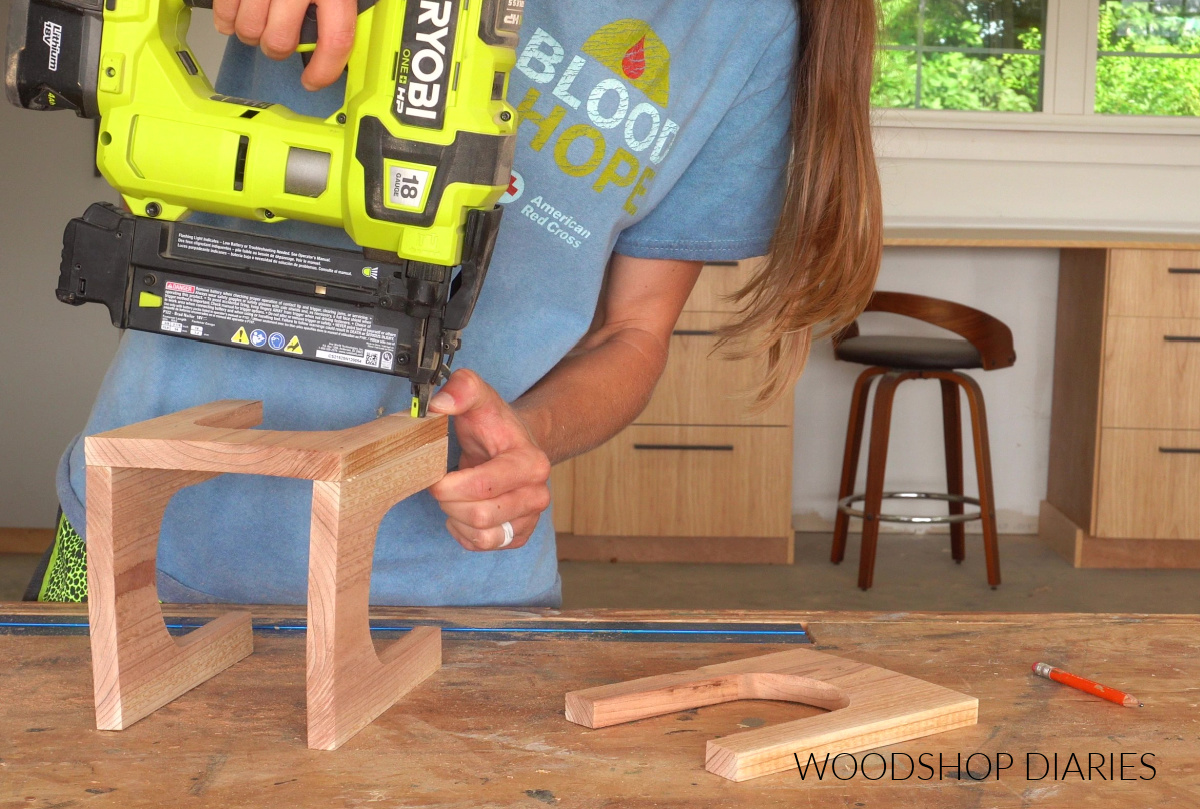
Be careful as you’re assembling to keep your fingers out of the way of the nails. I recommend using 1″ brad nails if you’re building with fence pickets.
If you’re building with 1x thick material, I recommend using 1 ¼″ long brad nails since the material is a little thicker.
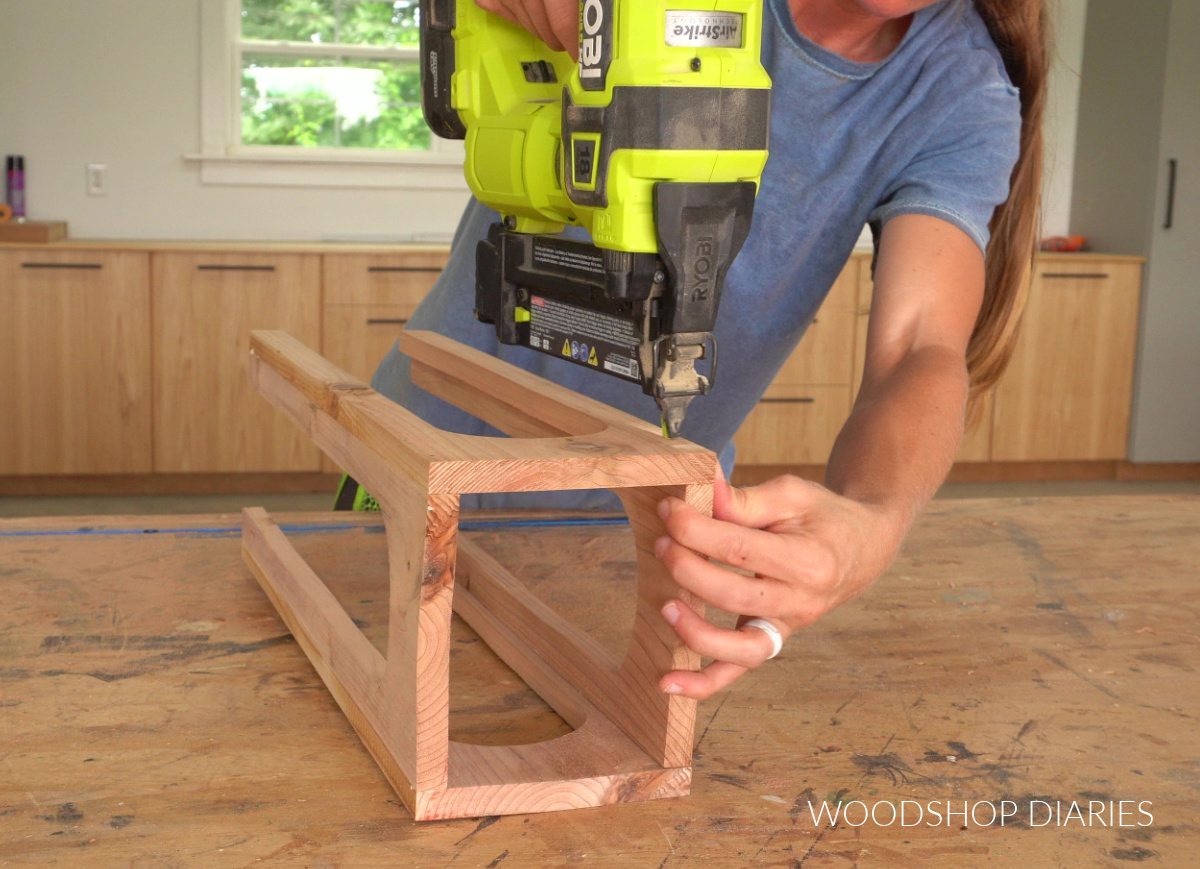
Step 4: Attach Bottom
After the lantern sides were all attached, I cut to fit another piece of fence picket to go on the bottom.
I flipped the lantern upside down, applied wood glue to the “legs” at leach corner, then placed the bottom on and nailed it in place.
I repeated for all three lanterns and wiped away all the glue squeeze out before moving on.
Step 5: Finish & Add Rope Handles
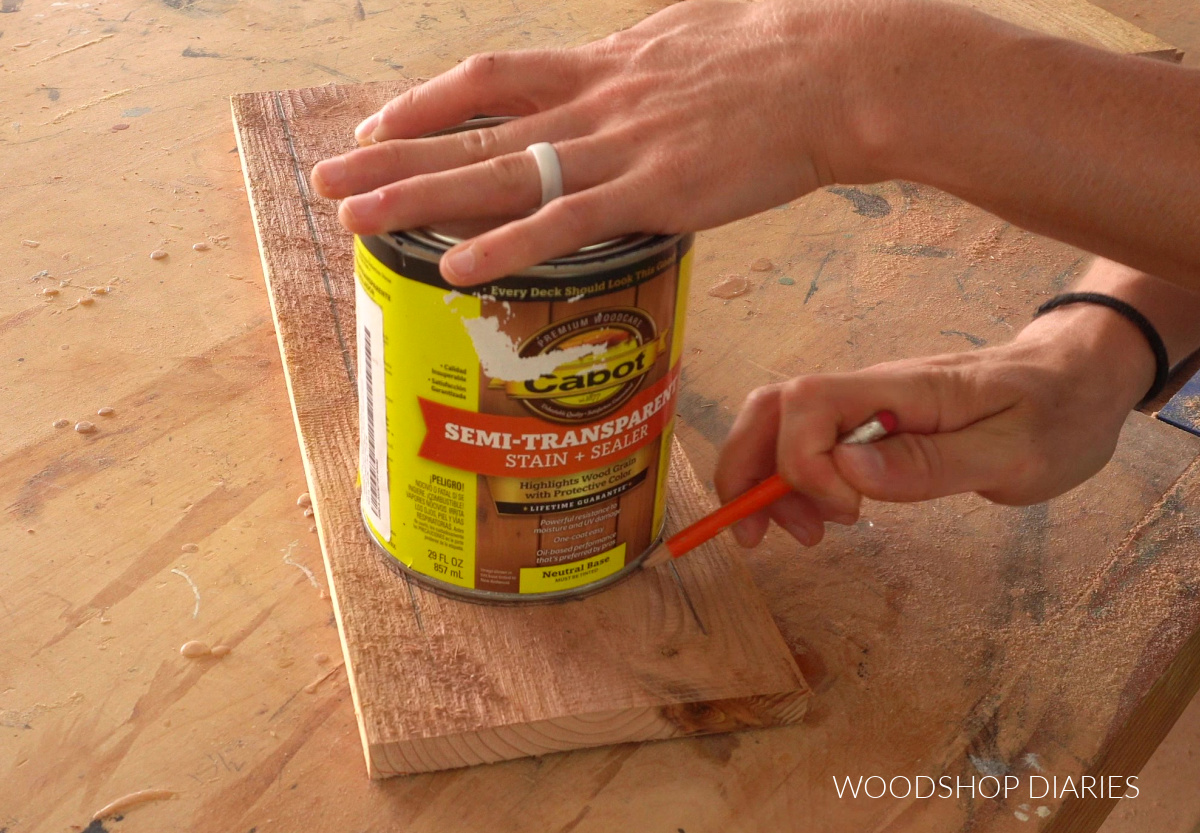
One of my favorite “features” of these lanterns was that I stained each size a different color. This made them feel like a fun mix and match set and the colors paired together SO well.
I used Cabot Semi Transparent stain + sealer for these lanterns. The tiny 7.25 oz cans of stain are more than enough for each lantern.
I used their Desert Sand color for the smallest lantern, Black for the middle lantern (shown below), and Bark Mulch for the tallest lantern.

This part is completely optional, but the rope handles looked so cute! So in case you want to add those, too, here’s how I did it.
After the stain had dried on each one, I drilled a couple holes (in two opposite sides) in each lantern large enough to fit my rope through.
Rope comes in a ton of sizes, so choose a drill bit slightly larger than your rope’s diameter.
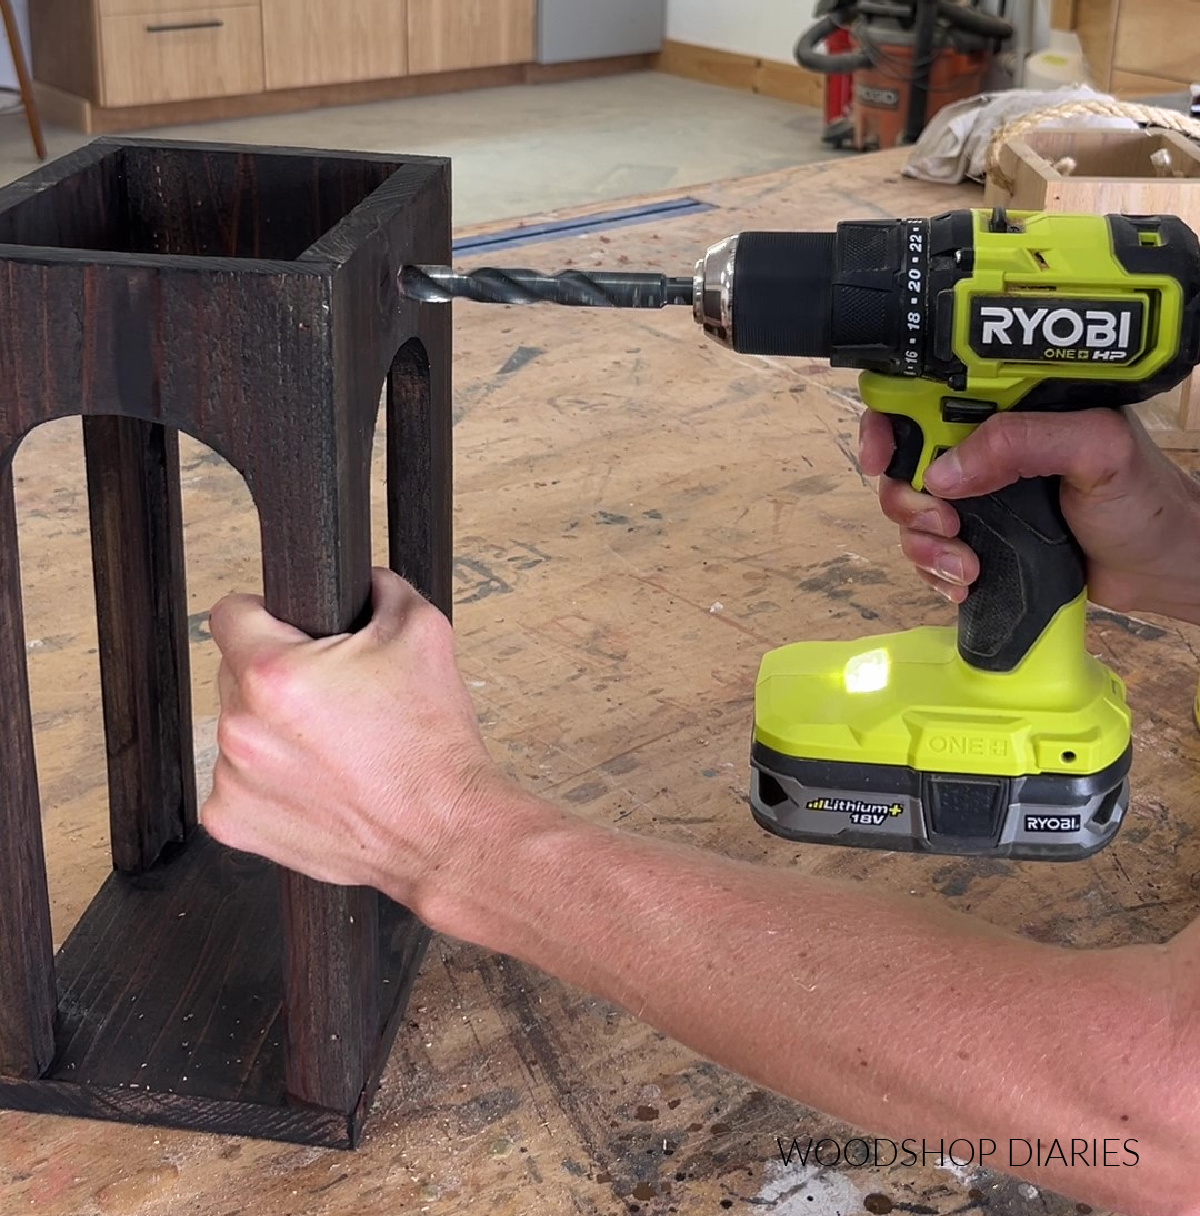
TIP: Be super careful when drilling large holes as these boards are thin and can tend to split. You may want to drill a pilot hole and work your way up to the final hole size.
I cut a piece of rope a little longer than I wanted my handles (you need to leave enough length to tie the knots on each end). Then, I slid the ends of the rope into the holes, and tied a knot on the inside.
And with that, these lanterns were finished! They make the perfect addition to my front porch and a great place to add some solar candles for evening hang outs.
If you want to keep them indoors, they’d also be adorable next to the fireplace, or as a centerpiece on the dining table.

These were such a fun DIY project that I may make a few more sets to put in all the places haha!
Looking for More Scrap Wood DIYs?
Can’t get enough scrap wood projects?? I’m teaming up with my friend, Kati, from Houseful of Handmade all month long for “Scrap Wood Summer!”
Check out all the projects in the series below. Click on the images to learn how to make each one!


This is our third year hosting Scrap Wood Summer and I enjoy it a little more each time. But, if you’ve never heard of it before, that’s okay!
Essentially, we each share a new scrap wood project every Tuesday throughout the month of August (2024). So by the end of the month, you’ve got 8 new project ideas to try.
So stay tuned to see all the other fun ideas we are so excited to share with you!
Can’t wait? Check out previous Scrap Wood Summer projects plus other scrap wood ideas here.
If you’d like to save these fun DIY arched wood lanterns for later, be sure to pin it or share to your favorite social channel!
Until next time, friends, happy building!