Want to make your own DIY wooden flatware caddy? I got you covered in this tutorial!
This post is sponsored by The Home Depot as part of the ProSpective program. This post also contains affiliate links. See policies for details.

Most normal people probably keep their silverware—you know…forks, spoons and knives—neatly tucked away in a drawer.
.
I’m not in that category. We used to have one of those fancy little bamboo drawer organizers for that, then there was a massacre incident during one of our remodels and somehow it got covered in blood and trashed. Don’t ask…
.
Ever since, being the thrifty crafter that I am, I just used glass jars I already had on hand to store them in inside one of the bottom cabinets. (Because $10 for a new one seemed like a lot…) And, it worked…for a while.
.
Recently, two of the jars broke while putting the silverware away after a spin through the dishwasher and Danny asked me to make something better for this than these silly glass jars before one of us gets hurt.
.
I’m on it. So I made a little wooden flatware caddy with these cute metal handles. I had seen one similar online somewhere and really thought the metal handles were cool.

So if you want to see how it came together, I’ve got the video here and the tutorial below 🙂
For this project, you will need:
(1) 8 ft. board (1×6 or 1×8 would work fine)
⅛″ thick x ¾″ wide steel flat stock
(4) 1 ¼″ lag screws
Husky Thin Wall Deep Socket Set
Table saw (optional)
Wood Glue
I made this caddy out of walnut. If you remember a few projects ago (the DIY walnut serving tray), I mentioned that a coworker of mine gave me a stack of rough sawn walnut earlier this year. I’ve been slowly working my way through it and that’s what I used for this project.
.
However, if you didn’t already have a stash of walnut to use, check your local Home Depot. Some stores carry walnut now. And if not, standard oak or pine works fine, too.
Step 1: Trim Boards to Size
I brought the wood to the miter saw to cut down my pieces to the following lengths:
- (2) @ 16″ long (long sides)
- (2) @ X” long where X=the width of the board you’re using (short sides)
- (2) @ 14 ½″ long (bottom and long divider)
- (2) @ 2 ½″ long (short dividers)

I dry fit all my pieces together to make sure everything fit well, then remembered that the middle pieces needed to be trimmed shorter to fit. So I marked where to trim and trimmed them.

After test fitting again, I was ready to glue…RIGHT after I gave all the pieces a good sanding.

Step 2: Glue Up Middle of DIY Wooden Flatware Caddy
I glued up middle dividers first, then assembled the rest of the box around it. So I applied wood glue to the short pieces and evenly spaced them out and clamped making sure to keep it square.

I applied glue along the bottom of this divider assembly and clamped it onto the bottom of the box.


While that glue was drying, I moved onto working on the handles.
Step 3: Bend and Prepare Flatware Caddy Handles
I made these handles out of ¾” wide ⅛” thick steel flat stock. I had a couple pieces to work with to make two handles.
.
I set them on top of one of the short side pieces of the caddy to get an idea of where I wanted to put the bends in it and marked. I will trim these later, so I wasn’t worried about centering the marks on the steel.

Then, I lined up one of the marks with the edge of my workbench, clamped it down and carefully bent it along this line 90 degrees.

I pulled this away from the workbench about 1”, clamped again, and bent back up to give me one side of my handle.

I did the same on the other side where I had marked to give me a rough handle. I repeated this process for the second handle until I had two almost identical handles. Then I moved back to the glue up.

Step 4: Finish Gluing Up Wooden Flatware Caddy
To finish the glue up, I just applied glue to all the joints where one wood will meet another and glued and clamped the sides around the divider.

Step 5: Finish and Install Handles
While that glue dried, I moved back to the handles. I centered the bends across the sides of the box and marked where to trim them to be flush. See above image.
.
Then, I clamped them down to the workbench and I installed a Diablo Steel Demon saw blade into my circular saw.

I’m not a metal worker, by any means, but It’s nice to have a good way to cut metal when I need to besides a hacksaw. This one cuts steel clean and with minimal sparks…which is nice since this is a woodshop full of saw dust haha.

I used my circular saw and this steel demon blade to trim the handles down along the marks on each side.
.
To attach these handles, I used some 1 ¼” lag screws. So I drilled a hole just big enough for this screw to fit through into each end of each handle.

Then, I spray painted the handles and the lag screws with this new rose gold color—I thought that would look good with the walnut.

While the paint dried, I removed the caddy from the clamps and gave it a final sanding to remove any glue squeeze out. Then I applied a simple beeswax finish along the outside AND inside of the caddy before attaching the handles.
.
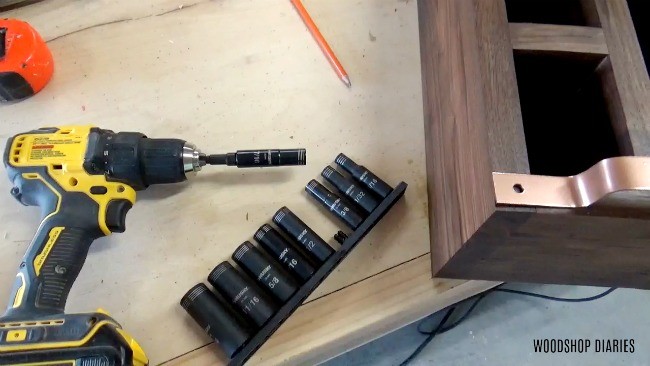
Now it’s time to finish this up. I brought the handles over and prepared to install them. For this, I used this Husky Thin Wall Deep Socket set and my drill.

I predrilled holes into the walnut, then drove the lag bolts in to attach the handles. It’s nice that this set works with my drill AND driver, so I don’t have to use a ratchet to drive bolts like this. If you’re looking for a simple, general socket set, it’s great to have a thin wall deep socket option for tight spaces. This one works great for general purposes like this as well.

And, it’s finished!

I brought it inside and trashed the old glass jars and now we don’t risk injury when unloading the dishwasher haha.

Besides being safer than storing our silverware in glass jars, I also think it’s MUCH nicer to look at 😉
And that’s enough to make it worth it haha. So if you’d like to make one yourself, be sure to check out the YouTube video. And if you aren’t already subscribed to my channel, then be sure to subscribe so you don’t miss out on what’s coming next. I’d also love if you pinned this for later 🙂

Until next time, friends, happy building 😊


