
This post is sponsored by The Home Depot and is part of the ProSpective Program. It also contains affiliate links. See policies for details.
.
I think the most important part of a laundry rooms is the counter tops. Is that weird? I mean, most people probably say the washer and dryer, or the storage, or a clothes drying rack. Nope, not me.
.
Countertops.

In my old house when we first moved in, I didn’t have a laundry room counter top. IT DROVE ME NUTS. So I literally ripped everything out of the room and put one in. #worthit
.
It was so nice to have a work surface to pretreat my extra filthy clothes, and to fold my clean ones. I also used it to paint and stain a TON of little projects on…but that’s another story for another day haha.
.
So when we moved into our little garage apartment, there wasn’t enough room to have a nice counter top like that because it was basically just a little 2 ½’ x 6’ nook on the other side of our bathroom wall. Sad day.

My only option was to install one over the washer and dryer…which wasn’t possible with my top load washer.
.
But after we decided to make the switch to a front load (check out my thoughts on this set here), I immediately started building a counter top.
.
I wanted it to look like butcher block counter top with lots of thin pieces glued together…because I like making things difficult haha.
So if you’re ready to see how I made it and how you can make your own, check out this video showing the process and the tutorial is below 🙂
For this DIY butcher block counter top, you will need:
2x material (I cut down 2x10s—amount will vary based on your space)
2 ½” screws to install supports
Driver or drill
Wood Glue
Table Saw (optional)
Planer (optional)
Large Clamps
Sander
Step 1: Cut Down 2x Material to make DIY Butcher Block
I started out by measuring the space I wanted the countertop to stretch between and how deep I wanted it. Based on my space, I needed a top that was about 6 ½” foot long and 30” deep. From that I determined the amount of lumber I would need.
.
I ended up purchasing four 2×10 boards from Home Depot and that gave me SLIGHTLY more than I needed. I ran them through the planer to get them cleaned up and to make sure they were all the same thickness. This step is optional, but saves time on sanding later.

Then, I cut them down on my miter saw to make them easier to trim down to thinner strips. If you didn’t want to make it look like butcher block and you were okay with wider boards, they’ll be easier to glue together without cutting them down like this. But I liked the butcher block look, so I cut two of my boards in half and the other two I cut into 5’ and 3’ pieces—just to give me some variation when gluing them up.

I took these boards over to my table saw and squared up one side by shaving about ⅛” off, then cut them all down into 1 ½” strips to make 2x2s. (Note: if you planed the boards, then cut the width here the same as your final board thickness, so all sides will be the same width.)

Note that you could just use 2x2s from Home Depot instead of cutting down 2x10s, but I prefer making my own.
Step 2: Glue Up DIY Butcher Block Counter Top in Sections
The glue up was stressful. I won’t lie. But, I found it MUCH easier to glue up in sections of 5 runs at a time.

So, I laid out my clamps and arranged 5 rows of 2x2s how I wanted across the clamps making sure that 1. My butt joints didn’t all line up in the middle (stagger them) and 2. I left myself enough room to trim off the ends so that my final length would still be enough.

Then, I applied glue to the edges and the butt joints and clamped tightly. It’s important to get everything as flat as possible to make the sanding process later less painful.
.
Once that glue was dry, I unclamped and glued up the next five rows. Then I clamped it all back up again.

I did this five rows at a time until I got to the final width I needed—approx 30”. It took a couple of days—one glue up after work, one glue up before bed, repeat the next day haha.

Step 3: Trim Counter Top to Desired Length
Once everything was glued up, I trimmed down the length to the exact size I needed to stretch wall to wall in my laundry nook. Using a square and my Kreg AccuCut, I trimmed one side with my circular saw making sure to keep it nice and square.

Then I measured from that end to where to cut on the other side for the length I needed and cut it as well.

Step 4: Sand and Flatten DIY Butcher Block Counter Top
The next step is sanding. It was a long process, but I used a belt sander and an orbital sander to get the counter top as flat as possible.

It actually would have been easier to glue up this counter top in sections of 5 runs, then run those through a planer, THEN glue them all together instead of gluing so many individual boards into one big piece, but hindsight is 20/20 and this ended up working fine…just took a little longer.
Step 5: Add a Decorative Edge
I’ll be leaning over this top pretty often to access the upper cabinet over my washer and dryer, so I didn’t want a super sharp corner.

So I used my new Ridgid 2 HP ½” Router and Diablo ½” 30 degree Chamfer Bit to give this counter top a nice chamfered edge along the front.

I’ve got a Ridgid ¼” trim router as well, but have been wanting something with a little more power for deeper cuts on thicker materials and this Ridgid ½” router didn’t disappoint.

With the upgrade from ¼” router to a ½” router, I had a good excuse to grab a few new bits (although the ½” router does come with an adapter to use my old ¼” bits), and a Diablo ½” 30 degree chamfer was my first bit choice since it’s my favorite edge to route.

I actually used it on an outdoor table I built for my mom (post coming soon!) as well and it cut through 4 sides of six 8’ boards like butter.
Step 6: Install Butcher Block Counter Top
Once the top was finished, I was ready to install it. First, I determined the height of my new washer and dryer to make sure I left enough room for them to slide underneath. Then I located the studs along the walls where the counter top was going and marked a line along the walls where the bottom of the counter top needed to set.
.
I used 2 ½” wood screws to screw 2×2 and 2×4 scraps into the studs right at the line I marked for the counter height. I made sure everything was level side to side when I screwed them in and I attached one on each side of the nook and placed one along the back wall.

We slid the counter top into place on top of these supports and checked that everything was level. It wasn’t (does anything ever work out right the first time??), so I ended up making a few adjustments to my supports to get it all level, but it wasn’t too bad.

At this point, you could screw the top into the supports to hold it in place, but we wanted to be able to remove the top in case we needed to access the shut offs quickly, so I didn’t screw it in. It’s heavy enough, it’ll stay put.
.
I installed the washer and dryer, slid my laundry hamper in place and gave it a couple coats of poly to protect and seal it and it was finished.

Step 7: Add Gap Filler Piece
Because my washer shut off access was so high, I ended up having to raise my top a couple inches above my washer and dryer to clear the water access. I wasn’t a huge fan of this gap, so I cut a scrap piece of 1×2 and glued it onto the bottom of the top like shown. This is optional, but I think it looks better to cover up the gap.

Ideally, you won’t have a gap to begin with (unless your water access is too high haha), but if you have a similar situation to mine, that’s how you can fix it 😊
.
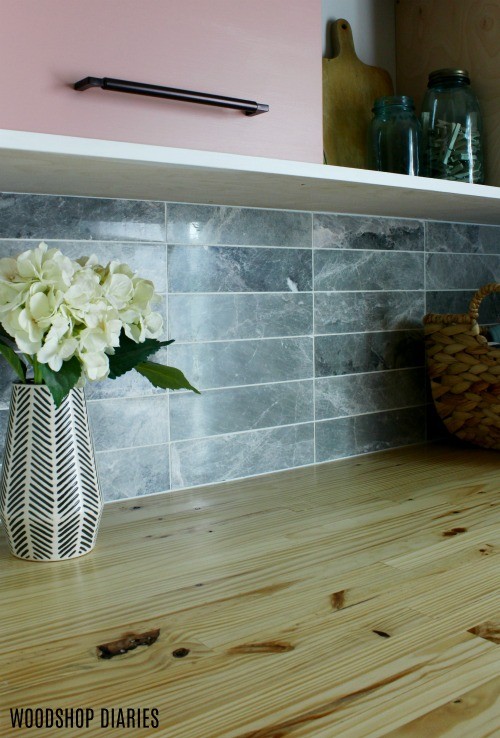
And now, I’ve got a nice pretty surface to fold my laundry on. Life changing, you guys. Life. Changing.

I made life a little more difficult by making this more of a butcher block counter top style with all the thin strips, but I really like the variation here. To each his own. HA!

If you haven’t already checked out my whole transformation and laundry nook refresh, check it out in this post. And stay tuned for details on how I built the cabinets and tiled the back splash coming very soon.

In the meantime, be sure to check out the video tutorial over on YouTube, be sure to subscribe to my channel, and if you don’t mind, I’d love if you’d pin this for later 😊

Until next time, friends, happy building! 🙂

[email protected] says
HI SHARA,
WE JUST DID TEMPORARY KITCHEN COUNTERS USING FINISHED PLYWOOD! I DID NOT TAKE VIDEO, BUT THE TUTORIAL WAS SO EASY. AND THE STAIN AND WATERPROOF SEALER HELD UP BEAUTIFULLY! GREAT TUTORIAL! FINISHED PLYWOOD STACKED ON TOP OF PLYWOOD WAS A GREAT ALTERNATIVE FOR COUNTERS! GREAT JOB, LAURA