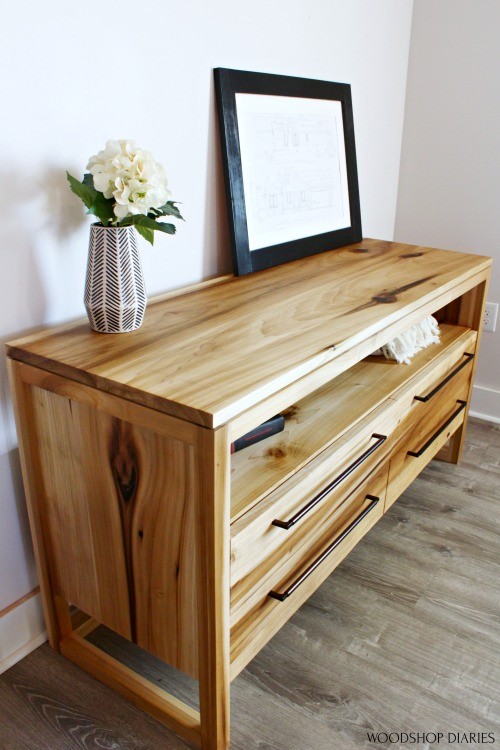
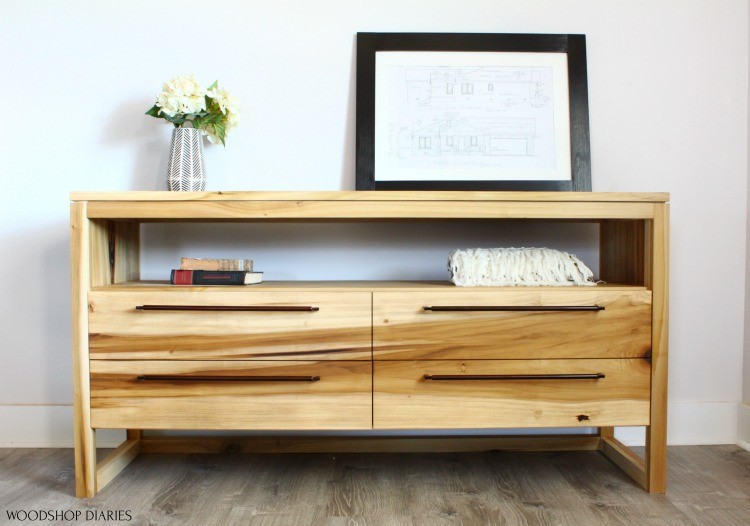
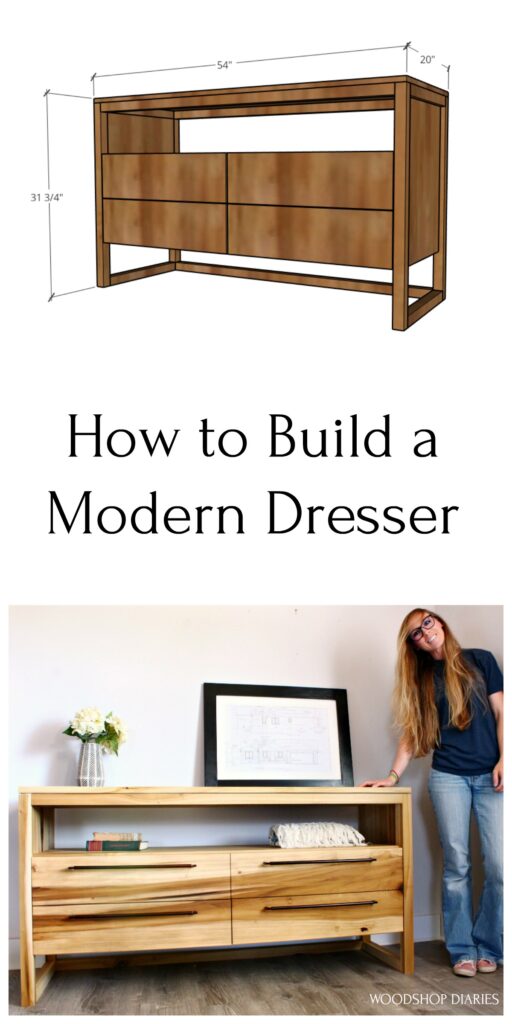
Today, I’m sharing a SECOND version of a DIY modern dresser to match my modern bedroom set! There are so many dresser styles, so I decided to share TWO different versions so you can take your pick…or build both 🙂
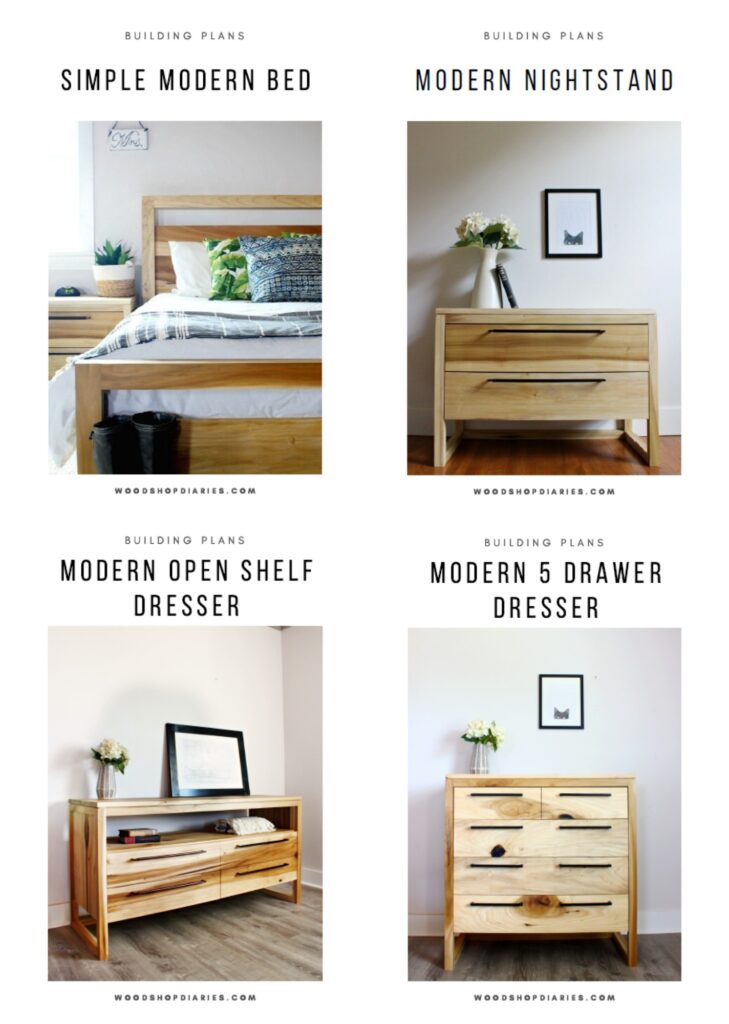
A couple weeks ago, I posted matching 5 drawer dresser plans. I told you how I’d been waiting two years to build the matching dresser to complete my bedroom set. See below–the nightstand, the bed, and the 5 drawer dresser.
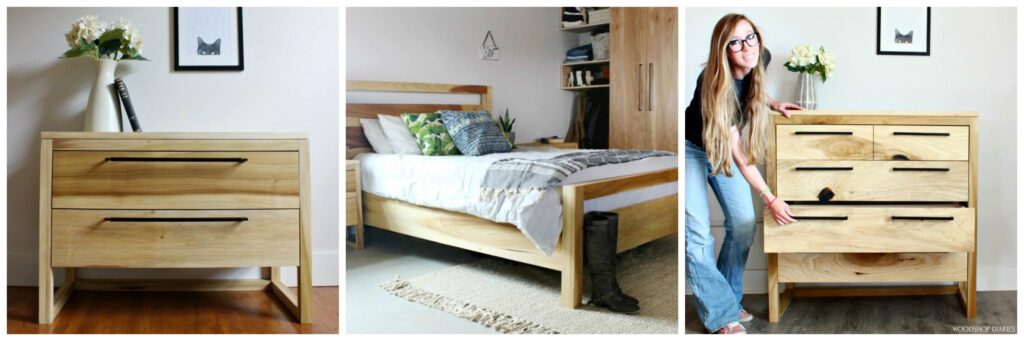
But I didn’t want to build just one dresser style. Mostly because I’m super indecisive ha! So, I built two of them. Last weeks was taller and skinnier and this time, I made it wider and shorter with an open shelf.
.
I’m sharing the printable plans for this build here and linked below. AND if you’re interested in the entire set, I’ve put together a complete bundle with the bed, nightstand, and both dresser plans here.
.
I’ve got the video for this build here and the step by step details follow 🙂 This post contains affiliate links. See policies for details.
Okay, now let’s get building.
.
FYI, this entire bedroom set was built with poplar wood. You can use poplar, pine, or whatever type of wood you prefer.
For this DIY Modern Dresser, you will need:
- (4) 2x2x8 boards
- (1) 1x10x8 board
- (3) 1x8x10 boards
- (3) 1x3x8 boards (OR use scrap ¾″ plywood strips)
- (1) sheet ¼″ plywood
- (1) sheet ¾″ plywood
- 1 ¼″ pocket hole screws
- 2 ½″ pocket hole screws (if using pocket holes on frame)
- Wood Dowels (if using dowels for joinery)
- Wood Glue
- (4) pair 16″ drawer slides (I buy these in a ten pack because it’s cheaper)
- (4) large modern drawer pulls
- Drill/Driver
- Miter Saw
- Circular Saw or Table Saw
- Clamps
- Router & Rabbeting bit (optional)
- Pocket hole jig and/or doweling jig
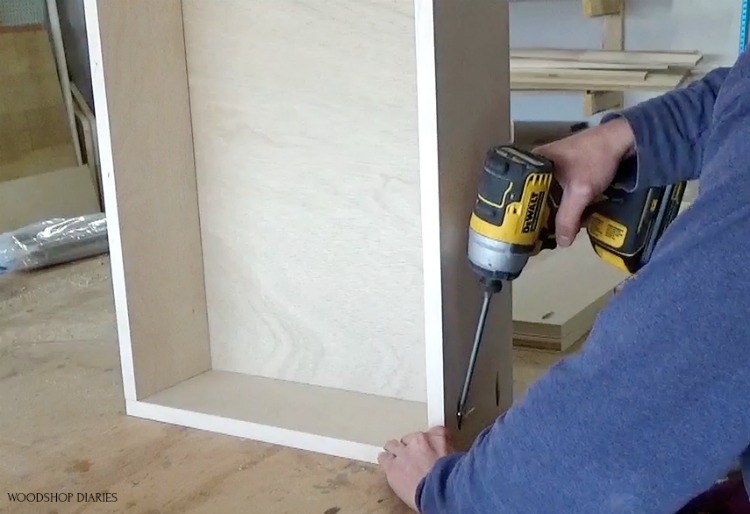
Step 1: Assemble DIY Dresser Side Panels
If any of this looks familiar, it’s because it is. I built the side panels for both of the dressers and the nightstands the same way (it is a matching set, after all), just with slightly different dimensions. So if you saw the last dresser build, this part is the same—I glued up my own 2x2s to use for the frame and also glued up a middle panel to put inside.
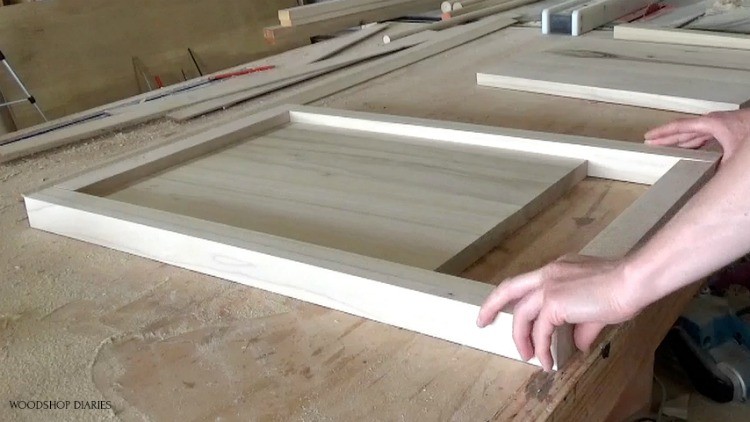
However, this time I assembled the entire side panel using dowels and wood glue. I used my Rockler ⅜″ doweling jig for this project.

I used a combination of pocket holes and dowels on my last dresser, but this time, since part of the inside panel will be seen in the open cubby, I just went with dowels all the way so you wouldn’t see any pocket holes.
I glued and clamped the side panels and wiped away all the excess glue before setting them aside.
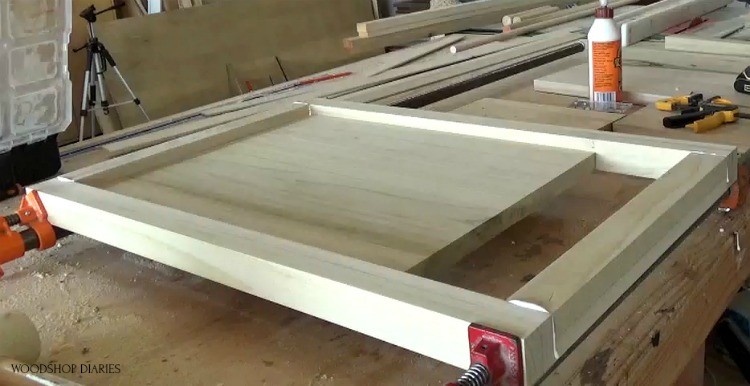
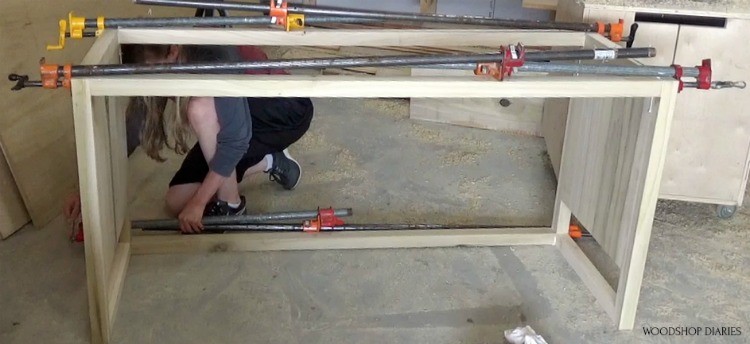
Step 2: Assemble Dresser Frame
Once the glue was dry on the side panels, I drilled dowel holes along the top corners and back bottom corner of the side panels and assembled the frame together using dowels and wood glue.
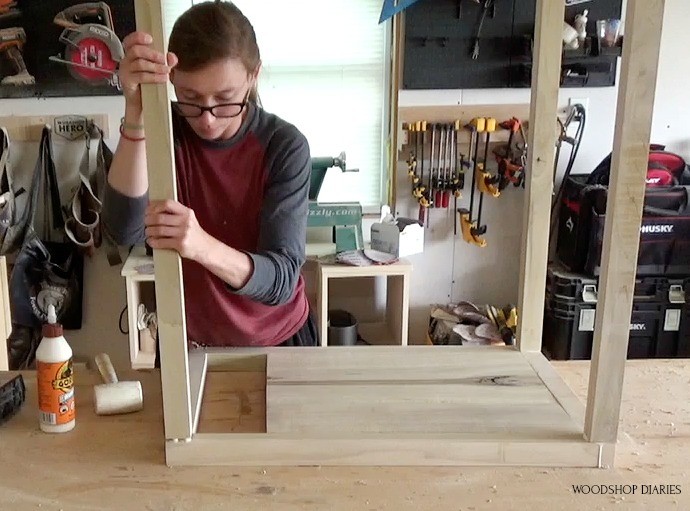
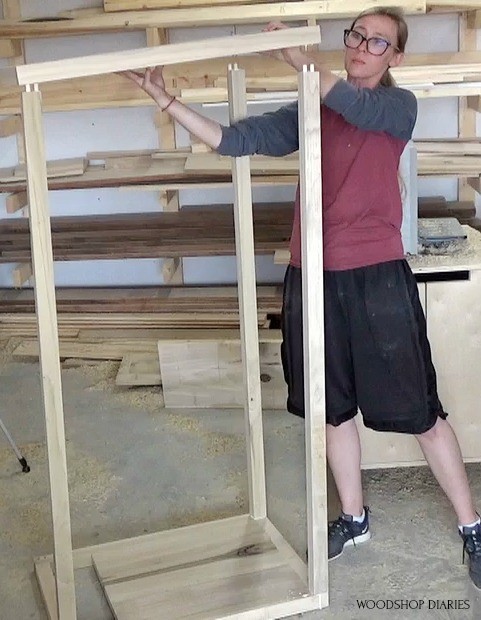
This DIY modern dresser was a lot longer than the last one I built, so I had to double up on my clamps.
Okay, so up until this point, most of the build looked pretty much like the last dresser (except shorter and wider), but here things start to look a little different.
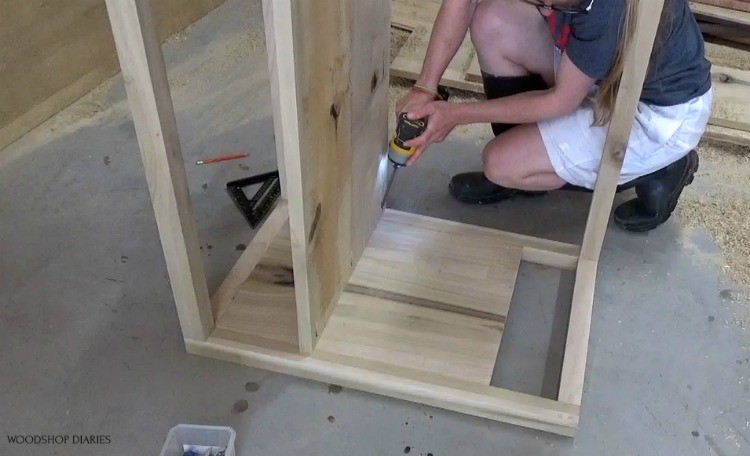
Step 3: Assemble and Install Dresser Open Shelf
Because this was going to have an open shelf, I needed to actually glue up that shelf. I have a post here on how to glue up a panel. I built both of these dressers using rough sawn poplar. So I found two boards that I could rip down and glue up to make the size piece I needed for the shelf.
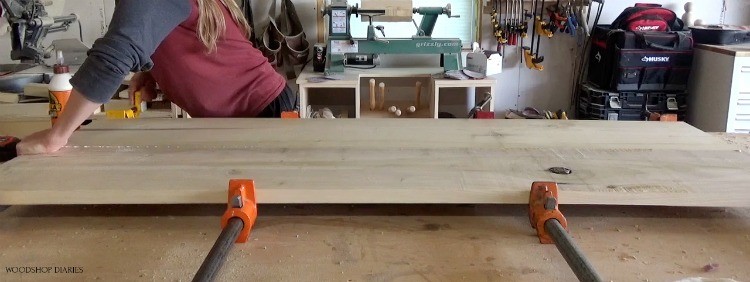
I cut this shelf to be about ¾” shallower than the overall width of the shelf. The drawer fronts will overlay these later and I wanted everything to be flush across the front.
.
Once the shelf panel glue was dry, I cut the ends clean and drilled ¾” pocket holes using my Kreg 320 jig along the edges to install. Up to this point, I used dowels, but I went with pocket holes here because it was quick, strong, and you wouldn’t see them on the underside of the shelf.
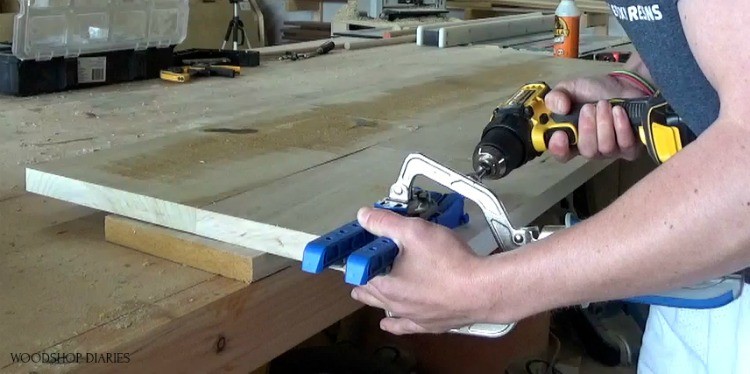
I installed this into the shelf with pocket hole screws making sure that both sides were equally spaced down from the top.
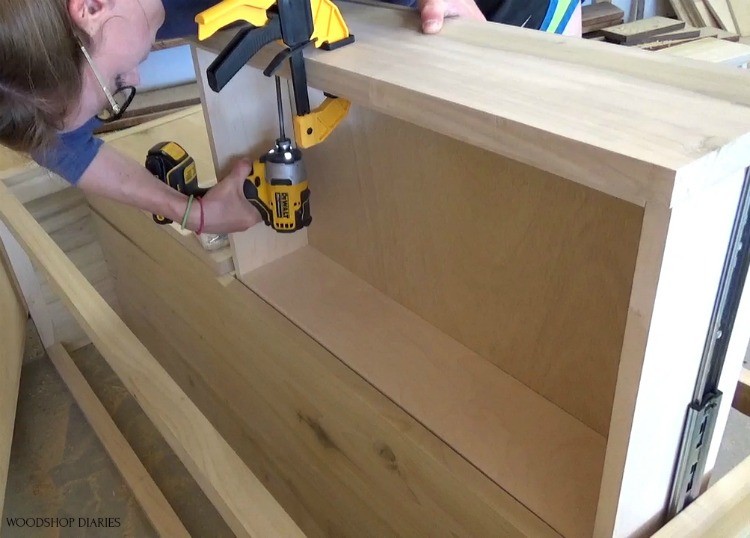
Step 4: Install Dresser Drawer Supports
Now I had the main parts of the dresser together, BUT I needed to add the structural frame pieces to hold and support the drawer boxes.
.
For this, I found three long scraps—about the size of a 1×3. You could use anything for this really, scrap ¾” plywood, 1×2, 1×4. I like to use as much of my scraps as possible, so I used some off cuts.
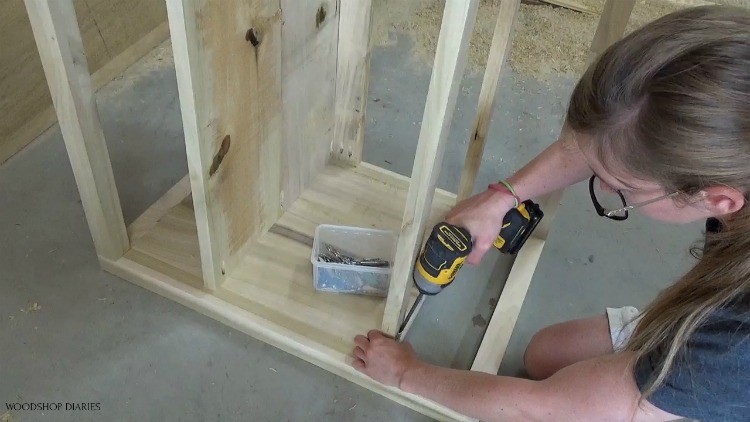
I cut these to length and installed them in place using pocket holes and screws. I put one in the back right under the shelf—this will help a little in preventing it from bowing in the middle, and then I attached two more at the bottom–even with the bottom of the side panels. Again, keeping the front one inset ¾″ so the drawer fronts can cover it later.
.
Once those were in place, I cut a piece of ¾” plywood to use as the drawer divider. I placed this into the dresser frame and installed it in the center using pocket hole screws. It’s important to get this piece in the very center of the dresser so that the drawer boxes on both sides will be equal size.
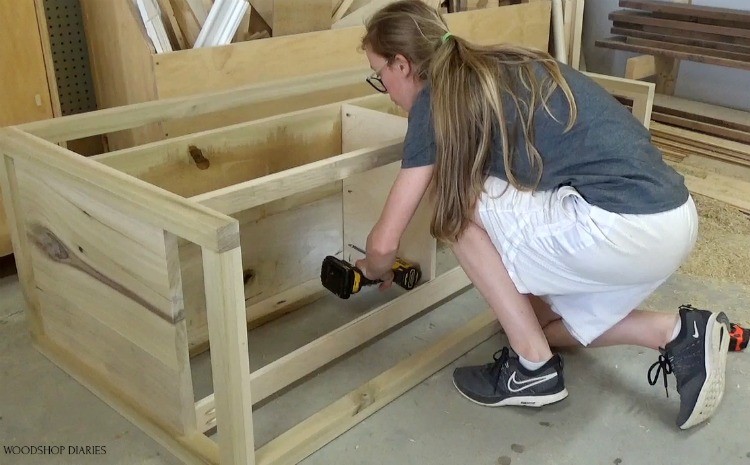
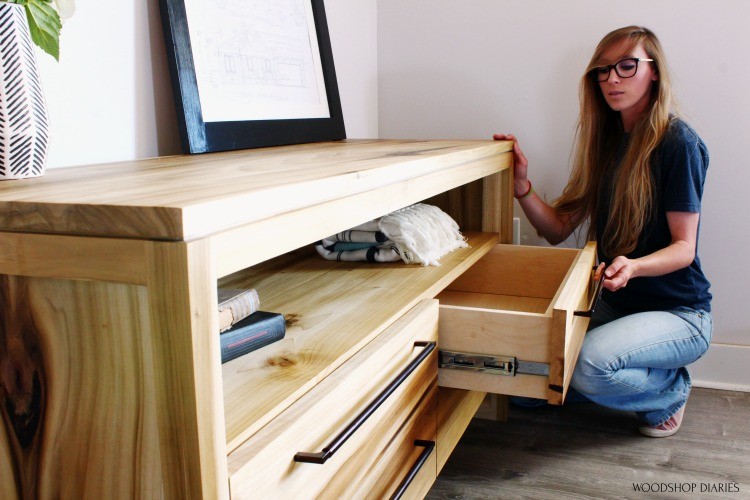
Step 5: Install Dresser Drawer Slides and Boxes
Now it was time to add the slides. I installed four pair of ball bearing slides (I buy the ten pack, because it’s cheaper) into the dresser. I’ve got an entire post on how to install drawer slides and drawer boxes here.
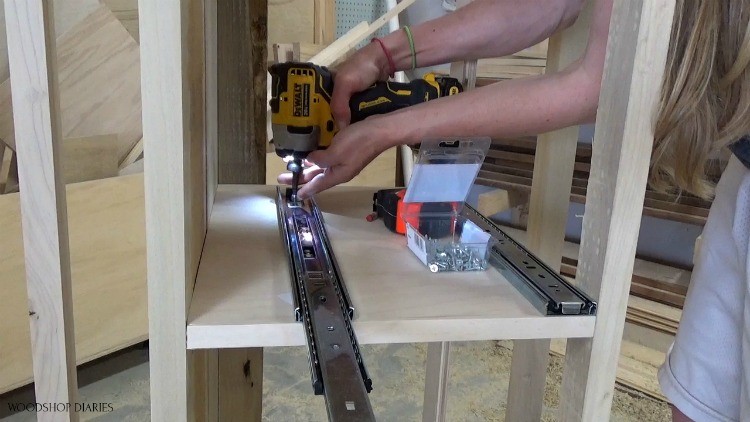
Once the slides were in place, I moved on to building the drawers. If you’ve noticed in past projects, I like to build my drawers from ¾” plywood, so I ripped strips from my plywood sheet to make the drawers from. I have a post here about how I cut down my plywood sheets. I assembled the drawers using pocket holes and screws and using a ¼″ plywood bottom. I have a post here on exactly how I build drawer boxes.
Once the drawers were built, I installed them into the dresser. Again, I’ve got an entire post here on how to build drawer boxes and install them.

Step 6: Attach Dresser Drawer Fronts
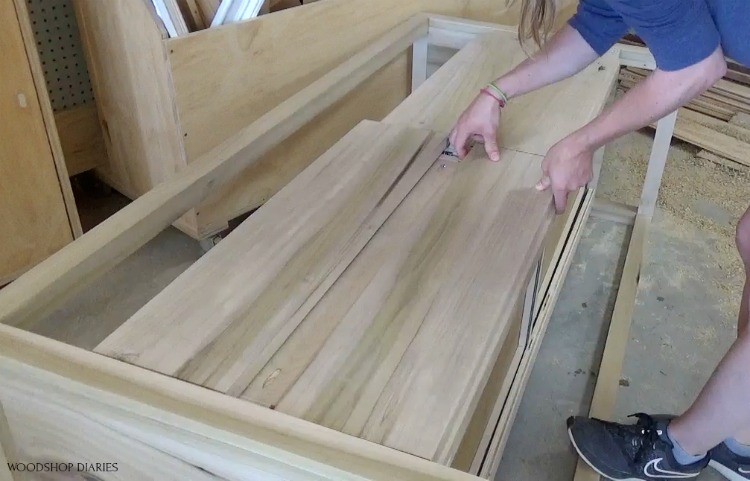
Now that the drawers are in, I was ready to add the drawer fronts. I had gotten one really wide board when I picked up my lumber. I thought it would look really cool to make these four fronts out of one board. It was about ½” narrower than I needed, but I ended up using it anyway.
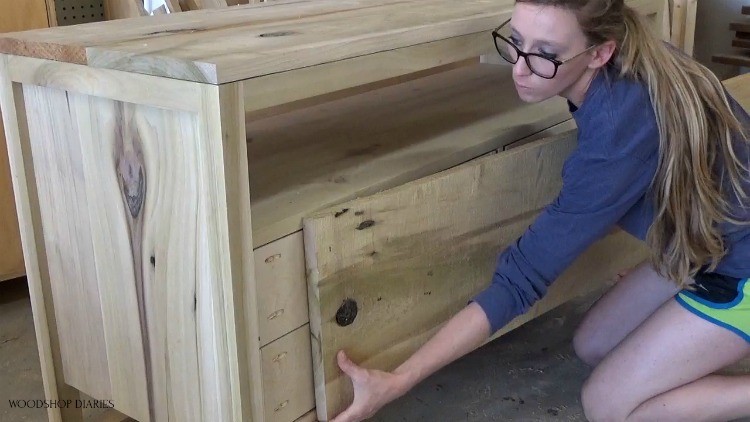
I thought the design element of the continuous grain fronts outweighed the fact that the drawer fronts wouldn’t come QUITE flush with the top of the shelf. Sometimes you compromise haha.
.
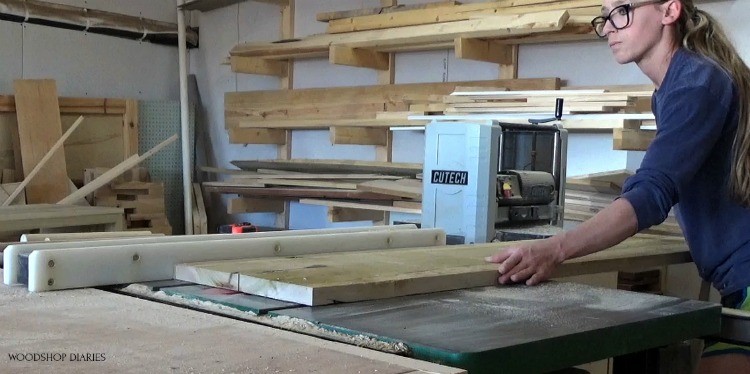
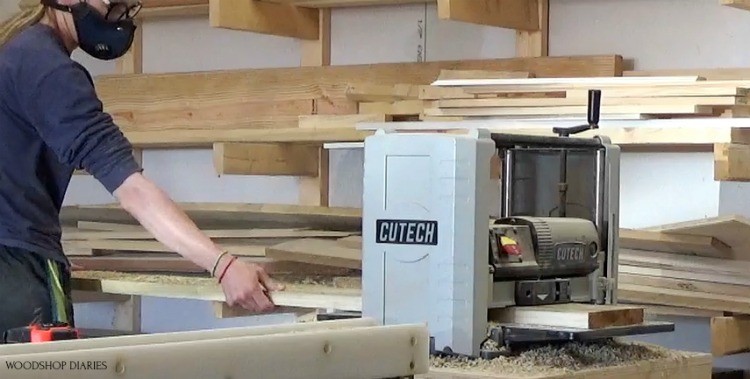
It was too wide to fit through the planer, so I ripped it first on the table saw into what would be the top drawer fronts and the bottom drawer fronts, then ran these boards through the planer.
Once they were cut down to size, I flipped the dresser on it’s back and screwed the fronts in place making sure to keep the grain matching up across the front.
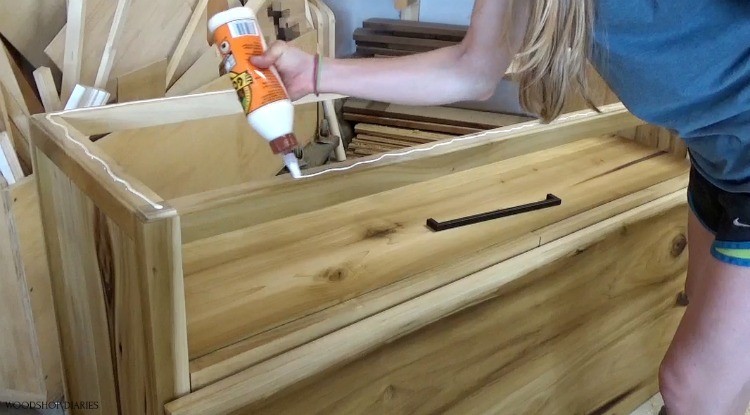
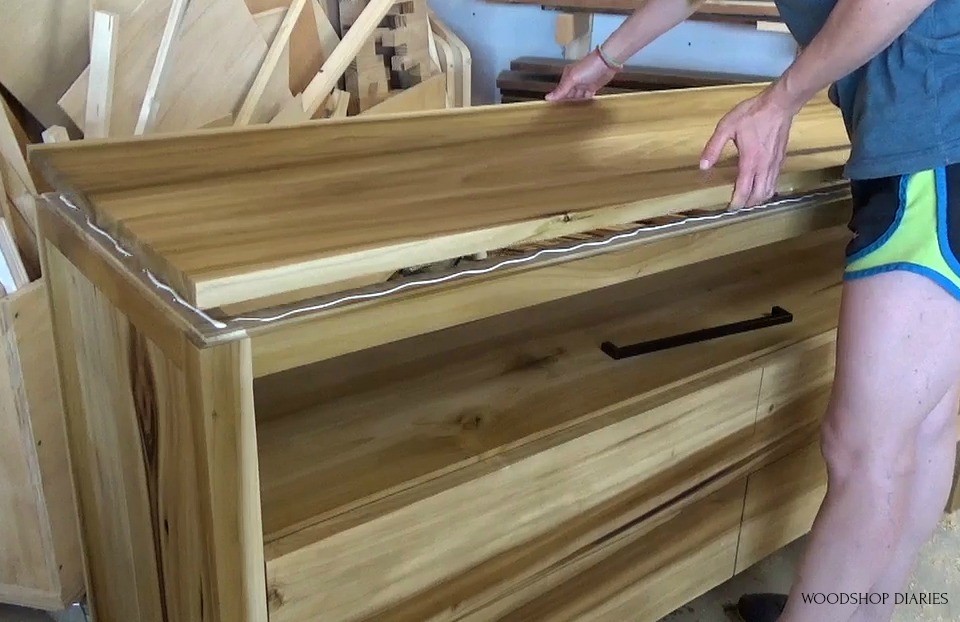
Step 7: Attach DIY Dresser Top
Then, if you remember on the last dresser, I used my router to cut a small rabbet along the top edge for a subtle little design detail. I did the same on this dresser, too. The nightstands, and both dressers have this little detail and I don’t know why, but I love it.
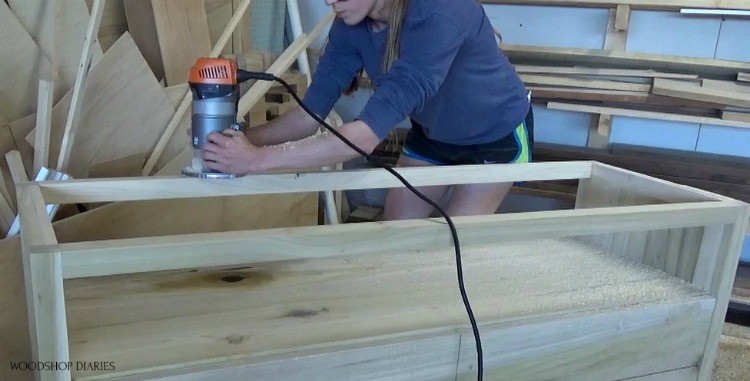
I glued up a top panel (here’s a post on how I glue up tops) to finish this up, and once the glue on the top was dry, I trimmed it down to fit the exact size of the dresser frame–so no overhang.
.
I finished both the dresser and the top with Walrus Oil Furniture Butter, then took them out to bake in the sun for a while.
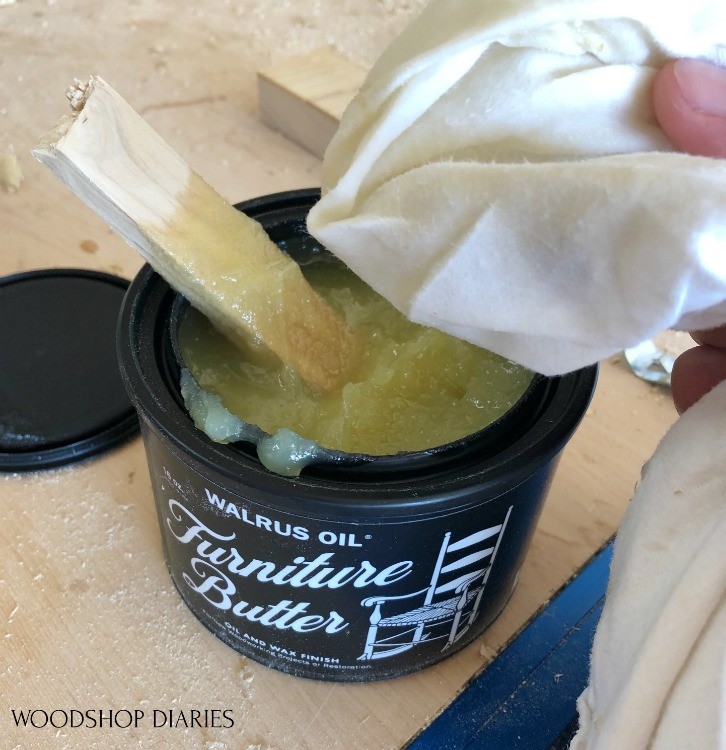
The poplar had a green tint to it once it was finished. If you didn’t already know, if your poplar is green, you can leave it in the sun for a couple hours to turn it more brown and give it a warmer tone.
.
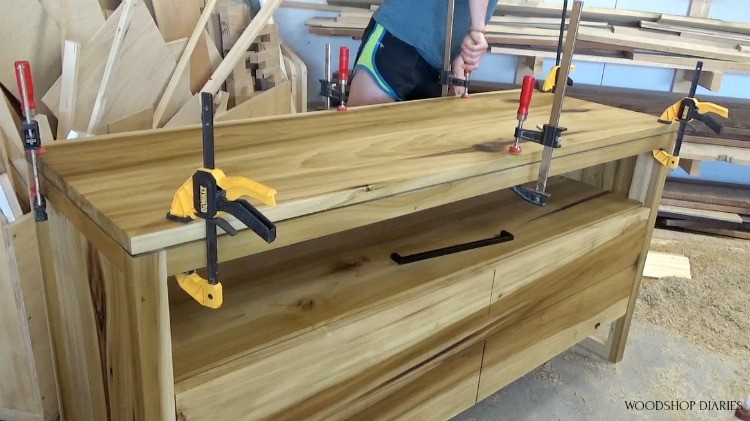
Then, just like the last dresser, I glued and clamped the top in place.
Again, I know this isn’t the “correct” way to do this because of potential issues with wood movement, BUT I’m taking my chances as my past experience doing it this way hasn’t caused any problems.
If you’re concerned about movement issues, you can attach using figure 8 tabs like I used on this table top.
I added these long modern pulls to match the same ones I used on my nightstands and just like that, DIY modern dresser number 2 was finished.
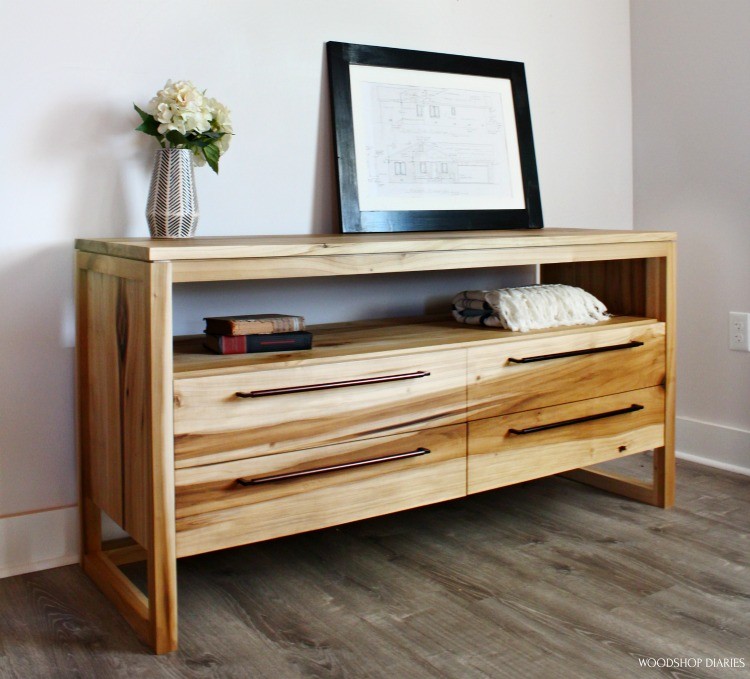
I love love love the open shelf here. BUT, if you wanted, you could definitely skip the shelf and add two more drawers instead.
This piece is the last piece in my modern bedroom set collection and I’ve put together a plan bundle for the set here.
You can also check out all the tutorials and videos on this page for the whole set, too.
I’ve got plenty more big builds coming soon, so be sure to subscribe below so you don’t miss out on all the upcoming shenanigans 😊 In the mean time, if you liked this DIY modern dresser build, be sure to pin this for later.
Until next time, happy building!