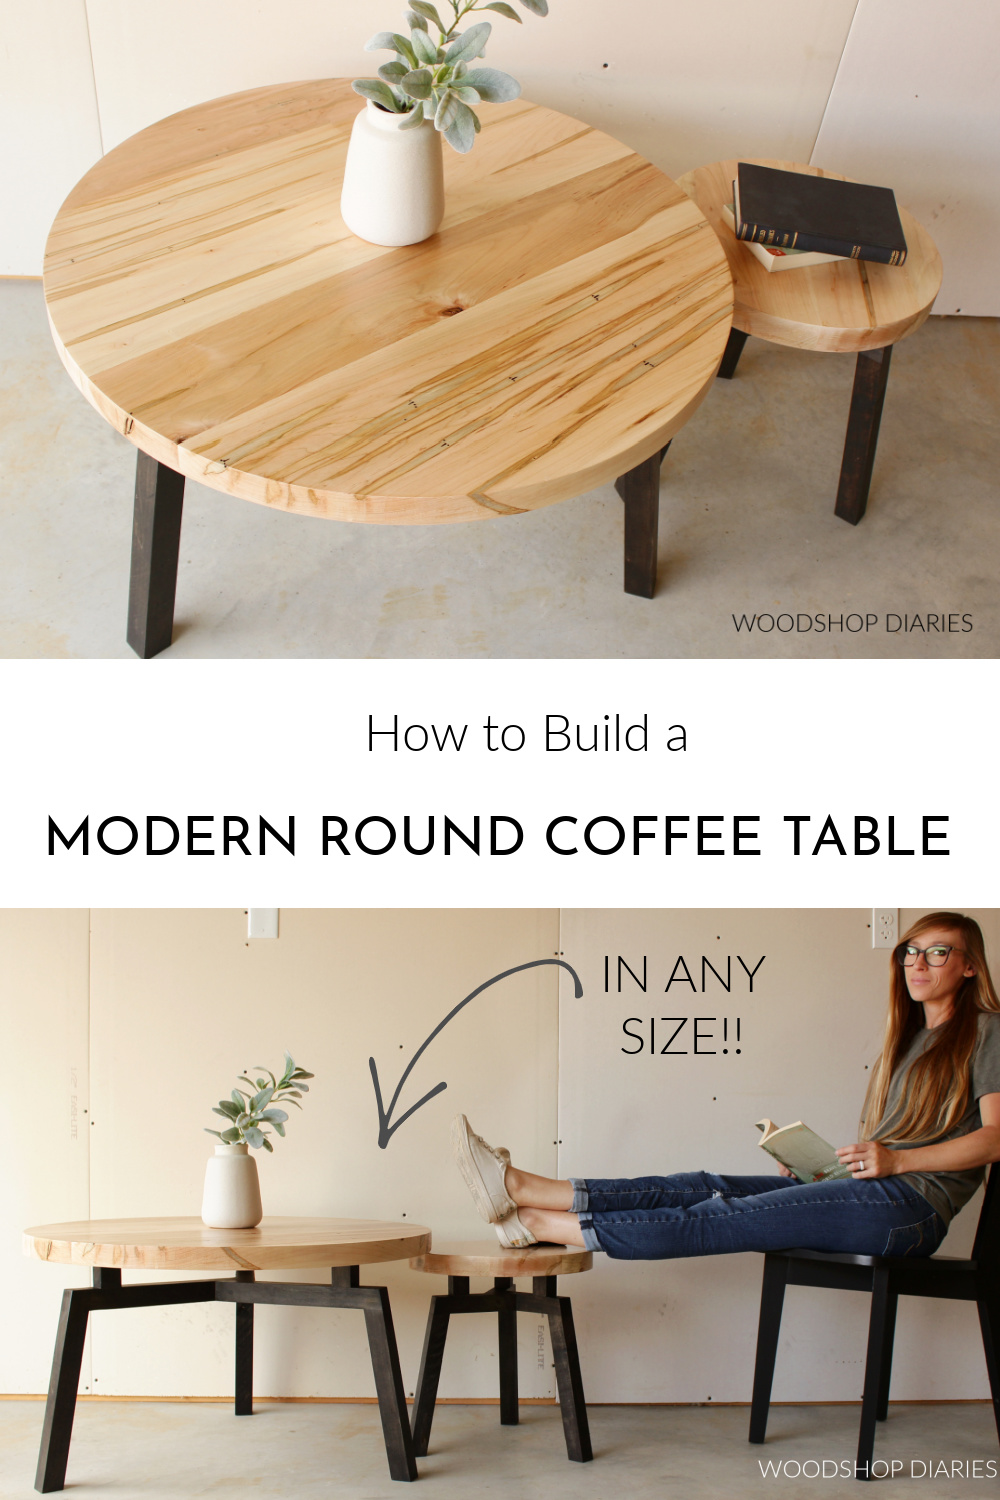
In this post, I’m sharing how to build a modern DIY round coffee table–in any size!

If you happened to see my last post on building a modern dining table, you may have seen that I recently purchased some maple to build that project with.
.
When I originally ordered the maple, I had intended on building that table differently–in a way that would have required more wood.
.
So when I changed my mind and built the table the way that I did, I had quite a bit of lumber left over that I had already paid for and I didn’t want it to go to waste.
.
So I decided to build myself a new round coffee table. Actually, TWO–I had just enough wood left to build two of these modern table designs in different sizes to make a “set.”
.
I’ve got step by step tutorial and plans below for this DIY round coffee table project plus a video (including how to make your own circle cutting jig!) here:
This post contains affiliate links. See website policies here.
Tools & Materials:
*Materials may vary depending on the size table you’re building.
Materials:
- (3) 2x8x8 boards (for the tops)
- (2) 2x2x8 boards (for the bases)
- 2 ½″ wood screws
- ⅝″ wood screws
- ⅜″ dowel (optional to plug screw holes)
- Figure 8 fasteners
- Wood Glue
- Ebony Stain
- Clear Poly
Tools:
- Miter Saw
- Table Saw (optional)
- Router (optional–can use a jig saw or band saw instead)
- Drill/Driver
- ⅜″ forstner bit (Optional–to countersink and plug screw holes)
- ⅝″ forstner bit (to install figure 8 fasteners)
- Large clamps to glue up top
- Sander(s)
- Flush cut saw (hand or oscillating)
Some Notes About the Round Coffee Table Build:
There are MULTIPLE ways to do almost every part of this project.
Options With This Build:
For example, you can use half laps OR simply use wood screws to attach the legs together. I’m sharing both ways in the video above (I used half laps for the larger table and screws for the smaller one), but in this post, I’m keeping it simple and showing the easiest way–using screws.
.
To cut the round table top, you can use a router and a circle jig–which will give you more accurate results. However, if you don’t have a router, you can definitely just use a jig saw or a band saw…or just cut a square or triangle and skip the circle altogether.
.
I used a ⅜″ forstner bit to drill out and plug my screw holes in this project. However, you could simply leave the screws exposed OR use putty to cover them over. That’s optional, too.
.
And lastly, I used figure 8 fasteners to attach this table top. There are LOTS of ways to attach it (simple screws, L brackets, etc), so if you prefer using another method, feel free to get creative.
Size Adjustments:
The table size is SUPER EASY to customize. To adjust the height, simply adjust the length of the legs in step 2.
.
To adjust the diameter of the top, simply adjust the length of the braces in step 1 and cut the size top you wish.
.
Take note that changing the size you build may change the amount of material you need to build. So adjust accordingly 🙂
.
I’m sharing below how I built mine 34″ diameter and about 19″ tall. That gives you a starting point and you can adjust your measurements as needed.
Some posts you may find helpful in this build:
- How to make your own 2x2s
- How to square board edges
- How to make a table top
- Basic Guide to Using a Router
- 5 Tips to Professional Looking DIY Furniture
- How to Finish Raw Wood Furniture
Step 1: Cut Center Coffee Table Braces
I began this project by determining the size table I wanted to make. In my case, my larger table was 34″ diameter. Once I knew the size I wanted the top, I could figure out what size to make the base.
.
The base of this table was made from 2x2s. You can purchase these precut or make your own 2x2s with this tutorial.
.
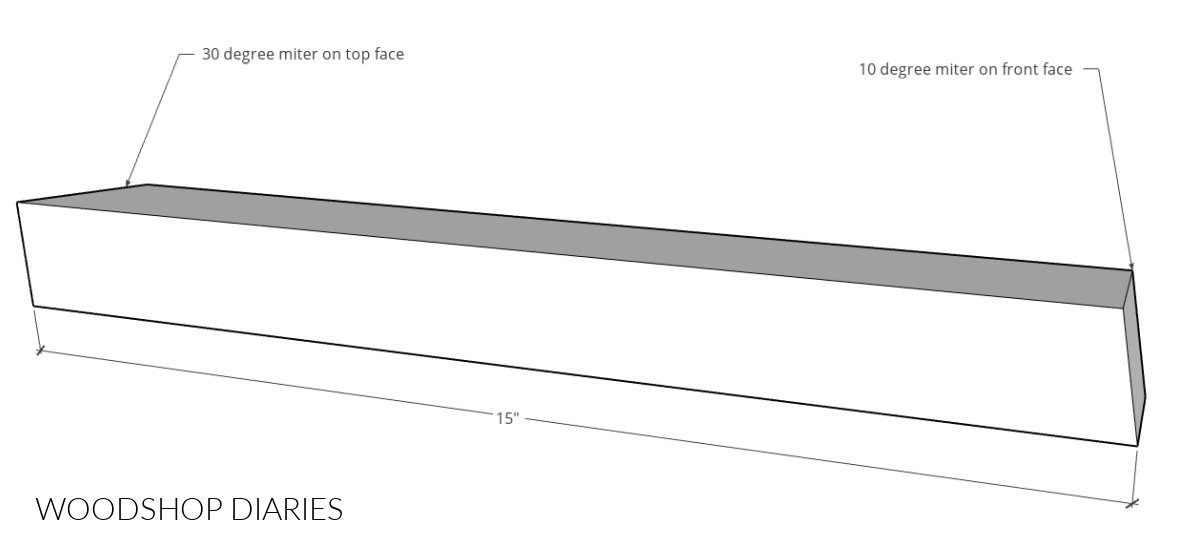
Based on my 34″ diameter top, I determined that the 2×2 braces that go between the table legs needed to be about 15″ long.
NOTE: Adjust this length ABOUT ½″ shorter for ever inch smaller you make your table table top and ½″ longer for every inch larger you make your table top. However, I don’t suggest making your table much larger than 36″.
.
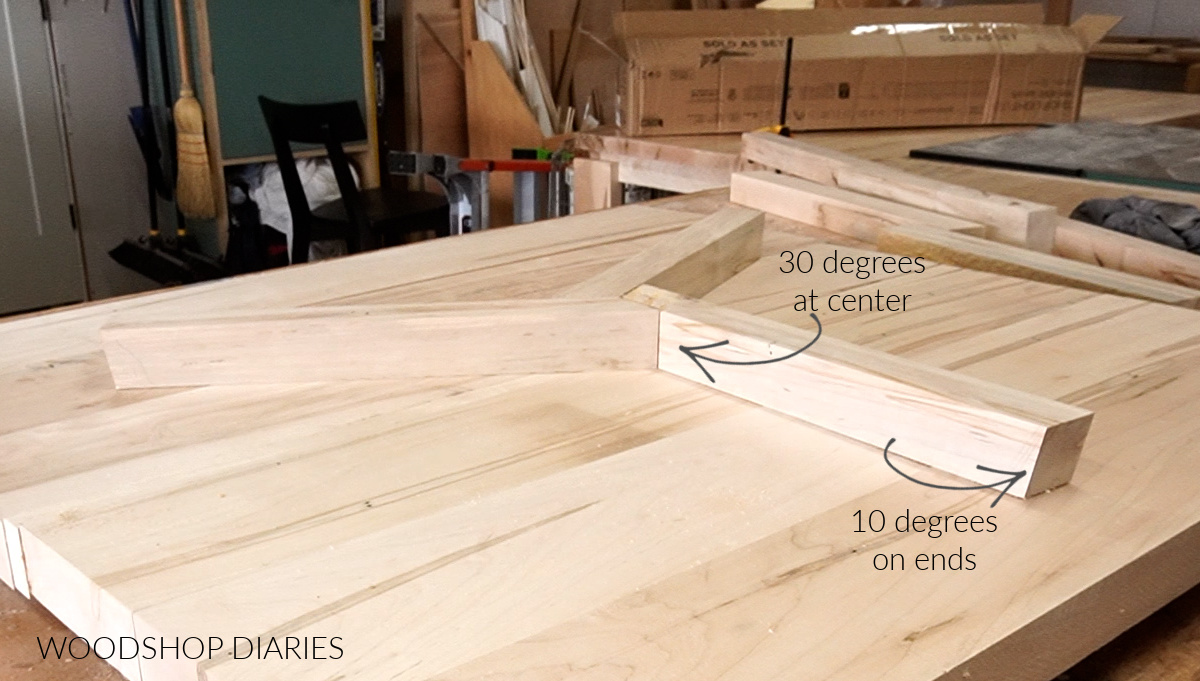
So, I cut three pieces of 2×2 about 15″ long, then used my miter saw to cut one end of each piece with a 30 degree miter. These ends will fit together in the center.
Then, I flipped these pieces 90 degrees and cut a 10 degree miter on the other end.
.
Note that the other end needs to be mitered so that the bottom is longer than the top (they’re laying upside down in the image below) and where the piece is rotated 90 degrees–these 30 and 10 degrees miters are not mitered on the same plane.
Step 2: Cut Coffee Table Legs
Once these center brace pieces were cut, I cut three more 2x2s with ends mitered 10 degrees parallel to each other for the legs.
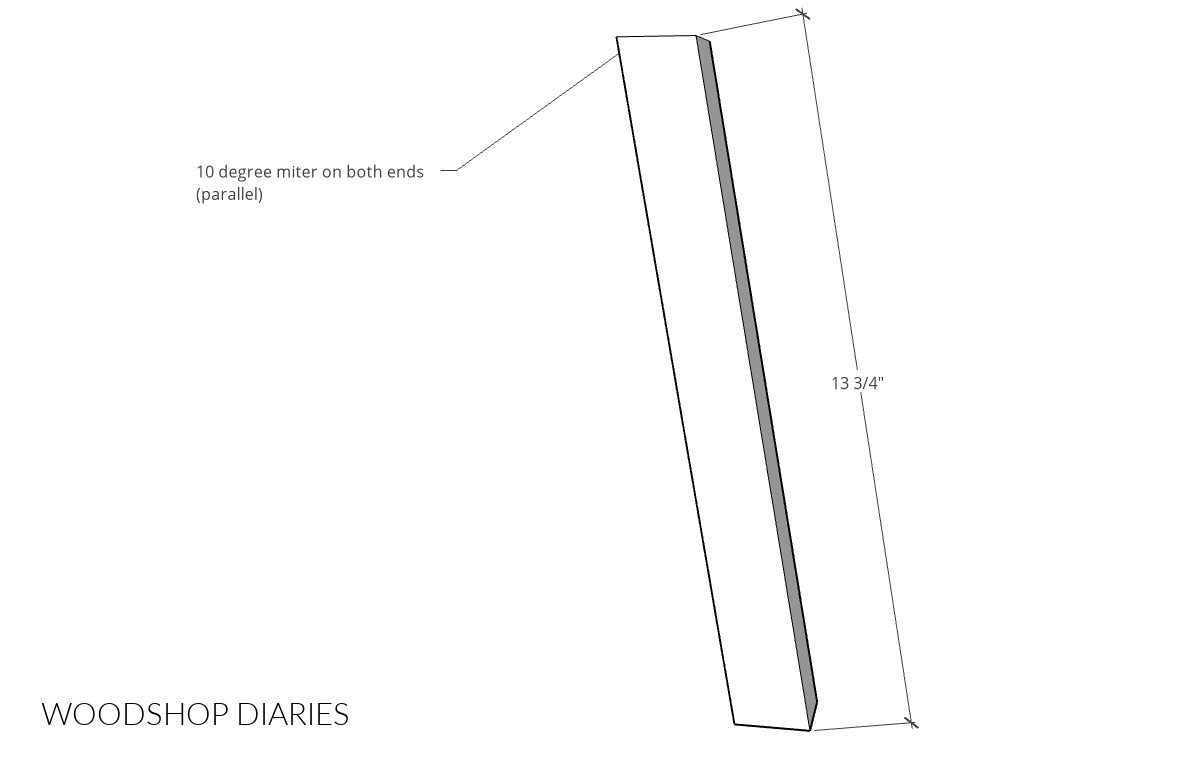
You can make these as long or as short as you need to make your table as short or as tall as you wish. For a table 19″ tall, these should be about 13 ¾″ long. Adjust shorter for a shorter table and longer for a taller table.
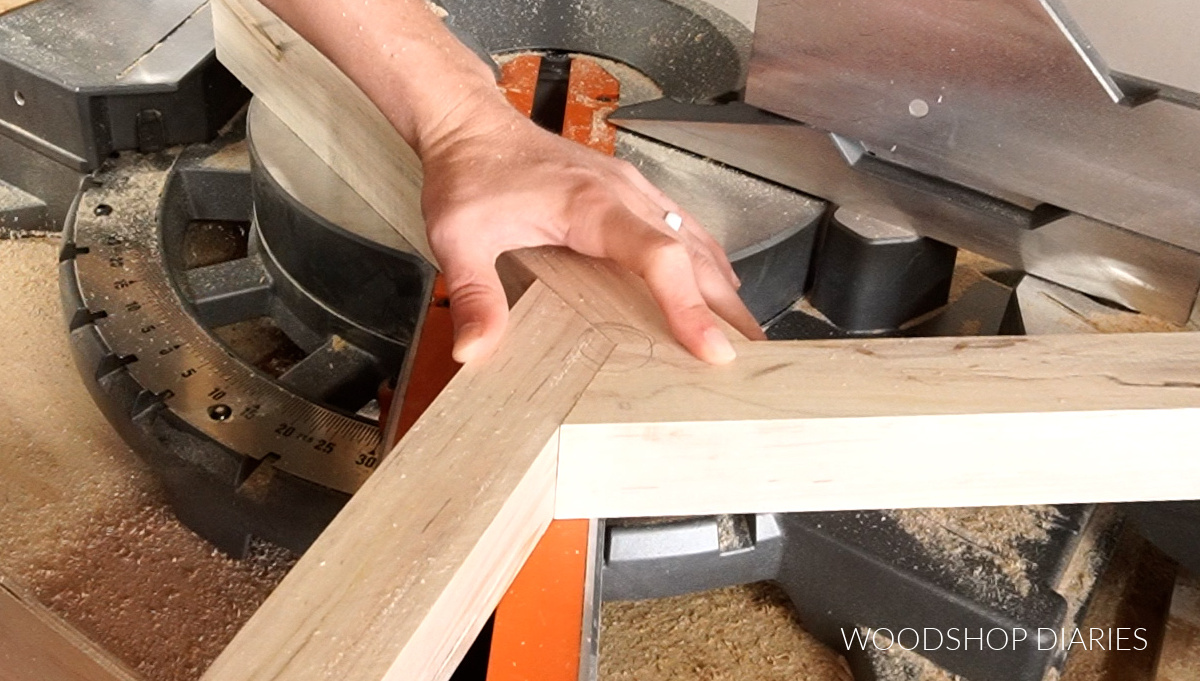
Step 3: Assemble Center Braces to Table Legs
To assemble these pieces together on the larger coffee table, I used half laps. I share that in detail in the video if you want to see that method.
.
NOTE: To use half laps, you’d need to make your table legs in step 2 about 1 ½″ longer since it would overlap the brace piece instead of sit underneath it.
.
Half laps are a great method to use for this, but they are a little more involved and time consuming.
.
So in this post, I’m sharing how to do this using just wood glue and screws. This is the method I used to build the smaller coffee table. (Both ways worked fine.)
.
First, I used a ⅜” forstener bit in the top of the brace piece to drill out a small hole (about ⅜″ deep) to plug later with a dowel to hide the screw. (If you don’t mind seeing the screw or using putty instead, you can skip that part.)
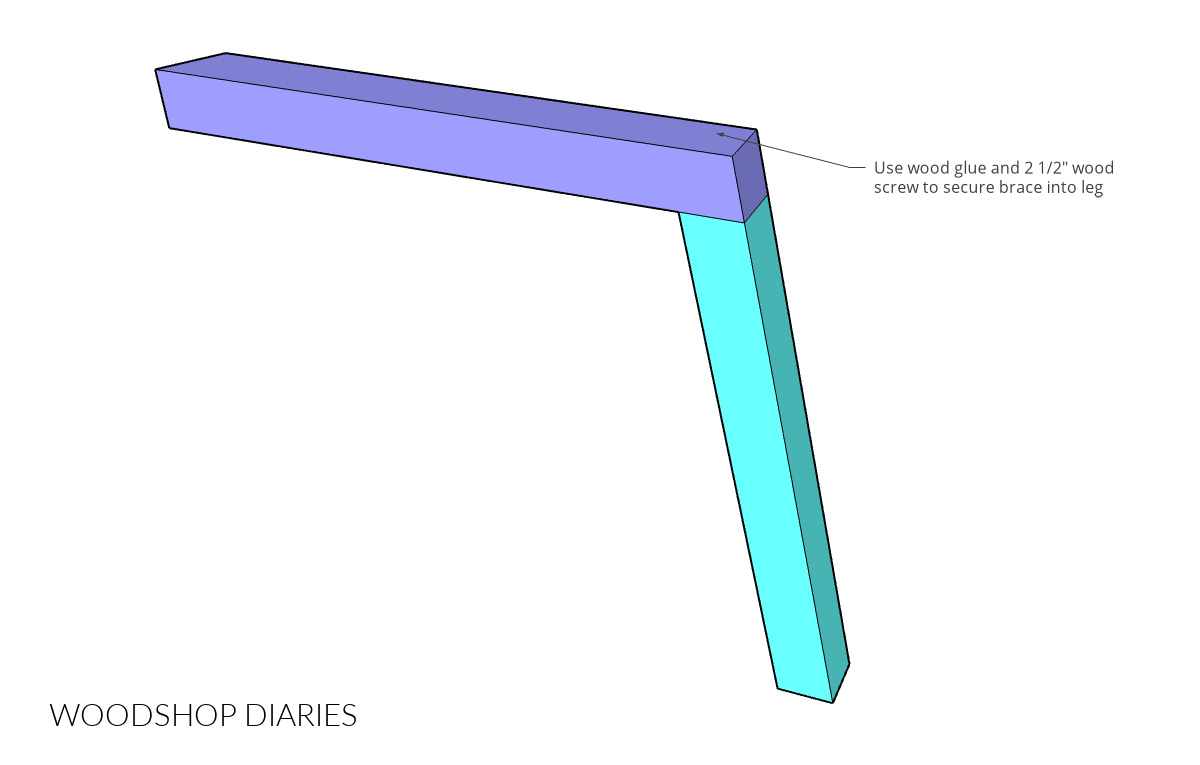
Then I predrilled through this hole and into the leg before driving the screw. Predrilling helps prevent the wood from splitting.
.
I used plenty of wood glue, and a 2 ½” long screw through this hole to attach these pieces.
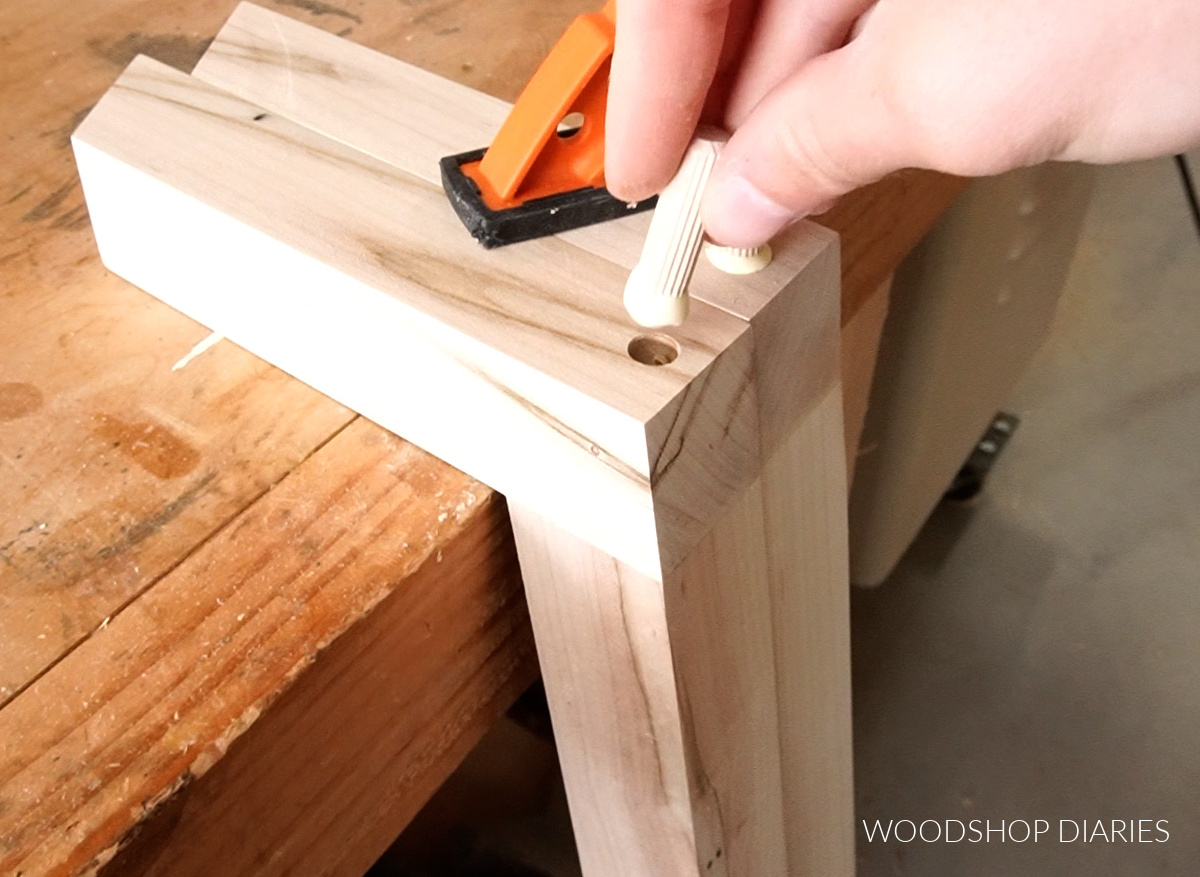
Then, I used some wood glue and ⅜” dowels to plug the screw holes and once these were dry, I just trimmed them off with a flush cut blade on an oscillating saw (you can use a hand saw as well).
Step 4: Attach Coffee Table Legs in Center
I attached the three leg pieces in the center using wood glue and screws. I laid the screws out here to get a visual of their locations.

This process was similar to how I screwed the legs together. I used a ⅜″ forstner bit to drill out a hole about ⅜″ deep to plug once the screw is in, predrilled the hole, and then drove 2 ½” screws to attach.
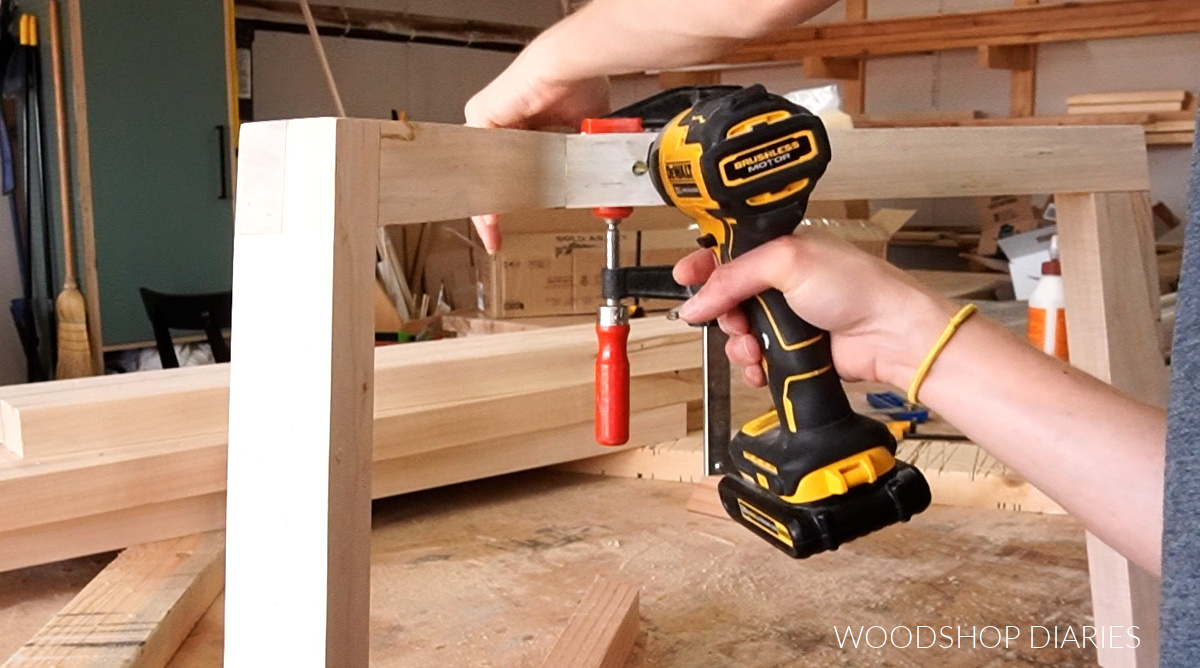
I used a generous amount of wood glue at each joint and once all three screws were in, I plugged these holes with glue and ⅜” dowels. Once the glue was dry, I flush cut these plugs and sanded smooth.
Step 5: Add Risers to Coffee Table Base
The last part of the base of this coffee table was the—what I’m going to call—risers. I just cut three pieces of 2×2 about 2 ½” long and glued these on top of each leg about 2 ½” from the edge.
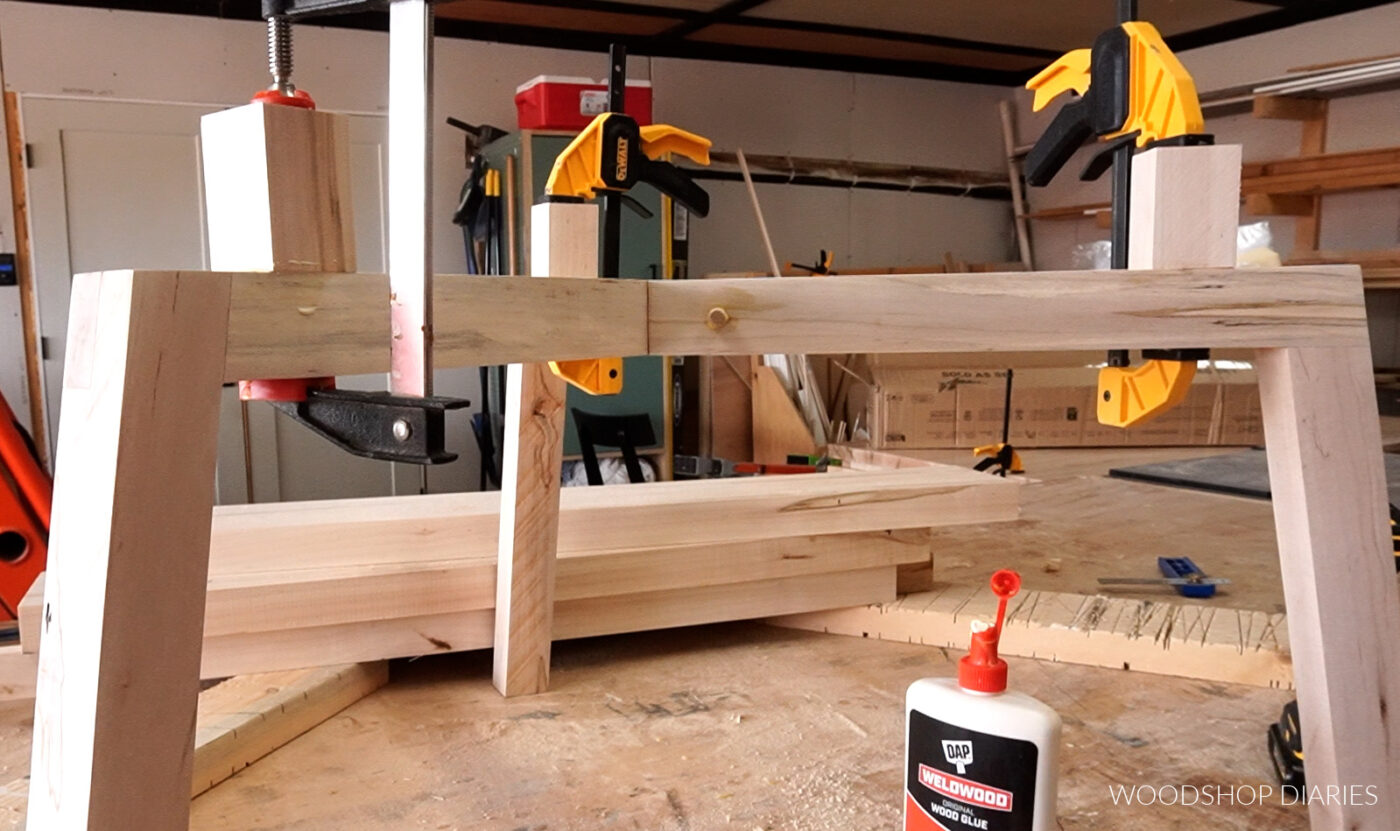
Once the glue was dry, I flipped this over and added a 2 ½″ screw through the bottom for extra security.
With the base complete, I gave it a final sanding and applied some ebony black stain to the base. You could paint, stain, leave natural, whatever, but I wanted some contrast so I went with a black base.
Step 6: Glue Up Table Top
I built this table top by gluing up whatever boards I had leftover from my dining table build, so they varied in size. However, you can glue up 5 pieces of 2×8 (which are 7 ¼″ wide) to make a 34″ diameter table.
.
NOTE: If you purchase 8 foot boards, you will cut 34″ long pieces and be left with a short piece. Glue the short piece on the end–the outside of the circle won’t need to be as long.
.
You can use a combination of whatever size boards you wish to make whatever size top you’re going for.
RELATED: Check out my tutorial here for how to make a table top.
.
I ran these boards through the table saw to just barely rip a little off the edges to give me a nice, smooth, square surface for gluing. You can do this with a circular saw and straight edge, table saw, or jointer.
.
OR, you can leave edges as is if you prefer.
RELATED: Learn about why it’s important to square off table top edges here.
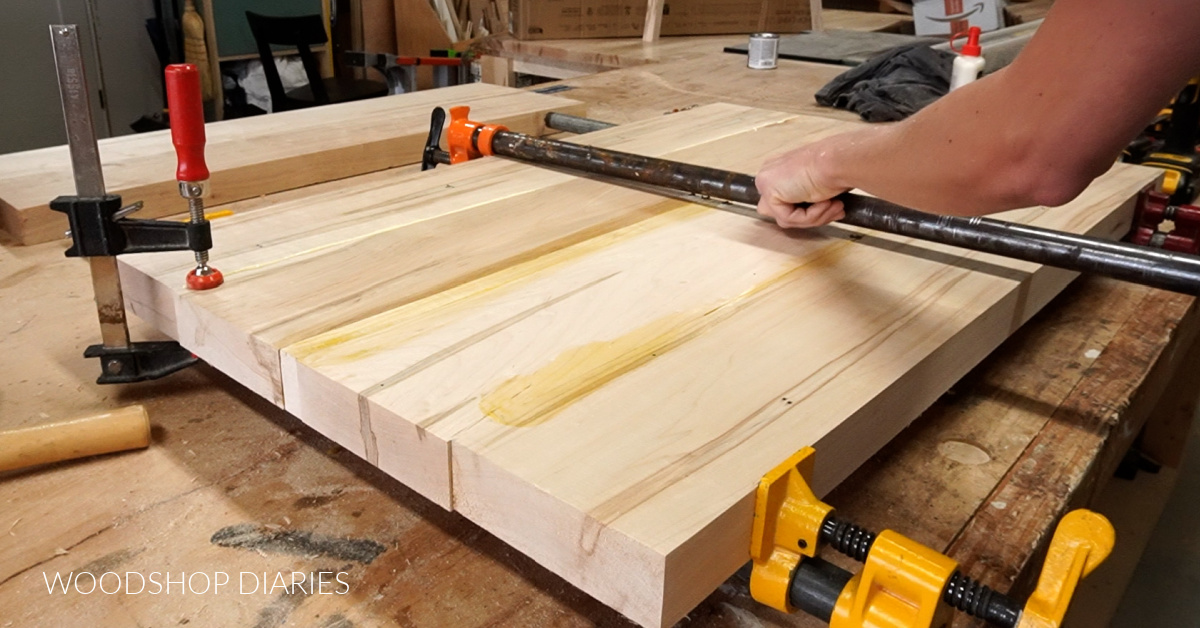
I glued up these pieces in sections adding one board at a time just like when I glued up my table top in the last project.
.
You could use dowels, dominoes or biscuits if you wanted, but I just used glue.
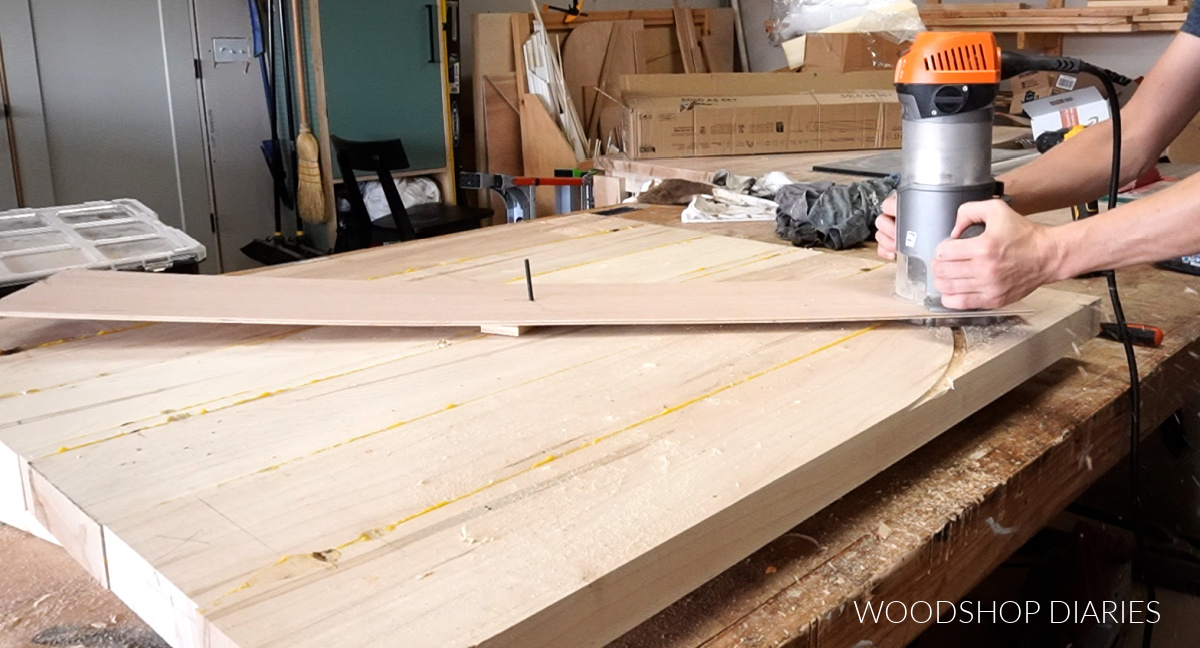
Step 7: Cut Round Coffee Table Top
Once the glue was dry on the top, I removed it from the clamps, flipped it top side down, and found the center of the panel.
.
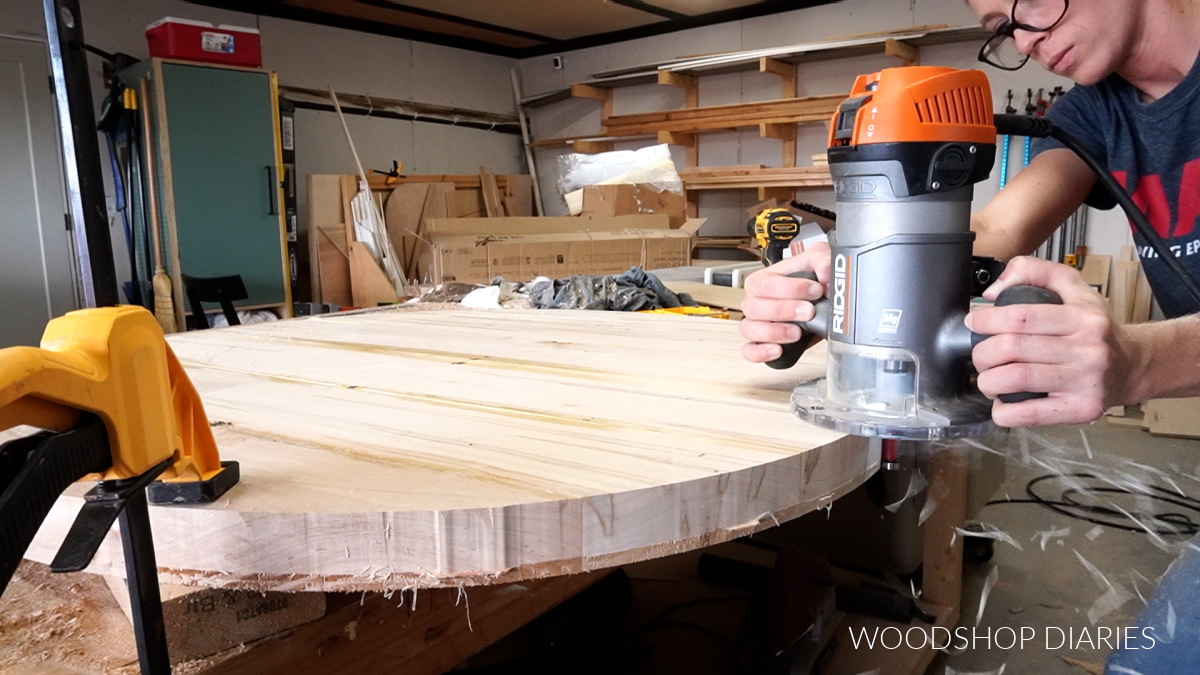
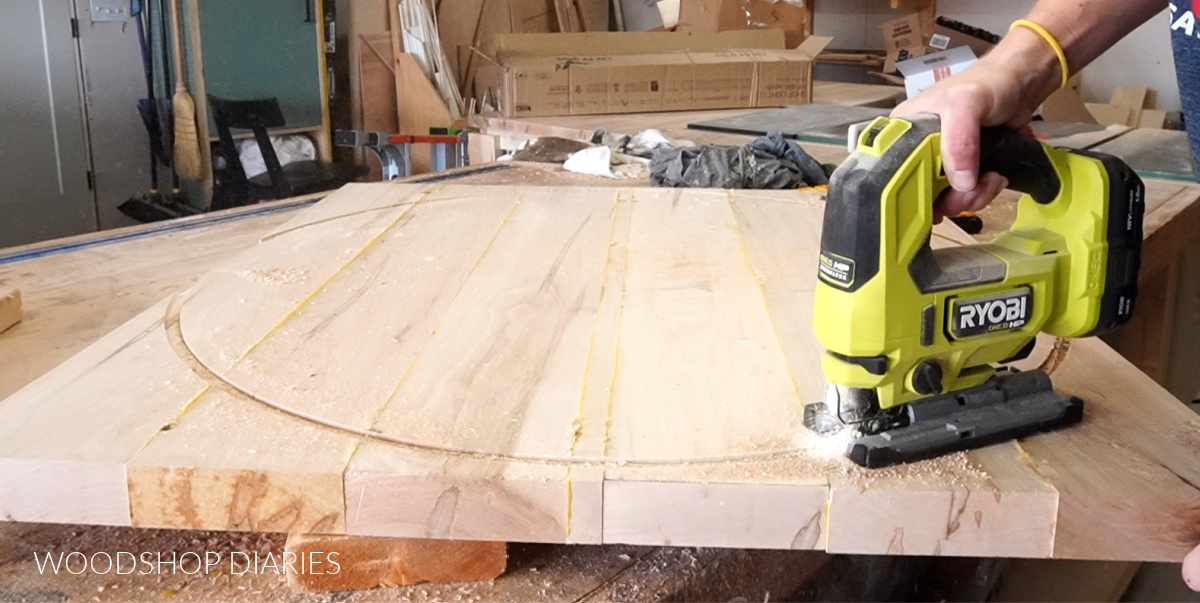
Now, there are a lot of ways to cut out a circle. You could use a band saw, a jig saw, even a table saw if you’re brave, but I used a straight bit in my router with a homemade circle jig.
Router Option:
The jig is SUPER easy to make–check out the video for more details. It’s just a piece of ¼″ plywood attached to the bottom of my router base.
RELATED: Check out this Basic Guide to Using a Router
.
I measured and drilled a small hole half the diameter of the circle I wanted to cut from the router bit. In this case, the circle was going to be about 34” diameter, so I marked 17” from the bit and drilled my hole.
.
I placed this hole on the center mark of the table top panel and drilled the bit about halfway through the wood. Don’t drill all the way through…since this is the bottom side of the table, this hole won’t matter.
.
I left the drill bit in place, but removed the plywood to adjust my router cut depth to about ¼”. I also put a piece of ½” plywood under the jig to try to keep the plywood on the same plane since the router base plate was about ½” thick.
Then, I proceeded to cut out my circle going counterclockwise. Once one pass was done, I could have dropped the router depth another ¼″ and continued making deeper passes until I was all the way through. That would work just fine.
.
But, I used a jig saw to cut off the edges, then used a flush bit in my router to cut the rest of the sides flush with the initial router cut.
Jig Saw or Band Saw Option:
If you don’t have a router, you can use a round object to trace a circle the size you want your top onto the panel or use a pencil with a string tied to the drill bit in the center to draw your circle out.
.
Then, use a jig or band saw to follow that line closely, but staying slightly to the outside of it. Once it’s cut out, you can sand the edges up to the line to get your circle.
However you decide to cut your circle is fine as long as it gets cut.
.
Once the edges were finished, I sanded it flat and smooth making sure to remove all the glue residue.
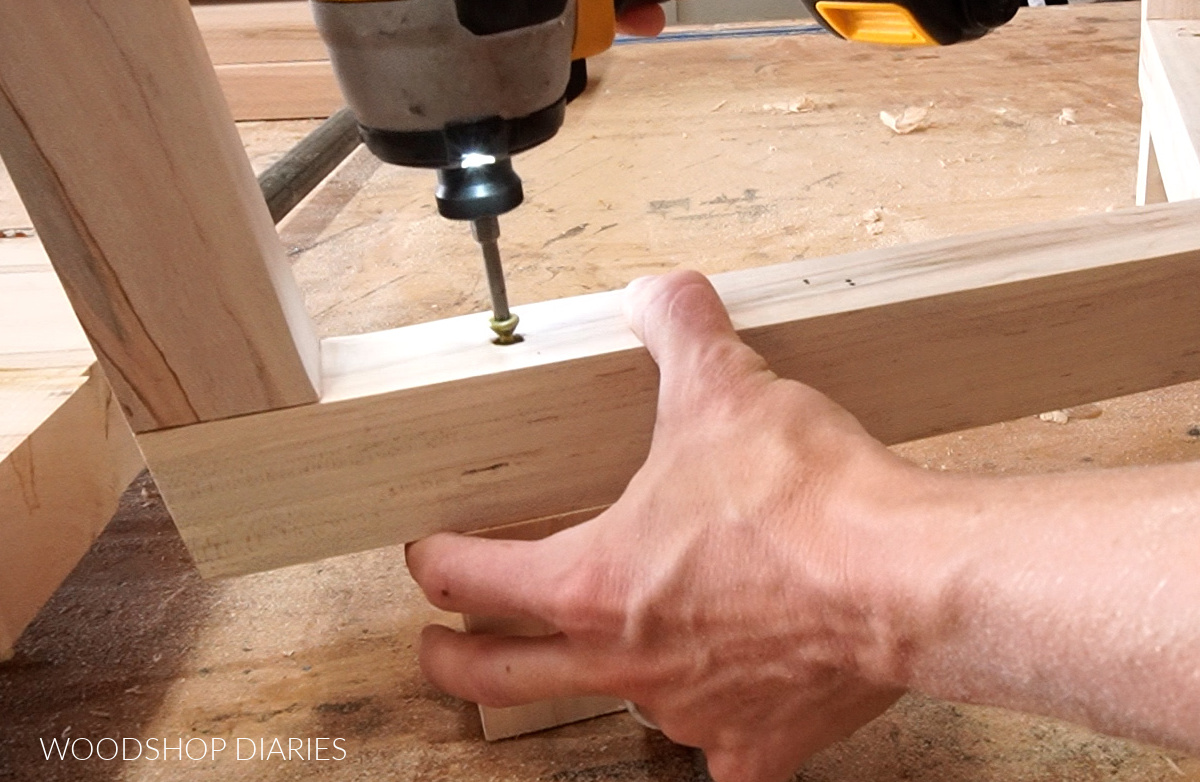
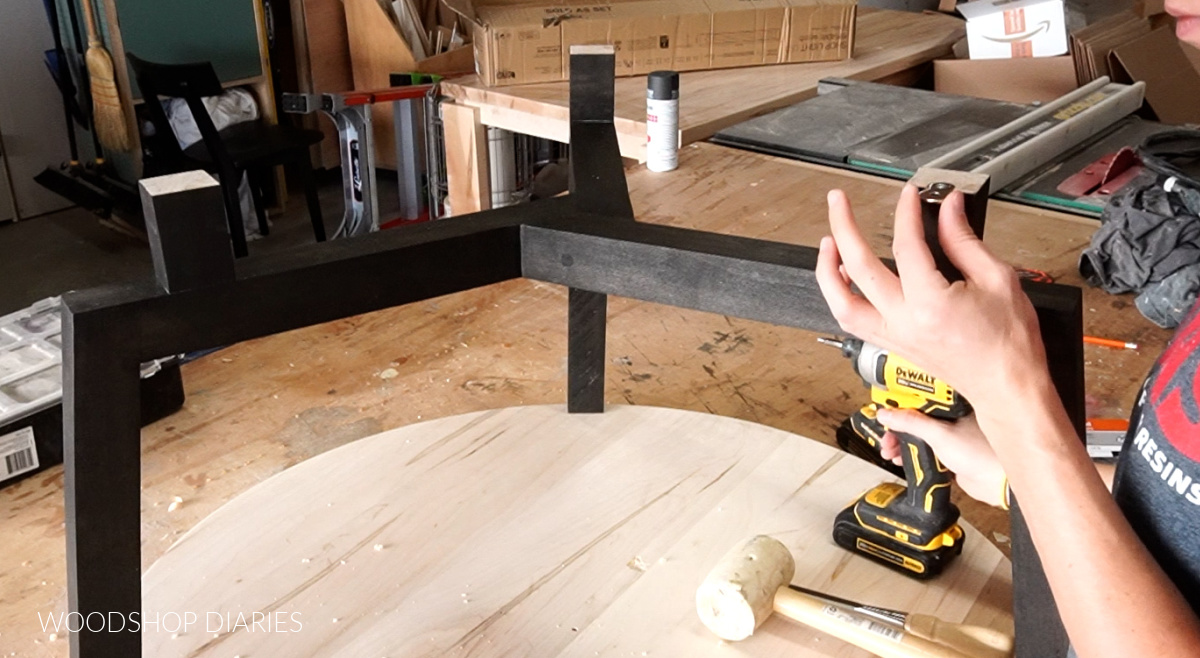
Step 8: Attach Base to Top
I attached these figure 8 tabs to the risers on each leg by drilling out a ⅝″ diameter hole just deep enough for the tab to sit down into flush.
RELATED: Check out these tabs used in this table top application for more information.
.
Because these tabs are supposed to be able to swivel back and forth, I used a chisel to remove the material on the sides of the hole, then screwed the tab in place with ⅝″ screws just tight enough that it can still swivel.
I did this on each riser. You could use a couple per riser if you wanted, but I felt like 3 was fine for me.
.
If you don’t want to use these fasteners, you could also use L-brackets, screws, or another method you feel comfortable with.
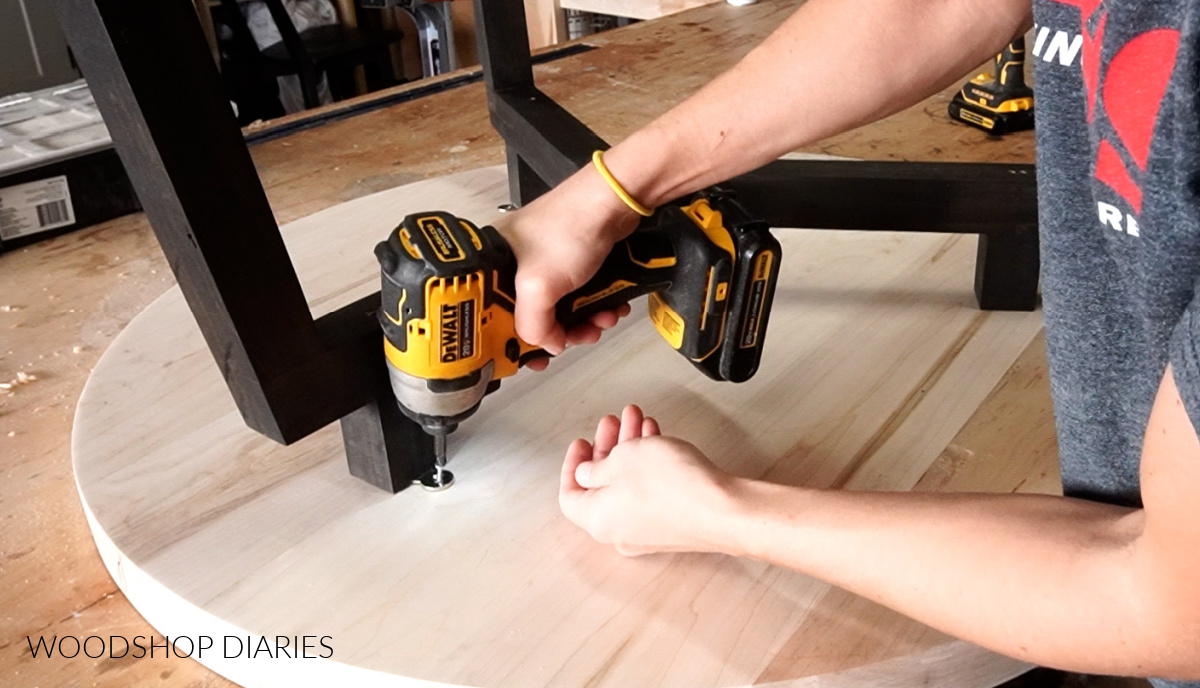
Then, I flipped the base over on the bottom of the round top, made sure it was centered, and screwed these tabs in with ⅝″ screws.
Step 9: Finish DIY Round Coffee Table
To finish up, I gave the entire table (including the legs and the underside) several coats of clear poly to seal it and sanded between each coat.
RELATED: How to finish raw wood furniture
.
I repeated all of this for the smaller table and then I sat down to enjoy them both. I really love this big and small table together…I may add a third one someday haha.

These are exactly what I wanted for our new living space—something simple, but modern, and they match the new dining table, and I didn’t was able to put that leftover maple to good use!
.
I really hope you guys enjoyed this DIY round coffee table project! Be sure to check out the video for more details if you’d like to build one of your own.
.
If you can’t wait to see what’s next, I’d love if you’d subscribe so you can stay up to date on all the latest projects and DIY tips!
If you want to save this for later, be sure to pin it!
Until next time, friends, happy building!