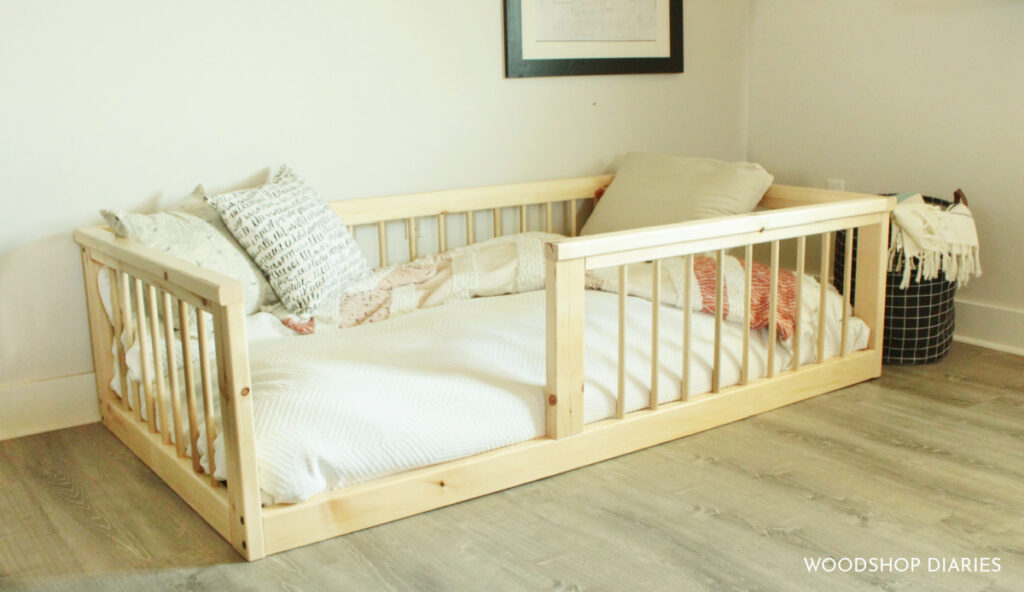
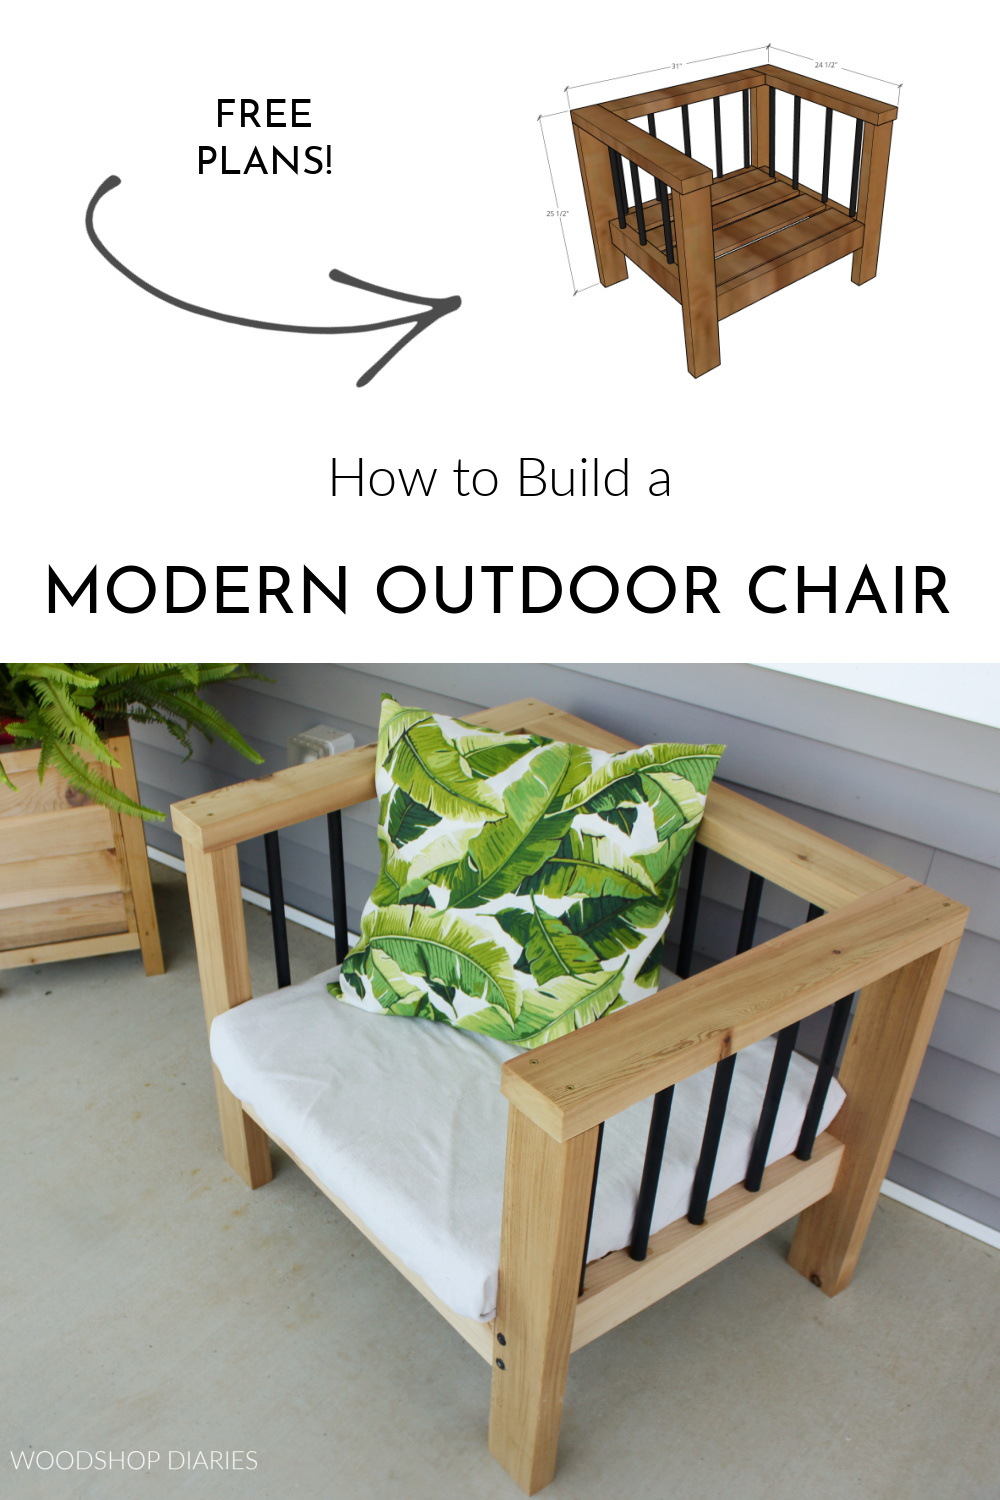
In this post, I’ll show you how to build this easy modern chair with dowel rails on the sides!
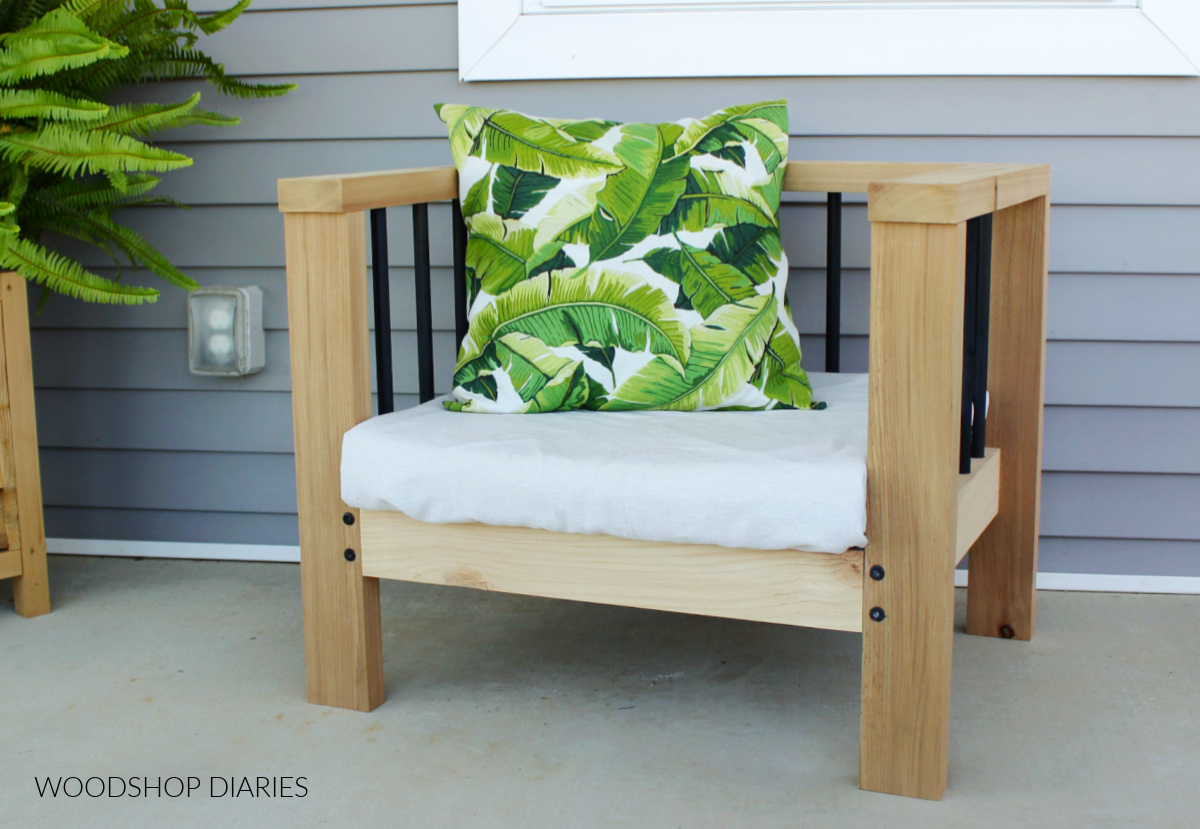
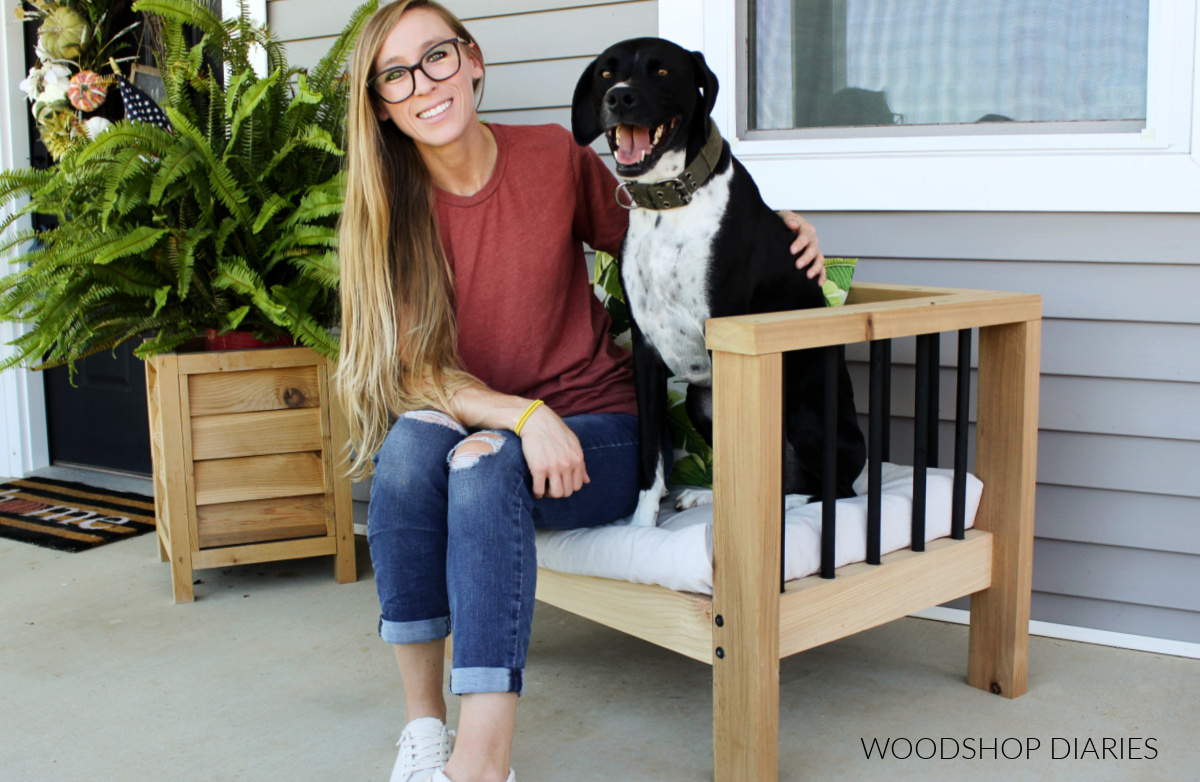
A while back I built some modern outdoor chairs that we’ve been using pretty much daily for the last several years. And when I say “we,” I mean mostly my dog, Lucy, as this is her favorite hangout spot while I’m working in the shop during the day.
.
Every spring I think “I really need to refinish these chairs” and every year I keep putting it off haha.
.
So, due my to neglect, they’ve started looking a little rough and I thought it might be time to spruce things up with a new chair for the porch. After all, Lucy deserves it 😉
.
I’m sharing FREE free plans for this simple outdoor chair build with diagrams, dimensions and details below, and I have a video tutorial here as well:
This post contains affiliate links. See website policies.
Tools & Materials:
Tools:
- Miter or Circular Saw (to cut pieces to length)
- Drill/Driver
- Pocket Hole Jig
- Table Saw (optional, but helpful)
- Kreg MultiMark (optional, but helpful)
- ¾″ forstner bit
Materials:
- (3) 2x4x8 boards
- (1) 1x6x8 board (tongue and groove 1x6s are usually cheaper and will work fine for this)
- (5) ¾″ diameter x 48″ long dowels
- Wood Glue
- 1 ¼″ & 2 ½″ wood screws (exterior grade)
- 2 ½″ exterior pocket hole screws
- 2 ⅞″ Timber Screws (optional)
- Black Spray Paint
- Outdoor Wood Finish
Some Notes About the Build:
Lumber:
Since I’ll be using this chair outside, I opted for cedar 2x4s and 1x6s since cedar is naturally rot resistant and holds up well for exterior projects.
.
I couldn’t find cedar dowels, so I used poplar dowels (pine dowels would also work fine) and will paint them to seal and protect them. This should help this chair last for years to come.
.
Hardware:
Also, since this is an outdoor chair, it’s important to use screws rated for exterior use so they don’t rust or corrode over time.
.
Cushions:
This seat sat comfortably, but was somewhat low to the ground. If you want to raise the seat, you can shorten the length of your dowels. Or, simply add a cushion.
.
You can check out this post to learn how to make an easy outdoor cushion and cover.
.
Size:
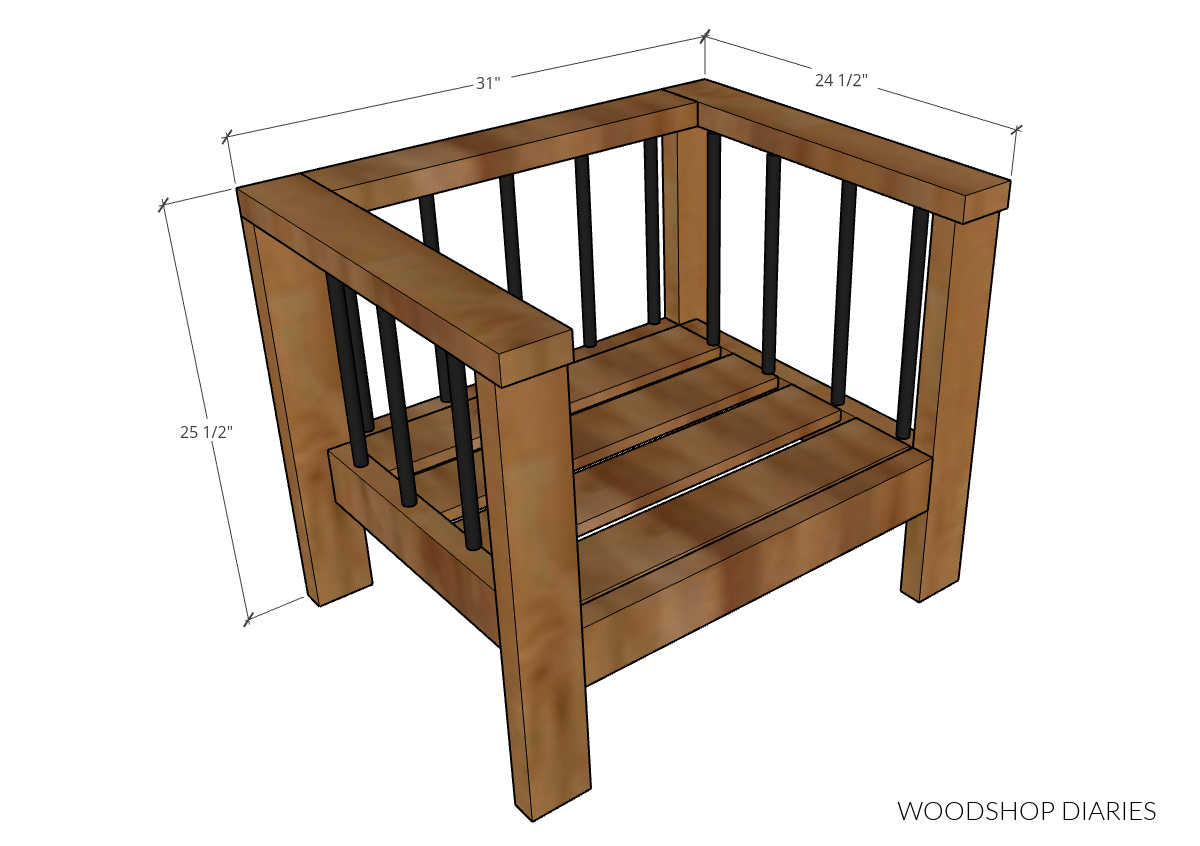
Overall project dimensions are 24 ½″ deep, 25 ½″ tall, and 31″ wide.
Step 1: Assemble Top Chair Frame
I assembled the top of the chair first. From my first 2×4, I cut three pieces like shown below to make the top chair frame.
.
I set the remaining piece of 2×4 from this board to the side to use in a later step.
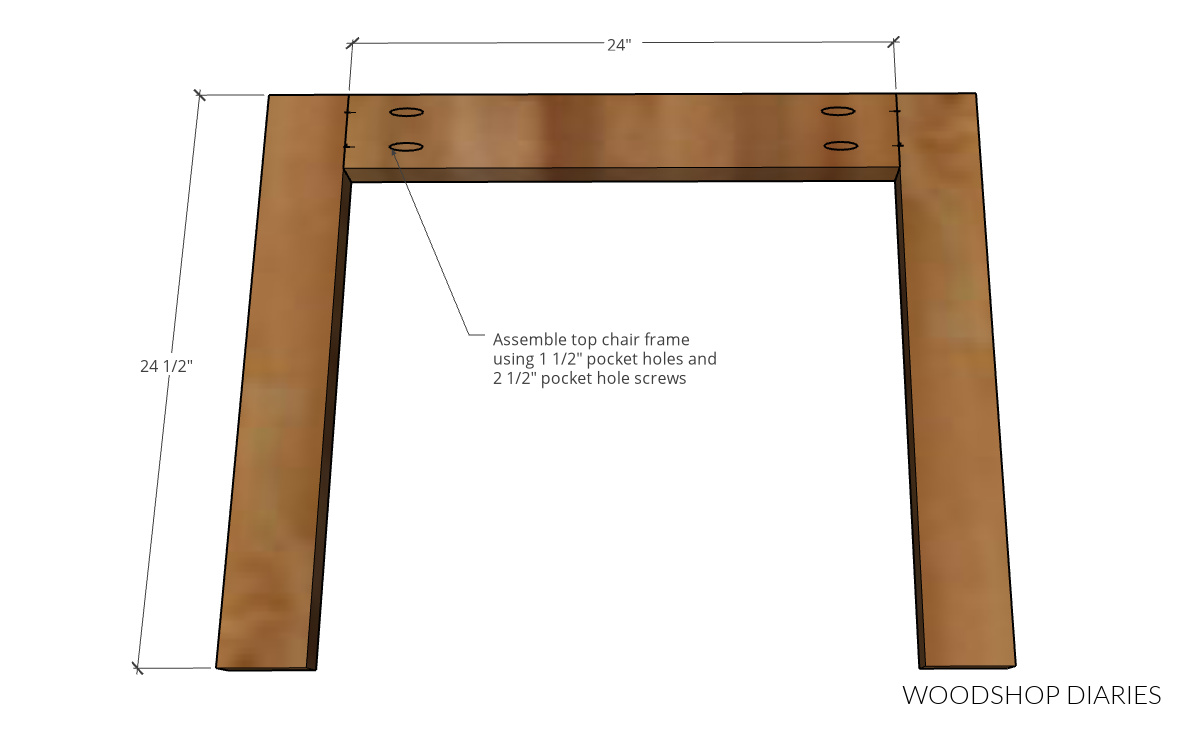
I assembled this “U” shaped frame using 1 ½″ pocket holes and 2 ½″ pocket hole screws.
RELATED: How to use a pocket hole jig
.
Since this is an outdoor chair, I used these Kreg Blue Kote screws since these are designed for use in pocket holes in exterior projects.
Step 2: Attach Legs to Top Chair Frame
Once this top frame was together, I used some 2 ½” exterior screws to attach the legs.
.
I cut these legs from my second 2×4 board.
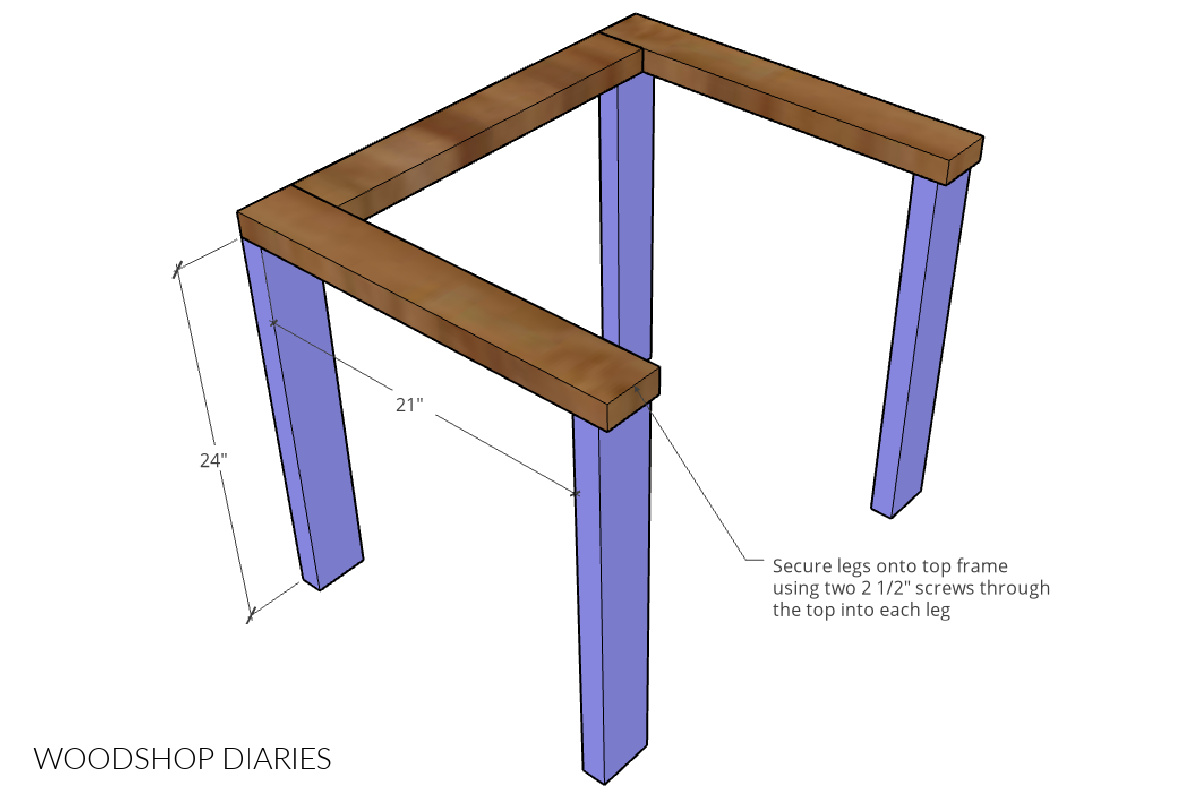
Helpful hint: Note that this diagram shows the legs at 24″ long. Due to the blade kerf from the cuts, in order to keep them all the same length, it might be best to cut them more like 23 ⅞″ so the last leg isn’t shorter than the rest.
.
I attached two legs at the back corners and I made sure to predrill the holes before driving the screws to prevent splitting the wood.
.
Then, I placed the front two legs 21″ from the back legs. I honestly don’t know why, but I thought it would be neat to let the arm rests overhang the front legs about ½” here as you can see. Feel free to make these flush instead if you prefer.
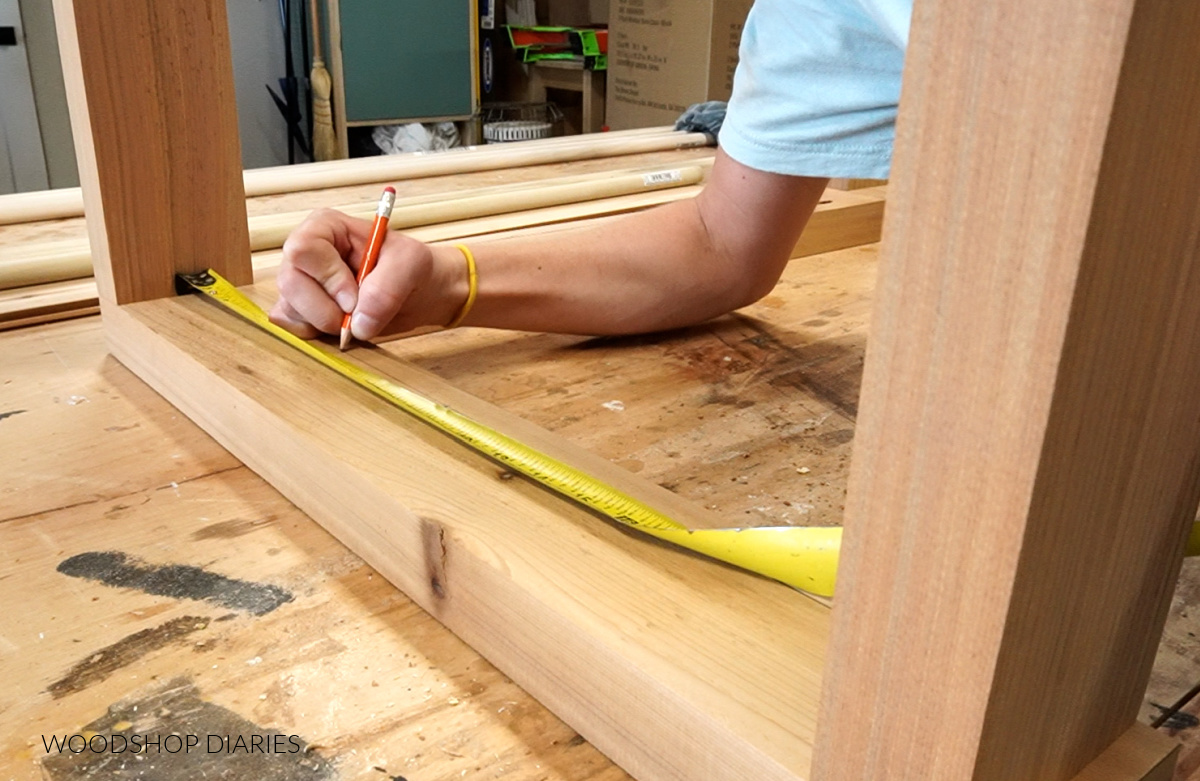
Step 3: Mark and Drill Dowel Holes for Chair Rails
After these legs were attached, it was time to move on to the fun stuff—adding the dowels.
.
I’ve actually added dowels to a few of my recent projects, so you may already know the drill here—no pun intended haha.
.
See more projects using dowels here:
But flipped this chair upside down on my work surface and used my Kreg multimark tool to mark a line ¾” in from the inside edge of the arm rests and along the back edge of the back rest.
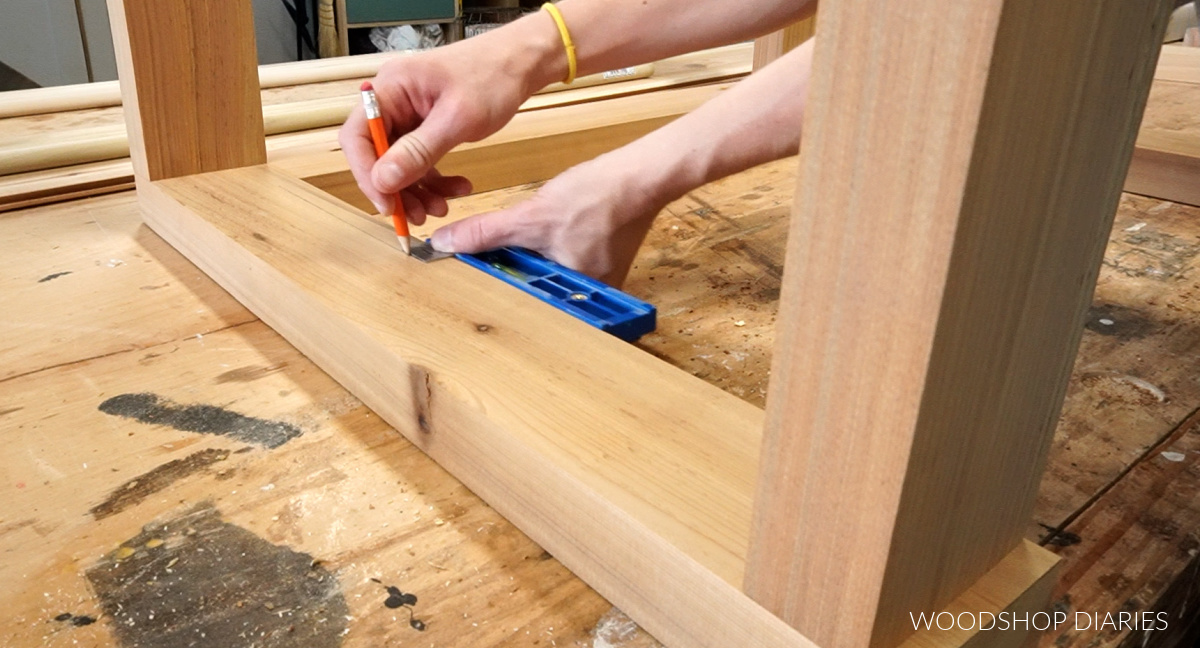
Then, I measured out 5 equally spaced marks along this line to add the dowels. You can space these however you wish and add as many as you wish. I just did five on each side and 5 on the back.
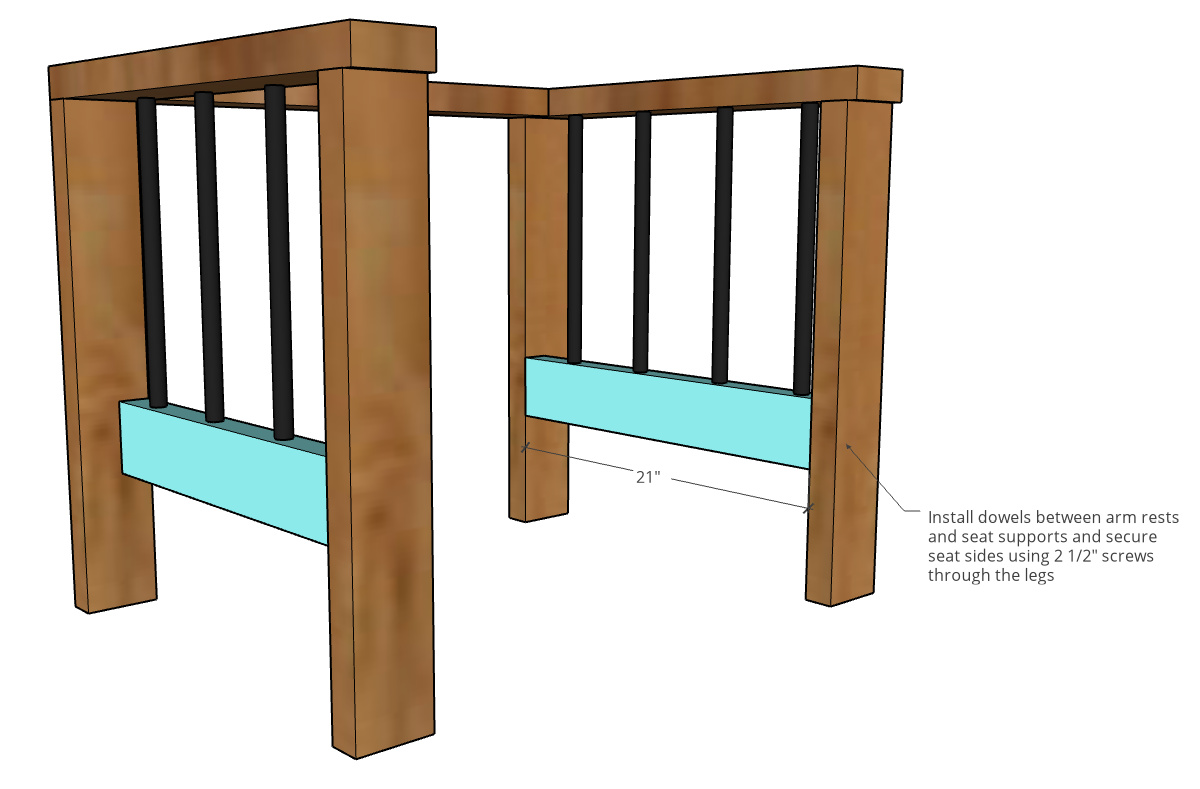
From my last 2×4 board, I cut two 24″ long pieces for the front and back of the seat and two 21″ long pieces for the sides of the seat.
.
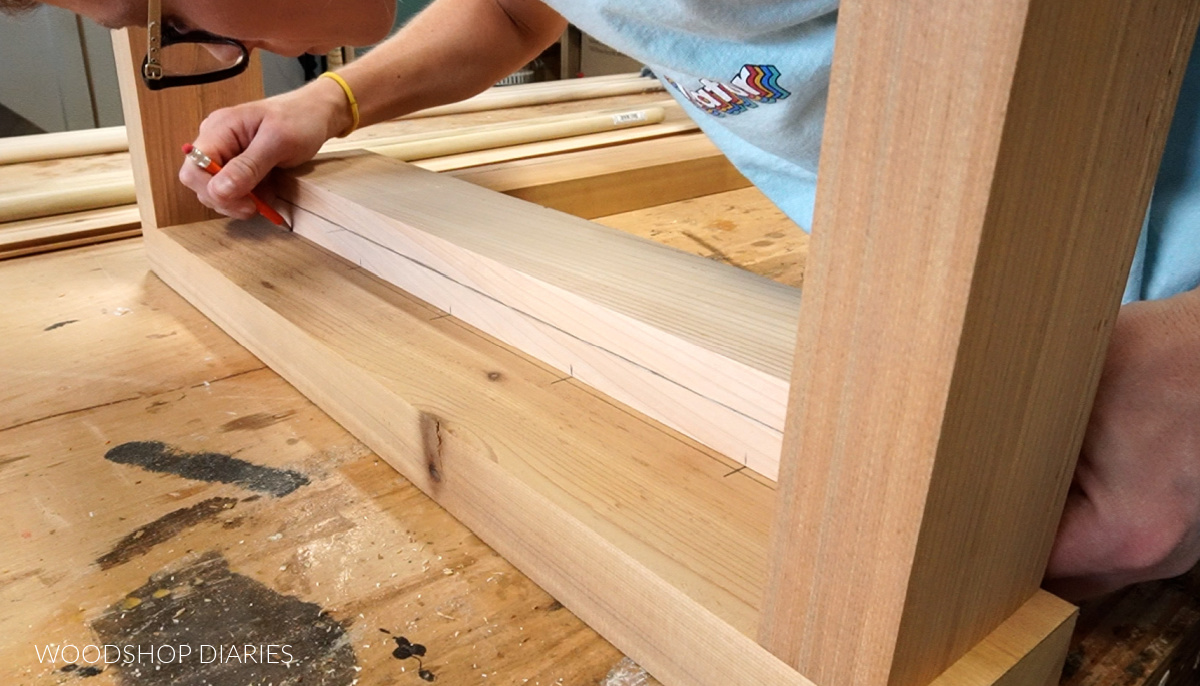
I transferred these marks from the top chair frame to the sides and back seat pieces so the dowel holes will be drilled at the same locations.
The front seat frame piece won’t need any holes drilled, so I left it alone.
.
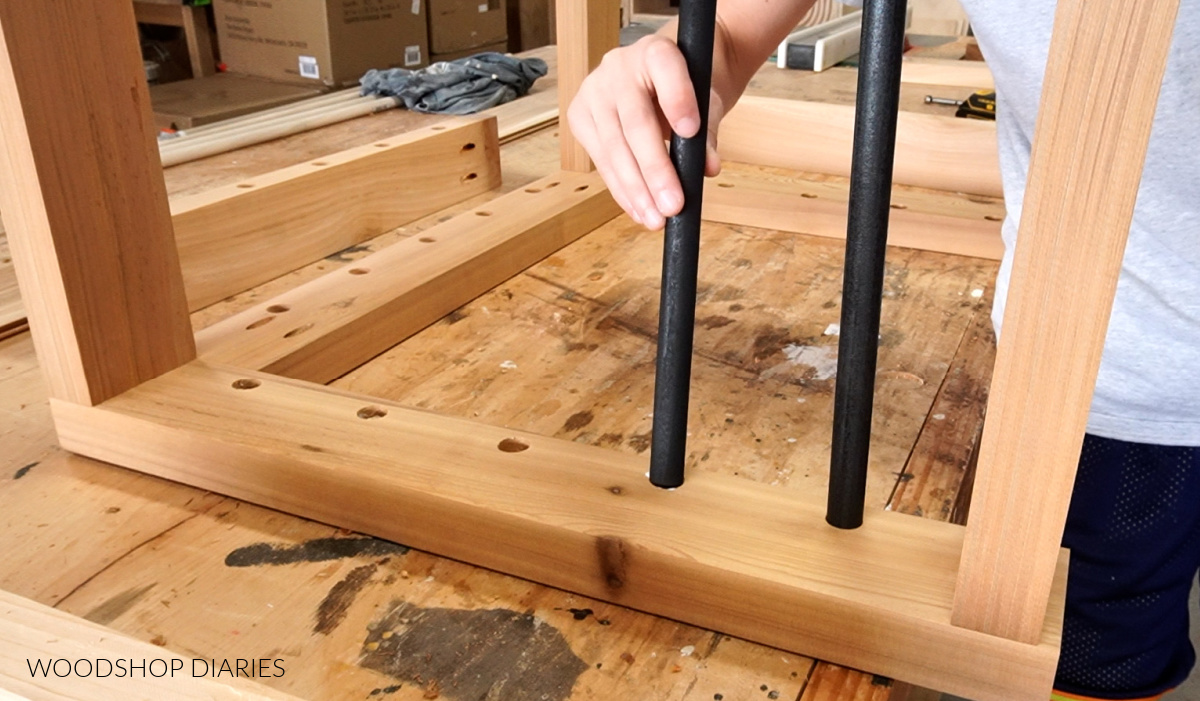
Since I was using ¾” dowels, I used a ¾” forstner bit to drill out holes at all these marks on both the arm and back rests and on the side and back seat supports.
I just used a regular drill for this since I don’t have a drill press and just drilled until the head of the bit was about flush to the surface of the wood. This doesn’t have to be perfectly precise, just keep it as consistent as possible.
Step 4: Cut and Paint Chair Rails
Then, I cut 15 dowels about 14” long. For a higher seat, you can cut them shorter and for a lower seat, you can cut them longer.
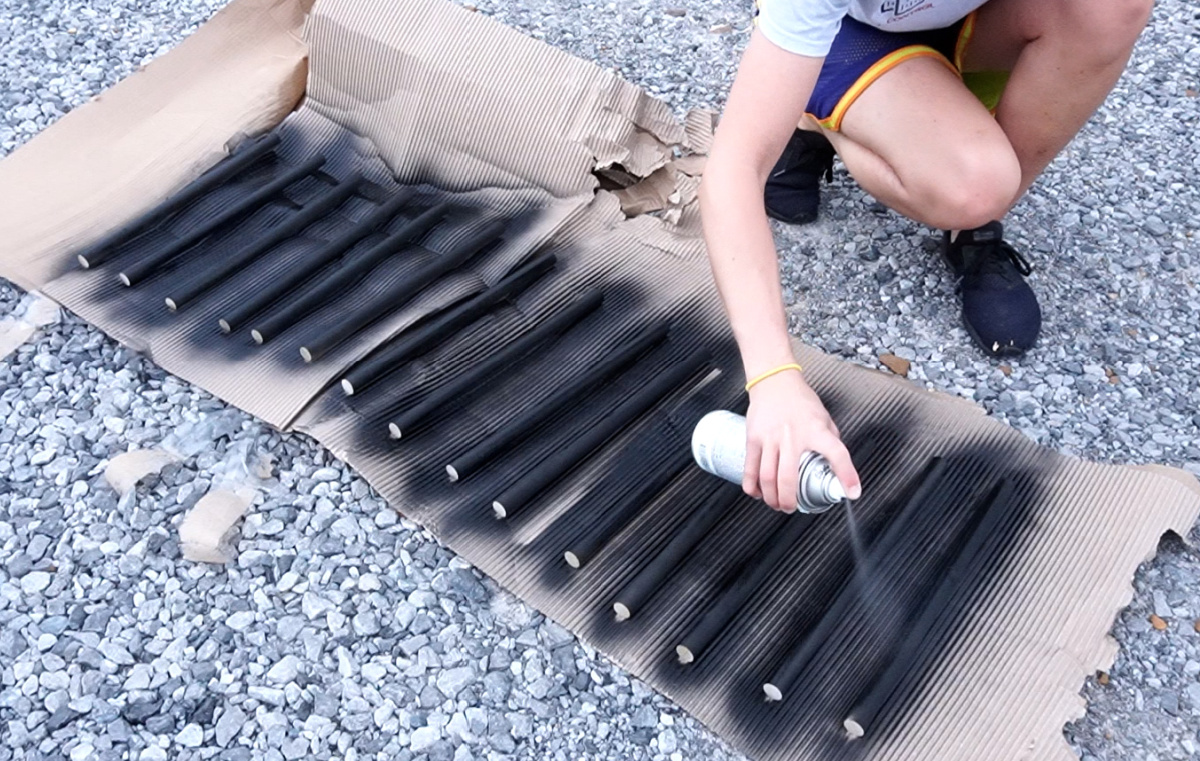
Once they were cut, I hand sanded them, then took them outside to spray paint them. I gave them all a few coats of satin black paint and made sure all the surfaces were covered and let them dry well.
Step 5: Install Outdoor Chair Railings and Seat Frame
Once the paint was dry on these railings, I used some wood glue and insert them into the holes drilled on the arm rests of the chair.
After they were inserted into the holes on the bottom of the arm rests, I added some glue at the tops of the railings and set the side seat frame piece on top. I used a rubber mallet to kind of tap the dowels into the holes in the seat support.
.
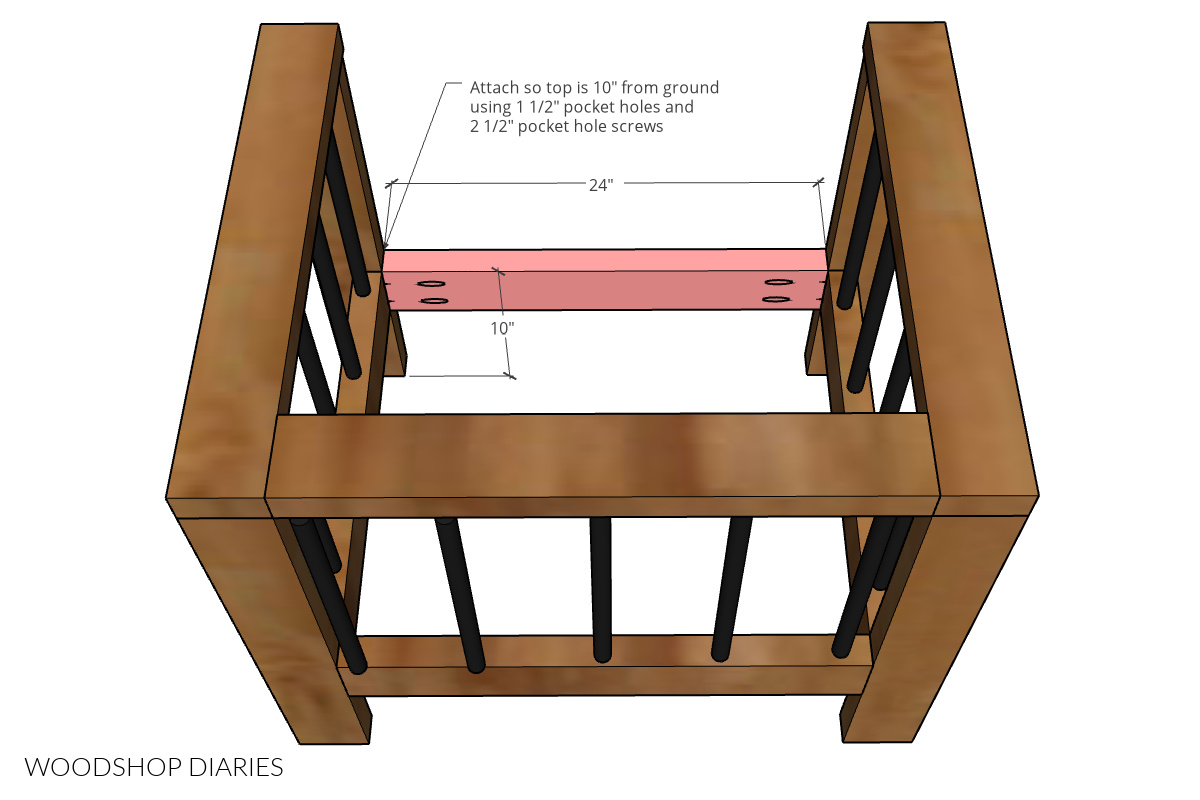
Then I used some timber screws to secure this seat support flush along the inside of the front chair leg.
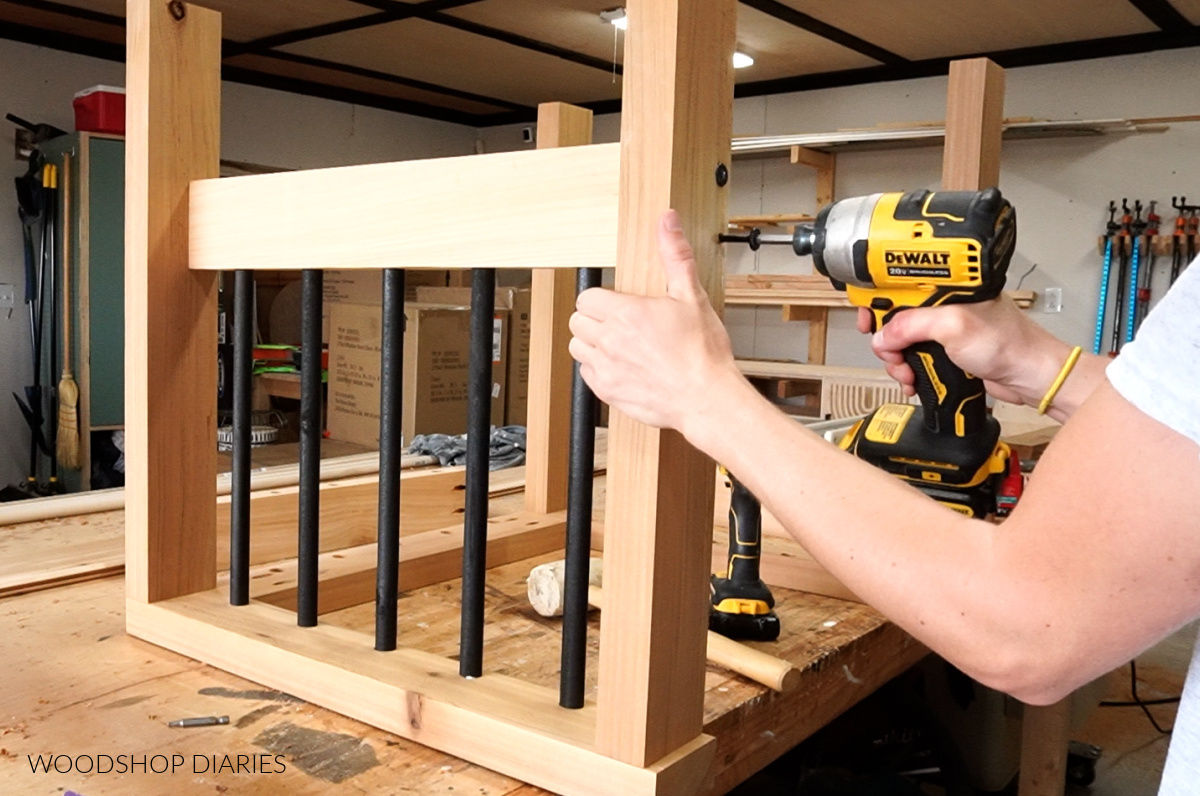
I checked that the distance at the front and the back between the arm rest and seat support was the same before securing. I tried for the seat frame top to be about 10″ from the bottom of the legs, but it doesn’t have to be 10″ exactly as long as you keep it consistent.
.
Now, I was running low on these timber screws, so I actually only used these at the front because they add a nice decorative touch and I just used regular exterior 2 ½” screws at the back since they won’t be seen.
.
But timber screws OR 2 ½″ screws would work fine here.
.
Then, I repeated this same process on the opposite side of the chair.
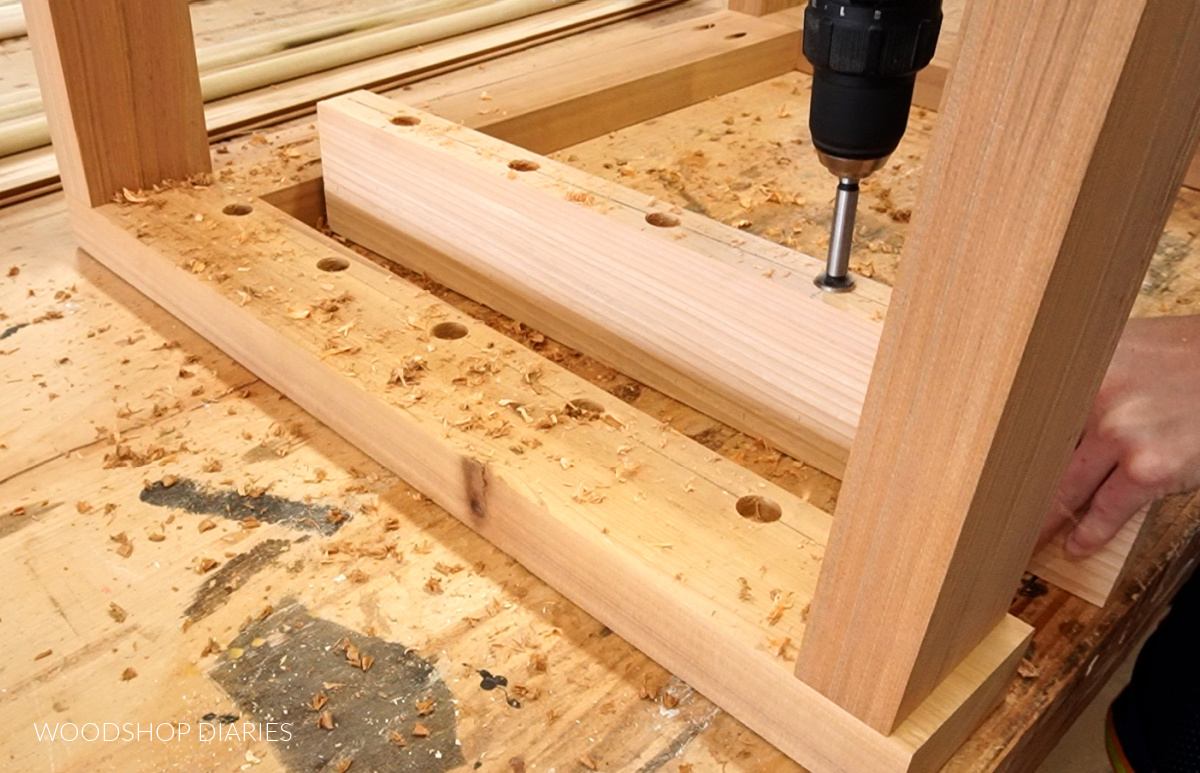
The front and back seat frame pieces will be attached with 1 ½″ pocket holes and 2 ½″ exterior pocket hole screws, so I drilled pocket holes into the ends of these two pieces.
.
I glued the dowels in place on the back side of the chair just like the sides and installed the seat piece just like the sides, only I secured them through the pocket holes.
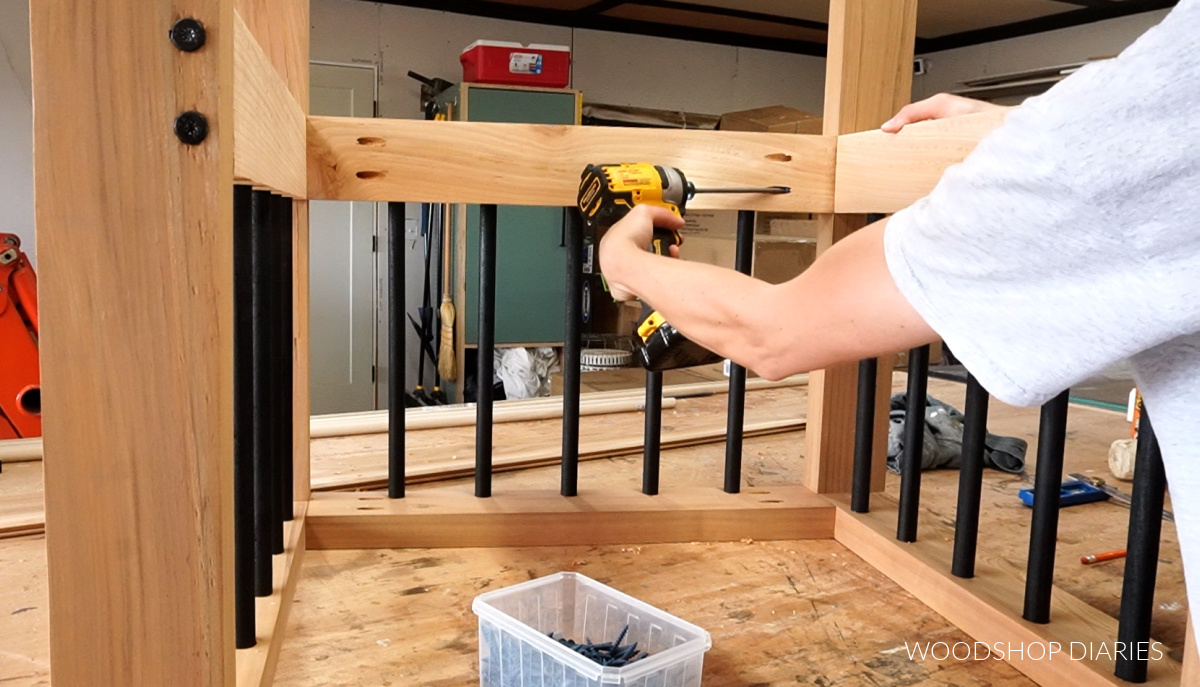
Then, I simply attached the front piece using pocket hole screws so that it was at the same height as the other seat supports.
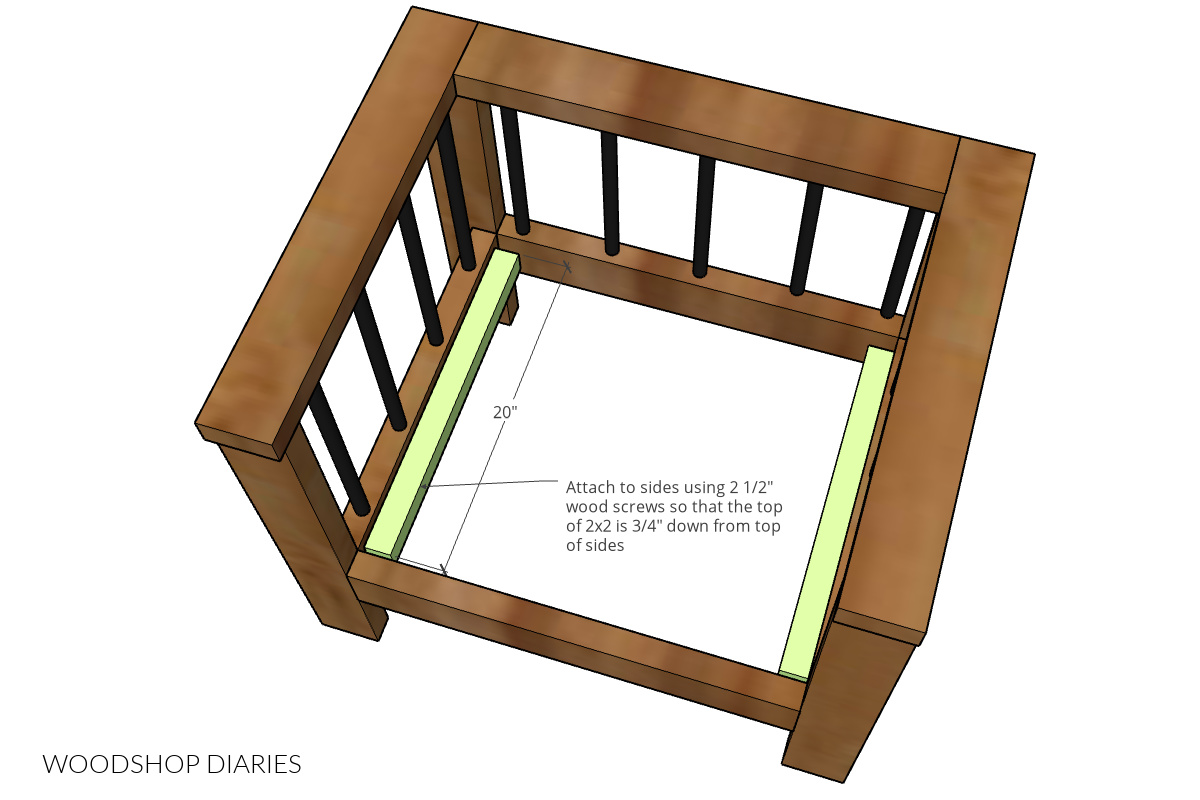
Step 6: Add Seat Supports and Slats
Now all that was left was adding the seat.
.
I ripped the leftover 2×4 from step 1 in half on the table saw to give me roughly two 2×2 pieces and cut them to 20″ long.
RELATED: How to cut your own 2x2s from 2x4s
.
I screwed these onto the inside of the seat frame sides ¾″ down from the top edge using 2 ½″ wood screws.
The seat slats were cut from a 1×6, but they are a little too wide to fit 4 full slats, so I ripped these down to about 4 ¼″ wide on the table saw.
.
Now, tongue and groove 1x6s are typically cheaper (especially with cedar) than standard 1×6 boards, and since these need to be ripped anyway, it makes sense to buy T&G and just rip off the tongue and grooves and use these for the slats to save a few bucks.
.
I cut my board into 4 pieces about 23 ⅞″ long, ripped off the tongue and groove edges, and placed them in the seat with equal gaps between them.
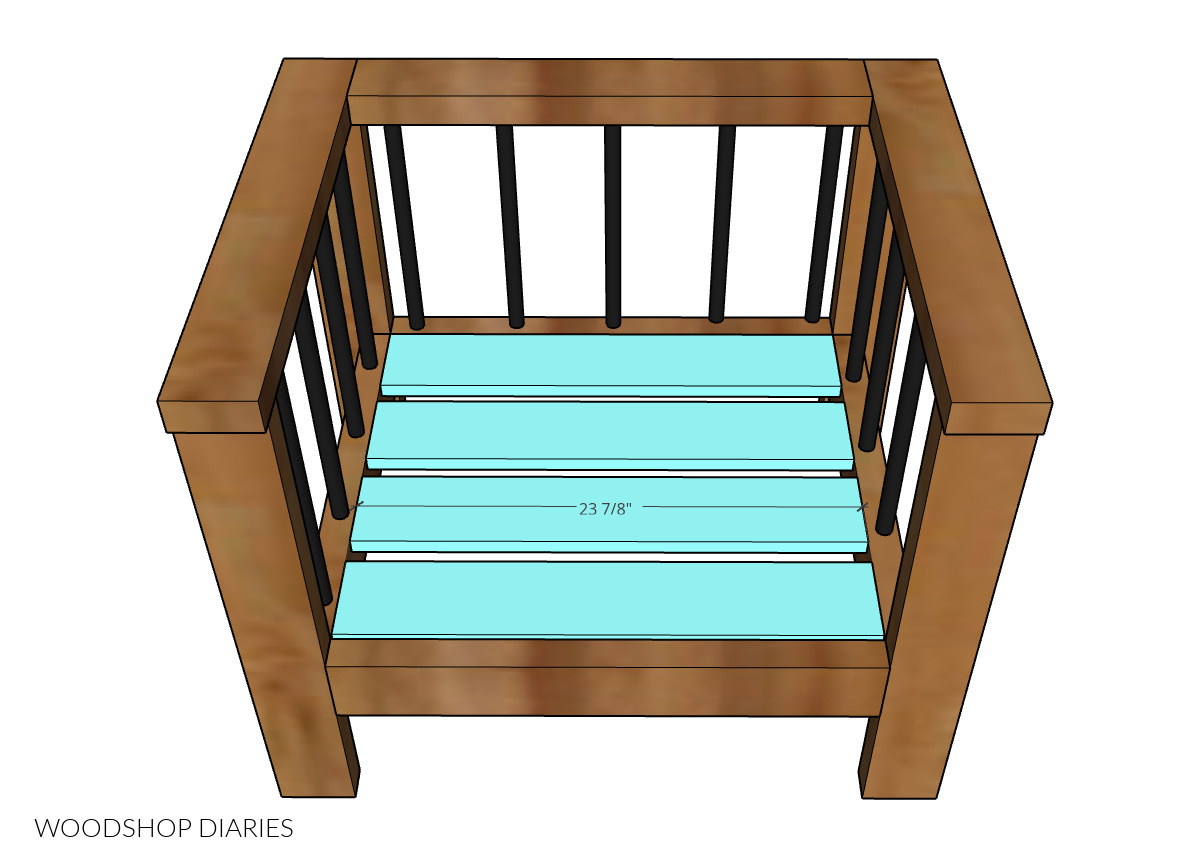
The gaps don’t have to be perfect. Just eye ball them so they all look even.
.
Then, I screwed them into the 2x2s below using 1 ¼″ exterior wood screws. At this point, you can add some outdoor finish/sealant and it’s ready to use!
.
Now, the chair sat good and felt strong and sturdy but, personally, it felt a little short and like it was missing something.
.
So I added a seat cushion to give it a little more comfort, height, and visual interest. You can make your own cushion with this tutorial, but I designed this outdoor chair to fit a standard 24″ x 24″ seat cushion, so you can also purchase one instead of making it if you prefer.
.
After me and Lucy tested out our new DIY chair in the shop, I moved it to the front porch so we (mostly her haha) can enjoy it all year long.
I hope you enjoyed this project, and if you’d like to build your own, be sure to check out the video tutorial here to get extra details on the process!
.
And if you can’t wait to see what’s next, I’d love if you’d subscribe to my newsletter so you don’t miss out on all the upcoming projects…and guest appearances from Lucy 😉
If you’d like to save this DIY chair project for later, don’t forget to pin it or share it to your favorite social channel!
Until next time, friends, happy building!