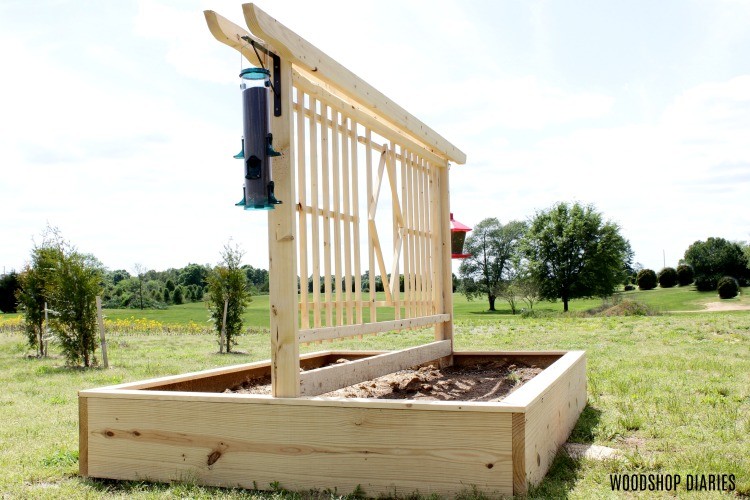
Check out how I built my husband this raised garden bed with trellis in this post and video tutorial!
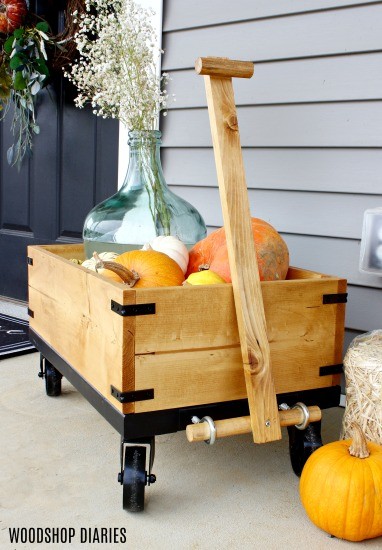
My husband, Danny, loves tending a garden during the summer. Last year he grew squash, zucchini, and lots of pumpkins so I had something to decorate the porch with. Remember this simple DIY industrial wagon I filled with them??
But we don’t have a functional tiller, and it was really difficult to work with this hard ground.
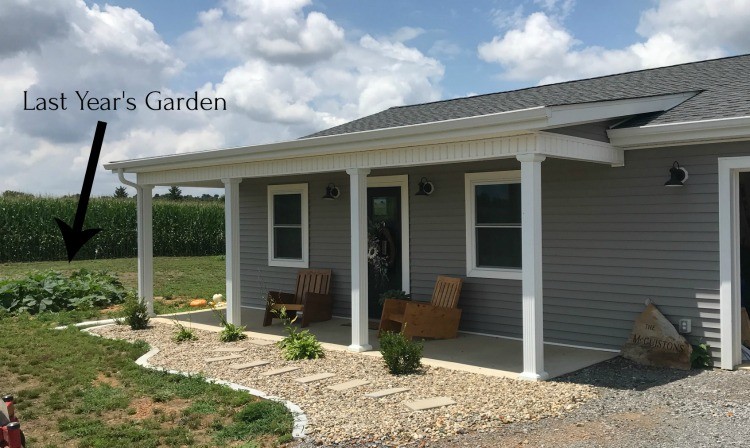
This year, he asked me if I’d help him build a garden bed for his squash to make things a little easier.
.
Looking for more outdoor project ideas?? Here are a few of my favorites!

I’m always up for building something practical, so we took a few hours this past weekend and put together this simple garden bed with a decorative trellis. The trellis was, of course, my idea.
.
He probably won’t use it, but I thought it was pretty. So I’ll show you how it came together here in this video. I’ve also got a step-by-step tutorial below as well. So, let’s get building
This post contains affiliate links. See policies for details.
How to Build a Garden Bed with Trellis
For this Build You Will Need:
- (1) 2x12x10
- (2) 2x12x8
- (3) 2x4x10
- (2) 2x4x8
- (2) 2x2x8 (I make my own 2×2 using this tutorial)
- (4) 1x4x8
- Square dowels (amount depends on design–we used about 48 ft–see step 3)
- Miter saw
- Table Saw (optional)
- Nail Gun
- Drill/Driver
- Jig Saw
- Level
- 2″, 2 ½″ and 3″ exterior wood screws
.
First of all, I want to address the wood type here. I’m aware that typical untreated pine boards are not weather resistant. But, we chose to use them here anyway.
.
I didn’t want to build this with treated lumber because 1. I hate working with treated wood and 2. I’m not sure about the chemical stuff in my food. Some say it’s okay and some say it’s not. Who knows.
.
We built this knowing it’ll probably need to be replaced in a few years. I’m okay with that because it cost less than $100 and about 4 hours to build.
.
Cedar will last longer but will be much more expensive–and treated wood will last longer but is full of chemicals. Use what you wish–and may the odds be ever in your favor 🙂
.
Okay, NOW the steps…
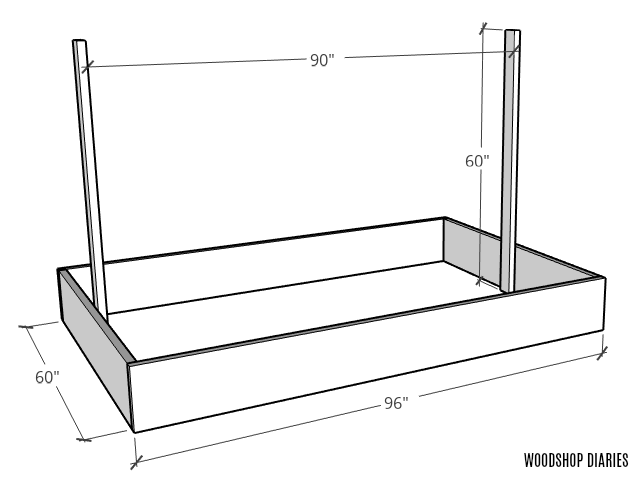
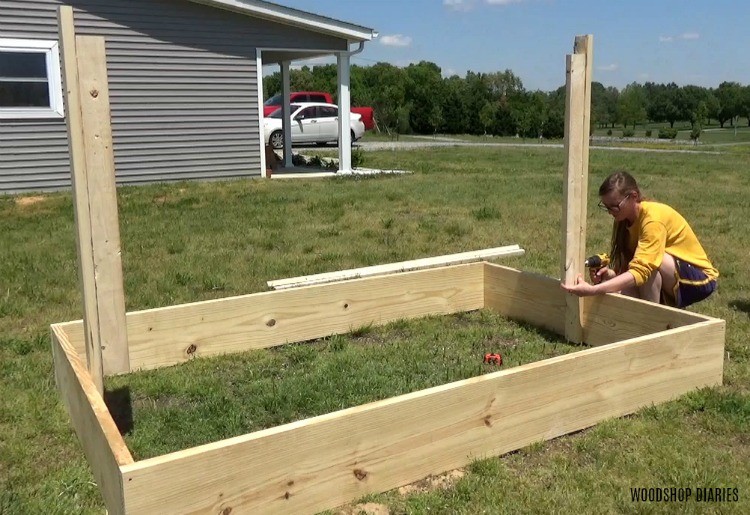
Step 1: Assemble the Raised Garden Bed
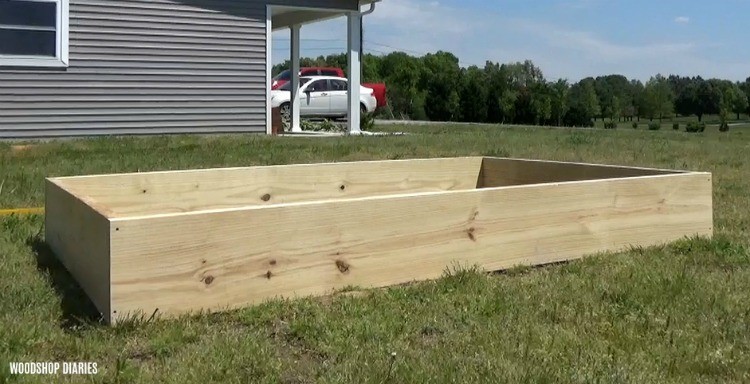
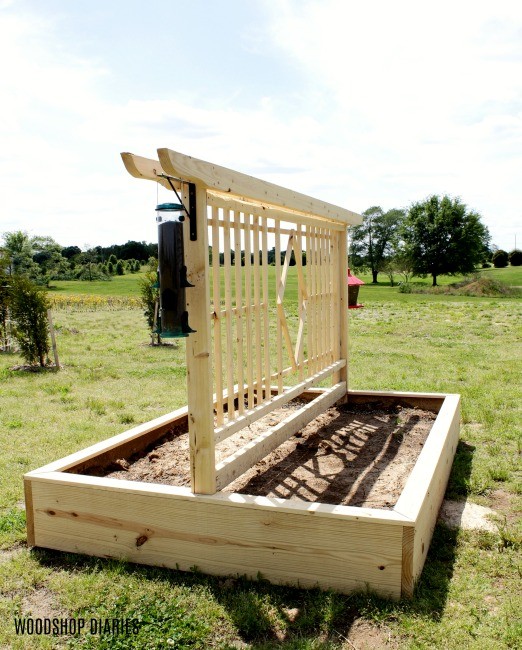
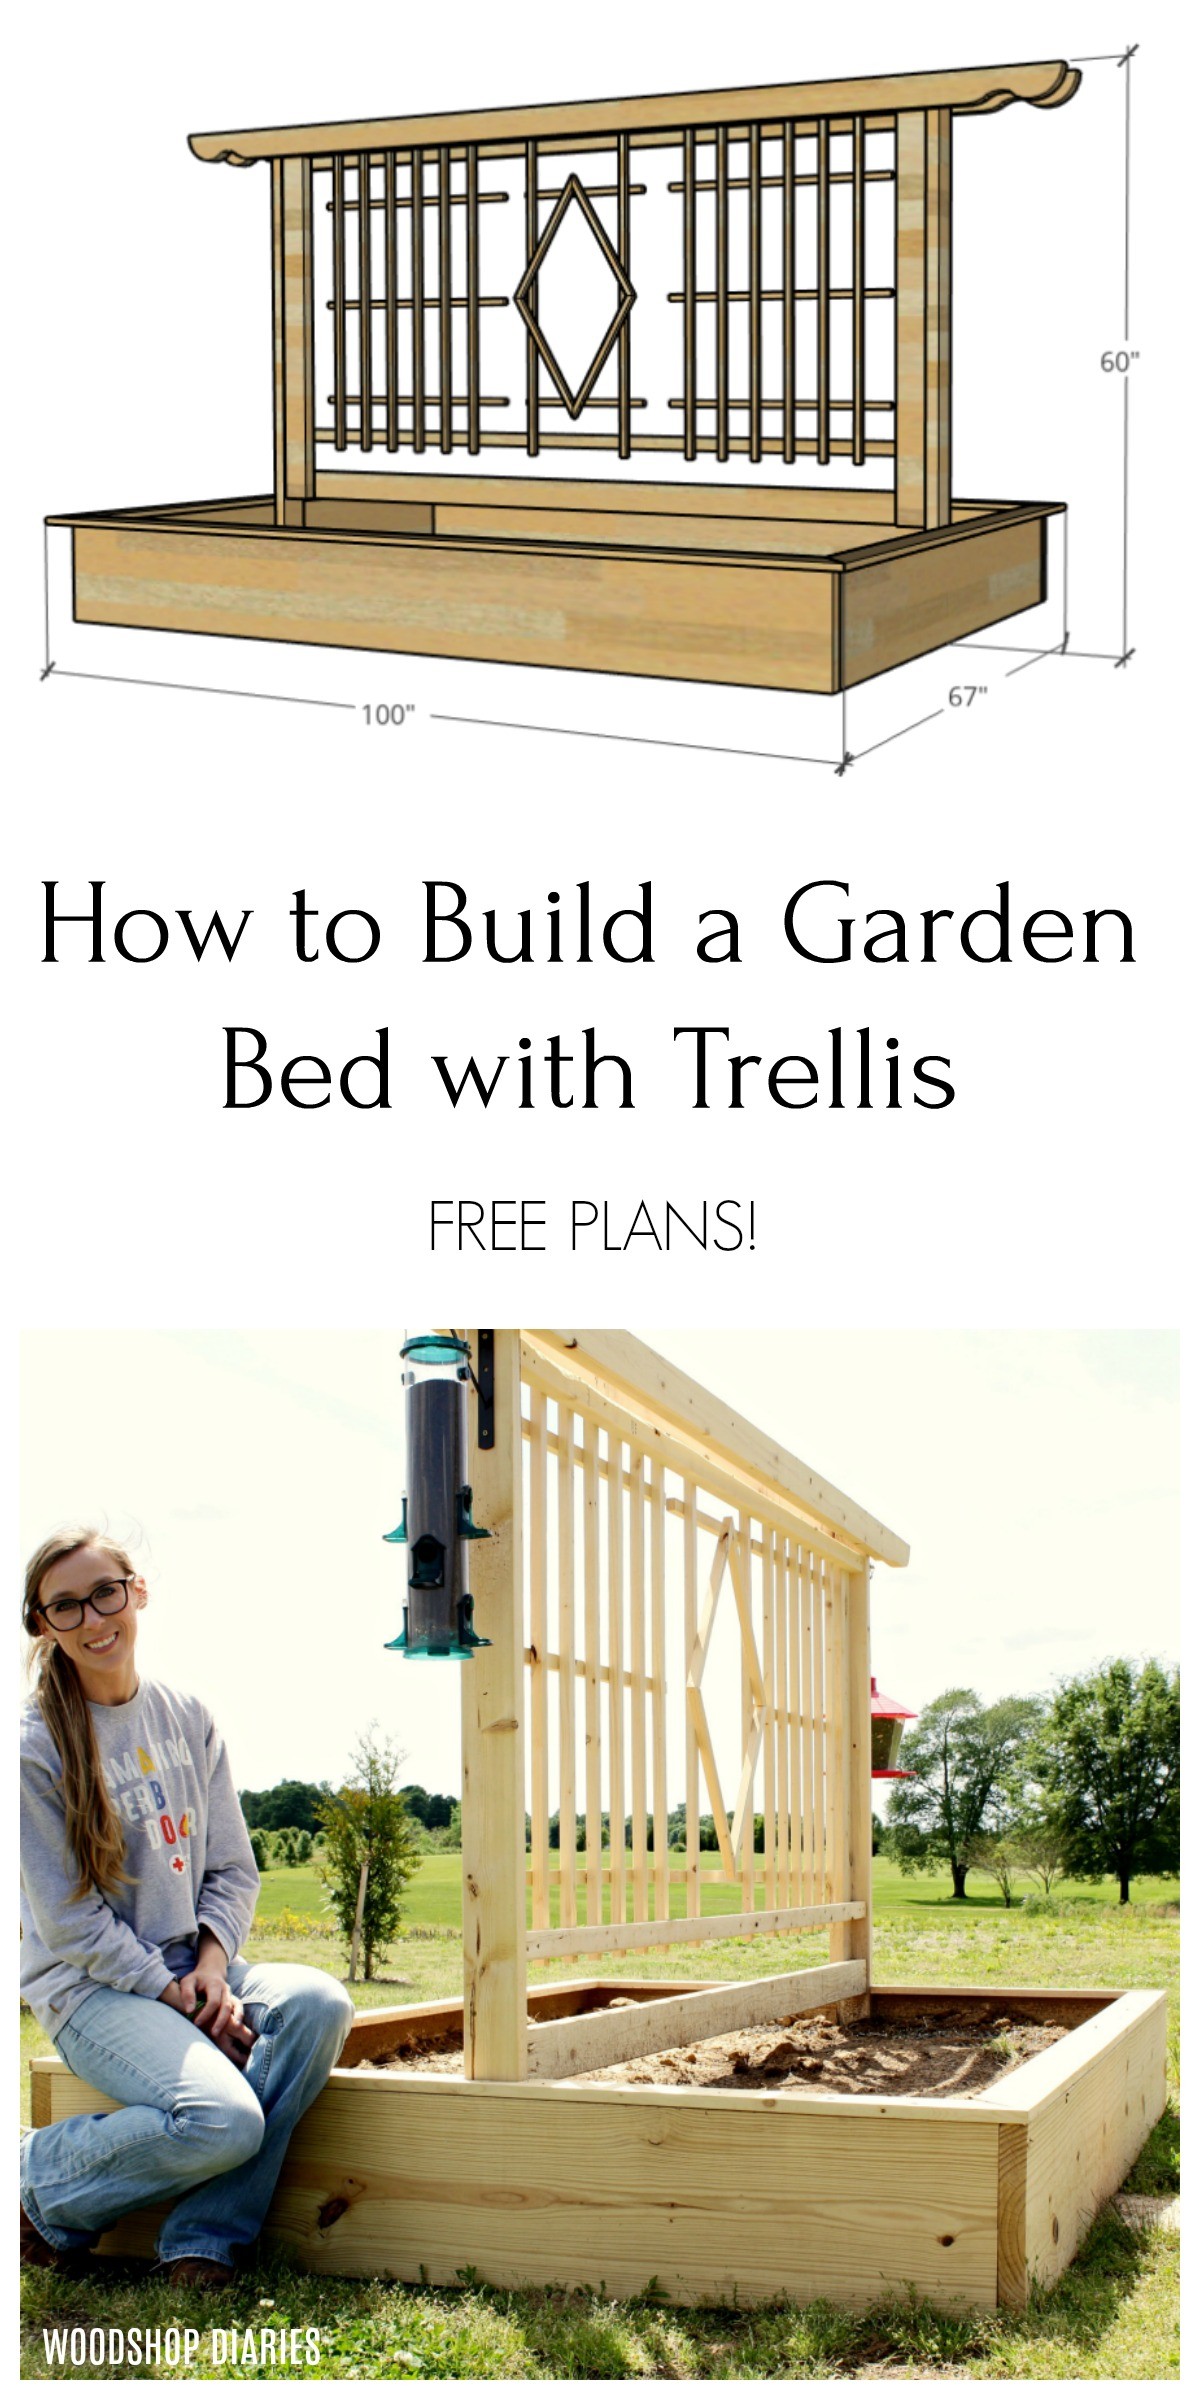
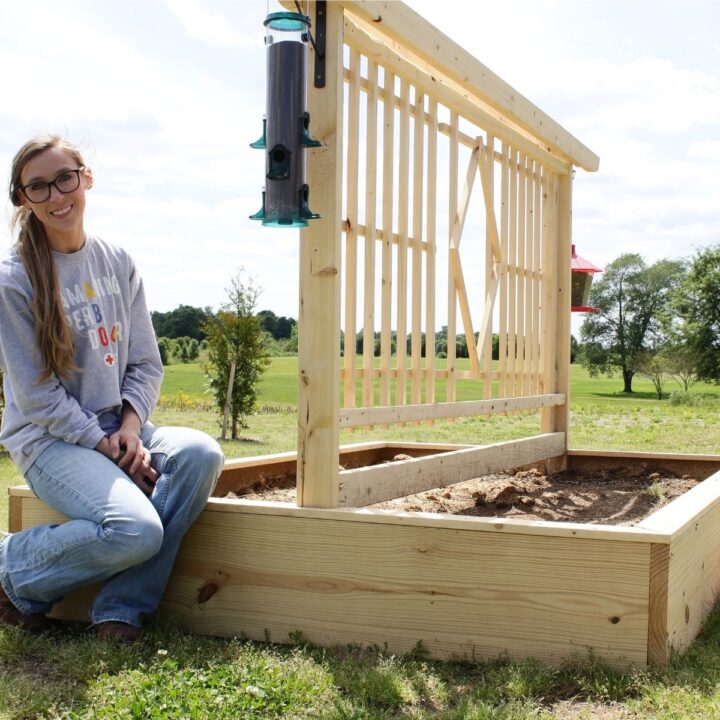
We built this bed about 5 ft wide and 8 ft long. Likely we will end up building another one because I’m not sure if it’ll fit very many large squash plants. BUT, I’d say this would be perfect for tomatoes.
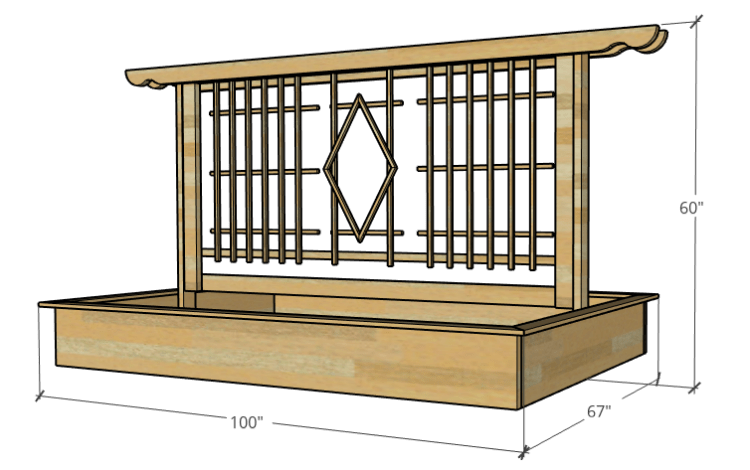
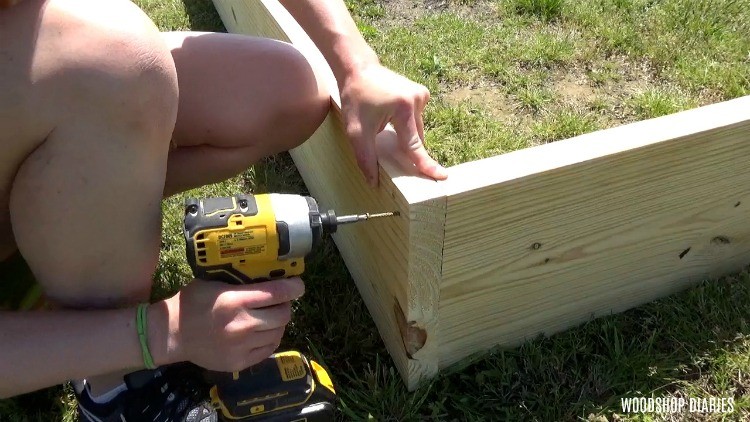
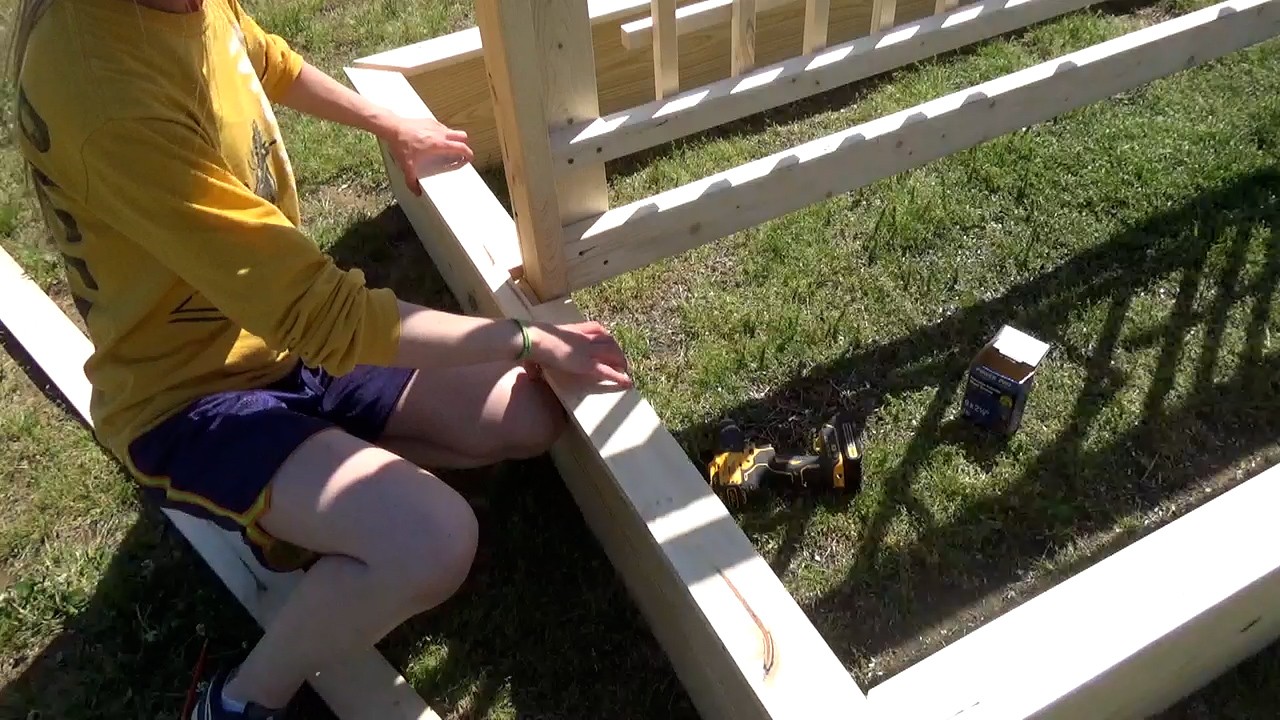
I cut the 2x12x10 in half to make two 5 ft pieces and screwed the 2x12x8s into the ends of them to make a box. I used (2) 3″ exterior grade decking screws per corner. We assembled this out in the yard where we wanted it. Once it’s all together this will be heavy to move.
.
Honestly, at this point, we could be finished. Fill it with dirt and call it a day. BUT, I wanted to add a trellis…because, well…why not make things difficult fun?
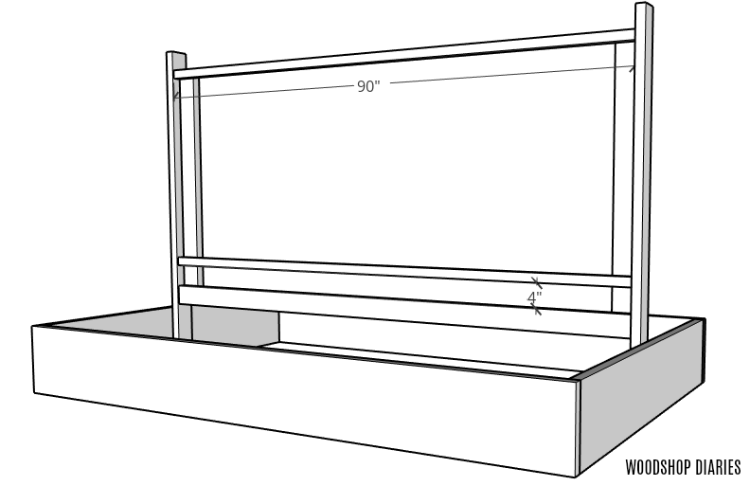
Step 2: Add Trellis Frame to Garden Bed
I cut one of my 2x4x10s in half to make two 5 ft long boards and screwed them into the center of the garden bed’s 5 ft sides with 2 ½″ wood screws. Danny helped me make sure they were level.
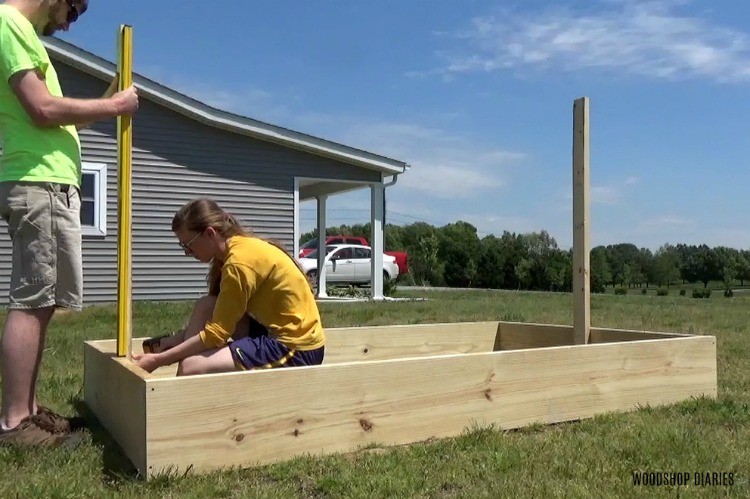
To save me several steps, I measured the distance between them and started assembling the parts that would go here on the floor of my shop. Once I got everything cut and laid out, then I could take it back outside to attach it.
Step 3: Design and Lay Out Trellis
As far as the trellis design, I was totally winging it here. There’s no science to it…you could do any design you wanted. Danny wasn’t picky, but he also wasn’t much design help…he just wanted the box haha.
.
I used 2x4s on the outsides, a 2×4 on the bottom, a 2×2 on the top, and another 2×2 about 4″ above the bottom 2×4. By the way, this only needed to be about 44 ½″ tall.
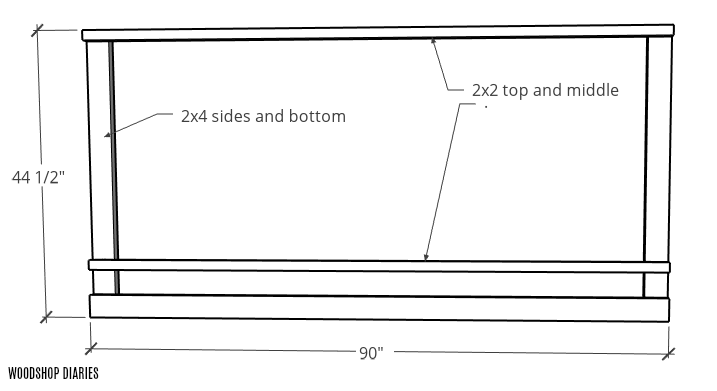
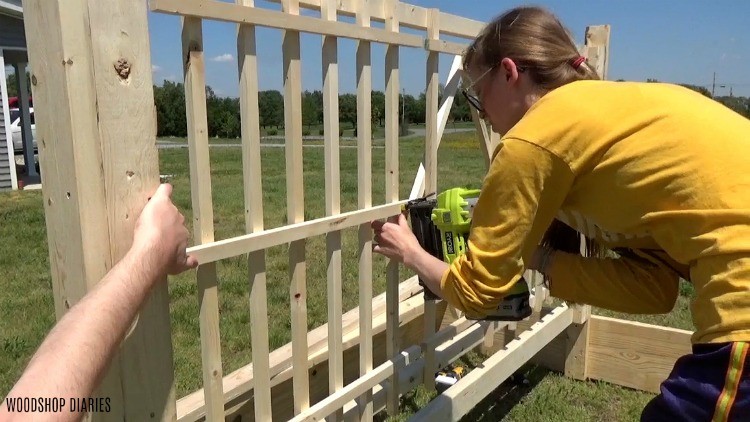
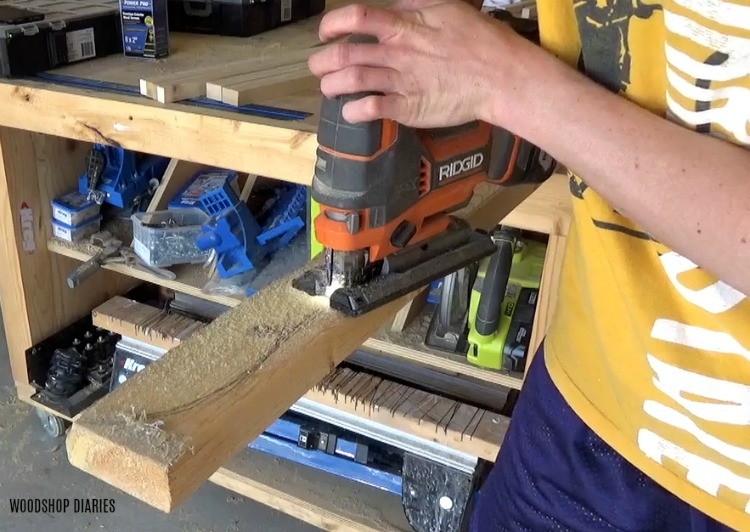
I ended up ripping two 1x4s down into square dowels on the table saw for the rest of this design (I ripped them to about 1″ wide so they weren’t SQUARE…but close to square).
.
To make things easier if you didn’t want to rip a bunch of boards or you don’t have a table saw, they do sell square dowel rods at the big box stores…they’re just more expensive.
.
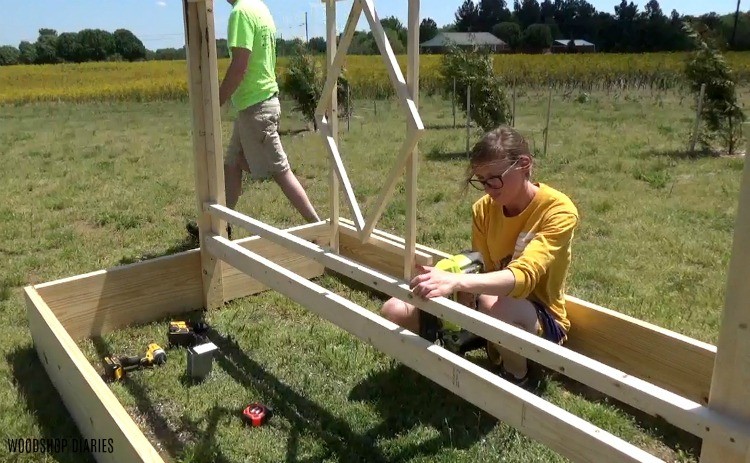
I had in my head that I wanted a diamond design on this trellis so I ended up putting a diamond in the center. I cut the top and bottom angles here with the miter saw at 60 degrees and cut my left and right angles with the miter saw set to 30 degrees. Then I fit pieces around the sides of it like shown.
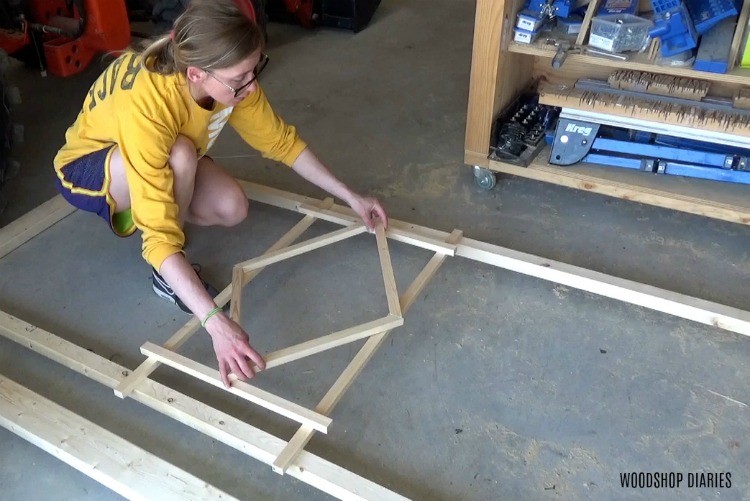
Then I cut to fit pieces to line the side sections of the trellis. Use your creativity here.
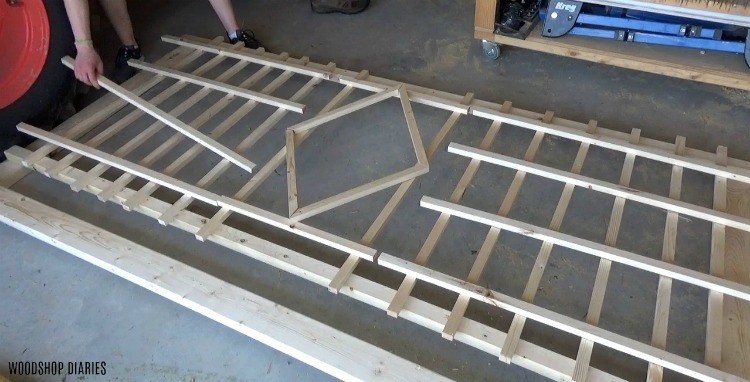
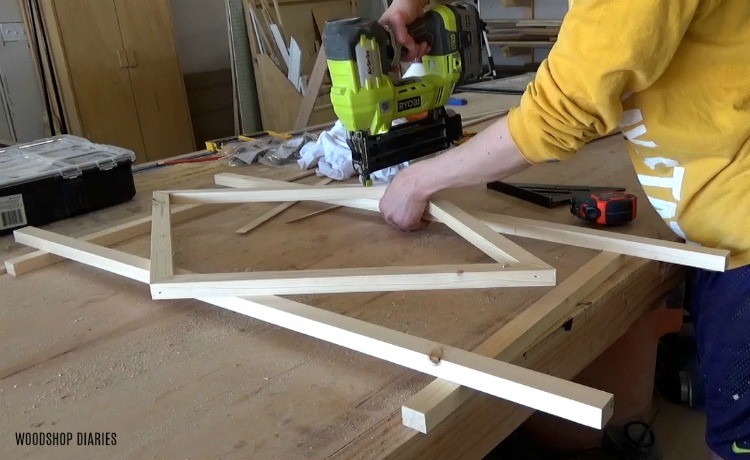
Once I was happy with the design, I assembled the middle “diamond section and packed up everything to assemble on the garden bed. Again, I know this garden bed isn’t going to last forever, so to keep things simple, I just glued and nailed the middle diamond design together.
Step 4: Install Trellis Onto Garden Bed Frame
Then we headed back outside to finish up. We screwed the two vertical sides into the frame first using 2 ½″ wood screws. I made sure to screw these pieces about 3 ½″ down from the top of the outside 2x4s to leave room for the top boards later.
Then we screwed the top, middle and bottom pieces into those boards.
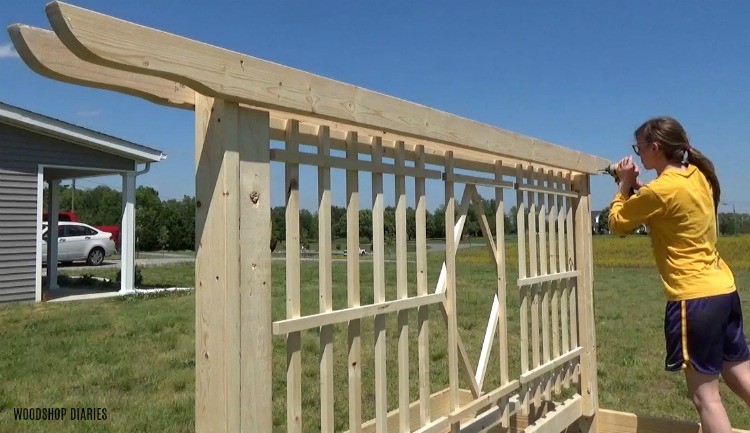
Once the frame was installed, I centered the diamond on them and nailed it in place.
We evenly spaced the rest of the trellis design on each side and just nailed in place. Since building and editing this video, this thing has withstood 60+ mph wind/thunderstorms on two separate occasions and nothing is loose, or damaged. So I think nails are good enough here.
Once the trellis was in place, I freehanded a design on the ends of the 2×4 boards for the top and cut it out with a jigsaw. We used 10′ long boards here to that it would overhang the sides some.
Then we took them out and screwed them into the top.
Step 5: Add a “Lip” to Garden Bed
The last thing I did was add a “lip” around the top of the garden bed. I intended for this to overhang the OUTSIDE of the bed, but I wasn’t thinking when we screwed the bed together that I bought 8 foot 1x4s and I used an 8 foot 2×12.
.
There wasn’t enough length on the 1×4 to overhang any. So I ended up overhanging the INSIDE of the bed. If you wanted it to overhang the outside, get two of your 1x4s ten foot long instead of eight.
.
This is just for looks and it made it look a little more finished, so it didn’t really matter. But that’s something I wish I had thought of before this moment in time. So I ended up having to notch out around the 2x4s on the short sides…again…not a big deal. I just hadn’t originally planned for that.
.
Once I had these cut to fit around the top, I screwed them in using 2″ wood screws.
Fill and Plant
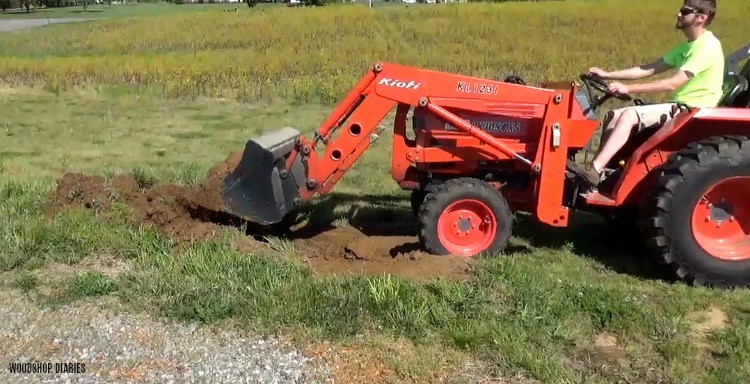
Once these pieces were screwed around the top of the garden bed, Danny was eager to put the tractor to work. When we built our garage house, we had some random piles of dirt left from when we put in the driveway.
.
We left them there and eventually they grew grass and blended into the yard. So Danny decided to dig into one of these piles to fill up the garden bed since we wouldn’t miss that dirt. Now we just have a bare spot haha.
Now, my work here is done…Danny gets to take care of the gardening part. I’m kind of a black thumb…mostly because I forget to water things ha. So, I’m headed back to the shop 😊
He’s going to plant this one and there may be another one added to the collection if he runs out of room. Time will tell. But in the meantime, I’ve got several more outdoor projects to finish up, so if you enjoyed this project and want to see more, be sure to subscribe to my newsletter so you don’t miss out on what’s coming next.
.
And also, if you enjoyed this DIY garden bed with trellis project, I’d love if you’d pin this for later 🙂
Until next time, happy building 😊
DIY Garden Bed with Trellis
Build your own raised garden bed with trellis design for less than $100 in material and in about 4 hours with this easy tutorial.
Materials
Instructions
- Assemble the raised garden bed according to the plans. Do this where you want it because it will be heavy to move later.
- Add the trellis frame to the garden bed.
- Design and lay out the trellis.
- Install the trellis onto the garden bed frame.
- Add a "lip" to the garden bed.
- Fill with soil and plant your garden!