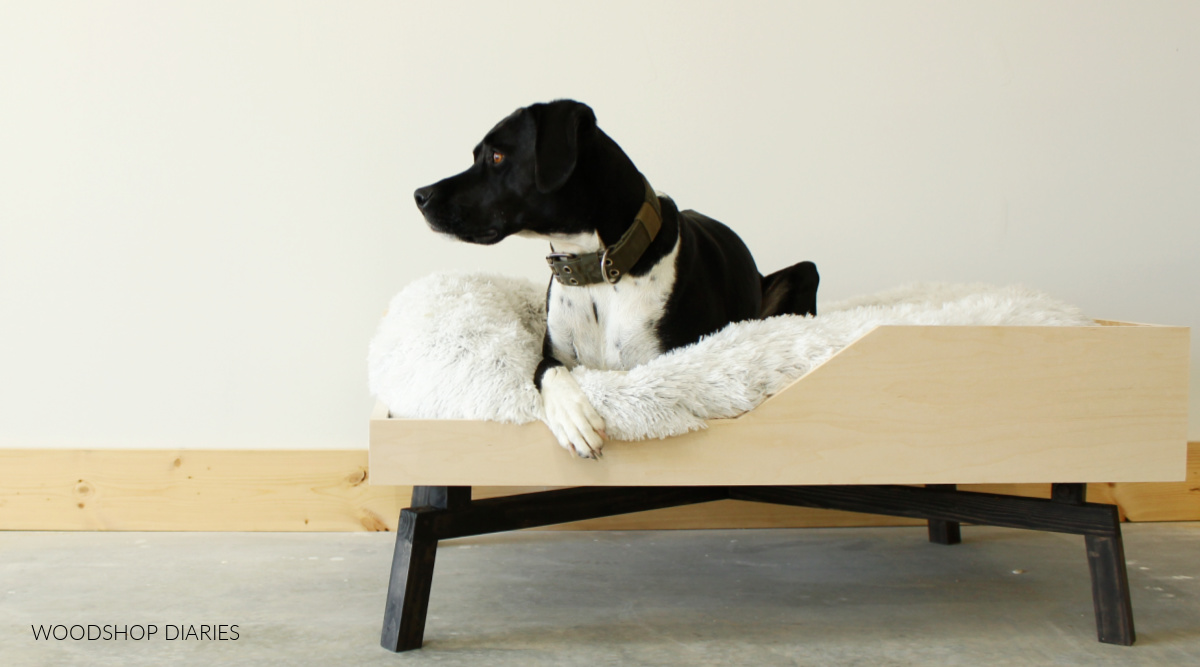
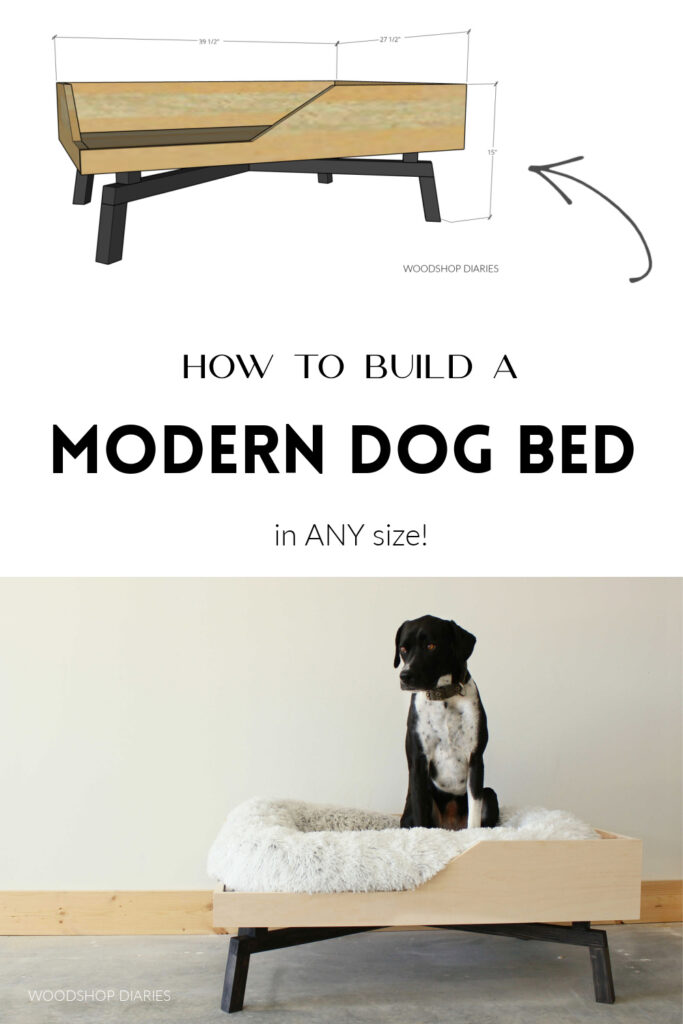
In this post, I’m sharing how to build another fun pet project! This DIY elevated dog bed is easy to build and easy to modify to fit your own pet’s size. I’ll show you how below.
If you’ve seen many of my projects in the past, you have probably seen Lucy show up a time or two.
.
She’s the true boss behind Woodshop Diaries, haha!
.
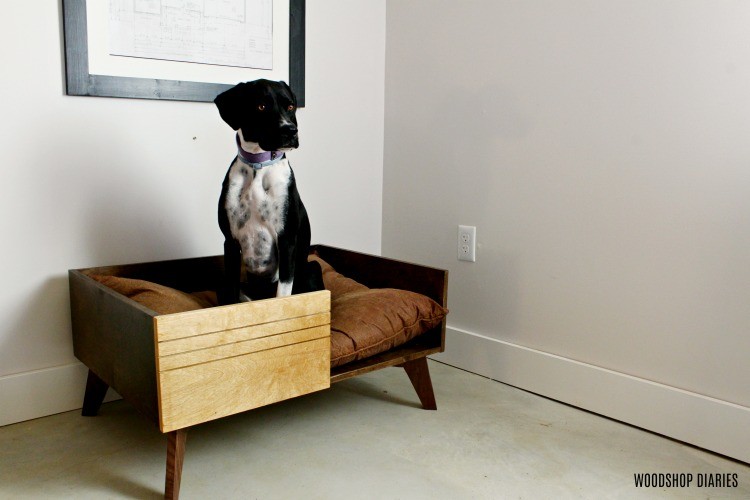
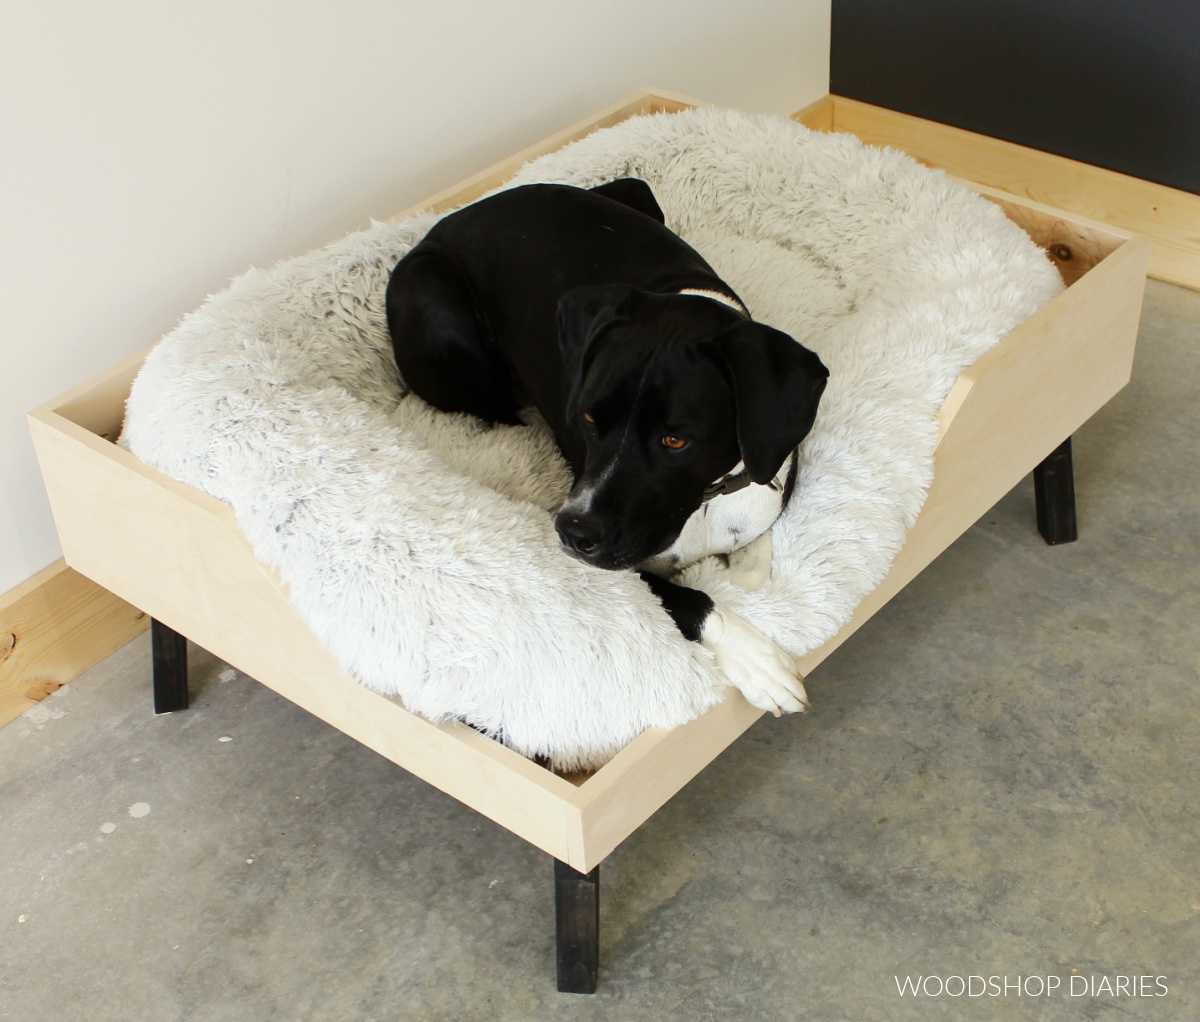
A while back, I built her a mid century style elevated dog bed and she has LOVED IT. (See below)
But since moving into a new home–one that actually has multiple rooms (our last home was a one room studio style home)–Lucy now has multiple beds around the house, and only one of them is elevated.
.
I think she really enjoys napping up off the ground (I imagine it’s a little less drafty). So I decided to build her a second DIY elevated dog bed so no matter where she’s hanging out in the house, she can have a platform to sleep on.
.
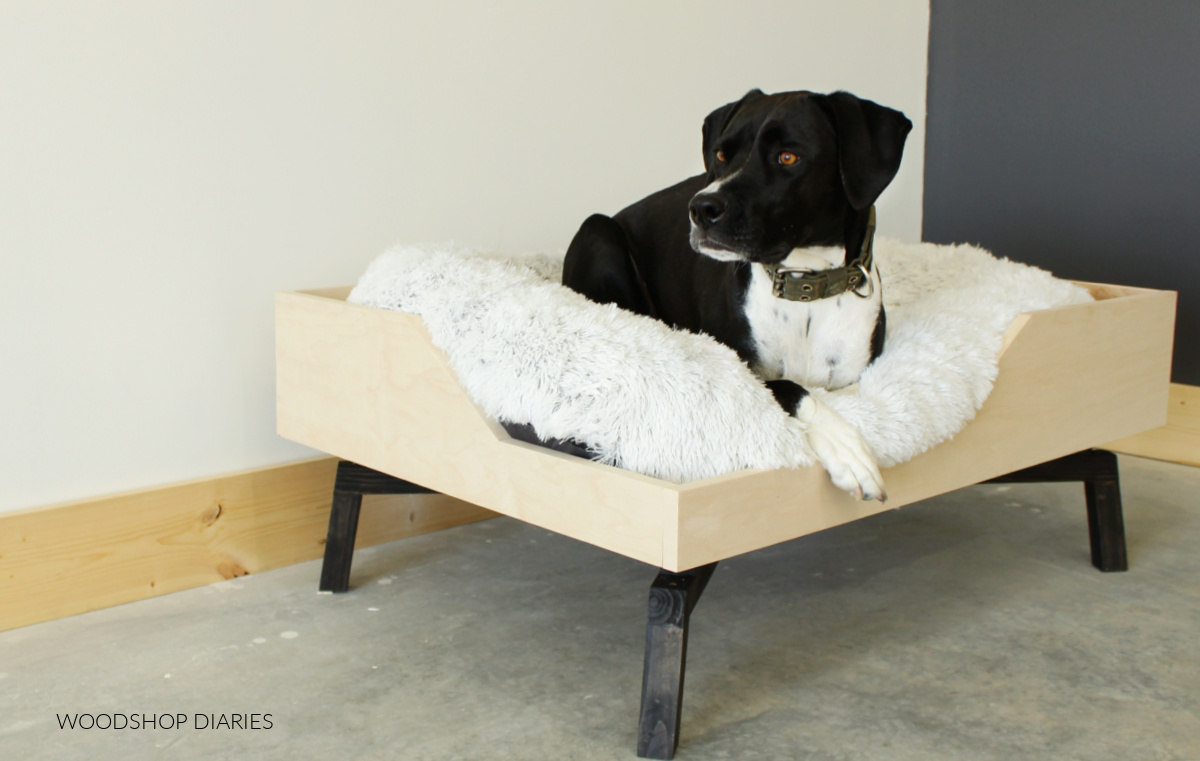
I actually put this in our living room, so I built it to match the coffee tables I built a while back. (See below)

Lucy is a large dog, so this is made to fit a large dog bed, BUT don’t worry, I’m sharing how to modify the sizing to fit your own dog’s bed size below.
.
I made a video of the project here and I’ve got the plans below:
**This post contains affiliate links. See website policies.
Tools & Materials:
Tools:
Materials:
- ¾″ plywood (amount depends on size you make)
- 2x2s (amount depends on size, but likely two 8′ boards will be plenty)
- 1 ¼″ pocket hole screws
- 2″ & 2 ½″ wood screws
- Wood Glue
- Edge banding (optional)
*NOTE: I used ¾″ cabinet grade maple plywood since that’s what I had in my shop. However, any smooth plywood would work fine–just don’t use anything super rough as you don’t want your pets to end up with splinters!
Notes About this DIY Elevated Dog Bed Build:
Modifying the size:
As I said earlier, the dimensions shown here are for a large dog bed. I used Lucy’s existing bed’s dimensions to build this from and her bed was about 26″ x 38″ overall. This is the bed I used.
.
However, you can easily modify the size here if you need bigger or smaller.
To do that, start by measuring your own dog’s bed and cut the bottom panel from step 1 to fit that size. Then, just cut the box sides to fit around that bottom panel.
.
For the base, you can shorten or lengthen the main X pieces to fit your box. Just make sure to change them equally.
.
For example, if you make the long piece of the X 4″ shorter than I show in the plans, then you need to make each short piece of the X 2″ shorter to accommodate the change.
.
You should likely be able to keep the angles the same, and just change the lengths as needed.
.
You can also adjust the height of the legs the same way.
.
Keep in mind that this isn’t rocket science and it’s just a dog bed–so don’t sweat it. Just make the pieces bigger or smaller as needed to fit your dog/cat/pet.
.
Some posts you might find helpful in the build:
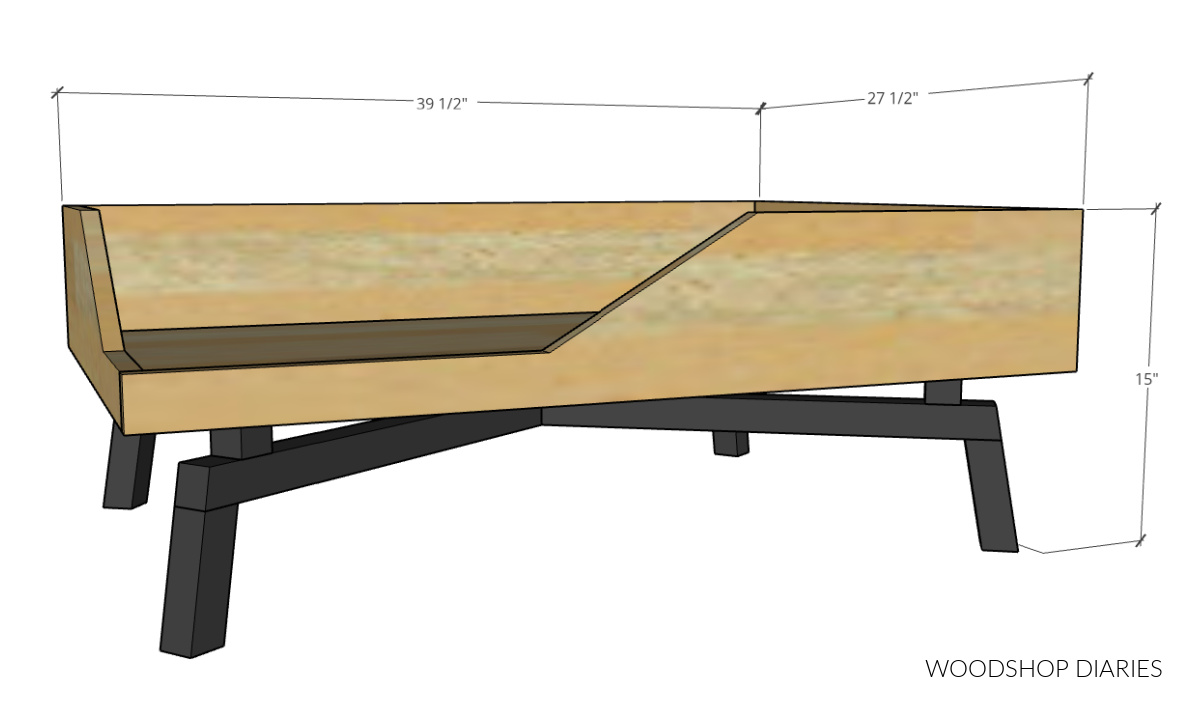
Step 1: Cut Pieces for the Elevated Dog Bed Box
I built this elevated dog bed as basically a plywood box sitting on a 2×2 base. So the first thing I did was build the box.
.
I measured Lucy’s dog bed and cut a panel of ¾″ plywood the same size to use as the bottom of the box.
RELATED: How to cut plywood sheets
.
Then, I ripped some plywood strips 7″ wide to use as the sides. FYI, if you have any plywood scraps, they would work great for this!
.
If your dog bed isn’t that tall or you want to adjust the height of the box, simply rip these widths smaller or larger as needed.
.
I cut these 7″ strips to “wrap around” the bottom panel to form a simple box.
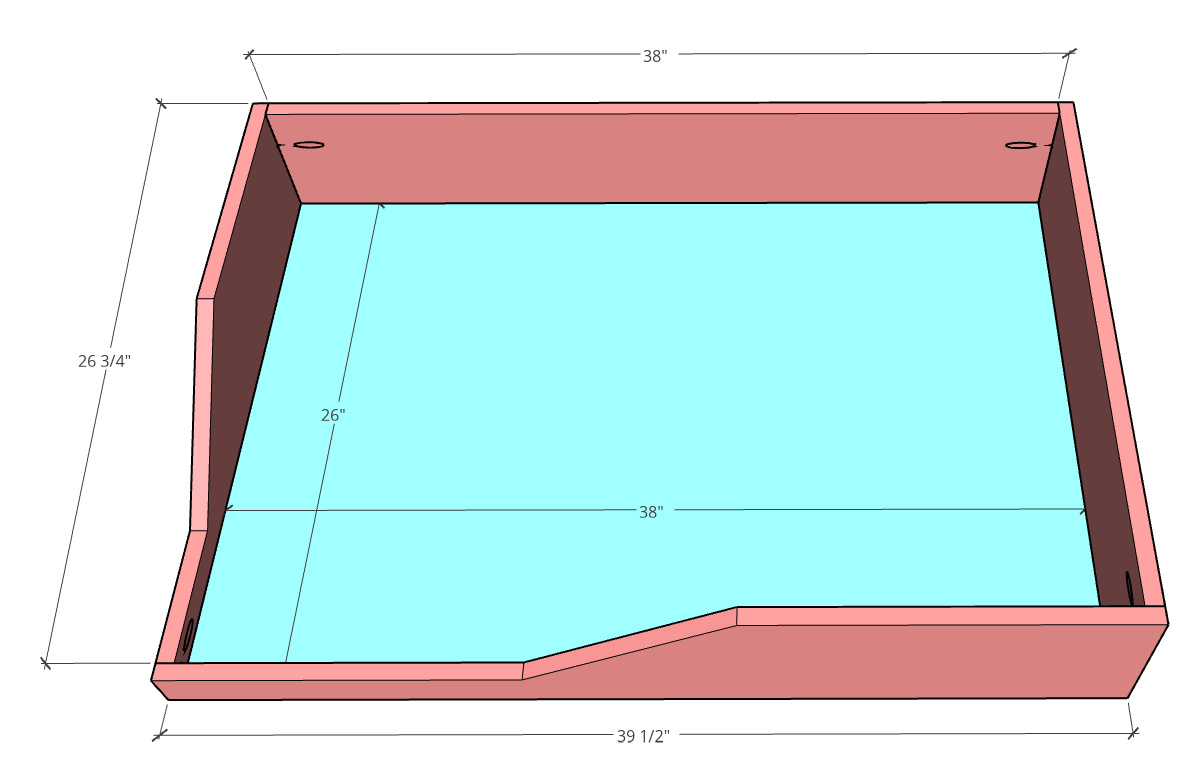
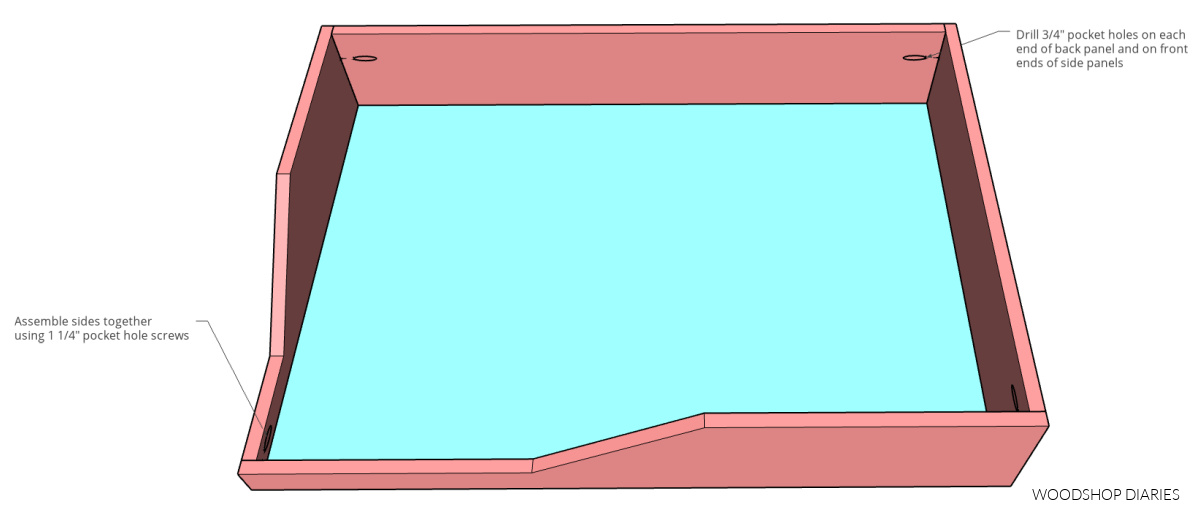
Notice that the back is the same width as the bottom panel, the sides stop at the front edge and the front runs the full length.
Step 2: Add a “Cut Out” to the Sides
You’ll notice in the image above that I added a cut out to one side and the front to make kind of an “opening” for Lucy to climb into easily. You are welcome to get as creative as you wish with this and cut this however you like.
.
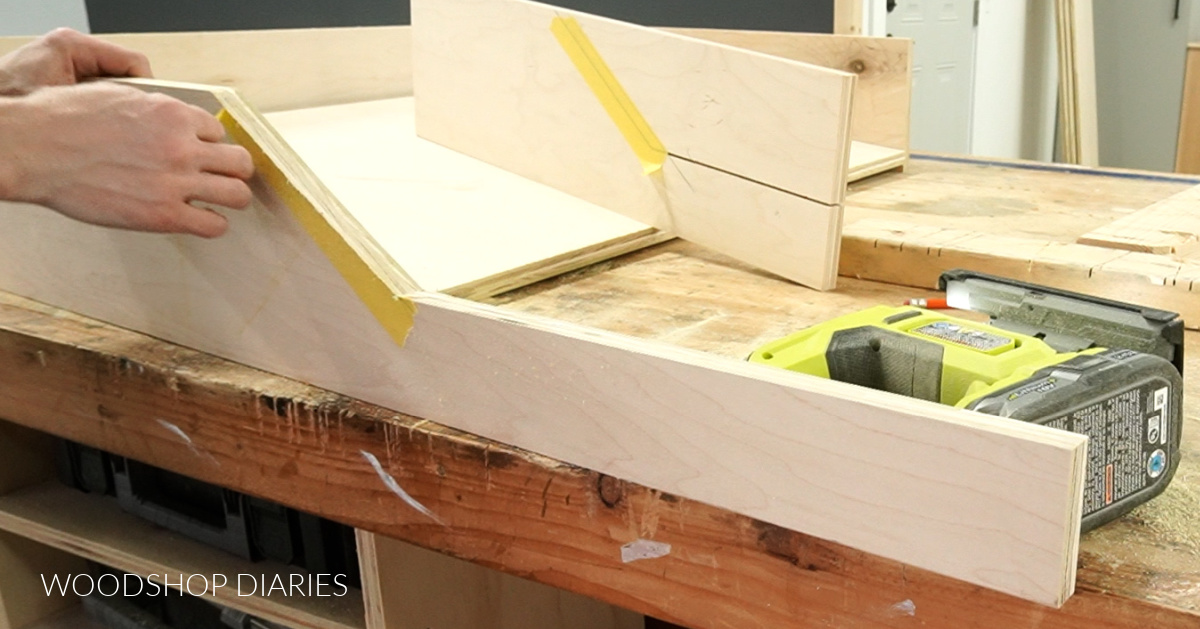
But I cut mine out like this because I thought it looked kind of “modern-ish.” I used a speed square to mark a 30 degree line from the top to the 2″ line, but 30 degrees is just a number I picked–you can adjust as you wish.
You can check out the video for more details, but I cut the straight line using a table saw and the diagonal using a jig saw. You can cut the entire thing using a jig saw if you don’t have a table saw.
.
I used some painters tape on the plywood surface to help prevent tear out from the jig saw on the cut.
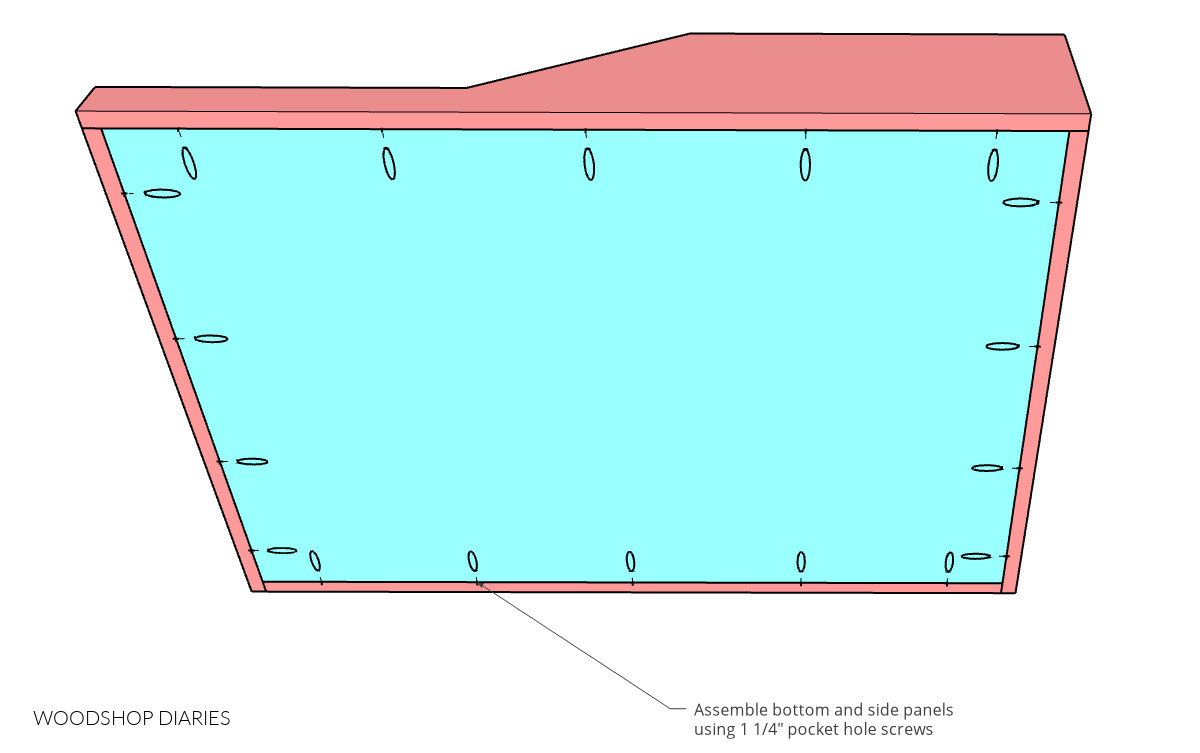
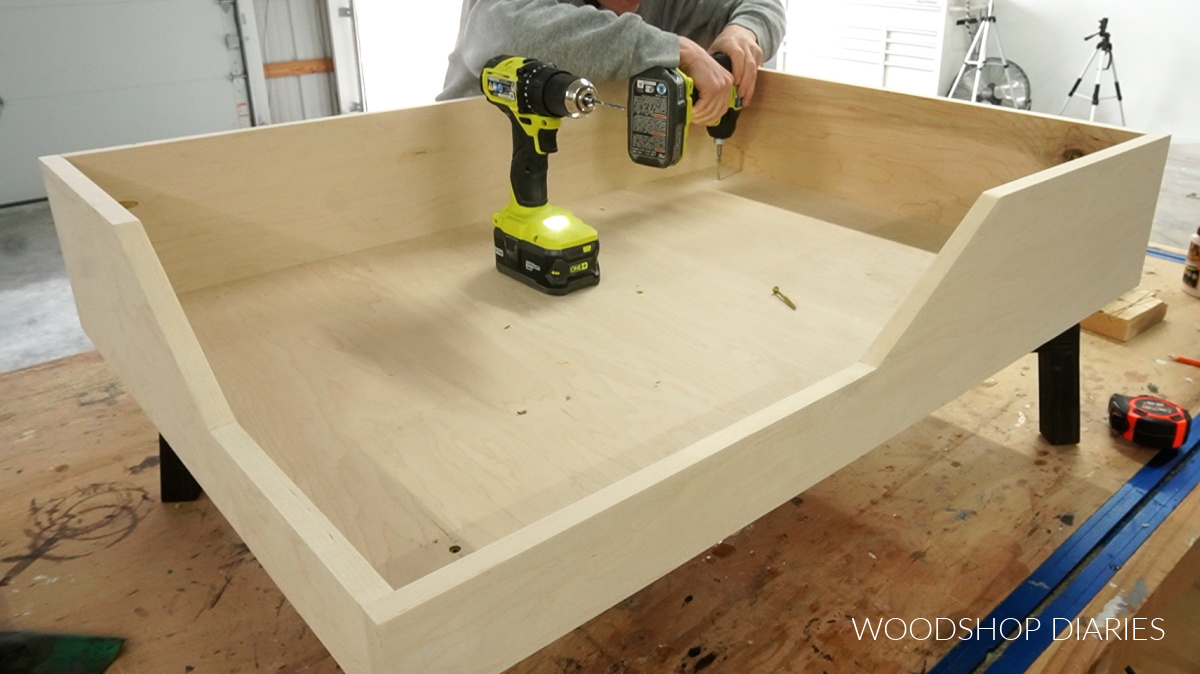
Step 3: Assemble Dog Bed Box
Once the pieces were all cut, I applied iron on edge banding along the top edges and any sides that will be exposed. Edge banding is optional, but helps smooth things out a bit.
RELATED: How to apply iron on edge banding
.
Then, I drilled ¾″ pocket holes along the edges of the bottom panel, into the ends of the back panel, and one at the front edge of the side panels (note locations in image below).
RELATED: How to use a pocket hole jig
.
I assembled this box using 1 ¼″ pocket hole screws. I attached the sides to the bottom panel first, then screwed the sides together at the top.
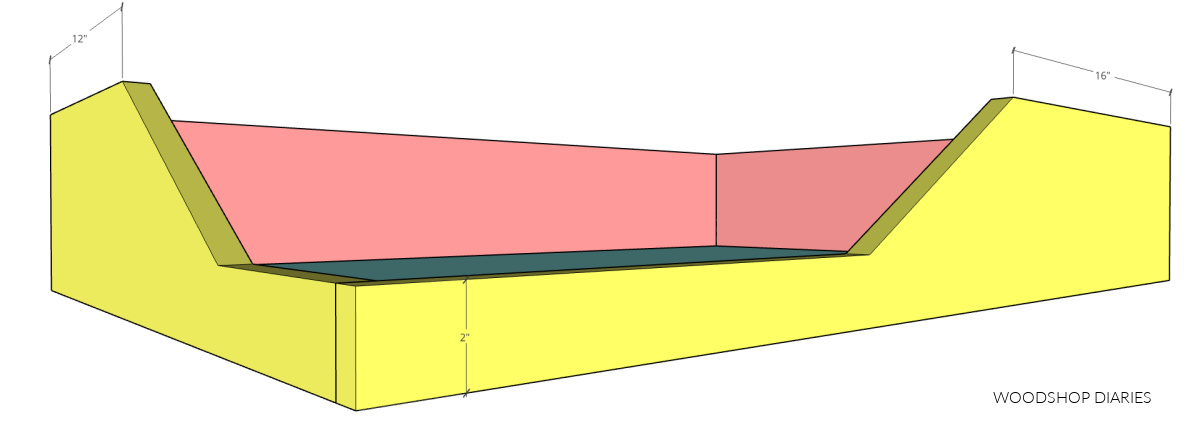
Step 4: Cut and Assemble Elevated Dog Bed Base
The base of this dog bed was made from 2x2s.
RELATED: How to make your own 2x2s
.
Now, if you modified your box size in the steps above, you’ll need to modify your base size here. To do this, simply adjust the lengths of your main X pieces as needed.
.
I recommend flipping your box over and figuring out how long you should make your long, main X board.
.
As an example, if it’s 4″ shorter than what’s shown here, then make your short X pieces 2″ shorter each for a total of 4″ shorter all together.
.
I cut the ends of my X pieces with a 10 degree miter so that the legs will slant in toward the top. At the center, the short X pieces were cut at 20 degrees to fit together properly.
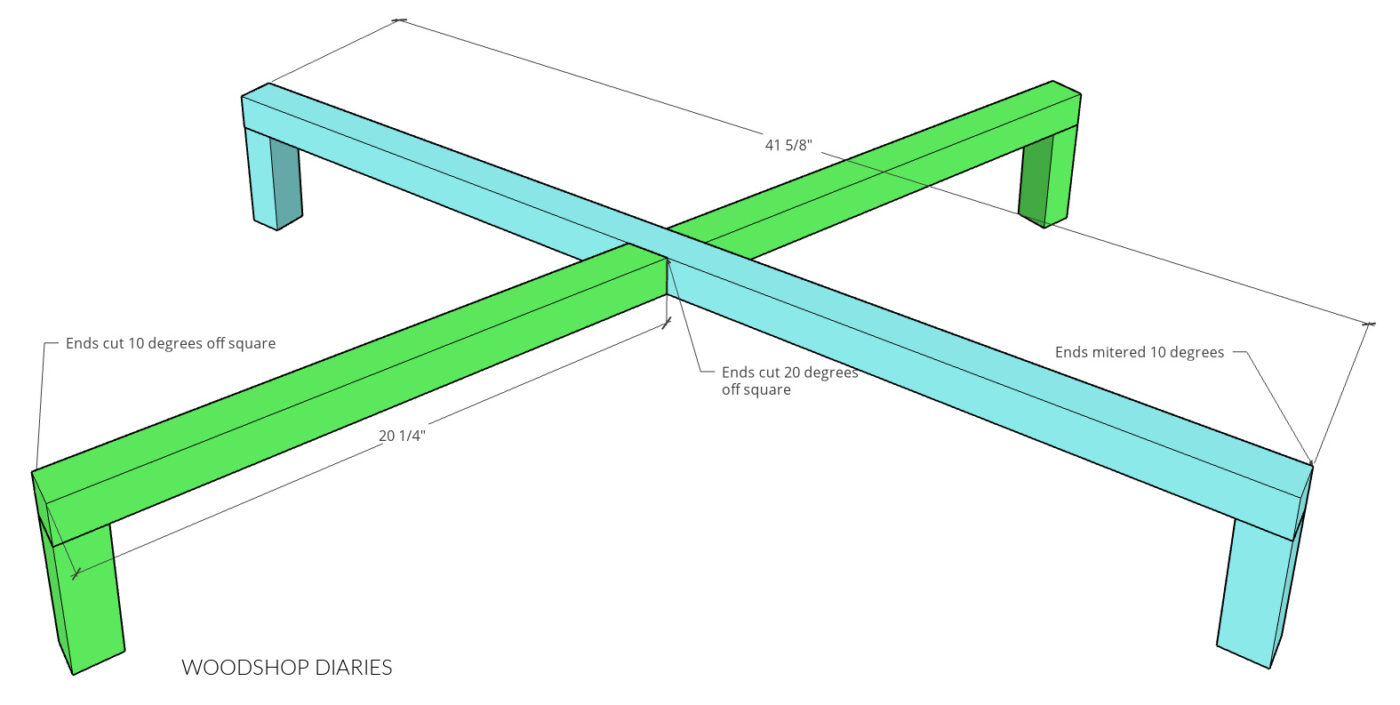
I cut the legs 5″ long with ends mitered 10 degrees–you can adjust the length here if you need to make your dog bed taller or shorter.
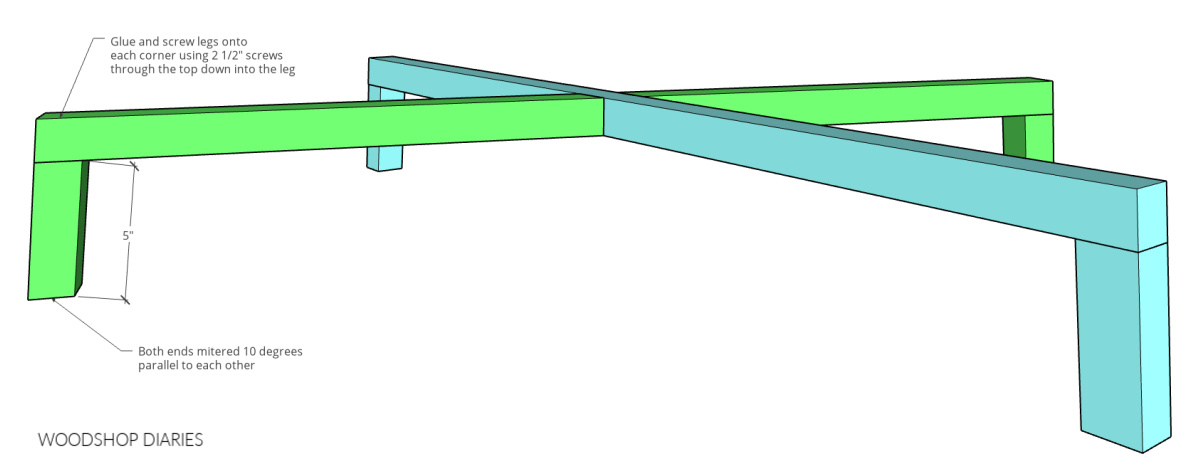
To assemble, I used wood glue and one 2 ½″ wood screw to secure each leg to the corners.

Then, I used wood glue and 2 ½″ wood screws to secure the short X pieces to the main X. I explain this in detail in the video above.
Step 5: Add Riser Blocks
This is an optional step, but I was building this to match these modern coffee tables and I used riser blocks on them for a neat design element, so I did the same here, too.
.
I cut five 1 ½″ cube blocks and glued and screwed them onto the top of the base like shown below.
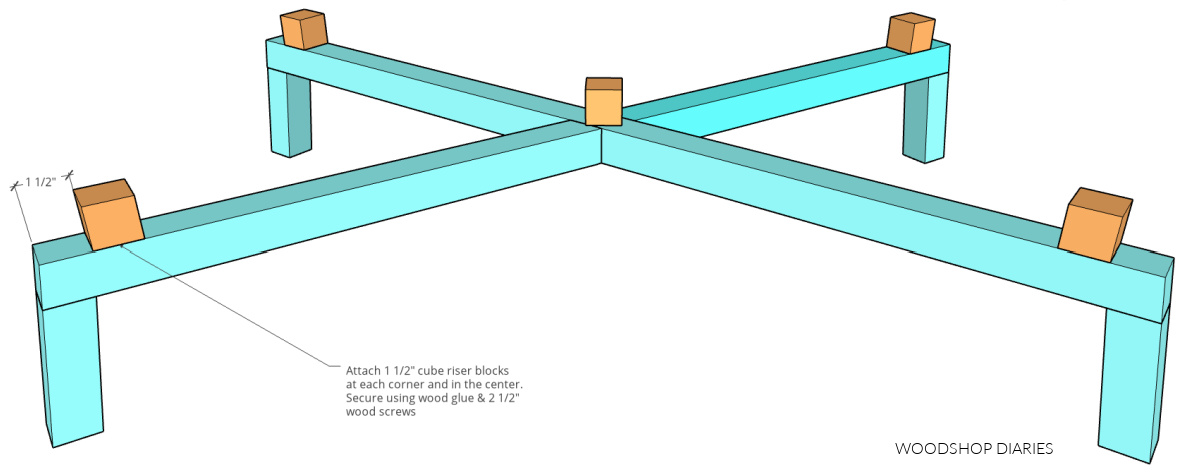
I put one in the middle and the other four 1 ½″ in from the ends of the X.
Step 6: Attach Dog Bed Box to Base
After the glue dried, I sanded the base smooth and applied an Ebony stain to the base. You can finish as desired.
.
After the stain was dry, I centered the dog bed box on the base and used 2″ wood screws through the bottom panel into each riser block of the base.
If you skipped adding the blocks, you can screw directly into the X base.
Step 7: Finish and Test
I applied a clear coat poly to the bed just to seal it and make it easier to clean in the future, then I tested it out to make sure it’ll hold.
.
It held me plus Lucy standing in it and I weigh twice as much as she does, so it definitely passed the weight test and should hold Lou just fine haha.
After the finish was cured, I placed the bed inside and let her try it out for herself. I think it’s safe to say she loves it.
.
I hope you enjoyed this fun and simple DIY elevated dog bed project and if you have a pet you want to spoil, I hope this gives you some inspiration to give it a go!
For more pet related projects, check out this list of fun pet DIYs here!
.
I’ve got tons more projects (both big and small!) to share soon, so if you want to stay up to date on all the latest happenings, be sure to subscribe below to be the first to know when new projects come out.
And if you’d like to save this for later, don’t forget to pin it!
Until next time, friends, happy building! 🙂