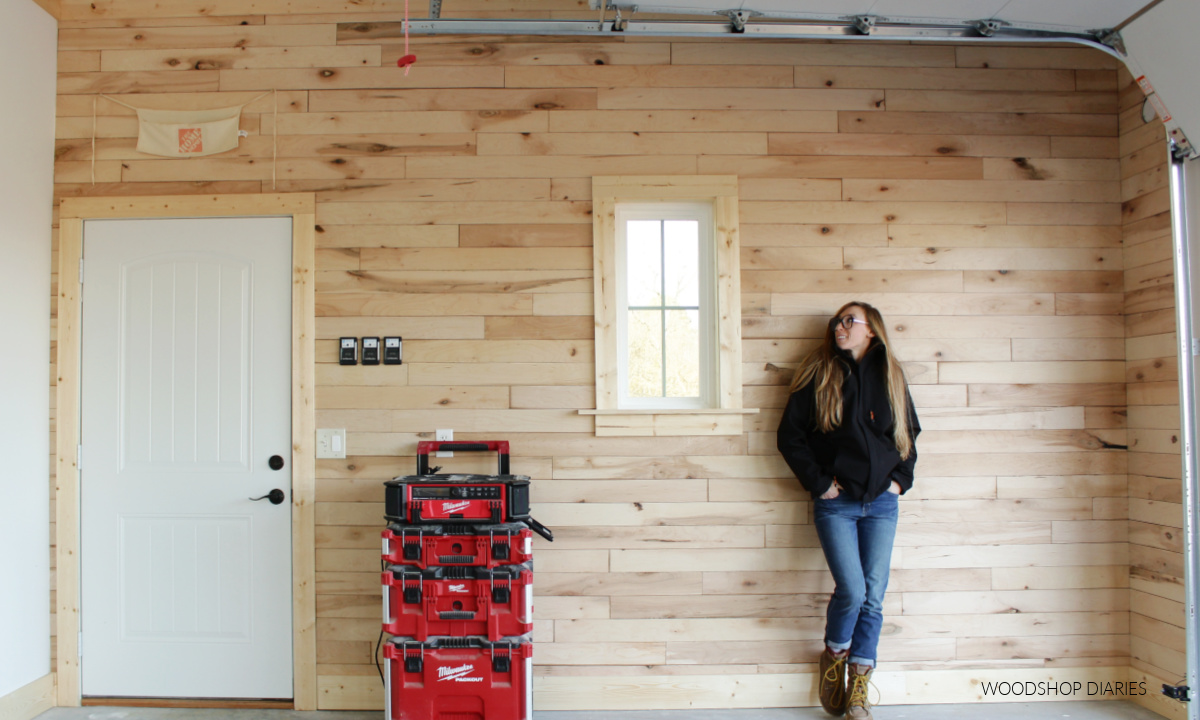
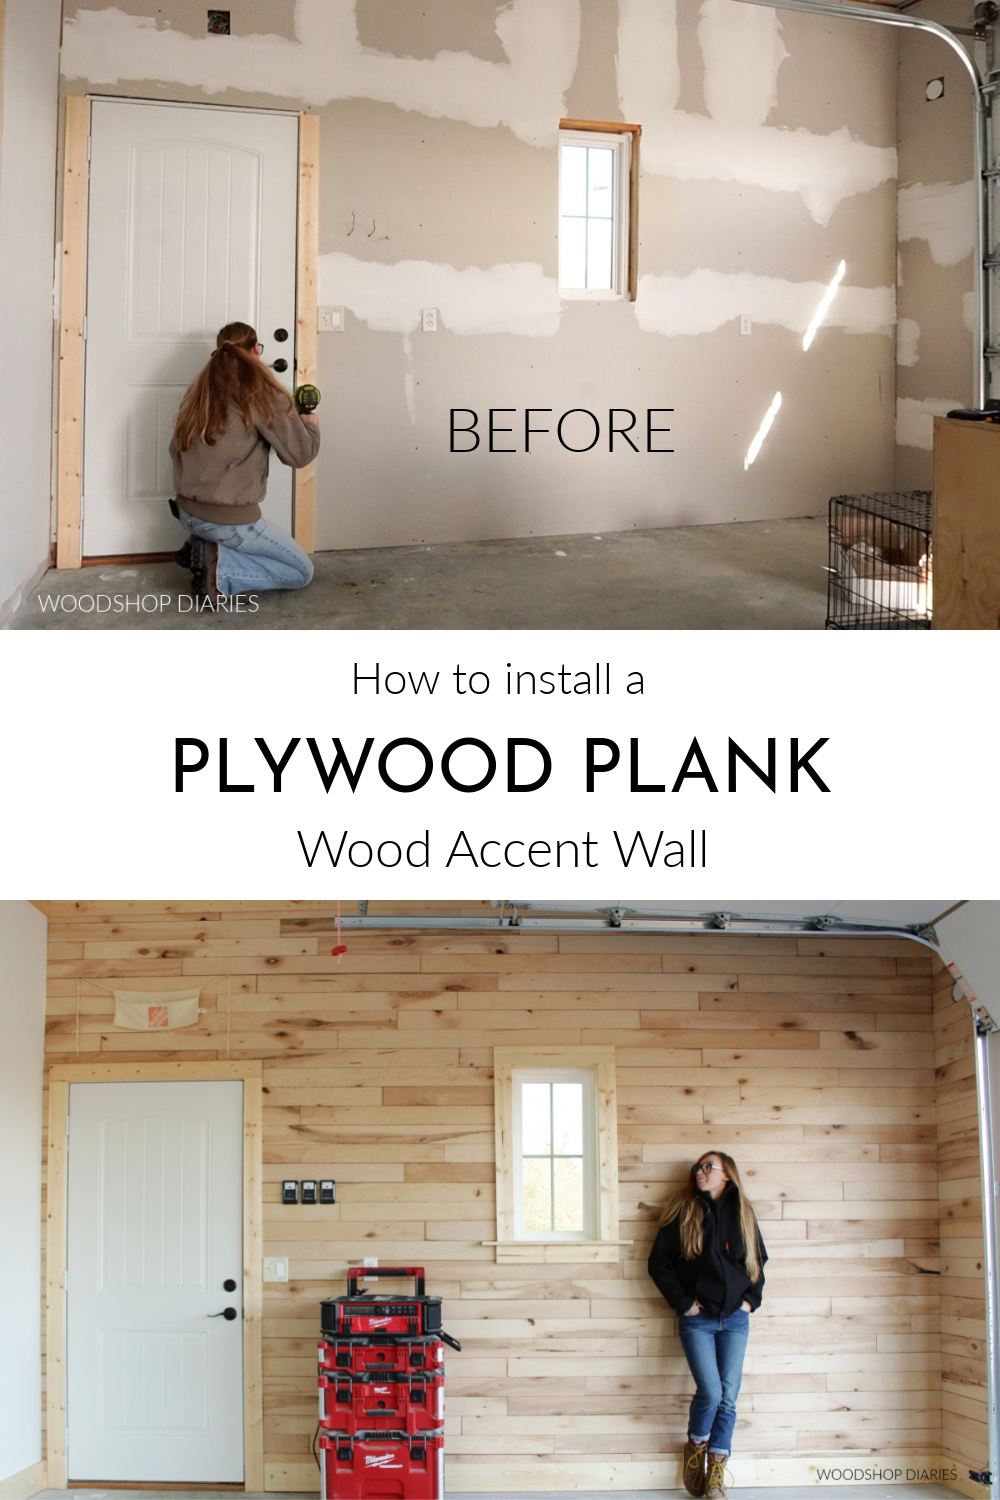
In this post, I’m sharing how I installed an easy DIY wood plank accent wall using precut plywood planks!
If you had the tools needed, you could definitely make your own wood planks for this and finish however you’d like.
.
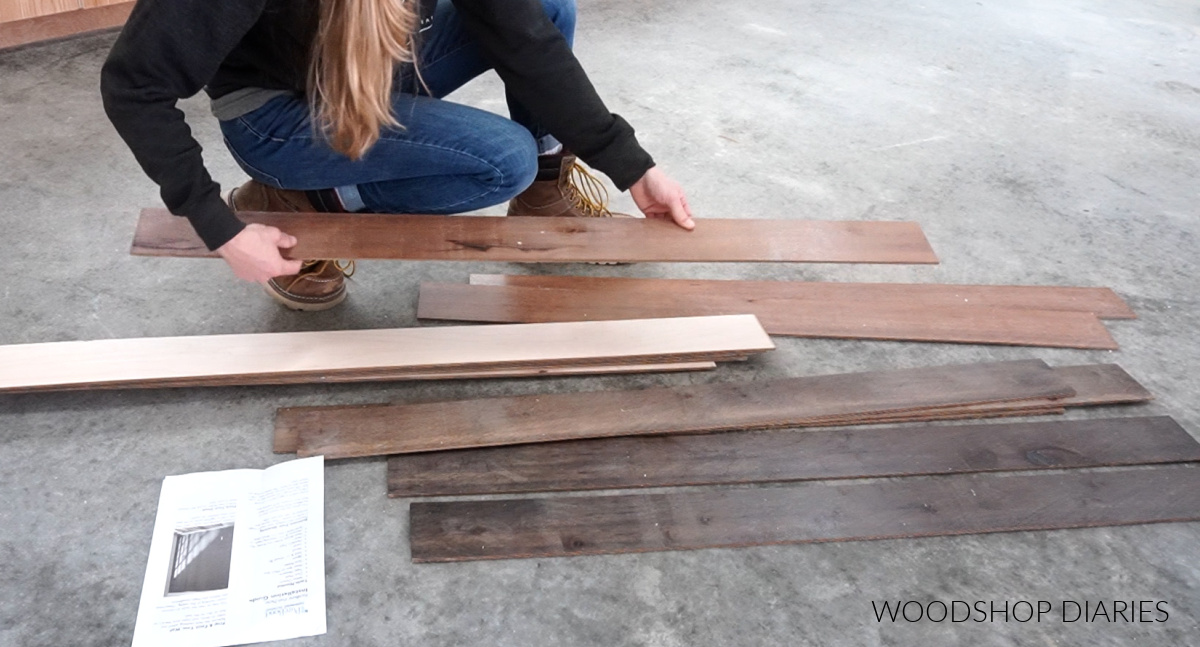
However, for this particular project, PureBond sent me some of their precut and prefinished planks to make this project go SUPER QUICK!
.
These are an excellent option if you don’t have the tools to cut your own planks, but want an easy way to add a shiplap or rustic wood accent wall…or you’re like me and have the tools, but just don’t want to take the time to cut them all down.
.
The wood wall planks are about ¼″ thick and come in precut sizes 3 ¾″ x 48″. One side is left unfinished (which is the side I used here), but the other side comes prefinished in varying colors to give a unique, rustic, barn wood style.
.
You can see how I used the prefinished side in the wood sign that I made for my workshop here.
.
But, in this case, for this wall, I used the unfinished side and left it natural because I liked the wood look. However, you can paint or stain this side as desired if you don’t like it plain.
.
So, if you’re ready to see how easy this is to install, let’s dive right in! I have a video tutorial here and a step by step below!
*This post contains affiliate links. See policies.
Tools & Materials:
Tools:
- Miter saw (optional)
- Jig Saw
- Screwdriver
- Nail Gun OR Staple gun
- Level
- Stud Finder
Materials:
- PureBond Wall Planks (or planks of your choosing)
- Nails/Staples (See notes section below for details)
Notes About This Wood Plank Accent Wall Project:
RELATED POST: Check out this post for more details on installing a wood plank accent wall in a herringbone pattern!
.
A Note About the Wall Plank Material:
For this project, to keep things quick and simple, I used these precut PureBond Wall Planks. However, you can cut your own ¼″ plywood strips if you prefer.
You can use thicker plywood or even solid wood for this, but ¼″ plywood planks are lightweight and really easy to install so I’d recommend it over thicker materials. Just a personal preference.
.
Nail/Staple Lengths:
The instructions suggest using brad or finish nails to secure these boards to the wall studs, but staples work as well.
RELATED: What’s the difference in finish, brad, and staple nailers?
.
You want to make sure to use a nail long enough to go through the plank boards and the drywall/wall covering and into the studs behind it.
.
Depending the thickness of the planks you choose to use and your existing wall covering (drywall, paneling, etc.), this length may vary and you’ll have to determine what you need for your situation.
.
What About Existing Trim?
You can opt to remove the existing trim on the wall (baseboards, crown molding, etc.) and replace them after installing the planks OR just cut the planks around the trim.
.
I know it’s more work, but I’d advise at least removing the crown and baseboard and replacing them after installing the wall planks for best results.
.
In my case, my wall was unfinished and didn’t have any trim, so I just added crown and baseboard after installing the planks.
.
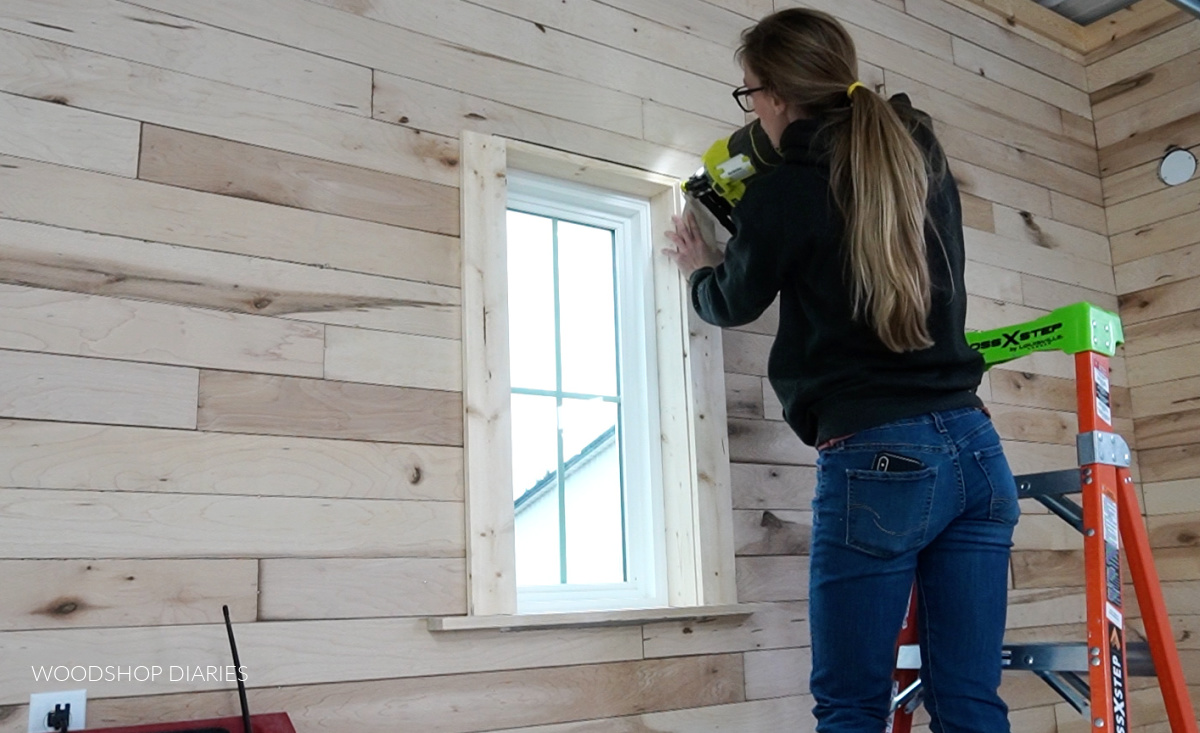
However, I did install the door trim first and cut my planks around that. I encourage you to check out the video to see how and why I installed the trim in the order I did.
Step 1: Prep the Accent Wall
My wall was unfinished and didn’t have any paint on it yet–this was a freshly drywalled surface. However, if you plan for your boards to be dark, it’s best to paint your wall dark before installing the planks.
.
Or, if you plan to keep your boards light, paint the wall a light color before installing.

This just helps blend in if there are any gaps between the boards when you install them. I was using light colored wood, so I left my drywall bare as it was a light color to begin with.
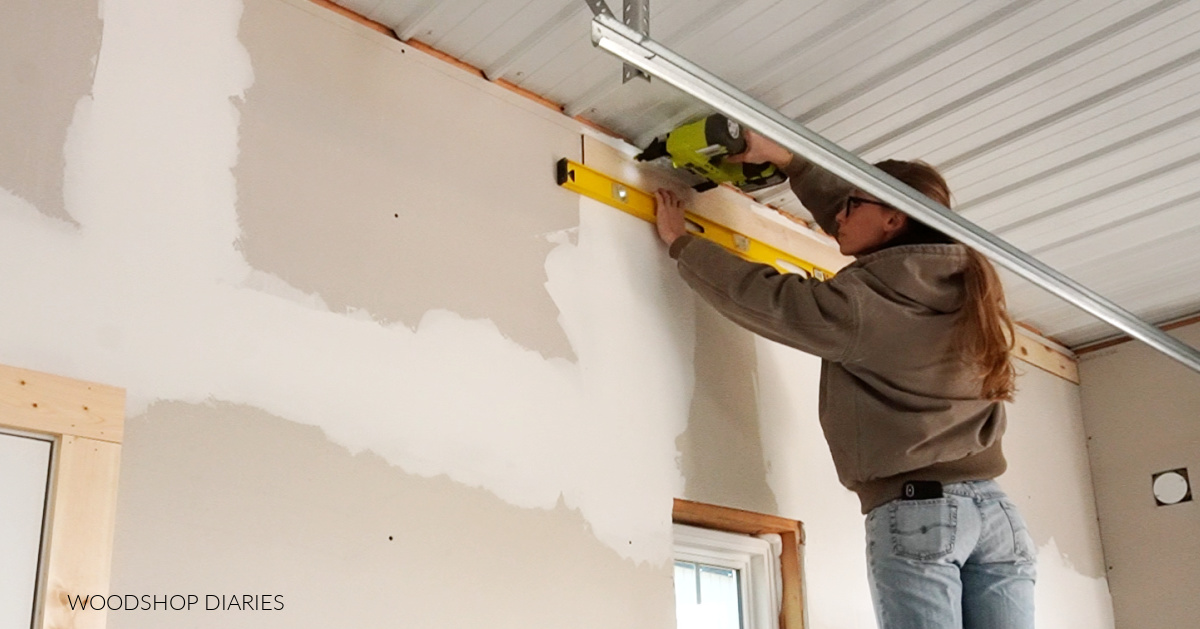
Step 2: Mark a Level Line and Wall Stud Locations
To get started, it’s important to make sure the first row is level. You can start at the top or bottom of the wall (I started at the top), and use a level to mark a level line across the wall.
.
I marked this about ½″ from the top edge. I’ll cover this ½″ gap later with trim.

After marking a level line across the wall horizontally, use a stud finder to mark the stud locations on the wall from the top to the bottom.
.
You will nail the boards into the studs, so it makes things go a little quicker if you just mark these first instead of finding them as you install each piece.
.
Since my drywall was unfinished, my studs were already marked with drywall screws. But you can simply draw a vertical line down the wall to mark the studs.
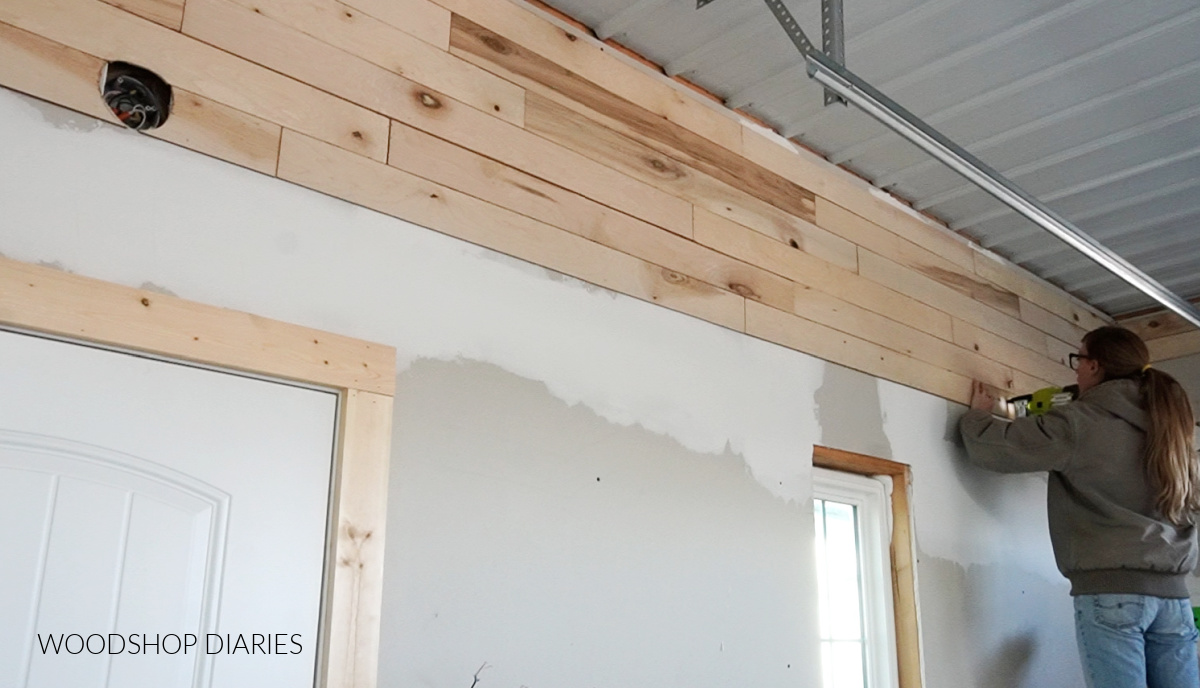
Step 3: Start First Two Wall Plank Rows
To begin, I started stapling planks along the level line at the top starting at one end and working my way to the other. It doesn’t matter which side you start on as long as you keep things level as you go.
.
I used a stapler, so I stapled each board into the wall studs they crossed. The first two rows are the most important. I double checked each board as I installed it that it stayed level.
When I got to the end, I used a miter saw to trim the last board to fit. If you don’t have a miter saw, you can use a jig saw instead.
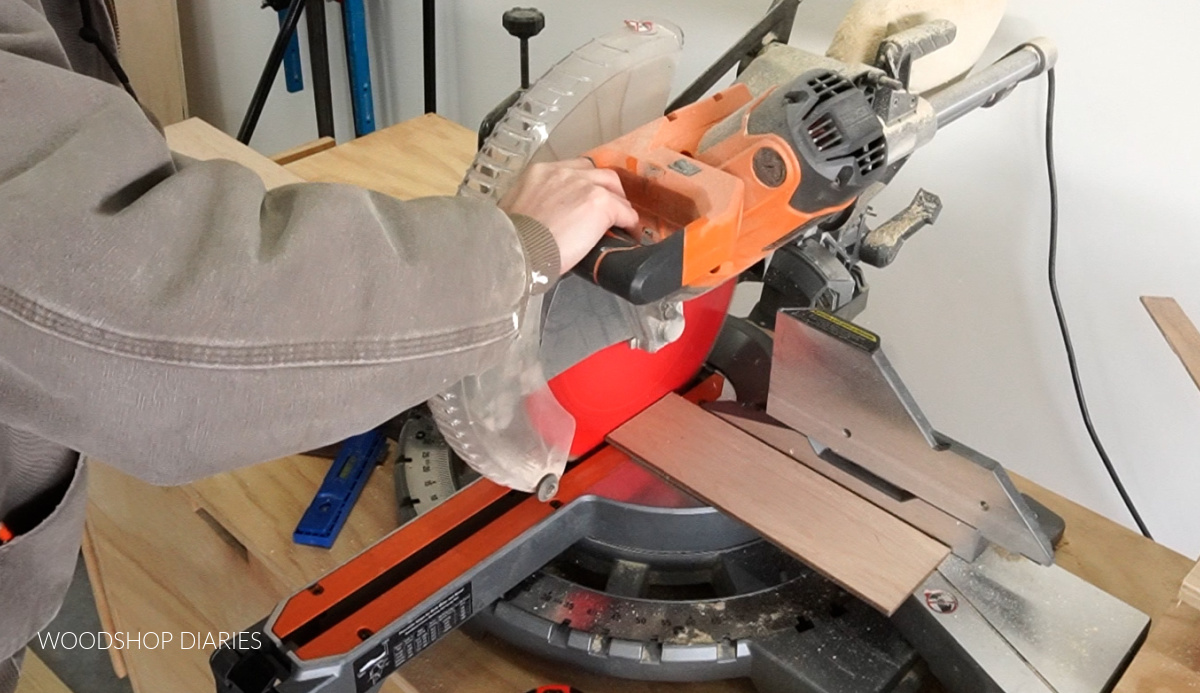
Then, I moved to the next row, making sure to install these so the seams were staggered–much like you’d install a wood floor. You don’t want all the ends to line up.
Step 4: Cut to Fit Wall Planks Around Obstacles
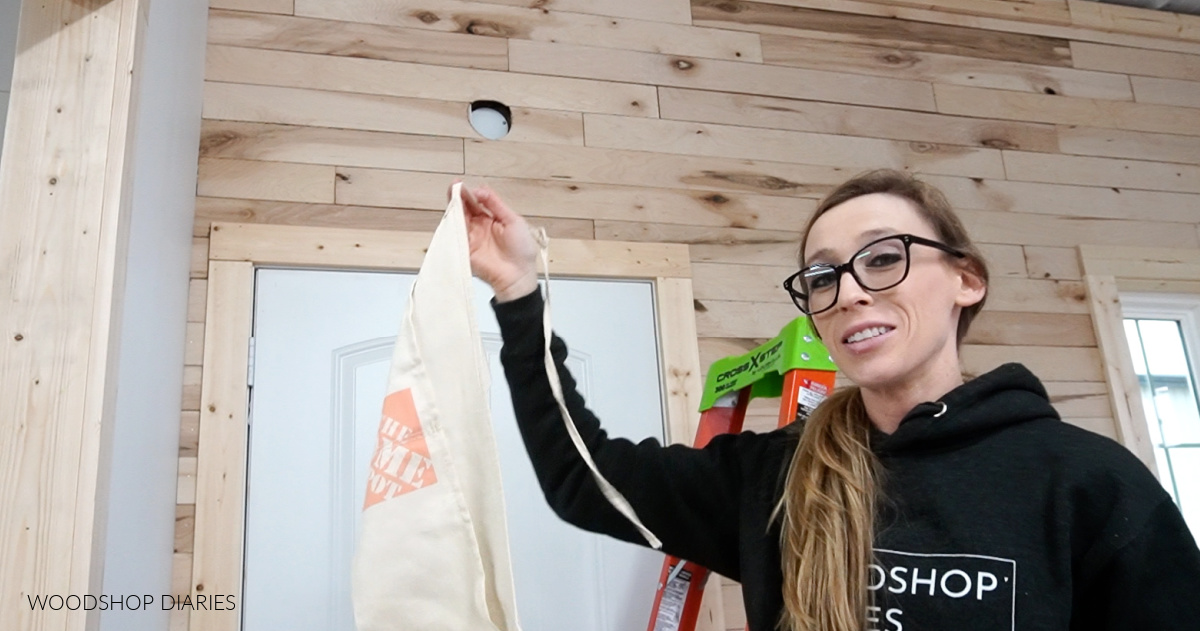
I kept working my way down the wall installing planks until I reached an obstacle to cut around. In my case, the first obstacle I reached was a hole for a light box for a light outside my shop.
.
In this case, I marked where to cut and used a jig saw to carefully cut out the pieces to fit around it.
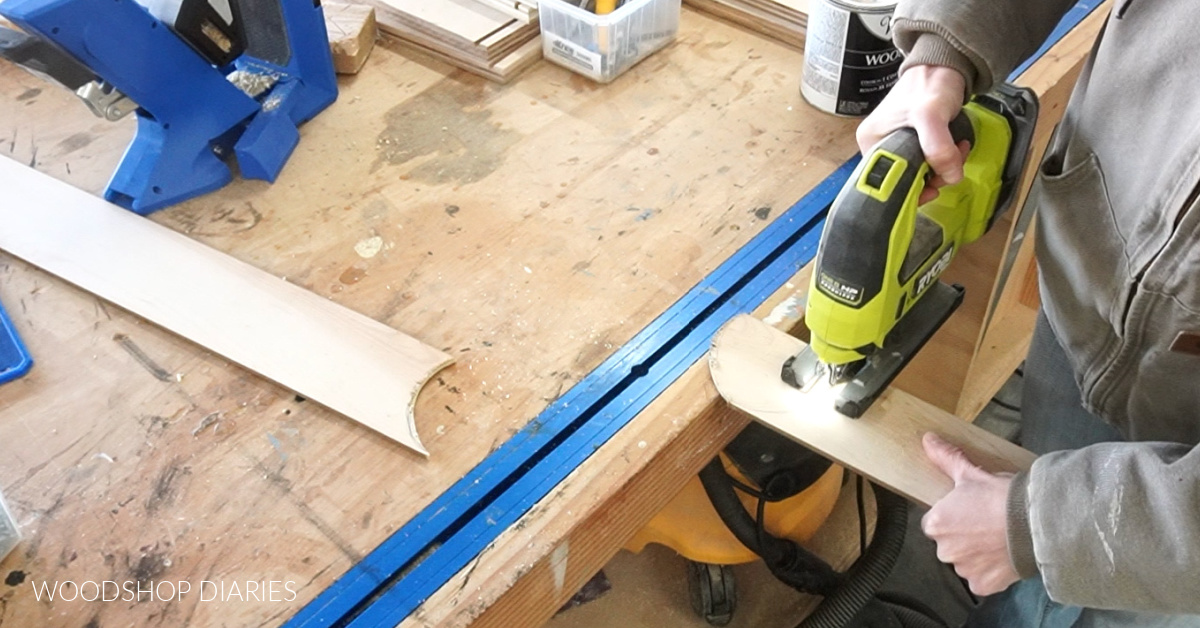
You can see where I cut these pieces below on the left.
Now I did come back to this later in the project to install a cover and make this look a little nicer. Likely, you wont have a recessed box in your wall like this to worry about haha.
.
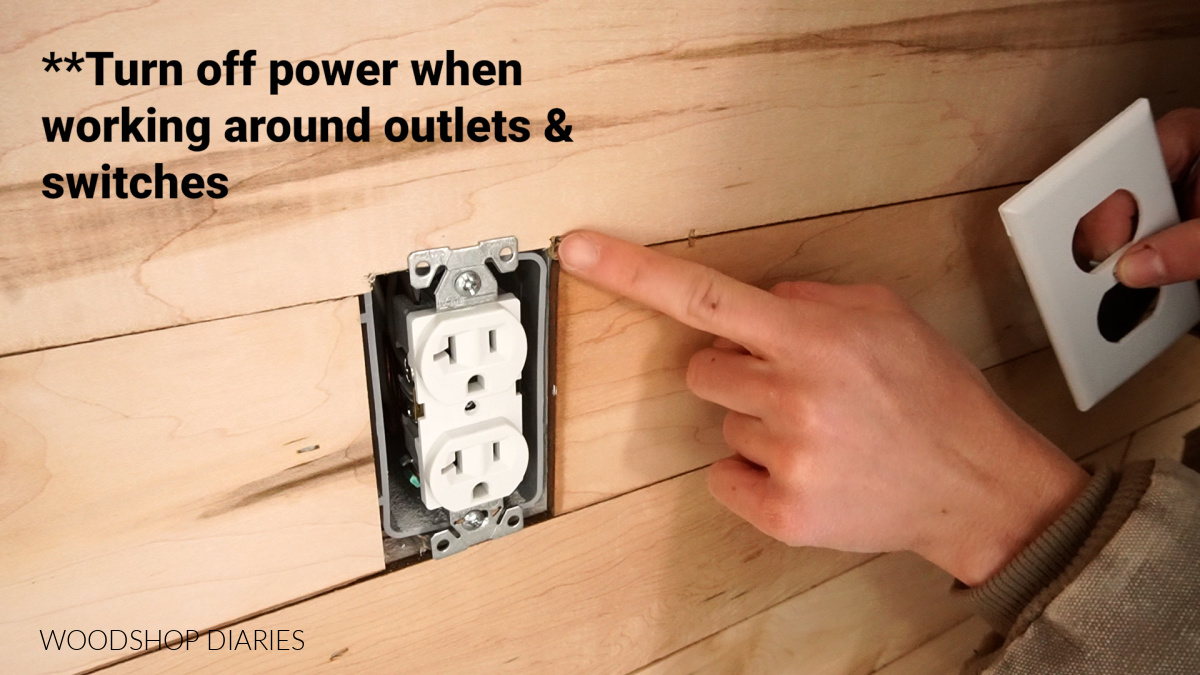
But when I came to trim I needed to cut around or outlets/switches, I just marked and cut to fit with my jig saw.
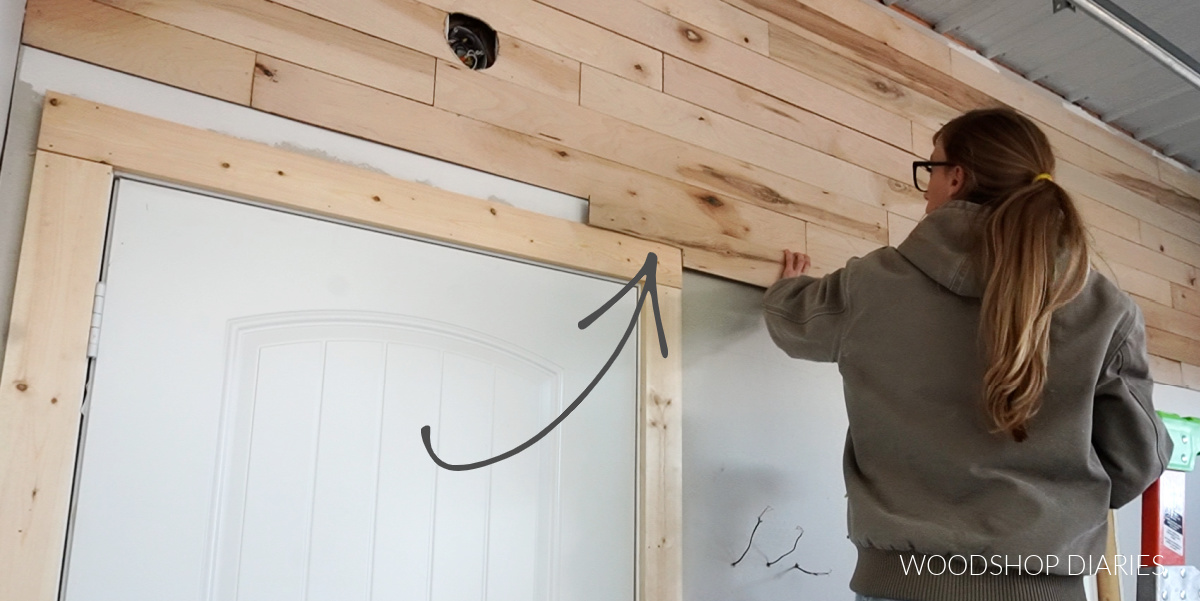
For the left side of this door, I just trimmed several small pieces to staple in between the trim and the adjacent wall.
.
For outlets, make sure to turn off power first, then remove the plates and cut to fit the wood plank pieces around the box. I loosened the outlets and slid the trimmed boards behind them, then tightened the outlets back up on the outside of the wood and reinstalled the plates.
.
However, if you don’t want to mess with that, you can also install outlet extenders instead.
Step 5: Install Final Row and Trim
I worked my way down the wall cutting and stapling pieces in place, staggering all the seams and cutting around obstacles. And when I got to the bottom of the wall, I installed the final row.
.
You don’t have to go all the way to the floor, but you want to make sure that you stop close enough to the bottom that your baseboard trim will cover it.
.
If you left your existing trim, you may need to use a jig saw (or a table saw if you have one) to trim down your last row boards to thinner strips to fit.
.
Once the last row was installed, I nailed trim on top. At the bottom, I installed a 1×6 board. Because the door trim was a 1×4 and the planks were butted up to them, if I installed the 1×6 on top of the planks, it would stick out past the door trim at the front corner.
.
I felt it looked a little weird like that, so I trimmed a small bevel on that corner using my miter saw to help these pieces “match up better.” See bottom left corner below.
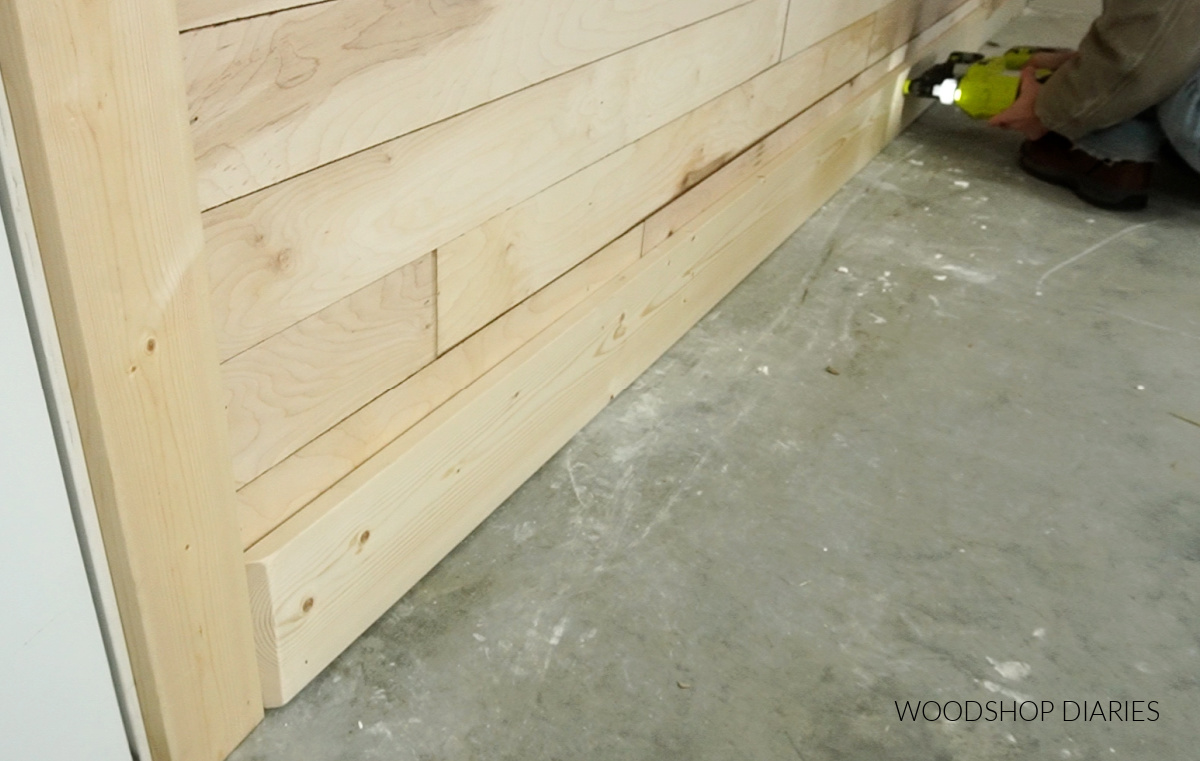
I used a finish nailer to secure this trim into the studs and I installed a 1×4 along the top as a crown molding alternative.
.
Then I came back and trimmed out the window. You can check out a step by step tutorial for how to install window trim here.
Step 6: Finish as Desired
At this point, you can putty over the staple/nail holes and paint and/or stain as desired. Or, like me, you can leave it as is. I really liked the natural wood look for this wall.
.
I will come back at some point and give it some clear coat poly to seal it, but for now, I was in a hurry to move on to my next project. I would recommend sealing it even if you don’t paint or stain.
.
I plan to use Minwax Helmsman Water Based Poly whenever I get back around to finishing it.
.
The final thing I needed to finish up was covering up that light box hole in the wall. This is just my workshop, so it’s not a huge deal that it be perfect, but this recessed light box was a bit of an eyesore.
.
I put a cover over it to keep the wires safe inside, and I hung up this little Home Depot apron that I used to have hanging on the wall in my old workshop to cover it up. No one will ever know haha.
And now I have an eye catching wood plank accent wall backdrop and staging area in my workshop perfect for taking photos against!
.
I’m SO happy with how this turned out. It definitely finishes out my shop well and looks a million times better than I expected–much better than that unfinished drywall wall haha.

I easily completed this project in a day and it’s a really fun project if you’re looking to add some texture and warmth to your space–in your home or in your shop/garage!
.
I really hope you enjoyed this DIY wood plank accent wall project and be sure to check out the video for more details and to watch the entire process.
.
And for a look at the prefinished side of these plank boards, check out my shop sign tutorial here.
.
If you’d like to follow along and stay up to date on all the latest projects and videos, be sure to subscribe to the newsletter below!
And if you’d like to save this for later, don’t forget to pin it!
Until next time, friends, happy building! 🙂