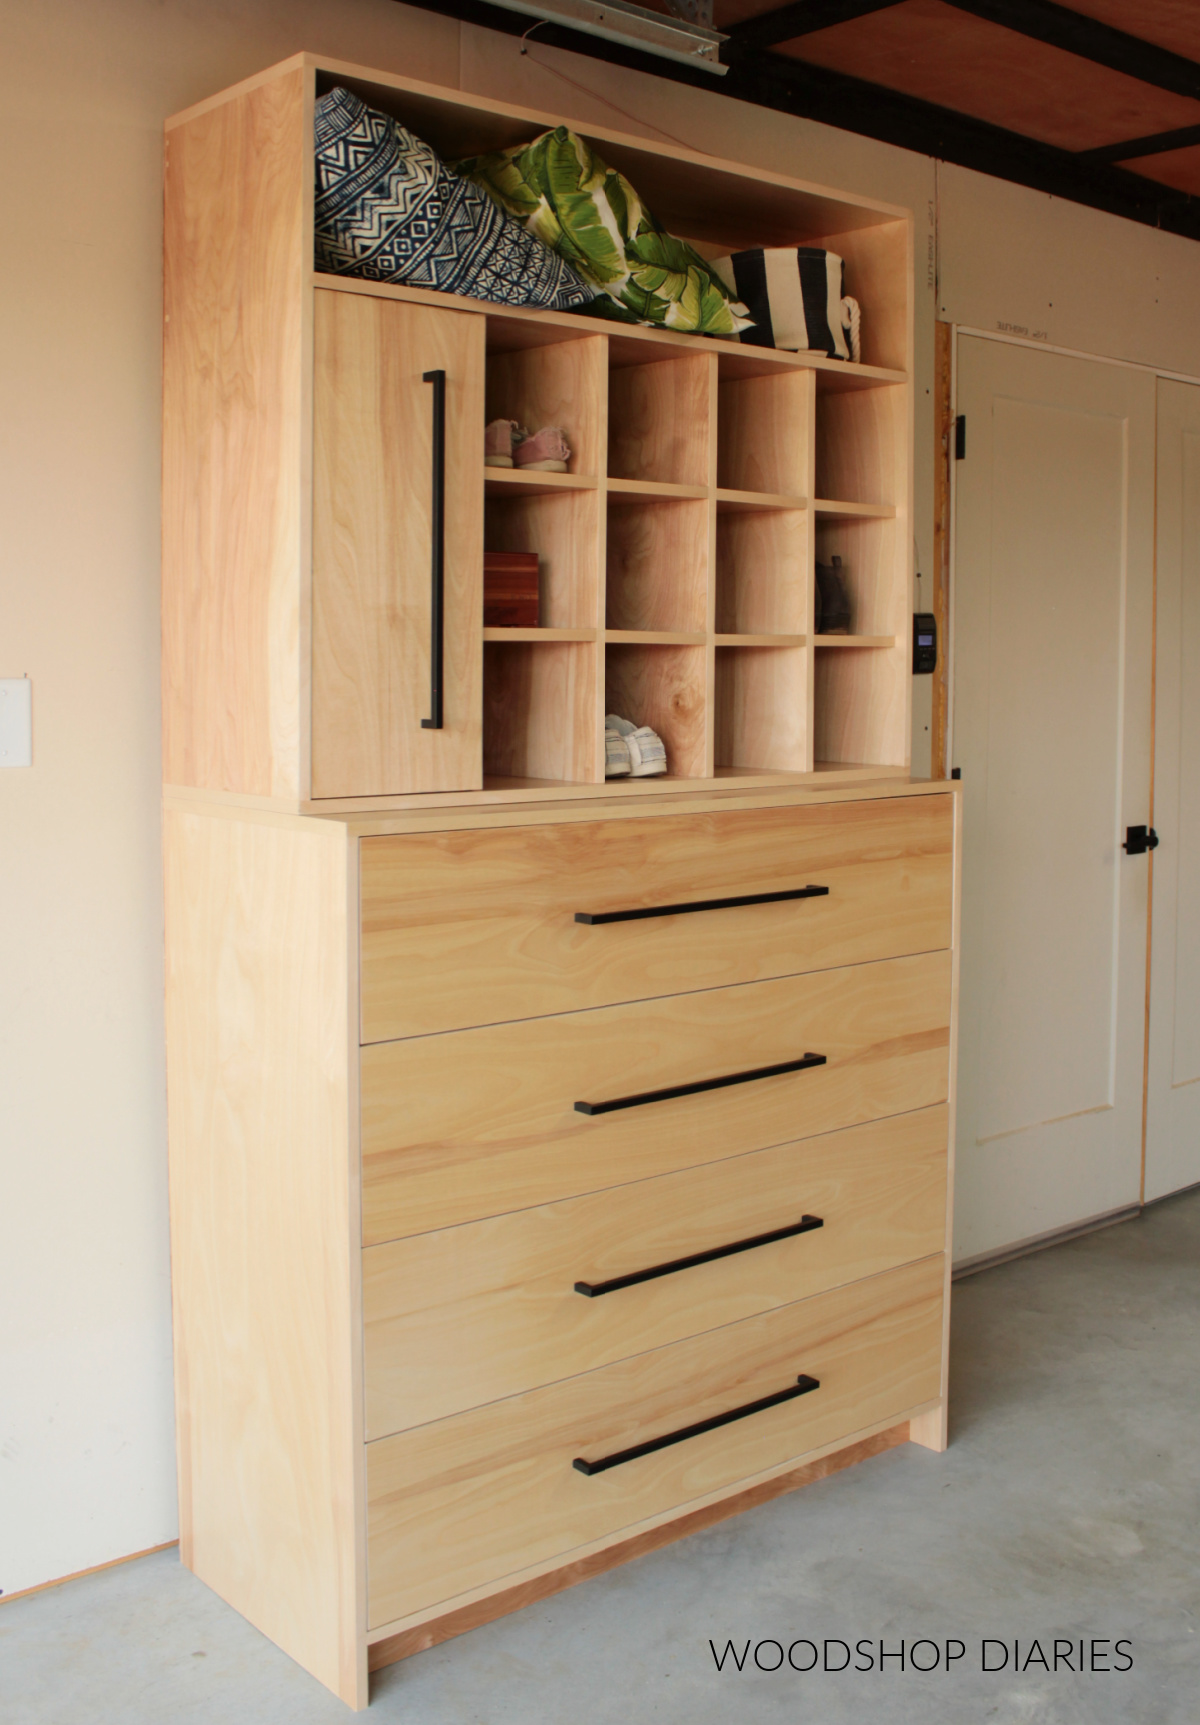
In this post, I’ll show you how to build your own built in (or stand alone, if you prefer) DIY Closet System!
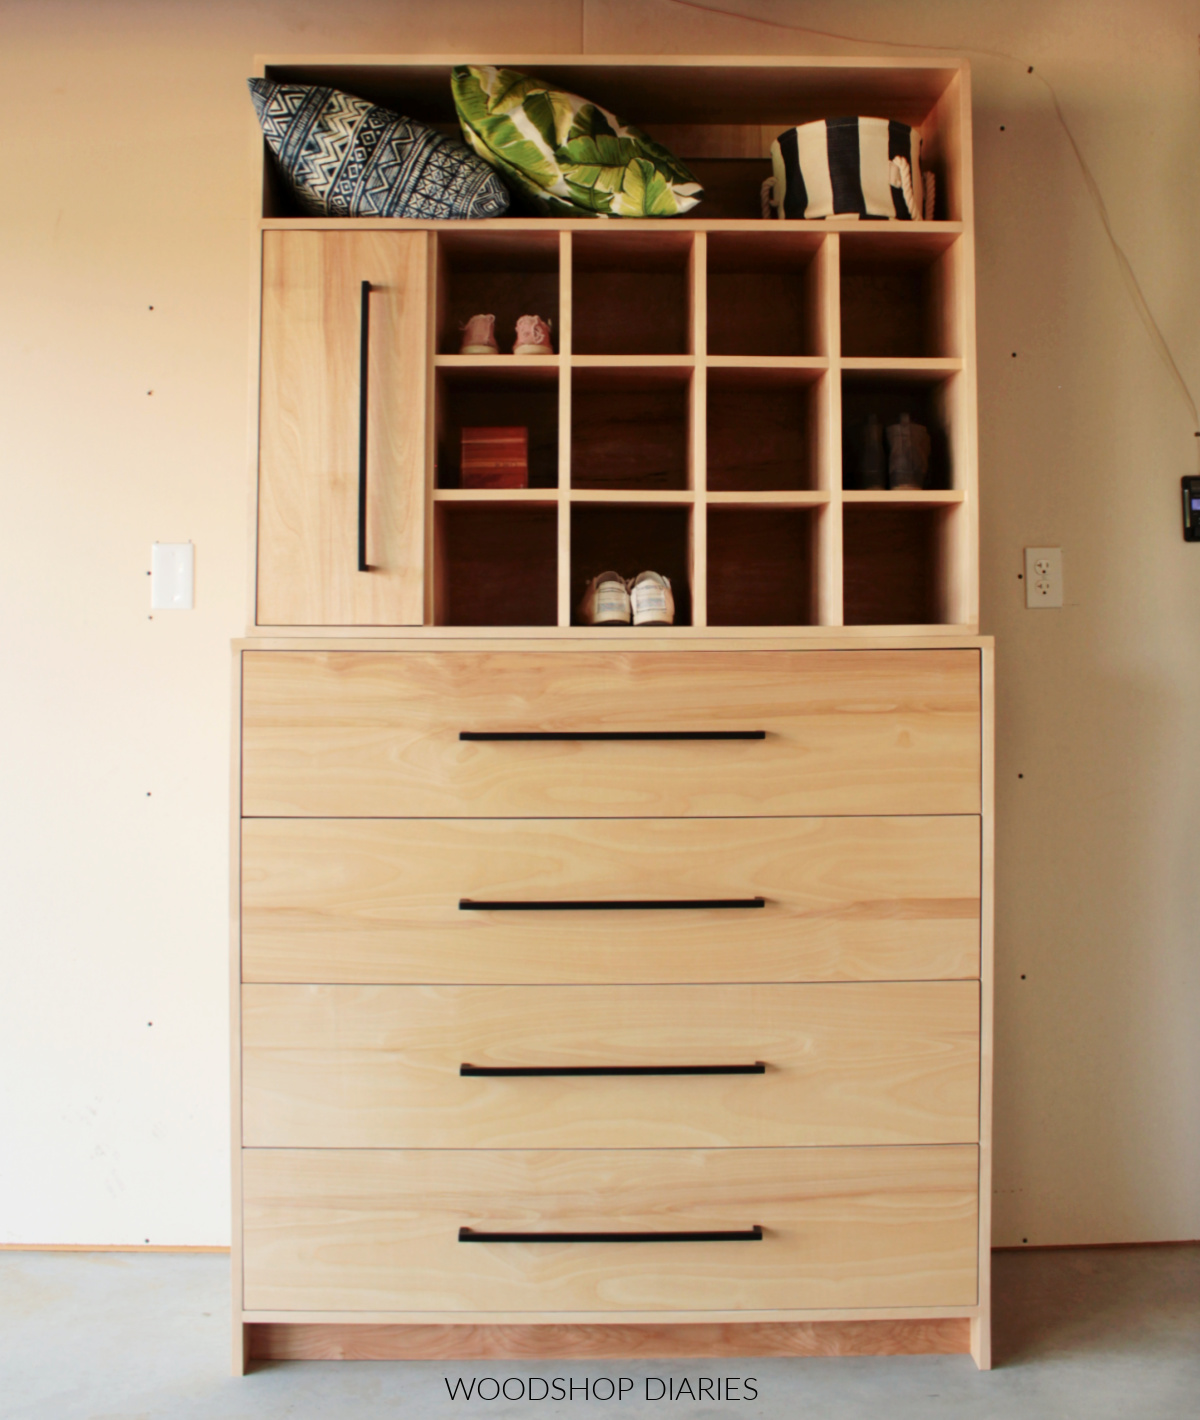
Now, I know the image above shows this DIY closet system standing on its own–and that’s definitely a possibility. This piece can stand alone in a room.
.
But it was actually designed to fit into a nook in a friend’s house that just needed some extra storage space. Dimensions below 🙂
.
The large drawers, shoe cubbies, and long shelf provide plenty of storage for t-shirts, sweaters, shoes, and jeans.
.
However, if you need some hanging storage, you may want to check out my DIY closet cabinet project here that can show you how to build a hanging clothes cabinet.
.
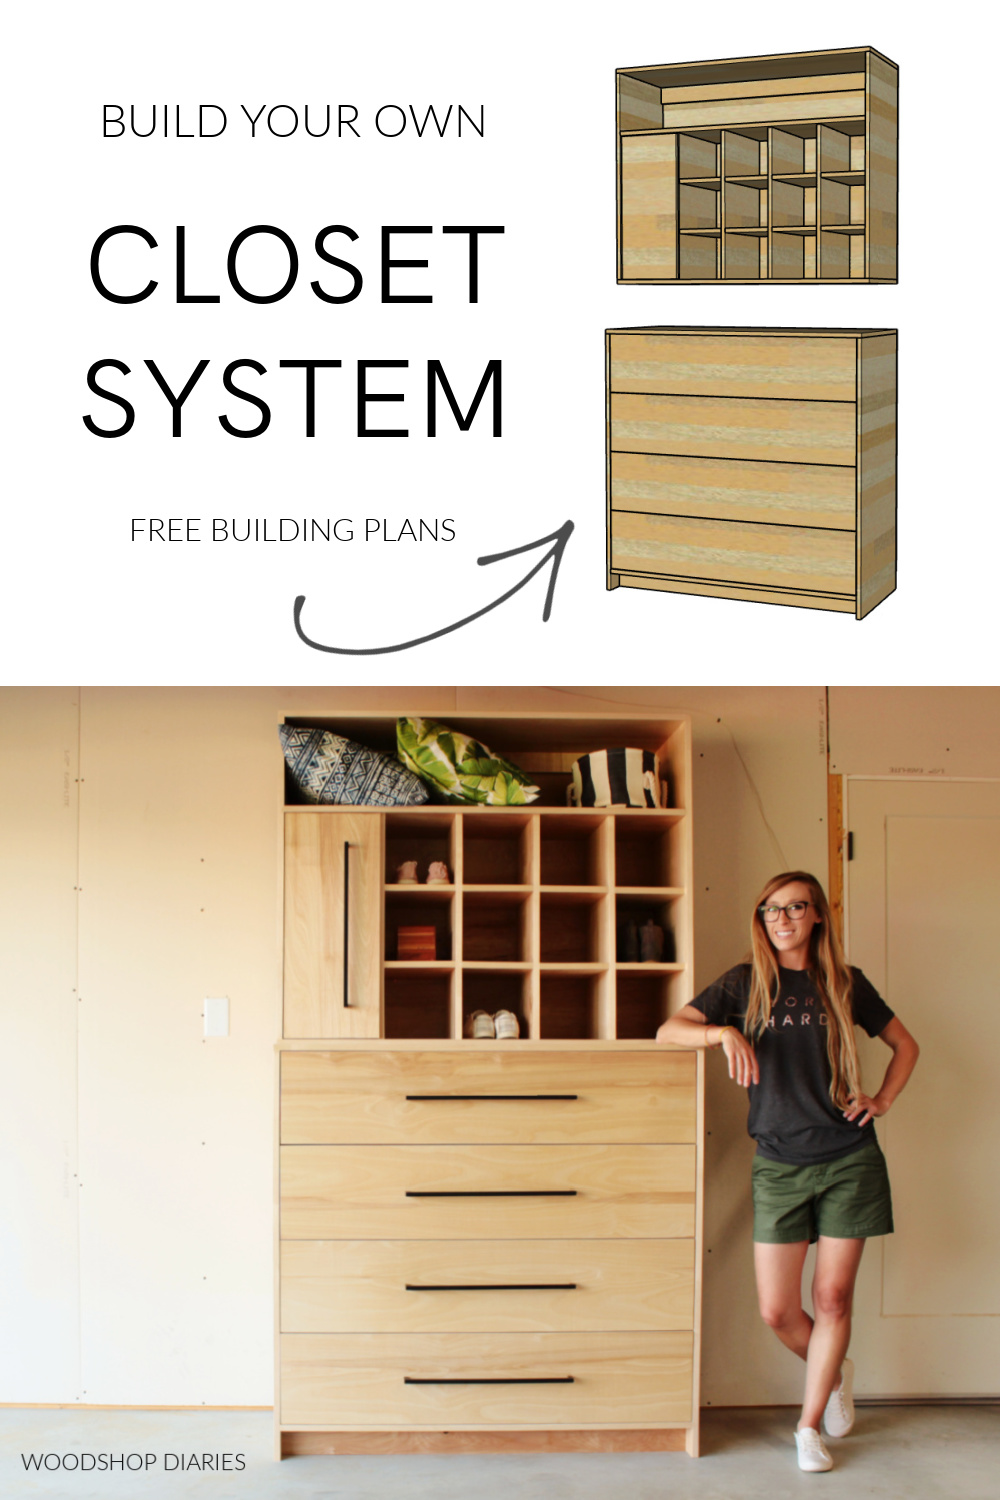
But, if this DIY closet system is exactly what you’ve been looking for, I’ll show you how to build it in this video and in the detailed plans below:
This post contains affiliate links. See policies.
Tools and Materials:
Tools:
- Circular saw
- Kreg Rip Cut & AccuCut (optional cutting guides to use with circular saw)
- Miter Saw (optional…you can use circular saw for everything if you want)
- Table saw (also optional)
- Drill/Driver
- Kreg Pocket Hole Jig
- Dowel Jig
- Clamps
- Stapler (optional)
Materials:
- (4) sheets ¾″ plywood
- (2) sheets ¼″ plywood
- (1) 1″ x 48″ wooden dowel
- (4) pair 16″ drawer slides (I buy the bulk pack because it’s cheaper)
- (1) pair 14″ drawer slides
- ⅜″ dowels
- 1 ¼″ pocket hole screws
- 1 ¼″ screws
- Wood Glue
- RapidFuse Glue
- Edge Banding
- (5) modern handles
- 3″ screws (for securing to wall when complete)
- Wood Putty
- Clear Coat Finish
Grab the Printable version of these Building Plans here. And browse the step by step process in the post below:
Some notes about this DIY Closet System
Sizing:
This project is basically a mini built-in closet. It was designed to be “built into” a nook roughly 4 ft wide, 2 ft deep and 8 ft tall.
.
In case you’re curious, the full backstory: My friends removed an old vanity sink in their house that had been recessed into this odd nook between the bedroom and bathroom. Instead of wasting the space after removing the vanity, they wanted this closet storage added to it.
.
So I built this project to be 47″ wide, 20″ deep and 7 ft tall to allow for some wiggle room to get it installed.
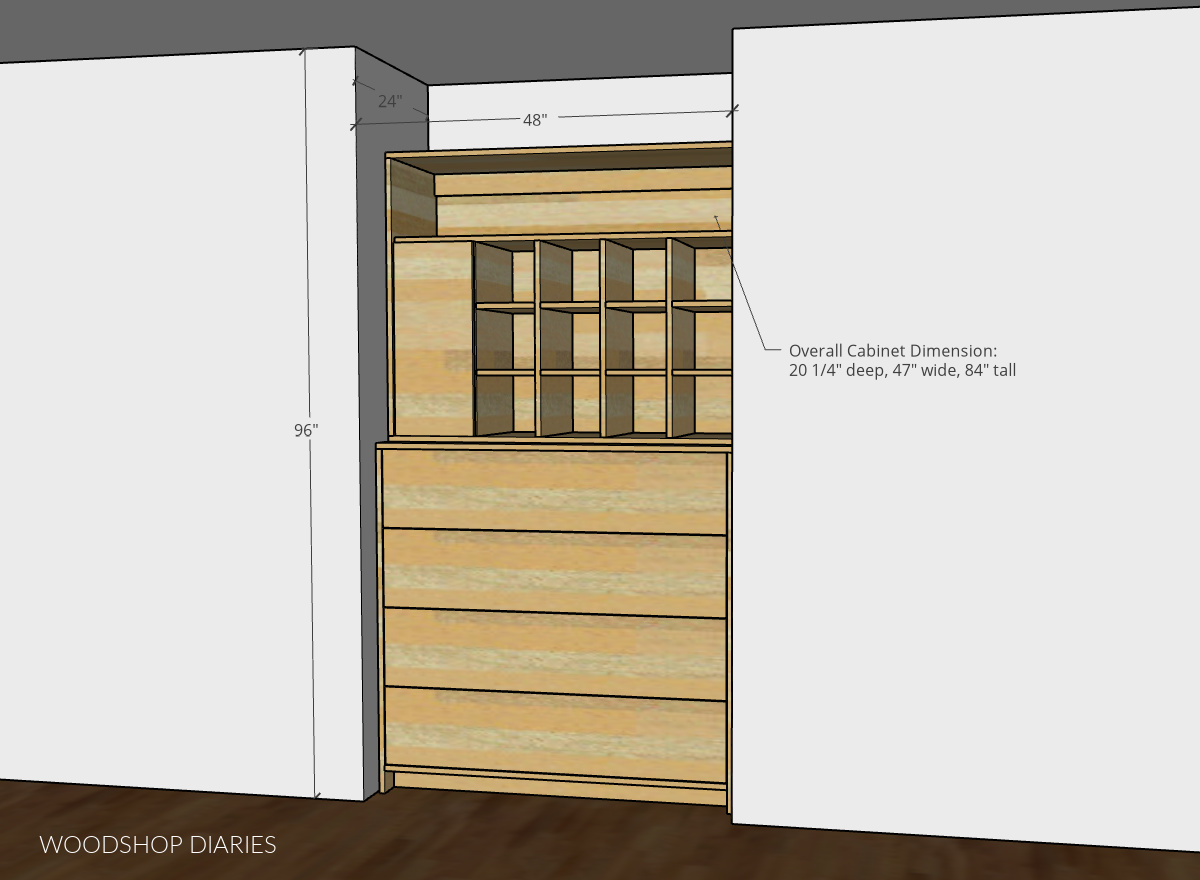
Any gaps after installation can be covered with half round, cove, or some other type of thin molding or trim, if desired. And the space at the top can be left for extra storage.
.
This could be easily modified, doubled up on, or added on to to fill a whole closet, or to fit your specific space as needed.
Design:
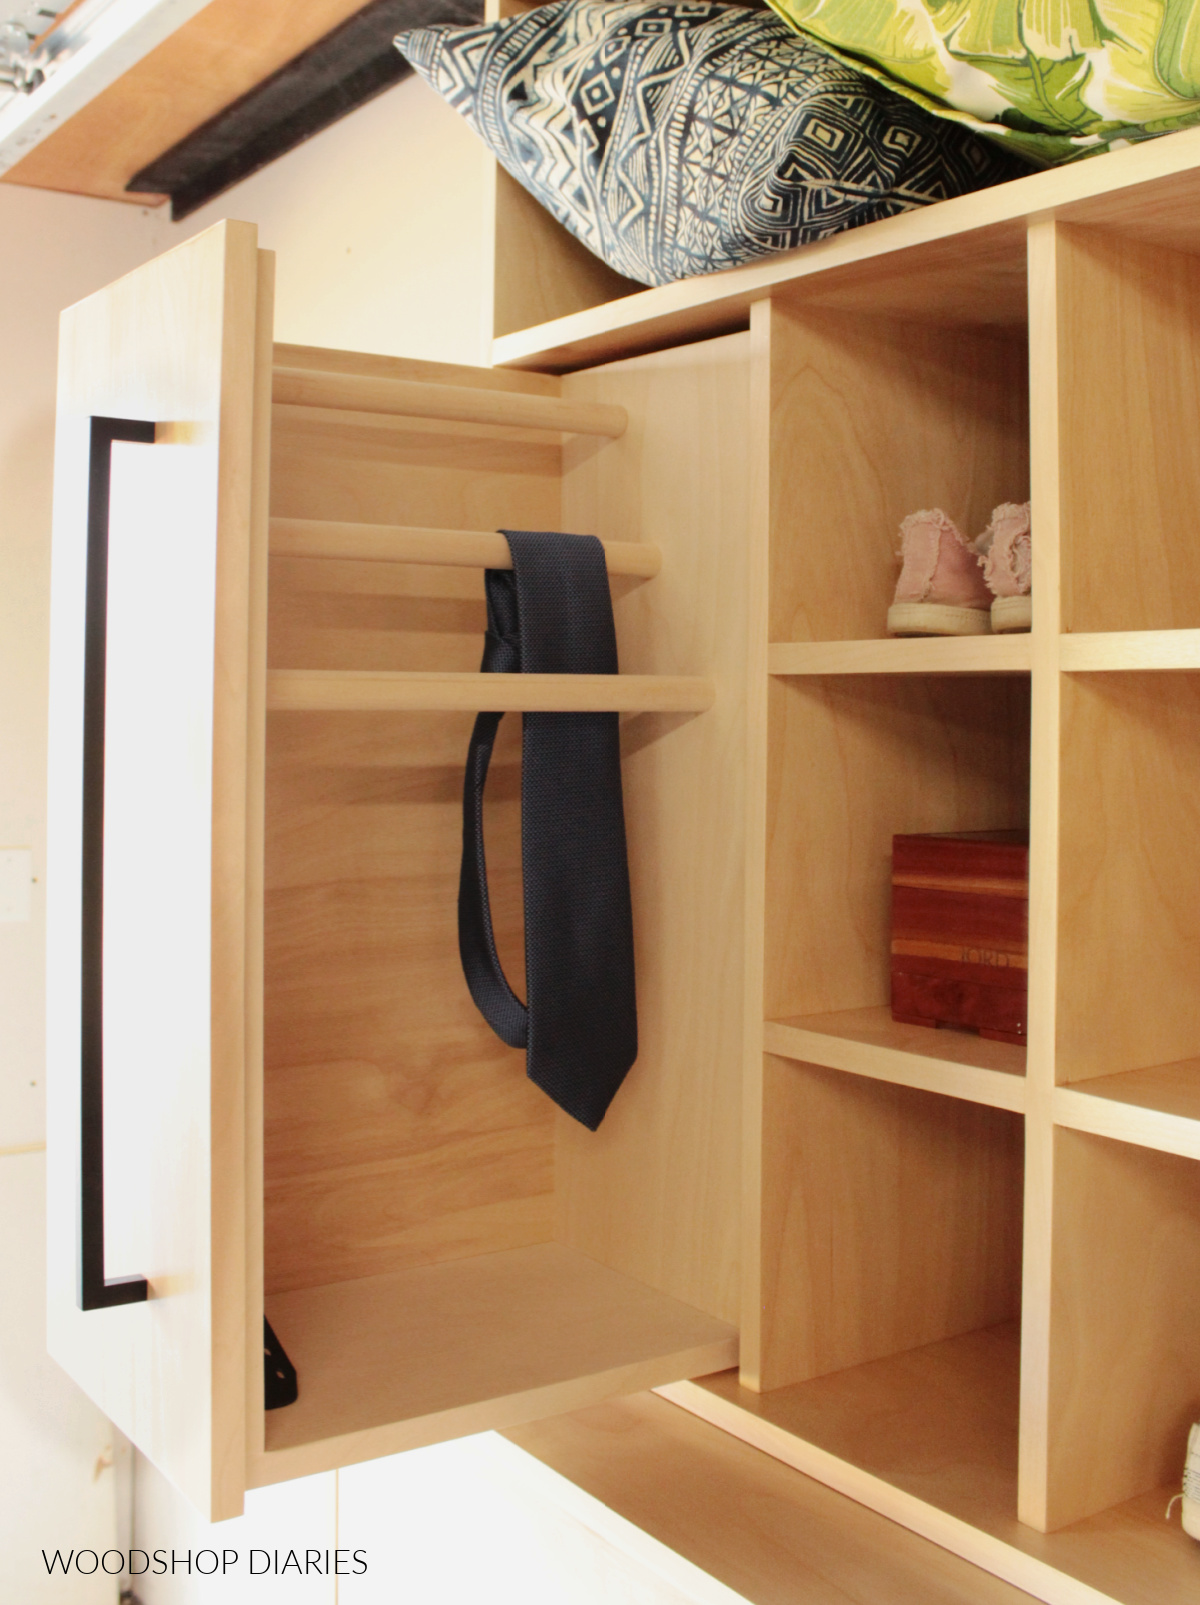
I designed this project to be built in two separate sections so it’s easier to build, move and install–the top has a long shelf, shoe cubbies, and a pull out belt/tie rack.
.
The shoe cubbies were built to be 8″ square openings.
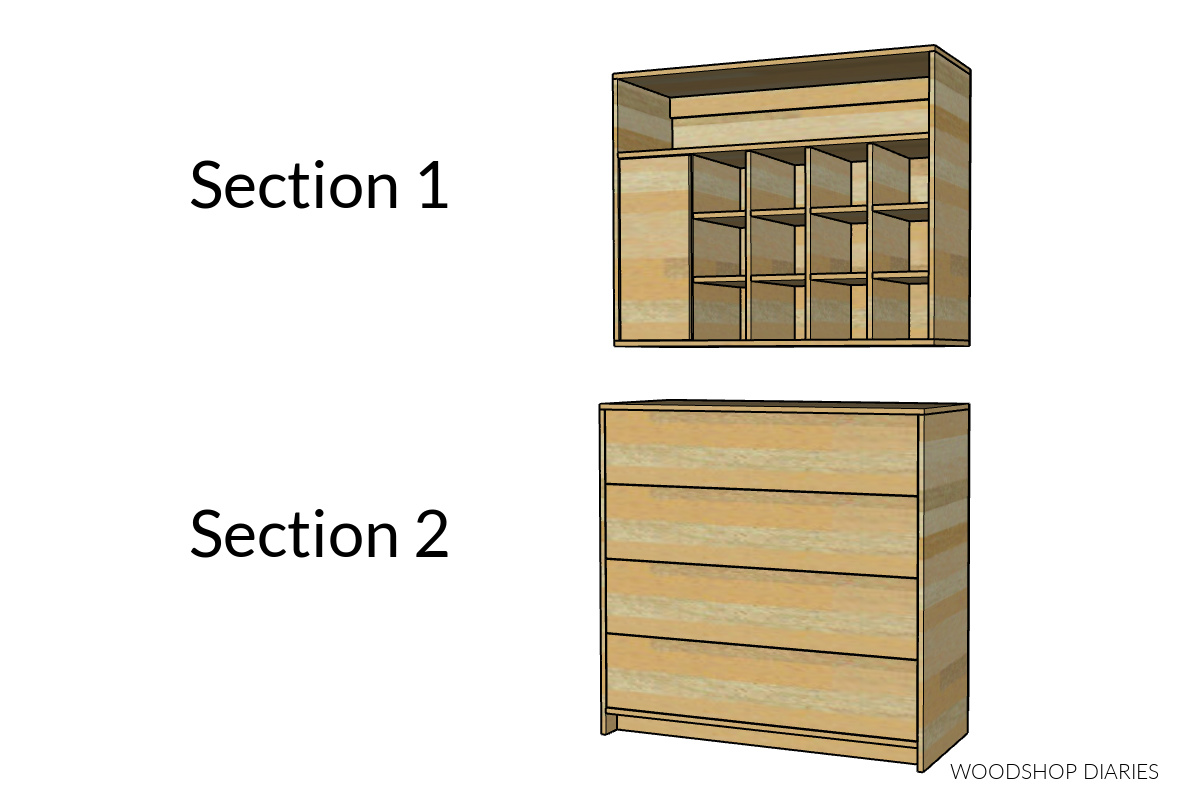
The bottom section is basically a dresser cabinet–just a box housing four large drawers.
Materials:
This project was built from almost 100% birch plywood except for the dowels used in the pull out tie rack. This kept things simple, quick, and as inexpensive as possible while still getting a clean, nice looking result.
Additional Resources You May Find Helpful For This Build:
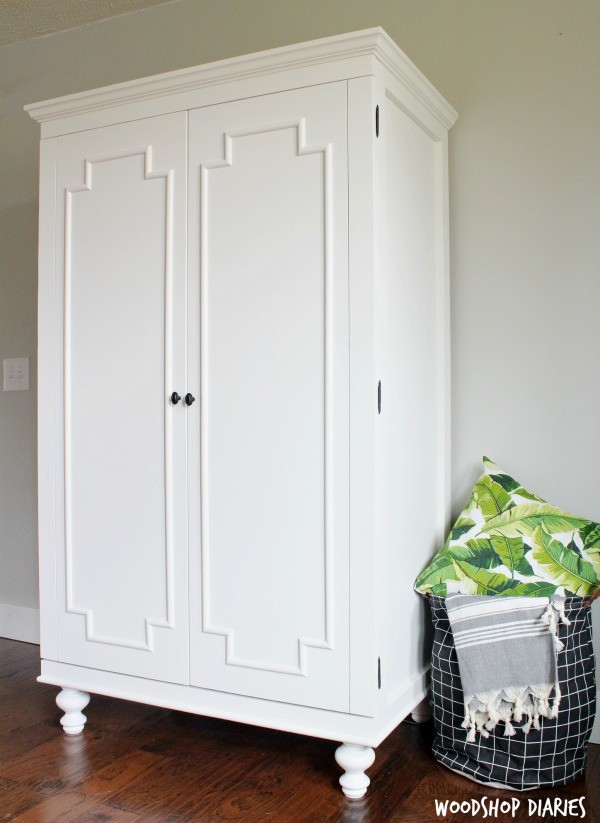
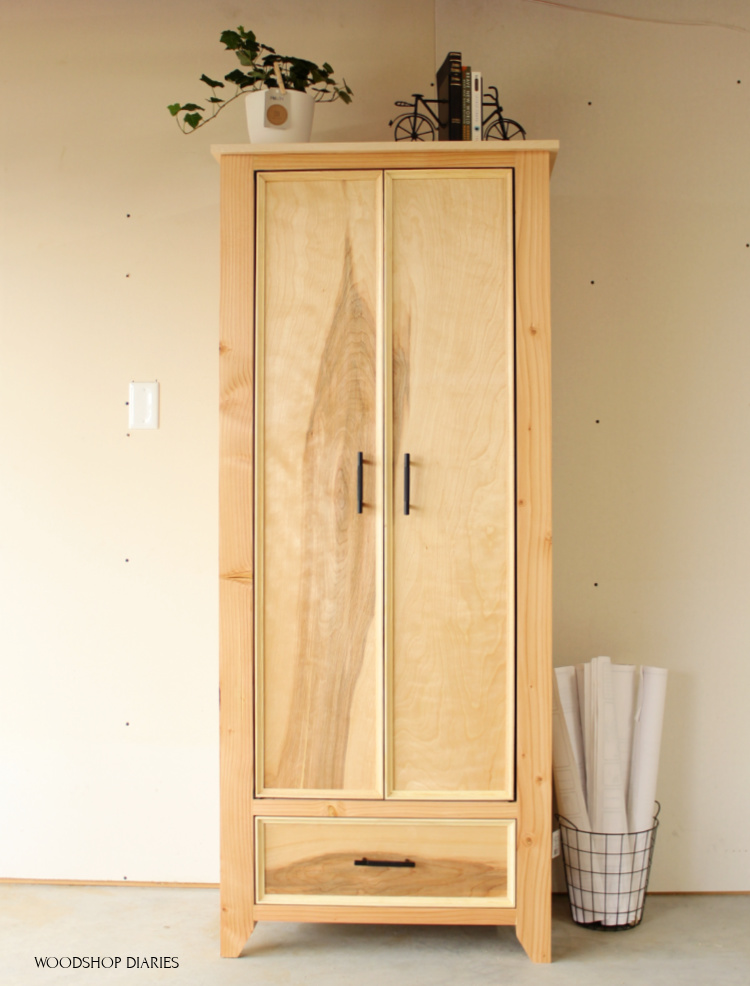
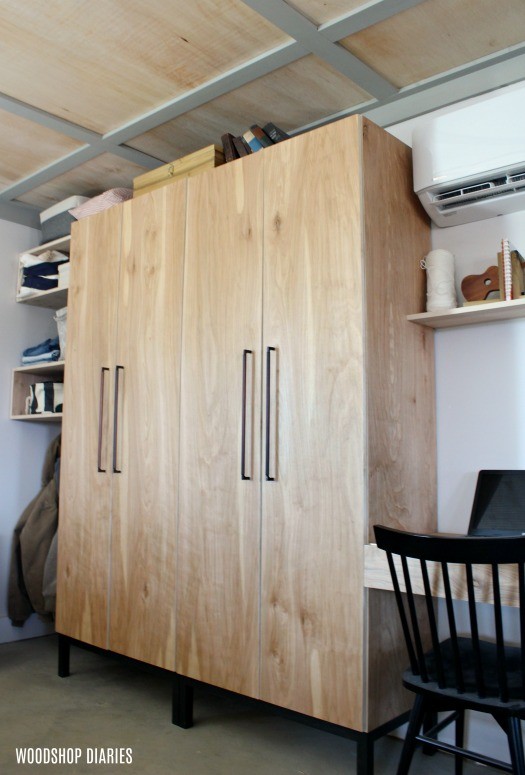
For more closet cabinet inspiration, check out these awesome projects, too!

DIY Armoire Cabinet 
DIY Wardobe with Drawer 
DIY Closet Cabinets
Step 1: Assemble Bottom Closet Cabinet Box
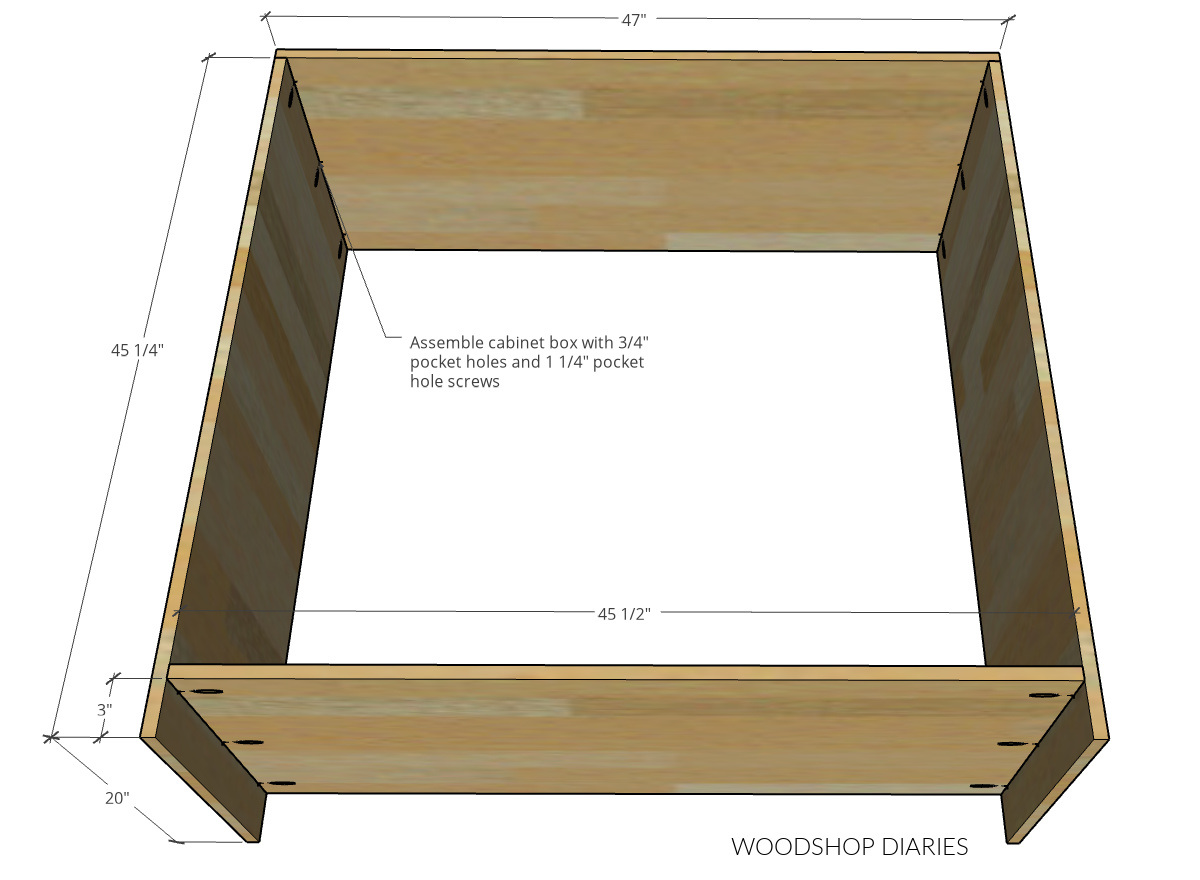
The first thing I did was cut down one of my ¾″ plywood sheets into 2 strips 20″ wide. From these two strips, I cut and assembled a cabinet like shown below using ¾″ pocket holes and 1 ¼″ pocket hole screws.
RELATED: How to Cut Down Plywood Sheets
ALSO RELATED: How to Use a Pocket Hole Jig
.
Because these edges will be exposed on the front side, I applied edge banding to the front edges of these pieces before assembling. You can apply edge banding after assembling, but it’s a little more difficult to sand smooth.
Check out this post to learn how to apply edge banding to plywood edges.
.
Once the main box was together, I added a 3″ tall toe kick piece(this was cut from ¾″ plywood) 3″ inset from the front edge along the bottom. I installed this using ¾″ pocket holes and 1 ¼″ pocket hole screws.
.
This cabinet will need to be secured to the wall behind it once it’s in place, so I added two ¾″ plywood pieces between the side panels at the top and bottom along the back edge using ¾″ pocket holes and 1 ¼″ pocket hole screws.
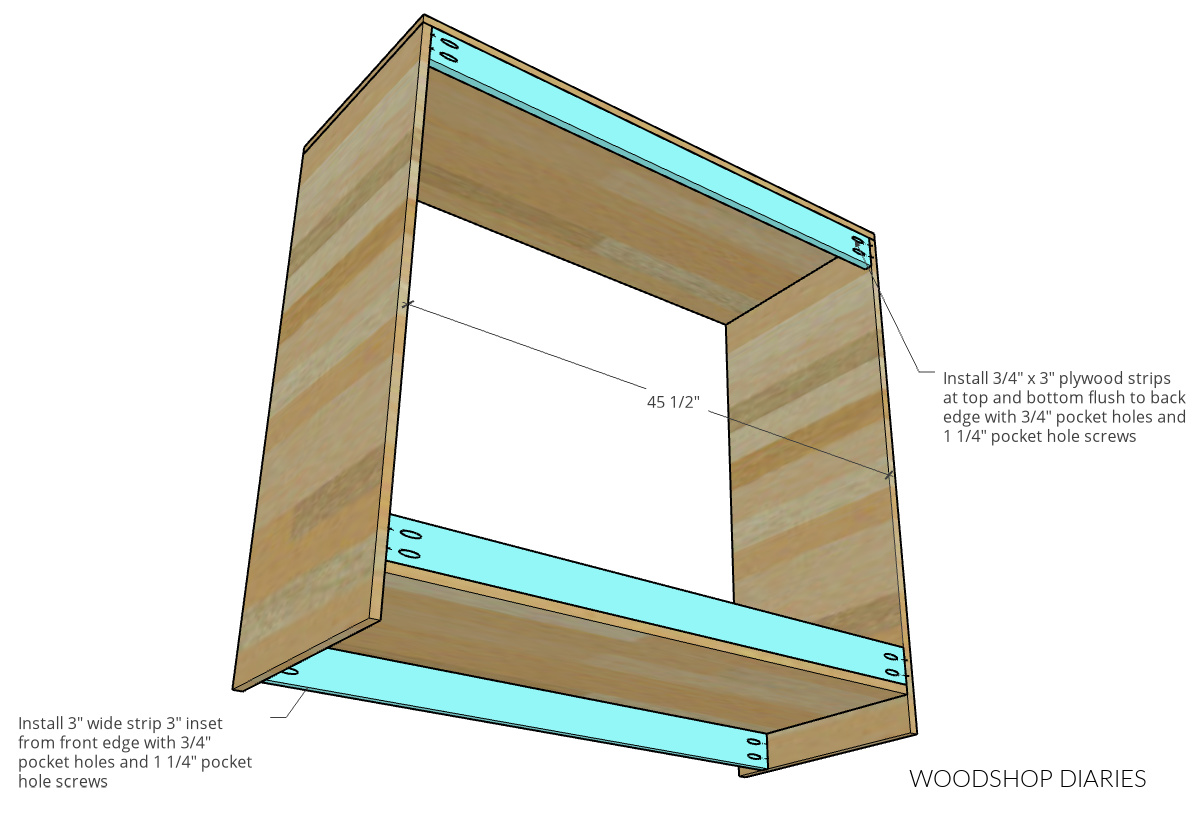
These pieces at the back are how you will attach the cabinet to the wall once it’s complete to secure it in place and prevent tip-over.
.
Now, I had an issue with my plywood tending to bow in once I got my drawers installed, so I added this little ¾″ plywood strip as a “spacer brace” in the middle here to keep the sides equal distance apart between the top and bottom.
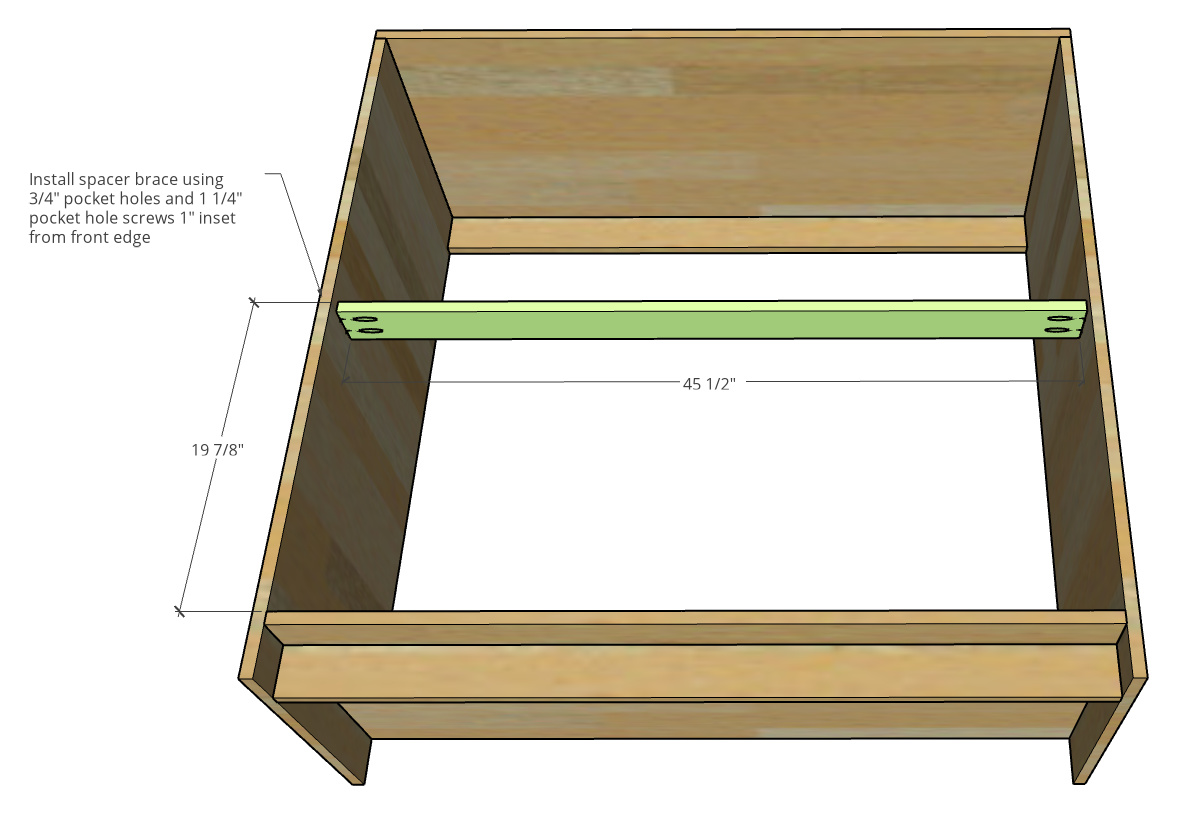
I installed it 1″ inset from the front edge using ¾″ pocket holes and 1 ¼″ pocket hole screws.
Step 2: Install Drawer Slides
I laid the cabinet on its side and installed four 16” drawer slides so that they were ¾” inset to allow for inset drawer fronts.

I have a detailed guide for how to install drawer slides here that you may find helpful.
.
And also a diagram for where to install them, below.

Step 3: Build Drawer Boxes for Closet System
I drug out another sheet of plywood and began ripping 7 ⅞″ wide strips to make the drawer boxes from.
.
I trimmed the strips to length to make four drawers total (see lengths in diagram below) and began cutting dadoes along the drawer box pieces to install the ¼” plywood bottom panel.
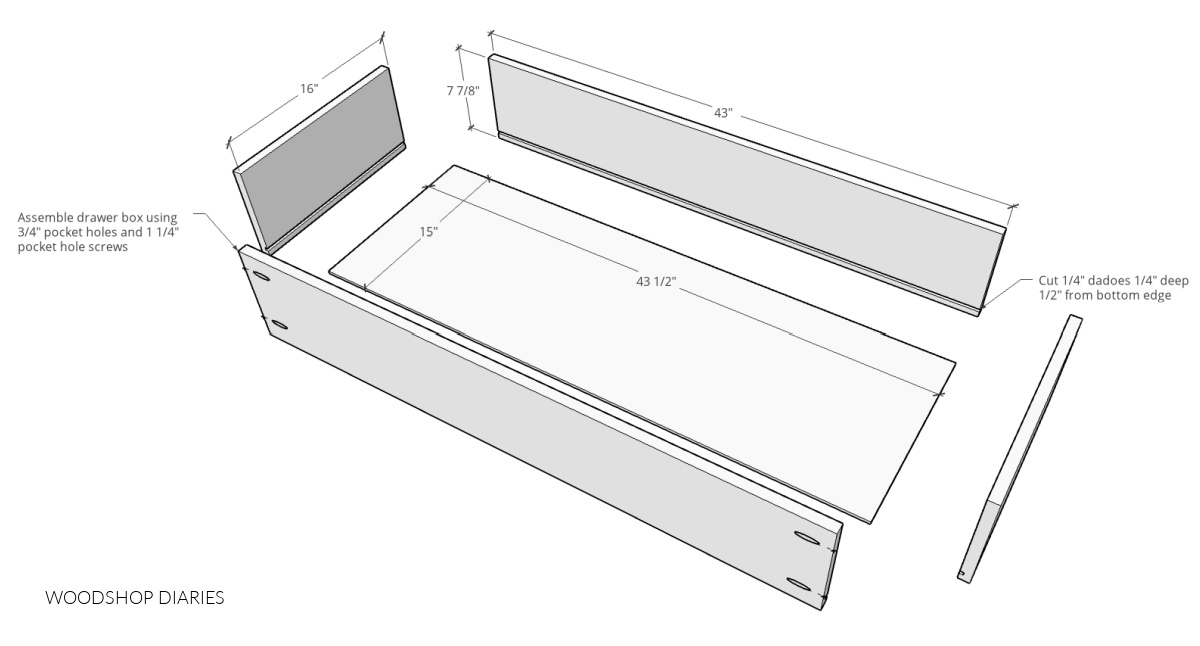
You can use a dado blade or a router to cut the dadoes, but I prefer to just set my table saw blade height to ¼” high, adjust my rip fence to cut about ½” from the bottom edge, make a pass, then adjust the rip fence closer to the blade and make 1-2 more passes until the dado is about ¼” wide.
.
You can see this in the video above.
RELATED: How to Build Drawer Boxes
.
Once these dadoes were cut, I cut ¼” plywood panels to fit inside and assembled the drawer boxes using ¾″ pocket holes and 1 ¼″ pocket hole screws.
NOTE: These drawers were pretty wide, but since they were only about 16” deep, the ¼” plywood seemed to hold fine without a lot of room for give. However, if you wanted, since they are larger than normal, you could use ½” plywood instead.
.
I feel like that would be overkill for a few sweaters and some jeans in a closet haha. But, to each their own 🙂
Step 4: Install Drawer Boxes
Once the four drawers were assembled, I began installing them into the cabinet.

Check out this post for a detailed guide on building and installing drawers and slides.
.
I used some spacer blocks to space out the drawer boxes and screw the slides onto them.
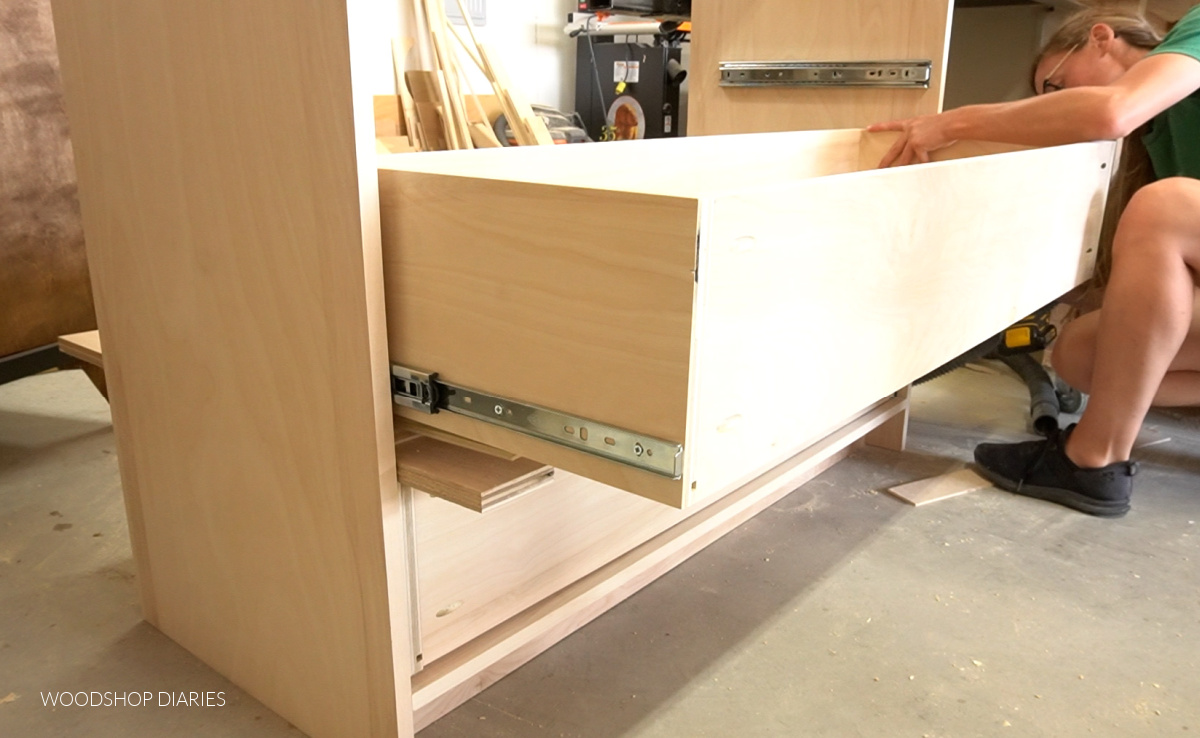
Since these are such large drawers, it’s important to get several screws in the slides to help with both the weight and the alignment.
.
I used four screws per side of each slide. I had to remove each drawer from the main slide attached to the cabinet to insert the screws in the back hole.
Step 5: Add Drawer Fronts
Once all four drawers were installed, I cut drawer fronts from ¾” plywood and edge banded them. Then, I installed them onto each drawer box using wood screws from the inside.
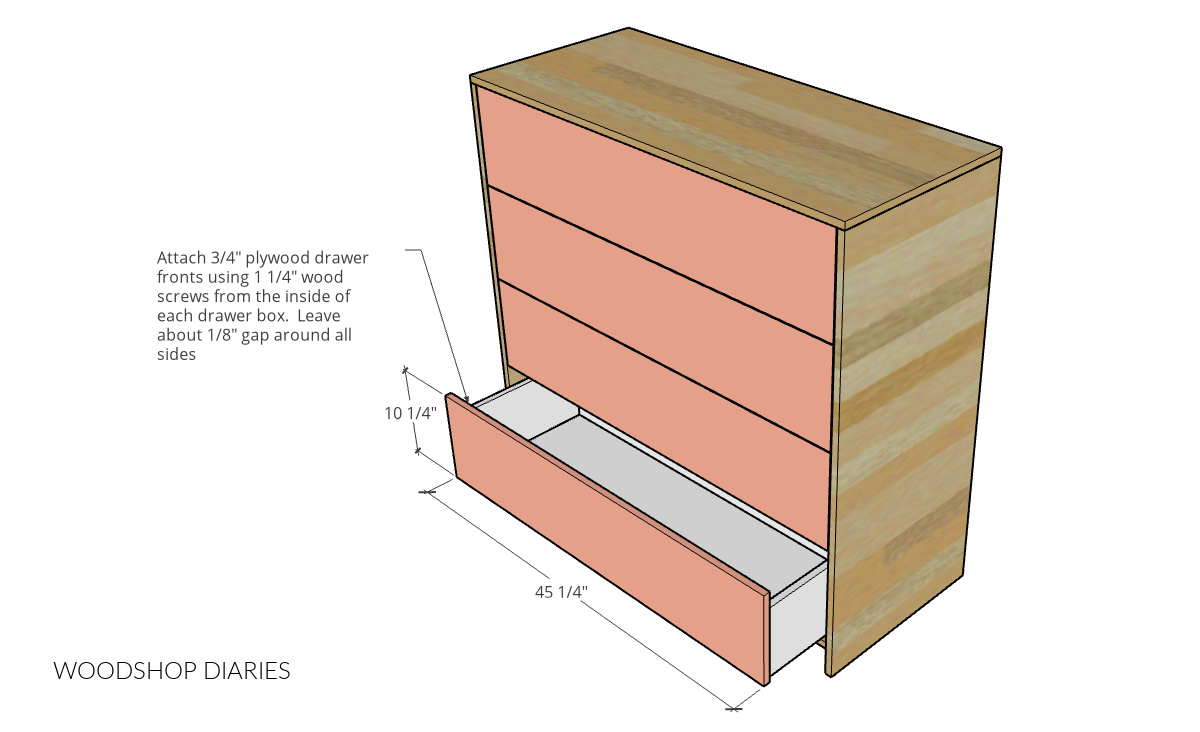
There are a lot of tricks to lining up drawer fronts, but honestly, I just eye balled it to see that the gaps looked even, clamped them, then screwed them in place. You can see this in more detail in the video above.
.
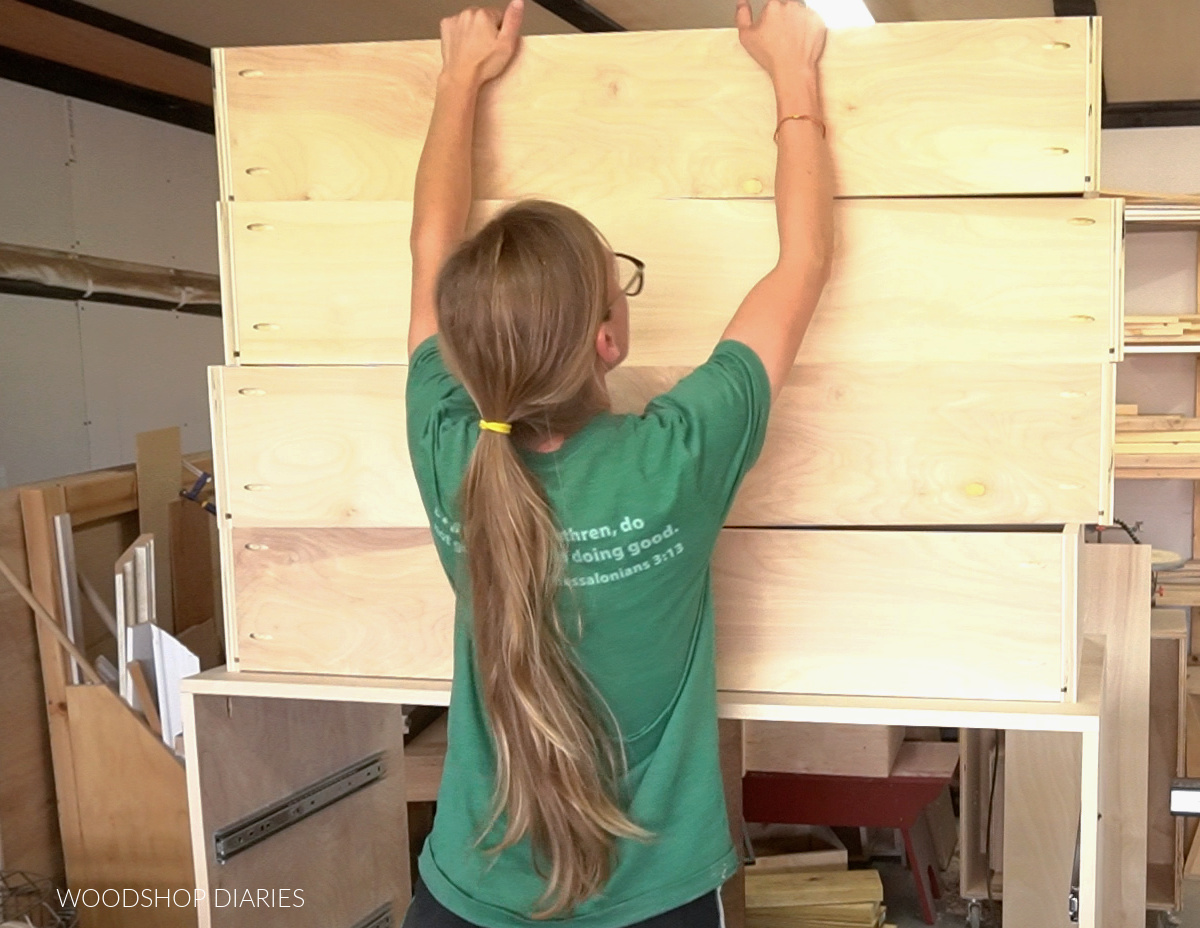
I began at the top and worked my way down.
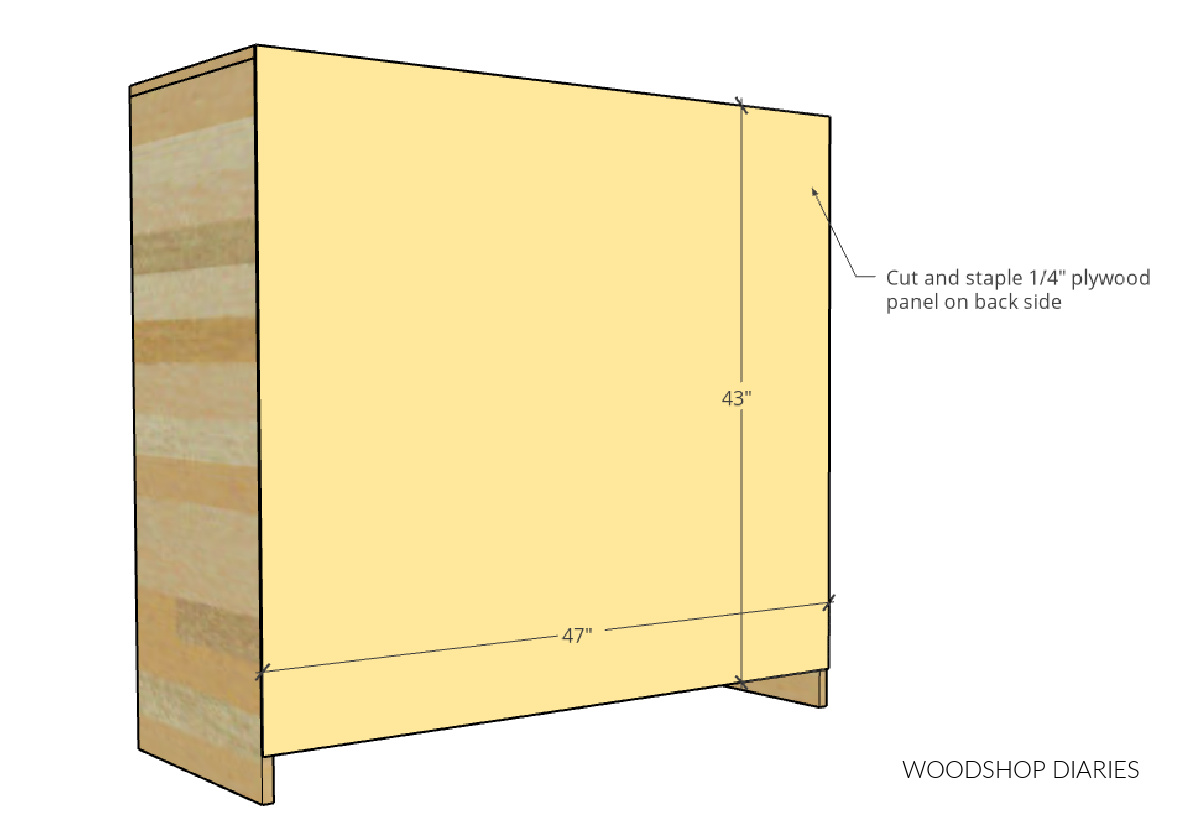
Step 6: Add Back Panel to Bottom Closet Cabinet
I cut and stapled a ¼” plywood back panel onto the back side of this cabinet to finish it up. If you don’t have a stapler, you can use wood screws or brad nails instead to secure it.
Step 7: Assemble Top DIY Closet System Cabinet
Just like the bottom, the top was basically just a large plywood box. In this case, I cut the pieces a few inches narrower than the bottom section—the bottom was about 20” deep, but I made the top about 16” deep.
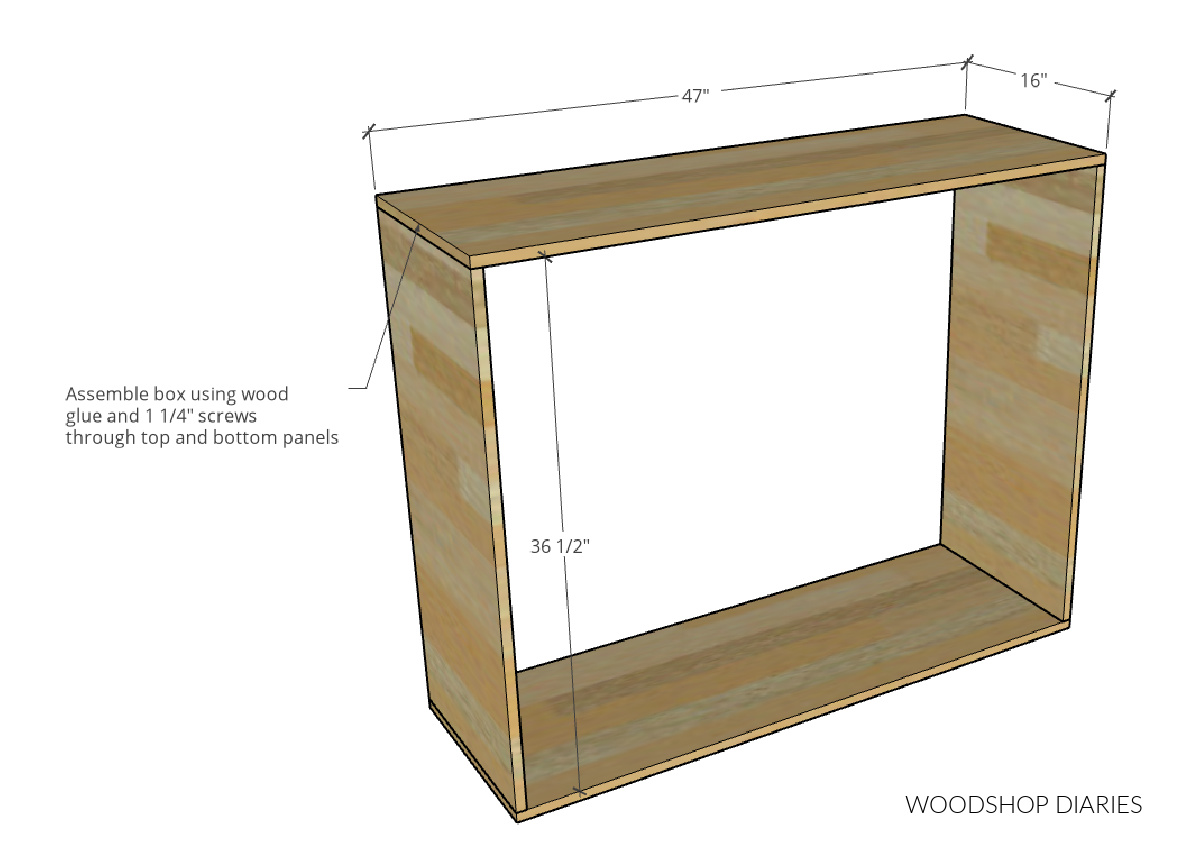
To keep things extra simple, I just glued and screwed these pieces together with 1 ¼″ wood screws through the top and bottom panels.
.
You can edge band the front and side edges before or after assembly, but again, I find it easier to edge band before.
Step 8: Build Shoe Cubbies
There are a lot of ways I could have built the shoe cubbies—dadoes, or lap joints, pocket holes, etc. But, I chose to use dowels because:
- This is a shoe rack and doesn’t need to hold hundreds of pounds.
- I didn’t want to see any pocket holes and the spaces were really too small for them anyway.
- I didn’t trust myself to cut this many dadoes or lap joints with very good accuracy or maintain the patience to do so.
.
Of course, you’re welcome to use whatever method you feel most comfortable with. But for me, it was dowels.
.
I cut four vertical divider panels to the size shown below. In THREE of the four, I drilled ⅜″ holes at the locations shown below using a ⅜″ dowel jig. I didn’t drill holes in the fourth panel.

Then, I cut 8 pieces like shown and drilled ⅜″ holes into the sides in the center, and ⅜″ in from the front and back edge. These holes need to line up with the holes drilled in the divider panels.

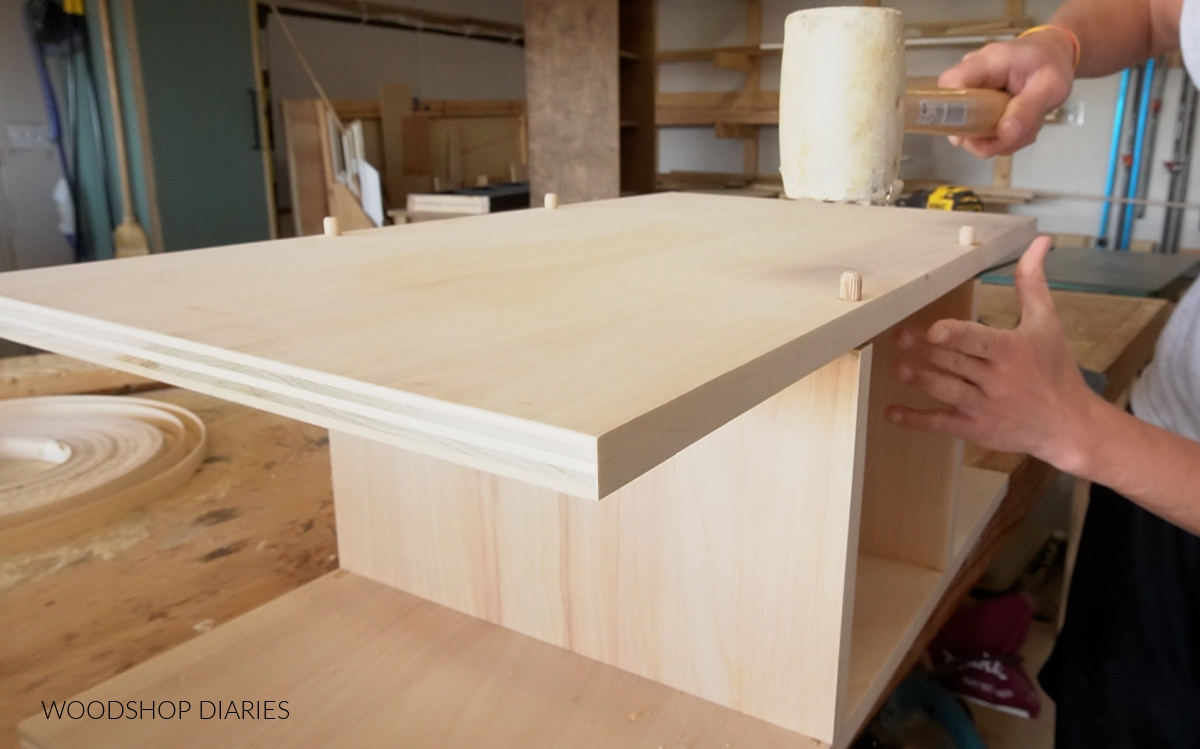
I used some RapidFuse glue to glue ⅜″ dowels into the holes in the three vertical panels so that they stuck out a little on each side.
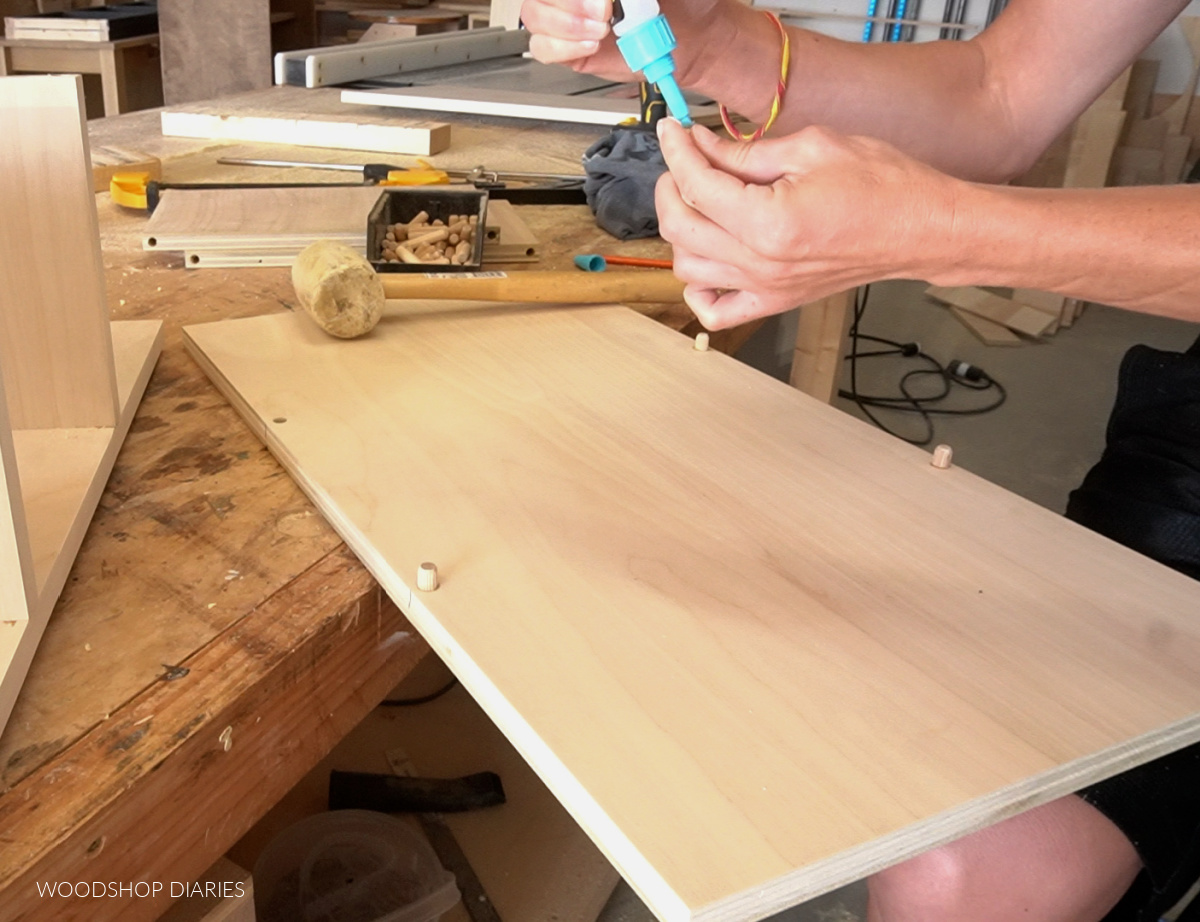
Then, I used wood glue to attach the shelves onto these dowels.
.
I glued up one section at a time and let them dry about an hour before moving onto the next section.
Once I had them all glued up—12 cubbies total—I screwed the outside piece on using 1 ¼″ wood screws.
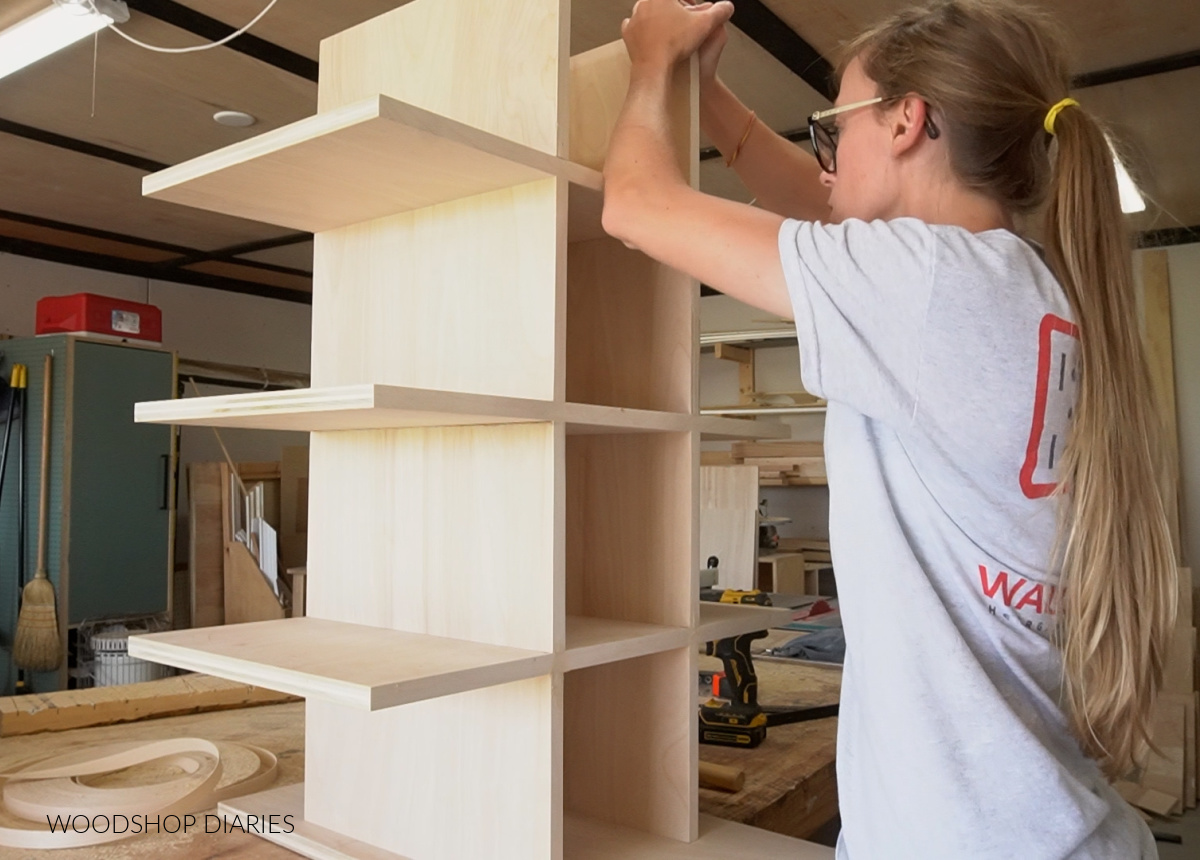
These screws will be hidden once it’s installed in the top piece of this closet system, so I wasn’t worried about them showing.

I edge banded the shoe cubby pieces before assembling, but I ended up sanding most of it off because I got messy with the glue so I reapplied it again after it was assembled.
.
This was by far the most stressful part of the project (mostly because of the glue haha), but once the shoe cubbies were together, it was smooth sailing.
Step 9: Install Shoe Cubbies and Add Shelf
For no particular reason other than just for looks, you’ll notice that I made the shoe cubby piece about 1” narrower than the overall cabinet.
.
I placed the shoe cubby inside the top cabinet from step 7 and carefully measured, clamped and screwed this piece in place with 1 ¼″ screws keeping all the cubbies perfectly square and flush to the back side.
.
Again, since this is going into a nook, none of these screws on the side or bottom will be seen once it’s installed.
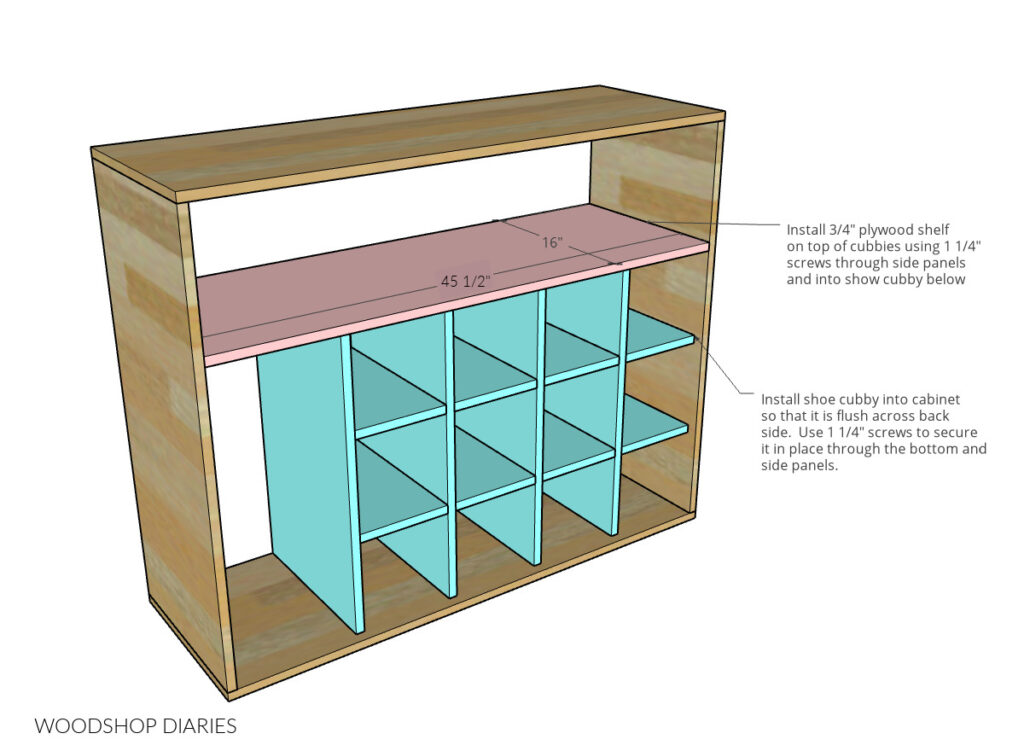
Then, I added a ¾″ plywood shelf on the top of the cubbies. I just used 1 ¼″ wood screws again . You will be able to see the screws on the top of the shelf here, but since this is going to be about 7 ft high and covered with clothes, I wasn’t concerned. I’ll putty over them later.
.
However, if you were concerned with seeing the screws, you could opt for dadoes here instead or plug the screw holes.
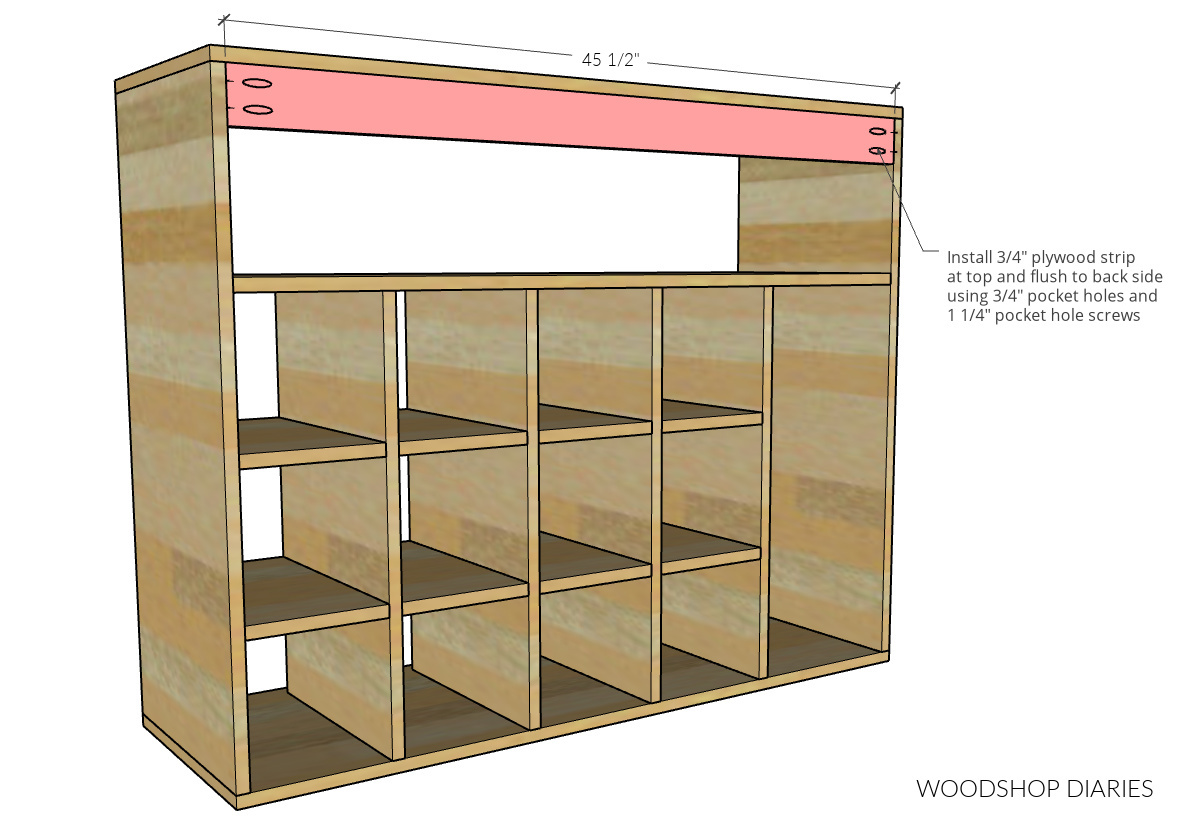
Step 10: Install Top Cabinet Bracing and Back Panel
I cut a scrap strip of ¾″ plywood and attached at the top of this cabinet flush with the back side using ¾″ pocket holes and screws. This piece will be used to secure the top section to the wall studs once it’s complete to prevent tip over.
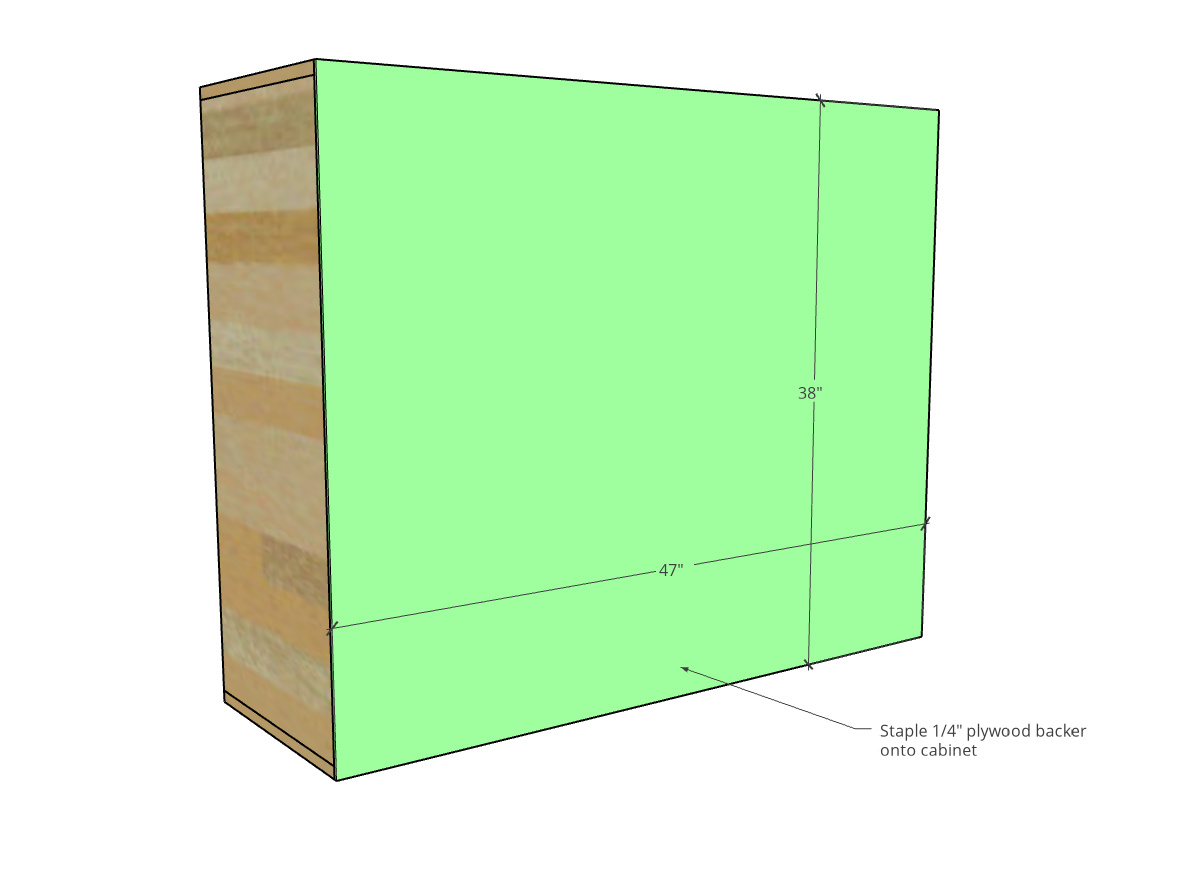
Then, I cut a ¼” plywood panel to fit over the back of the top cabinet section and simply stapled it in place.
Step 11: Build Tie/Belt Rack for Closet System
The friend I was building this for has a lot of ties and wanted somewhere to hang them and tuck them away.
.
So I rummaged around in my scrap pile to find some ¾″ plywood pieces I could cut down to build a small box.
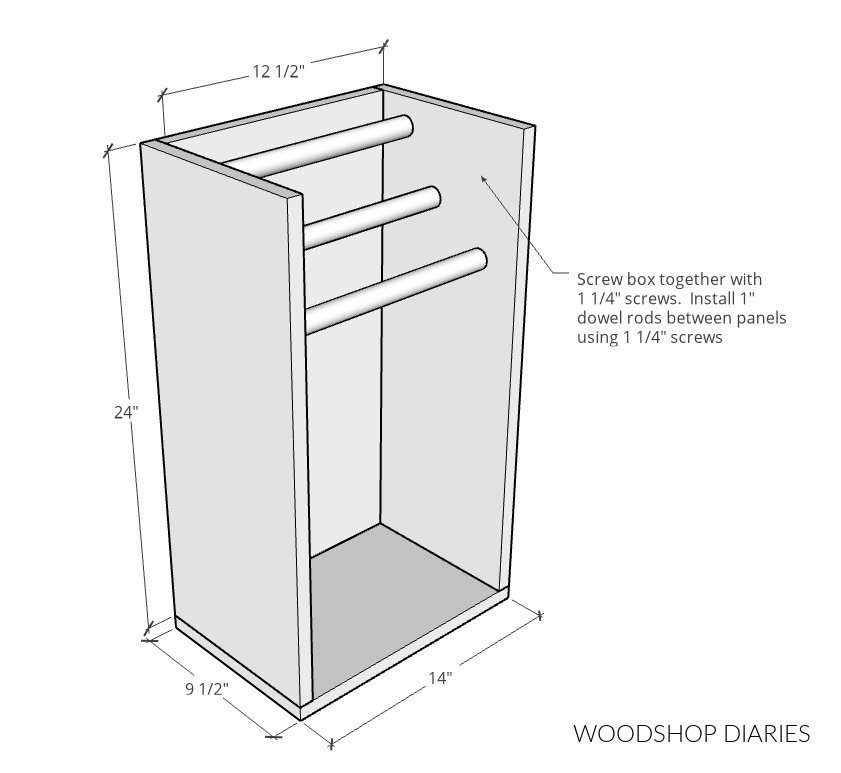
Instead of adding a top panel here, I cut three pieces from a 1″ diameter dowel rod to screw into this box to use as racks.
.
I carefully measured each side of each dowel to make sure they were installed square and level, then screwed them in from the sides.
Step 12: Install Tie Rack
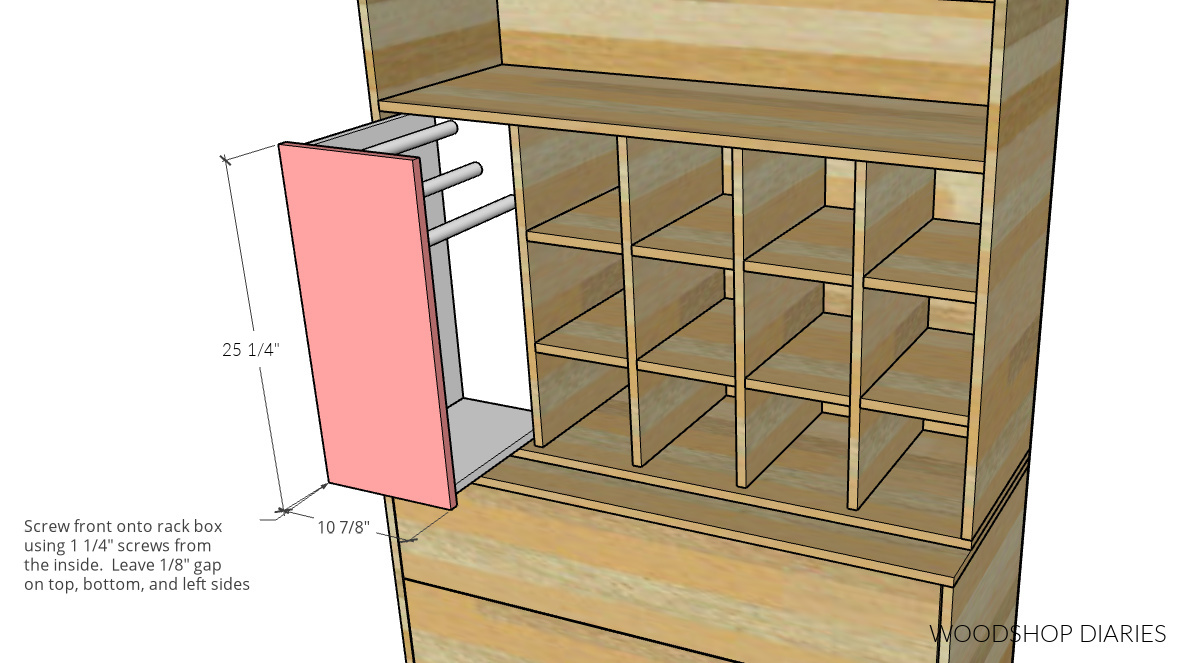
Once this box was built, I installed the 14″ drawer slides into the large left cubby on the top cabinet—one at the bottom and one at the top (both on the left side–see below), then I installed the tie rack box onto the slides.

I was pleasantly surprised that worked as well as it did, and all it needed was a front.
.
So, I cut to fit a ¾″ plywood front, edge banded it, and screwed it on from the inside leaving ⅛″ gap on the top, bottom, and left side. This way, it actually overlaid the divider panel on the right.
Step 13: Finish and Install Closet System
I puttied the screw holes (I used DAP Wood Putty), sanded, and applied a couple coats of clear coat (I used Minwax Helmsman) to the project.
RELATED: How to Finish Raw Wood Furniture
.
I added these black, modern handles and put the pieces together to see how they looked!
Broken down into sections, this closet project really wasn’t difficult, though it is rather large.
.
These closet cabinets could easily be modified, added on to, or doubled up on to add to a nook, closet, laundry room, or any other space you might need some additional cabinetry or storage space.
To install it, you’d simply level and attach the cabinets to the wall through the back braces (from steps 1 & 10) into the wall studs using 3″ screws.
.
I’d probably also use a few 1 ¼″ screws through the underside of the dresser top up into the top cabinet to secure them together as one unit.
.
Now, honestly, with this natural birch finish, the wood putty is almost un noticeable on the sides where I covered the screws.
.
However, if this wasn’t going into a nook and you didn’t want to see the putty, adding a veneer over the entire side, using wood plugs, a thin “end cap” board or some trim pieces are an easy way to cover the screws, add a decorative touch, and give you a seamless finish.
.
If you want to build your own DIY closet system, don’t forget to check out video above for additional details. And if you enjoyed this project, be sure to subscribe to our newsletter so you don’t miss out on what’s coming next!
To save this for later, don’t forget to share it to your favorite social channel or pin it!
Until next time, friends, happy building! 🙂