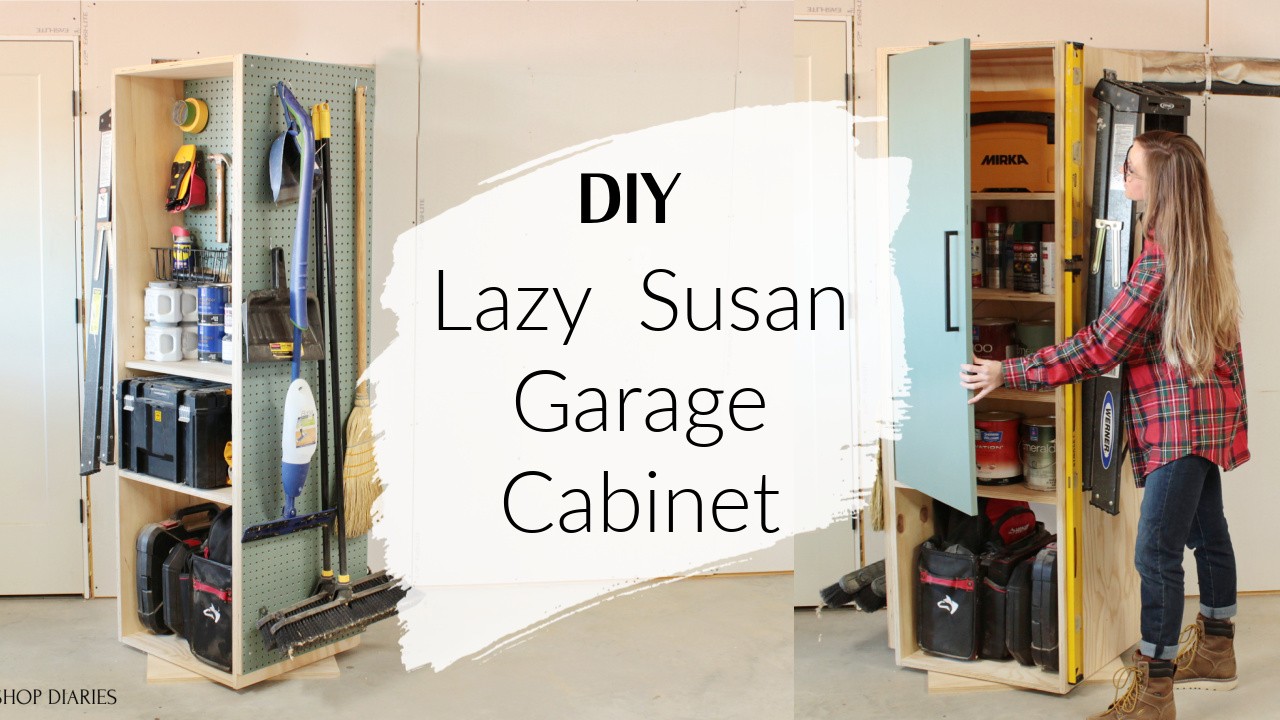
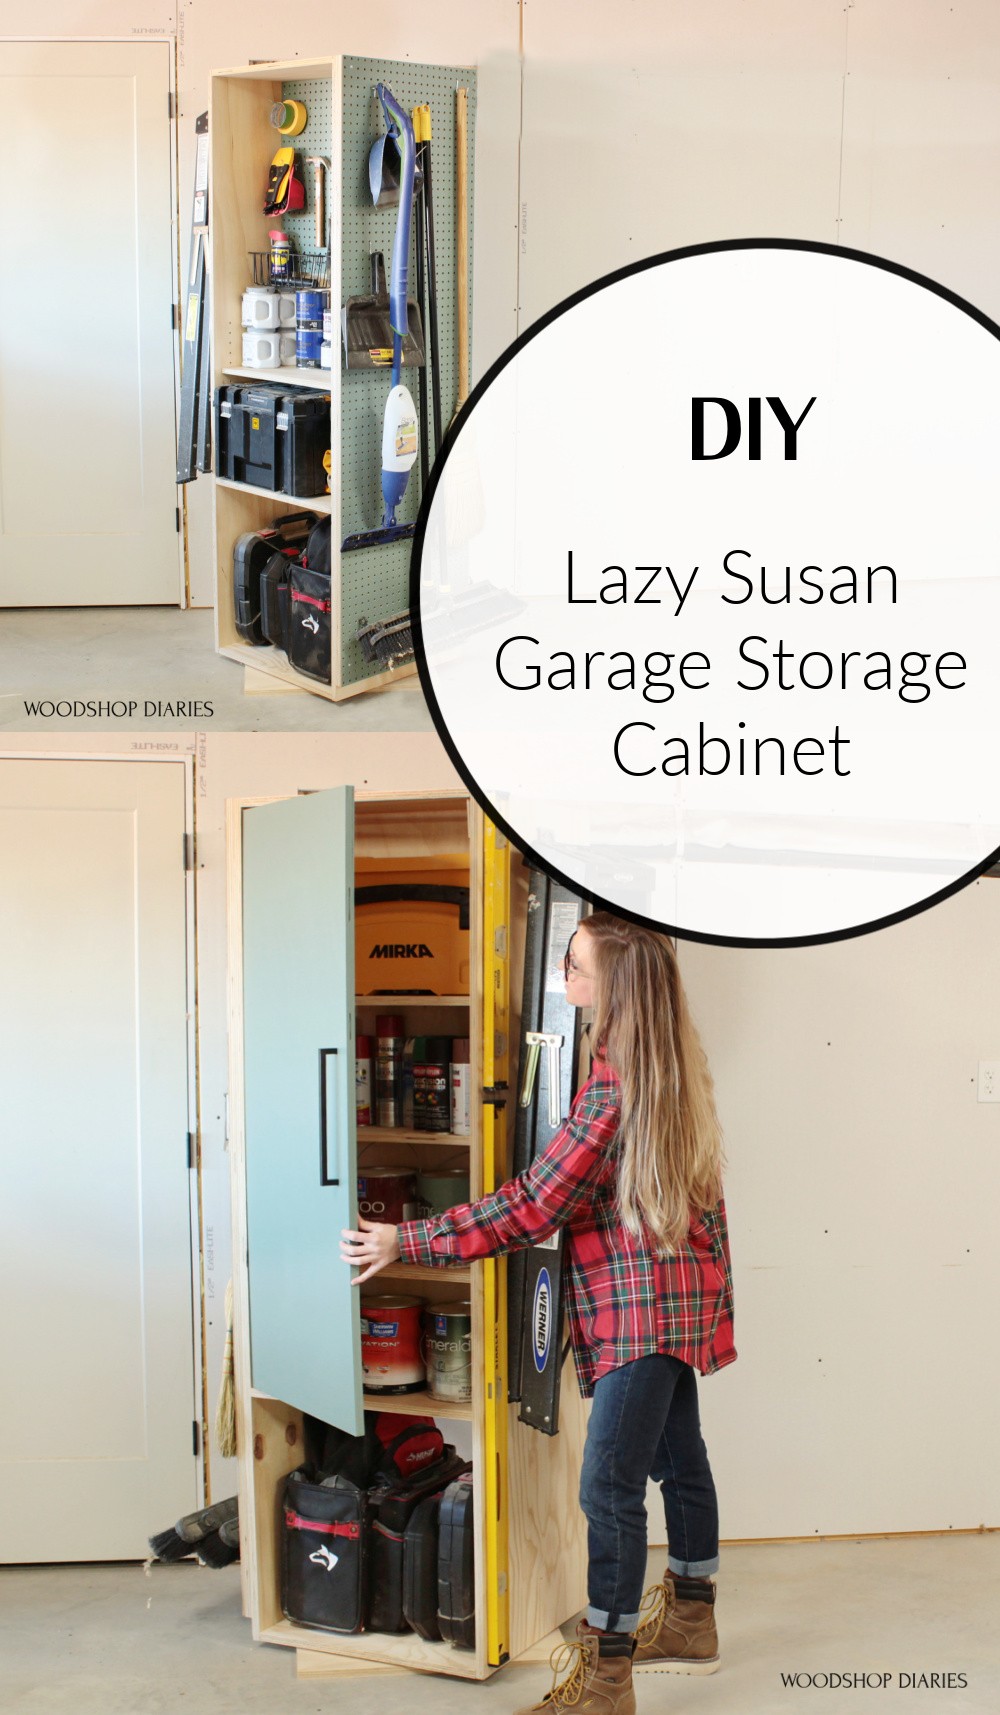
In this post, I’m sharing how to build a Lazy Susan DIY Garage Storage Cabinet!
* I’ve partnered with my friends at Kreg Tool to provide you the free plans for this project below! This post contains affiliate links. See policies.
When it comes to workshops and garages, they never have enough storage.
So since it’s impossible to have enough STORAGE SPACE, the key is ORGANIZATION *wink wink*
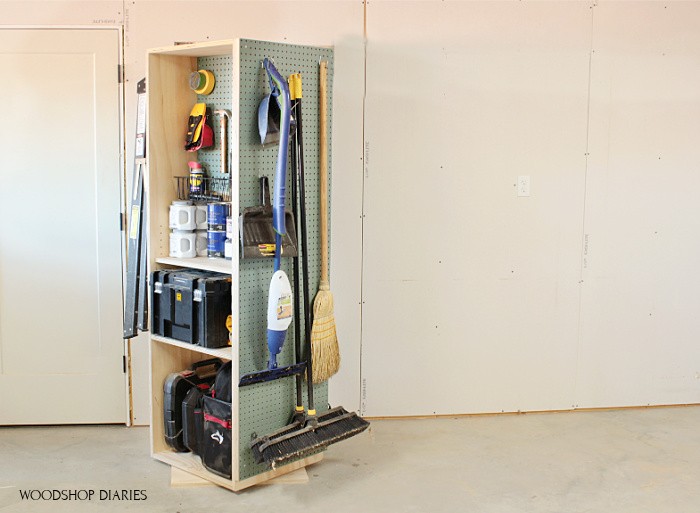
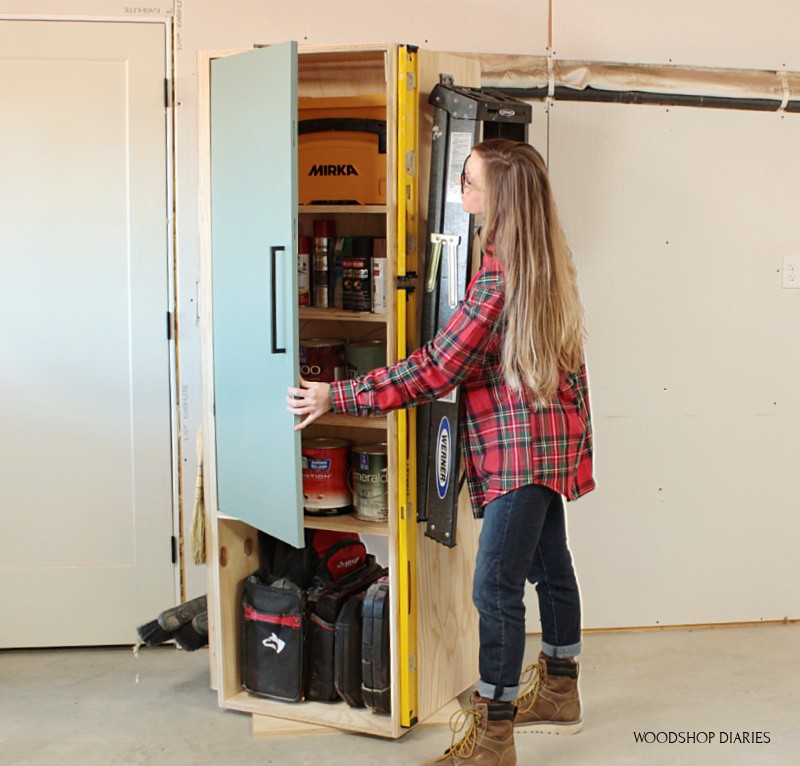
This Lazy Susan DIY Garage Storage Cabinet has a place for everything–with storage for larger items at the bottom, smaller items at the top, and pegboard for all kinds of items on the side.
What I love about this project is that the top cabinets are shallow and are the perfect size for storing away paint cans. Since they aren’t deep, you can’t stack one behind another and “lose” one–they’re all in plain view!
The larger bottom section is the perfect size for storing tool bags and socket sets. And the fact it all spins on a Lazy Susan is also an extra cool feature if I’m being 100% honest haha.
I’m sharing how to build your own DIY garage storage cabinet below with FREE PLANS and a video tutorial, so let’s dive in!
Tools & Materials
Tools:
Materials:
- (2) sheets ¾″ plywood
- (1) sheet pegboard
- (1) pair concealed hinges
- Shelf Pins
- 12″ Lazy Susan Hardware
- 1 ¼″ pocket hole screws
- ⅝″ and 1 ¼″ long wood screws
How to Build a Lazy Susan Garage Storage Cabinet
This is a really fun build you can tackle over the weekend. Since it’s a workshop/garage project, you don’t have to worry about it being super perfect.
Feel free to customize your pegboard and shelves to fit whatever you’re storing.
I’m sharing the how to below with tons of tips along the way. And you can grab the free plans at the end of the post!
If you prefer to watch, I’ve also got a video tutorial here as well.
Step 1: Cut Down Plywood Sheets
So as I always start out my plywood projects, I pulled out my circular saw and Kreg Rip Cut and began cutting down my sheets.
RELATED: How to Cut Down Plywood Sheets
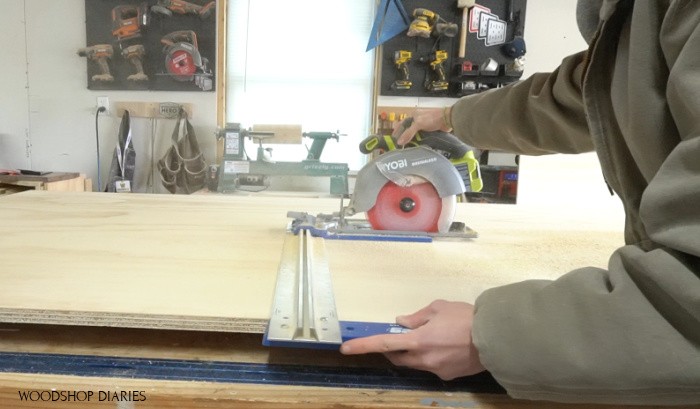
Since this was just a shop project and not a piece of furniture, I went with sanded pine plywood for this vs the birch plywood I normally use.
This is not as high quality, but did save me a few bucks.
I ripped three 22” wide strips of plywood from my two sheets to use for the cabinet box, then adjusted my rip cut to cut ¼” smaller and ripped another strip.
I labeled this narrower piece—it will be used for the door and the shelving.
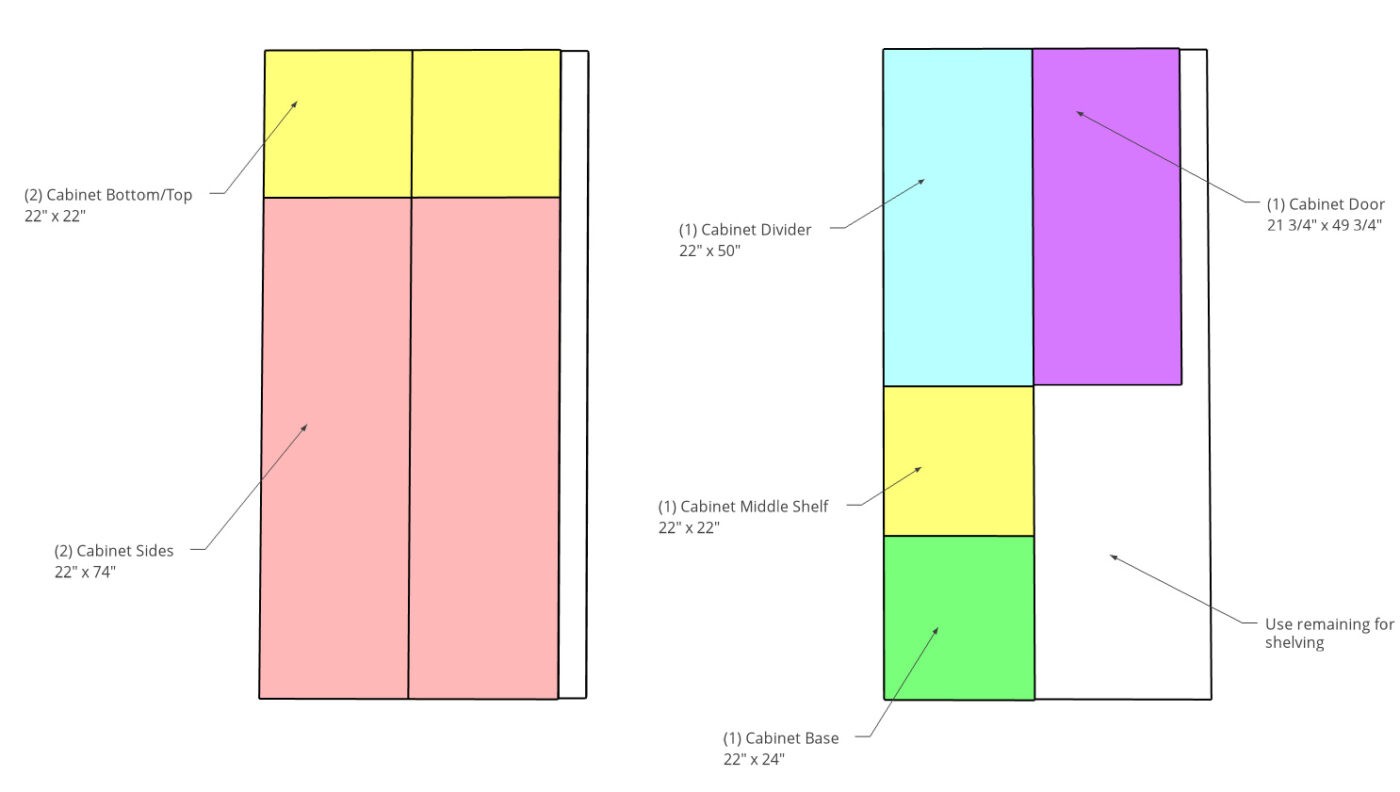
I set the leftover strips aside for now.
I used my circular saw and AccuCut to cut a top, bottom, middle, and two side panels from the 22” wide strips.
Step 2: Build Garage Cabinet Box
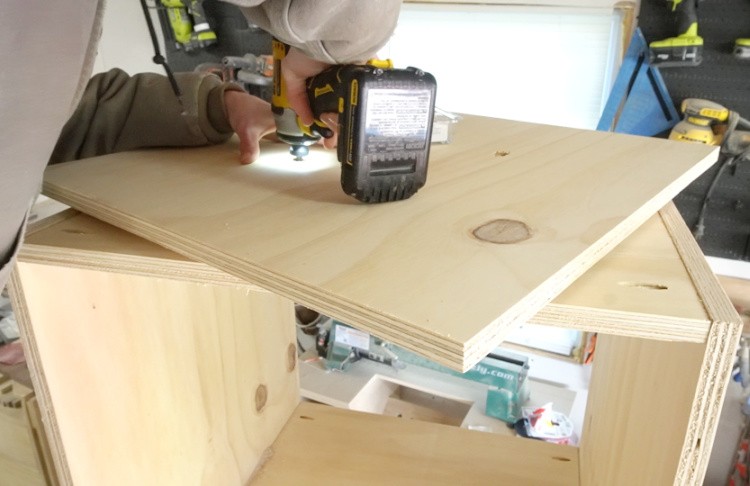
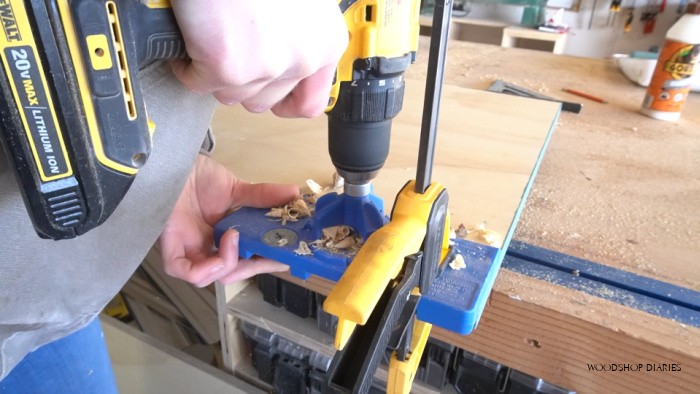
Once the pieces were cut, I brought out my drill and Kreg pocket hole jig and began drilling pocket holes in the shelves and middle divider panel to assemble the cabinet.
RELATED: How to use a pocket hole jig
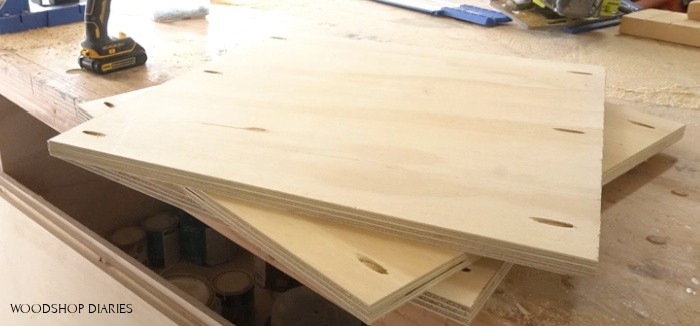
For a little extra hold, I used glue along with my pocket hole screws to assemble the cabinet.
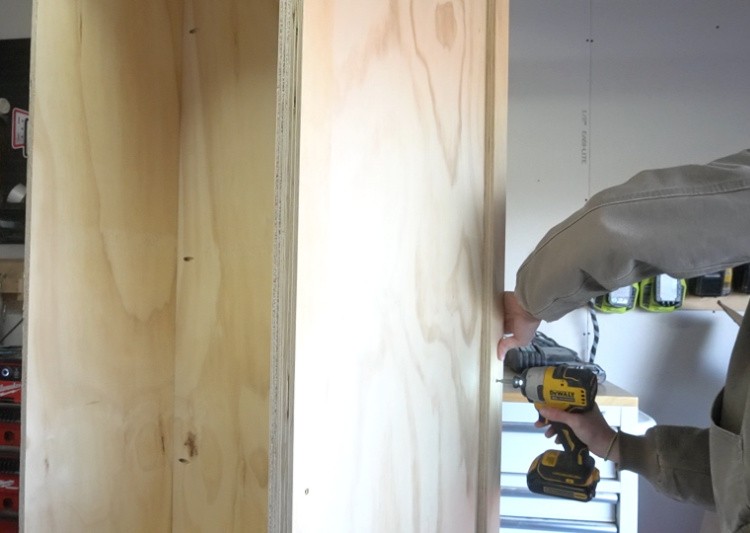
I attached the top and bottom to one side panel, then added the middle divider.
You could add this later, but I thought it was easier before adding the other side.

This divider panel can technically go anywhere you want inside this cabinet, but I tried to keep it centered between the front and back.
Before adding any screws, I double checked my measurements to make sure the panel was the correct distance from the edge.
Then, I added the middle shelf making sure to keep it square to the sides and the middle panel.
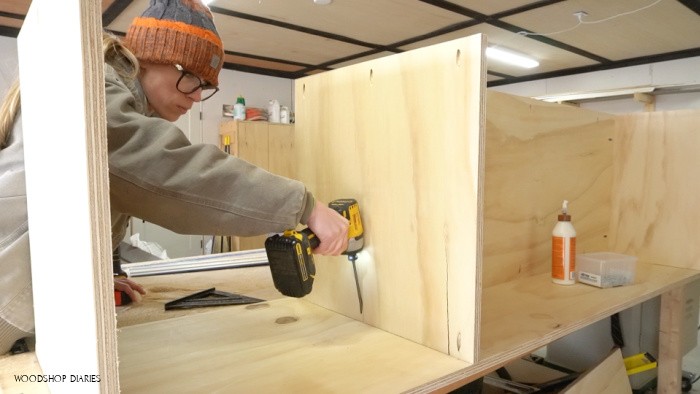
Once everything was secure, I placed the other side of the cabinet on and glued and screwed it in place.
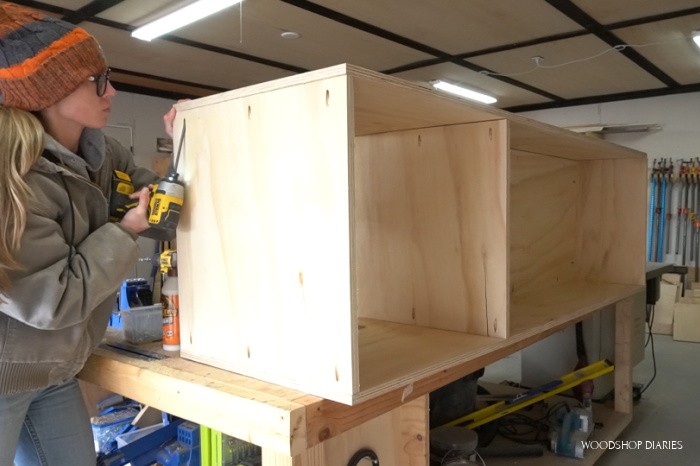
Now the main carcass of the cabinet is assembled and all that’s really left to do is add the door, shelves, and lazy Susan.
Step 3: Install Lazy Susan Hardware onto Garage Storage Cabinet
I cut a panel in step 1 to use as the “base plate.” I used a 12” diameter Lazy Susan rated for 1000 lbs for this project. I’ll link the one I used here.
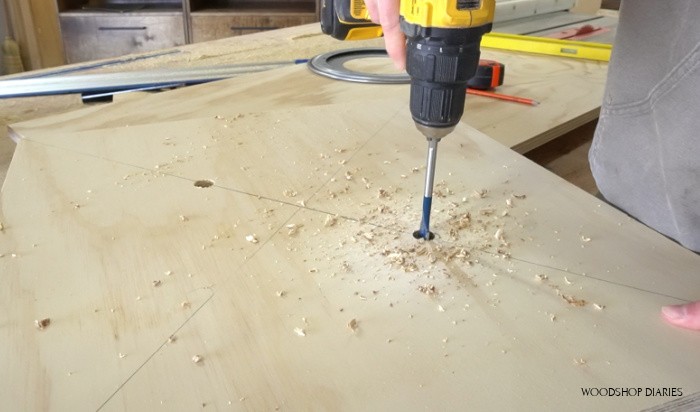
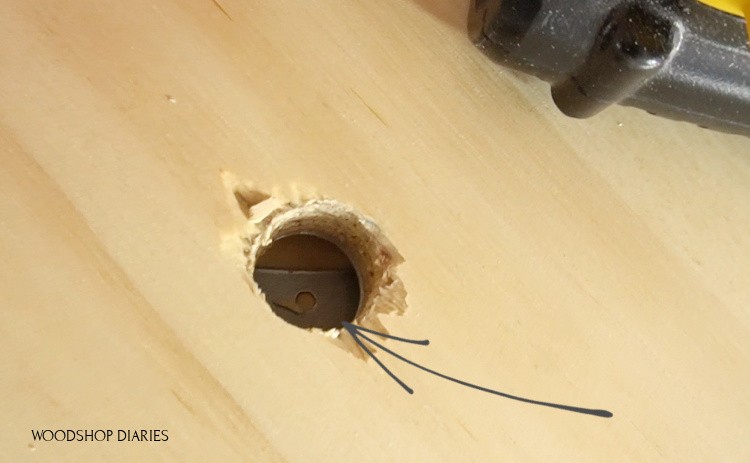
I drew diagonal lines across this base plate and centered the lazy Susan on it. There are some large ¾” diameter holes on the hardware that need to be drilled out on the base plate as access holes.
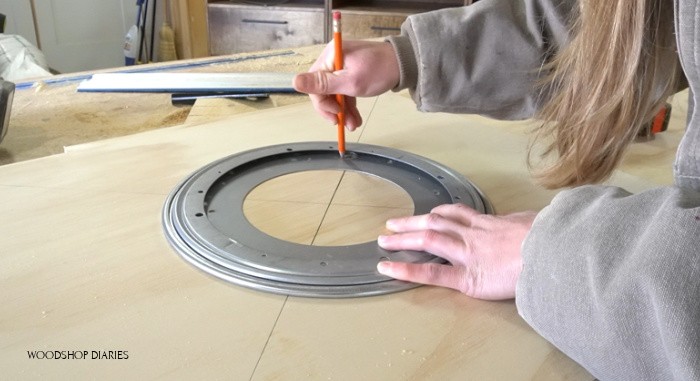
Once the hardware was centered, I marked these holes and used a spade bit to drill them out.
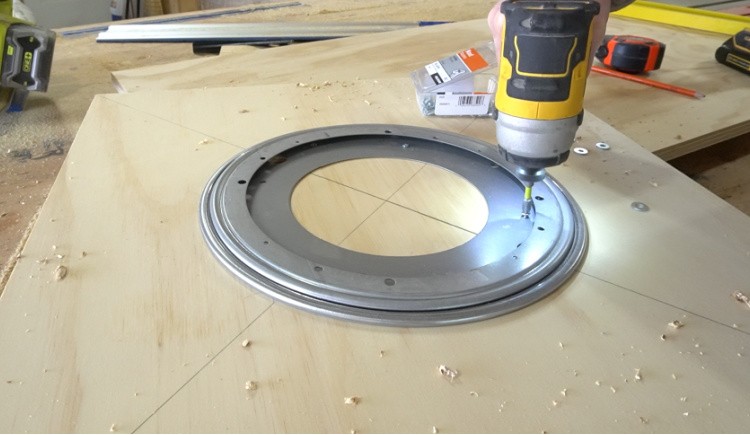
Then, I placed the hardware back in the center, and attached in place with ⅝” wood screws.
I flipped the main cabinet upside down so I could work on the bottom side, climbed up on my workbench (a ladder works as well haha) and set the base plate and hardware on top.
I centered the base plate on the bottom of the cabinet with the lazy Susan hardware facing down and screwed the hardware onto the cabinet through the access holes I drilled earlier.
You can see this better in the video. I spun the base plate around to find at least four screw holes to attach the lazy Susan onto the cabinet bottom.
Then, I flipped it back over and tested it out by sitting in it and spinning around haha.
Step 4: Add Pegboard to DIY Garage Storage Cabinet
At this point, I added some optional accessories, so you can add or skip this part as you need or wish.
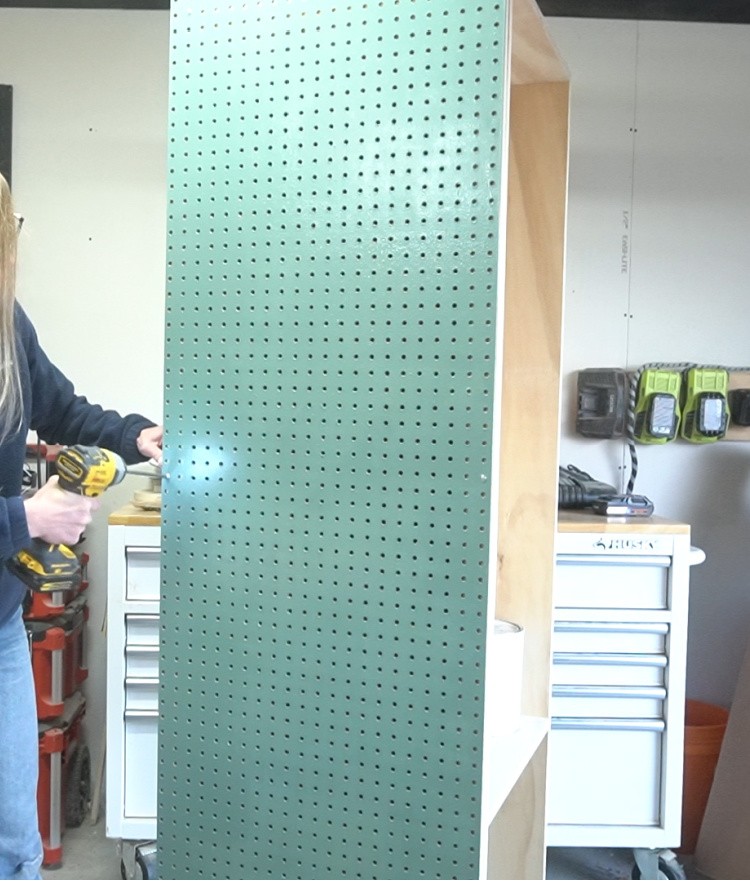
I wanted to add pegboard to the side of the cabinet to hang my brooms on, so I ripped a strip of pegboard I’ve had in my shop just waiting to use for literally 3 years haha.
Then, trimmed it to length to fit on the side of my cabinet.
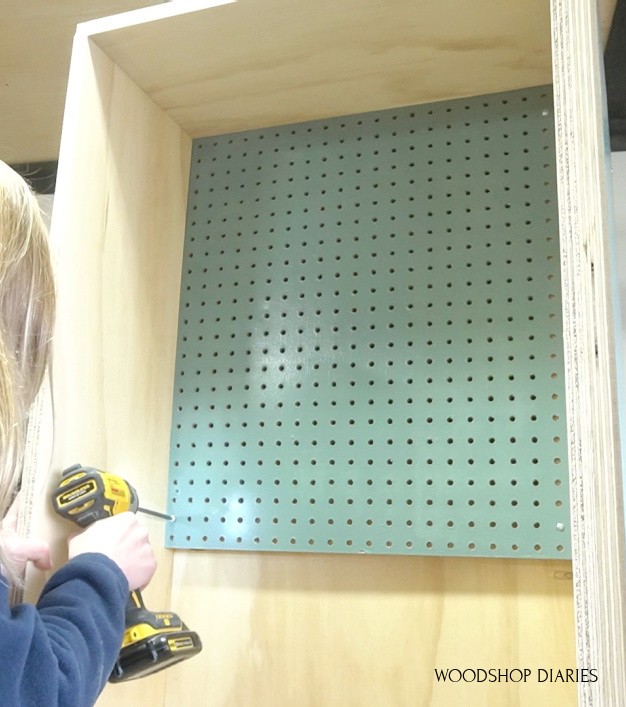
But you can’t mount pegboard directly on the side because then you cant get the pegs in the holes. So, remember those leftover plywood strips from the beginning?
I ripped them in half, cut them to length, and just screwed them on one side of the cabinet at the front and back edges.
Then I test fit the peg board and decided to paint that as well haha. I have no idea why I painted this, but whatever 🙂
And at this point, I decided not to waste the little piece I cut off my pegboard strip so I added it onto one of the insides of the cabinets as well.
I just added some spacer blocks like I did on the sides, then cut the pegboard to fit inside.
After letting the paint dry, I came back and attached the pegboard to the strips I installed using washer head screws to hold it in place.
You could also just use some washers with regular wood screws as well.
Step 5: Add Shelves to Lazy Susan Storage Cabinet
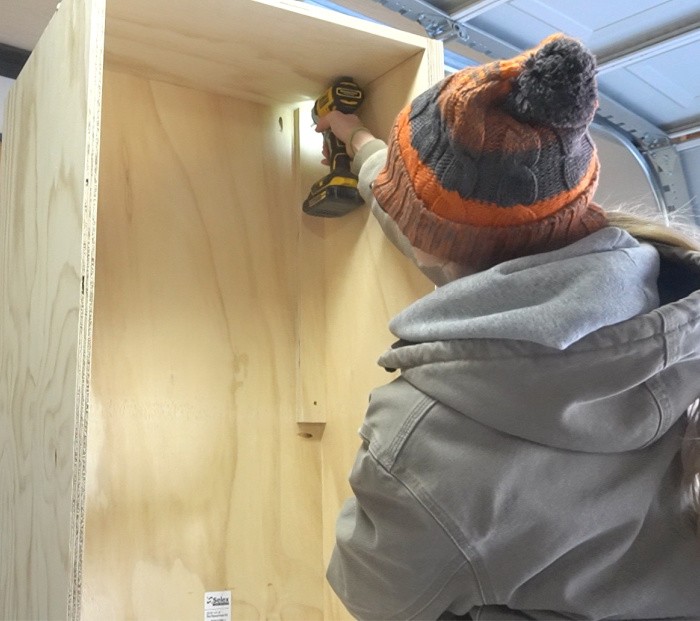
And before adding the door, I went ahead and drilled shelf pin holes with my shelf pin jig on both sides of the cabinet to install the adjustable shelves.
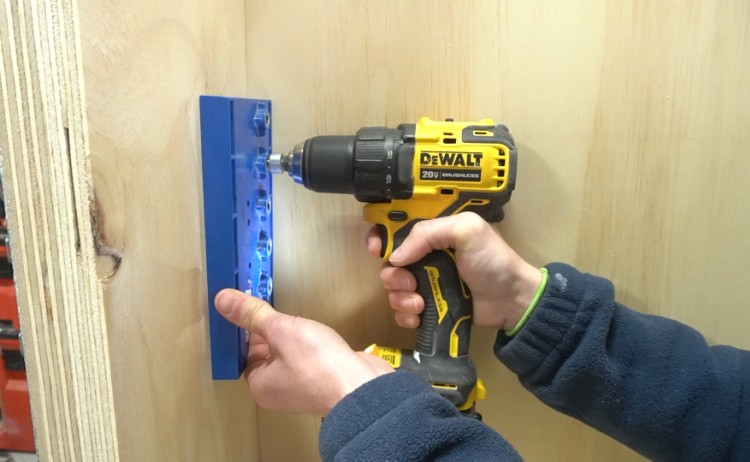
RELATED: This shelf pin jig is one the the Ten Must Have Tools for Cabinet and Furniture Building!
I used the remaining plywood to cut down shelves for this cabinet. I added three on the side I was putting the door and one on the open side underneath the pegboard.
I just stuck shelf pins in the shelf pin holes on both sides of the cabinet where I wanted my shelves to go and placed them inside.
Step 6: Add Door to Garage Storage Cabinet
In step 1, I cut a door (shown in the diagram) panel. At this point, I made sure it fit into the cabinet opening with about ⅛″ gap on all sides.
Once I made sure it would fit, I painted it—which is a totally optional step haha.
Honestly, I don’t know why I painted any of this, but I was in the mood to add some color, so here we are.
I used a concealed hinge jig to install concealed hinges for an inset door onto the door panel, and screwed it onto the cabinet.
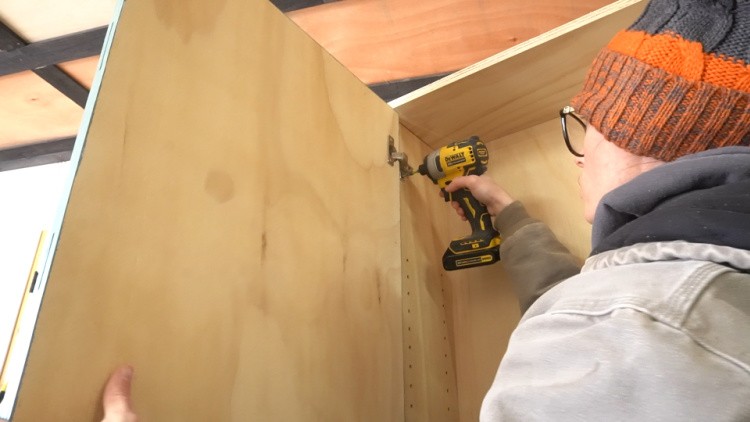
RELATED: How to Install Concealed Hinges
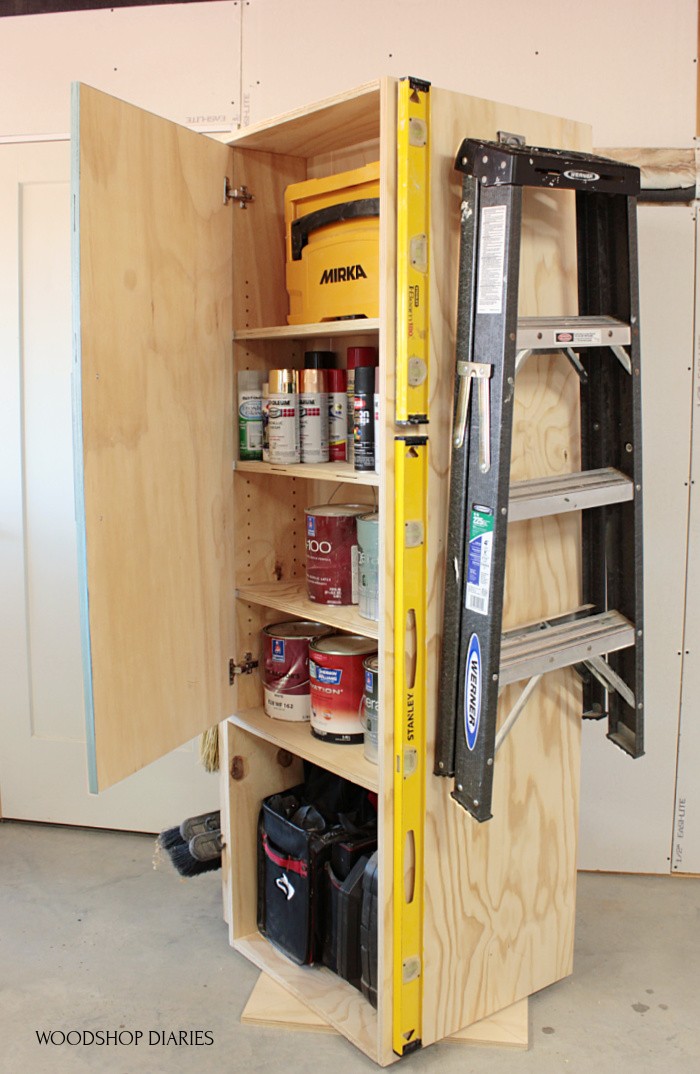
Adding the door is totally optional as well. I just wanted to hide all my paint cans and block out some dust.
If you wanted, you could skip it or even add it to both sides.
To finish it up, I loaded it up with paint cans, socket sets, tool bags, and other stuff I needed to find a good place for.
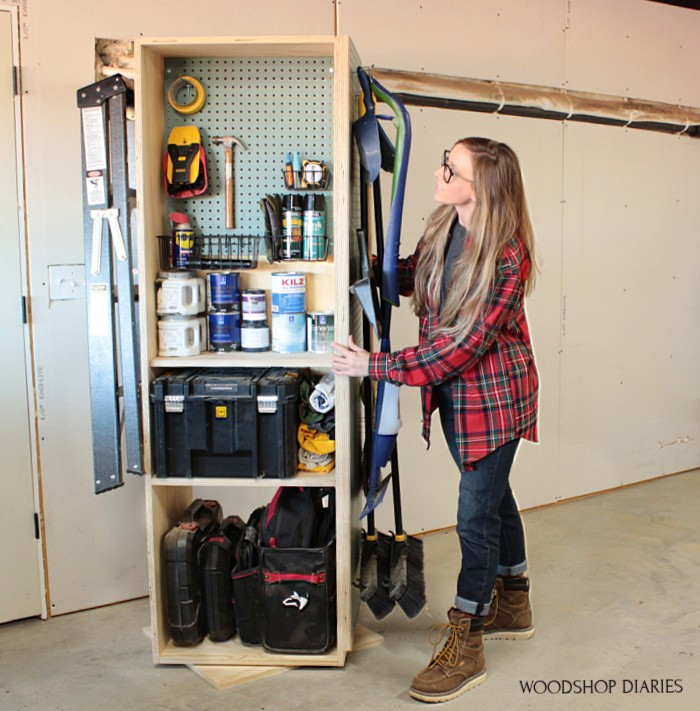
On the blank side, I just added some screws and a large hook to hang my ladder and levels, but you could also install pegboard on both sides if you wanted.
This is a really simple project that you can customize how you need for your own workspace or garage.
I’m happy to have my tool boxes off the floor, and my paint cans organized so I can actually see what I have.
I hope you enjoyed this DIY garage storage cabinet project, too and if you’d like to build one yourself, be sure to head over and grab the printable plans on Kreg Tool!
If you’re looking for more, you can check out plenty more garage and workshop projects here.
Be sure to subscribe to my newsletter below so you don’t miss out on what’s coming next!
And if you want to save this for later, you can pin this image.
That’s all for now, friends…Until next time, happy building 😊