In this post, I’m sharing how to build a built in storage bench and how to add a flip top to easily access to the inside!
This simple flip top storage bench was part of an overall hallway makeover project where I updated our hallway with fresh paint, new door trim, this built in bench, and a decorative wall trim (you can see in the image above).
.
If you’d like to see more, you can check out the hallway makeover before and after here and learn how to install the picture frame molding wall treatment here.
.
But right now in this post, I want to share the details on building the built in bench and how to modify it to fit your space!
.
I’ve got a video tutorial here and the step by step building plans below:
*This post contains affiliate links. See policies.
Tools & Materials:
Tools:
- Circular Saw
- Cutting Guides (optional, but helpful. Learn how to cut plywood in this post)
- Miter saw (optional, but helpful)
- Pocket hole jig
- Drill/Driver
- Jig Saw
- Nail Gun (brad or finish to replace/install trim. Learn the difference in brad and finish nailers in this post)
- Stud Finder
- Sander
Materials:
- ¾″ plywood (cabinet grade–birch or maple work well for painted or stained projects)
- Pre-Made Butcherblock countertop OR 2x material to make your seat top
- Trim for sides and bottom (You can get creative with this and do something different, but I used 1x6s for the baseboard and cove molding for the sides)
- Edge Banding (optional)
- 1 ¼″ pocket hole screws
- 2″ & 2 ½″ wood screws
- Wood shims
- Brad and/or finish nails
- (1) pair butt hinges for flip top seat
Notes About the Build:
Simple Cabinet Style Plywood Bench Design
There are SO many ways to build a built in storage bench. You could frame out the whole thing with 2x4s and then just cover it with plywood or trim pieces.
.
You could add drawers or doors instead of a flip top. I actually built some kitchen nook built ins several years ago with doors here.
.
However, this particular bench is a simple, flip top style made basically as a large plywood box. I was able to build this in the shop, then carry it inside and slide it into place as one big piece and just add the top.
So, this is definitely NOT THE ONLY WAY to do this, but it’s a very simple way 🙂
Tips on Measuring Your Space
Make sure when measuring the space that you want your bench to go into that you measure it at the back and the front and take the smallest measurement.
.
Walls are never perfectly square and corners are usually the worst. In my case, the nook I was sliding my bench into was about ½″ wider at the back corners than the front corners.
.
But I had to make my box small enough to fit through the front corners in order to sit back into the nook. It’s better to build a little too small than too big. You can always cover gaps with trim.
Storage Bench Seat Top Options
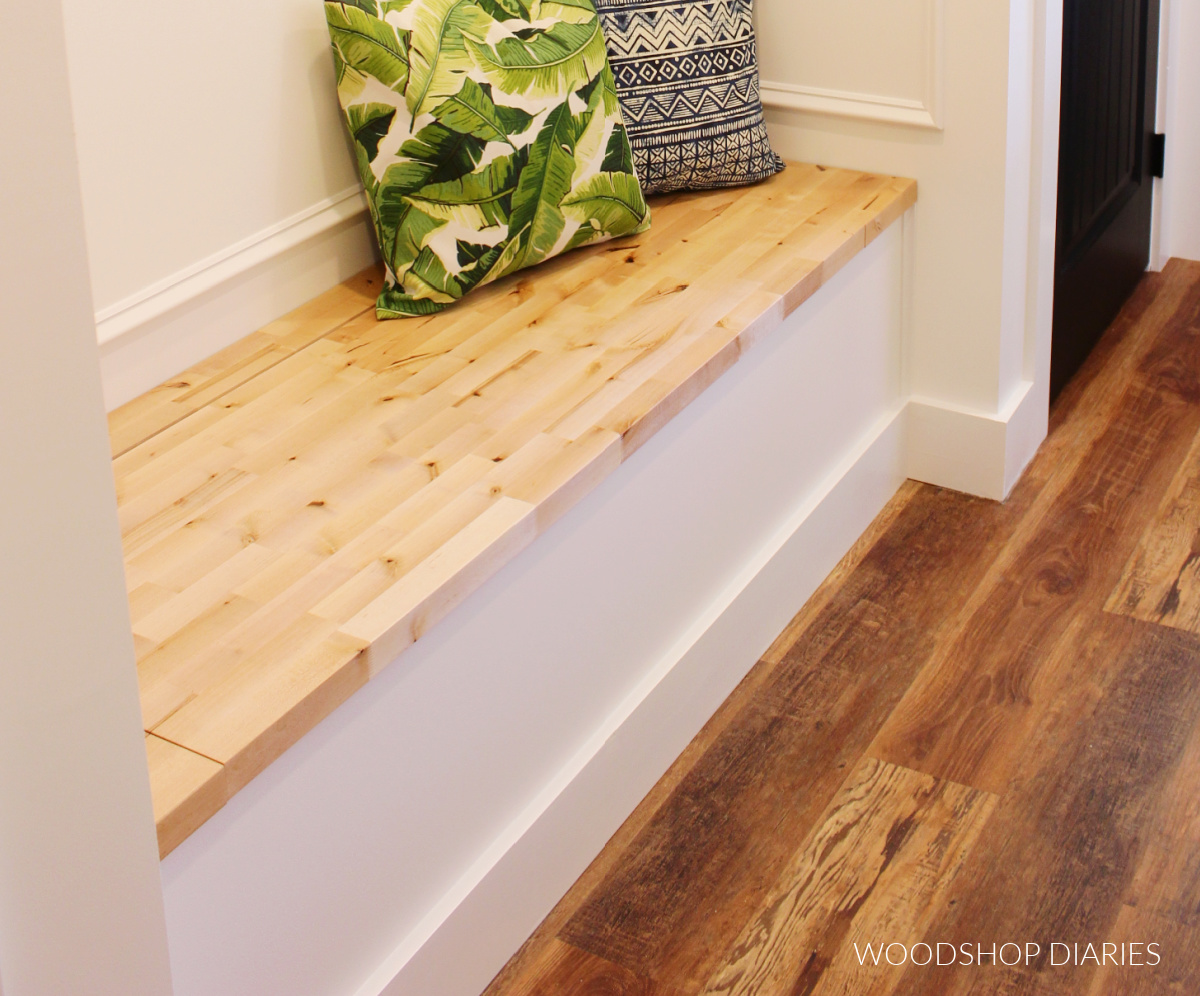
I used a pre-made butcherblock countertop for the bench seat and cut it to make part of it stationary and part of it flip open.
You can find these in a variety of sizes and wood types, or, if you’d rather, you can certainly use this tutorial to glue up your own top in whatever size you want.
.
If you have little ones and are worried about smashed fingers or you’d like to make your flip top stay open on it’s own, you can find several options online for soft close hinges/lid supports. However, I didn’t add one in my case.
Recommendations for Long Spaces
You can make this bench as a “built in” and put it in a nook, or in a corner, etc. Or, you can also build this as a stand alone bench as well.
.
However, I wouldn’t recommend going much wider than 6 ft. unless you add a middle support OR make two smaller boxes to go side by side.
Posts you may find helpful to build this built in storage bench:
How to Build a Built In Storage Bench
Step 1: Measure Space and Determine Bench Size
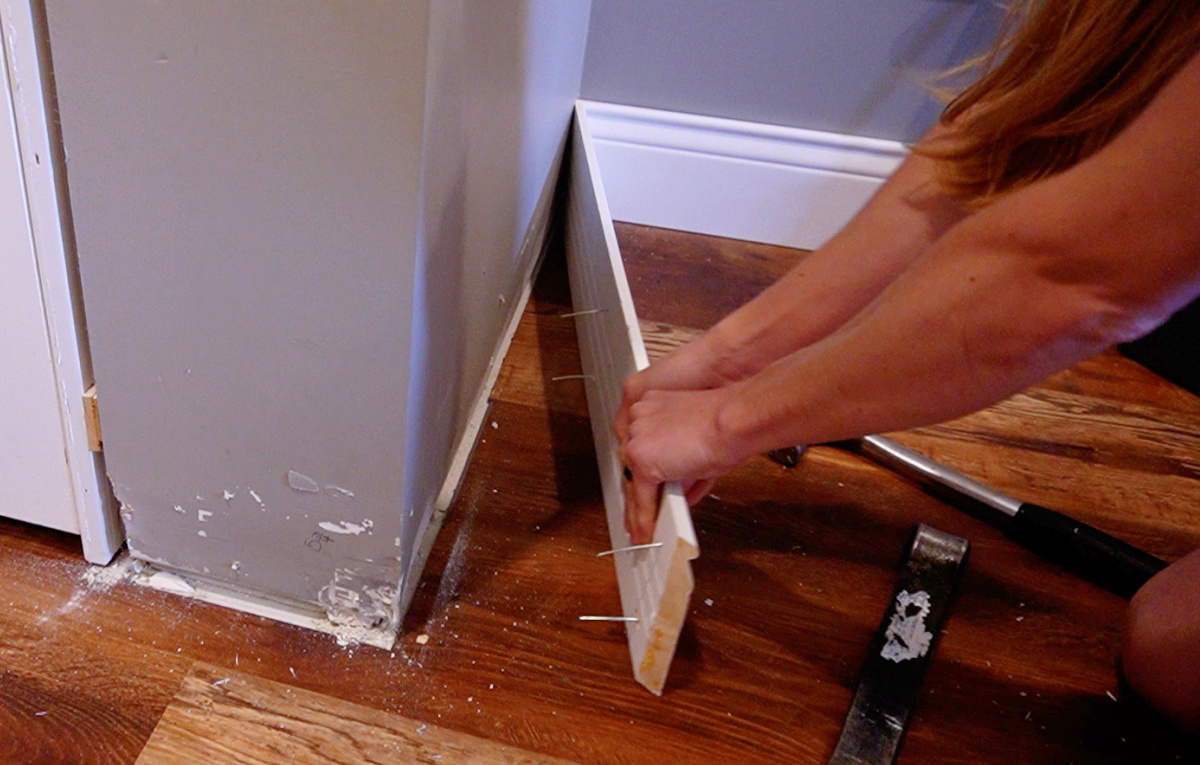
Remove existing trim/baseboards in your space to get everything down to the bare walls.
Take detailed measurements of the space. If you are adding this into a nook, make sure to measure at both the back and the front and take the smallest measurement.
.
For example, my wall was 70 ¾″ wide at the back and 70 ¼″ wide at the front of the nook.
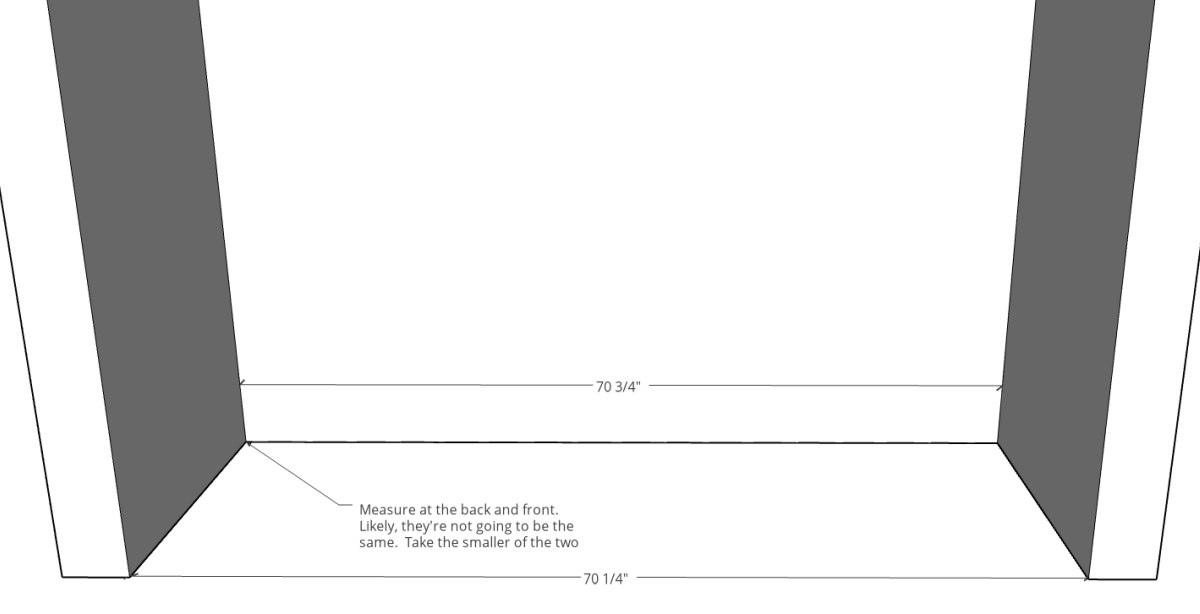
To allow for some additional wiggle room, subtract approximately ¼″ from the smallest measurement and that’s the overall width to make the bench. In my case, I went with 70″ wide.
.
Determine how tall, deep, and wide you want your bench to be based on your space. Pay attention to outlets, light switches and other things that might interfere with the bench that you will need to work/build around.
.
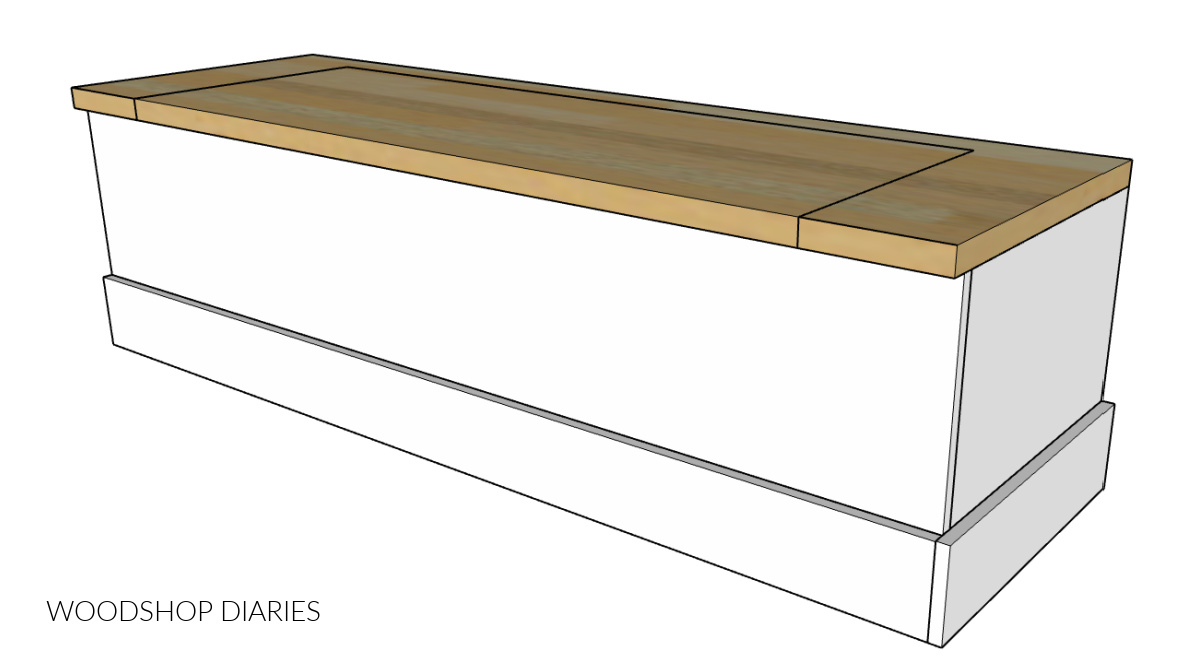
I made my bench BOX 18 ½″ tall, 21″ deep, and 70″ long overall.
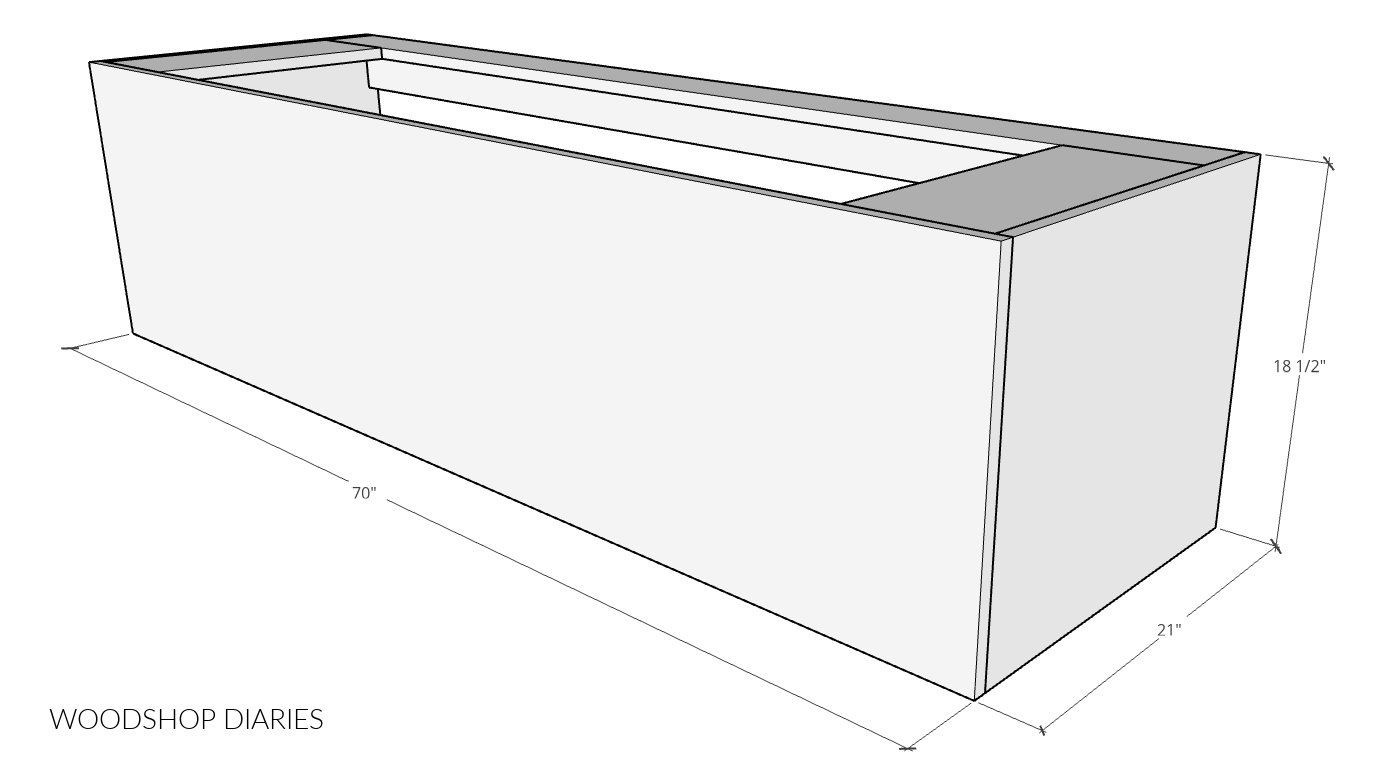
If your space is longer than 6′, I’d recommend making two separate boxes OR at least adding a middle divider for extra seat support over such a long span.
Step 2: Cut & Assemble Storage Bench Box
Cut ¾″ plywood pieces as needed to assemble the bench box the size you need from step 1.
RELATED: How to cut plywood sheets
.
You’ll need:
- (2) Sides 18 ½″ x 20 ¼″
- (1) Bottom 20 ¼″ x (Overall width – 1 ½″)
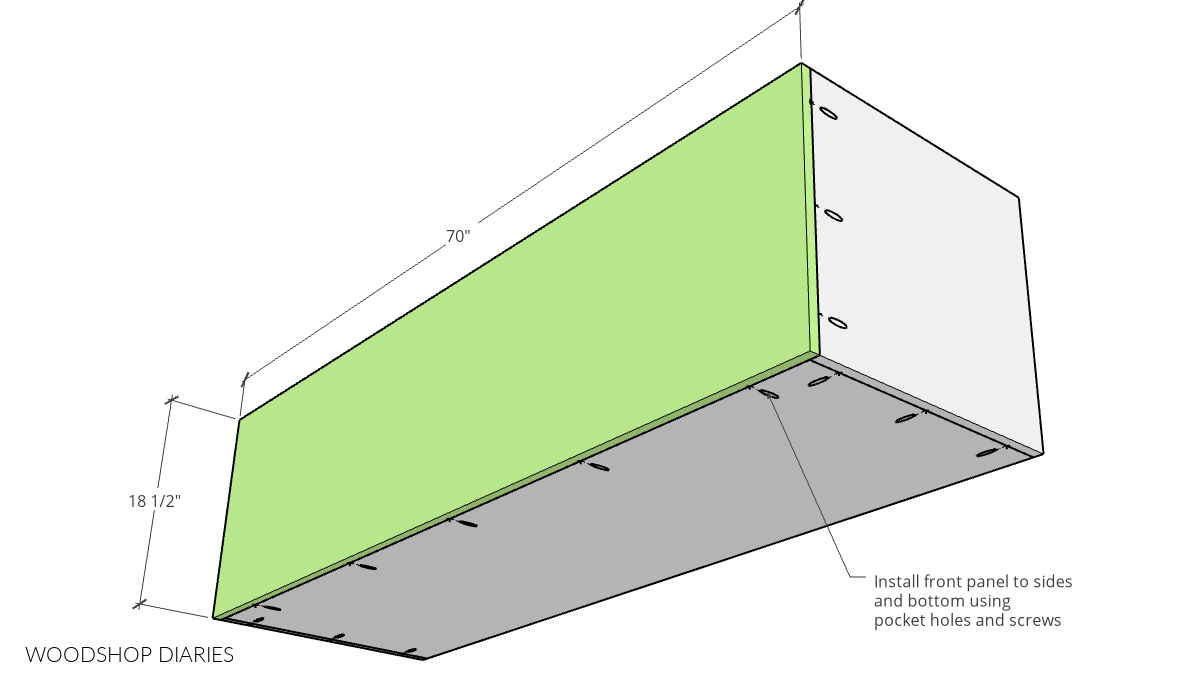
- (1) Front 18 ½″ x Overall Width
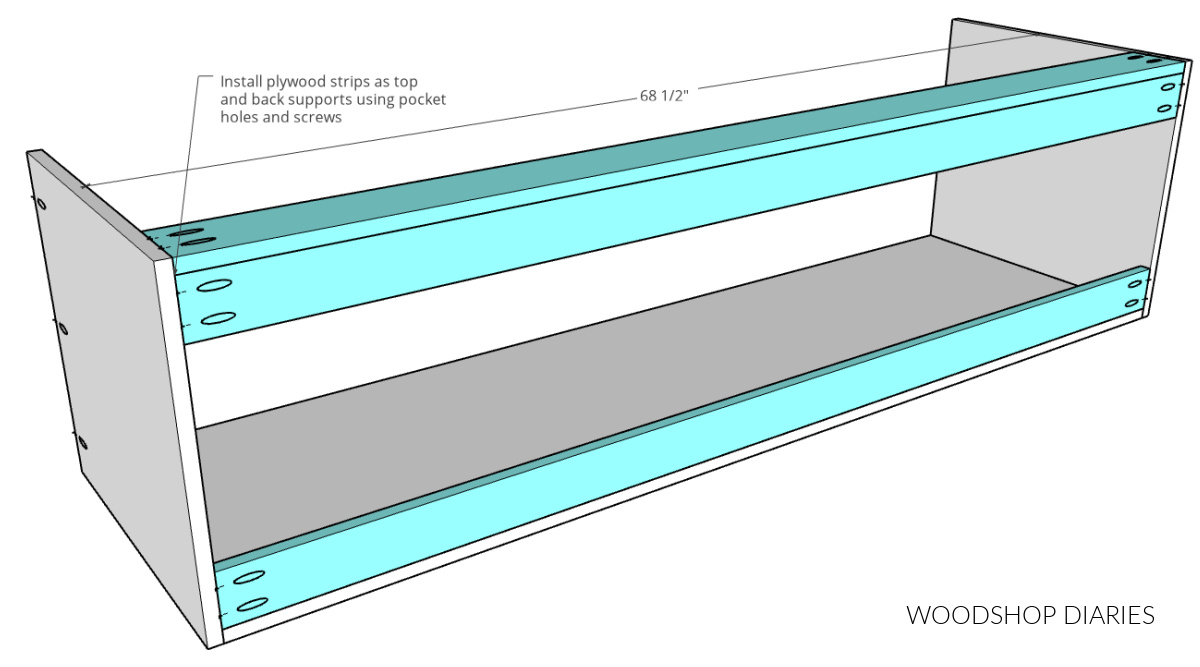
- (3) Plywood strips (widths of these strips isn’t critical) the same length as you cut the bottom panel
- (2) Top Side Supports (see below)
If desired, apply iron on edge banding to the TOP edge of the front panel as this will be exposed in the final product when the lid is lifted.
RELATED: How to apply iron on edge banding
.
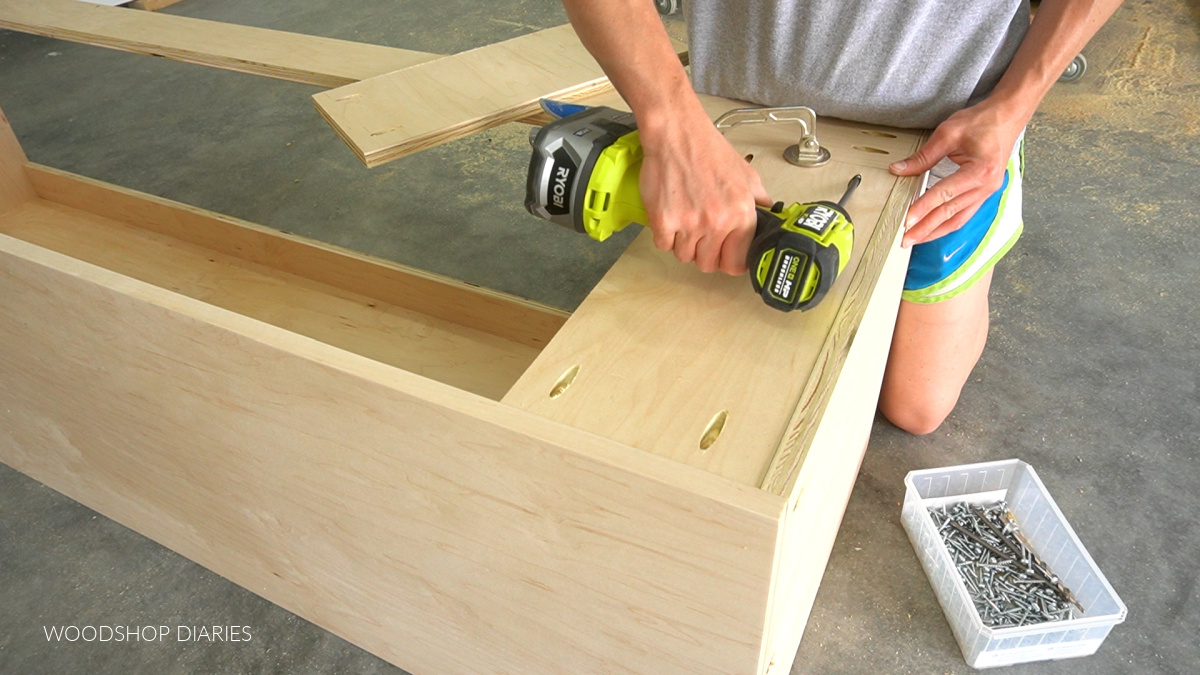
I assembled this box using ¾″ pocket holes and 1 ¼″ pocket hole screws.
.
I drilled pocket holes into the ends and along the front edge of the bottom panel, across the front edges of the side panels, and into the ends of the three plywood strips.
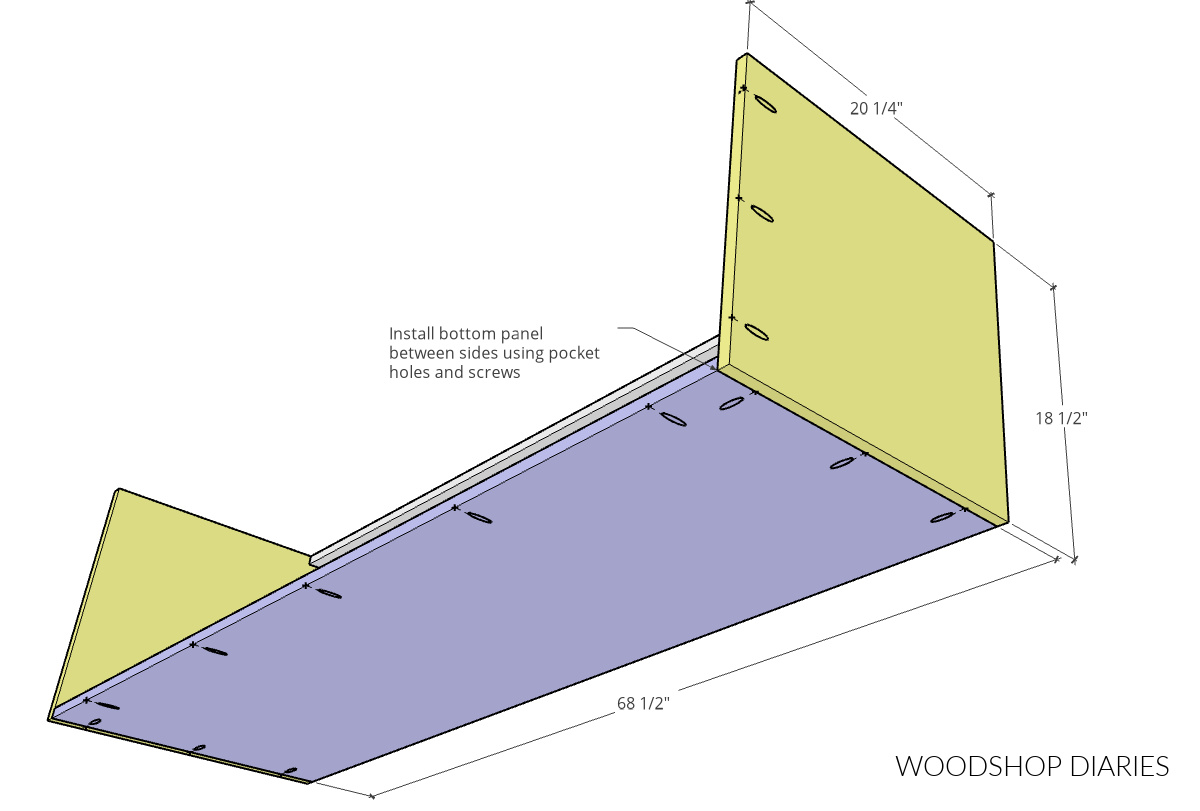
I installed the bottom panel and the plywood strips between the side panels.
Then, I laid the front panel face down, and placed the box on top to secure it with pocket hole screws.
.
Note that these pocket holes are on the outside of the box. Since this was going into a nook, these holes will be hidden. However, if you will have an exposed side with your bench, these pocket holes can certainly be placed on the INSIDE instead of the outside so they aren’t seen.
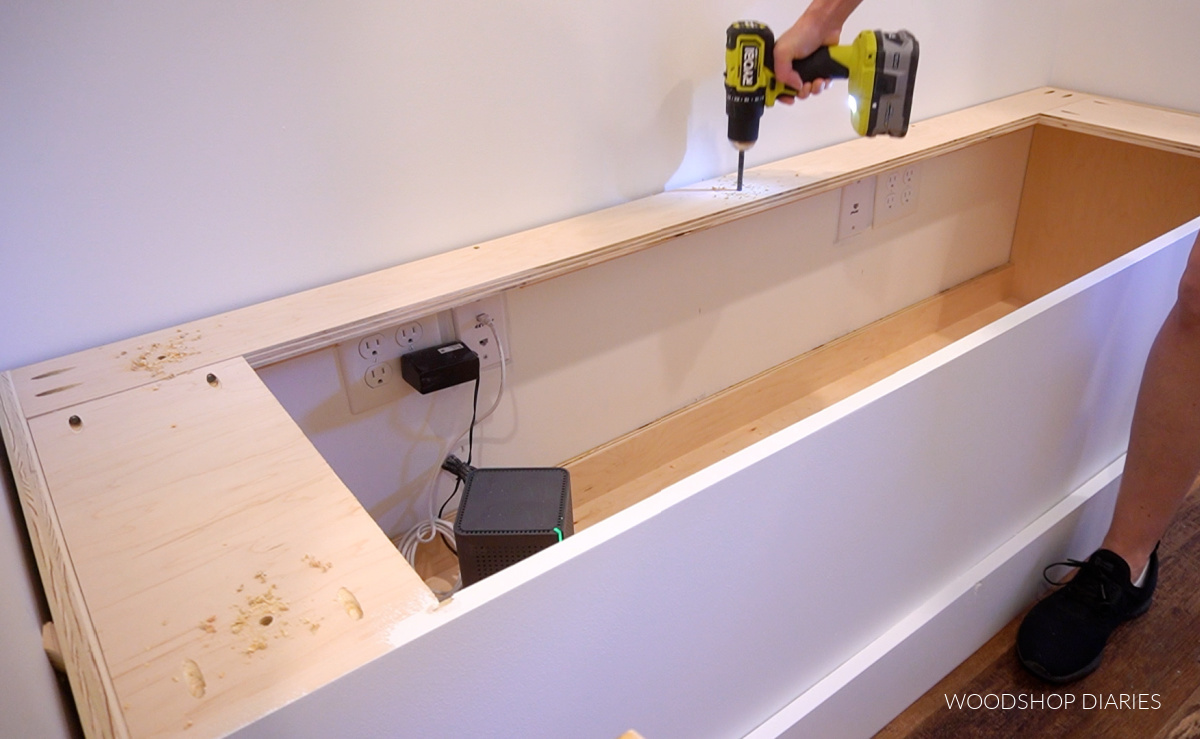
If desired, you can add a ¼″ plywood back panel, but I didn’t since there were several outlets on the back wall I wanted to have access to and I didn’t want to cut out all the holes for them in a plywood panel. A back is totally optional.
.
Since I was adding a flip top seat, I needed somewhere on the sides to attach the stationary portion of the top, but didn’t want anything that would run the full length across the front. So, I measured and cut two scrap plywood pieces to fit on the sides.
I installed these using pocket holes and screws. These can vary in size as needed, but I made mine approx. 7″ wide.
Step 3: Install Built In Storage Bench
I slid my bench box into the nook and used 2 ½″ wood screws to secure it through the top, back support into the wall studs behind and on each side.
.
Use a stud finder to mark the studs and use use shims where needed to ensure the box is square and level.
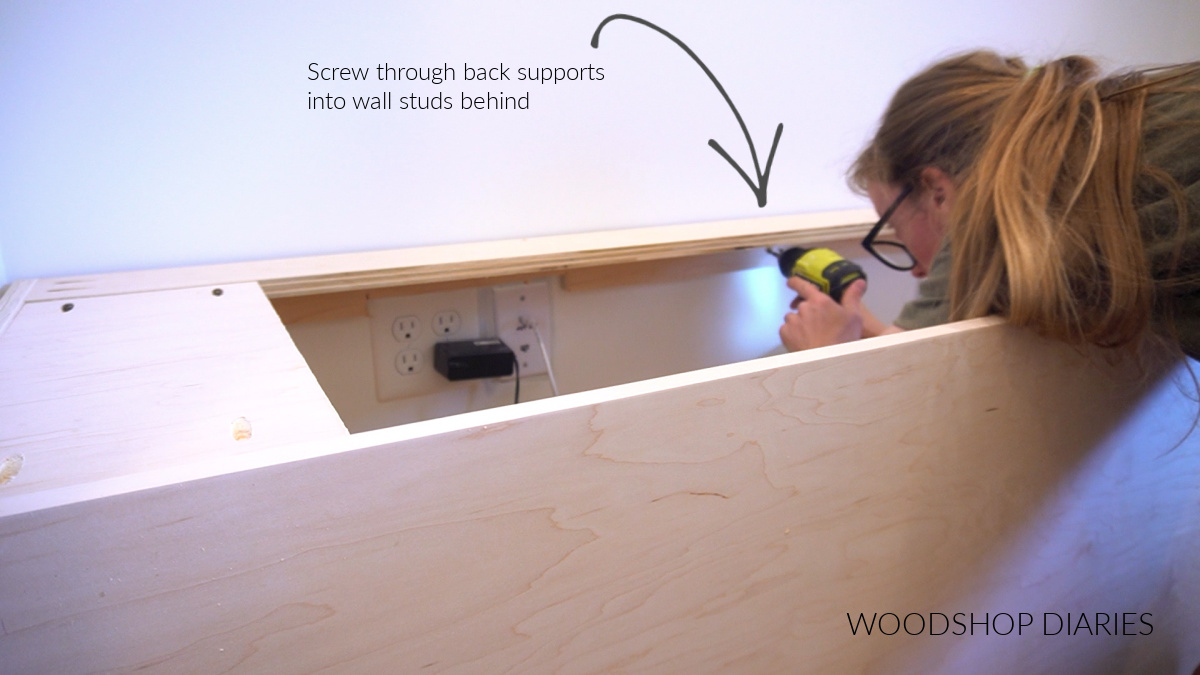
I hit three studs along the back and one on each side of the bench.
Step 4: Cut Flip Top Bench Seat
I actually used a pre-made butcher block for this bench seat. The previous homeowners used this nook as a desk and they had installed this as the desk top. I removed it, sanded it down, and reused it for the bench top.
.
However, you can find these at the big box stores in different sizes and wood types if you’d like to use one for this.
.
OR, you can simply purchase some 2x material and use this tutorial to glue up a top the size you need. That tutorial is for making table tops, but it’s the same process for any kind of “top” you need to make 🙂
.
Trim down the top–whatever you decide to use for this–to fit your bench. I made it the same length as my overall bench box and 1″ deeper so it would overhang the front edge by 1″. If you have an exposed side, you may want to add a little for overhang on your side, too.
.
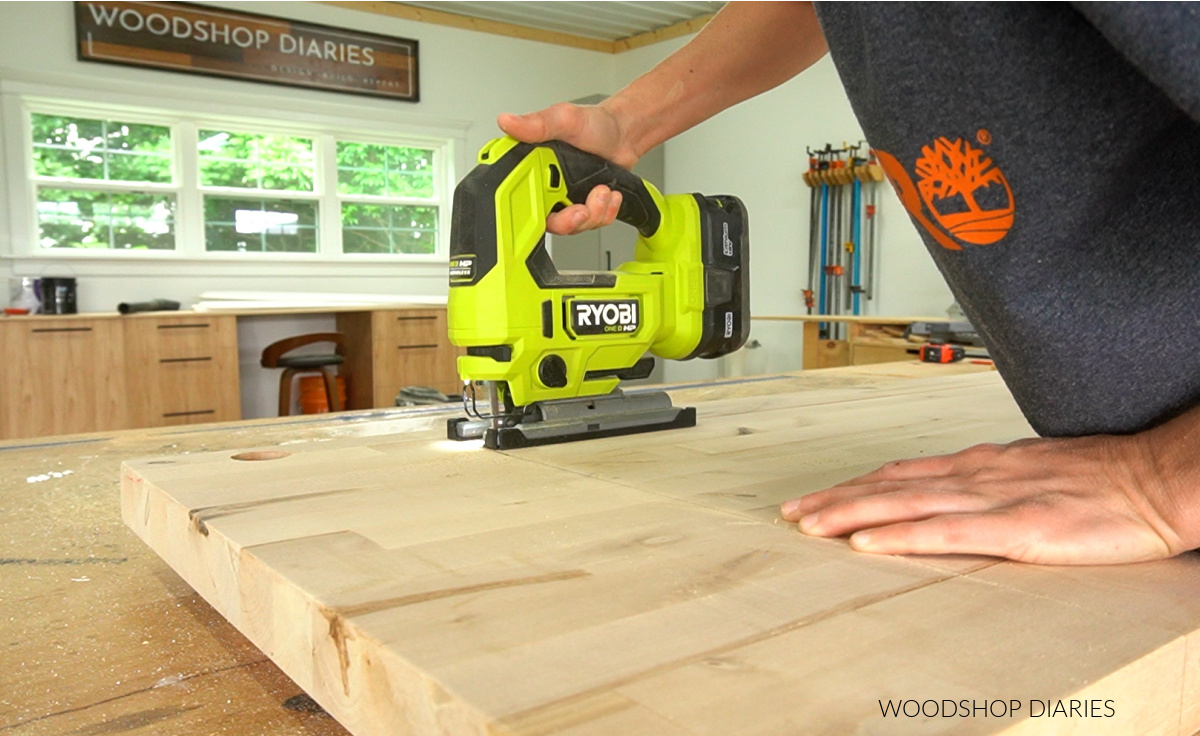
After it was trimmed to size, I flipped it upside down and marked out where I wanted to cut for the flip top.
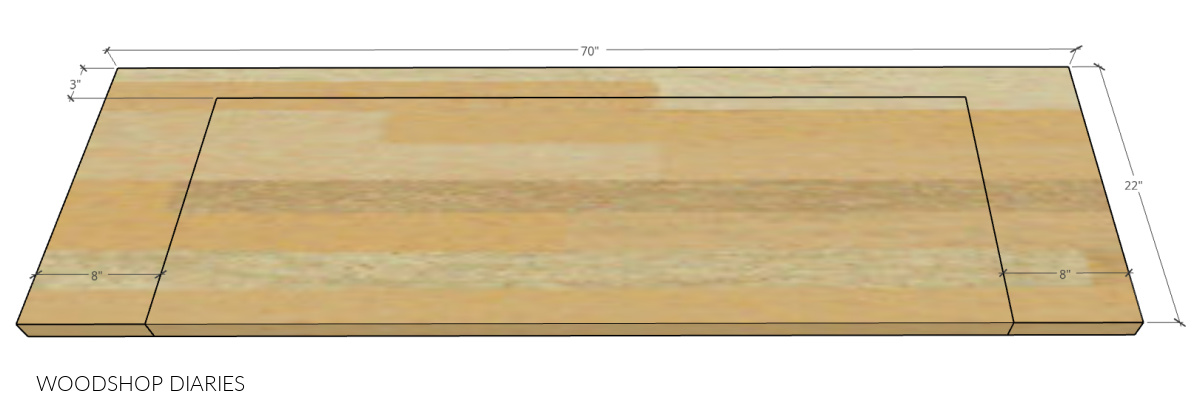
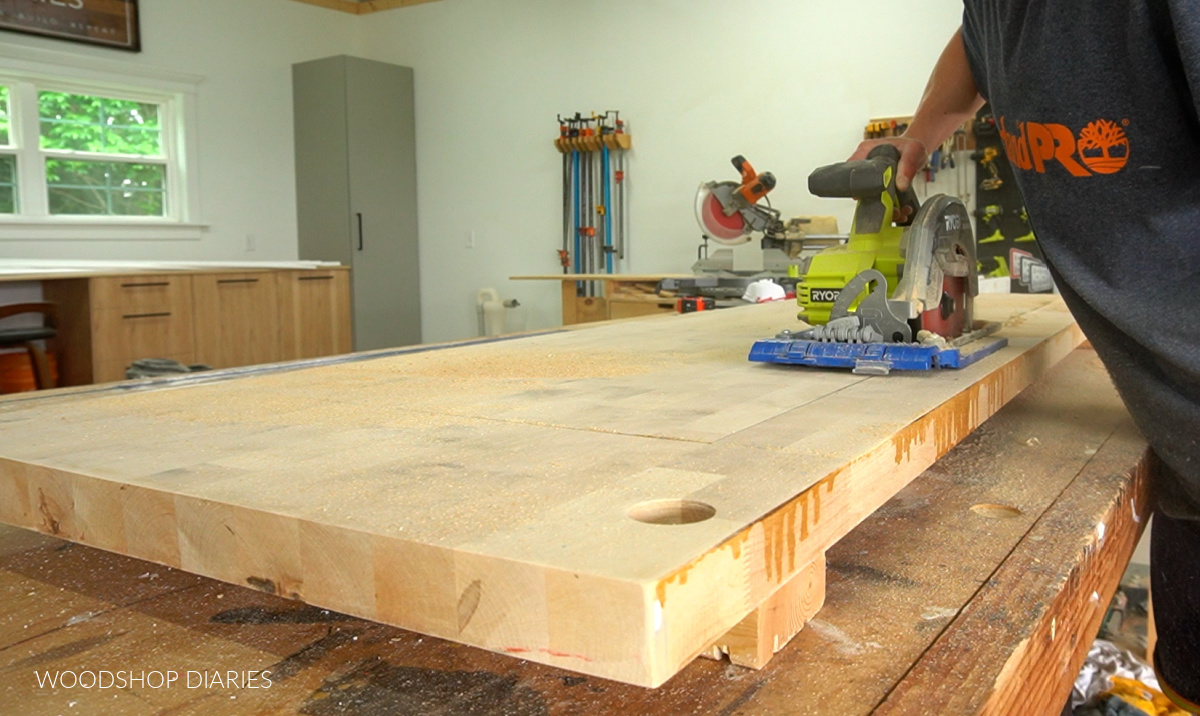
I used a circular saw to cut along these lines (I had to “plunge cut” the back line–CAREFULLY lower the saw down along the line–since it wasn’t a through cut).
Then, I flipped it back over and used a jig saw to finish cutting the corners nice and square.
Step 5: Install Built In Bench Top
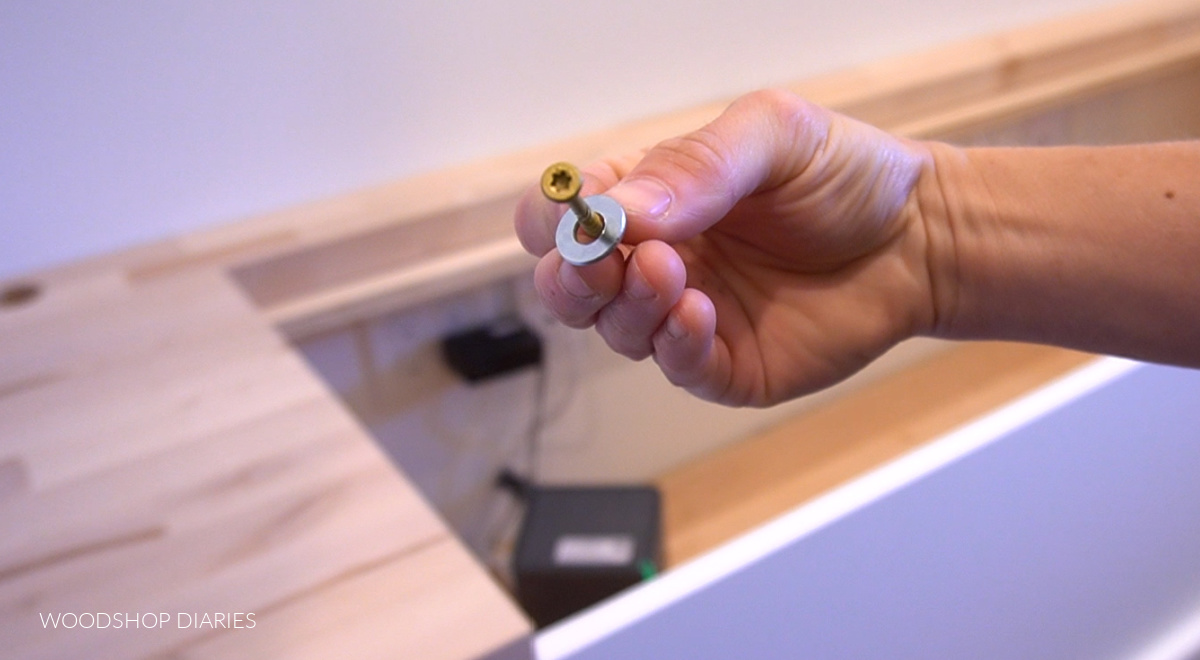
I wanted to allow for wood movement, so I drilled some oversized holes along the top supports in the bench box.
Then, I placed the “U shaped” stationary portion of the top onto the bench. I used 2″ screws with washers larger than the holes through the bottom, up into the top.
I used a pair of butt hinges (the exact size of these isn’t critical, as long as they are strong enough to handle the weight/size of the top) to attach the flip top.
.
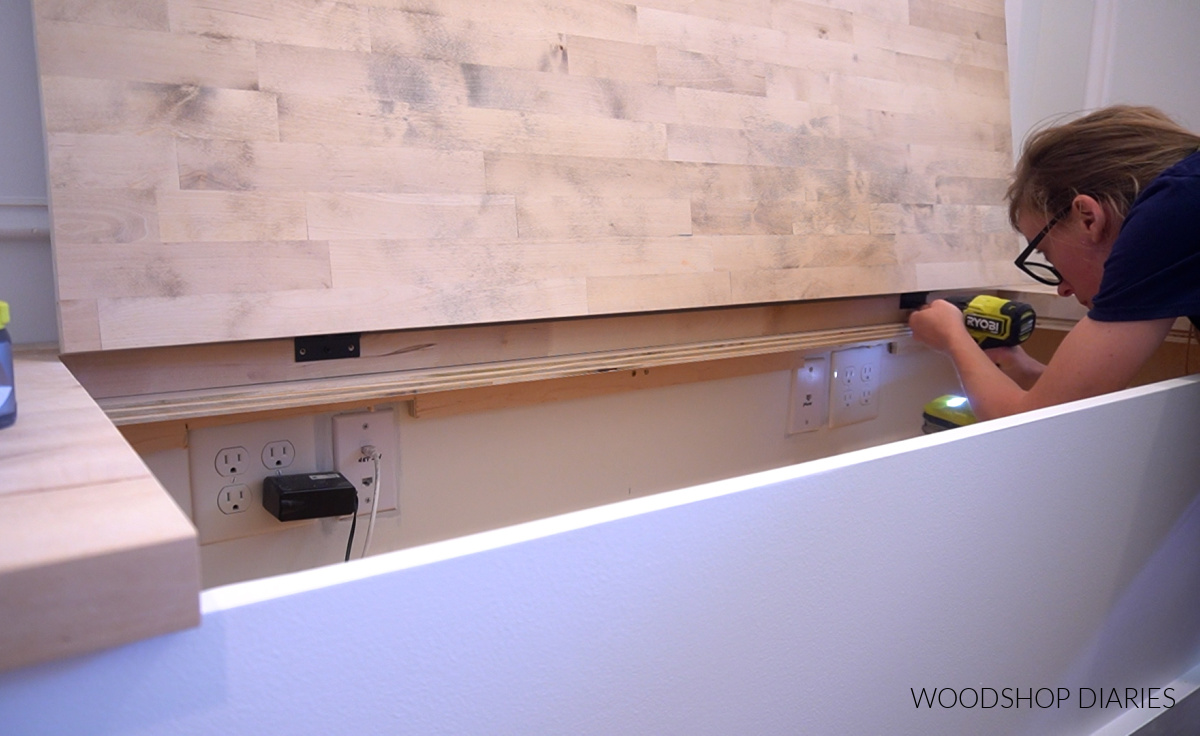
If desired, you can also add some soft close supports to the lid.
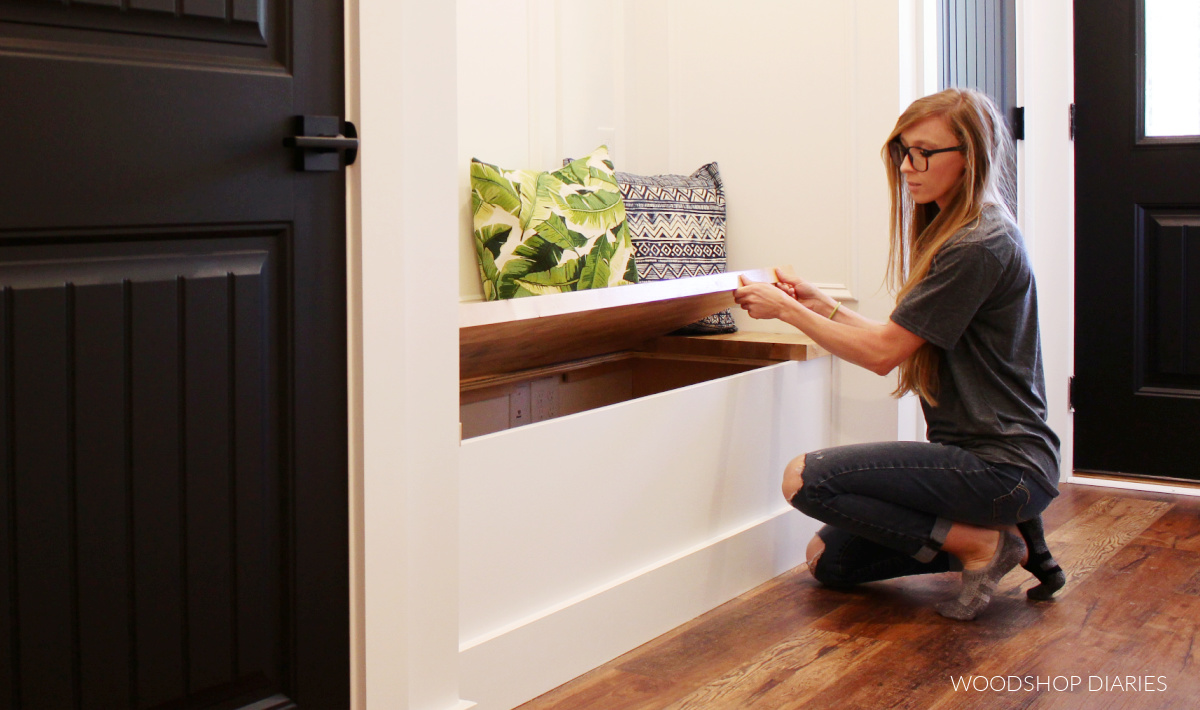
Step 6: Trim & Finish
I told you to remove the baseboards and trim in step 1, and now that the bench is in place, it’s time to cut and replace the trim and baseboards as needed. This is what really gives it the “built in look.”
.
I used 1x6s here for some simple baseboard trim, but you may choose to match your existing baseboard if you have something different.
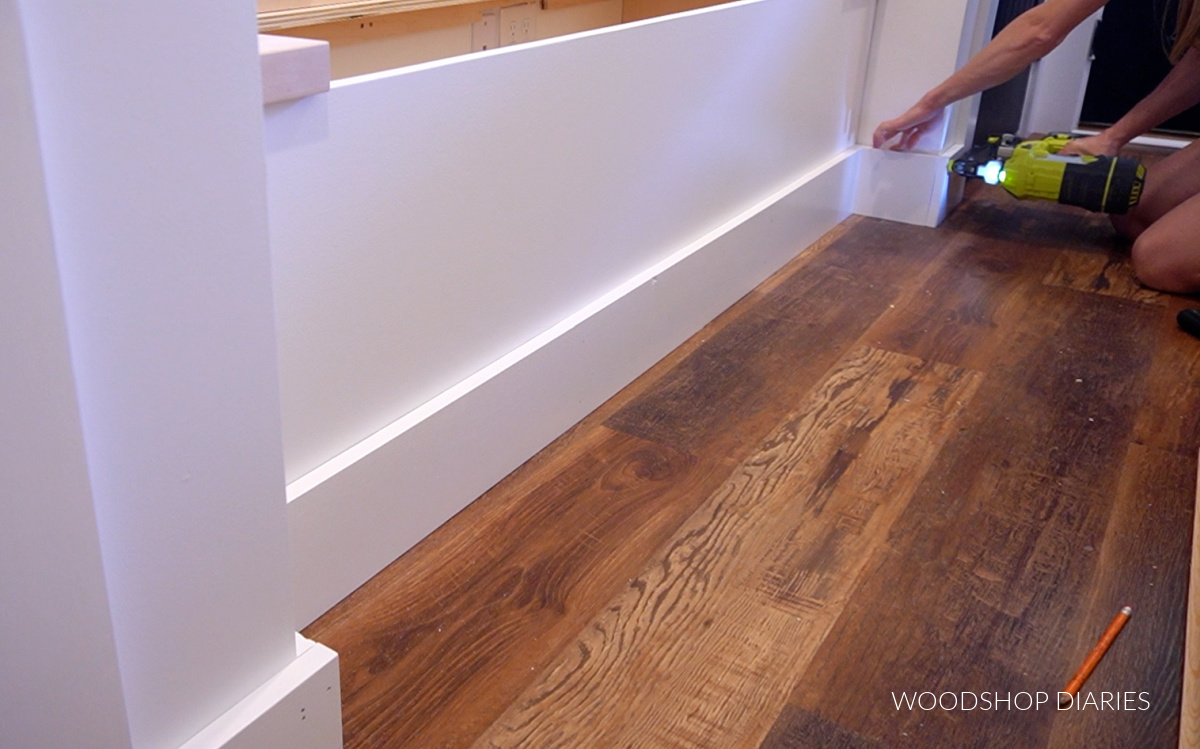
Use brad or finish nails to secure the trim in place.
RELATED: What’s the difference between brad and finish nails?
.
I had some gaps between the wall and the sides of my bench, so I cut some cove molding to fit here in the corners. You can get creative and use quarter round, 1x material, etc to trim out the corners or even add a decorative design along the front or sides of the bench as desired.
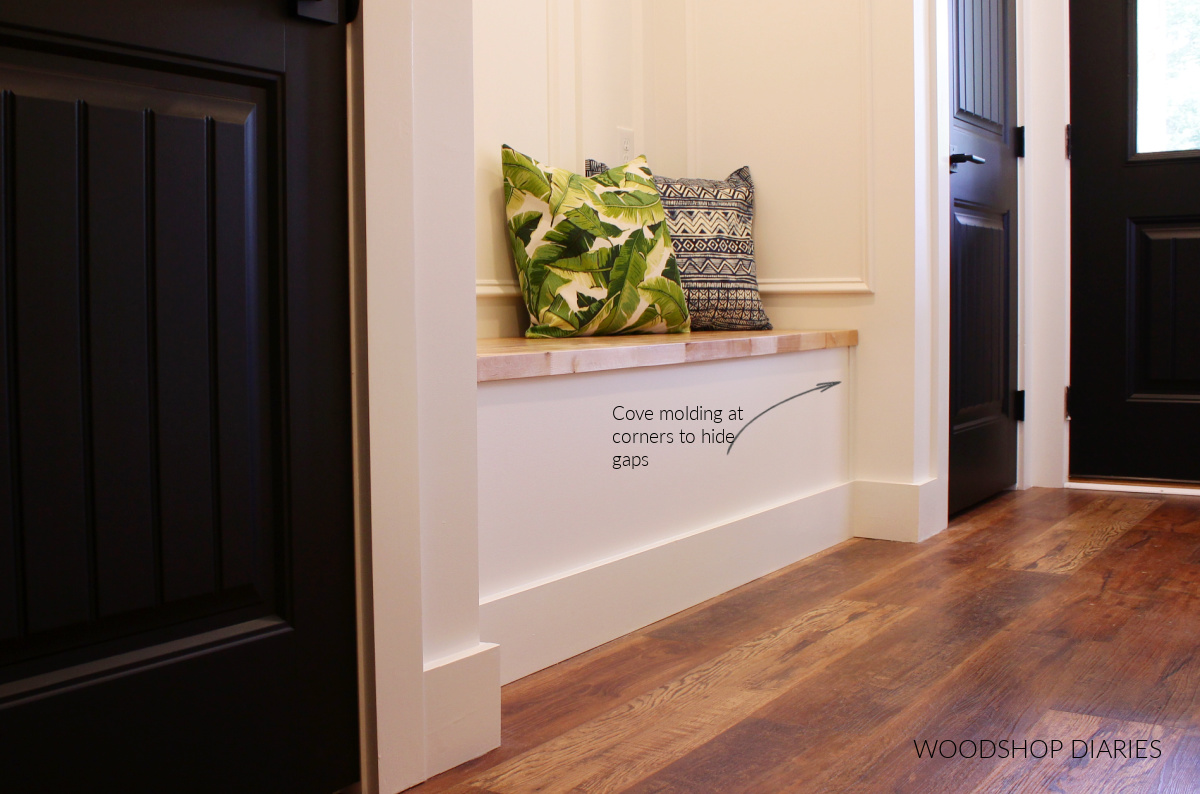
If you also have gaps along the bench top, you can certainly trim these out with cove, half round, or another trim as desired.
.
Caulk, putty, and sand as needed. Check out this guide for my top 5 secrets to making DIY furniture look more professional!
.
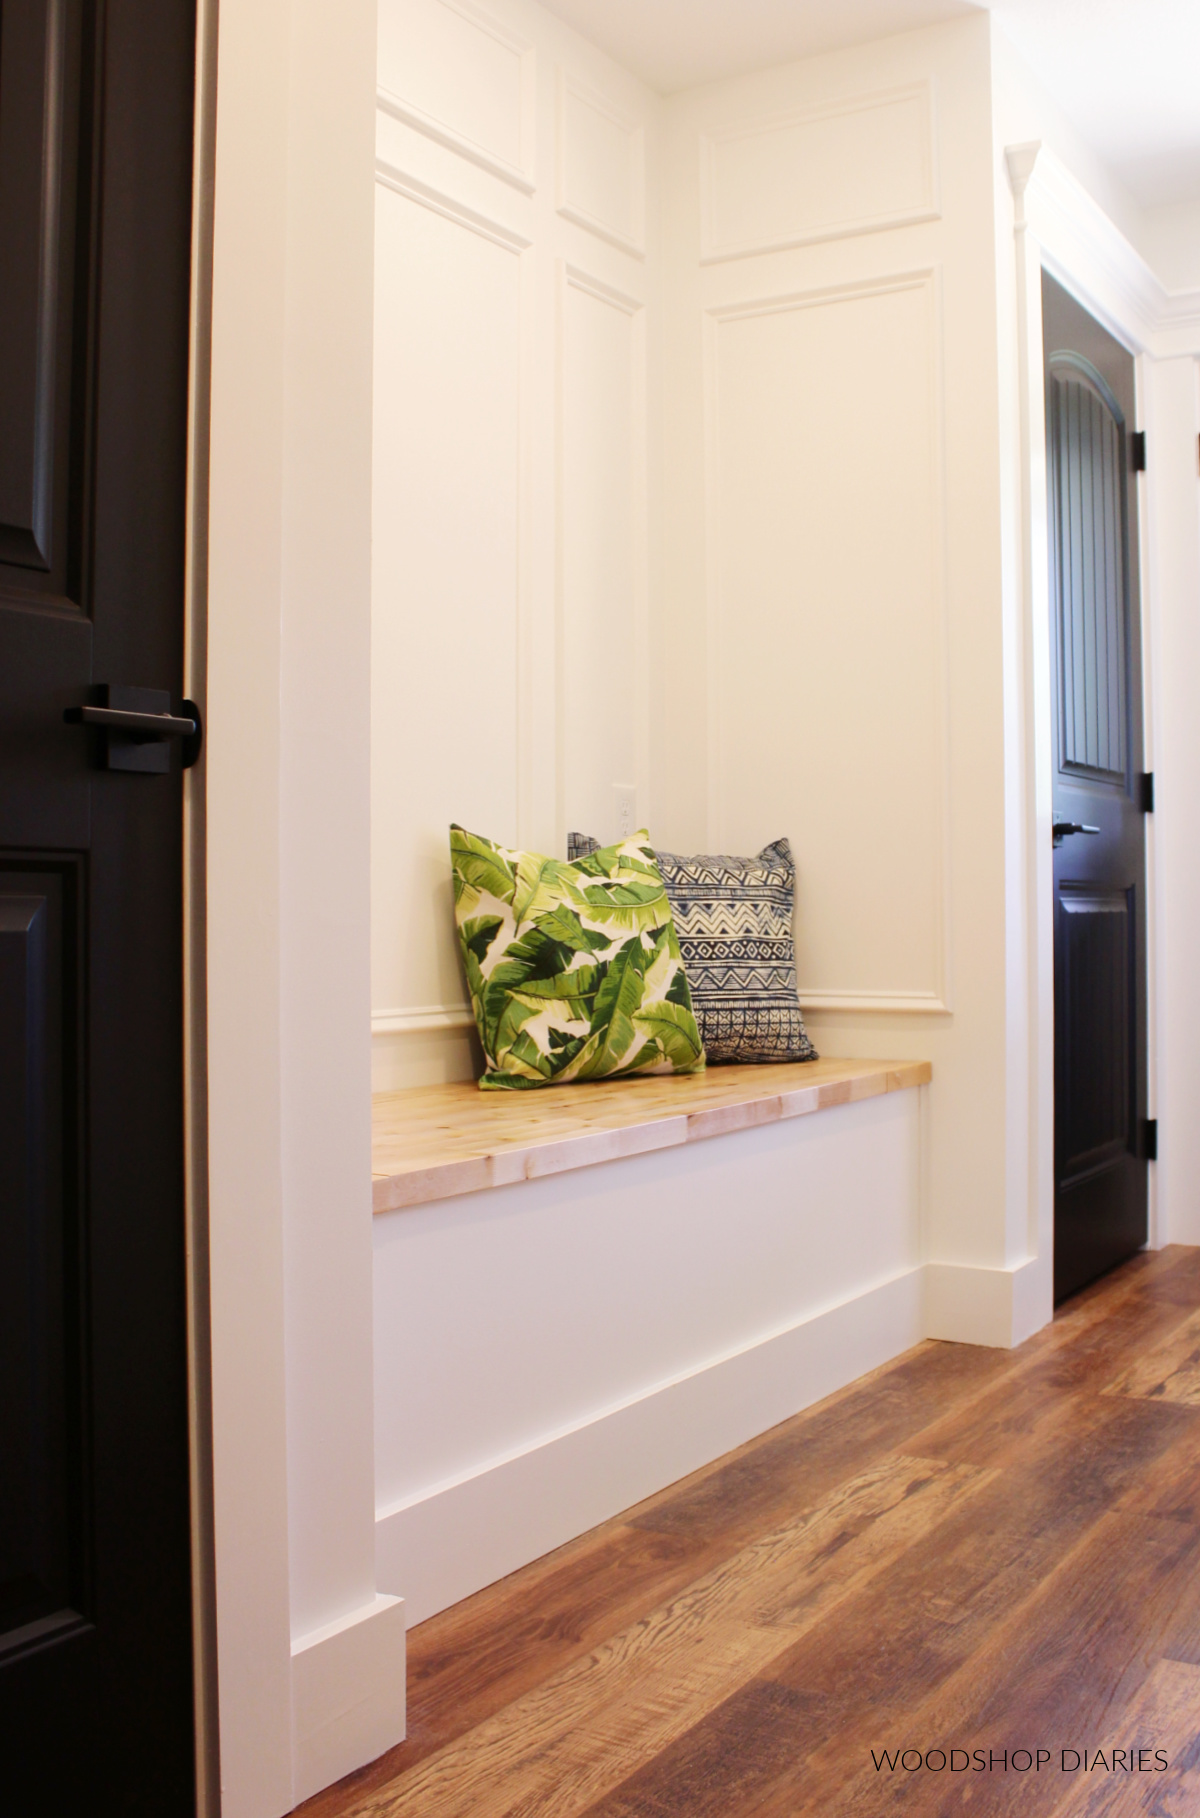
Then, finish bench and top as desired. I primed and painted my bench box to match my walls here (SW Pure White) and applied some Minwax Helmsman Poly to the bench top to protect it, but keep its natural color.
.
But obviously, you can paint or stain yours however you wish! 🙂
.
And now you have a simple, functional, built-in storage bench!
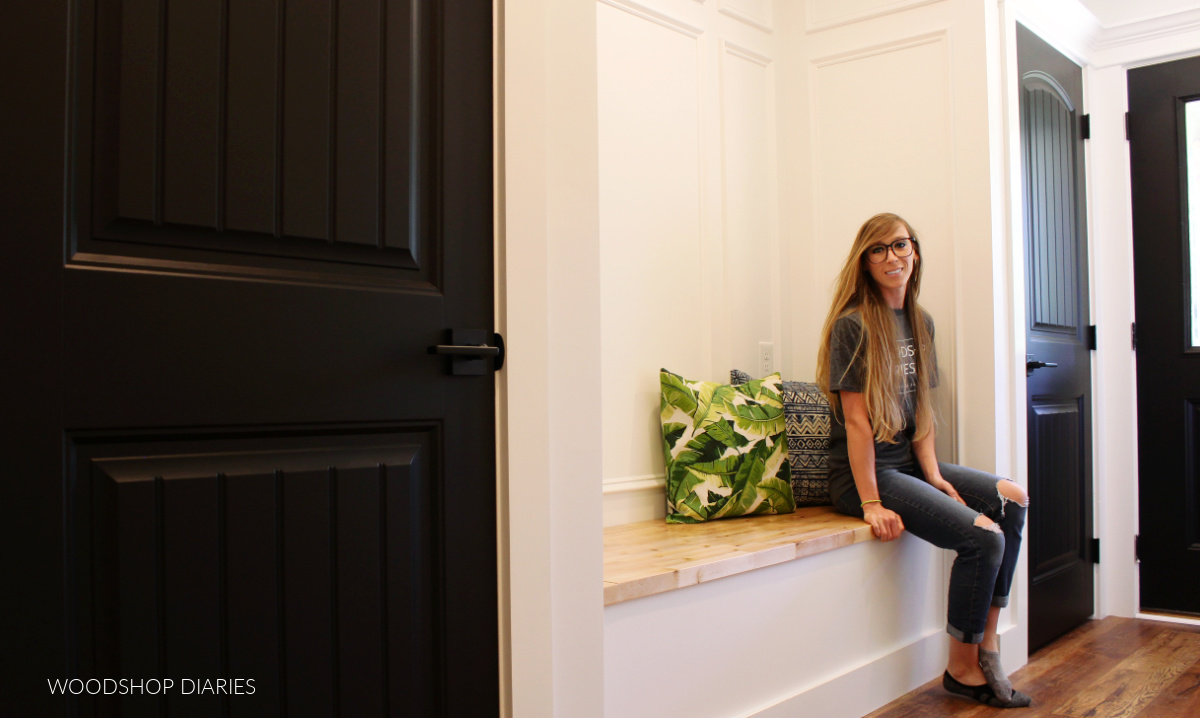
I love this little addition to our hallway, but this would also be great for a mudroom, or under a window in a bedroom or anywhere you have a little space that could use a little extra seating and storage.
.
This is a super simple design, so feel free to get creative to add your own custom touches with unique trim, pops of color, or some interesting hardware.
If you’d like to check out the whole hallway makeover, I’ve got those details here.
.
I hope you enjoyed this built in storage bench project and if you want to stay up to date on the latest projects and plans, be sure to subscribe to the newsletter!
And if you would like to save this for later, feel free to pin it or share it you your favorite social channel!

Until next time, friends, happy building!