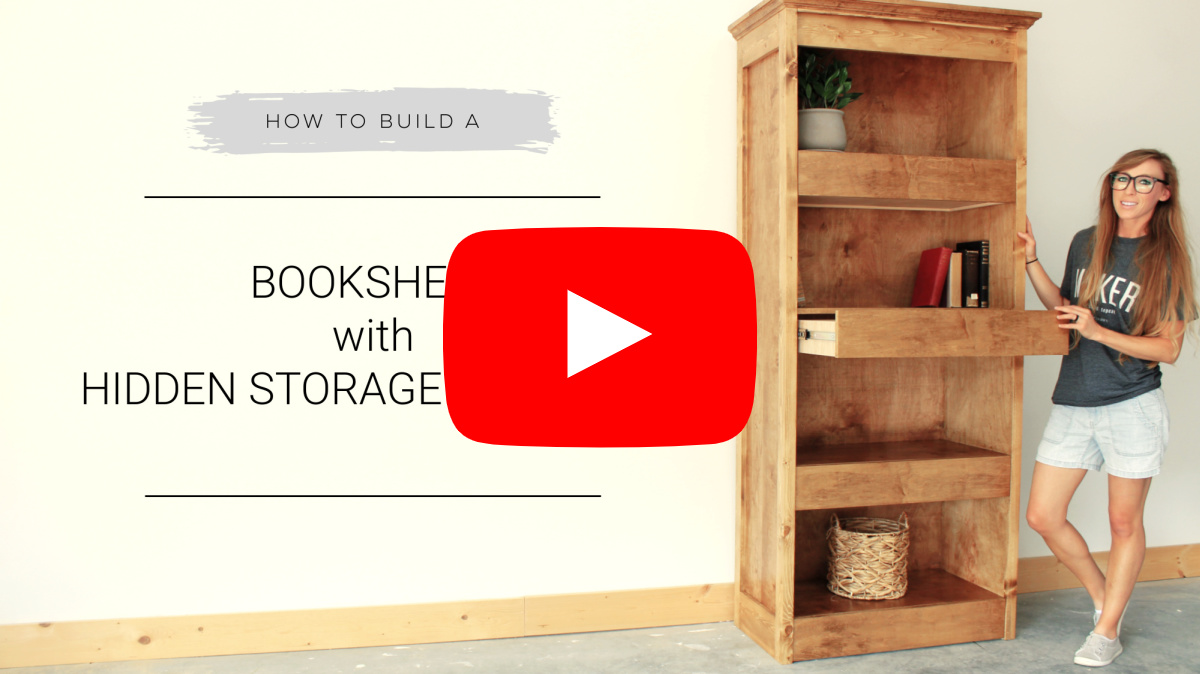
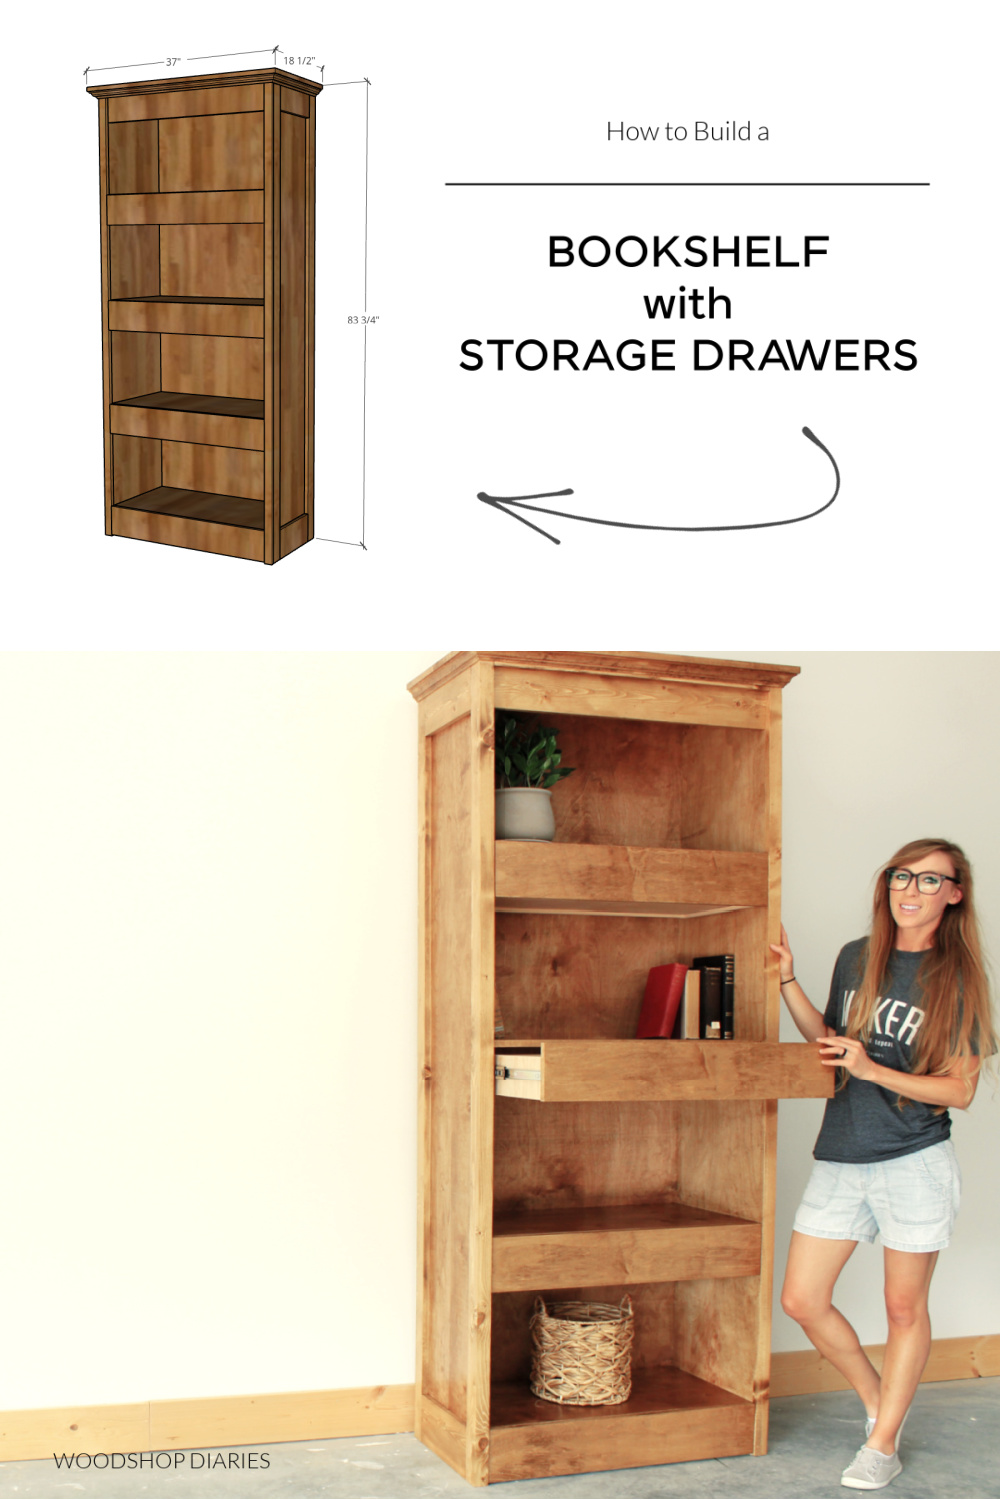
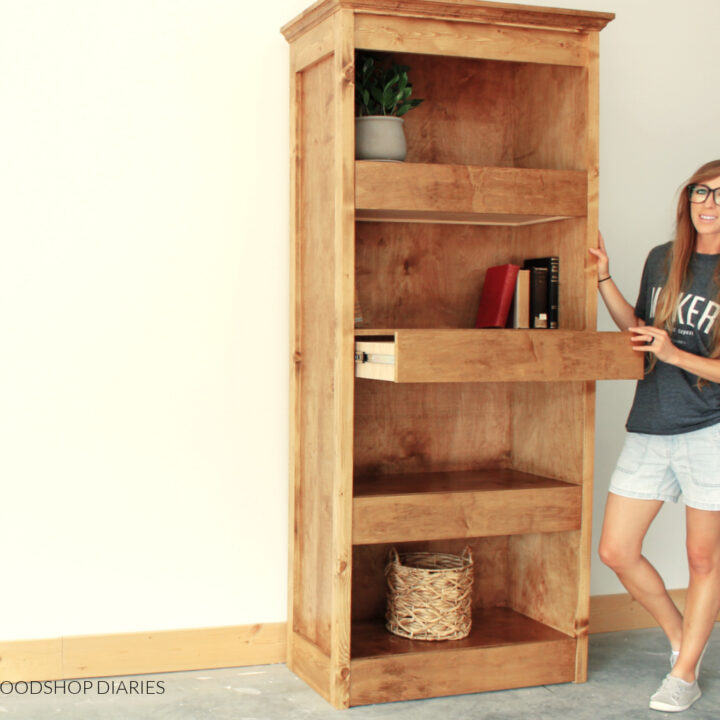
In this post, I’m sharing how to build this DIY bookshelf with hidden storage drawers!
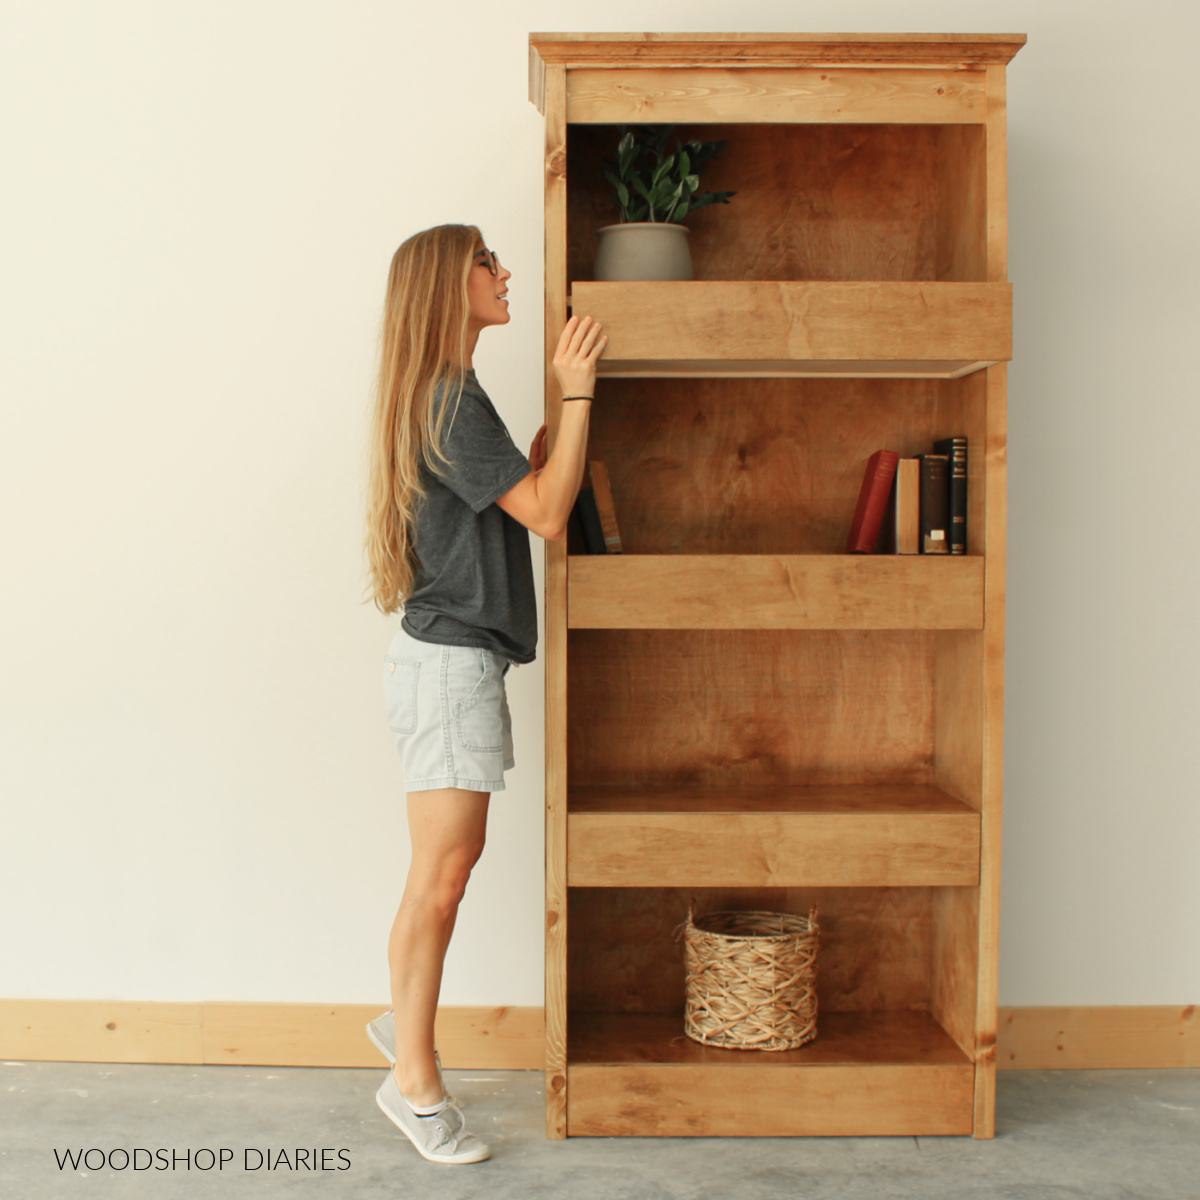
While the storage in this book shelf isn’t really that “hidden,” at first glance, it isn’t really obvious.
.
If you didn’t know any better, you may just think these are really thick shelves, but the shallow drawers are a great place to store remotes in a living room, a secret candy stash in a pantry, or whatever else you may want to hide away.
.
If you’d like to build one yourself, I’m sharing the printable building plans, step by step tutorial, and the full video of the build here in this post!
.
But first…
Some Notes About Building This Bookshelf with Drawers:
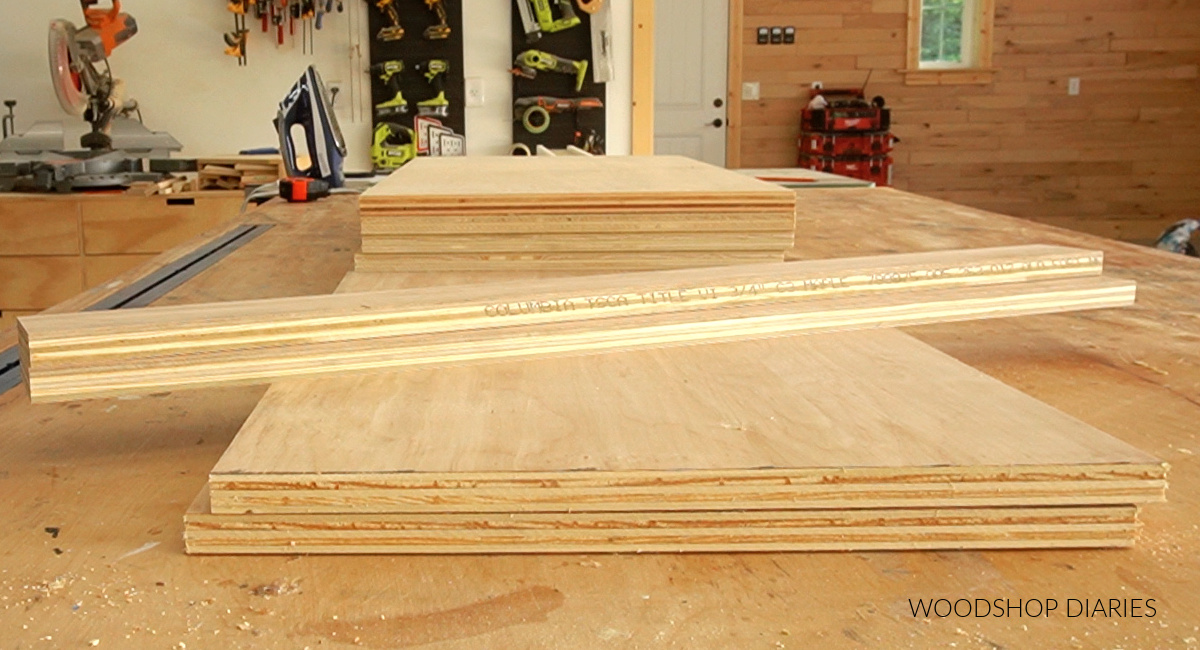
This project was built mainly using ¾″ plywood plus some solid wood for the trim on the sides.
.
You can use any wood type for this that you’d like, but I recommend using a good quality hardwood plywood for the main body for the nicest results.
.
In this build, I used birch plywood and I’ve linked exactly what I used in the materials list below.
Due to the possibility of overloading the drawers, this should be securely anchored to the wall before use.
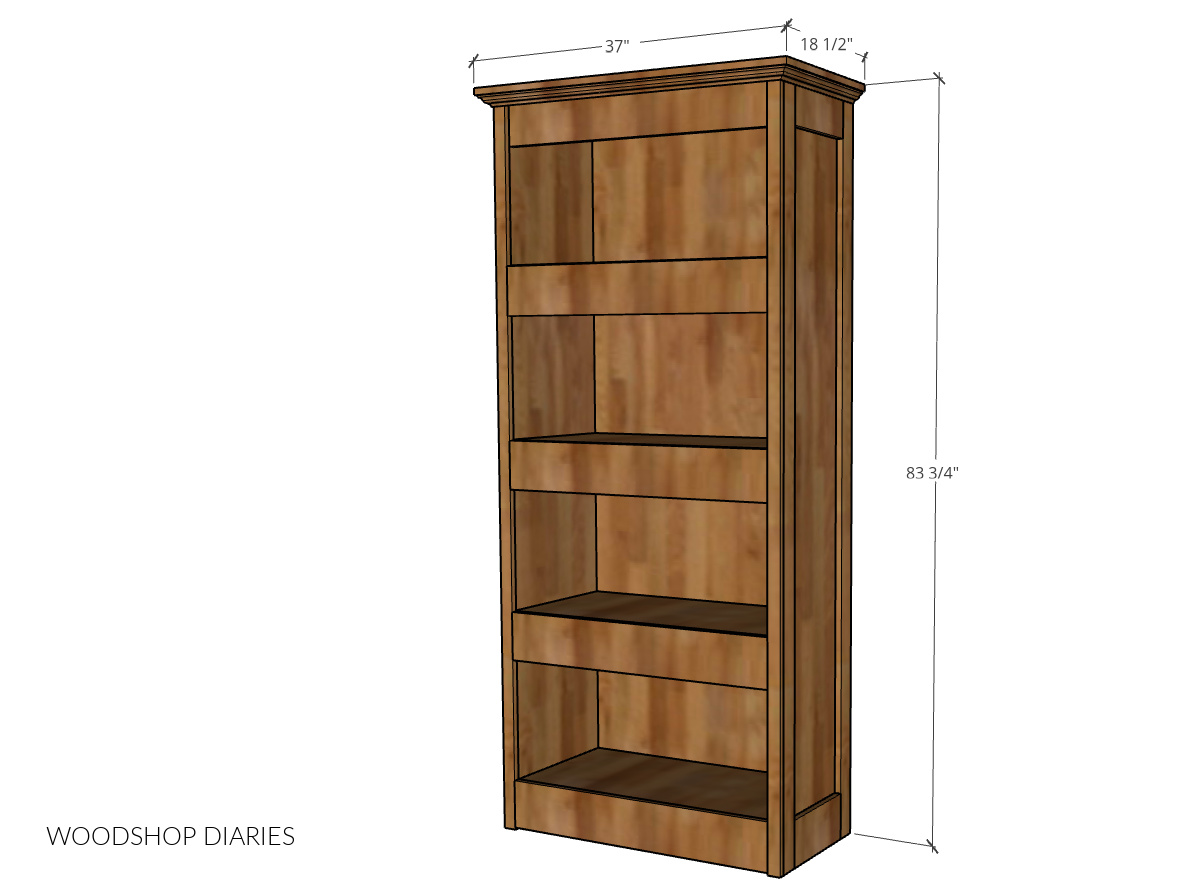
Overall Bookshelf Dimensions:
The overall dimensions of this project are 83 ¾″ tall, 18 ½″ deep (at the top), and 37″ wide (at the top). It has 4 shelves and 4 drawers total.
Helpful resources to use in the build:
Throughout the build, you may find these guides helpful to complete the project:
Tools & Materials:
*This post contains affiliate links. See website policies.
Tools:
- Circular Saw and straight edge (or cutting guides)
- Miter Saw
- Table Saw (optional)
- Drill/Driver
- Brad Nailer
- Pocket Hole Jig
- Clamps
Materials:
- (2) 1x3x8 boards
- (4) 1x2x8 boards
- (1) 1x6x8 boards
- (2) 4×8 sheets ¾″ plywood
- (1) 4×8 sheet ¼″ plywood
- (1) 1 ⅝″ x 8 ft crown molding OR cove molding
- (4) pair 14″ drawer slides
- Edge Banding (optional)
- Wood Glue
- 1 ¼″ pocket hole screws
- 1 ¼″ brad nails
- Wood finish (as desired)
How to Build a Bookshelf with Hidden Storage Drawers
Check out the full length video tutorial here:
Step 1: Assemble the Bookshelf Cabinet
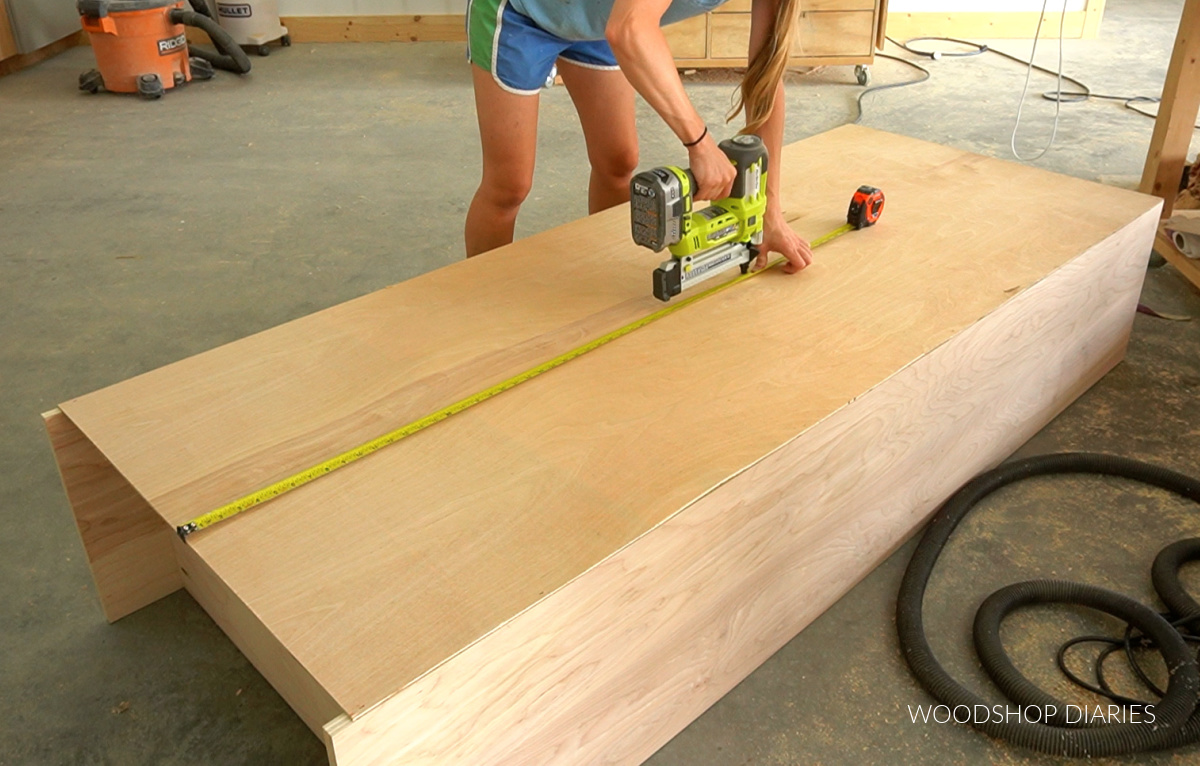
To get started, I used a circular saw and Kreg Rip Cut to cut down my plywood sheets. I cut 2 side panels, 4 shelves, and three thinner pieces to attach at the top as trim/supports.
All dimensions and cut diagram can be found in the plans here.
RELATED: How to cut plywood sheets
.
The front edges of the side panels will be covered with trim later, but I did apply edge banding to the front edges of the shelves before assembling because they will be exposed when the drawers are open.
.
Edge banding is always optional, but it does make the plywood edges look nice and finished.
RELATED: How to apply iron on edge banding
.
I assembled the main body of the shelf using ¾″ pocket holes and 1 ¼″ pocket hole screws.
RELATED: How to use a pocket hole jig
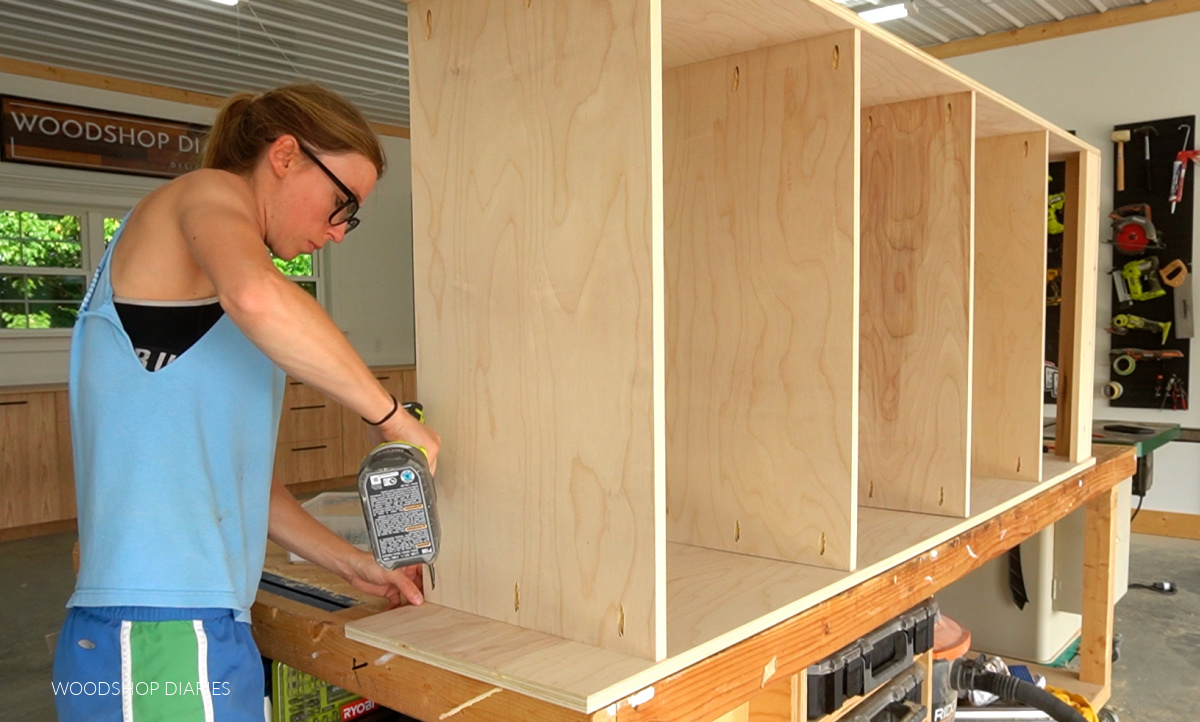
I’ve detailed the shelf locations in the printable plans.
Step 2: Add Back Panel
I pulled out a sheet of ¼” plywood and cut out a back panel to fit over the shelf body. I set aside and used the leftover pieces for the drawer bottoms later.
.
Before attaching, I double checked the diagonals of this panel to make sure it was square. This will help ensure the bookshelf is square once it’s attached.
Then, I stapled this in place. You could also glue and brad nail or screw this in place if you didn’t have a stapler.
RELATED: What’s the difference in a finish, brad, and pin nailer vs a stapler?
Step 3: Install Drawer Slides
The shelves were slightly shallower than the side panels, so I used a scrap piece of wood to help me install these slides flush to the front edge of the shelves.
.
And I used another scrap block to make sure these were installed about 1 ½” below each shelf.
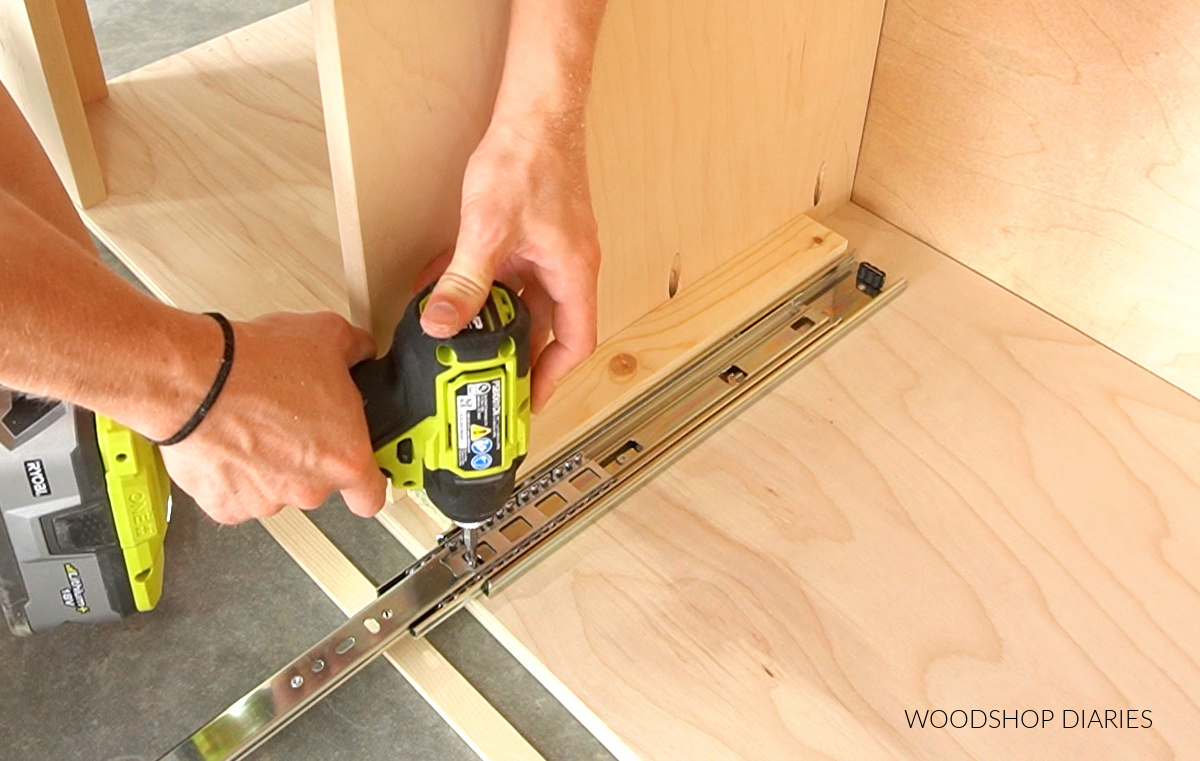
I installed four 14” slides on one side, then flipped it over and installed the other 4 on the opposite side the same way.
RELATED: How to install drawer slides
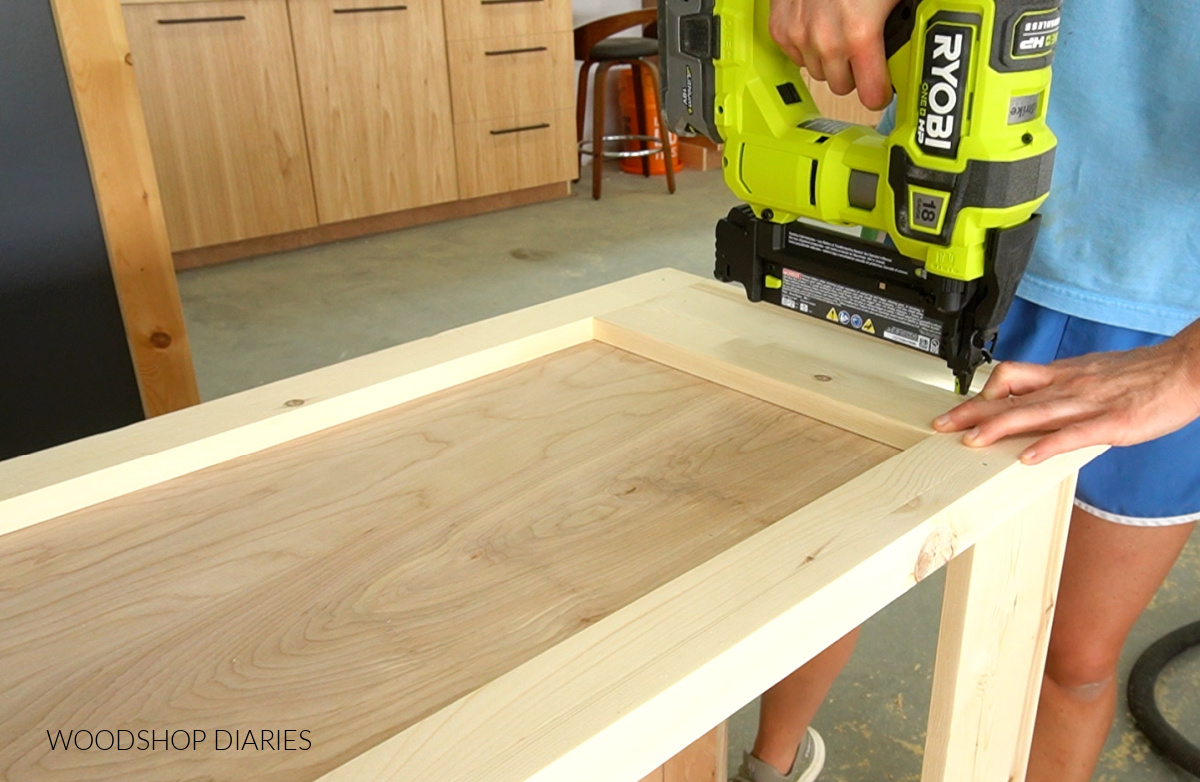
Step 4: Install Trim on Bookshelf Sides
I used 1x2s, 1x3s, and 1x6s for the trim. Feel free to get creative and customize this if you’d like something different.
.
For the front of the shelf, I glued up two 1x2s into an “L” to kind of “wrap around” each corner. You don’t have to glue these together first—you could just glue and nail them directly to the shelf instead.
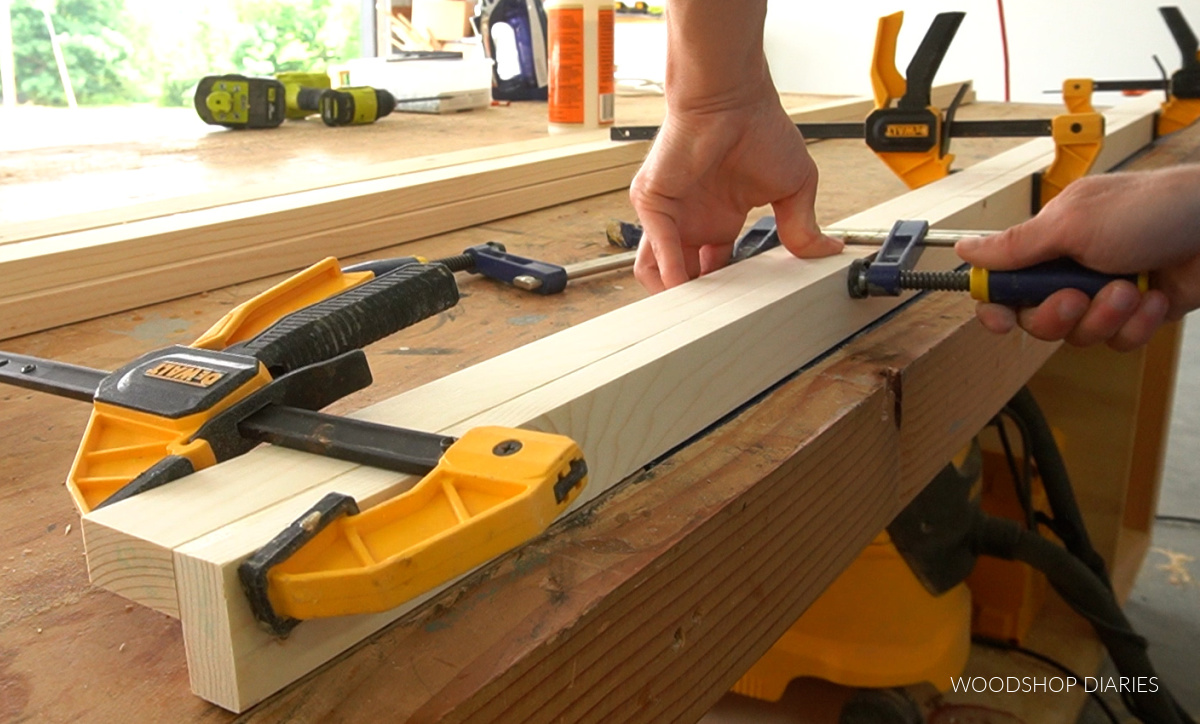
However, I thought it would be easier to line up everything this way. Either way works fine.
.
Once the glue on these corner pieces was dry, I glued and nailed a 1×3 along the back edge of the shelf. Then, I glued and nailed the corner trim pieces.
Notice that the full 1×2 goes on the side and the shorter piece goes on the front.
.
The inside edge of the shelf sides should be flush so as not to interfere with the drawer slides’ ability to slide in and out freely.
.
And finally, I cut to fit a couple of 1x6s to go between them at the top and bottom.
I trimmed out both sides like this.
Step 4: Build and Install Hidden Storage Drawers
I cut my drawer box pieces from ¾″ plywood according to the cut list in the plans. I cut ¼″ dadoes, ¼″ deep, ½″ from the bottom edge of all sides to install the ¼″ plywood drawer bottoms into.
.
You can see how to cut dadoes using a table saw in this video, but you can also use a dado blade or a router instead if you preferred.
.
Or, if you don’t want to cut dadoes, you can certainly just glue and nail the bottom panel onto the drawer box.
RELATED: Check out this post on how to build drawer boxes
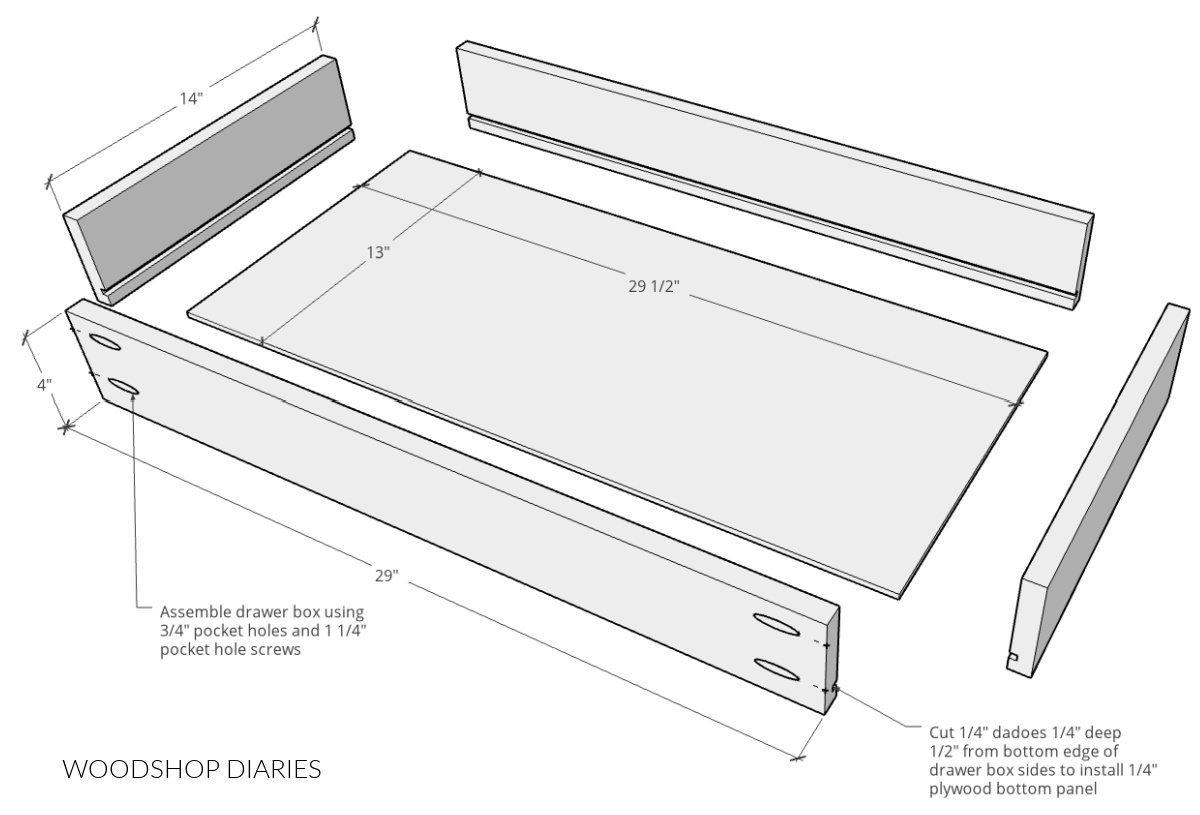
Then, I drilled ¾″ pocket holes into the front and back drawer pieces and assembled using 1 ¼″ pocket hole screws.
.
To install these drawer boxes, I screwed them directly onto the slides that were already installed.
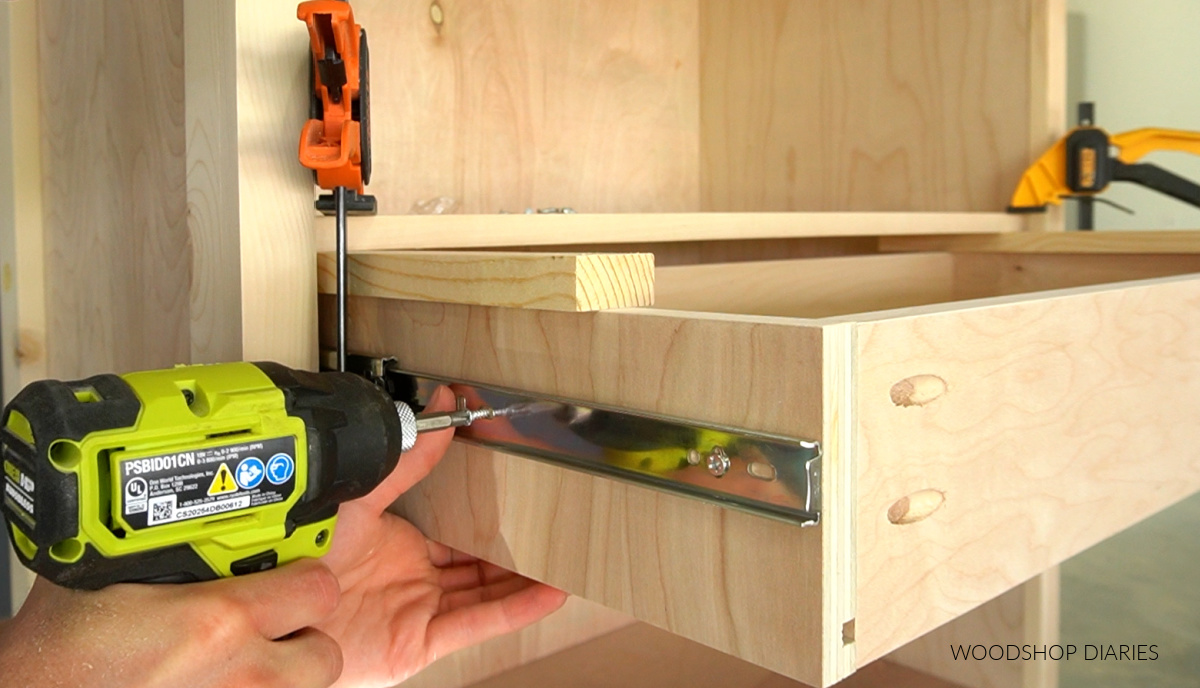
I used some scrap 1x pieces and some clamps to help keep these ¾” below each shelf as I screwed them in.
RELATED: How to install drawer slides
Step 5: Add Drawer Fronts
For the drawer fronts, I used ¾” plywood, but you could also use 1x6s for this if you’d rather. I cut four pieces to fit and applied iron on edge banding on all sides.
.
I held these in place so that they were just BARELY below the top edge of the shelf, then clamped it on at the bottom and screwed these in from the inside.
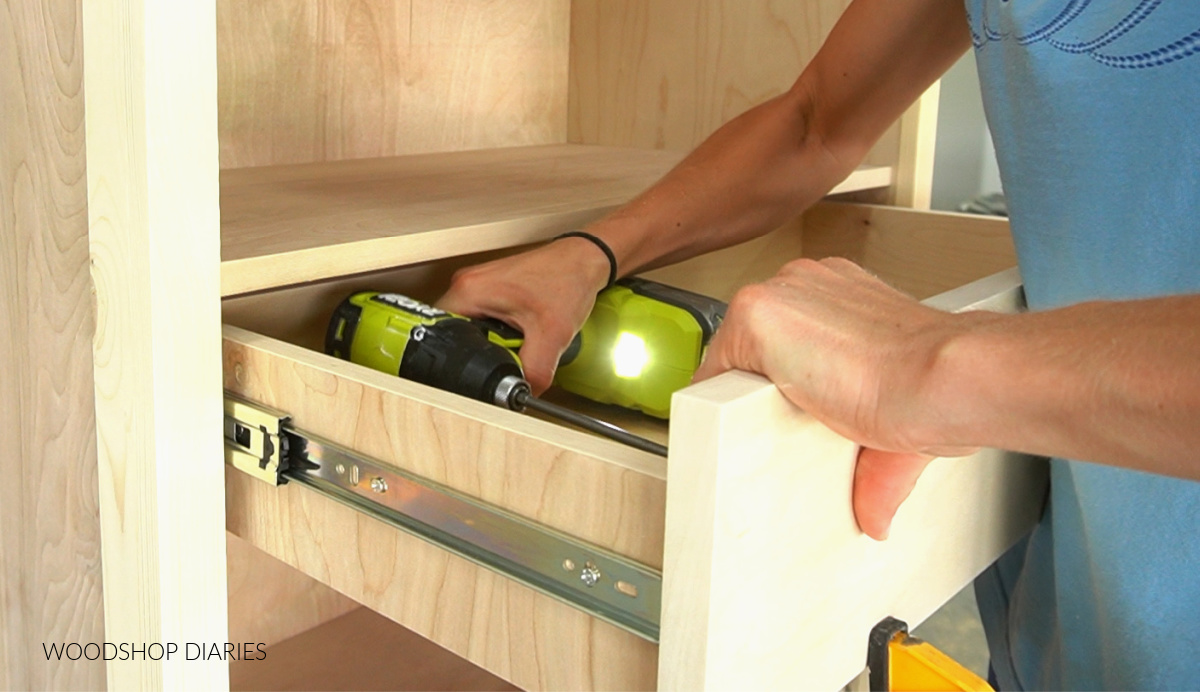
I repeated on all four drawers, but there wasn’t enough clearance below the bottom drawer to clamp.
.
So for this, I used a scrap piece of ¼” plywood to position the drawer front ¼” from the floor.
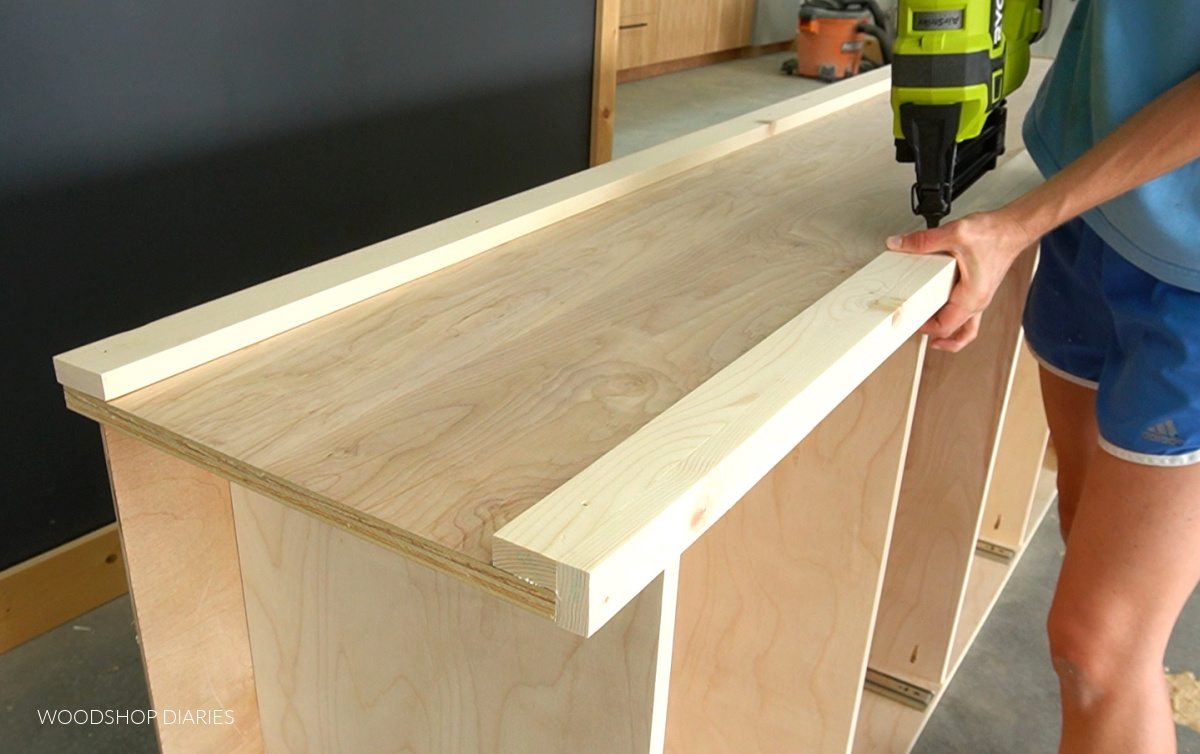
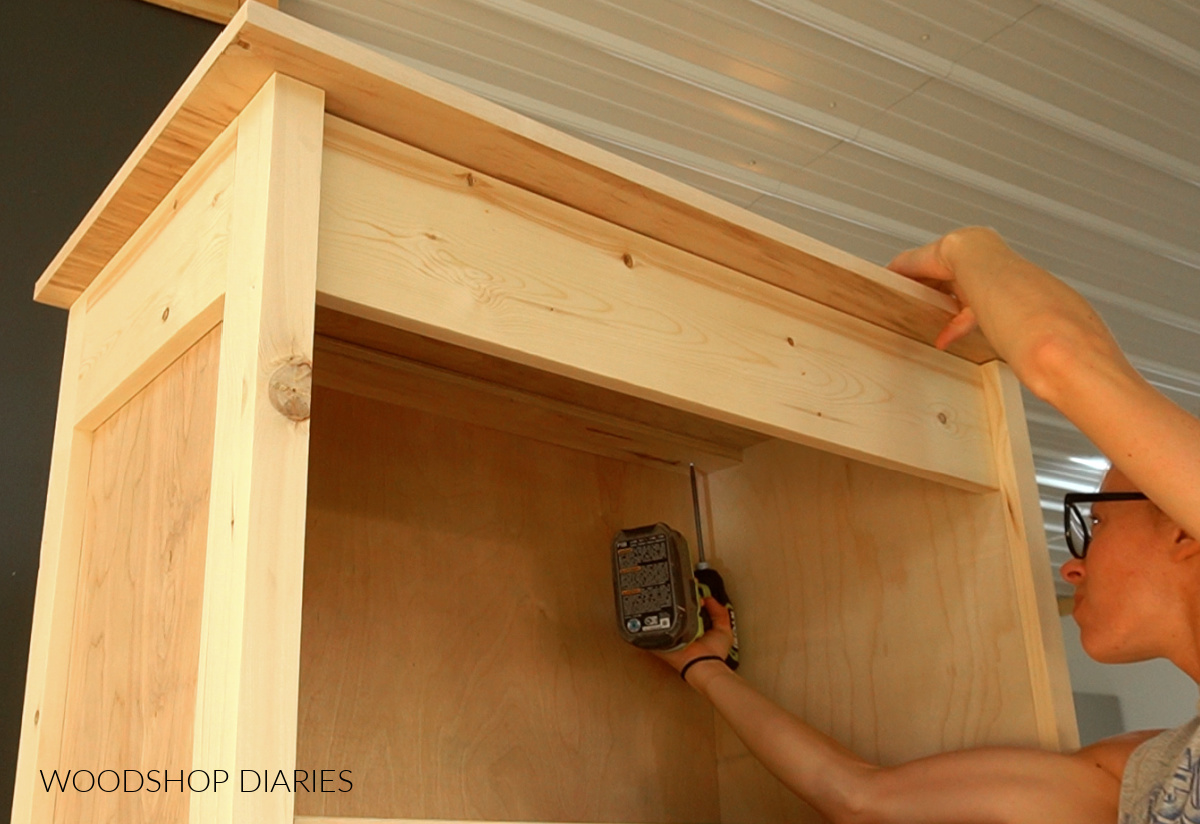
Step 6: Install Top Panel & Crown
I cut a piece of ¾” plywood to fit on the top so that there was 1 ¼” overhang on the sides and front. I applied iron on edge banding, then placed this on top of the shelf.
.
Before securing, I made sure the overhang was equal on the sides and the back edges were all flush, then I used 1 ¼” screws through the top supports to attach.
To dress it up a little, I added some small crown molding along the top. This is optional and you could definitely use whatever type of molding you wanted.
.
I marked and cut each piece to fit and nailed it in place.
RELATED: How to cut crown molding
.
I had planned to leave this gap between the front trim and the crown open, but after installing it, I decided it looked weird, so I cut some scrap 1×2 and tapped it in to fill this space.
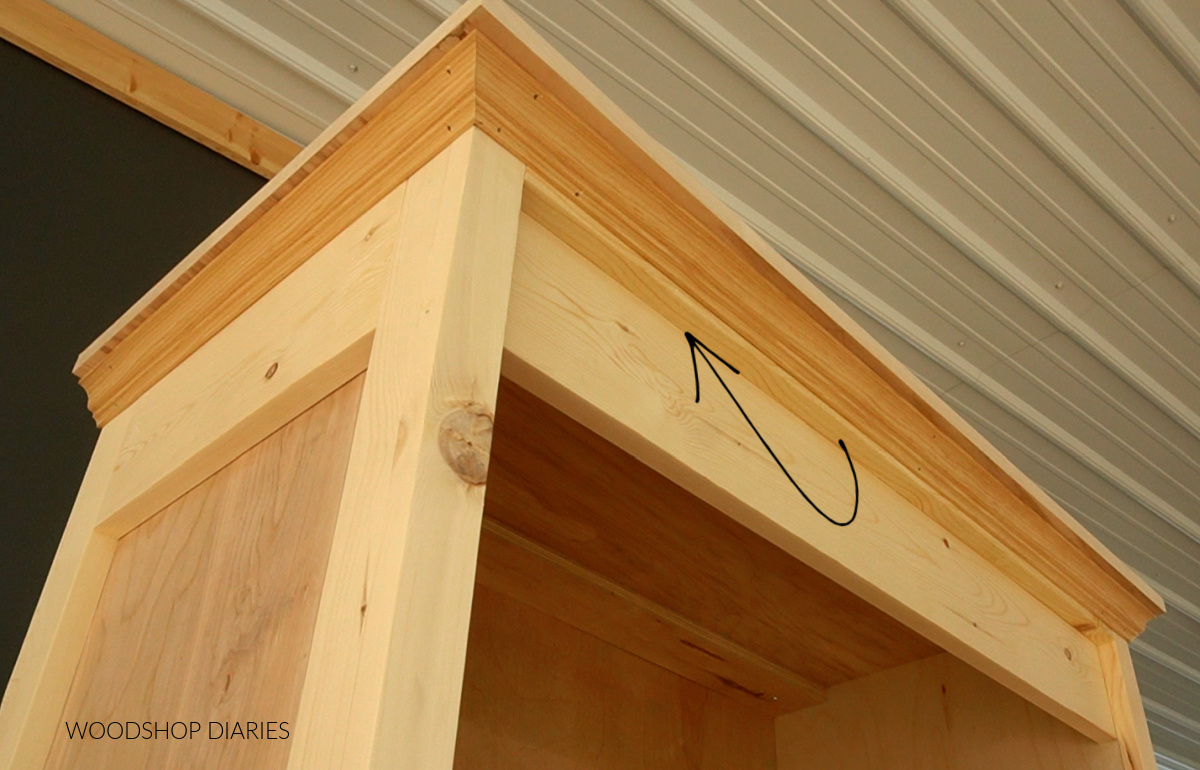
I secured the crown and this piece together with a few brad nails to finish it up.
Step 7: Finish Bookshelf with Drawers
After puttying the nail holes and a final sanding, I gave the shelf a coat of Minwax Early American stain and a few coats of Minwax Polycrylic and it was complete!
RELATED: How to finish wood furniture
.
This DIY bookshelf with hidden storage drawers was such a fun project that’s big in size, but not overly complicated to put together.

The storage drawers are a great addition to give it a little extra versatility without looking out of place.
.
I really hope you enjoyed seeing this bookshelf with hidden storage come together as much as I enjoyed building it! Don’t forget if you’d like to grab the plans to build your own, you can find them here!
.
If you enjoyed the project and want to see what’s next, be sure to subscribe to the newsletter to keep up with all the projects to come!
And if you’d like to save this DIY bookshelf with hidden storage drawers project for later, don’t forget to pin it or share it to your favorite social channel!
Until next time, happy building!
DIY Bookshelf with Hidden Storage
How to build this DIY bookshelf with hidden storage drawers!
Materials
- 3x8 boards
- (4) 1x2x8 boards
- (1) 1x6x8 boards
- (2) 4x8 sheets ¾" plywood
- (1) 4x8 sheet ¼" plywood
- (1) 1 ⅝" x 8 ft crown molding OR cove molding
- (4) pair 14" drawer slides
- Edge Banding (optional)
- Wood Glue
- 1 ¼″ pocket hole screws
- 1 ¼" brad nails
- Wood finish (as desired)
Tools
- Circular Saw
- straight edge (or cutting guides)
- Miter Saw
- Table Saw (optional)
- Drill/Driver
- Brad Nailer
- Pocket Hole Jig
- Clamps
Instructions
- Cut your plywood according to the cut list, apply edge banding, and assemble using ¾" pocket holes and 1 ¼" pocket hole screws.
- Add the back panel by stapling into place.
- Install drawer slides by using a scrap piece of wood to make sure they are flush to the front edge of the shelves.
- Install trim on bookshelf sides.
- Build drawer boxes from ¾" plywood using ¾" pocket holes and 1 ¼" pocket hole screws. Install drawers by screwing directly on the slides that are already installed.
- Add drawer fronts by attaching with screws from the inside of the drawer.
- Install top panel and crown molding for a little extra detail.
- Finish the bookshelf with drawers as desired.