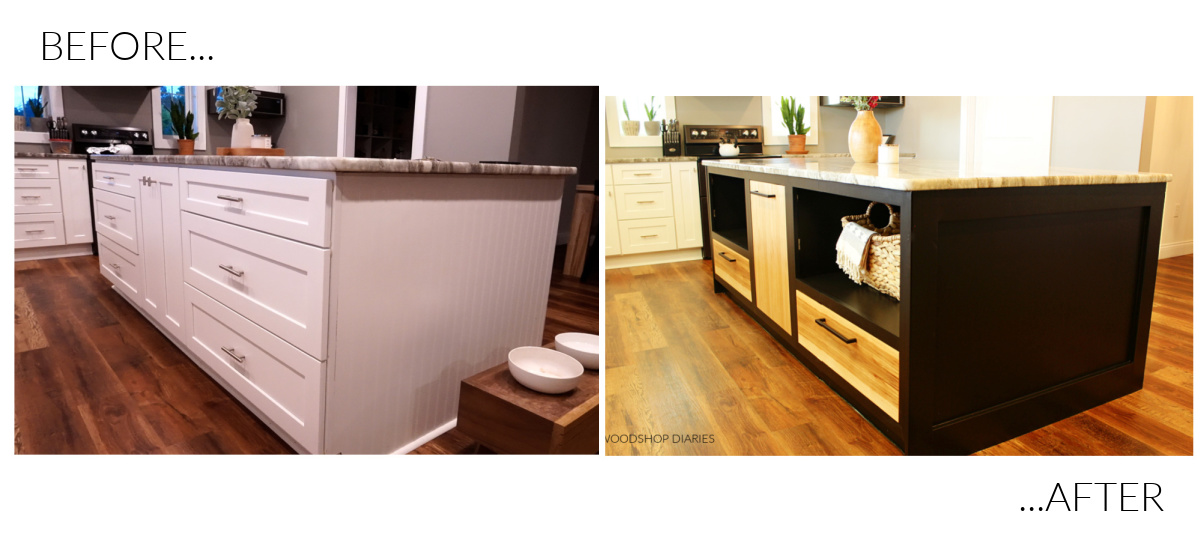
In this post, I’m sharing how I transformed our existing kitchen island into a functional and modern focal point with this DIY kitchen island makeover.
**This post is sponsored by DAP Products. This post also contains affiliate links. See website policies for details.
If you know me very well, you know I don’t do a lot of makeovers, repurposing or refinishing projects. I prefer to start my projects from scratch.
.
However, there are times when that doesn’t make a lot of sense—like in this case when I already had a massive kitchen island with a granite countertop that I didn’t want to take a chance on breaking in order to remove it.
.
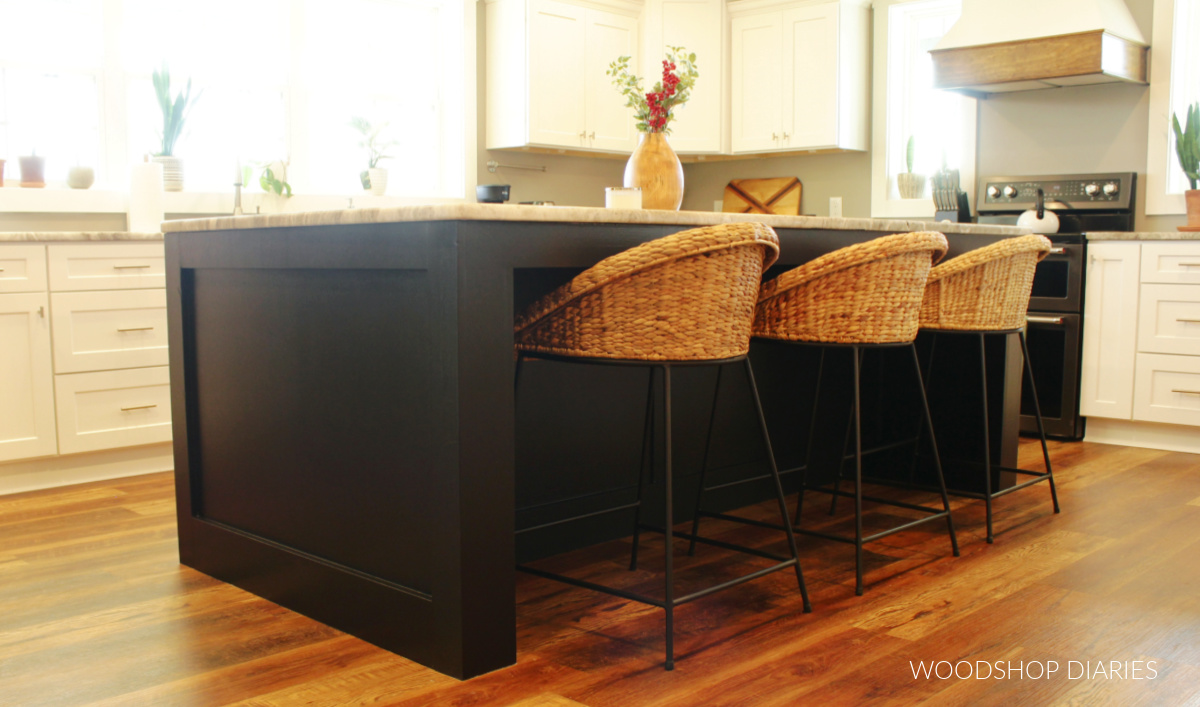
So this post will be a little different since I’m going to show you how I tackled this DIY kitchen island makeover and demoed, rebuilt, and refinished our existing kitchen island from this…to that.
Check out the full video to watch the entire transformation, and check out the written step by step below:
Tools and Materials Used to Makeover this Kitchen Island:
Tools:
- Circular saw and cutting guides
- Nail gun (and/or stapler)
- Hand Saw (totally optional)
- Jig Saw
- Sander/sandpaper
- Pocket Hole Jig (optional)
Materials:
- ¼” plywood for sides
- ¾” plywood for the shelves
- Hickory plywood for the door and drawer fronts
- 1×4 and 1×6 boards for trim
- DAP Weldwood Original Wood Glue
- DAP Plastic Wood-X Wood Filler
- DAP Premium Wood Filler
- DAP Alex Flex Caulk
- Primer
- Paint
- Modern Handles
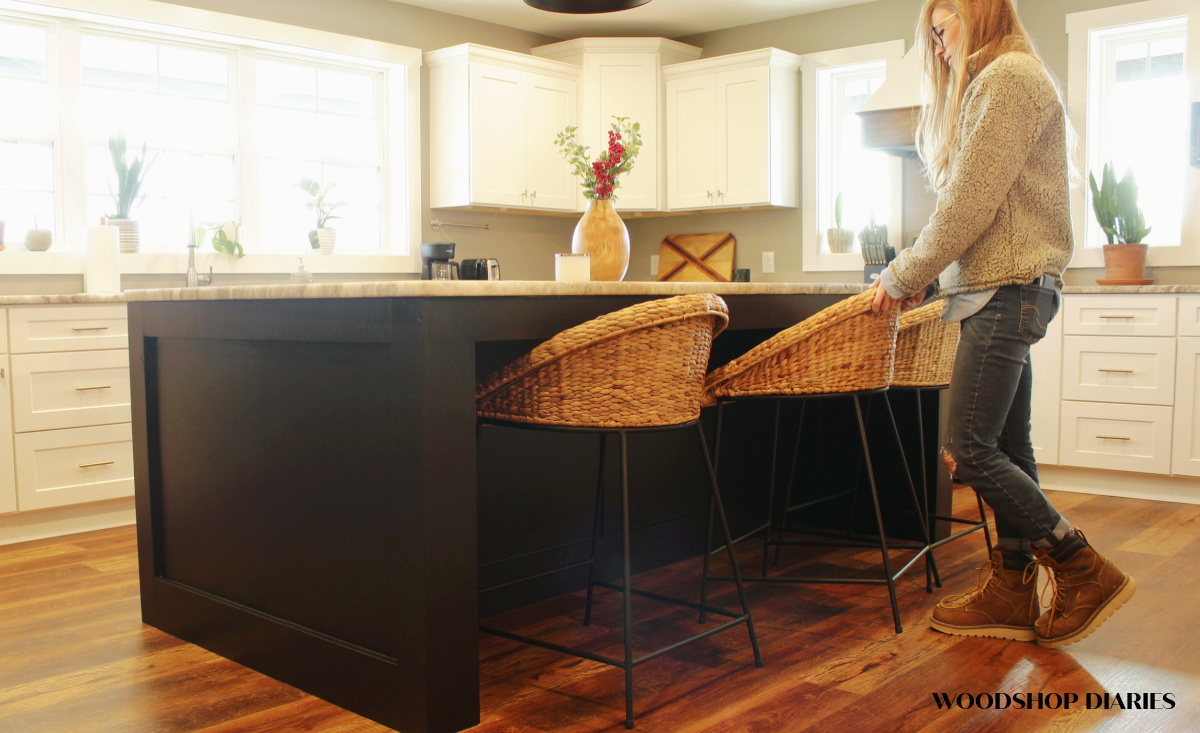
**Also, this isn’t a tool or material, but so many have asked where I got the bar stools, so here is a link to the bar stools. They go in and out of stock regularly, so click to be notified when they come back in if they’re out.
Some notes about the project:
One of the first things I wanted to do to our new home after moving in was update this kitchen island.
.
It was a good size, and it was great to have, but it needed some contrast against the already white cabinets and honestly, I just really hate bead board. If you like bead board, no hard feelings…we can still be friends. It’s just…not my favorite.

So my original DIY kitchen island makeover plan was to remove the beadboard, replace it with something a little more modern, add some trim details, and paint the whole thing a contrasting color.
.
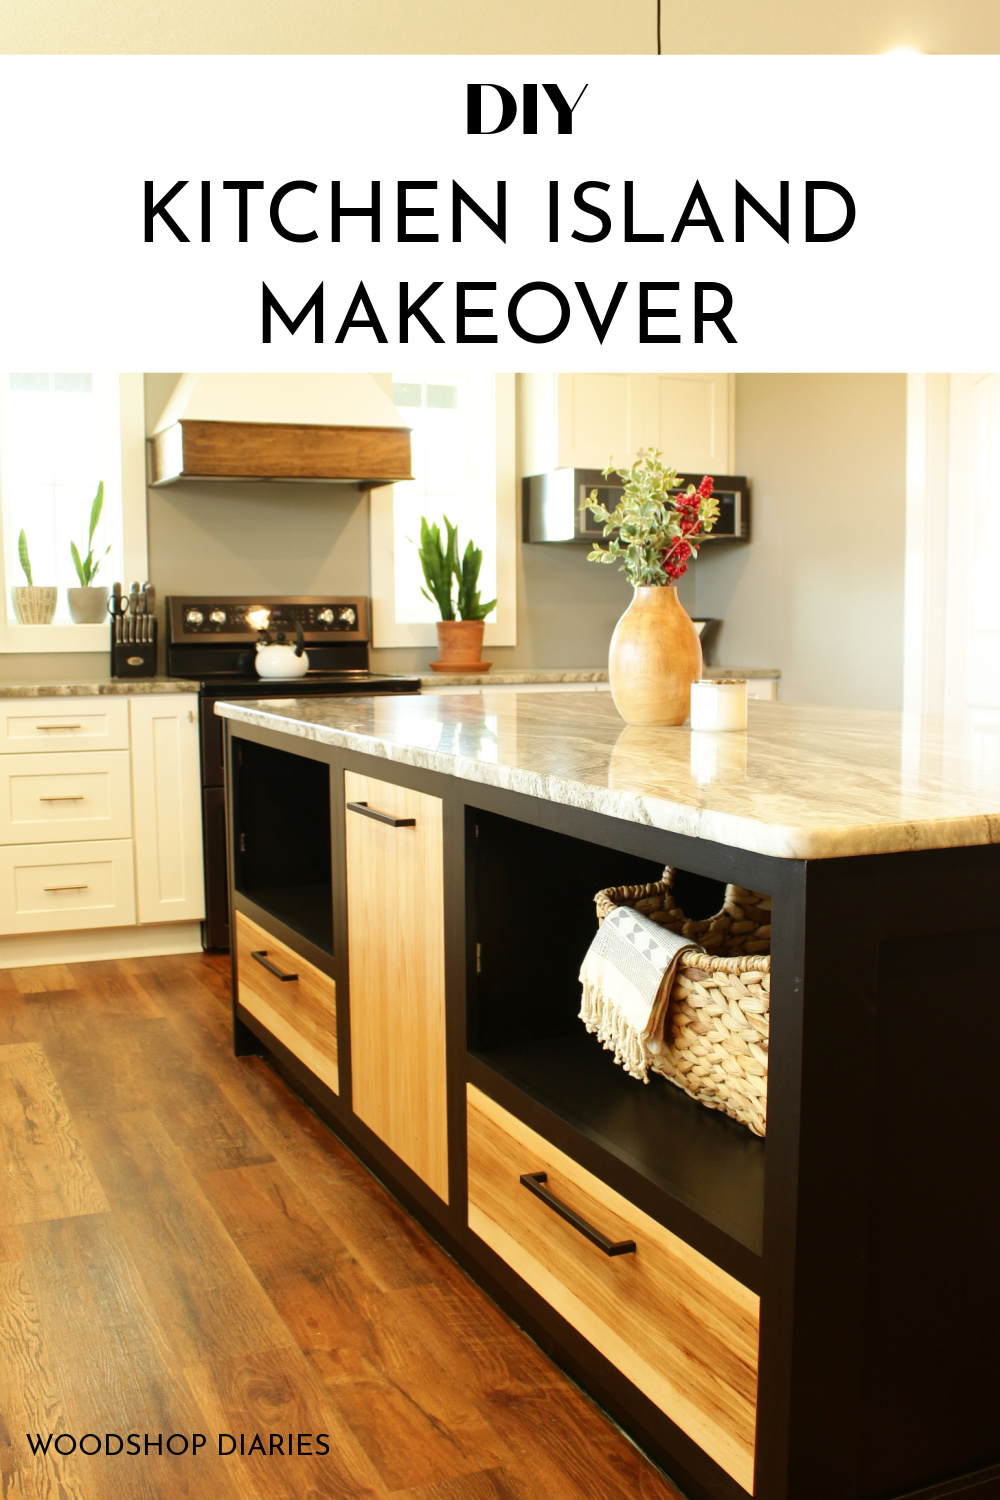
But one thing led to another and I ended up actually opening up the drawer cabinets here to make open shelving, replacing the drawer fronts and door with hickory plywood, and swapping them from overlay to inset drawers and doors.
.
Things got a little more…involved, ha.
.
But one thing I wasn’t planning on doing–mostly because…BUDGET–was replacing the countertop. Since the top here was granite, I tried to keep the existing cabinet boxes and basic framing intact to preserve the top.
.
There are a lot of options to try while still keeping the main body, so if you’re looking to redo your island, or vanity, or other large project you don’t want to completely replace, get creative with your options 😊
Step 1: Demo Existing Kitchen Island Sides
The first thing I needed to was remove this bead board.
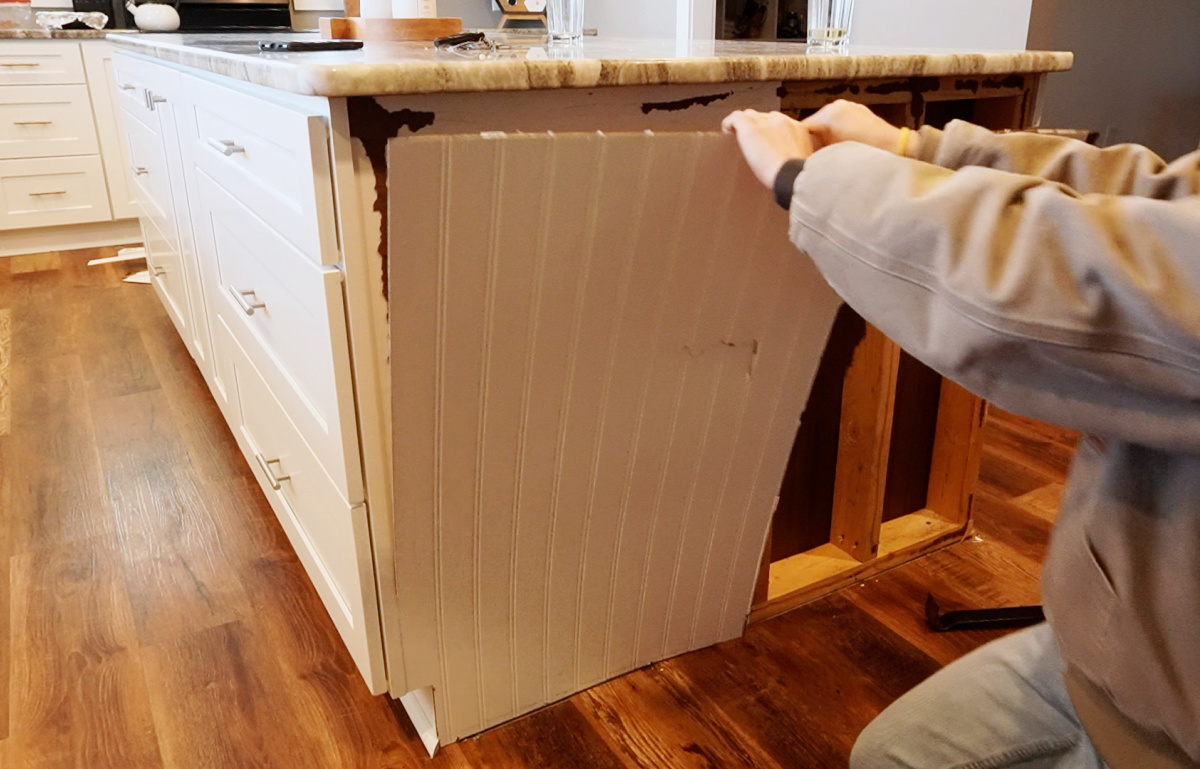
I used a prybar and a hammer and carefully worked my way around the island removing the bead board paneled sides, the quarter round along the bottom, and all the trim pieces I was planning to replace.
.
Now, on the back of the inside section where the bar stools go, there wasn’t really any reason to REMOVE those panels, so I left them for now and just covered them up later.
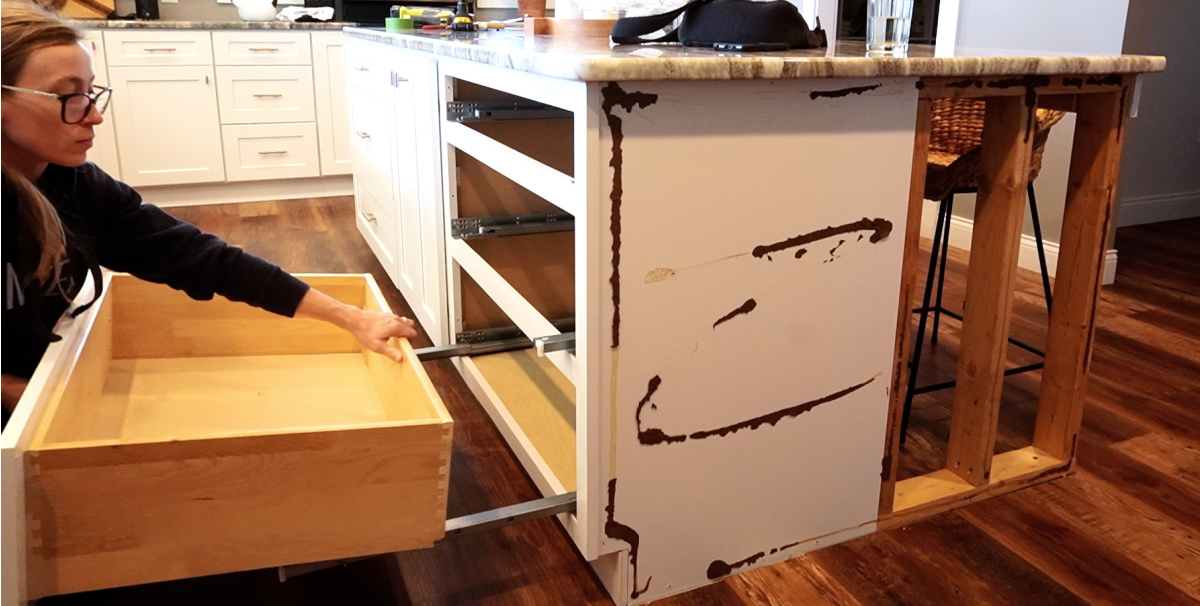
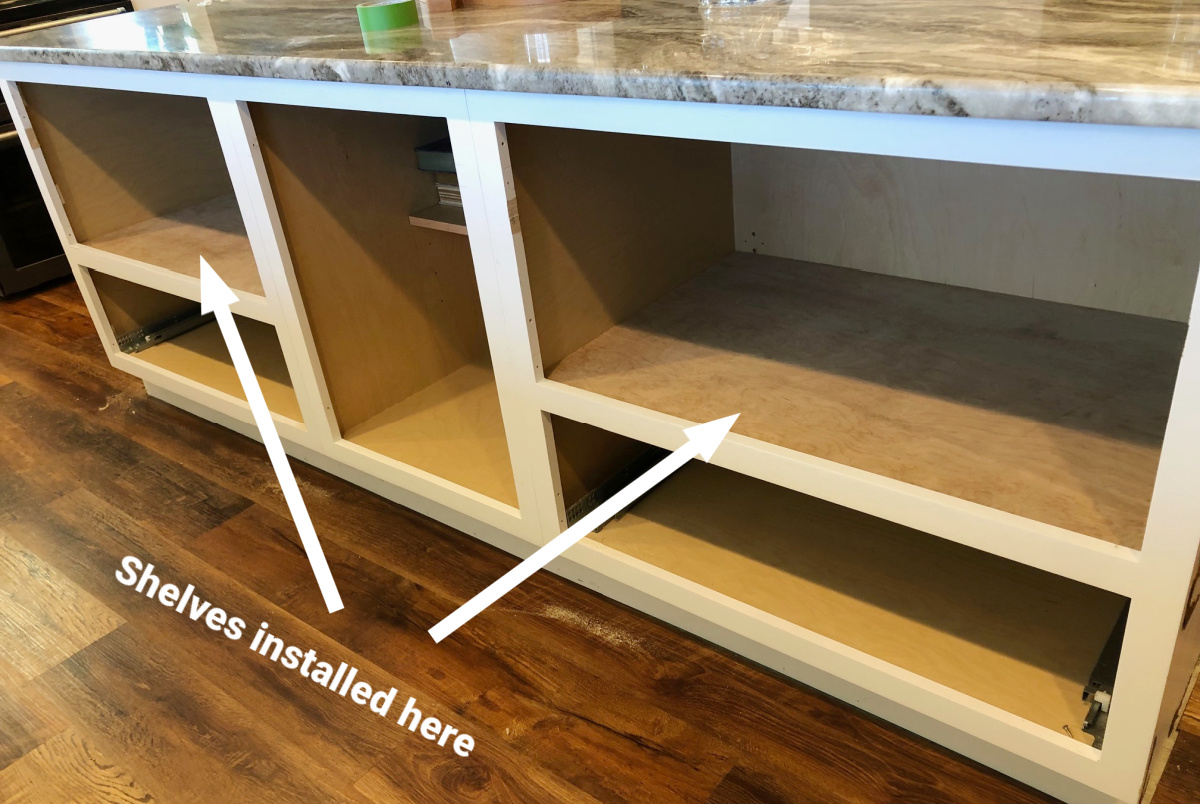
Step 2: Add Open Shelving in the Cabinets
Once the beadboard was gone, I started thinking about how we actually use the island and how I could modify it to better suit us.
.
The island was full of storage with 6 drawers and a cabinet in the middle. And while that was great, we only had stuff in two of the drawers and half of the rest of the kitchen cabinets are empty, too.
.
So, we really didn’t need that storage space, and personally, I’d prefer to have it open to display some of my cutting boards or keep my cookbooks easy to grab.
.
So I removed the drawers and the slides from the cabinets and decided to leave the top sections open, but just keep the bottom two drawers. I’ll come back to the bottom drawer later.
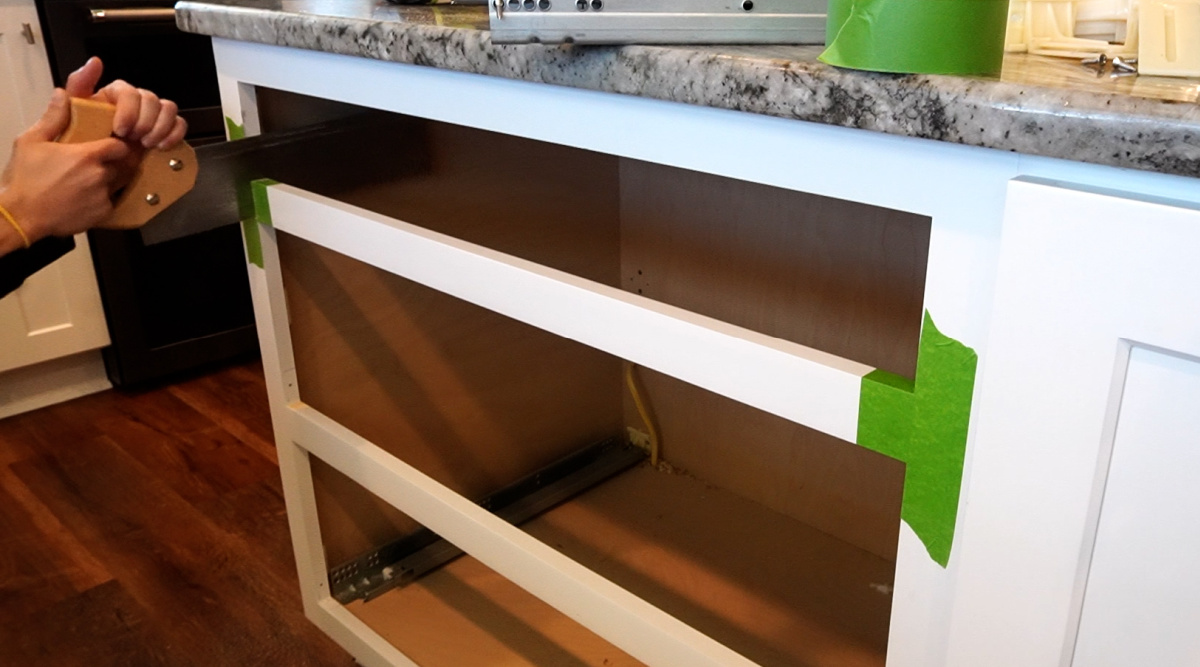
Since there was a face frame separating those two top drawers, I needed to cut that piece out.
.
I used some painters tape to protect the surface, help prevent chipping, and help me see to cut straight with a hand saw, and I carefully cut out this piece of the face frame on both sides.
I removed the doors in the middle cabinet as well as I’ll replace them later with a single solid door.
.
Now that the cabinet was open, I headed to the shop to cut a couple pieces of plywood to go into these drawer cabinets for the shelving.
RELATED: How to cut plywood sheets
.
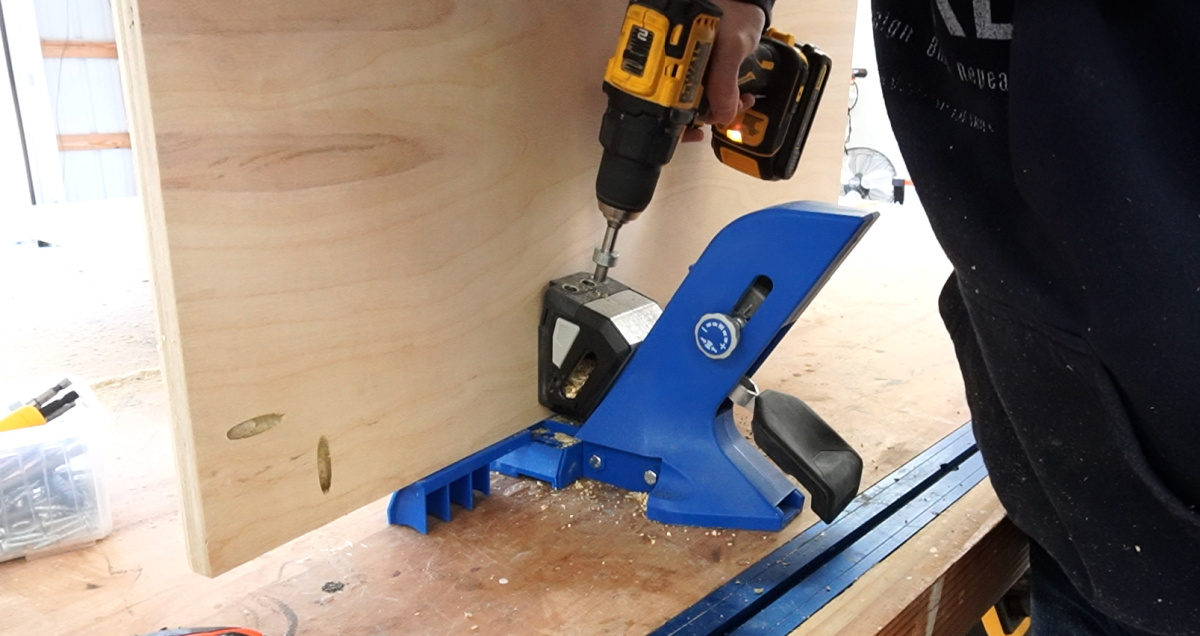
I measured and cut two pieces of ¾” plywood to fit into these cabinets.
.
Once the pieces were cut to fit, I drilled pocket holes along the sides and the front to install them.
RELATED: Interested in pocket hole jigs? Check out this guide to see which one is best for your shop!
.
Installing these pieces proved a little tricky because the space was pretty tight to reach into to drive the pocket hole screws, but where there’s a will, there’s a way haha.
The cabinet box sides were only ½” thick, so I ended up having to use 1” pocket hole screws on the sides vs the usual 1 ¼” so they didn’t stick through the other side.
RELATED: How to use a pocket hole jig
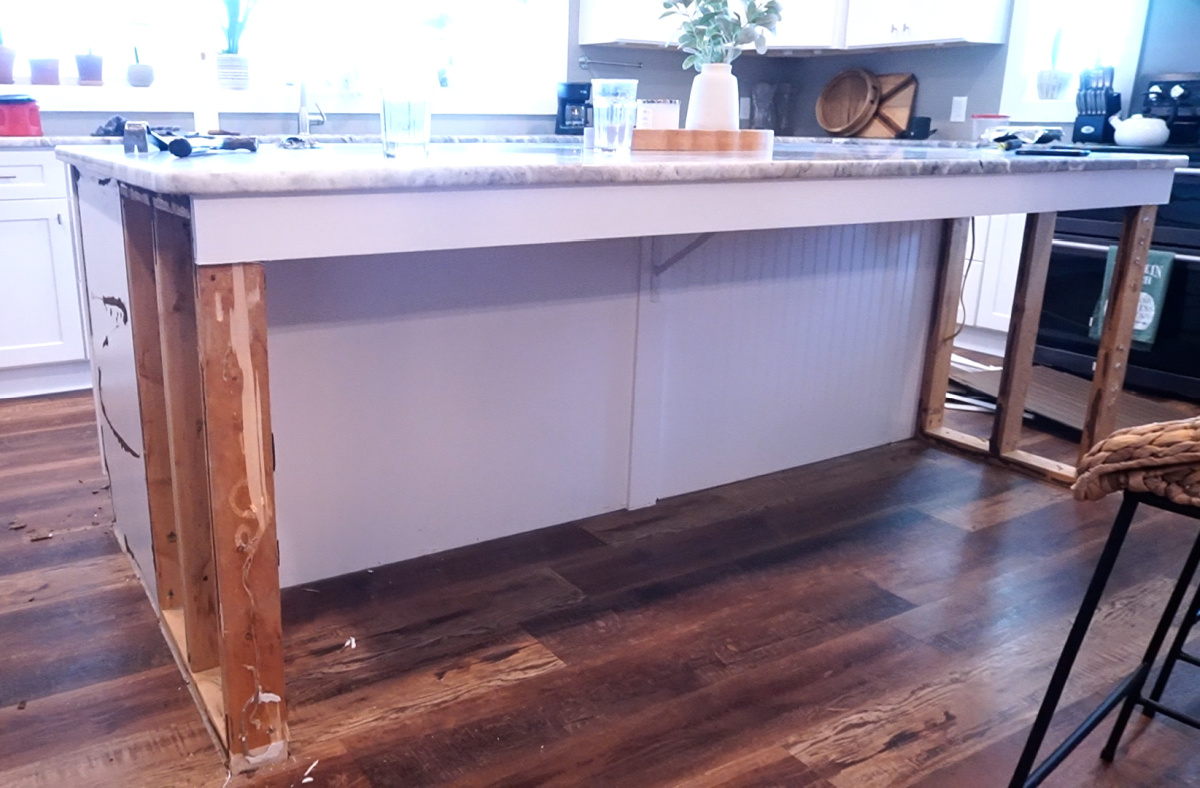
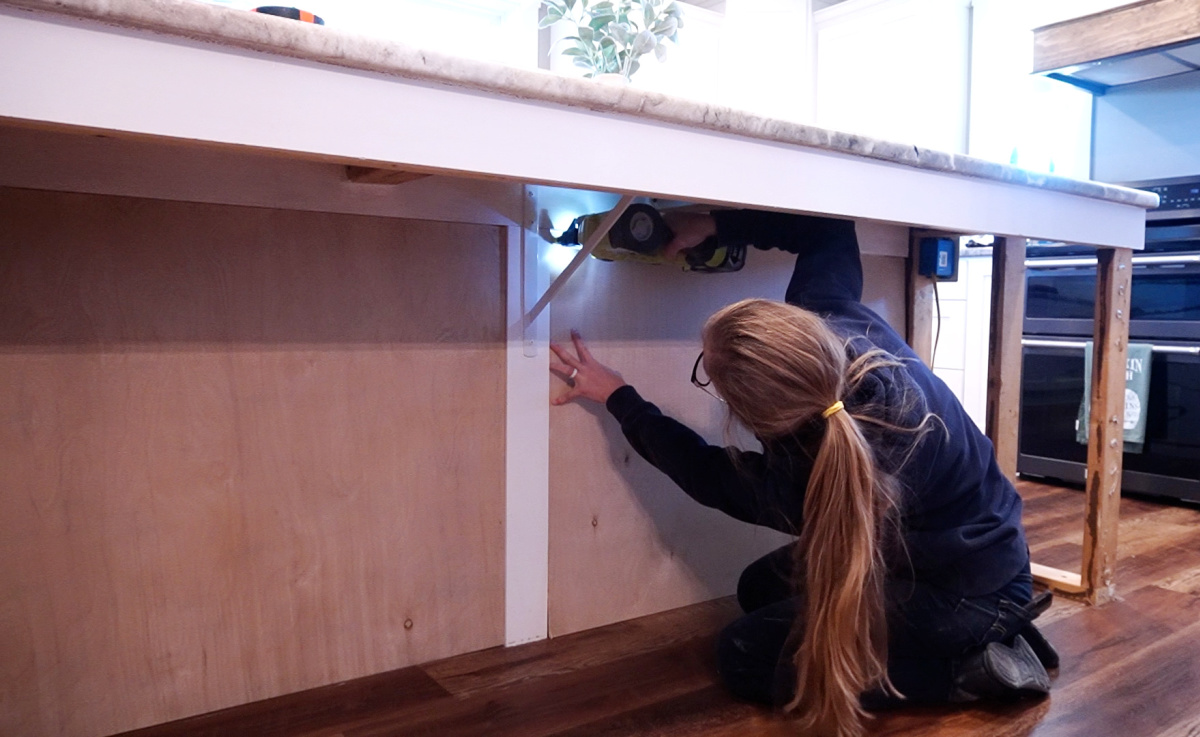
Step 3: Cover Kitchen Island Sides
After the shelves were in, the island was still kind of naked so next up was covering the exposed sides back up.
.
Instead of bead board, I wanted a just some simple, flat panels to cover the sides, so I measured and cut ¼” plywood panels to wrap around the outsides, and the insides of the island frame.
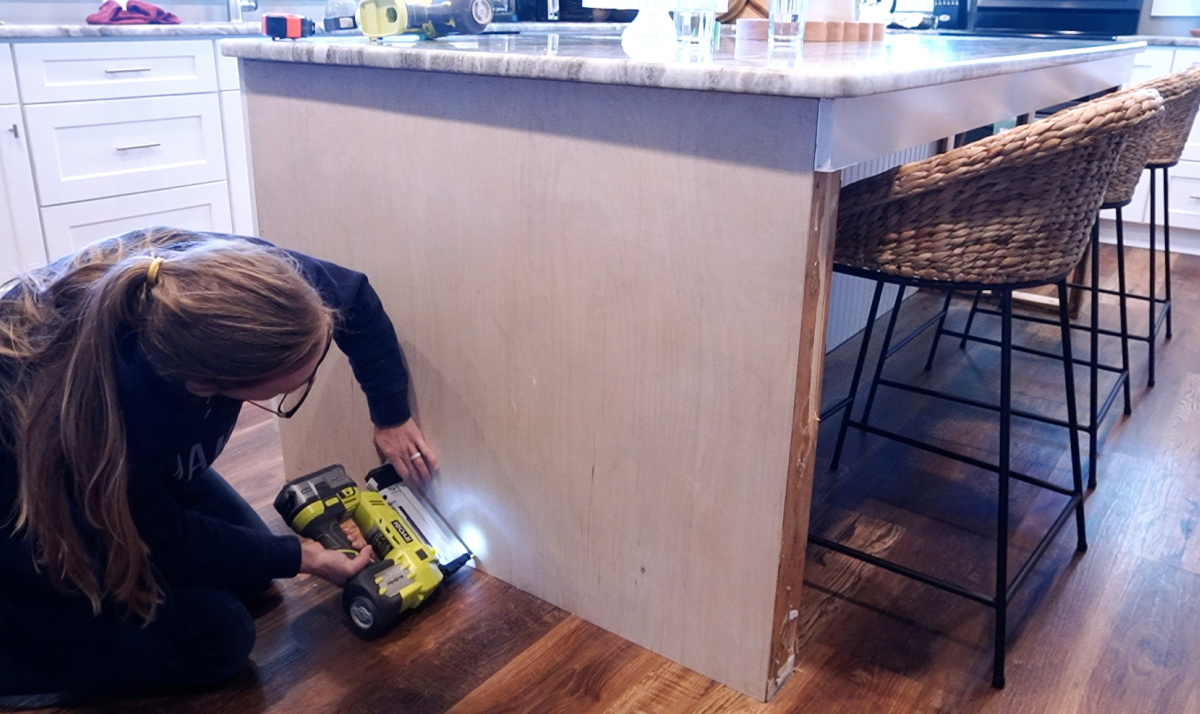
I used a crown stapler to install each piece to their corresponding sides, but you could also use brad nails and glue.
RELATED: Brad vs Finish vs Stapler–What’s the Difference and Which One Do You Need?
.
Full disclosure, I change my mind OFTEN, so just in case I decide to redo this again later, I didn’t glue the panels to the island. That way, later, if I change my mind, I can just pop them off and swap them out with something else.
.
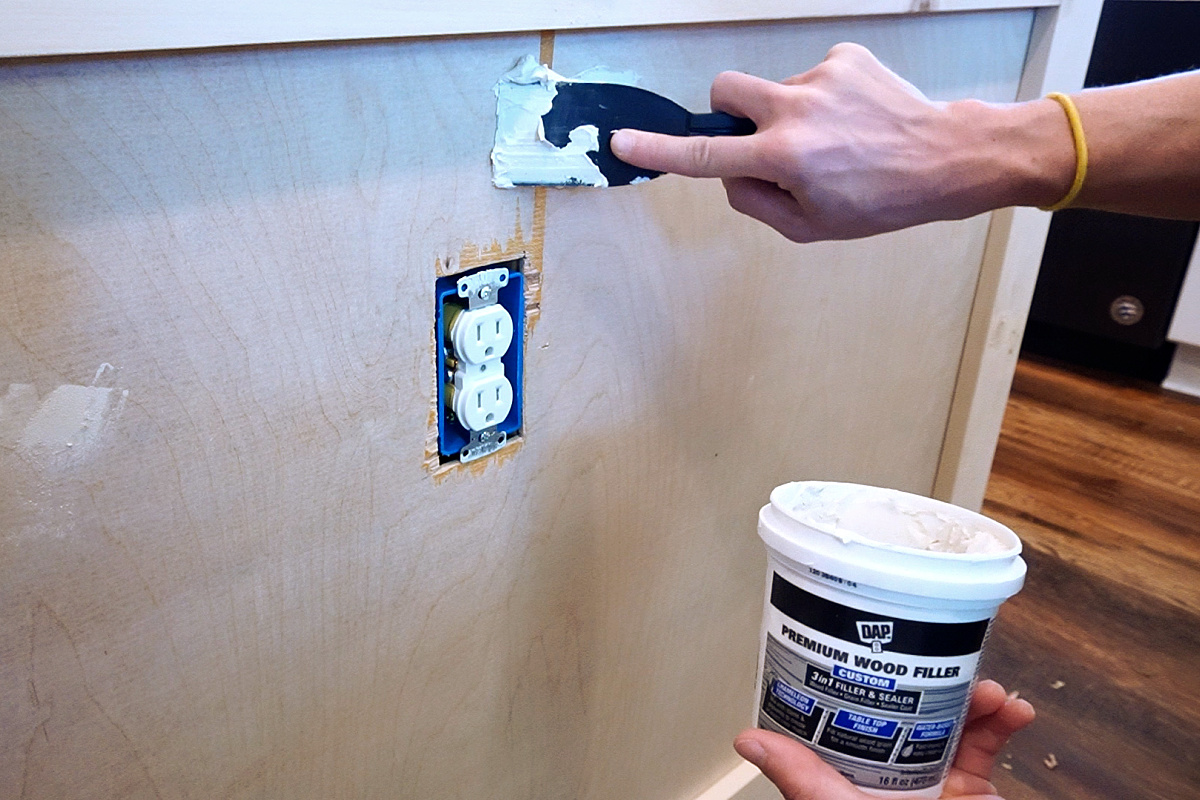
I used a jig saw to help me cut my panels to fit around any toe kicks, framing pieces, outlets or obstacles to “wrap” each side in plywood.
One side of the island had an outlet I had to cut around and clearly the plywood had some tear out issues when I cut this hole.
.
FYI, when cutting with a jig saw, it’s best to cut right side down to prevent this. But what’s done is done and I used some DAP Premium Wood Filler to fix this later.
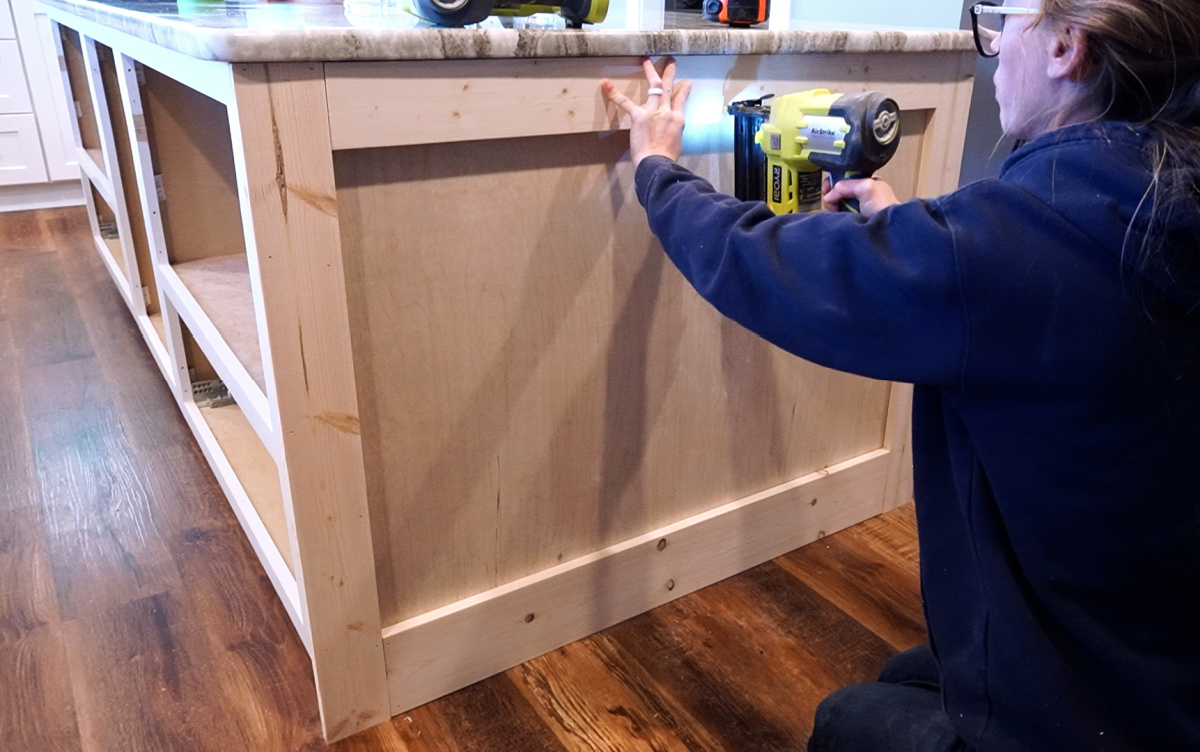
Step 4: Trim Out Kitchen Island Side Panels
After the plywood sides were on and the naked island was at least covered up, it was time to add some details.
.
I cut to fit pieces to trim out around each panel to dress this up.
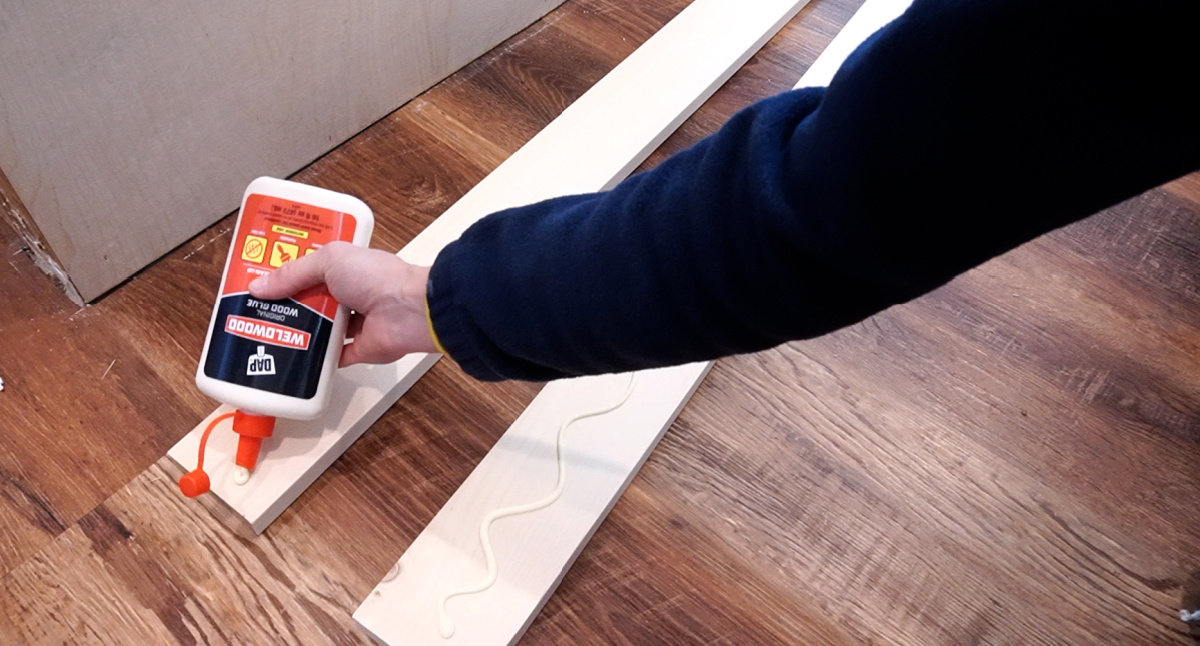
I used 1x4s vertically on each side and used DAP Weldwood wood glue and finish nails to secure these pieces in place.
.
While I didn’t glue the panels, I did glue the trim TO the panels so they will stay put and allow me to putty and caulk without them moving later.
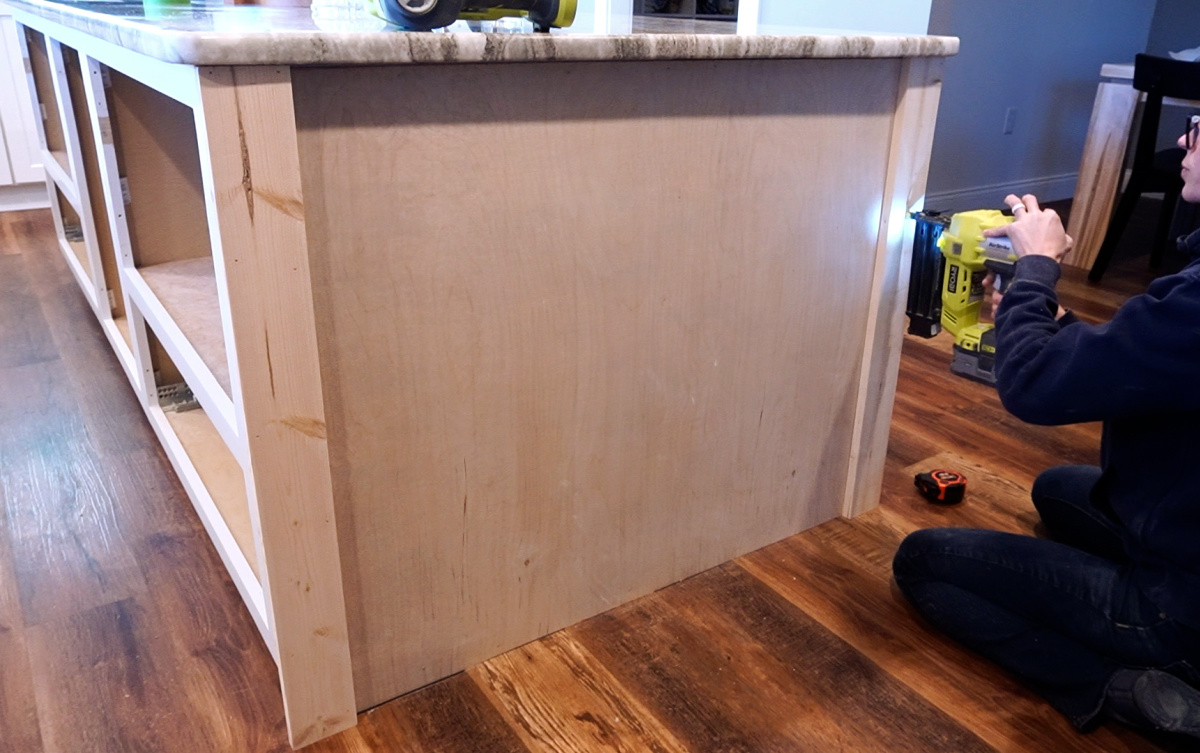
On these front sections, I installed the vertical 1x4s so they overhung the front edge ¾”.
.
That way, I could come back and cut to fit a 1x piece between them and they’d be flush across the front surface.
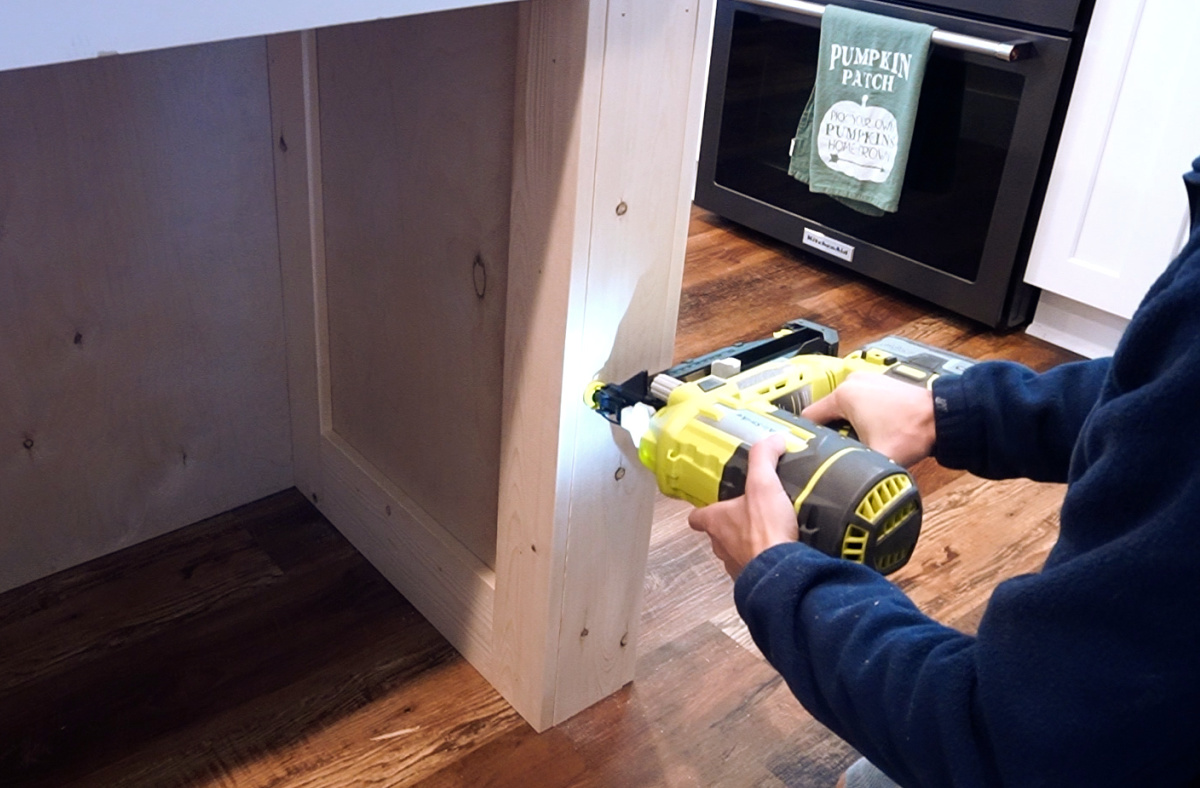
After the vertical pieces were on, I trimmed the tops with 1x4s and the bottoms with a 1x6s.
.
I did this on all sides, cutting each piece to fit, gluing and nailing in place.
Step 5: Reinstall Drawer Boxes
I decided to make the drawers and middle door inset instead of overlay like they had been.
.
Instead of replacing the existing slides, I just screwed some scrap blocks in the cabinet here and moved the slides back about ¾” making them inset to the frame.

They had been screwed to the face frame, but now I attached them to these scrap blocks, so I could remove the existing drawer front on the drawer boxes, and reinstall them, leaving room to attach new inset drawer fronts later.
.
The existing cabinets already had undermount slides, so I just used what was already here. However, I typically use (and prefer) side mount slides instead.
RELATED: Learn more about drawers, drawer fronts, and drawer slides here.
Step 6: Putty, Caulk, Prep for Paint
Once the island was trimmed out, I could start prepping for paint. And you guys know how I feel about paint haha.
.
Painting is my least favorite thing to do, so when I make the effort to paint, I don’t want it to be in vain, and I try to get the smoothest paint finish I can.
.
That said, putty is a crucial part to getting a smooth paint job especially when piecing trim together like this. And especially when painting a dark color in a shiny sheen like I had planned.
RELATED: How to finish raw wood furniture
.
It’s important to fill not only the nail holes, but also to cover and smooth out each joint.
RELATED: Check out my other tips here for more professional looking DIY projects
.
I used DAP Plastic Wood X Wood Filler on the nail holes and larger gaps, knots, and voids, but I like the consistency of DAP Premium Wood Filler for the joints and small seams that just need a little smoothing out.
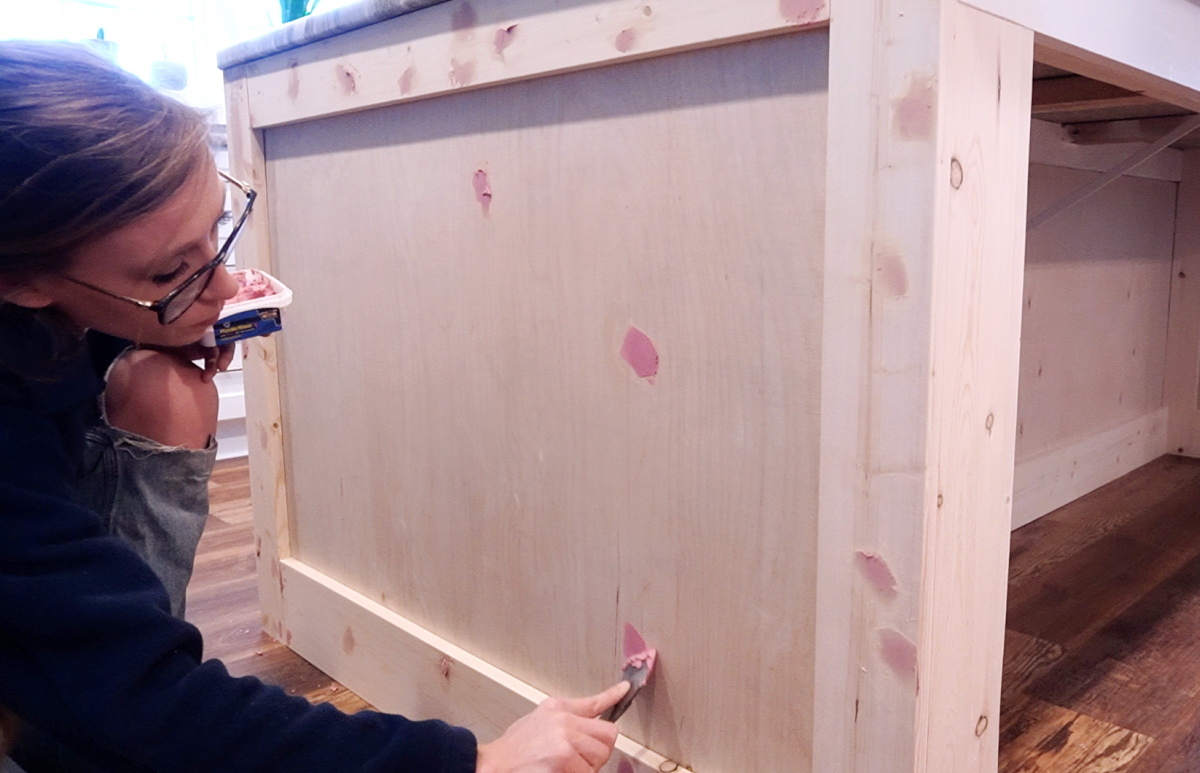
It’s a little easier to spread out and helps even out high and low spots that paint can emphasize if you aren’t careful.
.
After the filler was dry, I gave the entire piece a final sanding. Sanding is just as important as any other step. Make sure to sand the putty flat and smooth and make sure to sand all your boards smooth, too.
.
After the final sanding, I grabbed some DAP Alex Flex caulk to go over all the inside seams.
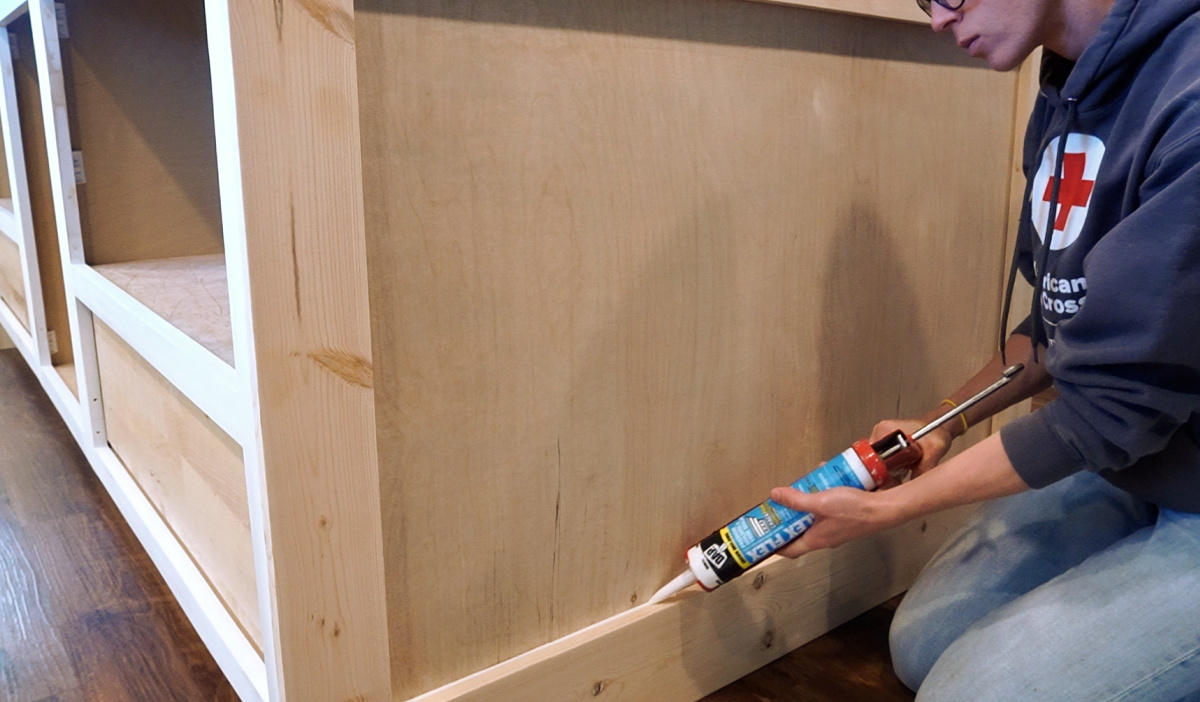
Just like filler, caulk is a crucial part to a smooth paint finish, so I covered all the inside corners around the trim, on the sides, and along the inside of the island.
Step 7: Prime and Paint Island
Once the caulk was dry, I gave the entire piece a coat of primer. DON’T SKIP PRIMER!
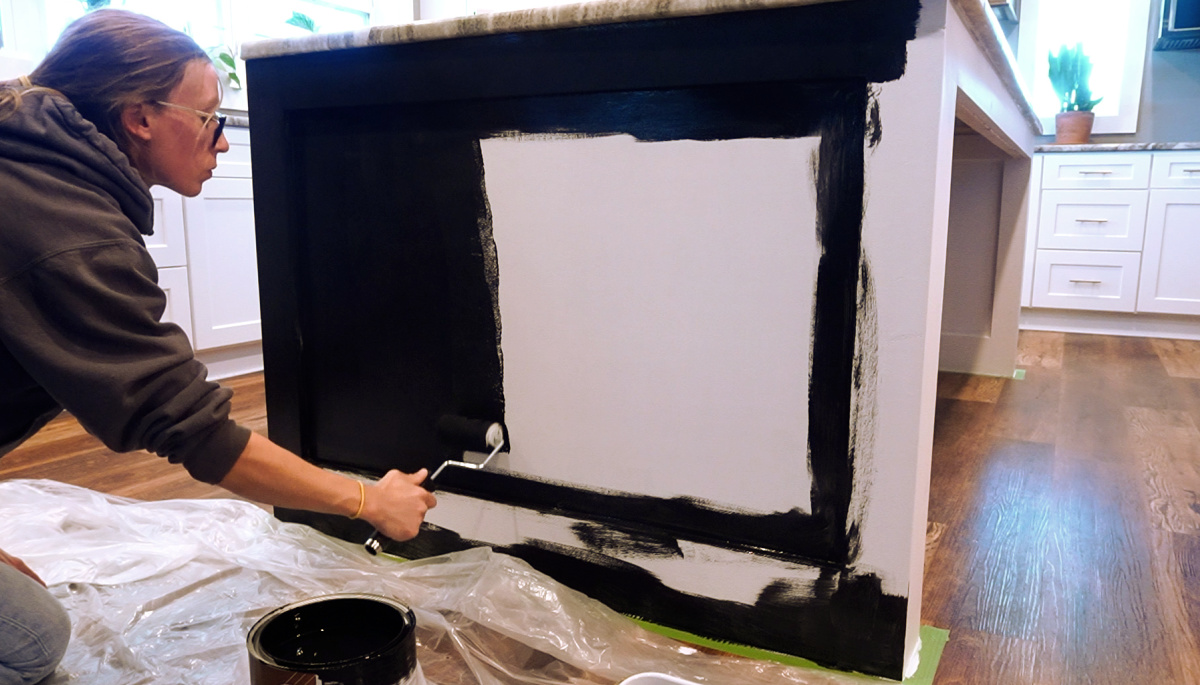
Then, I came back with a couple coats of paint. I choose a very dark color to contrast the white cabinets. I think it gives it a really classy look. I used Tricorn Black by Sherwin Williams here.
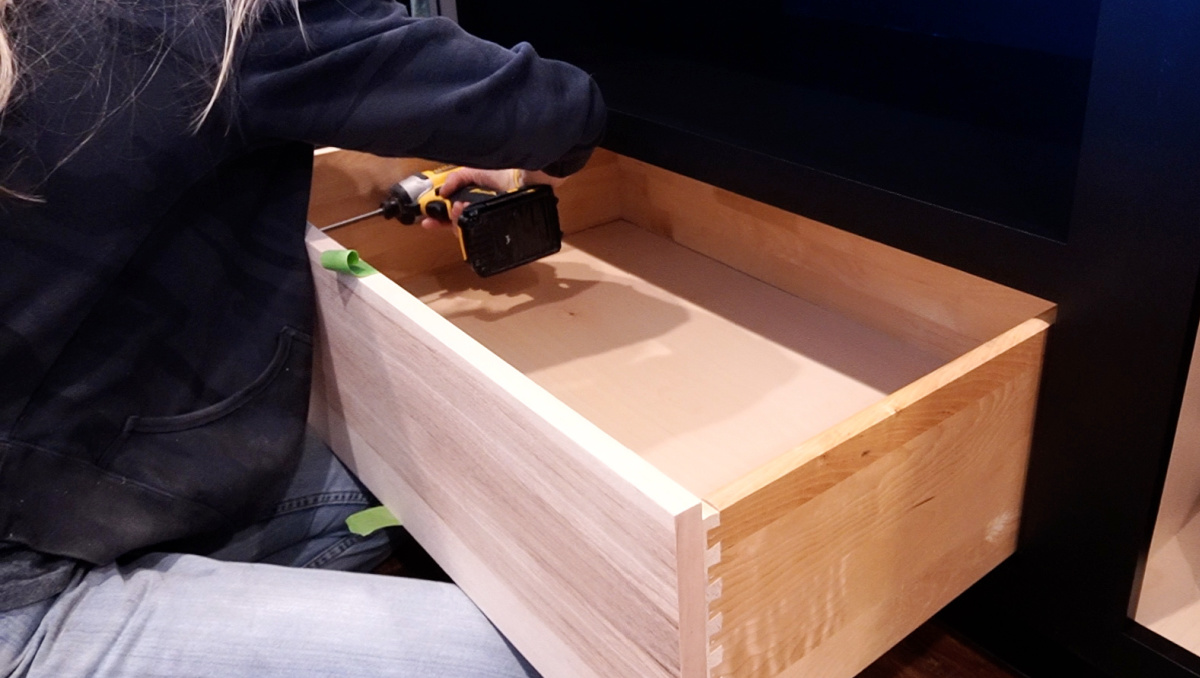
Step 8: Add Door and Drawer Fronts
While the paint dried and cured, I moved on to finishing things up by making the drawer fronts and door. I had some hickory plywood in the shop for a future project—stay tuned for that, *wink wink*
.
But I had a little extra, and decided that I’d make the drawer fronts from that.
.
I cut two inset drawer fronts and an inset door for the island and applied edge banding.
RELATED: Learn how to measure for drawer front sizes here
RELATED: Learn how to measure for door sizes here
RELATED: Learn how to apply edge banding here
.
I installed the drawer fronts with a few screws on the inside of the drawer boxes.
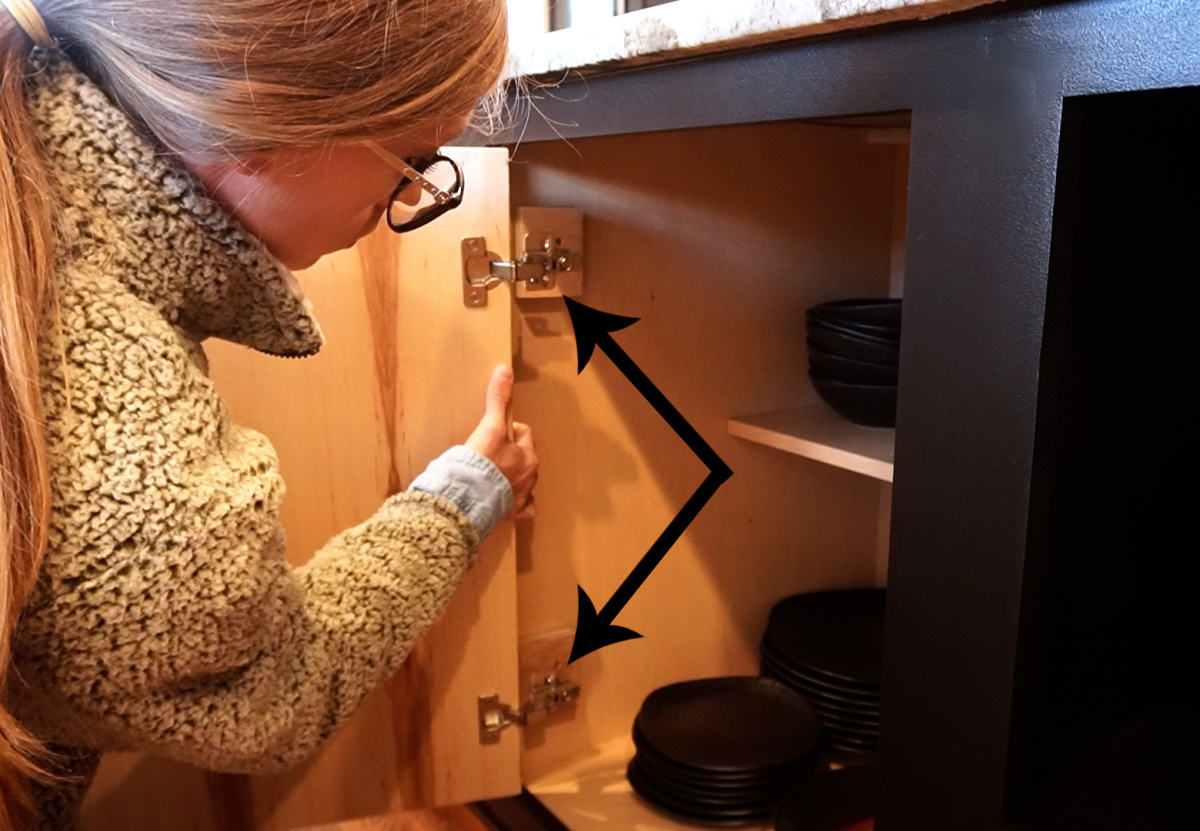
And for the door, I just used concealed inset hinges for frameless cabinets, and installed some scrap wood spacer blocks here to mount them on.
.
I’m sure they make these hinges for face frames, but I usually keep frameless hinges handy in my shop, so that’s what I had to work with.
I gave the doors and drawer fronts a few coats of poly, added these handles, then stepped back and took it all in.
.
I feel like the black, with the wood, with the solid, simple framed out sides really makes this kitchen look more modern and classic.
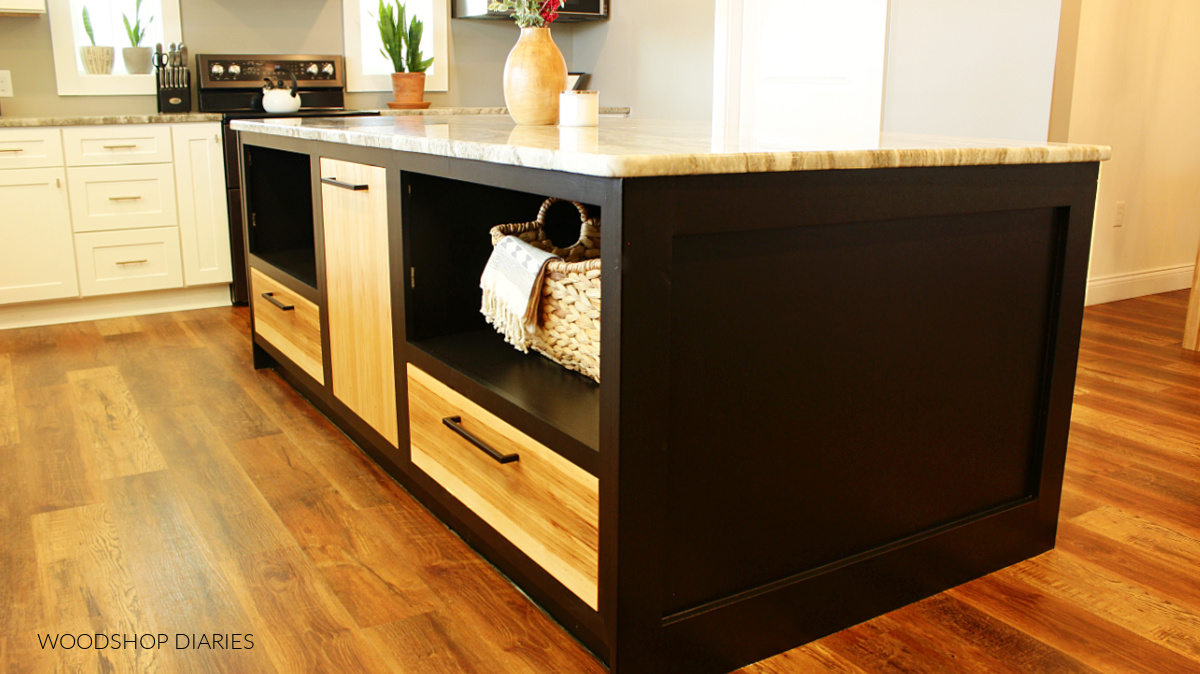
Although I’d prefer to build from scratch, this was definitely worth the work involved to redo what was here and make the best of what we already had.
.
This was an excellent, budget friendly way to upgrade our existing kitchen in a weekend and without a lot of demo work and replacement.
.
I know this project was a little out of the ordinary, but I hope you enjoyed it nonetheless and picked up a few things along the way 🙂
.
If you’re loving these stools, you can snag your own here.
Check out the video here for more details on the project and to watch it come together.
I have plenty more build from scratch, and home update projects coming soon, so if you want to follow along, be sure to subscribe to our newsletter so you don’t miss out on what’s coming next.
Until next time, friends, happy building! 😊