
I’ve never been big on “fake” stuff. Fake wood, fake crab, fake friends, fake smiles at that coworker you want to punch in the throat (JUST KIDDING). I just don’t like things that try to be something they aren’t.
.
That’s why I always try to be real with you guys. Honesty is the best policy and I like to remind you all the time that I really have no idea what I’m doing here and am a complete amateur. Just keepin’ it real, yo.
.
But lately, I find myself embracing the fact that some things are just better fake. Not wood, though. NEVER WOOD. You either go real with that stuff or go home, friends. (Sorry to all my particle board and MDF lovers…it’s just a pet peeve. We can still be friends, ok?)
.
But things like fake fur are totally cool (because…bunnies!!). And fake antique mirrors. And fake fireplaces (because sometimes putting in a real one just isn’t worth it).
.
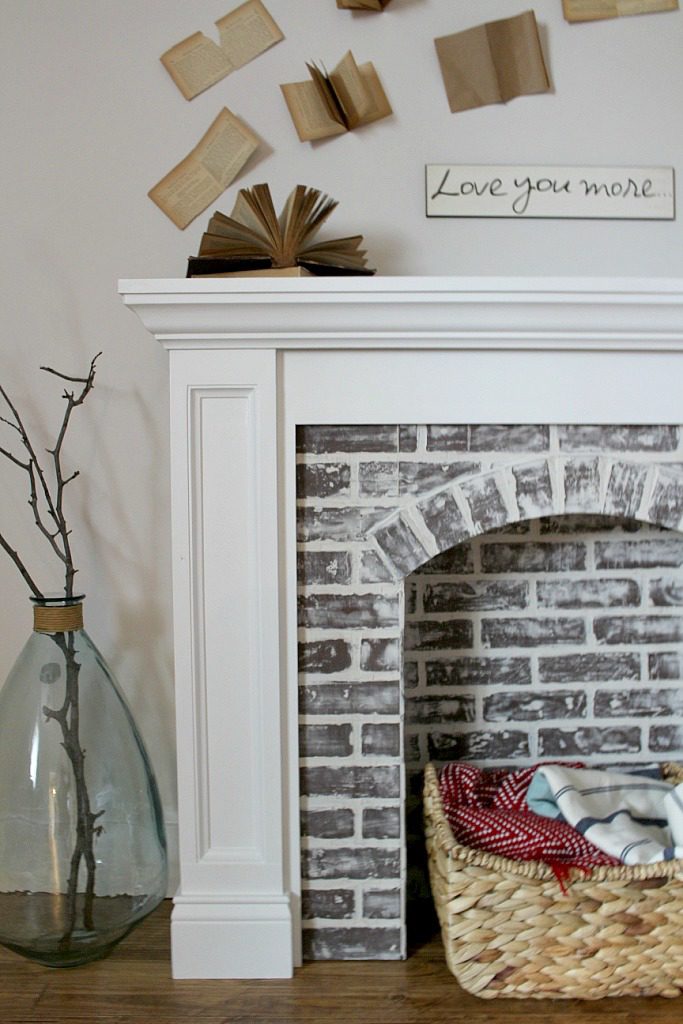
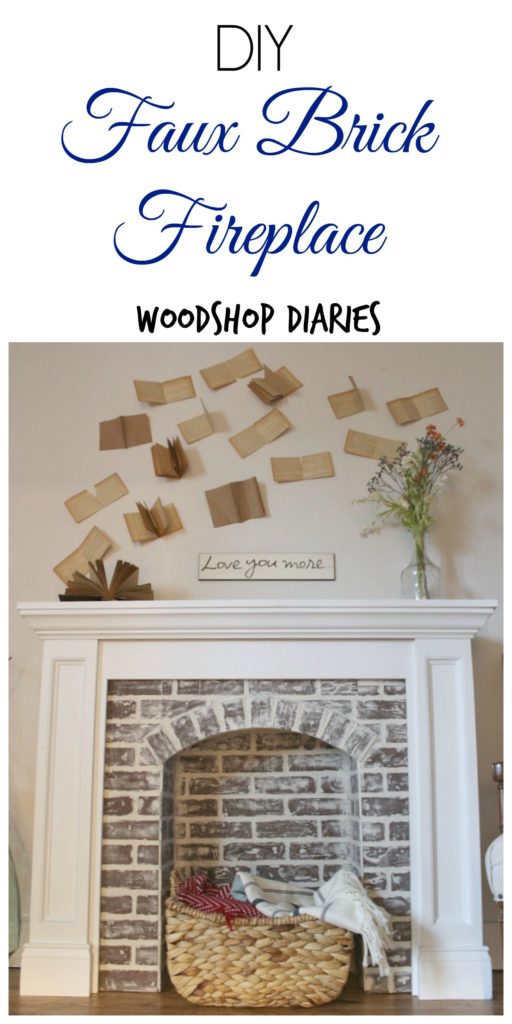
So when I decided I wanted a fake fireplace in our bedroom, I at least wanted it to look as real as possible. If you’re going to fake something, at least make it somewhat believable, right? Ironically, that required using even more fake stuff. Oh, the hypocrisy!!
.
But nonetheless, the fireplace turned out AWESOME (even if it is a total facade) and I’m going to show you exactly how I did it 🙂
.
This post contains affiliate links. If you purchase from one of these links, I may receive a small commission at no extra cost to you. Thank you for supporting this site so I can continue to provide free content. Please see disclosure policy for more details.
.
DISCLOSURE: This is meant to be a FAKE fireplace, just for decoration. Do not place any heat source in the fireplace as the wood and fake brick paneling is flammable. For applications where you will be using a heat source, contact a professional for their opinion. This application is strictly for decoration.
Materials needed:
(3) 1x12x8 boards
(2) 1x8x8
1x2x8
Baseboard molding (optional)
Crown molding (optional)
Fake Brick panel
White paint
Drywall mud or plaster of some sort
Sandpaper
Plastic putty knife
Wood putty
Tools needed:
Miter or Chop Saw
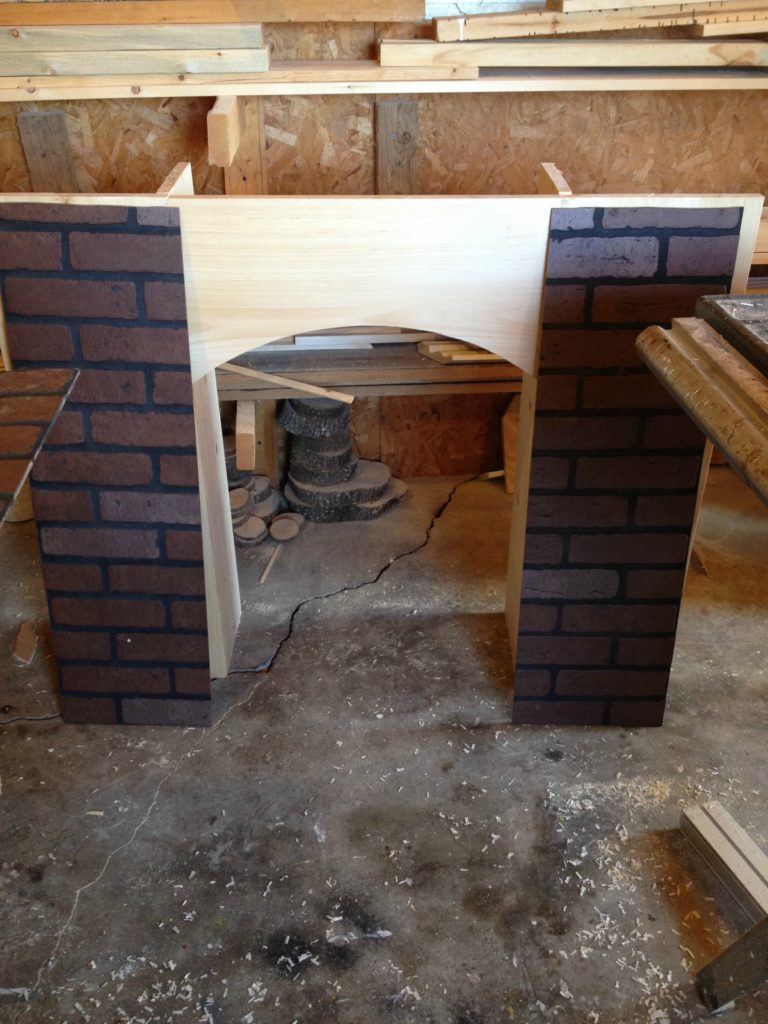
Step 1: Build the insert for the fake fireplace
This fake fireplace is really two main parts—the inside and the outside. I worked kind of backwards and made the inside first.
.
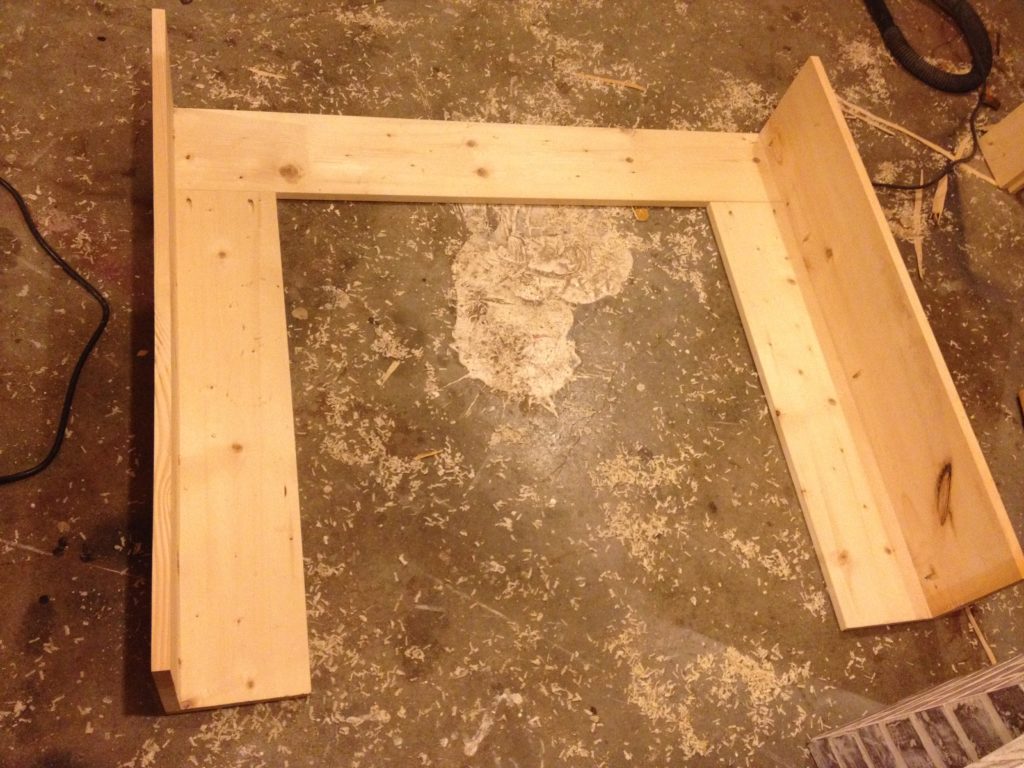
I cut two 1x12s at about 36” and one at about 22”. I used my jig saw to cut an arch in the 22” piece. This is optional, but I wanted the fireplace to have an arched top.
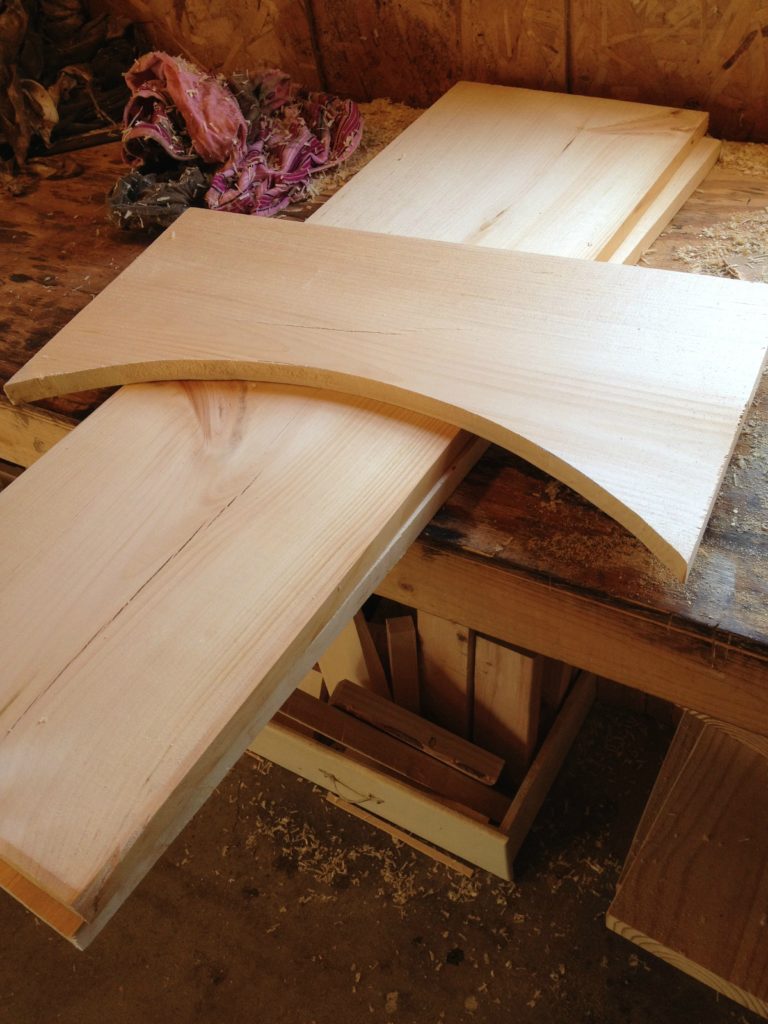
Then I used my Kreg Jig to drill pocket holes in the 22” piece and used 1 ¼” screws to attach it to the two 36” 1×12 boards like shown.
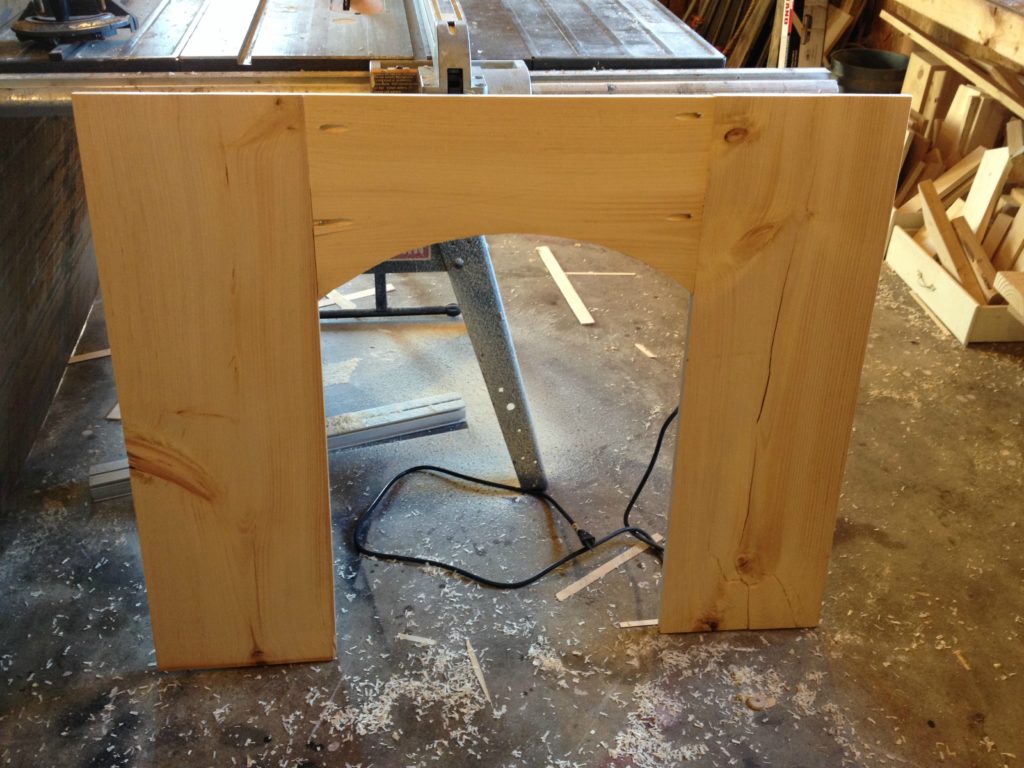
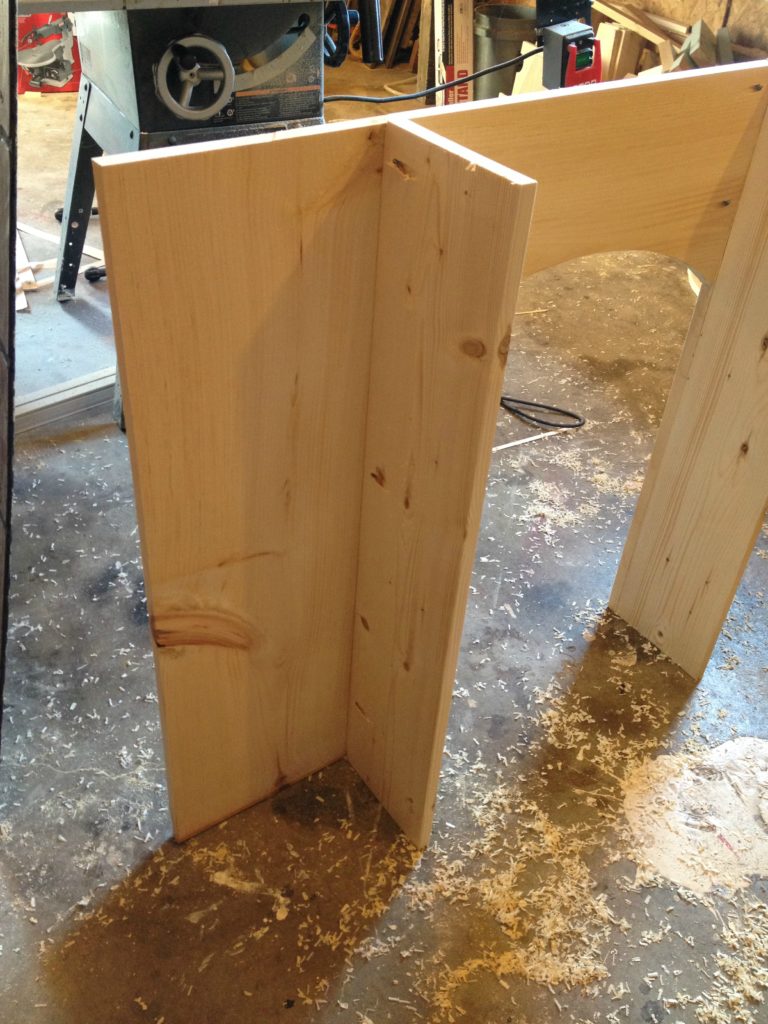
I cut two pieces of 1×8 at 36” long and drilled pocket holes in those as well and attached along the inside of the opening.
Step 2: Add the faux brick
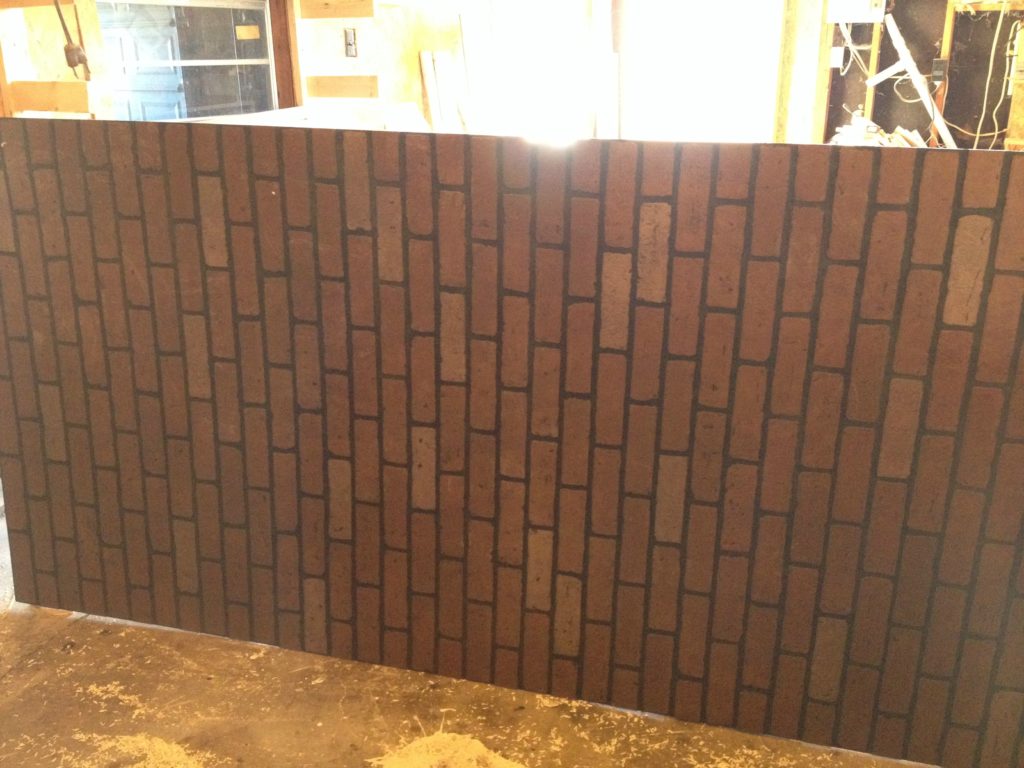
I got a 4×8 sheet of fake brick panel from the local big box store. My local lumber yard could order it, but didn’t keep any in stock. If you can’t find it at the bog box store, check the local places.
I’m going to warn you (here’s me being “real” with you teaching you how to fake something…ironic), don’t do it like I did it.
.
I pieced the front faux brick together in three pieces. Don’t do that…you can see the seams and it took me FOREVER to get things to line up to where they looked halfway normal.
I recommend lying the board face down on the ground and trace out the shape of the front of the insert onto the back of the panel and cut the front brick as one piece with a jig saw.
.
Glue and nail the brick panel onto the insert as you go.
.
I attached the front pieces first, then lined the 1x8s and then nailed a large piece onto the back of the 1x8s so it was all completely lined with brick. I cut my pieces on the table saw so I got good straight lines
For the arch, I cut individual bricks out and cut them in half and just nailed them along the arch. Don’t worry about gaps between them. We will deal with that later.
Step 3: Make the faux brick pretty
Let’s be honest. This brick is UGLY. It’s so brown and dark and the mortar is black. Apparently, back in the day, black mortar was more expensive. WHAT?! Our real fireplace has black mortar (from the 80s) and I HATE IT SO BAD.
.
So first thing was first, I painted the black lines with plain white paint.
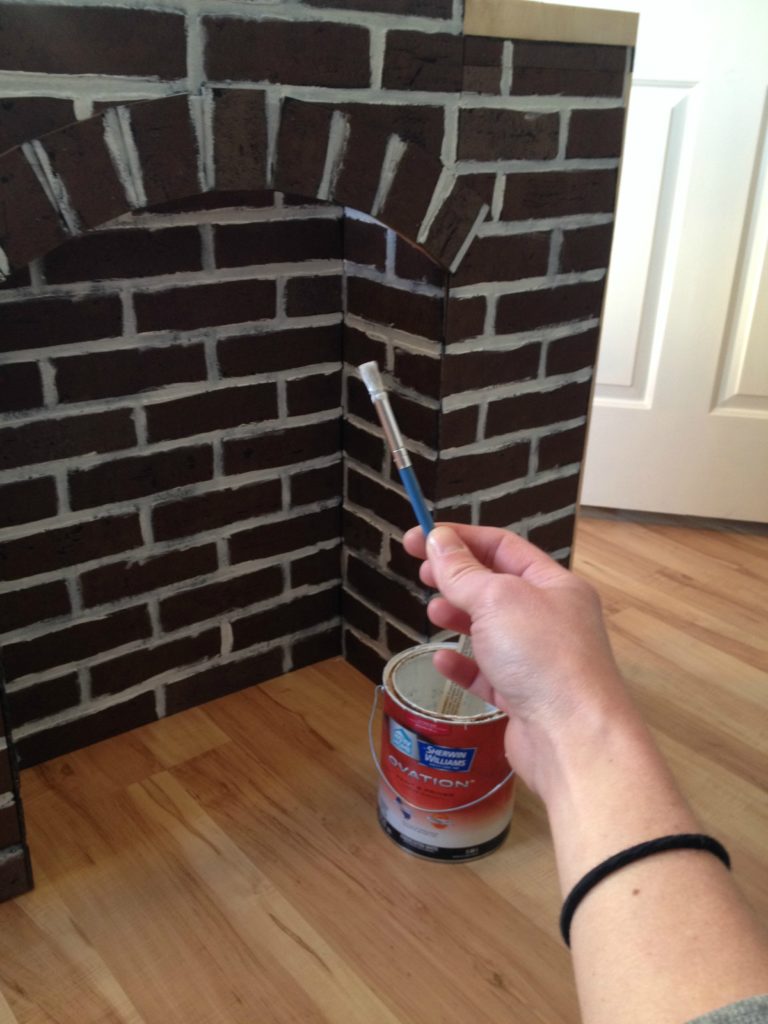
I was messy and not too concerned with it being in the lines. It’ll be covered up later.
.
Once the paint was dry, I took a cheap plastic putty knife and a HUGE bucket of drywall mud and puttied all over the brick.
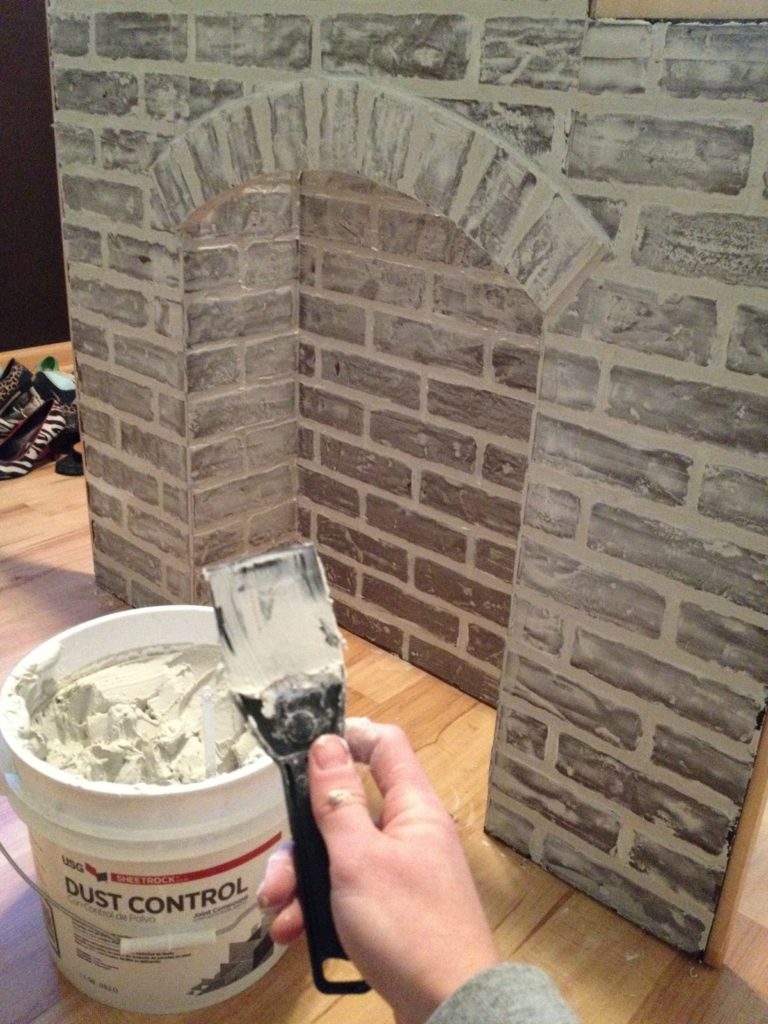
We had drywall mud leftover from the bathroom remodel, so that’s what I used. You can get smaller containers of plaster and it should work the same. You don’t need a whole lot, but you will need more than you think.
.
I should have taken a video to show you, but I didn’t. #badblogger I just scooped up some mud on the knife and smeared it all over. Be sure to get it in all the mortar lines and the little dimples in the bricks. Then scrape off the excess. I worked in small areas as I went.
.
Be sure to fill in all the gaps between the bricks in the arch, too.
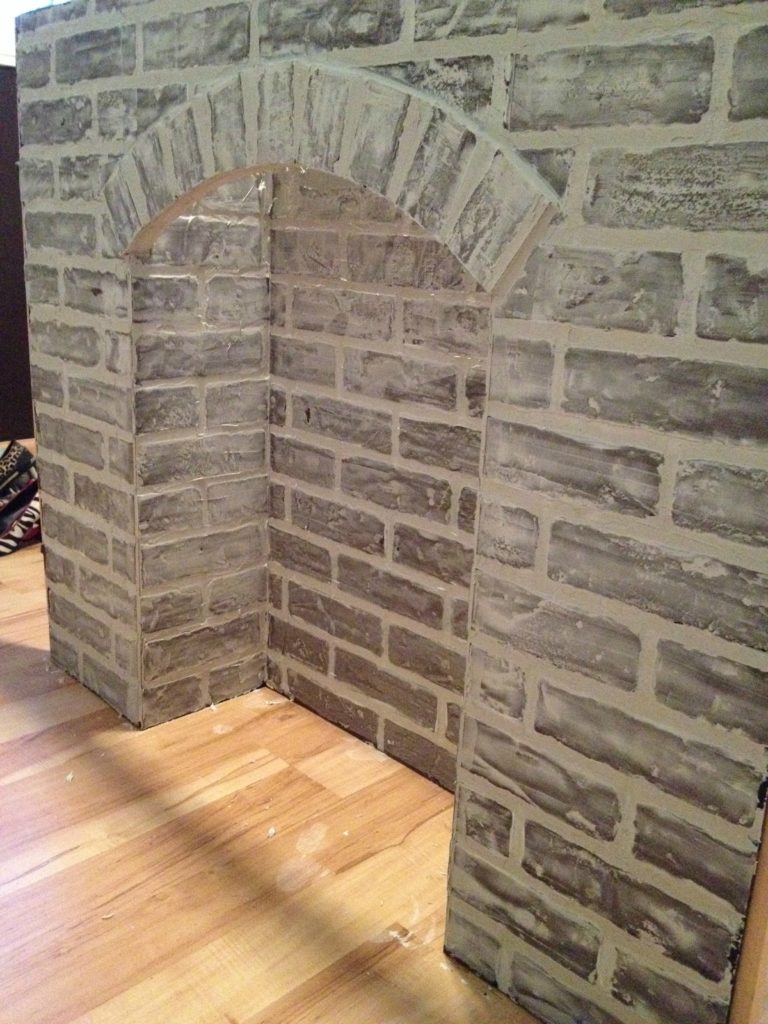
Just another warning…you will get the mud all over the floor no matter how careful you are. This floor is cheap and we will replace it soon, so I didn’t care. But I don’t advise you to do this on bare floor…lay down some plastic.
.
Ta da!! Now let it dry…it’ll take a while.
.
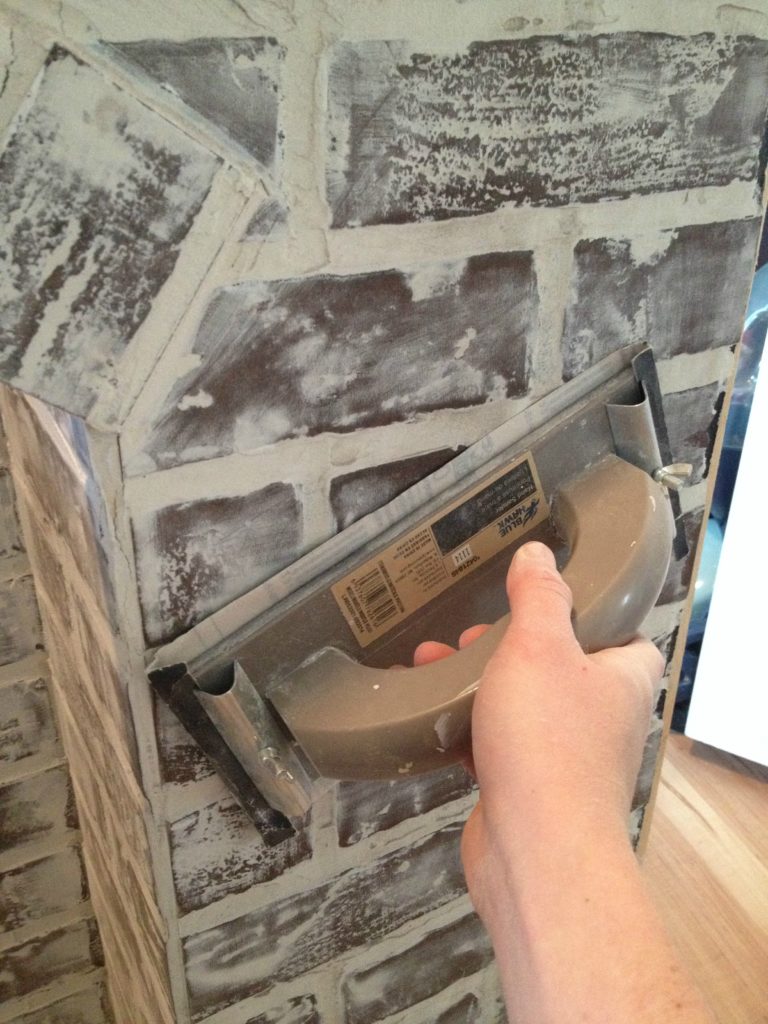
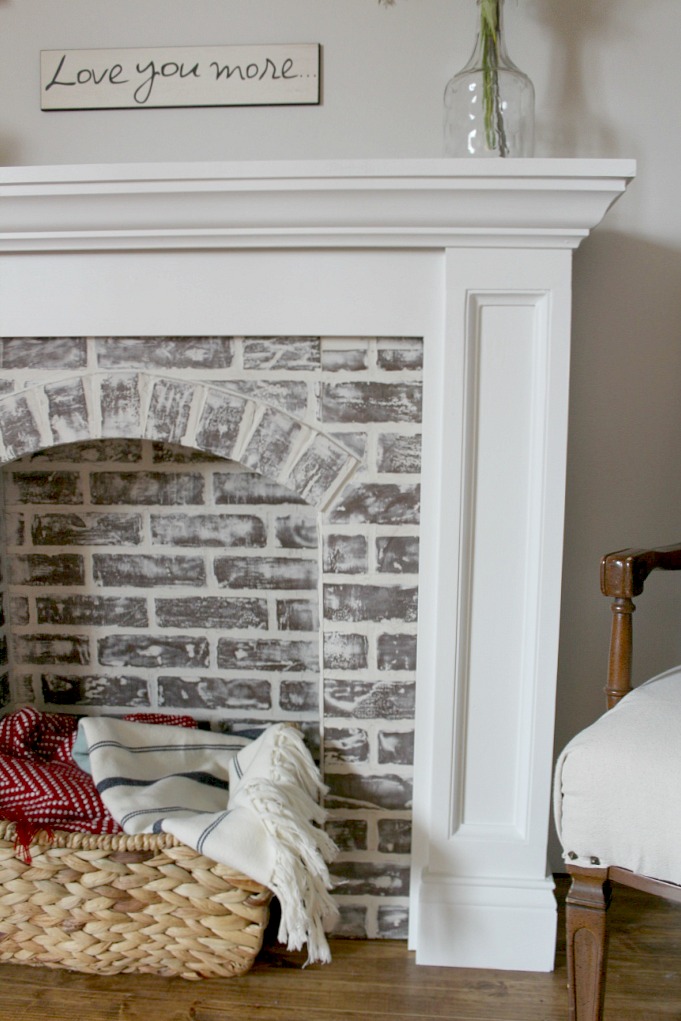
Once it was good and dry, I sanded it with drywall sandpaper. You can use regular sand paper too. After the mud, it was whiter than I wanted, so I just sanded until I liked it.
This is what I ended up with. It will be very dusty…just a warning. Wipe it down with a damp cloth after sanding.
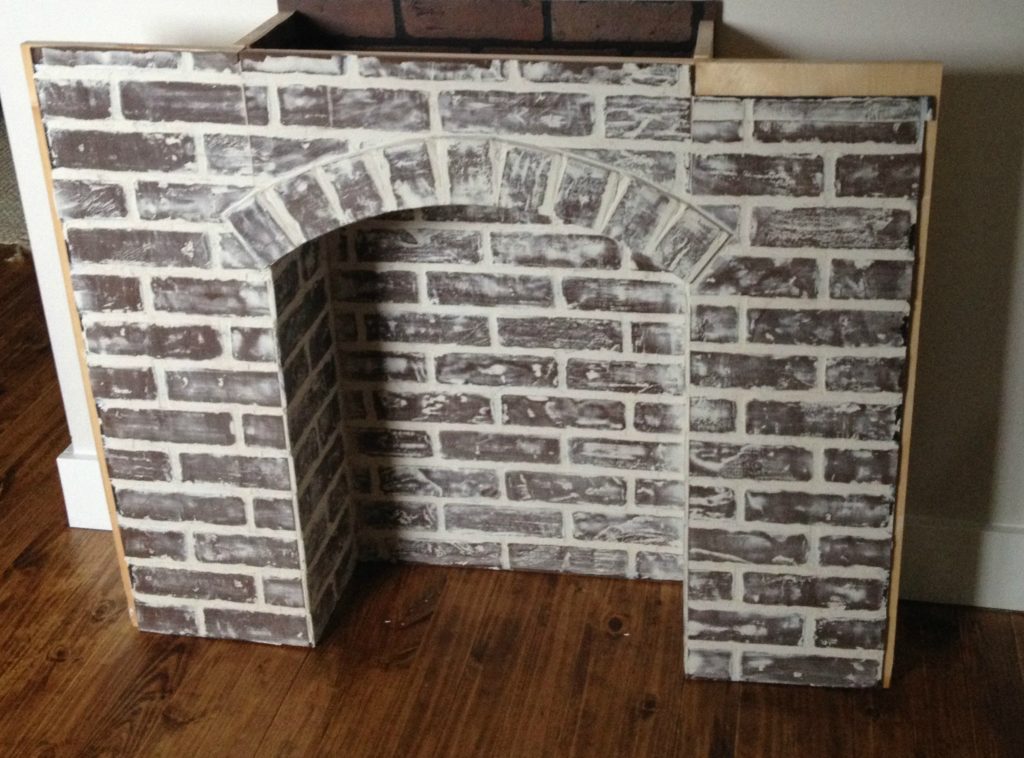
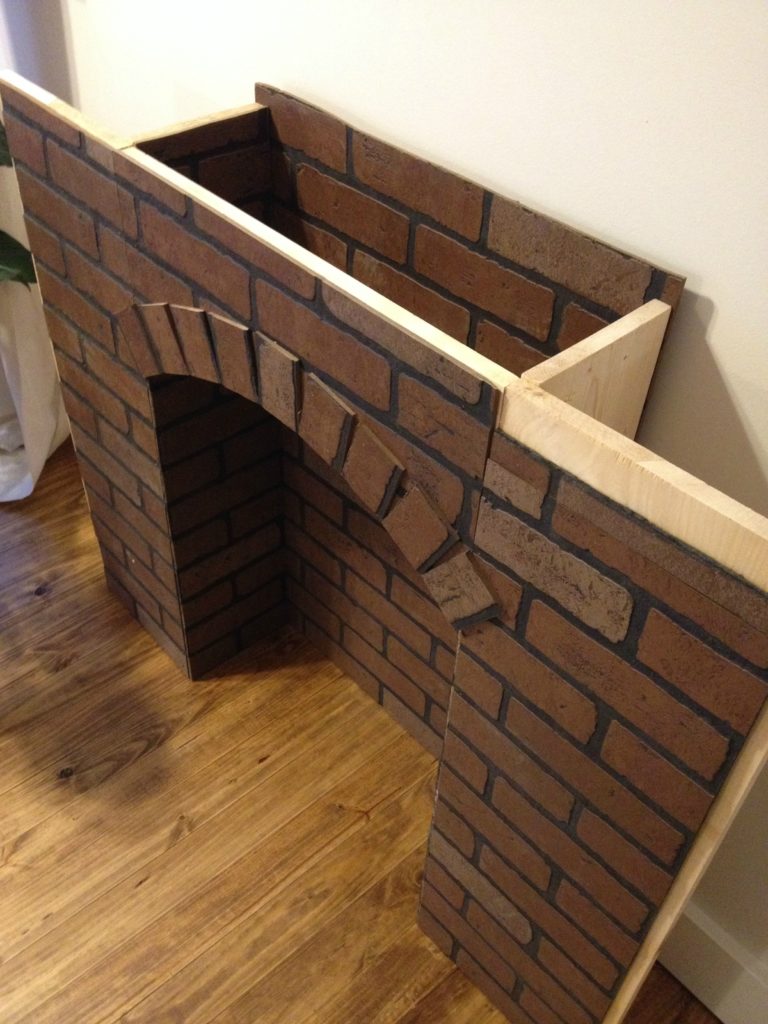
Step 4: Build the outside of the fake fireplace
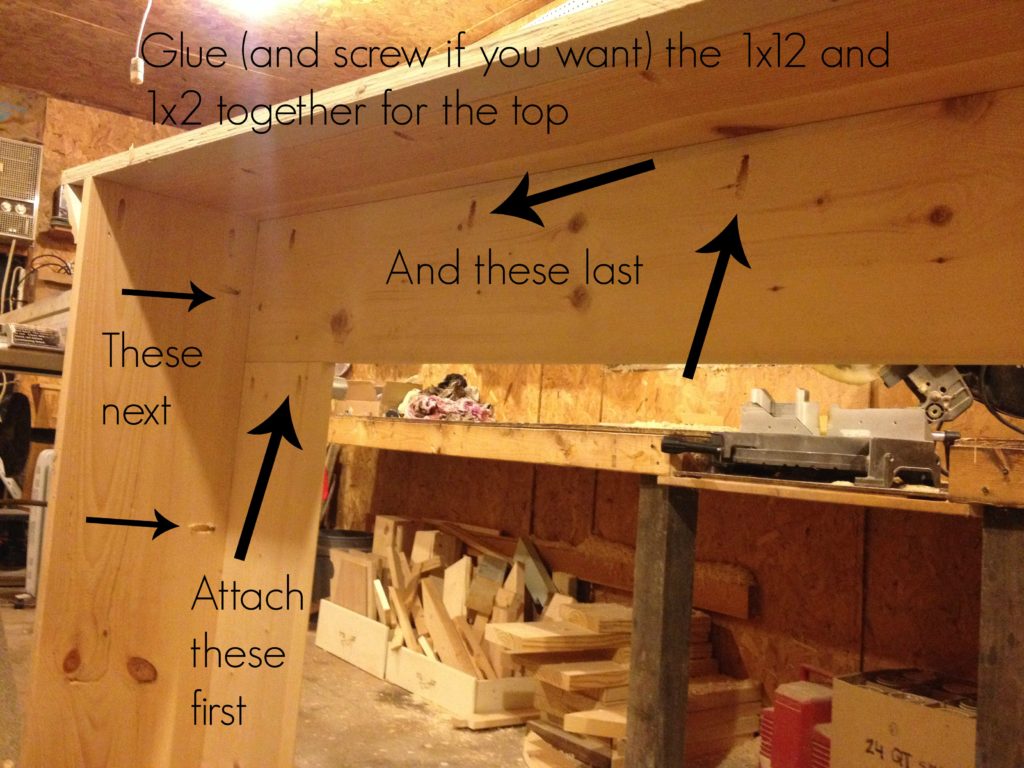
I cut 2 pieces of 1×8 at about 34” long and one 1×8 at about 48” long. I drilled pocket holes in the tops of the 34” long pieces and attached it to the 48” piece using 1 ¼” pocket hole screws like shown below.
.
Then I ripped two pieces of 1×12 to 8 ½” wide for the sides. You can use a 1×10 or 1×12 for the sides and not rip it if you want. But I didn’t want my fireplace very deep, so I ripped it.
.
I drilled pocket holes along the sides of the 8 ½” wide pieces and attached them to the front piece using 1 ¼” pocket hole screws.
Then I cut a 1×2 and a 1×12 at 53” long and glued them together. This will be the top. You could also attach them using pocket holes and screws.
.
I drilled pocket holes along the top of the box I just made and attached top using 1 ¼” screws.
The rest of this is optional and can be customized however you want. I added some interest to the front by nailing pieces on the fronts to make “boxes”, then adding cove molding along the insides, crown molding to the top and baseboards at the bottom.
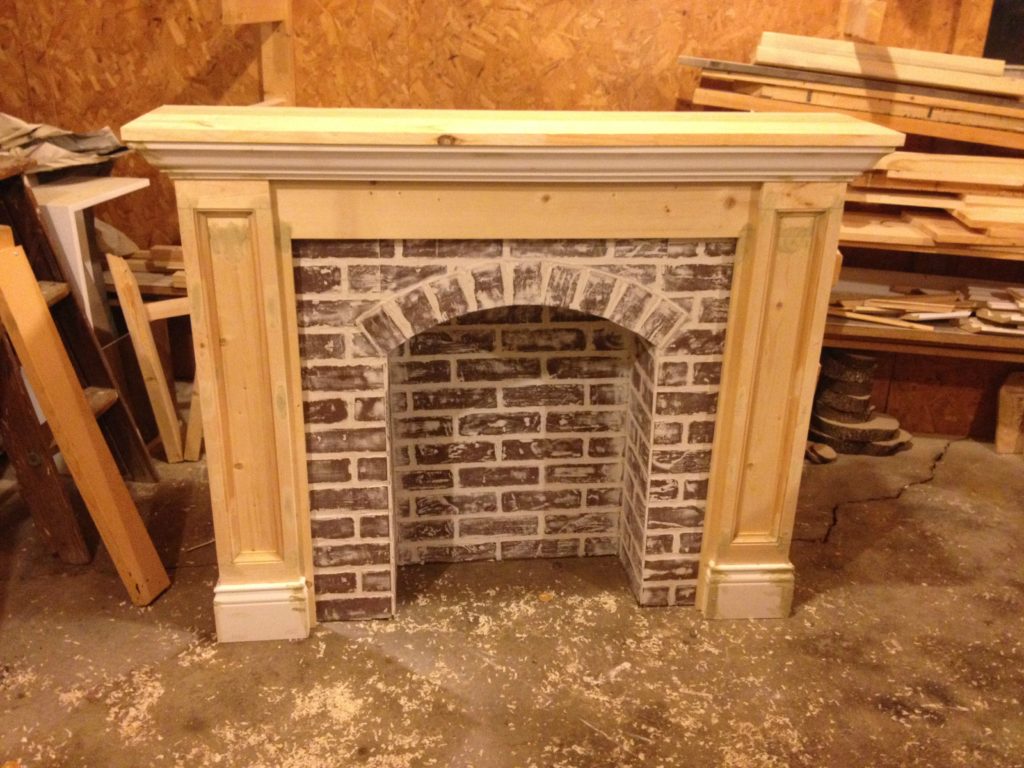
I puttied, sanded and caulked as needed and gave it two coats of primer and two coats of white paint.
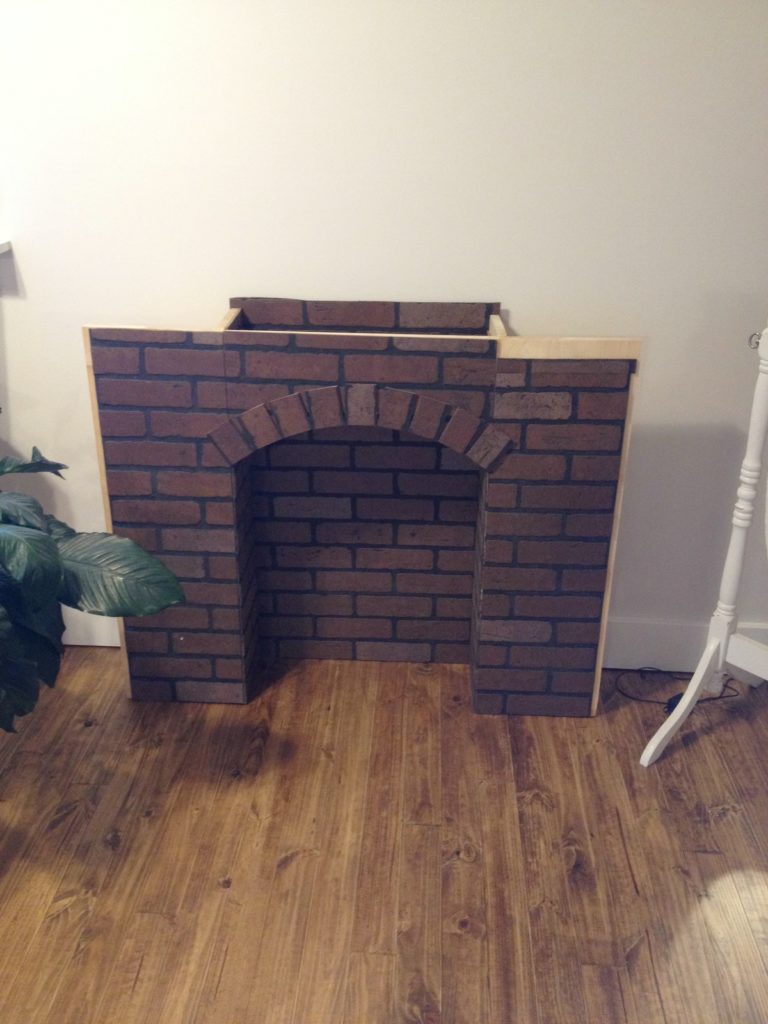
Step 5: Attach the inside to the outside
Once the paint was dry, I simply screwed the inside piece to the outside piece from the back side. In hindsight, I could have made the 1x8s in the inside piece go all the way to the top and attach there too, but oh well. It works fine like this.
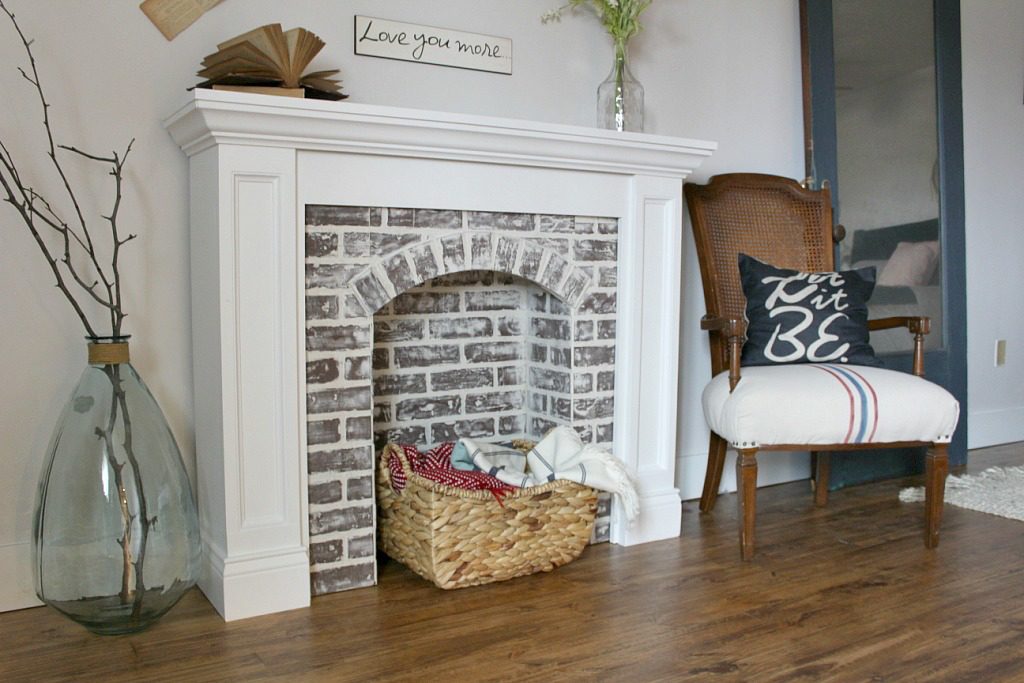
Step 6: Stress out about decorating then give up and just enjoy 🙂
I’ve always admitted that an eye for decorating is not my strongest asset. So, like always, I spent hours putting stuff on and taking it off again to decorate this thing. Then I just quit and said whatever, this is good enough. So don’t judge my decor…I just wanted to stand back and admire the fireplace 🙂
.
So here are some pictures of that…
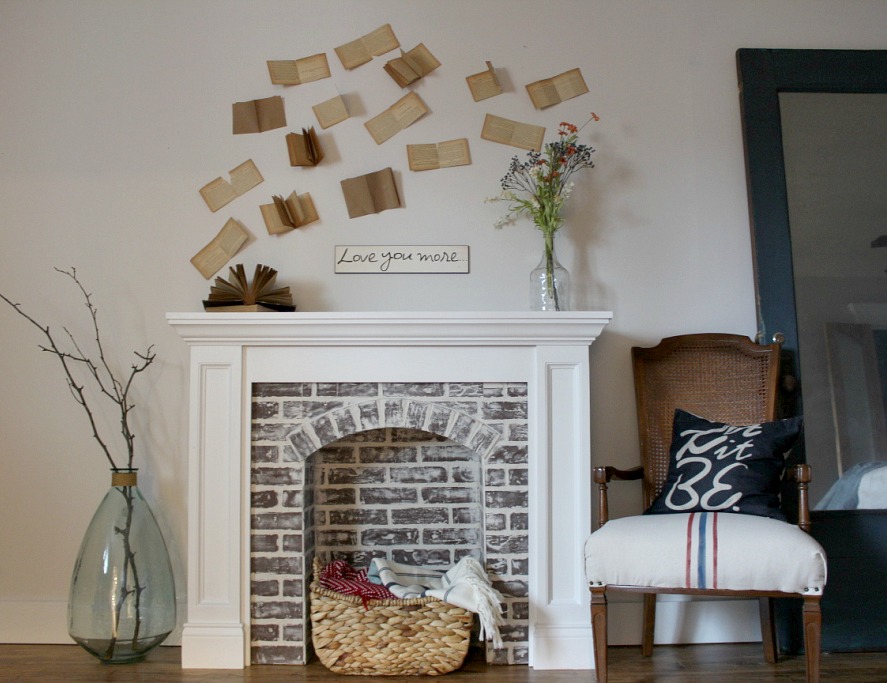
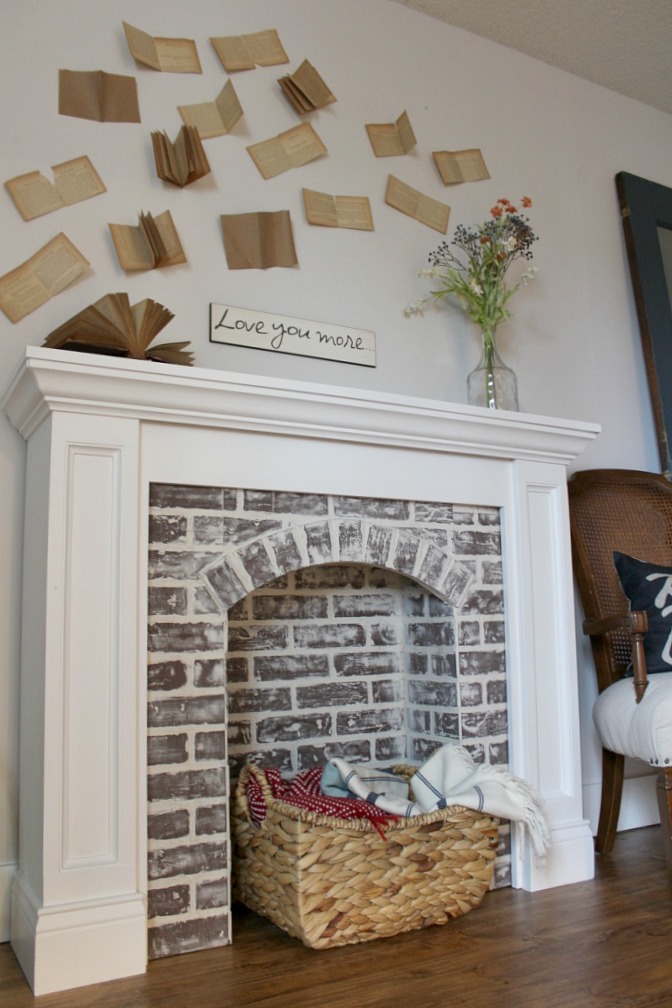
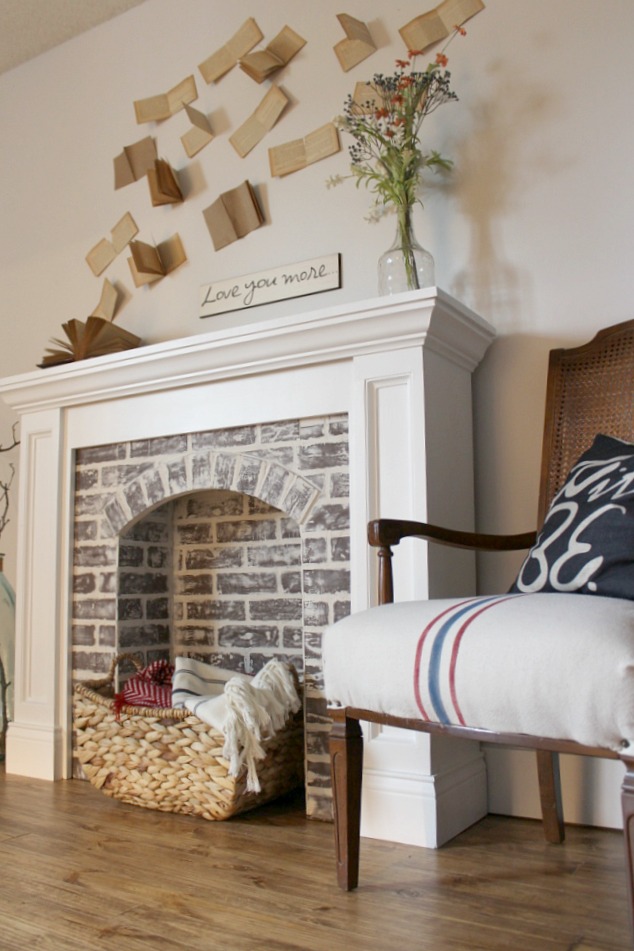
SOOOOOOO, tell me what you think? I have been so excited about this project since I started working on it and COULDN’T WAIT to show you all!! If you love it too, I’d love for you to pin it 🙂
Whew, what a long post. I’m gonna cut out right here, but I’ll be back again soon with some more fun projects 🙂 Until next time, happy DIYing!!
Mary says
Shara, this is beautiful. I am collecting power tools and am almost ready to begin a project. What is the approximate costs for this project?
Shara, Woodshop Diaries says
Thank you! Honestly, I can’t remember exactly how much everything costs, but I would estimate approximately $75-$100 for the lumber and materials depending on prices in your particular location.
Maxine says
I love the fire place its fantastic but what i’d really like to know is how have you made the pages of the book on the mantle stand up? i love the book and pages flying up the wall idea.
Shara, Woodshop Diaries says
Thank you! The open book on the mantle is just a really old book with stiff pages, so I just opened it and they stood up on their own. But the ones on the wall, I tore out some old book pages and stapled them together in the middle to make it like another “book” with multiple pages, then just used clear tape to tape them on the wall so it looked like they were flying.
Theresa says
Wow! Ingenius!
Shara, Woodshop Diaries says
Thank you so much!
Janean says
Awe-mazing! I wondered about this product & what it would look like painted. A genuine (not fake) thank you. ?
Shara, Woodshop Diaries says
Thank you! I was really surprised how great this faux brick looks with a little paint and putty 🙂
Jessyca says
This is BEAUTIFUL! Would you be willing to make another and ship? I am in love with this but unfortunately don’t have the necessary tools to create it 🙁 Please let me know! THANKS!!
Shara, Woodshop Diaries says
Thank you! Unfortunately I do not make things to ship. I do build some things for local pickup, but the cost and trouble with shipping just isn’t worth it at this time. Maybe you can find a local woodworker who could make it for you?
ecloud says
One of the others wrote that it would cost about 100$ is that close to correct?
Shara, Woodshop Diaries says
Yes, that is correct.
Emma says
About how much time and money did this project take you?
Shara, Woodshop Diaries says
This would be a good weekend project. I estimate it took about 8 hours (not including wait time for things to dry) and about $75-100.
Amber says
What are the height, depth, and width of the fireplace and mantle? This looks amazing!
Shara, Woodshop Diaries says
Thank you! The mantle is 53″ wide, 42″ tall, and about 12 1/2″ deep.
Jeanie says
Love this! I’ve been looking at many, many DIY faux fireplaces and this is the best so far. Gonna show this one to my husband for sure. Thanks for sharing!
Shara, Woodshop Diaries says
Thanks so much!! So glad you enjoyed that post and liked the fireplace 🙂 It’s one of my favorite projects!
JoAnn @ SweetPepperRose says
In a word, AWESOME! Just might make one of these for my master bedroom.
Shara, Woodshop Diaries says
Thanks so much!!
Suzanne says
Best faux fireplace I’ve seen. It really does look real! Great tutorial as well. I can’t wait to try it. How did we ever survive before those Kreg jigs? ?
Shara, Woodshop Diaries says
Thanks so much!! I know, right? I use mine ALL. THE. TIME. 🙂
Isobel Conradie says
Wonderful job done, Shara! Just one question though – did you also paint the red bricks black or charcoal] before starting to paint the mortar white? It seems in the end as if the bricks were black, and not red?
Thank you, I would love to change my red brick fireplace into one like this, that’s why I am asking!
Shara, Woodshop Diaries says
Thank you! I agree with you about the color change on the brick. I did not paint the brick, only the mortar lines. But it does look more charcoal than red now. Not sure if it’s because I sanded it or if it’s just the effect of the plaster, or what. I know what you mean about wanting to change your fireplace to look more like this (I do too on my actual brick fireplace), however, I’m not sure this is the best method to use on actual brick and on something that will have a heat source close by. I would check with someone first before putting drywall mud/plaster around your fireplace.
Lynn says
Shara, another way to fix the gap is to trim the “fireplace” to fit over the baseboard. I taped my cutouts to the underside of my cabinet, so if I do move it elsewhere, I just screw the cutout back on and putty the gaps. Love the fireplace!! And with the new “fire look” heaters, this would be beautiful. Great tutorial & super looking project!
Shara, Woodshop Diaries says
That’s a great idea!! Thank you!
Jen says
This looks awesome! One suggestion though- if you cut out the profile of the wall baseboard along the bottom in the back, you could get it to sit flush with the wall and add that much more to the realistic look! Even so, great idea and tutorial! Thanks for sharing!
Shara, Woodshop Diaries says
Thank you!! Yes, I thought about cutting out the baseboard, but the chances if this staying in the same place for a long time is very low haha. So I opted to leave it as is so I can move and rearrange easily 🙂
Krafty Fix says
Looks awesome! No self respecting living room is complete without a fireplace, so this is certainly a good way to make the case in the absence of the real thing. I guess it would also make the perfect surround for an electric fire. Anyway, great job!
Shara, Woodshop Diaries says
Thank you!!! 🙂
Linda says
Debbie! Don’t let anything stop you from doing this. Get the info from a professional (as Shara suggests)- ask for a detailed estimate to actually do the work and go from that. Ask lots of questions about what he would use and why, then you’ll be armed with enough information to find even more details on the internet. Maybe even get an additional estimate from another professional just to get different ideas and a thorough workup of what needs to be done. Require it be a detailed written estimate, maybe even with some drawings/sketches.
Believe me, you can do it! I’m 73 and I’ve tackled things no one would believe just because hubby couldn’t/wouldn’t do it. You’ll be surprised at what you learn and the confidence you gain! I’ve learned to use an air gun, planked a couple of walls and replaced light fixtures just in the past couple of months! And I’m an old gal. GO for it!
Sylvia says
B R A V O …. again! You never cease to amaze. I love it.
Shara, Woodshop Diaries says
Thank you so much!!!
debbie says
You are amazing and a inspiration to me. I love the faux fireplace. I have wanted a fireplace in my living room for as long as we have lived in our house (17 years), the ceiling is vaulted up towards the back of the house, and I have always thought a stone fireplace with a stone chimney going all the way up the wall to the ceiling would be beautiful, but the cost not affordable. We have a wood stove in the corner of the room which is wonderful, and provides heat. I would hate to get rid of it, so my idea long ago was to build a faux fireplace deep enough to set part of the wood stove in then put the stove piping up a faux chimney – again going up the wall.
My husband nixed the idea. Why? His response to most of my home improvement ideas “that’s too much work”. I have wanted this for so long and so badly, and you have inspired me. I have decide to just do it. I have done a lot of home improvement myself, and I believe I can do this.
The problem is I don’t know how much of a clearance I would need around the stove and pipe so not to catch the wood on fire, and perhaps there is another type of material that I could use that would be more fire retarded as opposed to wood…especially since I would be covering it with stone or faux stone. Any help, advice/suggestions on this I would greatly appreciate.
Shara, Woodshop Diaries says
Hi Debbie! So glad you enjoyed the project! I would love for you to try it, but I would definitely not recommend doing this sort of thing with an actual heat source or fire in the middle. The fake brick panel could easily catch fire! I’m not an expert on actual working fireplaces/wood stoves, so I would recommend finding a professional for advice. I’m sorry I’m not much help, but I do not want to give you any incorrect information on this type of thing!!
Tiana says
you are incredible with your ideas and your work. This is beautiful…. and I voted for you!
Shara, Woodshop Diaries says
Thank you so much!!! 🙂 I appreciate the vote!
Gail says
Fantastic.. Loving this.. Great job. It does look real. Thanks.
Shara, Woodshop Diaries says
Thank you so much!! Glad you enjoyed the project 🙂