
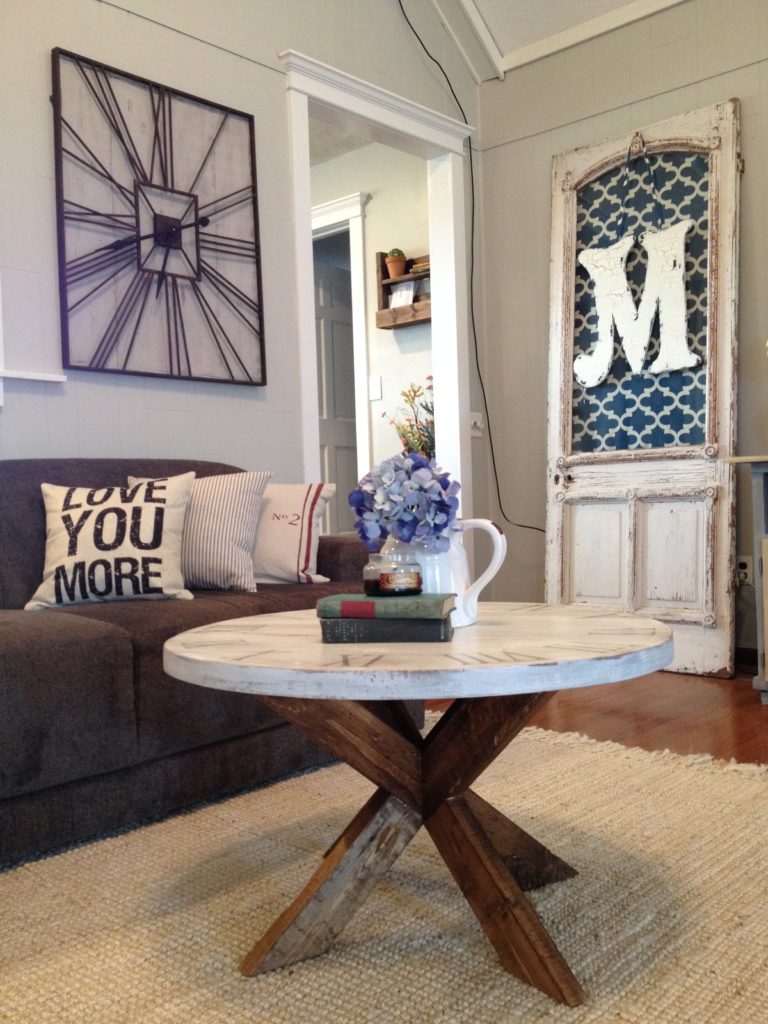
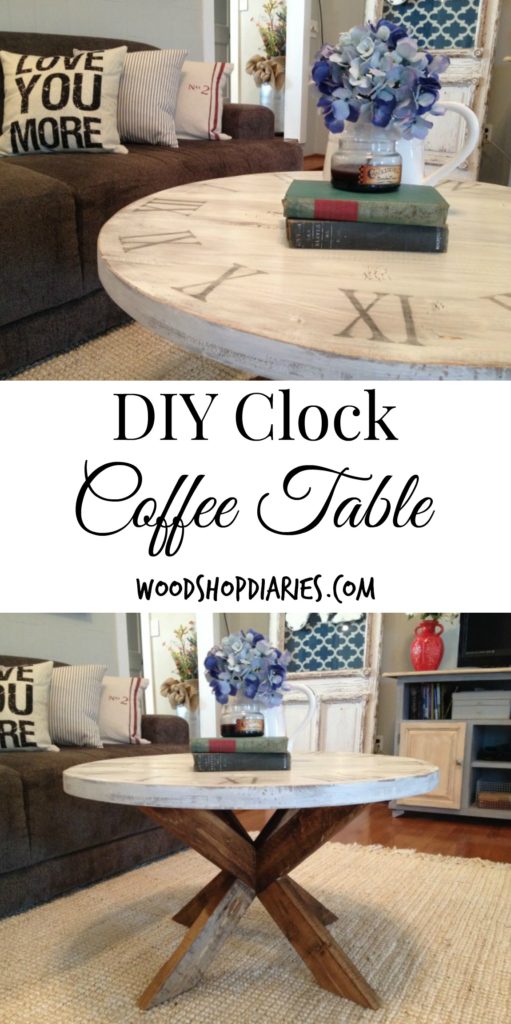
In this post, I’ll show you how to build this DIY X base coffee table with a round top that looks like a clock!
If you know me very well, you know that I LOVE geometry and basically all things math. #nerd
.
So this DIY X base coffee table has been one of my absolute favorite projects of all time–not just because it looks nice, BUT because it incorporated a few angles in the process of building it 🙂
.
But, don’t worry! I’ve broken it all down for you in the printable plans and I promise, it’s easier than you might think. So if you’d like to build your own, I’ve got all the info below!
.
My friend Jamison at Rogue Engineer actually made an x base table much like this–just a little taller and skinnier and using a concrete top for an outdoor side table. So check out his plans here for those. My version below is shorter and fatter, making for a nice sized coffee table.

Note: This post contains affiliate links. Please see disclosure policy for more details.
For this DIY X Base Coffee Table, You Will Need:
- (2) 2x4x8 boards
- (2) 2x8x8 boards
- 2 ½″ pocket hole screws
- Pocket hole plugs
- Wood glue
- Clamps
- Miter Saw
- Drill
- Router OR Jig Saw
- Obviously, measuring tape, pencil, and level will all come in handy as well 🙂
You can grab the printable plans here:
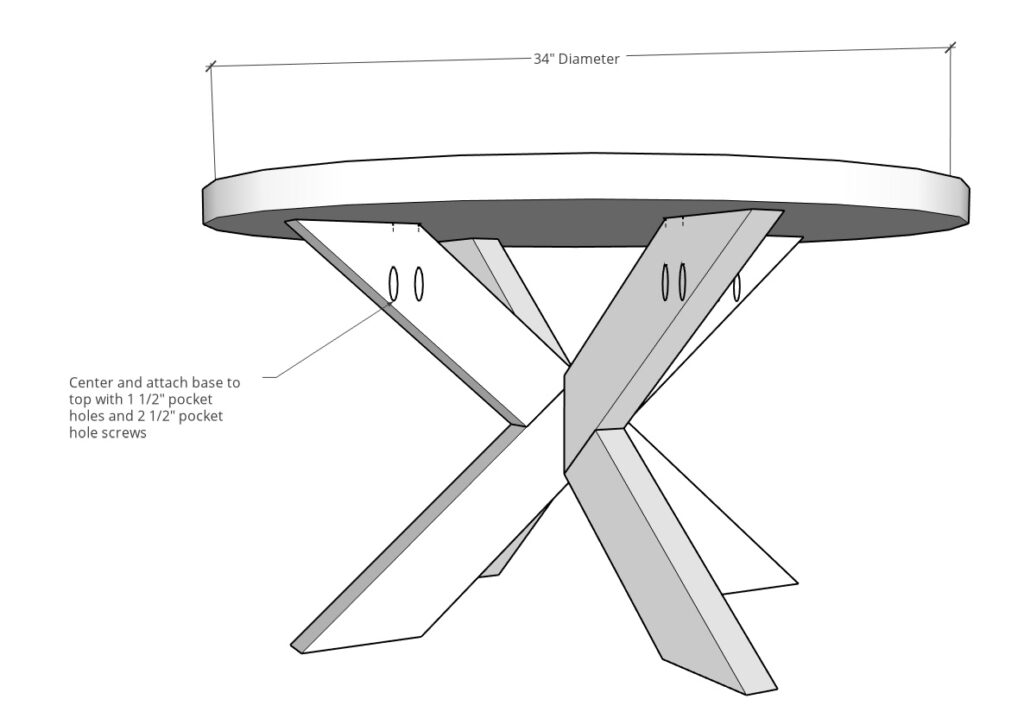
Step 1: Assemble Main X of Coffee Table Base
I built this entire base for this coffee table using standard 2x4s from the lumber yard.
.
I’ve detailed all the dimensions and cuts in the printable plans for this project here, but basically, I cut three pieces of 2×4 to assemble like shown using 1 ½″ pocket holes and 2 ½″ pocket hole screws.
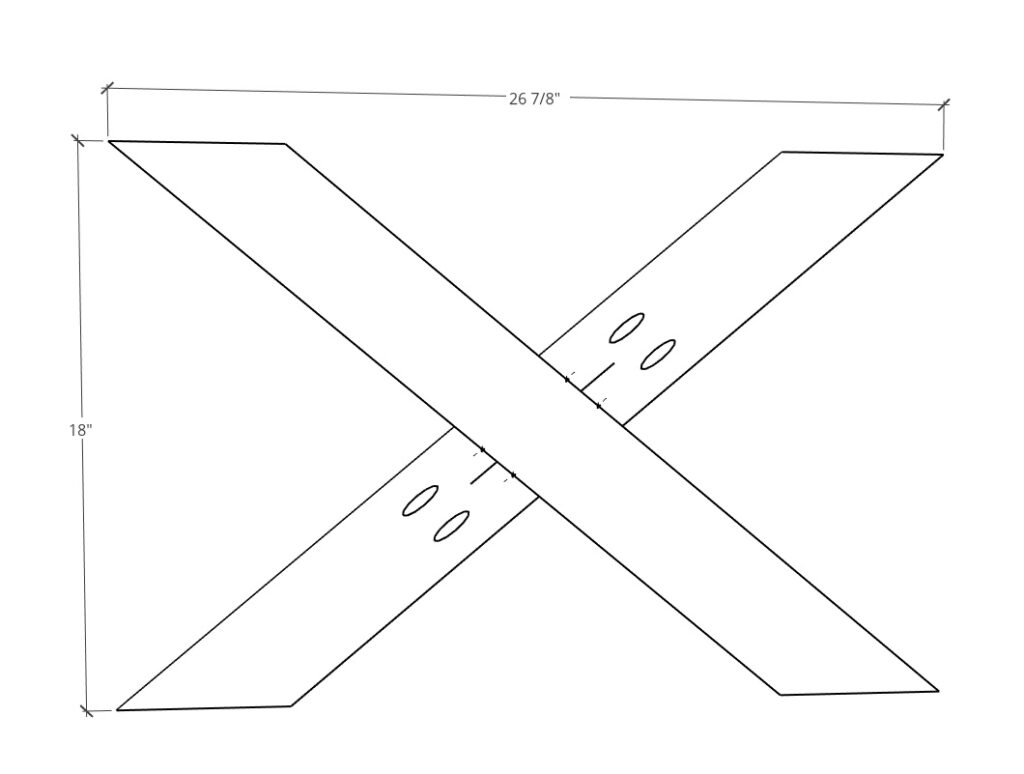
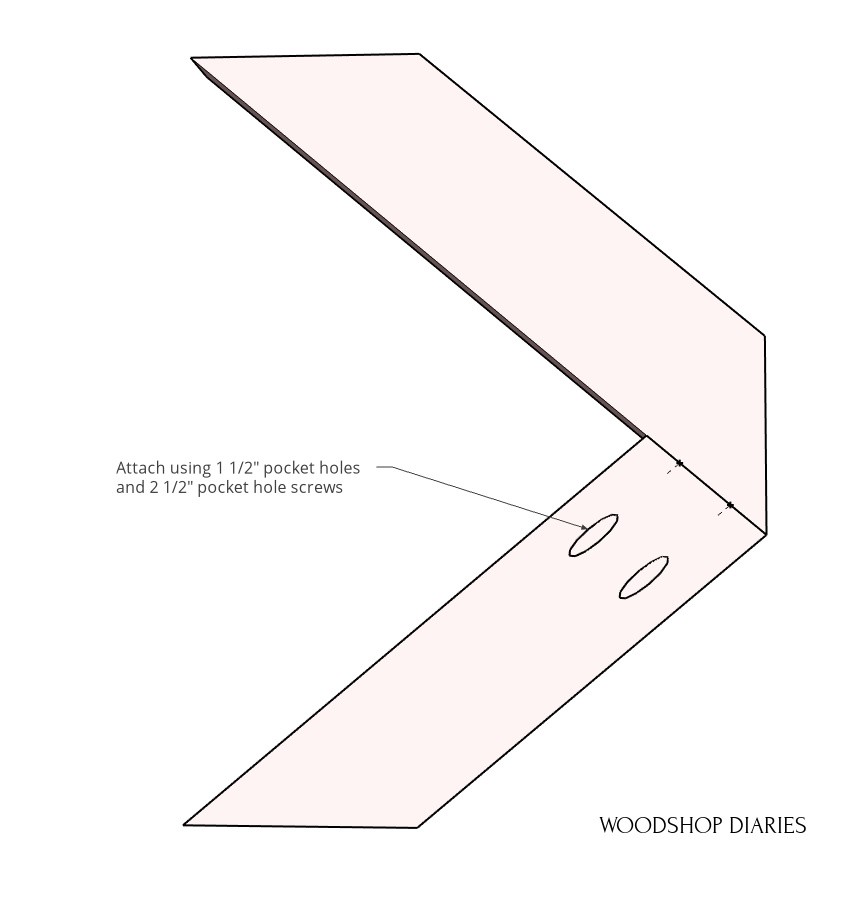
Step 2: Assemble Coffee Table Base Half Xs
Then, I cut and assembled two “half Xs” using pocket holes the same way.
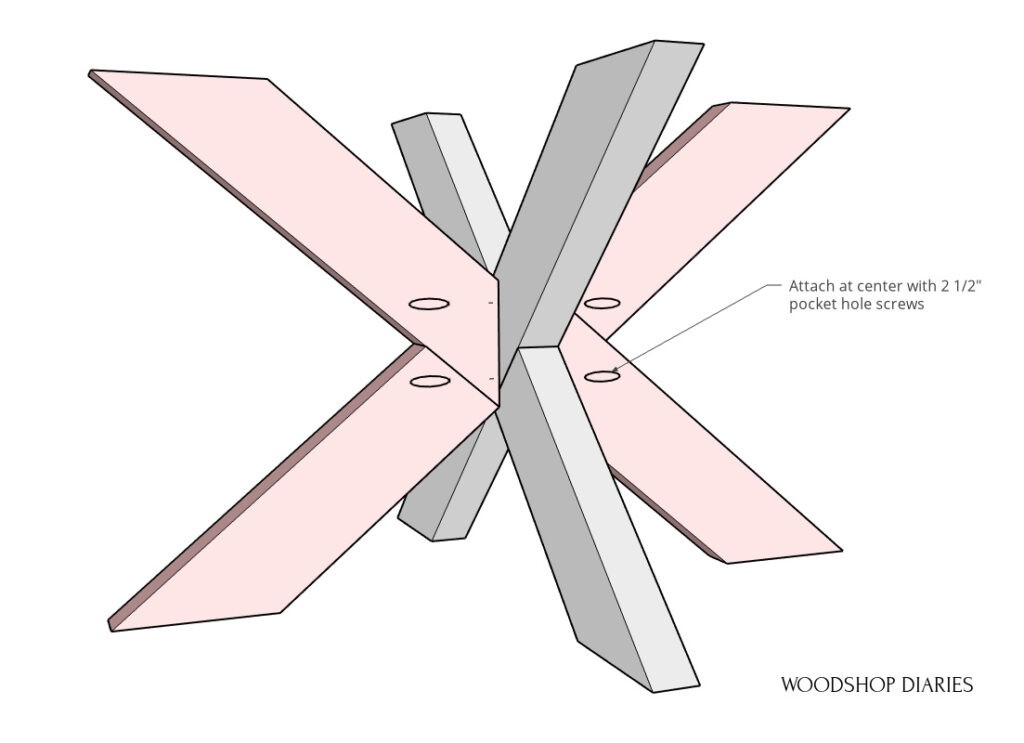
Step 3: Assemble X Coffee Table Base
Then, I just attached the two halves to the main X using pocket holes and screws again to make the completed coffee table base.
At this point, it’s a good idea to either putty over the pocket holes OR use some wood glue and pocket hole plugs to plug all the pocket holes.

Step 4: Assemble and Cut Round Table Top
I cut 5 pieces of 2×8 board to glue together to make the table top. I ran them through the table saw to get a nice square edge.
RELATED: Check out this post for how to square off board edges for cleaner glue ups.
.
Then, I glued the boards together and made sure the top was as flat as possible. You can check out this post for how to glue up table tops.

As a side note: if you don’t have large clamps to glue up a top, you could definitely use pocket holes and screws to assemble a top. BUT…make sure not to place the pocket holes in a location where you will be cutting in this next part.
.
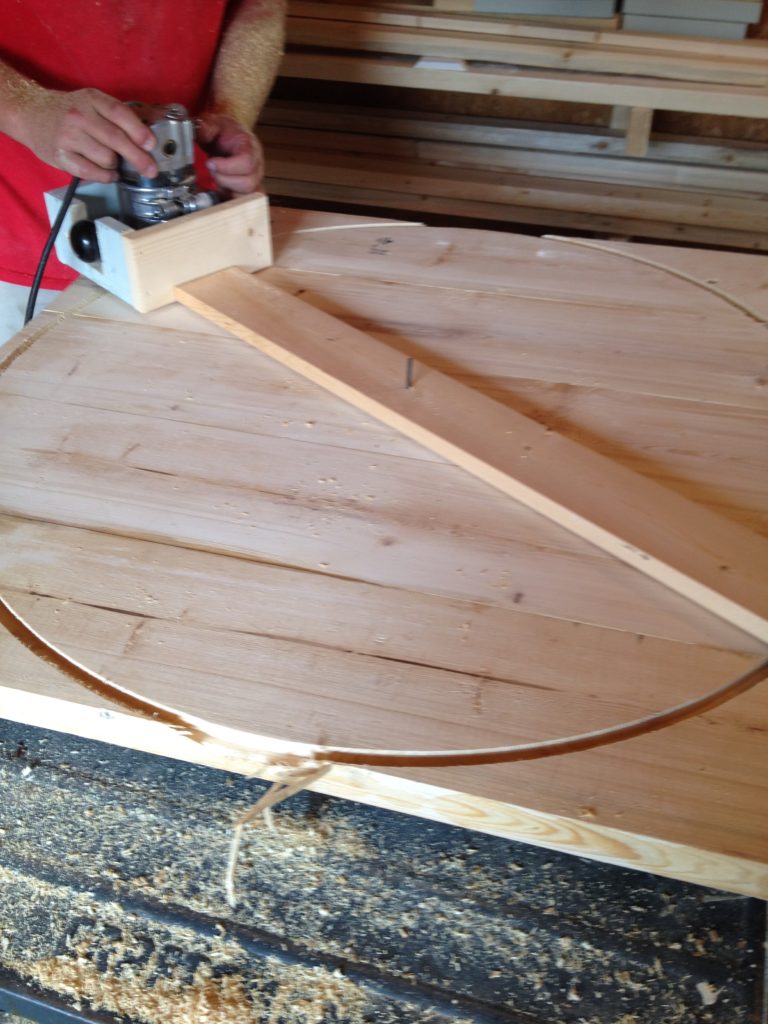
Once the glue was good and dry, I cut a 34″ diameter circle out of this panel. You can do this a few ways. You can cut this out with a simple jig saw OR a bandsaw if you have one.
.
But, I built a circle jig for my router and used the router with a straight bit to cut the top instead.
RELATED: Check out this helpful router guide for more info on routers and what cool things they can do for you in the shop!
Step 5: Attach Top to Coffee Table Base
I drilled pocket holes in the top of the four legs of the base and used pocket hole screws to attach the top.
.
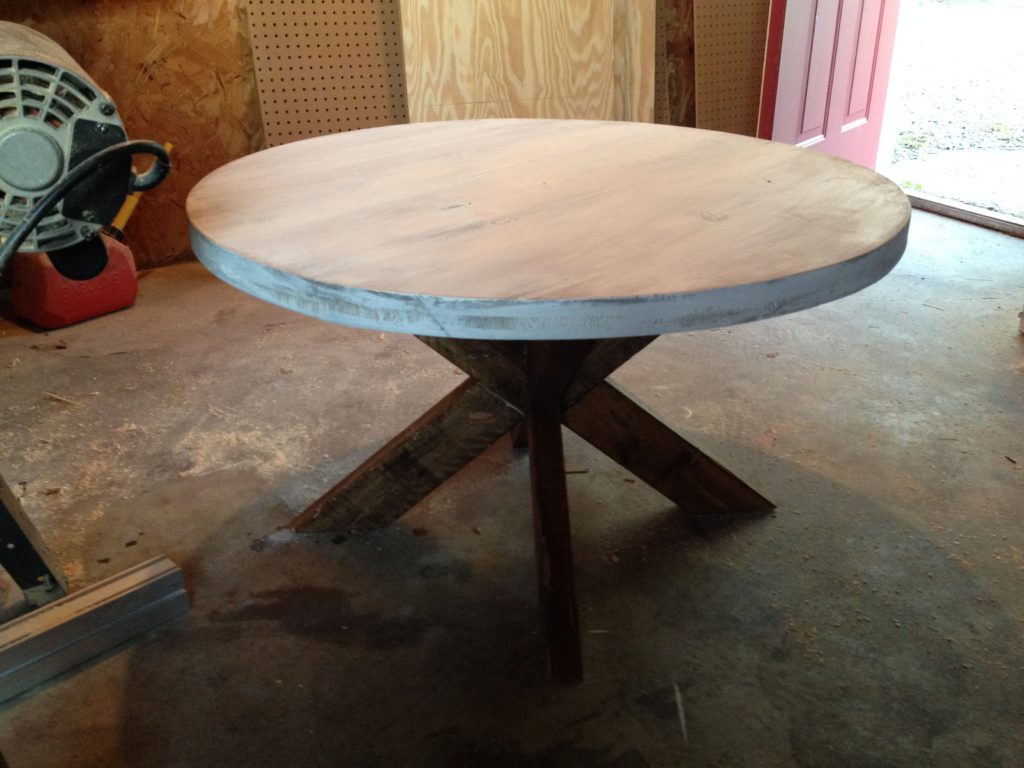
I flipped the top upside down and centered the base upside down on top of it. Once the screws were in, I used plugs to plug the holes.
Then, it was ready to finish. I stained the entire table with Minwax Provincial stain and once it was dry, I dry brushed some white paint on the top. Once the paint was dry, I gave it a light sanding to scuff it up a little.

Step 6: Add Roman Numerals on Top (OPTIONAL)
I had seen a cute coffee table top a while back that had Roman Numerals on it to make it look like a clock. I thought that was a neat idea, so to add some extra character to the top, I did the same.
.
I didn’t have any stencils the right font and size, so I got on Pinterest and found this tutorial for using paper and ink to transfer the numbers. Make sure to use INK (not toner) and MIRROR your letters before printing–don’t ask me how I know 🙂
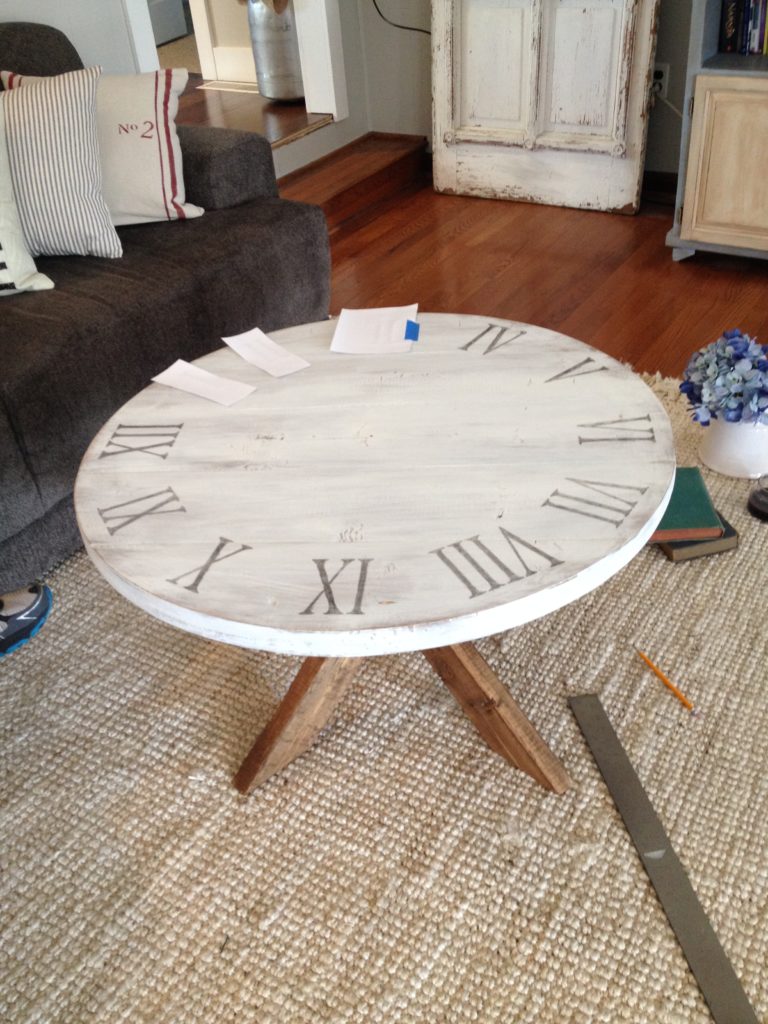
I added a coat of polycrylic on top because the ink from the letters was wiping off on my hand if I touched it. The poly sealed it in and prevents it from wiping off.
.
After all the work I put into getting those letters on, I wanted to make sure they were sealed in!

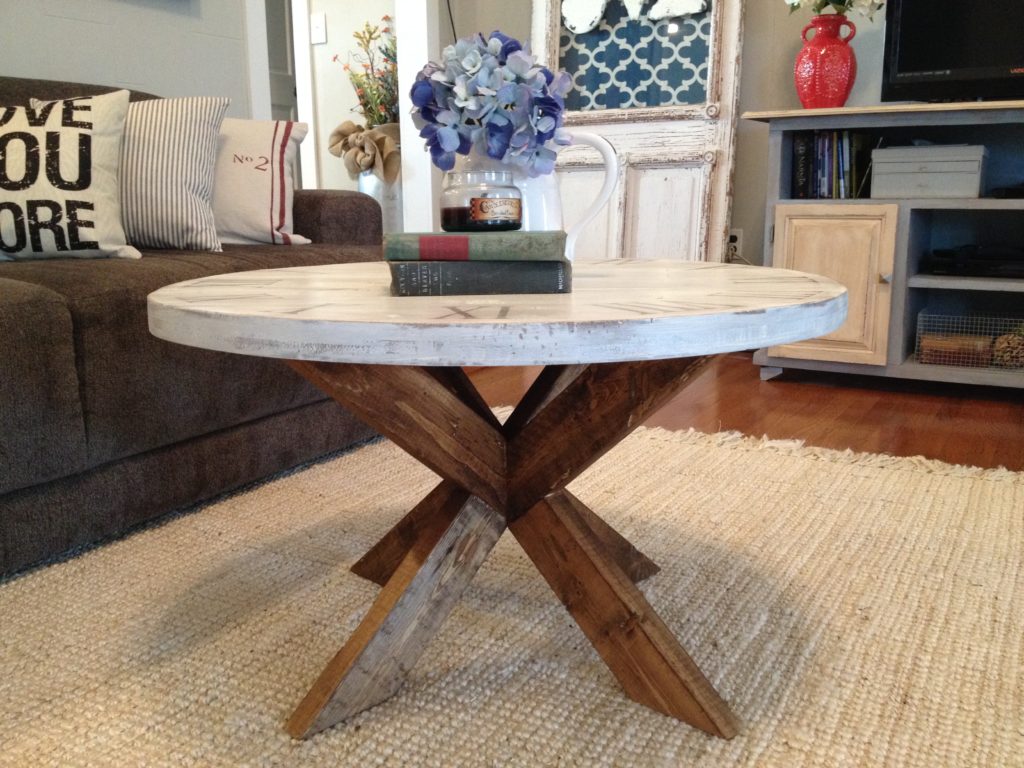
I love a “high end looking” low budget build. Total cost: about $20-$25 in lumber (plus a little patience ha!).
.
So if you enjoyed this project and want to build your own, don’t forget to grab the printable plans here. And don’t forget to pin this to save it for later!
Until next time, happy building 🙂

Ruth says
This is awesome! I am going to build one like this for our kitchen. Love it and thanks for sharing!
Shara, Woodshop Diaries says
Awesome! So glad you enjoyed the post 🙂
Theresa says
I love this table. I don’t see any measurements for the base. You do beautiful work and you are so creative. The top looked like concrete when I first saw it.
Shara, Woodshop Diaries says
I did not list exact measurements for the base, but if you would like them, I would be glad to provide them to you! Feel free to contact me if you need them! Thank you so much!
Katie says
I pinned your twisty table on Pinterest awhile ago and knew I needed two for our bedroom end tables. Upon further digging, I love your designs! This coffee table is awesome and I need one for myself! My husband recently purchased a table saw and router and I can’t wait to get going! Thanks for the inspiration!!
Shara, Chasing A Dream says
Awesome to hear! I am so glad you have enjoyed some of my projects and that I was able to inspire you! Good luck with your projects! I would love to see them when you get finished!
Julie says
This is lovely, really lovely. I’m positive your Dad just likes coming over to help – of course he does, why wouldn’t he, especially when he can see what lovely things you make with his assistance. (over use of the word lovely – sorry!)
Shara, Chasing A Dream says
Thank you! I appreciate your overuse of the word “lovely” 🙂 I think he likes to come over and help with projects, too, but he likes to pretend he doesn’t 😉 Dads are so funny.
Kiri says
Hello from Australia. Shara
I love how your coffee table turned out, it’s awesome! I’m trying to attempt my first ever project with a pocket hole jig to make the legs just like this one. I already have a round glass top 90 cm ( 35.43 inches) diameter, so it’s pretty close to what you have here. I was hoping if you would share the sizes and angles you used to come up with the legs. I’m aiming for the height of the table to be around 45 cms. My email is [email protected]
Thanks heaps,
Kiri
jdle1203 says
Loooooove this Table!!! So Beautiful!! Is there any way you can help me with modifying the base? 🙂 if so, can u email me at :
[email protected]
Thank you!!!!!
Shara, Chasing A Dream says
Thank you! I have sent you an email. Please let me know if you do not receive it!
jdle1203 says
Looooooove this Table!!!! So Beautiful!!! Is there anyway u can modify the base for me? 🙂 If you can, please email me @ [email protected]
Christie says
love this 🙂
Shara, Chasing A Dream says
Thank you so much!
Sarah T. says
Can you post the measurements/angles you ended up using to make the bottom?
Shara, Chasing A Dream says
Thank you for reading! I have added some instructions on how I modified the plans. I hope this helps. Please let me know if you try these. I apologize, I didn’t measure the pieces before I put them together, but I am pretty sure the measurements I listed are correct.
Judy says
This table <3 !
Shara says
Thank you!
Ashley says
Your table looks great! I Love the finish! When I first saw the top (the side view), I thought it was concrete! 🙂
Shara says
Thank you! Now that you mention it, it kind of does look like concrete haha!
Amy says
LOVE your coffee table!!
Shara says
Thank you so much!