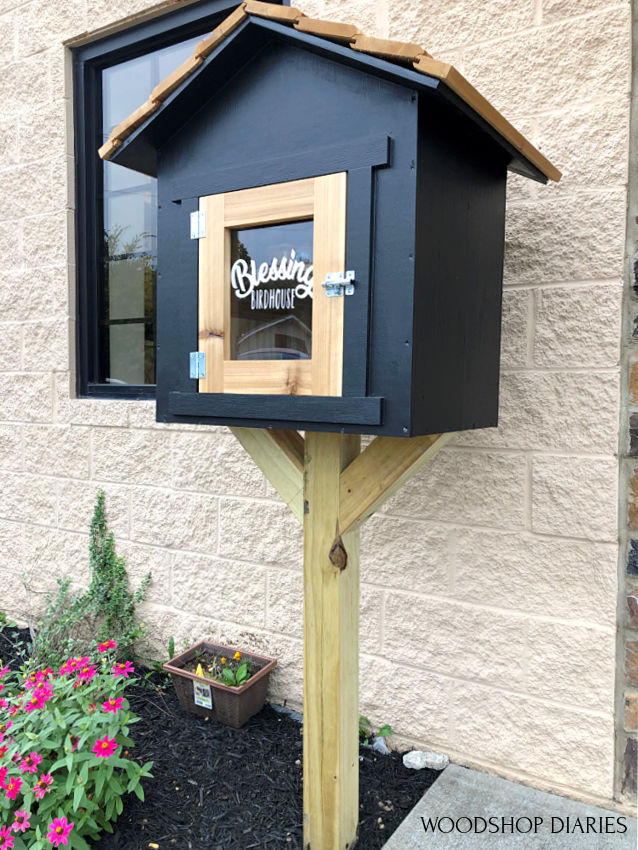
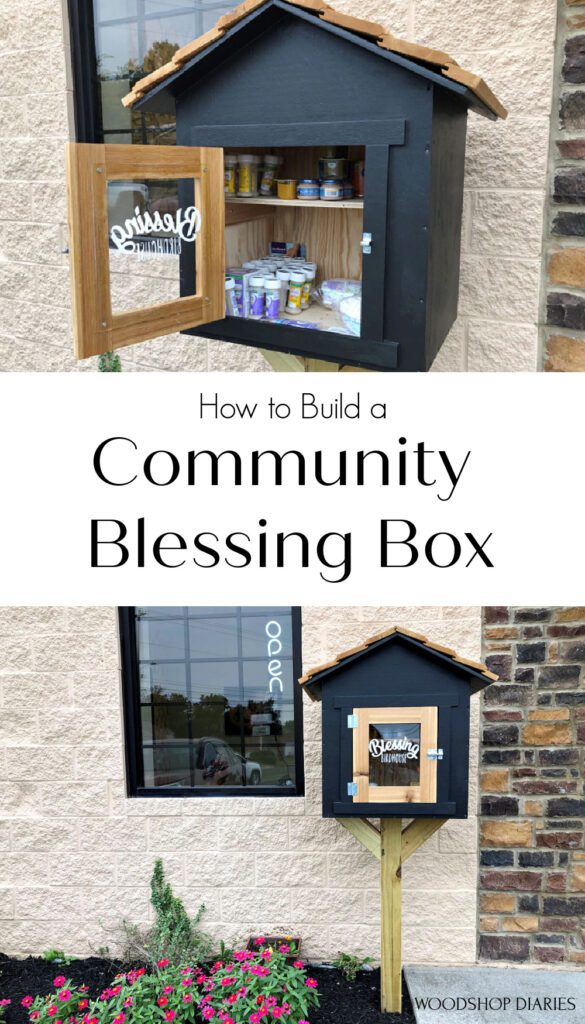
Give back to your community by building a Blessing Box–or a community donation/share box.
.
You’ve probably seen these donation boxes pop up a lot recently in local communities. Sometimes they’re called “little libraries” where people can share and trade books, sometimes they’re used as a food pantry for those in need.
.
There are lots of ways to use them to give back to a community, but a friend of mine is using this one as a “blessing box” for new moms—stocking it full of diapers, baby food, formula and other newborn and baby supplies.
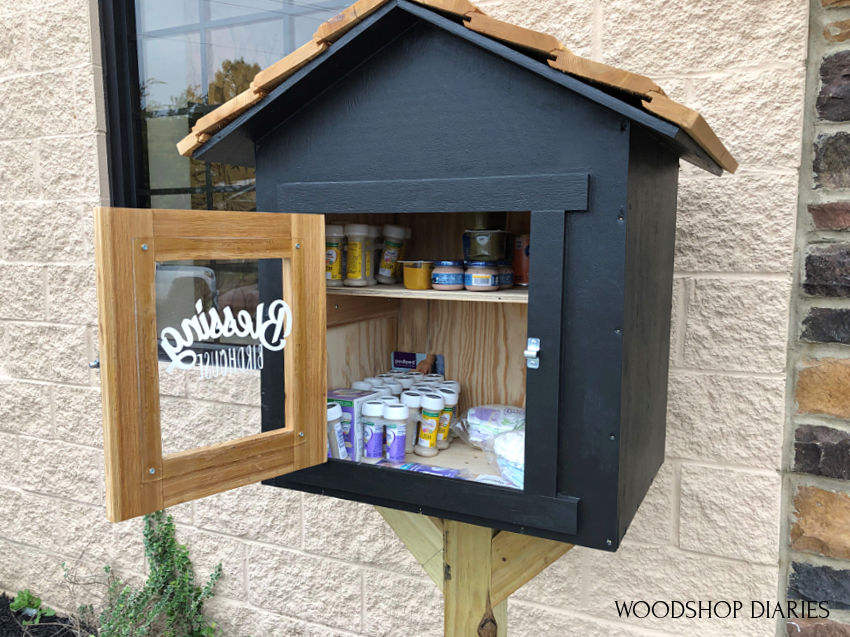
As an ultrasound tech and new business owner (you can find her here) catering to new and soon to be mothers, this was something she could post up beside her studio allowing the community to help keep it stocked and place items inside.
.
New moms can come and take what they need and hopefully pay it forward in helping to restock it later.
.
Obviously, you can get super creative as to how you want to use this project in your own community, but as always, I’m just here to show you how to put it together. After that, its purpose is up to you.
.
So if you’re ready to get building, here we go 😊 You can watch the video here and check out the plans below. This post contains affiliate links. See policies.
For this Community Donation Blessing Box Project, You Will Need:
- 1 sheet ½″ exterior plywood
- (1) 1x3x8 board (treated or cedar)
- (2) 1x6x8 tongue and groove cedar OR regular 1x6s work, too
- (1) 4x4x8 treated wood post
- Circular saw and straight edge or cutting guides
- Miter saw
- Jig Saw
- Drill
- Wood glue
- ⅝″, 1″, 1 ¼″ and 3″ exterior wood screws
- Caulk
- Paint/Finish
- Plexiglass panel for door
- Hinges and latch
Step 1: Cut Down Plywood to Build Blessing Box
I made this box simple—using only a single sheet of ½” exterior plywood, a treated 4×4 post, and a few cedar boards for the door and roof.
.
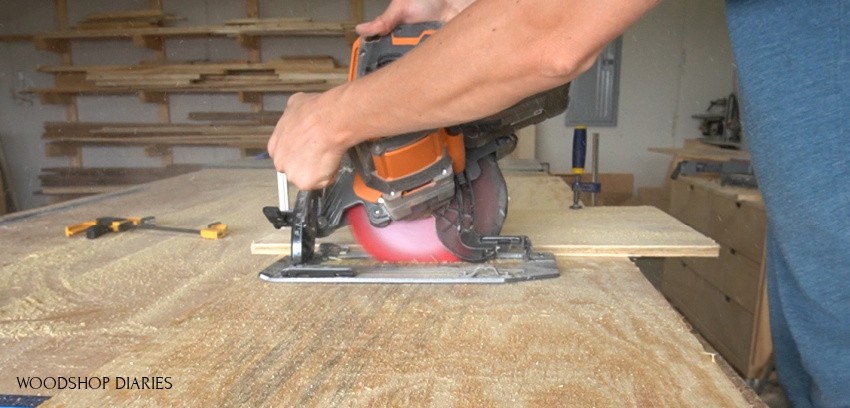
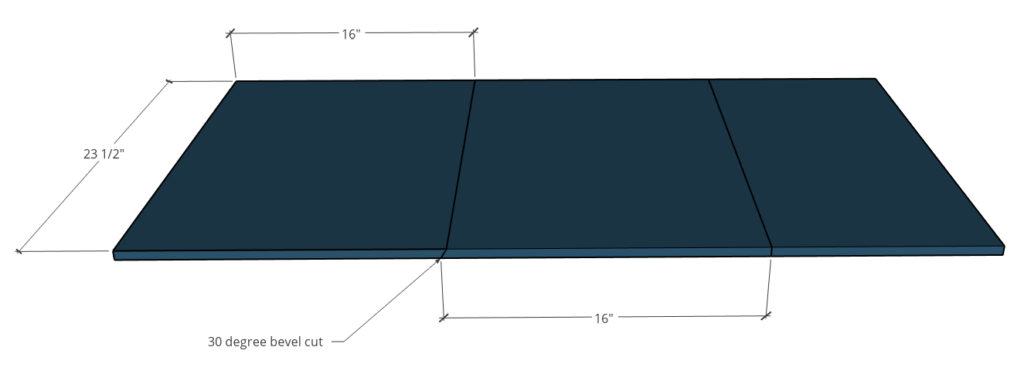
The first thing I did was cut two strips from my plywood sheet—one 16 ½” wide and the other 23 ½” wide. I set the leftover strip off to the side for now. I’ll use part of it later.
Related: Check out this post for how to easily cut down a plywood sheet.

The 16 ½” wide strip will be used to make the sides and bottom of the box. The wider piece will be used for the front, back , and roof. For now, I’m focusing on the sides and bottom, so I set up my 16 ½” wide strip on some scrap blocks to cut down.
.
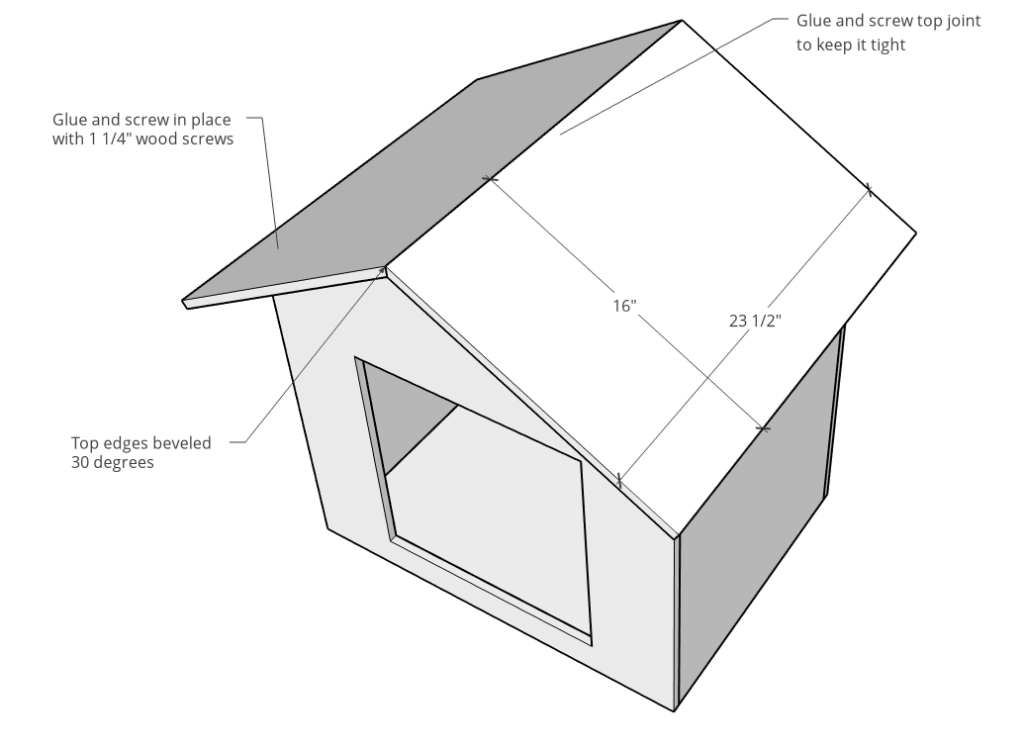
The top edge of the side pieces need to be beveled the same angle of the roof pitch. I made this 30 degrees.
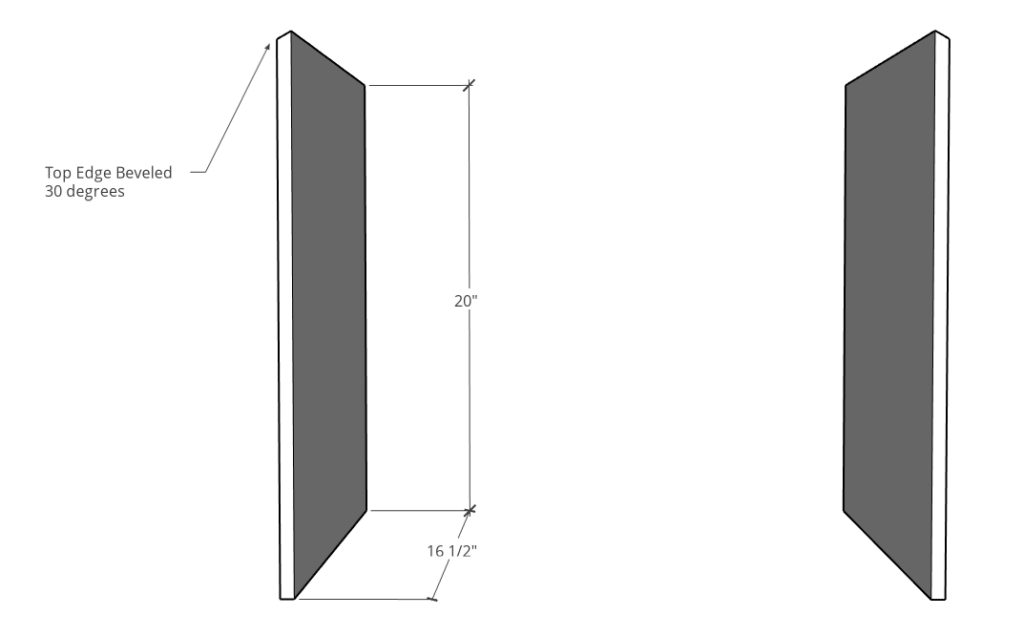
I set my circular saw’s bevel angle at 30 degrees, then set up a straight edge to run it along to cut this piece. See video above for details.
Normally, I’d use my Kreg AccuCut for this, but it’s hard to do with a bevel angle, so that’s why I’m using a straight edge instead.
.
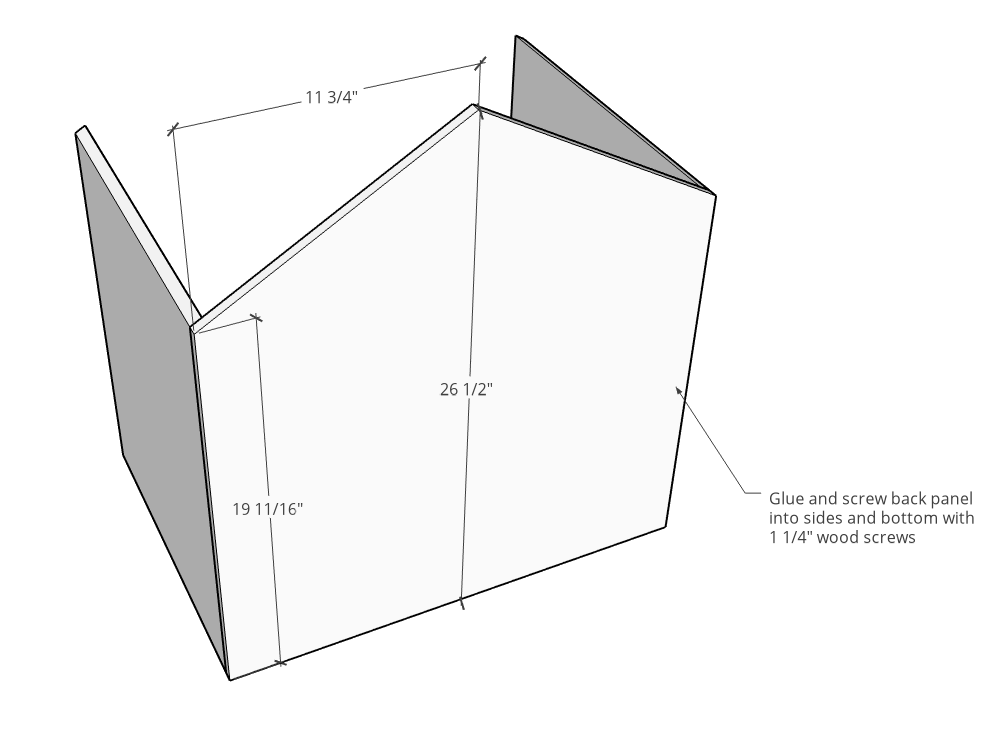
Now, I had one side piece with a square bottom and 30 degree beveled top. I used this piece to mark to cut the second piece the same size. Since the ends are both beveled 30 degrees, I cut this line square to use as the bottom edge.

Then, I cut a simple bottom panel and sanded everything smooth.
Step 2: Assemble Sides and Bottom of Blessing Box
I kept assembly pretty simple here, using only wood glue and screws. I attached the side panels to the bottom using wood glue and 1 ¼” exterior wood screws.
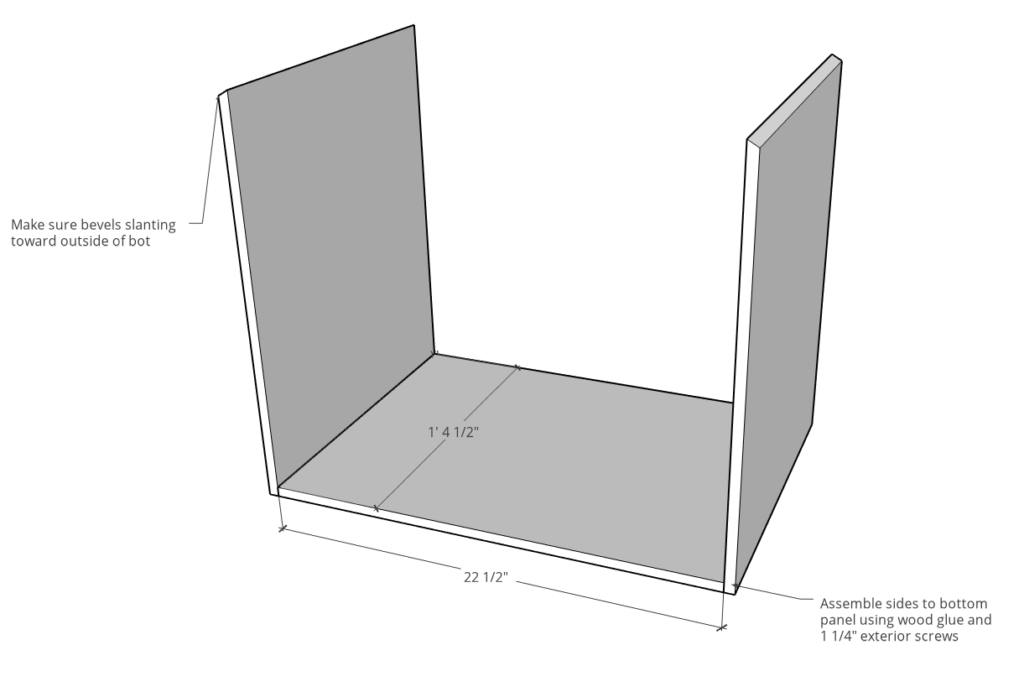
It’s important here to make sure your beveled tops are both slanting to the outside. AND make sure to predrill as this plywood is fairly thin, it will split pretty easy if you don’t.
.
As a side note, you could definitely use ¾” plywood for this instead of ½”, but I was trying to find the happy medium between it being super heavy and super sturdy. You don’t want the box to be too top heavy, so for this, I opted for ½”. If you have doubts, you can use ¾” if you prefer.
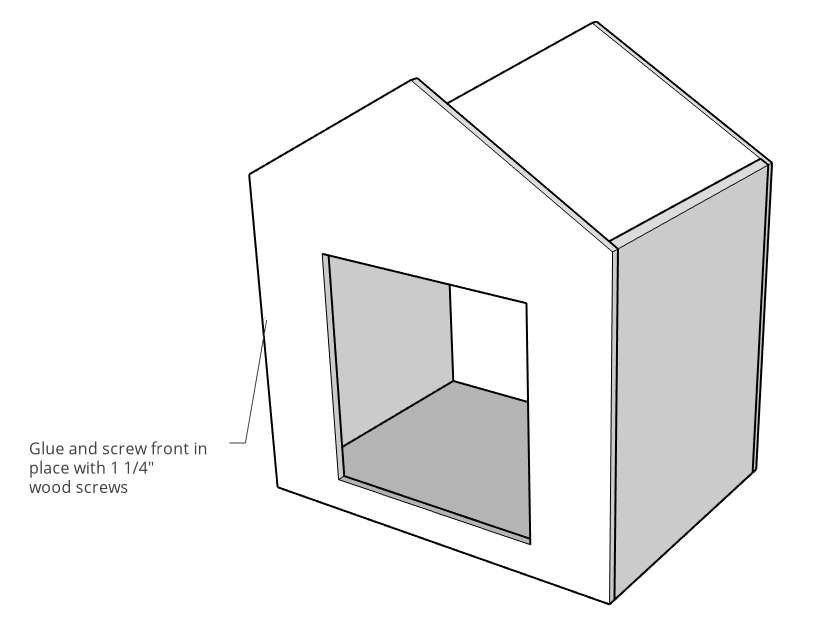
Step 3: Attach Back and Front Panels
Once the sides and bottom were together, the next step was the front and back pieces.
.
I pulled my 23 ½” wide plywood strip back out from step 1 and cut two pieces slightly taller than the back panel needed to be.

Then, I marked the roof lines like shown below and used my circular saw to cut along these lines. I needed two of these…one for the front and one for the back.
I glued and screwed the back piece onto the back side of the box—making sure to predrill for each screw.
Now, the front piece needs a cut out for the door. You can make this door any size you want. I played around with the sizing—just sketching until I thought the proportions looked right. The main thing is just sketching your lines so that your final door is square.

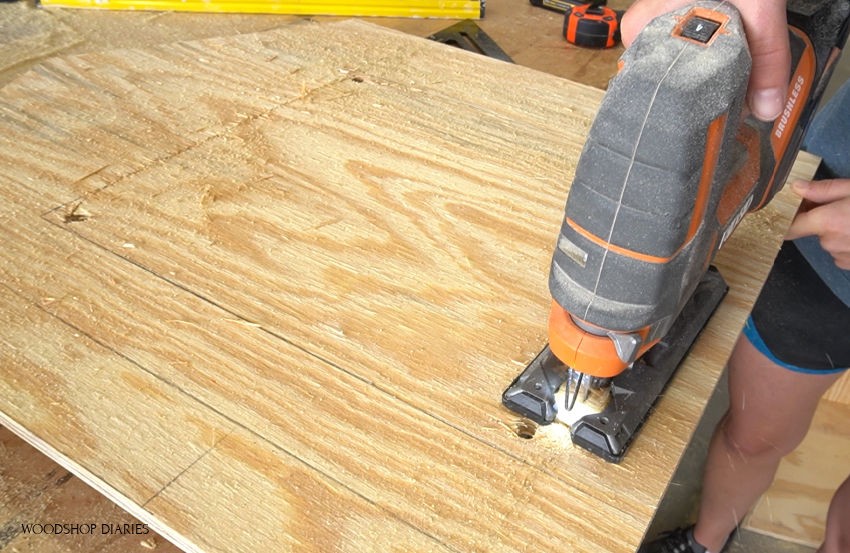
Once I liked where my lines were and the size of the opening here, I used a drill on each corner to give me a hole to start my jig saw blade, and proceeded to cut as straight as possible along these lines.
Then, I glued and screwed this piece onto the front. I’ll trim this opening out a little more later, so if the lines aren’t perfect, don’t worry.
Step 4: Cut and Attach Roof
Just like the side panels, the top edges of these roof pieces need to be beveled 30 degrees. So once again, I beveled my circular saw 30 degrees and used a straight edge clamped to the piece as a guide.
.
I cut these pieces from the 23 ½″ wide plywood strip again.
I centered these boards onto the box and screwed them together, and screwed them in place using 1 ¼″ wood screws.
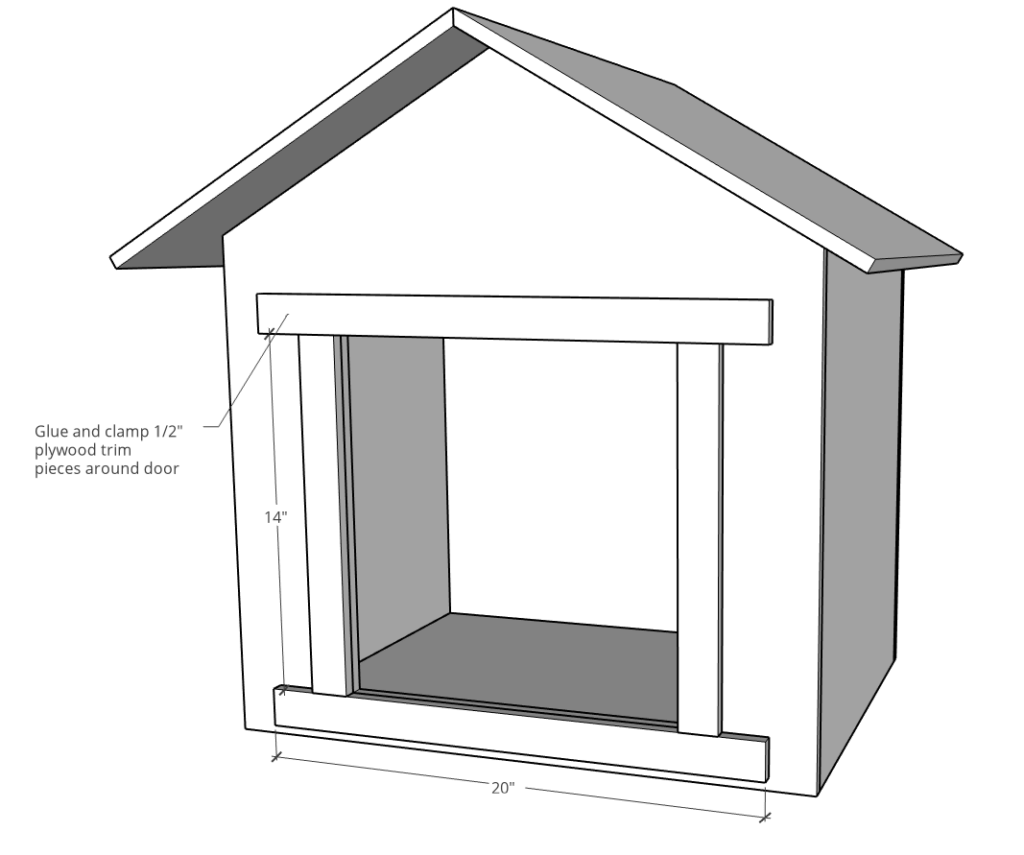
Step 5: Trim Out and Seal Blessing Box
I grabbed the leftover plywood strip from the very beginning of the project and cut off a 20″ piece of it to rip into smaller sections. I ripped four 1 ½” wide strips of this to frame out the door. You can use a circular saw OR a table saw for this.
.
I cut to fit the pieces around the door opening, then glued them in place.
While the glue dried, I caulked every crack of this box. Since this will be out in the elements, I covered everything really well—especially the top of the roof. I covered every crack on the in and outside of the box to help prevent any leaks.

And once the glue and caulk was dry, I started painting. I gave the box a couple coats of primer, then a couple coats of exterior paint.
Step 6: Add Shelf to Blessing Donation Box
Then I forgot I meant to add a shelf before this point. Thankfully it wasn’t too late…just a little cramped haha.
.
I glued and screwed two 1×3 blocks into the sides with 1″ wood screws and placed a piece of leftover plywood across them to give me a shelf.
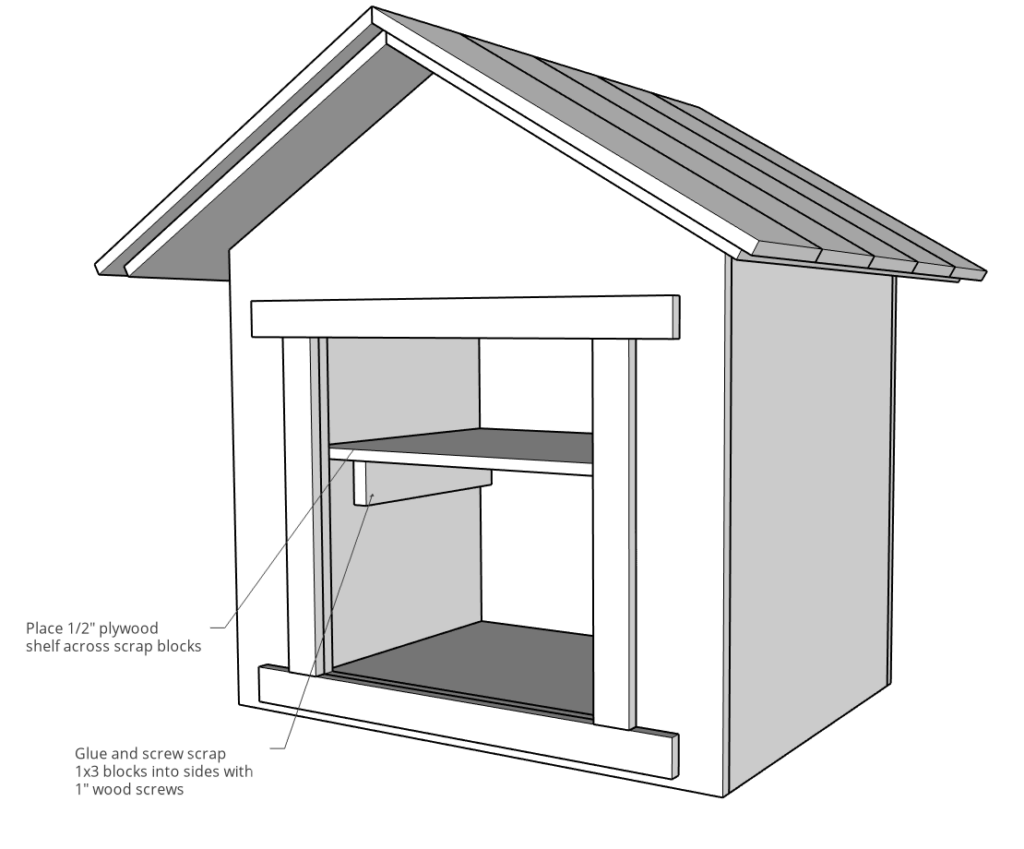
You can cut the shelf whatever depth you want from the remaining 16 ½″ strip. It just needs to be approx. 22 ¼″ wide to stretch across the box.
Step 7: Build Door for Blessing Box
Now all that’s left is the door, the roof and the post. Let’s take care of the door first.
.
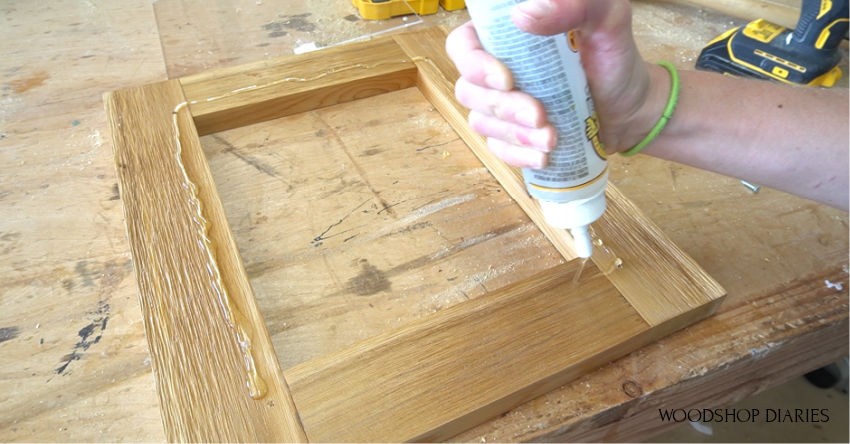
I made this door from 1×3 cedar boards. I cut the pieces to allow ⅛” gap on all sides in the opening and assembled this frame using wood glue and dowels.
.
Pocket holes would work fine for this as well. OR simply use 3″ wood screws through the vertical pieces into the top and bottom frame pieces–just be sure to predrill.
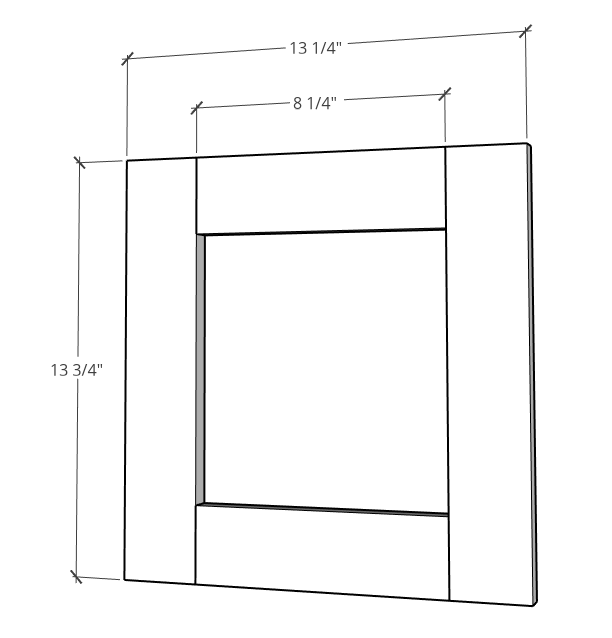
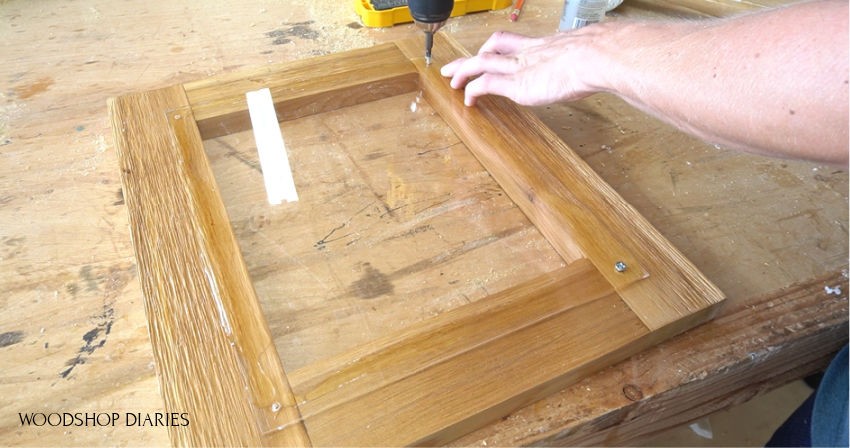
I had my local glass place cut me a piece of plexiglass to fit over the door frame opening and I predrilled holes in the corners. Then I used some clear Gorilla Glue to help seal the edges and secure the plexiglass.
I used ⅝” wood screws on the predrilled holes as well. If you don’t have a local glass place, by the way, the big box stores and many building supply stores can usually custom cut you a piece.
Step 8: Install Roof Slats to Box (OPTIONAL)
Next, I installed the roof slats. These are optional. I thought they looked cute and added slightly more protection, but I really wish I hadn’t turned the tongue and groove cedar horizontally on the one I built.
.
This stuff was pricey and since I had already cut it, I left it, but I’d recommend running them vertically instead. So that’s what I’m showing here.
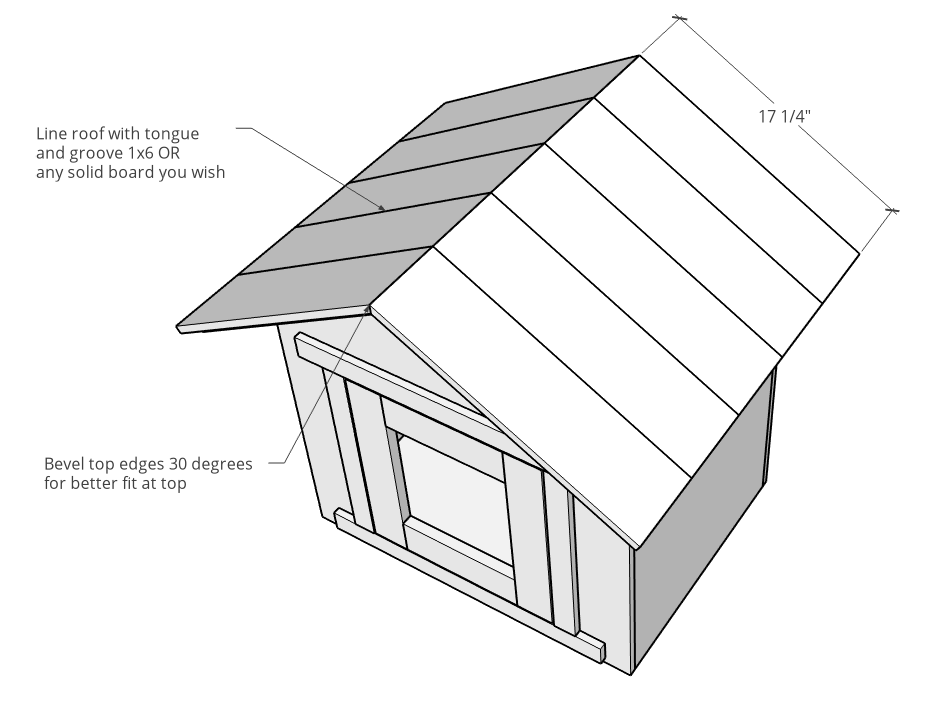
If I had this to do over, I would cut the tongue and groove 1×6 slats like shown above with the top edge beveled 30 degrees, center them along the roof (front and back) and glue and screw them in place with 1″ wood screws.
.
NOTE: 1×6 tongue and groove isn’t necessary here, but if you’re buying cedar, it’s usually cheaper than regular 1×6 boards.
.
Once the roof was on, I gave the roof and the door both a couple coats of exterior grade poly for extra protection. And I caulked the top roof line where the boards bet to help prevent leaks.
Step 9: Attach Post to Blessing Box
Now, the last part was adding the post. I cut this treated 4×4 post 5 ft long—it should go 2 ft in the ground so the box will be about 3 ft off the ground.
.
I glued and screwed this post into the center of the box—by the way—scrap blocks helped tremendously with this heavy post in this step. I laid it on its back and used scrap blocks to hold the post up while I screwed it into the center.
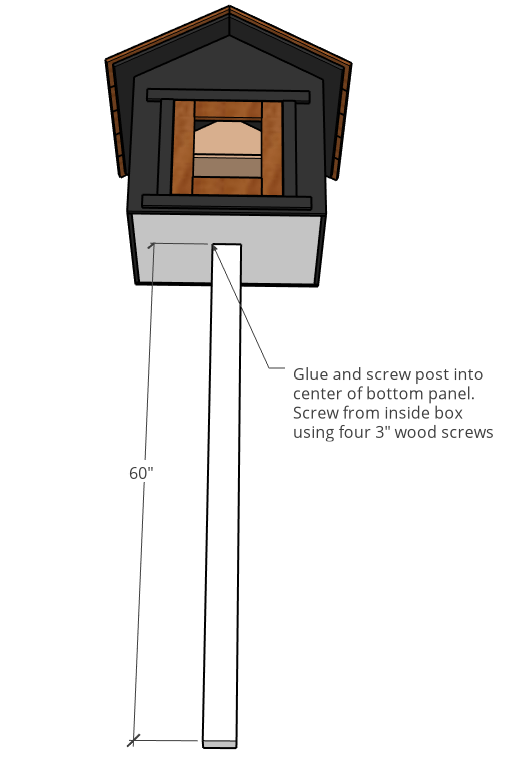
I clamped the post to the workbench once the box was screwed on top to help hold it upright, then I added two braces on each side. I just mitered these 4×4 piece corners 45 degrees and used wood glue and several 3″ screws to secure the support to the post and to secure the box to the support.
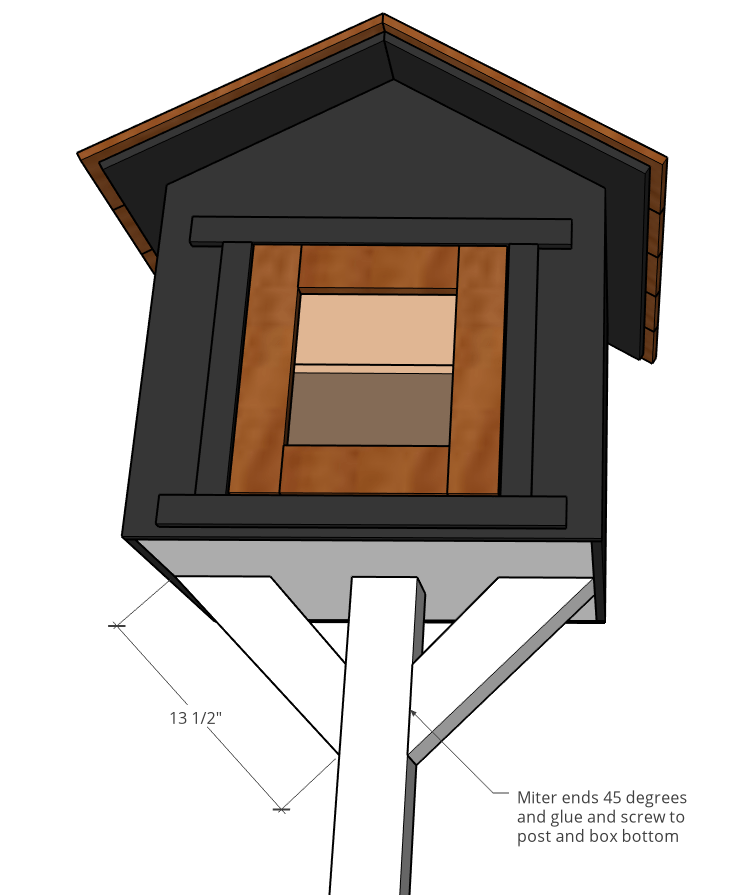
NOTE: Screw through bottom of box into the support below, not through the support into the box.
Step 10: Finish and Install
Then, I attached the door using a pair of simple butt hinges and a small latch to keep the door shut when it’s not in use. (Leave about ⅛″ gap around all sides of door.)
.
Now is the time to touch up paint, caulk anywhere you missed, and add any additional trim you wish.
.
All that was left at this point was putting it in the ground. Thankfully I didn’t have to do any digging haha. My friend and her husband picked it up and installed it 2 ft in the ground with a little concrete mix in the hole and now, it’s fully stocked and ready for use.
I feel like this post seems a little long and a little detailed—I tried to be thorough. But, I don’t want anyone to think this was a complicated project. It’s really fairly simple, and definitely worth the effort it takes to be able to give something so unique back to the community.
If you plan to build one, be sure to check out the video above or over on my YouTube channel for extra tips and details. And if you want to save this for later, I’d appreciate if you’d pin this 🙂
I hope this project has inspired you to create something that gives back. And if you’d like to follow along so you don’t miss out on my latest projects, be sure to subscribe to my newsletter below!
.
Until next time, friends, happy building 😊